assessing wireless security using open source tools
TRANSCRIPT

Assessing Wireless Security Using Open Source Tools
By: Matthew Neely
Presented: May 5th 2009 at Pittsburgh ISSA

Speaker Biography
• Matt Neely CISSP, CTGA, GCIH, GCWN - Manager of the Profiling team at SecureState:– Areas of expertise include: wireless security, penetration testing,
physical security, security convergence and incident response– Formed and ran the TSCM team at a Fortune 200 company– 10 years of security experience
• Outside of work:– Co-host of the Security Justice Podcast– Board member for the North Eastern Ohio Information
Security Forum– Licensed ham radio operator (Technician) for almost 20 years

What concerns do you have about wireless?
Agenda
• Overview of the 802.11 standard• Hardware - Requirements and recommendations• Discovering wireless networks• Introduction to Kismet• Lab – Discovering and enumerating wireless network using Kismet• Demo – Aircrack-ng• How to tell if an AP is on your network• Wireless security recommendations• Conclusion

OVERVIEW OF 802.11

What is 802.11
• Set of wireless local area network (WLAN) standards developed by the IEEE
• Uses the standard Ethernet protocol• Adds special media access control process

Popular 802.11 Standards
• 802.11– 2.4 GHz– 2 Mbps (0.9 Mbps typical)
• 802.11a– 5 GHz– 54 Mbps (23 Mbps typical)
• 802.11b– 2.4 GHz– 11 Mbps (4.5 Mbps typical)
• 802.11g– 2.4 GHz– 54 Mbps (23 Mbps typical)
• 802.11n - Draft– 2.4 and 5 GHz– 300 Mbps (74 Mbps typical)– Greenfield mode
802.11 Versus Wi-Fi
• 802.11 is a set of standards from the IEEE• Wi-Fi is a subset of the 802.11 standards managed
by the Wi-Fi Alliance• Wi-Fi Alliance insures all products with the Wi-Fi logo
will work together• Different vendors often interpret standards differently• Wi-Fi Alliance defines what is the “right” thing to do when
implementing a standard– Especially useful when vendors implement draft standards
• Wi-Fi Protected Access (WPA)• “Draft” 802.11n equipment.

Infrastructure Vs. Ad-hoc Networks
• Infrastructure: Allows one or more computers to connect to a network using an Access Point (AP).– AP is the hub of communication
– Service Set IDentifier (SSID) is used to identify the network
• Ad-Hoc: Allows user to create peer-to-peer networks.– Does not use an AP– Independent Basic Service Set
(IBSS) is used to identifythe network
– First active ad-hoc station establishes the network and starts sending beacons with the IBSS
HOW CLIENTS FIND WIRELESS NETWORKS

Broadcast Probe Request
• Client sends out broadcast probe request packets asking who is there
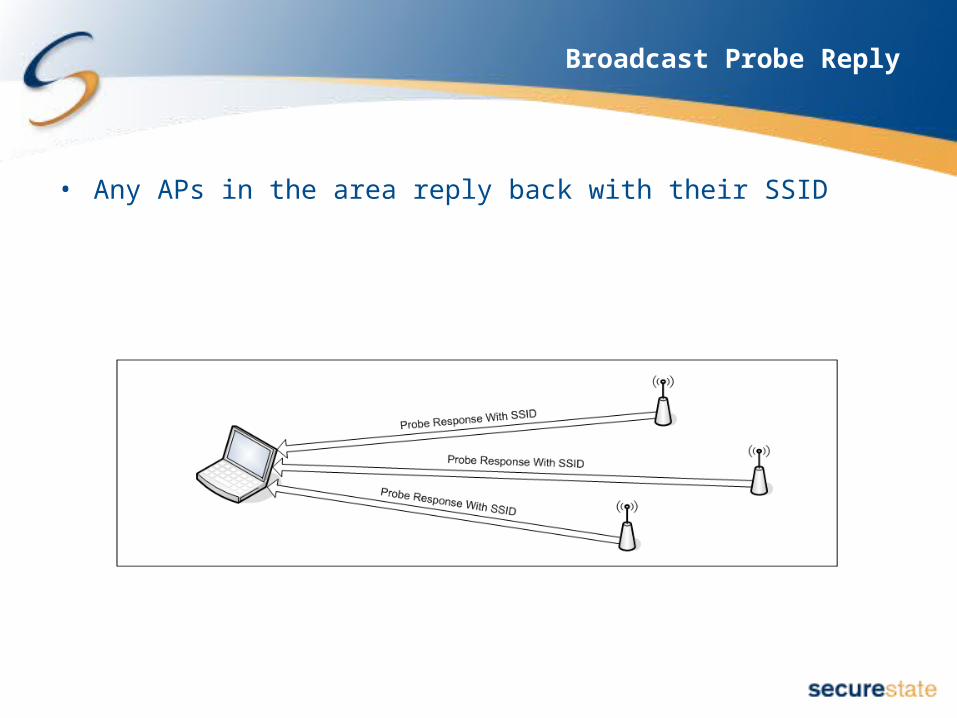
Broadcast Probe Reply
• Any APs in the area reply back with their SSID

Direct Probe Request
• Client can also send direct probe request packets looking for a specific network name– Example: I’m looking for network Linksys

Beacon Packets
• AP sends out beacon packets– Beacon packets contain the SSID of the network
• Client listens for beacon packets and uses the SSID information in the packet to figure out what networks are in range

Hidden APs
• Beaconless APs– AKA “disabled broadcast SSID”, “cloaked” or “closed”
• Some APs do not send beacon packets when clients are not connected
• Other APs still send a beacon packet but leave the SSID field blank• Attempts to prevent malicious users from finding the AP

HARDWARERequirement and Recommendations
Hardware
• Required– Computer - Running or capable of running Linux
• Install Linux on a laptop• Use a LiveLinux distro such as BackTrack
– Wireless card• Optional
– External Antenna– Pigtail– GPS

BackTrack
• LiveLinux distro containing a large number of pre-configured attack tools
• Variety of wireless drivers come pre-loaded• Plug and play support for many wireless cards• Available in two formats:
– Bootable CD– Bootable thumb drive
• Contains more tools• Data written to the thumb drive persists across reboots
• Download:– http://www.remote-exploit.org/backtrack_download.html
Backtrack in VMWare
• BackTrack can not directly access a PCMCIA or mini-pci card– Limits what fun stuff can be done
• Can use a USB dongle with a supported chipset– Temperamental and unstable at times
• For just about everything except wireless related tasks, I run BackTrack inside VMWare
• When I need to run wireless tools in BackTrack I prefer to run BackTrack on the bare hardware

Saving Data on BackTrack
• When run from a CD all saved data will be erased on reboot• Solution 1:
– Run BackTrack from a bootable thumb drive• Solution 2:
– Mount a thumb drive and save your data– Command: mount /dev/sdb1
• Solution 3:– Save your data to a network share before rebooting

Wireless Card
• Hopefully your internal wireless card works– Centrino or Atheros cards generally work well– Broadcom cards are a problem
• Can use an external wireless card if the internal card does not work

Determining What Wireless Type
• Look up the specs for your laptop• Query the USB or PCI bus inside of Linux
– lspci – Linux command that lists the devices attached to the PCI bus
• Useful for gathering information on internal wireless cards– lsusb – Linux command that list devices attached to the USB
bus

Example lspci Output

Example lsusb Output

Card Selection
• Features to look for in an external card:– 1) Atheros or Ralink RT73 chipset
• Must support RF monitor mode• LORCON support is recommended
– 2) External antenna connector– 3) Form factor that matches your needs
• PCMCIA/Express cards• USB

Getting the Card You Want
• Difficult to know what chipset a card uses– Manufactures change them all the time
• Pay close attention to model number and version• Buy your card from a store with a hassle free return policy• Buy your card from a store that states the chipset
– Look for stores that cater to Linux users, wardrivers and wireless hackers
– www.netgate.com

Card Chipset Information
• Card Chipset Lists– Atheros.rapla.net– Ralink.rapla.net– Broadcom.rapla.net – Avoid– www.seattlewireless.net/index.cgi/HardwareComparison
• Backtrack website:– wiki.remote-exploit.org/index.php/HCL:Wireless
• Aircrack-ng webiste:– www.aircrack-ng.org/doku.php?id=compatibility_drivers

External Antennas
• Greatly increases performance• Useful when:
– Performing audits from inside a vehicle– Triangulating the location of an AP– Measuring RF leakage from a building
• Antennas are tuned to work on specific frequencies• Need to select antennas that are tuned to the frequency
range being used– 2.4 GHz is the most common
• Used by b, g and n networks• Same frequency used by Bluetooth
– 5 GHz is needed for a and n networks

Types of Antennas
• Omni-directional– Increases reception in all directions– Magnetic mount omni-directional antennas are useful for
mounting on cars• Directional
– Focuses the signal like a spot light– Can be used to triangulate the location of a signal

Types of Directional Antennas
• Panel– $20-40– Typical gain 8-18 dBi– Good for travel: compact, portable and hard to damage
• Yagi– $30-50– Typically gain 9-15 dBi– Can be large– Typically encased in pcv pipe to protect the antenna
• Parabolic dish– $30 and up– Very large– Very high gain, 19-30 dBi– Hard to transport
• Waveguide (cantennas)– Around $50– Typical gain 12 dBi

Antenna Recommendation
• Get two antennas• Directional
– Either a panel or small yagi• Omni-direction
– Magnetic mount is very helpful if you spend time doing surveys outside a building
• Good source: www.hyperlinktech.com
Pigtails and Adapters
• Pigtail – Converts the small connector on the card to the connector used on the antenna
• Do not buy cheap cables!– Where most signal loss occurs– Good quality pigtails cost around $10-20– Only use cabled designed for use in the 2.4 or 5 GHz range
• Pigtails should probably end in a N-Type male jack– Most antennas have a N-Type female jack
• Good source: www.hyperlinktech.com• Pictures of common Wi-Fi antenna connectors:
– wireless.gumph.org/content/3/7/011-cable-connectors.html

GPS
• Allows data to be placed onto a map for analysis• Only get an NMEA compatible GPS• Interface type:
– Serial: Does not require a driver and just about always works– USB: Requires drivers which can be tricky in Linux– Bluetooth: Avoid because it operates in the 2.4 GHz spectrum
• If you run Linux and do not have a serial port, the safest option is a serial GPS and a USB-to-serial adaptor– Buy a USB adaptor that is Linux friendly

DISCOVERING WIRELESS NETWORKS

Active Network Discovery
• Official way to find networks• Client sends out a broadcast probe request looking for networks• Client listens for beacon packets from APs• Cons:
– Requires the client to be within transmission range of the AP– Cannot find beaconless/hidden network
• Pros:– Every wireless card supports this method– Does not require a card or driver that supports RF monitor mode
• Windows tools such as NetStumbler use active network discovery

Passive Network Discovery
• Card listens to the airwaves and extracts information about the networks in the area from the packets it sees
• Requires cards that support RF monitor mode– Not all cards and drivers support RF monitor mode
• Pros:– Client only needs to be within receiving range– Can detect networks with the beacon turned off– Can gain more information about the network
• Cons:– Requires a card and driver that supports full RF monitor mode– No free Windows program supports passive network discovery

Kismet
• http://www.kismetwireless.net/• Passive scanner• OS: Linux and other Unix systems• Kismet is really two programs
– kismet_server: Collects the packets– kismet_client: User interface
• Pros:– Will find hidden networks– GPS support
• Cons:– Complicated installation and configuration

Kismet Classic Versus Newcore
• “Classic” is the present stable release of Kismet• Kismet-newcore is a rewrite of Kismet
– Still under development– Supports plugins
• Example: DECT support• Avoid newcore unless you have a specific reason to use it or
like to tinker

Configuring Kismet
• Configuration file is usually located at /usr/local/etc/kismet.conf• Specify suiduser
– suiduser=<normal non-root user>– Ex: suiduser=matt
• Packet Source– source=<driver, interface, name>– Ex: source=madwifi_g,ath0,AtherosCard
• Skip these steps on BackTrack– Use –c flag when starting the server to tell it the packet source– Ex: kismet_server –c madwifi_g,wifi0,CiscoCard
Source Settings - Driver
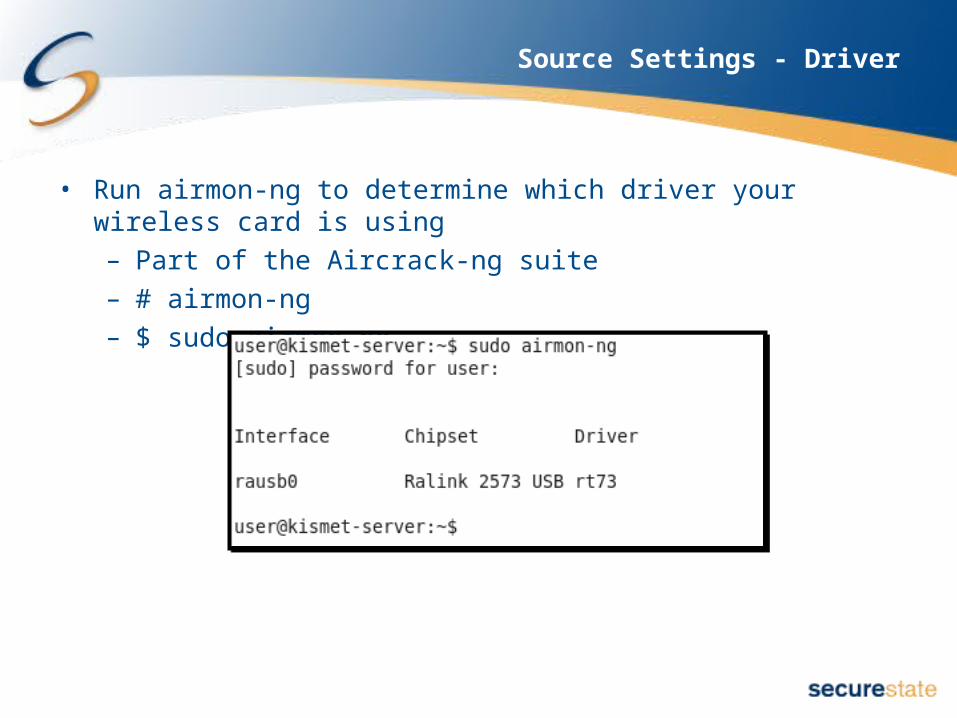
• Run airmon-ng to determine which driver your wireless card is using– Part of the Aircrack-ng suite– # airmon-ng– $ sudo airmon-ng
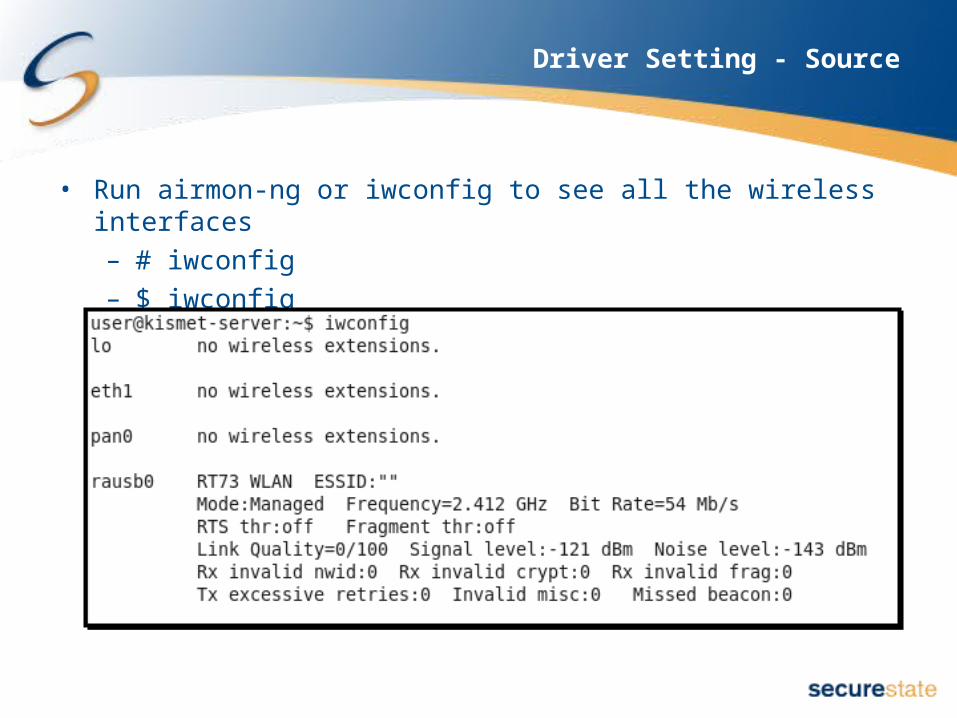
Driver Setting - Source
• Run airmon-ng or iwconfig to see all the wireless interfaces– # iwconfig– $ iwconfig

LAB: DISCOVERING AND ENUMERATING WIRELESS NETWORK USING KISMET

Accessing the Lab Server
• Connect to wireless network– Lab-Connect_Here
• Windows Telnet:– Start -> Run -> cmd.exe– telnet 192.168.10.102 –t vt100
• SSH (Putty or other SSH client)– Connect to 192.168.10.102
• Once connected login– Username: kismet– Password: kismet

DEMO: AIRODUMP-NG
How to Tell if an AP is on Your Network
• Direction/Location– GPS– Use a directional antenna
• Connect to the network and check:– If a traceroute shows the traffic traversing your network– If you can contact an internal server– DNS server address
• Do not rely on the assigned IP address

SECURITY RECOMMENDATIONS
General Security Recommendations
• Make the network difficult to find– Limit AP power output– Use RF shielding to prevent RF leakage– Only use 802.11a APs
• Do not use hidden APs– Could make it easier to attack your wireless Windows clients
• Windows prefers visible networks over hidden networks• Attackers can trick users into connecting to a malicious AP
• MAC filtering– Not recommended– Easy to by-pass and adds a lot of complexity in
a large environment– Minimal level of protection is generally not worth the effort

Wireless IDS
• Consider deploying a wireless IDS• Can detect:
– De-auth attacks– RTS and CTS attacks denial of service attacks– Rogue APs
• Both on and off your network• Remember IDS is only detection and not prevention• Be very careful with wireless IPS
– IPS system could end up attacking neighboring networks

Wireless Encryption and Authentication
• Do not use WEP• Migrate from LEAP
– Known weaknesses and attack tools for LEAP– If you can not migrate from LEAP be sure you enforce a strong
password policy• Use WPA or WPA2
– Prefer WPA2– Both can be secured fairly well

WPA-PSK Recommendations
• WPA-PSK (Pre-Shared Key)• AKA WPA Home• Choose a long and complex passphrase
– Prevents bruteforce attacks from tools like Cowpatty• Choose a unique SSID
– Prevents using pre-compiled tables to speed up bruteforce attacks
WPA Enterprise Recommendations
• Generally more secure than WPA-PSK– Also more complex
• Requires a RADIUS server• Use an authentication type that provides mutual authentication• With PEAP and EAP-TTLS insure the client is properly configured• Consider using two-factor authentication
Conclusion
• Kismet are free tools that can be used to locate wireless networks• Selecting the right card is critical when using Kismet• Finding N Greenfield mode networks could be a challenge
in the future• Do not use WEP to secure a wireless network• Use WPA2 Enterprise with multi-factor authentication• Insure the wireless client is properly configured and secured

QUESTIONS?More Information:
www.SecureState.com
www.matthewneely.com