atlantis synthesizer and filter delay effects...
TRANSCRIPT
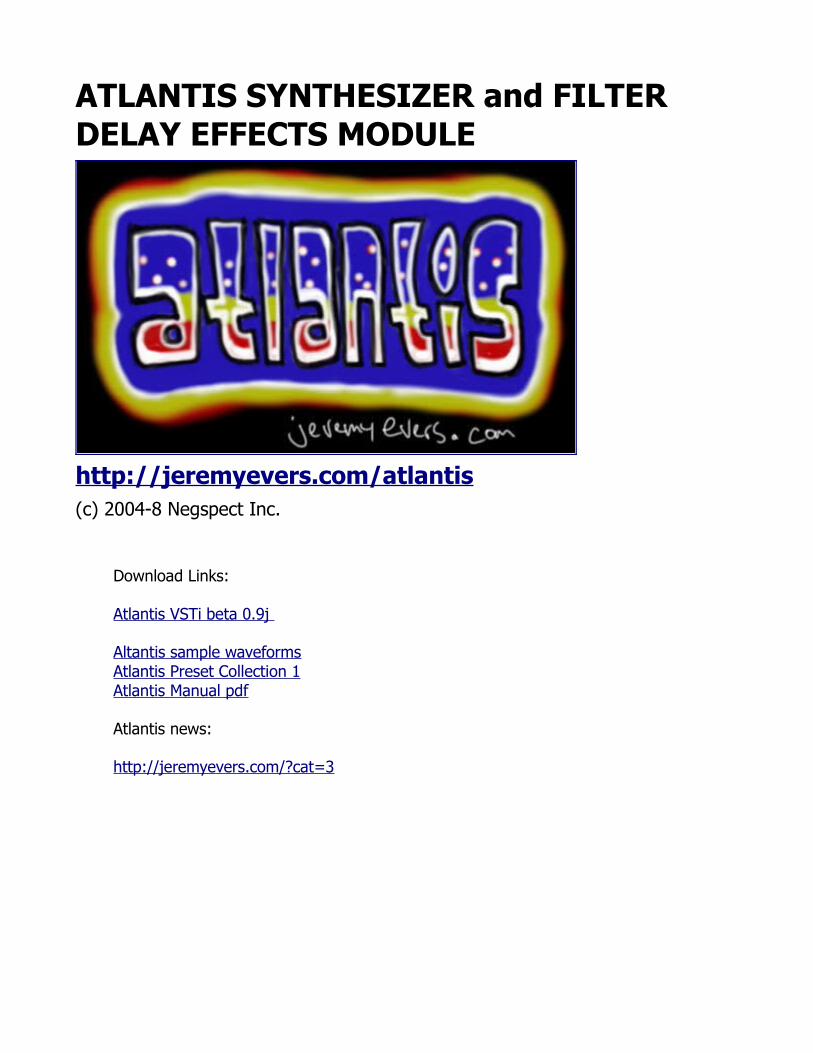
ATLANTIS SYNTHESIZER and FILTER DELAY EFFECTS MODULE
http://jeremyevers.com/atlantis(c) 2004-8 Negspect Inc.
Download Links:
Atlantis VSTi beta 0.9j
Altantis sample waveformsAtlantis Preset Collection 1Atlantis Manual pdf
Atlantis news:
http://jeremyevers.com/?cat=3
MANUALCONTENTS
• Credits • Overview • GUI Basics
• Power Buttons • Push Buttons • Selection Buttons • Sliders • Waveform Selectors • Envelope Windows • Delay Window • Routing Window • Oscilloscopes
• Parameters • Oscilators • Filters • Shapers • Delay • Routing • Modulators • LFO • Envelopes • Combiners • Global • Function Buttons • Config Dialog
• FAQ • History • Future

CREDITSconcept, design, programming, documentation: Jeremy Evers
graphics: Jim Redfern, Jeremy Evers
testing: Jim Redfern, Dan Peddle, James Long, Jason Long, Jereon Tell, Mick Rippon, Bryan Collins, Jon Grönvall, Steve Tomlinson, Andrej Golob
presets: Jason Long, Bryan Collins, Jeremy Evers, Shandar, Andrej A. Golob
OVERVIEW
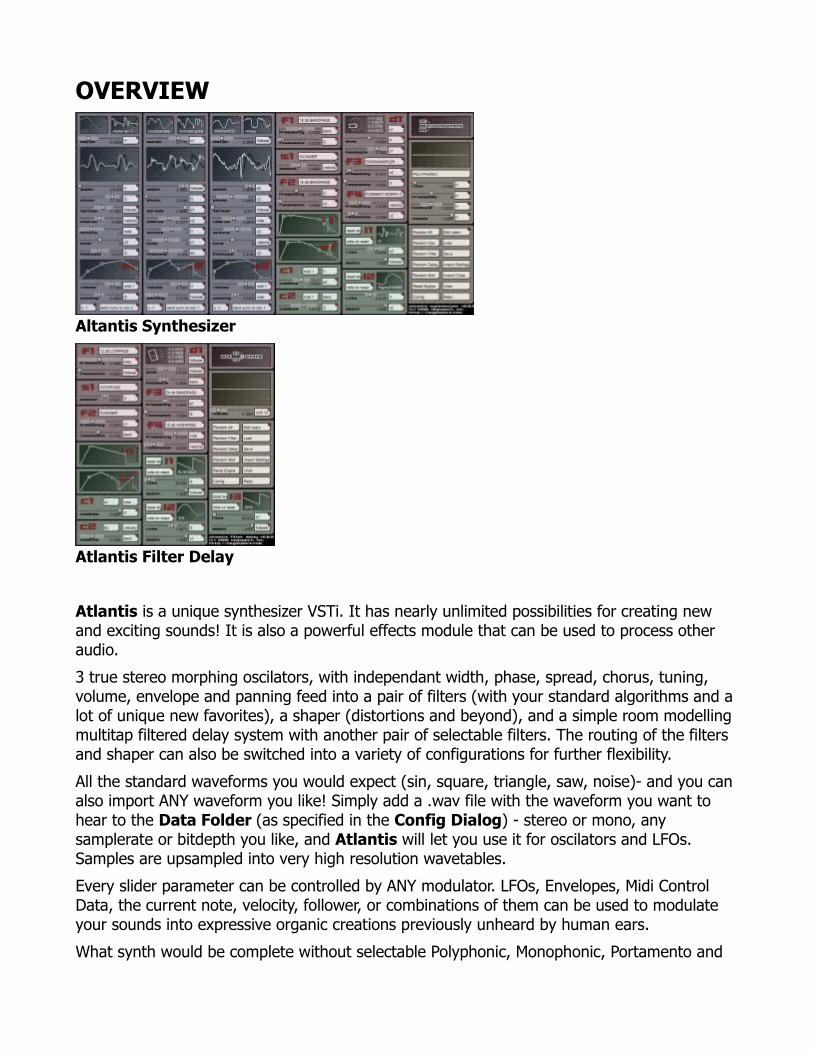
Altantis Synthesizer
Atlantis Filter Delay
Atlantis is a unique synthesizer VSTi. It has nearly unlimited possibilities for creating new and exciting sounds! It is also a powerful effects module that can be used to process other audio.
3 true stereo morphing oscilators, with independant width, phase, spread, chorus, tuning, volume, envelope and panning feed into a pair of filters (with your standard algorithms and a lot of unique new favorites), a shaper (distortions and beyond), and a simple room modelling multitap filtered delay system with another pair of selectable filters. The routing of the filters and shaper can also be switched into a variety of configurations for further flexibility.
All the standard waveforms you would expect (sin, square, triangle, saw, noise)- and you can also import ANY waveform you like! Simply add a .wav file with the waveform you want to hear to the Data Folder (as specified in the Config Dialog) - stereo or mono, any samplerate or bitdepth you like, and Atlantis will let you use it for oscilators and LFOs. Samples are upsampled into very high resolution wavetables.
Every slider parameter can be controlled by ANY modulator. LFOs, Envelopes, Midi Control Data, the current note, velocity, follower, or combinations of them can be used to modulate your sounds into expressive organic creations previously unheard by human ears.
What synth would be complete without selectable Polyphonic, Monophonic, Portamento and

Arpeggio modes?
All that, it's fast and it sounds great, too? What the hell?!
GUI BASICSAlthough it may look intimidating at first, Atlantis is very intuitive once you grow accustomed to it's interface. There are a few basic elements to the interface itself:
POWER BUTTONSPower buttons can be found in the top right of waveform selectors, selection buttons, algorithm selectors, envelopes, and the delay unit. They can be either on ( ) or off ( ).
Click them to toggle the power for that item.
PUSH BUTTONS
Push buttons generally click once to commit the described action.There are a few exceptions: the osc sync buttons and the keyboard mode button look like push buttons but they are actually selection buttons.
SELECTION BUTTONS
Selection buttons are used to select an option and in most cases control the power for it as well. Exceptions being buttons that control only power, such as note on reset, and some global options, or buttons that control only a selection, such as keyboard mode and combiner input.
Click on the power button ( ) to toggle the power.
Click and a menu will pop up with your available choices.
Click and drag vertically to adjust the selection.
CTRL + drag vertically to finetune the selection.
SLIDERS
Sliders are what it is all about. Their awesomeness may take a few minutes to sink in, but it is assured. They are used to set parameters and control the modulation range and direction. A numerical value is also displayed below them to assist in dialing in precise values. The selection buttons ( ) to the right of sliders select and enable the modulator for this slider.
The handle ( ) shows the parameter center and the modulation direction, either forward ( ) or reverse ( ).
The highlighted range area ( ) shows the range of modulation. If the modulator selection button power ( ) is on, a blip ( ) will represent the current status of the modulated parameter.
Sliders are manipulated in a variety of ways, get used to how they function immediately:
Left Click/drag horizontally to adjust the parameter center.
CTRL+Left drag horizontally to finetune the parameter center.
SHIFT+Left Click to reset the parameter center.
Right Click/drag horizontally to change the parameter range and direction. ( ) is forward and ( ) is reverse .
CTRL+Right drag horizontally to finetune the parameter range and direction.
SHIFT+Right Click to clear the range and direction.
WAVEFORM SELECTORS
Waveform selectors are used to select waveforms, set their phase, and control the power of the oscilator or LFO. If an LFO is off, it holds it's current value. If an oscilator waveform is off, it will not be mixed in. If both oscilator waveforms are off, the oscilator will not produce any sound.
Click on the power button ( ) to toggle the power.
Left Click and a menu will pop up with your available choices.

Left drag vertically to adjust the waveform
CTRL+Left drag vertically to finetune the waveform at a slower rate. A pop-up menu feature will be available in future versions.
Right drag horizontally to adjust the phase.
CTRL+Right drag horizontally to finetune the phase.
SHIFT+Right Click to reset the phase.
ENVELOPE WINDOWS
At first, the envelope windows may seem confusing. They pack a lot of things into a small space. With a little practise they become second nature. Here's a breakdown of their parts:
Power button ( ) toggles the power. When it is off, the envelope acts as a gate. Click it to toggle.
Scale ( ) each full vertical tick represents a beat, smaller ticks are subdivisions of a beat. These are tempo-synched to the host.
Points- there are 5 types of points: regular points ( ),loop start point ( ), loop end point ( ), release point ( ) and end points ( ). The envelope will follow those points and loop between the start and end points until release .
The release behaviour is shown by the triangle between the loop end point
and the release point ( ). When a release occurs, the volume fades to the release volume over an amount of time equivalent to the width of the triangle. To create a non-sustaining sound, set the amplitude of the loop points and release point to the bottom. To avoid release swells on patches with slow attack or deep dips in the envelope loop, set the release point to the bottom.
The points can be manipulated in a number of ways:
Left click on an open area to create a new regular point.
Left drag on a point to adjust amplitude and insert time.
CTRL+Left drag on a point to finetune amplitude and insert time.
SHIFT+Left drag on a point to adjust amplitude and timing without inserting time. This also will allow you to break the amplitude symmetry of loop points.
CTRL+SHIFT+Left drag on a point to finetune amplitude and timing without inserting time. This also will allow you to break the amplitude symmetry of loop points.
Right Click on a regular point to remove it.
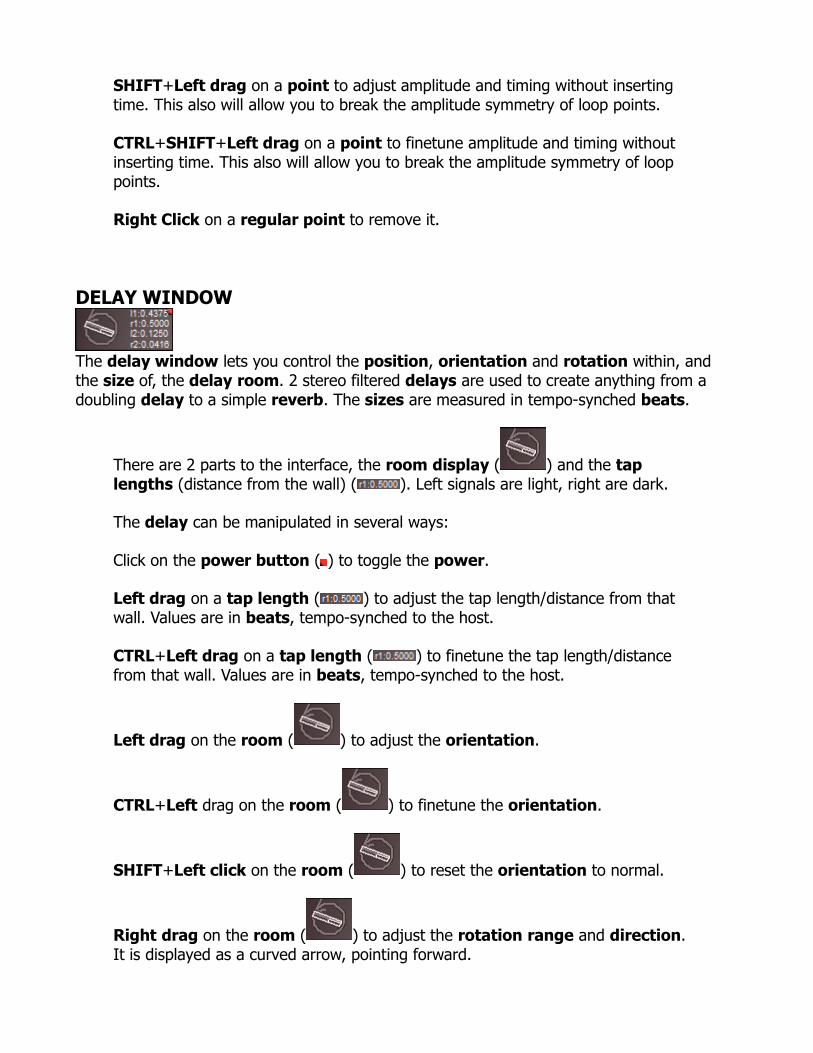
DELAY WINDOW
The delay window lets you control the position, orientation and rotation within, and the size of, the delay room. 2 stereo filtered delays are used to create anything from a doubling delay to a simple reverb. The sizes are measured in tempo-synched beats.
There are 2 parts to the interface, the room display ( ) and the tap lengths (distance from the wall) ( ). Left signals are light, right are dark.
The delay can be manipulated in several ways:
Click on the power button ( ) to toggle the power.
Left drag on a tap length ( ) to adjust the tap length/distance from that wall. Values are in beats, tempo-synched to the host.
CTRL+Left drag on a tap length ( ) to finetune the tap length/distance from that wall. Values are in beats, tempo-synched to the host.
Left drag on the room ( ) to adjust the orientation.
CTRL+Left drag on the room ( ) to finetune the orientation.
SHIFT+Left click on the room ( ) to reset the orientation to normal.
Right drag on the room ( ) to adjust the rotation range and direction. It is displayed as a curved arrow, pointing forward.
CTRL+Right drag on the room ( ) to finetune the rotation range and direction. It is displayed as a curved arrow, pointing forward.
SHIFT+Left click on the room ( ) to reset the rotation range and direction.
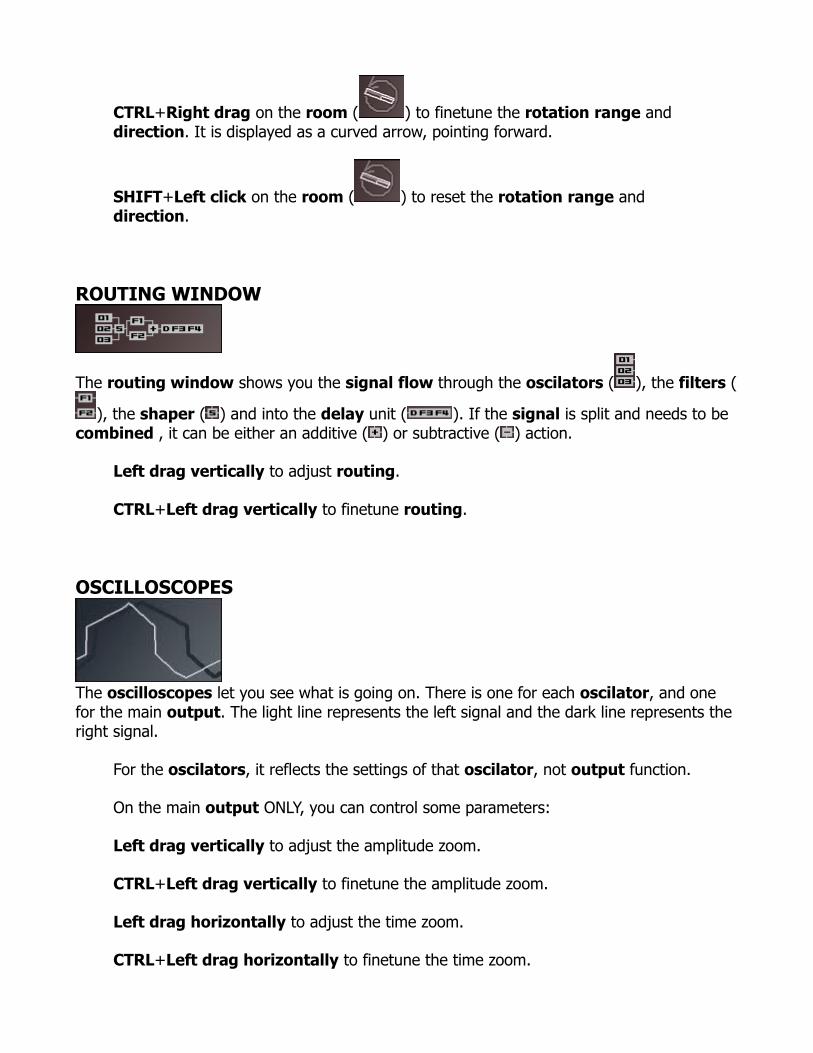
ROUTING WINDOW
The routing window shows you the signal flow through the oscilators ( ), the filters (
), the shaper ( ) and into the delay unit ( ). If the signal is split and needs to be combined , it can be either an additive ( ) or subtractive ( ) action.
Left drag vertically to adjust routing.
CTRL+Left drag vertically to finetune routing.
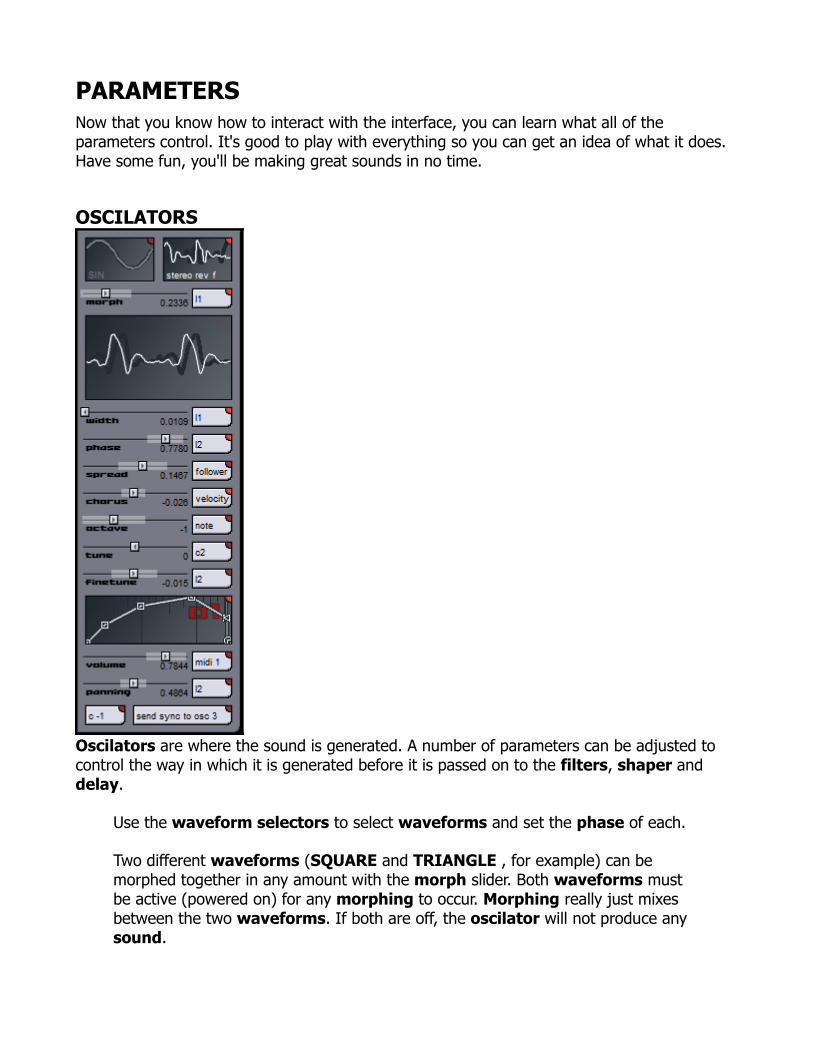
OSCILLOSCOPES
The oscilloscopes let you see what is going on. There is one for each oscilator, and one for the main output. The light line represents the left signal and the dark line represents the right signal.
For the oscilators, it reflects the settings of that oscilator, not output function.
On the main output ONLY, you can control some parameters:
Left drag vertically to adjust the amplitude zoom.
CTRL+Left drag vertically to finetune the amplitude zoom.
Left drag horizontally to adjust the time zoom.
CTRL+Left drag horizontally to finetune the time zoom.
PARAMETERSNow that you know how to interact with the interface, you can learn what all of the parameters control. It's good to play with everything so you can get an idea of what it does. Have some fun, you'll be making great sounds in no time.
OSCILATORS
Oscilators are where the sound is generated. A number of parameters can be adjusted to control the way in which it is generated before it is passed on to the filters, shaper and delay.
Use the waveform selectors to select waveforms and set the phase of each.
Two different waveforms (SQUARE and TRIANGLE , for example) can be morphed together in any amount with the morph slider. Both waveforms must be active (powered on) for any morphing to occur. Morphing really just mixes between the two waveforms. If both are off, the oscilator will not produce any sound.
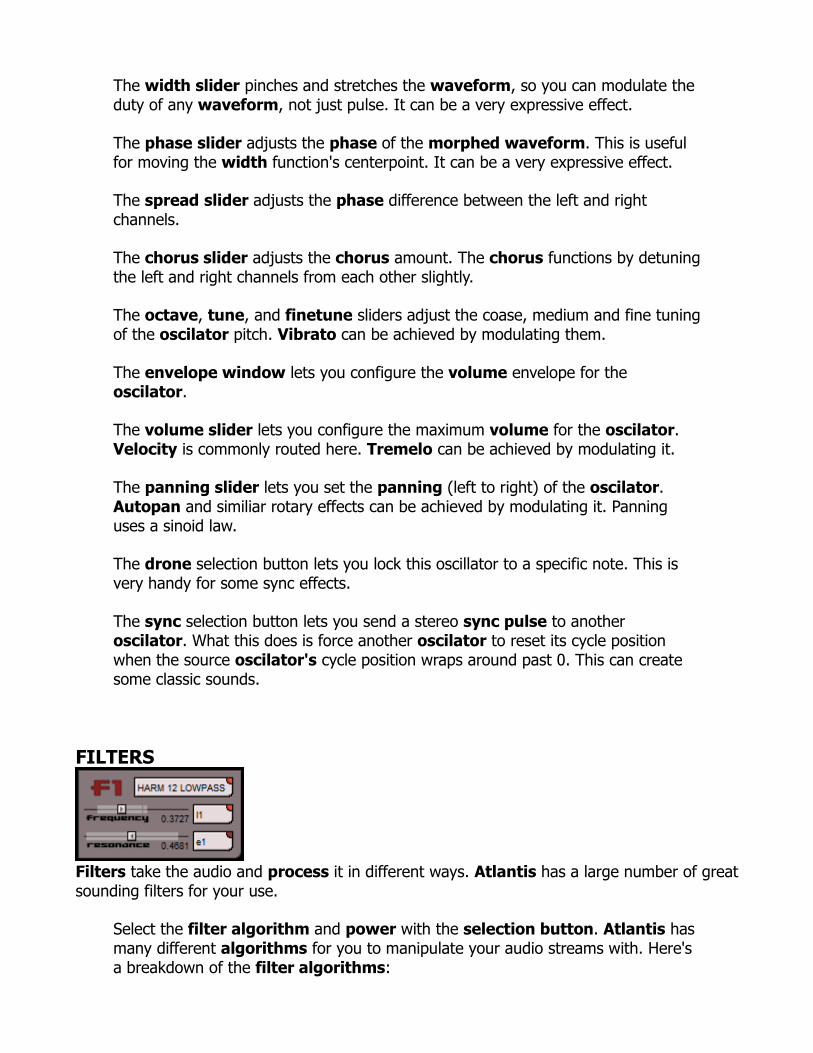
The width slider pinches and stretches the waveform, so you can modulate the duty of any waveform, not just pulse. It can be a very expressive effect.
The phase slider adjusts the phase of the morphed waveform. This is useful for moving the width function's centerpoint. It can be a very expressive effect.
The spread slider adjusts the phase difference between the left and right channels.
The chorus slider adjusts the chorus amount. The chorus functions by detuning the left and right channels from each other slightly.
The octave, tune, and finetune sliders adjust the coase, medium and fine tuning of the oscilator pitch. Vibrato can be achieved by modulating them.
The envelope window lets you configure the volume envelope for the oscilator.
The volume slider lets you configure the maximum volume for the oscilator. Velocity is commonly routed here. Tremelo can be achieved by modulating it.
The panning slider lets you set the panning (left to right) of the oscilator. Autopan and similiar rotary effects can be achieved by modulating it. Panning uses a sinoid law.
The drone selection button lets you lock this oscillator to a specific note. This is very handy for some sync effects.
The sync selection button lets you send a stereo sync pulse to another oscilator. What this does is force another oscilator to reset its cycle position when the source oscilator's cycle position wraps around past 0. This can create some classic sounds.
FILTERS
Filters take the audio and process it in different ways. Atlantis has a large number of great sounding filters for your use.
Select the filter algorithm and power with the selection button. Atlantis has many different algorithms for you to manipulate your audio streams with. Here's a breakdown of the filter algorithms:
• Lowpass - decreases amplitude above frequency, resonance will feedback at frequency.
• Highpass - decreases amplitude below frequency, resonance will feedback at frequency.
• Bandpass - decreases amplitude above and below frequency, resonance will feedback at frequency.
• Notch - decreases amplitude at frequency, resonance will feedback at frequency.
• Peak - increases amplitude at frequency, resonance will feedback at frequency.
• 6, 12, 18, 24 db/o - the slope of the filter, decibels per octave. Higher ratings produce sharper falloff.
• Harmonic 12, 18, 24, 30 - these are very nice and unique stacked filters that are tuned to different octaves to produce stepped frequency response and pleasant resonant harmonics.
• Formant Morph - filter the audio to make vowel sounds. Frequency controls the vowel sound, resonance controls the depth
• Phaser - adjust the phase at the target frequency. Resonance controls the depth and feedback. Sweep the frequency for classic sounds.
• Flanger - slightly delays the signal and mixes it back. Frequency controls the amount of delay, resonance controls the depth and feedback. Sweep the frequency for classic sounds.
• Flange chorus - uses a flanger to produce a chorus sound. Frequency controls the rate of the chorus, resonance controls the depth and feedback. Note that resonance at center is minimal depth and feedback.
• Flange vibrato - uses a flanger to produce a vibrato sound. Frequency controls the rate of the vibrato, resonance controls the depth and feedback. Note that resonance at center is minimal depth and feedback.
• Downsampler - resamples the audio at a lower sample rate, produces audible aliasing for a lofi sound. Frequency controls the resample rate, resonance controls the mix between the downsampled and original signal.
• AM ringer - modulates the amplitude of the signal with a stereo offset sine wave. Frequency controls the frequency of the sine wave, resonance controls the mix between the modulated and original signal.
• SID LPF - Another Lowpass filter tuned to sound similiar to the famous SID chip.
• SID LPF + HPF - Lowpass and hipass SID filters combined. • SID LPF + BPF - Lowpass and bandpass SID filters combined. This is a
classic sound. • SID LPF + HPF + BPF - Lowpass, hipass and bandpass SID filters
combined. • SID HPF - Hipass SID filter. • SID HPF + BPF - Hipass and bandpass SID filters combined. • SID BPF - Bandpass SID filter.
Set the frequency target parameter with the frequency slider. This controls the
center frequency of the filter.
Set the resonance parameter with the resonance slider. This controls the depth or resonance, depending on the filter algorithm selected.
SHAPERS
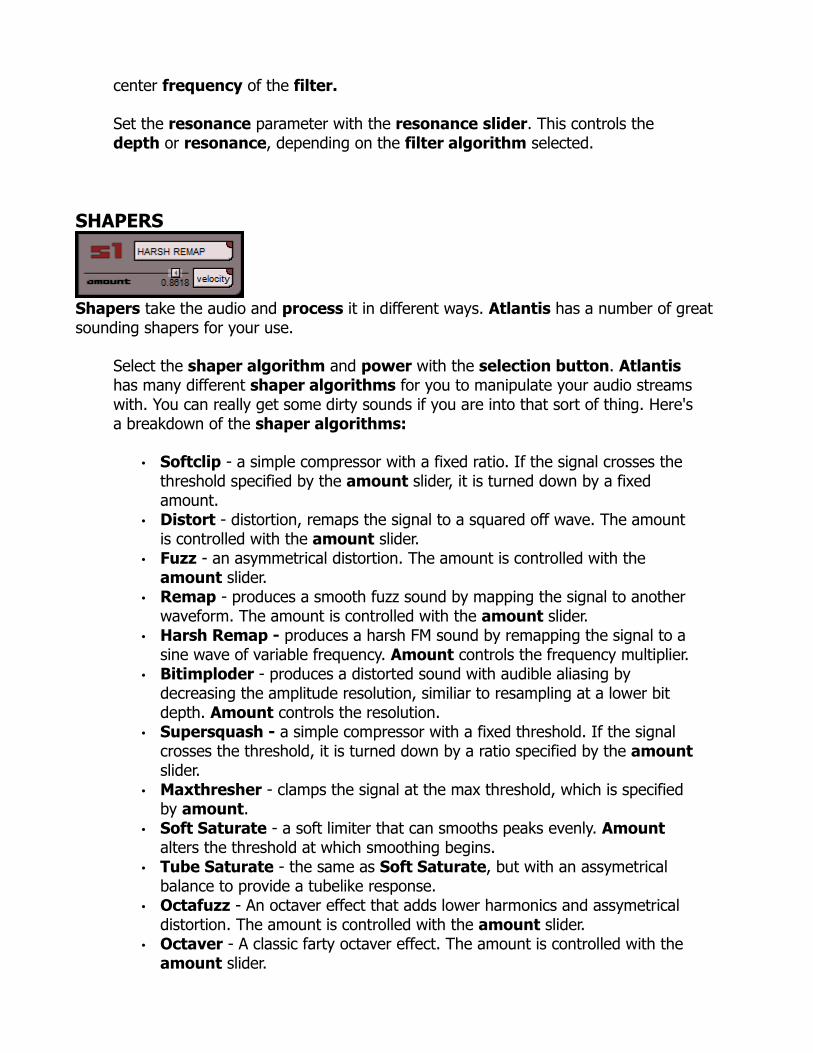
Shapers take the audio and process it in different ways. Atlantis has a number of great sounding shapers for your use.
Select the shaper algorithm and power with the selection button. Atlantis has many different shaper algorithms for you to manipulate your audio streams with. You can really get some dirty sounds if you are into that sort of thing. Here's a breakdown of the shaper algorithms:
• Softclip - a simple compressor with a fixed ratio. If the signal crosses the threshold specified by the amount slider, it is turned down by a fixed amount.
• Distort - distortion, remaps the signal to a squared off wave. The amount is controlled with the amount slider.
• Fuzz - an asymmetrical distortion. The amount is controlled with the amount slider.
• Remap - produces a smooth fuzz sound by mapping the signal to another waveform. The amount is controlled with the amount slider.
• Harsh Remap - produces a harsh FM sound by remapping the signal to a sine wave of variable frequency. Amount controls the frequency multiplier.
• Bitimploder - produces a distorted sound with audible aliasing by decreasing the amplitude resolution, similiar to resampling at a lower bit depth. Amount controls the resolution.
• Supersquash - a simple compressor with a fixed threshold. If the signal crosses the threshold, it is turned down by a ratio specified by the amount slider.
• Maxthresher - clamps the signal at the max threshold, which is specified by amount.
• Soft Saturate - a soft limiter that can smooths peaks evenly. Amount alters the threshold at which smoothing begins.
• Tube Saturate - the same as Soft Saturate, but with an assymetrical balance to provide a tubelike response.
• Octafuzz - An octaver effect that adds lower harmonics and assymetrical distortion. The amount is controlled with the amount slider.
• Octaver - A classic farty octaver effect. The amount is controlled with the amount slider.
• Repeatverb - A nasty repeating reverberator. Adds some depth and weirdness. Try turing Filters-Per-Voice mode off if it is using too much CPU in the synthesizer.
• Destroyverb - A nasty overdriving reverberator, useful for adding wet ambience in the lower amount range. Try turing Filters-Per-Voice mode off if it is using too much CPU in the synthesizer.
• Pan - Pans the audio from left to right using a sine-cosine ratio.
Set the amount parameter with the amount slider. This does different things for different algorithms, but generally the more you add the more distorted the sound gets. It is often a good idea to use a low-pass filter after a shaper that causes distortion.
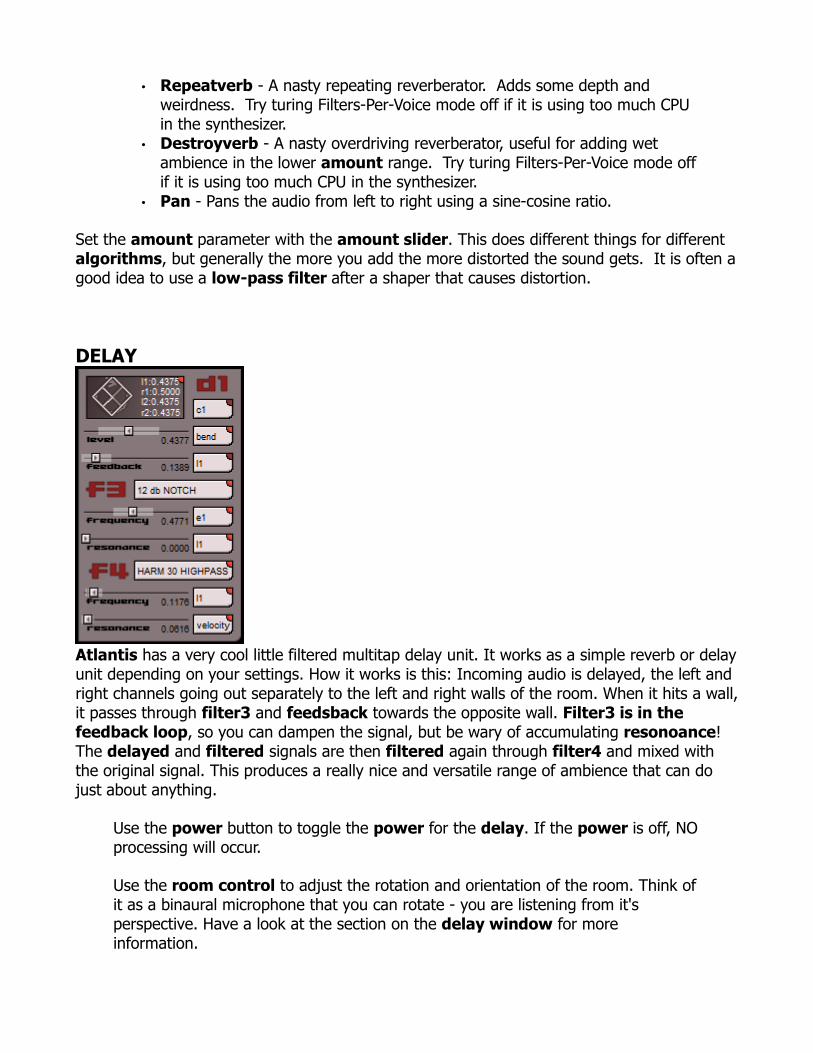
DELAY
Atlantis has a very cool little filtered multitap delay unit. It works as a simple reverb or delay unit depending on your settings. How it works is this: Incoming audio is delayed, the left and right channels going out separately to the left and right walls of the room. When it hits a wall, it passes through filter3 and feedsback towards the opposite wall. Filter3 is in the feedback loop, so you can dampen the signal, but be wary of accumulating resonoance! The delayed and filtered signals are then filtered again through filter4 and mixed with the original signal. This produces a really nice and versatile range of ambience that can do just about anything.
Use the power button to toggle the power for the delay. If the power is off, NO processing will occur.
Use the room control to adjust the rotation and orientation of the room. Think of it as a binaural microphone that you can rotate - you are listening from it's perspective. Have a look at the section on the delay window for more information.
Use the tap lengths to adust the size of the room. The numbers are in beats and are tempo-synched to the host. Have a look at the section on the delay window for more information.
The modulator selector to the right of the room control selects and powers the modulator for the room rotation.
The level slider adjusts the mix of delayed signal to input signal in the output.
The feedback slider adjusts the feedback amount of the delay. Be wary of adding too much feedback, it can squeal like mad if you do.
Filter3 and Filter4 are controlled exactly like the filters described above. They will not function if the delay unit is off.
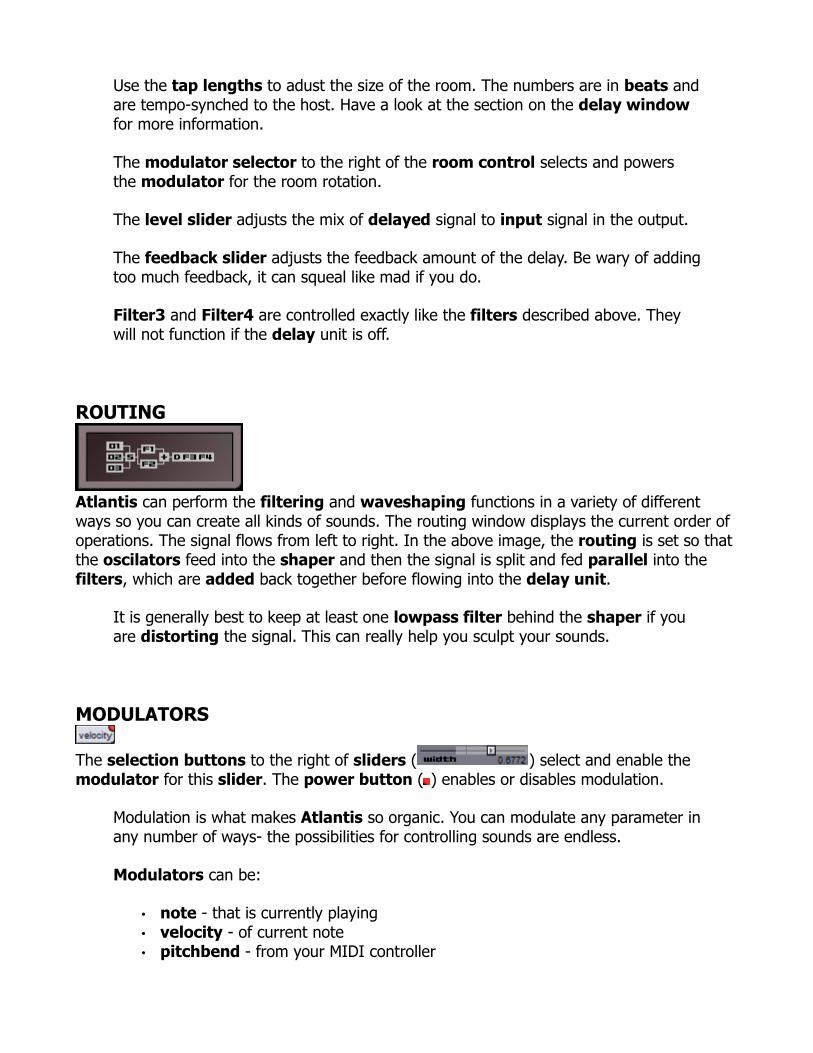
ROUTING
Atlantis can perform the filtering and waveshaping functions in a variety of different ways so you can create all kinds of sounds. The routing window displays the current order of operations. The signal flows from left to right. In the above image, the routing is set so that the oscilators feed into the shaper and then the signal is split and fed parallel into the filters, which are added back together before flowing into the delay unit.
It is generally best to keep at least one lowpass filter behind the shaper if you are distorting the signal. This can really help you sculpt your sounds.
MODULATORS
The selection buttons to the right of sliders ( ) select and enable the modulator for this slider. The power button ( ) enables or disables modulation.
Modulation is what makes Atlantis so organic. You can modulate any parameter in any number of ways- the possibilities for controlling sounds are endless.
Modulators can be:
• note - that is currently playing • velocity - of current note • pitchbend - from your MIDI controller
• Midi CCs - can be mapped to anything • envelopes - e1 or e2 • LFOs - l1 or l2 • combiners - c1 or c2, which combine other modulators
• follower - the output of the device is used as a modulator
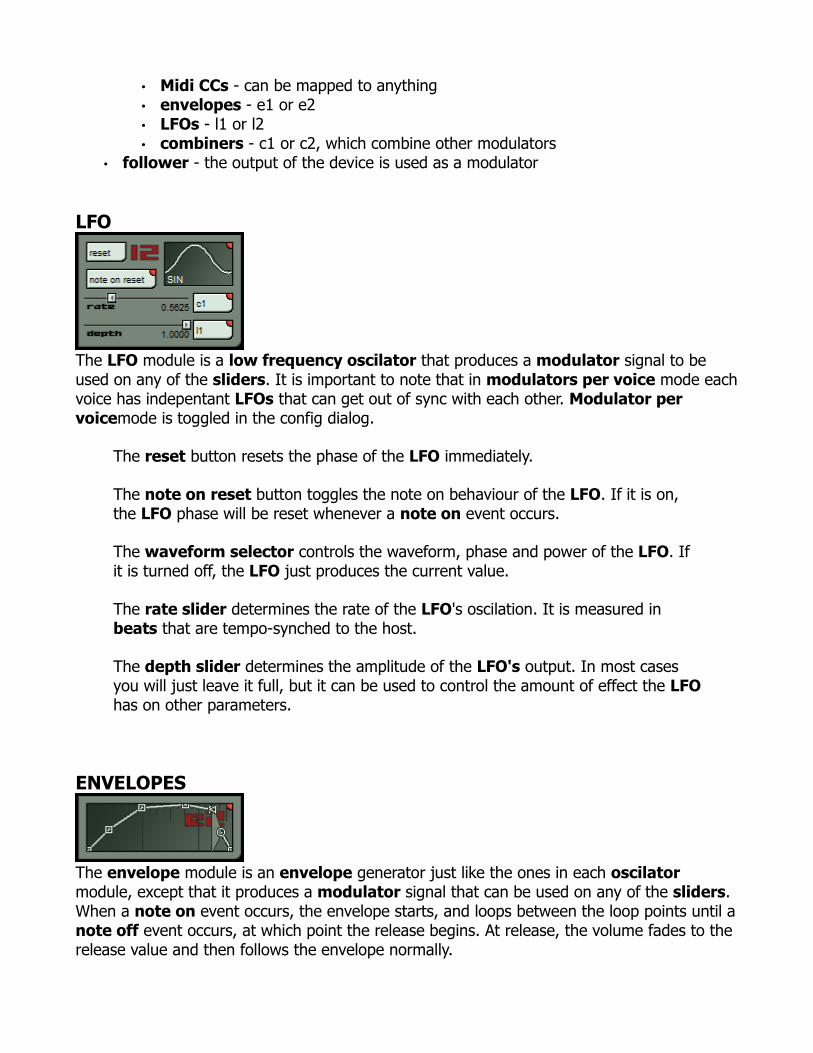
LFO
The LFO module is a low frequency oscilator that produces a modulator signal to be used on any of the sliders. It is important to note that in modulators per voice mode each voice has indepentant LFOs that can get out of sync with each other. Modulator per voicemode is toggled in the config dialog.
The reset button resets the phase of the LFO immediately.
The note on reset button toggles the note on behaviour of the LFO. If it is on, the LFO phase will be reset whenever a note on event occurs.
The waveform selector controls the waveform, phase and power of the LFO. If it is turned off, the LFO just produces the current value.
The rate slider determines the rate of the LFO's oscilation. It is measured in beats that are tempo-synched to the host.
The depth slider determines the amplitude of the LFO's output. In most cases you will just leave it full, but it can be used to control the amount of effect the LFO has on other parameters.
ENVELOPES
The envelope module is an envelope generator just like the ones in each oscilator module, except that it produces a modulator signal that can be used on any of the sliders. When a note on event occurs, the envelope starts, and loops between the loop points until a note off event occurs, at which point the release begins. At release, the volume fades to the release value and then follows the envelope normally.
More information about editing the envelope is available in the preceeding section. It is important to note that when modulators per voice mode is off, the release will not occur until ALL notes are off.
When the power is off, the envelope works as a gate.
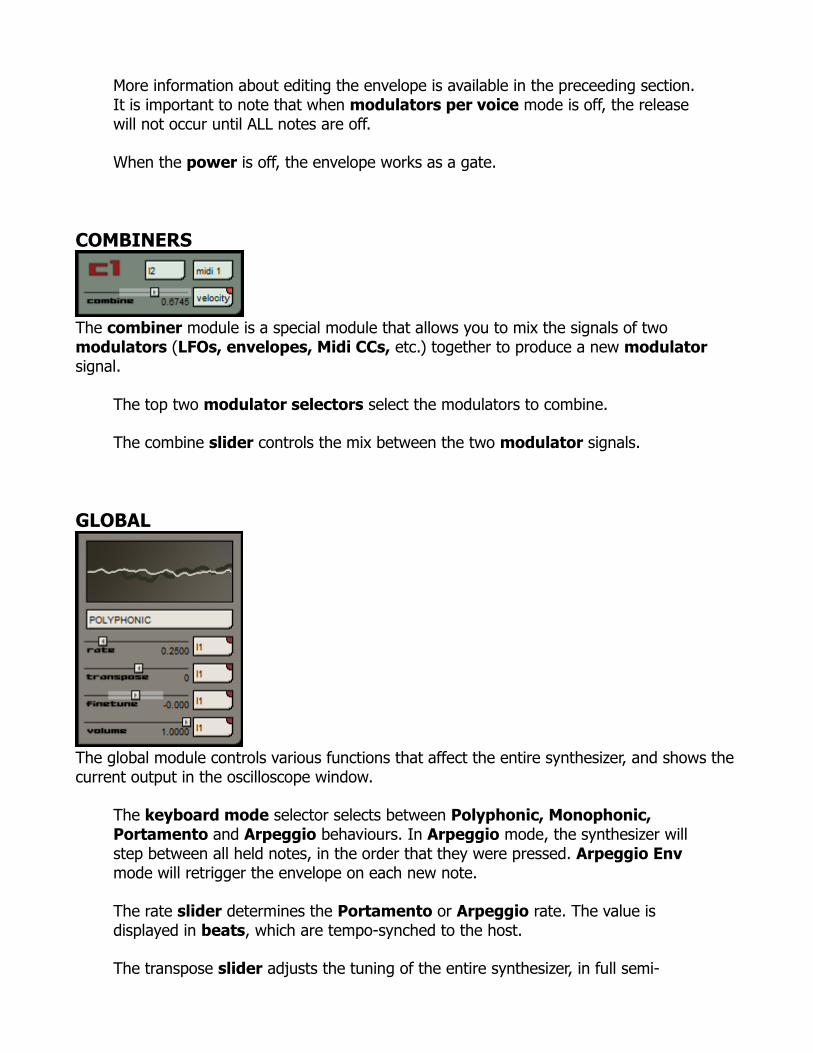
COMBINERS
The combiner module is a special module that allows you to mix the signals of two modulators (LFOs, envelopes, Midi CCs, etc.) together to produce a new modulator signal.
The top two modulator selectors select the modulators to combine.
The combine slider controls the mix between the two modulator signals.
GLOBAL
The global module controls various functions that affect the entire synthesizer, and shows the current output in the oscilloscope window.
The keyboard mode selector selects between Polyphonic, Monophonic, Portamento and Arpeggio behaviours. In Arpeggio mode, the synthesizer will step between all held notes, in the order that they were pressed. Arpeggio Env mode will retrigger the envelope on each new note.
The rate slider determines the Portamento or Arpeggio rate. The value is displayed in beats, which are tempo-synched to the host.
The transpose slider adjusts the tuning of the entire synthesizer, in full semi-
tones. You can build a simple vibrato by modulating this. You can also route your pitchbender here to use it in a traditional manner.
The finetune slider adjusts the finetuning of the entire synthesizer. You can build a simple vibrato by modulating this.
The volume slider adjusts the volume of the entire synthesizer. You can build a simple tremolo by modulating this.
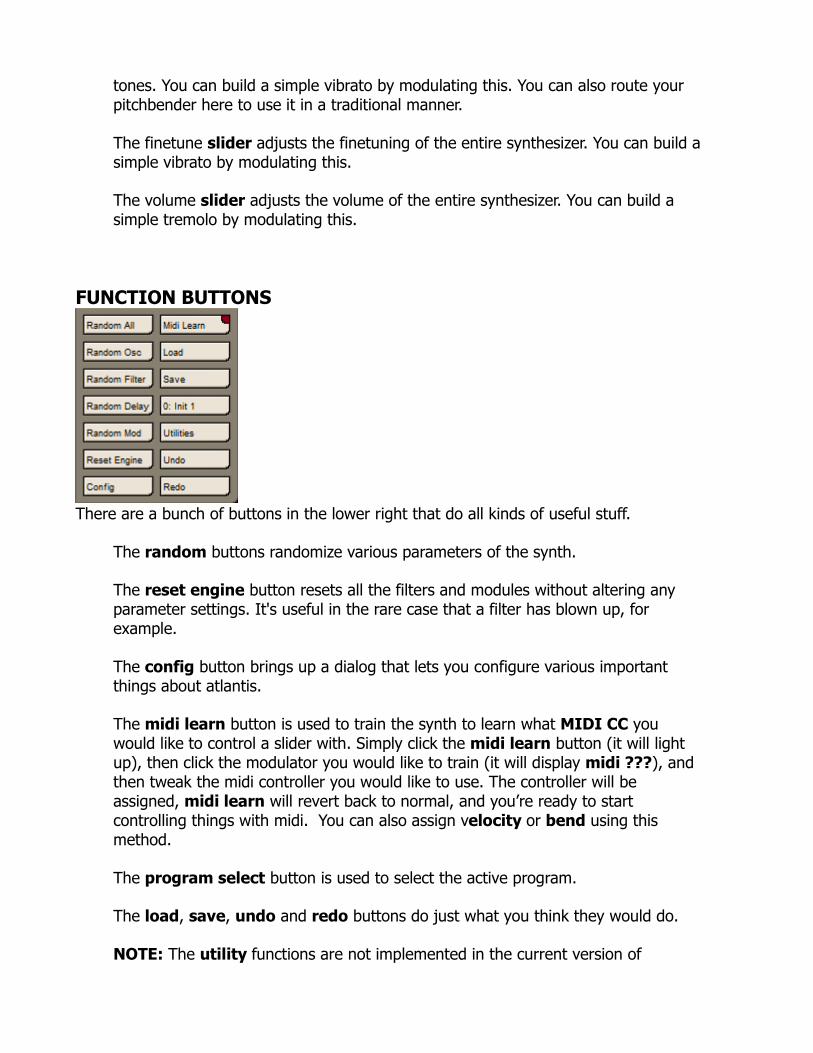
FUNCTION BUTTONS
There are a bunch of buttons in the lower right that do all kinds of useful stuff.
The random buttons randomize various parameters of the synth.
The reset engine button resets all the filters and modules without altering any parameter settings. It's useful in the rare case that a filter has blown up, for example.
The config button brings up a dialog that lets you configure various important things about atlantis.
The midi learn button is used to train the synth to learn what MIDI CC you would like to control a slider with. Simply click the midi learn button (it will light up), then click the modulator you would like to train (it will display midi ???), and then tweak the midi controller you would like to use. The controller will be assigned, midi learn will revert back to normal, and you’re ready to start controlling things with midi. You can also assign velocity or bend using this method.
The program select button is used to select the active program.
The load, save, undo and redo buttons do just what you think they would do.
NOTE: The utility functions are not implemented in the current version of
Atlantis.
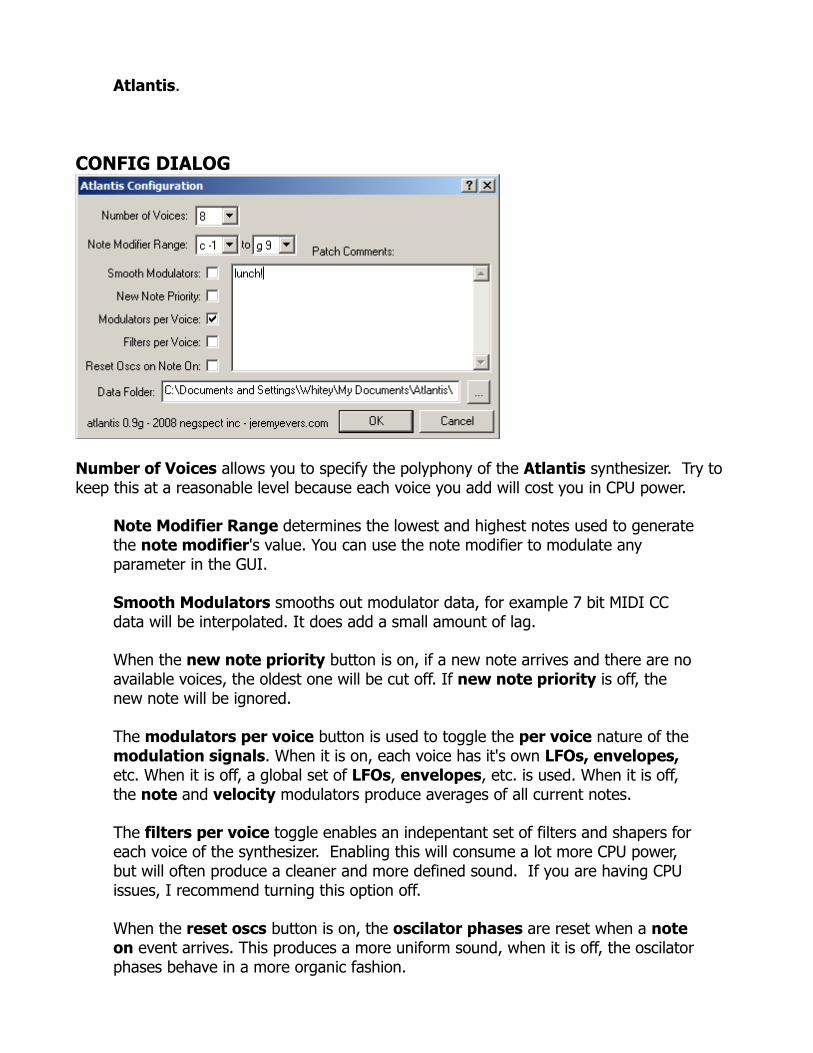
CONFIG DIALOG
Number of Voices allows you to specify the polyphony of the Atlantis synthesizer. Try to keep this at a reasonable level because each voice you add will cost you in CPU power.
Note Modifier Range determines the lowest and highest notes used to generate the note modifier's value. You can use the note modifier to modulate any parameter in the GUI.
Smooth Modulators smooths out modulator data, for example 7 bit MIDI CC data will be interpolated. It does add a small amount of lag.
When the new note priority button is on, if a new note arrives and there are no available voices, the oldest one will be cut off. If new note priority is off, the new note will be ignored.
The modulators per voice button is used to toggle the per voice nature of the modulation signals. When it is on, each voice has it's own LFOs, envelopes, etc. When it is off, a global set of LFOs, envelopes, etc. is used. When it is off, the note and velocity modulators produce averages of all current notes.
The filters per voice toggle enables an indepentant set of filters and shapers for each voice of the synthesizer. Enabling this will consume a lot more CPU power, but will often produce a cleaner and more defined sound. If you are having CPU issues, I recommend turning this option off.
When the reset oscs button is on, the oscilator phases are reset when a note on event arrives. This produces a more uniform sound, when it is off, the oscilator phases behave in a more organic fashion.

The Data Folder is where you store your chips, presets, etc.
You can write whatever you like in the Comments area. Poems, ASCII porn, whatever.
FAQ• I want more lfos!
What, there's not enough stuff on that screen for you? If you really need more modulators, you can set up an envelope loop to work similair to an LFO with retrigger set, or you can have your host send a MIDI CC.
• Pitchable noise?
Noise doesn't have a pitch. Map note to a filter cutoff to give your noise a tonal quality.
• how do o1/o2/o3 envelopes function in shared mod/voice mode?
Each oscilator works per voice, regardless of mod/voice setting. Things would sound really really bad if they behaved otherwise.
• What about the chip files, how do they work? are they samples? how many samples in each?
Atlantis uses hi-resolution multilayer 32 bit wavetables internally. All you need to do to add some custom waveforms to the synth are drop .wav files in the data folder that is specified in the config dialog (probably \My Documents\Atlantis). Atlantis will automagically convert from 8, 16, 24 bit to the size and length that it needs using a high quality spline interpolation. The wav files should be only of a few cycles of the desired waveform. More than one cycle will raise the pitch by an octave. Dropping giant wav files will not force Atlantis to work as a sampler- it will just play the waveform really really fast. Stereo waveforms work great, Atlantis has a fully stereo signal path.
• What does BLIM mean?
BLIM means Bandwidth-Limited. It is a waveform constructed in such a way as to not contain very high frequency harmonics that would foldback and cause nasty aliasing sounds.
• I was trying to get a 'delayed vibrato', using the combiner with an LFO and an envelope, but the combiner is an adder, not a multiplier!
Here's what you do: have an env control the depth of the LFO. That's the only reason for the lfo depth knobs!
• I tried to use Atlantis- it crashed, locked up my sequencer, and made my computer catch fire!
You didn't pay for it and I didn't offer a guarantee. It works amazing on most systems, but like any PC software, compatability testing is a full-time ordeal. If you want to get your issue resolved, the best thing you can do is get in touch with me via email, and describe the problem, including host, cpu, dump, and symptoms. Log and ini files from your chips folder would be nice, too.
• I am getting what appears to be denormal CPU spikes, especially with configuration X.
I pity the fool with an intel CPU. They suck at handling denormals. Regardless, I have put a good amount of effort into denormal prevention. Some of the shaper, filter and delay combinations may cause the occasion denormal. If you find a combination that is exceptionally displeasing, please email me the details.
• Wow that filter feedback really blew up, it got really loud and then would not make any sound!
Yep. It is possible in some situations to blow it up. Hit the reset button and turn the resonance/feedback down a little!
• I wish pitchbend would work.
It does, but you may have to apply it as a modulator yourself. In the future I would like to support partial preset import where you can load your favorite modulator routings from other patches, for example. No, I do not know when that will be.
• I can't believe this is free?? Does this version expire? There has to be a catch.
It does not expire. It is free during beta. One day I may be satisfied with it enough to try to charge a few dollars to try to make up for the insane amount of time that was spent developing it. In the meantime, enjoy, and don't cry too loud if it is not flawless.
• What's the story with this thing?
I started desgining Atlantis from my hammock in 2003 to be my final synthesizer. It would contain all of the features I could ever want with a no-nonsense easy-to-use interface. Of course I can still think of several more features, but that's just gluttony. I sent my UI design sketches to chiptune wizard Jim Redfern who came up with the tracker-influenced graphical style, and I fine-tuned it into it's current state. He later came up with a much slicker looking graphic design that I have STILL not implemented. Sorry, Jim. Hardware fiends James and Jason Long began helping me with extensive testing of the synth engine and many detailed discussions about synthesizers- the sync module would never have worked correctly without their help and support. Maniac of Noise Jeroen Tel also got involved in testing. In 2005 tracker master Mick Rippon began working on a server backend for an online sound repository, which may yet be revived. The synth itself has not changed much since then, other than the adding of new filters or waveshapers as ideas for new algorithms occur.

HISTORY• 0.9j - added pan shaper • 0.9i - forced all voices to run filters at all times to remove clicking sounds • 0.9h - enabled assigning of velocity or bend modulators by using midi learn • 0.9g - added repeatverb, destroyverb, tweaked gui, fixed some bugs • 0.9f - added fxb support, made chips folder selectable, increased power button size • 0.9e - fixed issue where text in gui was out of sync with actual synth parameters • 0.9d - fixed delay optimization bug, increase gui contrast • 0.9c - fixed denormal issues. fixed midi on effects lockups. tweaked gui. made midi learn even
easier. optimized all algorithms. made power buttons bigger. • 0.9 - updated documents, links, etc. • 0.8.9 - made Atlantis public
FUTURE• import chips button working • import preset button to import selectable preset components (midi mappings, etc) • improve envelope windows - zoom/snap, etc. • skinnable gui • online patch/bank repository • ADSR osc envelopes