atlas style map tutorial - cartographers' guild
TRANSCRIPT
ATLAS STYLE MAP PHOTOSHOP TUTORIAL Based on Ascension’s Atlas tutorial, revised by Kindari
Revised 8/17/2012
TABLE OF CONTENTS Chapter I: Introduction ................................................................................................................................................................ 3
Chapter II: Tutorial and Photoshop Notes ................................................................................................................................... 4
Part 1: Document Layout ......................................................................................................................................................... 4
Part 2: General Tips ................................................................................................................................................................. 5
Part 3: The Layer Style Dialog Box ........................................................................................................................................... 7
Part 4: The Lighting Effects Workspace (CS6) .......................................................................................................................... 8
Chapter III: Creating The Physical Terrain ................................................................................................................................... 9
Part 1: Create an Overall Map Shape ....................................................................................................................................... 9
Part 2: The Ocean .................................................................................................................................................................. 11
Part 3: Terrain ........................................................................................................................................................................ 15
Part 4: Overall Color ............................................................................................................................................................... 16
Part 5: Climate Zones - Deserts, Tundra, and More ............................................................................................................... 21
Part 6: Tweak the Shelving .................................................................................................................................................... 23
Part 7: Add Rivers .................................................................................................................................................................. 24
Chapter IV: Adding Map Features .............................................................................................................................................. 26
Part 1: Longitude and Latitude Grid ....................................................................................................................................... 26
Part 2: Countries .................................................................................................................................................................... 28
Chapter V: And the Rest… .......................................................................................................................................................... 31
Appendix: Special Notes for CS 5.1 ............................................................................................................................................ 33
Part 4: The Lighting Effects Dialog Box (CS 5.1) ..................................................................................................................... 34
CHAPTER I: INTRODUCTION Note: This tutorial was written for Photoshop CS 6, with notes for CS5.1. It has been tested and is known to work only with those versions of Photoshop. Where elements are drastically different between CS6 and CS5.1, I explain it both ways. You can follow a video tutorial using this document. The video series is here: http://www.youtube.com/playlist?list=PL44EEB5472CD8BE93 It’s tempting to skip the instructions (Chapter II). Unless you’re very proficient with Photoshop, don’t. You’ll just waste a lot of time. At least read Chapter II, Part 1. It explains the document layout and color coding of terms. This tutorial is an alternate presentation of Ascension’s Atlas Style mapping tutorial (used with permission) with a few revisions (http://www.cartographersguild.com/content.php?116-Ascensions-atlas-style-in-Photoshop). The main goal of this document is to speed the process by including as many shortcuts as possible (especially for repeated use). It was also intended to clarify some steps. Many steps are different from Ascension’s tutorial; there are several more layers, and the document organization is different. However, the end results of most steps are almost always identical. The differences in the final style are two additional mountain layers (which can be deleted) and a slightly different method of adjusting the climate gradient. Other changes were made more from a process perspective than a style perspective. I welcome feedback and suggestions on how to both improve the clarity of this document and improve the tutorial. I hope I’ve kept the original work as in-tact as possible while presenting it in a way that’s accessible to even first time Photoshop users. Hopefully, even a seasoned Photoshop user will learn some new techniques. I learned a lot from doing Ascension’s tutorial, and I learned a lot from creating this revised version. Thanks for checking it out. Good luck and happy mapping!
- Kindari @ www.cartographersguild.com
CHAPTER II: TUTORIAL AND PHOTOSHOP NOTES
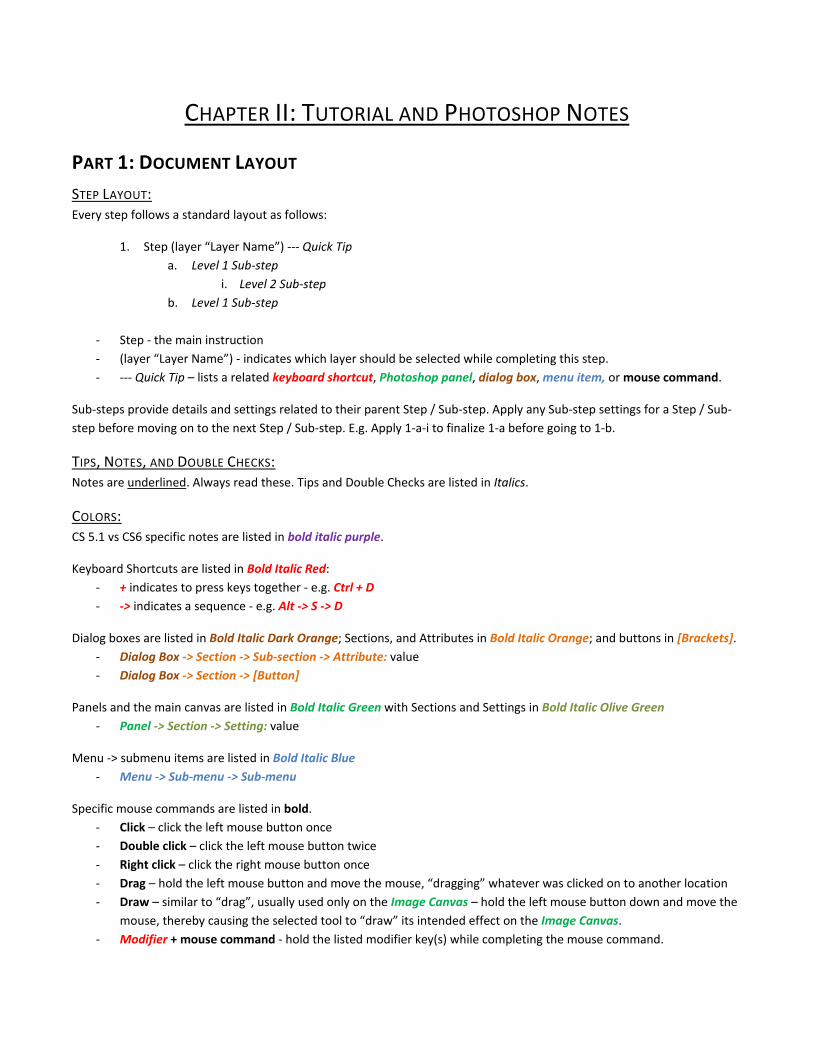
PART 1: DOCUMENT LAYOUT STEP LAYOUT: Every step follows a standard layout as follows:
1. Step (layer “Layer Name”) --- Quick Tip a. Level 1 Sub-step
i. Level 2 Sub-step b. Level 1 Sub-step
- Step - the main instruction - (layer “Layer Name”) - indicates which layer should be selected while completing this step. - --- Quick Tip – lists a related keyboard shortcut, Photoshop panel, dialog box, menu item, or mouse command.
Sub-steps provide details and settings related to their parent Step / Sub-step. Apply any Sub-step settings for a Step / Sub-step before moving on to the next Step / Sub-step. E.g. Apply 1-a-i to finalize 1-a before going to 1-b.
TIPS, NOTES, AND DOUBLE CHECKS: Notes are underlined. Always read these. Tips and Double Checks are listed in Italics.
COLORS: CS 5.1 vs CS6 specific notes are listed in bold italic purple.
Keyboard Shortcuts are listed in Bold Italic Red: - + indicates to press keys together - e.g. Ctrl + D - -> indicates a sequence - e.g. Alt -> S -> D
Dialog boxes are listed in Bold Italic Dark Orange; Sections, and Attributes in Bold Italic Orange; and buttons in [Brackets]. - Dialog Box -> Section -> Sub-section -> Attribute: value - Dialog Box -> Section -> [Button]
Panels and the main canvas are listed in Bold Italic Green with Sections and Settings in Bold Italic Olive Green - Panel -> Section -> Setting: value
Menu -> submenu items are listed in Bold Italic Blue - Menu -> Sub-menu -> Sub-menu
Specific mouse commands are listed in bold. - Click – click the left mouse button once - Double click – click the left mouse button twice - Right click – click the right mouse button once - Drag – hold the left mouse button and move the mouse, “dragging” whatever was clicked on to another location - Draw – similar to “drag”, usually used only on the Image Canvas – hold the left mouse button down and move the
mouse, thereby causing the selected tool to “draw” its intended effect on the Image Canvas. - Modifier + mouse command - hold the listed modifier key(s) while completing the mouse command.
PART 2: GENERAL TIPS CS6 VS CS5.1 AND EARLIER VERSIONS Where something is different between CS6 and CS5.1, it is noted. Where the differences are great, a link is provided to the section of the appendix to view alternate version of the step. Usually the CS 5.1 version will also work for older versions of Photoshop.
SAVE OFTEN Save about every 20 steps. It’s a good practice in any kind of file creation.
- Ctrl + S – Save - Ctrl + Alt + S – Save as copy…
READ BEFORE PROCEEDING Read an entire step (all the sub-steps) before you do a step your first time through. Sometimes this will put things into context and help you understand the overall goal of the step, which can help you figure things out if you get stuck.
STEP BY STEP Follow the guide step by step verbatim your first time through. And keep it simple. By the end, you’ll better understand how an early step affects a later one. You’ll also be more comfortable with shortcuts.
MAKE PRESETS Create presets when a step offers one. It saves a lot of time and makes repeated use of the tutorial’s faster.
KEEP TIDY Adding layer style effects can quickly clutter the Layers panel. Keep the Layers panel organized by collapsing these when not needed. You can always expand them again later.
- Collapse / Expand layer effects - click the small triangle at the far right of a layer (just right of the “fx” icon) - Collapse / Expand group - click the triangle just to the left of the group folder icon
KNOW THE USER INTERFACE (UI) I refer to sections of the screen by proper names if I know them, such as the “Control panel” or “Tools panel”. If you’re not familiar with those, use this as reference.
- http://help.adobe.com/en_US/photoshop/cs/using/WS3021052C-107A-42bd-B64E-D658875592AF.html
LOOK FOR TOOLTIPS If you’re not sure what an element of the UI does, hold mouse cursor still over an element for a few seconds. Usually a tooltip will display with the name of the element with its hotkey in parentheses.
WATCH WHILE USING SHORTCUTS Many keystroke sequences are just quick ways of navigating through the menus. For instance, Alt -> S -> M -> E is the same as navigating the menus Select -> Modify -> Expand with the mouse. Watch the screen while following these sequences to learn where many menu items are located.
LEARN WITH CTRL + Z! If you aren’t sure what a step did, use Ctrl + Z to undo your last action, and hit it again to redo it again. You can hit it repeatedly to “toggle” back and forth. Just remember end up with your last action completed and not undone.
TOOL GROUP SHORTCUTS Most Steps refer to tools by their shortcut keys - e.g. M for the Rectangular Marquee tool. Tools of a similar type often share a shortcut key and are also grouped in the Tools panel. Hold Shift + shortcut key (in this case M) to cycle through the tools in a group.
In the Tools panel, click and hold a tool to show all the tools in the group. Notice, the shortcut key is displayed for each tool that can be reached with it. With the Marquee tools, Shift + M cycles through the Rectangular Marquee and Elliptical Marquee tools but not the Single Column Marquee and Single Row Marquee tools. To get to the latter two, select them through the Tools panel.
When using tool shortcuts, double check the right tool was selected with the shortcut. If not, use Shift + shortcut key to select the correct tool.
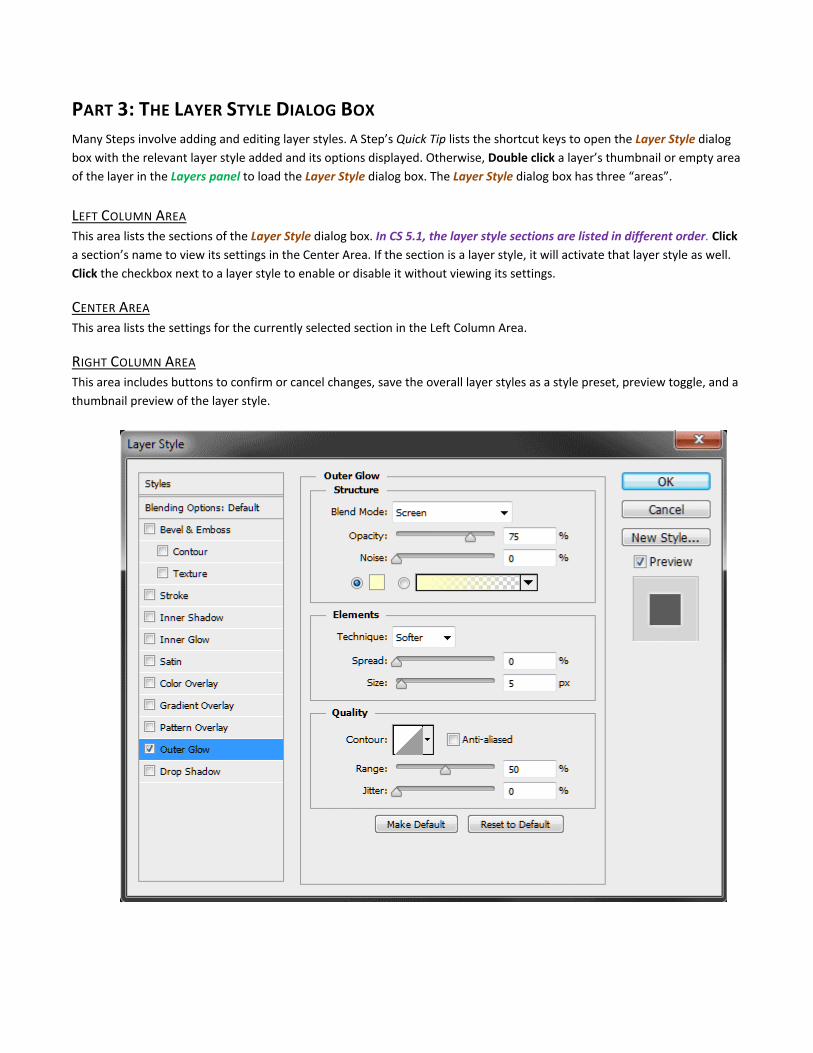
PART 3: THE LAYER STYLE DIALOG BOX Many Steps involve adding and editing layer styles. A Step’s Quick Tip lists the shortcut keys to open the Layer Style dialog box with the relevant layer style added and its options displayed. Otherwise, Double click a layer’s thumbnail or empty area of the layer in the Layers panel to load the Layer Style dialog box. The Layer Style dialog box has three “areas”.
LEFT COLUMN AREA This area lists the sections of the Layer Style dialog box. In CS 5.1, the layer style sections are listed in different order. Click a section’s name to view its settings in the Center Area. If the section is a layer style, it will activate that layer style as well. Click the checkbox next to a layer style to enable or disable it without viewing its settings.
CENTER AREA This area lists the settings for the currently selected section in the Left Column Area.
RIGHT COLUMN AREA This area includes buttons to confirm or cancel changes, save the overall layer styles as a style preset, preview toggle, and a thumbnail preview of the layer style.
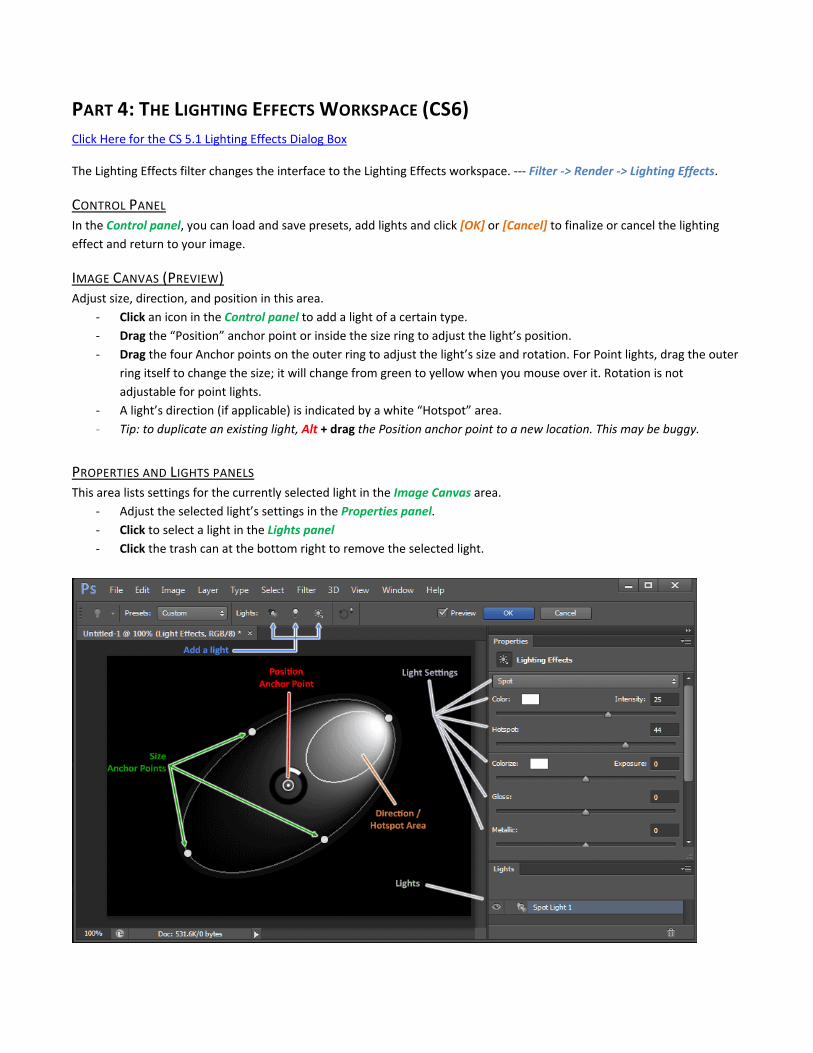
PART 4: THE LIGHTING EFFECTS WORKSPACE (CS6) Click Here for the CS 5.1 Lighting Effects Dialog Box
The Lighting Effects filter changes the interface to the Lighting Effects workspace. --- Filter -> Render -> Lighting Effects.
CONTROL PANEL In the Control panel, you can load and save presets, add lights and click [OK] or [Cancel] to finalize or cancel the lighting effect and return to your image.
IMAGE CANVAS (PREVIEW) Adjust size, direction, and position in this area.
- Click an icon in the Control panel to add a light of a certain type. - Drag the “Position” anchor point or inside the size ring to adjust the light’s position. - Drag the four Anchor points on the outer ring to adjust the light’s size and rotation. For Point lights, drag the outer
ring itself to change the size; it will change from green to yellow when you mouse over it. Rotation is not adjustable for point lights.
- A light’s direction (if applicable) is indicated by a white “Hotspot” area. - Tip: to duplicate an existing light, Alt + drag the Position anchor point to a new location. This may be buggy.
PROPERTIES AND LIGHTS PANELS This area lists settings for the currently selected light in the Image Canvas area.
- Adjust the selected light’s settings in the Properties panel. - Click to select a light in the Lights panel - Click the trash can at the bottom right to remove the selected light.
CHAPTER III: CREATING THE PHYSICAL TERRAIN
PART 1: CREATE AN OVERALL MAP SHAPE In this section, we’ll create the overall shape of the land versus water areas of the map.
0. IMPORTANT REMINDERS: a. This tutorial is keyboard shortcut heavy. If things don’t seem to be working, there’s probably a text or
dropdown box selected. Hit the Esc key a few times (I do 2, for good measure) to clear it up. b. Make Photoshop your active window! Oh, and make sure Photoshop is open. Good luck, and have fun!
1. Create a New Document --- Ctrl + N a. Tip: Don’t forget to apply a Sub-step’s settings to close the dialog box before moving on to the next Step. b. Name: Name your map! c. Width: 2000 pixels d. Height: 2000 pixels e. Resolution: 300 pixels/inch f. Background Contents: White
2. Set colors to default - Tools panel -> Foreground Color: Black, Background Color: White --- D 3. Create a new layer and name it “Ocean” (layer “Background”) --- Ctrl + Shift + N
a. Name: Ocean 4. Render Clouds filter (layer “Ocean”) --- Filter -> Render -> Clouds 5. Duplicate layer and name it “Shape Land” (layer “Ocean”) --- Ctrl + Alt + J
a. Tip: We see the New Layer dialog box, because we are using the “New Layer via copy” command. 6. Create a new layer with default settings. (layer “Shape Land”) --- Ctrl + Alt + Shift + N 7. Fill (layer “Layer 1”) --- Shift + Backspace
a. Use: 50% Gray 8. Set layer Blending Mode to “Hard Mix” (layer “Layer 1”) --- Layers panel
a. Note: After setting the Blending Mode, the drop down box might still be highlighted. Press Enter or Esc to clear that selection. If you don’t, shortcut keys won’t properly work.
b. Tip: The Blending Mode dropdown box is located in the top left corner of the Layers panel. It is set to “Normal” by default. Near it are the layer Opacity and Fill settings, which are referred to in later Steps.
9. Select layer “Shape Land” --- Layers panel -> click layer thumbnail or name area 10. Select the Brush tool --- B (-> Shift + B if needed)
a. Tip: B selects the most recently used of four different tools: “Brush”, “Pencil”, “Color Replacement”, and “Mixer Brush”. Shift + B cycles between them, and the tool icon changes in the Tools panel.
b. Control panel -> Flow: 10% c. Image Canvas -> right click --- Enter (twice if needed) closes pop-up brush palette
i. Size: 300 px --- adjust as needed ii. Hardness: 0%
iii. Tip: Enter (twice if needed) closes pop-up brush palette. 11. Shape the land areas (layer “Shape Land”) – Image Canvas
a. Tip: Alt + scroll mouse wheel to zoom in or out. b. Tip: Hold spacebar to temporarily switch to Hand tool, then drag to adjust the Image Canvas position. c. Tip: You can also use the zoom tool to zoom in and out --- Z d. Draw with black to create water, white for land. --- Image Canvas
e. Tip: X swaps background and foreground colors. f. Stop whenever you’re happy with your overall land / water layout.
12. Select layer “Layer 1” --- Layers panel -> click layer thumbnail or name area 13. Merge Down layer “Layer 1” into layer “Shape Land” --- Ctrl + E 14. Double Check: Default Colors: --- D 15. Select Color Range (layer “Shape Land”) --- Alt -> S -> C
a. Select: Sampled Colors b. Localized Color Clusters: Unchecked c. Fuzziness: 1
16. Delete Selected -> delete selected again (layer “Shape Land”) --- Delete -> Delete a. Note: This may seem odd, but the first Delete actually leaves a tiny bit of transparent pixel data. The
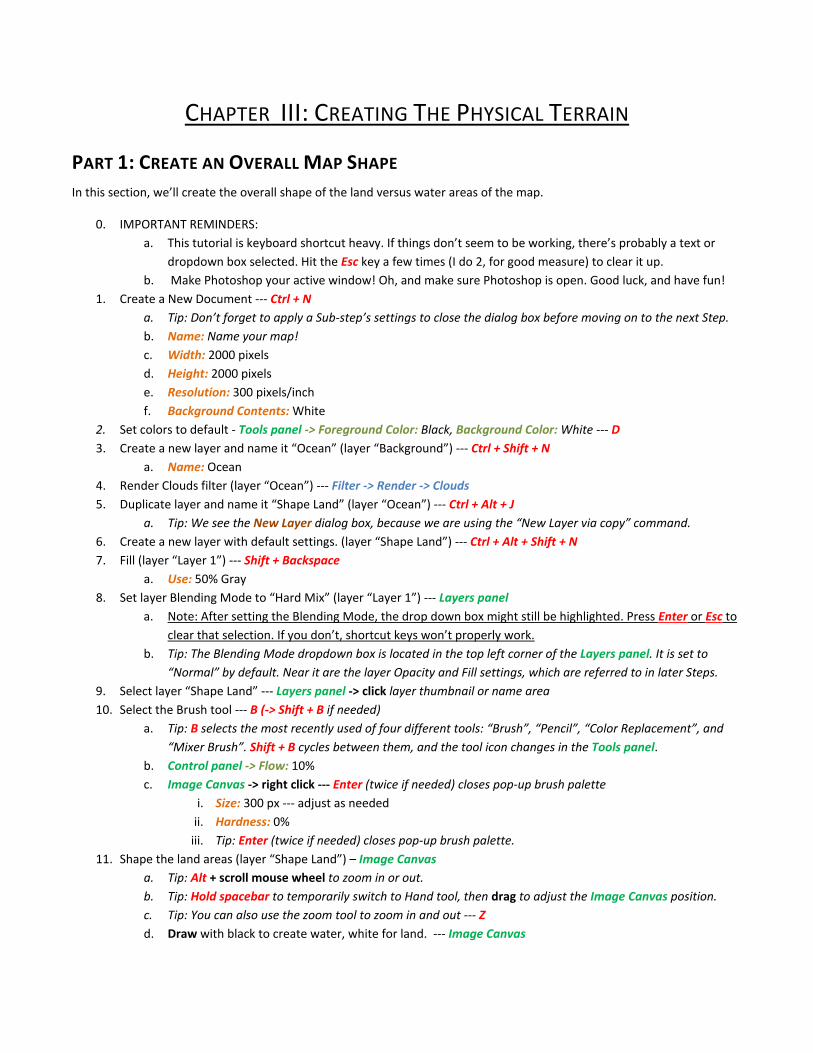
second one finishes the job. In CS6, this seems to be resolved. 17. Deselect --- Ctrl + D 18. Before finalizing the land shape, either leave the edges as is (18-a) or smooth them (18-b). Do either part 18-a or
18-b of this Step but not both.
a. Continue with no land shape edge smoothing:
i. Rename layer “Shape Land” to “Base” --- Layers panel -> double click layer name b. Smooth the land shape edges:
i. Create a new layer and name it “Base” (layer “Shape Land”) --- Ctrl + Shift + N ii. Hide layer “Shape Land” --- Layers panel -> click “eye” icon left of layer thumbnail
iii. Create a selection from layer “Shape Land” --- Layers panel -> Ctrl + click layer thumbnail iv. Smooth Selection --- Alt -> S -> M -> S
1. Sample Radius: 1 v. Double Check: Default Colors --- D
vi. Fill with Background Color (White) --- Ctrl + Backspace vii. Deselect --- Ctrl + D viii. Optional: Try a different amount of smoothing.
1. Step Backward 3 times --- Ctrl + Alt + Z 3 times to Step 18-b-iii completed. 2. Repeat Sub-steps 18-b-iv to 18-b-vii using a different Sample Radius for 18-b-iv-1.
ix. Select layer “Shape Land” --- Layers panel x. Delete layer (layer “Shape Land”) --- Delete
PART 2: THE OCEAN Here we’ll make the ocean look more like an ocean, and we’ll add shelving around the land borders. In Ascension’s original tutorial, this section was done after setting up the land terrain. It was moved earlier in this version mainly because I liked seeing the blue ocean while working on the land, and it was a bit easier to do this while there are still only a few layers to manage.
19. Double Check: You should have 3 layers from top to bottom. --- Layers panel a. Base b. Ocean c. Background
20. Hide layer “Base” --- Layers panel -> click “eye” icon left of layer thumbnail 21. Select layer “Ocean” --- Layers panel 22. Duplicate layer and name it “Land” (layer “Ocean”) --- Ctrl + Alt + J 23. Hide layer “Land” and select layer “Ocean” --- Layers panel 24. Add a Color Overlay layer style (layer “Ocean”) --- Alt -> L -> Y -> V
a. Tip: Alternative to shortcut keys, Layers panel -> double click the layer thumbnail or name area will also open the Layer Style dialog box. See Chapter II, Part 3 for more information.
b. Color: Light Blue with some Gray and Green: #6EA0C8 (RGB 110, 160, 200) i. Note: click the color sample box right of the Blend Mode drop down box to bring up the Color
Picker dialog box c. Opacity: 75% --- if you like less texture, increase the Opacity
GO TO THE NEXT PAGE
25. Lighting Effects filter (layer “Ocean”) --- Filter -> Render -> Lighting Effects Click here for Step 25 for CS5.1
a. Note: This lighting effect uses five lights with identical size and settings. Only their positions differ. b. Adjust the settings and size for the first light (the one in the center position). Then, in Step 25-n, you will
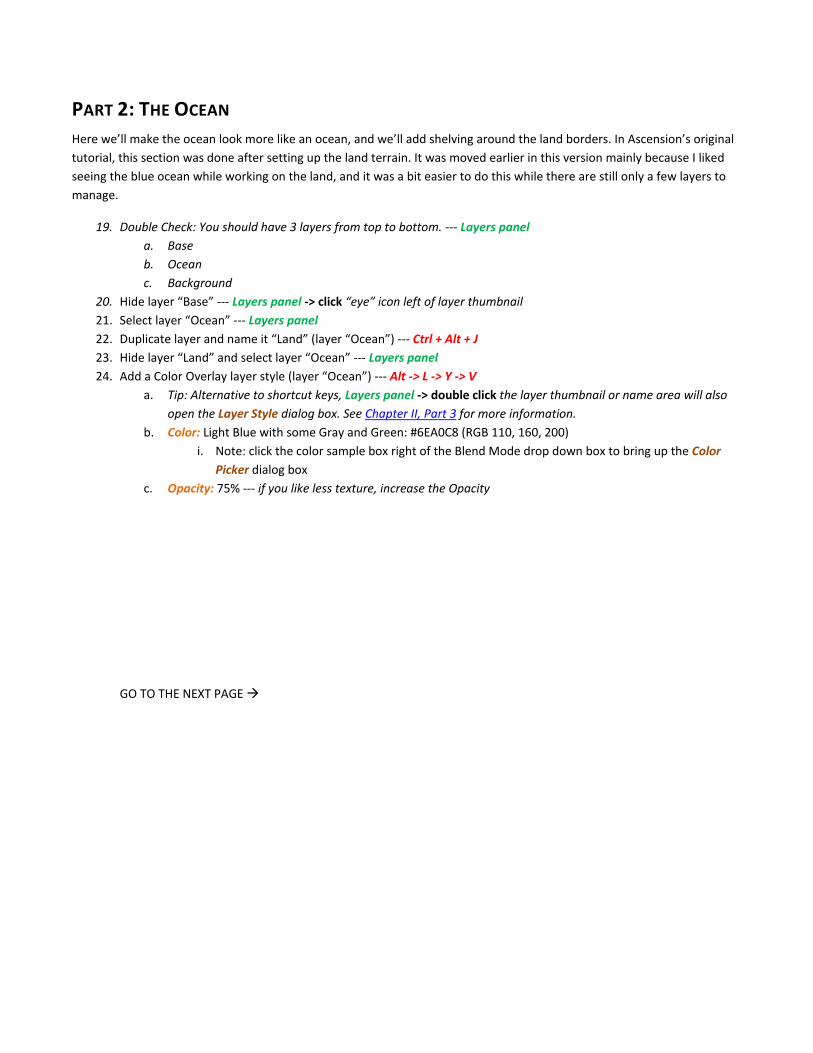
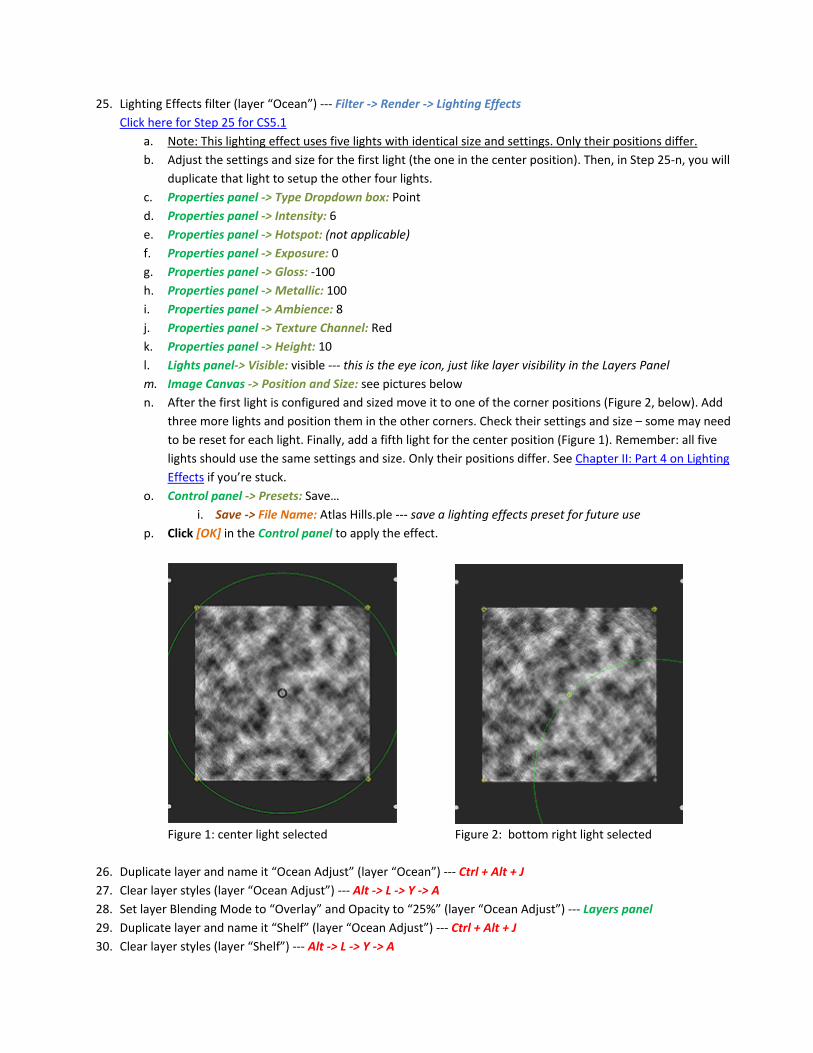
duplicate that light to setup the other four lights. c. Properties panel -> Type Dropdown box: Point d. Properties panel -> Intensity: 6 e. Properties panel -> Hotspot: (not applicable) f. Properties panel -> Exposure: 0 g. Properties panel -> Gloss: -100 h. Properties panel -> Metallic: 100 i. Properties panel -> Ambience: 8 j. Properties panel -> Texture Channel: Red k. Properties panel -> Height: 10 l. Lights panel-> Visible: visible --- this is the eye icon, just like layer visibility in the Layers Panel m. Image Canvas -> Position and Size: see pictures below n. After the first light is configured and sized move it to one of the corner positions (Figure 2, below). Add
three more lights and position them in the other corners. Check their settings and size – some may need to be reset for each light. Finally, add a fifth light for the center position (Figure 1). Remember: all five lights should use the same settings and size. Only their positions differ. See Chapter II: Part 4 on Lighting Effects if you’re stuck.
o. Control panel -> Presets: Save… i. Save -> File Name: Atlas Hills.ple --- save a lighting effects preset for future use
p. Click [OK] in the Control panel to apply the effect.
Figure 1: center light selected Figure 2: bottom right light selected
26. Duplicate layer and name it “Ocean Adjust” (layer “Ocean”) --- Ctrl + Alt + J 27. Clear layer styles (layer “Ocean Adjust”) --- Alt -> L -> Y -> A 28. Set layer Blending Mode to “Overlay” and Opacity to “25%” (layer “Ocean Adjust”) --- Layers panel 29. Duplicate layer and name it “Shelf” (layer “Ocean Adjust”) --- Ctrl + Alt + J 30. Clear layer styles (layer “Shelf”) --- Alt -> L -> Y -> A

31. Create a new layer with default settings. (layer “Shelf”) --- Ctrl + Alt + Shift + N 32. Create a selection from layer “Base” --- Layers panel -> Ctrl + click layer thumbnail 33. Expand Selection --- Alt -> S -> M -> E
a. Expand By: 20 34. Feather Selection --- Alt -> S -> M -> F
a. Feather Radius: 20 35. Select Inverse --- Ctrl + Shift + I 36. Fill with Foreground Color (Black) (layer “Layer 1”) --- Alt + Backspace 37. Deselect -> Merge Down (layer “Layer 1”) --- Ctrl + D -> Ctrl + E 38. Select Color Range (layer “Shelf”) --- Alt -> S -> C
a. Select: Sampled Colors b. Fuzziness: 150
39. Delete Selected -> Deselect (layer “Shelf”) --- Delete -> Ctrl + D 40. Set layer Fill to “0%” (layer “Shelf”) --- Layers panel 41. Add a Color Overlay layer style (layer “Shelf”) --- Alt -> L -> Y -> V
a. Blend Mode: Overlay b. Color: White: #FFFFFF (RGB 255, 255, 255) c. Opacity: 25%
42. Add a Bevel and Emboss layer style (layer “Shelf”) --- Alt -> L -> Y -> B a. Style: Outer Bevel b. Technique: Chisel Soft c. Depth: 20% d. Size: 32 e. Angle: -30 f. Highlight Mode: Linear Dodge (Add) g. (Highlight) Opacity: 33% h. Shadow Mode: Linear Burn i. (Shadow) Opacity: 33%
43. Add a Contour layer style (layer “Shelf”) --- Layer Style -> Contour a. Tip: Layers panel -> double click the layer thumbnail or name area to open the Layer Style dialog box. See
Chapter II, Part 3 for more information.
b. Note: This is NOT Layer Style -> Bevel and Emboss -> Gloss Contour, found in the options screen for Bevel and Emboss. Contour is its own sub-section in the Left Column Area of the Layer Style dialog box (see picture) and has its own options screen like other layer styles.
c. Contour: Contour Editor (Custom) --- click the contour shape thumbnail i. click the diagonal line on the grid to add points
ii. Point 1 Input: 25 iii. Point 1: Output 2 iv. Point 2 Input: 95 v. Point 2 Output: 85
vi. click [New…] -> Name: Atlas Shelf --- save a contour preset for future use
d. Ascension’s notes on Contour vs. Contour Gloss: Gloss contour affects how the highlight and shadow colors interact with underlying colors so that high points on the gloss contour are hit with the highlight color and low points on the gloss contour are hit with the shadow color. Bevel contour is what the actual bevel profile looks like (sort of like using a router on a piece of wood). This is the side profile of what the bevel looks like and this diagonal line [the default setting] is ideal for doing a carved stone look ala Roman chiseled text on a statue or façade. It is not, however, ideal for our continental shelf so we have to modify it [see settings above]. What we want is something that curves up to the right rather than going straight. That slope looks pretty steep, but that is why we set the depth of the bevel (in the previous step) at 20%. Think of it as someone stepping on the slope and squashing it flat. You could set the depth at something higher but that only increases the darkness of the shadow and brightness of the highlight and it doesn’t transition smoothly. If we were to use the soften option on the chisel soft bevel (in the previous step), that only blurs everything and we want it sharp so by defining a contour and then lowering the depth we keep the ridges crisp but it also transitions smoothly from seafloor to shelf.
44. Select layers “Shelf”, “Ocean Adjust”, and “Ocean” --- Layers panel -> Ctrl + click layer name area of each layer to add it to your selected layers. Don’t click the layer thumbnail. That will create a Selection.
45. Group Layers --- Layers panel -> Ctrl + G 46. Rename group “Group 1” to “Ocean Group” --- Layers panel –> double click group name
PART 3: TERRAIN Now that the ocean is setup, let’s add some terrain on our land. In this section, we’ll create the mountains and hills.
47. Unhide and select layer “Land” --- Layers panel 48. Duplicate layer and name it “Hills” (layer “Land”) --- Ctrl + Alt + J 49. Difference Clouds filter (layer “Hills”) --- Filter -> Render -> Difference Clouds 50. Repeat Last Filter (Difference Clouds) (layer “Hills”) --- Ctrl + F 51. Duplicate the layer and name it “Mountains” (layer “Hills”) --- Ctrl + Alt + J 52. Hide layer “Mountains” and select layer “Hills” --- Layers panel 53. Add Noise filter (layer “Hills”) --- Filter -> Noise -> Add Noise…
a. Amount: 5% b. Distribution: Gaussian c. Monochromatic: checked
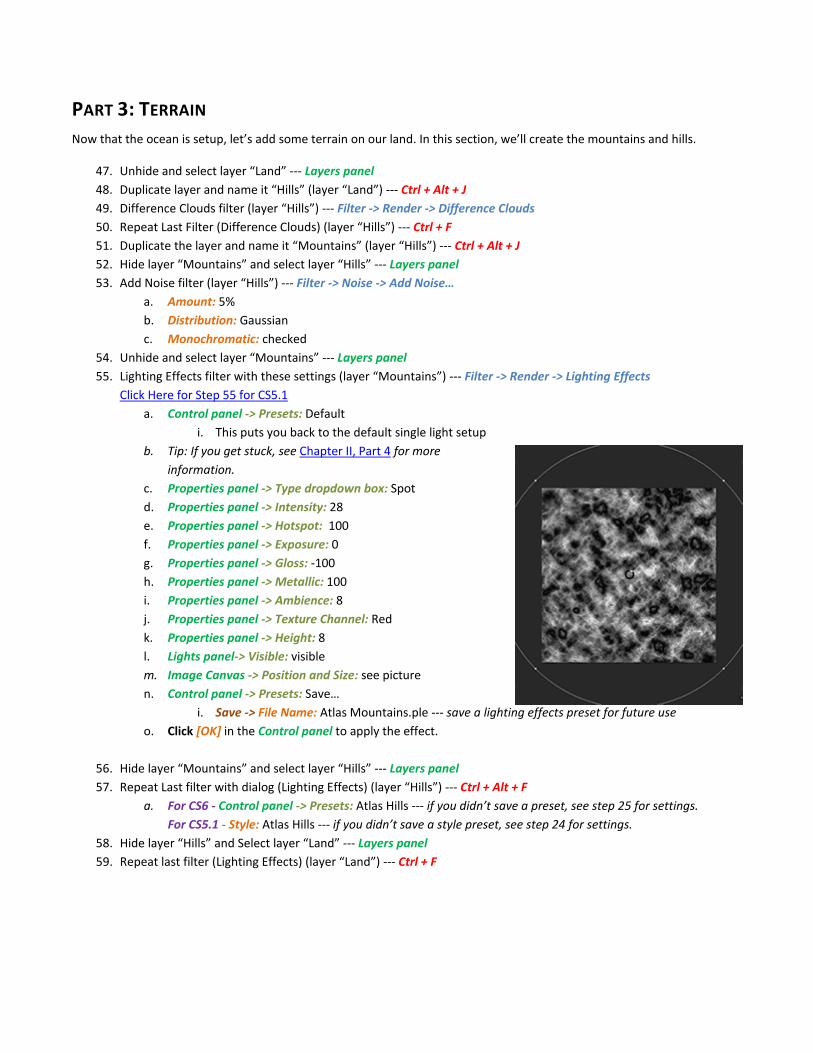
54. Unhide and select layer “Mountains” --- Layers panel 55. Lighting Effects filter with these settings (layer “Mountains”) --- Filter -> Render -> Lighting Effects
Click Here for Step 55 for CS5.1 a. Control panel -> Presets: Default
i. This puts you back to the default single light setup b. Tip: If you get stuck, see Chapter II, Part 4 for more
information. c. Properties panel -> Type dropdown box: Spot d. Properties panel -> Intensity: 28 e. Properties panel -> Hotspot: 100 f. Properties panel -> Exposure: 0 g. Properties panel -> Gloss: -100 h. Properties panel -> Metallic: 100 i. Properties panel -> Ambience: 8 j. Properties panel -> Texture Channel: Red k. Properties panel -> Height: 8 l. Lights panel-> Visible: visible m. Image Canvas -> Position and Size: see picture n. Control panel -> Presets: Save…
i. Save -> File Name: Atlas Mountains.ple --- save a lighting effects preset for future use o. Click [OK] in the Control panel to apply the effect.
56. Hide layer “Mountains” and select layer “Hills” --- Layers panel 57. Repeat Last filter with dialog (Lighting Effects) (layer “Hills”) --- Ctrl + Alt + F
a. For CS6 - Control panel -> Presets: Atlas Hills --- if you didn’t save a preset, see step 25 for settings. For CS5.1 - Style: Atlas Hills --- if you didn’t save a style preset, see step 24 for settings.
58. Hide layer “Hills” and Select layer “Land” --- Layers panel 59. Repeat last filter (Lighting Effects) (layer “Land”) --- Ctrl + F
PART 4: OVERALL COLOR Next, we’ll add the overall color effects to our terrain elements as well as a basic flow of climate flow from arctic to desert. This section also includes the main stylistic difference from this tutorial and Ascension’s original. Two extra layers of mountains have been added for an optional “rough” mountains look. This may also be good for closer view maps where you would see more detail in the mountains.
60. Double Check: Review your layer setup to make sure everything is ordered properly --- Layers panel a. Expand group “Ocean Group” to see the layers inside it --- Layers panel -> click the triangle left of the
group folder icon. b. Your layers should be ordered like this. If they’re not, drag a layer by its thumbnail or name area to change
its order in the layer stack: i. Base (Hidden)
ii. Mountains (Hidden) iii. Hills (Hidden) iv. Land v. Ocean Group
1. Shelf 2. Ocean Adjust 3. Ocean
vi. Background 61. Double Check: layer “Land” is selected. Collapse group “Ocean Group”. --- Layers panel 62. Create a selection from layer “Base” --- Layers panel -> Ctrl + click layer thumbnail 63. Invert Selection -> Delete Selected -> Deselect (layer “Land”)--- Ctrl + Shift + I -> Delete -> Ctrl + D 64. Add an Outer Glow layer style (layer “Land”) --- Alt -> L -> Y -> O
a. Blend Mode: Screen b. Opacity: 25% c. Color: Solid - Light Blue: #40C8FF (RGB 64, 200, 255) d. Size: 11
65. Add a Gradient Fill Layer and name it “Land Gradient” (layer “Land”) --- Alt -> L -> W -> G a. Note: This is NOT a layer style. Don’t add a Gradient Overlay layer style. This is a Gradient Fill Layer. b. New Layer dialog box
i. Name: Land Gradient ii. Mode: Normal
iii. Opacity: 100% iv. Click [OK] to confirm settings and progress to Step 65-c
c. Gradient Fill dialog box i. Gradient: Gradient Editor (Custom) --- click the sample gradient bar
1. Gradient Type: Solid 2. Note: You will setup five Color Stops. First, you will edit the two existing Color Stops.
Then, you will create three new Color Stops. 3. Tip: In the Gradient Editor -> Gradient Type: Solid section, Opacity Stops are displayed
above the Gradient Preview bar. Color Stops are displayed below it. 4. Double Check: Both Opacity Stops -> Opacity: 100%
a. Tip: Click a Stop to edit it.
5. Leftmost Color Stop -> Color: White - #FFFFFF (RGB 255, 255, 255); Location: 5% a. Tip: Click the solid colored box to load the Color Picker
6. Rightmost Color Stop -> Color: Papyrus - #F0E6BE (RGB 240, 230, 190); Location: 100% 7. Add 3rd Color Stop -> Color: Dark Olive Green - #405018 (RGB 64, 80, 24); Location: 35%
a. Tip: Click an empty area left or right of an existing Stop to create a new one. (Above the Gradient Preview bar for Opacity Stops, below it for Color Stops.)
8. Add 4th Color Stop -> Color: Dark Olive Green - #405018 (RGB 64, 80, 24); Location: 60% 9. Add 5th Color Stop -> Color: Dark Flesh - #DAC094 (RGB 218, 192, 148); Location: 85% 10. Name: Atlas Gradient 11. Click [New] --- save a gradient preset for future use
ii. Reverse: click to check or uncheck so the gradient runs north to south (White to Papyrus) 66. Add a Color Overlay layer style (layer “Land Gradient”) --- Alt -> L -> Y -> V
a. Note: Use this overlay to lighten the gradient if it seems too dark. b. Blend Mode: Soft Light c. Color: White: #FFFFFF (RGB 255, 255, 255) d. Opacity: 25% (or adjust to preference)
67. Group Layers (layer “Land Gradient”) --- Ctrl + G 68. Rename group “Group 1” to “Gradient Group” --- Layers panel -> double click group name 69. Create a selection from layer “Base” --- Layers panel -> Ctrl + click layer thumbnail 70. Add a Reveal Selection layer mask (group “Gradient Group”) --- Alt -> L -> M -> V
a. Tip: Don’t worry too much about the blend of white to green to tan areas. We’ll adjust all that later. 71. Set group Blending Mode to “Hard Light” (group “Gradient Group”) --- Layers panel 72. Collapse group “Gradient Group” --- Layers panel -> click the triangle left of the group folder icon 73. Select group “Gradient Group” and layer “Land” --- Layers panel -> Ctrl + click layer name area of each layer to
select. Don’t click the layer thumbnail. That will create a Selection. 74. Group Layers --- Layers panel -> Ctrl + G 75. Rename group “Group 1” to “Land Group” --- Layers panel 76. Double Check: Default Colors --- D 77. Select group “Ocean Group” --- Layers panel 78. Add a Solid Fill Layer with default name (group “Ocean Group”) --- Alt -> L -> W -> O
a. New Layer dialog box i. Name: Color Fill 1
ii. Color: None iii. Click [OK] to confirm settings and progress to Step 78-b
b. Color Picker (Solid Color) dialog box i. Black - #000000 (RGB 0, 0, 0)
79. Unhide and select layer “Mountains” --- Layers panel 80. Select Color Range (layer “Mountains”) --- Alt -> S -> C
a. Select: Sampled Colors b. Fuzziness: 200
81. Delete Selected (layer “Mountains”) --- Delete 82. Select All --- Ctrl + A 83. Border Selection --- Alt -> S -> M -> B
a. Width: 60 84. Feather Selection --- Alt -> S -> M -> F
a. Feather Radius: 25
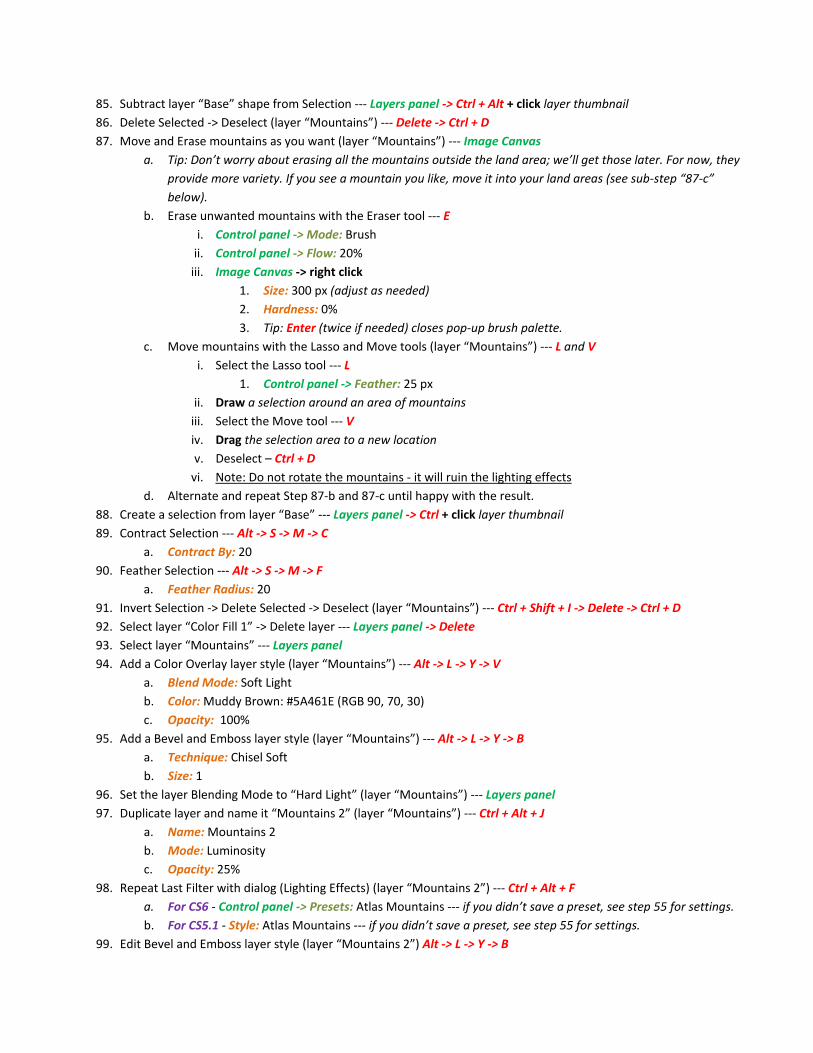
85. Subtract layer “Base” shape from Selection --- Layers panel -> Ctrl + Alt + click layer thumbnail 86. Delete Selected -> Deselect (layer “Mountains”) --- Delete -> Ctrl + D 87. Move and Erase mountains as you want (layer “Mountains”) --- Image Canvas
a. Tip: Don’t worry about erasing all the mountains outside the land area; we’ll get those later. For now, they provide more variety. If you see a mountain you like, move it into your land areas (see sub-step “87-c” below).
b. Erase unwanted mountains with the Eraser tool --- E i. Control panel -> Mode: Brush
ii. Control panel -> Flow: 20% iii. Image Canvas -> right click
1. Size: 300 px (adjust as needed) 2. Hardness: 0% 3. Tip: Enter (twice if needed) closes pop-up brush palette.
c. Move mountains with the Lasso and Move tools (layer “Mountains”) --- L and V i. Select the Lasso tool --- L
1. Control panel -> Feather: 25 px ii. Draw a selection around an area of mountains
iii. Select the Move tool --- V iv. Drag the selection area to a new location v. Deselect – Ctrl + D
vi. Note: Do not rotate the mountains - it will ruin the lighting effects d. Alternate and repeat Step 87-b and 87-c until happy with the result.
88. Create a selection from layer “Base” --- Layers panel -> Ctrl + click layer thumbnail 89. Contract Selection --- Alt -> S -> M -> C
a. Contract By: 20 90. Feather Selection --- Alt -> S -> M -> F
a. Feather Radius: 20 91. Invert Selection -> Delete Selected -> Deselect (layer “Mountains”) --- Ctrl + Shift + I -> Delete -> Ctrl + D 92. Select layer “Color Fill 1” -> Delete layer --- Layers panel -> Delete 93. Select layer “Mountains” --- Layers panel 94. Add a Color Overlay layer style (layer “Mountains”) --- Alt -> L -> Y -> V
a. Blend Mode: Soft Light b. Color: Muddy Brown: #5A461E (RGB 90, 70, 30) c. Opacity: 100%
95. Add a Bevel and Emboss layer style (layer “Mountains”) --- Alt -> L -> Y -> B a. Technique: Chisel Soft b. Size: 1
96. Set the layer Blending Mode to “Hard Light” (layer “Mountains”) --- Layers panel 97. Duplicate layer and name it “Mountains 2” (layer “Mountains”) --- Ctrl + Alt + J
a. Name: Mountains 2 b. Mode: Luminosity c. Opacity: 25%
98. Repeat Last Filter with dialog (Lighting Effects) (layer “Mountains 2”) --- Ctrl + Alt + F a. For CS6 - Control panel -> Presets: Atlas Mountains --- if you didn’t save a preset, see step 55 for settings. b. For CS5.1 - Style: Atlas Mountains --- if you didn’t save a preset, see step 55 for settings.
99. Edit Bevel and Emboss layer style (layer “Mountains 2”) Alt -> L -> Y -> B
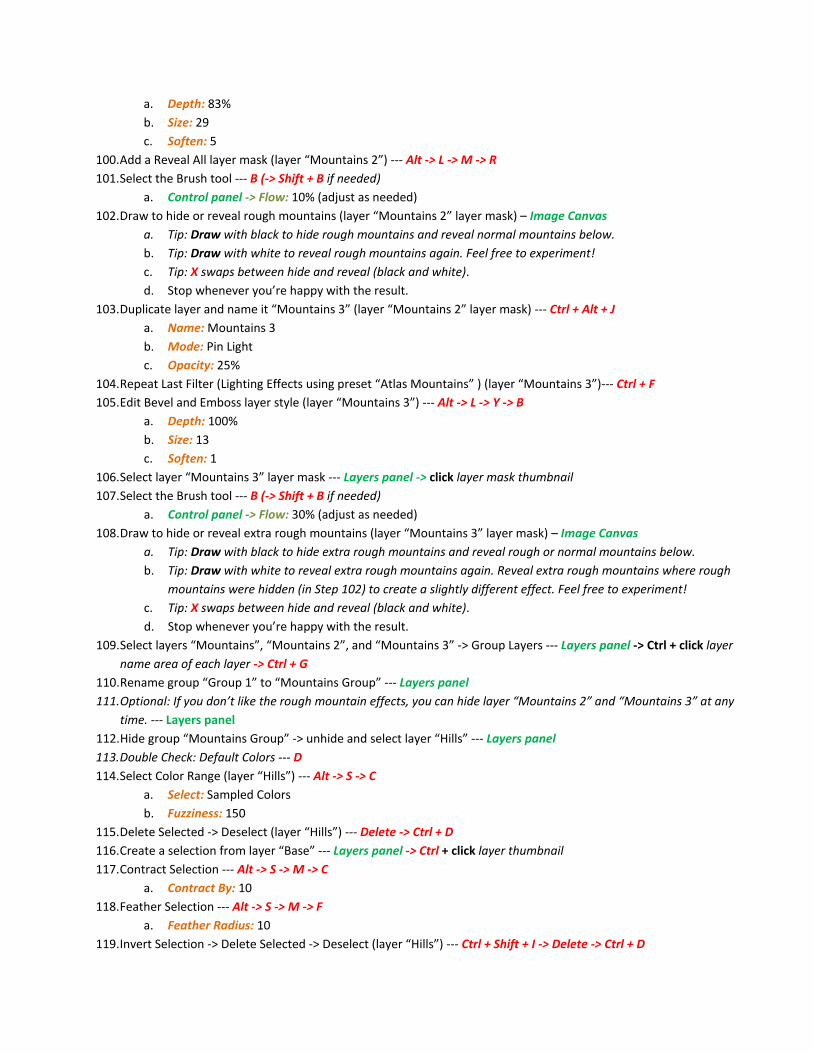
a. Depth: 83% b. Size: 29 c. Soften: 5
100. Add a Reveal All layer mask (layer “Mountains 2”) --- Alt -> L -> M -> R 101. Select the Brush tool --- B (-> Shift + B if needed)
a. Control panel -> Flow: 10% (adjust as needed) 102. Draw to hide or reveal rough mountains (layer “Mountains 2” layer mask) – Image Canvas
a. Tip: Draw with black to hide rough mountains and reveal normal mountains below. b. Tip: Draw with white to reveal rough mountains again. Feel free to experiment! c. Tip: X swaps between hide and reveal (black and white). d. Stop whenever you’re happy with the result.
103. Duplicate layer and name it “Mountains 3” (layer “Mountains 2” layer mask) --- Ctrl + Alt + J a. Name: Mountains 3 b. Mode: Pin Light c. Opacity: 25%
104. Repeat Last Filter (Lighting Effects using preset “Atlas Mountains” ) (layer “Mountains 3”)--- Ctrl + F 105. Edit Bevel and Emboss layer style (layer “Mountains 3”) --- Alt -> L -> Y -> B
a. Depth: 100% b. Size: 13 c. Soften: 1
106. Select layer “Mountains 3” layer mask --- Layers panel -> click layer mask thumbnail 107. Select the Brush tool --- B (-> Shift + B if needed)
a. Control panel -> Flow: 30% (adjust as needed) 108. Draw to hide or reveal extra rough mountains (layer “Mountains 3” layer mask) – Image Canvas
a. Tip: Draw with black to hide extra rough mountains and reveal rough or normal mountains below. b. Tip: Draw with white to reveal extra rough mountains again. Reveal extra rough mountains where rough
mountains were hidden (in Step 102) to create a slightly different effect. Feel free to experiment! c. Tip: X swaps between hide and reveal (black and white). d. Stop whenever you’re happy with the result.
109. Select layers “Mountains”, “Mountains 2”, and “Mountains 3” -> Group Layers --- Layers panel -> Ctrl + click layer name area of each layer -> Ctrl + G
110. Rename group “Group 1” to “Mountains Group” --- Layers panel 111. Optional: If you don’t like the rough mountain effects, you can hide layer “Mountains 2” and “Mountains 3” at any
time. --- Layers panel 112. Hide group “Mountains Group” -> unhide and select layer “Hills” --- Layers panel 113. Double Check: Default Colors --- D 114. Select Color Range (layer “Hills”) --- Alt -> S -> C
a. Select: Sampled Colors b. Fuzziness: 150
115. Delete Selected -> Deselect (layer “Hills”) --- Delete -> Ctrl + D 116. Create a selection from layer “Base” --- Layers panel -> Ctrl + click layer thumbnail 117. Contract Selection --- Alt -> S -> M -> C
a. Contract By: 10 118. Feather Selection --- Alt -> S -> M -> F
a. Feather Radius: 10 119. Invert Selection -> Delete Selected -> Deselect (layer “Hills”) --- Ctrl + Shift + I -> Delete -> Ctrl + D
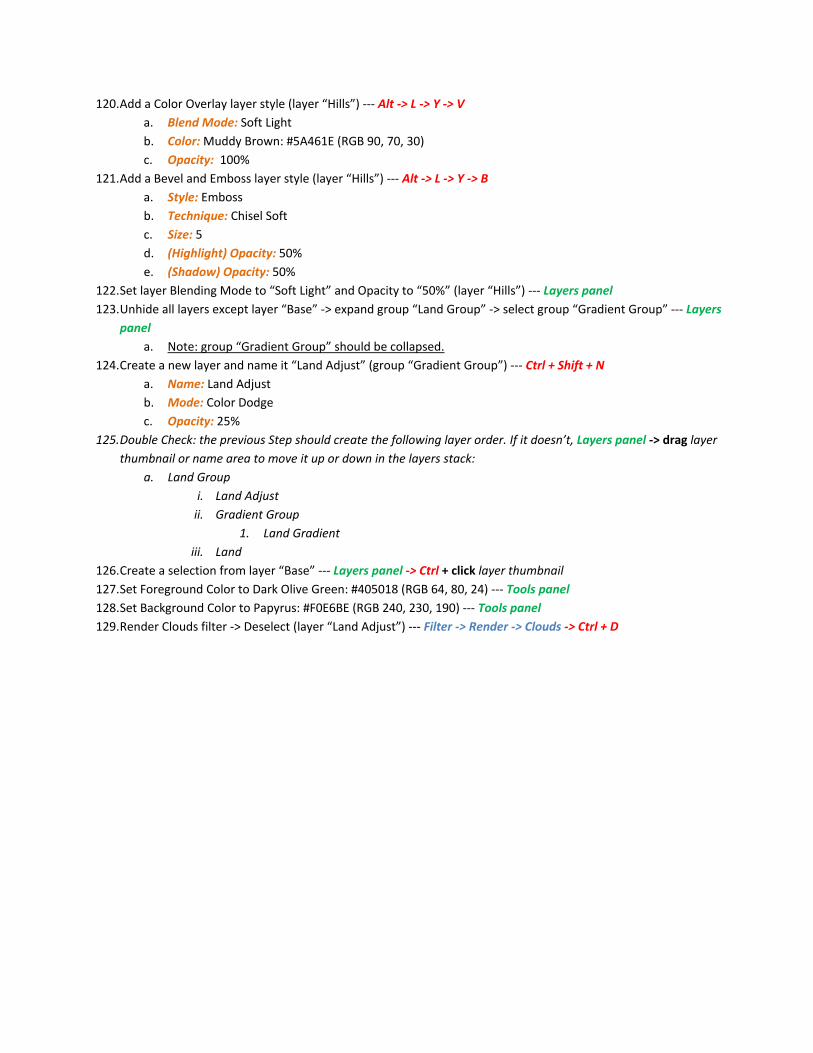
120. Add a Color Overlay layer style (layer “Hills”) --- Alt -> L -> Y -> V a. Blend Mode: Soft Light b. Color: Muddy Brown: #5A461E (RGB 90, 70, 30) c. Opacity: 100%
121. Add a Bevel and Emboss layer style (layer “Hills”) --- Alt -> L -> Y -> B a. Style: Emboss b. Technique: Chisel Soft c. Size: 5 d. (Highlight) Opacity: 50% e. (Shadow) Opacity: 50%
122. Set layer Blending Mode to “Soft Light” and Opacity to “50%” (layer “Hills”) --- Layers panel 123. Unhide all layers except layer “Base” -> expand group “Land Group” -> select group “Gradient Group” --- Layers
panel a. Note: group “Gradient Group” should be collapsed.
124. Create a new layer and name it “Land Adjust” (group “Gradient Group”) --- Ctrl + Shift + N a. Name: Land Adjust b. Mode: Color Dodge c. Opacity: 25%
125. Double Check: the previous Step should create the following layer order. If it doesn’t, Layers panel -> drag layer thumbnail or name area to move it up or down in the layers stack:
a. Land Group i. Land Adjust
ii. Gradient Group 1. Land Gradient
iii. Land 126. Create a selection from layer “Base” --- Layers panel -> Ctrl + click layer thumbnail 127. Set Foreground Color to Dark Olive Green: #405018 (RGB 64, 80, 24) --- Tools panel 128. Set Background Color to Papyrus: #F0E6BE (RGB 240, 230, 190) --- Tools panel 129. Render Clouds filter -> Deselect (layer “Land Adjust”) --- Filter -> Render -> Clouds -> Ctrl + D
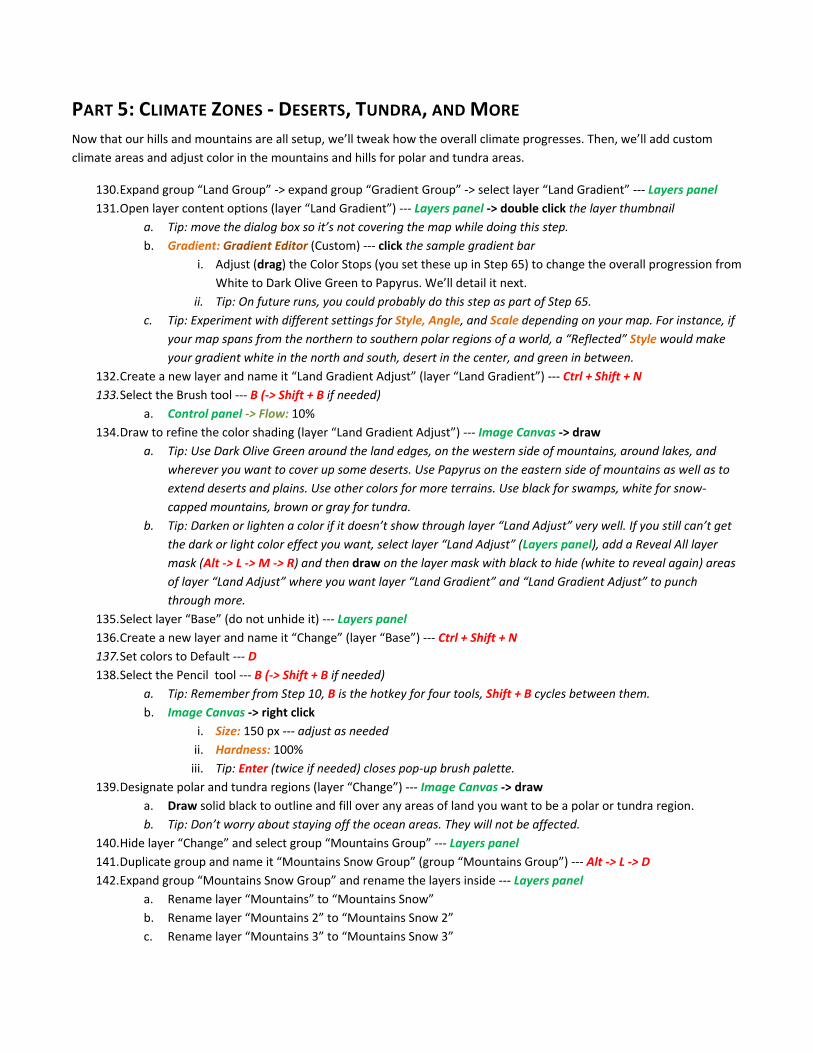
PART 5: CLIMATE ZONES - DESERTS, TUNDRA, AND MORE Now that our hills and mountains are all setup, we’ll tweak how the overall climate progresses. Then, we’ll add custom climate areas and adjust color in the mountains and hills for polar and tundra areas.
130. Expand group “Land Group” -> expand group “Gradient Group” -> select layer “Land Gradient” --- Layers panel 131. Open layer content options (layer “Land Gradient”) --- Layers panel -> double click the layer thumbnail
a. Tip: move the dialog box so it’s not covering the map while doing this step. b. Gradient: Gradient Editor (Custom) --- click the sample gradient bar
i. Adjust (drag) the Color Stops (you set these up in Step 65) to change the overall progression from White to Dark Olive Green to Papyrus. We’ll detail it next.
ii. Tip: On future runs, you could probably do this step as part of Step 65. c. Tip: Experiment with different settings for Style, Angle, and Scale depending on your map. For instance, if
your map spans from the northern to southern polar regions of a world, a “Reflected” Style would make your gradient white in the north and south, desert in the center, and green in between.
132. Create a new layer and name it “Land Gradient Adjust” (layer “Land Gradient”) --- Ctrl + Shift + N 133. Select the Brush tool --- B (-> Shift + B if needed)
a. Control panel -> Flow: 10% 134. Draw to refine the color shading (layer “Land Gradient Adjust”) --- Image Canvas -> draw
a. Tip: Use Dark Olive Green around the land edges, on the western side of mountains, around lakes, and wherever you want to cover up some deserts. Use Papyrus on the eastern side of mountains as well as to extend deserts and plains. Use other colors for more terrains. Use black for swamps, white for snow-capped mountains, brown or gray for tundra.
b. Tip: Darken or lighten a color if it doesn’t show through layer “Land Adjust” very well. If you still can’t get the dark or light color effect you want, select layer “Land Adjust” (Layers panel), add a Reveal All layer mask (Alt -> L -> M -> R) and then draw on the layer mask with black to hide (white to reveal again) areas of layer “Land Adjust” where you want layer “Land Gradient” and “Land Gradient Adjust” to punch through more.
135. Select layer “Base” (do not unhide it) --- Layers panel 136. Create a new layer and name it “Change” (layer “Base”) --- Ctrl + Shift + N 137. Set colors to Default --- D 138. Select the Pencil tool --- B (-> Shift + B if needed)
a. Tip: Remember from Step 10, B is the hotkey for four tools, Shift + B cycles between them. b. Image Canvas -> right click
i. Size: 150 px --- adjust as needed ii. Hardness: 100%
iii. Tip: Enter (twice if needed) closes pop-up brush palette. 139. Designate polar and tundra regions (layer “Change”) --- Image Canvas -> draw
a. Draw solid black to outline and fill over any areas of land you want to be a polar or tundra region. b. Tip: Don’t worry about staying off the ocean areas. They will not be affected.
140. Hide layer “Change” and select group “Mountains Group” --- Layers panel 141. Duplicate group and name it “Mountains Snow Group” (group “Mountains Group”) --- Alt -> L -> D 142. Expand group “Mountains Snow Group” and rename the layers inside --- Layers panel
a. Rename layer “Mountains” to “Mountains Snow” b. Rename layer “Mountains 2” to “Mountains Snow 2” c. Rename layer “Mountains 3” to “Mountains Snow 3”
143. Select layer “Hills” --- Layers panel 144. Duplicate layer and name it “Hills Snow” (layer “Hills”) --- Ctrl + Alt + J 145. Select layer “Hills” --- Layers panel 146. Create a selection from layer “Change” --- Layers panel -> Ctrl + click layer thumbnail 147. Expand Selection --- Alt -> S -> M -> E
a. Expand By: 20 148. Feather Selection --- Alt -> S -> M -> F
a. Feather Radius: 20 149. Delete Selected (layer “Hills”) --- Delete 150. Select layer “Hills Snow” -> --- Layers panel 151. Invert Selection -> Delete Selected (layer “Hills Snow”) --- Ctrl + Shift + I -> Delete 152. Select group “Mountains Group” --- Layers panel 153. Add a Reveal Selection layer mask (group “Mountains Group”) --- Alt -> L -> M -> V 154. Select group “Mountains Snow Group” --- Layers panel 155. Reselect --- Ctrl + Shift + D 156. Add a Hide Selection layer mask (group “Mountains Snow Group”) --- Alt -> L -> M -> D 157. Select layer “Change” -> Delete layer (layer “Change”) --- Layers panel -> Delete 158. Select layer “Mountains Snow” --- Layers panel 159. Edit Color Overlay layer style (layer “Mountains Snow”) --- Alt -> L -> Y -> V
a. Color: Gray: #505050 (RGB 80, 80, 80) --- try experimenting with some additional blue 160. Copy layer “Mountains Snow” Color Overlay layer style to layers “Mountains Snow 2”, “Mountains Snow 3”, and
“Hills Snow” --- Layers panel a. Double Check: Reveal layer “Mountains Snow” Layer Effects --- Layers panel -> click triangle at right edge
of the layer if the effects are not already revealed. b. Copy the Color Overlay effect to the other layers. --- Layers panel -> Alt + drag “Color Overlay” from layer
“Mountains Snow” effects to destination layers. c. Note: Each layer may only have one Color Overlay layer style. This Step will replace the existing Color
Overlays.
PART 6: TWEAK THE SHELVING For the most part, the terrain is complete. Sometimes the shelving doesn’t always come out from the land properly, which makes it look wrong. This little section includes steps to tweak that.
161. Expand group “Ocean Group” and select layer “Shelf” --- Layers panel 162. Zoom in close to your land edges --- Alt + scroll mouse wheel to zoom in or out. 163. Select the Brush tool --- B
a. Flow: 10% b. Image Canvas -> right click
i. Size: 10 px ii. Hardness: 100%
iii. Tip: Enter (twice if needed) closes pop-up brush palette. 164. Look for areas where the ocean shelf doesn’t extend out from under the land. Draw starting from just inside the
land edge toward the sea until the shelf pops up, sort of like you are “pushing” the shelf out from under the land. Don’t go overboard. It’s easy to go too far and make the shelving look too smooth. The goal is to tweak just so it doesn’t look like the land is hanging over the shelf. (layer “Shelf”) --- Image Canvas
a. Tip: You can add some variations to large flat areas of shelving with the Eraser (E), Mode: Brush, Flow: 10%, Size: 10px, Hardness: 0%. Use it sparingly.
PART 7: ADD RIVERS For our final physical feature, let’s create some rivers!
165. Double Check: Collapse any expanded groups and layer effects to tidy up. 166. Set colors to default --- D 167. Select group “Mountains Snow Group” --- Layers panel 168. Create a new layer and name it “Layout” (group “Mountains Snow Group”) --- Ctrl + Shift + N
a. Name: Layout b. Opacity: 25% --- adjust this while working if it is hard to see
169. Double Check: the previous Step should create the following layer order. If it doesn’t, Layers panel -> drag layer thumbnail or name area to move it up or down in the layers stack:
a. Base (hidden) b. Layout c. Mountains Snow Group
i. Mountains Snow 3 170. Select the Pencil Tool --- B (OR Shift + B if needed)
a. Image Canvas -> right click i. Size: 18 px --- large enough to see when zoomed out
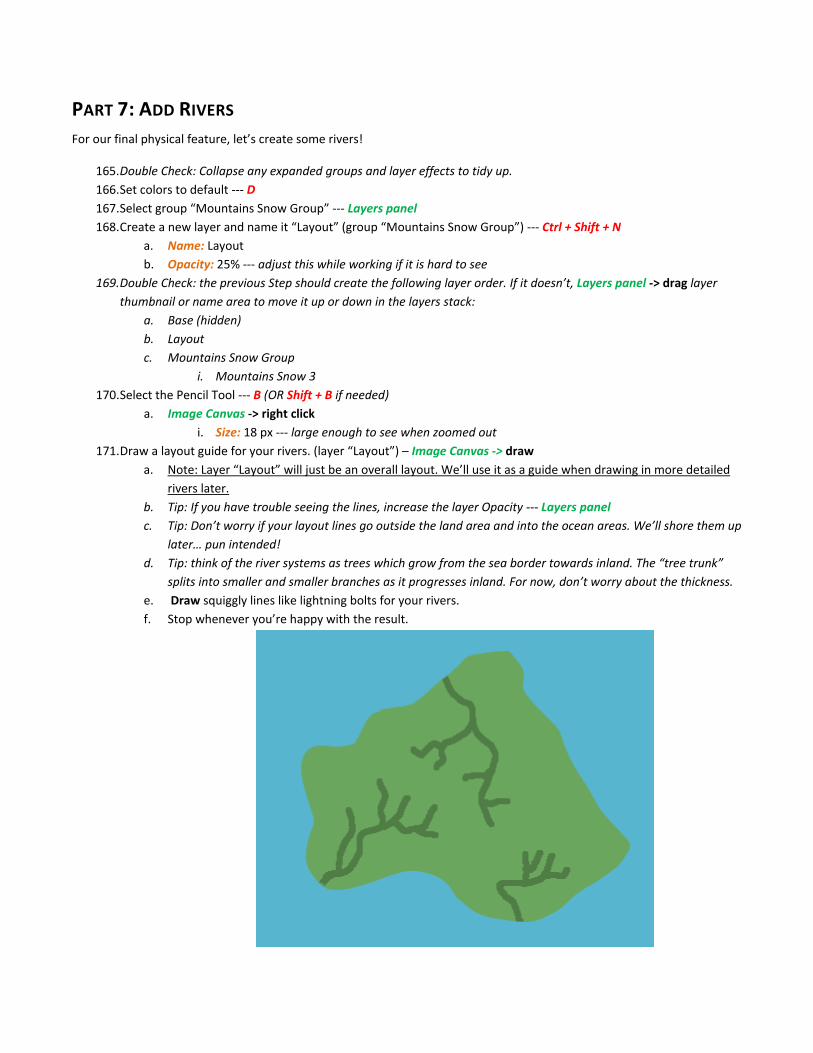
171. Draw a layout guide for your rivers. (layer “Layout”) – Image Canvas -> draw a. Note: Layer “Layout” will just be an overall layout. We’ll use it as a guide when drawing in more detailed
rivers later. b. Tip: If you have trouble seeing the lines, increase the layer Opacity --- Layers panel c. Tip: Don’t worry if your layout lines go outside the land area and into the ocean areas. We’ll shore them up
later… pun intended! d. Tip: think of the river systems as trees which grow from the sea border towards inland. The “tree trunk”
splits into smaller and smaller branches as it progresses inland. For now, don’t worry about the thickness. e. Draw squiggly lines like lightning bolts for your rivers. f. Stop whenever you’re happy with the result.
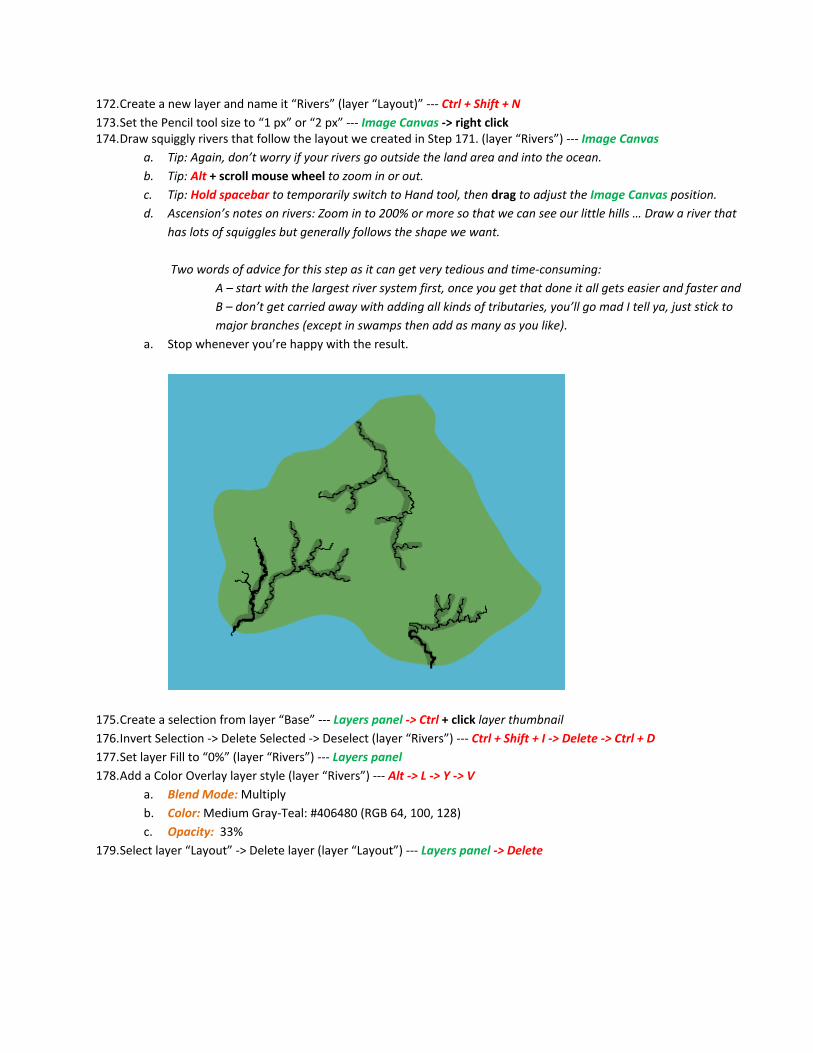
172. Create a new layer and name it “Rivers” (layer “Layout)” --- Ctrl + Shift + N 173. Set the Pencil tool size to “1 px” or “2 px” --- Image Canvas -> right click 174. Draw squiggly rivers that follow the layout we created in Step 171. (layer “Rivers”) --- Image Canvas
a. Tip: Again, don’t worry if your rivers go outside the land area and into the ocean. b. Tip: Alt + scroll mouse wheel to zoom in or out. c. Tip: Hold spacebar to temporarily switch to Hand tool, then drag to adjust the Image Canvas position. d. Ascension’s notes on rivers: Zoom in to 200% or more so that we can see our little hills … Draw a river that
has lots of squiggles but generally follows the shape we want. Two words of advice for this step as it can get very tedious and time-consuming:
A – start with the largest river system first, once you get that done it all gets easier and faster and B – don’t get carried away with adding all kinds of tributaries, you’ll go mad I tell ya, just stick to major branches (except in swamps then add as many as you like).
a. Stop whenever you’re happy with the result.
175. Create a selection from layer “Base” --- Layers panel -> Ctrl + click layer thumbnail 176. Invert Selection -> Delete Selected -> Deselect (layer “Rivers”) --- Ctrl + Shift + I -> Delete -> Ctrl + D 177. Set layer Fill to “0%” (layer “Rivers”) --- Layers panel 178. Add a Color Overlay layer style (layer “Rivers”) --- Alt -> L -> Y -> V
a. Blend Mode: Multiply b. Color: Medium Gray-Teal: #406480 (RGB 64, 100, 128) c. Opacity: 33%
179. Select layer “Layout” -> Delete layer (layer “Layout”) --- Layers panel -> Delete
CHAPTER IV: ADDING MAP FEATURES The physical terrain is complete; the rest of the tutorial covers adding map features like longitude and latitude grid lines, and borders for countries.
PART 1: LONGITUDE AND LATITUDE GRID First up, let’s add a nice grid for longitude and latitude.
180. Create a New Document --- Ctrl + N a. Tip: The Width and Height attributes determine the size of our grid. If you’d like a different sized grid, just
change their values. b. Width: 200 pixels c. Height: 200 pixels d. Background Contents: Transparent
181. Note: Steps 182 – 189 take place in the newly created document. 182. Select All --- Ctrl + A 183. Select the Rectangular Marquee tool --- M 184. Move the Selection down and right one pixel --- Down arrow (once) -> Right arrow (once) 185. Invert Selection --- Ctrl + Shift -> I 186. Double Check: Default Colors --- D 187. Fill with Foreground Color (Black) -> Deselect --- Alt + Backspace -> Ctrl + D 188. Define Pattern --- Edit -> Define Pattern
a. Note: If you used a different width and height in Step 176, use those numbers instead (e.g. Name: 250 x 200 px grid)
b. Name: 200 x 200 px grid 189. Close the document without saving it. Make sure you don’t close your main map! --- Ctrl + W 190. Double Check: You should be back in your main map document. Layer “Rivers” should be selected. 191. Create a new layer and name it “Lat/Long Lines” (layer “Rivers”) --- Ctrl + Shift + N
a. Name: Lat/Long Lines b. Mode: Overlay c. Opacity: 35%
i. Tip: Adjust this setting to your own preference. 192. Fill (layer “Lat/Long Lines”) --- Shift + Backspace
a. Use: Pattern b. Custom Pattern: 200 x 200 px grid --- click to expand the selection box
i. Tip: the pattern should be located in the bottom right corner of the selection box (i.e. the last one in the list). It may look transparent. Make sure it’s the right one by holding the mouse still over the thumbnail until the tooltip appears with the name.
193. Double Check: Default Colors --- D 194. Expand group “Land Group” and select layer “Land” -> Add a Stroke layer style (layer “Land”) --- Alt -> L -> Y -> K
a. Ascension’s Note: this [gradient choice] allows the stroke to be seen around the green land and doesn’t overpower the snow and sand.
b. Size: 1 px c. Fill Type: Gradient d. Gradient: Gradient Editor (Custom) --- click the sample gradient bar
i. Gradient Type: Solid ii. Double Check: Both Opacity Stops -> Opacity: 100% iii. Leftmost Color Stop -> Color: Gray - #A0A0A0 (RGB 160, 160, 160); Location: 0% iv. Rightmost Color Stop -> Color: Black - #000000 (RGB 0, 0, 0); Location: 100%
e. Reverse: Checked f. Style: Reflected g. Angle: 90 degrees
PART 2: COUNTRIES Now let’s add countries! We will follow a similar method to the river layout in Chapter III, Part 6.
195. Double Check: Collapse any expanded groups and layer effects to tidy up. 196. Double Check: Default Colors --- D 197. Select layer “Rivers” --- Layers panel 198. Create a new layer and name it “Layout” (layer “Rivers”) --- Ctrl + Shift + N
a. Name: Layout b. Opacity: 25% --- adjust this while working if it is hard to see
199. Select the Pencil Tool --- B (OR Shift + B if needed) a. Image Canvas -> right click
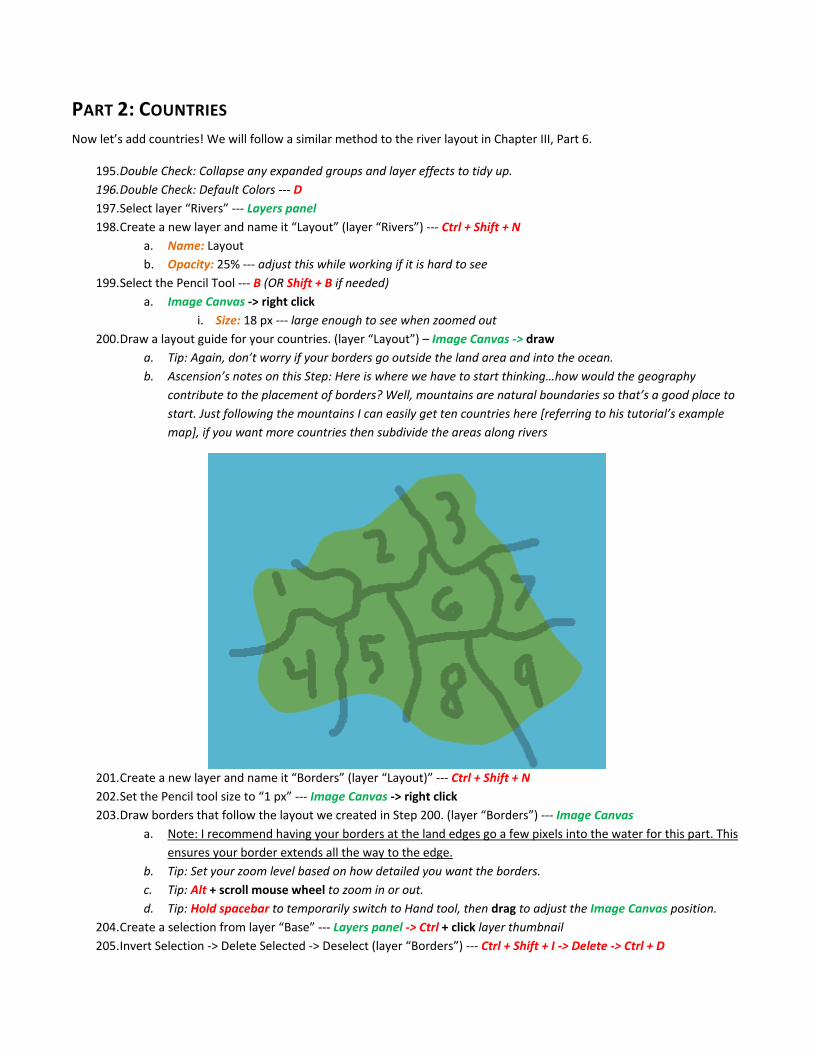
i. Size: 18 px --- large enough to see when zoomed out 200. Draw a layout guide for your countries. (layer “Layout”) – Image Canvas -> draw
a. Tip: Again, don’t worry if your borders go outside the land area and into the ocean. b. Ascension’s notes on this Step: Here is where we have to start thinking…how would the geography
contribute to the placement of borders? Well, mountains are natural boundaries so that’s a good place to start. Just following the mountains I can easily get ten countries here [referring to his tutorial’s example map], if you want more countries then subdivide the areas along rivers
201. Create a new layer and name it “Borders” (layer “Layout)” --- Ctrl + Shift + N 202. Set the Pencil tool size to “1 px” --- Image Canvas -> right click 203. Draw borders that follow the layout we created in Step 200. (layer “Borders”) --- Image Canvas
a. Note: I recommend having your borders at the land edges go a few pixels into the water for this part. This ensures your border extends all the way to the edge.
b. Tip: Set your zoom level based on how detailed you want the borders. c. Tip: Alt + scroll mouse wheel to zoom in or out. d. Tip: Hold spacebar to temporarily switch to Hand tool, then drag to adjust the Image Canvas position.
204. Create a selection from layer “Base” --- Layers panel -> Ctrl + click layer thumbnail 205. Invert Selection -> Delete Selected -> Deselect (layer “Borders”) --- Ctrl + Shift + I -> Delete -> Ctrl + D
206. Select layer “Layout” -> Delete layer (layer “Layout”) --- Delete 207. Select layer “Base” -> Duplicate layer and name it “Country 1” (layer “Base”) --- Layers panel -> Ctrl + Alt + J 208. Unhide layer “Country 1” and move it beneath layer “Borders” --- Layers panel 209. Hide layer “Borders” and Double Check: layer “Country 1” is selected --- Layers panel 210. Create a selection from layer “Borders” --- Layers panel -> Ctrl + click layer thumbnail 211. Delete Selected -> Deselect (layer “Country 1”) --- Delete -> Ctrl + D 212. Make sure the borders work.
a. Select the Magic Wand tool --- W i. Tolerance: 0%
ii. Contiguous: Checked b. Click inside each country’s border. If the Selection that loads is not the same as the border you expected,
there may be a gap in the lines you drew on layer “Borders”. Unhide layer “Borders” and go back and close any gaps and then continue the tutorial from Step 209.
c. When you’re finished, Deselect --- Ctrl + D 213. Add an Inner Glow layer style (layer “Country 1”) --- Layers panel -> Alt -> L -> Y -> W
a. Blend Mode: Overlay b. Opacity: 25% c. Color: Solid - Red: #FF0000 (RGB 255, 0, 0) d. Size: 16 px
214. Duplicate layer and name it “Country 2” (layer “Country 1”) --- Ctrl + Alt + J 215. Repeat Step 214 to create a layer for each country you have until you have a layer for each country. (i.e. “Country
1”, “Country 2”, “Country 3”, “Country 4”, etc.). a. Tip: If you already know the names of all your countries, you can go ahead and name each layer one of the
names. At the moment, all the layers are all the same, so it doesn’t matter which is named which. Just keep in mind that the tutorial will keep calling these the “Country ##” layers.
216. Hide all the “Country ##” layers except layer “Country 1” --- Layers panel 217. Select layer “Country 1” -> select the Magic Wand tool --- Layers panel -> W
a. Tolerance: 0 b. Contiguous: Checked
218. Create a Selection of the country shape boundary--- Image Canvas -> click inside the country’s border a. Note: This should select the shape area of the country. b. Note: If you set custom country names, select the country that corresponds to the layer’s name. c. Tip: If you want an island off the coast to be included with this country, shift + click inside it to add it to the
selection. d. Tip: To quickly select many small islands, switch to the Lasso tool (L -> Feather: 0px,
Anti-alias: Unchecked) -> shift + draw a selection around the islands to add any land in that area to your current selection. It’s okay to include empty areas of ocean in the selection. Don’t forget to go back to the Magic Wand tool (W) when finished!
219. Invert Selection -> Delete Selected -> Deselect (layer “Country 1”) --- Ctrl + Shift + I -> Delete -> Ctrl + D 220. Unhide the next “Country ##” layer and select it. Repeat Steps 218 – 219 for each country.
a. Note: Do this for each “Country ##” layer until all your countries are isolated on their layers. b. Tip: If it helps you organize, hide each “Country ##” layer after you finish isolating it in Step 218 - 219. You
can always toggle it hidden and unhidden to check your progress.
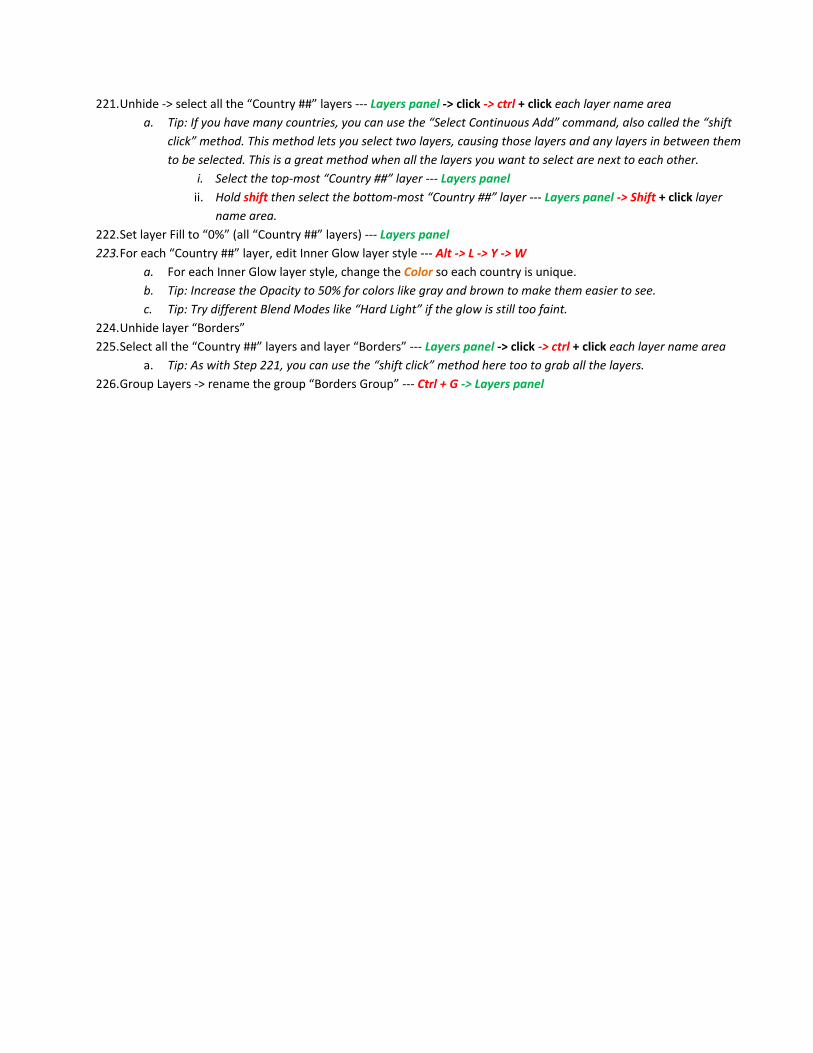
221. Unhide -> select all the “Country ##” layers --- Layers panel -> click -> ctrl + click each layer name area a. Tip: If you have many countries, you can use the “Select Continuous Add” command, also called the “shift
click” method. This method lets you select two layers, causing those layers and any layers in between them to be selected. This is a great method when all the layers you want to select are next to each other.
i. Select the top-most “Country ##” layer --- Layers panel ii. Hold shift then select the bottom-most “Country ##” layer --- Layers panel -> Shift + click layer
name area. 222. Set layer Fill to “0%” (all “Country ##” layers) --- Layers panel 223. For each “Country ##” layer, edit Inner Glow layer style --- Alt -> L -> Y -> W
a. For each Inner Glow layer style, change the Color so each country is unique. b. Tip: Increase the Opacity to 50% for colors like gray and brown to make them easier to see. c. Tip: Try different Blend Modes like “Hard Light” if the glow is still too faint.
224. Unhide layer “Borders” 225. Select all the “Country ##” layers and layer “Borders” --- Layers panel -> click -> ctrl + click each layer name area
a. Tip: As with Step 221, you can use the “shift click” method here too to grab all the layers. 226. Group Layers -> rename the group “Borders Group” --- Ctrl + G -> Layers panel
CHAPTER V: AND THE REST… This concludes the main tutorial section of this revision. This tutorial was mainly created for the terrain styling section, but Ascension’s tutorial has some additional information.
Ascension’s tutorial continues with placing titles and icons for bodies of water, countries, capital cities, towns, villages, etc. If you want to hop over to the original to continue on where I left off, start at Step 61 (Page 23). You can find the original version here: http://www.cartographersguild.com/content.php?116-Ascensions-atlas-style-in-Photoshop.
There’s also other good general information in Ascension’s tutorial I didn’t copy over because I wanted to streamline the steps so you could repeat this tutorial quickly by focusing more on the keyboard shortcut listed in each step.
I do want to mention a couple ideas about titling and layer organization for that section, though.
1. When making the city dots, use a different layer for each type of dot. Thus, you will have a layer for “Villages”, “Capitals”, “Towns”, etc.
2. When you create a text style, setup your first text layer’s style before you copy it, like we did with the Inner Glow layer style for the country borders (Step 213). That way, you copy it with the styles already applied.
3. After you’ve done that, Alt + drag the text layer on the Image Canvas to duplicate the layer at another location. You can quickly prep many names of a similar style this way (e.g. all your country names).
4. After you’ve done all that, double click each text layer thumbnail (not the text layer name) in the Layers panel to edit its type on the Image Canvas. Press Numpad Enter when done. The layer name will automatically be updated to what you just typed.
5. When you have all the text layers of a certain type done (e.g. town titles), select them all as well as their corresponding city dots layer (e.g. layer “Towns”) in the Layers panel and group them (Ctrl + G).
a. For Countries, instead of the dots layer, you have group “Countries Group” with all the borders. Create a group with just the titles named “Country Titles Group”. Then, group those two groups together into “Countries Group”.
6. Put all these groups into one group called “Political Group”. That way, you can easily hide / unhide an entire level of dots and titles with one click, or you can hide / unhide all the political info with one click.
On the next page is how I laid out my layers based on the notes listed above.
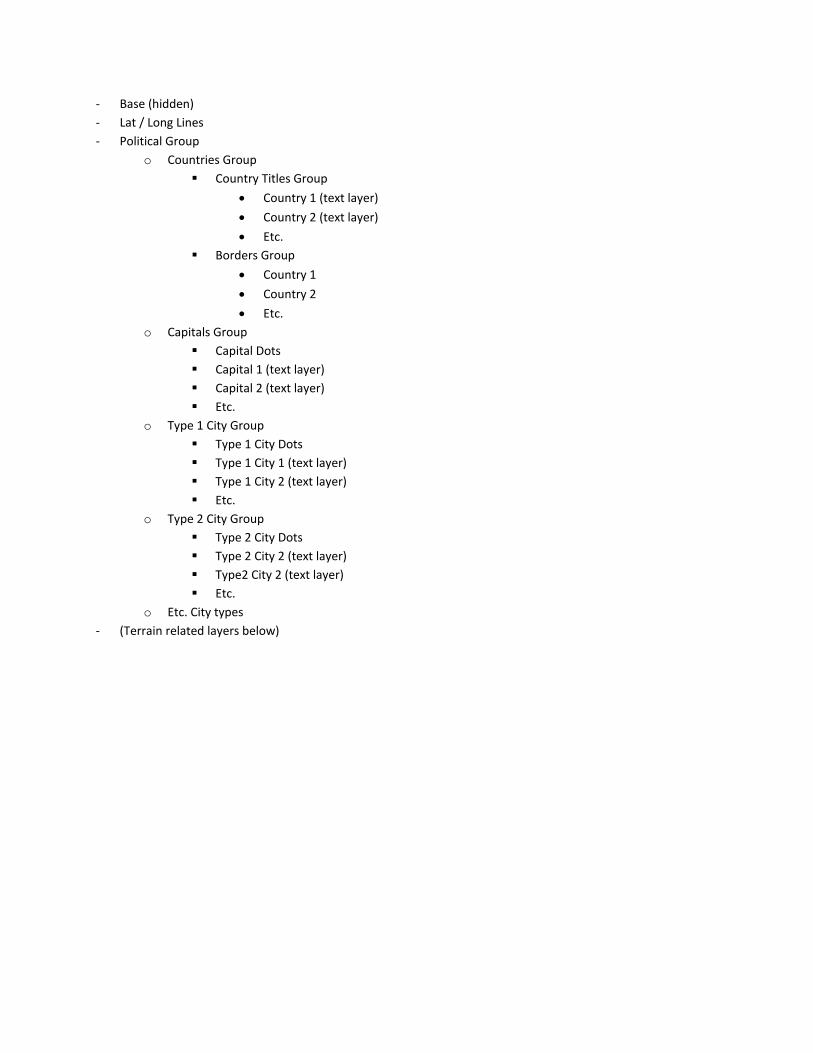
- Base (hidden) - Lat / Long Lines - Political Group
o Countries Group Country Titles Group
• Country 1 (text layer) • Country 2 (text layer) • Etc.
Borders Group • Country 1 • Country 2 • Etc.
o Capitals Group Capital Dots Capital 1 (text layer) Capital 2 (text layer) Etc.
o Type 1 City Group Type 1 City Dots Type 1 City 1 (text layer) Type 1 City 2 (text layer) Etc.
o Type 2 City Group Type 2 City Dots Type 2 City 2 (text layer) Type2 City 2 (text layer) Etc.
o Etc. City types - (Terrain related layers below)
APPENDIX: SPECIAL NOTES FOR CS 5.1 This section lists instructions where they are vastly different from the CS 6 version. Usually if it works for CS 5.1, it will work for a few earlier versions as well
Each section has a link back to the corresponding section in the main tutorial so you can quickly jump here and back while going through the tutorial.
The main differences are when applying the Lighting Effects filter.
GO TO THE NEXT PAGE
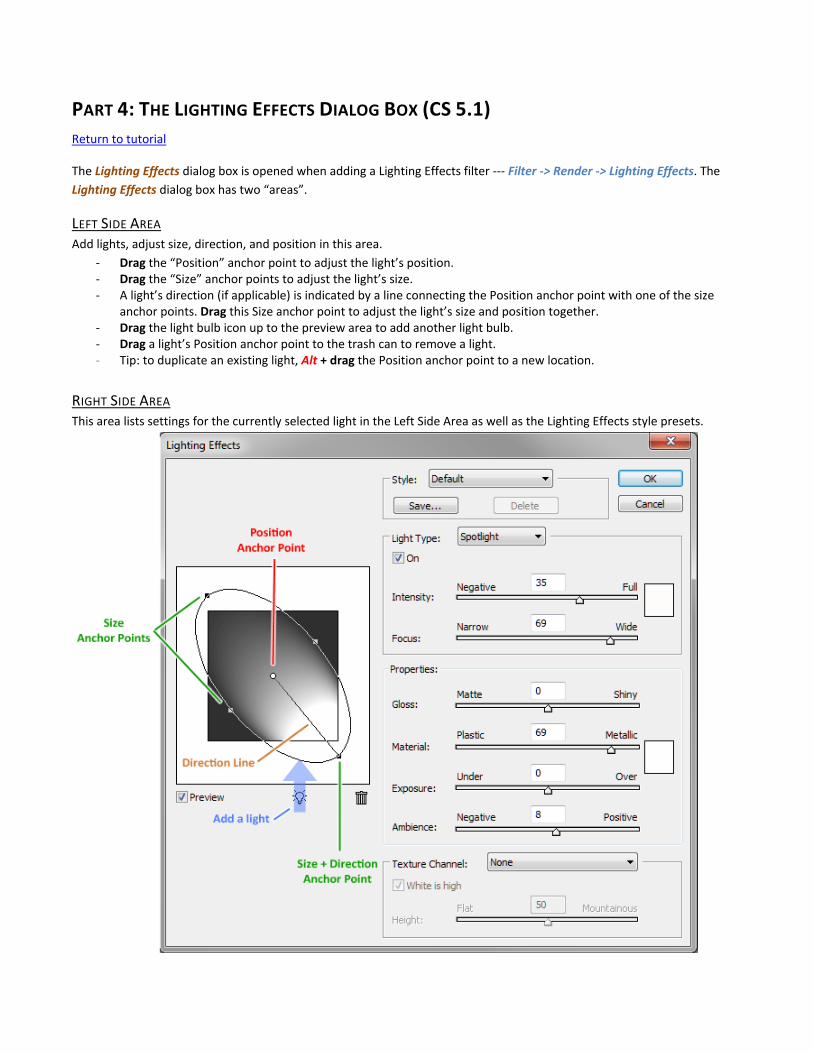
PART 4: THE LIGHTING EFFECTS DIALOG BOX (CS 5.1) Return to tutorial
The Lighting Effects dialog box is opened when adding a Lighting Effects filter --- Filter -> Render -> Lighting Effects. The Lighting Effects dialog box has two “areas”.
LEFT SIDE AREA Add lights, adjust size, direction, and position in this area.
- Drag the “Position” anchor point to adjust the light’s position. - Drag the “Size” anchor points to adjust the light’s size. - A light’s direction (if applicable) is indicated by a line connecting the Position anchor point with one of the size
anchor points. Drag this Size anchor point to adjust the light’s size and position together. - Drag the light bulb icon up to the preview area to add another light bulb. - Drag a light’s Position anchor point to the trash can to remove a light. - Tip: to duplicate an existing light, Alt + drag the Position anchor point to a new location.
RIGHT SIDE AREA This area lists settings for the currently selected light in the Left Side Area as well as the Lighting Effects style presets.
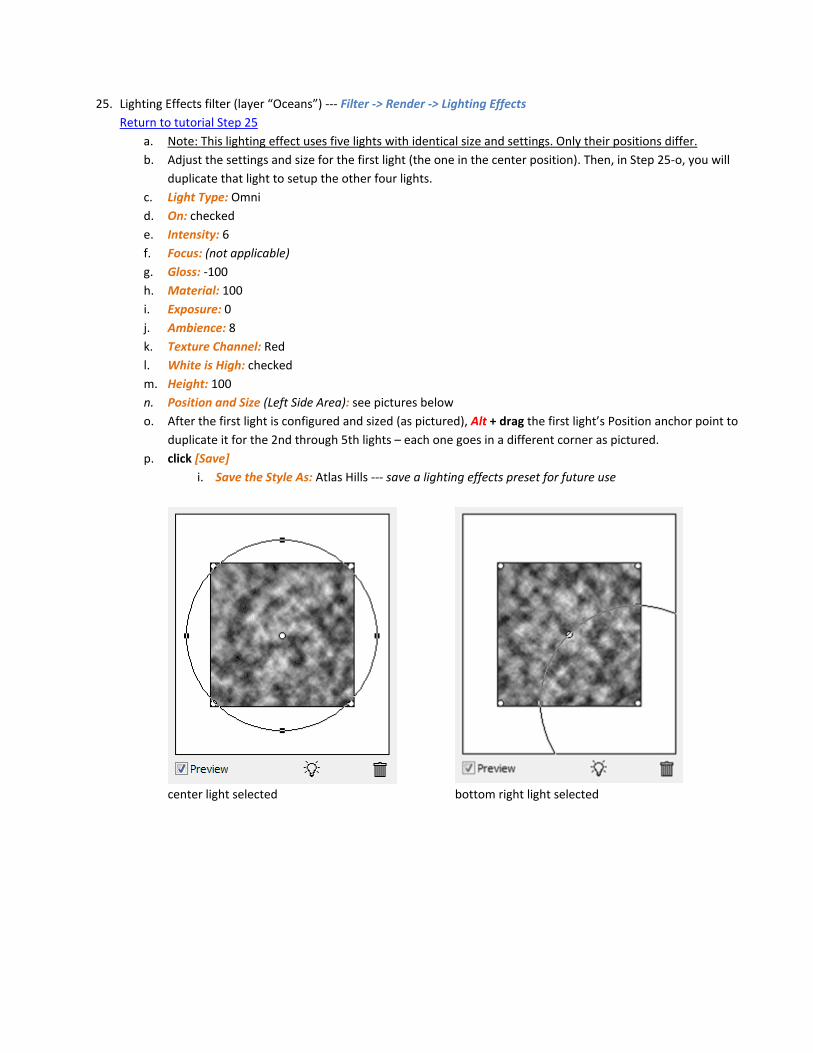
25. Lighting Effects filter (layer “Oceans”) --- Filter -> Render -> Lighting Effects Return to tutorial Step 25
a. Note: This lighting effect uses five lights with identical size and settings. Only their positions differ. b. Adjust the settings and size for the first light (the one in the center position). Then, in Step 25-o, you will
duplicate that light to setup the other four lights. c. Light Type: Omni d. On: checked e. Intensity: 6 f. Focus: (not applicable) g. Gloss: -100 h. Material: 100 i. Exposure: 0 j. Ambience: 8 k. Texture Channel: Red l. White is High: checked m. Height: 100 n. Position and Size (Left Side Area): see pictures below o. After the first light is configured and sized (as pictured), Alt + drag the first light’s Position anchor point to
duplicate it for the 2nd through 5th lights – each one goes in a different corner as pictured. p. click [Save]
i. Save the Style As: Atlas Hills --- save a lighting effects preset for future use
center light selected bottom right light selected
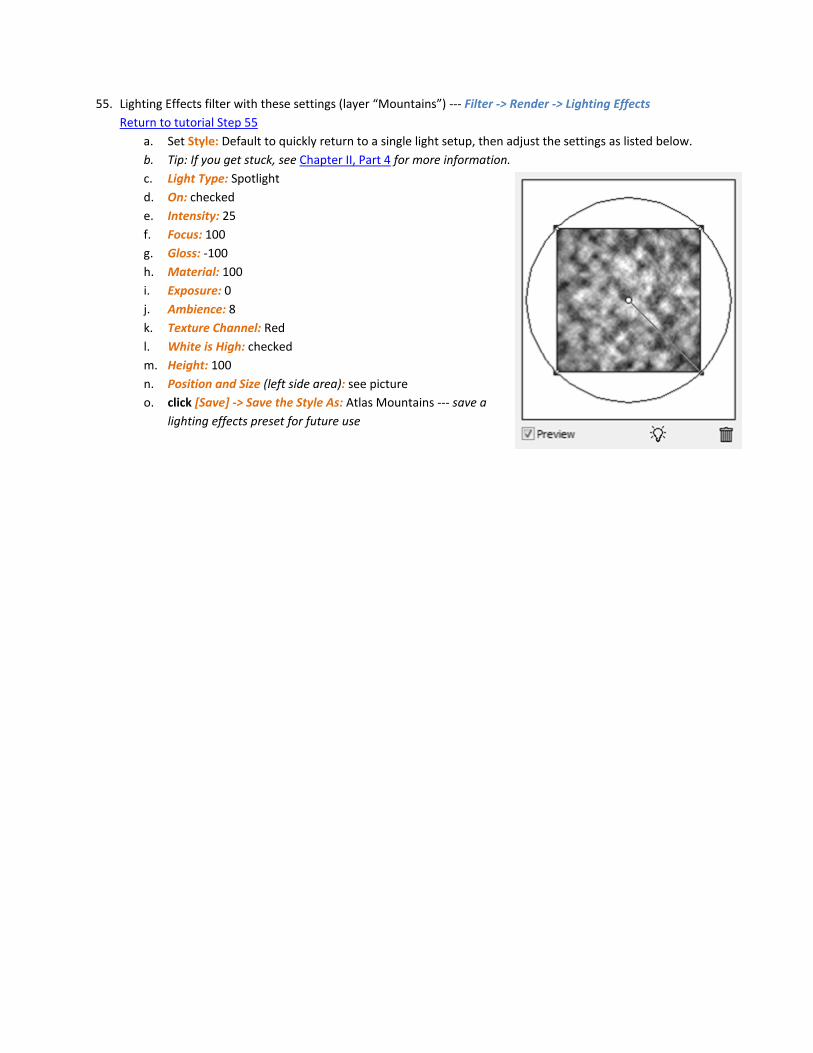
55. Lighting Effects filter with these settings (layer “Mountains”) --- Filter -> Render -> Lighting Effects Return to tutorial Step 55
a. Set Style: Default to quickly return to a single light setup, then adjust the settings as listed below. b. Tip: If you get stuck, see Chapter II, Part 4 for more information. c. Light Type: Spotlight d. On: checked e. Intensity: 25 f. Focus: 100 g. Gloss: -100 h. Material: 100 i. Exposure: 0 j. Ambience: 8 k. Texture Channel: Red l. White is High: checked m. Height: 100 n. Position and Size (left side area): see picture o. click [Save] -> Save the Style As: Atlas Mountains --- save a
lighting effects preset for future use