audi > a8/a8l > 2004 -2008 heating air conditioning 87 ... · 12/31/2013 · audi > a8/a8l...
TRANSCRIPT

Audi > A8/A8L > 2004-2008 Heating Air Conditioning 87 - Removal and Installation
.
A/C Control Components Inside Passenger Compartment
Left Center Vent Motor
Right Center Vent Motor
Center Outlet Temperature Sensor
Sunlight Photo Sensor
Interior Temperature Sensor Fan
Climatronic Control Module
Rear Footwell Heaters
Rear Center Console Temperature Sensors
Left Rear Flap Air Outlet Motor
Right Rear Flap Air Outlet Motor
Rear A/C Control Head, Climatronic
Evaporator Drain Hose
Air Conditioner Components Inside Passenger Compartment
Defroster Flap Motor
Center Vent Adjustment Motor
Left Front Defrost/Upper Body Shut-Off Flap Motor
Right Front Defrost/Upper Body Shut-Off Flap Motor
Left Footwell Flap Motor
Right Footwell Flap Motor
Page 1 of 53A/C Control Components Inside Passenger Compartment
12/31/2013x-ebahn:///C:/Program%20Files/eBahn/data/AUDI-D-D3-HA01.ebn/AUDI/D/D3/Repair...
Temperature Regulator Flap Motor
Lent Vent Temperature Sensor
Right Vent Temperature Sensor
Evaporator Vent Temperature Sensor
Rear Air Outlet Motors
Note:
If there is a malfunction in the system, first check DTC memory of Climatronic Control Module J255 (and of Rear A/C Control Head (Climatronic) E265 ). Vehicle Diagnosis, Testing and Information System VAS 5051 in "Guided Fault Finding" function.
If no fault is displayed, read out measured value block of Climatronic Control Module J255 (and Rear A/C Control Head (Climatronic) E265 ) (pay particular attention to measured value blocks "001" , "002" , "034 " "030" and "050" of Climatronic Control Module J255 and actuate any problematic component via "output Diagnostic Test Mode (DTM)" function. Vehicle Diagnosis, Testing and Information System VAS 5051 in "Guided Fault Finding" function.
Repair work on refrigerant circuit A/C Refrigerant Circuit, Servicing .
Perform the following work on completion of repair operations:
Check DTC memory of Climatronic Control Module J255 (and of Rear A/C Control Head (Climatronic) E265 ) and erase DTCs displayed if necessary.
Check coding of A/C control head Climatronic Control Module J255
If necessary, check adaptation of Climatronic Control Module J255 and Rear A/C Control Head (Climatronic) E265 (not installed on all vehicles).
Perform air conditioner basic setting. Vehicle Diagnosis, Testing and Information System VAS 5051 in "Guided Fault Finding" function.
Electrical checking of the various control motors, potentiometers and senders is described in the guided fault-finding. Vehicle Diagnosis, Testing and Information System VAS 5051 in "Guided Fault Finding" function.
.
Left Center Vent Motor
Note:
Page 2 of 53A/C Control Components Inside Passenger Compartment
12/31/2013x-ebahn:///C:/Program%20Files/eBahn/data/AUDI-D-D3-HA01.ebn/AUDI/D/D3/Repair...
Mark motor/flap connecting elements when removing (danger of swapping with connecting elements of the other actuator motors).
In the event of fault "Upper or lower limit value exceeded" , check connecting element of engine/flap, it must be attached to engine accurate to side and there must not be any clearance between actuator mount and connecting element.
If a "clicking noise" is determined from area of actuator, check connection of lug of connecting element at actuator to vent adjustment levers. Such noise may be produced if lug does not engage properly between the two adjustment levers.
Removing
Remove storage compartment beneath left instrument panel Body Interior - Repair Group 70 .
Switch ignition on.
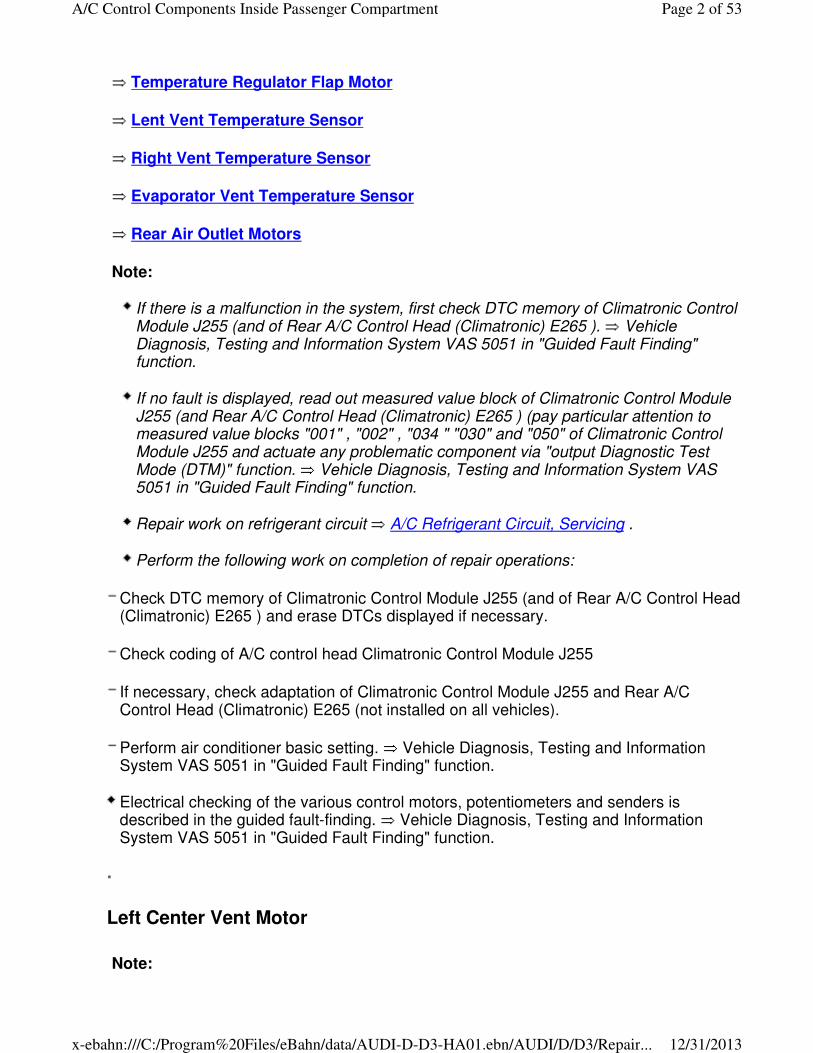
Set air distribution at Climatronic Control Module J255 to instrument panel vents and open two instrument panel vents - A - and - B - .
Pull left center instrument panel - A - out of instrument panel Body Interior - Repair Group 70
Close center instrument panel vents on left - A - and right - B - using corresponding knurled wheels.
Set air distribution on Climatronic Control Module J255 to footwell.
Page 3 of 53A/C Control Components Inside Passenger Compartment
12/31/2013x-ebahn:///C:/Program%20Files/eBahn/data/AUDI-D-D3-HA01.ebn/AUDI/D/D3/Repair...
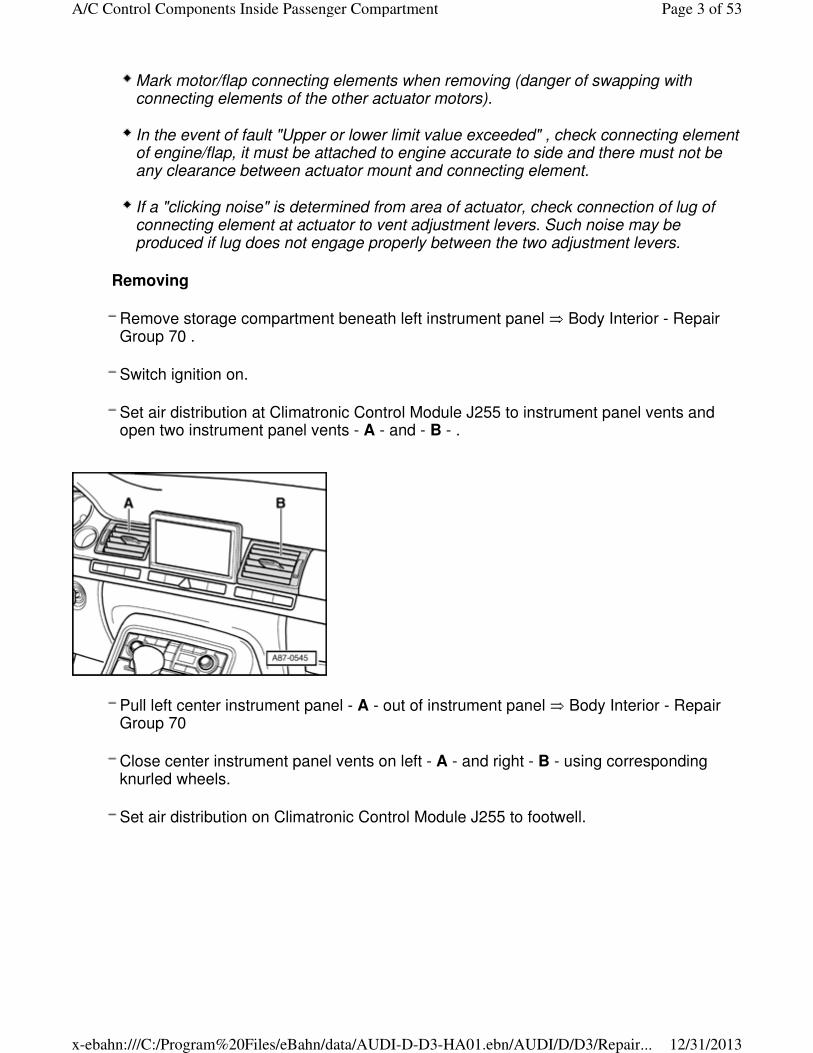
Wait until lug - D - is positioned such that bolt - B - can be removed.
Switch off ignition.
Disconnect wire connection to left center instrument panel vent and remove entire vent Body Interior - Repair Group 70
Remove bolts - A - and - B - .
Note:
If actuator cannot be moved and lug - D - is positioned such that bolt - B - cannot be removed:
Disconnect plug-in coupling attached to air conditioner in wiring to actuator.
Connect terminal 5 and 6 of actuator to 12 V battery by means of 5 A fuse using e.g. adapter cable Control Motor Actuation Adapter Cables, Preparing or auxiliary wire from connector test set V.A.G 1594/C .
Rotate actuator until bolt - B - can be removed, turning direction can be reversed by swapping B+ and Ground.
Disconnect electrical connection wire to actuator - C - at attachment points.
Tilt actuator - C - with bracket in direction of arrow out of mount in instrument panel.
Page 4 of 53A/C Control Components Inside Passenger Compartment
12/31/2013x-ebahn:///C:/Program%20Files/eBahn/data/AUDI-D-D3-HA01.ebn/AUDI/D/D3/Repair...
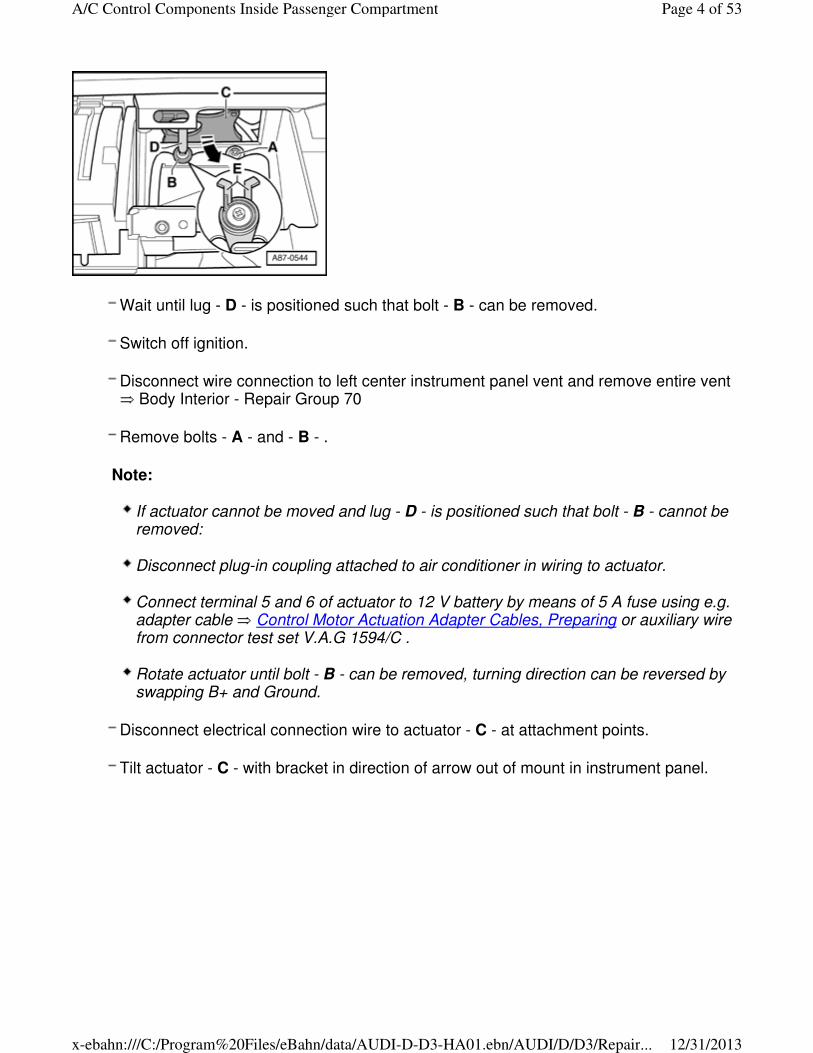
Remove connector - A - .
Remove bolts - B - .
Remove bracket - C - .
Pry off connecting element - D - using 2 screwdrivers.
Installing
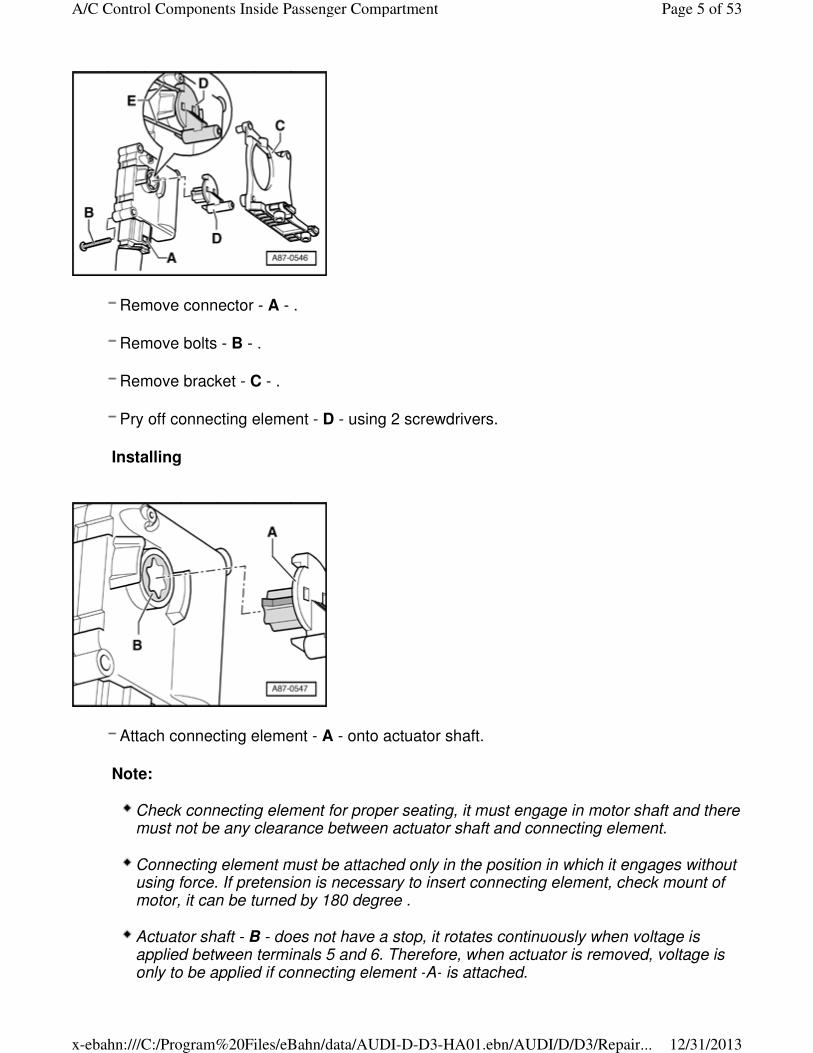
Attach connecting element - A - onto actuator shaft.
Note:
Check connecting element for proper seating, it must engage in motor shaft and there must not be any clearance between actuator shaft and connecting element.
Connecting element must be attached only in the position in which it engages without using force. If pretension is necessary to insert connecting element, check mount of motor, it can be turned by 180 degree .
Actuator shaft - B - does not have a stop, it rotates continuously when voltage is applied between terminals 5 and 6. Therefore, when actuator is removed, voltage is only to be applied if connecting element -A- is attached.
Page 5 of 53A/C Control Components Inside Passenger Compartment
12/31/2013x-ebahn:///C:/Program%20Files/eBahn/data/AUDI-D-D3-HA01.ebn/AUDI/D/D3/Repair...
If connecting element - A - cannot be inserted into actuator without pretension, actuator may be incorrectly positioned.
If shaft is so awkwardly positioned that connecting piece cannot be attached, connect terminals 5 and 6 of actuator via a 5A fuse to a 12 V battery e.g. using adapter lead Control Motor Actuation Adapter Cables, Preparing or an adapter lead from connector test kit V.A.G 1594/C .
Rotate actuator for only as long until connecting element can be attached without pretension, the turning direction can be reversed by swapping B+ and Ground.
Install positioning motor.
Slightly lubricate guide in instrument panel vent using grease (e.g. G 000 150)
After installing actuator, perform "basic setting" function in On Board Diagnostic of air conditioner; if connecting element has not been installed properly, fault will be displayed. Vehicle Diagnosis, Testing and Information System VAS 5051 in "Guided Fault Finding" function.
Switch ignition on.
Set air distribution on Climatronic Control Module J255 to instrument panel vents.
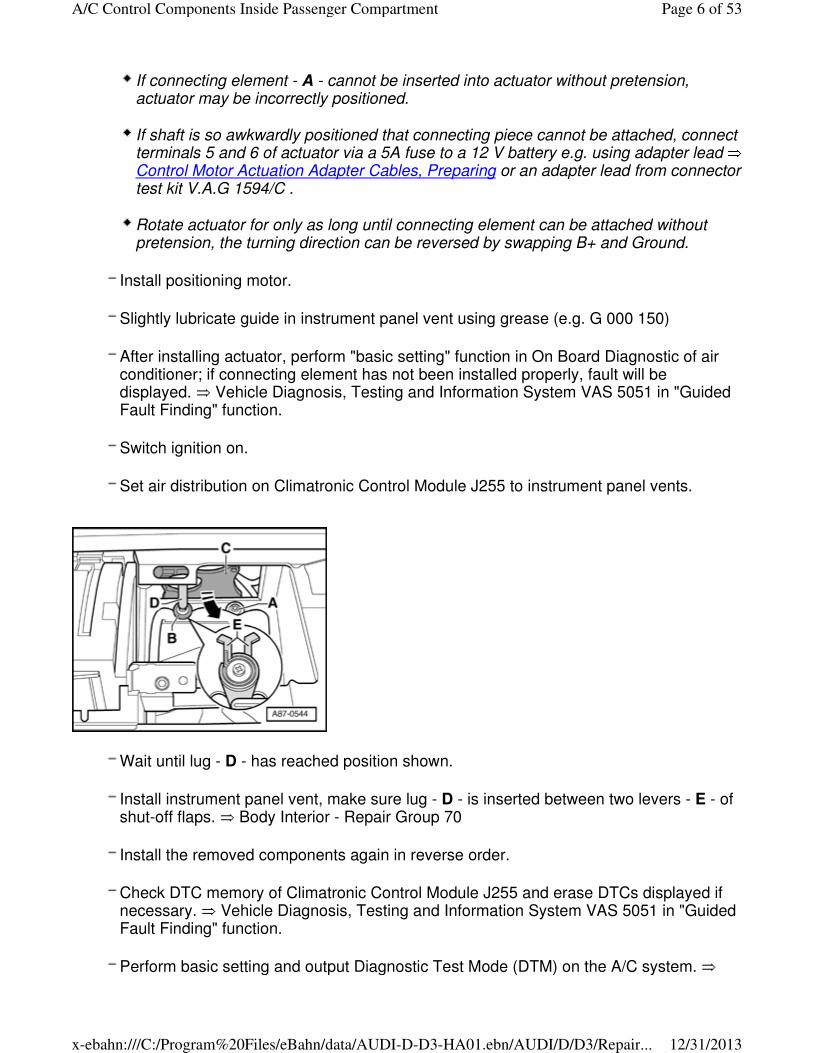
Wait until lug - D - has reached position shown.
Install instrument panel vent, make sure lug - D - is inserted between two levers - E - of shut-off flaps. Body Interior - Repair Group 70
Install the removed components again in reverse order.
Check DTC memory of Climatronic Control Module J255 and erase DTCs displayed if necessary. Vehicle Diagnosis, Testing and Information System VAS 5051 in "Guided Fault Finding" function.
Perform basic setting and output Diagnostic Test Mode (DTM) on the A/C system.
Page 6 of 53A/C Control Components Inside Passenger Compartment
12/31/2013x-ebahn:///C:/Program%20Files/eBahn/data/AUDI-D-D3-HA01.ebn/AUDI/D/D3/Repair...
Vehicle Diagnosis, Testing and Information System VAS 5051 in "Guided Fault Finding" function.
.
Right Center Vent Motor
Note:
Mark motor/flap connecting elements when removing (danger of swapping with connecting elements of the other actuator motors).
In the event of fault "Upper or lower limit value exceeded" , check connecting element of engine/flap, it must be attached to engine accurate to side and there must not be any clearance between actuator mount and connecting element.
If a "clicking noise" is determined from area of actuator, check connection of lug of connecting element at actuator to vent adjustment levers. Such noise may be produced if lug does not engage properly between the two adjustment levers.
Remove glove compartment Body Interior - Repair Group 68 .
Switch ignition on.
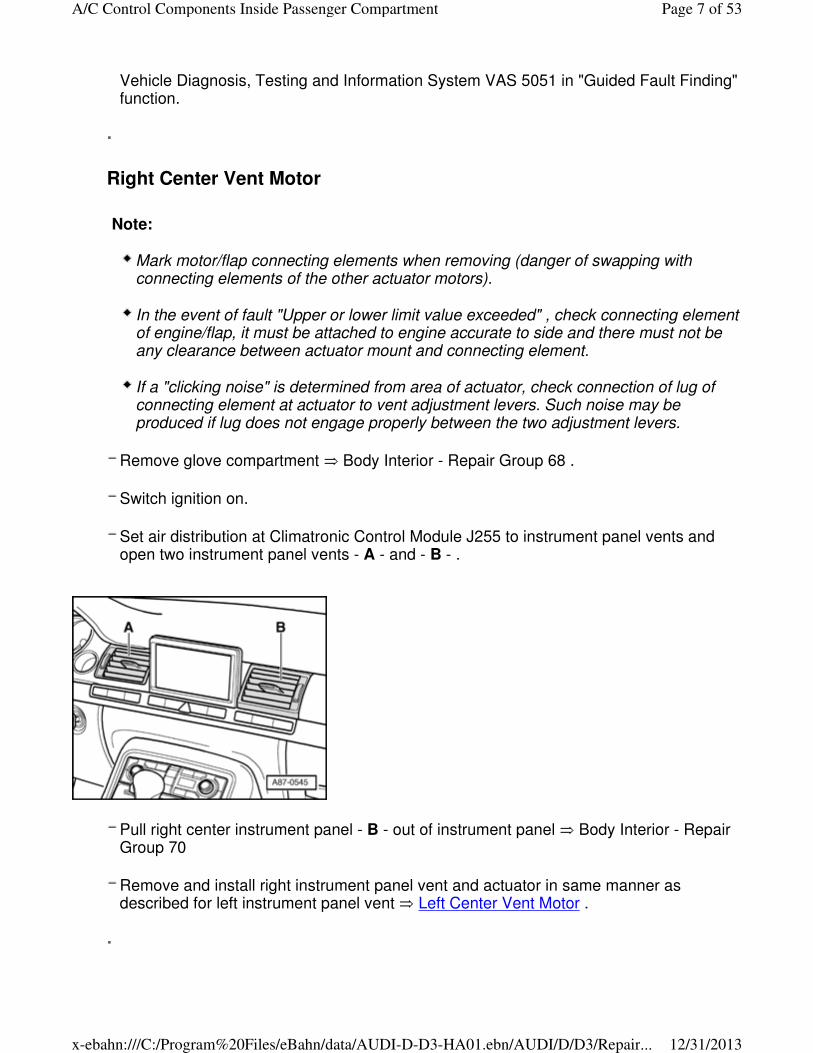
Set air distribution at Climatronic Control Module J255 to instrument panel vents and open two instrument panel vents - A - and - B - .
Pull right center instrument panel - B - out of instrument panel Body Interior - Repair Group 70
Remove and install right instrument panel vent and actuator in same manner as described for left instrument panel vent Left Center Vent Motor .
.
Page 7 of 53A/C Control Components Inside Passenger Compartment
12/31/2013x-ebahn:///C:/Program%20Files/eBahn/data/AUDI-D-D3-HA01.ebn/AUDI/D/D3/Repair...
Center Outlet Temperature Sensor
Switch off ignition.
Remove center console. Without Extension Body Interior - Repair Group 68 With Extension Body Interior - Repair Group 68
Remove storage compartment beneath left instrument panel and steering column support to center tunnel Body Interior - Repair Group 68
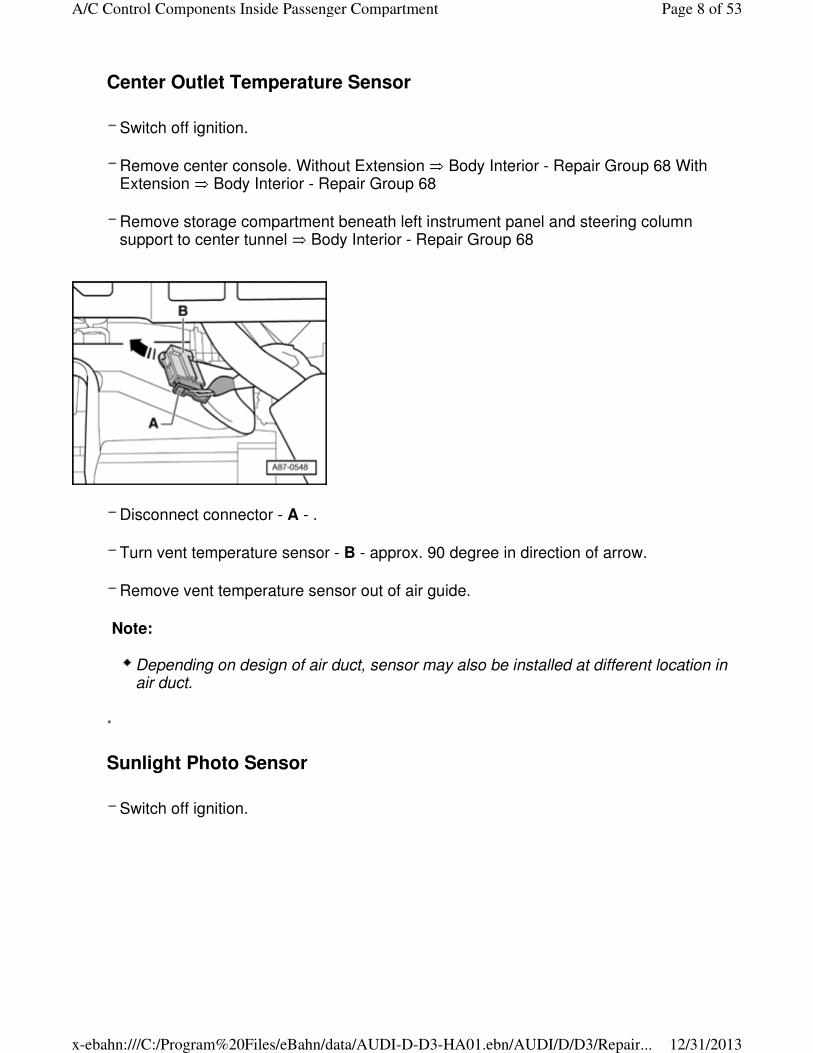
Disconnect connector - A - .
Turn vent temperature sensor - B - approx. 90 degree in direction of arrow.
Remove vent temperature sensor out of air guide.
Note:
Depending on design of air duct, sensor may also be installed at different location in air duct.
.
Sunlight Photo Sensor
Switch off ignition.
Page 8 of 53A/C Control Components Inside Passenger Compartment
12/31/2013x-ebahn:///C:/Program%20Files/eBahn/data/AUDI-D-D3-HA01.ebn/AUDI/D/D3/Repair...
Carefully pry cover - A - out of windshield defroster vent.
Carefully pry sunlight photo sensor - B - out of front windshield defroster vent.
Disconnect connector - C - .
.
Interior Temperature Sensor Fan
Remove Climatronic Control Module J255 Climatronic Control Module .
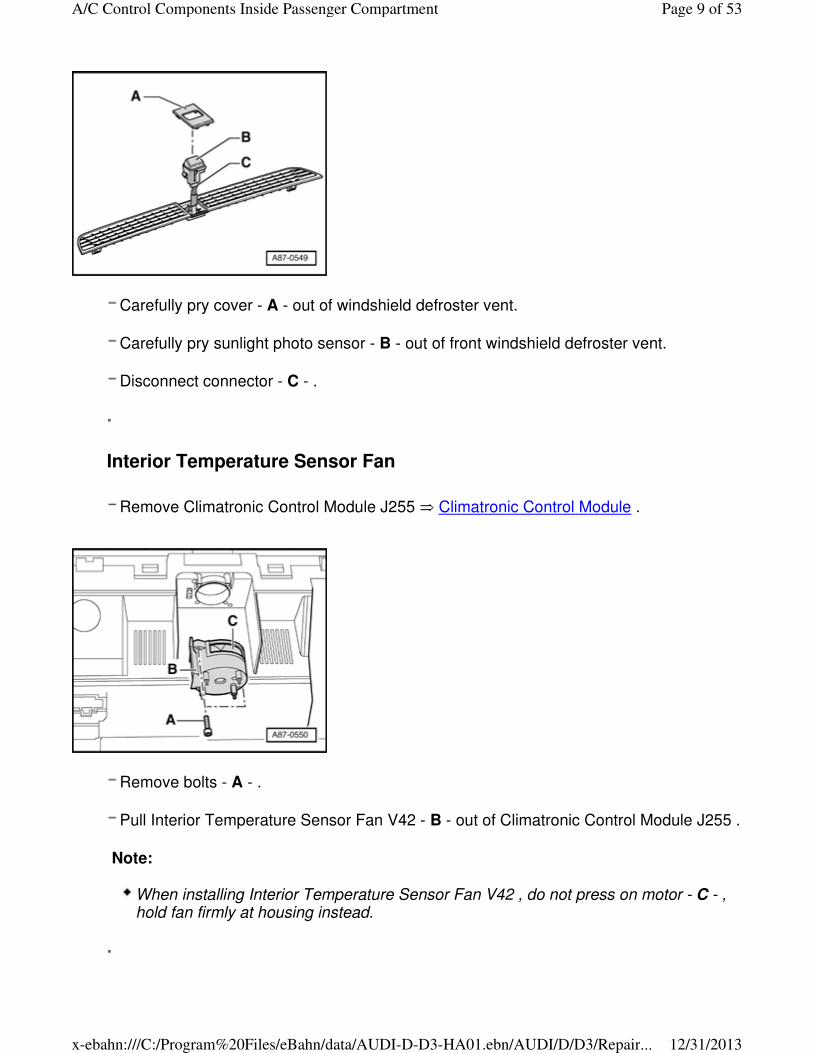
Remove bolts - A - .
Pull Interior Temperature Sensor Fan V42 - B - out of Climatronic Control Module J255 .
Note:
When installing Interior Temperature Sensor Fan V42 , do not press on motor - C - , hold fan firmly at housing instead.
.
Page 9 of 53A/C Control Components Inside Passenger Compartment
12/31/2013x-ebahn:///C:/Program%20Files/eBahn/data/AUDI-D-D3-HA01.ebn/AUDI/D/D3/Repair...
Climatronic Control Module
Removing and installing Climatronic Control Module J255 Climatronic Control Module J255 , removing
Note:
Front A/C control heads can no longer be cross-exchanged in the familiar way; as soon as a the Climatronic control module J255 has been adapted in a vehicle, component protection takes effect. Vehicle Diagnosis, Testing and Information System VAS 5051 in "Guided Fault Finding" function.
If a Climatronic Control Module J255 with active component protection (anti-theft system) is installed in a different vehicle, only the functions necessary for vehicle safety can be selected, comfort functions can no longer be selected. Vehicle Diagnosis, Testing and Information System VAS 5051 in "Guided Fault Finding" function.
Component protection can only be canceled by entering specific vehicle data Vehicle Diagnosis, Testing and Information System VAS 5051 in "Guided Fault Finding" function.
Climatronic Control Module J255 may also be designated "Climatronic Control Module -J255-" in wiring diagrams.
Follow allocation exactly when replacing Climatronic Control Module J255 : Parts Catalog
Different versions of Climatronic Control Module J255 on vehicles with or without seat heater, seat heating with or without seat ventilation. Part number index must therefore be heeded. Parts Catalog
After installing Climatronic Control Module J255 , perform basic setting for A/C system according to specifications. Vehicle Diagnosis, Testing and Information System VAS 5051 in "Guided Fault Finding" function.
If a newwas installed and basic setting was not performed, controls of Climatronic Control Module J255 are restricted and this is displayed as a malfunction in DTC memory. Vehicle Diagnosis, Testing and Information System VAS 5051 in "Guided Fault Finding" function.
Climatronic Control Module J255 can be set into operation for a certain period of time (up to approx. 30 minutes) after switching off ignition by operating the "On/Off" button (the operating time depends on the battery charge state, it is approx. 10 minutes). Owners Manual
Display fields and control buttons on Climatronic Control Module J255 are illuminated by light emitting diodes (LEDs, cannot be replaced).
Page 10 of 53A/C Control Components Inside Passenger Compartment
12/31/2013x-ebahn:///C:/Program%20Files/eBahn/data/AUDI-D-D3-HA01.ebn/AUDI/D/D3/Repair...
If Instrument Panel Interior Temperature Sensor G56 sends incorrect measurements, check intake grille on panel of Climatronic Control Module J255 (must not be sealed) and function of Interior Temperature Sensor Fan V42 . .
The selected functions are displayed by illuminated LEDs in the various buttons of Climatronic Control Module J255 .
Always perform the following work after replacing Climatronic Control Module J255 :
- Check coding.
- Perform basic setting.
- Check adaptation.
- Check DTC memory. Vehicle Diagnosis, Testing and Information System VAS 5051 in "Guided Fault Finding" function.
Display unit ( degree C or degree F) of temperature display of Climatronic Control Module J255 , is specified by MMI (Multi Media Interface) via Comfort CAN-Bus system and determined by setting entered there.
In model year 2003, Climatronic Control Module J255 was installed with software number "026" . With these Climatronic Control Module J255 , settings assigned to a specific person via fingerprint may be lost when starting the vehicle via "one-touch memory" . Service installation of Climatronic Control Module J255 with this software number is therefore not permitted on vehicles with "one-touch memory" .
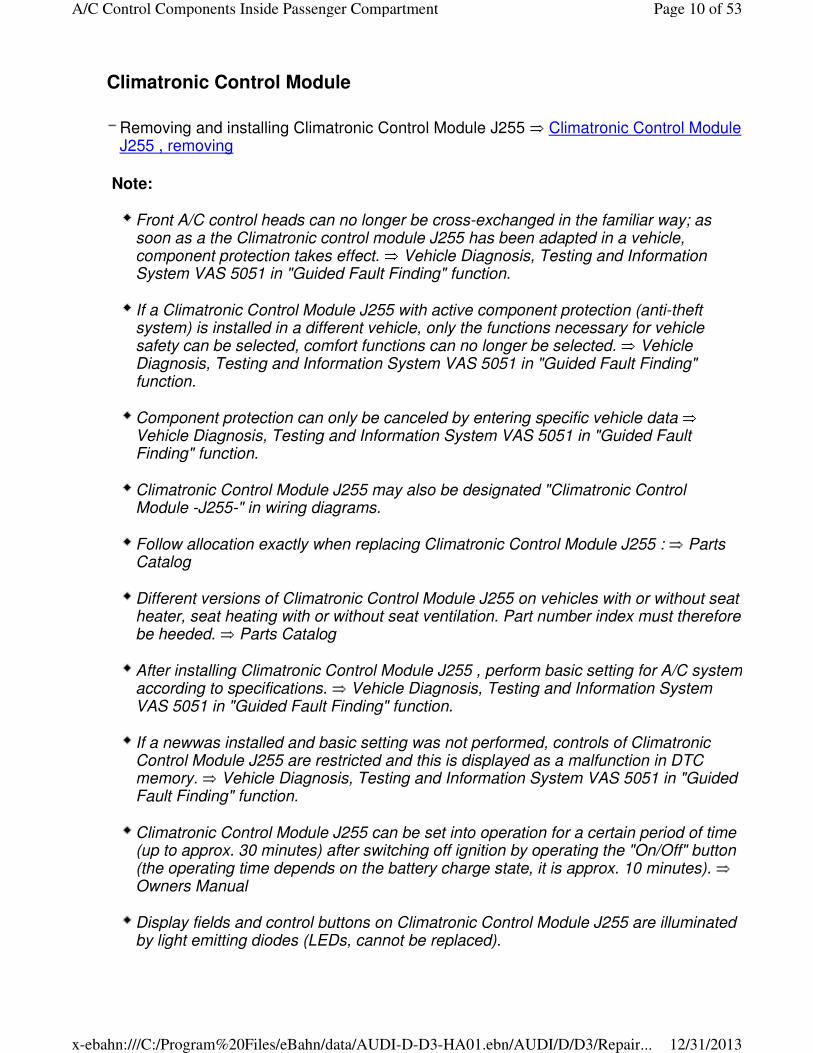
Climatronic Control Module J255 is not connected to terminal "15" , therefore after voltage supply interruption (via connector - E - ), it is necessary to wait at least 30 seconds to protect electronics until remaining connections are disconnected .
Two rotary buttons are attached, they can be carefully removed and replaced individually Parts Catalog
.
Page 11 of 53A/C Control Components Inside Passenger Compartment
12/31/2013x-ebahn:///C:/Program%20Files/eBahn/data/AUDI-D-D3-HA01.ebn/AUDI/D/D3/Repair...
Climatronic Control Module J255 , removing
Check coding and adaptation of Climatronic Control Module J255 via the "Replace control module" function of Guided Fault Finding (in the event that Climatronic Control Module J255 is to be replaced). Vehicle Diagnosis, Testing and Information System VAS 5051 in "Guided Fault Finding" function.
Switch off ignition.
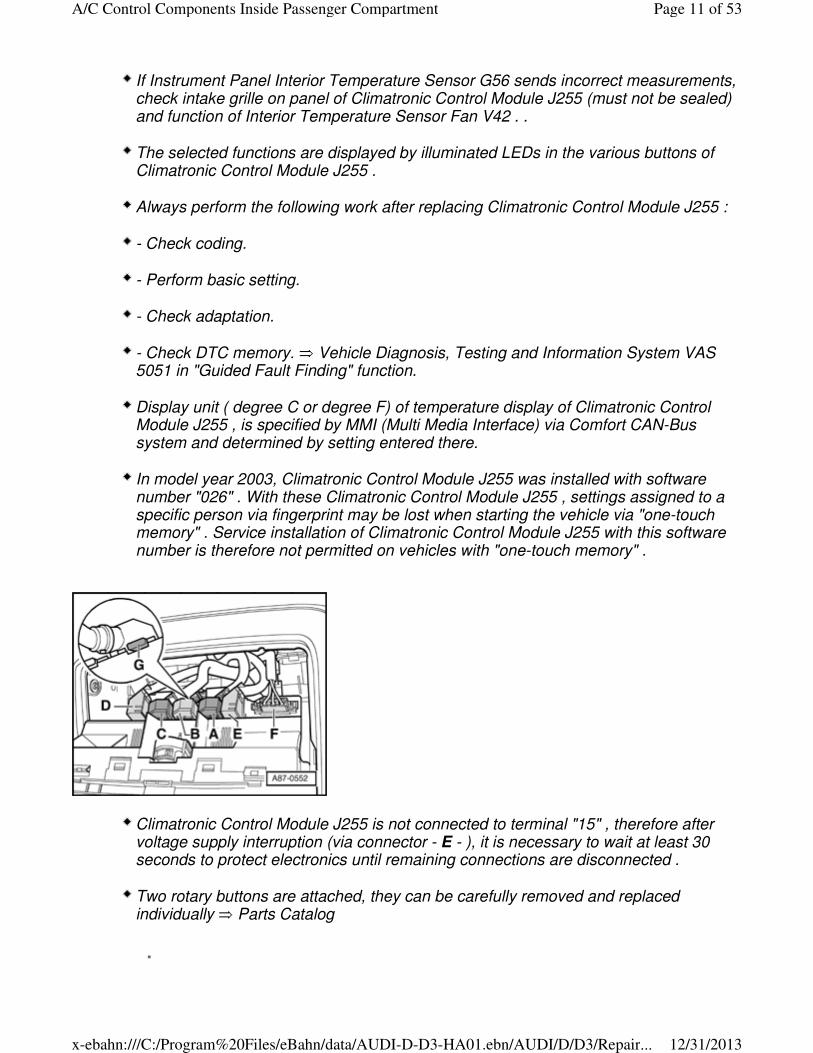
Remove trim for front center instrument panel section and ashtray. Body Interior - Repair Group 68
Remove two bolts - A - .
Remove Climatronic Control Module J255 from center console.
Disengage catches of connector - E - by pressing retaining tabs - G - and disconnect this connector.
Wait 30 seconds (to protect electronics in Climatronic Control Module J255 ).
Disengage catches of connectors - A - to - D - by pressing retaining tabs - G - and disconnect them.
Page 12 of 53A/C Control Components Inside Passenger Compartment
12/31/2013x-ebahn:///C:/Program%20Files/eBahn/data/AUDI-D-D3-HA01.ebn/AUDI/D/D3/Repair...

Disengage connector - F - and disconnect it.
Installing
Install in reverse order of removal.
Check DTC memory of Climatronic Control Module J255 and erase DTCs displayed if necessary. Vehicle Diagnosis, Testing and Information System VAS 5051 in "Guided Fault Finding" function.
Perform basic setting, coding, adaptation and output Diagnostic Test Mode (DTM) on A/C system. Vehicle Diagnosis, Testing and Information System VAS 5051 in "Guided Fault Finding" function.
.
Rear Footwell Heaters
Note:
Left Rear Footwell Heater Z42 and Right Rear Footwell Heater Z43 are actuated by Climatronic Control Module J255 via data wire, actuation is displayed in measured value block (display group "041" and "042" ). Vehicle Diagnosis, Testing and Information System VAS 5051 in "Guided Fault Finding" function.
Heater element consists of control module, temperature sensor and, at present, 4 transistors with heat sinks which generate heat and supply it to the passing air flow.
Heater element is installed only on vehicles with Rear A/C Control Head (Climatronic) E265 in vent - C - (optional equipment).
Removing
Switch off ignition.
Page 13 of 53A/C Control Components Inside Passenger Compartment
12/31/2013x-ebahn:///C:/Program%20Files/eBahn/data/AUDI-D-D3-HA01.ebn/AUDI/D/D3/Repair...
Remove left or right seat Body Interior - Repair Group 72
Remove cover - A - .
Lift floor covering - B - .
Disconnect harness connector to heater element.
Remove vent - C - with heater element.
Installing
Install in reverse order of removal.
.
Rear Center Console Temperature Sensors
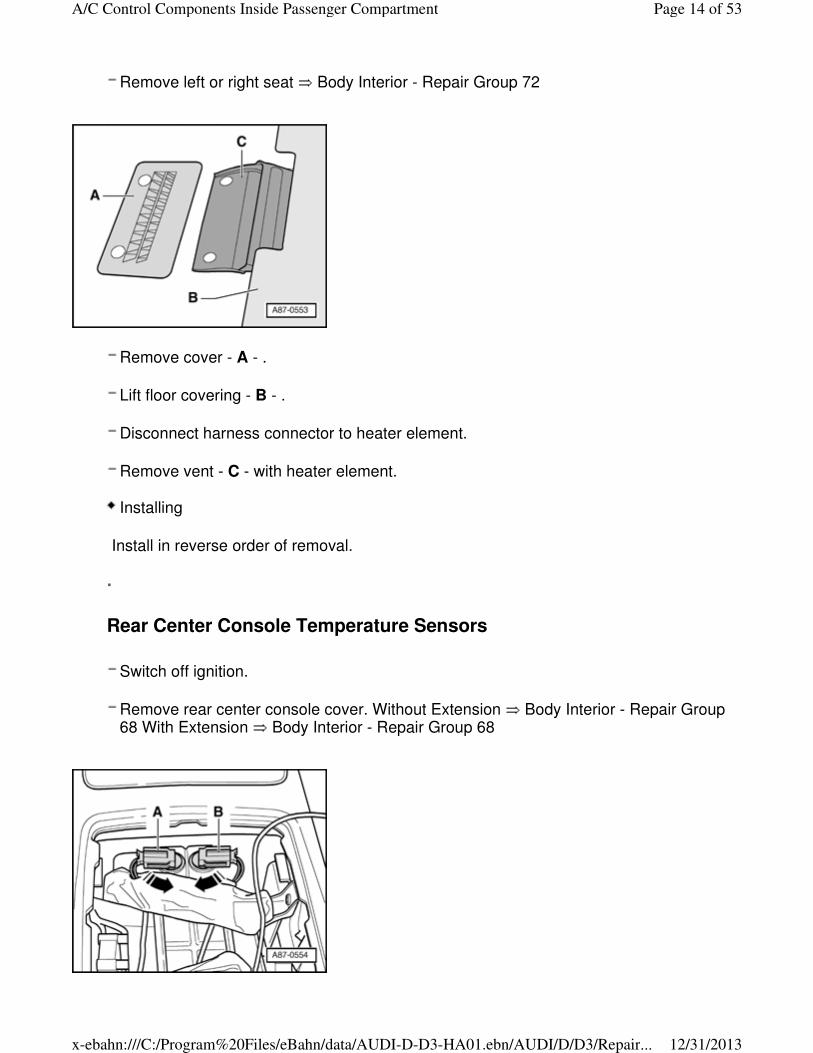
Switch off ignition.
Remove rear center console cover. Without Extension Body Interior - Repair Group 68 With Extension Body Interior - Repair Group 68
Page 14 of 53A/C Control Components Inside Passenger Compartment
12/31/2013x-ebahn:///C:/Program%20Files/eBahn/data/AUDI-D-D3-HA01.ebn/AUDI/D/D3/Repair...
Disconnect connector from temperature sensor - A - or - B - .
Rotate - A - ( Left Rear Center Console Temperature Sensor G311 ) or - B - ( Right Rear Center Console Temperature Sensor G312 ) approx. 90 degree in direction of arrow.
Remove appropriate temperature sensor from air guide.
Note:
Left Rear Center Console Temperature Sensor G311 and Right Rear Center Console Temperature Sensor G312 are installed only on vehicles with Rear A/C Control Head (Climatronic) E265 (optional equipment). On vehicles without Rear A/C Control Head (Climatronic) E265 , openings in air guide are sealed with plugs.
Observe connector arrangement to Left Rear Center Console Temperature Sensor G311 and Right Rear Center Console Temperature Sensor G312 and mark them if necessary to avoid possible interchange.
In cases of doubt about correct connector assignment, disconnect connector e.g. from temperature sensor and then check DTC memory of Rear A/C Control Head (Climatronic) E265 . Vehicle Diagnosis, Testing and Information System VAS 5051 in "Guided Fault Finding" function.
.
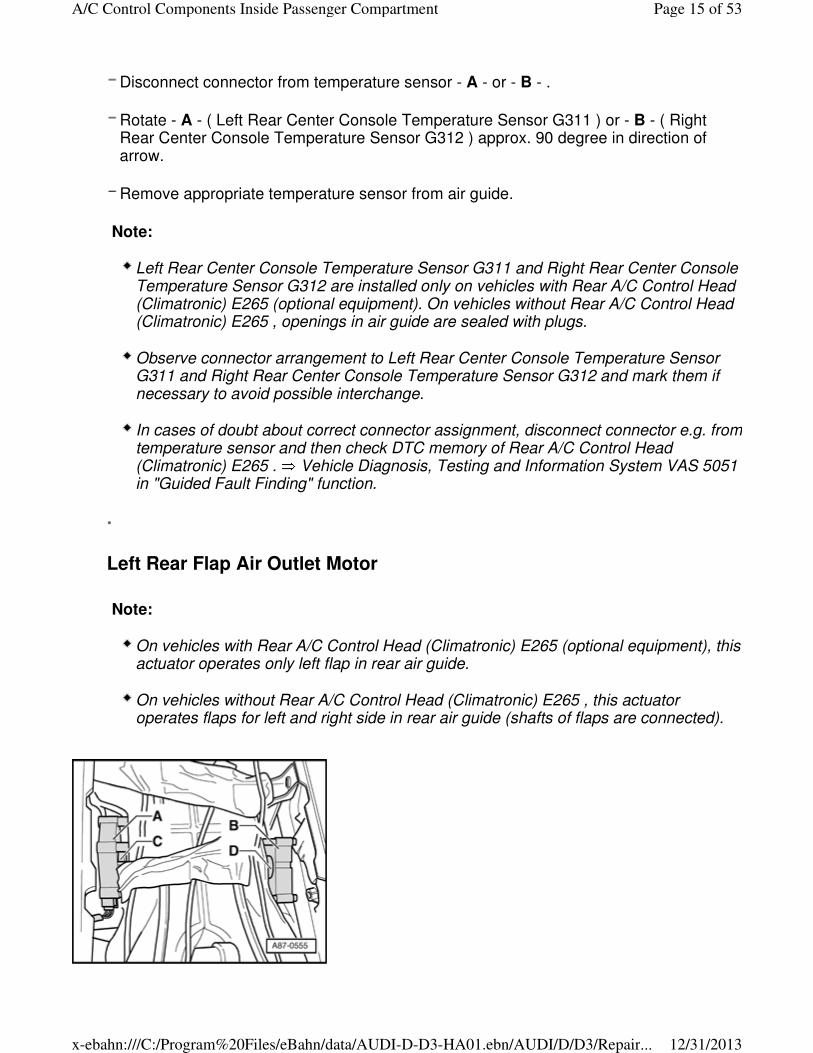
Left Rear Flap Air Outlet Motor
Note:
On vehicles with Rear A/C Control Head (Climatronic) E265 (optional equipment), this actuator operates only left flap in rear air guide.
On vehicles without Rear A/C Control Head (Climatronic) E265 , this actuator operates flaps for left and right side in rear air guide (shafts of flaps are connected).
Page 15 of 53A/C Control Components Inside Passenger Compartment
12/31/2013x-ebahn:///C:/Program%20Files/eBahn/data/AUDI-D-D3-HA01.ebn/AUDI/D/D3/Repair...

Observe connector arrangement on vehicles with Rear A/C Control Head (Climatronic) E265 to the two actuators - A - ( Left Rear Warm/Cold Flap Air Outlet Motor V220 ) with connecting element - C - ( "red" color) and actuator - B - ( Right Rear Warm/Cold Flap Air Outlet Motor V221 ) with connecting element - D - ( "blue" color) and mark them if necessary to avoid possible interchange.
In cases of doubt about correct connector assignment, disconnect connector e.g. from actuator and then check DTC memory of Climatronic Control Module J255 . Vehicle Diagnosis, Testing and Information System VAS 5051 in "Guided Fault Finding" function.
Switch off ignition.
Remove center console. Without Extension Body Interior - Repair Group 68 With Extension Body Interior - Repair Group 68
Remove air duct from center console Without Extension Body Interior - Repair Group 68 With Extension Body Interior - Repair Group 68
Remove bolts - A - .
Remove actuator - B - .
Pry off connecting element - D - using 2 screwdrivers - C - .
Installing
Page 16 of 53A/C Control Components Inside Passenger Compartment
12/31/2013x-ebahn:///C:/Program%20Files/eBahn/data/AUDI-D-D3-HA01.ebn/AUDI/D/D3/Repair...

Attach connecting element - A - onto actuator shaft.
Perform remaining installation operations in reverse order of removal.
Note:
Check connecting element for proper seating, it must engage in motor mount and there must not be any clearance between actuator mount and connecting element.
Observe correct assignment of connecting element (color "red" for left actuator and color "blue" for right actuator).
Connecting piece must be attached only in the position in which it engages without using force. If pretension is necessary to insert connecting piece, check mount of motor, it may be turned by 180 degree .
Actuator shaft - B - does not have a stop, it rotates continuously when voltage is applied between terminals 5 and 6. Therefore, when actuator is removed, voltage is only to be applied if connecting element -A- is attached.
If connecting piece - A - cannot be inserted into actuator without pretension, actuator may be incorrectly positioned.
If shaft is so awkwardly positioned that connecting piece cannot be attached, connect terminals 5 and 6 of actuator via a 5A fuse to a 12 V battery e.g. using adapter lead Control Motor Actuation Adapter Cables, Preparing or an adapter lead from connector test kit V.A.G 1594/C .
In the event of fault "Upper or lower limit value exceeded" , check connecting element of engine/flap, it must be attached to engine accurate to side and there must not be any clearance between actuator mount and connecting element.
Rotate actuator until intermediate piece can be attached without pretension, turning direction can be reversed by swapping B+ and Ground.
Install the removed components again in reverse order.
Page 17 of 53A/C Control Components Inside Passenger Compartment
12/31/2013x-ebahn:///C:/Program%20Files/eBahn/data/AUDI-D-D3-HA01.ebn/AUDI/D/D3/Repair...

Check DTC memory of Climatronic Control Module J255 and erase DTCs displayed if necessary. Vehicle Diagnosis, Testing and Information System VAS 5051 in "Guided Fault Finding" function.
Perform basic setting and output Diagnostic Test Mode (DTM) on the A/C system. Vehicle Diagnosis, Testing and Information System VAS 5051 in "Guided Fault Finding" function.
.
Right Rear Flap Air Outlet Motor
Note:
On vehicles with Rear A/C Control Head (Climatronic) E265 , Left Rear Warm/Cold Flap Air Outlet Motor V220 actuates flaps for left and right side in rear air guide (shafts of flaps are connected, no Right Rear Warm/Cold Flap Air Outlet Motor V221 is installed.
Observe connector arrangement on vehicles with Rear A/C Control Head (Climatronic) E265 to the two actuators - A - ( Left Rear Warm/Cold Flap Air Outlet Motor V220 ) with connecting element - C - ( "red" color) and actuator - B - ( Right Rear Warm/Cold Flap Air Outlet Motor V221 ) with connecting element - D - ( "blue" color) and mark them if necessary to avoid possible interchange.
In cases of doubt about correct connector assignment, disconnect connector e.g. from actuator and then check DTC memory of Climatronic Control Module J255 . Vehicle Diagnosis, Testing and Information System VAS 5051 in "Guided Fault Finding" function.
In the event of fault "Upper or lower limit value exceeded" , check connecting element of engine/flap, it must be attached to engine accurate to side and there must not be any clearance between actuator mount and connecting element.
Switch off ignition.
Page 18 of 53A/C Control Components Inside Passenger Compartment
12/31/2013x-ebahn:///C:/Program%20Files/eBahn/data/AUDI-D-D3-HA01.ebn/AUDI/D/D3/Repair...
Remove and install Right Rear Warm/Cold Flap Air Outlet Motor V221 - B - in the same manner as described for Left Rear Warm/Cold Flap Air Outlet Motor V220 Left Rear Flap Air Outlet Motor .
.
Rear A/C Control Head, Climatronic
Rear A/C Control Head (Climatronic) E265 , removing and installing Rear A/C Control Head (Climatronic) E265 , removing and installing .
Note:
At present, Rear A/C Control Head (Climatronic) E265 can still be exchanged in the familiar manner; component protection is currently not active for this component (introduction of component protection not yet finalized). Vehicle Diagnosis, Testing and Information System VAS 5051 in "Guided Fault Finding" function.
Front A/C control heads can no longer be cross-exchanged in the familiar way; as soon as a , the Climatronic control module J255 has been adapted in a vehicle, the component protection takes effect. Vehicle Diagnosis, Testing and Information System VAS 5051 in "Guided Fault Finding" function.
If a Climatronic Control Module J255 with active component protection (anti-theft system) is installed in a different vehicle, only the functions necessary for vehicle safety can be selected, comfort functions can no longer be selected; this also applies to functions of Rear A/C Control Head (Climatronic) E265 . Vehicle Diagnosis, Testing and Information System VAS 5051 in "Guided Fault Finding" function.
Follow assignment exactly when replacing Rear A/C Control Head (Climatronic) E265 : Parts Catalog
Different versions of Rear A/C Control Head (Climatronic) E265 on vehicles with or without rear seat heating, rear seat heating with or without seat ventilation. Part number index must therefore be heeded. Parts Catalog
Page 19 of 53A/C Control Components Inside Passenger Compartment
12/31/2013x-ebahn:///C:/Program%20Files/eBahn/data/AUDI-D-D3-HA01.ebn/AUDI/D/D3/Repair...

After installing Rear A/C Control Head (Climatronic) E265 , perform basic setting for A/C system according to specifications. Vehicle Diagnosis, Testing and Information System VAS 5051 in "Guided Fault Finding" function.
The selected functions are displayed by illuminated LEDs in the various buttons of Rear A/C Control Head (Climatronic) E265 .
If information "child safety system for rear doors activated" is received via data bus system, Rear A/C Control Head (Climatronic) E265 is switched off, and, depending on version, display of Rear A/C Control Head (Climatronic) E265 shows e.g. "Passive" (air conditioner can then only be operated by Climatronic Control Module J255 ). Owners Manual
Display unit of temperature display of Rear A/C Control Head (Climatronic) E265 in degree C or degree F is transmitted by MMI (Multi Media Interface) via Comfort CAN-Bus system and determined by setting entered there.
Display fields and control buttons on Rear A/C Control Head (Climatronic) E265 are illuminated by light emitting diodes (LEDs, cannot be replaced).
Always perform the following work after replacing Rear A/C Control Head (Climatronic) E265 :
- Perform basic setting.
- Check adaptation.
- Check DTC memory. Vehicle Diagnosis, Testing and Information System VAS 5051 in "Guided Fault Finding" function.
Two rotary buttons are attached, they can be carefully removed and replaced individually Parts Catalog
.
Rear A/C Control Head (Climatronic) E265 , removing and installing
Note:
At present, Rear A/C Control Head (Climatronic) E265 can still be exchanged in the familiar manner, no component protection is active (introduction of component protection not yet finalized) Vehicle Diagnosis, Testing and Information System VAS 5051 in "Guided Fault Finding" function.
Removing
Check adaptation of Rear A/C Control Head (Climatronic) E265 via "Replace control module" function of Guided Fault Finding (in the event Rear A/C Control Head (Climatronic) E265 is to be replaced). Vehicle Diagnosis, Testing and Information
Page 20 of 53A/C Control Components Inside Passenger Compartment
12/31/2013x-ebahn:///C:/Program%20Files/eBahn/data/AUDI-D-D3-HA01.ebn/AUDI/D/D3/Repair...
System VAS 5051 in "Guided Fault Finding" function.
Switch off ignition.
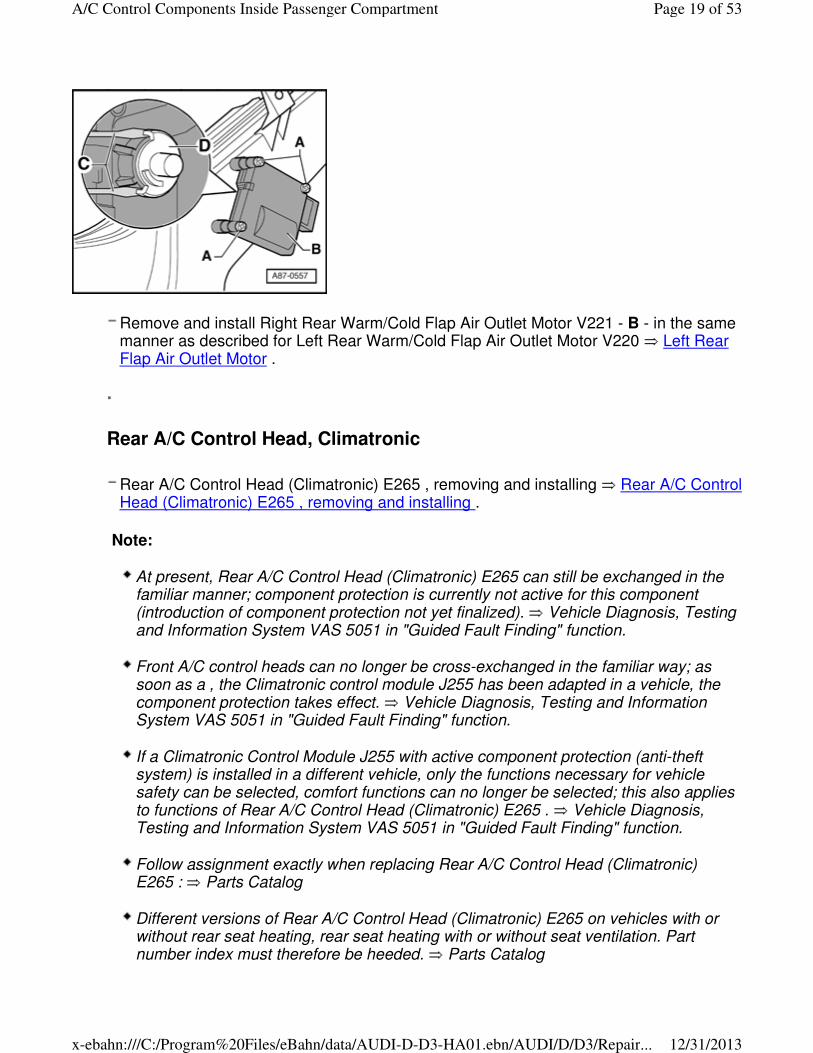
Remove vents from rear center console - A - . Without Extension Body Interior - Repair Group 68 With Extension Body Interior - Repair Group 68
Disengage catch of connector - A - by lifting clip - B - and disconnect connector.
Disengage connector - C - and disconnect it.
Pull Rear A/C Control Head (Climatronic) E265 - B - out of center console vent - A - (clipped in).
Installing
Install in reverse order of removal.
Check DTC memory of Rear A/C Control Head (Climatronic) E265 and of Climatronic Control Module J255 and erase DTCs displayed if necessary. Vehicle Diagnosis, Testing and Information System VAS 5051 in "Guided Fault Finding" function.
Perform basic setting, adaptation and output Diagnostic Test Mode (DTM) on A/C
Page 21 of 53A/C Control Components Inside Passenger Compartment
12/31/2013x-ebahn:///C:/Program%20Files/eBahn/data/AUDI-D-D3-HA01.ebn/AUDI/D/D3/Repair...
system. Vehicle Diagnosis, Testing and Information System VAS 5051 in "Guided Fault Finding" function.
.
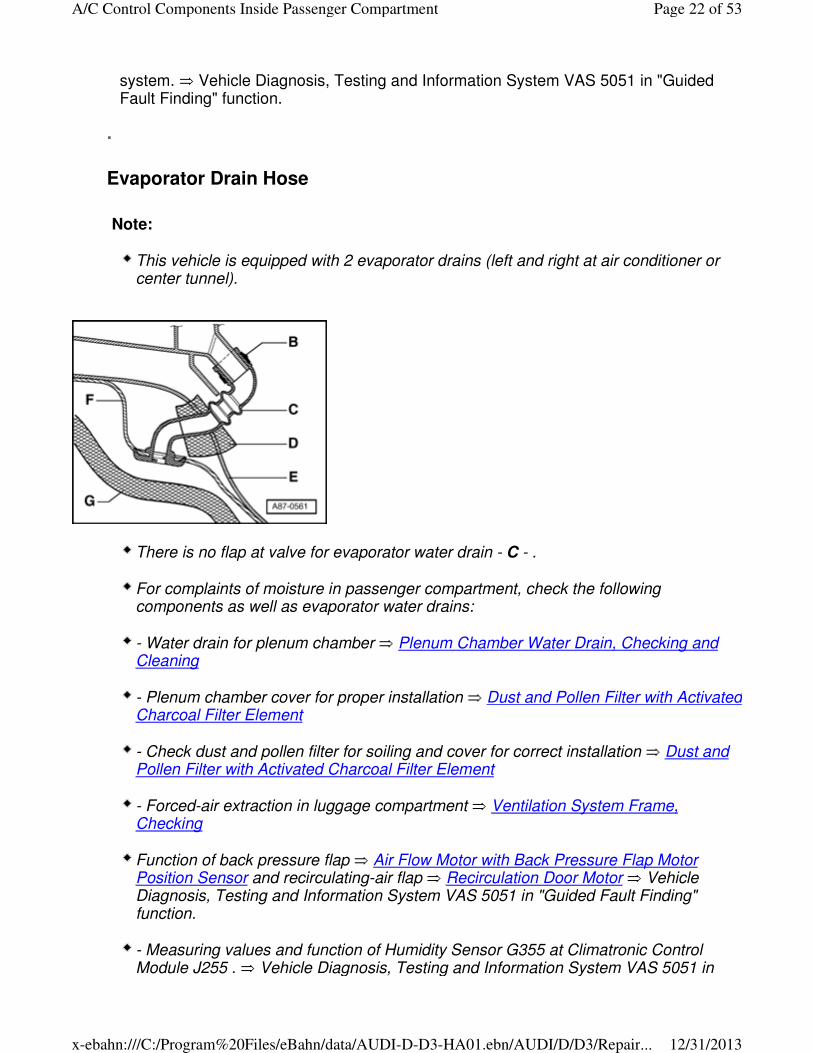
Evaporator Drain Hose
Note:
This vehicle is equipped with 2 evaporator drains (left and right at air conditioner or center tunnel).
There is no flap at valve for evaporator water drain - C - .
For complaints of moisture in passenger compartment, check the following components as well as evaporator water drains:
- Water drain for plenum chamber Plenum Chamber Water Drain, Checking and Cleaning
- Plenum chamber cover for proper installation Dust and Pollen Filter with Activated Charcoal Filter Element
- Check dust and pollen filter for soiling and cover for correct installation Dust and Pollen Filter with Activated Charcoal Filter Element
- Forced-air extraction in luggage compartment Ventilation System Frame, Checking
Function of back pressure flap Air Flow Motor with Back Pressure Flap Motor Position Sensor and recirculating-air flap Recirculation Door Motor Vehicle Diagnosis, Testing and Information System VAS 5051 in "Guided Fault Finding" function.
- Measuring values and function of Humidity Sensor G355 at Climatronic Control Module J255 . Vehicle Diagnosis, Testing and Information System VAS 5051 in
Page 22 of 53A/C Control Components Inside Passenger Compartment
12/31/2013x-ebahn:///C:/Program%20Files/eBahn/data/AUDI-D-D3-HA01.ebn/AUDI/D/D3/Repair...
"Guided Fault Finding" function.
- Signal for recognition of wiper operation at Climatronic Control Module J255 . Vehicle Diagnosis, Testing and Information System VAS 5051 in "Guided Fault Finding" function.
Check vent temperature of air from evaporator via measured values of Evaporator Vent Temperature Sensor G263 under operating conditions reported by customer with the following settings on Climatronic Control Module J255 : Vehicle Diagnosis, Testing and Information System VAS 5051 in "Guided Fault Finding" function.
- "Temperature Lo" for drivers and front passengers side
- Medium fresh-air blower speed (approx. 7 volts) Vehicle Diagnosis, Testing and Information System VAS 5051 in "Guided Fault Finding" function.
- "Fresh air mode"
If measured value of sensor is too low (at an ambient temperature above 0 degree C, colder than 0 degree C for extended period of time) or too high (greater than e.g. 10 degree C even though A/C system is operating without problems), observe notes for testing cooling output A/C System, Checking Cooling Output
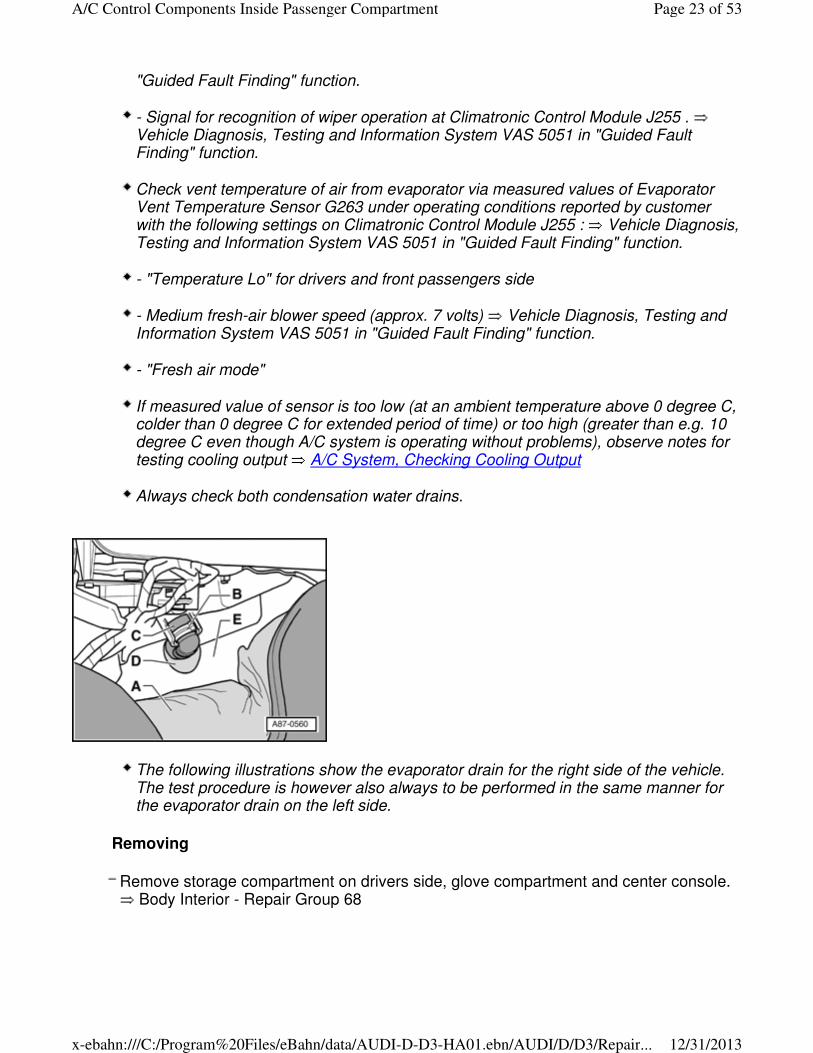
Always check both condensation water drains.
The following illustrations show the evaporator drain for the right side of the vehicle. The test procedure is however also always to be performed in the same manner for the evaporator drain on the left side.
Removing
Remove storage compartment on drivers side, glove compartment and center console. Body Interior - Repair Group 68
Page 23 of 53A/C Control Components Inside Passenger Compartment
12/31/2013x-ebahn:///C:/Program%20Files/eBahn/data/AUDI-D-D3-HA01.ebn/AUDI/D/D3/Repair...

Carefully fold back floor mat far enough that evaporator drain - A - is visible.
Disengage clamp - B -
Cover area beneath evaporator drain - C - with absorbent paper (so that any water present does not flow under carpet).
Remove foam pipe - D - .
Remove evaporator drain - C - .
Check gap between lower floor panel - F - and insulation mat - G - installed in center tunnel; there must be sufficient space for evaporator to drain out of evaporator drain -C-.
Page 24 of 53A/C Control Components Inside Passenger Compartment
12/31/2013x-ebahn:///C:/Program%20Files/eBahn/data/AUDI-D-D3-HA01.ebn/AUDI/D/D3/Repair...

Check evaporator water drain of A/C unit - A - for soiling (e.g. using a piece of wire).
Installing
Install in reverse order, paying attention to the following.
Insert evaporator drain into opening in lower floor plate - B - , observe locking element while doing so.
Insert foam pipe - D - into opening of upper floor plate - E - such that cross-section of evaporator drain is not constricted.
.
Air Conditioner Components Inside Passenger Compartment
Note:
Different versions of air conditioner on vehicles with and without Rear A/C Control Head (Climatronic) E265 Heating and A/C Unit and Air Distribution System Block Diagram
Air guide in air conditioner and in vehicle Air Distribution System Block Diagram
Heating and A/C unit, removing and installing Heating and A/C Unit
Page 25 of 53A/C Control Components Inside Passenger Compartment
12/31/2013x-ebahn:///C:/Program%20Files/eBahn/data/AUDI-D-D3-HA01.ebn/AUDI/D/D3/Repair...
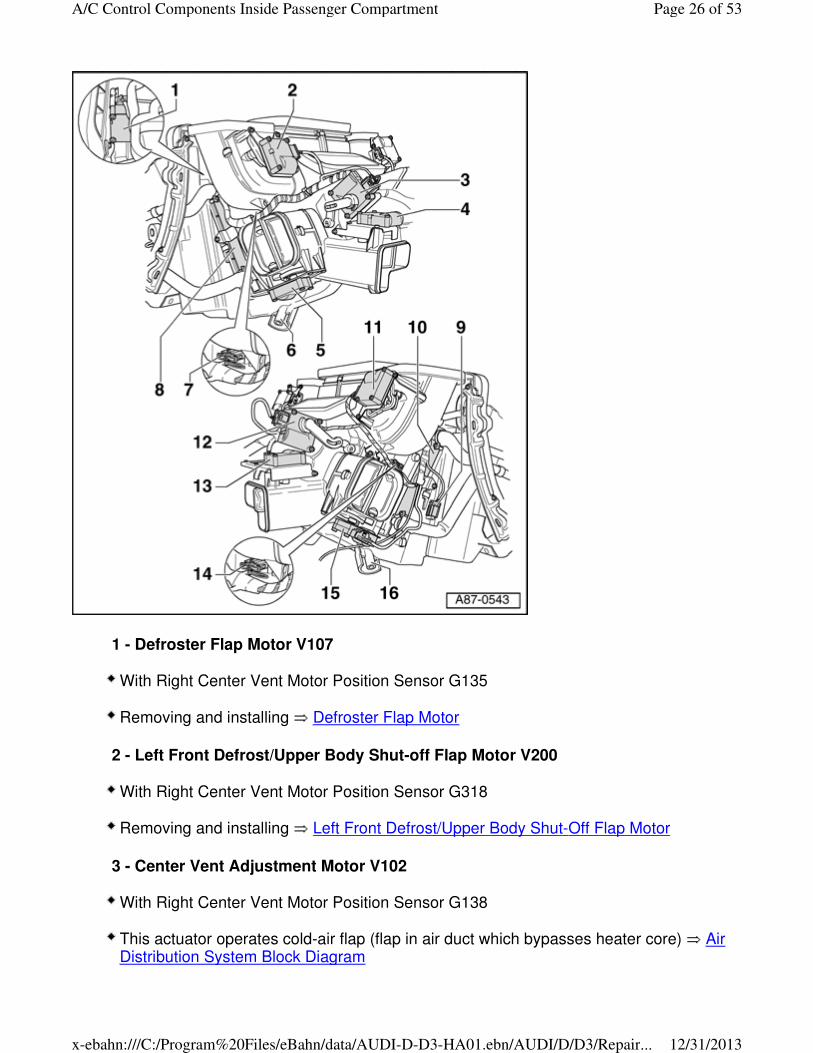
1 - Defroster Flap Motor V107
With Right Center Vent Motor Position Sensor G135
Removing and installing Defroster Flap Motor
2 - Left Front Defrost/Upper Body Shut-off Flap Motor V200
With Right Center Vent Motor Position Sensor G318
Removing and installing Left Front Defrost/Upper Body Shut-Off Flap Motor
3 - Center Vent Adjustment Motor V102
With Right Center Vent Motor Position Sensor G138
This actuator operates cold-air flap (flap in air duct which bypasses heater core) Air Distribution System Block Diagram
Page 26 of 53A/C Control Components Inside Passenger Compartment
12/31/2013x-ebahn:///C:/Program%20Files/eBahn/data/AUDI-D-D3-HA01.ebn/AUDI/D/D3/Repair...
Removing and installing Center Vent Adjustment Motor
4 - Left Rear Air Outlet Motor V218
With Right Center Vent Motor Position Sensor G349
Installed only on vehicles with Rear A/C Control Head (Climatronic) E265 .
removing and installing Rear Air Outlet Motors
5 - Left Footwell Flap Motor V108
With Right Center Vent Motor Position Sensor G139
Removing and installing Left Footwell Flap Motor
6 - Flange for left evaporator drain
7 - Left Vent Temperature Sensor G150
Removing and installing Lent Vent Temperature Sensor .
8 - Heater core for heater unit
Left
Removing and installing Left Heater Core
9 - Evaporator Vent Temperature Sensor G263
Removing and installing Evaporator Vent Temperature Sensor
10 - Heater core for heater unit
Right
Removing and installing Right Heater Core
11 - Right Front Defrost/Upper Body Shut-off Flap Motor V199
With Right Center Vent Motor Position Sensor G317
Removing and installing Right Front Defrost/Upper Body Shut-Off Flap Motor
12 - Temperature Regulator Flap Motor V68
With Right Center Vent Motor Position Sensor G92
This actuator operates warm-air flap (flap in air duct starting in mixing chamber
Page 27 of 53A/C Control Components Inside Passenger Compartment
12/31/2013x-ebahn:///C:/Program%20Files/eBahn/data/AUDI-D-D3-HA01.ebn/AUDI/D/D3/Repair...
downstream heater core) Air Distribution System Block Diagram
Removing and installing Temperature Regulator Flap Motor
13 - Right Rear Air Outlet Motor V219
With Right Center Vent Motor Position Sensor G350
Installed only on vehicles with Rear A/C Control Head (Climatronic) E265 .
Removing and installing Rear Air Outlet Motors
14 - Right Vent Temperature Sensor G151
Removing and installing Right Vent Temperature Sensor
15 - Right Footwell Flap Motor V109
With Right Center Vent Motor Position Sensor G140
Removing and installing Right Footwell Flap Motor
16 - Flange for right evaporator drain
.
Defroster Flap Motor
Note:
Mark motor/flap connecting elements when removing (danger of swapping with connecting elements of the other actuator motors).
In the event of fault "Upper or lower limit value exceeded" , check connecting element of engine/flap, it must be attached to engine accurate to side and there must not be any clearance between actuator mount and connecting element.
Removing
Remove dash panel complete with dash panel cross member. Body Interior - Repair Group 70
Remove left footwell vent (drivers side).
Page 28 of 53A/C Control Components Inside Passenger Compartment
12/31/2013x-ebahn:///C:/Program%20Files/eBahn/data/AUDI-D-D3-HA01.ebn/AUDI/D/D3/Repair...
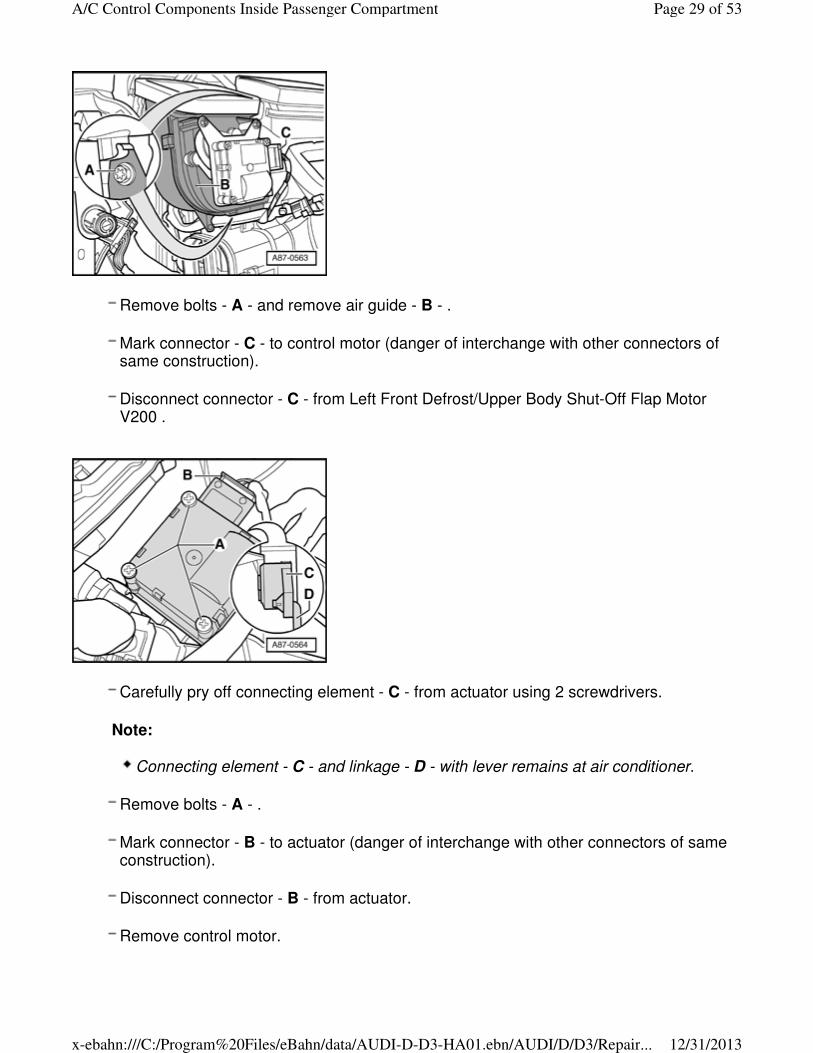
Remove bolts - A - and remove air guide - B - .
Mark connector - C - to control motor (danger of interchange with other connectors of same construction).
Disconnect connector - C - from Left Front Defrost/Upper Body Shut-Off Flap Motor V200 .
Carefully pry off connecting element - C - from actuator using 2 screwdrivers.
Note:
Connecting element - C - and linkage - D - with lever remains at air conditioner.
Remove bolts - A - .
Mark connector - B - to actuator (danger of interchange with other connectors of same construction).
Disconnect connector - B - from actuator.
Remove control motor.
Page 29 of 53A/C Control Components Inside Passenger Compartment
12/31/2013x-ebahn:///C:/Program%20Files/eBahn/data/AUDI-D-D3-HA01.ebn/AUDI/D/D3/Repair...
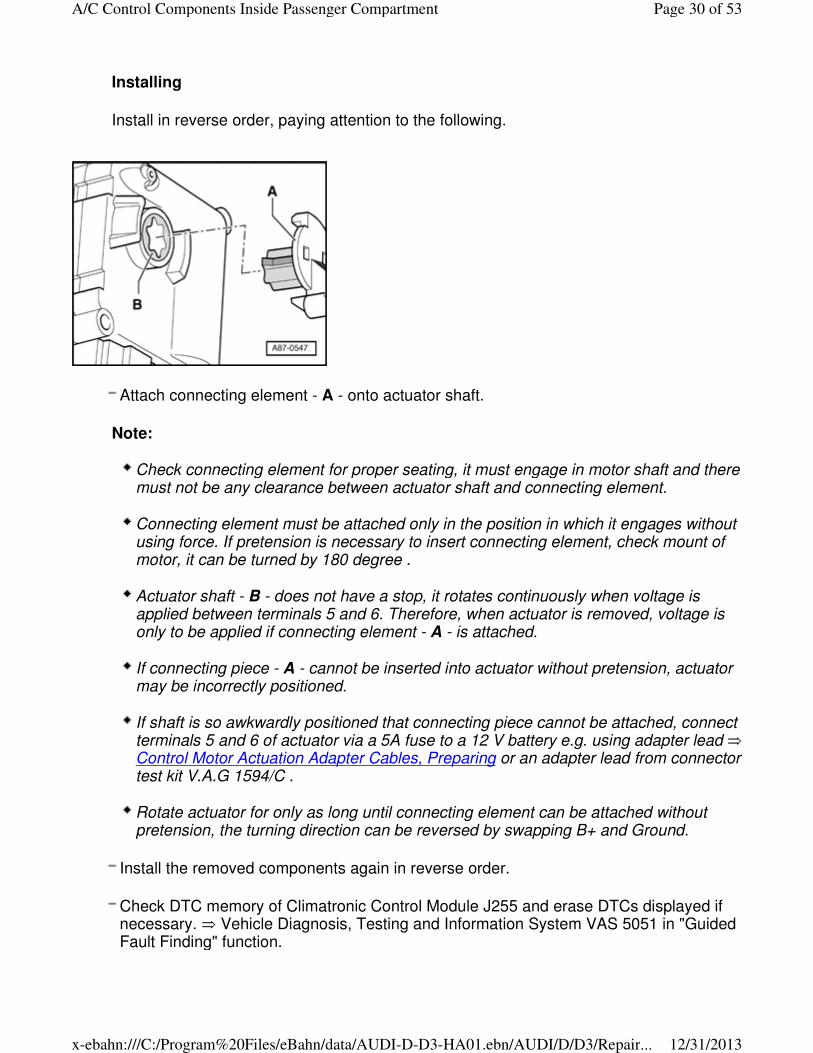
Installing
Install in reverse order, paying attention to the following.
Attach connecting element - A - onto actuator shaft.
Note:
Check connecting element for proper seating, it must engage in motor shaft and there must not be any clearance between actuator shaft and connecting element.
Connecting element must be attached only in the position in which it engages without using force. If pretension is necessary to insert connecting element, check mount of motor, it can be turned by 180 degree .
Actuator shaft - B - does not have a stop, it rotates continuously when voltage is applied between terminals 5 and 6. Therefore, when actuator is removed, voltage is only to be applied if connecting element - A - is attached.
If connecting piece - A - cannot be inserted into actuator without pretension, actuator may be incorrectly positioned.
If shaft is so awkwardly positioned that connecting piece cannot be attached, connect terminals 5 and 6 of actuator via a 5A fuse to a 12 V battery e.g. using adapter lead Control Motor Actuation Adapter Cables, Preparing or an adapter lead from connector test kit V.A.G 1594/C .
Rotate actuator for only as long until connecting element can be attached without pretension, the turning direction can be reversed by swapping B+ and Ground.
Install the removed components again in reverse order.
Check DTC memory of Climatronic Control Module J255 and erase DTCs displayed if necessary. Vehicle Diagnosis, Testing and Information System VAS 5051 in "Guided Fault Finding" function.
Page 30 of 53A/C Control Components Inside Passenger Compartment
12/31/2013x-ebahn:///C:/Program%20Files/eBahn/data/AUDI-D-D3-HA01.ebn/AUDI/D/D3/Repair...

Perform basic setting and output Diagnostic Test Mode (DTM) on the A/C system. Vehicle Diagnosis, Testing and Information System VAS 5051 in "Guided Fault Finding" function.
.
Center Vent Adjustment Motor
Note:
Mark motor/flap connecting elements when removing (danger of swapping with connecting elements of the other actuator motors).
In the event of fault "Upper or lower limit value exceeded" , check connecting element of engine/flap, it must be attached to engine accurate to side and there must not be any clearance between actuator mount and connecting element.
This actuator operates cold-air flap (flap in air duct which bypasses heater core) Air Distribution System Block Diagram
Removing
Switch off ignition.
Remove center console. Without Extension Body Interior - Repair Group 68 With Extension Body Interior - Repair Group 68
Remove storage compartment beneath left instrument panel and steering column support to center tunnel Body Interior - Repair Group 68
Carefully pry off connecting element - C - from actuator, e.g. using 2 screwdrivers.
Mark connector - B - to actuator (danger of interchange with other connectors of same construction).
Page 31 of 53A/C Control Components Inside Passenger Compartment
12/31/2013x-ebahn:///C:/Program%20Files/eBahn/data/AUDI-D-D3-HA01.ebn/AUDI/D/D3/Repair...

Disconnect connector - B - from actuator.
Remove bolts - A - .
Remove control motor.
Installing
Install in reverse order, paying attention to the following.
Lightly lubricate guide of lever - C - or lug at flap lever with grease (e.g. G 000 150)
Attach connecting element - A - onto actuator shaft.
Note:
Check connecting element for proper seating, it must engage in motor shaft and there must not be any clearance between actuator shaft and connecting element.
Connecting element must be attached only in the position in which it engages without using force. If pretension is necessary to insert connecting element, check mount of motor, it can be turned by 180 degree .
Actuator shaft - B - does not have a stop, it rotates continuously when voltage is applied between terminals 5 and 6. Therefore, when actuator is removed, voltage is only to be applied if connecting element - A - is attached.
If connecting piece - A - cannot be inserted into actuator without pretension, actuator may be incorrectly positioned.
If shaft is so awkwardly positioned that connecting piece cannot be attached, connect terminals 5 and 6 of actuator via a 5A fuse to a 12 V battery e.g. using adapter lead Control Motor Actuation Adapter Cables, Preparing or an adapter lead from connector test kit V.A.G 1594/ A .
Rotate actuator for only as long until connecting element can be attached without
Page 32 of 53A/C Control Components Inside Passenger Compartment
12/31/2013x-ebahn:///C:/Program%20Files/eBahn/data/AUDI-D-D3-HA01.ebn/AUDI/D/D3/Repair...

pretension, the turning direction can be reversed by swapping B+ and Ground.
Install the removed components again in reverse order.
Check DTC memory of Climatronic Control Module J255 and erase DTCs displayed if necessary. Vehicle Diagnosis, Testing and Information System VAS 5051 in "Guided Fault Finding" function.
Perform basic setting and output Diagnostic Test Mode (DTM) on the A/C system. Vehicle Diagnosis, Testing and Information System VAS 5051 in "Guided Fault Finding" function.
.
Left Front Defrost/Upper Body Shut-Off Flap Motor
Note:
Mark motor/flap connecting elements when removing (danger of swapping with connecting elements of the other actuator motors).
In the event of fault "Upper or lower limit value exceeded" , check connecting element of engine/flap, it must be attached to engine accurate to side and there must not be any clearance between actuator mount and connecting element.
Removing
Switch off ignition.
Remove center console. Without Extension Body Interior - Repair Group 68 With Extension Body Interior - Repair Group 68
Remove storage compartment beneath left instrument panel and steering column support to center tunnel Body Interior - Repair Group 68
Page 33 of 53A/C Control Components Inside Passenger Compartment
12/31/2013x-ebahn:///C:/Program%20Files/eBahn/data/AUDI-D-D3-HA01.ebn/AUDI/D/D3/Repair...
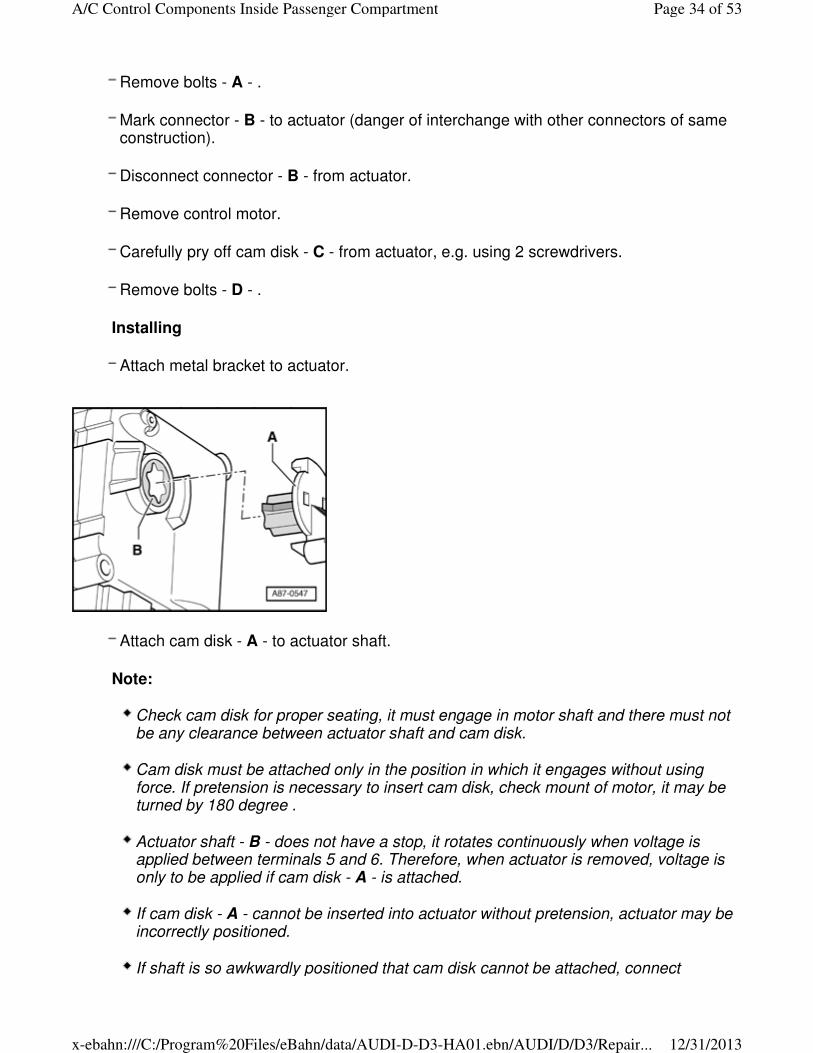
Remove bolts - A - .
Mark connector - B - to actuator (danger of interchange with other connectors of same construction).
Disconnect connector - B - from actuator.
Remove control motor.
Carefully pry off cam disk - C - from actuator, e.g. using 2 screwdrivers.
Remove bolts - D - .
Installing
Attach metal bracket to actuator.
Attach cam disk - A - to actuator shaft.
Note:
Check cam disk for proper seating, it must engage in motor shaft and there must not be any clearance between actuator shaft and cam disk.
Cam disk must be attached only in the position in which it engages without using force. If pretension is necessary to insert cam disk, check mount of motor, it may be turned by 180 degree .
Actuator shaft - B - does not have a stop, it rotates continuously when voltage is applied between terminals 5 and 6. Therefore, when actuator is removed, voltage is only to be applied if cam disk - A - is attached.
If cam disk - A - cannot be inserted into actuator without pretension, actuator may be incorrectly positioned.
If shaft is so awkwardly positioned that cam disk cannot be attached, connect
Page 34 of 53A/C Control Components Inside Passenger Compartment
12/31/2013x-ebahn:///C:/Program%20Files/eBahn/data/AUDI-D-D3-HA01.ebn/AUDI/D/D3/Repair...
terminals 5 and 6 of actuator via a 5A fuse to a 12 V battery e.g. using adapter lead Control Motor Actuation Adapter Cables, Preparing or an adapter lead from connector test kit V.A.G 1594/C .
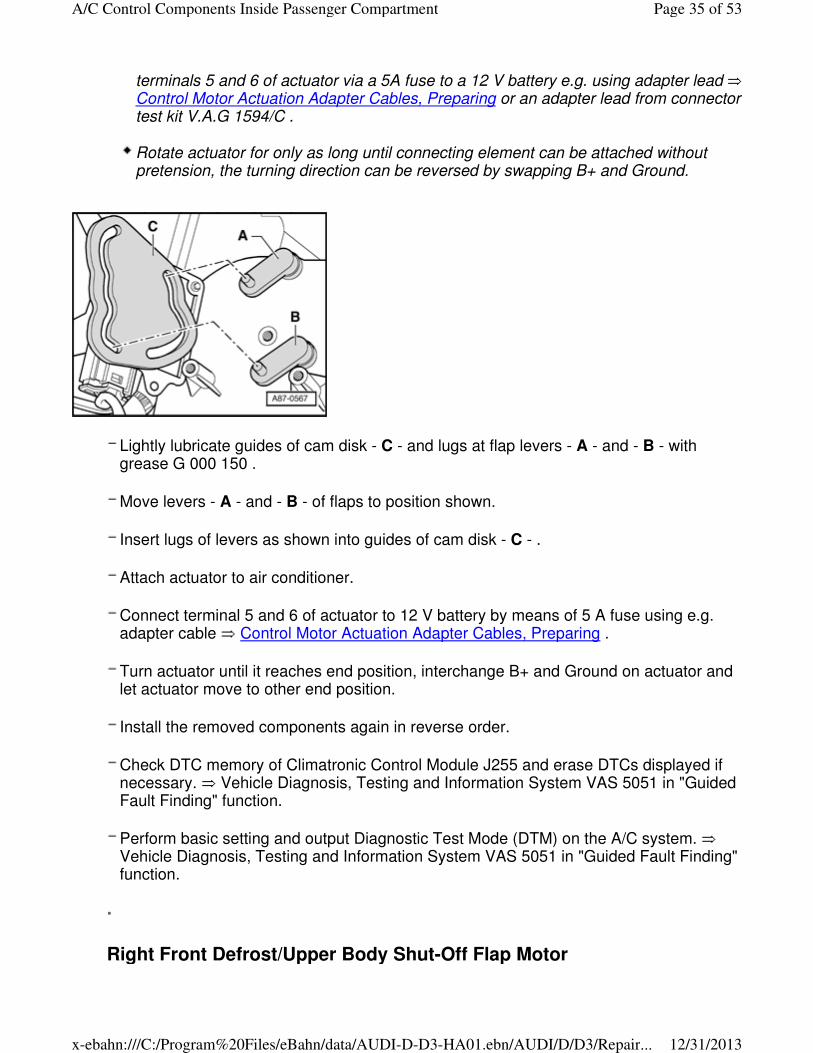
Rotate actuator for only as long until connecting element can be attached without pretension, the turning direction can be reversed by swapping B+ and Ground.
Lightly lubricate guides of cam disk - C - and lugs at flap levers - A - and - B - with grease G 000 150 .
Move levers - A - and - B - of flaps to position shown.
Insert lugs of levers as shown into guides of cam disk - C - .
Attach actuator to air conditioner.
Connect terminal 5 and 6 of actuator to 12 V battery by means of 5 A fuse using e.g. adapter cable Control Motor Actuation Adapter Cables, Preparing .
Turn actuator until it reaches end position, interchange B+ and Ground on actuator and let actuator move to other end position.
Install the removed components again in reverse order.
Check DTC memory of Climatronic Control Module J255 and erase DTCs displayed if necessary. Vehicle Diagnosis, Testing and Information System VAS 5051 in "Guided Fault Finding" function.
Perform basic setting and output Diagnostic Test Mode (DTM) on the A/C system. Vehicle Diagnosis, Testing and Information System VAS 5051 in "Guided Fault Finding" function.
.
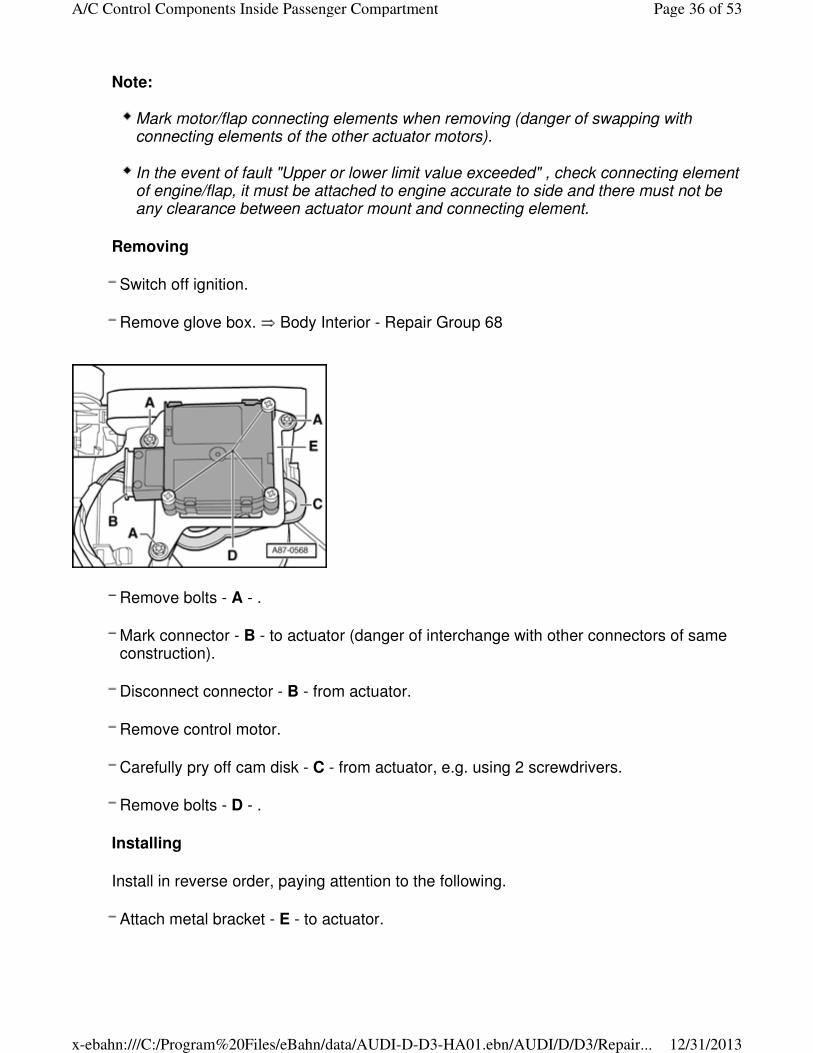
Right Front Defrost/Upper Body Shut-Off Flap Motor
Page 35 of 53A/C Control Components Inside Passenger Compartment
12/31/2013x-ebahn:///C:/Program%20Files/eBahn/data/AUDI-D-D3-HA01.ebn/AUDI/D/D3/Repair...
Note:
Mark motor/flap connecting elements when removing (danger of swapping with connecting elements of the other actuator motors).
In the event of fault "Upper or lower limit value exceeded" , check connecting element of engine/flap, it must be attached to engine accurate to side and there must not be any clearance between actuator mount and connecting element.
Removing
Switch off ignition.
Remove glove box. Body Interior - Repair Group 68
Remove bolts - A - .
Mark connector - B - to actuator (danger of interchange with other connectors of same construction).
Disconnect connector - B - from actuator.
Remove control motor.
Carefully pry off cam disk - C - from actuator, e.g. using 2 screwdrivers.
Remove bolts - D - .
Installing
Install in reverse order, paying attention to the following.
Attach metal bracket - E - to actuator.
Page 36 of 53A/C Control Components Inside Passenger Compartment
12/31/2013x-ebahn:///C:/Program%20Files/eBahn/data/AUDI-D-D3-HA01.ebn/AUDI/D/D3/Repair...
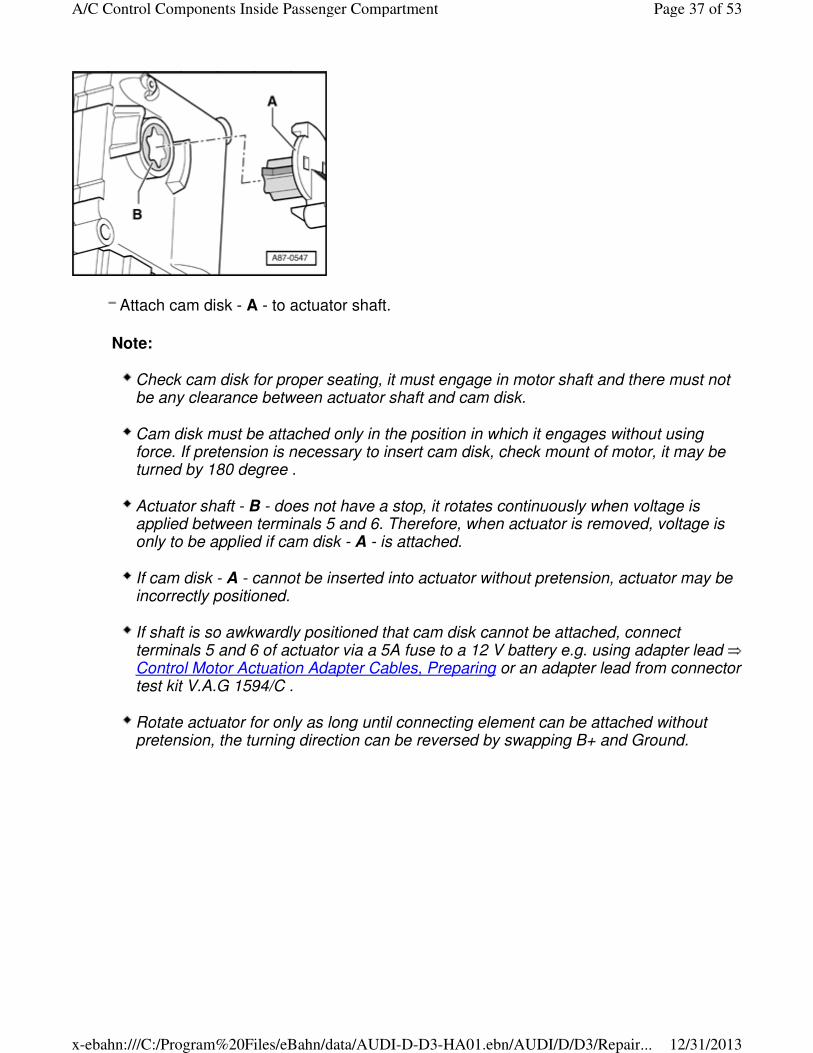
Attach cam disk - A - to actuator shaft.
Note:
Check cam disk for proper seating, it must engage in motor shaft and there must not be any clearance between actuator shaft and cam disk.
Cam disk must be attached only in the position in which it engages without using force. If pretension is necessary to insert cam disk, check mount of motor, it may be turned by 180 degree .
Actuator shaft - B - does not have a stop, it rotates continuously when voltage is applied between terminals 5 and 6. Therefore, when actuator is removed, voltage is only to be applied if cam disk - A - is attached.
If cam disk - A - cannot be inserted into actuator without pretension, actuator may be incorrectly positioned.
If shaft is so awkwardly positioned that cam disk cannot be attached, connect terminals 5 and 6 of actuator via a 5A fuse to a 12 V battery e.g. using adapter lead Control Motor Actuation Adapter Cables, Preparing or an adapter lead from connector test kit V.A.G 1594/C .
Rotate actuator for only as long until connecting element can be attached without pretension, the turning direction can be reversed by swapping B+ and Ground.
Page 37 of 53A/C Control Components Inside Passenger Compartment
12/31/2013x-ebahn:///C:/Program%20Files/eBahn/data/AUDI-D-D3-HA01.ebn/AUDI/D/D3/Repair...
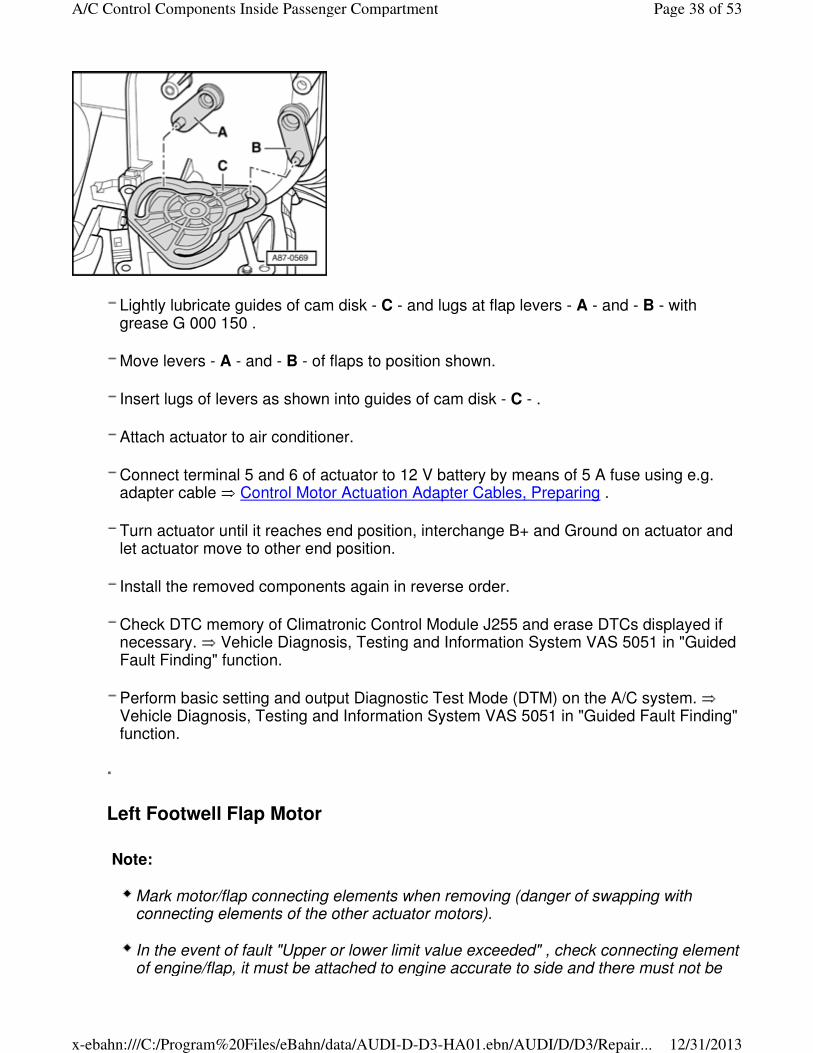
Lightly lubricate guides of cam disk - C - and lugs at flap levers - A - and - B - with grease G 000 150 .
Move levers - A - and - B - of flaps to position shown.
Insert lugs of levers as shown into guides of cam disk - C - .
Attach actuator to air conditioner.
Connect terminal 5 and 6 of actuator to 12 V battery by means of 5 A fuse using e.g. adapter cable Control Motor Actuation Adapter Cables, Preparing .
Turn actuator until it reaches end position, interchange B+ and Ground on actuator and let actuator move to other end position.
Install the removed components again in reverse order.
Check DTC memory of Climatronic Control Module J255 and erase DTCs displayed if necessary. Vehicle Diagnosis, Testing and Information System VAS 5051 in "Guided Fault Finding" function.
Perform basic setting and output Diagnostic Test Mode (DTM) on the A/C system. Vehicle Diagnosis, Testing and Information System VAS 5051 in "Guided Fault Finding" function.
.
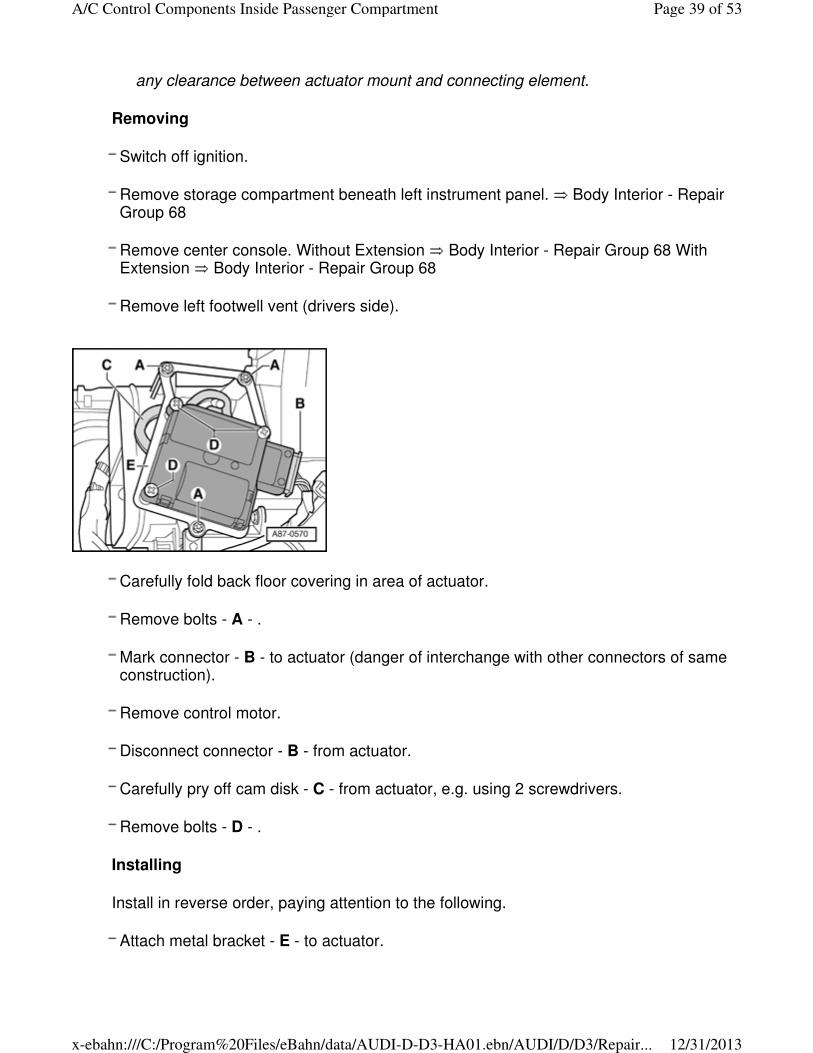
Left Footwell Flap Motor
Note:
Mark motor/flap connecting elements when removing (danger of swapping with connecting elements of the other actuator motors).
In the event of fault "Upper or lower limit value exceeded" , check connecting element of engine/flap, it must be attached to engine accurate to side and there must not be
Page 38 of 53A/C Control Components Inside Passenger Compartment
12/31/2013x-ebahn:///C:/Program%20Files/eBahn/data/AUDI-D-D3-HA01.ebn/AUDI/D/D3/Repair...
any clearance between actuator mount and connecting element.
Removing
Switch off ignition.
Remove storage compartment beneath left instrument panel. Body Interior - Repair Group 68
Remove center console. Without Extension Body Interior - Repair Group 68 With Extension Body Interior - Repair Group 68
Remove left footwell vent (drivers side).
Carefully fold back floor covering in area of actuator.
Remove bolts - A - .
Mark connector - B - to actuator (danger of interchange with other connectors of same construction).
Remove control motor.
Disconnect connector - B - from actuator.
Carefully pry off cam disk - C - from actuator, e.g. using 2 screwdrivers.
Remove bolts - D - .
Installing
Install in reverse order, paying attention to the following.
Attach metal bracket - E - to actuator.
Page 39 of 53A/C Control Components Inside Passenger Compartment
12/31/2013x-ebahn:///C:/Program%20Files/eBahn/data/AUDI-D-D3-HA01.ebn/AUDI/D/D3/Repair...
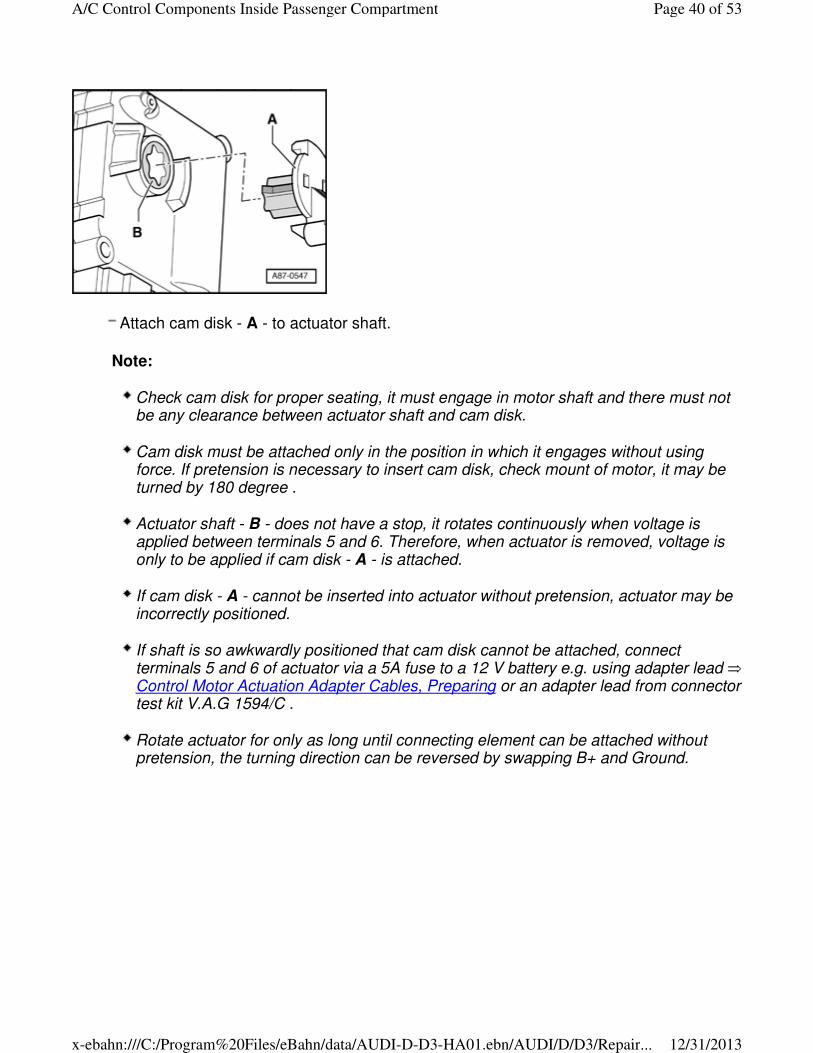
Attach cam disk - A - to actuator shaft.
Note:
Check cam disk for proper seating, it must engage in motor shaft and there must not be any clearance between actuator shaft and cam disk.
Cam disk must be attached only in the position in which it engages without using force. If pretension is necessary to insert cam disk, check mount of motor, it may be turned by 180 degree .
Actuator shaft - B - does not have a stop, it rotates continuously when voltage is applied between terminals 5 and 6. Therefore, when actuator is removed, voltage is only to be applied if cam disk - A - is attached.
If cam disk - A - cannot be inserted into actuator without pretension, actuator may be incorrectly positioned.
If shaft is so awkwardly positioned that cam disk cannot be attached, connect terminals 5 and 6 of actuator via a 5A fuse to a 12 V battery e.g. using adapter lead Control Motor Actuation Adapter Cables, Preparing or an adapter lead from connector test kit V.A.G 1594/C .
Rotate actuator for only as long until connecting element can be attached without pretension, the turning direction can be reversed by swapping B+ and Ground.
Page 40 of 53A/C Control Components Inside Passenger Compartment
12/31/2013x-ebahn:///C:/Program%20Files/eBahn/data/AUDI-D-D3-HA01.ebn/AUDI/D/D3/Repair...
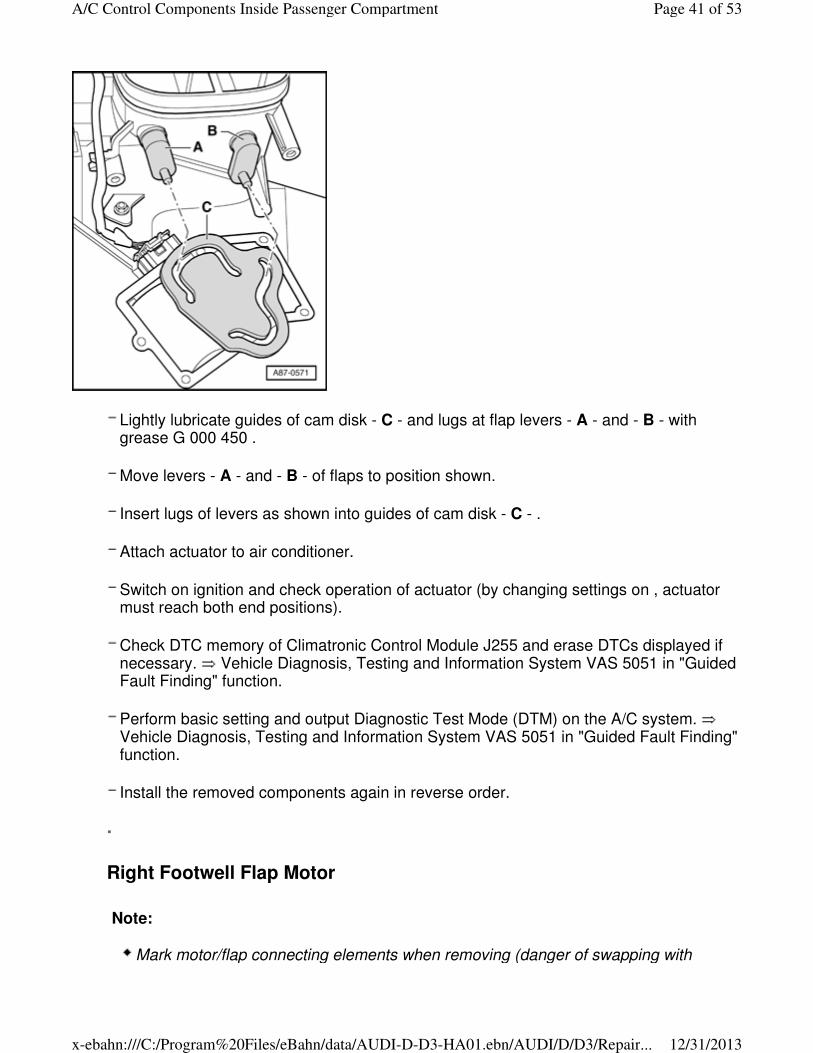
Lightly lubricate guides of cam disk - C - and lugs at flap levers - A - and - B - with grease G 000 450 .
Move levers - A - and - B - of flaps to position shown.
Insert lugs of levers as shown into guides of cam disk - C - .
Attach actuator to air conditioner.
Switch on ignition and check operation of actuator (by changing settings on , actuator must reach both end positions).
Check DTC memory of Climatronic Control Module J255 and erase DTCs displayed if necessary. Vehicle Diagnosis, Testing and Information System VAS 5051 in "Guided Fault Finding" function.
Perform basic setting and output Diagnostic Test Mode (DTM) on the A/C system. Vehicle Diagnosis, Testing and Information System VAS 5051 in "Guided Fault Finding" function.
Install the removed components again in reverse order.
.
Right Footwell Flap Motor
Note:
Mark motor/flap connecting elements when removing (danger of swapping with
Page 41 of 53A/C Control Components Inside Passenger Compartment
12/31/2013x-ebahn:///C:/Program%20Files/eBahn/data/AUDI-D-D3-HA01.ebn/AUDI/D/D3/Repair...
connecting elements of the other actuator motors).
In the event of fault "Upper or lower limit value exceeded" , check connecting element of engine/flap, it must be attached to engine accurate to side and there must not be any clearance between actuator mount and connecting element.
Removing
Switch off ignition.
Remove glove box. Body Interior - Repair Group 68
Remove center console. Without Extension Body Interior - Repair Group 68 With Extension Body Interior - Repair Group 68
Remove right footwell vent (passengers side).
Carefully fold back floor covering in area of actuator.
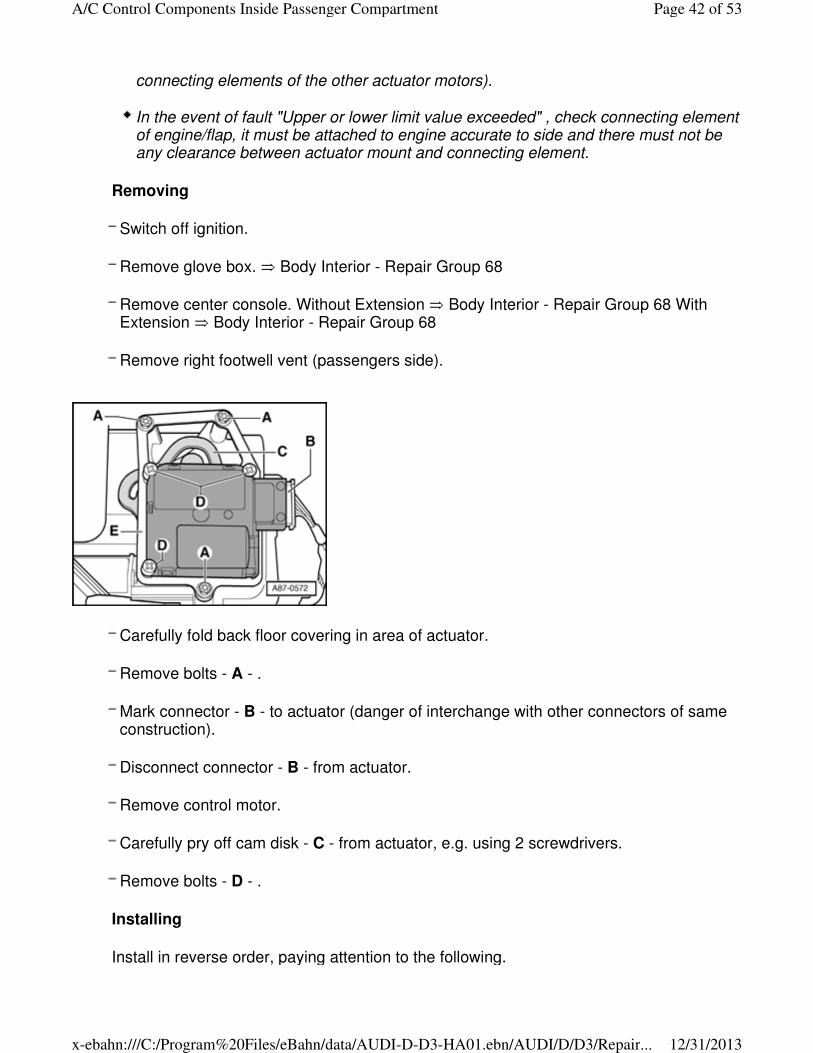
Remove bolts - A - .
Mark connector - B - to actuator (danger of interchange with other connectors of same construction).
Disconnect connector - B - from actuator.
Remove control motor.
Carefully pry off cam disk - C - from actuator, e.g. using 2 screwdrivers.
Remove bolts - D - .
Installing
Install in reverse order, paying attention to the following.
Page 42 of 53A/C Control Components Inside Passenger Compartment
12/31/2013x-ebahn:///C:/Program%20Files/eBahn/data/AUDI-D-D3-HA01.ebn/AUDI/D/D3/Repair...
Attach metal bracket - E - to actuator.
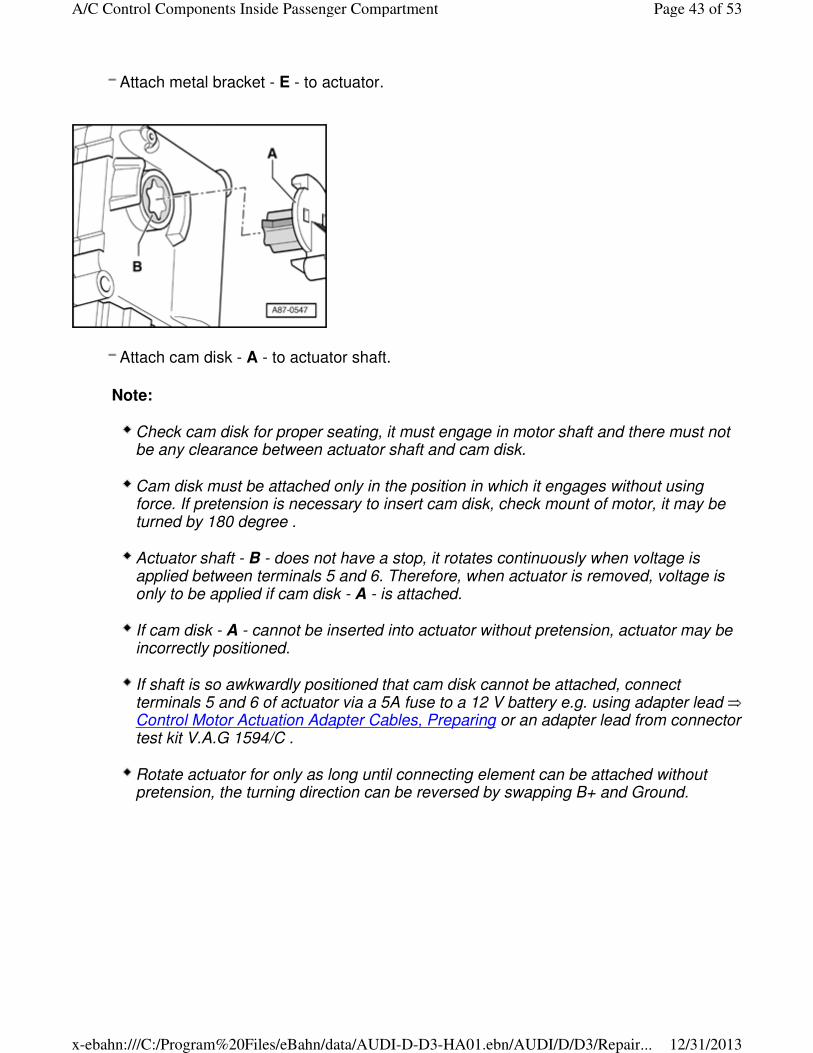
Attach cam disk - A - to actuator shaft.
Note:
Check cam disk for proper seating, it must engage in motor shaft and there must not be any clearance between actuator shaft and cam disk.
Cam disk must be attached only in the position in which it engages without using force. If pretension is necessary to insert cam disk, check mount of motor, it may be turned by 180 degree .
Actuator shaft - B - does not have a stop, it rotates continuously when voltage is applied between terminals 5 and 6. Therefore, when actuator is removed, voltage is only to be applied if cam disk - A - is attached.
If cam disk - A - cannot be inserted into actuator without pretension, actuator may be incorrectly positioned.
If shaft is so awkwardly positioned that cam disk cannot be attached, connect terminals 5 and 6 of actuator via a 5A fuse to a 12 V battery e.g. using adapter lead Control Motor Actuation Adapter Cables, Preparing or an adapter lead from connector test kit V.A.G 1594/C .
Rotate actuator for only as long until connecting element can be attached without pretension, the turning direction can be reversed by swapping B+ and Ground.
Page 43 of 53A/C Control Components Inside Passenger Compartment
12/31/2013x-ebahn:///C:/Program%20Files/eBahn/data/AUDI-D-D3-HA01.ebn/AUDI/D/D3/Repair...

Lightly lubricate guides of cam disk - C - and lugs at flap levers - A - and - B - with grease G 000 450 .
Move levers - A - and - B - of flaps to position shown.
Insert lugs of levers as shown into guides of cam disk - C - .
Attach actuator to air conditioner.
Switch on ignition and check operation of actuator (by changing settings on , actuator must reach both end positions).
Check DTC memory of Climatronic Control Module J255 and erase DTCs displayed if necessary. Vehicle Diagnosis, Testing and Information System VAS 5051 in "Guided Fault Finding" function.
Perform basic setting and output Diagnostic Test Mode (DTM) on the A/C system. Vehicle Diagnosis, Testing and Information System VAS 5051 in "Guided Fault Finding" function.
Install the removed components again in reverse order.
.
Temperature Regulator Flap Motor
Note:
Mark motor/flap connecting elements when removing (danger of swapping with connecting elements of the other actuator motors).
In the event of fault "Upper or lower limit value exceeded" , check connecting element of engine/flap, it must be attached to engine accurate to side and there must not be any clearance between actuator mount and connecting element.
This actuator operates the warm-air flap (flap in air duct from heater core) Air
Page 44 of 53A/C Control Components Inside Passenger Compartment
12/31/2013x-ebahn:///C:/Program%20Files/eBahn/data/AUDI-D-D3-HA01.ebn/AUDI/D/D3/Repair...
Distribution System Block Diagram
Removing
Switch off ignition.
Remove glove box. Body Interior - Repair Group 68
Remove right footwell vent (passengers side).
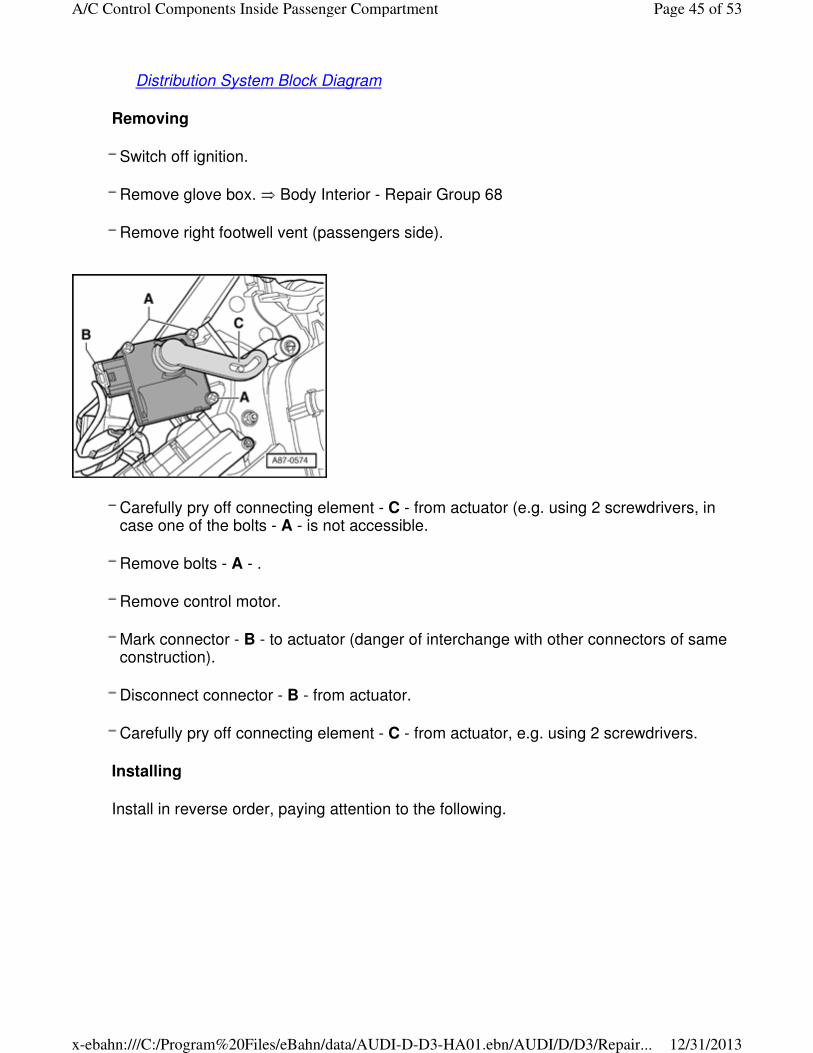
Carefully pry off connecting element - C - from actuator (e.g. using 2 screwdrivers, in case one of the bolts - A - is not accessible.
Remove bolts - A - .
Remove control motor.
Mark connector - B - to actuator (danger of interchange with other connectors of same construction).
Disconnect connector - B - from actuator.
Carefully pry off connecting element - C - from actuator, e.g. using 2 screwdrivers.
Installing
Install in reverse order, paying attention to the following.
Page 45 of 53A/C Control Components Inside Passenger Compartment
12/31/2013x-ebahn:///C:/Program%20Files/eBahn/data/AUDI-D-D3-HA01.ebn/AUDI/D/D3/Repair...
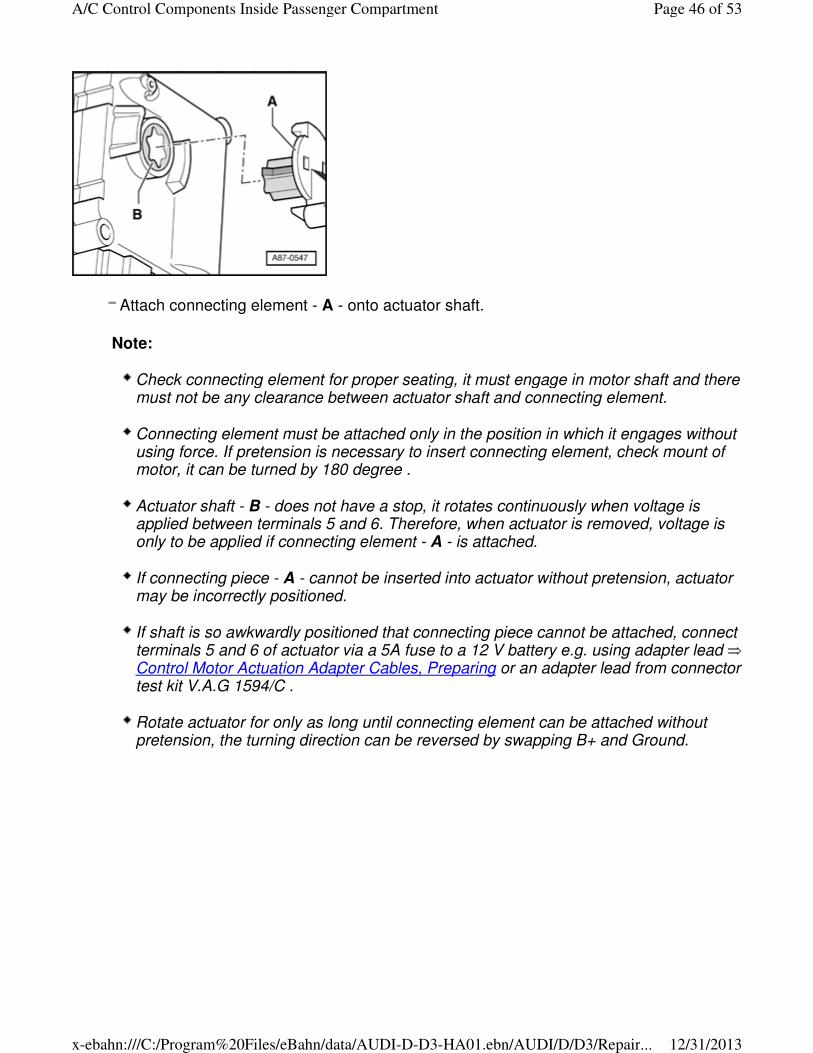
Attach connecting element - A - onto actuator shaft.
Note:
Check connecting element for proper seating, it must engage in motor shaft and there must not be any clearance between actuator shaft and connecting element.
Connecting element must be attached only in the position in which it engages without using force. If pretension is necessary to insert connecting element, check mount of motor, it can be turned by 180 degree .
Actuator shaft - B - does not have a stop, it rotates continuously when voltage is applied between terminals 5 and 6. Therefore, when actuator is removed, voltage is only to be applied if connecting element - A - is attached.
If connecting piece - A - cannot be inserted into actuator without pretension, actuator may be incorrectly positioned.
If shaft is so awkwardly positioned that connecting piece cannot be attached, connect terminals 5 and 6 of actuator via a 5A fuse to a 12 V battery e.g. using adapter lead Control Motor Actuation Adapter Cables, Preparing or an adapter lead from connector test kit V.A.G 1594/C .
Rotate actuator for only as long until connecting element can be attached without pretension, the turning direction can be reversed by swapping B+ and Ground.
Page 46 of 53A/C Control Components Inside Passenger Compartment
12/31/2013x-ebahn:///C:/Program%20Files/eBahn/data/AUDI-D-D3-HA01.ebn/AUDI/D/D3/Repair...
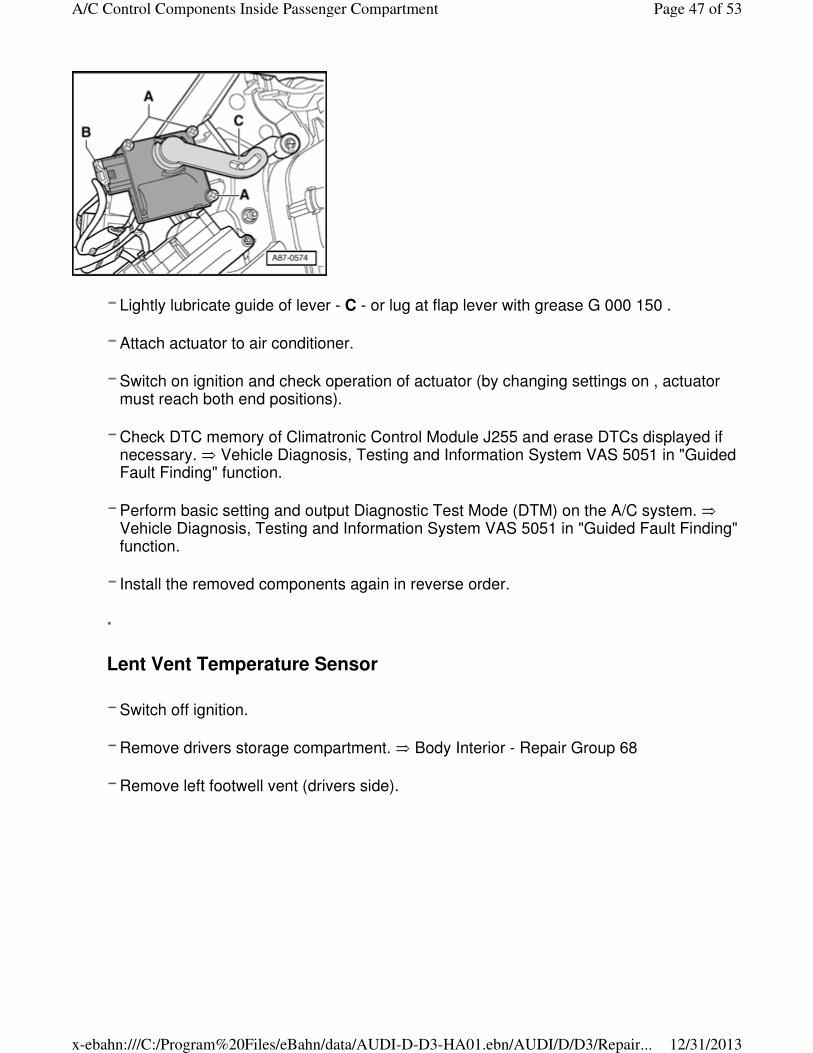
Lightly lubricate guide of lever - C - or lug at flap lever with grease G 000 150 .
Attach actuator to air conditioner.
Switch on ignition and check operation of actuator (by changing settings on , actuator must reach both end positions).
Check DTC memory of Climatronic Control Module J255 and erase DTCs displayed if necessary. Vehicle Diagnosis, Testing and Information System VAS 5051 in "Guided Fault Finding" function.
Perform basic setting and output Diagnostic Test Mode (DTM) on the A/C system. Vehicle Diagnosis, Testing and Information System VAS 5051 in "Guided Fault Finding" function.
Install the removed components again in reverse order.
.
Lent Vent Temperature Sensor
Switch off ignition.
Remove drivers storage compartment. Body Interior - Repair Group 68
Remove left footwell vent (drivers side).
Page 47 of 53A/C Control Components Inside Passenger Compartment
12/31/2013x-ebahn:///C:/Program%20Files/eBahn/data/AUDI-D-D3-HA01.ebn/AUDI/D/D3/Repair...
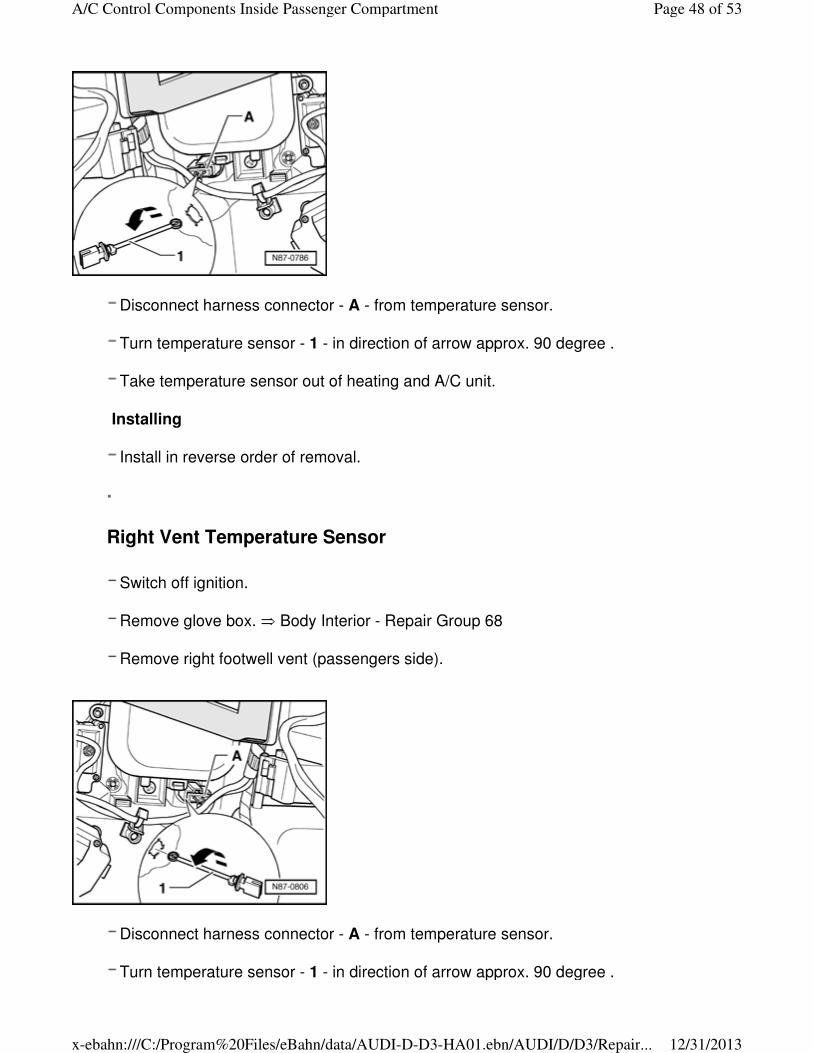
Disconnect harness connector - A - from temperature sensor.
Turn temperature sensor - 1 - in direction of arrow approx. 90 degree .
Take temperature sensor out of heating and A/C unit.
Installing
Install in reverse order of removal.
.
Right Vent Temperature Sensor
Switch off ignition.
Remove glove box. Body Interior - Repair Group 68
Remove right footwell vent (passengers side).
Disconnect harness connector - A - from temperature sensor.
Turn temperature sensor - 1 - in direction of arrow approx. 90 degree .
Page 48 of 53A/C Control Components Inside Passenger Compartment
12/31/2013x-ebahn:///C:/Program%20Files/eBahn/data/AUDI-D-D3-HA01.ebn/AUDI/D/D3/Repair...
Take temperature sensor out of heating and A/C unit.
Installing
Install in reverse order of removal.
.
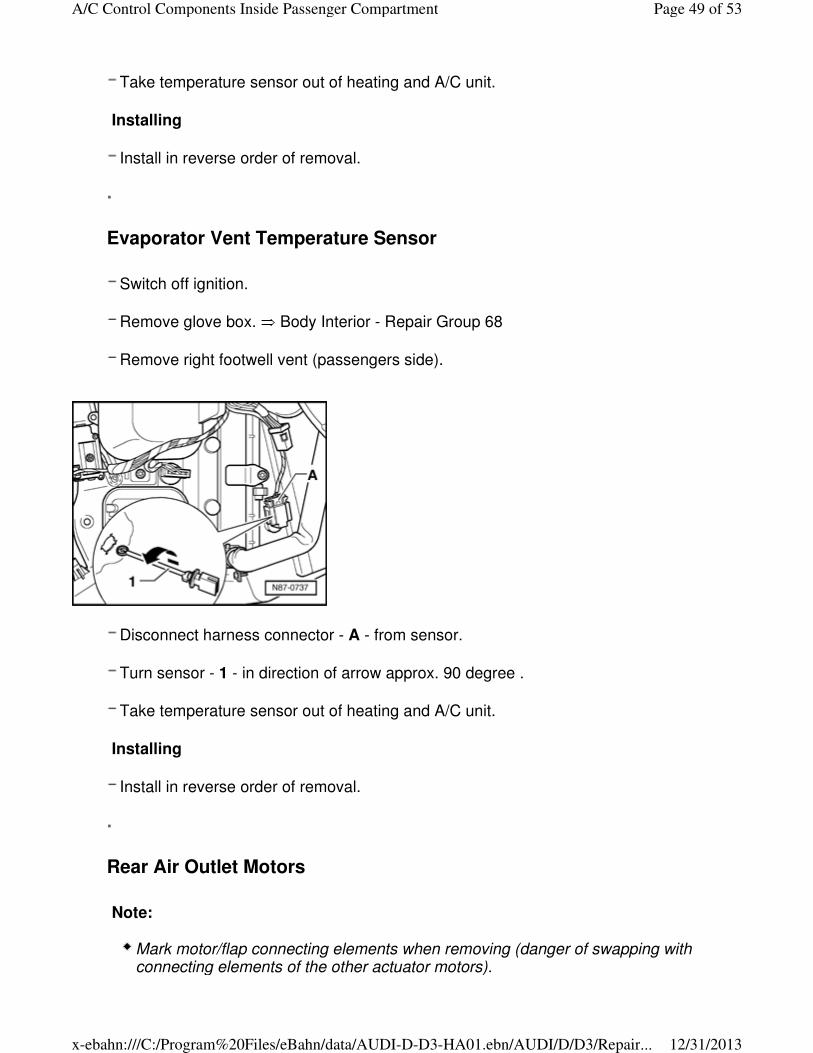
Evaporator Vent Temperature Sensor
Switch off ignition.
Remove glove box. Body Interior - Repair Group 68
Remove right footwell vent (passengers side).
Disconnect harness connector - A - from sensor.
Turn sensor - 1 - in direction of arrow approx. 90 degree .
Take temperature sensor out of heating and A/C unit.
Installing
Install in reverse order of removal.
.
Rear Air Outlet Motors
Note:
Mark motor/flap connecting elements when removing (danger of swapping with connecting elements of the other actuator motors).
Page 49 of 53A/C Control Components Inside Passenger Compartment
12/31/2013x-ebahn:///C:/Program%20Files/eBahn/data/AUDI-D-D3-HA01.ebn/AUDI/D/D3/Repair...
In the event of fault "Upper or lower limit value exceeded" , check connecting element of engine/flap, it must be attached to engine accurate to side and there must not be any clearance between actuator mount and connecting element.
These actuators are installed only on vehicles with Rear A/C Control Head (Climatronic) E265 . On vehicles without Rear A/C Control Head (Climatronic) E265 , there are no flaps installed in air duct of air conditioner.
In cases of doubt about correct connector assignment after installation of actuators, disconnect connector e.g. from actuator and then check DTC memory of Rear A/C Control Head (Climatronic) E265 . Vehicle Diagnosis, Testing and Information System VAS 5051 in "Guided Fault Finding" function.
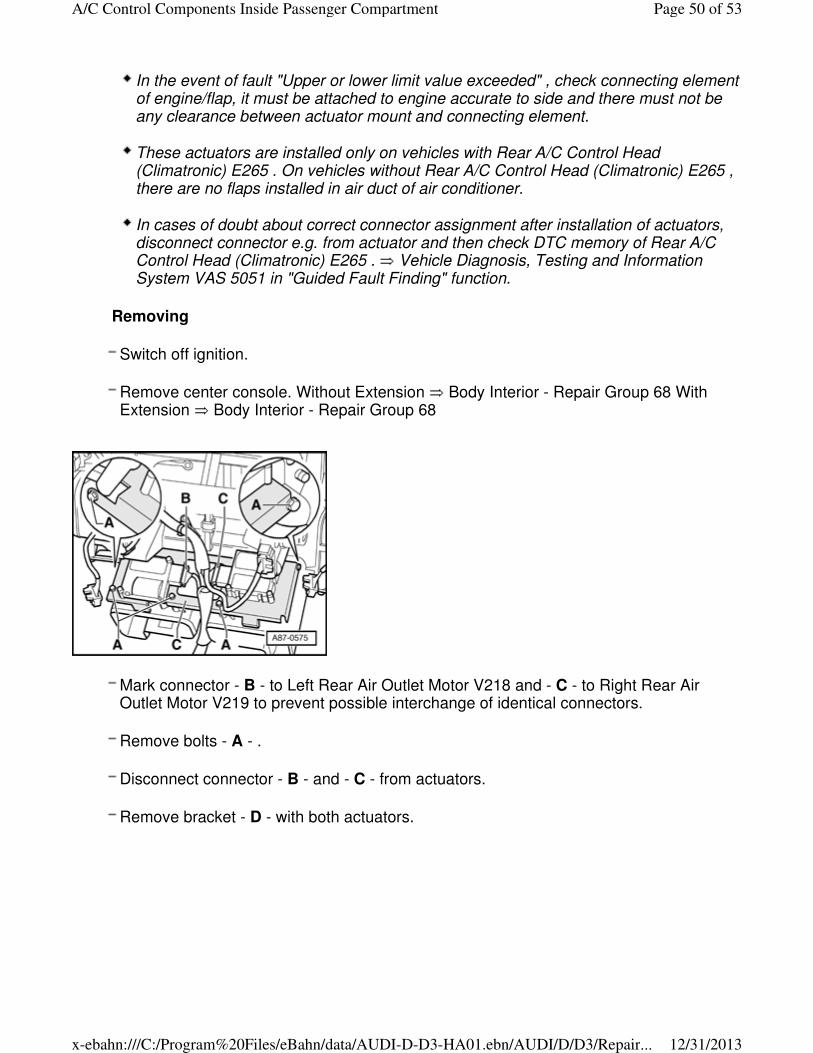
Removing
Switch off ignition.
Remove center console. Without Extension Body Interior - Repair Group 68 With Extension Body Interior - Repair Group 68
Mark connector - B - to Left Rear Air Outlet Motor V218 and - C - to Right Rear Air Outlet Motor V219 to prevent possible interchange of identical connectors.
Remove bolts - A - .
Disconnect connector - B - and - C - from actuators.
Remove bracket - D - with both actuators.
Page 50 of 53A/C Control Components Inside Passenger Compartment
12/31/2013x-ebahn:///C:/Program%20Files/eBahn/data/AUDI-D-D3-HA01.ebn/AUDI/D/D3/Repair...
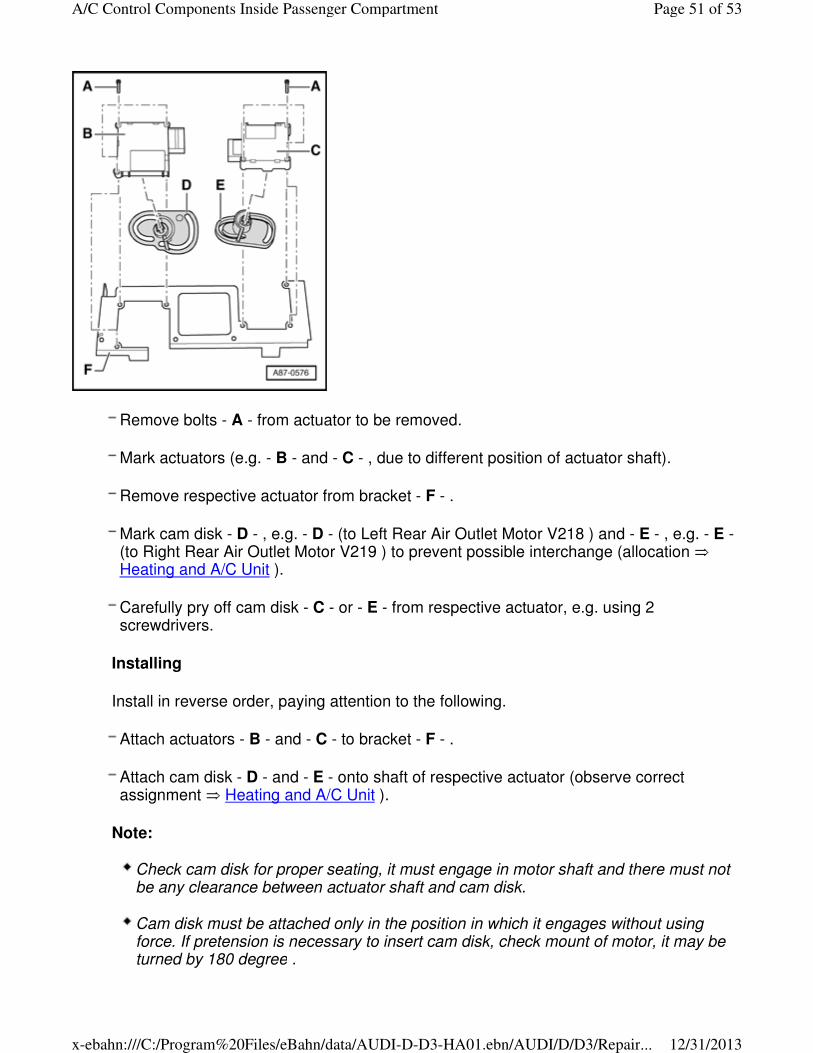
Remove bolts - A - from actuator to be removed.
Mark actuators (e.g. - B - and - C - , due to different position of actuator shaft).
Remove respective actuator from bracket - F - .
Mark cam disk - D - , e.g. - D - (to Left Rear Air Outlet Motor V218 ) and - E - , e.g. - E - (to Right Rear Air Outlet Motor V219 ) to prevent possible interchange (allocation Heating and A/C Unit ).
Carefully pry off cam disk - C - or - E - from respective actuator, e.g. using 2 screwdrivers.
Installing
Install in reverse order, paying attention to the following.
Attach actuators - B - and - C - to bracket - F - .
Attach cam disk - D - and - E - onto shaft of respective actuator (observe correct assignment Heating and A/C Unit ).
Note:
Check cam disk for proper seating, it must engage in motor shaft and there must not be any clearance between actuator shaft and cam disk.
Cam disk must be attached only in the position in which it engages without using force. If pretension is necessary to insert cam disk, check mount of motor, it may be turned by 180 degree .
Page 51 of 53A/C Control Components Inside Passenger Compartment
12/31/2013x-ebahn:///C:/Program%20Files/eBahn/data/AUDI-D-D3-HA01.ebn/AUDI/D/D3/Repair...
Actuator shaft - B - does not have a stop, it rotates continuously when voltage is applied between terminals 5 and 6. Therefore, when actuator is removed, voltage is only to be applied if cam disk - A - is attached.
If cam disk - A - cannot be inserted into actuator without pretension, actuator may be incorrectly positioned.
If shaft is so awkwardly positioned that cam disk cannot be attached, connect terminals 5 and 6 of actuator via a 5A fuse to a 12 V battery e.g. using adapter lead Control Motor Actuation Adapter Cables, Preparing or an adapter lead from connector test kit V.A.G 1594/C .
Rotate actuator for only as long until connecting element can be attached without pretension, the turning direction can be reversed by swapping B+ and Ground.
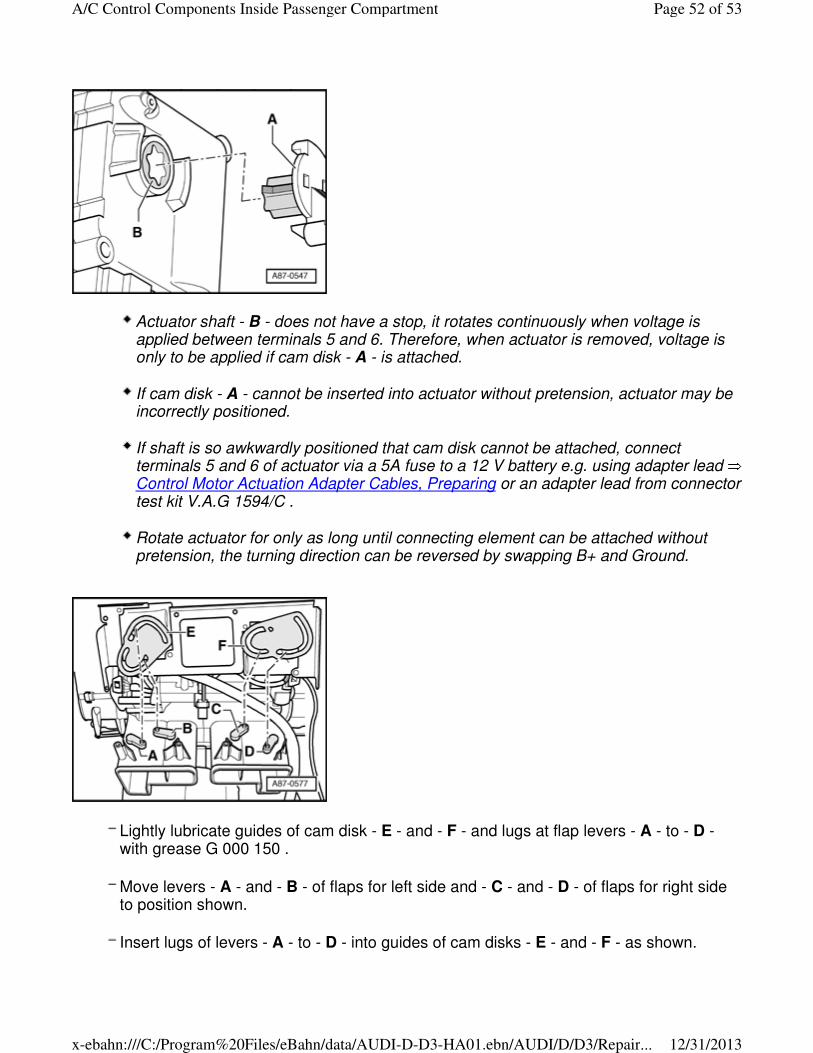
Lightly lubricate guides of cam disk - E - and - F - and lugs at flap levers - A - to - D - with grease G 000 150 .
Move levers - A - and - B - of flaps for left side and - C - and - D - of flaps for right side to position shown.
Insert lugs of levers - A - to - D - into guides of cam disks - E - and - F - as shown.
Page 52 of 53A/C Control Components Inside Passenger Compartment
12/31/2013x-ebahn:///C:/Program%20Files/eBahn/data/AUDI-D-D3-HA01.ebn/AUDI/D/D3/Repair...
Attach bracket with actuators to air conditioner.
Install the removed components again in reverse order.
Check DTC memory of Rear A/C Control Head (Climatronic) E265 (and of Climatronic Control Module J255 ) and erase DTCs displayed if necessary. Vehicle Diagnosis, Testing and Information System VAS 5051 in "Guided Fault Finding" function.
Perform basic setting and output Diagnostic Test Mode (DTM) on the A/C system. Vehicle Diagnosis, Testing and Information System VAS 5051 in "Guided Fault Finding" function.
Copyright © 2008 Audi of America, Inc. and Bentley Publishers. All rights reserved. Last processed:
Page 53 of 53A/C Control Components Inside Passenger Compartment
12/31/2013x-ebahn:///C:/Program%20Files/eBahn/data/AUDI-D-D3-HA01.ebn/AUDI/D/D3/Repair...