audio system upgrade package 2007 dodge nitro …site.justforjeeps.com/guide/77kick15.pdf ·...
TRANSCRIPT

Audio System Upgrade Package 2007 Dodge Nitro 2003-2006 Jeep Liberty Installation Instructions
77KICK15 12/08/06 Page 1 of 9
© 2004, DaimlerChrysler Motors Company, LLC. Mopar is a registered trademark of DaimlerChrysler Motors Company. LLC. All rights reserved.
Fig. 1 Fig. 2
TOOLS REQUIRED:
*Torx® T20 Screwdriver *Pick Tool *7mm Socket *Ratchet *10mm Nut Driver *Panel Removal Tool
Dodge Nitro Front Door Speaker Installation
1. Using a pick tool remove the screw cover in the arm rest pocket. Fig. 1 2. Using a Torx® T20 screwdriver remove the screw. Fig. 2
2EA. 6.5” WOOFER P/N RW06DCX65W 2EA. TWEETER P/N RT06DCX25 1EA. INSTRUCTIONS P/N RBI77KICK15
CONTENTS:

Audio System Upgrade Package 2007 Dodge Nitro 2003-2006 Jeep Liberty Installation Instructions
77KICK15 12/08/06 Page 2 of 9
© 2004, DaimlerChrysler Motors Company, LLC. Mopar is a registered trademark of DaimlerChrysler Motors Company. LLC. All rights reserved.
Fig. 3 Fig. 4
Fig. 5 Fig. 6
Dodge Nitro Front Door Speaker Installation continued
3. Using a pick tool pry open the screw covers toward the bottom of the door front and rear and remove the screws. Fig. 3
4. Using a panel removal tool pry loose the plastic trim panel around the interior door release lever to reveal the 10mm bolt. Fig. 4
5. Using a 10mm nut driver remove the bolt securing the door panel. Fig. 5 6. Using a panel removal tool gently pry up on the door switch plate, and disconnect wiring. Fig. 6 7. Remove door panel

Audio System Upgrade Package 2007 Dodge Nitro 2003-2006 Jeep Liberty Installation Instructions
77KICK15 12/08/06 Page 3 of 9
© 2004, DaimlerChrysler Motors Company, LLC. Mopar is a registered trademark of DaimlerChrysler Motors Company. LLC. All rights reserved.
Fig. 7 Fig. 8
Fig. 9 Fig. 10
Dodge Nitro Front Door Speaker Installation continued
8. Using a Torx® T20 screwdriver remove the three screws securing the existing speaker. Remove and disconnect wiring. Fig. 7
9. Connect the speaker wiring and install the upgrade speaker. Fig. 8 10. Repeat for other side of vehicle.
Dodge Nitro Dash Speaker Installation
11. Pull the rubber door molding away from door openings to reveal the edges of the A pillar post covers. Fig. 9
12. Using a panel removal tool gently pry the A pillar post covers away from the metal to release the fasteners. Fig. 10
Audio System Upgrade Package 2007 Dodge Nitro 2003-2006 Jeep Liberty Installation Instructions
77KICK15 12/08/06 Page 4 of 9
© 2004, DaimlerChrysler Motors Company, LLC. Mopar is a registered trademark of DaimlerChrysler Motors Company. LLC. All rights reserved.
Fig. 11 Fig. 12
Fig. 13 Fig. 14
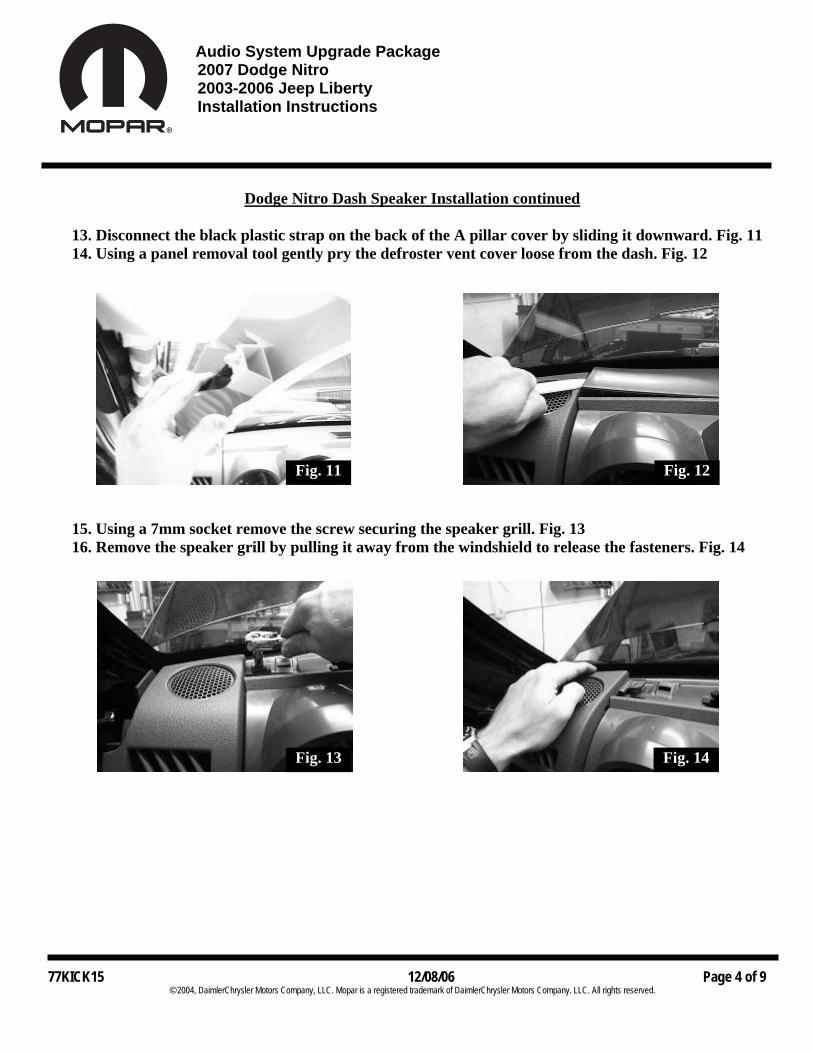
Dodge Nitro Dash Speaker Installation continued
13. Disconnect the black plastic strap on the back of the A pillar cover by sliding it downward. Fig. 11 14. Using a panel removal tool gently pry the defroster vent cover loose from the dash. Fig. 12
15. Using a 7mm socket remove the screw securing the speaker grill. Fig. 13 16. Remove the speaker grill by pulling it away from the windshield to release the fasteners. Fig. 14

Audio System Upgrade Package 2007 Dodge Nitro 2003-2006 Jeep Liberty Installation Instructions
77KICK15 12/08/06 Page 5 of 9
© 2004, DaimlerChrysler Motors Company, LLC. Mopar is a registered trademark of DaimlerChrysler Motors Company. LLC. All rights reserved.
Fig. 16 Fig. 15
Dodge Nitro Dash Speaker Installation continued
17. Using a 7mm socket remove the two screws securing the dash speaker. Remove and disconnect wiring. Fig. 15
18. Connect the speaker wiring and install the upgrade speaker. Fig. 16
19. Reinstall all previously removed parts in reverse order. 20. Repeat for other side of vehicle.

Audio System Upgrade Package 2007 Dodge Nitro 2003-2006 Jeep Liberty Installation Instructions
77KICK15 12/08/06 Page 6 of 9
© 2004, DaimlerChrysler Motors Company, LLC. Mopar is a registered trademark of DaimlerChrysler Motors Company. LLC. All rights reserved.
Fig. 19
TOOLS REQUIRED: *Phillips Screwdriver *Panel Removal Tool *Pick Tool
Jeep Liberty Front Door Speaker Installation
1. Using a pick tool remove the plastic cover to reveal the screw behind the interior door handle release
lever and remove the screw. Fig. 17 2. Remove the screw in the armrest pocket. Fig. 18
3. Using a panel removal tool gently pry the door panel away from the door. Fig. 19 4. Disconnect the door handle linkage by rotating the black plastic latch and pulling the linkage rod
loose. Fig. 20
Fig. 17 Fig. 18
Fig. 20

Audio System Upgrade Package 2007 Dodge Nitro 2003-2006 Jeep Liberty Installation Instructions
77KICK15 12/08/06 Page 7 of 9
© 2004, DaimlerChrysler Motors Company, LLC. Mopar is a registered trademark of DaimlerChrysler Motors Company. LLC. All rights reserved.
Fig. 22
Long Tab
Jeep Liberty Front Door Speaker Installation continued
5. Disconnect door wiring and set door panel aside. 6. Remove the screws securing the speaker, disconnect wiring and remove speaker. Fig. 21 7. Connect speaker wiring and install the upgrade speaker making sure the longest speaker tab is in
the location designated by arrow in picture. Replace screws and tighten. Fig. 22 8. Reinstall all previously removed parts in reverse order. 9. Repeat for other side of vehicle.
Fig. 21

Audio System Upgrade Package 2007 Dodge Nitro 2003-2006 Jeep Liberty Installation Instructions
77KICK15 12/08/06 Page 8 of 9
© 2004, DaimlerChrysler Motors Company, LLC. Mopar is a registered trademark of DaimlerChrysler Motors Company. LLC. All rights reserved.
Fig. 23 Fig. 24
Fig. 25 Fig. 26
TOOLS REQUIRED: *7/32(5.5mm) Nut Driver*7mm Wrench*Panel Removal Tool *Pick Tool
Jeep Liberty Dash Speaker Installation
10. Pull the rubber door molding away from the A pillar location. Fig. 23 11. Using a pick tool, pry open the screw covers on the plastic a pillar covers to reveal the 7/32” (5.5mm)
bolts. Fig. 24
12. Using a 7/32” (5.5mm) nut driver remove the bolts and the A pillar covers. Fig. 25 13. Starting at one end and working across the dash, use a panel removal tool to gently pry up on the
dash speaker cover to release the fasteners. Fig. 26

Audio System Upgrade Package 2007 Dodge Nitro 2003-2006 Jeep Liberty Installation Instructions
77KICK15 12/08/06 Page 9 of 9
© 2004, DaimlerChrysler Motors Company, LLC. Mopar is a registered trademark of DaimlerChrysler Motors Company. LLC. All rights reserved.
Fig. 27 Fig. 28
Jeep Liberty Dash Speaker Installation continued
14. Remove the screws securing the speakers, with a 7mm wrench or stubby screw driver, disconnect wiring and remove speakers. Fig. 27
15. Install the upgrade speakers, replace screws and tighten. Fig. 28
16. Reinstall all previously removed parts in reverse order.