authenticare® new mexico · 5 september 2018 authenticare® new mexico centennial care 9.3.2.2...
TRANSCRIPT

1
September 2018 AuthentiCare® New Mexico Centennial Care
AuthentiCare®
New Mexico
User Manual
Prepared by:
Version 5.2

2
September 2018 AuthentiCare® New Mexico Centennial Care
Table of Contents
DOCUMENT HISTORY ................................................................................................. 12
CHAPTER I INTRODUCTION ..................................................................................... 13
1.1 COMMON TERMINOLOGY/ACRONYMS ............................................... 13
1.2 OVERVIEW OF AUTHENTICARE .......................................................... 15
1.3 ORGANIZATION OF THE DATA ............................................................ 16
1.4 AUTHENTICARE USERS ....................................................................... 17
1.5 SECURITY .............................................................................................. 18
1.6 USING THIS WEB APPLICATION .......................................................... 18
1.7 USING THIS MANUAL ............................................................................ 20
CHAPTER 2 GETTING STARTED ............................................................................... 22
2.1 ESTABLISHING A USER ACCOUNT ..................................................... 22
2.2 LOGGING IN TO AUTHENTICARE ........................................................ 22
2.3 LOGGING OUT OF AUTHENTICARE .................................................... 23
2.4 ADDING NEW USERS ............................................................................ 24
2.5 DISABLING A USER ............................................................................... 29
2.5.1 PROVIDERS ........................................................................................... 29
2.5.2 NEW MEXICO CENTENNIAL CARE ADMINISTRATIVE USERS .......... 31
2.6 CHANGING YOUR PASSWORD ............................................................ 31
CHAPTER 3 AN INTRODUCTION TO NAVIGATING AUTHENTICARE ................... 36
3.1 HOME PAGE ........................................................................................... 36
3.2 PROVIDER DASHBOARD ...................................................................... 39
3.2.1 UNSUBMITTED CLAIM STATUS ........................................................... 40
3.2.2 TODAY’S SCHEDULE STATUS ............................................................. 41

3
September 2018 AuthentiCare® New Mexico Centennial Care
3.2.2.1 CHECKED IN ON TIME – CONSUMER-DELEGATED ............................ 41
3.2.2.2 CHECKED IN ON TIME – CONSUMER-DIRECTED (99509) .................. 41
3.2.2.3 SCHEDULED NOT DUE .......................................................................... 41
3.2.2.4 LATE OR MISSED ................................................................................... 42
3.3 WORKER DASHBOARD ......................................................................... 42
3.3.1 CHECKED IN ON TIME .......................................................................... 44
3.3.2 SCHEDULED NOT DUE ......................................................................... 44
3.3.3 LATE OR MISSED .................................................................................. 44
3.4 SETTING EARLY, LATE AND MISSED VISITS THRESHOLDS ............ 45
3.4.1 STEPS TO SET NEW EARLY, LATE AND MISSED ALERTS: ............... 46
3.4.2 THRESHOLDS EXCEPTIONS/NOTIFICATIONS SCENARIOS: ............ 47
3.5 EXCEPTIONS DASHBOARD .................................................................. 48
CHAPTER 4 SEARCH AND VIEWING PEOPLE AND/OR AGENCIES ..................... 50
4.1 SEARCHING FOR PEOPLE AND/OR AGENCIES ................................. 50
4.1.1 VIEWING PROVIDERS ........................................................................... 51
4.1.2 VIEWING CLIENTS ................................................................................. 53
4.1.2.1 NO TECH ZONE INDICATOR ON CLIENT ENTITY PAGE ..................... 54
4.1.2.2 HIGH RISK INDICATOR ON CLIENT ENTITY PAGE .............................. 54
4.1.2.3 VIEWING WORKERS .............................................................................. 54
CHAPTER 5 MANAGING PROVIDER INFORMATION .............................................. 56
5.1 EDITING PROVIDER INFORMATION .................................................... 56
5.1.1 ADDING NEGOTIATED RATES FOR EACH SERVICE BY MCO .......... 59
5.2 ELECTRONIC REMITTANCE ADVICE (835) FROM NMCC MCOS....... 66
5.2.1 UPLOADING THE 835 INTO AUTHENTICARE ...................................... 67

4
September 2018 AuthentiCare® New Mexico Centennial Care
CHAPTER 6 MANAGING WORKER INFORMATION ................................................. 69
6.1 ADDING A WORKER .............................................................................. 69
6.2 DELETING A WORKER .......................................................................... 73
6.3 EDITING WORKERS .............................................................................. 77
6.4 SUSPENDING/INACTIVATING/END-DATING WORKERS .................... 78
6.5 CREATING A WORKER FOR CONSUMER-DIRECTED ADMIN FEE ... 80
CHAPTER 7 MANAGING CLIENT INFORMATION .................................................... 81
7.1 EXTERNAL CLIENT ID ........................................................................... 82
7.2 NO TECH ZONE INDICATOR ................................................................. 84
7.3 HIGH RISK CLIENT INDICATOR ............................................................ 85
CHAPTER 8 SEARCH AND VIEW AUTHORIZATIONS ............................................. 87
8.1 AUTO END-DATING OF AUTHORIZATIONS ......................................... 89
8.2 NMCC MCO DELETION OF AUTHORIZATIONS ................................... 90
8.3 AUTHORIZATIONS WITH ZERO UNITS ................................................ 90
CHAPTER 9 SCHEDULING ......................................................................................... 91
9.1 USING THE CALENDAR ........................................................................ 91
9.1.1 DAILY ...................................................................................................... 92
9.1.2 MONTHLY ............................................................................................... 94
9.1.3 WEEKLY ................................................................................................. 95
9.2 SEARCHING FOR SCHEDULED EVENTS IN THE CALENDAR ........... 97
9.3 SCHEDULING AN EVENT ...................................................................... 98
9.3.1 SCHEDULING AN EVENT USING THE AUTHORIZATION ................... 99
9.3.2 SCHEDULING A RECURRING EVENT ................................................ 103
9.3.2.1 DAILY RECURRING EVENT ................................................................. 105

5
September 2018 AuthentiCare® New Mexico Centennial Care
9.3.2.2 WEEKLY RECURRING EVENT ............................................................. 106
9.3.2.3 MONTHLY RECURRING EVENT .......................................................... 106
9.4 EDITING AN EVENT ............................................................................. 107
9.5 CANCELLING AN EVENT (DELETING) ............................................... 109
9.6 ACKNOWLEDGING MISSED VISITS ................................................... 111
9.7 UPLOADING WORKER SCHEDULES ................................................. 115
CHAPTER 10 THE AUTHENTICARE IVR .............................................................. 117
10.1 IVR FLOW ............................................................................................. 117
10.2 SAFEGUARD - WORKERS WITH MORE THAN ONE WORKER ID .... 118
10.3 ACTIVITY CODES FOR PERSONAL CARE SERVICES ...................... 118
10.4 CHECKING-IN/OUT FROM AN UNAUTHORIZED PHONE NUMBER . 118
10.4 WORKER INSTRUCTIONS - USING THE IVR ..................................... 120
CHAPTER 11 THE AUTHENTICARE® 2.0 MOBILE APPLICATION ................... 122
11.1 INTRODUCTION – ANDROID MOBILE APPLICATION ....................... 122
11.1.1 SERVICE ZONES ................................................................................. 122
11.1.2 CORE AUTHENTICARE PREPARATION ............................................. 123
11.1.3 APPLICATION SETUP DONE BY PROVIDERS ................................... 123
11.1.3.1 ONE TIME APPLICATION SETTINGS – PROVIDER ENTITY SETTINGS .
............................................................................................................... 123
11.1.3.2 WORKER’S MOBILE DEVICE INFORMATION – WORKER ENTITY
SETTINGS ............................................................................................................... 124
11.1.4 AUTHENTICARE MOBILE APP FUNDAMENTALS .............................. 125
11.1.4.1 DOWNLOADING, INSTALLING AND SETTING UP THE MOBILE APP 125
11.1.4.2 INITIAL SETUP FOR ENVIRONMENT .................................................. 126
11.1.5 THE WORKER ID AND PASSWORD SCREEN ................................... 128

6
September 2018 AuthentiCare® New Mexico Centennial Care
11.1.5.1 CHANGE PASSWORD BEFORE LOGIN - REQUEST PASSCODE ..... 128
11.1.5.2 CHANGE PASSWORD AFTER SUCCESSFUL LOGIN ........................ 131
11.1.6 TO FIND A DEVICE ID FROM THE SETTINGS MENU ........................ 131
11.1.7 CLEARING DATA TO CHANGE FROM ONE ENVIRONMENT TO
ANOTHER ............................................................................................................... 132
11.1.8 TO LOG IN TO THE MOBILE APP – FIRST USE ................................. 134
11.1.9 TO LOG OUT OF THE MOBILE APP .................................................... 135
11.1.10 TO ACCESS THE CALENDAR .............................................................. 136
11.1.11 WORKER CHECK-IN AT CLIENT LOCATION ...................................... 137
11.1.12 LOOKUP CLIENT - ENTER THE CLIENT’S ID NUMBER OR LAST NAME
139
11.1.13 WORKER CHECK-OUT FROM CLIENT’S LOCATION ......................... 142
11.1.14 AUTHENTICARE MOBILE APP MENU BASICS ................................... 143
11.1.14.1 SEE DEVICE IDENTIFIER ..................................................................... 143
11.1.14.2 OFFLINE REMINDER ............................................................................ 143
11.1.14.3 CALL OFFICE ........................................................................................ 143
11.1.14.4 FORCE CHECK-OUT ............................................................................. 144
11.1.14.5 CHANGE PASSWORD .......................................................................... 145
11.1.14.6 RESET AND CHANGE SETUP CODE .................................................. 145
11.1.14.7 RATE US ................................................................................................ 145
11.1.14.8 END USER LICENSE AGREEMENT ..................................................... 145
11.1.14.9 LOGOUT ................................................................................................ 145
11.1.15 TWO DIFFERENT MENU DISPLAYS .................................................... 145
11.2 WORKER INSTRUCTIONS FOR USING THE MOBILE APP – ANDROID
............................................................................................................... 146

7
September 2018 AuthentiCare® New Mexico Centennial Care
11.3 THE AUTHENTICARE MOBILE APPLICATION - IOS .......................... 147
11.3.1 INTRODUCTION – IOS MOBILE APPLICATION .................................. 147
11.3.2 SERVICE ZONES ................................................................................. 147
11.3.3 CORE AUTHENTICARE PREPARATION .............................................. 147
11.3.4 APPLICATION SETUP DONE BY PROVIDERS ................................... 148
11.3.4.1 ONE TIME APPLICATION SETTINGS – PROVIDER ENTITY SETTINGS
PAGE ............................................................................................................... 148
11.3.4.2 WORKER’S MOBILE DEVICE INFORMATION – WORKER ENTITY
SETTINGS ............................................................................................................... 149
11.3.5 AUTHENTICARE MOBILE APP FUNDAMENTALS .............................. 150
11.3.5.1 DOWNLOADING, INSTALLING AND SETTING UP THE MOBILE APP 150
11.3.5.2 INITIAL SETUP FOR ENVIRONMENT .................................................. 150
11.3.6 THE WORKER ID AND PASSWORD SCREEN ................................... 152
11.3.6.1 CHANGE PASSWORD BEFORE LOGIN - REQUEST PASSCODE ..... 152
11.3.6.2 CHANGE PASSWORD AFTER SUCCESSFUL LOGIN ........................ 155
11.3.7 TO FIND A DEVICE ID FROM THE SETTINGS MENU ........................ 155
11.3.8 CLEARING DATA TO CHANGE FROM ONE ENVIRONMENT TO
ANOTHER ............................................................................................................... 156
11.3.9 TO LOG IN TO THE MOBILE APP – FIRST USE ................................. 158
11.3.10 TO LOG OUT OF THE MOBILE APP..................................................... 159
11.3.11 TO ACCESS THE CALENDAR .............................................................. 160
11.3.12 WORKER CHECK-IN AT CLIENT LOCATION ...................................... 161
11.3.12.1 LOOKUP CLIENT - ENTER THE CLIENT’S ID NUMBER OR LAST NAME
............................................................................................................... 162
11.3.13 WORKER CHECK-OUT FROM CLIENT’S LOCATION ......................... 166
11.3.14 AUTHENTICARE MOBILE APP MENU BASICS ................................... 167

8
September 2018 AuthentiCare® New Mexico Centennial Care
11.3.14.1 SEE DEVICE IDENTIFIER ..................................................................... 167
11.3.14.2 OFFLINE REMINDER ............................................................................ 167
11.3.14.3 CALL OFFICE ........................................................................................ 167
11.3.14.4 FORCE CHECK-OUT ............................................................................. 167
11.3.14.5 CHANGE PASSWORD .......................................................................... 168
11.3.14.6 RESET AND CHANGE SETUP CODE .................................................. 168
11.3.14.7 RATE US ................................................................................................ 168
11.3.14.8 END USER LICENSE AGREEMENT ..................................................... 168
11.3.14.9 LOGOUT ................................................................................................ 168
11.3.15 TWO DIFFERENT MENU DISPLAYS .................................................... 168
11.4 WORKER INSTRUCTIONS FOR USING THE MOBILE APP - IOS...... 170
CHAPTER 12 MANAGING CLAIMS ......................................................................... 171
12.1 SEARCHING AND VIEWING CLAIMS .................................................. 171
12.2 EDITING A CLAIM (CLAIMS CORRECTION) ....................................... 178
12.2.1 CORRECTING A CHECK-IN/CHECK-OUT ........................................... 178
12.2.2 CHANGING/CORRECTING A DEFAULT PAYER ................................. 179
12.3 ADDING AN INDIVIDUAL (STANDARD) CLAIM .................................. 180
12.4 GROUPING CLAIMS ............................................................................. 185
12.5 ADDING MULTIPLE CLAIMS (EXPRESS ENTRY) .............................. 186
12.6 DELETING A CLAIM ............................................................................. 187
12.7 CONFIRMING A CLAIM FOR EXPORT – DUAL CONFIRMATION ...... 188
12.8 CONFIRMING A SINGLE CLAIM FOR EXPORT .................................. 191
12.9 CONFIRMING CLAIMS IN BULK .......................................................... 196
12.10 UNCONFIRMING CLAIMS FOR FURTHER EDITING .......................... 197

9
September 2018 AuthentiCare® New Mexico Centennial Care
12.11 ADDING NOTES – CLAIM EDIT/ENTRY DOCUMENTATION ............. 197
12.12 AUTO CLAIMS CREATION-CONSUMER-DIRECTED ADMIN FEE ..... 198
12.12.1 CREATE A CONSUMER-DIRECTED ADMIN FEE WORKER ............... 199
12.12.2 PROCESSING CONSUMER-DIRECTED ADMIN FEE CLAIMS .......... 199
12.12.3 FILING SOURCE OF NMCC’S AUTOMATED CLAIMS ......................... 199
12.13 PERSONAL CARE – CONSUMER DIRECTED SERVICE (99509) ...... 200
12.13.1 AUTHORIZATIONS: PERSONAL CARE–CONSUMER DIRECTED ..... 201
12.13.2 VISIT SERVICE CLAIMS AND BILLING SERVICE CLAIMS ................. 201
12.13.2.1 CONFIRMING A BILLING SERVICE CLAIM ......................................... 203
12.13.2.2 DELETING A BILLING SERVICE CLAIM .............................................. 203
12.13.2.3 CLIENT TRANSITIONS FROM ONE MCO TO ANOTHER ................... 204
12.13.2.4 MONTH END IN THE MIDDLE OF A WEEK .......................................... 205
12.13.3 GENERIC WORKER CREATION – BILLINGSERVICE WORKER ........ 205
12.13.4 CAUTION: CLAIMS FOR SAME DATE OF SERVICE .......................... 206
12.14 STIPEND CLAIMS................................................................................. 206
12.15 CREATING WEB CLAIMS: T1019- 99509V- G9006U1-U2 ................... 209
12.16 PAYER CLAIMS REVIEW – PROVIDERS ............................................ 211
12.16.1 CREATING WEB-BASED CLAIMS FOR PAYER REVIEW ................... 211
12.16.2 CONFIRMING WEB-BASED, PAYER-REVIEWED CLAIMS ................. 214
12.16.3 RESOLVING A DENIED CLAIM - PROVIDER ....................................... 215
12.17 PAYER CLAIMS REVIEW – PAYERS .................................................. 216
12.17.1 REASON CODES AND CLAIM NOTES ................................................. 219
12.17.2 RESOLVING A DENIED CLAIM - PAYER ............................................. 221
12.17.3 INFORMATION FOR 99509V AND 99509 ............................................. 222

10
September 2018 AuthentiCare® New Mexico Centennial Care
12.17.4 FINAL PAYER NOTES ........................................................................... 222
CHAPTER 13 REPORTING ...................................................................................... 224
13.1 CREATING A REPORT ......................................................................... 224
13.2 VIEWING A REPORT ............................................................................ 228
13.3 DELETING A REPORT FROM THE VIEW REPORTS SECTION ........ 230
13.4 USING REPORT TEMPLATES ............................................................. 231
13.4.1 CREATING REPORT TEMPLATES ....................................................... 231
13.4.2 RUNNING A REPORT FROM A TEMPLATE ......................................... 233
13.4.3 EDITING A REPORT TEMPLATE .......................................................... 234
13.4.4 DELETING A REPORT TEMPLATE ...................................................... 236
13.5 SCHEDULING A REPORT .................................................................... 237
13.6 REPORT EXAMPLES ........................................................................... 239
13.6.1 AUTHORIZATIONS REPORT WITHOUT CLAIM DETAIL ..................... 239
13.6.2 AUTHORIZATIONS REPORT WITH CLAIM DETAIL ............................ 241
13.6.3 AUTHORIZATION HISTORY REPORT ................................................. 242
13.6.4 BILLING INVOICE REPORT .................................................................. 244
13.6.5 CALENDAR REPORT ............................................................................ 246
13.6.6 CLAIM DATA LISTING REPORT ........................................................... 248
13.6.7 CLAIM DETAILS REPORT ..................................................................... 251
13.6.8 CLAIM HISTORY REPORT .................................................................... 253
13.6.9 ELIGIBLE CLIENT DATA LISTING REPORT ........................................ 255
13.6.10 EXCEPTION REPORT ........................................................................... 256
13.6.11 LATE AND MISSED VISITS REPORT ................................................... 259
13.6.12 OVERLAPPED CLAIM REPORT BY CLIENT ........................................ 261

11
September 2018 AuthentiCare® New Mexico Centennial Care
13.6.13 OVERLAPPED CLAIM REPORT BY WORKER .................................... 262
13.6.14 PROVIDER ACTIVITY REPORT ............................................................ 264
13.6.15 THE REMITTANCE ADVICE REPORT: ................................................. 268
13.6.16 REMITTANCE DATA LISTING REPORT ............................................... 269
13.6.17 TIME AND ATTENDANCE REPORT ..................................................... 271
13.6.18 UNAUTHORIZED LOCATION REPORT ................................................ 274
13.6.19 UNAUTHORIZED PHONE NUMBER REPORT ..................................... 276
13.6.20 WORKER ACTIVITY REPORT .............................................................. 279
13.6.21 WORKER BY PROVIDER REPORT ...................................................... 280
CHAPTER 14 MULTI-BRANCH PROCESS ............................................................. 283
14.1 TO ASSIGN AN AUTHORIZATION ....................................................... 284
14.2 TO REASSIGN AN AUTHORIZATION TO A DIFFERENT BRANCH ... 285
CHAPTER 15 ONGOING USER SUPPORT AND TRAINING ................................. 287
APPENDIX A.1: SERVICE CODES – NEW MEXICO CENTENNIAL CARE ............. 288
APPENDIX A.2: ACTIVITY CODES FOR THE FOLLOWING SERVICES: ................ 289
APPENDIX A.3: CLAIM EXCEPTION CODES AND CLAIM STATUS ....................... 290
APPENDIX A.4: DESCRIPTION OF PROVIDER ROLES .......................................... 299
APPENDIX A.5: SERVICE PLAY BACK ORDER ON THE IVR ................................. 301

12
September 2018 AuthentiCare® New Mexico Centennial Care
Document History
This document is controlled through the Document Management Process. To verify that
the document is the latest version, please contact First Data Client Support at
Date Version Responsible Reason for Revision
April 24, 2014 1.0 First Data Initial Submission
May 14, 2014 1.1 First Data Updated Submission
August 1, 2014 1.2 First Data Updated Submission
November 18, 2014 1.3 First Data Updated Submission
April 16, 2015 1.4 First Data Updated Submission
June 26, 2015 1.5 First Data Updated Submission
September 29, 2015 1.6 First Data Updated Submission
March 24, 2016 2.0 First Data Updated Submission
July 27, 2016 3.0 First Data Updated Submission
March 10, 2017 4.0 First Data Updated Submission
April 1, 2018 5.0 First Data Updated Submission
April 9, 2018 5.1 First Data Updated Submission
September 28, 2018 5.2 First Data Updated Submission

13
September 2018 AuthentiCare® New Mexico Centennial Care
Chapter I Introduction
New Mexico Centennial Care utilizes AuthentiCare for six (6) specific services provided
to clients assessed as eligible to receive one or more of the services provided through
New Mexico Centennial Care providers. New Mexico Centennial Care is comprised of
four different Managed Care Organizations (MCOs): Blue Cross and Blue Shield of
New Mexico, Molina Healthcare of New Mexico, Presbyterian Health Services, and
UnitedHealthcare Community Plan of New Mexico.
Providers of selected services (procedures) are required to use AuthentiCare to capture
and bill for services provided to New Mexico Centennial Care members who are known
in AuthentiCare as “clients.” (See Appendix A.1 for the list of included services.)
AuthentiCare is web-based electronic visit verification, scheduling, tracking, reporting
and billing system that:
Automatically captures and invoices accurate services provided to clients
Provides the ability to automate scheduling, time and attendance, billing and
reporting functions
Assists in identifying and responding to unmet client needs (missed and late
visits)
Provides New Mexico Centennial Care MCOs data to assist in making policy
decisions regarding the delivery of services
1.1 Common Terminology/Acronyms
Users must be familiar with the terms and acronyms used in AuthentiCare in order to
take full advantage of the functionality and follow the instructions in this User Manual.
These include:
Term/Acronym Meaning/Use
835 The 835 is the electronic remittance advice (RA) that applicable New Mexico Centennial Care MCOs provide to providers reporting the adjudication status of each claim submitted.
837P The 837 Professional (P) is the electronic billing file of confirmed claims that AuthentiCare submits each weekday morning on behalf of each provider. Providers will be reimbursed for services rendered on their current payment schedule.
Case Manager The case management entity at each New Mexico Centennial Care MCO is a Care Coordinator.

14
September 2018 AuthentiCare® New Mexico Centennial Care
Term/Acronym Meaning/Use
Claim Each episode of service captured in AuthentiCare is known as a claim. Each will have a unique claim number. Claims may be entered into AuthentiCare by the mobile device, IVR, or the Web.
Client The New Mexico Centennial Care member is known as client throughout this manual and is the person receiving Centennial Care services.
Client Support
Services
Client Support Services is the First Data help desk established to assist AuthentiCare users. Contact information for them is located in Chapter 14 of this User Manual.
External Client
ID
The client ID number that a provider has created in the provider’s own client data system can be captured in the AuthentiCare system for the provider’s accounting purposes.
Event For those providers who use the Scheduling functionality in AuthentiCare, an event is a visit scheduled in advance for service to a client.
First Data The company that operates AuthentiCare for New Mexico Centennial Care.
High Risk
Indicator
The box on the Client Entity Settings page that is open to MCO-user-edit to designate a client with more risk than other clients in regard to his/her services delivery.
IVR The Interactive Voice Response system used by AuthentiCare contains pre-recorded information that the Worker interacts with via touch tone phone when calling a designated toll-free number. For more information, see Chapter 10 of this User Manual.
Jurisdiction The portion of state or federal government services in which AuthentiCare has been implemented to provide accurate time reporting and/or claims submission of Medicaid services on behalf of eligible providers is known to First Data as an AuthentiCare jurisdiction.
MCO A managed care organization is referred to as an MCO or health plan. In AuthentiCare New Mexico Centennial Care, an MCO staff member utilizing AuthentiCare is referred to as a New Mexico Centennial Care Administrator user.

15
September 2018 AuthentiCare® New Mexico Centennial Care
Term/Acronym Meaning/Use
Mobile Device A GPS enabled mobile device (smartphone) can be used to record services provided for a client. For more information, see Chapter 11 of this User Manual.
Multi-Branch A provider who has several branch offices is referred to in NMCC as a multi-branch provider. Authorizations, schedules, late/missed visit alerts are divided and tracked by branch location. For more information, see Chapter 14 of the User Manual.
No Tech Zone
Indicator
The box on the Client Entity Settings page that indicates the client lives in an area with no cell telephone or landline telephone access.
Provider “Provider” designates the provider agency that is authorized to deliver services for a client.
Role A role is the individual user’s defined term that designates what information the user may access and what actions the user may perform on the AuthentiCare website. At each provider location, all users are created by the AuthentiCare initial administrator user who and then assigns other roles. The role each user is assigned allows users to do their designated work while assuring that all data is maintained in a private and secure manner. For a description of each role, see Appendix A.4 of this User Manual.
Service The procedure provided for the client through AuthentiCare New Mexico Centennial Care is known as the service. For a list of the services for which the provider is required to use AuthentiCare, see Appendix A.1 of this User Manual.
Staff Staff members at each of the New Mexico Centennial Care MCOs who oversee the services applicable to AuthentiCare are the staff members who have access to information in AuthentiCare.
Worker The worker is the employee of the provider who actually provides the service to the client. Each worker is assigned a unique 5-digit Worker ID number for each provider and/or provider location where they work to use when recording services via the IVR, mobile device, or the Web.
1.2 Overview of AuthentiCare
The core of AuthentiCare is a database containing information on the clients, services,
authorizations, providers and workers. This information is updated each week day via

16
September 2018 AuthentiCare® New Mexico Centennial Care
entry provided by New Mexico Centennial Care MCO staff or Web entry by provider
staff. The basic use of AuthentiCare requires these steps:
The worker goes to the home of the client to provide a service.
The worker uses the client’s touch-tone phone to call the toll-free
AuthentiCare
number or uses a GPS enabled mobile device.
Using caller ID or GPS technology, AuthentiCare identifies the client and
the services authorized for that client, and prompts the worker to enter
his/her Worker ID number and to verify the service to be provided.
The system verifies the information and advises the worker that he/she is
“checked in” as of the time the contact was initiated.
When the worker completes the service, the worker calls the same toll-
free number or uses the GPS enabled mobile device to “check out.
The worker is advised that he/she is “checked out” as of the end of the contact.
From that telephone/mobile device interaction, AuthentiCare creates a claim.
After the provider reviews and approves it, the claim is submitted electronically for
adjudication.
Claims are submitted for processing in the early morning of each week day.
In situations where the IVR system cannot be used (example: the phone is out of order)
and the worker does not have a GPS enabled mobile device or in situations where the
worker makes an error (example: forgets to check out); the worker notifies his/her
supervisor and provides the information about the visit.
The provider enters the visit information into AuthentiCare via the Web, thus creating a
claim for the service provided.
1.3 Organization of the Data
The data in AuthentiCare is organized under four main areas:
Entities - includes people or agencies that are involved in providing care
as well as individuals receiving care. In AuthentiCare, the Entities are:
Providers, Workers and Clients.
Services – those procedures defined by New Mexico Centennial Care
MCOs for reporting through AuthentiCare are listed in Appendix A.1.
Authorizations - specify the types and amount (units) of service that
providers are pre-authorized to provide based to clients.

17
September 2018 AuthentiCare® New Mexico Centennial Care
Claims- Visits that are submitted in AuthentiCare for billing purposes.
Under certain pre-defined circumstances several visits may be combined
to create one claim for billing purposes. If a client receives the same
service in different shifts throughout the day, and those visits are
confirmed the same date for that date of service, those separate visits are
“rolled” into one claim for export in the early morning hours of the next
day. Each claim created in AuthentiCare has a unique claim number
which is retained and displayed in AuthentiCare claims reports for audit
purposes. Refer to Chapter 12 for additional claims information.
1.4 AuthentiCare Users
The user of AuthentiCare is assigned one of several different roles. This User Manual
is designed to provide each user, regardless of role, with the ability to maximize use of
the system on a daily basis.
The client is the heart of any in-home and facility care system, but clients do not interact
directly with AuthentiCare. Those who do have active roles in AuthentiCare are:
The Worker is the person who calls the IVR or uses a GPS mobile device
to check in upon arrival at a client’s home and again to check out after
completing services.
The Provider staff members who use the secure website to:
o Manage worker information
o Schedule workers’ visits to clients’ homes (optional)
o Add claims for services where the use of the IVR or mobile device was
not feasible
o Modify a claim that was incorrectly entered by the worker using the IVR
or mobile device
Review and confirm claims for billing prior to their submission for payment
Acknowledge and provide an explanation of missed visits
View reports of real-time information to assist in record keeping and management
New Mexico Centennial Care MCO Staff, including Case Managers, use the secure
website to monitor services being provided to clients.
AuthentiCare helps to reduce paperwork and gives the user tools to assist in managing
staff resources, service delivery and reimbursement through access to real-time
information via Internet Explorer at any time.
18
September 2018 AuthentiCare® New Mexico Centennial Care
1.5 Security
AuthentiCare maintains extensive security protocols to protect the information available
via the website while at the same time making it readily available to authorized users.
There are two levels of security controlling access to the data:
The first level of security is dependent on the role that the user has in the system. The
roles in AuthentiCare are Provider Administrative User, Blue Cross and Blue Shield of
New Mexico Administrative User, Molina Healthcare of New Mexico Administrative
User, Presbyterian Health Systems Administrative User, and UnitedHealthcare
Community Plan of New Mexico Administrative User.
Each Provider can designate another Administrator role or other role
within their agency. Each role has the ability to perform specific
functions within the system. See Appendix A.4 for a description of
the roles.
The second level of security is referred to as data scoping. Data scoping restricts what
information the user has access to within the assigned role.
A Provider user has the access only to information associated with the agency ID. A
provider is not able to view the data of other providers for confidentiality reasons.
New Mexico Centennial Care MCO Administrative users can view all data in
AuthentiCare related to their clients.
1.6 Using This Web Application
The AuthentiCare Web component is accessible from any computer that has a
connection to the Internet. Examples of unique functions:
Hyperlinks - a hyperlink, or link, is a connection from your current location in the
application to another page in the application or another website or Web application.
When the mouse is placed on a hyperlink, the text may change, and the cursor changes
from an arrow to a hand. Hyperlinks only require a single click. Below is an example of
a text hyperlink in AuthentiCare.
Pictures, graphics, or icons can also be used as hyperlinks. If the cursor arrow changes
to a hand, then there is a link. In the example below, the graphic does not change in
appearance but a pop up box indicates what the hyperlink does and the arrow changed
to a hand.

19
September 2018 AuthentiCare® New Mexico Centennial Care
Web applications use a Web browser. The Web browser has the ability to maintain the
Web addresses of your “favorite” websites, to add an address to your favorites, to enter
a Web address (also known as a URL), to go back to the previous page, to go forward
to the next Web page assuming you have viewed it previously, to reload or refresh the
current page, and to cancel the loading of the current page.
Web applications can use breadcrumbs to assist in navigation. As the name suggests,
this provides you with a history of the Web pages you used in getting to your current
page in the event that you wish to return to any of the previous Web pages. The Web
pages identified in the breadcrumb are hyperlinks, and by clicking on them, you will be
returned to that Web page.
Home
|
Create
|
Reports
|
Scheduling
|
Administration
|
My Account
|
Custom Links
|
Logout
Hover Text -additional information is displayed when the mouse cursor is placed over
the hover link. This functionality is utilized in AuthentiCare to provide additional
INFORMATION RATHER THAN HAVING TO NAVIGATE TO ANOTHER PAGE IN THE APPLICATION TO
GET the same information.
AuthentiCare
Search

20
September 2018 AuthentiCare® New Mexico Centennial Care
There are also several icons unique to AuthentiCare that you will see on the Web
pages. These include:
Schedule Event icon - used on the Authorizations page to schedule an
event for the authorization
Looking Glass icon - provides the ability to look up values for fields
linked to other existing data in the system
Information icon - provides the ability to display more detailed data
when you place the mouse over the icon (hover text)
Entity icon - provides a link to view the associated data for the value
displaying in a certain field
Exceptions icon - provides an ability to view the exceptions on a claim
Run Report icon - provides the ability to run a report from a previously
created report template
1.7 Using this Manual
This manual is designed to provide the information you need to use AuthentiCare. Each
section within a chapter provides step-by-step instructions. Each section may also have
one of the following boxes:
Notes – The information provided in these boxes is intended to assist
and further explain the material. It may include an important tip or hint
to using the system.

21
September 2018 AuthentiCare® New Mexico Centennial Care
Important – The information provided in these boxes highlights
specific rules that are critical to the proper functioning of the system.
Caution – The information provided in these boxes highlights actions
that if taken in the system may have an adverse effect.
The information provided in all of these boxes is essential when using the system and
should not be ignored.

22
September 2018 AuthentiCare® New Mexico Centennial Care
Chapter 2 Getting Started
This chapter is designed to help you begin using AuthentiCare by walking through the
provider registration process, adding new users, logging in, logging out, and changing
your password. The AuthentiCare website is www.AuthentiCare.com/nmcc. The use of
an Internet Explorer Web browser is preferable.
2.1 Establishing a User Account
To log into AuthentiCare, you must have a user account which consists of a username
(email address) and a password. There are several ways that a user may obtain a
username and password.
For all providers, an initial user account for an Administrator user is created by First
Data and provided to a manager. Proceed to Section 2.2 for instructions on logging into
AuthentiCare. After logging in, the Administrator user can create user accounts for
other users for that provider (refer to Section 2.1.1 for further instructions).
For New Mexico Centennial Care administrators, user accounts are created by First
Data when authorized by New Mexico Centennial Care MCOs. The registration process
is not required. First Data will provide the username (email address) and password so
that Centennial Care administrators are able to log into and use AuthentiCare. Proceed
to Section 2.2 for instructions on logging into AuthentiCare.
2.2 Logging In to AuthentiCare
Navigate to the AuthentiCare website at www.AuthentiCare.com/nmcc .
The Welcome page displays.

23
September 2018 AuthentiCare® New Mexico Centennial Care
Enter your AuthentiCare Email Address and Password.
Click Submit.
The Home page displays and varies in appearance based on the user’s role. Your view
of the Home page may be different from what is displayed in this User Manual as this is
the Provider Administrator’s view. From the Home page, you can access the
functionality available in AuthentiCare.
2.3 Logging out of AuthentiCare
For security and privacy reasons, it is important for users to log off AuthentiCare when
leaving the work station. After a 15 minute period of inactivity, AuthentiCare
automatically logs the user off the system. Select Logout from the Main Menu.

24
September 2018 AuthentiCare® New Mexico Centennial Care
2.4 Adding New Users
A provider staff member with the NM_Administrator role can create additional user
accounts, including another user with the NM_Administrator role and a variety of other
roles.
An MCO staff member, a New Mexico Centennial Care Administrator user, cannot add
another New Mexico Centennial Care Administrator user to AuthentiCare. To add an
MCO New Mexico Centennial Care Administrator user, contact
An AO_Administrator user (created for MultiBranch authorization work) cannot add
another AO_Administrator user to AuthentiCare. To add another AO_Administrator
user, contact [email protected].
Important – For MCOs, an MCO New Mexico Centennial Care Administrator
user cannot add another MCO NMCC Administrator user.
Important – For providers, an AO_Administrator user cannot add another
AO_Administrator user.
To add these users, contact [email protected].
For providers, enter your AuthentiCare Email Address and Password.
Click Submit.
Upon successful completion of logging in, the Home page displays.
Home
| Create
| Reports
| Scheduling
| Administration
| My Account
| Custom Links
| Logout

25
September 2018 AuthentiCare® New Mexico Centennial Care
1. If you want to narrow your search you may choose an Entity Type. Enter the
name of your provider or some portion of the name in the Entities
Search >.
2. Click Go!
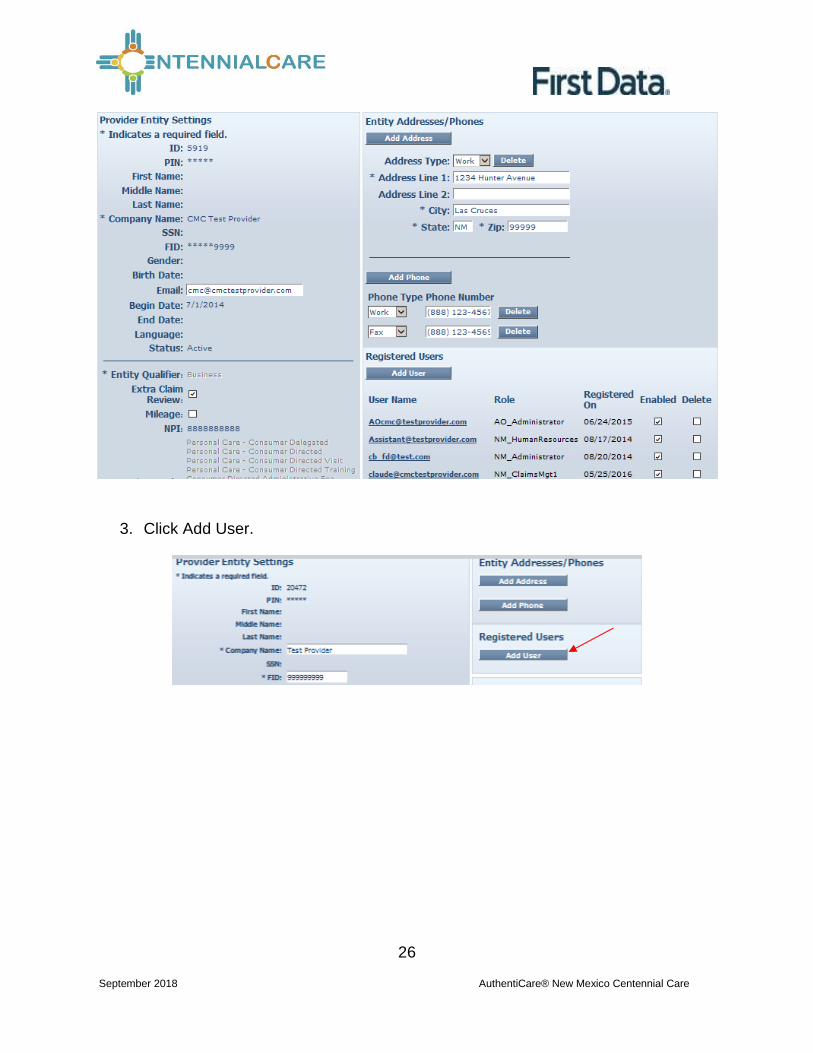
The Provider Entity Settings page displays with the information about this provider.
26
September 2018 AuthentiCare® New Mexico Centennial Care
3. Click Add User.

27
September 2018 AuthentiCare® New Mexico Centennial Care
The Register page displays.
Choose the Administrator role only from the list below. There is an additional role of
Assignment Office Administrator for Multi-Branch providers (AO_Administrator) that only
First Data can assign. Refer to Chapter 14 for an explanation of this User role. When
you choose the NM_Administrator role or a different role, the screen will refresh to
display on the right the list of rights for that role. See Appendix A.4 for a description of
functions the Administrator role and each different role can perform. The
NM_Administrator role and available provider roles are listed here:
AO_Administrator
NM_Administrator
NM_AdminAssistant
NM_Payroll/Billing
NM_HumanResources
NM_Payroll/Billing/HumanResources
NM_Scheduler/Coordinator
NM_ClaimsMgt1
NM_ClaimsMgt2
NM_IntakeReferral
There can be only one role per email address. When creating a new user
account, one cannot use the same email address in existence for another
account. If the person needs to be assigned to more than one role, each
role will require its own distinct email address.

28
September 2018 AuthentiCare® New Mexico Centennial Care
Enter an Email Address.
This email address serves as a User Name and is not used to contact the
provider. It does not have to be a valid email address, but it must be in the
format of an email address.
For example, a provider with a facility called. “Special Care, Inc.” may wish
to type in the User Name: [email protected].
Enter a Password. The password must have at least one uppercase letter, at least one
lower care letter, at least one number, at least one special character, and must be at
least eight characters in length.
Special Characters of * and + are not accepted in the AuthentiCare
password format.
Re-enter the password in Confirm Password.
This password is used in the future along with the email address to access the
website so it is important to write them down and store
both email address and password in a secure place.
The Register page displays with the entered information.
Click Register.

29
September 2018 AuthentiCare® New Mexico Centennial Care
You are returned to the Home page. A message in the top left hand corner informs you
that the registration was completed successfully. The user you just registered displays
in the Registered Users section of the Provider Entity Settings page specifying the email
address, the role assigned and that he is enabled.
2.5 Disabling a User
2.5.1 Providers
If an employee of the provider has left the company and that person had access to
AuthentiCare as an agency Administrator or as one of the roles, it is critical that the user
account is disabled immediately. Because you can log in to AuthentiCare anywhere
you can access the Internet, a former employee would still have access to your
agency’s information. Only someone with the NM_Administrator role can disable an
account.
Only someone with the Administrator role at the provider agency can disable
an account.
Navigate to the Provider Entity Settings page by entering the name of the provider or
some portion of the name in the Entities Search > field and click Go!
The Provider Entity Settings page displays with the information about this provider.

30
September 2018 AuthentiCare® New Mexico Centennial Care
Click the Enabled checkbox and the check mark will disappear.
Click Save.
You are returned to the Home page which displays a message that the provider
agency’s office staff member change was saved successfully.

31
September 2018 AuthentiCare® New Mexico Centennial Care
This user will no longer be able to log into AuthentiCare. All changes are done in real
time from the time of the save.
Do not click the “delete” check box to disable the user. That will hamper the
functions in AuthentiCare that automatically track by user name (email)
actions that were taken in the system.
2.5.2 New Mexico Centennial Care Administrative Users
If a user should no longer have access to AuthentiCare, contact First Data Client
Support Services at [email protected] to have the account disabled.
2.6 Changing Your Password
There are several reasons why an AuthentiCare user would want or need to change
his/her password:
Password Expiration: The password expires every 60 days and a new one needs to
be chosen. There is a password rotation of ten (10) passwords which means that you
cannot use any of your previous ten passwords when creating a new password.
Security: Users may want to secure their password by creating a new one if they feel
this information has been compromised.
Account Lockout: After three (3) failed attempts to log-in in a single session the
account is automatically disabled. To re-establish access:
For Providers – someone with an Administrator role can manage registrations
and change the password for the locked out user.
For New Mexico Centennial Care Administrators – contact First Data Client
Support services at 1-800-441-4667, option 6, or email
When creating a new user account, you cannot use the same email
address as the account that has been locked out. When creating a new
user account, one cannot use the same email address in existence for
another account. The locked out account is determined to be “in
existence.”

32
September 2018 AuthentiCare® New Mexico Centennial Care
Enter your AuthentiCare Email Address and Password.
Click Submit.
The Home page displays and varies in appearance based on the user’s role. From the
Home page, you can access the functionality available in AuthentiCare.

33
September 2018 AuthentiCare® New Mexico Centennial Care
PASSWORD CHANGE REMINDER
A reminder to change passwords will appear once a User logs in and if the password is to be changed within the next 5 days. Users will also receive a reminder each of the next 4 days after that as illustrated here with a 3-day reminder. A provider has the ability to select ‘Yes’ to change the password or ‘No’ to bypass. Once the number of days has expired, the user will be required to change his/her password in order to log in to AuthentiCare.

34
September 2018 AuthentiCare® New Mexico Centennial Care
Follow the steps below to change your password.
Place the curser on My Account in the main menu, and when Change Password
displays, click on that.
The Change Password page displays.
Enter your Existing Password.
Enter a New Password.

35
September 2018 AuthentiCare® New Mexico Centennial Care
The Password must have at least one uppercase letter, at least one lower case letter, at least one
number, at least one special character, and be at least eight characters in length. Do not utilize * or
+ in your password.
This password is used in the future along with the email address to access the website so it is
important to write them down and store them in a secure place.
The password entered cannot be the same as any of the previous ten passwords you have used.
Re-enter the password in Confirm Password.
Click Submit.
The AuthentiCare Home page displays with a confirmation that you successfully
changed your password.

36
September 2018 AuthentiCare® New Mexico Centennial Care
Chapter 3 An Introduction to Navigating AuthentiCare
AuthentiCare provides several “starting points” from which to navigate through the
system. All users will see the Home page when first logging in to the system. From this
point, the user can access all data and functionality allowed by the assigned role.
For providers with the role of Administrator, and roles of AdminAssistant, Payroll/Billing
or Payroll/Billing/Human Resources, there are two additional navigation tools that are
listed on the top tool bar, Provider Dashboard, Worker Dashboard, and Exceptions
Dashboard. These are short cuts to data that is essential to daily operations.
3.1 Home Page
The Home page is the central location in AuthentiCare. From this page users can
navigate to any of the other areas of the system. This page differs depending on the
user role, and therefore, controls the information users can access in the system.

37
September 2018 AuthentiCare® New Mexico Centennial Care
The user name is displayed in the upper right-hand corner of the Home page. All
actions taken by the user are tracked in AuthentiCare to maintain an accurate record of
activity.
The Main Menu on the tool bar across the top of the page allows the user to navigate to
different pages to perform different tasks. The Main Menu functions are discussed in
detail throughout this manual. The options on the main menu differ depending on the
user’s role and appear on every page in the system.
38
September 2018 AuthentiCare® New Mexico Centennial Care
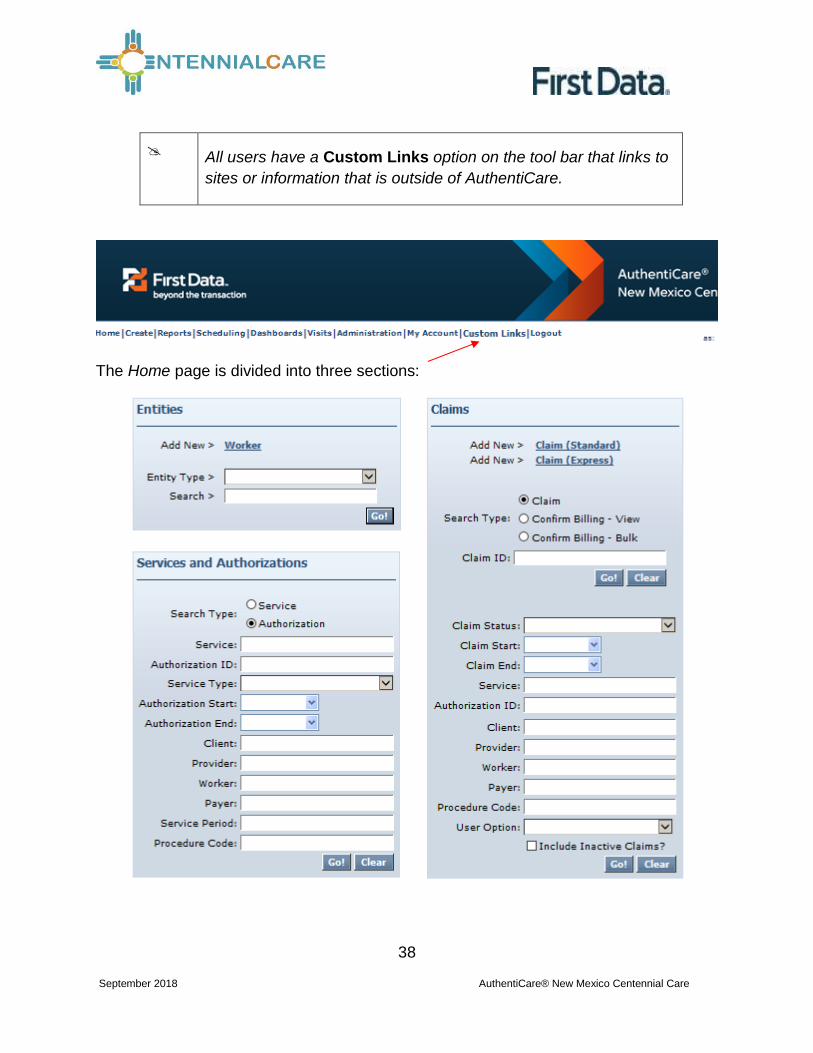
All users have a Custom Links option on the tool bar that links to
sites or information that is outside of AuthentiCare.
The Home page is divided into three sections:

39
September 2018 AuthentiCare® New Mexico Centennial Care
Entities – Entities is a broad category within AuthentiCare that designates people and
agencies involved in the care giving experience including:
Clients (the members served by New Mexico Centennial Care)
Providers (each provider agency)
Workers (those employed by a provider agency)
There is an optional Entity Type to narrow the search. Providers can choose from either
Client or Worker.
Services and Authorizations – This section of the Home page allows the user to perform
detailed searches for existing services and authorizations by clicking on Go!
Claims – While most claims are created using the IVR phone system or the GPS
enabled mobile device, designated provider roles can also create claims using the
website. All claims, whether they were created using the IVR, mobile device or the
website, can be viewed from the website. Providers may perform detailed searches for
existing claims from the Home page. Refer to Chapter 12, Managing Claims.
The Search and Create functions are described in more detail throughout the manual.
3.2 Provider Dashboard
In addition to the Home page, AuthentiCare includes a Provider Dashboard where
information is presented in a graphical format and provides easy navigation to the
source data represented in the dashboard. The Provider Dashboard is only available to
users who have the Administrator, AdminAssistant, Payroll/Billing or
Payroll/Billing/Human Resources roles in the system.

40
September 2018 AuthentiCare® New Mexico Centennial Care
Place your cursor on Dashboards in the Main Menu and click on Provider Dashboard.
The Provider Dashboard displays with real time information.
3.2.1 Unsubmitted Claim Status
The Unsubmitted Claim Status section provides information on the number of claims
that fall into the following categories:
Ready to export – This gives the number of claims that have been confirmed by the
provider, but have not yet been submitted for adjudication. These claims may have
informational exceptions, but they do not have any critical exceptions. In the next

41
September 2018 AuthentiCare® New Mexico Centennial Care
routine system export, these claims will be submitted. Click on the List button to view
these claims on the Claim Search Results. Refer to Section 12.1 for more information.
Needs Confirmation – This represents the number of claims that are ready to be
confirmed for billing to allow submission for payment. In other words the only critical
exception on these claims is billing confirmation. Once a claim has been confirmed for
billing, it will be moved to the “ready to export” group. Click on the List button to view
the Confirm Billing page where providers can confirm these claims. Refer to Section
12.6 for more information.
Critical exception – This represents the number of claims with one or more critical
exceptions in addition to billing confirmation. A critical exception means the claim did
not pass one of the system edits that are based on Centennial Care business rules.
These exceptions prevent the claim from being confirmed for billing and exported. Click
on the List button to view the Claim Search Results which will list these claims and
provide a link to the claim so that details about the exception can be viewed and
addressed.
3.2.2 Today’s Schedule Status
The Today’s Schedule Status section provides information for the events scheduled for
the current day only if the provider is using the scheduling functionality of AuthentiCare.
Refer to Chapter 9, Scheduling for further information. The information in this section of
the dashboard is divided into the following three categories:
3.2.2.1 Checked In On Time – Consumer-Delegated
This represents the number of events (visits) where the worker has checked in on time.
(On time is defined as checking in between 60 minutes prior to the scheduled event
start time and up to 60 minutes after the scheduled event start time.) For further
information about these events, click List to view the Worker Dashboard which will
display all events identifying the worker, the check-in time, and the check-out time (if the
visit has been completed). Refer to Section 3.3 for further information.
3.2.2.2 Checked In On Time – Consumer-Directed (99509)
This represents the number of events (visits) where the worker has checked in on time.
(On time is defined as checking in within 4320 minutes of the scheduled end time.) The
Early and Late thresholds are disabled for Consumer-Directed service.
3.2.2.3 Scheduled Not Due
This represents the number of events scheduled for later in the day. To view these
scheduled events, click List to view the Worker Dashboard which will display the

42
September 2018 AuthentiCare® New Mexico Centennial Care
scheduled events and the worker assigned to each event scheduled to occur later in the
day. Refer to Section 3.3 for further information.
3.2.2.4 Late or Missed
Consumer-Delegated - This represents the number of scheduled events where the
worker either checked in Late (between 60 and 120 minutes after the scheduled start
time of the event), has not yet checked in and the current time is between 60 and 120
minutes after the scheduled start time of the event, or the worker did not check in within
120 minutes of the scheduled start time of the event.
If a worker checks in more than 60 minutes before the scheduled start time of the event
or 120 minutes or later after the scheduled start time of the event, the check in will not
match to the scheduled event and the event status will be “Missed”. For further
information about these events, click List to view the Worker Dashboard which will
display all late or missed events for the current day. Refer to Section 3.3 for further
information.
Consumer-Directed - The Missed Visit Threshold for Consumer-Directed (99509)
clients’ services is 72 hours (4320 minutes).
Reminder: For consumer-directed clients’ schedules, the Early and Late
visit thresholds are disabled.
In a provider agency does not use the scheduling functionality in AuthentiCare this part
of that provider’s Dashboard will be blank.
3.3 Worker Dashboard
In addition to the Provider Dashboard, AuthentiCare also includes a Worker Dashboard
to facilitate quick access to information about the current day’s schedule. The Worker
Payroll/Billing, Payroll/Billing/Human Resources, and Scheduler/Coordinator roles.

43
September 2018 AuthentiCare® New Mexico Centennial Care
In your provider agency does not use the scheduling functionality in AuthentiCare the
Worker Dashboard will be blank.
Place your cursor on Dashboards in the Main Menu, and click on Worker Dashboard.
The Worker Dashboard displays with real time information about the scheduled events
for the current day.
Each column has a sort option. By default the Worker Dashboard displays the
scheduled events in ascending alphabetical order of the worker’s last name.
To change the order of the sort, click on the title of the column, then the arrow in the
column name on which you wish to have the information displayed. For instance, if you
click on the up arrow in the Worker ID column, the information will be sorted in

44
September 2018 AuthentiCare® New Mexico Centennial Care
ascending Worker ID order..
The Status column displays one of the following three statuses:
3.3.1 Checked In On Time
Consumer-Delegated: This means the worker checked in between 60 minutes prior to
the scheduled event start time and up to 60 minutes after the scheduled event start
time.
Consumer-Directed: This means the worker checked in within 72 hours of the
scheduled end time.
3.3.2 Scheduled Not Due
This means the event is scheduled to occur later in the day based on the current time in
AuthentiCare.
3.3.3 Late or Missed
For Consumer-Delegated, this means either the worker checked in late (between 60
and 120 minutes after the scheduled start time of the event), has not yet checked in and
the current time is between 60 and 120 minutes after the scheduled start time of the
event, or the worker did not check in within 60 minutes prior to the scheduled start time
of the event. Setting different service visit thresholds for Early, Late and Missed Visits is
explained in 3.5 of this User Manual.
For Consumer-Directed, the Early and Late visit thresholds are disabled. A missed visit
is one that is not provided within 72 hours (4320 minutes) of the scheduled end time.
Each of the data items displayed on the Worker Dashboard is a hyperlink.

45
September 2018 AuthentiCare® New Mexico Centennial Care
Clicking on the worker name or worker ID will take you to the Worker Entity Settings
page. This allows you to view the information about the worker. Refer to Section 4.4
for further information.
Clicking on the scheduled check in time will take you to the Scheduled Event page.
This allows you to view the information about the event. Refer to Section 9.2 for further
information.
Clicking on the actual check in time (if there is one) will take you to the Claim page.
This allows you to view the information captured for the claim. Refer to Section 12.1 for
further information.
Clicking on the client name or client ID will take you to the Client Entity Settings page.
This allows you to view the information about the client for whom the event is
scheduled. Refer to Section 4.3 for further information.
3.4 Setting Early, Late and Missed Visits Thresholds
Providers are allowed to set client-specific thresholds for Early, Late and Missed Visits.
Providers can set ONLY these client-specific thresholds. In AuthentiCare all services
reference the default jurisdictions threshold settings that are set by First Data with
agreement from the NMCC MCOs.
Providers with the NM_Administrator role have the ability to set client level thresholds
for Early, Late and Missed visits by turning on the custom attributes found on the
Provider Entity Settings page.

46
September 2018 AuthentiCare® New Mexico Centennial Care
Providers have access to set the client threshold for services provided by each of their
specific agencies. If the client is receiving services from multiple providers, each
provider will have the capability to add a separate client threshold for Early, Late and
Missed visits. When providers log into the AuthentiCare system, they can view only the
client thresholds set by them for their provider agency.
If client level thresholds are set for Early, Late and Missed visits, then service thresholds
will be overwritten by client thresholds set by the provider.
To set the client thresholds for Early, Late and Missed Visits, all three custom attributes
have to be set to ‘Yes’ on the Provider page as shown above, and then the thresholds
appear on the Client Entity Settings page for each client receiving services through that
provider.
If the above custom attributes are set to NO, there is no change in how the Late and
Missed visits are handled. Early, Late and Missed visit thresholds from the service
settings are referenced to create Late and Missed visit notifications. Providers receive
email notification for Late and Missed visits based on the thresholds set.
If these custom attributes for the Early, Late and Missed client thresholds are set to Yes
on the Provider Entity Settings page, the service thresholds will be overwritten by the
client thresholds.
3.4.1 Steps to Set New Early, Late and Missed Alerts:
Open the Provider Entity Settings page.
In the Optional Attributes Data Collection section, select “Yes” for all three,
the Early, Late and Missed Visits alerts. (Set all three thresholds to Yes
even if one or two are the same as the default setting.)
Select Save.
On Client Entity Settings pages, for those clients needing unique
thresholds, enter those new thresholds in minutes.

47
September 2018 AuthentiCare® New Mexico Centennial Care
Select Save.
The Late and Missed Visit alerts are now set based on the information entered by
providers.
3.4.2 Thresholds Exceptions/Notifications Scenarios:
Worker checks in earlier than the Early Visit Threshold:
There will be an Early Visit exception on the claim.
The provider will not receive an email notification for Late and Missed
Visit.
Worker checks in within the Early Visit Threshold:
There will be no exceptions on the claim.
The provider will not receive any email notification.
Worker Checks in Later than the Late Visit Threshold:

48
September 2018 AuthentiCare® New Mexico Centennial Care
There will be a Late Visit exception on the claim.
The provider will receive notification for a Late Visit.
Worker Checks in Later than the Missed Visit Threshold:
The provider will receive two notifications, one for Late Visit and one for a
Missed visit.
Worker Checks in when multiple events are scheduled for the day:
When there are multiple events scheduled with the same
Provider/Client/Worker/Service combination:
The first appointment that has the status set to scheduled or late will be
considered.
Status of this appointment is updated to On Time or Late complete
An Early or Late exception is received on the claim depending on the check-in time of
the visit with reference to the scheduled event.
Worker Checks in when no events are scheduled for the day:
Claims created for the day will receive an event matching exception (E1).
3.5 Exceptions Dashboard
Place your cursor on Dashboards in the Main Menu, and click on Exceptions
Dashboard.
The Exceptions Dashboard displays with real time information about the scheduled
events for the current month or for the current day. Once a provider selects Claim
Review Needed, Claim Review Needed displays as an exception.

49
September 2018 AuthentiCare® New Mexico Centennial Care

50
September 2018 AuthentiCare® New Mexico Centennial Care
Chapter 4 Search and Viewing People and/or Agencies
The extent to which a user is able to view people and/or agencies depends on his/her
role in the system.
Centennial Care Administrative users can view all data in AuthentiCare related to their
clients who receive Personal Care and/or Adult Day Health Care. Provider agency
users can view the information in AuthentiCare about their agency as well as
information about all clients served by the agency and all workers who work for that
agency.
4.1 Searching for People and/or Agencies
Enter a name, partial name or ID in the Search field and click Go!
If nothing is entered in the Search field, then all entities will be returned
in your search results. Finding just one client or worker in the list will
take longer than searching for one entity.
The search results display all Entities which match the search criteria entered on the
Home page. If there is only one entity that matches the search criteria entered, then
that entity is displayed immediately rather than the Entity Search Results page.
Note the columns displayed in the search results:

51
September 2018 AuthentiCare® New Mexico Centennial Care
ID – Click this link to go to the Entity Settings page for this entity
Name – Identifies the name for the Entity
User Type – Identifies the type of Entity: Provider, Client or Worker
Click the column heading for the search results to sort using a different column. Click
the heading once to change the sort to ascending order for that column. Click the
heading again to change it to descending order for that column.
Position the cursor over the Information icon to display a pop-up to view more
detailed information.
Click the ID number in the first column next to the entities name to view the Entity
Settings page. The Entity Settings page that displays is dependent on the type of entity.
4.1.1 Viewing Providers
If you click on a provider, that Provider Entity Settings page displays.

52
September 2018 AuthentiCare® New Mexico Centennial Care
This page provides information regarding the provider: the services the provider is
enrolled to provide, the provider’s workers, address and phone information, holidays,
and work hours. This information is data scoped (restricted) to match the rights of the
user who is logged in. A provider can only see information specific to his/her agency.
The Centennial Care Administrator has provided the provider information via the Web.
For additional information regarding the Provider Entity Settings page, refer Chapter 5,
Managing Provider Information.

53
September 2018 AuthentiCare® New Mexico Centennial Care
4.1.2 Viewing Clients
If you click on a client, the Client Entity Settings page displays.
This page provides client information required for claims processing, scheduling and
using the IVR/mobile device.
The Centennial Care Administrator user at the MCO and the Provider Administrator
user can:
Add or edit client telephone information via the Web;
Select “Yes” on the Provider Entity Settings page to open Early, Late and Missed
Visit thresholds that can be set by the provider; and

54
September 2018 AuthentiCare® New Mexico Centennial Care
Add an External Client ID unique to the provider agency.
4.1.2.1 No Tech Zone Indicator on Client Entity Page
The Client Entity Page has a check box indicator field, “No Tech Zone” that is utilized, if
applicable, for the client by each provider of record. Providers should choose the No
Tech Zone designation if the client resides in a no tech zone. Should the client’s area of
residence become a full service zone, or should the client move to a residence in a full
service zone, the provider should remove the check mark from the No Tech box. For
additional information on the No Tech Zone indicator, refer to Chapter 7, Managing
Client Information.
4.1.2.2 High Risk Indicator on Client Entity Page
The Client Entity Page now has a new check box indicator field, “High Risk” that is
utilized, if applicable, for the client by the MCO of record. Providers should contact the
MCO if there is evidence clients not designated as High Risk might need that
designation.
4.1.2.3 Viewing Workers
If you click on a worker, the Worker Entity Settings page displays.

55
September 2018 AuthentiCare® New Mexico Centennial Care
This page provides information about the worker that is required for scheduling and
capturing service activities via the IVR. This information is entered and maintained by
the provider.

56
September 2018 AuthentiCare® New Mexico Centennial Care
Chapter 5 Managing Provider Information
5.1 Editing Provider Information
AuthentiCare receives provider information from New Mexico Centennial Care MCO
staff. Each provider has access in AuthentiCare to only the information associated with
that specific provider agency.
When first signing on to the AuthentiCare system, the Provider Administrator user must
view the agency’s information in AuthentiCare to verify that information is correct. If the
information is not correct, or if information needs added, providers should contact the
agency’s contracted MCOs. Find MCO contacts listed in Chapter 14 of this manual.
A provider should also enter an Email Address on the Provider Entity Settings page.
This is the email address used for notification of late and/or missed visits.
A provider may also enter holidays and working hours for the agency. If entered, this will
drive some of the pop-up messages in the Scheduling system.
Providers should verify their information in the system on a regular basis to make sure
that it is up-to-date and that no changes are required.
Follow the Search and View instruction above to access the Provider Entity Settings
page.

57
September 2018 AuthentiCare® New Mexico Centennial Care
Verify the existing data is correct. Request the Email Address be entered. This is
where AuthentiCare will automatically send alerts for missed and late visits.
Unlike the email address you use for your user name,
AuthentiCare uses this address to automatically send an alert if a
worker is late checking in for a scheduled service and/or if a
worker does not check in at all to provide a scheduled service
(missed visit).
There can only be one email address but it can be an individual or
an address that distributes the email to multiple employees within
your agency.
Providers who have provider-specific client identification numbers and want that number
reflected in AuthentiCare can select edit the Optional Attribute Data Collection field
located under the Worker list on the Provider Entity Settings page. Providers can select
“yes” and “save” to open the External Client ID on the Client Entity Settings page. The

58
September 2018 AuthentiCare® New Mexico Centennial Care
selection on the Provider Entity Settings page opens the External Client ID field for each
client associated with the provider agency. For more information about External Client
ID, refer to Chapter 7, Managing Client Information.

59
September 2018 AuthentiCare® New Mexico Centennial Care
5.1.1 Adding Negotiated Rates for Each Service by MCO
On the Provider Entity Settings page, find the four MCOs listed in the
Optional Attributes section.

60
September 2018 AuthentiCare® New Mexico Centennial Care
Choose Yes for the first four attributes listed, then select Save.
o 000M1808: Molina Health Care
o 000M1814: Presbyterian Health Services
o 42101522: Blue Cross/Blue Shield of New Mexico
o 87726: UnitedHealthcare Community Plan

61
September 2018 AuthentiCare® New Mexico Centennial Care
Search for services from the Home page by moving the radio button from
Authorizations to Service, then selecting Go!
The Services page displays with a list of NMCC services in AuthentiCare. Note that at
this time, Respite claim information is not available in AuthentiCare.

62
September 2018 AuthentiCare® New Mexico Centennial Care
View a Service Settings page by clicking on the link designating the procedure code.
Note that since all four MCOs were chosen, all four MCOs have an open
field on the Service Settings page.
Input a negotiated rate for each of the MCOs.
Select Save Rates.
Select each service to add negotiated rates for each service for each
MCO.
Select Save Rates.

63
September 2018 AuthentiCare® New Mexico Centennial Care
Each provider will be responsible for adding the appropriate rate for each of these
services for each MCO on the Service Settings page. It will also be the providers’
responsibility to ensure the correct rates are entered. If negotiated rates are not
entered, then the default rates are the rates billed through AuthentiCare.
Requesting Dual Confirmation from the Provider Entity Settings page is on the left side
of the Provider Entity Settings page in the Entity Qualifier section. If the provider clicks
on this box, then saves the change, a check mark indicates that a Dual Confirmation
process will take place on each claim before claims export.

64
September 2018 AuthentiCare® New Mexico Centennial Care
On the right side of the Provider Entity Settings page is the Request Schedule section.
Schedule information here is optional.
Providers may choose to request that Holidays/Days Off be entered for the agency.
These are days that the agency does not provide services to clients, not days that the
office is closed.
To add a single day: Type in the Date OR choose a date from the calendar then click
Add.
To add a date range for a multi-day agency closure: Enter a From Date and To Date
OR choose the dates from the calendars, and then click Add.

65
September 2018 AuthentiCare® New Mexico Centennial Care
Providers may choose to request that Work Hours be entered. These are the hours that
workers from the agency may provide services for clients and does not reflect the office
hours of the agency.
To apply the default hours (12:00 AM to 11:59 PM), no change is needed.
To enter specific service hours for one or more days of the week:
Click the radio button in the column labeled “Cust” (for Custom)
Enter the Start Time and End Time in the fields provided. Be sure to
indicate AM or PM for each entry.
To establish days of the week (for every week) that the agency’s workers do not
provide services (for example on Sunday):
Check the circle in the column labeled “Off”.

66
September 2018 AuthentiCare® New Mexico Centennial Care
Entering details in this section causes warning notices to display if the
provider attempts to schedule a worker for a time that falls outside of
the agency’s work hours. However, providers are not prevented from
scheduling a visit outside normal work hours. Refer to Chapter 9.
Click Save.
A successful save message displays at the top of the page indicating the provider
information was saved successfully.
5.2 Electronic Remittance Advice (835) from NMCC MCOs
AuthentiCare New Mexico Centennial Care submits claims on the provider’s behalf to
the appropriate Payer in a HIPAA compliant 837 electronic file in the early morning
hours of each week day. The Payer, the appropriate MCO, provides adjudication
results to the provider in a HIPAA compliant 835 electronic remittance advice file.
Each provider must decide whether or not to load the 835 remittance advice into
AuthentiCare New Mexico Centennial Care. The advantage to loading the 835 into
AuthentiCare New Mexico Centennial Care is that providers will have a complete history
of each claim in one system, from the worker’s IVR call/mobile device contact or claim
web entry through adjudication with the amount paid linked to each service episode.
Another advantage for providers is that, if the data collection of the External Client ID is
selected, providers will have each client’s External Client ID with each client’s claim
information on the 835.
If you choose to not upload the 835 remittance advice into AuthentiCare New Mexico
Centennial Care, many of your reports will be incomplete; having no information about a
claim beyond the date it was submitted to the applicable MCO for adjudication.
If you choose to request and upload the 835, use the process outlined below.

67
September 2018 AuthentiCare® New Mexico Centennial Care
5.2.1 Uploading the 835 into AuthentiCare
Providers can upload the 835 files they receive from the applicable MCO into
AuthentiCare New Mexico Centennial Care whenever they want to do so, 24/7. The
ability to upload the file is a right assigned to the person(s) with an Administrator role in
the system. AuthentiCare will accept the 835 file with an “.edi” extension, as a zip file
having a “.zip” extension or with an “.rsp” extension.
Once uploaded, the 835 file will be queued in the background for the remittance data to
be imported. The provider will be notified by email when the processing is complete.
The provider can enter up to three email addresses to be used to report file processing
results.
If the file is successfully processed, providers will be able to run the remittance reports
to see the data processed from the 835 files.
If the file is unsuccessful, the reason will be provided in the email along with contact
information for Customer Support for assistance in resolving the issue.
To begin the upload process, hover over the Administration tab on the tool bar and
click on the File Upload tab when it appears.
Once providers select “File Upload,” the selection of the 835 will remain the same.
The screen below displays where you can upload your 835 file.

68
September 2018 AuthentiCare® New Mexico Centennial Care
A 90 day rolling history will be displayed that shows details about the files uploaded
(date, time, uploaded and processed, success/failure, payment date in the file, client ID
in the file).
There is an added choice of “Schedules.” For further information regarding uploading
worker schedules, refer to Chapter 9, Section 9.7.
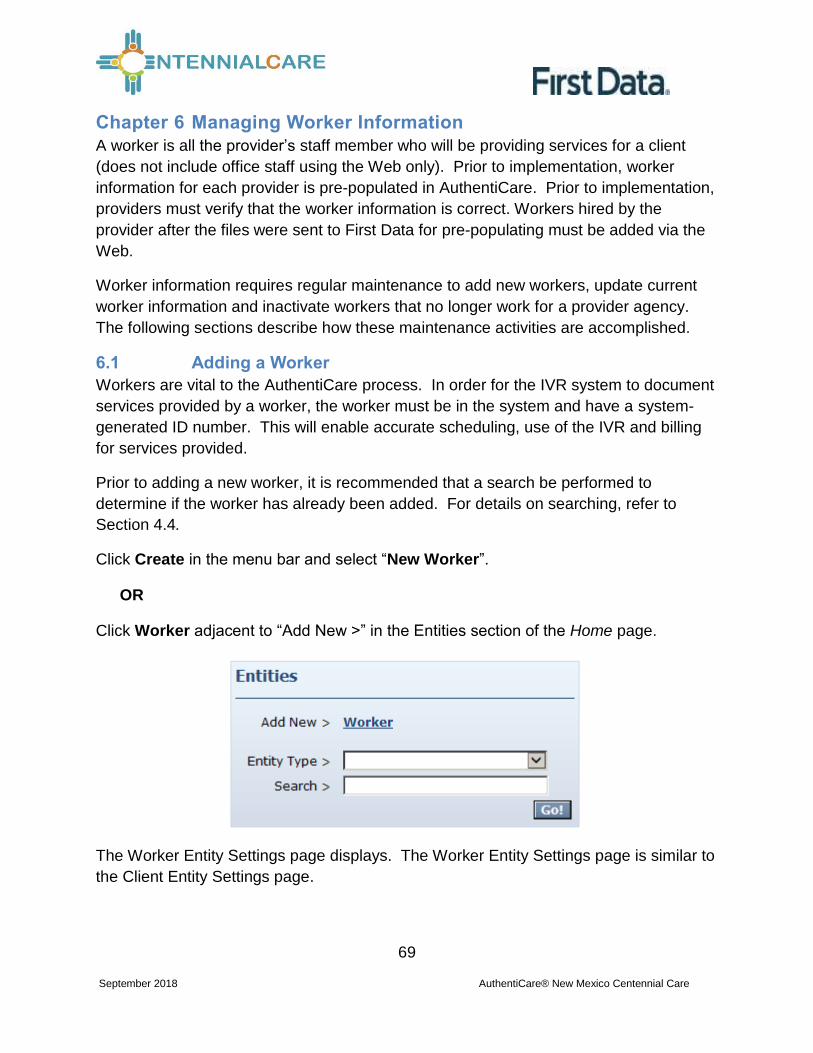
69
September 2018 AuthentiCare® New Mexico Centennial Care
Chapter 6 Managing Worker Information
A worker is all the provider’s staff member who will be providing services for a client
(does not include office staff using the Web only). Prior to implementation, worker
information for each provider is pre-populated in AuthentiCare. Prior to implementation,
providers must verify that the worker information is correct. Workers hired by the
provider after the files were sent to First Data for pre-populating must be added via the
Web.
Worker information requires regular maintenance to add new workers, update current
worker information and inactivate workers that no longer work for a provider agency.
The following sections describe how these maintenance activities are accomplished.
6.1 Adding a Worker
Workers are vital to the AuthentiCare process. In order for the IVR system to document
services provided by a worker, the worker must be in the system and have a system-
generated ID number. This will enable accurate scheduling, use of the IVR and billing
for services provided.
Prior to adding a new worker, it is recommended that a search be performed to
determine if the worker has already been added. For details on searching, refer to
Section 4.4.
Click Create in the menu bar and select “New Worker”.
OR
Click Worker adjacent to “Add New >” in the Entities section of the Home page.
The Worker Entity Settings page displays. The Worker Entity Settings page is similar to
the Client Entity Settings page.

70
September 2018 AuthentiCare® New Mexico Centennial Care
1. Enter the worker’s First Name and Last Name.
2. Select the worker’s Gender from the drop down box.
3. Enter the worker’s Birth Date in mm/dd/yyyy format.
4. Select Language. Selecting either English or Spanish will determine the
language the worker will hear when using the IVR. If Other is selected, the IVR
language will default to English.
5. If the provider chooses, an External Worker ID can be entered. Many providers
already have an ID number for their workers and want to capture that information
here.
6. Select the Worker Services. Providers must select at least one service this
worker may provide, but may select more than one if needed. To do so, hold
down the Control key (Ctrl) on the keyboard while clicking the selections in the
list.
7. Enter additional information in the appropriate fields if desired.

71
September 2018 AuthentiCare® New Mexico Centennial Care
. Provider is automatically populated with the name of the provider that
corresponds to the user that is presently logged into AuthentiCare and
creating this worker. Do not use the Add Provider button.
Enter the following schedule information, if desired.
Entering details in this section causes warning notices to display if the
provider attempts to schedule a worker for a planned day off. For
details on scheduling, refer to the Chapter 9, Scheduling.
A) Providers may choose to add Holidays/Days Off for each worker to assist
with scheduling.
To add a single day: Type in the Date OR choose a date from the
calendar, then click Add.
To add a date range: Enter a From Date and To Date OR choose the
dates from the calendars, and then click Add.
B) Providers may choose to Work Hours for the worker.
To apply the default hours to the worker, no change is needed.

72
September 2018 AuthentiCare® New Mexico Centennial Care
The default (Def) hours are the work hours of the provider and
AuthentiCare automatically checks the circles in the column labeled
“Def” for each day.
To see the hours set for the provider, click on the link icon next to the
provider’s name. Clicking this icon displays the Provider Entity Settings
page.
To enter hours that differ from the provider’s work hours for one or more days of the
week:
Check the circle in the column labeled “Cust” (for Custom)
Enter the Start Time and End Time in the fields provided. Be sure to
indicate AM or PM for each entry.
To establish ongoing days off (for example if the worker never works on Monday or
Tuesday):
Check the circle in the column labeled “Off”.

73
September 2018 AuthentiCare® New Mexico Centennial Care
Click Save/Create Another at the bottom of the page, to save the worker and create
another worker.
OR
Click Save, to save the worker and return to the Home page.
A successful save message displays at the top of the page indicating the worker was
saved successfully.
The worker ID appears in this message. The worker must use this ID
when calling the IVR from the client’s home. Be sure to record this ID
on the Worker Instruction sheet to be supplied to the worker. The ID
can also be found by viewing the Worker Entity Setting page.
6.2 Deleting a Worker
If a worker is entered in error, the worker can be deleted from the system, but this must
be done immediately after the mistake is made. Once an event is scheduled or a claim
is created for this worker, the worker cannot be deleted.
Search for the worker you wish to delete according to the instructions in Section 4.4.

74
September 2018 AuthentiCare® New Mexico Centennial Care
The Worker Entities Settings page displays.

75
September 2018 AuthentiCare® New Mexico Centennial Care
Click Delete.
The system asks you to confirm the deletion. By clicking OK, the worker is permanently
deleted from the system. If you do not wish to proceed with permanently deleting the
worker, then click Cancel.
Click OK to permanently delete this entity.
Return to the Home page. A message displays in the upper left hand corner confirming
the deletion. If the worker you attempted to delete had any other relationships in the
system, then an error message will display informing you that the deletion was not
completed.
OR
Enter a name, partial name or ID in the Search field and click Go!

76
September 2018 AuthentiCare® New Mexico Centennial Care
The Entity Search Results page displays with the results of your search.
Click the checkbox in the Delete Selected column.
Click the Delete Selected column heading to delete the worker you wish to delete.
Once an event is scheduled or a claim is created for this worker, the worker cannot be
deleted.

77
September 2018 AuthentiCare® New Mexico Centennial Care
The system asks you to confirm the deletion. By clicking OK, the worker is permanently
deleted from the system. If you do not wish to proceed with permanently deleting the
worker, then click Cancel.
Click OK to permanently delete this worker.
You return to the Home page. A message displays in the upper left hand corner
confirming the deletion. If the worker you attempted to delete had any other
relationships in the system, then an error message will display informing you that the
deletion was not completed.
6.3 Editing Workers
Search for the worker you wish to edit according to the instructions in Section 4.4.
The Worker Entities Settings page displays.

78
September 2018 AuthentiCare® New Mexico Centennial Care
Verify, and if needed, update the appropriate fields such as First Name, Last Name,
Gender, Birth Date, Worker Services, and scheduling information. Click Save at the
bottom of the page to save the worker and return to the Home page.
A successful save message displays at the top of the page indicating the worker was
saved successfully.
6.4 Suspending/Inactivating/End-Dating Workers
A worker cannot be deleted once there are any relationships created for the worker. In
other words, if a worker has been scheduled for an event or if a claim has been created
for which the worker provided the service, then the worker cannot be deleted from
AuthentiCare. If the worker no longer works for the provider or simply will not be
providing services any longer, there are three options for editing the worker file:
Change the worker’s status to “Suspend”. The worker cannot use the IVR but claims
can be entered via the Web. All claims (pending and new) will show a critical exception
that the worker is not eligible.
Change the worker’s status to “Inactive”. The worker can still use the IVR and have
claims entered via the Web but all claims (pending and new) will show a critical
exception that the worker is not eligible.
Populate the “End Date” field on the worker’s screen. The worker can still use the IVR
and have claims entered via the Web. Claims with a Date of Service (DOS) prior to the
end date will be processed normally. Claims with a DOS after the end date will
generate a critical exception that the worker is not eligible.
At any time the “End Date” can be removed or the worker’s status changed back to
active, making the worker again eligible to provide services and/or removing the “worker
not eligible” critical exception from pending claims.
Populate the “End Date” when a worker terminates. Once the End Date is populated,
all future scheduled appointments are deleted automatically by AuthentiCare. This
reduces the late and missed visit alerts to providers.
To suspend, inactivate, and/or end date a worker, search for the worker you wish to
inactivate according to the instructions in Section 4.4.
The Worker Entities Settings page displays.

79
September 2018 AuthentiCare® New Mexico Centennial Care
Change Status to Suspend or Inactive or enter an End Date.
Click Save at the bottom of the page to save the worker and return to the Home page.
A successful save message displays at the top of the page indicating the worker was
saved successfully.
If a worker is rehired, that worker should not be re-entered because
the worker still exists in the system. Instead, the Status should be
changed back to Active and/or the End Date removed.

80
September 2018 AuthentiCare® New Mexico Centennial Care
6.5 Creating a Worker for Consumer-Directed Admin Fee
Every claim in AuthentiCare has to have an associated worker and associated
authorization for service to submit successfully for payment. Providers will be able to
set up an “administrative” worker for AuthentiCare to automatically create claims for the
Consumer-Directed Admin Fee. If providers choose to add the “administrative” worker
for this purpose, the provider is granting approval to AuthentiCare to create these
claims.
Claims will not be created for any month an authorization for the Consumer-Directed
Admin fee is not present. Once the AdminFee Worker is created, and an authorization
for that service is present, claims will be created for those clients. The first weekend of
the next month, new claims for the clients of that service for that month will be created.
Providers need to create only one “administrative” worker with the name AdminFee
Worker. That worker will be present in AuthentiCare month after month.
Providers will utilize the following procedure to create an “administrative” worker for
Consumer-Directed Admin Fee claims.
Log into AuthentiCare. From the Home page, select Add Worker
On the Worker Entity page, add an “administrative” worker with the exact
name “AdminFee” as the first name and “Worker” as the last name
Highlight the service “Consumer Directed Admin Fee”
If desired, create and add any other data, birthdate, etc. for this new
worker
Click Save to save the new worker, “AdminFee Worker”

81
September 2018 AuthentiCare® New Mexico Centennial Care
Chapter 7 Managing Client Information
MCO Members are referred to as clients in AuthentiCare. Clients are created in
AuthentiCare by New Mexico Centennial Care MCO staff. New Mexico Centennial Care
MCO staff members verify the client list and confirm that a correct telephone number(s)
is provided (unless the client does not have a phone). Providers also verify clients’
telephone numbers, and have access to edit telephone information as needed.
Search for the client you wish to edit according to the instructions in Section 4.3.
The Client Entity Settings page displays:

82
September 2018 AuthentiCare® New Mexico Centennial Care
Verify the Phone Type and Phone Number for the client. If the client does not have a
phone, then this field should be populated with 999-999-9999.
Manage the client’s telephone information. Correct or delete an incorrect number and
add a correct number or additional numbers. The number(s) listed is the one
AuthentiCare will use to verify if the worker is calling from the client’s home.
Click Save at the bottom of the page to save the client information and to return to the
Home page.
A successful save message displays at the top of the page indicating the client was
saved successfully.
7.1 External Client ID
If the provider has selected Yes in the Optional Attribute Data Collection field on the
Provider Entity Settings page, the External Client ID field displays on the Client Entity
Settings page. Providers can input the provider-specific client identification number
from the provider’s own data system, and select Save to record the new information.

83
September 2018 AuthentiCare® New Mexico Centennial Care
Click Save at the bottom of the page to save the client information and to return to the
Home page.
A successful save message displays at the top of the page indicating the client was
saved successfully.
The External Client ID (if present on the Client Entity Settings page) is displayed in a
designated column on the Claim Data Listing Report, the Remittance Advice Report,
and the Time and Attendance Report.

84
September 2018 AuthentiCare® New Mexico Centennial Care
For additional information on all reports, refer to Chapter 13, Reporting.
7.2 No Tech Zone Indicator
Providers can select the No Tech Zone indicator on the Client Entity Settings page for
clients who reside and receive services in a location when cell telephone or landline
service is not available and/or for the situations of clients not having an available
telephone of either kind.

85
September 2018 AuthentiCare® New Mexico Centennial Care
Click Save at the bottom of the page to save the client information and to return to the
Home page.
A successful save message displays at the top of the page indicating the client was
saved successfully.
The No Tech Zone designation displays on the Eligible Client Data Listing Report. For
additional information on all reports, refer to Chapter 13, Reporting.
7.3 High Risk Client Indicator
MCO Users can designate a client as a “High Risk” client. Providers have view/read-
only access of the High Risk indicator box.
86
September 2018 AuthentiCare® New Mexico Centennial Care
The High Risk indicator is displayed in the Eligible Client Data Listing Report and in the
Late and Missed Visit Report.
For additional information on all reports, refer to Chapter 13, Reporting.

87
September 2018 AuthentiCare® New Mexico Centennial Care
Chapter 8 Search and View Authorizations
A service to be provided for a client must have a valid authorization documented in
AuthentiCare in order to be scheduled and for the claim to be submitted for payment.
. A worker can use the IVR to record services without a valid
authorization in AuthentiCare. A claim will be created but will have a
critical exception and will not be submitted for payment until the
authorization is in place.
All authorizations for clients are loaded into AuthentiCare by Centennial Care MCOs.
The provider cannot add a new authorization or edit an existing authorization.
For providers to search and view an authorization:
Click the Authorization radio button in the Services and Authorizations section of the
Home page.
Enter search criteria in any of the fields, if desired and click Go!
The search results display all authorizations which match the search criteria entered on
the Home page.

88
September 2018 AuthentiCare® New Mexico Centennial Care
If nothing is entered in the Search field, then all entities will be returned
in your search results. Finding just one client or worker in the list will
take longer than searching for one entity.
Note the columns displayed in the search results:
Event Actions – Click the Schedule Event icon to schedule an event for this
authorization. Refer to Chapter 9, Scheduling, for further instructions. This column also
indicates how many units remain in the authorization by comparing the total number of
units authorized and the total number of units scheduled. This is not a comparison with
the units actually provided to date but with those scheduled to date.
ID – Click the ID hyperlink to view/edit the Authorization Settings page for this
Authorization. Proceed to Step 7.
Service ID – Identifies the service and its service code
Client – Identifies the client and the client ID
Provider – Identifies the provider assigned to the authorization and the
provider’s ID
Worker - Field is blank as authorizations are issued to the provider, not the
provider’s individual workers.
Effective Dates – Identifies the start and end dates of the authorization
Click the column heading if you wish for the search results to sort using a different
column than the default, which is the ID (Authorization) column in ascending order.
Click the heading once to change the sort to descending order for that column. Click
the heading again to change it to ascending order for that column.

89
September 2018 AuthentiCare® New Mexico Centennial Care
Position the cursor over the Information icon to display an Additional Information
pop-up about the authorization.
Click on the ID hyperlink in the ID column to view the authorization.
The Authorization Settings page displays.
Click Cancel to return to the Authorization Search Page.
8.1 Auto End-dating of Authorizations
When a client transfers from one MCO (payer) to another (as indicated in the payer
assignment on the Client Record itself), then AuthentiCare will end date the existing
authorizations for the “sending” MCO. The “receiving” MCO will be expected to send in
new authorizations records to replace those. MCOs will have access in AuthentiCare to
the historical authorization data for a client to help facilitate this transition.

90
September 2018 AuthentiCare® New Mexico Centennial Care
8.2 NMCC MCO Deletion of Authorizations
If an MCO deletes an authorization on the Web that was previously sent to
AuthentiCare, any scheduled visits in the future that are associated with that
authorization will also be deleted. This means the provider will not receive late and
missed visits notifications against an authorization which is now invalid, but will need to
reschedule that client’s services against a more current authorization.
8.3 Authorizations with Zero Units
In the case where there may be duplicate and overlapping authorizations, and one of
those authorizations may be for zero units, the authorizations for zero units are ignored.
This allows providers’ claims to bill against other authorizations with available units
when providers confirm and submit claims.

91
September 2018 AuthentiCare® New Mexico Centennial Care
Chapter 9 Scheduling
Providers may use AuthentiCare to schedule workers’ visits to clients’ homes. A
scheduled visit is called an event. Each event must be linked to an authorization.
Events may only be scheduled for authorized client/service/provider/worker
combinations. AuthentiCare tracks the number of units available for scheduling in each
authorization and notifies the scheduler if an event exceeds the number of units
available for scheduling. AuthentiCare notifies the provider with an alert, and offers
choices of discard, accept or change the scheduled event if the client or the worker
have been previously scheduled for that timeframe. AuthentiCare also allows providers
to schedule back up workers for events.
AuthentiCare compares the scheduled events to the actual check in and check out
times of the worker and alerts the provider via email if a worker is late or if an event is
missed.
If a worker is scheduled for an event on a regularly occurring day off, AuthentiCare
displays a warning message alerting the scheduler to this conflict. The scheduler may
choose to change the event or to save it even though a conflict exists. AuthentiCare
scheduled warnings are meant to assist schedulers, but not prevent the scheduler from
scheduling an event with a conflict.
This chapter is designed to help you schedule non-recurring and recurring events.
Additionally, it helps you search for an event, view an event, maintain events, and
acknowledge a missed event when a worker misses a scheduled event.
9.1 Using the Calendar
AuthentiCare allows you to view your calendar of events by the month, week or day.
This section describes the three views.
Select Scheduling from the Main Menu on the Home page.
The Event Scheduling page displays with the calendar.

92
September 2018 AuthentiCare® New Mexico Centennial Care
The default view of the calendar is the daily view.
9.1.1 Daily
The Daily view of your calendar enables you to view all of the events scheduled for your
agency for one day at a time. This is the default view of your calendar which means the
date you view when you open the calendar is the current date.
If you are, however, in the Monthly view, click a day you would like to view, or if
you are in the Weekly view, click a day you would like to view. Click the Daily
link above the calendar.
The day displays in hourly increments.
Position the cursor over the event and a pop-up box with additional detail displays.
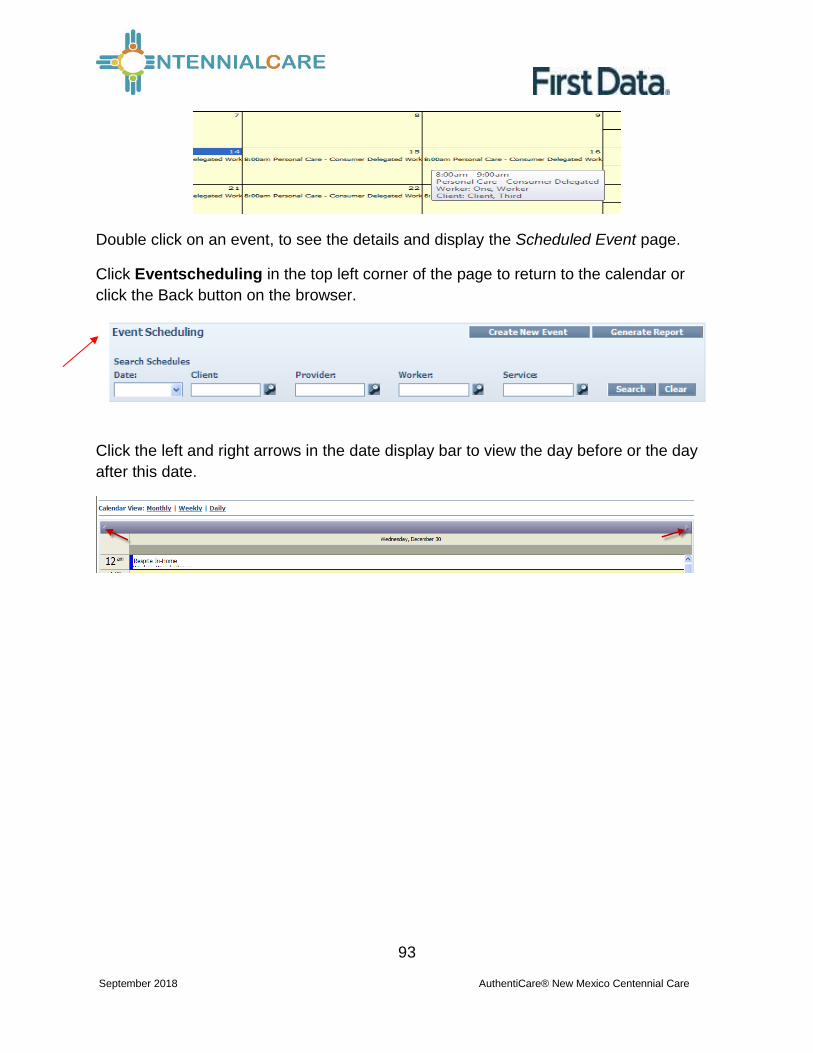
93
September 2018 AuthentiCare® New Mexico Centennial Care
Double click on an event, to see the details and display the Scheduled Event page.
Click Eventscheduling in the top left corner of the page to return to the calendar or
click the Back button on the browser.
Click the left and right arrows in the date display bar to view the day before or the day
after this date.

94
September 2018 AuthentiCare® New Mexico Centennial Care
9.1.2 Monthly
The Monthly view of your calendar enables you to view all of the events scheduled for
your agency for one month at a time. This is one of the calendar settings you can
choose from the calendar heading.
Position the cursor over the event and a pop-up box with additional detail displays.
Double click on an event to view all of the event information.
The Scheduled Event page displays.

95
September 2018 AuthentiCare® New Mexico Centennial Care
Click Eventscheduling in the top left corner of the page to return to the calendar or
click the Back button on the browser.
Click the left and right arrows in the date display bar to view the month before or the
month after this date.
9.1.3 Weekly
The Weekly view of your calendar enables you to view all of the events scheduled for
your agency for one week at a time.
From the Monthly view, click a day in the week you would like to view.
Click the Weekly link above the calendar.
The week’s schedule with the day you selected now displays.

96
September 2018 AuthentiCare® New Mexico Centennial Care
Position the cursor over the event and a pop-up box with additional detail displays.
Double click on an event to display the Scheduled Event page and see the details of the
event.
Click Eventscheduling in the top left corner of the page to return to the calendar or
click the Back button on the browser.
Click the left and right arrows in the date display bar to view the week before or the
week after this date.

97
September 2018 AuthentiCare® New Mexico Centennial Care
9.2 Searching for Scheduled Events in the Calendar
After an event has been scheduled, you are able to search for this event in the
calendar. AuthentiCare provides a variety of options for searching for an event in the
calendar.
Navigate to the Event Scheduling page.
Enter at least one of the following search criteria to locate event(s) in the calendar.
Each search criteria field is described below:
Enter a Date (mm/dd/yyyy) or click the down arrow and select the date from the
calendar, then click Search.
The calendar displays events from this date forward.
Enter the Client ID, full name or partial name and click the Looking Glass icon to
find the client, and then click Search.

98
September 2018 AuthentiCare® New Mexico Centennial Care
The calendar displays all the events scheduled for this individual.
Enter the Primary Worker ID, full name or partial name and click the Looking Glass
icon to find the worker, and then click Search.
The calendar displays all the events scheduled for this person.
Enter the Service name or partial name and click the Looking Glass icon to find
the services, and then click Search.
The calendar displays all the events scheduled for this Service at your agency.
The more search criteria you enter, the more narrow the search results.
Be aware, there is the potential no results will display because some of
the criteria may conflict.
Click Clear, if you have entered incorrect information in the search
criteria fields at any time or would like to start a new search.
9.3 Scheduling an Event
Events are the visits the worker makes to the client to deliver an authorized service.
Events can be of varying durations, at any time of the day and on any day of the week.
An event may be a one-time service (non-recurring) or a service that is provided on an
ongoing, regularly scheduled basis (recurring).

99
September 2018 AuthentiCare® New Mexico Centennial Care
9.3.1 Scheduling an Event Using the Authorization
An authorization has been entered in the system and now you are ready to schedule the
visit for this client. Follow the instructions below to add the event. These instructions
assume you are viewing the Authorizations page. Refer to Chapter 8, Managing
Authorizations if you need further instructions about authorizations.
Click the Schedule Event icon for the appropriate authorization on the
Authorizations page.

100
September 2018 AuthentiCare® New Mexico Centennial Care
The Scheduled Event page displays.
The Authorization ID number is populated below the Authorizations field.
Additionally, the Client and Service are completed since you navigated to this
page from the Authorizations page. The Provider is populated based on the
provider agency associated with the current log in.
Enter the Date of the event or select a Date from the drop-down calendar.
Enter Start and End Times. Start and end times must include AM or PM. The
Duration is automatically calculated by AuthentiCare.
When a worker visits a client one time, or a variety of times not in a normal, repeated
schedule, this is considered a non-recurring event. For these types of events, proceed
to Step 4. When a worker visits a client on a regular basis, at the same time of the day,
this is considered a recurring event. Refer to Section 9.3.3 for further information.
Enter the Primary Worker. You may enter the worker ID, a full name or partial name.
Then click the Looking Glass icon . Select the worker from the list displayed. You
may leave this field blank if you do not know who will be conducting the service.
Enter the Backup Worker, if applicable. Enter a worker ID, full name or partial name
and click the Looking Glass icon .
Click Save.
The client’s phone number displays on the Scheduled Event page as long as the client has a phone number on the Client Entity Settings page. For Client, if the home phone number is not available, the first available phone number is displayed. If there are no phone numbers associated with the client, the field on the Scheduled Event is blank. The worker’s phone number displays on the Scheduled Event page as long as the provider has added the worker’s work phone number to the Worker Entity Settings page. If the work phone number is not available, the first available phone number in the

101
September 2018 AuthentiCare® New Mexico Centennial Care
database is displayed. If there is no phone number associated with the Primary Worker the field is blank.
If the backup worker is named on the Scheduled Event page, the backup worker’s
phone number displays as long as the provider has added the backup worker’s phone
number to the Worker Entity Settings page. The same process occurs in AuthentiCare.
If there is no phone number associated with the Backup Worker, the field is blank.
If AuthentiCare discovers scheduling conflicts or issues, a message displays at the top
of the page advising the user of the conflict. In this example the event scheduled for
January 4, 2010 exceeds the total units remaining for this authorization. The
authorization for this event has 1 unit remaining (15 minutes) and the event scheduled
requires 4 units; therefore, the message indicates that the event will exceed the total
units allowed on the authorization.

102
September 2018 AuthentiCare® New Mexico Centennial Care
o Click Change to return to the event and change the information, OR
o Click Accept to accept the event with the conflict, OR
o Click Discard to discard the event and return to the Scheduled Event page.
There is a warning/alert if a client is already scheduled. Warning messages: For Same Provider – “You have already scheduled a visit for the client at this time.”
For different Provider – “A different Provider has already scheduled a visit for the client
at this time.”
There is warning/alert if a Worker is already scheduled.
Same Provider warning message: "You have already scheduled a visit for this Worker at
this time."
Providers can ignore the message and schedule the appointment if they choose.

103
September 2018 AuthentiCare® New Mexico Centennial Care
Messages you may receive when scheduling an event.
This event will exceed the total units allowed on the authorization.
This event occurs outside the effective dates of the authorization.
This event falls on the worker's day off.
The status of the primary worker is inactive or the event date is outside the
effective date range.
The status of the client is inactive or the event date is outside the effective
date range.
This event falls outside the range of the worker's assigned business hours.
This event falls outside the range of the backup worker's assigned business
hours.
This event will exceed the worker's assigned hours for the week.
This event falls on a provider holiday.
The status of the provider is inactive or the event date is outside the
effective date range.
This event falls on the backup worker's day off.
The status of the backup worker is inactive or the event date is outside the
effective date range.
If no scheduling conflicts or issues arise, the Authorizations page displays a note at the
top of the page indicating the event was scheduled successfully.
9.3.2 Scheduling a Recurring Event
When a worker visits a client on a regular basis, at the same time of the day, the
provider can establish an event that occurs repeatedly. This is considered a recurring
event. This is an efficient way to schedule as you only have to enter the basic
information one time but can use it to populate multiple days.

104
September 2018 AuthentiCare® New Mexico Centennial Care
A recurring event can be created for as long as necessary within the limits set by the
authorization.

105
September 2018 AuthentiCare® New Mexico Centennial Care
Complete Steps 1 - 3 from Section 9.3.1 or Section 9.3.2.
Click the Recurring Event check box.
The page expands to display scheduling options.
Follow the steps outlined below to create a Daily, Weekly or Monthly recurring event.
9.3.2.1 Daily Recurring Event
AuthentiCare defaults to Daily recurrence. To schedule an event to occur more than
once in the same week, use the Daily occurrence option.
a. Select the frequency of the recurring event by entering the number of times
the event should occur (every 2 days or every 3 days for example) or by
choosing every weekday.
b. Enter the number of occurrences of the event or enter an End by date for
the event.

106
September 2018 AuthentiCare® New Mexico Centennial Care
9.3.2.2 Weekly Recurring Event
To schedule an event to occur on the same day or days for multiple weeks, select the
Weekly occurrence option.
a. Select the frequency of the event by entering the number of times the event
should occur (every week, every 2 weeks for example).
b. Select the day or days of the week the event should occur.
c. Select the number of times the event should occur or enter an End by date for
the event.
9.3.2.3 Monthly Recurring Event
To schedule an event to occur on a monthly, bi-monthly or quarterly basis, select the
Monthly occurrence option.
a. Select the frequency of the event by entering the calendar day of the month (the
15th day of every month or the 1st day of every 2nd month, for example) or by
entering the weekday of the month (the 1st Monday of every month of the last
Friday of every 3rd month, for example).

107
September 2018 AuthentiCare® New Mexico Centennial Care
b. Select the number of times the event should occur or enter an End by date for
the event.
Proceed with Step 4 in Section 9.3.1or in Section 9.3.2.
9.4 Editing an Event
If the date or time of a scheduled event has already passed, the event
cannot be edited or deleted.
When information changes for an event, AuthentiCare allows you to make adjustments
up to the end time of an event. The following instructions discuss editing an event
Date, Time, Client, and/or Worker.
Click on Scheduling from the Main Menu on the Home page.
Find the event on the calendar that needs to be changed (use Search or various views
available to do so). Double click on the event on the calendar to display the details in
the Scheduled Event page.

108
September 2018 AuthentiCare® New Mexico Centennial Care
If this is a recurring event, AuthentiCare asks you to confirm whether
you are editing the single event or the whole series.
Click Edit this Occurrence or Edit the Series in the Scheduled Event
page.
Click on the field for the item to be corrected. Initially it looks like the fields are not
editable, but once you click on the field it changes to an editable field. The Scheduled
Event page will allow a worker in series to be edited without first clicking on editing the
occurrence
Enter the new information.
Click Save.
When providers add a new worker to scheduled events, the change will update only the
first event and all future scheduled events, leaving historic information on past events
intact.
If this is a recurring event, and you have forgotten to select whether you
are editing the single event or the whole series, a message displays.
a. Click Edit this Occurrence or Edit the Series in the
Scheduled Event page.
b. Click Save again.

109
September 2018 AuthentiCare® New Mexico Centennial Care
If AuthentiCare discovers scheduling conflicts or issues, a message displays at the top
of the page indicating the conflict the system has found. Refer to Section 9.3.1 for
further instructions. Along with the message are three options from which to choose for
how the system should proceed. Select one of the following three options:
o Click Change to return to the event and change the information, OR
o Click Accept to accept the event with the conflict, OR
o Click Discard to discard the event and return to the Scheduled Event
page.
If no scheduling conflicts or issues arise, a message displays at the top of the page
indicating the event was scheduled successfully.
9.5 Cancelling an Event (Deleting)
If you need to delete an event that means it was either entered in error or needs to be
cancelled. Cancellations must be done prior to the end time of the event. Once the
event end time has passed, the system will not allow you to cancel (delete) the event.
Double click on the event on the calendar to display the details in the Scheduled Event
page.

110
September 2018 AuthentiCare® New Mexico Centennial Care
Click Delete (Cancel).
Once you click Delete (Cancel), the event is permanently deleted.
There is no pop up dialog box asking you to confirm the deletion, so
prior to clicking Delete, be sure this is the event you want to delete.
The Event Scheduling page displays with a note at the top indicating the event was
deleted successfully.
If this is a recurring event, and you have forgotten to select whether you
are deleting the single event or the whole series, a message displays.

111
September 2018 AuthentiCare® New Mexico Centennial Care
a. Click Edit this Occurrence or Edit the Series in the
Scheduled Event page.
b. Click Delete again. If you selected Edit this Occurrence,
then only the specific event you chose will be deleted. If you
selected Edit the Series, then all of the recurring events will
be deleted.
Note: Future scheduled appointments are deleted automatically by AuthentiCare when
the worker is terminated or end dated. This reduces the late and missed visit alerts to
providers.
9.6 Acknowledging Missed Visits
When a worker uses the IVR or the GPS mobile device either to check in or check out,
the information is captured in AuthentiCare immediately. You may need to refresh your
screen for updates to display depending on what you are doing in the system.
AuthentiCare links worker check-ins and check-outs to scheduled events continuously
and provides notice of late and missed visits to providers via email so that back-up
coverage can be initiated. In addition to email messages, these late and missed visits
are posted on the Late and Missing Events page of the system.
If a worker, other than the worker noted on the client’s schedule, provides services
timely, i.e. within the early and late threshold of the scheduled event, AuthentiCare will
not generate a late and/or missed visit alert to the provider. “Timely” is defined in the
definitions listed below for Late Visit and for Missed Visit.
Definition of a Late Visit: For Consumer-Delegated clients, if the worker does not
check in within 60 minutes of the event start time, the event receives a Late Visit
designation. The Late Visit is removed if the worker checks in. The visit becomes a
Missed Visit if the worker does not check in within the next 60 minutes (120 minutes
after the event start time). For Consumer-Directed clients, the Early and Late visit
thresholds are disabled.
Definition of a Missed Visit: For Consumer-Delegated clients, if the worker does not
check in within 120 minutes of the event start time, the visit is designated as Missed.

112
September 2018 AuthentiCare® New Mexico Centennial Care
For Consumer-Directed clients, if the worker does not check in within 72 hours (4320
minutes) of the visit end time, the visit is designated as Missed.
If providers set Early, Late and Missed Visit Thresholds for clients, the jurisdictions
thresholds for those clients for specific services will take precedence. For more
information on setting Early, Late and Missed Visit Thresholds, see Chapter 3.
The late and missed visits are recorded in three ways:
The Late and Missing Events page: lists all scheduled events that are late or missed.
This page is available from the menu bar to the following roles: Administrator,
AdminAssistant and Scheduler/Coordinator.
The Late/Missed Visits Report: Refer to Chapter 13, Reporting, for more information.
An email is sent to the email address on the provider’s record each time an event is late
and/or missed. Examples of these emails are included below with the difference that
the client’s name has been added.
Late:
This is an AuthentiCare late visit notification. Worker John Jones (ID Number) for
provider Senior Helpers (ID) was scheduled to provide service Personal Care
(GO156) on 01/05/2015 at 09:00 PM for Client1 Test. An AuthentiCare visit is
considered late when the service is not provided within 60 minutes of the
scheduled start time. To view this scheduled event in more detail, log in to the
AuthentiCare website at: www.authenticare.com/nmcc.
Please do not reply to this email as it is intended for notification purposes only.
Missed:
This is an AuthentiCare missed visit notification. Worker John Jones (ID number)
for provider Senior Helpers ID) was scheduled to provide service Personal Care
(GO156) on 01/04/2015 at 09:00 PM for Client1 Test, but missed the
appointment. An AuthentiCare visit is considered missed when the service is not
provided within 120 minutes of the scheduled start time. To view this scheduled
event in more detail, log in to the AuthentiCare website at:
www.authenticare.com/nmcc.
Please do not reply to this email as it is intended for notification purposes only.

113
September 2018 AuthentiCare® New Mexico Centennial Care
To view the list of late and missed visits, place your cursor on Late and Missed Visits
in the toolbar of the Main Menu, and when Late and Missed Visits displays below, click
on it.
You will see a selection criteria screen that allows you to choose the visits you want to
work. If you do not choose, all visits will be displayed.
The Late and Missing Events page displays if there are scheduled events for this
provider which have been identified as late or missed.
Note: The columns, except the Notes column, on the Late and Missed Visits page are
sortable. Click on each header to sort the column in ascending or descending order.
Click the heading once to change the sort to descending order for that column. Click
the heading again to change it to ascending order for that column.
Select the appropriate missed visit code from the missed visit coe dropdown list for
each of the missed visits listed on the Late and Missing Events page. Do not choose
missed visit codes for events that have a status of “Late”. There is a note section for
each missed visit for additional documentation if needed.

114
September 2018 AuthentiCare® New Mexico Centennial Care
Description Code
Hospital 1
Nursing Facility temporary 2
Consumer refusal 3
Consumer not available – justify in notes 4
Family voluntarily provided temporary service
instead
5
Other (consumer driven) – justify in notes 6
Consumer deceased 7
No staff available A
No staff willing B
Natural disaster/Inclement Weather C
Late plan from Case Manager E
Other (provider driven) – justify in notes F
No Landline or Cell Phone Service L
Not a Missed Visit – must justify in notes N
Click the Save Missed Visit Code link column heading. This saves the missed visit
codes which can be viewed on the Late and Missed Visits Report (refer to Section
13.5.6 for further information). A missed visit will remain on the list until it is
acknowledged by adding the missed visit code and adding a note.
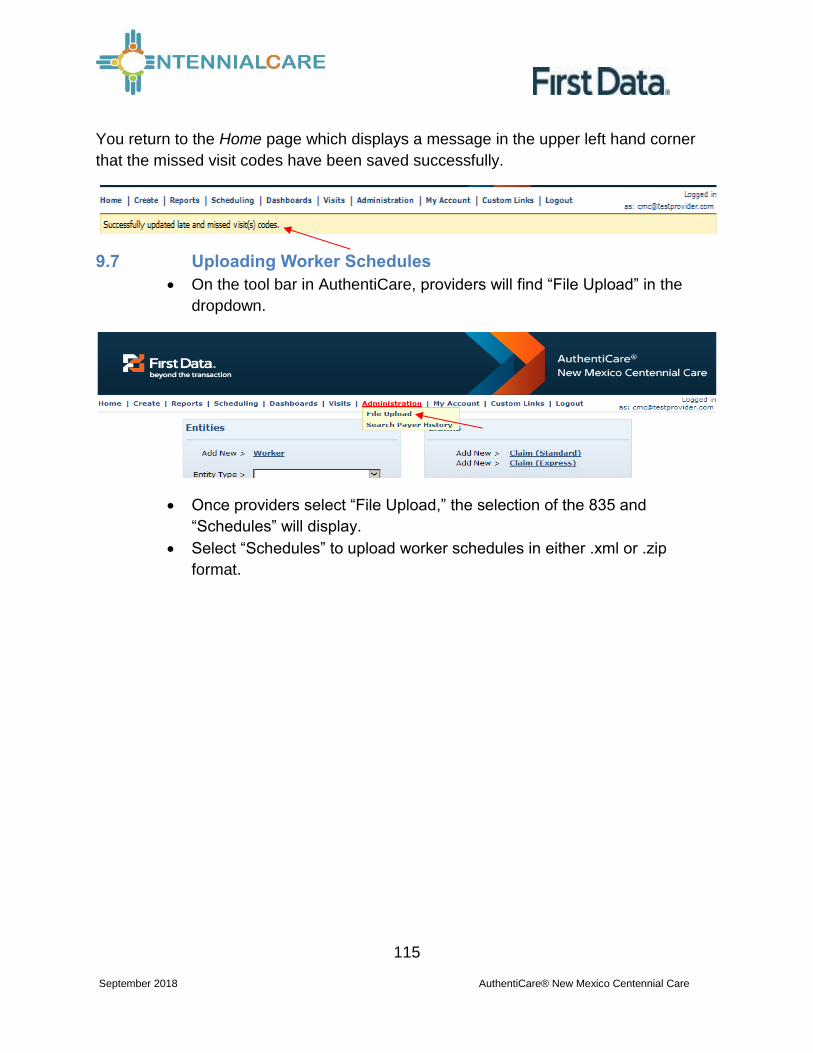
115
September 2018 AuthentiCare® New Mexico Centennial Care
You return to the Home page which displays a message in the upper left hand corner
that the missed visit codes have been saved successfully.
9.7 Uploading Worker Schedules
On the tool bar in AuthentiCare, providers will find “File Upload” in the
dropdown.
Once providers select “File Upload,” the selection of the 835 and
“Schedules” will display.
Select “Schedules” to upload worker schedules in either .xml or .zip
format.

116
September 2018 AuthentiCare® New Mexico Centennial Care
Uploaded schedules cannot be edited using AuthentiCare web scheduling feature. The
providers have to re-upload the schedules for updates and deletes before the
appointment “Start” time.
If providers send a revised schedule, the second one will overwrite the first one only if it
has the same EntityXRef field (appointment ID from Provider’s system, part of the
import layout) and the schedule is uploaded by the same web user ID and role as the
first one (EX: Provider ID should be same).

117
September 2018 AuthentiCare® New Mexico Centennial Care
Chapter 10 The AuthentiCare IVR
Much of the functionality and data described in Chapters 2 through 9 leads to in-home
workers using the Interactive Voice Response (IVR) to record services provided for the
client by calling in from the client’s home when service begins and calling out from the
client’s home when service is completed. Each worker has a 5-digit worker ID number
that identifies him/her as a worker for a specific provider location. That worker ID is
recorded in the IVR each time the worker makes a call.
Important – If a worker works for more than one provider and/or
provider location, he/she is assigned a different number for each
location. Caution workers to make sure they use the correct Worker
ID for each client visit.
10.1 IVR Flow
The IVR (available in English and Spanish) is designed to capture the information
required to create a claim for the service being provided. Section 10.3 below walks the
worker step-by-step through what he/she can expect to hear when calling AuthentiCare.
If the phone number the worker is calling from matches the number for the client as
recorded in AuthentiCare, then the client’s name will be read by the IVR. If the system
does not recognize the number, then the worker is asked to enter the ID number of the
client.
Workers the ability to select option 8 on the Main Menu in the IVR to select their
language preference. Once a worker has changed the language preference from the
Main Menu in the IVR, the language preference will automatically update the Language
Preference field on the Worker Entity Settings page.
When checking out, if the IVR reads more than one name, that means the
worker has not checked out for previous claim(s) for which he/she had
checked in. In order to resolve this, the claim(s) must be completed on the
Web with the appropriate check out times.
The IVR then reads the list of services that the worker could potentially be providing for
this client. For consistency, the services for a specific client are read in the same order
on all calls. This same list also applies during check out calls. Additionally, during
check out the worker must specify activities (tasks) completed during the visit if the
services provided required activity codes.

118
September 2018 AuthentiCare® New Mexico Centennial Care
A worker can use the IVR even if there is no authorization yet for the client.
However, the client must exist in AuthentiCare in order for the call to be
completed.
The IVR then reads back all of the information in order for the worker to verify its
accuracy. If there are any errors, the worker has the option to start over and correct the
errors. If the information is correct, then the call is completed and the worker is checked
in or out depending on the option chosen at the beginning of the call.
If the worker is there to provide services for more than one client, the worker
must check in for the first client and at the end of the call when given the
option to return to the main menu, choose that option and check in for the
second client. The worker can repeat this process as many times as
necessary.
When checking out, the worker will need to follow the same process – check
out for the first client, return to the main menu as needed to check out for
additional clients.
Each time the worker returns to the main menu on either a check-in or
check-out call, the beginning time of the call is reset.
10.2 Safeguard - Workers with More Than One Worker ID
Workers who have more than one worker ID, because they work for more than one
provider, cannot accidently sign in using the ID not matched to the client. If they try, the
IVR will play the following message “You have entered an incorrect worker ID. Please
enter a different worker ID followed by the pound sign.”
10.3 Activity Codes for Personal Care Services
Upon check-out, workers must enter activity codes for the tasks provided to the client
during their visit to provide Personal Care Services. Activity Codes for Personal Care
Services are listed in Appendix A.2.
10.4 Checking-In/Out from an Unauthorized Phone Number
Providers can prevent workers from performing a Check-In or Check-Out from a phone
number not on the client record or matched to another client phone number in
AuthentiCare.
If a worker is calling from an unauthorized phone number he/she will hear the phrase,
“You are calling from an unauthorized phone number. Please contact your provider”
followed by the goodbye phrase.

119
September 2018 AuthentiCare® New Mexico Centennial Care
If the phone he/she are attempting to call from is valid, the provider can update the
client record with the new number(s) and the worker can re-attempt the call.
By default, the Jurisdiction Setting for Unauthorized Phone Access to IVR is set to No
on the Provider Entity Settings page.
By default, the Provider setting for ‘Unauthorized Phone Access’ is set to No. If
providers want to enable this feature, they should change this value to Yes. A change
to Yes allows all workers associated with the provider agency the opportunity to check
in from an unauthorized phone number.
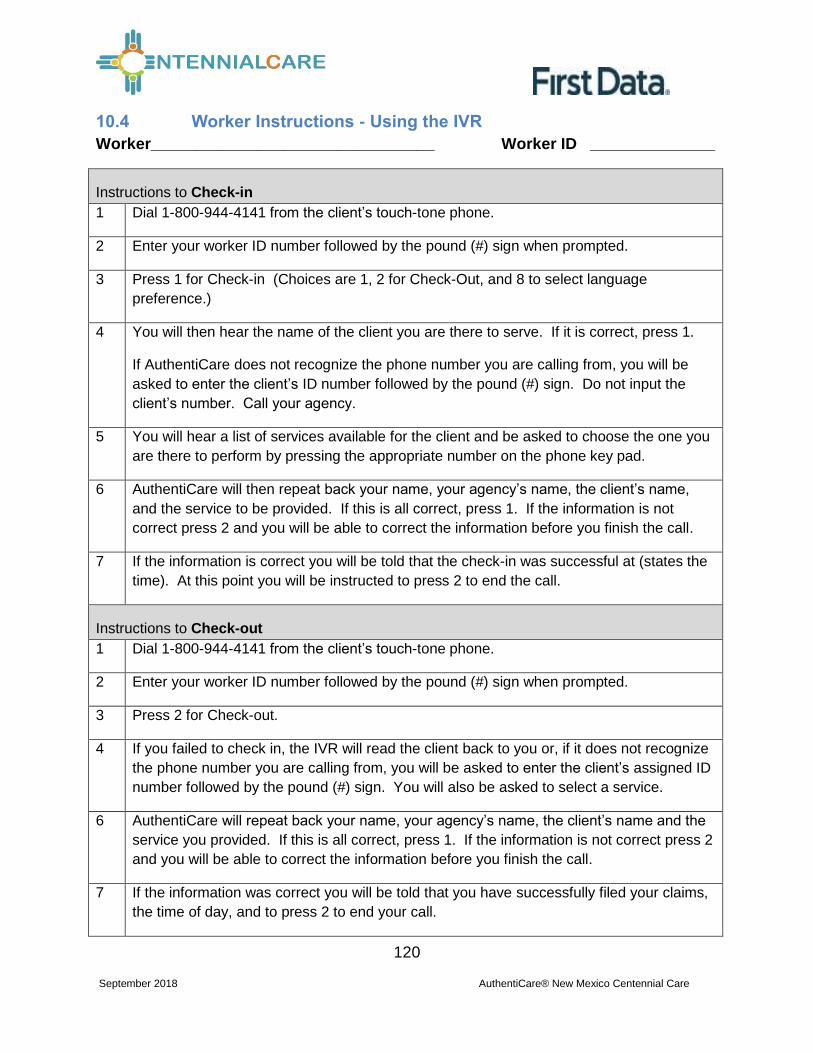
120
September 2018 AuthentiCare® New Mexico Centennial Care
10.4 Worker Instructions - Using the IVR
Worker________________________________ Worker ID ______________
Instructions to Check-in
1 Dial 1-800-944-4141 from the client’s touch-tone phone.
2 Enter your worker ID number followed by the pound (#) sign when prompted.
3 Press 1 for Check-in (Choices are 1, 2 for Check-Out, and 8 to select language
preference.)
4 You will then hear the name of the client you are there to serve. If it is correct, press 1.
If AuthentiCare does not recognize the phone number you are calling from, you will be
asked to enter the client’s ID number followed by the pound (#) sign. Do not input the
client’s number. Call your agency.
5 You will hear a list of services available for the client and be asked to choose the one you
are there to perform by pressing the appropriate number on the phone key pad.
6 AuthentiCare will then repeat back your name, your agency’s name, the client’s name,
and the service to be provided. If this is all correct, press 1. If the information is not
correct press 2 and you will be able to correct the information before you finish the call.
7 If the information is correct you will be told that the check-in was successful at (states the
time). At this point you will be instructed to press 2 to end the call.
Instructions to Check-out
1 Dial 1-800-944-4141 from the client’s touch-tone phone.
2 Enter your worker ID number followed by the pound (#) sign when prompted.
3 Press 2 for Check-out.
4 If you failed to check in, the IVR will read the client back to you or, if it does not recognize
the phone number you are calling from, you will be asked to enter the client’s assigned ID
number followed by the pound (#) sign. You will also be asked to select a service.
6 AuthentiCare will repeat back your name, your agency’s name, the client’s name and the
service you provided. If this is all correct, press 1. If the information is not correct press 2
and you will be able to correct the information before you finish the call.
7 If the information was correct you will be told that you have successfully filed your claims,
the time of day, and to press 2 to end your call.

121
September 2018 AuthentiCare® New Mexico Centennial Care
What do I do if . . .
. . . I forget my worker ID Call your supervisor who has your worker ID on file.
. . . I check-in but forget to
check-out?
Call your supervisor and let him know what client you
were serving and the time you left the client’s home.
. . . I forget to check-in? If you are near the beginning of your visit, go ahead
and do a check-in. Then let your supervisor know the
check-in was phoned in late and what time you started
providing care. If you don’t remember until the end of
your visit, go ahead and check-out when you leave.
Let your supervisor know you forgot to check-in and the
time you arrived at the client’s home.
. . . I forget to check-in and
check-out?
Call your supervisor and explain what happened.
. . . I am in the process of
checking in and realize I have
made a mistake?
AuthentiCare will let you change the information before
you complete the check-in. You can go back by
pressing 2 at the confirmation heard during Step 6 of
the Check-in process or Step 6 of the Check-out
process. Re-enter the correct information when
prompted.
. . . I have already checked in
and realize I made a mistake?
Go ahead and check out after you provide service, but
call your supervisor and explain what happened.
. . . .I have checked in and
checked out and realize I
have made a mistake?
Call your supervisor and explain what happened.
. . . the client does not have a
touch-tone phone, refuses to
let me use the phone, or the
phone is out of order?
Call your supervisor and explain what happened.

122
September 2018 AuthentiCare® New Mexico Centennial Care
Chapter 11 The AuthentiCare® 2.0 Mobile Application
11.1 Introduction – Android Mobile Application
First Data offers both an Android and an iOS mobile application (app) for workers to use
as a means of Check-In/Check-Out in English or in Spanish. The AuthentiCare mobile
applications provide the same capabilities as the Interactive Voice Response (IVR) and,
with GPS technology, have the ability to base their validation process on the location of
the mobile device. The following sections detail features of the Android AuthentiCare
mobile app, list the setup processes to prepare providers and workers for mobile
application operation and the steps for workers to utilize AuthentiCare mobile app
features and process Check-Ins/Check-Outs of client service visits. The AuthentiCare
Mobile Application is available to Android operating systems 4.4 and newer.
11.1.1 Service Zones
In a Standard Service Zone, GPS location coordinates can be determined. GPS
coordinates are captured and used to match (verify) the location of the device during
Check-In/Check-Out against the client’s GPS coordinates on record. The mobile app
does not validate the clients’ locations against their physical addresses. Instead the
mobile app is being sent the GPS coordinates to validate each client’s location.
In a Limited Service Zone, there is no internet access/data coverage. GPS location
coordinates can still be captured most of the time. The banner on the mobile app screen
displays in a dark color in a Limited Service Zone with the message, “No data
connection.”
If the worker gets to a client visit location that is outside the Standard Service Zone, the
worker will proceed through the same Check-In and Check-Out steps. The data is
stored on the mobile device as the Check-In and Check-Out are completed. The visit
will show as “Completed Not Synced.”
A Warning Message is displayed after 60 minutes when there are claims not synced on
the mobile device informing the user to return to a Standard Service Zone with internet
coverage.
When the mobile device detects its return to a Standard Service Zone, a sync of the
Check-In/Check-Out data will automatically begin. Once the data is synced, the banner
on the screen will return to its original color, and the visit will display as Completed.

123
September 2018 AuthentiCare® New Mexico Centennial Care
11.1.2 Core AuthentiCare Preparation
The following settings have been set by First Data at the application jurisdiction level,
typically across the whole state:
The mobile messaging feature has been turned on.
Messaging has been enabled.
Message expiration has been enabled.
Message polling has been enabled.
The GPS geo-fence distance has been set so that there is a defined
maximum distance surrounding the client’s location that can be acquired
on the app without creating an exception on the claim. An exception is an
indicator that a worker is found outside the specific radius of a client’s
home. Exceptions are triggered on Check-In and Check-Out.
The timeout duration is set (in minutes) before the mobile app logs the
worker out of the system due to inactivity.
11.1.3 Application Setup Done by Providers
11.1.3.1 One Time Application Settings – Provider Entity Settings
On the Provider Entity Page:
The Provider and Worker must be active within AuthentiCare, and have active IDs.
1. Mobile Enabled is defaulted to Yes to allow workers to use the AuthentiCare mobile app.
If Yes is not selected for Mobile Enabled, workers will receive a Login failed message when they try to log into the mobile app on their phones.
2. Select Messaging Enabled to send messages to workers.

124
September 2018 AuthentiCare® New Mexico Centennial Care
If Messaging Enabled is not selected, workers will not view a Messaging option at the bottom of their device screen.
3. A provider can also register provider-owned phones for mobile app use and can provide a name assigned (temporarily or permanently) to the phone by entering the following information:
a. Enter the mobile phone number, including area code, of the provider’s phone assigned to the worker.
b. The Device ID of the provider’s phone assigned to the worker.
c. The Worker ID or the worker’s name under Assignment.
Once all information is entered, the provider can select Add to save.
11.1.3.2 Worker’s Mobile Device Information – Worker Entity Settings
On the Worker Entity Page:
1. Add the worker’s email address so that the worker can receive a passcode
if the worker forgets the password to log into the mobile app.

125
September 2018 AuthentiCare® New Mexico Centennial Care
2. Create initial Password for workers. (Workers will use their assigned
Worker ID as their individual username.)
Passwords to log into the mobile app must contain at least 1-digit, 1-
lowercase, 1-uppercase, 1-special character (acceptable special
characters @#$%^&?!+=) and must be a minimum of 8 characters in
length.
If a password is changed through the system, it will be flagged for a Force
Change once the worker logs into the mobile app.
3. Enter the worker’s Mobile Phone Number, including area code.
4. Enter the Device ID of the worker’s personal mobile device/phone.
5. Enter the Office Phone number.
The Office Phone you enter on the worker record will be the number the
worker will call when the worker selects “Call Office” from the menu button
within the mobile app.
11.1.4 AuthentiCare Mobile App Fundamentals
11.1.4.1 Downloading, Installing and Setting Up the Mobile App
The AuthentiCare application is a free Mobile App.
Steps for Workers to download the AuthentiCare Mobile App from the Google Play
Store are:
1. Open the Google Play Store on the mobile device.
2. Select the AuthentiCare Mobile App for download.
3. Tap ALLOW for the App to make and manage phone calls.

126
September 2018 AuthentiCare® New Mexico Centennial Care
4. Tap ALLOW for the App to access the mobile device’s location. These
terms and conditions must be accepted prior to the App opening on the
mobile device.
11.1.4.2 Initial Setup for Environment
Once the Mobile App is installed, initial setup needs to occur. In order for the worker to
use the AuthentiCare Mobile App, the worker will need to:
1. Confirm the Provider has entered the mobile device/phone number, email
address and Device ID in AuthentiCare.
2. Use the Setup Code to choose the environment.
When the worker first opens the AuthentiCare Mobile App, the worker will see a screen
that requires the entry of a Setup Code. The AuthentiCare Mobile App allows the use of
one or two modes (called environments):
The Test/Training Environment, (used for practicing and learning about
how to use the app), or
The Live Production Environment (used when you are going to perform
actual client care)
Initial Setup for Environment The worker will choose which option to use by entering
one of the codes below:
Test/Training: NMCCCAT or Live/Production: NMCCPRD
Initial Setup for Environment:

127
September 2018 AuthentiCare® New Mexico Centennial Care
The link to the End User License Agreement is on the Setup Code screen.
The worker will:
1. Enter the choice of environment in the Setup Code field.
2. Review the End User License Agreement by tapping View End User
License
3. Agreement. Tap SUBMIT which saves the Setup Code and signifies the
acceptance of the End User License Agreement.
4. The Worker ID Login and Password screen displays.

128
September 2018 AuthentiCare® New Mexico Centennial Care
11.1.5 The Worker ID and Password Screen
11.1.5.1 Change Password before Login - Request Passcode
The choices of FORGOT PASSWORD? and Settings are also found on this screen.
A worker who has forgotten the password can tap FORGOT PASSWORD? The Forgot
Password? screen displays, complete with instructions.
To recover a password, the worker must have an email address listed in AuthentiCare.
1. Input Worker ID. 2. Tap REQUEST PASSCODE.

129
September 2018 AuthentiCare® New Mexico Centennial Care
If the worker’s email address is not in AuthentiCare, the following screen will display.
Once the worker’s email address is in AuthentiCare, the following screen will display:

130
September 2018 AuthentiCare® New Mexico Centennial Care
Tap OK.
The Change Password screen displays.
The worker will:
1. Enter the new password in the New Password field. The password rules are listed on the screen.

131
September 2018 AuthentiCare® New Mexico Centennial Care
2. Confirm the new password by entering the new password again in the Confirm New Password field.
3. Scroll down to tap SUBMIT.
If there is a need to start the process again, the worker could scroll further down to tap
REQUEST NEW PASSCODE found at the bottom of the screen.
11.1.5.2 Change Password after Successful Login
After logging in, should the worker wish to change the password, the worker will:
1. Tap SETTINGS
2. Select Change Password to display Current Password, New Password
and Confirm New Password fields.
3. Enter applicable passwords in all three fields, then tap SUBMIT.
4. The Password Change Success screen displays. Tap OK.
11.1.6 To Find a Device ID from the Settings Menu
After entering the Setup Code, the worker will be taken to the login screen.
To find the mobile device’s Device ID:
1. Tap SETTINGS at the bottom right of the screen. The Menu displays.
2. Tap See Device Identifier in the Menu. The Device ID displays.
3. Tap OK to close the window.
4. Assure the provider has the correct Device ID.
(The worker can copy the Device I on the mobile device clipboard, and email it to the
provider.)

132
September 2018 AuthentiCare® New Mexico Centennial Care
11.1.7 Clearing Data to Change from One Environment to Another
In order to switch from one environment to the other, the worker will be required to clear
the data from the AuthentiCare app.
Clearing data is necessary only when switching between environments.
Remember that if the data is cleared from the live environment, the worker will
lose any data that has not been uploaded to AuthentiCare.

133
September 2018 AuthentiCare® New Mexico Centennial Care
The worker will need to make sure that all data has been uploaded before leaving the
Live/Production environment. To clear the data:
1. Tap Settings at the bottom right of the screen. The Menu displays.
2. Tap Reset and Change Setup Code in the Menu.
3. Tap OK. The data is removed.

134
September 2018 AuthentiCare® New Mexico Centennial Care
The Setup Code screen displays.
4. Enter the next Training or Production environment in the Setup Code
field.
5. Tap DONE on the keyboard to display the bottom half of the Setup Code
screen or scroll to reveal SUBMIT.
6. Tap SUBMIT.
11.1.8 To Log In to the Mobile App – First Use
Change the temporary password assigned by the provider to log in.
On the Login screen:
1. Enter the Worker ID.
2. Tap the icon which opens the “eye” to display the password
as typed or after the full password is fully typed. Tap the icon again to
cancel the display of the password.
3. Tap Done on the keyboard to display the full screen or simply tap SIGN
IN.
4. Tap SIGN IN. Tapping SIGN IN logs the worker into the App for the
session.
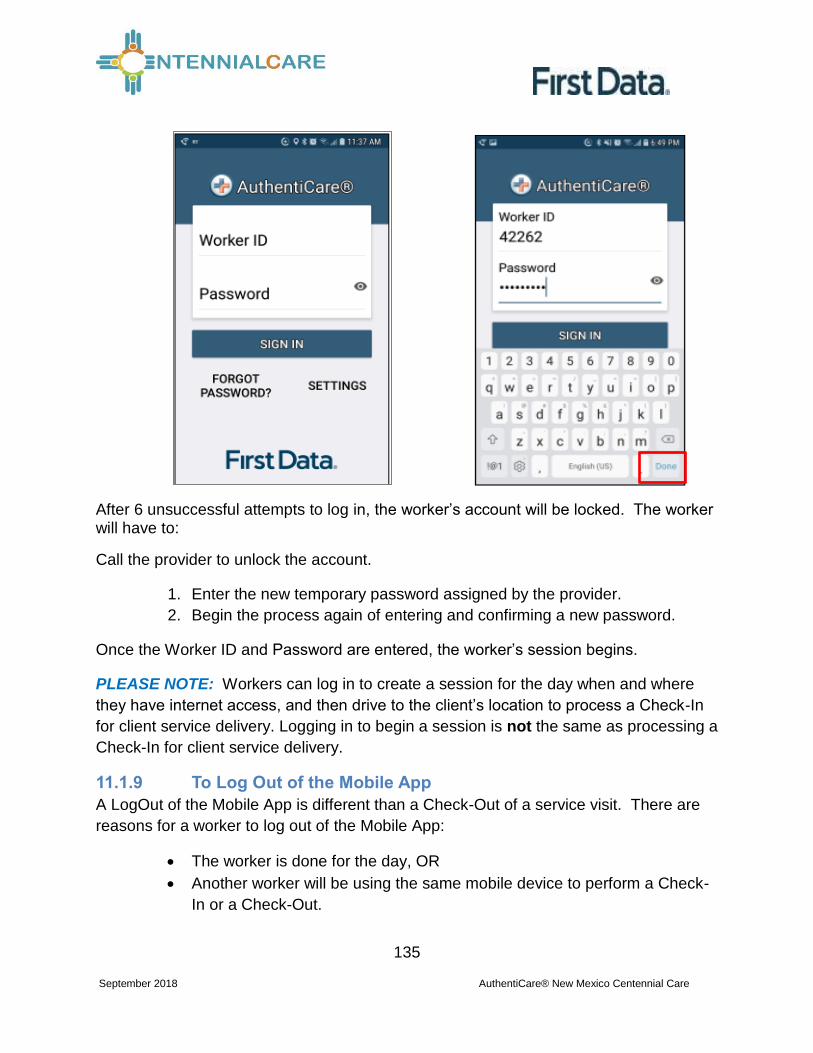
135
September 2018 AuthentiCare® New Mexico Centennial Care
After 6 unsuccessful attempts to log in, the worker’s account will be locked. The worker will have to:
Call the provider to unlock the account.
1. Enter the new temporary password assigned by the provider.
2. Begin the process again of entering and confirming a new password.
Once the Worker ID and Password are entered, the worker’s session begins.
PLEASE NOTE: Workers can log in to create a session for the day when and where
they have internet access, and then drive to the client’s location to process a Check-In
for client service delivery. Logging in to begin a session is not the same as processing a
Check-In for client service delivery.
11.1.9 To Log Out of the Mobile App
A LogOut of the Mobile App is different than a Check-Out of a service visit. There are
reasons for a worker to log out of the Mobile App:
The worker is done for the day, OR
Another worker will be using the same mobile device to perform a Check-
In or a Check-Out.

136
September 2018 AuthentiCare® New Mexico Centennial Care
PLEASE NOTE: Before performing a logout, the worker needs to ensure all Check-Ins
and Check-Outs are complete. At the end of the day the worker will need to return to a
place where there is a data connection in order for the data to be sent to the
AuthentiCare system.
To log out of the AuthentiCare Mobile App, the worker will:
1. Tap SETTINGS found at the bottom right of the screen.
2. From the Settings Menu, tap Logout.
3. The Confirm Logout message displays. Tap OK to log out.
11.1.10 To Access the Calendar
To access the calendar, workers will:
1. Log in to the Mobile App using the Worker ID and Password.
2. Tap the current date (Today) at the top of the mobile screen to open the
calendar.
3. The calendar defaults to the current date. Tap OK to view any visits you have
already completed for the day.
4. Tap and scroll to display past dates. Tap OK on the chosen date to view completed visits for that date.

137
September 2018 AuthentiCare® New Mexico Centennial Care
11.1.11 Worker Check-In at Client Location
When the worker arrives at the client location, the worker will:
1. Open the AuthentiCare Mobile App.
2. Input Worker ID and App Password to begin the session.
3. Tap DONE on the keyboard to remove the keyboard display or simply tap
SIGN IN.

138
September 2018 AuthentiCare® New Mexico Centennial Care
4. Tap SIGN IN.
5. “You have 0 appointments” displays in the date banner. The worker will
tap NEW CHECK-IN.

139
September 2018 AuthentiCare® New Mexico Centennial Care
The Select Client screen displays with a list of any clients associated with the provider
who are found near the current location of the mobile device.
6. If the client’s name is on the list, tap the client’s name or the icon to the
left of the client’s name.
Tapping a client name leads to the display of the Visits screen.
If the client’s name is not listed on this screen, the screen will display “Error No clients
found.”
The worker will:
7. Tap OK.
8. Tap LOOKUP CLIENT found at the bottom of the screen to begin the
Check-In process. .
11.1.12 Lookup Client - Enter the Client’s ID Number or Last Name
The worker will: 1. Tap LOOKUP CLIENT to open the Lookup Client screen.
2. Input the client’s Last Name.
3. Tap LOOKUP.

140
September 2018 AuthentiCare® New Mexico Centennial Care
Follow the remainder Check-In process steps detailed in 11.1.11 Worker Check-In at Client Location.
GPS coordinates from the Check-In process display if the client lives in a
Standard Service Zone.
If the mobile device has no internet access, all screens throughout the
Check-In and Check-Out process will display the banner message, “No
data connection.” The banner is darkened to a red/reddish brown
dependent upon the mobile device used.

141
September 2018 AuthentiCare® New Mexico Centennial Care
The worker will continue with each action to progress throughout the
Check-In to Check-Out for the service visit.
The message, “Sync failed. No data connection” flashes on the screen.
Since there is no data connection, the Check-In and the Check-Out are
queued until the mobile device enters a location where internet connection
is available.
When the mobile device returns to a location with a data connection, all
visit data transmits to the AuthentiCare system.
When the visits have been transmitted to AuthentiCare, the Status for the
visit(s) will change to Completed without No Data Connection on the
screen.
When the login occurs with no data connection, the worker will follow the process steps
detailed in 11.1.12 Lookup Client - Enter the Client’s ID Number or Last Name. The
screen will display with the banner, “No data connection.”
The message, “No data connection” continues to display. Without a data
connection, the app cannot research the name to determine whether or
not the name should be displayed. The worker will call the provider to
report the issue and to follow the process the provider has in place for this
circumstance.

142
September 2018 AuthentiCare® New Mexico Centennial Care
If the client is one from the list of clients found near the location of the mobile device,
the worker will:
1. Add the Service(s) for the client visit.
2. Tap SUBMIT CHECK-IN.
As long as the mobile device does not have internet access, all screens throughout the
Check-In and Check-Out process will display the banner message, “No data
connection.”
The worker will continue with each action to progress throughout the
Check-In to Check-Out for the service visit.
The message, “Sync failed. No data connection” flashes on the screen.
If the entire work day is spent in an area with no internet access/data connection, at
the end of the day the worker will need to return to a place where there is a data
connection in order for the claims data to be sent to the AuthentiCare system. All
claims data for the preceding day is removed from the Mobile App at 2:00 AM each
morning unless the worker is designated as a Frontier worker. With that designation,
all visits are stored for up to seven days in the mobile app. When the worker returns
the mobile device to a location of data connection, the stored data is “pushed” to
AuthentiCare.
11.1.13 Worker Check-Out from Client’s Location
For the client served, the worker will:
1. Access Check-In information from the Visits screen.
2. If required, tap Observations to select one or more of the Observations;
tap DONE.
3. Tap Activities to select one or more of the Activities from the list; tap
DONE. Depending on the service, multiple selections on both Activities
and/or Observations are possible. Check these as required
4. Tap SUBMIT CHECK-OUT.
5. When finished, tap SUBMIT CHECK-OUT.
6. The application will display Check-Out Success. Tap OK.

143
September 2018 AuthentiCare® New Mexico Centennial Care
Abbreviated Menu Before Log In: Full Menu After Log In:
The Visits screen will then display the client’s visit is in Completed status.
11.1.14 AuthentiCare Mobile App Menu Basics
There is an abbreviated Menu accessed from Settings even before a worker logs in.
After a Worker Login, the worker will tap SETTINGS at the bottom right on the screen to
open the Menu with a full array of choices. The following choices display:
11.1.14.1 See Device Identifier
A tap of this choice allows the mobile device’s Device ID to display.
11.1.14.2 Offline Reminder
A slide of this button allows the worker to receive a reminder of the mobile device’s
offline status.
11.1.14.3 Call Office
A tap this choice automatically makes a call from the worker’s mobile device to the
agency telephone number listed on the worker’s Worker Entity Settings page in
AuthentiCare.

144
September 2018 AuthentiCare® New Mexico Centennial Care
11.1.14.4 Force Check-Out
A tap on this choice allows a capture of the time and location of a visit for a Check-Out
when the worker has forgotten, or has been unable, to process a Check-In.

145
September 2018 AuthentiCare® New Mexico Centennial Care
11.1.14.5 Change Password
A tap on this choice enables the worker to process a password change, before being
locked out, without having to call the agency for a temporary password reset. Once the
worker is locked out of the Mobile App, the worker will have to contact the provider to
reset the password following steps in 11.1.5.2 Change Password after Successful
Login.
11.1.14.6 Reset and Change Setup Code
A tap on this choice allows the worker to reset the app from one jurisdiction to another is
found in 11.1. 7 Clearing Data to Change from One Environment to Another.
11.1.14.7 Rate Us
A tap on this choice allows the worker to rate the AuthentiCare Mobile App.
11.1.14.8 End User License Agreement
A tap of this choice displays the full agreement for the worker’s review.
11.1.14.9 Logout
A tap of this choice enables the worker to log out of the Mobile App. All needed data
should be saved before a log out.
11.1.15 Two Different Menu Displays
Two different Menu screens display for the worker:
An abbreviated menu is available to the worker after opening the Mobile
App, but before logging in for a service visit.
The full menu is available to the worker after a complete login for a service
visit.

146
September 2018 AuthentiCare® New Mexico Centennial Care
11.2 Worker Instructions for Using the Mobile App – Android
Instructions for a Mobile App Check-In ,
1 You are at the client’s location. Tap NEW CHECK-IN. Tap the name of the client to be served. Verify the client’s address and location to be served. Tap Services. Select the service; tap DONE. If required, enter Mileage and Travel Time. Tap SUBMIT CHECK-IN.
2 A Check-In Success screen displays; tap OK. The Appointment screen displays. Once the Check-In occurs, the headings, Observations and Activities display along with SUBMIT CHECK-OUT. There is a choice for an immediate Check-Out or a return to the main Appointments screen by tapping the back arrow on the mobile device. The visit details screen displays. A second tap of the back arrow on the device displays the visit as In Progress.
3 Once services are completed, tap Pending Check-Out. If required, tap Activities to open the list. Choose one or more Activities; tap DONE. If required, tap Observations to open the list. Choose one or more Observations; tap DONE. Tap SUBMIT CHECK-OUT. .
4 The Check-Out Success screen displays. Tap OK. The visit details screen displays. Tap the back button on the mobile device to view the status as Completed next to the client’s name with the Check-In and Check-Out times of the visit.
5 All stored data, except stored visits, is deleted at 2:00 AM each morning for privacy and security reasons. To view stored data again, a log in to the mobile app has to occur.
Instructions to Check-In and Check-Out in a limited Service Zone
1 You are at the client’s location. The screen banner has darkened. “No data connection” displays on the screen with “Sync failed. No data connection” flashing intermittently on the screen. Tap NEW CHECK-IN.
2 Add the client’s ID number. Tap Services to open the services list. Choose the service to be provided; tap DONE. Enter Mileage and Travel Time if required. Tap SUBMIT CHECK-IN. The message in the darkened banner displays as “No data connection.”
3 Once the Check-In occurs, the headings, Activities and Observations display along with SUBMIT CHECK-OUT. There is a choice for an immediate Check-Out or a return to the main Appointments screen by tapping the back arrow on the mobile device. The visit details screen displays.
4 A second tap of the back arrow on the mobile device displays the visit as In Progress with the Check-In time. The client ID also displays with “Pending Check-Out – Not synced.”
5 Once services are completed, tap Pending Check-Out. If required, tap Activities to open the list. Choose one or more Activities; tap DONE. If required, tap Observations to open the list. Choose one or more Observations; tap DONE. Tap SUBMIT CHECK-OUT. The Check-Out Success screen displays. Tap OK.
6 The visit details screen displays including GPS coordinates, if detected. Tap the back button to view the status as Completed next to the client’s name with the Check-In and Check-Out times of the visit.
7 The visit details screen displays. Tap the back button on the device to return to the Appointments screen. Now the visit displays as Completed - Not Synced with only the Check-In time.
8 Visit data is stored in the mobile app on the mobile device. A push of the data is done when the device detects it is back in a cellular service zone. Status will display as Not Synced until the device has all data back to the AuthentiCare system. Once that is done the visit displays as Completed with both Check-In and Check-Out times if the services requires a Check-Out time.

147
September 2018 AuthentiCare® New Mexico Centennial Care
11.3 The AuthentiCare Mobile Application - iOS
11.3.1 Introduction – iOS Mobile Application
First Data offers both an Android and an iOS mobile application (app) for workers to use
as a means of Check-In/Check-Out in English or in Spanish. The AuthentiCare mobile
applications provide the same capabilities as the Interactive Voice Response (IVR) and,
with GPS technology, have the ability to base their validation process on the location of
the mobile device. The following sections detail features of the iOS AuthentiCare mobile
app, list the setup processes to prepare providers and workers for mobile application
operation and the steps for workers to utilize AuthentiCare mobile app features and
process Check-Ins/Check-Outs of client service visits. The AuthentiCare Mobile
Application 2.0 is available to iOS operating systems 9.0 and newer.
11.3.2 Service Zones
In a Standard Service Zone, GPS location coordinates can be determined. GPS
coordinates are captured and used to match (verify) the location of the device during
Check-In/Check-Out against the client’s GPS coordinates on record. The mobile app
does not validate the clients’ locations against their physical addresses. Instead the
mobile app is being sent the GPS coordinates to validate each client’s location.
In a Limited Service Zone, there is no internet access/data coverage. GPS location
coordinates can still be captured most of the time. The banner on the mobile app screen
displays in a dark color in a Limited Service Zone with the message, “No data
connection.”
If the worker gets to a client visit location that is outside the Standard Service Zone, the
worker will proceed through the same Check-In and Check-Out steps. The data is
stored on the mobile device as the Check-In and Check-Out are completed. The visit
will show as “No data connection.”
A Warning Message is displayed after 60 minutes when there are claims not synced on
the mobile device informing the user to return to a Standard Service Zone with internet
coverage.
When the mobile device detects its return to a Standard Service Zone, a sync of the
Check-In/Check-Out data will automatically begin. Once the data is synced, the banner
on the screen will return to its original color, and the visit will display as Completed.
11.3.3 Core AuthentiCare Preparation
The following settings have been set by First Data at the application jurisdiction level,
typically across the whole state:
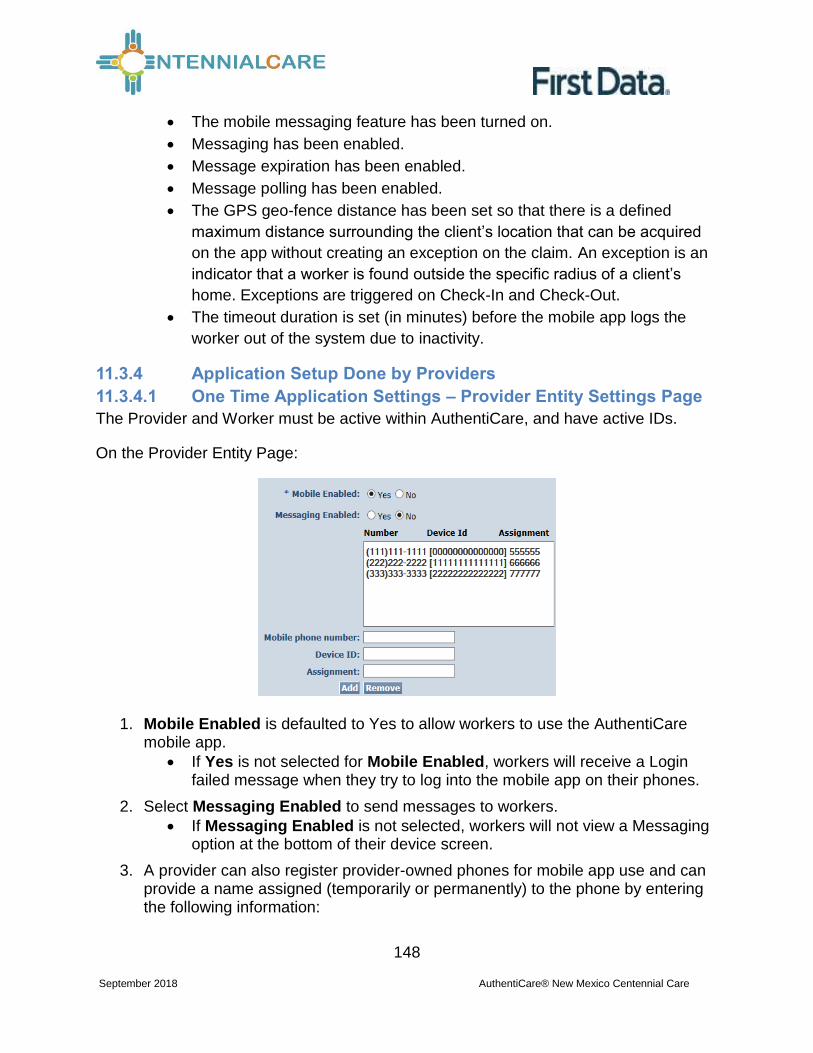
148
September 2018 AuthentiCare® New Mexico Centennial Care
The mobile messaging feature has been turned on.
Messaging has been enabled.
Message expiration has been enabled.
Message polling has been enabled.
The GPS geo-fence distance has been set so that there is a defined
maximum distance surrounding the client’s location that can be acquired
on the app without creating an exception on the claim. An exception is an
indicator that a worker is found outside the specific radius of a client’s
home. Exceptions are triggered on Check-In and Check-Out.
The timeout duration is set (in minutes) before the mobile app logs the
worker out of the system due to inactivity.
11.3.4 Application Setup Done by Providers
11.3.4.1 One Time Application Settings – Provider Entity Settings Page
The Provider and Worker must be active within AuthentiCare, and have active IDs.
On the Provider Entity Page:
1. Mobile Enabled is defaulted to Yes to allow workers to use the AuthentiCare mobile app.
If Yes is not selected for Mobile Enabled, workers will receive a Login failed message when they try to log into the mobile app on their phones.
2. Select Messaging Enabled to send messages to workers.
If Messaging Enabled is not selected, workers will not view a Messaging option at the bottom of their device screen.
3. A provider can also register provider-owned phones for mobile app use and can provide a name assigned (temporarily or permanently) to the phone by entering the following information:

149
September 2018 AuthentiCare® New Mexico Centennial Care
a. Enter the mobile phone number, including area code, of the provider’s phone assigned to the worker.
b. The Device ID of the provider’s phone assigned to the worker.
c. The Worker ID or the worker’s name under Assignment.
Once all information is entered, the provider can select Add to save.
11.3.4.2 Worker’s Mobile Device Information – Worker Entity Settings
On the Worker Entity Settings Page:
1. Add the worker’s email address so that the worker can receive a passcode
if the worker forgets the password to log into the AuthentiCare mobile app.

150
September 2018 AuthentiCare® New Mexico Centennial Care
2. Select Yes for Mobile Enabled.
3. Create initial Password for workers. (Workers will use their assigned
Worker ID as their individual username.)
Passwords to log into the mobile app must contain at least 1-digit, 1-
lowercase, 1-uppercase, 1-special character (acceptable special
characters @#$%^&?!+=) and must be a minimum of 8 characters in
length.
If a password is changed through the system, it will be flagged for a
Force Change once the worker logs into the mobile app.
4. Enter the worker’s Mobile Phone Number, including area code.
5. Enter the Device ID of the worker’s personal mobile device/phone.
The AuthentiCare Mobile App 2.0 will assign a new Device ID as the
worker installs the iOS app. The provider will need to input the new
Device ID on the Worker Entity Settings Page.
6. Enter the Office Phone number.
The Office Phone you enter on the worker record will be the number
the worker will call when the worker selects “Call Office” from the menu
button within the mobile app.
11.3.5 AuthentiCare Mobile App Fundamentals
11.3.5.1 Downloading, Installing and Setting Up the Mobile App
The AuthentiCare application is a free Mobile App.
Steps for Workers to download the AuthentiCare Mobile App from the Apple Store are:
1. Open the Apple Store on the mobile device. 2. Select the AuthentiCare Mobile App for download. 3. Tap Allow for the App to make and manage phone calls. 4. Tap Allow for the App to access the mobile device’s location.
These terms and conditions must be accepted prior to the App opening on the mobile
device.
11.3.5.2 Initial Setup for Environment
Once the Mobile App is installed, initial setup needs to occur. In order for the worker to
use the AuthentiCare Mobile App, the worker will need to:
1. Confirm the Provider has entered the mobile device/phone number, email
address
2. and Device ID in AuthentiCare.
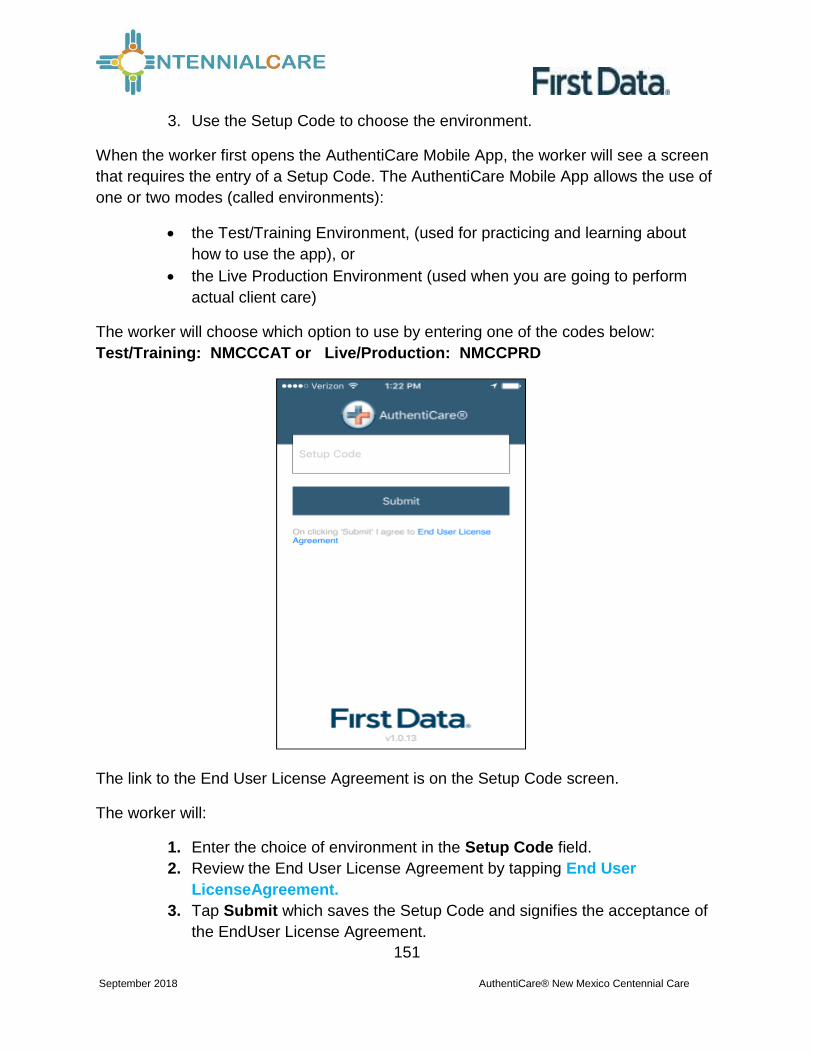
151
September 2018 AuthentiCare® New Mexico Centennial Care
3. Use the Setup Code to choose the environment.
When the worker first opens the AuthentiCare Mobile App, the worker will see a screen
that requires the entry of a Setup Code. The AuthentiCare Mobile App allows the use of
one or two modes (called environments):
the Test/Training Environment, (used for practicing and learning about
how to use the app), or
the Live Production Environment (used when you are going to perform
actual client care)
The worker will choose which option to use by entering one of the codes below:
Test/Training: NMCCCAT or Live/Production: NMCCPRD
The link to the End User License Agreement is on the Setup Code screen.
The worker will:
1. Enter the choice of environment in the Setup Code field.
2. Review the End User License Agreement by tapping End User
LicenseAgreement.
3. Tap Submit which saves the Setup Code and signifies the acceptance of
the EndUser License Agreement.

152
September 2018 AuthentiCare® New Mexico Centennial Care
The Worker ID Login and Password screen displays.
11.3.6 The Worker ID and Password Screen
11.3.6.1 Change Password before Login - Request Passcode
The choices of FORGOT PASSWORD? and Settings are also found on this screen.
A worker who has forgotten the password can tap FORGOT PASSWORD? The Forgot
Password? screen displays, complete with instructions.

153
September 2018 AuthentiCare® New Mexico Centennial Care
To recover a password, the worker must have an email address listed in AuthentiCare.
1. Input Worker ID.
2. Tap REQUEST PASSCODE.
If the worker’s email address is not in AuthentiCare, the following screen will display.

154
September 2018 AuthentiCare® New Mexico Centennial Care
Once the worker’s email address is in AuthentiCare, the following screen will display:
Tap Done.
The Change Password screen displays.
The worker will:
1. Enter the passcode in the Passcode field. 2. Enter the new password in the New Password field. The password rules are
listed on the screen.

155
September 2018 AuthentiCare® New Mexico Centennial Care
3. Confirm the new password by entering the new password again in the Confirm New Password field.
4. Tap Submit.
If there is a need to start the process again, the worker could return to Forgot
Password? on the Login screen to begin the process again.
11.3.6.2 Change Password after Successful Login
After logging in, should the worker wish to change the password, the worker will:
1. Tap SETTINGS
2. Select Change Password to display Current Password, New Password
and Confirm New Password fields.
3. Enter applicable passwords in all three fields, and then tap Submit.
4. The Password Change Success screen displays. Tap OK.
11.3.7 To Find a Device ID from the Settings Menu
After entering the Setup Code, the worker will be taken to the login screen. To find the mobile device’s Device ID:
1. Tap Settings on the right side of the screen. The Menu displays.
2. Tap See Device Identifier in the Menu. The Device ID displays.
3. Tap OK to close the window.
4. Assure the provider has the correct Device ID. (The worker can tap to
copy the Device ID and then email the Device ID to the provider.)
The AuthentiCare Mobile App 2.0 will assign a new Device ID as the worker installs the
iOS app. The provider will need to input the new Device ID on the Worker Entity
Settings Page.

156
September 2018 AuthentiCare® New Mexico Centennial Care
11.3.8 Clearing Data to Change from One Environment to Another
In order to switch from one environment to the other, the worker will be required to clear
the data from the AuthentiCare app.
Clearing data is necessary only when switching between environments.
Remember that if the data is cleared from the live environment, the
worker will lose any data that has not been uploaded to AuthentiCare.

157
September 2018 AuthentiCare® New Mexico Centennial Care
The worker will need to make sure that all data has been uploaded before leaving the
Live/Production environment. To clear the data:
1. Tap Settings on the right side of the screen. The Menu displays.
2. Tap Reset and Change Setup Code in the Menu.
3. Tap OK. The data is removed.

158
September 2018 AuthentiCare® New Mexico Centennial Care
The Setup Code screen displays.
5. Enter the next Training or Production environment in the Setup Code
field.
6. Tap Done on the keyboard to display the bottom half of the Setup Code
screen or
7. scroll to reveal Submit. Tap Submit.
11.3.9 To Log in to the Mobile App – First Use
Change the temporary password assigned by the provider to log in.
On the Login screen:
1. Enter the Worker ID.
2. Begin typing the password which the displays Show so the password
displays as
3. typed. Tap Hide to cancel the display of the password.
4. Click Done on the keyboard to display the full screen or simply tap Sign
In.
5. Tap Sign In. Tapping Sign In logs the worker into the App for the session.

159
September 2018 AuthentiCare® New Mexico Centennial Care
After 6 unsuccessful attempts to log in, the worker’s account will be locked. The worker will have to:
1. Call the provider to unlock the account.
2. Enter the new temporary password assigned by the provider.
3. Begin the process again of entering and confirming a new password.
Once the Worker ID and Password are entered, the worker’s session begins.
PLEASE NOTE: Workers can log in to create a session for the day when and where
they have internet access, and then drive to the client’s location to process a Check-In
for client service delivery. Logging in to begin a session is not the same as processing a
Check-In for client service delivery.
11.3.10 To Log Out of the Mobile App
A Log Out of the Mobile App is different than a Check-Out of a service visit. There are
reasons for a worker to log out of the Mobile App:
The worker is done for the day, OR
Another worker will be using the same mobile device to perform a Check-
In or a Check-Out.
PLEASE NOTE: Before performing a logout, the worker needs to ensure all Check-Ins
and Check-Outs are complete. At the end of the day the worker will need to return to a
place where there is a data connection in order for the data to be sent to the
AuthentiCare system.
To log out of the AuthentiCare Mobile App, the worker will:
1. Tap Settings found at the bottom right of the screen.
2. From the Settings Menu, tap Logout.
3. The Confirm Logout message displays. Tap Logout to complete the
logout process.

160
September 2018 AuthentiCare® New Mexico Centennial Care
11.3.11 To Access the Calendar
To access the calendar, workers will:
1. Log in to the Mobile App using the Worker ID and Password.
2. Tap the current date (Today) at the top of the mobile screen to open the
calendar.
3. The calendar defaults to the current date. Tap the calendar date to display
any visits you have already completed for the day plus any pending visits.
Tap any past dates to display any visits for that date.

161
September 2018 AuthentiCare® New Mexico Centennial Care
11.3.12 Worker Check-In at Client Location
When the worker arrives at the client location, the worker will:
Open the AuthentiCare Mobile 1. Input Worker ID and App Password to begin the session.
2. Tap Done on the keyboard or simply tap Sign In.
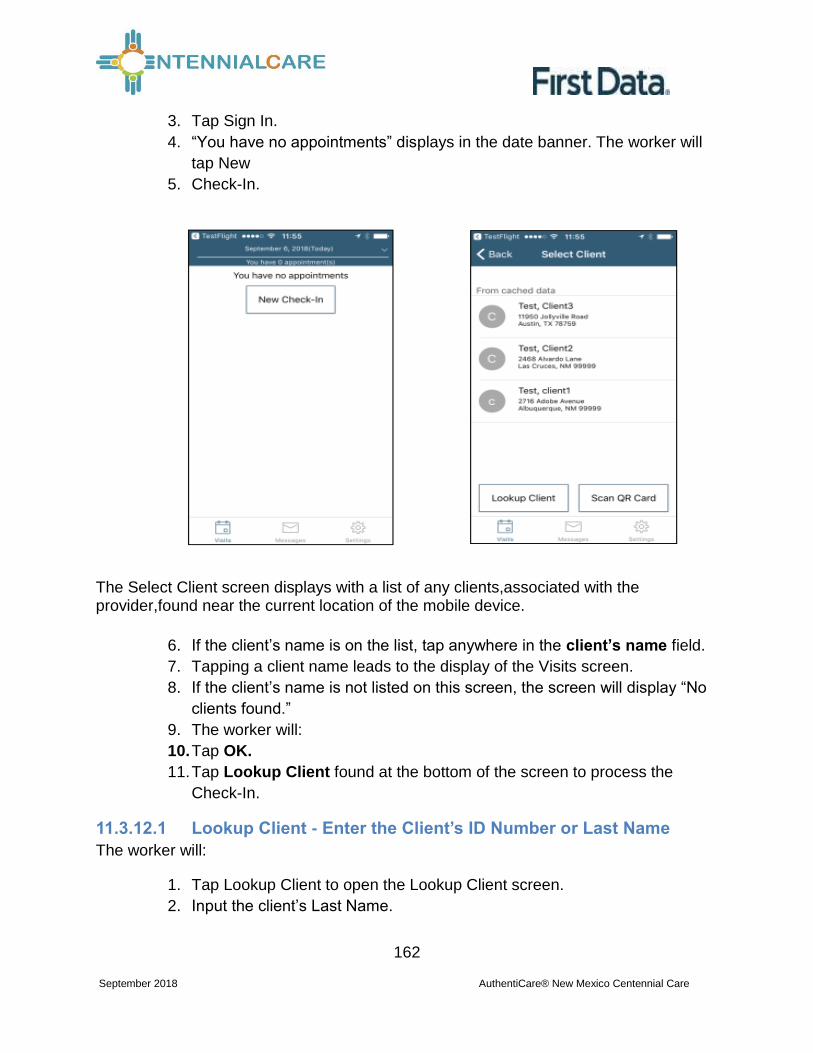
162
September 2018 AuthentiCare® New Mexico Centennial Care
3. Tap Sign In.
4. “You have no appointments” displays in the date banner. The worker will
tap New
5. Check-In.
The Select Client screen displays with a list of any clients,associated with the provider,found near the current location of the mobile device.
6. If the client’s name is on the list, tap anywhere in the client’s name field.
7. Tapping a client name leads to the display of the Visits screen.
8. If the client’s name is not listed on this screen, the screen will display “No
clients found.”
9. The worker will:
10. Tap OK.
11. Tap Lookup Client found at the bottom of the screen to process the
Check-In.
11.3.12.1 Lookup Client - Enter the Client’s ID Number or Last Name
The worker will:
1. Tap Lookup Client to open the Lookup Client screen.
2. Input the client’s Last Name.

163
September 2018 AuthentiCare® New Mexico Centennial Care
1. Tap Lookup.
Follow the remainder Check-In process steps detailed in 11.3.12 Worker Check-In at Client Location.
GPS coordinates from the Check-In process display if the client lives in a
Standard Service Zone.
If the mobile device has no internet access, all screens throughout the
Check-In and Check-Out process will display the banner message, “No
data connection.” The banner is darkened to a red/reddish brown
dependent upon the mobile device used.

164
September 2018 AuthentiCare® New Mexico Centennial Care
The worker will continue with each action to progress throughout the
Check-In to Check-Out for the service visit.
Since there is no data connection, the Check-In and the Check-Out are
queued until the mobile device enters a location where internet connection
is available.
When the mobile device returns to a location with a data connection, all
visit data transmits to the AuthentiCare system, and the red banner
disappears.
When the visits have been transmitted to AuthentiCare, the Status for the
visit(s) will change to Completed without a Not Synced message.

165
September 2018 AuthentiCare® New Mexico Centennial Care
When the login occurs with no data connection, the worker will follow the process steps
detailed in 11.3.12.1 Lookup Client - Enter the Client’s ID Number or Last Name. The
screen will display with the banner, “No data connection.”
The message, “No data connection” continues to display. Without a data
connection, the app cannot research the name to determine whether or
not the name should be displayed. The worker will call the provider to
report the issue and to follow the process the provider has in place for this
circumstance.
If the client’s name displays when the worker inputs a last name and taps Lookup, the
worker will:
1. Add the Service(s) for the client visit.
2. Tap Submit Check-In.
As long as the mobile device does not have internet access, all screens throughout the
Check-In and Check-Out process will display the banner message, “No data
connection.”
The worker will continue with each action to progress the Check-In to
Check-Out for the service visit.
The visit displays as “Completed Not Synced.”

166
September 2018 AuthentiCare® New Mexico Centennial Care
If the entire work day is spent in an area with no internet access/data connection, at the
end of the day the worker will need to return to a place where there is a data connection
in order for the claims data to be sent to the AuthentiCare system. All claims data for
the preceding day is removed from the Mobile App at 2:00 AM each morning unless the
worker is designated as a Frontier worker. With that designation, all visits are stored for
up to seven days in the mobile app. When the worker returns the mobile device to a
location of data connection, the stored data is “pushed” to AuthentiCare.
11.3.13 Worker Check-Out from Client’s Location
For the client served, the worker will:
1. Access Check-In information from the Visits screen.
2. If required, tap Observations to select one or more of the Observations;
tap Done.
3. Tap Activities to select one or more of the Activities from the list; tap
Done.
4. Depending on the service, multiple selections of Activities are possible.
Check these as required.
5. When finished, tap Submit Check-Out.
6. The application will display Check-Out Success. Tap OK.

167
September 2018 AuthentiCare® New Mexico Centennial Care
The Visits screen will then display the client’s visit is in Completed status with Not
synced in the Completed field. When the mobile device returns to data connection, the
visit is synced, and marked as completed.
11.3.14 AuthentiCare Mobile App Menu Basics
There is an abbreviated Menu accessed from Settings even before a worker logs in.
After a Worker Login, the worker will tap Settings at the bottom right on the screen to
open the Menu with a full array of choices. The following choices display:
11.3.14.1 See Device Identifier
A tap of this choice allows the 4 device’s Device ID to display.
11.3.14.2 Offline Reminder
A slide of this button allows the worker to receive a reminder of the mobile device’s
offline status.
11.3.14.3 Call Office
A tap on this choice automatically makes a call from the worker’s mobile device to the
agency telephone number listed on the worker’s Worker Entity Settings page in
AuthentiCare.
11.3.14.4 Force Check-Out
A tap on this choice allows a capture of the time and location of a visit for a Check-Out
when the worker has forgotten, or has been unable, to process a Check-In.

168
September 2018 AuthentiCare® New Mexico Centennial Care
11.3.14.5 Change Password
A tap on this choice enables the worker to process a password change, before being
locked out, without having to call the agency for a temporary password reset. Once the
worker is locked out of the Mobile App, the worker will have to contact the provider to
reset the password following steps in 11.3.6.2 Change Password after Successful
Login.
11.3.14.6 Reset and Change Setup Code
A tap on this choice allows the worker to reset the app from one jurisdiction to another is
found in 11.3.8 Clearing Data to Change from One Environment to Another .
11.3.14.7 Rate Us
A tap on this choice allows the worker to rate the AuthentiCare Mobile App.
11.3.14.8 End User License Agreement
A tap of this choice displays the full agreement for the worker’s review.
11.3.14.9 Logout
A tap of this choice enables the worker to log out of the Mobile App. All needed data
should be saved before a log out.
11.3.15 Two Different Menu Displays
Two different Menu screens display for the worker:
An abbreviated menu is available to the worker after opening the Mobile App, but before logging in for a service visit.
The full menu is available to the worker after a complete login for a service visit.

169
September 2018 AuthentiCare® New Mexico Centennial Care
Abbreviated Menu Before Log In: Full Menu After Log In:
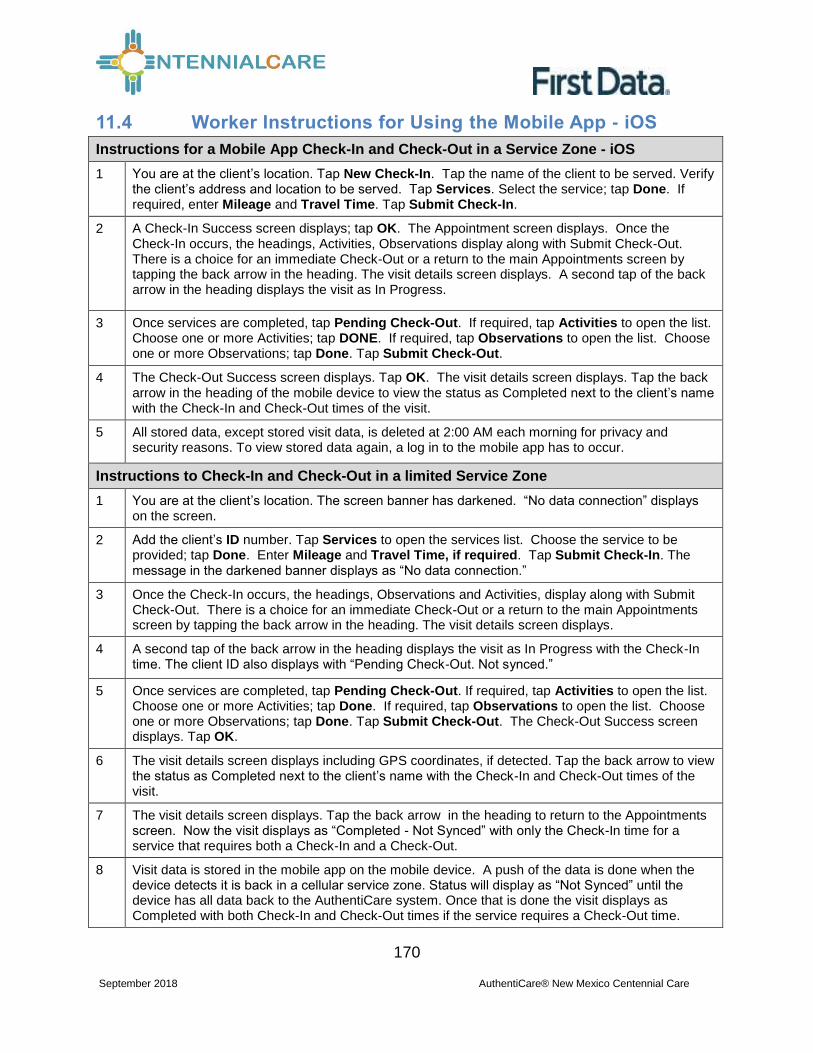
170
September 2018 AuthentiCare® New Mexico Centennial Care
11.4 Worker Instructions for Using the Mobile App - iOS
Instructions for a Mobile App Check-In and Check-Out in a Service Zone - iOS
1 You are at the client’s location. Tap New Check-In. Tap the name of the client to be served. Verify the client’s address and location to be served. Tap Services. Select the service; tap Done. If required, enter Mileage and Travel Time. Tap Submit Check-In.
2 A Check-In Success screen displays; tap OK. The Appointment screen displays. Once the Check-In occurs, the headings, Activities, Observations display along with Submit Check-Out. There is a choice for an immediate Check-Out or a return to the main Appointments screen by tapping the back arrow in the heading. The visit details screen displays. A second tap of the back arrow in the heading displays the visit as In Progress.
3 Once services are completed, tap Pending Check-Out. If required, tap Activities to open the list. Choose one or more Activities; tap DONE. If required, tap Observations to open the list. Choose one or more Observations; tap Done. Tap Submit Check-Out.
4 The Check-Out Success screen displays. Tap OK. The visit details screen displays. Tap the back arrow in the heading of the mobile device to view the status as Completed next to the client’s name with the Check-In and Check-Out times of the visit.
5 All stored data, except stored visit data, is deleted at 2:00 AM each morning for privacy and security reasons. To view stored data again, a log in to the mobile app has to occur.
Instructions to Check-In and Check-Out in a limited Service Zone
1 You are at the client’s location. The screen banner has darkened. “No data connection” displays on the screen.
2 Add the client’s ID number. Tap Services to open the services list. Choose the service to be provided; tap Done. Enter Mileage and Travel Time, if required. Tap Submit Check-In. The message in the darkened banner displays as “No data connection.”
3 Once the Check-In occurs, the headings, Observations and Activities, display along with Submit Check-Out. There is a choice for an immediate Check-Out or a return to the main Appointments screen by tapping the back arrow in the heading. The visit details screen displays.
4 A second tap of the back arrow in the heading displays the visit as In Progress with the Check-In time. The client ID also displays with “Pending Check-Out. Not synced.”
5 Once services are completed, tap Pending Check-Out. If required, tap Activities to open the list. Choose one or more Activities; tap Done. If required, tap Observations to open the list. Choose one or more Observations; tap Done. Tap Submit Check-Out. The Check-Out Success screen displays. Tap OK.
6 The visit details screen displays including GPS coordinates, if detected. Tap the back arrow to view the status as Completed next to the client’s name with the Check-In and Check-Out times of the visit.
7 The visit details screen displays. Tap the back arrow in the heading to return to the Appointments screen. Now the visit displays as “Completed - Not Synced” with only the Check-In time for a service that requires both a Check-In and a Check-Out.
8 Visit data is stored in the mobile app on the mobile device. A push of the data is done when the device detects it is back in a cellular service zone. Status will display as “Not Synced” until the device has all data back to the AuthentiCare system. Once that is done the visit displays as Completed with both Check-In and Check-Out times if the service requires a Check-Out time.

171
September 2018 AuthentiCare® New Mexico Centennial Care
Chapter 12 Managing Claims
A claim contains all of the information required for submission via a HIPAA compliant
electronic billing file (837). Every service captured by the IVR, mobile device or entered
via the web, automatically creates a claim. Each claim within AuthentiCare is assigned
a unique claim number which can be fully tracked in the system.
Providers must confirm each claim before AuthentiCare can submit it for payment. This
involves reviewing each claim for accuracy and approving the claim for billing. Only
confirmed claims are exported to be adjudicated for payment. Unconfirmed claims
remain in AuthentiCare until they are confirmed or deleted.
Claims can be confirmed one at a time (see Section 12.6) or in bulk (see Section 12.7).
Bulk confirmation is a function that providers initiate on the website, and then
AuthentiCare completes the confirmation process after hours. If a Bulk confirmation is
chosen, all claims for all services in a given timeframe are confirmed at once.
AuthentiCare exports claims for adjudication in the early morning hours Monday through
Friday of each week. Claims confirmed by11:59 PM the night before will be included in
that morning’s file submission.
If it is determined that there is an error in the claim that requires a correction, you can
make those corrections using the procedures outlined in Section 12.2.
12.1 Searching and Viewing Claims
Click the Claim radio button in the Claims section of the Home page.
Enter search criteria in any of these fields, if desired. You can also choose to filter
claims and confirm billing by date or user name (log in) as shown at the bottom of the
screen. If you do not enter any search criteria, all claims will be listed.
Click Go!

172
September 2018 AuthentiCare® New Mexico Centennial Care
The Claims page displays with the results of the search up a maximum of 600 claims.

173
September 2018 AuthentiCare® New Mexico Centennial Care
Note the columns displayed in the search results:
ID – Identifies a claim
Status –
Displays as NoExceptions or InfoExceptions if the claim has been sent for
payment or is ready to be sent.
OR
Displays the name of the critical exception (if there are any). The critical
exceptions are: Authorize, Calculate, AuthExhastedBefore, AuthExhaustedOn,
IneligibleWorker, IneligibleProvider, DuplicateClaim, ConfirmBillingForClaim,
MissingActivityCode and UnenrolledProviderServices. You could see any
combination of these critical exceptions listed under status.
Client ID – Identifies the client who received services
Client Name - Identifies the client who received services.
Date Range – The date or dates of the service. This indicates if a claim spanned more
than one day.
Claims are automatically listed alphabetically by client last name. Click the column
heading if you wish for the search results to sort using a different column than the
default. Click the heading once to change the sort to descending order for that column.
Click the heading again to change it to ascending order for that column.
Position the cursor over the Information icon to display an additional Information
pop-up about the claim.

174
September 2018 AuthentiCare® New Mexico Centennial Care
The Claim page displays and includes the Client, Provider, Worker, Service, Check in
date and time, Check out date and time and the time Amount (if required). The box on
the right side notes whether the claim was created via the IVR, mobile device or web
and identifies the calculated amount which takes the total time after applying rounding
rules and computes the dollar amount using the rate identified on the authorization. This
is the amount that AuthentiCare submits for payment. When the claim is adjudicated,
the actual amount paid may be different if the provider did not set contracted rates for
each service. See Chapter 3 for information on setting contracted services rates.
The Claim page displays the amount of Scheduled units and Scheduled Hours for the
authorization used by the claim for the current day.
The Claim Acknowledgement page displays the Scheduled units and Scheduled
Amount in hours for the authorization used by the claim for the current day.
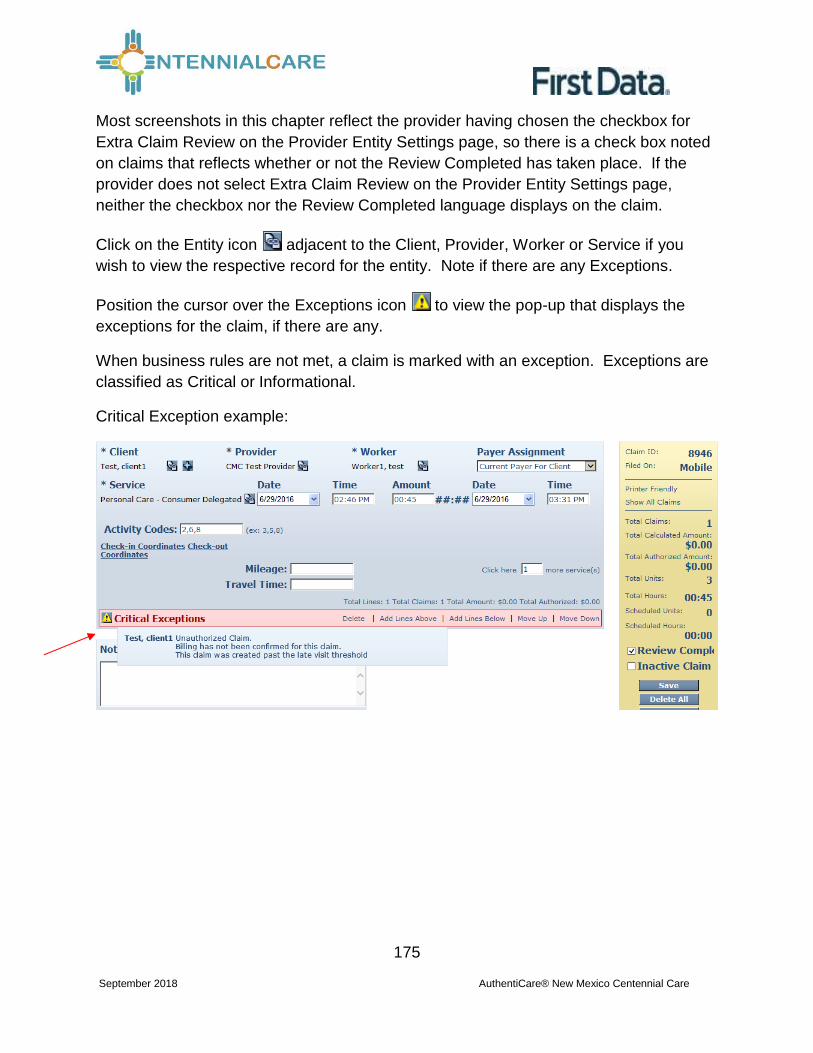
175
September 2018 AuthentiCare® New Mexico Centennial Care
Most screenshots in this chapter reflect the provider having chosen the checkbox for
Extra Claim Review on the Provider Entity Settings page, so there is a check box noted
on claims that reflects whether or not the Review Completed has taken place. If the
provider does not select Extra Claim Review on the Provider Entity Settings page,
neither the checkbox nor the Review Completed language displays on the claim.
Click on the Entity icon adjacent to the Client, Provider, Worker or Service if you
wish to view the respective record for the entity. Note if there are any Exceptions.
Position the cursor over the Exceptions icon to view the pop-up that displays the
exceptions for the claim, if there are any.
When business rules are not met, a claim is marked with an exception. Exceptions are
classified as Critical or Informational.
Critical Exception example:

176
September 2018 AuthentiCare® New Mexico Centennial Care
Claims with Critical Exceptions cannot be submitted for payment until the identified
problem has been corrected. Critical Exceptions are listed in Appendix A.3.
Informational Exception example:
Informational Exceptions or non-critical exceptions do not prevent a claim from being
processed, but serves as a notice of some problem associated with the claim creation
which may warrant further investigation (e.g. a claim that does not have a matching
event). These exceptions are informational only and are listed in Appendix A.3.
If a worker checks in more than 60 minutes prior to the start time for
the scheduled event, the claim indicates an Event Matching Info
Exception. For example, if the event was scheduled from 11:00 AM
to 11:30 AM and the worker checked in at 9:59 AM, AuthentiCare is
not able to match the scheduled event to the actual event and an Info
Exception results. If a provider has set Early, Late and Missed Visit
thresholds for clients, the alerts and business rules follow the
thresholds set by the provider.
Click Cancel to return to the Claims page which lists all of the search results.
Additional Functionality on this page:

177
September 2018 AuthentiCare® New Mexico Centennial Care
Click Printer Friendly to view the claim in a format that prints well.
The Claim Acknowledgment page displays.
Print the page using Print. Click Done to return to the Home page.

178
September 2018 AuthentiCare® New Mexico Centennial Care
12.2 Editing a Claim (Claims Correction)
12.2.1 Correcting a Check-in/Check-out
In most situations, claims are created by workers calling from the client’s home.
Workers may forget to check in or check out when arriving at or leaving a client’s home.
They may choose the wrong service in error and fail to correct it while on the phone. In
such situations, the provider is able to edit the claim by completing or correcting it.
Search for the claim you wish to view according to the instructions in Section 12.1.
The Claim page displays:
Edit the information about the claim as necessary. Click Save to save your changes.
OR
Click Cancel to cancel your changes and return to the Claims page.
The Claim Acknowledgement page displays with a successful save message at the top,
if you clicked Save.

179
September 2018 AuthentiCare® New Mexico Centennial Care
12.2.2 Changing/Correcting a Default Payer
The default payer assignment on a claim is the “current payer for the client” which in
most cases is exactly what is desired. However if a client has recently transferred from
one payer (MCO) to another, a provider may want to select a different payer assignment
for dates of service that are in the past. If the payer assignment for dates of services in
the past needs changed, select the correct payer from the drop down.
Search for the claim you wish to view according to the instructions in Section 12.1.
The Claim page displays.
Click on the Payer Assignment drop down to choose the correct payer (MCO). Once
the correct payer is chosen, click Save.
The Claim Acknowledgement page displays with a Successful Save message at the
top.
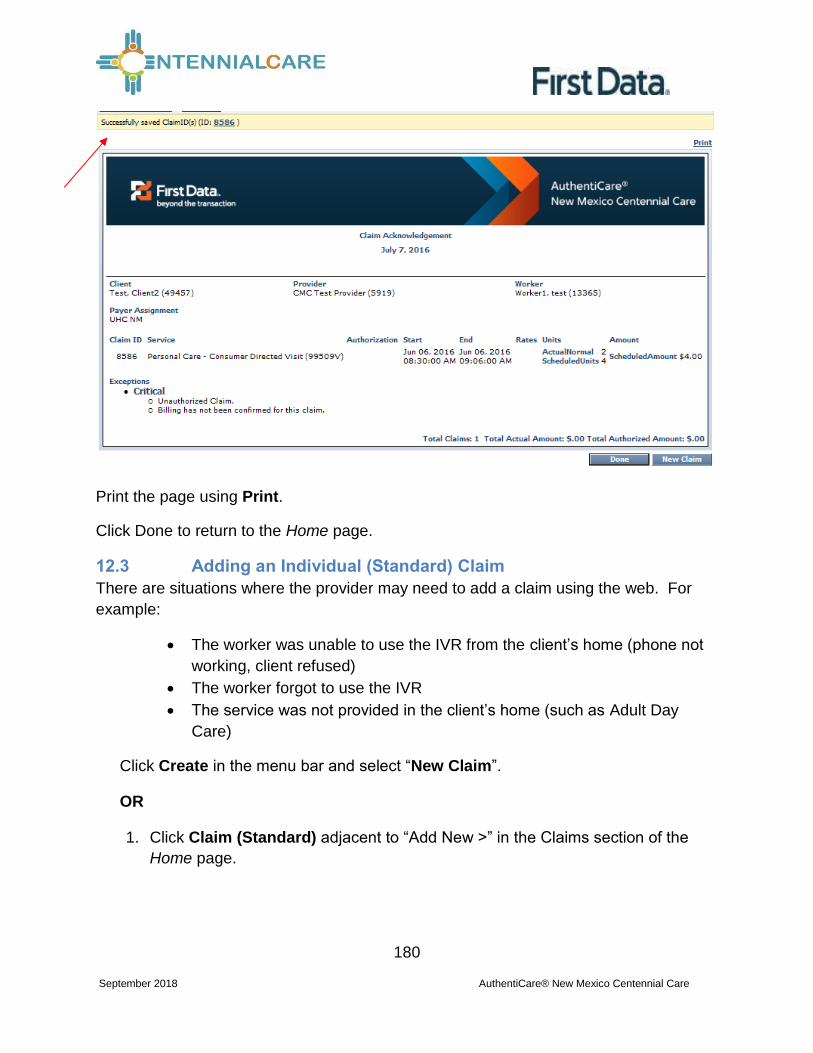
180
September 2018 AuthentiCare® New Mexico Centennial Care
Print the page using Print.
Click Done to return to the Home page.
12.3 Adding an Individual (Standard) Claim
There are situations where the provider may need to add a claim using the web. For
example:
The worker was unable to use the IVR from the client’s home (phone not
working, client refused)
The worker forgot to use the IVR
The service was not provided in the client’s home (such as Adult Day
Care)
Click Create in the menu bar and select “New Claim”.
OR
1. Click Claim (Standard) adjacent to “Add New >” in the Claims section of the
Home page.

181
September 2018 AuthentiCare® New Mexico Centennial Care
The Claim page displays. It is pre-populated with the name of the Provider of the
user currently logged in.
2. Enter the Client ID, full name or partial last name and click the Looking Glass
icon to find the client. Then select the client from the list provided.
3. Enter the Service ID, full name or partial name and click the Looking Glass
icon to find the service. Then select the service from the list provided.
The following fields display once the service is selected if the service is time
based: Date, Time, and Amount.
OR
The following fields display once the service is selected if the service is unit
based: Date and Amount.

182
September 2018 AuthentiCare® New Mexico Centennial Care
4. Enter the Worker ID, full name or partial last name and click the Looking Glass
icon to find the worker who performed the service. Then select the
worker from the list provided.
5. Enter the Date. This is the date the service was delivered if it was a unit-based
service. If it was a time-based service, then this is the date the delivery of the
service was started.
If the service is a time-based service, proceed to Step 6. If the service is a unit-
based service, proceed to Step 8.
6. Enter the Time the delivery of the service started. You must include AM or PM
in the time entry or use military time. If it is on the hour, it is not necessary to
include “:00”.
7. Enter the Date and Time the delivery of the service ended.
8. Enter the Amount. This is the number of units delivered.
For time-based services the amount is computed by the system
based on the start date and time and the end date and time. This
step is not required.

183
September 2018 AuthentiCare® New Mexico Centennial Care
9. Click Save if you have completed the claim and do not need to group this claim
with any other claims. If you are grouping claims, then proceed to Step 12.
The amount for the claim (what displays on the right side of the
screen) is not computed until the claim is saved.
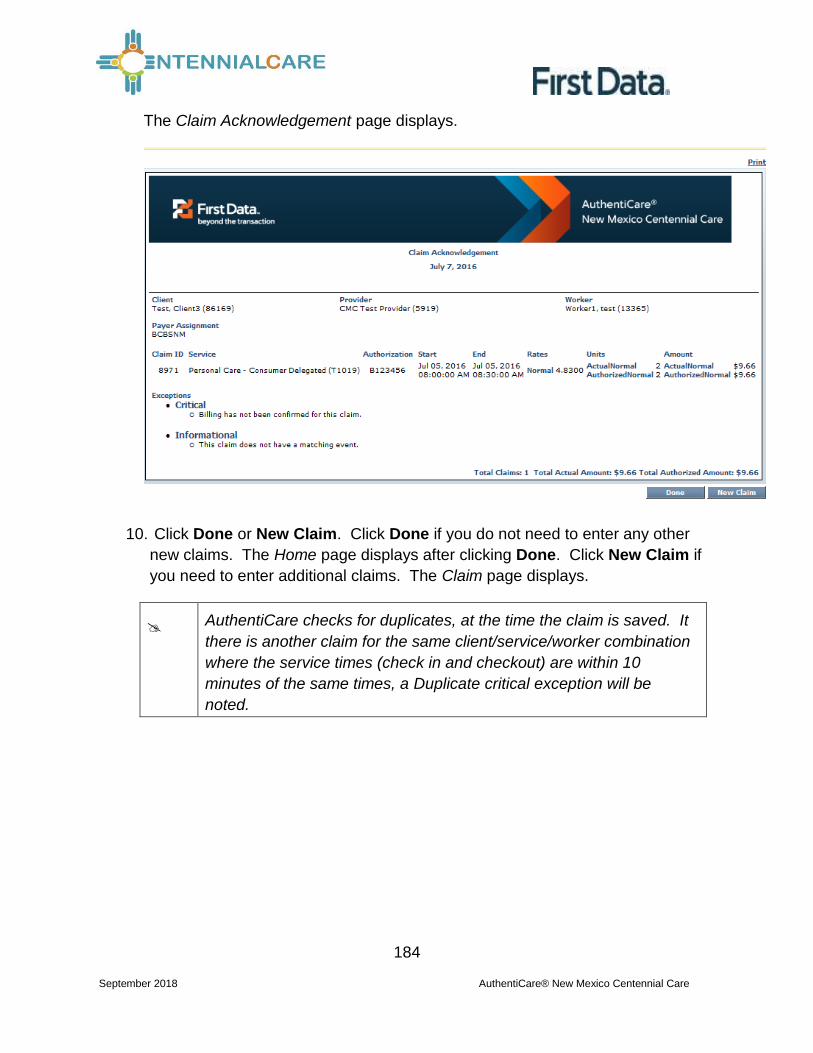
184
September 2018 AuthentiCare® New Mexico Centennial Care
The Claim Acknowledgement page displays.
10. Click Done or New Claim. Click Done if you do not need to enter any other
new claims. The Home page displays after clicking Done. Click New Claim if
you need to enter additional claims. The Claim page displays.
AuthentiCare checks for duplicates, at the time the claim is saved. It
there is another claim for the same client/service/worker combination
where the service times (check in and checkout) are within 10
minutes of the same times, a Duplicate critical exception will be
noted.

185
September 2018 AuthentiCare® New Mexico Centennial Care
12.4 Grouping Claims
Click Add Lines Below.
A new claim opens below the claim you just finished.
1. Enter the information for this claim. The claim pre-populates with the same
client, provider, and worker of the claim above it; however, this information can
be changed if needed. All of the claims in the group do not have to be for the
same client and worker. Grouping claims provides a mechanism to view a
number of claims on the same screen. Claims cannot be grouped using the IVR
or mobile device; they can only be grouped using the web interface.

186
September 2018 AuthentiCare® New Mexico Centennial Care
2. Return to Step 10 to proceed with saving all of the claims in the group.
12.5 Adding Multiple Claims (Express Entry)
There are situations where the provider may need to add a claim using the web for the
same client-worker-service combination. Note: Claims for Service 99509 (Billing
Service claims) cannot be created via the Claim Express feature. AuthentiCare creates
claims for Personal Care – Consumer Directed – 99509.
1. Click Claim (Express) adjacent to “Add New >” in the Claims section of the
Home page.
The Claim page displays. It is pre-populated with the name of the Provider of the
user currently logged in.
Enter the Client, Worker and Service as for a single claim entry and click Next.
2. A list with 10 blank rows where you can enter date, time and activity codes will
appear.
3. There is an Add Rows button on each screen that allows you to add as many
rows as needed.
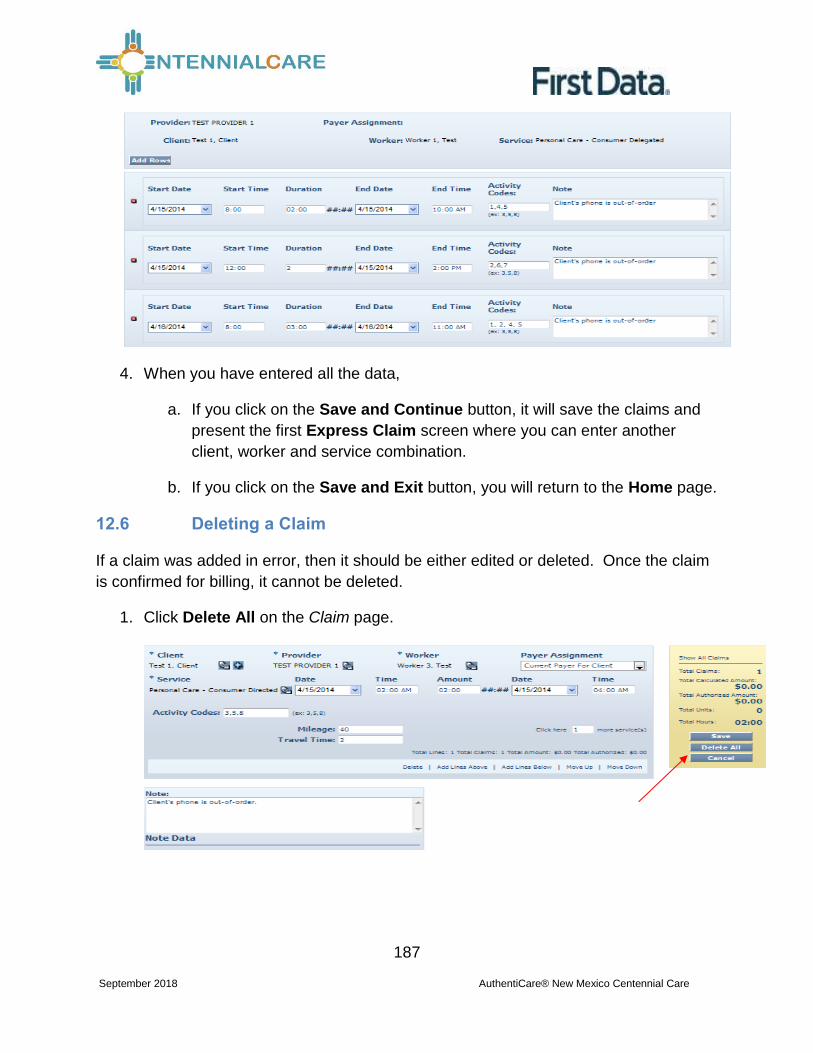
187
September 2018 AuthentiCare® New Mexico Centennial Care
4. When you have entered all the data,
a. If you click on the Save and Continue button, it will save the claims and
present the first Express Claim screen where you can enter another
client, worker and service combination.
b. If you click on the Save and Exit button, you will return to the Home page.
12.6 Deleting a Claim
If a claim was added in error, then it should be either edited or deleted. Once the claim
is confirmed for billing, it cannot be deleted.
1. Click Delete All on the Claim page.

188
September 2018 AuthentiCare® New Mexico Centennial Care
The system asks you to confirm the deletion. If you click OK, the claim is permanently
deleted from the system. If the claim is a group of claims, they will all be permanently
deleted. If you click Cancel, the claim is not deleted and you are returned to the Claim
page.
2. Click OK to proceed with permanently deleting the claim.
You are returned to the Home page which displays a message in the upper left
hand corner that the claim was deleted successfully.
12.7 Confirming a Claim for Export – Dual Confirmation
Providers can check the Extra Claim Review checkbox on the Provider Entity Settings
page for an extra review of each claim.
If the Extra Claim Review checkbox is enabled, every claim will get a new Claim Review
Needed, a Critical Exception. To review the list of Critical Exceptions, see Appendix
A.3.

189
September 2018 AuthentiCare® New Mexico Centennial Care
Reviewers can select the ‘Review Complete’ checkbox on the claim to complete the
review. Once the review is completed, the claim will be ready to be confirmed for billing.

190
September 2018 AuthentiCare® New Mexico Centennial Care
Once the claim review is complete, and the reviewer selects Save, the Billing Confirmed
checkbox will become available and the Claim Review Needed exception drops off the
claim.
Once the claim is confirmed, the Critical Exceptions drop off, and the claim is left with
an Informational Exception. The note put on the claim is now in Note Data, and the
claim creation, claim review and claims confirmation are displayed in Audit Data.

191
September 2018 AuthentiCare® New Mexico Centennial Care
A claim that has completed review can be sent back to review needed status by
unchecking the ‘Review Needed’ checkbox. This can be done only before the claim has
been ‘Billing Confirmed’. Once the claim has been ‘Billing Confirmed’, the ‘Review
Needed’ checkbox becomes read only.
12.8 Confirming a Single Claim for Export
The function of confirming a single claim can take place in two areas of AuthentiCare.
Option 1
1. Select Confirm Billing as the Search Type in the Claims section of the Home
page.
2. There is a Sort By selection at the bottom of the screen. The default is to
display the claims to be confirmed alphabetically by Client’s Last Name.
However you can also sort by Worker’s Last Name, Date of Service, Claim ID,
Client ID or Worker ID.
3. Click Go!

192
September 2018 AuthentiCare® New Mexico Centennial Care
The Confirm Billing page displays a maximum of 600 claims not yet confirmed for billing.

193
September 2018 AuthentiCare® New Mexico Centennial Care
4. Click Check All/Uncheck All at the top of the page to select all displayed claims
for confirmation.
OR
1. Click the checkbox adjacent to the claim you wish to confirm.
2. Click Confirm Billing to confirm all selected claims.

194
September 2018 AuthentiCare® New Mexico Centennial Care
The Home page displays with a successfully confirmed billing message.
A claim cannot be edited after it has been confirmed.
Option 2:
1. Search for the Claim you wish to view according to the instructions in Section
12.1.

195
September 2018 AuthentiCare® New Mexico Centennial Care
The Claim page displays.
1. Click the Billing Confirm check box and click Save.
2. The Claim Acknowledgement page displays with a note that your confirmation saved
successfully.

196
September 2018 AuthentiCare® New Mexico Centennial Care
3. Click Done and the Home page displays.
12.9 Confirming Claims in Bulk
Providers have the option to choose a group of claims to be automatically confirmed by
the system after hours but prior to the next submission of claims. Put in a start and end
date for the Date of Service (DOS) to indicate the claims for that date range are to be
confirmed in bulk. All claims filed for that date range will be chosen unless you chose a
specific Filing Source (Web or IVR). When the bulk confirmation process runs, it will
look at the services that are ready for confirmation and confirm those that do not have
critical exceptions.

197
September 2018 AuthentiCare® New Mexico Centennial Care
12.10 Unconfirming Claims for Further Editing
Occasionally you will need to edit a claim that has been confirmed but not yet exported.
In order to edit it, you must first unconfirm it.
Open the individual claim.
Uncheck the Billing Confirmation box
Save the claim
The claim can now be edited, inactivated or deleted. It must be confirmed again before
it can be exported for adjudication.
12.11 Adding Notes – Claim Edit/Entry Documentation
Anytime you make an edit to an existing claim, such as changing the service (worker
selected the incorrect service on the IVR), or adding a check out time (worker forgot to
check out), you should also enter a note the details the change being made. Anytime
you add a new claim on the web, you should also enter notes to detail the manual entry.
1. Open the individual claim

198
September 2018 AuthentiCare® New Mexico Centennial Care
2. Add any note information in the text box provided. When finished hit Save.
IMPORTANT. The “save” button saves the claim details and the note.
12.12 Auto Claims Creation-Consumer-Directed Admin Fee
Every claim in AuthentiCare has to have an associated worker and associated
authorization for service to export successfully for payment. Effective November 20,
2014, First Data created an AdminFee Worker for existing providers at that time.
Providers enrolled to provide services since November 20, 2014, are able to create an
“administrative” worker for AuthentiCare to automatically create claims for the
Consumer-Directed Admin Fee (See 12.11.1). If providers choose to add the
“administrative” worker for this purpose, the provider is granting approval to
AuthentiCare to create these claims.
Claims will not be created for any month an authorization for the Consumer-Directed
Admin fee is not present. Once the AdminFee Worker is created, and an authorization
for that service is present, claims will be created for those clients. The first weekend of
the next month, new claims for the clients of that service for that month will be created.
Providers who do not have a First-Data-created AdminFee Worker need to create only
one “administrative” worker with the name AdminFee Worker. That worker will be
present in AuthentiCare month after month.

199
September 2018 AuthentiCare® New Mexico Centennial Care
12.12.1 Create A Consumer-Directed Admin Fee Worker
Providers enrolled to provide services since First Data created the AdminFee Worker for
existing providers will utilize the following procedure to create an “administrative” worker
for Consumer-Directed Admin Fee claims.
First, check the list of your workers which is found on your Provider Entity
Settings page. If you already have an “AdminFee” (first name) Worker
(last name), do not create an additional “AdminFee” Worker..
If you do not have AdminFee Worker as a worker listed on your Provider
Entity Settings page, then:
o Log into AuthentiCare. From the Home page, select Add Worker.
o On the Worker Entity page, add an “administrative” worker with the
exact name “AdminFee” as the first name and “Worker” as the last
name.
o Highlight the service “Consumer Directed Admin Fee
o If desired, create and add any other data, birthdate, etc. for this
new worker
o Click Save to save the new worker, “AdminFee Worker”
12.12.2 Processing Consumer-Directed Admin Fee Claims
On the first weekend of each month, for any Consumer Directed Admin Fee
authorization for which the provider has claim records, claims will be automatically
created using this “administrative” worker. Providers will be able to see the claims
created, make adjustments as needed, and confirm these claims when appropriate.
12.12.3 Filing Source of NMCC’s Automated Claims
AuthentiCare NMCC has automated claims for the following services:
99509
FMS Admin Fee
Stipend 1 and Stipend 2
These claims are designated in a Claim Search and on certain reports with a Filing
Source of System Generated.

200
September 2018 AuthentiCare® New Mexico Centennial Care
12.13 Personal Care – Consumer Directed Service (99509)
Personal Care - Consumer Directed services in New Mexico are set up differently in the
Medicaid Waiver than are Personal Care - Consumer Delegated services, and that
difference presents unique requirements for AuthentiCare. Personal Care – Consumer
Directed service visits are required to be managed and tracked to the nearest 15
minutes, just as are Personal Care - Consumer Delegated service visits.
Consumer Directed services have to, however, be billed on a weekly basis to the
nearest one hour service unit. In order to meet both requirements in AuthentiCare, the
MCOs are authorizing Personal Care – Consumer Directed services in whole one hour
units, according to their billing system requirements. This is called the “Billing Service”
authorization.
AuthentiCare then creates a parallel authorization strictly for visit tracking in 15-minute
units that works just like an existing authorization for the Personal Care - Consumer
Delegated service. This is called a “Visit Service” authorization for Personal Care-
Consumer Directed service, and the service is displayed as 99509V.
The Personal Care - Consumer Directed Visit Service works just like any other service
in AuthentiCare for tracking.
The service can be scheduled from the Visit Service authorization, and workers can
check in and check out.
Providers can review and confirm Visit Service claims.
AuthentiCare provides a weekly process that takes confirmed Visit Service claims and
rolls them up into a weekly Billing Service claim. Providers cannot edit the details in the
Billing Service claim, but, if it is correct, providers can accept and confirm the weekly
Billing Service claim for export.
In this way providers have control over the review of what Billing Service claims are
confirmed for export, and when Billing Service claims are confirmed for export. By
splitting the activity into a Visit Service for tracking and a Billing Service for weekly
billing, the overall process meets New Mexico requirements, gives providers control
over their claims and the automated claims export, while keeping the process for
workers checking in and checking out exactly the same process they use for other
NMCC AuthentiCare services.
A walkthrough of how the Billing Service and the Visit Service work together is detailed
below.

201
September 2018 AuthentiCare® New Mexico Centennial Care
12.13.1 Authorizations: Personal Care–Consumer Directed
MCOs submit authorizations to AuthentiCare for Personal Care – Consumer Directed
service (99509). Each authorization includes the client’s name, client’s Medicaid ID
number, the provider’s name and Medicaid number, authorized units, the applicable
service name and service procedure code. (For more general information about
authorizations in AuthentiCare, refer to Chapter 8.)
AuthentiCare will automatically generate parallel 99509V authorizations based on
existing 99509 authorizations. From the list of authorizations for service 99509,
providers will see both the “visit service authorization” with procedure code 99509V and
a corresponding “billing service authorization” with procedure code 99509 for cumulative
weekly confirmation and export for billing.
In the screen shot below, P000000407-01 is the authorization submitted by the MCO to
authorize services to the client. The parallel authorization created by AuthentiCare for
visit tracking is numbered P000000407-01-V.
Authorization P000000407-01-V is the authorization providers will use to schedule client
services. Providers are not able to schedule events for service Personal Care –
Consumer Directed from Billing Service authorizations. Note the lack of a on the
Billing Service authorization, P000000407-01. Note, too, the Visit Service authorization
has the service as Personal Care – Consumer Directed Visit which also distinguishes it
from the authorization for 99509.
12.13.2 Visit Service Claims and Billing Service Claims
Providers can confirm Visit Service claims on a daily basis or once a week, as long as
all Visit Service claims for that week are confirmed before the weekly Billing Service
claims process runs.
AuthentiCare will automatically generate a corresponding weekly Billing Service claim,
at a pre-determined time, using confirmed Visit Service claims that were created with
IVR check-ins and check-outs, with the mobile application (app), and/or by web claim
creation.

202
September 2018 AuthentiCare® New Mexico Centennial Care
The screenshot below is of a Visit Service claim. Note the worker is named Test10B
Worker1. This claim has been confirmed by the provider and displays as “Billed
(05/15/2015).” Once the Billing Service claim is confirmed, each Visit Service claim
utilized for the weekly Billing Service claim will be marked as “Billed (date)” as displayed
in the screen shot below.
The screenshot below is of a Billing Service claim. Note the worker is named
“BillingService Worker.” In the Note Data section, you will see “781” displayed. This is
the number of the Visit Service claim utilized for the Billing Service claim. If there are
additional Visit Service claims utilized for the Billing Service claim, providers will see
more than one claim number in the Note Data section.

203
September 2018 AuthentiCare® New Mexico Centennial Care
The AuthentiCare system will total the service time reflected on Visit Service claims for
the same client during the week, round the time, and then reflect that calculated number
of units of service in the Billing Service claim.
The Billing Service claim is created in the overnight hours of Wednesday night each
week. Once the Billing Service claim is created, providers can confirm the claim or
delete it.
12.13.2.1 Confirming a Billing Service Claim
Billing Service Claims can be confirmed one at a time by utilizing the Confirm Billing –
View feature or many at a time by utilizing the Confirm Billing – Bulk feature, both on the
Home page. Billing Service Claims can also be confirmed or by selecting Confirm
Billing – Bulk and by completing the Claim Start and Claim End fields. Providers could
also use the Provider Dashboard to confirm claims.
12.13.2.2 Deleting a Billing Service Claim
If there are errors in the Billing Service claim the steps for providers are:
Delete the weekly Billing Service claim;
Add Visit Service claims and/or edit Visit Service claims that were included in the
deleted weekly Billing Service claim;
Confirm the Visit Service claims corrected and/or added: and

204
September 2018 AuthentiCare® New Mexico Centennial Care
Confirm the new Billing Service claim that will be created in the next process run, the
following week.
Providers can delete a Billing Service claim only if it has not been exported to the MCO
for payment. If the Billing Service claim has not been exported, providers can make any
edits needed on the Visit Service claims for the week by first deleting the Billing Service
claim which unlocks the Visit Service claims for editing.
Once edits are made, and those Visit Service claims are confirmed, the Billing Service
claim will regenerate the next week in the process run to reflect any edits made by a
provider on any past week’s Visit Service claims. The provider can then confirm the
“regenerated” Billing Service claim, and it will export to the MCO for payment.
If a Billing Service claim is deleted in AuthentiCare, the Visit Service claims
corresponding to that Billing Service claim will have the marking “Billed (date)” removed,
and those Visit Service claims will be marked with the message that was first on each
claim. Those Visit Service claims will then be marked with “Info Exceptions” or they will
be blank.
A provider might have to delete a Billing Service claim in AuthentiCare for one of the
following reasons:
All existing Visit Service claims for the week were confirmed, and then additional claims
were submitted for the same weekly time period on paper timesheets.
All existing Visit Service claims for the week were confirmed, but the provider had later
edits to make on one or more Visit Service claims.
12.13.2.3 Client Transitions from one MCO to Another
The provider, client, and payer on a Billing Service claim have to match all the Visit
Service Claims used to generate the Billing Service claim. If the client is a member of
the same MCO for the entire week, there will be only one Billing Service claim each
week, per client, for Personal Care – Consumer Directed service - 99509. The Billing
Service claim is the only claim that will export for payment.
If the client is a member of one MCO for part of the week, and a member of a different
MCO for the remainder of the week, AuthentiCare will generate one Billing Service
claim for each MCO for that week, for that client, for service 99509. The AuthentiCare
system will total the service time provided during the week for each MCO, round the
time, and then reflect that calculated number of units of service in each MCO’s Billing
Service claim.

205
September 2018 AuthentiCare® New Mexico Centennial Care
An NMCC client can be enrolled with only one MCO (Payer) at a time, so claims
confirmed and exported for the first MCO after the transition date from one MCO to
another will be denied. Likewise, claims for the second MCO before the transition date
will be denied.
Once a Billing Service claim has been paid, neither the Billing Service claim nor that
Billing Service claim’s applicable Visit Service claims are editable. A provider can
resubmit a Billing Service claim for that same time period, same client, same service, by
finding the Billing Service claim on the MCO’s site, and, if the claim has been paid, void
it. Providers can then submit a new Billing Service claim directly to the MCO for
payment.
For additional general information regarding claims, refer to the first part of this chapter.
12.13.2.4 Month End in the Middle of a Week
If providers need to keep service billing separated by month due to monthly client
obligation or other reasons:
Providers can confirm Visit Service claims for June 28 – July 4 by Wednesday, July 8,
close of business (COB). Rounding to the nearest hour will occur on one Billing Service
claim for dates of service June 28-July 4 (the full week).
Rounding will work differently for the week where the provider has split the billing into
two claims. Rounding to the nearest hour will occur on the two different Billing Service
claims for dates of service June 28 – July 4: rounding across three days for a Billing
Service claim for June 28-30, and rounding across four days for a Billing Service claim
for July 1-4.
12.13.3 Generic Worker Creation – BillingService Worker
AuthentiCare claims require a designated worker. Providers enrolled after June 4,
2015, and after, to provide service 99509, shall create a generic worker named

206
September 2018 AuthentiCare® New Mexico Centennial Care
“BillingService Worker” which will display on Billing Service claims for service 99509.
This worker name is to be created with the exact first name, “BillingService” with NO
space between “Billing” and “Service.” This worker is to be created with “Worker” as the
exact last name. As with all workers created in AuthentiCare NMCC, “BillingService
Worker” will be assigned a 5-digit worker ID unique to each provider agency.
First Data added this worker to all current NMCC providers’ Worker list in AuthentiCare
effective June 3, 2015. BillingService Worker is not to be deleted.
(For general information about creating workers, refer to Chapter 6.)
12.13.4 Caution: Claims for Same Date of Service
Medicaid views the date of services for claims by the same provider, for the same client,
who has been provided the same service when claims are reviewed. All claims for a
client receiving one particular service on a given date must be confirmed together so
those claims are exported together. Otherwise any lingering claims for that service for
that client, on that date, are viewed as duplicates, and are denied.
12.14 Stipend Claims
Workers in NMCC use personal mobile or provider-supplied mobile devices, or tablets,
to log into the AuthentiCare Mobile App to record services provided to clients. Workers
who use their personal mobile device(s) for this purpose receive a monthly Stipend fee
to pay towards the cost of the data plan of the device.
AuthentiCare runs monthly automated processes to identify workers who are eligible to
receive Stipends, and generates Stipend claims. These claims will go through the billing
confirmation process by providers prior to getting exported for payment. It is not
required for providers to select Stipend Services in the Worker Services list on the
Worker Entity Settings page in order for AuthentiCare to generate a Stipend claim on
the worker’s behalf.
Stipend claims are generated on the 8th and 25th of every month for claims exported in
the previous month if the conditions listed below are satisfied:
There is no Stipend claim previously generated for the worker in the
previous month.
The worker has at least one exported mobile claim for the previous month.
The ‘Receive Stipends’ value on the Worker Entity Settings page is set to
Yes.

207
September 2018 AuthentiCare® New Mexico Centennial Care
AuthentiCare creates Stipend claims for a provider only if Stipend Services are included in the provider’s list of enrolled services and the provider is Mobile-Enabled.

208
September 2018 AuthentiCare® New Mexico Centennial Care
Stipend claims are created as follows:
Stipend claim will be generated with the client and the payer of the last
exported mobile claim identified for the worker and will be dated the last
day of the previous month (month for which the claims are generated).
A single Stipend claim with service G9006U1 is generated if the worker
has only one Payer for all exported mobile claims in the previous month.

209
September 2018 AuthentiCare® New Mexico Centennial Care
Two Stipend claims with service G9006U2 are generated with two different payers if the worker has more than one Payer for the exported mobile claims in the previous month.
12.15 Creating Web Claims: T1019- 99509V- G9006U1-U2
Providers have the ability to create claims on the AuthentiCare web portal through
Standard or Express Claim links. Consumer Delegated (T1019), Consumer Directed
Visit (99509V) and Stipend (G90006U1, G9006U2) services are restricted from Express
claim creation. An error message will be displayed if any of these services are selected
to create Express claims: “Express claims cannot be created for this service.”
Providers can, however, create Standard claims for these services by selecting a
Reason Code from the drop down list available on the claim page. A variety of Reason
Codes display on the claim page once the provider selects one of these services.
Providers are required to add additional notes pertaining to the Reason Code selected,
to justify the web entry instead of using EVV. These web claims will receive a C6
Informational Exception: “EVV not used.”
Reason Code Descriptions
Tablet Malfunction
Smartphone malfunction
Landline/IVR unavailable
Tablet not delivered
Inclement weather
Electrical outage
Authorization issue
Substitute caretaker
Missing Stipend claim
Payer Denied Claim

210
September 2018 AuthentiCare® New Mexico Centennial Care
At least one Reason Code must be chosen before a claim can be saved, and only one
Reason Code at a time can be selected. If a Reason Code is not selected, and the
provider attempts to save the claim, AuthentiCare will display an error message: “Claim
cannot be saved without a reason code.”
Once a Reason Code is selected, a note is mandatory. If the provider attempts to save
the claim without a note, AuthentiCare will display an error message: “Enter claim
notes for the selected reason code.”
Additional Reason Codes and notes can be added by the provider by editing the claim
as long as the claim has not yet been exported.
Once a claim is saved, the Reason Code appears in the Note Data section on the claim
page along with the additional notes that the provider has entered. The Reason Code
field is again open so that providers can edit the claim to select an additional Reason
Code from the dropdown list on the claim page. If providers select another Reason
code, they will need to write another note, and again save the claim. The claim will then
display both Reason Codes in the Note Data section on the claim page.
The Reason Codes are included in the body of the Claim Data Listing report. For more
information regarding the Claim Data Listing Reports, refer to Reports, Chapter 13.
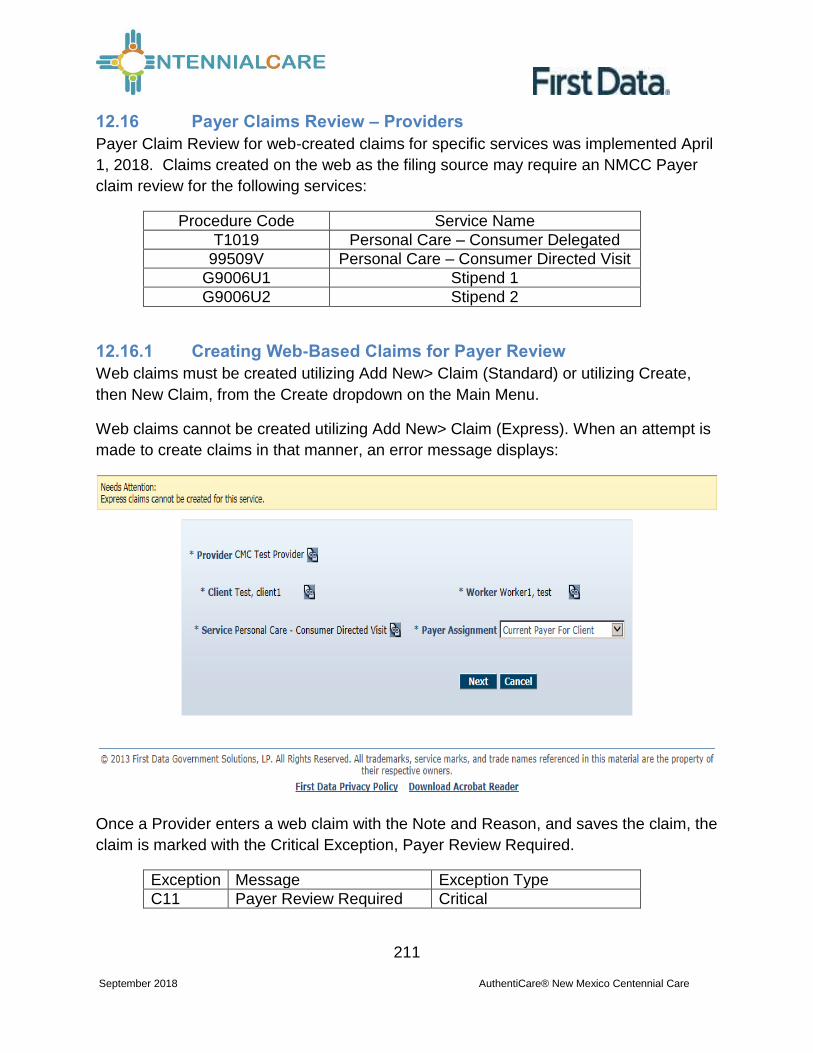
211
September 2018 AuthentiCare® New Mexico Centennial Care
12.16 Payer Claims Review – Providers
Payer Claim Review for web-created claims for specific services was implemented April
1, 2018. Claims created on the web as the filing source may require an NMCC Payer
claim review for the following services:
Procedure Code Service Name
T1019 Personal Care – Consumer Delegated
99509V Personal Care – Consumer Directed Visit
G9006U1 Stipend 1
G9006U2 Stipend 2
12.16.1 Creating Web-Based Claims for Payer Review
Web claims must be created utilizing Add New> Claim (Standard) or utilizing Create,
then New Claim, from the Create dropdown on the Main Menu.
Web claims cannot be created utilizing Add New> Claim (Express). When an attempt is
made to create claims in that manner, an error message displays:
Once a Provider enters a web claim with the Note and Reason, and saves the claim, the
claim is marked with the Critical Exception, Payer Review Required.
Exception Message Exception Type
C11 Payer Review Required Critical

212
September 2018 AuthentiCare® New Mexico Centennial Care
Note Data displays the Reason and Notes explaining why the web claim was created.
The Provider can no longer edit and save changes to the claim other than to inactivate it
or to cancel the view of the claim. The claim, otherwise, is read-only for Providers.
The exception Payer Review Required displays on the Provider’s Exceptions
Dashboard.

213
September 2018 AuthentiCare® New Mexico Centennial Care
At this point the claim is also on the Payer’s Dashboard awaiting Payer approval or
denial.
Exception Message Exception Type
C12 Payer Review Denied Critical
C13 Payer Review Accepted Informational

214
September 2018 AuthentiCare® New Mexico Centennial Care
Once the Payer accepts a claim, the claim is marked with a Payer Review Accepted
exception and displays on the Provider Dashboard on the Needs Confirmation List in
the Unsubmitted Claim Status section.
The exceptions Payer Review Required and Payer Review Denied display in the Critical
Exception List on the Provider Dashboard in the Unsubmitted Claim Status section.
Providers have a view of 20 claims per page maximum at a time on any list.
12.16.2 Confirming Web-Based, Payer-Reviewed Claims
Once claims are marked Payer Accepted, claims can be confirmed from the Confirm
Billing – View selection.
The view of the claim titled Confirm Billing displays Payer Review Accepted as an
Informational Exception. The Provider can now review and confirm this claim for export.

215
September 2018 AuthentiCare® New Mexico Centennial Care
Once claims are marked Payer Accepted, claims can also be confirmed from the
Confirm Billing – Bulk selection.
For additional information on Claims Confirmation, see 12.7.
12.16.3 Resolving a Denied Claim - Provider
For Payer-denied claims, claim numbers display on the Critical Exception List on the
Provider’s Exception Dashboard. Should the Provider want to resolve denied claim
issues with the Payer, providers may submit the denied Claim ID number and resolution
documentation to the Payer. If the documentation is submitted timely and resolves the
reason the claim was denied:
1) The Payer will open the denied claim for review and will revise the exception to
Payer Review Accepted. Once that occurs:
2) The Provider will find the newly reviewed and approved claim on the Provider
Dashboard in the Needs Confirmation List and from viewing for the Claim ID
itself. Payer Review Accepted is now listed as anInformational Exception on the
claim. The Provider can review and confirm this claim for export.
Timelines for Provider documentation submittal and for Payer review of claims have
been established by the NMCC Managed Care Organizations (MCOs). MCO contact
information is listed in Chapter 14 of this user manual.
Web-based claims left marked as Payer Review Denied for more than 60 days from the
end date of the claim will automatically be inactivated.

216
September 2018 AuthentiCare® New Mexico Centennial Care
12.17 Payer Claims Review – Payers
There is Payer Claim Review for web-created claims for specific services for Payers
who wish to review claims before the Provider confirms billing for export. Payers have
the role of claims reviewer and the right for Override Exception.
The specific services are:
Procedure Code Service Name
T1019 Personal Care – Consumer Delegated
99509V Personal Care – Consumer Directed Visit
G9006U1 Stipend 1
G9006U2 Stipend 2
There are three exceptions placed on web-created claims for specific services. Payer
Review Required occurs when the provider creates a claim, then saves it. The
remaining two exceptions are Payer-based exceptions.
Exception Message Exception Type
C11 Payer Review Required Critical
C12 Payer Review Denied Critical
C13 Payer Review Accepted Informational

217
September 2018 AuthentiCare® New Mexico Centennial Care
As with all AuthentiCare data, claims are data-scoped so that Payers view claims for
only members of their health plans.
All Payers have access to review and to “work” claims from a Payer Dashboard found in
the Main Menu of AuthentiCare NMCC.
All three web-based claim exceptions reside on the Payer Dashboard lists.
The Claim Dates field is set by default to Current Month with a dropdown available to
choose a different timeline. A Date Range of up to 31 days is available. Once a choice
other than Current Month is selected, Payers need to select Refresh to update the
exception counts and lists applicable to the revised timeline.
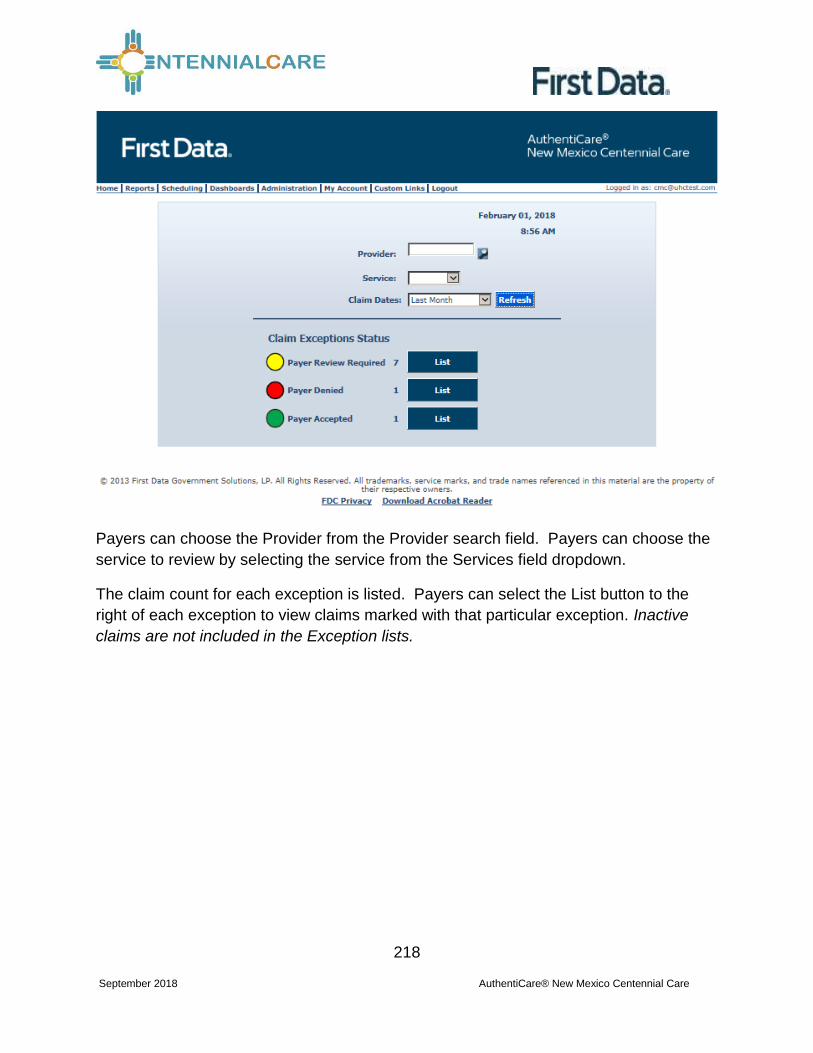
218
September 2018 AuthentiCare® New Mexico Centennial Care
Payers can choose the Provider from the Provider search field. Payers can choose the
service to review by selecting the service from the Services field dropdown.
The claim count for each exception is listed. Payers can select the List button to the
right of each exception to view claims marked with that particular exception. Inactive
claims are not included in the Exception lists.

219
September 2018 AuthentiCare® New Mexico Centennial Care
The Payer’s action is to place an exception on the claim, either to accept the claim or to
deny the claim. Once any of the lists are selected, the Payer has a claim view list that is
easily read. Exceptions are listed by Critical Exception and Informational Exception in
this claim view.
12.17.1 Reason Codes and Claim Notes
The screen for each claim displays the Reason Code the Provider has selected for
adding a web claim and the latest claim note associated with it. The Provider’s claim
note and Reason display in the Claim Notes section.

220
September 2018 AuthentiCare® New Mexico Centennial Care
Payers can review, accept or deny the claims from this page. Payers have a choice of working one claim at a time by choosing Accept or Deny, or by working the full page of claims by selecting Accept All or Deny All. There is a text box for Review Notes to complete on each claim as well as making the
choice of Accept or Deny. Clicking Save is done at the bottom of the page. Claim
notes will not save unless the Payer checks either Accept or Deny, or Accept All or Deny
all, then saves.

221
September 2018 AuthentiCare® New Mexico Centennial Care
The page has a view of 20 claims per list maximum. Once Payers “work” each claim
from the list of 20 claims, and click Save, the “worked” claims move to the appropriate
list, either Payer Accepted or Payer Denied. Payers then are able to select Refresh to
review the refreshed Payer Review Required list.
12.17.2 Resolving a Denied Claim - Payer
For Payer-denied claims, claim numbers display on the Critical Exception List on the
Provider’s Exception Dashboard. Should the Provider want to resolve denied claim
issues with the Payer, providers may submit the denied Claim ID number and resolution
documentation to the Payer.
Payers can search for the Claim ID number submitted with the Provider’s
documentation from their Payer Denied List on the Payer Dashboard or they can
conduct claim searches from the Home page utilizing the Claim ID number.
If the documentation is submitted timely and resolves the reason the claim was denied:
1) The Payer will open the denied claim for review and will revise the exception to
Payer Review Accepted. Once that occurs:
2) The Provider will find the newly reviewed and approved claim on the Provider
Dashboard in the Needs Confirmation List and from viewing for the Claim ID
itself. Payer Review Accepted is now listed as anInformational Exception on the
claim. The Provider can review and confirm this claim for export.

222
September 2018 AuthentiCare® New Mexico Centennial Care
12.17.3 Information for 99509V and 99509
The 99509 system generated job runs early each Thursday morning. All 99509V claims
for all shifts for a client must be in approval status by the Payer so that the Provider can
confirm billing for export by close of business each Wednesday.
Medicaid reviews the date of services for claims by the same provider, for the same
client, who has been provided the same service. All claims for a client receiving one
particular service on a given date must be confirmed together so those claims are
exported together. Otherwise any lingering claims for that service for that client, on that
date, are viewed as duplicates, and are denied.
12.17.4 Final Payer Notes
After accepting a claim, Payers can change the exception to Payer Denied if the claim
has not yet been exported. To accomplish this, Payers select the list of Payer Accepted
claims to search for the claim whose exception requires a change.
In a scenario where the claim has not exported, the Payer can still make edits to the
claim.

223
September 2018 AuthentiCare® New Mexico Centennial Care
When the Payer saves the exception change, an audit record is created for the audit
action of Payer Review Required, Payer Review Denied or Payer Review Accepted.
There will be no error messages displayed for the Payer Dashboard or the Provider
Dashboard.
Claims marked as Payer Denied for more than 60 days from the end date of the claim
will automatically be inactivated.
Payers need to check frequently for claims to review. The Payer Dashboard timeline
lists only the claims to review for the timeline chosen.

224
September 2018 AuthentiCare® New Mexico Centennial Care
Chapter 13 Reporting
AuthentiCare includes robust reporting capabilities to assist providers, Centennial Care
MCOs staff in managing and monitoring clients, workers, schedules and claims.
Reports are available 24/7 via the web and information is current as of the time a report
is created.
A variety of sort and filter criteria are available to create unique reports reflecting the
specific information needed. A user may filter information to produce a report which
displays information related to a particular client, worker or service and within date
ranges chosen by the user. The information may be sorted to display in an order that is
most convenient for the user. The sort and filter options for each report are discussed
more fully later in this chapter.
As discussed in earlier chapters, the provider agency can create reports with only
information related to the specific provider’s ID number. New Mexico Centennial Care
MCO staff can create reports on information related to all clients who are members of
their own specific MCO’s health plan.
13.1 Creating a Report
Click Reports on the Main Menu.
The Report page displays.
There are three sections of the Report Page: Report Templates – Users can create
templates for reports that are created on a regular basis. For example, there is a need
for a report on Late and Missed Visits at the end of each month for all clients, a template
can be created with the desired settings. Templates are addressed in more detail in
Section 13.4.Create Reports – Seventeen types of reports are available for creation
and each can be filtered and sorted to create a unique report to fit the user’s needs.
Each report name is a hyperlink that allows you to enter your filter and sort criteria and
run the report. Proceed to Step 2 for further instructions.
View Reports – Once a report is generated, it appears in the View Reports section of
the page. Reports can be saved to the user’s local drive for permanent storage and
retrieval. If a report is needed at a later date and has been deleted, it can simply be
rerun for the same dates. Methods of viewing reports are addressed in detail in Section
13.2.Click on a report name hyperlink from the list provided in the Create Reports
section of the Report page.

225
September 2018 AuthentiCare® New Mexico Centennial Care
The Authorizations Report page was chosen for this example. It displays the filter and
sort criteria for the report which are unique for the chosen report. This screen varies
depending on the type of report chosen in Step 2, refer to Section 13.5 for specific filter
and sort information for each type of report.

226
September 2018 AuthentiCare® New Mexico Centennial Care
1. Enter a Report Name. This automatically defaults to the name of the
report selected, but this name should be changed to something more
descriptive. For example, if the report is for a single client, the report
name can be changed to include the client’s name and the date range.
2. Enter a Description, if desired. This is most helpful in creating templates
which are addressed in more detail in Section 13.4.
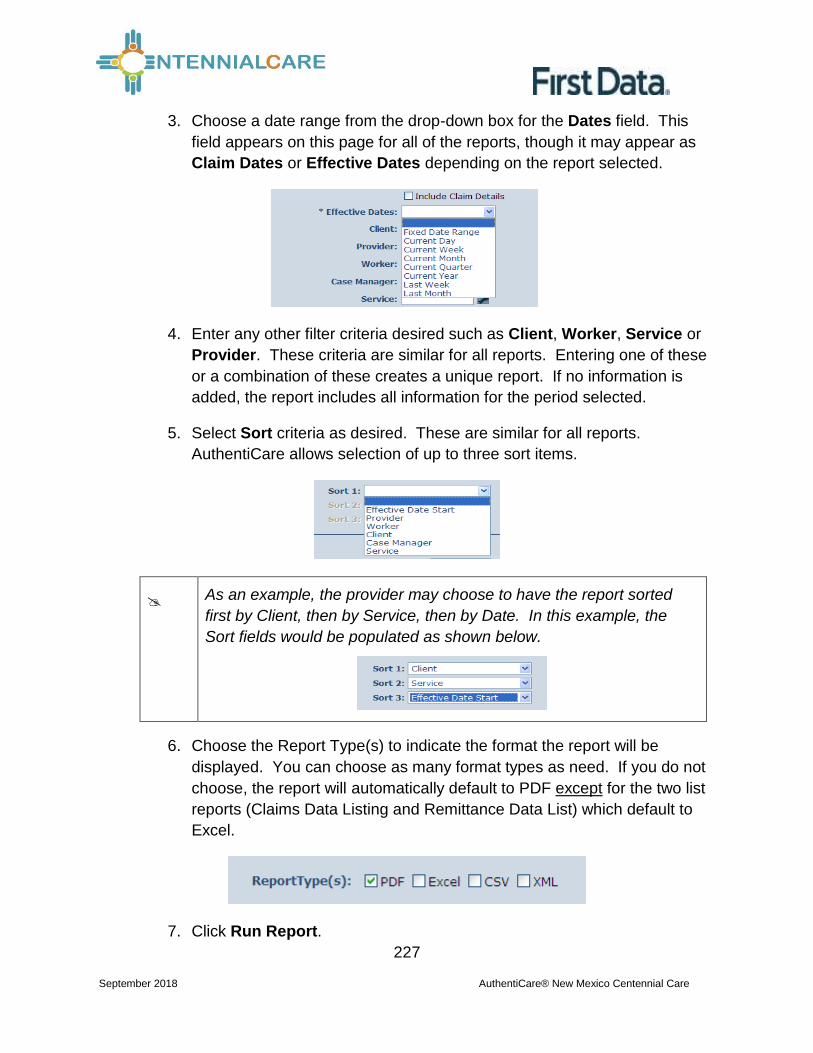
227
September 2018 AuthentiCare® New Mexico Centennial Care
3. Choose a date range from the drop-down box for the Dates field. This
field appears on this page for all of the reports, though it may appear as
Claim Dates or Effective Dates depending on the report selected.
4. Enter any other filter criteria desired such as Client, Worker, Service or
Provider. These criteria are similar for all reports. Entering one of these
or a combination of these creates a unique report. If no information is
added, the report includes all information for the period selected.
5. Select Sort criteria as desired. These are similar for all reports.
AuthentiCare allows selection of up to three sort items.
As an example, the provider may choose to have the report sorted
first by Client, then by Service, then by Date. In this example, the
Sort fields would be populated as shown below.
6. Choose the Report Type(s) to indicate the format the report will be
displayed. You can choose as many format types as need. If you do not
choose, the report will automatically default to PDF except for the two list
reports (Claims Data Listing and Remittance Data List) which default to
Excel.
7. Click Run Report.

228
September 2018 AuthentiCare® New Mexico Centennial Care
The system returns to the Report page. The report appears in the View
Reports section of the page with a submitted time and status. The Status
can be one of the following:
Queued - the report is in line for processing
In Progress – the report is being created
Completed – the report is ready for viewing
13.2 Viewing a Report
Once the Status of the Report has changed to Completed, the report may be viewed in
the format(s) selected.
1. Click one of the icons under the report name to generate the report in the desired
format. These icons do not appear until the status of the report is “Completed”.
The icons are:
It usually takes a few minutes for a report status to change from Queued to
Completed. There is an interim status of In Progress. To view the updated
status of the report, you may need to click Refresh. This refreshes the page
and displays the updated status of the report.
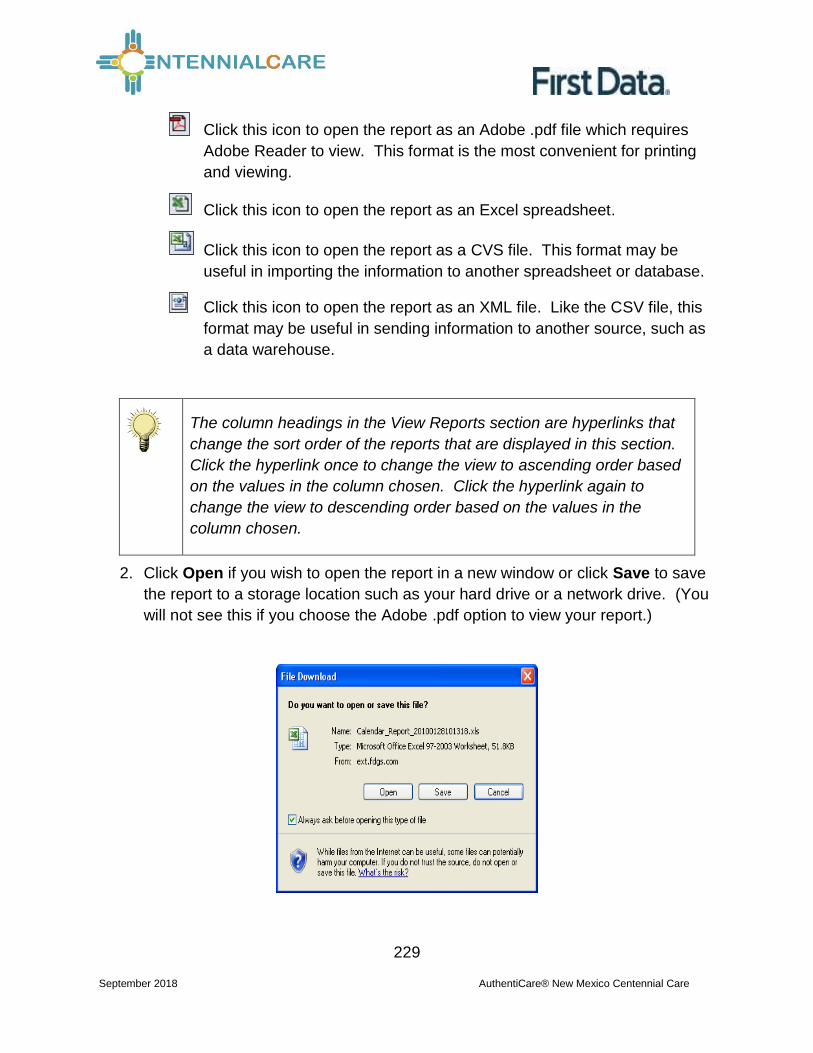
229
September 2018 AuthentiCare® New Mexico Centennial Care
Click this icon to open the report as an Adobe .pdf file which requires
Adobe Reader to view. This format is the most convenient for printing
and viewing.
Click this icon to open the report as an Excel spreadsheet.
Click this icon to open the report as a CVS file. This format may be
useful in importing the information to another spreadsheet or database.
Click this icon to open the report as an XML file. Like the CSV file, this
format may be useful in sending information to another source, such as
a data warehouse.
The column headings in the View Reports section are hyperlinks that
change the sort order of the reports that are displayed in this section.
Click the hyperlink once to change the view to ascending order based
on the values in the column chosen. Click the hyperlink again to
change the view to descending order based on the values in the
column chosen.
2. Click Open if you wish to open the report in a new window or click Save to save
the report to a storage location such as your hard drive or a network drive. (You
will not see this if you choose the Adobe .pdf option to view your report.)

230
September 2018 AuthentiCare® New Mexico Centennial Care
The appropriate application starts based on the format you selected and the report is
displayed, if you click Open. At that point, you may print the report if desired. The
following example is from clicking the Adobe .pdf icon.
13.3 Deleting a Report from the View Reports Section
1. Click the checkbox to the left of the name of the report you wish to delete.
Clicking the checkbox next to Name populates a checkmark in the
checkboxes for all of the reports listed in the View Reports section.

231
September 2018 AuthentiCare® New Mexico Centennial Care
2. Click Delete Selected Reports if you want to permanently remove the report.
The Report page displays and the report is no longer listed in the View Reports
section.
Reports are automatically deleted three (3) days after they are
created.
13.4 Using Report Templates
Instead of creating the same report at the end of each week, month or quarter,
providers can save time by creating a template for the report. The Calendar Report
is being used as an example for this section.
13.4.1 Creating Report Templates
Click on a report name from the list provided in the Create Reports section of the
Report page.
The Calendar Report page for the report displays. This page is where you enter the
filter and sort criteria for the report.

232
September 2018 AuthentiCare® New Mexico Centennial Care
Enter a unique Report Name. This automatically defaults to the name of the report
selected, but this name should be changed to something more descriptive.
Enter a Description. This identifies the purpose of the report.
Choose a date range from the drop-down box for the Effective Dates. This varies
based on the type of report. Refer to Section 13.5.
Enter any other filter criteria. This varies based on the type of report. Refer to Section
13.5.
Select Sort criteria as desired.
Select the Report Type(s).
1. Click Save as Template.

233
September 2018 AuthentiCare® New Mexico Centennial Care
The Report page displays and the template just created is included in the Report
Templates section.
13.4.2 Running a Report from a Template
Click the Run Report icon adjacent to the name of the template.
The system returns to the Report page. The report appears in the View Reports section
of the page with a submitted time and status of “Queued”. Proceed to Section 13.2 for
further instructions on viewing the report.

234
September 2018 AuthentiCare® New Mexico Centennial Care
13.4.3 Editing a Report Template
1. Click the hyperlink on the name of the report.
The Calendar Report page displays.

235
September 2018 AuthentiCare® New Mexico Centennial Care
2. Edit the Calendar Report page as desired.
3. Click Save as Template.

236
September 2018 AuthentiCare® New Mexico Centennial Care
13.4.4 Deleting a Report Template
1. Click the checkbox to the left of the name of the report template you wish to
delete.
2. Click Delete Selected Templates if you want to permanently remove the report
template.
The Report page displays. In this example, the Description was modified and it now
displays under the name of the Report Template.
After the delete function, the page displays, and the calendar report template deleted is
no longer listed.

237
September 2018 AuthentiCare® New Mexico Centennial Care
13.5 Scheduling a Report
AuthentiCare users use a standard report criteria (template) page to select content and
sorting of the data requested in a report. Instead of running as a report immediately
from the Reports page, the user can select “Save as Template.” This choice accesses
a Reports Scheduler feature in AuthentiCare whereby a provider is able to:
1. For any report, filter for content, sort as needed, then select a standard file format for the output (Excel, CSV, XML, or PDF), and
2. Save the template.
3. Once, saved, select Schedule.

238
September 2018 AuthentiCare® New Mexico Centennial Care
The Schedule Report window displays.
4. For Schedule Type, choose a daily or monthly schedule for the report to run.
5. Specify a regular Time in the scheduler for the report to run.
6. Select the Day of the Week or the Day of the Month for the report to run.
7. Specify Email Addresses to receive an automated email alert once the report
has completed running and the file is ready for pickup and viewing.
An example of the email received: Scheduled AccessNet Report, Provider Activity
Report for Wed PM has completed on 04/06/2016 at 04:31 PM.

239
September 2018 AuthentiCare® New Mexico Centennial Care
8. Scheduled Export files for the Provider are available under View Reports on the
Reports page
9. The user clicks on a file icon and the file opens in a browser tab. The file can be
saved from there.
13.6 Report Examples
13.6.1 Authorizations Report without Claim Detail
The Authorizations Report lists all authorizations in AuthentiCare for a given time
period. The report can be filtered to include only authorizations for a particular client or
service. It can be sorted to display the authorizations in a certain order. For example,
the provider may choose to see the authorizations sorted by service then by client. The
Authorizations Report without Claim Detail does not include the claims associated with
the authorizations.
The Authorizations Report as displayed in the screenshot below only requires filter
criteria for Effective Dates (Effective Dates of the authorization). The options include
Current Day, Current Week, Current Month, Current Quarter, Current Year, and Fixed
Date. If Fixed Date is chosen, then you must enter the “from” and “to” dates
(mm/dd/yyyy). Additional filter criteria include Client, Provider, Worker, Service and
Waiver.

240
September 2018 AuthentiCare® New Mexico Centennial Care
The Authorizations Report can also be sorted which means that the information
returned on the report is grouped by whatever sort selection is made. For instance if
Client is chosen, then all of the authorizations for that client are grouped together.
Below is a screenshot of the Sort options available on the Authorizations Report.
An example of the Authorizations Report:

241
September 2018 AuthentiCare® New Mexico Centennial Care
13.6.2 Authorizations Report with Claim Detail
The Authorizations Report with Claim Detail is the same as the Authorizations Report
described in Section 13.5.1; however, in addition to the authorizations, any claims
associated with those authorizations are also displayed. This report provides
information on the number of units remaining in the authorization based on the number
of units for which there are claims.
The filter and sort criteria are the same as the Authorizations Report without Claim
Detail, but you must check the Include Claim Details checkbox.

242
September 2018 AuthentiCare® New Mexico Centennial Care
13.6.3 Authorization History Report
The Authorization History Report lists both new authorizations and updated
authorizations.
New authorizations are labeled in the report as “New.”
Updated authorizations are labeled as “Update” with the “change” date and the “start
date” of the updated service. The report displays the last two records and the update so
providers can identify what changes have been made over time.
The Authorization History Report as displayed in the screenshot below has several filter
criteria. The filter criteria for Effective Dates (Effective Dates of the authorization) has
options that include Current Day, Current Week, Current Month, Current Quarter,
Current Year, and Fixed Date Range. If you select Fixed Date Range, you must specify
a “from” and “to” date (mm/dd/yyyy).
NOTE: The effective date for data in this report is September 30, 2015.

243
September 2018 AuthentiCare® New Mexico Centennial Care
An example of the Authorization History Report:

244
September 2018 AuthentiCare® New Mexico Centennial Care
13.6.4 Billing Invoice Report
The Billing Invoice report gives a list of claims for each service date, along with the
billing status and amount. With this report, providers have documented what was
submitted each day. Providers can then monitor the Remittance Advice to ensure that
each claim was adjudicated as expected.
The Billing Invoice Report as displayed in the screenshot below has several filter
criteria. Claim Type, Claim Dates, and Exception are all required when running the
report.
Select the Claim Type from All Claims, Exported Claims Only, Non-Exported Claims
Only or Specific Claim. If Specific Claim is chosen, you must supply a Claim number for
the claim on which you wish to report.
Select the Claim Dates from Current Day, Current Week, Current Month, Current
Quarter, Current Year, Last Week, Last Month, or Fixed Date Range. If you select
Fixed Date Range, you must specify a “from” and “to” date (mm/dd/yyyy).

245
September 2018 AuthentiCare® New Mexico Centennial Care
Select the Exception from the list of information and critical exceptions or choose All
Exceptions.

246
September 2018 AuthentiCare® New Mexico Centennial Care
Additional filter criteria include Client, Provider, Worker and Service.
If desired, you may also select sort criteria which include Service Date, Check In Time,
Claim Number, Client, Worker ID, Worker Name, and Service. This determines the
order of the data.
An example of the Billing Invoice Report heading:
13.6.5 Calendar Report
The Calendar Report lists all scheduled events for a selected time period. The report
can be filtered to include only events related to a particular client, worker or service.
The report can be generated by the day, by the week or by the month.
The Calendar Report as displayed in the screenshot below only requires a filter criteria
for Effective Dates which include Current Day, Current Week, Current Month, Current
Quarter, Current Year, Last Week, Last Month, or Fixed Date Range. If you select
Fixed Date Range, you must specify a “from” and “to” date (mm/dd/yyyy).

247
September 2018 AuthentiCare® New Mexico Centennial Care
Additional filter criteria include Event (to report on a specific event), Authorization (to
report on the events scheduled for a specific authorization), Client, Provider, Primary
Worker and Service.
If desired, you may also select sort criteria which include Scheduled Start, Provider,
Client, Worker, Event, Authorization, and Service.

248
September 2018 AuthentiCare® New Mexico Centennial Care
An example of the Calendar Report:
13.6.6 Claim Data Listing Report
The AuthentiCare Claim Data Listing Report gives a provider the ability to download
claims data as needed for use in the back-end systems. As with the other AuthentiCare
reports, the provider must select report criteria on the criteria pages.
The Claim Data Listing Report is a report that lists, by provider and worker, all services
performed during a given time period and the total dollars billed.
The Claim Data Listing report is also a useful tool for MCOs to get an overview of the
data specific to Stipend claims by each provider. The report will also help the MCOs in
monitoring and tracking web claims for Personal Care - Consumer Delegated (T1019),
Personal Care - Consumer Directed Visit (99509V) and Stipend (G9006U1 and
G9006U2) services.
The Claim Data Listing Report template is shown here:

249
September 2018 AuthentiCare® New Mexico Centennial Care
Both Claim Creation Dates and Receive Stipends, Yes or No, are filters on the
Claims Data Listing report template.
Services Personal Care – Consumer Delegated (T1019), Personal Care – Consumer
Directed Visit (99509V) and Stipend (G9006U1 and G9006U2) are displayed in the
body of the report in the column under Service.
The report has columns for External Worker ID for the provider-specific worker ID if
that client ID is utilized by the provider. The report also has a column for Claim Create
Date and the report can be sorted by that date.

250
September 2018 AuthentiCare® New Mexico Centennial Care
The Device ID of the worker’s mobile smart phone is both registered on the Worker
Entity Settings page and displayed in the body of the Claim Data Listing Report. The
Device ID, the Source and the Claim Note Reason for creating the claim through the
AuthentiCare web are all displayed in the body of the report as shown in the last screen
shot below.
The listing report is a very simple format with a row of column headings followed by a
list of data rows so that it is easily integrated with other back office systems.

251
September 2018 AuthentiCare® New Mexico Centennial Care
An example of the Claim Data Listing Report itself is listed here:
13.6.7 Claim Details Report
The Claim Details Report lists all claims in AuthentiCare for the time period specified.
The report can be filtered to include only certain types of claims (for example, claims
that have been exported for billing) or only claims for a particular client, worker and/or
service. It can also be sorted to display the claims in a specific order.
The Claim Details Report as displayed in the screenshot below has several filter criteria.
Claim Type, Claim Dates, and Group By are all required when running the report.

252
September 2018 AuthentiCare® New Mexico Centennial Care
Select the Claim Type from All Claims, Exported Claims Only, Non-Exported Claims
Only or Specific Claim. If Specific Claim is chosen, you must supply a Claim number for
the claim on which you wish to report.
Select the Claim Dates from Current Day, Current Week, Current Month, Current
Quarter, Current Year, Last Week, Last Month, or Fixed Date Range. If you select
Fixed Date Range, you must specify a “from” and “to” date (mm/dd/yyyy).
Select Group By so the claims listed are grouped according to your selection. The
options include Client, Provider, Exception (Client), and Exception (Provider).
Additional filter criteria include Client, Provider, Worker, Service and Waiver.
If desired, you may also select sort criteria which include Start Date, Provider, Client,
Worker, and Service. This determines the order of the data within the group selected in
Group By.
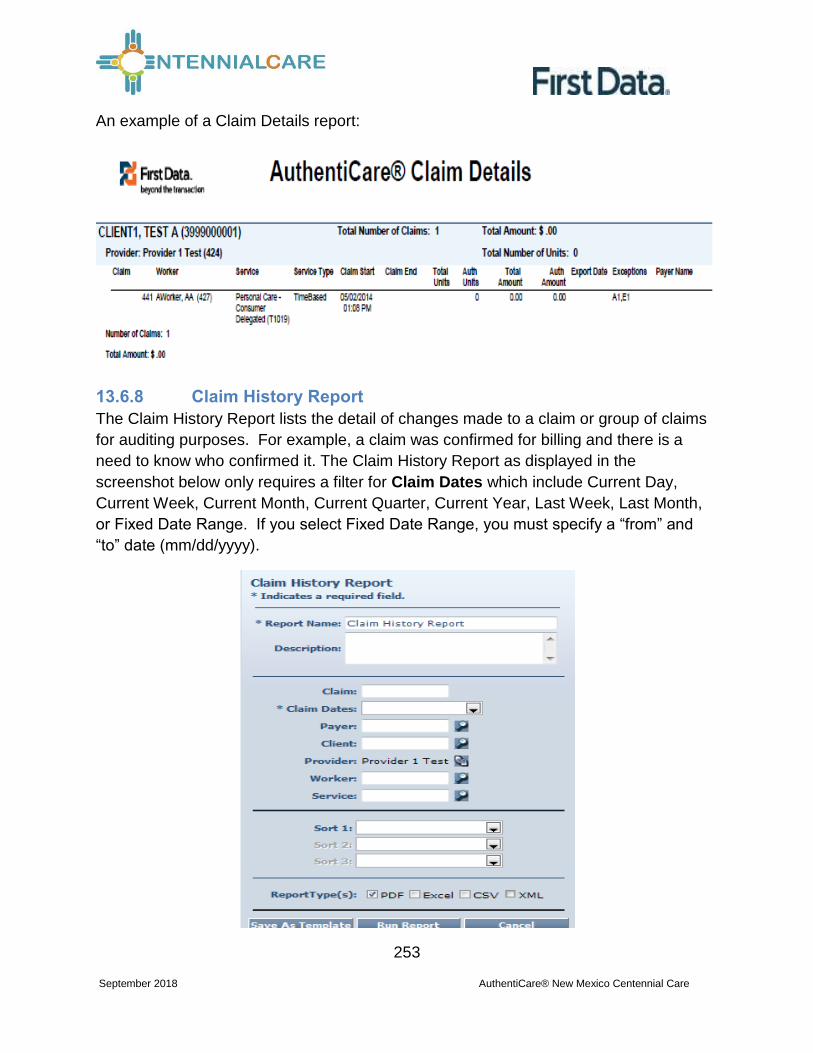
253
September 2018 AuthentiCare® New Mexico Centennial Care
An example of a Claim Details report:
13.6.8 Claim History Report
The Claim History Report lists the detail of changes made to a claim or group of claims
for auditing purposes. For example, a claim was confirmed for billing and there is a
need to know who confirmed it. The Claim History Report as displayed in the
screenshot below only requires a filter for Claim Dates which include Current Day,
Current Week, Current Month, Current Quarter, Current Year, Last Week, Last Month,
or Fixed Date Range. If you select Fixed Date Range, you must specify a “from” and
“to” date (mm/dd/yyyy).

254
September 2018 AuthentiCare® New Mexico Centennial Care
Additional filter criteria include Claim (to report on a specific claim), Client, Provider,
Worker, Service and Waiver/Program.
If desired, you may also select sort criteria which include Start Date, Provider, Client,
Worker, and Service.
An example of the Claim History Report heading:

255
September 2018 AuthentiCare® New Mexico Centennial Care
13.6.9 Eligible Client Data Listing Report
This report shows any clients that the provider has authorization to provide services for
or has claims. The report provides most of the data elements shown in the client
record. The report displays only one row for the client, with only the current payer.

256
September 2018 AuthentiCare® New Mexico Centennial Care
An example of the Eligible Client Data Listing Report:
Client Name
Client
ID SSN Gender DOB Language Status
At
Risk
Diagnosis Program
Client, Fourth 437 838234982 Male 01/01/2000 Active
Client, Third 436 234234234 Male 01/01/2000 Active
Test 1, Client 495 Female 05/01/1990 Active
13.6.10 Exception Report
Exceptions are used to readily identify claims that do not meet the business rules
established for the program. Exceptions can be informational to alert the user that a
criterion was not met, i.e. check in phone number does not match authorized, or can be
critical which prevents the claim from being exported for adjudication, i.e. no
authorization for service. The Exception Report is structured to identify exceptions for a
single client or for multiple clients with the same exception.
The Exception Report as displayed in the screenshot below has several filter criteria.
Claim Type, Claim Dates, and Exception are all required when running the report.
Select from the Exception list which exceptions you want returned in the report. Hold
down the Ctrl key to select more than one type of Exception.

257
September 2018 AuthentiCare® New Mexico Centennial Care
Select the Claim Type from All Claims, Exported Claims Only, Non-Exported Claims
Only or Specific Claim. If Specific Claim is chosen, you must supply a Claim number for
the claim on which you wish to report.
Select the Claim Dates from Current Day, Current Week, Current Month, Current
Quarter, Current Year, Last Week, Last Month, or Fixed Date Range. If you select
Fixed Date Range, you must specify a “from” and “to” date (mm/dd/yyyy).

258
September 2018 AuthentiCare® New Mexico Centennial Care
Select the Exception from the list of information and critical exceptions or choose All
Exceptions.
Additional filter criteria include Client, Provider, Worker and Service.
If desired, you may also select sort criteria which include Service Date, Check In Time,
Claim Number, Client, Worker ID, Worker Name, and Service. This determines the
order of the data.
An example of the Exception Report:

259
September 2018 AuthentiCare® New Mexico Centennial Care
Exceptions are grouped by claim number. Claim number is
equivalent to Claim ID. For the screenshot above, Claim Number
11785 has an Event Matching exception, a Billing Confirmation
exception, an EVV Not Used exception, and a Payer Review
Accepted exception.
13.6.11 Late and Missed Visits Report
The Late and Missed Visits Report lists all late and missed visits for a selected time
period. The report can be filtered to display information relating to a particular client,
worker, service or event.
The Late and Missed Visits Report as displayed in the screenshot below only requires
filter criteria for Effective Dates which include Current Day, Current Week, Current
Month, Current Quarter, Current Year, Last Week, Last Month, or Fixed Date Range. If
you select Fixed Date Range, you must specify a “from” and “to” date (mm/dd/yyyy).
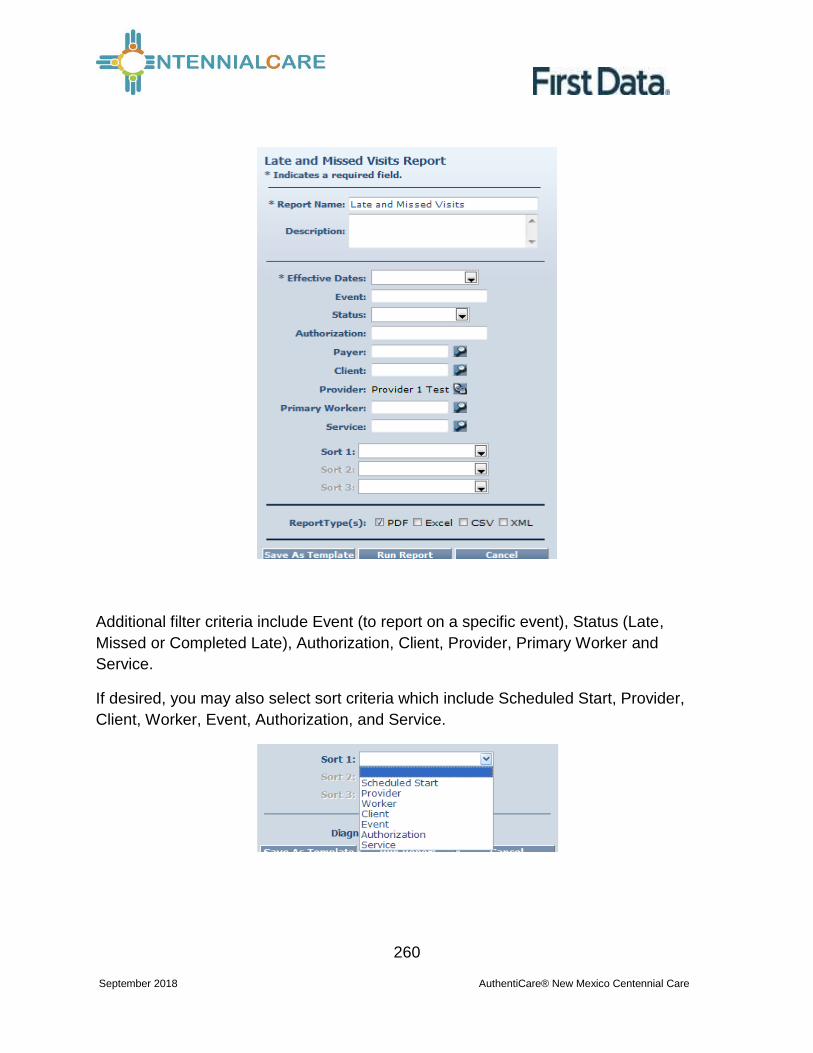
260
September 2018 AuthentiCare® New Mexico Centennial Care
Additional filter criteria include Event (to report on a specific event), Status (Late,
Missed or Completed Late), Authorization, Client, Provider, Primary Worker and
Service.
If desired, you may also select sort criteria which include Scheduled Start, Provider,
Client, Worker, Event, Authorization, and Service.

261
September 2018 AuthentiCare® New Mexico Centennial Care
An example of the Late and Missed Visits Report:
13.6.12 Overlapped Claim Report by Client
The Overlapped Claim Report by Client is useful in identifying quality concerns and/or
overpayments. Under usual circumstances, service is delivered to one client before the
worker moves on to provide services for the next client. Monitoring the Overlapped
Claim Report by client enables the user to identify clients whose care may be
compromised as well as workers that may have forgotten to check out from one service
before beginning to provide another service to the same or another client. This report is
also helpful in determining patterns for specific workers that may need targeted
training/retraining or reminders of program requirements and expectations.
The Overlapped Claim Report as displayed in the screenshot below has several filter
criteria. Claim Type and Claim Dates are required when running the report.

262
September 2018 AuthentiCare® New Mexico Centennial Care
The Overlapped Claim Report by Client as displayed in the screenshot below has
several filter criteria. Claim Type and Claim Dates are required when running the
report. Additional filter criteria include Client, Provider, Worker and Service. You may
also sort from the additional sort criteria.
13.6.13 Overlapped Claim Report by Worker
The Overlapped Time Report by Worker is useful in identifying quality concerns and/or
overpayments. Under usual circumstances, workers should complete care for one
client before moving on to provide care to another client. Monitoring the Overlapped
Claim Report enables the user to identify clients whose care may be compromised as
well as workers that may have forgotten to check out from one service before beginning
to provide another service to the same or another client. This report is also helpful in
determining patterns for specific workers that may need targeted training/retraining or
reminders of program requirements and expectations.
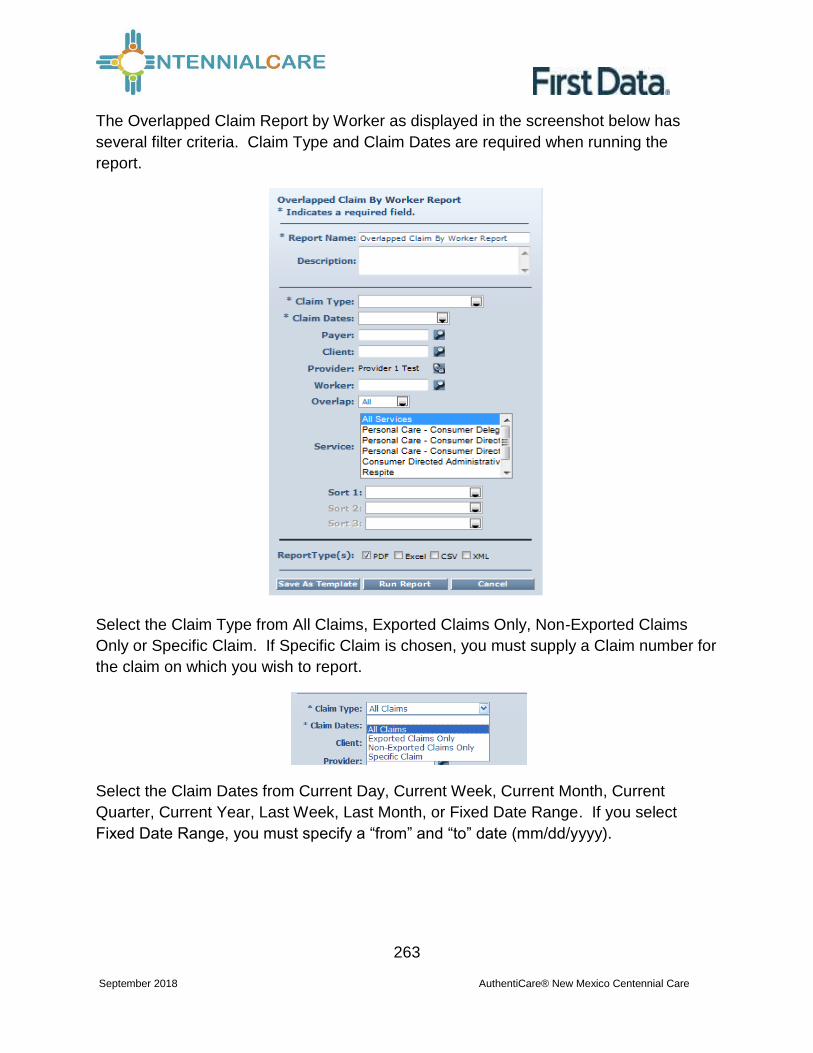
263
September 2018 AuthentiCare® New Mexico Centennial Care
The Overlapped Claim Report by Worker as displayed in the screenshot below has
several filter criteria. Claim Type and Claim Dates are required when running the
report.
Select the Claim Type from All Claims, Exported Claims Only, Non-Exported Claims
Only or Specific Claim. If Specific Claim is chosen, you must supply a Claim number for
the claim on which you wish to report.
Select the Claim Dates from Current Day, Current Week, Current Month, Current
Quarter, Current Year, Last Week, Last Month, or Fixed Date Range. If you select
Fixed Date Range, you must specify a “from” and “to” date (mm/dd/yyyy).

264
September 2018 AuthentiCare® New Mexico Centennial Care
If you wish, you may change the selection for Overlap. This automatically defaults to
“All”, but you can change it to “Clients” or “Services”.
Additional filter criteria include Client, Provider, Worker and Service.
If desired, you may also select sort criteria which include Service Date, Check In Time,
Claim Number, Client, Worker ID, Worker Name, and Service. This determines the
order of the data.
An example of the Overlapped Claim Report by Worker Report:
13.6.14 Provider Activity Report

265
September 2018 AuthentiCare® New Mexico Centennial Care
A report that lists, by worker, all services performed during a given time period and the
total dollars billed, again by worker. The Provider Activity Report is a useful tool for
State monitoring or for the providers who need to know the revenue billed by a selected
worker for a specified time period. It can be used to identify workers who report an
unusually high number of hours worked as that could be considered a risk for quality of
care issues or for providers to use to compare revenue generated by one worker over
another.
The Provider Activity Report as displayed in the screenshot below has several filter
criteria. Claim Type, Claim Dates, and Exception are required when running the report.
Select the Claim Type from All Claims, Exported Claims Only, Non-Exported Claims
Only or Specific Claim. If Specific Claim is chosen, you must supply a Claim number for
the claim on which you wish to report.

266
September 2018 AuthentiCare® New Mexico Centennial Care
Select the Claim Dates from Current Day, Current Week, Current Month, Current
Quarter, Current Year, Last Week, Last Month, or Fixed Date Range. If you select
Fixed Date Range, you must specify a “from” and “to” date (mm/dd/yyyy).
Select the Exception from the list of information and critical exceptions or choose All
Exceptions.
Additional filter criteria include Client, Provider, Worker and Service.
If desired, you may also select sort criteria which include Service Date, Check In Time,
Claim Number, Client, Worker ID, Worker Name, and Service. This determines the
order of the data.
An example of the Provider Activity Report:

267
September 2018 AuthentiCare® New Mexico Centennial Care
Current Quarter, Current Year, Last Week, Last Month, or Fixed Date Range. If you
select Fixed Date Range, you must specify a “from” and “to” date (mm/dd/yyyy).
Select Group By from Client, Payee Provider, Worker and no grouping.
Additional filter criteria include Client, Provider, Worker and Service.
If desired, you may also select sort criteria which include Service Date, Provider, Client,
Worker and Service. This determines the order of the data.

268
September 2018 AuthentiCare® New Mexico Centennial Care
13.6.15 The Remittance Advice Report:
The Remittance Advice Report as displayed in the screenshot below has filter criteria of
Payment Dates and Group By.
Select the Payment Dates from Current Day, Current Week, Current Month, Current
Quarter, Current Year, Last Week, Last Month, or Fixed Date Range.
If you select Fixed Date Range, you must specify a “from” and “to” date (mm/dd/yyyy).
Select Group By from Client, Payee Provider, Worker and no grouping.

269
September 2018 AuthentiCare® New Mexico Centennial Care
Additional filter criteria include Client, Provider, Worker and Service.
If desired, you may also select sort criteria which include Service Date, Provider, Client,
Worker and Service. This determines the order of the data.
The report has a column for external worker ID for the provider-specific worker ID if that
client ID is utilized by the provider.
An example of the AuthentiCare Remittance Advice Report heading:
13.6.16 Remittance Data Listing Report
The Remittance Data Listing Report provides remittance advice reporting on the
AuthentiCare web, so that the provider can examine paid claims, and understand check
amounts.
The Remittance Data Listing report is oriented around the Payer claim number and not
the AuthentiCare claim number, and around payment date, not claim date. The intent is
to support drill down of a payment received to the individual claims included in it. Claim
reports should still be used to research the payment status of an individual claim.

270
September 2018 AuthentiCare® New Mexico Centennial Care
The Remittance Data Listing report offers the similar sort and filter criteria as the other
provider reports, but some criteria that are not relevant are omitted. Note that the date
range selected is the Payer payment or processing date, not the date of service. The
Remittance Data Listing report is available only in Excel and CSV formats.
An example of the Remittance Data Listing Report:

271
September 2018 AuthentiCare® New Mexico Centennial Care
13.6.17 Time and Attendance Report
The Time and Attendance Report is a useful tool for the providers who need to know the
time billed by a selected worker for a specified time period. It can be used to identify
workers who report an unusually high number of hours worked as that could be
considered a risk for quality of care issues or for providers to use to compare revenue
generated by one worker with another.
The Time and Attendance Report as displayed in the screenshot below has several filter
criteria. Claim Type, Claim Dates, and Exception are all required when running the
report.

272
September 2018 AuthentiCare® New Mexico Centennial Care
Select the Claim Type from All Claims, Exported Claims Only, Non-Exported Claims
Only or Specific Claim. If Specific Claim is chosen, you must supply a Claim number for
the claim on which you wish to report.
Select the Claim Dates from Current Day, Current Week, Current Month, Current
Quarter, Current Year, Last Week, Last Month, or Fixed Date Range. If you select
Fixed Date Range, you must specify a “from” and “to” date (mm/dd/yyyy).
Additional filter criteria include Client, Provider, Worker and Service.

273
September 2018 AuthentiCare® New Mexico Centennial Care
Select the Exception from the list of information and critical exceptions or choose All
Exceptions.
If desired, you may also select sort criteria which include Service Date, Check In Time,
Claim Number, Client, Worker ID, Worker Name, and Service. This determines the
order of the data.
Additional filter criteria include Worker Start Date Range, Provider, Worker and Service.
If desired, you may also select sort criteria which include Worker Name, Worker ID,
Worker Status, and Start Date. This determines the order of the data.
An example of the Time and Attendance Report:
The report has a column for external worker ID for the provider-specific worker ID if that
client ID is utilized by the provider.
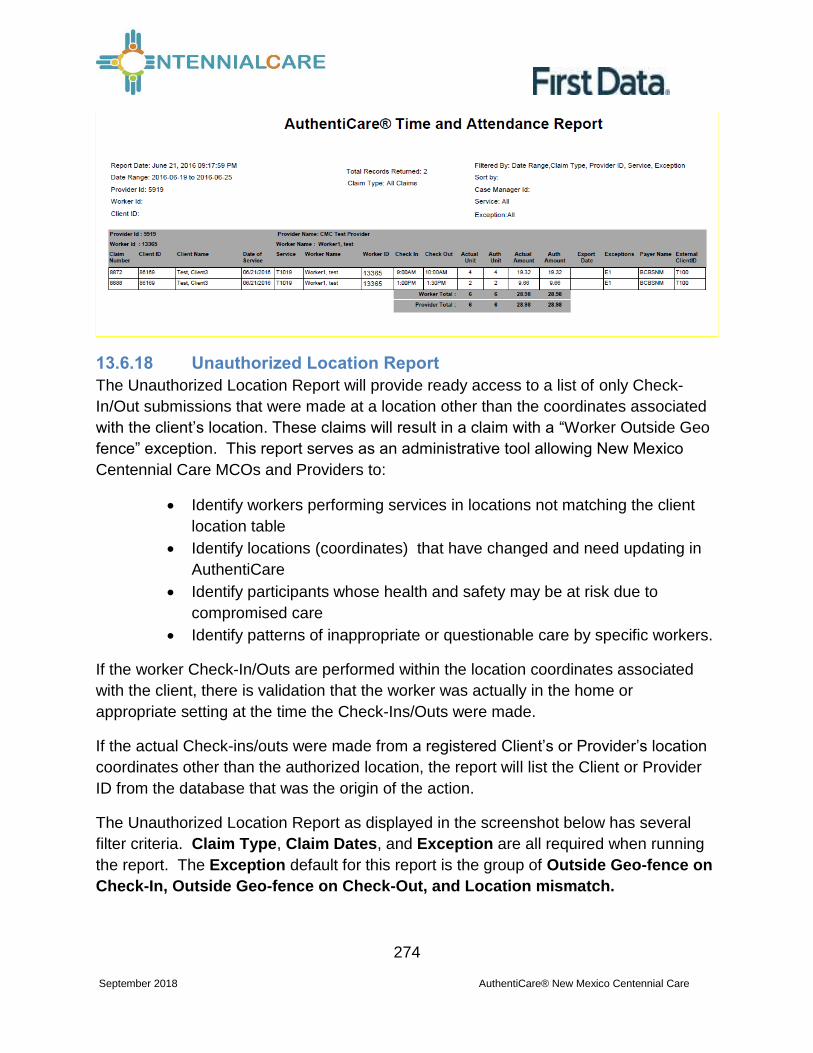
274
September 2018 AuthentiCare® New Mexico Centennial Care
13.6.18 Unauthorized Location Report
The Unauthorized Location Report will provide ready access to a list of only Check-
In/Out submissions that were made at a location other than the coordinates associated
with the client’s location. These claims will result in a claim with a “Worker Outside Geo
fence” exception. This report serves as an administrative tool allowing New Mexico
Centennial Care MCOs and Providers to:
Identify workers performing services in locations not matching the client
location table
Identify locations (coordinates) that have changed and need updating in
AuthentiCare
Identify participants whose health and safety may be at risk due to
compromised care
Identify patterns of inappropriate or questionable care by specific workers.
If the worker Check-In/Outs are performed within the location coordinates associated
with the client, there is validation that the worker was actually in the home or
appropriate setting at the time the Check-Ins/Outs were made.
If the actual Check-ins/outs were made from a registered Client’s or Provider’s location
coordinates other than the authorized location, the report will list the Client or Provider
ID from the database that was the origin of the action.
The Unauthorized Location Report as displayed in the screenshot below has several
filter criteria. Claim Type, Claim Dates, and Exception are all required when running
the report. The Exception default for this report is the group of Outside Geo-fence on
Check-In, Outside Geo-fence on Check-Out, and Location mismatch.

275
September 2018 AuthentiCare® New Mexico Centennial Care
An example of the Unauthorized Location Report:

276
September 2018 AuthentiCare® New Mexico Centennial Care
13.6.19 Unauthorized Phone Number Report
The Unauthorized Phone Number Report will provide ready access to only a list of calls
that were made from a phone other than the phone number associated with the client.
These calls result in a claim with an unauthorized phone number exception. This report
serves as an administrative tool allowing the Provider or New Mexico Centennial Care
MCO Administrative User to:
Identify workers making calls from outside the home
Identify phone numbers that have changed and need updating in AuthentiCare
The Unauthorized Phone Number Report as displayed in the screenshot below has
several filter criteria. Claim Type, Claim Dates, and Exception are all required when
running the report.

277
September 2018 AuthentiCare® New Mexico Centennial Care
Select the Claim Type from All Claims, Exported Claims Only, Non-Exported Claims
Only or Specific Claim. If Specific Claim is chosen, you must supply a Claim number for
the claim on which you wish to report.

278
September 2018 AuthentiCare® New Mexico Centennial Care
Select the Claim Dates from Current Day, Current Week, Current Month, Current
Quarter, Current Year, Last Week, Last Month, or Fixed Date Range. If you select
Fixed Date Range, you must specify a “from” and “to” date (mm/dd/yyyy).
The Exception default is a group of UnAuthPhone Check-In No Match;
UnAuthPhone Check-Out No Match; UnAuthPhone Check-In Other Match and
UnAuthPhone CheckOutOtherMatch. If you select All Claims,” all claims with
exceptions will be returned instead of just the ones with unauthorized phone number
exceptions.
Additional filter criteria include Client, Provider, Worker and Service.
If desired, you may also select sort criteria which include Service Date, Check In Time,
Claim Number, Client, Worker ID, Worker Name, and Service. This determines the
order of the data.
An example of the Unauthorized Phone Number Report:

279
September 2018 AuthentiCare® New Mexico Centennial Care
13.6.20 Worker Activity Report
This report logs only check in and check out information of worker entered data. The
report can be shared with a client’s worker because it does not have billing information,
amounts or rates involved.

280
September 2018 AuthentiCare® New Mexico Centennial Care
The Worker Activity Report as displayed in the screenshot above has several filter
criteria. Claim Type, Claim Dates, and Group By are all required when running this
report.
An example of the Worker Activity Report:
13.6.21 Worker by Provider Report
The Worker by Provider Report is used for monitoring purposes or can be used by
providers to determine workers that are currently employed to provide care. Other uses
of the report include determining worker to client ratios or validating that all workers
employed by the provider are registered in the system.
The Worker by Provider Report as displayed in the screenshot below has filter criteria of
Worker Status. Select from “All”, “Active”, or “Inactive.”

281
September 2018 AuthentiCare® New Mexico Centennial Care
An example of the AuthentiCare Workers by Provider Report:

282
September 2018 AuthentiCare® New Mexico Centennial Care
All critical exceptions are displayed in report templates that have that filter.
Each critical exception is displayed in reports that have an Exceptions column.

283
September 2018 AuthentiCare® New Mexico Centennial Care
Chapter 14 Multi-Branch Process
The Multi-Branch process was created for providers to have the ability to:
Allow providers to reassign authorizations to branch locations
Allow branch locations to view schedules specific to their location
Allow branch locations to receive late and missed visit alerts specific to their
location.
Allow the assignment office to view reports across all branch locations.
The AO_Administrator can only make a change to the Provider ID on authorizations.
Once authorizations are reassigned any associated schedules with the original Provider
ID (assignment office) are automatically updated to reflect the Provider ID of the branch
location to which it was reassigned.
A branch location can setup an email address on their Provider Entity page to receive
late and missed visits alerts.
Each branch location has its own unique Provider ID, billing profile and registered users.
First Data staff will manually create branch location Provider records and maintain the
branch location billing profile information.
If a new Assignment Office user is needed, please open a ticket with the AuthentiCare
Support Help Desk.
When an AO_Administrator logs in to AuthentiCare, the Home Page is limited to the
view shown below.

284
September 2018 AuthentiCare® New Mexico Centennial Care
14.1 To Assign an Authorization
Authorizations are assigned to the provider’s Assignment Office by the MCO. The
AO_Administrator can then:
Change the radio button to Authorization on the Services and Authorizations section
of the Home Page;
Enter the client ID and/or authorization number in the search filter;
Click Go
On the Authorizations Settings page, enter the branch location Provider ID in the
Provider ID field; and
Select “Save” to complete the authorization reassignment.

285
September 2018 AuthentiCare® New Mexico Centennial Care
14.2 To Reassign an Authorization to a Different Branch
The Branch Location office is to notify the Assignment Office of the client’s transfer from
that Branch Location to another Branch Location within the agency. The
AO_Administrator logs in to AuthentiCare, then:
Assure the radio button is on Authorization on the Services and Authorizations
section of the Home Page;
Enter the client ID and/or authorization number in the search filter;
Click Go
On the Authorizations Settings page, enter the branch location Provider ID in the
Provider ID field; and
Select “Save” to complete the authorization reassignment.
If the worker moves with the client, the new branch location within the agency will add
the worker to their branch location resulting in a new Worker ID for the worker.

286
September 2018 AuthentiCare® New Mexico Centennial Care
The previous branch location is to suspend the worker on the Worker Entity screen
unless the worker plans to work through both branches.
If the worker plans to work through both branch locations the worker is to maintain their
existing Worker ID at the previous location, and be added to the new branch location
resulting in a new (second) Worker ID for the worker.
Providers are responsible to add future workers to their appropriate branch locations.

287
September 2018 AuthentiCare® New Mexico Centennial Care
Chapter 15 Ongoing User Support and Training
By design, this User Manual can help you research any system issues that you
encounter because it fully explains all the functions you use in AuthentiCare. As with
most documents of this type, searching by topic is often the first step.
First Data User support is available:
If you are unable to solve your problem by using this manual, you can contact First Data
Client Support services at 1-800-441-4667, option 6, or by email to
[email protected] for assistance.
For training your staff, a training website and training IVR are available 24/7 and mirror
the production web and IVR.
The URL for the Training Website: https://uat.authenticare.com/nmcc/
The toll-free phone number for the Training IVR: (888) 852-7846, App. Code 567
For user support regarding authorizations, the client’s plan of care, or policies of
New Mexico Centennial Care MCOs, contact:
Blue Cross and Blue Shield of New Mexico: www.bcbsnm.com or Provider Customer Service 1-800-693-0663
Molina Healthcare of New Mexico:
Provider Inquiries or Issues: Leeann Kaminski, Provider Services Supervisor -
[email protected]; 505-348-0352
Authorization Issues and Spreadsheets: Helen Caulfield, Utilization Manager –
[email protected]; 505-348-0362
Presbyterian Health Plan:
Brittney Maldonado | Relationship Executive, Office: 505 923 5765 | Fax: 505 923 5400
Lisa Goodman | Relationship Executive, Office: 505 923 5424 | Fax: 505 923 5400
Naomi Parra | Relationship Executive, Office: 505-923-5794 | Fax: 505-923-5400
UnitedHealthcare Community Plan New Mexico: For Authorizations: 1-888-702-
2202 - United Healthcare Centennial Care - Care Coordination; for Provider
Questions/Support: [email protected]

288
September 2018 AuthentiCare® New Mexico Centennial Care
Appendix A.1: Service Codes – New Mexico Centennial Care
Service
Identifier
Service Name
T1019 Personal Care –Consumer Delegated
99509 Personal Care – Consumer Directed
S5110 Personal Care – Consumer Directed
Training
G9006 Consumer – Directed Administrative
Fee
G9012 Consumer-Directed Advertisement Fee
X9999 Supervisory Home Visit
G9006U1 Stipend Service – 100%
G9006U2 Stipend Service - 50%
Note: Providers will need to highlight both Stipend services for all workers eligible to
receive a Stipend. For an existing worker, providers will select both services from the
services list. When adding a new worker, providers will select both Stipend services
along with the other services the worker will provide.
These claims are only available for providers to submit via the web. These services are
not available on the IVR or Mobile. These services are, however, reflected in existing
reports.
There are no authorizations for Stipend Services.

289
September 2018 AuthentiCare® New Mexico Centennial Care
Appendix A.2: Activity Codes for the following services:
Personal Care – Consumer Delegated
Personal Care – Consumer Directed
IVR Phrase - Activity Activity Code
Hygiene and Grooming 1
Individual Bowel and Bladder 2
Meal Preparation and Assistance 3
Eating 4
Household Services and Support
Services
5
Supportive Mobility Assistance 6
Hauling and Heating Water 7

290
September 2018 AuthentiCare® New Mexico Centennial Care
Appendix A.3: Claim Exception Codes and Claim Status
Critical Exceptions
Claims with Critical Exceptions cannot be submitted for payment until the identified
problem has been corrected.
Code Exception Definition What do I need to do?
A1 Authorize There is no authorization in
AuthentiCare for the
service, date, client, and/or
provider.
Wait for authorization to be
provided from New Mexico
Centennial Care MCO staff.
AuthentiCare will
automatically recalculate
when a valid authorization is
entered.
A2 Authorization
Exhausted
on Claim
Indicates the authorization
was exhausted (authorized
units used up) while this
claim was being calculated.
There are not enough
authorized units to cover the
claim. If additional
authorized units are
provided by New Mexico
Centennial Care MCO staff,
the system will recalculate
and remove this exception.
If no more units are
available, the provider may
edit the claim (change the
check in or check out time)
to match the authorized
units so the claim can be
submitted for payment.

291
September 2018 AuthentiCare® New Mexico Centennial Care
Code Exception Definition What do I need to do?
A3 Authorization
Exhausted
Before Claim
All authorized units were
used before this claim was
calculated.
Contact the Case Manager
to see if additional units can
be added to the
authorization. If so, this
update will be reflected in
AuthentiCare once
approved. AuthentiCare will
automatically recalculate
once the new authorization
information is entered.
C1 Billing
Confirmation
The claim has not been
confirmed for billing.
Complete billing
confirmation. See Section
12.6 and 12.7 for
instructions.
C2 Duplicate
Claim
The claim data already
exists in the AuthentiCare
system.
As a duplicate, it cannot be
submitted for payment.
Refer to Section 12.2, claims
corrections, for the steps
needed to have this claim
deleted.
C3 Missing
Activity
Codes
The claim is for a service
that requires the selection
of an activity code but no
code was entered
Add appropriate activity
code(s).
C5 Calculate All data needed to calculate
the claim is not available.
Usually means that the
check-in time or check-out
time is missing. If an
Authorize exception occurs,
it will trigger the Calculate
exception as well.
Verify what information is
missing. If the check-in or
check-out time is missing,
see Section 12.2 for claims
correction instructions.

292
September 2018 AuthentiCare® New Mexico Centennial Care
Code Exception Definition What do I need to do?
C11 Payer
Review
Required
The provider has saved a
web-entered claim for
service T1019, 99509V,
G9006U1 or G9006U2.
Watch for the Payer to either
Accept or Deny the claim.
C12 Payer
Review
Denied
The Payer has denied a
web-entered claim for
service T1019, 99509V,
G9006U1 or G9006U2.
A Payer denied claim will
automatically inactivate in 60
days from the end date of
the claim. Providers can
inactivate a denied claim
sooner, then recreate the
information on a new claim
that can be saved and
submitted for Payer review.
R1 Extra Claim
Review
Needed
The provider has selected
the Claim Review Needed
checkbox on the Provider
Entity Settings page. The
claim is ready for its first
review.
Review the claim. Select
Save following the review.
The claim is now ready for
final confirmation.
I1 Ineligible
Provider
The provider is
designated as inactive
If you verify that this
information is correct, the
claim cannot be submitted. If
corrected information is
provided by the MCOs,
AuthentiCare will
automatically recalculate.

293
September 2018 AuthentiCare® New Mexico Centennial Care
Code Exception Definition What do I need to do?
I2 Ineligible
Worker
The worker is not eligible to
deliver services based on
his/her start- and end-
dates or
active/inactive/suspend
status.
If you verify that this
information is correct, the
claim cannot be submitted.
If the information is incorrect
and the provider corrects it,
AuthentiCare will
automatically recalculate if
the worker’s eligibility status
changes.
I4 Unenrolled
Provider
Service
The claim has been filed for
a service that this provider
does not provide.
This only occurs with claims
entered via the web if the
incorrect service is
erroneously entered. To
correct this claim exception,
either correct the service
entered for the claim or,
when the provider’s
authorized service list is
updated by New Mexico
Centennial Care MCOs,
AuthentiCare will
automatically recalculate the
claim.

294
September 2018 AuthentiCare® New Mexico Centennial Care
Informational (Non-Critical) Exceptions
Informational Exceptions or non-Critical exceptions do not prevent a claim from being
processed, i.e. there is no action required in order to confirm the claim. This
informational exception does serve as a notice of some problem associated with the
claim creation which may warrant further investigation.
Code Exception Definition What do I need to do?
C6 EVV Not
Used
A claim was created on the
Web through AuthentiCare for
T1019, 99509V, G9006U1 or
G9006U2
Place a Reason Code on
the Claim along with a
Note describing the
Reason Code.
C13 Payer
Review
Accepted
A web-entered claim was
approved by a Payer for
service T1019, 99509V,
G9006U1 or G9006U2.
The claim is now ready for
your review and
confirmation for export.
E1 Event
Matching
The does not match an event
scheduled in the system.
No action required. You
cannot enter an event for
a date in the past.
G1 Unauthorized
phone
number – No
Match –
Check in
The claim was filed by
checking in from a phone
number that does not match
the phone number on record
for the client.
No action required. You
may want to check with
the worker to understand
why the client’s phone
was not used. Double
check the client’s phone
number to make sure it is
correct.
G2 Unauthorized
phone
number – No
match –
Check Out
The claim was filed by
checking out from a phone
number that does not match
the phone number on record
for the client.
No action required. You
may want to check with
the worker to understand
why the client’s phone
was not used. Double
check the client’s phone
number to make sure it is
correct.

295
September 2018 AuthentiCare® New Mexico Centennial Care
Code Exception Definition What do I need to do?
G3 Unauthorized
phone
number –
Other Match
– Check in
The claim was filed by
checking in from a phone
number that exists in the
system, but isn’t the phone
number on record for the client
named in the claim.
No action required. You
may want to check with
the worker to understand
why the client’s phone
was not used. You may
also want to see what
other phone number in
AuthentiCare this
matches (such as another
client’s home). Double
check the client’s phone
number to make sure it is
correct.
G4 Unauthorized
phone
number –
Other Match
– Check out
The claim was filed by
checking out from a phone
number that exists in the
system, but isn’t the phone
number on record for the client
for which the claim is being
filed.
No action required. You
may want to check with
the worker to understand
why the client’s phone
was not used. You may
also want to see what
other phone number in
AuthentiCare this
matches (such as another
client’s home). Double
check the client’s phone
number to make sure it is
correct.
I5 Unenrolled
Worker
Service
The claim is for a service the
worker is not authorized to
provide.
No action required. Verify
that the service on the
claim is correct. If it is,
then verify the services
entered for the worker on
the Worker page and
modify as needed. Refer
to Section 6.3 for further
information.

296
September 2018 AuthentiCare® New Mexico Centennial Care
Code Exception Definition What do I need to do?
L1 Location
Mismatch –
Check In
The check in location does not
match the client’s location.
No action required. Verify
that the location where
the check-in occurred is
the client’s location. If it
is, then verify the client’s
location has changed.
Refer to Section 11 for
further information.
L2 Location
Mismatch –
Check Out
The check-out location does
not match the client’s location.
No action required. Verify
that the location where
the check-out occurred is
the client’s location. If it
is, then verify the client’s
check-out location has
changed. Refer to section
11 for further information.
Q1 No QR card
available
This identifies a claim where
QR code scan was required,
but it was indicated that there
was no card available.
No action required. Verify
that a QR card has been
delivered to the client so
that the QR card can be
scanned for subsequent
claims.
Q2 QR card
scanned by
invalid or
expired
This identifies a claim where
QR code scan occurred, but
the card is either invalid or
expired.
No action required. Verify
the need for a QR card
and if needed, order a
new QR card for the
client.
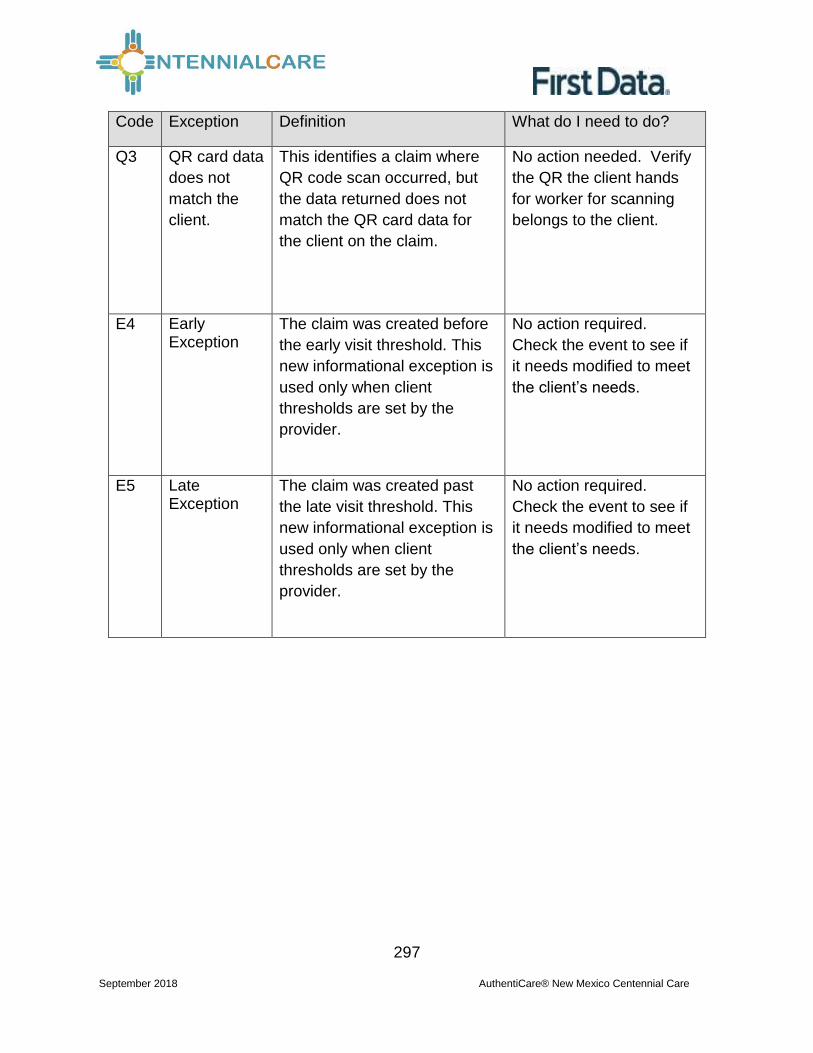
297
September 2018 AuthentiCare® New Mexico Centennial Care
Code Exception Definition What do I need to do?
Q3 QR card data
does not
match the
client.
This identifies a claim where
QR code scan occurred, but
the data returned does not
match the QR card data for
the client on the claim.
No action needed. Verify
the QR the client hands
for worker for scanning
belongs to the client.
E4 Early Exception
The claim was created before
the early visit threshold. This
new informational exception is
used only when client
thresholds are set by the
provider.
No action required.
Check the event to see if
it needs modified to meet
the client’s needs.
E5 Late Exception
The claim was created past
the late visit threshold. This
new informational exception is
used only when client
thresholds are set by the
provider.
No action required.
Check the event to see if
it needs modified to meet
the client’s needs.

298
September 2018 AuthentiCare® New Mexico Centennial Care
Claim Status:
CLAIM
STATUS
DEFINITION WHAT DO I NEED TO DO?
Dirty When a claim is completed, the
system immediately places the
claim in “dirty” status which
queues the claim for an
immediate run through the
workflow. This happens
instantaneously as the check-out
is completed, so users might
only occasionally see “Dirty”
status on claims.
There is no follow-up from the
provider needed until
exceptions are assigned to
claims. Then the appropriate
claims follow-up to resolve
the exceptions should be
completed.
Recheck Nightly all claims that potentially
could be updated from Critical
Exception to Informational
Exception, or to no exceptions,
are placed in recheck
status. The “autoupdate” (spider
agent) process runs claims back
through the workflow, and then
updates each of those claims to
its appropriate status.
There is no follow-up from the
provider needed until
exceptions are assigned to
claims. Then the appropriate
claims follow-up to resolve
the exceptions should be
completed.

299
September 2018 AuthentiCare® New Mexico Centennial Care
Appendix A.4: Description of Provider Roles
Each provider has a broad Administrator role but there are other relevant roles that can
be assigned to staff members with specific functions related to AuthentiCare and their
day-to-day responsibilities.
Name Rights
AO_Administrator Rights to administer multi-branch functionality. Limited to
authorization reassignment and reporting view across all
branch locations. First Data assigns a log in and initial
password for each AO_Administrator.
NM_Administrator Rights to do all functions for that provider except those
functions restricted to First Data (add, edit, delete services;
add/edit/delete authorizations and delete providers). Can
view the Provider and Worker Dashboards.
[NOTE: First Data assigns a log in and initial password for
the first Administrator for the provider who can then
add/manage other users (including other administrators)]
NM_AdminAssistant Rights to do all function Administrator can do except the
ability to add/edit registrations.
NM_Payroll/Billing Activities associated with billing and using AuthentiCare
information for employee payroll. Includes adding, editing,
deleting claims as well as confirm billing. This role has
primary responsibility for resolving claims with critical
exceptions. Can view the Provider and Worker
Dashboards.
NM_Human
Resources
Activities associated with managing workers – adding,
editing, and deleting workers and the Worker by Provider
Report.
NM_Payroll/Billing/
HumanResources
Combination of Payroll/ Billing and Human Resources roles
which may be more appropriate for smaller providers
NM_Scheduler/
Coordinator
Activities necessary to schedule visits for clients. Includes
view and search of clients, workers, authorizations and
services as these are needed to accomplish the tasks.
This role will acknowledge missed visits and run Late and

300
September 2018 AuthentiCare® New Mexico Centennial Care
Name Rights
Missed Visit and Provider Activity Reports. This role can
also view the Worker Dashboard.
NM_Claims Mgt 1 Can add, edit and delete claims
NM_Claims Mgt 2 Can add, edit, delete and confirm claims for submission for
payment.
NM_Intake &
Referral
Ability to edit client information

301
September 2018 AuthentiCare® New Mexico Centennial Care
Appendix A.5: Service Play Back Order on the IVR
Service Name IVR Number to Press
Personal Care – Consumer Delegated 1
Personal Care – Consumer Directed 2
Personal Care – Consumer Directed
Training
3
Supervisory Home Visit 4
Note: The IVR plays back the service(s) authorized for the client plus Supervisory
Home Visit. All workers will hear Supervisory Home Visit as the last choice. If a client
does not have current authorizations for any of the first three services, the worker will
hear only Supervisory Home Visit.
Workers should listen to the entire prompt as the playback order may change
depending on the current authorization(s) available for a client.