autodesk revit 2015 answer key - files.stem101.org teacher answer key.pdf · revit answer key . 3 ....
TRANSCRIPT
Autodesk Revit 2015 Answer Key

REVIT ANSWER KEY 2
Chapter 1 Lesson 1: What is Revit?
1. What is Autodesk Revit?
Revit is a software for architects that allows them to design a building in 2D and 3D, and annotate 2D drafting plans.
2. What does BIM stand for?
BIM stands for “building information modeling.” It is a technique of modeling a structure with all of it’s elements and utilities. The advantage of a BIM models is that it allows for creative designing, fast modifications, and better communication. BIM allows contractors to plan where their systems will be placed and sized correctly before they even get to the job site.

REVIT ANSWER KEY 3
Chapter 1 Lesson 2: User Interface and Navigation Lecture Fill in the boxes and record more detail information about each area of the User Interface on the next page.
Give a brief explanation of the steering wheel tools: Zoom Zooms in and out of the view Orbit Rotates the screen in 3D Pan Slides the view up/down/left/right Rewind Allows the user to select from previous views of the screen Center Allows the user to select a point to center on the screen Walk Acts like a zoom and pan in a camera view Look Moves the view like the turning of your head Up/Down Changes the elevation of the view on the Z axis
Application Menu
Elevation Symbol
Navigation
Ribbon
Project Browser
Properties
Status Bar View Control
Quick Access ToolbarOptions Bar

REVIT ANSWER KEY 4
Label each icon and give a brief description of what it is used for:Scale of view: Changes the size of the view
Detail Level: Allows the user to see either simplified views of the object or very detailed (individual components of a wall.) Visual Style: Allows the user to switch between shaded/wireframe/hidden line views. Sun Path: Shows the path the sun will take around the structure. Shadows: Adds shadows relative to specified time of day/year. Rendering: Quick access to the rendering dialog box.
Crop View: Allows the user to show less or more of the structure. Show Crop Region: Displays the rectangle that controls where the view will be cropped. Lock/Unlock 3D View: Locks the view so the user can only pan and zoom. Temporary Hide/Isolate: Temporarily turns off elements within the view. Reveal Hidden Elements: Shows elements that were hidden within the view. Temporary View Properties: Temporarily changes view settings without messing up the entire projects view settings. Show Analytical Model: Shows where loads and stresses are placed on the structure. Highlight Displacement Sets: Components that were moved in the exploded view are highlighted.

REVIT ANSWER KEY 5
User Interface Describe the main functions of the following items
1. List the tabs across the top of the ribbon.
a. Architecture d. Annotate g. Collaborate j. Add-insb. Structure e. Analyze h. View k. Modifyc. Insert f. Massing & Site I. Manage
2. Project Browser:
The Project Browser allows the user to navigate to the different floor plans, views, and models in Revit.
3. Properties Box:
The Properties Box allows the user to change the type, size, color, etc. of elements in Revit.
4. Navigation Bar:
The Navigation Bar contains tools like zoom and pan.
5. Options Bar:
The Options Bar will appear when a tool is selected. Each tool may have unique options like “multiple” or base and top constraints.
6. Elevation Symbols:
The Elevation symbols deal with how the structure’s elevations look like. The location of the symbol relates to where a person would be standing and how far the person can see.
REVIT ANSWER KEY 6
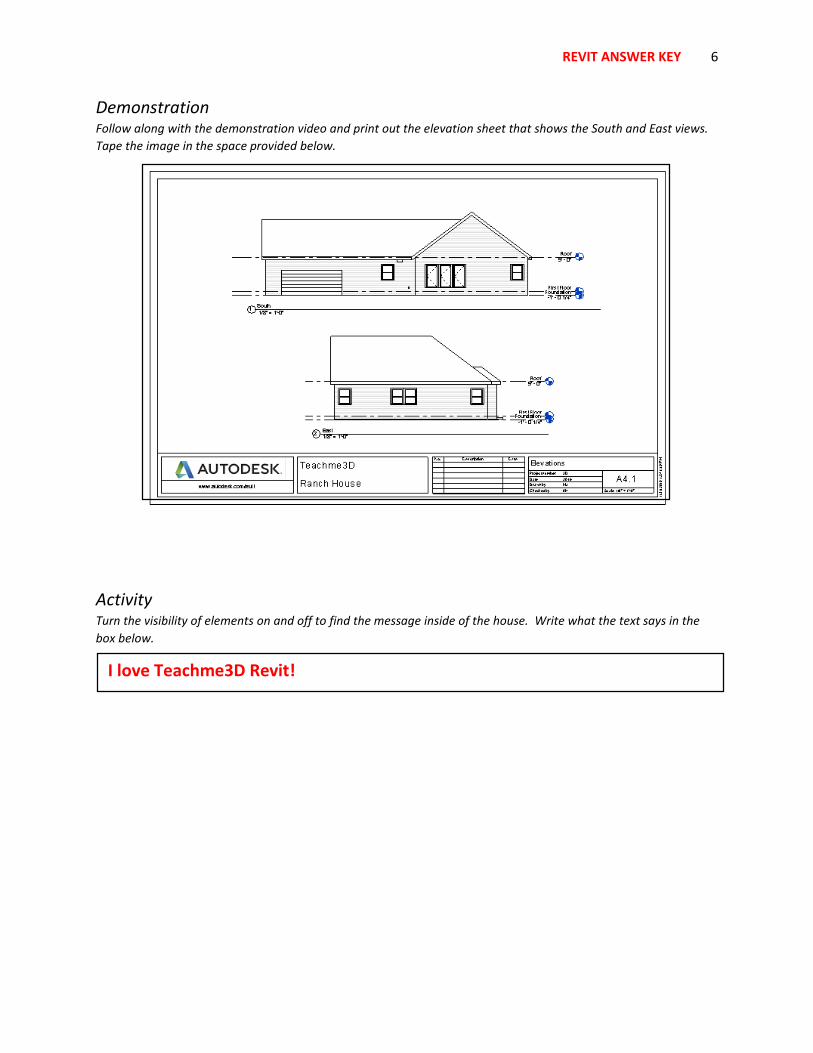
DemonstrationFollow along with the demonstration video and print out the elevation sheet that shows the South and East views. Tape the image in the space provided below.
Activity Turn the visibility of elements on and off to find the message inside of the house. Write what the text says in the box below.
I love Teachme3D Revit!

REVIT ANSWER KEY
Chapter 2 Lesson 1: Walls
1. Why is it important to start a Revit Project using the correct template?Each template has preloaded elements unique to that style of structure.For example, a residential project template will have elements like wallswith siding, kitchen cabinets, and even furniture.
2. What are the 4 different types of templates in Revit?a. Residential
b. Commercial
c. Construction
d. Architectural/Default
3. After you’ve started a project, what could be the first thing you checkbefore starting your model?Level height in the elevation view.
4. It’s a good idea to check a _wall’s top constraint__ before starting a wall.
5. While not absolutely necessary, it will speed up your workflow to drawexterior walls clockwise/counterclockwise.
6. What does this symbol allow the Revit user to do quickly?
This symbol allows the user to “flip” things like walls, doors,windows and stairs.

REVIT ANSWER KEY
7. Label each layer of the wall section.a. _Siding__________________
b. _Plywood Sheathing_______
c. _Wood Stud/2 x 6______________
d. _Vapor Retarder___________
e. _Drywall/Gypsum__________
8. Revit sees units in _feet_ unless otherwise annotated.
9. Adjust the _witness lines___ before changing a dimension.
10. The element that is __selected____ will move when the dimension ischanged.
a.
e.
c.
b. d.
Exterior of wall Interior of wall

REVIT ANSWER KEY
11. Label and describe what the following Modify tools are used for:
Align Aligns one or more elements with a selected element.
Offset Copies or moves a selected element a specified distance perpendicular to its length.
Mirror – Pick Axis
Reverses the position of selected elements, using an existing line or edge as the mirror line.
Mirror – Draw Axis
Draws a temporary line to use as an axis for mirroring.
Move Moves selected elements to the specified location in the current view.
Copy Copies selected elements and places them in the specified location in the current view.
Rotate Rotates selected elements around an axis.
Trim/Extend to Corner
Trims or extends elements to form a corner.
Split Element Cuts an element at a selected point, or removes a segment between 2 points.
Split with Gap Splits a wall into 2 separate walls with a defined gap between them.
Array Creates a linear or radial array of selected elements. Scale Resizes the selected item. Trim/Extend Single Element
Trims or extends one element to a boundary defined by another element.
Trim/Extend Multiple Elements
Trims or extends multiple elements to a boundary defined by another element.
Unpin Unlocks a model element so it can move. Pin Locks a model element in place. Delete Removes selected elements from the building model.

REVIT ANSWER KEY
DemonstrationFollow along with the demonstration video and print out the floor plan at 50%. Tape the image in the space provided below.

REVIT ANSWER KEY
Activity Start a new Residential Project and draw the first floor of the Activity House below. Leave the level heights as 9’-0”. Print out the floor plan at 50% and turn in with this chapter worksheet.
REVIT ANSWER KEY
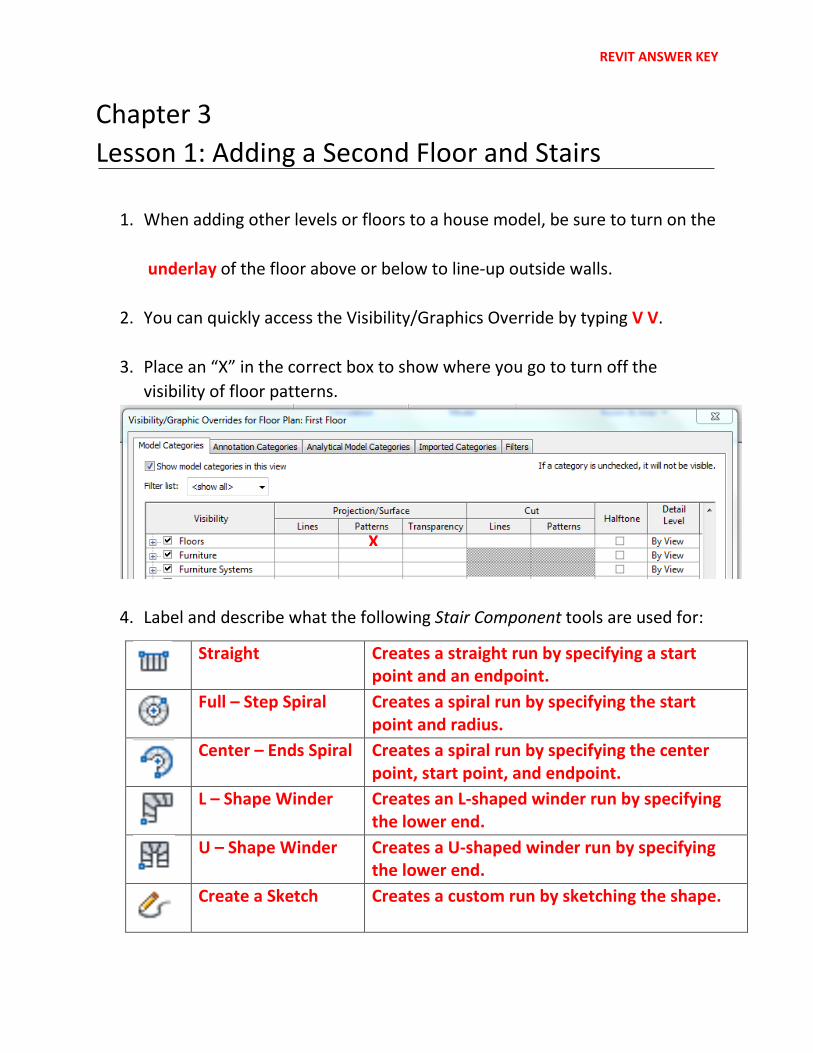
Chapter 3 Lesson 1: Adding a Second Floor and Stairs
1. When adding other levels or floors to a house model, be sure to turn on the
underlay of the floor above or below to line-up outside walls.
2. You can quickly access the Visibility/Graphics Override by typing V V.
3. Place an “X” in the correct box to show where you go to turn off thevisibility of floor patterns.
4. Label and describe what the following Stair Component tools are used for:
Straight Creates a straight run by specifying a start point and an endpoint.
Full – Step Spiral Creates a spiral run by specifying the start point and radius.
Center – Ends Spiral Creates a spiral run by specifying the center point, start point, and endpoint.
L – Shape Winder Creates an L-shaped winder run by specifying the lower end.
U – Shape Winder Creates a U-shaped winder run by specifying the lower end.
Create a Sketch Creates a custom run by sketching the shape.
X
REVIT ANSWER KEY
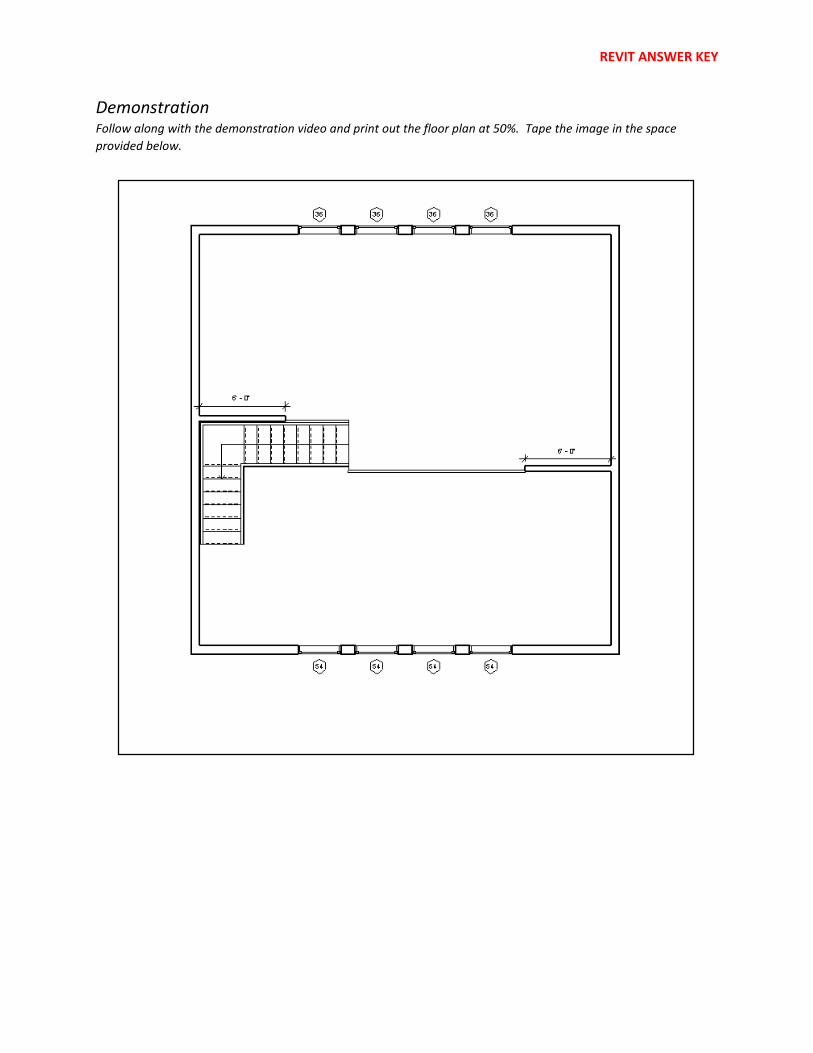
DemonstrationFollow along with the demonstration video and print out the floor plan at 50%. Tape the image in the space provided below.
REVIT ANSWER KEY
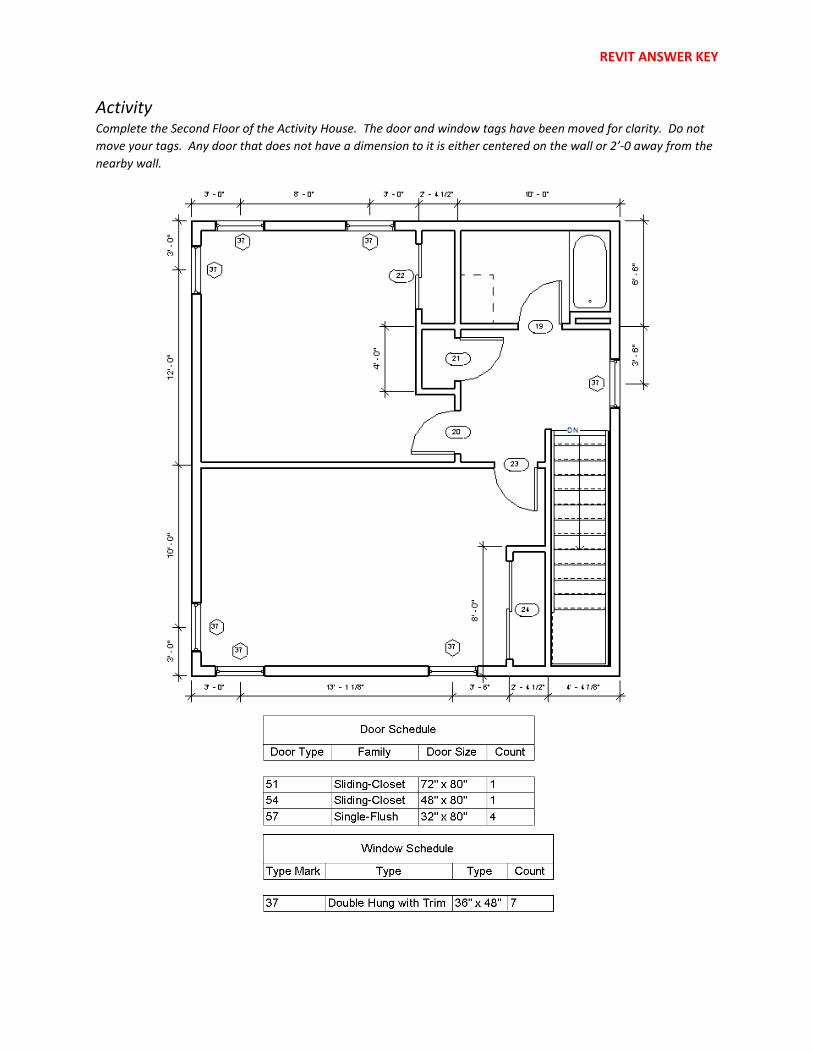
Activity Complete the Second Floor of the Activity House. The door and window tags have been moved for clarity. Do not move your tags. Any door that does not have a dimension to it is either centered on the wall or 2’-0 away from the nearby wall.

REVIT ANSWER KEY
Chapter 3 Lesson 2: Roofs
1. What are the 3 fastest roof styles you can create in Revit?
a. Hip
b. Gable
c. Shed
2. What the three ways to create a roof in Revit?
a. Roof by Footprint
b. Roof by Extrusion
c. Roof by Face
3. What does mean when creating a roof?
When this is checked, the roof will slope to this wall. When it is not checked, the wall extends up to the roof to create a gable end.
4. In the roof command, what does the triangle mean?
It is the symbol for slope.
5. In the roof command, what does 9”/12” mean?
The 9” represents the rise of the roof, the 12” represents the run. For every 12” of horizontal distance there is 9” of rise.

REVIT ANSWER KEY
6. Describe what the following tools do:This command will attach a wall’s top or base to things like a roof or floor.
This command will detach a wall’s top or base from roofs and floors.
This command joins geometry into one shape.
This command will extend a roof to meet another roof.
DemonstrationFollow along with the demonstration video. Take a screenshot of the Demo House in 3D and tape to your workbook.

REVIT ANSWER KEY
Activity Open your Activity House and place a gable style roof on the roof level. Print out per your instructor’s direction.
REVIT ANSWER KEY
Chapter 3 Lesson 3: Foundations/Footings
1. Any level’s distance below the first floor is seen as a negativemeasurement.
2. Why is it a good idea to place and lock dimensions between the levels?
This allows the user to move the elevation of levels up and down but maintain the spacing between levels with the locked dimension.
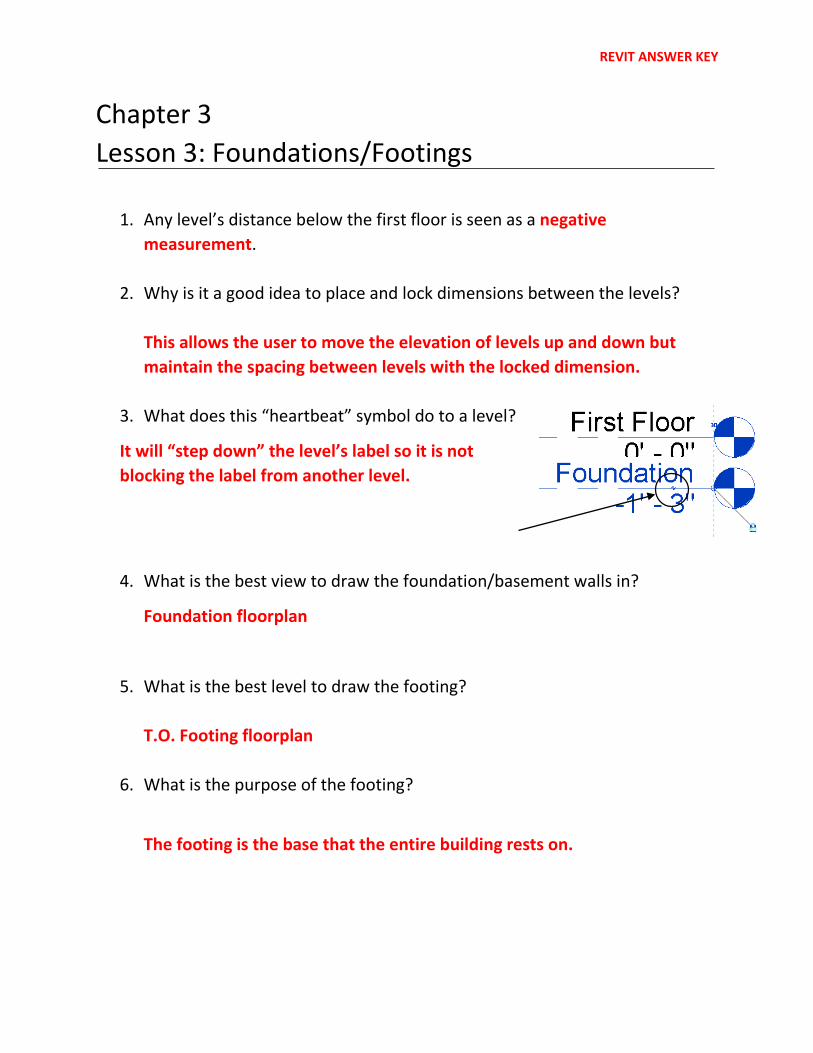
3. What does this “heartbeat” symbol do to a level?
It will “step down” the level’s label so it is not blocking the label from another level.
4. What is the best view to draw the foundation/basement walls in?
Foundation floorplan
5. What is the best level to draw the footing?
T.O. Footing floorplan
6. What is the purpose of the footing?
The footing is the base that the entire building rests on.
REVIT ANSWER KEY
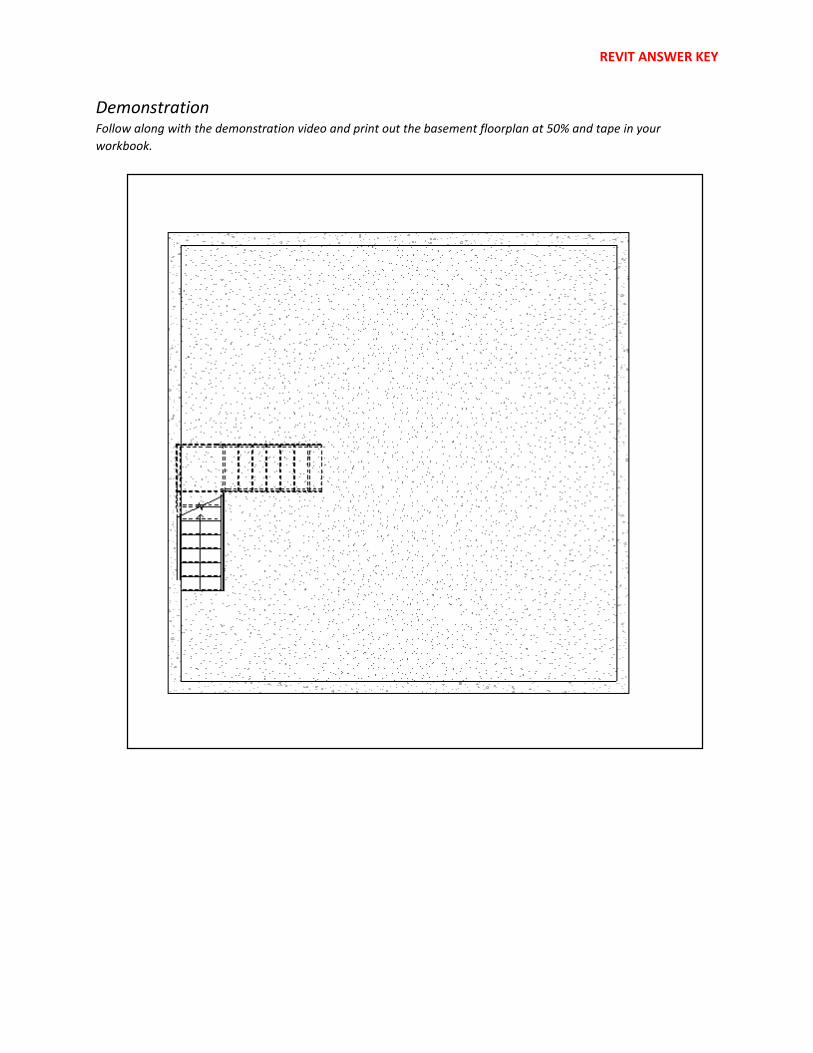
DemonstrationFollow along with the demonstration video and print out the basement floorplan at 50% and tape in your workbook.
REVIT ANSWER KEY
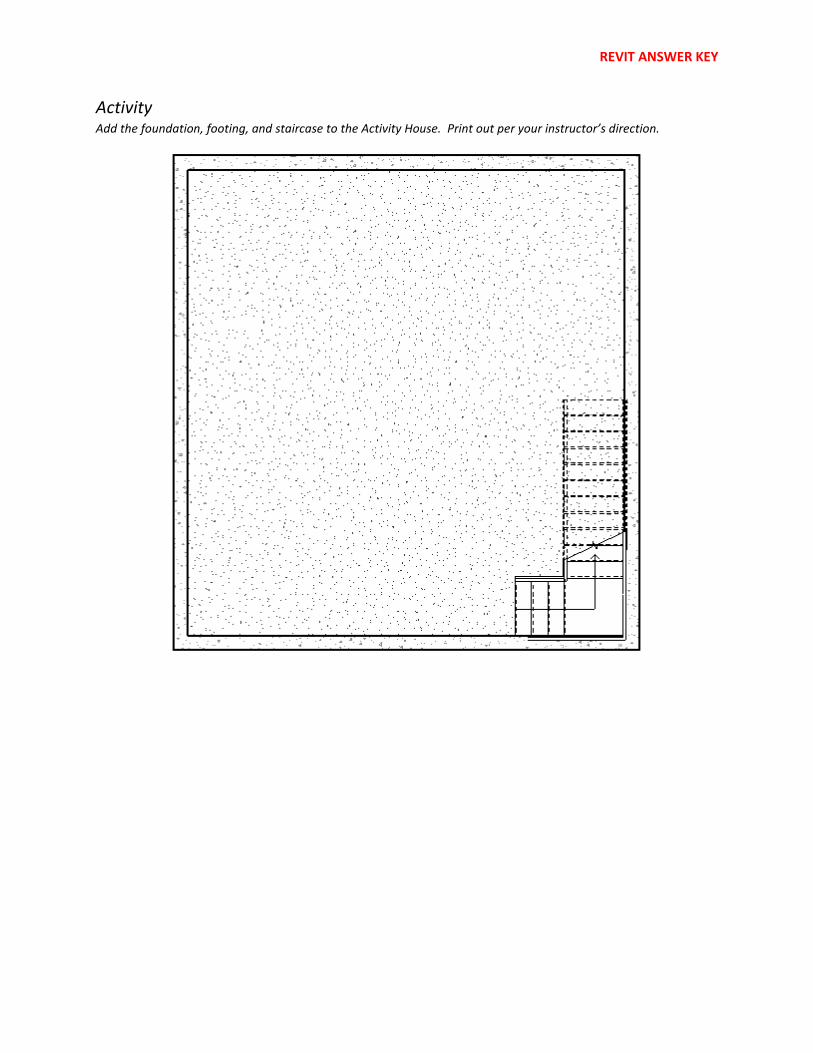
Activity Add the foundation, footing, and staircase to the Activity House. Print out per your instructor’s direction.

REVIT ANSWER KEY
Chapter 4 Lesson 1: Kitchens and Bathrooms
1. When placing items in Revit, hitting the space bar will rotate the items by90 degree increments.
2. Label each of the components typically found in a kitchen:
Kitchen Sink
Refrigerator
Dishwasher
Range (Stove)
Base Cabinet
Upper Cabinet
3. What is the purpose of using a Section View?
It allows the user to see an elevation anywhere they choose.
4. Describe each component of the section view symbol.
a. Section head
b. View range
c. Section tail
d. Changes style of Section head
e. Changes Section tail
a.
b.
c.
d. e.

REVIT ANSWER KEY
DemonstrationFollow along with the demonstration video and print out the floor plan at 50%. Tape the image in the space provided below.

REVIT ANSWER KEY
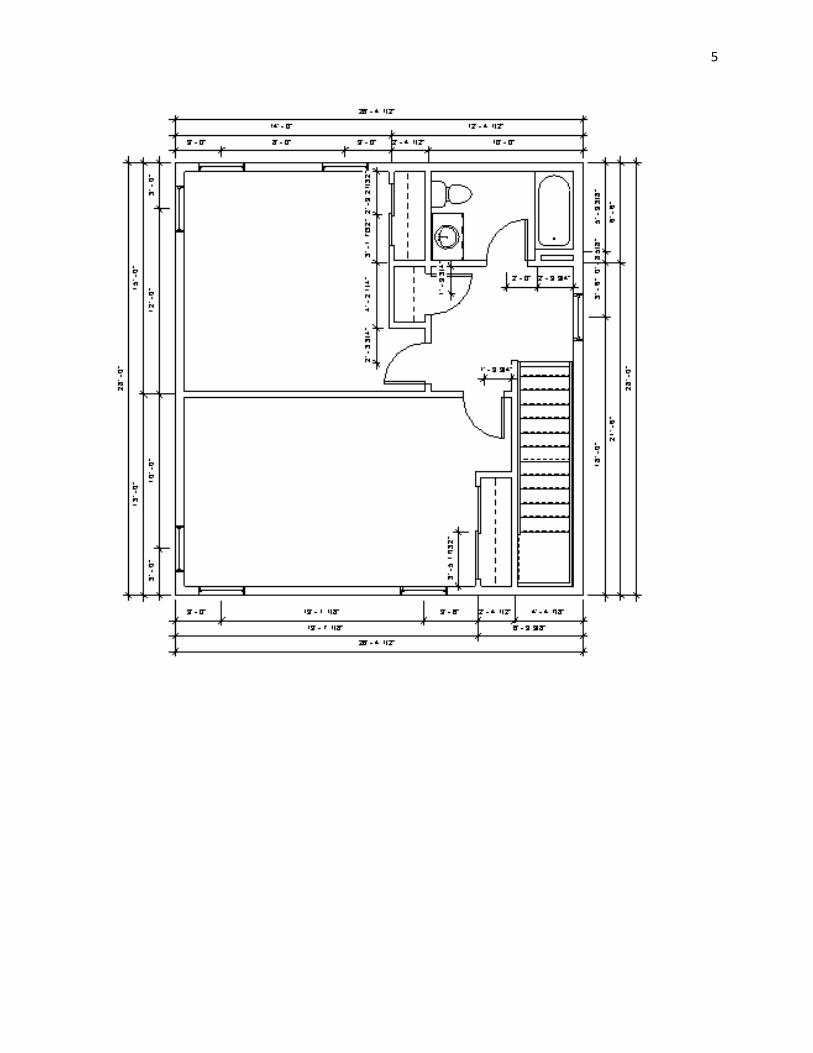
Activity Complete the kitchen, first floor bathroom, and upstairs bathroom. Print out at 50% and turn in to your instructor.
Upstairs Bathroom
First Floor Kitchen & Bathroom
Dishwasher

REVIT ANSWER KEY
Chapter 4 Lesson 2: Adding Components
1. Why is it a good idea to place furniture and other components in yourfloorplans?
It’s a good way to judge how big a room is or a space’s dimensions.
2. Label each of the symbols below:
Washer (Clothes)
Dryer
Queen Bed
Sofa
Table
Chair
Closet Rod and Shelf
3. How do you add components/doors/windows/etc. that are not preloadedinto the project template?
Go to the appropriate tool and click “Load Family.”

REVIT ANSWER KEY
DemonstrationFollow along with the demonstration video. Take a screenshot of the First Floor of the Demo House.

REVIT ANSWER KEY
Activity Open your Activity House and place SIMILAR furniture in the various roomsl. Print out per your instructor’s direction.

REVIT ANSWER KEY
Chapter 5 Lesson 1: Electrical Plans & Ceilings
1. Why is the electrical plan grayed out?
It makes it easier to see the electrical components.
2. Label each of the components typically found in an electrical plan:
Switch – Single
Switch – 3 Way
Outlet - Duplex Single
Outlet - Duplex Range
Outlet – GFI (Ground Fault Interrupter)
Downlight – Recessed Can
3. What is a reason why the Automatic Ceiling tool doesn’t work?
The walls are not extended up to the floor above.
4. To create a vaulted ceiling you have to use the Slope Arrow and adjust theLevel at Tail and Level at Head.
5. After setting up the Revit sheets you will connect the light switches to lightsusing hidden line arcs called switch legs.
DemonstrationFollow along with the demonstration video and print out the floor plan at 50%. Tape the image in the space provided below.

REVIT ANSWER KEY
Activity Complete the first and second floor electrical plans. Print out at 50% and turn in to your instructor.

REVIT ANSWER KEY
REVIT ANSWER KEY
Chapter 5 Lesson 2: Wall Section/Kitchen Elevations
1. What is the purpose of a section view?
It allows us to see what components make up the wall/floor/etc.
2. It’s easiest to pull the siding down in elevation views.
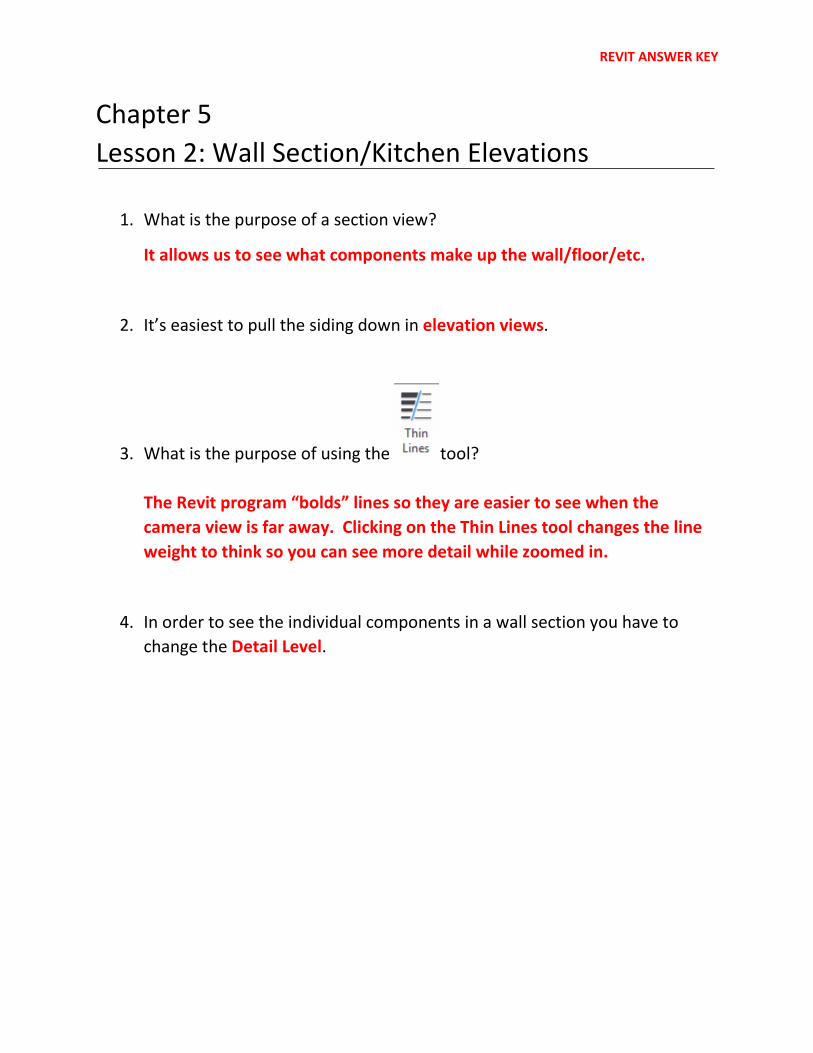
3. What is the purpose of using the tool?
The Revit program “bolds” lines so they are easier to see when the camera view is far away. Clicking on the Thin Lines tool changes the line weight to think so you can see more detail while zoomed in.
4. In order to see the individual components in a wall section you have tochange the Detail Level.

REVIT ANSWER KEY
DemonstrationFollow along with the demonstration video. Take a screenshot of the First Floor of the Demo House.

REVIT ANSWER KEY
Activity Open your Activity House and create a wall section with appropriate labels. Watch the Demo video again if needed. Print out per your instructor’s direction.

REVIT ANSWER KEY
Chapter 5 Lesson 3: Adding Topography and Outside Elements
1. Why may we want to create the site in a separate file from the mainstructure?
In every view of the house file you may have to turn the visibility oftopography and plantings.
2. Describe what each tool does:Creates the land the structure sits on.
Places elements like trees, shrubs, lights, etc.
Places elements related to parking lots.
Creates a cavity in the topography surface. Commonly used for a basement.
Splits the topographical surface into 2 separate entities. Commonly used to “trim” the topography.
Merges split surfaces back together.
Places a separate region on the topographical surface.
Created in the site plan view. Establishes the site’s property lines by sketch or typing in distances in a table.
Shows changes to the site during the construction process.

REVIT ANSWER KEY
3. Describe what these Material tools are used for:Opens User Defined Libraries Creates and Duplicates materials Opens the Asset Browser
4. By checking Use Render Appearance your material color will look more likethe finished color while still in the Shaded view style.
5. Using this tool is a great way to create driveways, sidewalks, and patios.
Sub Region
6. What are the two ways to create Property lines on a site plan?
a. Create by entering distances and bearings
b. Create by sketching
7. What three things should be annotated on a site plan?
a. Property lines/tags
b. North Symbol
c. Setbacks

REVIT ANSWER KEY
DemonstrationFollow along with the demonstration video. When finished take a screenshot of the Site Plan. Print out at 50% and tape the image into your workbook. (The position of the trees/property lines/sub regions/setbacks do not have match the Demo video)
REVIT ANSWER KEY
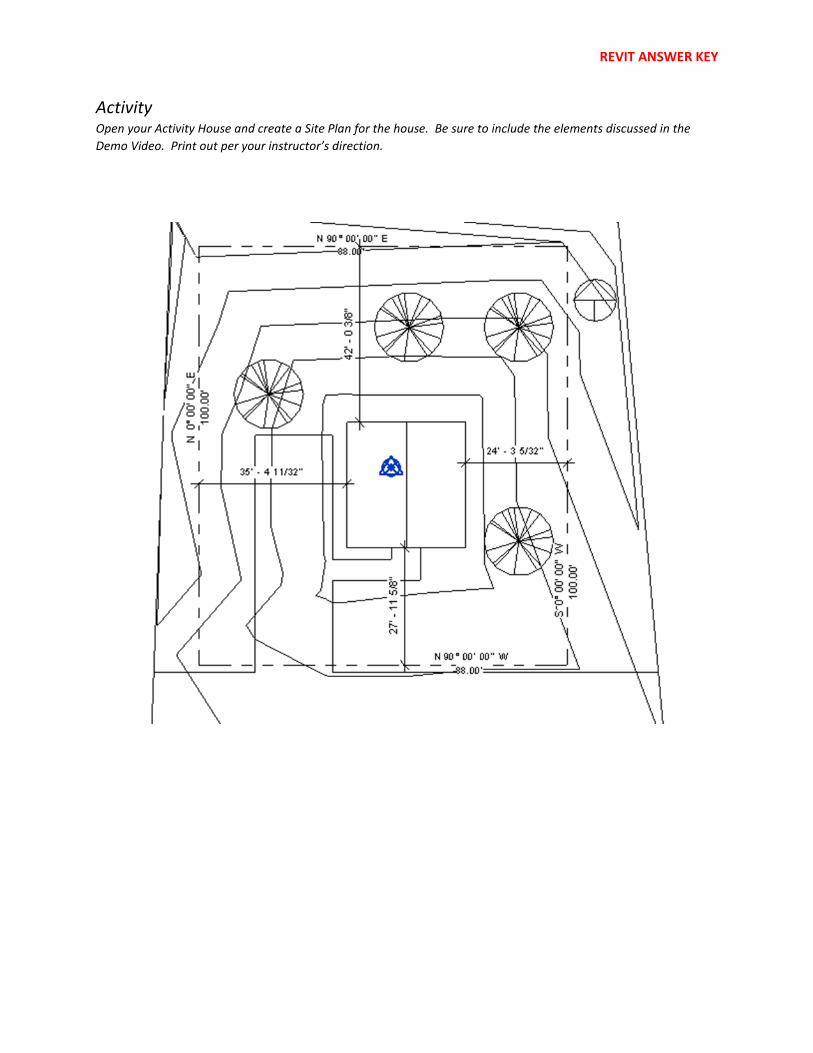
Activity Open your Activity House and create a Site Plan for the house. Be sure to include the elements discussed in the Demo Video. Print out per your instructor’s direction.

Chapter 6 Lesson 1: Dimension Plans
1. The first step in creating a dimensioned floor plan is to duplicate thefloor plan you are planning to dimension.
2. Describe what each of the following tools does:
Duplicates only the model elements, without annotation symbols, dimensions, tags. Duplicates model elements and annotations.
Primary and duplicate view are connected. When one change is made, it is updated onto the other view.
3. What needs to be done to the floorplan before adding dimensions?
All furniture, section symbols, and tags should be turned off. Keepcounters, casework, plumbing fixtures.
4. What are the two ways of selecting elements to dimension?
a. Individual Reference
b. Entire Walls
5. When dimensioning a floor plan, start at the outside corner of the floor,then select the centers of walls/windows/doors, and finish with theother outside corner.

2
6. List the 3 steps when dimension the side of a structure:
a. Pick all elements
b. Pick only walls
c. Pick the overall length
DemonstrationFollow along with the demonstration video and print out the floor plan at 50%. Tape the image in the space provided below.

3
DemonstrationFollow along with the demonstration video and print out the floor plan at 50%. Tape the image in the space provided below.

4
Activity Complete the first and second floor dimension plans. Print out at 50% and turn in to your instructor.
5

6
Chapter 6 Lesson 2: Revit Sheets
1. Why may you want to delete the existing sheets in a Revit file and replacethem with a size of your choosing?
Revit sheets automatically places the views on the sheets which gives us less control of where we want to place views.
2. If we don’t have access to a large format printer, what size sheet could wepossibly use and print out at “Fit to Page?”
C size, 17”x22”
3. List the order of sheets:T1 Title Page A1 Site Plan
A2 Elevations A3 Foundation Plan A4 First Floor Plan A5 Basement Floor Plan A6 Dimensioned Floor Plans A7 Schedules
A8 Interior Elevations A9 Wall Section A10 Roof Plan L1 Landscaping Plan E1 Lighting/Electrical Plan

7
DemonstrationFollow along with the demonstration video. Wait to print out your Revit sheets until the final demonstration video.
Activity Open your Activity House and update your Revit sheets. Wait to print out your Revit sheets until the final demonstration video.

8
Chapter 6 Lesson 3: Schedules/Room Tags
1. List the fields necessary for a door, lighting, room and window schedule.
Door Schedule Lighting Fixture Schedule
Room Finish Schedule Window Schedule
Type Mark Family and Type Number Type Mark Type Count Name Family and Type Family Area Type Count Count Count
2. A room tag can be put outside of a room as long as the leader line isactivated.
DemonstrationFollow along with the demonstration video. Take a screen shot of your Schedules Sheet, print out and tape in your workbook.

9
Activity Open your Activity House and update your Revit sheets with your schedules.

10
Chapter 6 Lesson 4: Electrical Plan Switch Legs
1. The ceiling plan gets placed directly over the electrical plan so both thelights and switches can be seen at the same time.
2. The connections between switches and lights are known as switch legs.
3. What type of line type is used for switch legs? Hidden line arcs
DemonstrationFollow along with the demonstration video. When finished take a screenshot of the electrical plans and tape below.
11
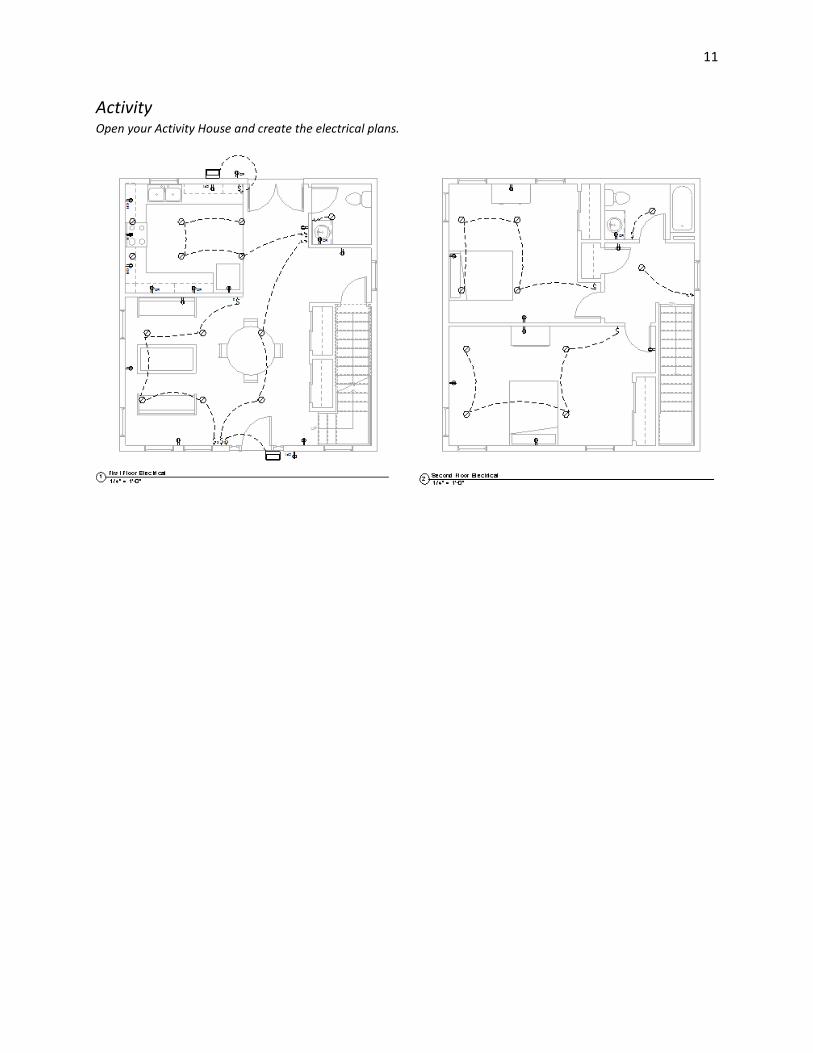
Activity Open your Activity House and create the electrical plans.

12
Chapter 6 Lesson 5: Rendering and Walkthroughs
1. What are the 2 fields added to a Sheet List?
a. Sheet Number
b. Sheet Name
2. How can we change the angle of the camera?
We can adjust the height of the Eye Elevation and the height of the Target Elevation.
3. List the different Render Quality Settings:
a. Draft
b. Low
c. Medium
d. High
e. Best
DemonstrationFollow along with the demonstration video. When finished print out all of the sheets from the project.
Activity Open your Activity House, make the changes to your Title Sheet, then print out all the sheets from the project.