automating deployment with azure & chef · pdf fileautomating deployment with azure &...
TRANSCRIPT

Automating Deployment
with Azure & Chef A HANDS-ON INTRODUCTION TO
CLOUD DEPLOYMENT AUTOMATION
Ryan Irujo and Pete Zerger
The second installment in the Inside the Microsoft Cloud series

©2015 Inside the Microsoft Cloud 2 | P a g e
Table of Contents Introduction .............................................................................................. 3
Chapter 1: About the learn_chef ARM Template ................................... 6
Chapter 2: Deploying the Chef Environment to Azure ......................... 17
Chapter 3: Bootstrapping the Hosts ...................................................... 32
Chapter 4: Configure the SQL_Disk_F Cookbook .................................. 48
Chapter 5: SQL Server 2014 SP1 Installation Cookbook ....................... 52

©2015 Inside the Microsoft Cloud 3 | P a g e
Introduction Before we get started, there are a few things you should be aware of. At a minimum, please read
the prerequisites and make sure that they are already in place or you will not be able to complete
the examples presented throughout this book.
How to get the most from this book While it is recommended that you read this book from cover-to-cover, the reader can perform the
exercises in this book sequentially, skip the details contained in each chapter, and have a
functional Chef Environment running in Azure with Windows Servers reporting into it in only a
couple of hours. However, it is required to follow the exercises in this book in sequential order to
have a functioning Chef Environment.
The beginning each chapter will have a brief summary of what was covered in the previous
chapter, as well as what will be covered in the present chapter. At the end of each chapter will be
additional notes and information about the material covered in the present chapter. The exercises
in each chapter have been written to be the primary focus of the chapter with additional
information about the exercises following it.
Prerequisites The content in this book is intended for those that have some exposure to Azure and have
experience using PowerShell DSC, PowerShell, JSON and Ruby. Although this book was written for
the intended audience as previously stated, the examples in this book have been written so that
just about anyone could effectively complete the tasks described.
To successfully complete the tutorials in the rest of this book, you must have the following:
- Access to an Azure Subscription
- A GitHub Account
- Basic familiarity with Azure Resource Manager concepts
If you do not currently have access to an Azure Subscription, you can sign-up for a free one-
month trail with $200 of Azure credits at the link below:
https://azure.microsoft.com/en-us/pricing/free-trial/
If you do not currently have a GitHub Account, you can sign-up at the link below:
https://azure.microsoft.com/en-us/pricing/free-trial/
GitHub is free also, unless you need the ability to create private repositories under your account.
For the purposes of this book, that will not be necessary.
Internet access is required. As the Chef Environment you will be working in is automatically
being built in Azure using Azure Resource Manager (ARM or Azure v2) Templates deployed from
GitHub.

©2015 Inside the Microsoft Cloud 4 | P a g e
About Chef Chef is an Open-Source configuration management tool that automates application
configuration, deployment and management in your environment. Chef uses a client/server
model that runs on Windows, Linux and AIX. You might be wondering at this point, why not focus
on PowerShell DSC instead? Chef is a more mature solution than PowerShell DSC in that it has the
following features
- High Availability
- Replication
- Reporting
- Management Console
- Analytics
Along with other features not listed here, you can also use Chef’s hosted solution (known as
“Hosted Chef”) to manage your environment using a subscription based model. At the time of this
writing, you can use Chef On-Premise for free with access to the Management Console, High
Availability and Analytics Platform for up to 25 nodes. For Hosted Chef, the limit is five nodes.
Why Setup Chef in Azure? While the primary focus of this book is on learning Chef, the other part is demonstrating the
power of how you can use ARM Templates to quickly build and tear down entire environments in
a fraction of the time it takes to deploy manually. If you would prefer to setup the four server
environment that this book uses in your own physical environment, you can analyze all of the
resources in the learn_chef repository on GitHub and do just that.
However, the benefits of using the ARM Template instead is immediate in that the entire
Environment required to perform the exercises in this book is up and running in less than 45
minutes. Additionally, if you wish to start over for whatever reason, you can do so in less than an
hour.
What is Azure Resource Manager? In the original model of managing resources in Azure (Service Management), you deploy
resources such as Compute, Storage, Networking; as individual resources that are not inherently
grouped together or associated unless you specifically do so; either manually or
programmatically. Issues tend to arise from this model, as it is very easy to lose track of how
resources are grouped together and their interdependencies.
ARM resolves some of these issues by inherently grouping deployed resources into new or
existing collections called Azure resource groups. Whereas previously when using Azure Service
Management (Azure v1), you could end up having to track down all virtual hard disks (VHDs)
associated with an Azure storage account before being able to remove it; using ARM, you can
delete the entire resource group and anything associated within the resource group (compute,
storage, networking) is automatically deleted.
In short, ARM allows you to manage resources in Azure in more methodical and simplified way
with Resource Groups.
©2015 Inside the Microsoft Cloud 5 | P a g e
Additional Software Suggestions There are some compatibility issues with Internet Explorer (IE) and the Chef Management Console
if you use the default security settings in IE. The issues are minor and will not affect your ability to
go through the examples in this book. However, you will notice that some actionable features in
the Chef Management Console will not be easily viewable. Neither Chrome nor Firefox have this
issue.
Chapter Summary In this chapter, a brief summary was given of the Software prerequisites required to complete the
exercises in this book along with some introductory information about Chef and Azure Resource
Manager.
In the next chapter, we will explore the contents of the learn_chef ARM template and how they
are configured to deploy the Chef Environment in Azure, which we will be using throughout the
rest of this book.

©2015 Inside the Microsoft Cloud 6 | P a g e
Chapter 1: About the learn_chef
ARM template Before you begin, note that the information detailed in this chapter is recommended, but not
necessary to complete the exercises in this book. However, by reading this section, you will have a
better understanding of how the learn_chef ARM template works.
As discussed in the introductory chapter, Azure Resource Manager (ARM) templates are a new
method of deploying new resources to Azure using either Visual Studio or the new Azure Portal.
ARM templates are written in JavaScript Object Notation (JSON), a lightweight text format for
serializing structured data. Instead of deploying resources individually, ARM templates allow you
to deploy an entire environment programmatically to a single Azure resource group. How you
want to allocate those resources into the resource group is entirely up to you. Not only does this
allow you to deploy several resources very quickly in Azure, you are also able to delete all the
resources you deployed by simply deleting the resource group they were deployed to. Having to
worry about dependencies from using the Service Management Model in Azure v1 are no longer
an issue.
In this chapter, we will review the key aspects of the learn_chef ARM template
Template Parameters
Template Variables
Resources
o Virtual Network
o Storage Account
o Network Interfaces
o Public IP Addresses
o Virtual Machines (VMs)
PowerShell DSC Extension
Custom Script Extension for Windows
Custom Script Extension for Linux
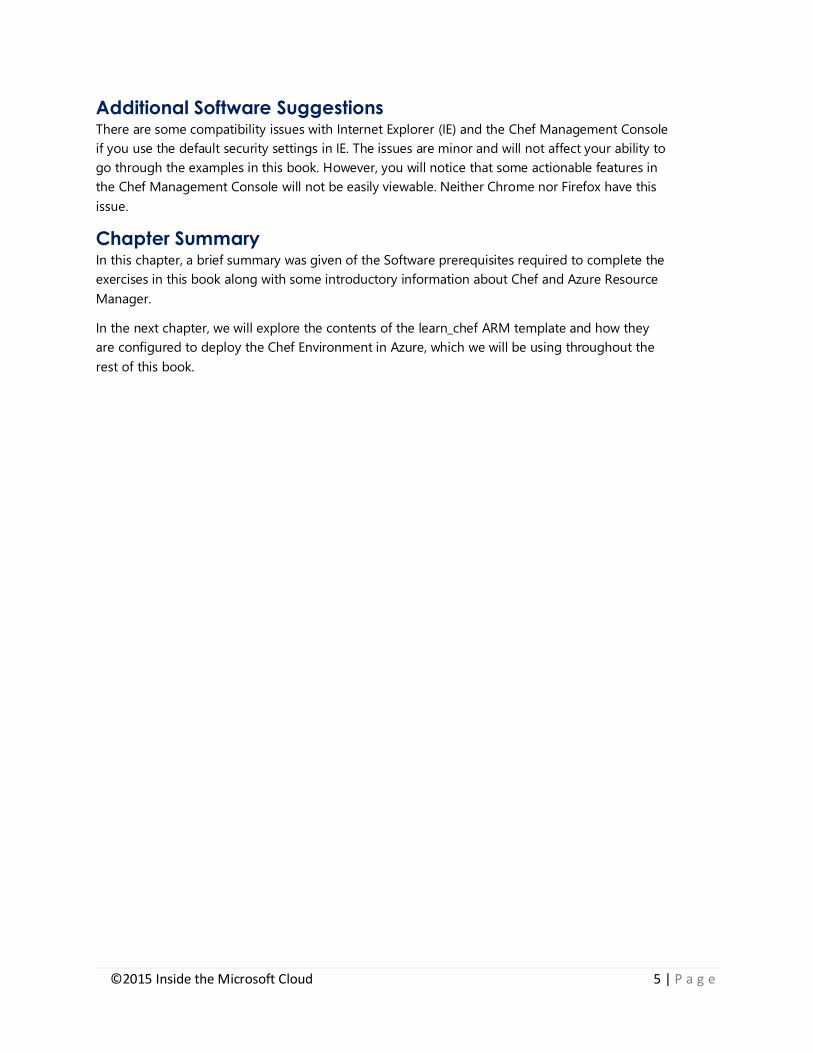
The environment for which we will be automating the building is pictured in figure 1.0.0.
©2015 Inside the Microsoft Cloud 7 | P a g e
FIGURE 1.0.0 VISIO DIAGRAM OF THE CHEF ENVIRONMENT THAT YOU WILL BE DEPLOYING
The code for the full configuration we will be building is accessible online at the link below:
https://github.com/starkfell/azure-quickstart-templates/blob/master/learn_chef/azuredeploy.json
A screenshot showing the JSON outline is shown in figure 1.0.1:

©2015 Inside the Microsoft Cloud 8 | P a g e
FIGURE 1.0.1 JSON OUTLINE OF THE ARM TEMPLATE AS SHOWN IN VISUAL STUDIO
1.1 What is an ARM template? As discussed in the Introductory Chapter, Azure Resource Manager (ARM) templates are the
preferred method of deploying new Resources to Azure using either Visual Studio or the new
Azure Portal when deploying sets of resources that must be deployed in a specific order, such as
your entire Chef environment.
ARM templates consist of the following components:
Parameters: values provided when a deployment is executed to customize the resources
in the deployment.
Variables: JSON fragment values that are used to simplify template language expressions
in the template.
Resources: Services that are created or updated by the deployment in a resource group.
Extensions: JSON fragments that support various Microsoft and Cross-Platform
technologies such as PowerShell Scripting, PowerShell DSC, Linux Scripting, Chef and
Docker. In general, extensions are used to customize resources towards the end of the
deployment process, i.e. - Installing Windows Server Features after a VM has been
deployed.
Why not just do this in PowerShell? Technically, you could, but your deployment would only be as
reliable as your PowerShell authoring skills, error checking and restart routines, etc. More
importantly, you would be missing out on some of the key benefits of ARM. A few of the key
features of ARM that make it the go-to option for complex deployments include:
Declarative. Instead of deploying resources individually, ARM templates allow you to
deploy an entire environment programmatically to a single resource group. You can
define dependencies between resources to ensure various elements of your deployment
do not begin too early. For example, if a VM tried to join an Active Directory domain
before the Active Directory domain was fully deployed, the domain join operation (and all

©2015 Inside the Microsoft Cloud 9 | P a g e
steps after) would fail. The ARM json template capabilities allow you to describe these
dependencies to deliver reliable results every time.
Idempotent. If a json-based deployment in ARM from Visual Studio fails, you can restart
and it will pick up where it left off! This is a huge leap over Azure Service Management
(Azure v1).
DISCLAIMER: It is important that we not overstate Idempotence here. The fact of the matter is, if your deployment fails in a custom script stage of your deployment, you will likely have to do some cleanup before you attempt to restart. At this point, it is likely just as fast to delete the deployment and re-
deploy.
Reusable. Once you have created and tested a template, you can share the template and
related resources (PowerShell scripts, DSC modules, etc.) with anyone who can then use
the template to deploy their own environment!
Cleanup. Not only does this allow you to deploy several resources very quickly in Azure,
you are also able to delete all the resources you deployed by simply deleting the resource
group they were deployed to. Having to worry about dependencies from using the
Service Management Model in Azure are no longer an issue.
This is not to say deploying with ARM via PowerShell does not have its place. There are many
deployment and configuration operations where this is going to be faster, easier and a better fit
than ARM json templates. Scenarios where you just want to deploy a VM to an existing
environment, or just do some bulk configuration or administration, PowerShell is still a great fit.
Simply match the right methodology to your situation using what we have shared here as
guidelines.
Additional Information about ARM templates can be found at the link below:
https://azure.microsoft.com/en-us/documentation/articles/resource-group-authoring-templates/
Now, let us get step through the template and get ready to deploy Chef in Azure!
1.2 Chef Template and Related Resources The chef template is really a set of resources, comprised of the following files. The files and a brief
description of each is included in the table. We will review the function of each of these in depth
in the sections that follow.
Name Type Comments
Cookbooks Folder Contains the Chef Cookbooks used in
Chapters 3 through 5 of this book.
CreateADPDC.zip PowerShell
DSC
Zipped DSC Configuration Files used to
create a new Domain on ADDC.
azuredeploy.json ARM
template
File
The main JSON file that contains the
main configuration for deploying the
Chef Environment to Azure
©2015 Inside the Microsoft Cloud 10 | P a g e
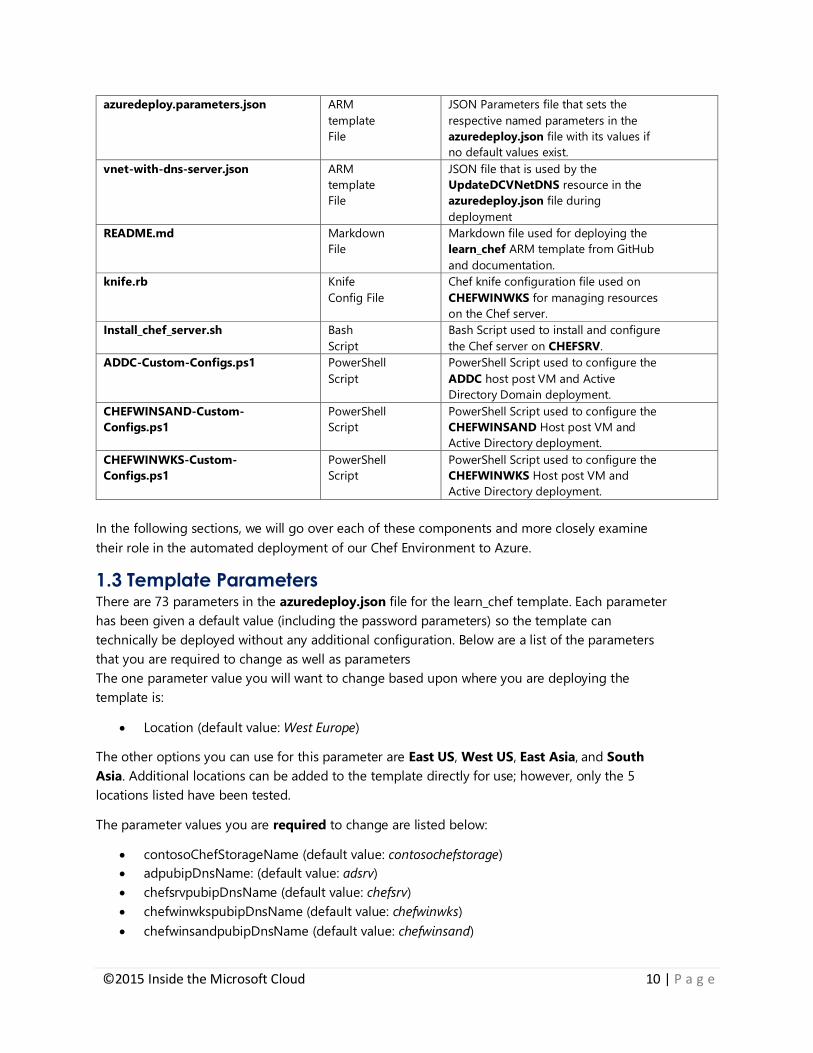
azuredeploy.parameters.json ARM
template
File
JSON Parameters file that sets the
respective named parameters in the
azuredeploy.json file with its values if
no default values exist.
vnet-with-dns-server.json ARM
template
File
JSON file that is used by the
UpdateDCVNetDNS resource in the
azuredeploy.json file during
deployment
README.md Markdown
File
Markdown file used for deploying the
learn_chef ARM template from GitHub
and documentation.
knife.rb Knife
Config File
Chef knife configuration file used on
CHEFWINWKS for managing resources
on the Chef server.
Install_chef_server.sh Bash
Script
Bash Script used to install and configure
the Chef server on CHEFSRV.
ADDC-Custom-Configs.ps1 PowerShell
Script
PowerShell Script used to configure the
ADDC host post VM and Active
Directory Domain deployment.
CHEFWINSAND-Custom-
Configs.ps1
PowerShell
Script
PowerShell Script used to configure the
CHEFWINSAND Host post VM and
Active Directory deployment.
CHEFWINWKS-Custom-
Configs.ps1
PowerShell
Script
PowerShell Script used to configure the
CHEFWINWKS Host post VM and
Active Directory deployment.
In the following sections, we will go over each of these components and more closely examine
their role in the automated deployment of our Chef Environment to Azure.
1.3 Template Parameters There are 73 parameters in the azuredeploy.json file for the learn_chef template. Each parameter
has been given a default value (including the password parameters) so the template can
technically be deployed without any additional configuration. Below are a list of the parameters
that you are required to change as well as parameters
The one parameter value you will want to change based upon where you are deploying the
template is:
Location (default value: West Europe)
The other options you can use for this parameter are East US, West US, East Asia, and South
Asia. Additional locations can be added to the template directly for use; however, only the 5
locations listed have been tested.
The parameter values you are required to change are listed below:
contosoChefStorageName (default value: contosochefstorage)
adpubipDnsName: (default value: adsrv)
chefsrvpubipDnsName (default value: chefsrv)
chefwinwkspubipDnsName (default value: chefwinwks)
chefwinsandpubipDnsName (default value: chefwinsand)

©2015 Inside the Microsoft Cloud 11 | P a g e
Each of the parameters listed above must have a unique name in Azure as they are created as
FQDNs based upon the region in Azure they are deployed. For example, if you deploy the
template to West Europe, the DNS name of the chefsrvpubipDnsName will be
chefsrv.westeurope.cloudapp.azure.com. As stated in the classic 80’s movie about an immortal
Scotsman, there can be only one!
The additional parameters you may want to change in the future are listed below:
installChefServerScriptUri
installChefServerScriptName
addcCustomConfigsScriptUri
addcCustomConfigsScriptName
chefwinwksCustomConfigsScriptUri
chefwinwksCustomConfigsScriptName
chefwinsandCustomConfigsScriptUri
chefwinsandCustomConfigsScriptName
vnetDNSTemplateUri
assetLocation
The parameters listed above all point to URLs that are in the GitHub repository that the learn_chef
template resides in. If you decide to fork the repository, or want to modify the Scripts that are a
part of this template, you will need to update the URLs of these parameters accordingly.
1.4 Template Variables There are no variables in the azuredeploy.json file for the learn_chef template. To ensure as much
flexibility as possible, parameters have been used in place of where variables are typically used
throughout the template, making changing of default values at deployment time easy. For
example, an azure account storage container name, which is often represented as vhds in the URI
path of a VHD for a VM. This is not a value that is normally modified, but is required to deploy a
VM in Azure.
1.5 Template Resources There are 15 resources in the azuredeploy.json file for the learn_chef template. Below is a table
of the name of the resources, the type of resources they are and some additional comments
where pertinent. The names shown below are the parameter names of each resource in the
template with the exception of the Network Interface names, which are a combination of the VM
Name of each host and NIC.
Name Type Comments
ContosoNET Virtual
Network
Creates two subnets: one for
Domain Controller and One for
the Chef Environment.
Contosochefstorage Storage
Account
Standard Azure Storage
Container
[addcNameNic]Nic Network
Interface
Statically assigned
©2015 Inside the Microsoft Cloud 12 | P a g e
[chefsrvName]Nic Network
Interface
Statically assigned
[chefwinwksName]Nic Network
Interface
Statically assigned / uses
addcNameNic for DNS
[chefwinsandName]Nic Network
Interface
Statically assigned / uses
addcNameNic for DNS
adpubipDnsName Public IP
Address
Dynamically assigned Public IP
chefsrvpubipDnsName Public IP
Address
Dynamically assigned Public IP
chefwinwkspubipDnsName Public IP
Address
Dynamically assigned Public IP
chefwinsandpubipDnsName Public IP
Address
Dynamically assigned Public IP
addcName Virtual
Machine
Domain Controller, Domain is
created on F:\ Drive
chefsrvName Virtual
Machine
Chef server
chefwinwksName Virtual
Machine
Chef Windows Workstation, has
an extra drive that isn’t
partitioned or formatted
chefwinsandName Virtual
Machine
Chef Windows Sandbox, has an
extra drive that isn’t partitioned
or formatted.
UpdateDCVNetDNS Nested
Deployment
Updates the DNS of the DC
Subnet after main deployment
is finished.
1.6 Template Extensions Technically speaking, the custom extensions used during the deployment of the VM are
resources. To better explain how they fit into the deployment template, they are given their own
section in this text.
The three extension types used during the template deployment are detailed in the table below.
Name Publisher Type Versio
n
PowerShe
ll DSC
Extension
Microsoft.PowerShell DSC 1.7
Custom
Script
Extension
for
Windows
Microsoft.Compute CustomScriptExtensi
on
1.4
Custom
Script
Microsoft.OSTCExtensio
ns
CustomScriptForLinu
x
1.4
©2015 Inside the Microsoft Cloud 13 | P a g e
Extension
for Linux
Note: If you are using a version of the Custom Script Extension for Windows lower than
1.4, your PowerShell Script must be stored in an Azure Storage Public Container in order to work properly. If you are using a lower version, you cannot retrieve PowerShell Scripts
in an ARM template hosted on GitHub.
These custom extensions are used five times in the template to make additional configurations to
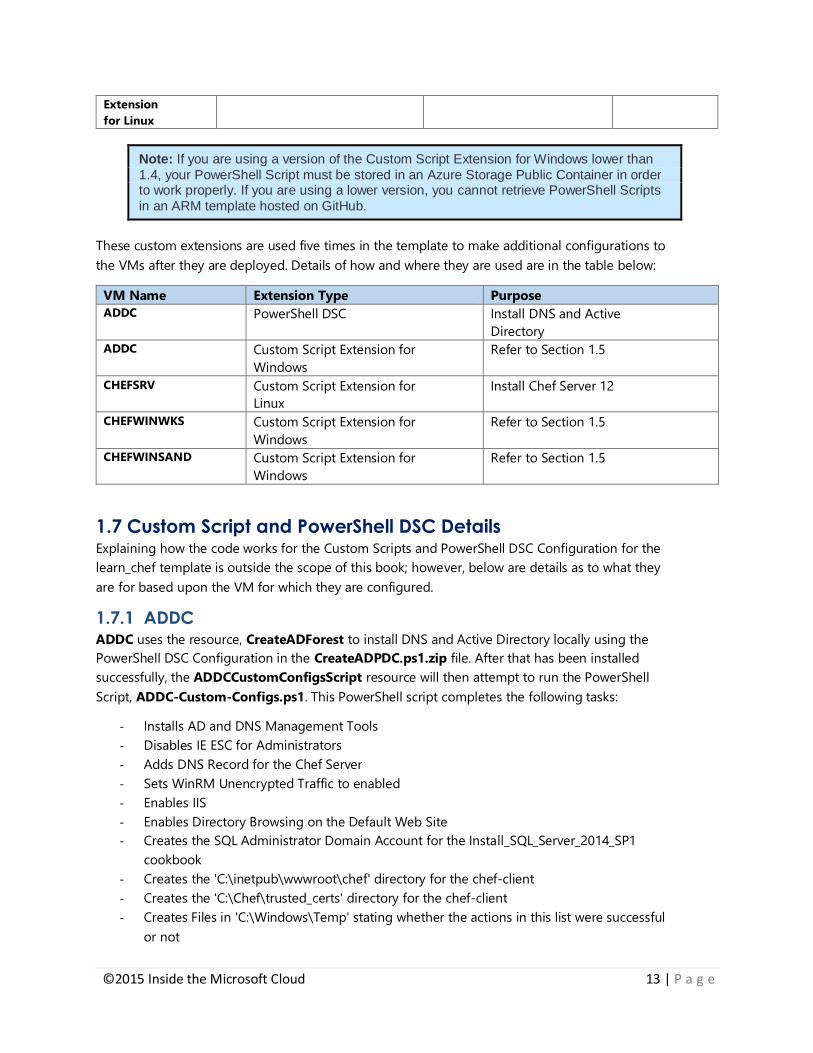
the VMs after they are deployed. Details of how and where they are used are in the table below:
VM Name Extension Type Purpose
ADDC PowerShell DSC Install DNS and Active
Directory
ADDC Custom Script Extension for
Windows
Refer to Section 1.5
CHEFSRV Custom Script Extension for
Linux
Install Chef Server 12
CHEFWINWKS Custom Script Extension for
Windows
Refer to Section 1.5
CHEFWINSAND Custom Script Extension for
Windows
Refer to Section 1.5
1.7 Custom Script and PowerShell DSC Details Explaining how the code works for the Custom Scripts and PowerShell DSC Configuration for the
learn_chef template is outside the scope of this book; however, below are details as to what they
are for based upon the VM for which they are configured.
1.7.1 ADDC ADDC uses the resource, CreateADForest to install DNS and Active Directory locally using the
PowerShell DSC Configuration in the CreateADPDC.ps1.zip file. After that has been installed
successfully, the ADDCCustomConfigsScript resource will then attempt to run the PowerShell
Script, ADDC-Custom-Configs.ps1. This PowerShell script completes the following tasks:
- Installs AD and DNS Management Tools
- Disables IE ESC for Administrators
- Adds DNS Record for the Chef Server
- Sets WinRM Unencrypted Traffic to enabled
- Enables IIS
- Enables Directory Browsing on the Default Web Site
- Creates the SQL Administrator Domain Account for the Install_SQL_Server_2014_SP1
cookbook
- Creates the 'C:\inetpub\wwwroot\chef' directory for the chef-client
- Creates the 'C:\Chef\trusted_certs' directory for the chef-client
- Creates Files in 'C:\Windows\Temp' stating whether the actions in this list were successful
or not

©2015 Inside the Microsoft Cloud 14 | P a g e
In order to create the DNS Record for the Chef Server and create the SQL Administrator Domain
Account, the following parameter values are passed from the learn_chef template to the script:
ChefServer
ADDomain
ChefServerIP
SQLUsername
SQLPassword
The rest of the tasks in the script do not require the use of these parameter values.
1.7.2 CHEFSRV CHEFSRV uses the resource, installchefserverscript, which utilizes the install_chef_server.sh
script to install and configure Chef Server 12 locally. The beginning of the script has parameter
values passed to the script from the learn_chef template for the following:
CHEF_USERNAME
CHEF_PASSWORD
CHEF_IP
AD_DOMAIN
CHEF_HOSTNAME
CHEF_ORG
Each of these values is used to install and configure Chef Server 12 on the Ubuntu host based
upon how the parameter values above are configured. Using the CHEF_IP, AD_DOMAIN, and
CHEF_HOSTNAME parameter values, the script modifies the Hosts File locally so that a Host A
record can be created on ADDC.contoso.corp. Using the default template values, the Hosts file
has the following entry added:
10.0.2.4 CHEFSRV.contoso.corp CHEFSRV
The Chef Admin User is created using the CHEF_USERNAME and CHEF_PASSWORD parameter
values. Finally, the Server Certificate, first Chef Admin User Certificate, and the first Chef
Organization Certificate are all created dynamically based upon the CHEF_USERNAME and
CHEF_ORG parameter values provided.
The install_chef_server.sh script is called from its GitHub location in the learn_chef template.
1.7.3 CHEFWINWKS After the VM has been successfully deployed, the Active Directory Domain is created, and the
updateDCVnetDNS resource has been deployed, CHEFWINWKS uses the resource,
CHEFWINWKSCustomConfigsScript with the CHEFWINWKS-Custom-Configs.ps1 PowerShell
Script to complete the following tasks:
Installs AD and DNS Management Tools
Disables IE ESC for Administrators
Sets WinRM Unencrypted Traffic to enabled and Authentication to Basic
Creates the 'C:\Chef\trusted_certs' directory for the chef-client
Creates the 'C:\chef\chef-repo\cookbooks' directory for the Chef Development Kit
©2015 Inside the Microsoft Cloud 15 | P a g e
Creates the 'C:\chef\.chef\trusted_certs' directory for the Chef Development Kit
Creates the 'C:\GitHub' directory where the learn_chef repo will reside
Downloads and Installs the Chef Development Kit (0.8.1)
Downloads the knife.rb file from the learn_chef repo on GitHub
Modifies the knife.rb file for the Chef Environment Deployed and saves the file in ASCII
Format
Downloads and Installs Notepad++
Downloads GitHub for Windows
Joins the Host to the Domain
Creates Files in 'C:\Windows\Temp' stating whether the actions in this list were successful
or not
In order to modify the knife.rb file for the Chef Environment deployed and to join the Host to the
Domain the following parameter values are passed from the learn_chef template to the script:
ChefServer
ChefUsername
ChefOrg
ADUsername
ADPassword
ADDomain
The rest of the tasks in the script do not require the use of these parameter values.
The PowerShell Script, CHEFWINWKS-Custom-Configs.ps1, is pulled from the learn_chef ARM
template directory in the azure-quickstart-templates repository on GitHub at the link below:
https://github.com/starkfell/azure-quickstart-templates/tree/master/learn_chef
1.7.4 CHEFWINSAND After the VM has been successfully deployed, the Active Directory Domain is created, and the
updateDCVnetDNS resource has been deployed, CHEFWINSAND uses the resource,
CHEFWINSANDCustomConfigsScript with the CHEFWINSAND-Custom-Configs.ps1
PowerShell Script to complete the following tasks:
Disables IE ESC for Administrators
Sets WinRM Unencrypted Traffic to enabled and Authentication to Basic
Enables .NET Framework 3.5 for SQL Install
Creates the 'C:\Chef\trusted_certs' directory for the chef-client
Downloads and Installs Notepad++
Join the Host to the Domain
Creates Files in 'C:\Windows\Temp' stating whether the actions in this list were successful
or not
In order to join the Host to the Domain the following parameter values are passed from the
learn_chef template to the script:
ADUsername
ADPassword
©2015 Inside the Microsoft Cloud 16 | P a g e
ADDomain
The rest of the tasks in the script do not require the use of these parameter values.
The PowerShell Script, CHEFWINSAND-Custom-Configs.ps1, is pulled from the learn_chef ARM
template directory in the azure-quickstart-templates repository on GitHub at the link below:
https://github.com/starkfell/azure-quickstart-templates/tree/master/learn_chef
1.8 GitHub Private Repository Limitations At the time of the publication of this book, there exists an issue where you are unable to retrieve
resources from a private repository in GitHub using a Custom Script Extension. Currently, when
you need to retrieve a resource from GitHub private repository, a token is created and appended
to the URL of the resource as shown in the example URL below:
https://raw.githubusercontent/starkfell/repo/script.ps1?token=ACoFdbqqy1qYauDTJlGFefghTYUn
kpeD-mks5V-sKPwA%3D%3D
When a target VM in Azure attempts to download the resource from GitHub the following error
message is returned:
[Error]:DownloadFiles: Encountered an error while downloading files. Cancelling
download tasks...
[Fatal]: Failed to download all specified files. Exiting. Exception:
System.Net.WebException: An exception occurred during a WebClient request. --->
System.ArgumentException: Illegal characters in path.
Currently, your options to work around this issue are as follows:
1. Make your private repository public
2. Move the resources from GitHub to Azure Storage for retrieval
1.9 Chapter Summary In this chapter, we went over the contents of the learn_chef template and how they are
configured to deploy the Chef environment in Azure that we will be using for the rest of this
book.
In the next chapter, we will deploying our Chef Environment in Azure using the learn_chef
template and configuring our Chef Windows Workstation to manage our Chef server.
©2015 Inside the Microsoft Cloud 17 | P a g e
Chapter 2: Deploying the Chef
Environment to Azure Using an
ARM Template In the previous chapter, we went over the contents of the learn_chef ARM template and how they
are configured to deploy the Chef Environment in Azure. Azure Resource Manager (ARM)
templates are the preferred method of deploying new resources to Azure as they coded
instructions in JSON that can be submitted to Azure using a hyperlink from GitHub, directly from
Visual Studio, or using PowerShell. As Visual Studio is not a prerequisite of using this book,
deploying ARM templates from Visual Studio will not be covered; however you can find more
information on this subject in the link below:
https://azure.microsoft.com/en-us/documentation/articles/resource-group-authoring-templates/
In this Chapter we will complete the following tasks:
Deploy the learn_chef ARM template from GitHub
Configure the Chef Windows Workstation
Reset two Chef Server Certificates
o Chef Client Validation
o Chef Admin User
Verify Connectivity from the Chef Windows Workstation to the Chef Server
2.1 Deploy the learn_chef Template from GitHub Before you attempt to deploy a Windows ARM template from GitHub, make sure you have
already logged into https://portal.azure.com. If the deployment fails after following the
instructions below, please review the Troubleshooting section of this chapter for additional help.
1. After you have logged into the Azure Portal, open up another tab and browse to the
following URL to access the learn_chef ARM template.
https://github.com/starkfell/azure-quickstart-templates/tree/master/learn_chef
2. Scroll down the page until you see Learn Chef Deployment and then click on this icon:
You will then be redirected to the Azure Portal and presented with the Parameters
section of a Custom Deployment.

©2015 Inside the Microsoft Cloud 18 | P a g e
FIGURE 2.1.0 AZURE PORTAL CUSTOM DEPLOYMENT PARAMETERS
3. You will need to change the following Parameter values as listed below:
LOCATION: (Change to East US, West US, West Europe, East Asia, or South East
Asia)
CONTOSOCHEFSTORAGENAME: (default value: contosochefstorage)
ADPUBIPDNSNAME: (default value: adsrv)
CHEFSRVPUBIPDNSNAME: (default value: chefsrv)
CHEFWINWKSPUBIPDNSNAME: (default value: chefwinwks)
CHEFWINSANDPUBIPDNSNAME: (default value: chefwinsand)
Make sure the LOCATION parameter is set to a location of the Azure regional data center
closest to you geographically to minimize latency; for example if you live in Seattle, you
might choose West US. As stated previously in Chapter 1, make sure to change the
Storage Account and Public IP Address parameter values to something unique! For
example, change contosochefstorage to myconamecontosochefstorage and adsrv to
mycoadsrv. When finished, click on OK in the Parameters section.
4. Next, you will need to create an Azure resource group to host the resources deployed by
the template. Next, click on the Resource group section. Then, click the Or create new
hyperlink and enter LearnChef in the box provided.
5. Click on the Resource group location section and set it to the same location as the
LOCATION parameter you set earlier.

©2015 Inside the Microsoft Cloud 19 | P a g e
FIGURE 2.1.1 AZURE PORTAL CUSTOM DEPLOYMENT RESOURCE GROUP PARAMETER
6. Next, click on the Legal terms parameter and then click the Buy button. (You are not
actually purchasing anything, just agreeing to EULA terms.) Afterwards, click on the
Create button
The ARM template should then start to deploy; the entire process should take anywhere
from 35 to 40 minutes for this particular template.
FIGURE 2.1.2 ARM TEMPLATE DEPLOYMENT IN PROGRESS
Once the Deployment is complete, you should be notified as shown in Figure 2.1.3.
FIGURE 2.1.3 ARM TEMPLATE DEPLOYMENT COMPLETED SUCCESSFULLY

©2015 Inside the Microsoft Cloud 20 | P a g e
2.2 Post Deployment: Configure the Chef Windows Workstation First, you need to locate the Chef Windows Workstation’s publicly accessible FQDN for RDP
access. This is located in the chefwinwks Public IP Address resource which is found using the
following steps.
1. From the Azure Portal Home Page, Click on Resource Groups, scroll down and click on
LearnChef.
FIGURE 2.2.1 AZURE PORTAL RESOURCE GROUPS
2. In the LearnChef Resource Group, click on the Ellipsis to the right of the adsrv Public IP
Address to expand and display all of the Resources as shown circled below in Figure
2.2.2.

©2015 Inside the Microsoft Cloud 21 | P a g e
FIGURE 2.2.2 AZURE PORTAL LEARNCHEF RESOURCES (CONDENSED VIEW)
3. Next, click on the Public IP Address resource as shown below in
Figure 2.2.3.
FIGURE 2.2.3 AZURE PORTAL LEARNCHEF RESOURCES (FULL VIEW)

©2015 Inside the Microsoft Cloud 22 | P a g e
4. Under the DNS name field in Figure 2.2.4, copy and paste the FQDN into a new RDP
Session. Note that you can copy the FQDN by clicking on the icon.
FIGURE 2.2.4 CHEFWINWKS PUBLIC IP ADDRESS DETAILS
5. Use the following credentials to log in to CHEFWINWKS via RDP.
Username: chefadmin
Password: LearnChef!
2.2.1 Download the Chef Server Certificates Once you are logged into CHEFWINWKS, you need to change a security setting in Internet
Explorer in order to be able to download the Chef Server Certificates you are going to reset.
1. Open up Internet Explorer, click on Settings and select Internet Options.
FIGURE 2.2.1.0 INTERNET EXPLORER INTERNET OPTIONS

©2015 Inside the Microsoft Cloud 23 | P a g e
2. Next, click on the Security tab, make sure the Internet Zone is selected and click on the
Custom level… button.
FIGURE 2.2.1.1 INTERNET EXPLORER OPTIONS SECURITY ZONES
3. In Security Settings - Internet Zone, scroll down to the Downloads Setting, change File
download to Enable and then click on OK.
FIGURE 2.2.1.2 INTERNET EXPLORER SECURITY SETTINGS - INTERNET ZONE OPTIONS
4. You will prompted with a Warning, click Yes and then Click on the former OK buttons
until you are back to the Browser Window.

©2015 Inside the Microsoft Cloud 24 | P a g e
FIGURE 2.2.1.3 INTERNET EXPLORER SECURITY SETTINGS - WARNING MESSAGE
2.2.2 Login to the Chef Management Console Next, browse to https://chefsrv.contoso.corp and click Continue to this website.
FIGURE 2.2.2.0 CHEF SERVER SSL CERTIFICATE WARNING PAGE
1. Login to the Chef Management Console using the following credentials:
Username: chefadmin
Password: LearnChef!
FIGURE 2.2.2.1 CHEF SERVER LOGIN PAGE
2. Next, click on the Policy tab at the top of the page. Then click on the Clients section on
the left hand side. In the right-hand pane, click on learn_chef_12_env-validator under

©2015 Inside the Microsoft Cloud 25 | P a g e
"Showing All Clients". The Public Key details will then be displayed at the bottom of the
page. Click on Reset Key.
FIGURE 2.2.2.2 CHEF SERVER POLICY SETTINGS - EXISTING CLIENTS
3. You will be prompted to ensure you are certain you want to continue, click on Reset Key.
FIGURE 2.2.2.3 LEARN_CHEF_12_ENV-VALIDATOR CLIENT SSL CERTIFICAT RESET PROMPT
4. Afterwards, click on the Download button.

©2015 Inside the Microsoft Cloud 26 | P a g e
FIGURE 2.2.2.4 LEARN_CHEF_12_ENV-VALIDATOR CLIENT NEW SSL CERTIFICATE DOWNLOAD PROMPT
5. Save the SSL Certificate, learn_chef_12_env-validator.pem to C:\chef\.chef. Afterwards,
click on the Close button.
FIGURE 2.2.2.5 SAVING THE NEW LEARN_CHEF_12_ENV-VALIDATOR SSL CERTIFICATE
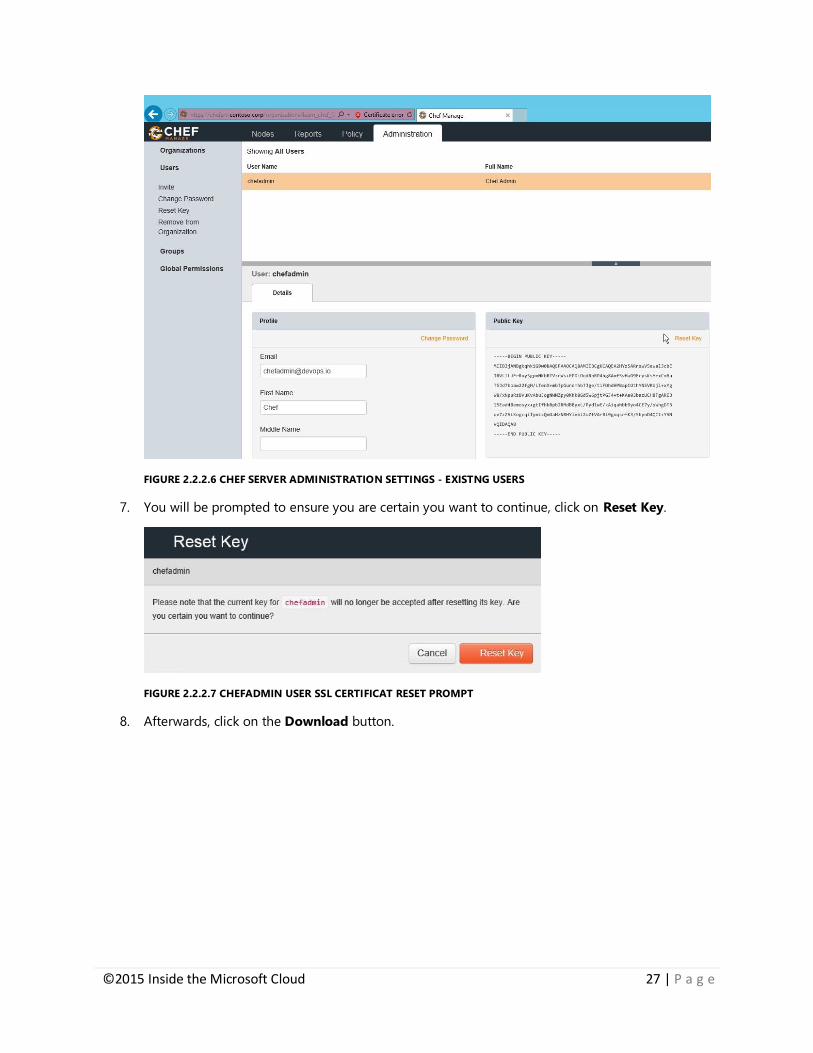
6. Next, click on the Administration tab up top and click on the Users section on the left
hand side. Under Showing All Users, click on chefadmin. The Public Key details will be
displayed in the bottom pane. Click on Reset Key.
©2015 Inside the Microsoft Cloud 27 | P a g e
FIGURE 2.2.2.6 CHEF SERVER ADMINISTRATION SETTINGS - EXISTNG USERS
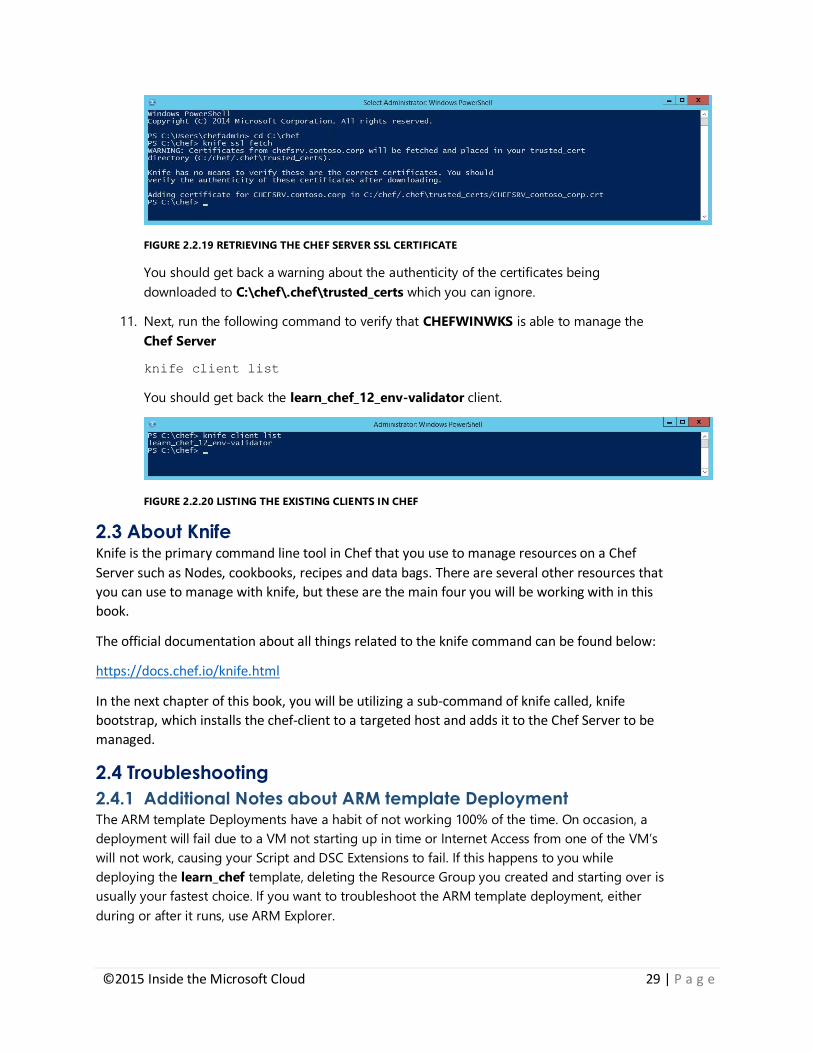
7. You will be prompted to ensure you are certain you want to continue, click on Reset Key.
FIGURE 2.2.2.7 CHEFADMIN USER SSL CERTIFICAT RESET PROMPT
8. Afterwards, click on the Download button.

©2015 Inside the Microsoft Cloud 28 | P a g e
FIGURE 2.2.2.8 CHEFADMIN USER NEW SSL CERTIFICATE DOWNLOAD PROMPT
9. Save the SSL Certificate, chefadmin.pem to C:\chef\.chef. Afterwards, click on the Close
button.
FIGURE 2.2.2.9 SAVING THE NEW CHEFADMIN USER SSL CERTIFICATE
10. Next, open a PowerShell prompt and cd to C:\Chef\. Run the following command to
retrieve the Chef Server SSL Certificate from the Chef Server.
knife ssl fetch
©2015 Inside the Microsoft Cloud 29 | P a g e
FIGURE 2.2.19 RETRIEVING THE CHEF SERVER SSL CERTIFICATE
You should get back a warning about the authenticity of the certificates being
downloaded to C:\chef\.chef\trusted_certs which you can ignore.
11. Next, run the following command to verify that CHEFWINWKS is able to manage the
Chef Server
knife client list
You should get back the learn_chef_12_env-validator client.
FIGURE 2.2.20 LISTING THE EXISTING CLIENTS IN CHEF
2.3 About Knife Knife is the primary command line tool in Chef that you use to manage resources on a Chef
Server such as Nodes, cookbooks, recipes and data bags. There are several other resources that
you can use to manage with knife, but these are the main four you will be working with in this
book.
The official documentation about all things related to the knife command can be found below:
https://docs.chef.io/knife.html
In the next chapter of this book, you will be utilizing a sub-command of knife called, knife
bootstrap, which installs the chef-client to a targeted host and adds it to the Chef Server to be
managed.
2.4 Troubleshooting
2.4.1 Additional Notes about ARM template Deployment The ARM template Deployments have a habit of not working 100% of the time. On occasion, a
deployment will fail due to a VM not starting up in time or Internet Access from one of the VM’s
will not work, causing your Script and DSC Extensions to fail. If this happens to you while
deploying the learn_chef template, deleting the Resource Group you created and starting over is
usually your fastest choice. If you want to troubleshoot the ARM template deployment, either
during or after it runs, use ARM Explorer.
©2015 Inside the Microsoft Cloud 30 | P a g e
2.4.2 ARM Explorer Azure Resource Explorer (also known as ARM Explorer) allows you to view ARM Deployments in
Azure as they are being deployed in real-time. ARM Explorer allows you to view the API in your
own subscription directly from a web browser at the URL below:
https://resources.azure.com
Everything displayed in ARM Explorer is in JSON, but is color coded for readability. Below is a
screenshot of the output of the ADDC Custom Script resource and the message output from the
script.
FIGURE 2.4.2.0 ADDC CUSTOM SCRIPT RESOURCE STATUS AS SHOWN IN ARM EXPLORER
Using ARM Explorer, you have the option of creating resources by submitting JSON directly of the
properties of the resources you are creating. You also have the option of deleting resources from
here as well. Finally, the PowerShell Code used to add and remove resources is available on the
PowerShell tab.
The Azure Portal also has a new option called Resource Explorer, giving you a quick glance into
the API to determine if a resource was deployed successfully or not.
FIGURE 2.4.2.1 ADDC CUSTOM SCRIPT RESOURCE STATUS AS SHOWN IN RESOURCE EXPLORER
Unlike ARM Explorer, Resource Explorer only provides a quick view of resources and their status;
additionally, there isn’t an option to manage resources directly like in ARM Explorer.
©2015 Inside the Microsoft Cloud 31 | P a g e
2.4.3 Windows Azure Agent VM Logs If you are still having problems finding the root cause of your deployment issues, you can log into
the deployed VMs and find additional information as to why an extension failed to run correctly
by review the logs of the respective named extensions in the following paths:
C:\WindowsAzure\Logs\Plugins
This section will have basic information as to when the extension was installed and executed
successfully. When using the PowerShell Script Extension, it is possible for the PowerShell Script to
fail but for the execution of the extension to return successful. That is why you should review the
logs generated by the extensions in the following path below:
C:\Packages\Plugins
Under the named folder of the extension you are investigating, you should find a folder called
Status; within this folder should be a file called 0.status. The actions taken by the extension
during runtime will available here for your review.
On Linux Hosts, you can find the same 0.status file by looking in the following directory:
/var/lib/waagent/
For example, if you are using the Custom Script Extension for Linux, the full path to the 0.status
file might look like:
/var/lib/waagent/Microsoft.OSTCExtensions.CustomScriptForLinux-
1.2.2.0/status/0.status
2.4.4 Additional Notes about the Chef Server Certificates The instructions you just went through have you reset the certificates for both Chef Client
Validation, learn_chef_12_env-validator, and the User chefadmin even though both of these SSL
Certificates are located on the Chef Server. In order to retrieve those certificates from the Chef
Server, you need to use a tool such as WinSCP to copy the certificates to C:\Chef\.chef on
CHEFWINWKS. Rather than go through those steps, demonstrating how to reset the existing
Certificates and download them to CHEFWINWKS was just as effective. Just know that if you
need to in the future, copying the certificates directly from the Chef Server is an option if you
don’t have access to the Chef Management Console.
2.5 Chapter Summary In this chapter we deployed a Chef Environment in Azure using the learn_chef ARM template. We
verified that the Chef Management Console was working and then proceeded to configure the
Chef Windows Workstation to manage the Chef Server by resetting the existing Chef Server
Certificates responsible for Chef Client Validation and the Chef Admin User. Finally, we verified
connectivity to the Chef Server from the Chef Workstation by running the knife client list
command.
In the next Chapter, we will install the Chef client on the Windows Systems in the Chef
Environment by bootstrapping them using knife along with bootstrapping a host using a Run List.

©2015 Inside the Microsoft Cloud 32 | P a g e
Chapter 3: Bootstrapping the
Hosts In the previous chapter, we discussed and demonstrated the following:
Deploying the learn_chef ARM Template from GitHub
Configure the Chef Windows Workstation
Reset two Chef Server Certificates
o Chef Client Validation
o Chef Admin User
Verifying Connectivity from the Chef Windows Workstation to the Chef Server
Now that we have a working Chef Server and a Chef Windows Workstation configured to manage
it, it is time to bootstrap the rest of the Windows Hosts in the environment so they can be
managed by the Chef Server. We call the process that installs chef-client on a node and the initial
check-in to the Chef Server bootstrapping the node.
In this Chapter we will complete the following tasks:
Bootstrap the Chef Windows workstation
Bootstrap the Domain Controller
Install the GitHub Desktop on the Chef Windows workstation
Clone the learn_chef Azure Template locally to the Chef Windows workstation
Upload the Install_Chef_Client_Win_Service_10_MIC Cookbook to the Chef server
Bootstrap the Chef Windows sandbox host with the
Install_Chef_Client_Win_Service_10_MIC recipe.
3.1 About Cookbooks In Chef, a cookbook is the base unit (container) of configuration and policy distribution. A
cookbook defines a scenario and contains everything that is required to support that scenario:
Recipes that specify the resources to use
The order in which they are to be applied
Attribute values
File distributions
Templates
Extensions to Chef, such as libraries, definitions, and custom resources
Much like a recipe you use in the kitchen, a recipe in Chef describes all the resources needed to
successfully deploy an environment in an automated way.

©2015 Inside the Microsoft Cloud 33 | P a g e
While we are on the topic, a Chef cookbook contains recipes. The smaller tasks in a chef
deployment, usually written in Ruby, are called recipes. Much like a recipe for apple pie may
refer to a recipe for pie crust on another page in the cookbook, recipes in chef may reference
other recipes.
The official documentation about all things related to the cookbooks can be found below:
https://docs.chef.io/cookbooks.html
In this chapter, and throughout the rest of this book, we will be using cookbooks to customize
the configuration of the Windows Servers running in the Chef Environment.
3.2 Bootstrap the Chef Windows Workstation Adding your Chef Workstation to your Chef Environment is something you may want to consider
doing to ensure your workstations has the applications installed and configured you require. For
the purposes of this book, CHEFWINWKS is being bootstrapped to help you get accustomed to
adding new hosts to the Chef server and what to expect.
1. Make sure you are logged into CHEFWINWKS via RDP. Open up a PowerShell prompt
and cd to C:\Chef\. Run the following command to bootstrap CHEFWINWKS.
knife bootstrap windows winrm 'CHEFWINWKS.contoso.corp' -x
chefadmin -P 'LearnChef!' -N 'CHEFWINWKS.contoso.corp'
The bootstrapping process will first verify that it can communicate with the Chef Server
before continuing. Next, it will attempt to download and install the latest version of the
chef-client that is applicable to the OS that you targeting. Once the chef-client installation
is finished, the chef-client will run for the first time and output the text shown below if it
ran successfully. The entire bootstrap process should only take a few minutes.
FIGURE 3.2.0 CHEFWINWKS FIRST CHEF-CLIENT RUN
2. Next, browse to the Chef Management Console (https://chefsrv.contoso.corp) and verify
that CHEFWINWKS is displayed under the Nodes tab.
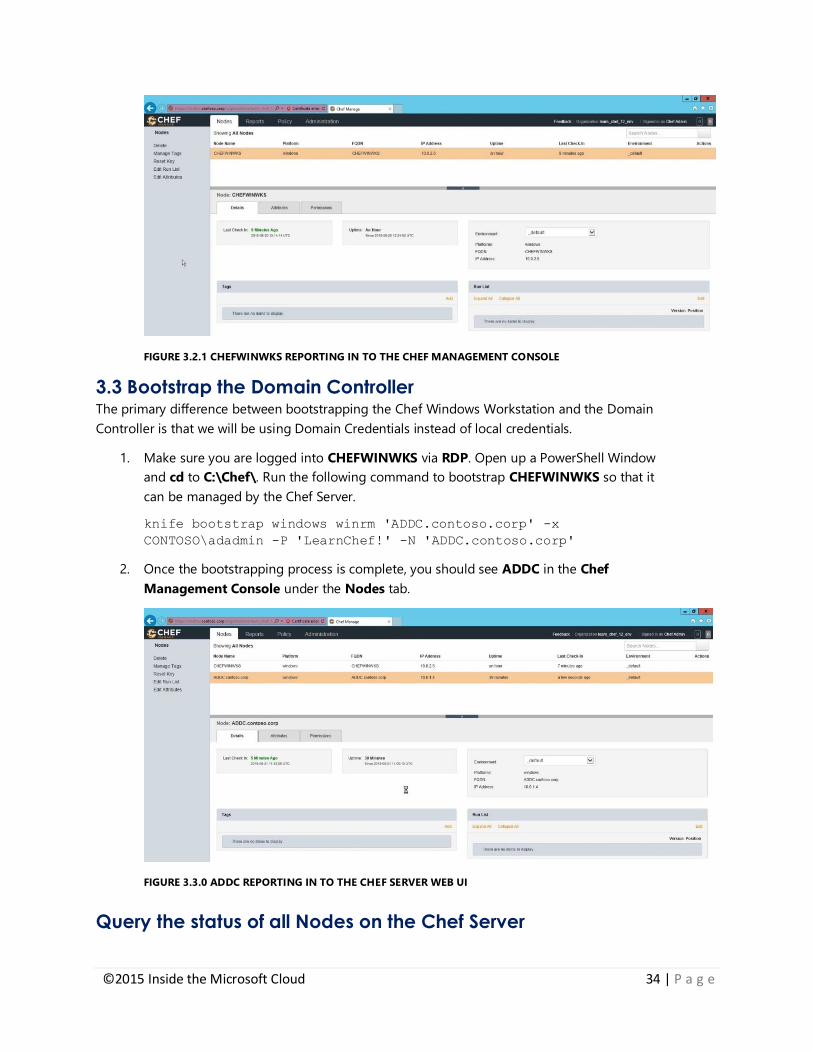
©2015 Inside the Microsoft Cloud 34 | P a g e
FIGURE 3.2.1 CHEFWINWKS REPORTING IN TO THE CHEF MANAGEMENT CONSOLE
3.3 Bootstrap the Domain Controller The primary difference between bootstrapping the Chef Windows Workstation and the Domain
Controller is that we will be using Domain Credentials instead of local credentials.
1. Make sure you are logged into CHEFWINWKS via RDP. Open up a PowerShell Window
and cd to C:\Chef\. Run the following command to bootstrap CHEFWINWKS so that it
can be managed by the Chef Server.
knife bootstrap windows winrm 'ADDC.contoso.corp' -x
CONTOSO\adadmin -P 'LearnChef!' -N 'ADDC.contoso.corp'
2. Once the bootstrapping process is complete, you should see ADDC in the Chef
Management Console under the Nodes tab.
FIGURE 3.3.0 ADDC REPORTING IN TO THE CHEF SERVER WEB UI
Query the status of all Nodes on the Chef Server

©2015 Inside the Microsoft Cloud 35 | P a g e
While using the Chef Management Console is useful for getting a quick overview of what is
going on in your Chef Environment, most of the management takes place from the command
line.
On CHEFWINWKS, open up a PowerShell Window and cd to C:\Chef\. Run the following
command to check the status of your new bootstrapped hosts.
knife status
You should get back the following:
FIGURE 3.3.1 CURRENT LIST OF NODES MANAGED BY THE CHEF SERVER
3.4 Running the chef-client as a Service in Windows The first thing you need to know about the chef-client is that is does not run as a Service by
default in Windows or Linux! However, it is very easy to install it as a service in Windows by
running the following command from PowerShell, once the chef-client has been installed:
chef-service-manager –a install
After installing the chef-client as a service, it will attempt to check-in with the Chef Server every
30 minutes to update its Run List configuration.
There is not a straightforward way to configure the interval as the chef-client Service is configured
to take parameters from the chef-windows-service file in C:\opscode\chef\bin. When you first
install the Chef Client Windows Service, you will see the following under the Chef Client
Service (Local Computer) Properties under Path to executable:
C:\opscode\chef\embedded\bin\ruby C:\opscode\chef\bin\chef-windows-
service -c C:\chef\client.rb -L C:\chef\client.log
You can pass a different interval value (seconds) to the service using the -i parameter after the
entry for the path to the client knife configuration file, knife.rb. Therefore, to configure the chef-
client to run every 10 minutes, you would use the configuration shown below.
C:\opscode\chef\embedded\bin\ruby C:\opscode\chef\bin\chef-windows-
service -c C:\chef\client.rb -i 600 -L C:\chef\client.log
Finally, in order to set this value, you need to use the Service Controller command line tool in
Windows, i.e. - sc.exe. Instead of taking you through how to use this tool, the next section(s) of
this chapter will be on deploying your first recipe, Install_Chef_Client_Win_Service_10_MIC, to
CHEFWINSAND during the bootstrap process. The Install_Chef_Client_Win_Service_10_MIC
recipe configures the chef-client to run as a Service on a Windows host at regular 10 minutes
intervals.

©2015 Inside the Microsoft Cloud 36 | P a g e
3.5 Installing GitHub Desktop on the Chef Windows Workstation Before we can bootstrap the Chef Windows sandbox host with a recipe, first we need to retrieve
the required cookbook from GitHub and add it to our local chef-repo. Afterwards we need to
upload the Cookbook to the Chef Server. For starters, we are going to install GitHub on
CHEFWINWKS.
1. The GitHubSetup.exe binary has already been downloaded to C:\Windows\Temp. Go
ahead and double-click on it to start the installation process. If you are prompted with a
Security Warning, ignore it and click Run.
FIGURE 3.5.0 GITHUB INSTALLATION SECURITY WARNING
2. Next, click on the Install button.
FIGURE 3.5.1 GITHUB APPLICATION INSTALL SECURITY WARNING
The installation will start to retrieve the rest of the installation files from the Amazon
Cloud.

©2015 Inside the Microsoft Cloud 37 | P a g e
FIGURE 3.5.2 GITHUB INSTALLATION DOWNLOADING REMAINING FILES
3. Once the remaining files have been downloaded, you might be prompted with a Security
Warning. Ignore it and click Run.
FIGURE 3.5.3 GITHUB INSTALLATION SECURITY WARNING AFTER DOWNLOADING REMAINING FILES
4. During the initial setup, you will be required to login with your GitHub Account, which
you should have setup before reading Chapter 1. Type in your Credentials and click the
Log in button.
FIGURE 3.5.4 GITHUB DESKTOP INITIAL LOGIN
5. Next, type in your GitHub username and e-mail address. These settings are used to
identify whom you are when making changes to repository, so use an e-mail address of
your choosing. Once you have finished, click Continue.

©2015 Inside the Microsoft Cloud 38 | P a g e
FIGURE 3.5.5 GITHUB DESKTOP LOCAL GIT CONFIGURATION
6. Since there are currently no local repositories, click Skip.
FIGURE 3.5.6 GITHUB DESKTOP LOCAL REPOSITORY OPTIONS
7. Open up Internet Explorer and browse to the following URL:
https://github.com/starkfell/azure-quickstart-templates
8. Next, click on the Sign In button as shown below
FIGURE 3.5.7 GITHUB SIGN IN BUTTON LOCATED ON THE TOP UPPER RIGHT CORNER OF THE WEBSITE
9. Login using your GitHub Account.
©2015 Inside the Microsoft Cloud 39 | P a g e
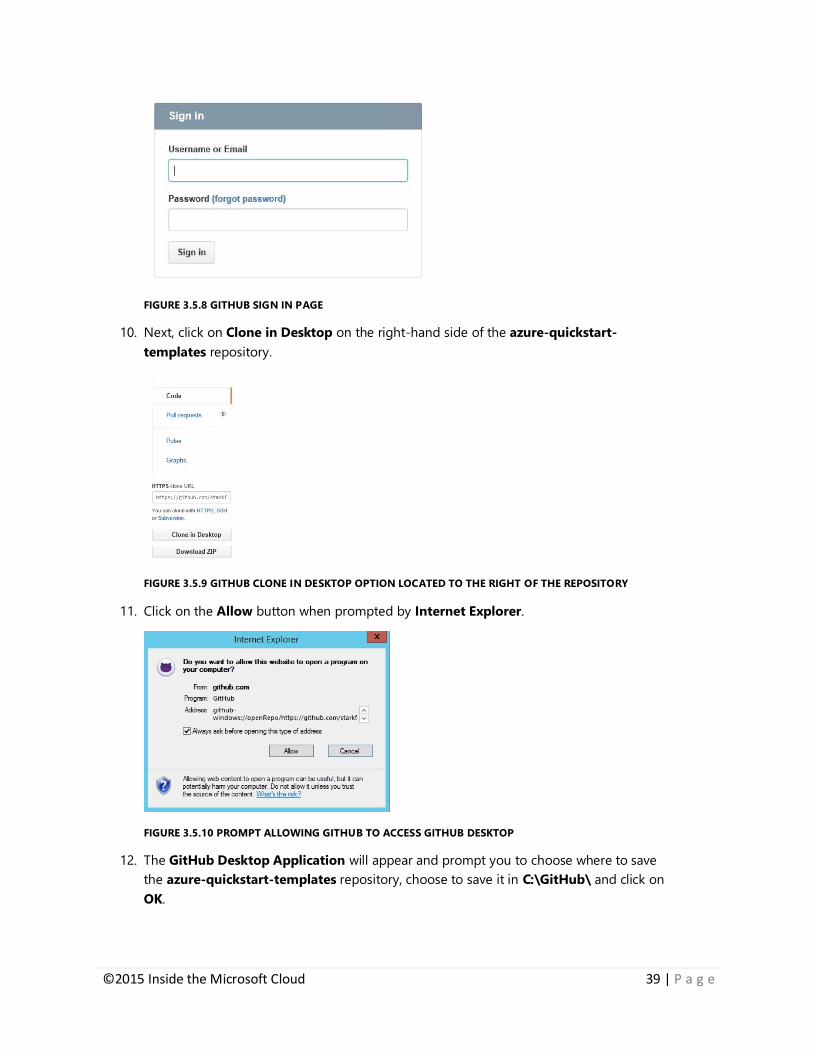
FIGURE 3.5.8 GITHUB SIGN IN PAGE
10. Next, click on Clone in Desktop on the right-hand side of the azure-quickstart-
templates repository.
FIGURE 3.5.9 GITHUB CLONE IN DESKTOP OPTION LOCATED TO THE RIGHT OF THE REPOSITORY
11. Click on the Allow button when prompted by Internet Explorer.
FIGURE 3.5.10 PROMPT ALLOWING GITHUB TO ACCESS GITHUB DESKTOP
12. The GitHub Desktop Application will appear and prompt you to choose where to save
the azure-quickstart-templates repository, choose to save it in C:\GitHub\ and click on
OK.

©2015 Inside the Microsoft Cloud 40 | P a g e
FIGURE 3.5.11 STORE AZURE-QUICKSTART-TEMPLATES IN C:\GITHUB
13. You will then see a progress bar as the azure-quickstart-templates repository is
downloaded to C:\GitHub.
FIGURE 3.5.12 GITHUB DESKTOP CLONING AZURE-QUICKSTART-TEMPLATES LOCALLY
14. Open up Windows Explorer and copy the Install_Chef_Client_Win_Service_10_MIC
directory from C:\GitHub\azure-quickstart-templates\learn_chef\Cookbooks to
C:\chef\chef-repo\cookbooks. Note that the directory you are copying over is in fact a
cookbook.
3.6 Uploading a Cookbook to the Chef Server Now that we copied over the Install_Chef_Client_Win_Service_10_MIC Cookbook locally to our
chef-repo, we can upload it to our Chef Server for further use.
On CHEFWINWKS, open up a PowerShell prompt and cd to C:\Chef\chef-repo\cookbooks and
run the following command to upload the cookbook to the Chef Server.
knife cookbook upload Install_Chef_Client_Win_Service_10_MIC
You should get back the following:
FIGURE 3.6.0 UPLOAD OF THE INSTALL_CHEF_CLIENT_WIN_SERVICE_10_MIC COOKBOOK

©2015 Inside the Microsoft Cloud 41 | P a g e
3.7 Bootstrap the Chef Windows Sandbox with a Run-List Just as you have already done with CHEFWINWKS and ADDC, bootstrap CHEFWINSAND using
the following command below.
knife bootstrap windows winrm 'CHEFWINSAND.contoso.corp' -x
CONTOSO\adadmin -P 'LearnChef!' -N 'CHEFWINSAND.contoso.corp' –-run-
list 'recipe[Install_Chef_Client_Win_Service_10_MIC]'
As you can see, we are adding a Run List to deploy during the first chef-client run at the end of
the bootstrap process. Additionally, we are using the Domain Credentials instead of local
credentials since we have joined this host to the contoso.corp domain.
Note: You can also perform the Active Directory domain join process using the DSC
extension in resource manager. We chose to use a custom script instead, as we found the
process to be faster and more reliable in our testing.
As before, once the bootstrapping process is complete, you should see CHEFWINSAND in the
Chef Management Console. Note the listing of the cookbook we added to the CHEFWINSAND
Run List during the bootstrap.
FIGURE 3.7.0 CHEF WEB SERVER UI SHOWING THE STATUS OF CHEFWINSAND
Next, login to CHEFWINSAND via RDP. Right-click on the Windows Logo on the bottom left
hand corner of the desktop and click Run and type in services.msc. Verify that the Chef Client
Windows Service exists and its status is Running.

©2015 Inside the Microsoft Cloud 42 | P a g e
FIGURE 3.7.1 CHEF-CLIENT SERVICE RUNNING ON CHEFWINSAND AS CONFIGURED VIA RUN LIST
3.8 Manually updating the chef-client to run as a Service in
Windows Since we did not configure ADDC to bootstrap and run the
Install_Chef_Client_Win_Service_10_MIC cookbook, the chef-client will not run on a regular
basis. If the chef-client is not configured to run on a regular basis, its configuration will remain
static until the Client is forced to run again manually. To resolve this issue, login via RDP into
ADDC, open a PowerShell Prompt and run the following command:
chef-service-manager –a install
You should get back the following:
FIGURE 3.8.0 MANUAL INSTALL OF THE CHEF-CLIENT SERVICE ON ADDC
Next, on CHEFWINWKS, cd to C:\Chef and run the command below to update the Run List for
ADDC.
knife node run_list add ADDC.contoso.corp
'recipe[Install_Chef_Client_Win_Service_10_MIC]'
You should get back the following:
FIGURE 3.8.1 UPDATING THE RUN LIST OF ADDC
Next, go back to ADDC and Start the Chef Client Service.
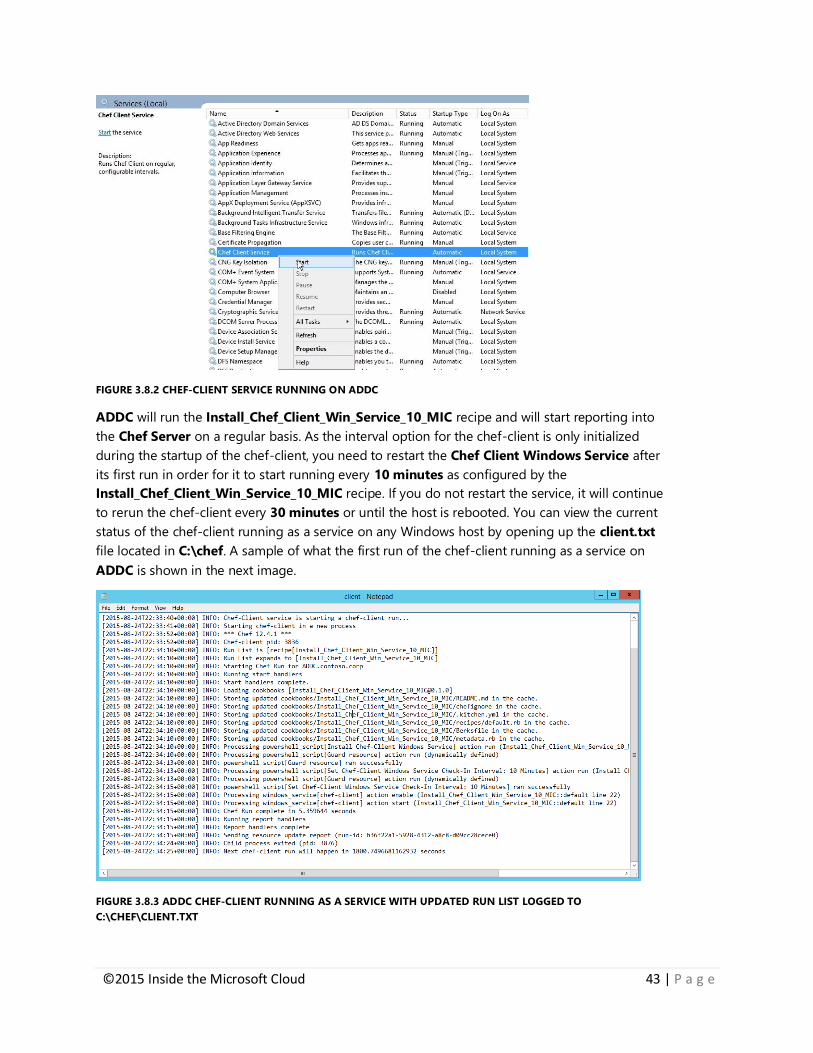
©2015 Inside the Microsoft Cloud 43 | P a g e
FIGURE 3.8.2 CHEF-CLIENT SERVICE RUNNING ON ADDC
ADDC will run the Install_Chef_Client_Win_Service_10_MIC recipe and will start reporting into
the Chef Server on a regular basis. As the interval option for the chef-client is only initialized
during the startup of the chef-client, you need to restart the Chef Client Windows Service after
its first run in order for it to start running every 10 minutes as configured by the
Install_Chef_Client_Win_Service_10_MIC recipe. If you do not restart the service, it will continue
to rerun the chef-client every 30 minutes or until the host is rebooted. You can view the current
status of the chef-client running as a service on any Windows host by opening up the client.txt
file located in C:\chef. A sample of what the first run of the chef-client running as a service on
ADDC is shown in the next image.
FIGURE 3.8.3 ADDC CHEF-CLIENT RUNNING AS A SERVICE WITH UPDATED RUN LIST LOGGED TO
C:\CHEF\CLIENT.TXT

©2015 Inside the Microsoft Cloud 44 | P a g e
3.9 Additional Details about Bootstrapping Windows Hosts If you were to attempt to bootstrap a brand new Windows Server 2012 R2 host without the
following changes detailed below, the bootstrap process would fail. Since the Learn Chef
Environment was deployed using Azure Templates, it was possible to automate these required
changes before you started bootstrapping hosts.
The learn_chef template requires the following script resources, which are executed at a certain
point in the deployment:
ADDC-Custom-Configs.ps1
CHEFWINWKS-Custom-Configs.ps1
CHEFWINSAND-Custom-Configs.ps1
Each of these scripts are executed on the respective hosts they are named after and perform
slightly different tasks. Where they are similar is that they all change the Windows Remote
Management Feature (WinRM) to allow Unencrypted Traffic by executing the following
command:
winrm set winrm/config/service '@{AllowUnencrypted="true"}'
For CHEFWINWKS, an additional command is executed to allow Basic Authentication through
the WinRM as we never join it to the contoso.corp domain.
winrm set winrm/config/service/auth '@{Basic="true"}'
The reason that the Basic Authentication setting is not required to be changed for Domain-
Joined hosts (or Domain Controllers) is that Chef will automatically change over to Negotiate
Authentication when it detects the use of Domain Credentials.
3.10 About the Knife Configuration File In order for the Chef Windows Workstation to understand how it is supposed to manage local
Chef related resources and communicate with the Chef Server, it uses a Configuration File called
knife.rb located in C:\chef\.chef. The Current Knife Configuration on CHEFWINWKS is shown
below:
log_level :info
log_location STDOUT
node_name 'chefadmin'
client_key 'C:/Chef/.chef/chefadmin.pem'
validation_client_name 'learn_chef_12_env-validator'
validation_key 'C:/Chef/.chef/learn_chef_12_env-validator.pem'
chef_server_url 'https://chefsrv.contoso.corp/organizations/learn_chef_12_env'
syntax_check_cache_path 'C:/Chef/.chef/syntax_check_cache'
cookbook_path [ 'C:/Chef/chef-repo/cookbooks' ]
knife[:editor] = '"C:\Program Files (x86)\Notepad++\notepad++.exe" -nosession -multiInst'
A brief explanation of each property is given in the table below. Most of the information was
taken from the Official Chef Documentation Online.
©2015 Inside the Microsoft Cloud 45 | P a g e
Property Description
log_level Default is :info, can also be set to :debug
log_location Default is STDOUT, can also be set to a File Path.
node_name Name of the host as registered on the Chef Server, this
can be different than the hostname or FQDN of the host.
client_key Location of the File that contains the client key
validation_client_name Name of the Chef Validator Key used by the chef-client to
access the Chef Server during the initial chef-client Run.
validation_key Location of the file that contains the key used when a
chef-client is registered with a Chef Server.
chef_server_url The URL for the Chef server and the organization to
manage
syntax_check_cache_path Location where knife caches information about files that
have been checked for valid Ruby syntax.
cookbook_path Location where knife where look by default for all local
cookbooks.
knife[:editor] Text Editor that is used for all interactive commands. For
Windows, it is best to use a third party editor such as
Notepad++ as the default notepad editor in Windows
does not work well with Ruby files by default.
Normally, the knife.rb file will be located in the Users Directory of the user that is currently
logged in on the host. For example, if you were logging in as Administrator, knife.rb would
typically be found or configured in C:\Users\Administrator\.chef\.
Additionally, you will notice that the knife.rb file is using forward slashes instead of back slashes
to delineate directories for all respective properties. The exception being the knife[:editor]
property. If you attempt to use back slashes in any of the other properties, there is a good chance
that you will encounter errors from knife that can waste a significant amount of your time to
troubleshoot.
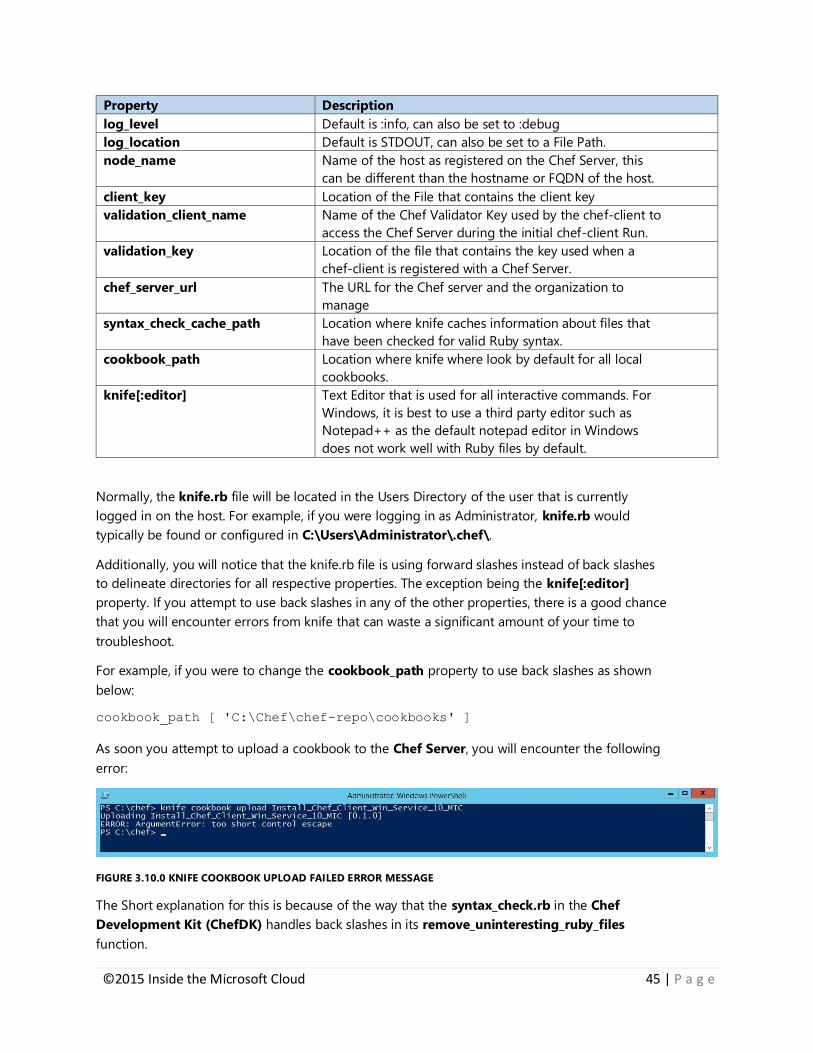
For example, if you were to change the cookbook_path property to use back slashes as shown
below:
cookbook_path [ 'C:\Chef\chef-repo\cookbooks' ]
As soon you attempt to upload a cookbook to the Chef Server, you will encounter the following
error:
FIGURE 3.10.0 KNIFE COOKBOOK UPLOAD FAILED ERROR MESSAGE
The Short explanation for this is because of the way that the syntax_check.rb in the Chef
Development Kit (ChefDK) handles back slashes in its remove_uninteresting_ruby_files
function.

©2015 Inside the Microsoft Cloud 46 | P a g e
The ChefDK is a collection of development tools provided by the Chef community necessary for
managing your Chef Environment. ChefDK is constantly being updated based upon the needs of
the community and as of the publication date of this book, is at version 0.9.0. ChefDK can be
installed on Debian, Mac OS X, Red Hat, Ubuntu, and Windows. You can download ChefDK and
read additional documentation about the product at the link below:
https://downloads.chef.io/chef-dk/
If you want more detailed information as to this type of behavior, you will need to learn more
about the Ruby scripting language used to write Chef recipes. You can get started using Ruby by
starting one of the online tutorials listed below:
Codecademy - https://www.codecademy.com/tracks/ruby
tryruby.org - http://tryruby.org/
rubymonk - https://rubymonk.com/
3.11 Troubleshooting the Bootstrap process You may run across a couple of common issue(s) when bootstrapping a Windows host. Below are
some troubleshooting steps to help you resolve them quickly should they come up as you are
completing the tasks in this chapter.
3.11.1 Class not registered If you see, Class not registered, as shown below, just rerun the bootstrap command again.
FIGURE 3.11.1.0 BOOTSTRAPPING WINDOWS HOST - CLASS NOT REGISTERED ERROR MESSAGE
3.11.2 Bootstrap process is hung On occasion, while the bootstrap process is running from the PowerShell Prompt on
CHEFWINWKS, it may appear as though the bootstrap process is hung. If you don’t see any
activity from the process after 5 minutes, just hit the Enter key in the prompt and the text should
immediately scroll to where the bootstrapping process is currently at; in most cases, it will have
already completed.
3.11.3 Chef Service will not start Another known issue that can occur whereby the Chef Service is installed; however it will fail to
start and return the following error as shown below:
FIGURE 3.11.3.0 CHEF CLIENT SERVICE FAILED TO START ON LOCAL COMPUTER MESSAGE

©2015 Inside the Microsoft Cloud 47 | P a g e
First, change the Chef Client Service to Automatic (Delayed Start) and attempt to start the
Service. If this does not work, delete the host from the Nodes tab in the Chef Management
Console. Next, remove the Chef Client Service by running the following command from a
PowerShell Prompt.
chef-service-manager –a delete
Next, uninstall the chef-client completely using Programs and Features and delete the C:\chef
directory and its contents on the host. Afterwards, attempt to bootstrap the host again with the
Install_Chef_Client_Win_Service_10_MIC recipe added to its initial run list.
3.12 Chapter Summary In this chapter we installed the Chef Windows Client on the Chef Windows Workstation and the
Domain Controller in the Chef Environment by using the knife bootstrap command. GitHub was
installed on the Chef Windows Workstation so that the learn_chef repository could be cloned
(copied) to C:\GitHub. Afterwards, the Install_Chef_Client_Win_Service_10_MIC Cookbook was
uploaded to the Chef Server. Next, the Chef Windows Sandbox was bootstrapped with the
Install_Chef_Client_Win_Service_10_MIC recipe in its Run List. Finally, the Domain Controller’s
Run List was updated to include the Install_Chef_Client_Win_Service_10_MIC recipe and the
Chef Client Windows Service was restarted on the host to reflect the change.
In the next Chapter, we will uploading the Configure_SQL_Disk_F cookbook and updating the
Chef Windows Sandbox Run List configuration to include the default recipe from it.
©2015 Inside the Microsoft Cloud 48 | P a g e
Chapter 4: Configure_SQL_Disk_F
Cookbook In the previous chapter, we discussed and demonstrated the following:
Bootstrap the Chef Windows Workstation
Bootstrap the Domain Controller
Installing the GitHub Desktop on the Chef Windows Workstation
Cloning the learn_chef Azure Template locally to the Chef Windows Workstation
Uploading the Install_Chef_Client_Win_Service_10_MIC Cookbook to the Chef Server
Bootstrapping the Chef Windows sandbox host with the
Install_Chef_Client_Win_Service_10_MIC recipe.
In this chapter, we will complete the following tasks:
Upload the Configure_SQL_Disk_F cookbook to the Chef Server
Add the Configure_SQL_Disk_F to the Run List of CHEFWINSAND
The F:\ Drive on CHEFWINSAND will be used in the following chapter to install and configure
SQL Server 2014 SP1.
4.1 Upload the Configure_SQL_Disk_F Cookbook to the Chef
Server Since we have already cloned the azure-quickstart-templates repository to C:\GitHub on
CHEFWINWKS, the Configure_SQL_Disk_F cookbook just needs to be copied from
C:\GitHub\azure-quickstart-templates\learn_chef\cookbooks to C:\chef\chef-
repo\cookbooks.
After you have finished copying over the cookbook, cd to C:\chef\chef-repo\cookbooks on
CHEFWINWKS and run the following command.
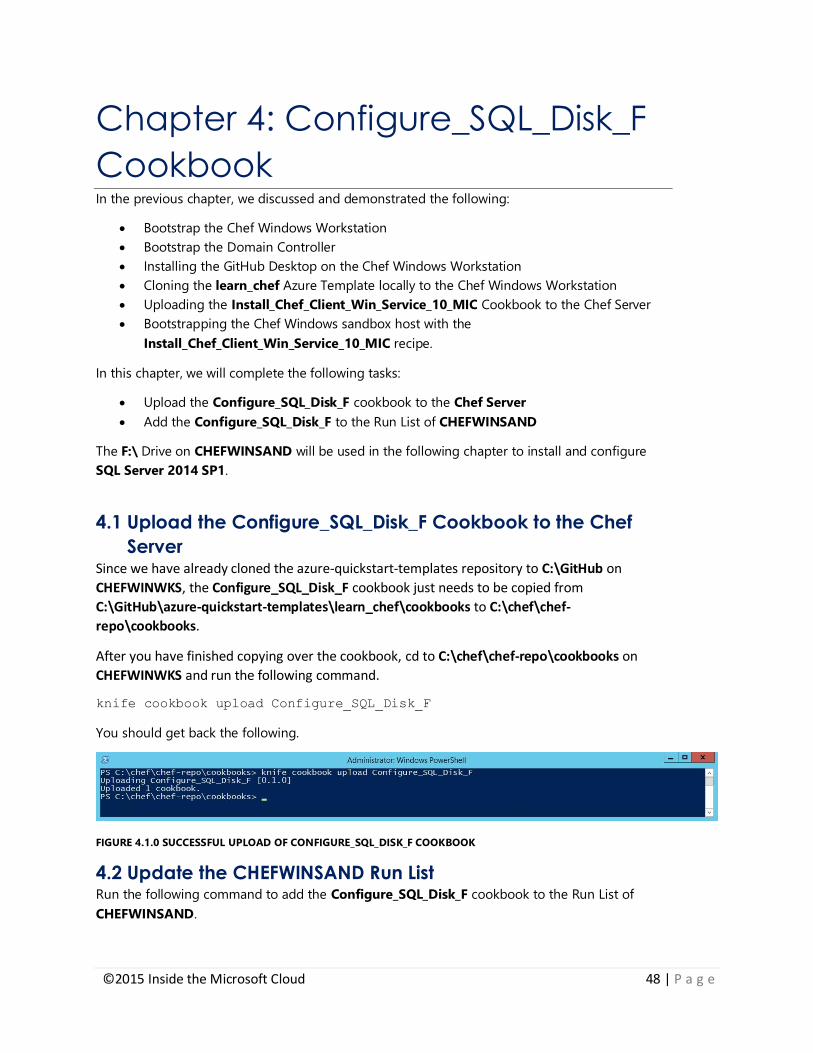
knife cookbook upload Configure_SQL_Disk_F
You should get back the following.
FIGURE 4.1.0 SUCCESSFUL UPLOAD OF CONFIGURE_SQL_DISK_F COOKBOOK
4.2 Update the CHEFWINSAND Run List Run the following command to add the Configure_SQL_Disk_F cookbook to the Run List of
CHEFWINSAND.

©2015 Inside the Microsoft Cloud 49 | P a g e
knife node run_list add CHEFWINSAND.contoso.corp
'recipe[Configure_SQL_Disk_F]'
You should get back the following.
FIGURE 4.2.0 SUCCESSFULLY UPDATED THE RUN LIST FOR CHEFWINSAND
As we have already configured CHEFWINSAND to run the chef-client every 10 minutes using the
Install_Chef_Client_Win_Service_10_MIC cookbook, you should only have to wait a few minutes
for the new recipe to be applied and the F:\ Drive to be created and formatted.
You should see the F:\ Drive in Windows Explorer on CHEFWINSAND
FIGURE 4.2.1 F:\ DRIVE SUCCESSFULLY CREATED ON CHEFWINSAND
The Run History Section under the Reports Tab in the Chef Web Server UI should display the
following.
FIGURE 4.2.2 SUCCESSFUL RUN OF CONFIGURE_SQL_DISK_F RECIPE ON CHEFWINSAND
The chef-client Log on CHEFWINSAND, located in C:\chef\client.txt should have the following
entry.
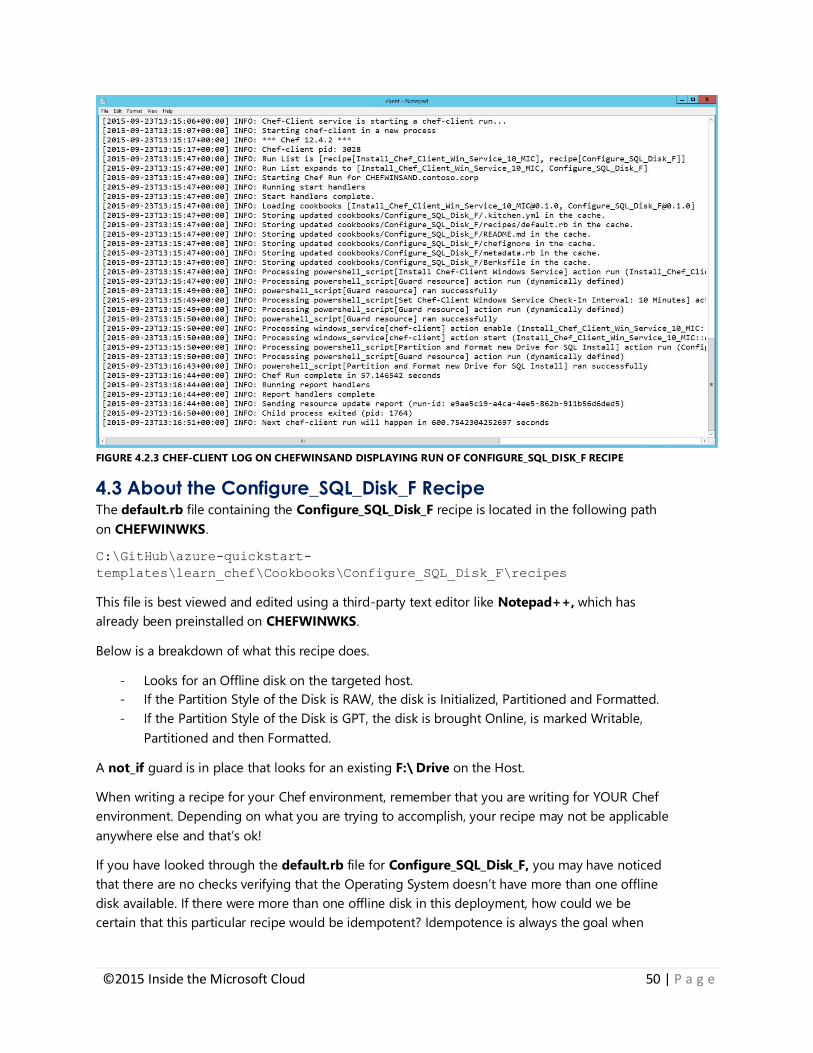
©2015 Inside the Microsoft Cloud 50 | P a g e
FIGURE 4.2.3 CHEF-CLIENT LOG ON CHEFWINSAND DISPLAYING RUN OF CONFIGURE_SQL_DISK_F RECIPE
4.3 About the Configure_SQL_Disk_F Recipe The default.rb file containing the Configure_SQL_Disk_F recipe is located in the following path
on CHEFWINWKS.
C:\GitHub\azure-quickstart-
templates\learn_chef\Cookbooks\Configure_SQL_Disk_F\recipes
This file is best viewed and edited using a third-party text editor like Notepad++, which has
already been preinstalled on CHEFWINWKS.
Below is a breakdown of what this recipe does.
- Looks for an Offline disk on the targeted host.
- If the Partition Style of the Disk is RAW, the disk is Initialized, Partitioned and Formatted.
- If the Partition Style of the Disk is GPT, the disk is brought Online, is marked Writable,
Partitioned and then Formatted.
A not_if guard is in place that looks for an existing F:\ Drive on the Host.
When writing a recipe for your Chef environment, remember that you are writing for YOUR Chef
environment. Depending on what you are trying to accomplish, your recipe may not be applicable
anywhere else and that’s ok!
If you have looked through the default.rb file for Configure_SQL_Disk_F, you may have noticed
that there are no checks verifying that the Operating System doesn’t have more than one offline
disk available. If there were more than one offline disk in this deployment, how could we be
certain that this particular recipe would be idempotent? Idempotence is always the goal when

©2015 Inside the Microsoft Cloud 51 | P a g e
writing your recipes in Chef, but it is something that you have to determine how you want to work
into your recipe.
Additionally, there are pauses put in place in between the time a disk is partitioned and
formatted. This is because there appears to be an issue if you attempt to format a drive
immediately right after it has been partitioned. For onsite resources, this may not be an issue;
however, in Azure, for the current configuration and size of the VMs that are used for this book, a
delay is required. This is just another example of something in the recipe that you can customized
based upon the needs of your environment.
The number of checks you want to use to create Idempotence in your recipe is up to you as well.
In this particular recipe, we are only using a single not_if guard that checks to see if Drive Letter
F:\ with a File System Label of "SQL Data" exists. If these conditions are not found, then the
recipe will run.
The only_if guard could also be used with the not_if guard to check for another condition on the
System, such as making sure that SQL Server 2014 SP1 isn’t already installed.
This is just one example of the many processes that you will have to take into account each time
you write and add a new recipe to an existing Run List on a host.
4.4 Chapter Summary In this chapter we uploaded the Configure_SQL_Disk_F cookbook to the Chef Server and then
added the Configure_SQL_Disk_F recipe to the Run List of The Chef Windows Sandbox.
In the next Chapter, we will uploading the Install_SQL_Server_2014_SP1 cookbook and updating
the Chef Windows Sandbox Run List configuration to include the default recipe from it.
©2015 Inside the Microsoft Cloud 52 | P a g e
Chapter 5: SQL 2014 SP1 Installation
Cookbook In the previous chapter, we discussed and demonstrated the following:
Uploading the Configure_SQL_Disk_F cookbook to the Chef Server
Adding the Configure_SQL_Disk_F to the Run List of CHEFWINSAND
In this chapter, we will complete the following tasks:
Create an Encrypted data bag for sqladmin credentials
Upload the Install_SQL_Server_2014_SP1 cookbook to the Chef Server
Add the Install_SQL_Server_2014_SP1 to the Run List of CHEFWINSAND
5.1 Create Encrypted Data Bag for storing sqladmin Credentials A data bag is a global variable that is stored as JSON data and is accessible from a Chef server. A
data bag is indexed for searching and can be loaded by a recipe or accessed during a search.
We will begin by creating a data bag to store the SQL administrator credentials. The sqladmin
domain service account should already exist, as it was created during the ARM Template
deployment using the ADDC-Custom-Configs.ps1.
So that we do not have to store the sqladmin credentials in plaintext in the
Install_SQL_Server_2014_SP1 recipe, we are going to create a data bag on the Chef Server to
store the credentials and retrieve them from a file that will be hosted on ADDC. Normally, it’s not
a very good idea to host a website on a Domain Controller; however, for demonstration purposes
IIS has been installed and configured on ADDC.
In the first step below, we will be generating an encryption key using PowerShell which will be
used to encrypt the sqladmin password on the Chef Server using shared secret encryption. In the
steps following the creation of the encryption key, we will be creating a Data Bag to store the
sqladmin credentials and then encrypting the Data Bag Item containing the sqladmin
password. Finally, we will be going over how to verify that our encrypted password is secured and
how we can retrieve the password value as required.
1. Login to CHEFWINWKS via RDP and open up a PowerShell Prompt. Type cd C:\chef\ to
change directories and run the following commands to generate an encryption key.
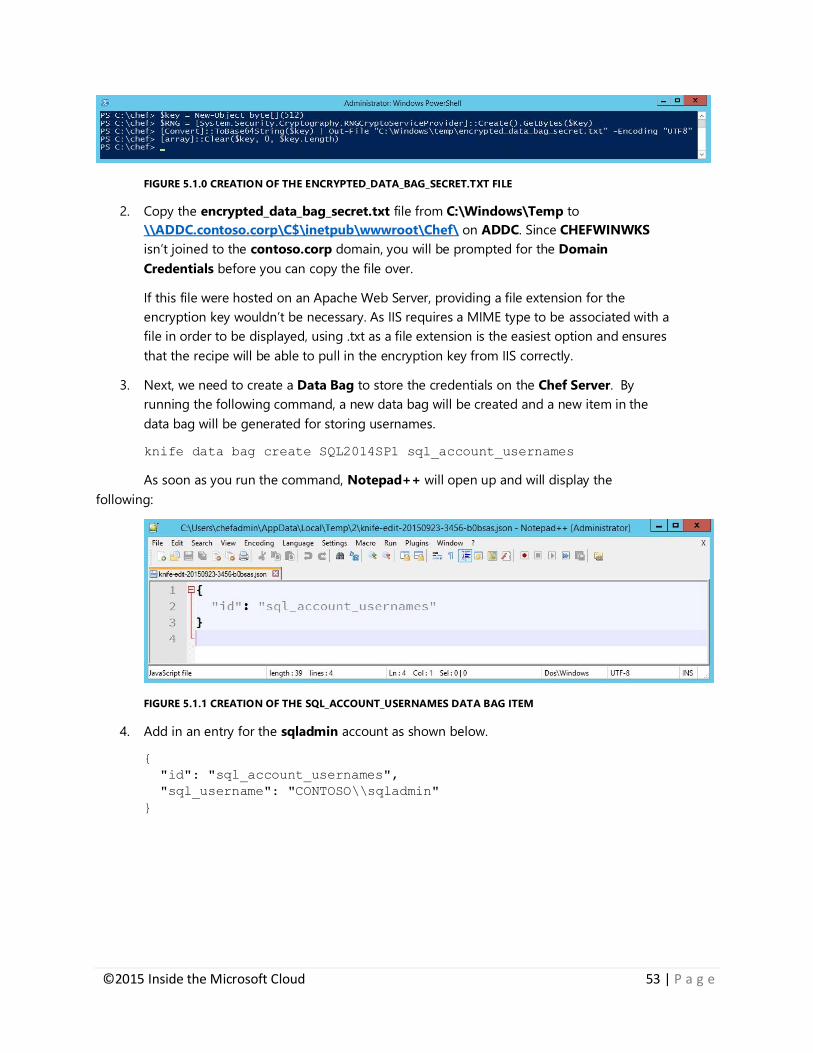
$key = New-Object byte[](512)
$rng =
[System.Security.Cryptography.RNGCryptoServiceProvider]::Create()
.GetBytes($key)
[Convert]::ToBase64String($key) | Out-File
"C:\Windows\Temp\encrypted_data_bag_secret.txt" -encoding "UTF8"
[array]::Clear($key, 0, $key.Length)
©2015 Inside the Microsoft Cloud 53 | P a g e
FIGURE 5.1.0 CREATION OF THE ENCRYPTED_DATA_BAG_SECRET.TXT FILE
2. Copy the encrypted_data_bag_secret.txt file from C:\Windows\Temp to
\\ADDC.contoso.corp\C$\inetpub\wwwroot\Chef\ on ADDC. Since CHEFWINWKS
isn’t joined to the contoso.corp domain, you will be prompted for the Domain
Credentials before you can copy the file over.
If this file were hosted on an Apache Web Server, providing a file extension for the
encryption key wouldn’t be necessary. As IIS requires a MIME type to be associated with a
file in order to be displayed, using .txt as a file extension is the easiest option and ensures
that the recipe will be able to pull in the encryption key from IIS correctly.
3. Next, we need to create a Data Bag to store the credentials on the Chef Server. By
running the following command, a new data bag will be created and a new item in the
data bag will be generated for storing usernames.
knife data bag create SQL2014SP1 sql_account_usernames
As soon as you run the command, Notepad++ will open up and will display the
following:
FIGURE 5.1.1 CREATION OF THE SQL_ACCOUNT_USERNAMES DATA BAG ITEM
4. Add in an entry for the sqladmin account as shown below.
{
"id": "sql_account_usernames",
"sql_username": "CONTOSO\\sqladmin"
}

©2015 Inside the Microsoft Cloud 54 | P a g e
FIGURE 5.1.2 ADDING THE SQLADMIN USERNAME TO THE SQL_ACCOUNTS_USERNAMES DATA BAG
ITEM
5. Once you have finished editing the file, click on the Save icon and close the window. The
following should then be displayed in the PowerShell Prompt.
FIGURE 5.1.3 SUCCESS IN ADDING THE SQLADMIN USERNAME TO THE SQL2014SP1 DATA BAG
6. Next, we need to create the sql_account_passwords data bag item and encrypt the entry
using the encrypted_data_bag_secret.txt file we created earlier. Run the following
command below.
knife data bag create SQL2014SP1 sql_account_passwords –-secret-
file C:\Windows\Temp\encrypted_data_bag_secret.txt
As soon as you run the command, Notepad++ will open up and will display the
following:
FIGURE 5.1.4 CREATION OF THE SQL_ACCOUNT_PASSWORDS DATA BAG ITEM
7. Add in the password of the sqladmin account as shown below.
{
"id": "sql_account_passwords",
"sql_password": "P@ssw0rd1!"
}
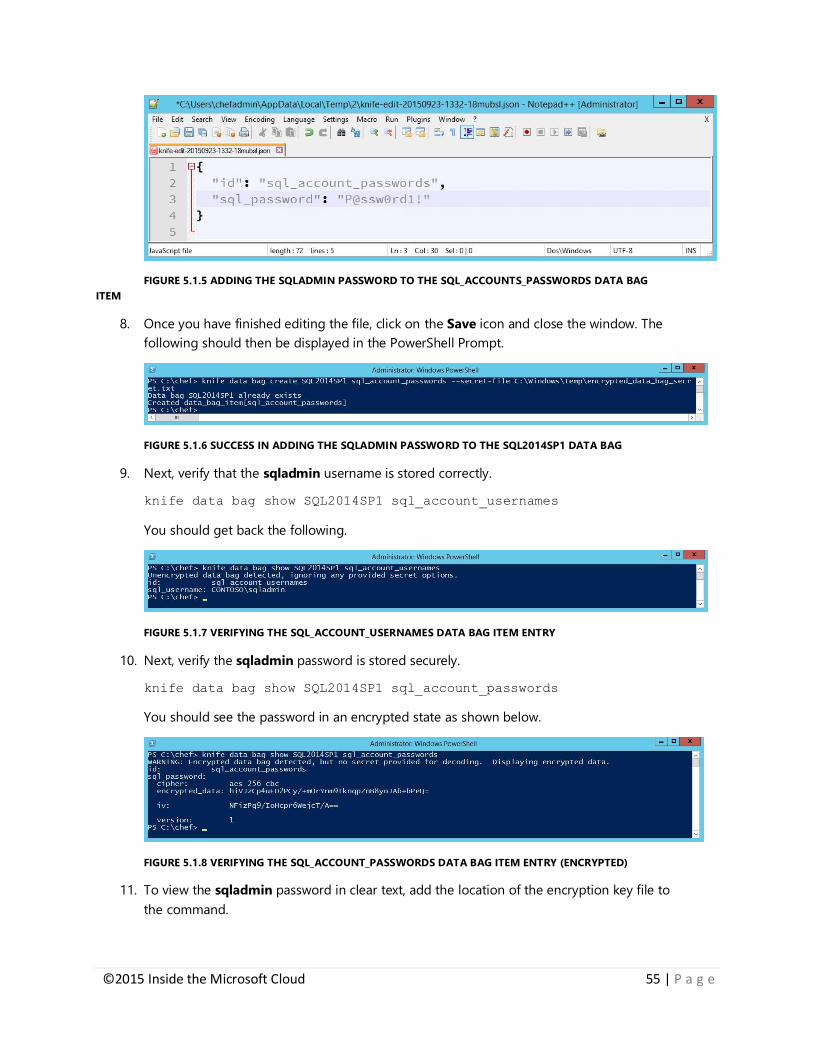
©2015 Inside the Microsoft Cloud 55 | P a g e
FIGURE 5.1.5 ADDING THE SQLADMIN PASSWORD TO THE SQL_ACCOUNTS_PASSWORDS DATA BAG
ITEM
8. Once you have finished editing the file, click on the Save icon and close the window. The
following should then be displayed in the PowerShell Prompt.
FIGURE 5.1.6 SUCCESS IN ADDING THE SQLADMIN PASSWORD TO THE SQL2014SP1 DATA BAG
9. Next, verify that the sqladmin username is stored correctly.
knife data bag show SQL2014SP1 sql_account_usernames
You should get back the following.
FIGURE 5.1.7 VERIFYING THE SQL_ACCOUNT_USERNAMES DATA BAG ITEM ENTRY
10. Next, verify the sqladmin password is stored securely.
knife data bag show SQL2014SP1 sql_account_passwords
You should see the password in an encrypted state as shown below.
FIGURE 5.1.8 VERIFYING THE SQL_ACCOUNT_PASSWORDS DATA BAG ITEM ENTRY (ENCRYPTED)
11. To view the sqladmin password in clear text, add the location of the encryption key file to
the command.
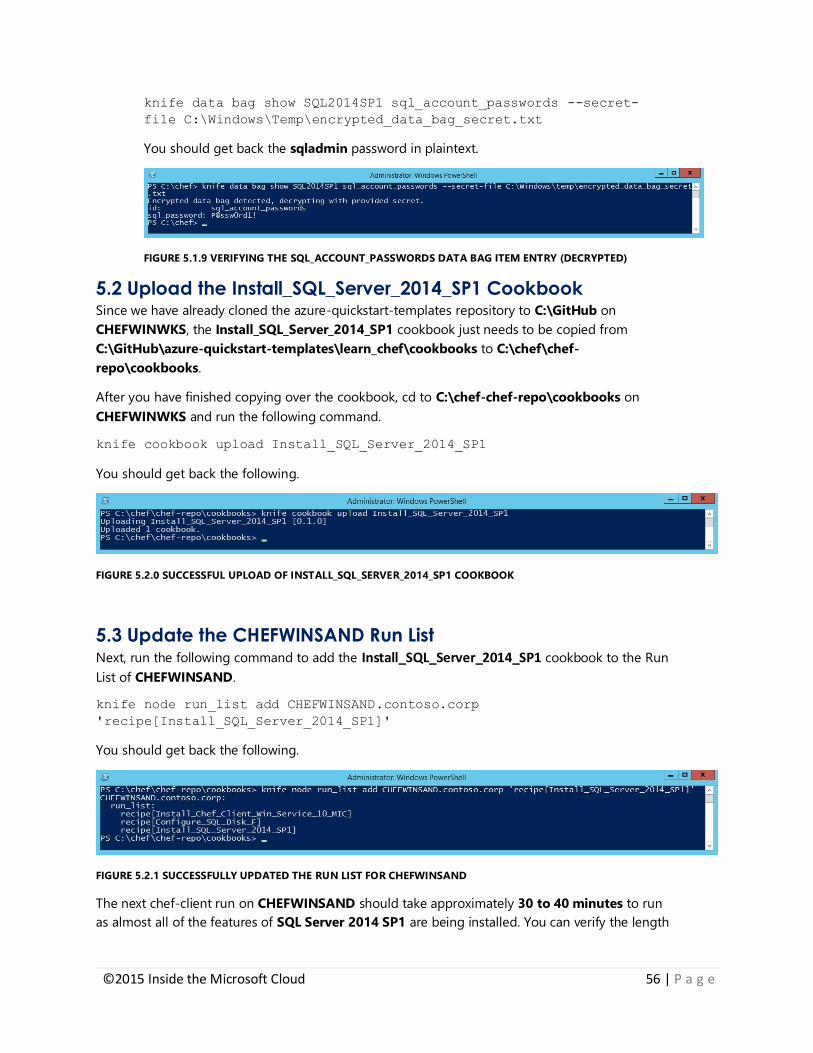
©2015 Inside the Microsoft Cloud 56 | P a g e
knife data bag show SQL2014SP1 sql_account_passwords --secret-
file C:\Windows\Temp\encrypted_data_bag_secret.txt
You should get back the sqladmin password in plaintext.
FIGURE 5.1.9 VERIFYING THE SQL_ACCOUNT_PASSWORDS DATA BAG ITEM ENTRY (DECRYPTED)
5.2 Upload the Install_SQL_Server_2014_SP1 Cookbook Since we have already cloned the azure-quickstart-templates repository to C:\GitHub on
CHEFWINWKS, the Install_SQL_Server_2014_SP1 cookbook just needs to be copied from
C:\GitHub\azure-quickstart-templates\learn_chef\cookbooks to C:\chef\chef-
repo\cookbooks.
After you have finished copying over the cookbook, cd to C:\chef-chef-repo\cookbooks on
CHEFWINWKS and run the following command.
knife cookbook upload Install_SQL_Server_2014_SP1
You should get back the following.
FIGURE 5.2.0 SUCCESSFUL UPLOAD OF INSTALL_SQL_SERVER_2014_SP1 COOKBOOK
5.3 Update the CHEFWINSAND Run List Next, run the following command to add the Install_SQL_Server_2014_SP1 cookbook to the Run
List of CHEFWINSAND.
knife node run_list add CHEFWINSAND.contoso.corp
'recipe[Install_SQL_Server_2014_SP1]'
You should get back the following.
FIGURE 5.2.1 SUCCESSFULLY UPDATED THE RUN LIST FOR CHEFWINSAND
The next chef-client run on CHEFWINSAND should take approximately 30 to 40 minutes to run
as almost all of the features of SQL Server 2014 SP1 are being installed. You can verify the length
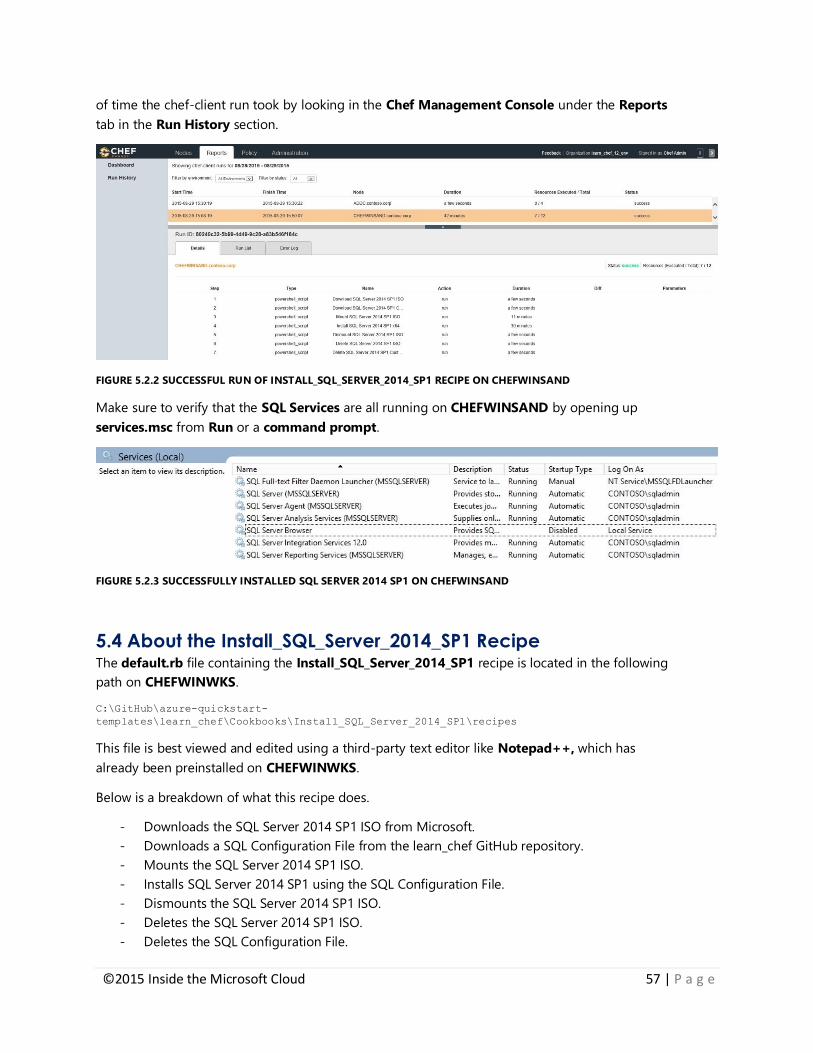
©2015 Inside the Microsoft Cloud 57 | P a g e
of time the chef-client run took by looking in the Chef Management Console under the Reports
tab in the Run History section.
FIGURE 5.2.2 SUCCESSFUL RUN OF INSTALL_SQL_SERVER_2014_SP1 RECIPE ON CHEFWINSAND
Make sure to verify that the SQL Services are all running on CHEFWINSAND by opening up
services.msc from Run or a command prompt.
FIGURE 5.2.3 SUCCESSFULLY INSTALLED SQL SERVER 2014 SP1 ON CHEFWINSAND
5.4 About the Install_SQL_Server_2014_SP1 Recipe The default.rb file containing the Install_SQL_Server_2014_SP1 recipe is located in the following
path on CHEFWINWKS.
C:\GitHub\azure-quickstart-
templates\learn_chef\Cookbooks\Install_SQL_Server_2014_SP1\recipes
This file is best viewed and edited using a third-party text editor like Notepad++, which has
already been preinstalled on CHEFWINWKS.
Below is a breakdown of what this recipe does.
- Downloads the SQL Server 2014 SP1 ISO from Microsoft.
- Downloads a SQL Configuration File from the learn_chef GitHub repository.
- Mounts the SQL Server 2014 SP1 ISO.
- Installs SQL Server 2014 SP1 using the SQL Configuration File.
- Dismounts the SQL Server 2014 SP1 ISO.
- Deletes the SQL Server 2014 SP1 ISO.
- Deletes the SQL Configuration File.

©2015 Inside the Microsoft Cloud 58 | P a g e
To ensure that these actions are not taken if SQL Server 2014 SP1 is already installed on the
targeted Host, a not_if guard is placed after each of these actions in the recipe to first check if the
SQL Server Service (MSSQLSERVER) already exists.
In the Variables section of the recipe, there are three entries that retrieve web based resources:
secret_key
iso_url
sql_config_file_url
What you should know about these variables, is that you can change these to point at each
respective resource depending on your own environment. If you have an existing SQL Server ISO
on a Web Server, you could change the iso_url variable to the point to it. The same can be done
for the sql_config_file_url once you have created your own custom SQL Configuration File and
then stored it on a Web Server.
In regards to the secret_key, do not store your data bag encryption key in a publicly accessible
location, i.e. GitHub. If someone has access to the data bag encryption key, they could potentially
access your encrypted credentials stored in your data bags. Thus, if you wish to host the
secret_key on a Web Server in your environment, make sure to restrict access to it accordingly.
5.5 Chapter Summary In this chapter we uploaded the Install_SQL_Server_2014_SP1 cookbook to the Chef Server and
then added the Install_SQL_Server_2014_SP1 recipe to the Run List of The Chef Windows
Sandbox.
5.6 Questions, Comments and Errata Please send questions, comments and errata on the material in this book via e-mail to