autoright 12 volt, 6 inch cordless orbital buffer/polisher ... · autoright® 12 volt, 6 inch...
TRANSCRIPT
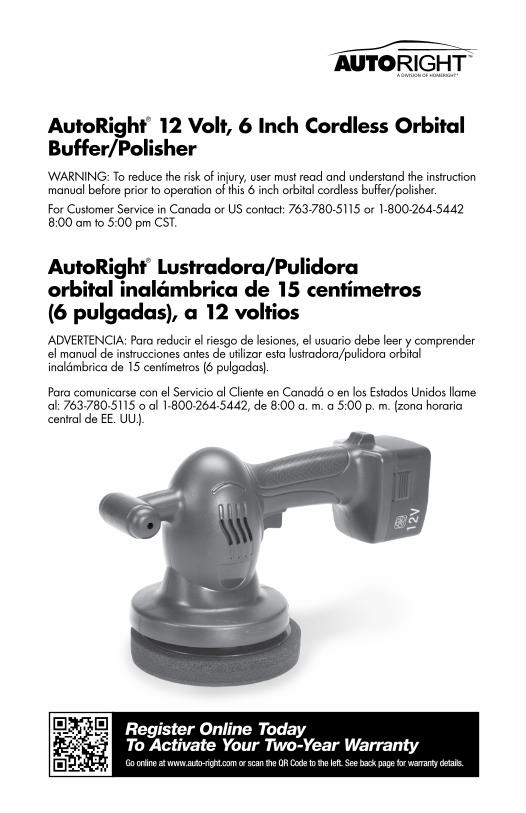
AutoRight® 12 Volt, 6 Inch Cordless Orbital Buffer/PolisherWARNING: To reduce the risk of injury, user must read and understand the instruction manual before prior to operation of this 6 inch orbital cordless buffer/polisher.For Customer Service in Canada or US contact: 763-780-5115 or 1-800-264-5442 8:00 am to 5:00 pm CST.
AutoRight® Lustradora/Pulidora orbital inalámbrica de 15 centímetros (6 pulgadas), a 12 voltiosADVERTENCIA: Para reducir el riesgo de lesiones, el usuario debe leer y comprender el manual de instrucciones antes de utilizar esta lustradora/pulidora orbital inalámbrica de 15 centímetros (6 pulgadas).
Para comunicarse con el Servicio al Cliente en Canadá o en los Estados Unidos llame al: 763-780-5115 o al 1-800-264-5442, de 8:00 a. m. a 5:00 p. m. (zona horaria central de EE. UU.).
Register Online Today To Activate Your Two-Year Warranty
Go online at www.auto-right.com or scan the QR Code to the left. See back page for warranty details.

6 INCH CORDLESS ORBITALENGLISH2
Important Safeguards
General Safety Rules 3Work Area 3Personal Safety 3Tool Use and Care 3Service 4Environmentally Safe Disposal of Your Batteries
4
Battery Safety Rules 4
Batteries and Battery Charger 5Charging the Battery 5Specifications of the AC/DC Charger Adapter
5
SpecificationsKit Contents 6Parts Listing for the 6 inch Orbital Polisher/Buffer
6
Operating InstructionsOperation Warnings/Instructions 7Battery Installation 8Polishing 8Care of Bonnet and Pad 8Polisher Maintenance/Storage 8Troubleshooting 9Warranty 16
Medidas preventivas importantes
Normas generales de seguridad 10Área de trabajo 10Seguridad personal 10Uso y cuidado de la herramienta 10Servicio técnico 11Cómo eliminar las baterías de forma segura para el medioambiente
11
Normas de seguridad para el manejo de las baterías
11
Baterías y cargador de baterías 12Cómo cargar la batería 12Especificaciones para el adaptador CA/CC del cargador
12
EspecificacionesContenido del kit 13Listado de las piezas de la lustradora/pulidora orbital de 15 cm (6 in)
13
Instrucciones de funcionamientoAdvertencias/Instrucciones para el funcionamiento
14
Instalación de la batería 15Pulido 15Cuidado del bonete y de la almoha-dilla
15
Mantenimiento/Guardado de la pulidora
15
Solución de problemas 9Garantía 16

6 INCH CORDLESS ORBITAL ENGLISH 3
GENERAL SAFETY RULES READ AND UNDERSTAND BEFORE USING
!WARNING! Read and understand the user manual instructions. Failure to follow all instructions listed below may result in electric shock, fire and/or serious personal injury.
WORK AREA
1. Keep your work area clean and well lit. Cluttered benches and dark areas invite accidents.
2. Do not use power tools in explosive atmospheres, such as in the presence of flammable liquids, gases or dust. Power tools create sparks, which may ignite the dust and fumes.
3. Keep bystanders, children and visitors away while operating a power tool. Distractions can cause you to lose control.
PERSONAL SAFETY
1. Stay alert, watch what you are doing, and use common sense when operating a power tool. Do not use tool while tired or under the influence of drugs, alcohol or medication. A moment of inattention while operating power tools may result in serious personal injury.
2. Dress properly. Do not wear loose clothing or jewelry. Keep your hair, clothing and gloves away from moving parts. Loose clothes, jewelry, or long hair can be caught in moving parts.
3. Avoid accidental starting. Be sure switch is in the OFF position before inserting battery pack. Carrying tools with your finger on the switch invites accidents.
4. Use safety equipment. Always wear eye protection. Dust mask, non-skid safety shoes, hardhat or hearing protection must be used for appropriate conditions.
TOOL USE AND CARE
1. Prevent Surface Damage: Always use a clean bonnet with each project. Before beginning, check bonnet or pad for foreign elements, dirt and debris. Dirt and debris can cause damage to the surface of a vehicle.
2. Use clamps or other practical ways to secure and support the work piece to a stable platform. Holding the work by hand or against your body is unstable and may lead to loss of control.
3. Do not force tool. Use the correct tool for your application. The correct tool will do the job better and safer at the rate for which it is designed.
4. Do not use tool if switch does not turn on or off. A tool that cannot be controlled with the switch is dangerous and must be repaired.
5. Disconnect battery pack from tool or place the switch in the locked or off position before storing to ensure no accidental starting.
6. Store idle tools out of reach of children and other untrained persons. Tools are dangerous in the hand of untrained users.
7. When battery pack is not in use, keep it away from other metal objects like: paper clips, coins, keys, nails, screws, or other small metal objects that can make a connections from one terminal to another. Shorting the battery terminals together may cause sparks, burns or a fire.
8. Check for misalignment or binding of moving parts, breakage of parts, and any other conditions that may affect the tool’s operation. If damaged, have the tool serviced before using. Many accidents are caused by poorly maintained tools.
9. Use only accessories that are recommended by the manufacturer for your model. Accessories that may be suitable for one tool may create a risk of injury when used on another tool.
IMPORTANT SAFEGUARDS

SERVICE
1. Tool service must be performed only by qualified repair personnel. Service or maintenance performed by unqualified personnel may result in a risk of injury.
2. Accessories must be rated for at least the speed recommended on the tool warning label. Wheels and other accessories running over rated speed can fly apart and cause injury.
Important!: Do not operate the polisher until you have inspected each part. If any part is missing or damaged, do not use it. Return the polisher to the place of purchase. See WARRANTY.
ENVIRONMENTALLY SAFE DISPOSAL OF YOUR BATTERIES
!WARNING! If any of your batteries break or crack, they may or may not leak, do not attempt to recharge and use it, dispose of it immediately and replace it with a new one.
Never try to repair a battery. Batteries used in the tool contain a toxic material called Cadmium.
!WARNING! Batteries contain toxic materials and must be disposed in a specific manners so there is no contamination of the environment. Before you can dispose of any worn or damaged batteries, contact your local Environmental Protection Agency (EPA) for instructions and information pertaining to Nickel-Cadmium Batteries.
BATTERY SAFETY RULES
Follow these simple rules to avoid injury and risk of fire, electrical shock, and explosion.
• Do not attempt to open any battery.
• Do not put the batteries in the regular trash.
• Do not incinerate any battery.
• If a leak appears, the released electrodes are corrosive, wash your hands and do not get the material in your eyes or mouth.
• Dispose your batteries to a certified disposal center.
• When battery pack is not in use, keep away from other metal objects such as paper clips, coins, keys, nails, screws or other small metal objects that may connect one terminal. The short of the one terminal may cause sparks, burn and even a fire.
• The battery pack included with this product can only be charged by the charger supplied in this kit, other types may burst causing fire or other danger.
• Only battery pack supplied in this kit can be used for the polisher. Other types may cause fire or other dangers.
• Make sure the switch is in off position before inserting the battery pack into the polisher to avoid damages caused by accidental starting.
• Carrying tools with your finger on the switch invites accident.
• Ensure battery is disposed of safely as instructed by the manufacturer.
• Don’t store battery pack in a container with other metal objects such as nails, coins, etc.
• Don’t short the battery pack; a battery short can cause a large current flow, overheating, possible burn and even a fire.
• Don’t expose battery pack to water or rain.
• Don’t carry battery pack in a pocket containing any metal objects.
• Don’t store the battery pack in locations where the temperature may reach or exceed 50 °C (182 °F).
• Don’t incinerate the battery pack even if it is severely damaged or is completely worn out.
• If batteries leak, avoid contact with the liquid. Should contact occur, wash immediately with soap and water.
• The polisher should always be off before inserting or removing the battery pack.
IMPORTANT SAFEGUARDS
6 INCH CORDLESS ORBITALENGLISH4
6 INCH CORDLESS ORBITAL ENGLISH 5
BATTERIES AND BATTERY CHARGER
• Unplug your battery charger when you are not charging your batteries.
• If your battery pack is hot, let it cool before recharging.
• Do not charge batteries in direct sunlight.
• Keep your battery charger clean, do not allow materials in the cavity of the charger, and while UNPLUGGED wipe out the cavity with a dry cloth, never use water or solvents.
CHARGING THE BATTERY
Caution: Charge only 12 Volt battery packs with your charger supplied in this AutoRight kit, other types may burst causing damage or personal injury.
• Plug the charger into a 120V AC power source and insert the battery pack into the charger receptacle pocket. Make sure that the polarity rib in the battery pack is aligned with the polarity slot in the charger. There are plus and minus symbols on either side of the battery pack that designate the polarity of the terminals. These symbols are on the same sides as their respective symbols on your charger. In order for the charger to work properly the pack must be fully inserted into the charger receptacle pocket. When fully inserted into the pocket a light will come on.
• Charge your batteries only with the AutoRight supplied battery charger.
• Use only (120 volts, 60 HZ AC only) regular household voltage.
• Don’t charge battery pack when temperature is below 10 °C (50 °F) or above 40 °C (104 °F).
• Don’t attempt to use a step-up transformer, an engine generator or DC power receptacle.
• Don’t allow anything to cover or clog the charger vents.
• Before connecting the charger to a power source (receptacle or outlet), be certain the voltage supplied is the same as power requirements specified on the charger. Mismatched voltage source can result in serious injury to the user. When in doubt, don’t plug in the charger.
• Don’t operate charger if damaged in any way. Don’t operate charger with damaged cord. Return product to factory. To prevent damage to cord when disconnecting charger from power source, grip plug body when removing it from a receptacle.
• Unplug charger from outlet before attempting maintenance or cleaning.
• Don’t substitute charger of any other type. Doing so may result in risk of electrical shock, fire or injury to persons.
• Keep charger free of foreign matter.
• Your new battery pack is not fully charged when received; therefore charging is necessary prior to use.
• When not in use the battery pack can be left on charger (indicated by the red light) without any adverse effect; the batteries cannot be “over-charged”. However, if the battery pack is not going to be used for an extended period of time the charger should be unplugged from its power source.
• If you need to charge more than one battery pack, allow 15 minutes between charges.
SPECIFICATIONS OF THE AC/DC CHARGER ADAPTER
Output voltage: 15V DC Adapter Charging time: 5 to 7 hours
IMPORTANT SAFEGUARDS

SPECIFICATIONS
SPECIFICATIONS
Orbital Diameter 6" Rated Voltage 12V DC Speed Without Load 3300 rpm Rated Current 5 AmpsBattery (Part Number C817544) 12V Battery Type Nickel Cadmium
(Ni CAD) Rechargable Charging Time 5 to 7 hours Charger Input Current 120V AC 60Hz
NOTE: Please contact AutoRight’s customer service department at 763-780-5115 or 1-800-264-5442. 8:00 am to 5:00 pm CST with questions.
PARTS LIST
1. Interface Pad
2. Motor Switch
3. 12-Volt NiCad Rechargeable Battery
4. 12-Volt Battery Charger
5. Poly/Cotton Bonnet
6. Microfiber Bonnet
2
3
1
4
5
6
ACCESSORIES AVAILABLE:
C800905 6/7" Foam Bonnet (1 Pack)C800897 6/7" Poly/Cotton Bonnet (2 Pack)C800898 6/7" Microfiber Bonnet (2 Pack)C817544 12-Volt NiCad Rechargeable BatteryC817545 12-Volt Battery Charger
6 INCH CORDLESS ORBITALENGLISH6

6 INCH CORDLESS ORBITAL ENGLISH 7
OPERATING INSTRUCTIONS
OPERATION WARNINGS/INSTRUCTIONS
There must be a bonnet on the polishing pad before using the polisher.
Do not press down on the polisher, the machine’s actions, light pressure does the best job.
Do not make adjustments to the polisher while it is in operation.
When the polisher is not in use for a short duration, rest the polisher in an upright position.
• The most common error is applying too much wax.
Before you begin, make sure the work surface is clean and dry. If the work surface is a car, remove road tar with a general cleaner and remove excess grease spots, bugs, stains, and other surface problems before waxing or polishing.
• Make sure the work surface is free of objects that could tear the bonnet or damage the pad.
• Make sure a clean bonnet is used at the start of each project. Before beginning check pad for dirt and debris and remove, if dirt and debris are left on the pad it may cause damage to the surface.
• Always start and stop polisher on or against the surface of the car.
• If the bonnet should come off the pad, you may be using too much wax.
• Do not wax a surface in direct sunlight.
• Do not leave wax on a car or work surface for an extended time period.
• Follow the recommendations provided with the wax to avoid wax removal problems and/or paint damage.

BATTERY PACK INSTALLATION
1. Insert the BATTERY PACK into the polisher. Align the polarity rib on the BATTERY PACK with the polarity slot in the polisher handle and slide the pack into the polisher. Make sure the latches on the BATTERY PACK have snapped into place.
2. Check the BATTERY PACK alignment by lightly pulling on the end of battery pack.
CARE OF BONNET AND PADS
The application pads and polishing bonnets are washable and re-usable. Hand washing and air-drying is recommended for longer bonnet life. However, the bonnets may be machine-washed in cold water with a small amount of detergent and machine dried at medium heat.
• Always remove the bonnet from the pad when the polisher is not in use. This will allow the pad to dry out and retain its original shape.
• To prolong pad life and shape, store polisher with pad face up.
• Do not use abrasive compounds on the pad.
• Do not apply too much wax to the bonnet. If the pad becomes saturated, the polisher will not work as well and the pad will not last as long. If polishing seems difficult too much wax may have been applied.
POLISHING
1. Place proper pad according to Figure 1.
2. Hold in the MOTOR SWITCH; polish the wax from front to back using long strokes Figure 2.
3. Remove the wax or polish in the same order as it was applied.
4. DO NOT press down. Let the polisher do the work. If the wax seems difficult to polish, you may have applied too much wax.
OPERATING INSTRUCTIONS
Figure 1
Figure 2
POLISHER MAINTENANCE/STORAGE
Use mild soap and damp sponge to clean the polisher.
The battery pack of the polisher shall be charged frequently to extend the life of the battery.
When storing the polisher, do not store with bonnet on pad. Disconnect battery pack prior to unit storage.
6 INCH CORDLESS ORBITALENGLISH8

ORBITAL INALÁMBRICA DE 15 CM (6 IN) ENGLISH • ESPAÑOL 9
TROUBLESHOOTING
Battery pack charging stand light does not come on
Battery pack is dead. Replace it with a new battery. After charging the battery, unplug the charger from the power source.
The pad does not rotate Check if the battery is not charged or the battery pack is worn out. There are times where a battery pack will not accept a full charge: when it is a new battery pack and when the pack has not been used for an extended period of time. These are normal conditions and do not indicate a problem. However, after approximately a few charge and discharge cycles, the batteries will be able to accept a full charge.
Wax seems difficult to polish Too much wax may have been applied.
SOLUCIÓN DE PROBLEMAS
La luz del soporte para carga de la batería no se enciende
La batería está agotada. Reemplácela con una batería nueva. Luego de cargar la batería, desenchufe el cargador de la fuente de alimentación.
La almohadilla no rota Revise si la batería no está cargada o si está agotada. Hay ocasiones en que la batería no acepta una carga completa: cuando es una batería nueva y cuando no se la ha utilizado durante un período prolongado. Estas son condiciones normales y no son indicio de ningún problema. Sin embargo, luego de algunos ciclos de carga y descarga, las baterías aceptarán una carga completa.
El pulido de la cera resulta difícil Es posible que se haya aplicado demasiada cera.

NORMAS GENERALES DE SEGURIDAD LEA Y COMPRENDA LAS INSTRUCCIONES ANTES DEL USO
¡ADVERTENCIA! Lea y comprenda las instrucciones del manual del usuario. En caso de no seguir todas las instrucciones que se presentan a continuación, se correrá el riesgo descarga eléctrica, incendio y/o lesiones personales graves.
ÁREA DE TRABAJO
1. Mantenga su área de trabajo limpia y bien iluminada. Los bancos de trabajo desordenados y las áreas oscuras propician accidentes.
2. No emplee herramientas eléctricas en atmósferas explosivas, por ejemplo, donde haya líquidos inflamables, gases o polvo. Las herramientas eléctricas crean chispas que, a su vez, pueden iniciar una ignición en presencia de polvo y emisiones.
3. Mientras opere una herramienta eléctrica, mantenga una distancia prudente de las personas ajenas al trabajo, como niños y visitantes. Las distracciones pueden hacer que pierda el control de la herramienta.
SEGURIDAD PERSONAL
1. Cuando opere una herramienta eléctrica, esté atento, preste atención a lo que hace y ejerza el sentido común. No utilice herramientas eléctricas si está cansado o si está bajo los efectos de drogas, alcohol o medicación. Cuando opera una herramienta eléctrica, una desatención momentánea puede causar lesiones personales graves.
2. Use las prendas de vestir adecuadas. No use prendas holgadas ni joyas. Mantenga su cabello, su ropa y sus guantes lejos de las partes móviles. La ropa holgada, las joyas o el cabello largo pueden enredarse en las partes móviles.
3. Evite el encendido accidental. Asegúrese de que el interruptor esté en la posición de apagado (OFF) antes de insertar la batería. Al cargar las herramientas con el dedo en el interruptor, puede propiciar accidentes.
4. Use el equipo de seguridad. Siempre use protección ocular. Según las condiciones de trabajo, debe usar mascarilla, calzado con suela antideslizante, casco o protección auditiva.
USO Y CUIDADO DE LA HERRAMIENTA
1. Evite daños en la superficie: siempre utilice un bonete limpio para cada proyecto. Antes de comenzar, revise el bonete o la almohadilla para detectar elementos extraños, polvo o partículas. El polvo y las partículas pueden dañar la superficie de un vehículo.
2. Para fijar y apoyar la pieza de trabajo sobre una plataforma estable, use abrazaderas u otros elementos de sujeción. Si sostiene la pieza de trabajo con la mano o contra su cuerpo, no tendrá estabilidad y puede perder el control de la herramienta.
3. No fuerce la herramienta. Emplee la herra-mienta adecuada para la aplicación que necesite. Con la herramienta correcta comple-tará el trabajo de forma más eficaz y segura, según la prestación para la que fue diseñada.
4. No use la herramienta si el interruptor de encendido/apagado no funciona. Si la herramienta no se puede controlar con el interruptor, es peligrosa y deberá repararse.
5. Desconecte la batería de la herramienta o coloque el interruptor en posición de bloqueo o apagado antes de guardar la herramienta; así se evitará el encendido accidental.
6. Guarde las herramientas que no estén en uso lejos del alcance de los niños y de cualquier persona que desconozca cómo operarlas. Las herramientas son peligrosas en manos de quienes no saben utilizarlas.
7. Cuando la batería no esté en uso, manténgala lejos de otros objetos metálicos como: ganchos para papel, monedas, llaves, clavos, tornillos u otros objetos metálicos pequeños que pueden generar conexión entre los terminales. Si se hace un puente entre los terminales de la batería, se pueden generar chispas, quemaduras o un incendio.
8. Revise que las partes móviles no estén mal alineadas ni adheridas, que no haya roturas ni cualquier otra condición que pueda afectar el funcionamiento de la herramienta. Si la herramienta está dañada, hágala reparar antes de utilizarla. Las herramientas con mantenimiento deficiente causan muchos accidentes.
9. Utilice solamente aquellos accesorios que recomienda el fabricante para su modelo. Los accesorios que son aptos para una herramienta pueden generar un riesgo de lesión cuando se los usa en otra herramienta.
MEDIDAS PREVENTIVAS IMPORTANTES
ORBITAL INALÁMBRICA DE 15 CM (6 IN)ESPAÑOL10

ESPAÑOL 11ORBITAL INALÁMBRICA DE 15 CM (6 IN)
SERVICIO TÉCNICO
1. Solamente el personal capacitado en reparaciones podrá hacer el servicio técnico de la herramienta. Cualquier servicio técnico o mantenimiento realizado por personal no capacitado puede generar riesgo de lesión.
2. Los accesorios deben cumplir, como mínimo, con la especificación de velocidad recomendada en la etiqueta de advertencia de la herramienta. Los discos y otros accesorios que funcionen a velocidades superiores a la que se especifica pueden desprenderse y causar lesiones.
¡Importante!: No utilice la pulidora hasta no haber inspeccionado cada pieza. Si falta cualquiera de las piezas o si presentan daños, no la use. Devuelva la pulidora al lugar donde la compró. Véase GARANTÍA.
CÓMO ELIMINAR LAS BATERÍAS DE FORMA SEGURA PARA EL MEDIOAMBIENTE
¡ADVERTENCIA! Si alguna de sus baterías se rompe o se fisura, cabe la posibilidad de que tenga pérdidas. No intente recargarla ni usarla; elimínela de inmediato y reemplácela con una nueva.
Nunca intente reparar una batería. Las baterías que se utilizan con esta herramienta contienen un material tóxico denominado cadmio.
¡ADVERTENCIA! Las baterías contienen materiales tóxicos y debe desechárselas de formas específicas, a fin de no producir la contaminación del medioambiente. Antes de eliminar cualquier batería agotada o dañada, comuníquese con la sede local de la Agencia de Protección Ambiental (EPA) para obtener instrucciones e información relativas a las baterías de níquel-cadmio.
NORMAS DE SEGURIDAD PARA EL MANEJO DE BATERÍAS
Siga estas simples reglas para evitar lesiones y riesgo de incendio, descarga eléctrica y explosión.
• No intente abrir ninguna batería.
• No deseche las baterías junto con la basura hogareña.
• No incinere ninguna batería.
• Si observa una pérdida, lávese las manos y evite llevarse el material a los ojos o la boca: los electrodos que se liberan son corrosivos.
• Deseche sus baterías en un centro certificado para ese fin.
• Cuando la batería no está en uso, manténgala alejada de cualquier otro objeto metálico como ganchos para papel, monedas, llaves, clavos, tornillos u otros objetos metálicos pequeños que puedan establecer conexión con un terminal. Si se hace puente con un terminal, se pueden generar chispas, quemaduras e incluso un incendio.
• La batería que se incluye con este producto sólo puede cargarse con el cargador suministrado en este kit; otros cargadores pueden explotar y producir un incendio u otros peligros.
• Con esta pulidora solamente podrá usarse la batería suministrada con este kit. Otros tipos de batería pueden causar incendio u otros peligros.
• Asegúrese de que el interruptor esté en la posición de apagado (OFF) antes de insertar la batería en la pulidora; así se evitarán los daños causados por el encendido accidental.
• Al cargar las herramientas con el dedo en el interruptor, puede propiciar accidentes.
• Asegúrese de desechar la batería de forma segura, según indicaciones del fabricante.
• No guarde la batería en el mismo recipiente en el que guarde otros objetos metálicos como clavos, monedas, etc.
• No haga puente en la batería; un corto en la batería podría generar una sobretensión, sobrecalentamiento, posibles quemaduras o incluso un incendio.
• No exponga la batería al agua ni a la lluvia.
• No lleve la batería en un bolsillo en el que tenga algún objeto metálico.
• No guarde la batería en lugares en los que la temperatura pueda alcanzar o superar los 50 °C (182 °F).
• No incinere la batería, incluso cuando esté seriamente dañada o agotada por completo.
• Si la batería presenta pérdidas, evite el contacto con el líquido. En caso de contacto, lave de inmediato con agua y jabón.
• La pulidora siempre debe estar apagada antes de insertar o retirar la batería.
MEDIDAS PREVENTIVAS IMPORTANTES
BATERÍAS Y CARGADOR DE BATERÍAS
• Desenchufe el cargador de batería cuando no lo esté utilizando.
• Si la batería tiene una temperatura elevada, deje que se enfríe antes de volver a cargarla.
• No exponga las baterías a la luz del sol directa mientras las carga.
• Mantenga su cargador de baterías limpio. No permita que se aloje ningún material en la cavidad del cargador. DESENCHÚFELO y limpie la cavidad con un paño seco; nunca use agua ni solventes.
CÓMO CARGAR LA BATERÍA
Precaución: Cargue solamente baterías de 12 voltios con el cargador que se incluye en este kit AutoRight; otros tipos de baterías pueden explotar y causar daños o lesiones.
• Enchufe el cargador en una fuente de alimentación de 120 V de CA e inserte la batería en el receptáculo del cargador. Asegúrese de que la marca acanalada de polaridad de la batería coincida con la ranura de polaridad del cargador. Encontrará signos positivos y negativos en cada uno de los extremos de la batería, con los que se designa la polaridad de los terminales. Estos signos están del mismo lado que los símbolos correspondientes en su cargador. Para que el cargador funcione correctamente, la batería debe insertarse por completo en el receptáculo del cargador. Una vez que se la inserte por completo, se encenderá una luz.
• Cargue sus baterías solamente con el cargador HomeRight incluido en el kit.
• Utilice únicamente la tensión residencial convencional (120 voltios, 60 HZ CA, exclusivamente).
• No cargue la batería cuando la temperatura sea inferior a 10 °C (50 °F) ni superior a 40 °C (104 °F).
• No intente usar un transformador elevador de voltaje, un grupo electrógeno ni un receptáculo de corriente continua.
• No permita que nada obstruya o cubra la ventilación del cargador.
• Antes de conectar el cargador a una fuente de alimentación (receptáculo o enchufe), asegúrese de que la tensión de la línea sea acorde a los requisitos especificados en el cargador. Si se conecta a una tensión incompatible, el usuario corre riesgo de sufrir lesiones graves. Si tiene dudas, no conecte el cargador.
• No utilice el cargador si presenta cualquier tipo de daño. No utilice el cargador si el cable está dañado. Devuelva el producto a la fábrica. Para evitar que el cable se dañe al desconectar el cargador de la fuente de alimentación, tome el cuerpo del enchufe cuando lo retire de un receptáculo.
• Desconecte el cargador del enchufe antes de realizar tareas de mantenimiento o limpieza.
• No reemplace el cargador con ningún otro. Si lo hiciera, correrá el riesgo provocar un incendio, o de sufrir una descarga eléctrica o lesiones.
• No permita que se aloje ningún material extraño en el cargador.
• Cuando recibe su batería nueva, esta no está totalmente cargada; por lo tanto, necesita cargarla antes de utilizarla.
• Cuando la batería no está en uso, se la puede dejar en el cargador (se encenderá una luz roja) sin efectos adversos; no hay posibilidad de que la batería se “sobrecargue”. Sin embargo, si se prevé que la batería no se utilizará durante un período prolongado, debe desconectarse el cargador de la fuente de alimentación.
• Si necesita cargar más de una batería, deje que transcurran 15 minutos entre una carga y la siguiente.
ESPECIFICACIONES PARA EL ADAPTADOR CA/CC DEL CARGADOR
Tensión de salida: Adaptador CC de 15 V Tiempo de carga: 5 a 7 horas
MEDIDAS PREVENTIVAS IMPORTANTES
ORBITAL INALÁMBRICA DE 15 CM (6 IN)ESPAÑOL12
ESPAÑOL 13
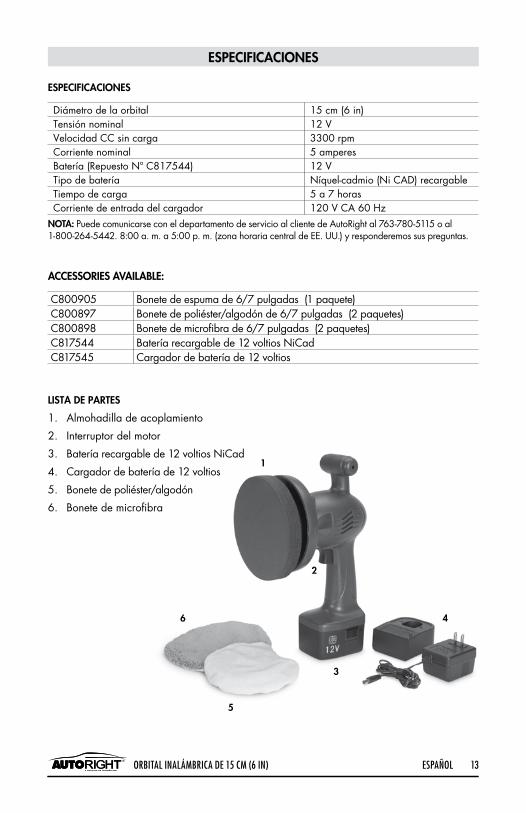
ESPECIFICACIONES
Diámetro de la orbital 15 cm (6 in)Tensión nominal 12 VVelocidad CC sin carga 3300 rpmCorriente nominal 5 amperesBatería (Repuesto Nº C817544) 12 VTipo de batería Níquel-cadmio (Ni CAD) recargableTiempo de carga 5 a 7 horasCorriente de entrada del cargador 120 V CA 60 Hz
NOTA: Puede comunicarse con el departamento de servicio al cliente de AutoRight al 763-780-5115 o al 1-800-264-5442. 8:00 a. m. a 5:00 p. m. (zona horaria central de EE. UU.) y responderemos sus preguntas.
ESPECIFICACIONES
ORBITAL INALÁMBRICA DE 15 CM (6 IN)
LISTA DE PARTES
1. Almohadilla de acoplamiento
2. Interruptor del motor
3. Batería recargable de 12 voltios NiCad
4. Cargador de batería de 12 voltios
5. Bonete de poliéster/algodón
6. Bonete de microfibra
2
3
1
4
5
6
ACCESSORIES AVAILABLE:
C800905 Bonete de espuma de 6/7 pulgadas (1 paquete)C800897 Bonete de poliéster/algodón de 6/7 pulgadas (2 paquetes)C800898 Bonete de microfibra de 6/7 pulgadas (2 paquetes)C817544 Batería recargable de 12 voltios NiCadC817545 Cargador de batería de 12 voltios
INSTRUCCIONES DE FUNCIONAMIENTO
ADVERTENCIAS/INSTRUCCIONES PARA EL FUNCIONAMIENTO
Antes de utilizar la pulidora, debe colocar un bonete sobre la almohadilla de pulido.
No haga fuerza sobre la pulidora; el propio accionar de la máquina, con una ligera presión, hará un trabajo óptimo.
No ajuste la pulidora mientras está en funcionamiento.
Si deja de usar la pulidora durante un lapso breve, déjela en posición vertical.
• El error más común consiste en aplicar exceso de cera.
Antes de empezar, verifique que la superficie de trabajo esté limpia y seca. Si va a trabajar sobre un automóvil, retire toda mancha de brea con un limpiador de uso general, al igual que las salpicaduras de grasa, bichos, manchas y cualquier suciedad de la superficie antes de encerar o pulir.
• Asegúrese de que la superficie de trabajo esté libre de objetos que puedan rasgar el bonete o dañar la almohadilla.
• Recuerde utilizar un bonete limpio al iniciar cada proyecto. Antes de comenzar, revise la almohadilla y elimine cualquier resto de tierra o partículas; si se dejan en la almohadilla, pueden dañar la superficie.
• Siempre encienda y apague la pulidora sobre o contra la superficie del automóvil.
• Si el bonete se desprende de la almohadilla, puede deberse a que esté empleando demasiada cera.
• No encere ninguna superficie que esté expuesta a la luz directa del sol.
• No deje cera sobre la superficie del automóvil ni sobre otra superficie de trabajo durante períodos prolongados.
• Siga las instrucciones del fabricante de cera para evitar problemas al momento de retirarla y para prevenir daños a la pintura.
ORBITAL INALÁMBRICA DE 15 CM (6 IN)ESPAÑOL14

ESPAÑOL 15ORBITAL INALÁMBRICA DE 15 CM (6 IN)
INSTALACIÓN DE LA BATERÍA
1. Inserte la BATERÍA en la pulidora. Alinee la marca acanalada de polaridad de la BATERÍA para que coincida con la ranura de polaridad en la empuñadura de la pulidora; deslice la batería hacia el interior de la pulidora. Verifique que los seguros de la BATERÍA hayan calzado en su lugar.
2. Revise que la BATERÍA haya quedado bien alineada; para ello, tire suavemente del extremo de la batería.
PULIDO
1. Coloque la almohadilla adecuada, según se indica en la Figura 1.
2. Presione el INTERRUPTOR del MOTOR; pula la cera desde adelante hacia atrás y de lado a lado con movimientos largos. Figura 2.
3. Retire la cera o pula en el mismo orden en que la aplicó.
4. NO ejerza presión. Deje que la pulidora haga el trabajo. Si le resulta difícil pulir la cera, es posible que haya aplicado demasiada cera.
INSTRUCCIONES DE FUNCIONAMIENTO
Figure 1
Figure 2
MANTENIMIENTO/GUARDADO DE LA PULIDORA
Para limpiar la pulidora, use un jabón suave y una esponja húmeda.
Para prolongar la vida útil de la batería de la pulidora, cárguela con frecuencia.
Cuando guarde la pulidora, recuerde retirar el bonete de la almohadilla. Desconecte la batería antes de guardar la unidad.
CUIDADO DEL BONETE Y DE LA ALMOHADILLA
Las almohadillas de aplicación y los bonetes de pulido pueden lavarse y volver a utilizarse. Se recomienda el lavado a mano y el secado al aire para prolongar la vida útil del bonete. No obstante, los bonetes pueden lavarse en la lavadora, con agua fría y con una pequeña cantidad de detergente. También se los puede secar en la secadora, a temperatura media.
• Siempre retire el bonete de la almohadilla cuando no utilice la pulidora. Así permitirá que la almohadilla se seque y que conserve su forma original.
• Para prolongar la vida útil y la forma de la almohadilla, guarde la pulidora con la almohadilla hacia arriba.
• No utilice compuestos abrasivos sobre la almohadilla.
• No aplique cera en exceso sobre el bonete. Si la almohadilla se satura, se acortará su vida útil y la pulidora no tendrá un funcionamiento óptimo. Si el proceso de pulido se dificulta, es probable que se deba al exceso de cera.

©2014 HomeRight All rights reserved. C820522 Rev. B 8/14
1661 94th Lane N.E., Minneapolis, Minnesota 55449-4324Phone 763-780-5115, Customer Service Line 1-800-264-5442, 8:00 a.m. to 5:00 p.m. CST
www.auto-right.comPatents Pending
GARANTÍA
GARANTÍA LIMITADA DE DOS AÑOS
La garantía de AutoRight cubre este producto durante dos años posteriores a la fecha de compra contra defectos en los materiales y en la mano de obra. Cualquier producto en el que se encuentren defectos dentro del período de garantía debe devolverse a AutoRight con franqueo pagado y con comprobante de compra a la dirección 1661 94th Lane N.E., Minneapolis, MN 55449-4324, (763-780-5115), Attention: Service Department. AutoRight reparará o sustituirá el producto defectuoso sin cargo y se lo devolverá con franqueo pagado. En la caja, debe incluir su nombre, su dirección y una descripción del problema. Esta garantía no cubre los accesorios, los daños ocasionados por uso incorrecto, negligencia o accidentes ni el desgaste natural del producto.
CUALQUIER GARANTÍA IMPLÍCITA DE COMERCIABILIDAD O APTITUD PARA UN PROPÓSITO PARTICULAR SE LIMITA A DOS AÑOS POSTERIORES A LA FECHA DE COMPRA. LA RESPONSABILIDAD SE LIMITA A LA REPARACIÓN O A LA SUSTITUCIÓN POR DEFECTOS EN LOS MATERIALES O EN LA MANO DE OBRA. EN NINGÚN CASO, AutoRight SERÁ RESPONSABLE DE LOS DAÑOS INCIDENTALES O DERIVADOS DE NINGÚN TIPO, YA SEAN POR INCUMPLIMIENTO DE LA GARANTÍA O CUALQUIER OTRO MOTIVO. En algunos estados, no se permite la limitación de la duración de las garantías implícitas o la exclusión de daños incidentales o derivados; por lo tanto, es posible que limitación y la exclusión anteriores no se apliquen a su caso. Esta garantía le proporciona derechos legales y usted también puede tener otros derechos que varían según el estado. Si no puede obtener piezas o accesorios en su distribuidor local, puede escribir a: AutoRight, 1661 94th Lane N.E., Minneapolis, Minnesota 55449-4324, Teléfono (763) 780-5115 o al 1-800-264-5442, de 8:00 a. m. a 5:00 p. m. CST (horario central).
WARRANTY
TWO YEAR LIMITED WARRANTYAutoRight warrants this product for two years following date of purchase against any defects in material or workmanship. Any product believed defective within the warranty period should be returned postage-paid with proof of purchase to AutoRight, 1661 94th Lane N.E., Minneapolis, MN 55449-4324, (763-780-5115), Attention: Service Department. AutoRight will repair or replace defective product at no charge, and return postage-paid to you. Your name, address, and a description of problem should be included in the box. This warranty does not cover accessories or damage resulting from improper use, negligence, accidents or normal wear and tear.
ANY IMPLIED WARRANTY OF MERCHANTABILITY OR FITNESS FOR A PARTICULAR PURPOSE IS LIMITED TO TWO YEARS FOLLOWING DATE OF PURCHASE. RESPONSIBILITY IS LIMITED TO THE REPAIR OR REPLACEMENT FOR DEFECTS IN MATERIAL OR WORKMANSHIP. AutoRight SHALL NOT IN ANY EVENT BE LIABLE FOR ANY INCIDENTAL OR CONSEQUENTIAL DAMAGES OF ANY KIND, WHETHER FOR BREACH OF THE WARRANTY OR ANY OTHER REASON. Some states do not allow a limitation on how long implied warranties last or the exclusion of incidental or consequential damages, so the above limitation and exclusion may not apply to you. This warranty gives you specific legal rights, and you may also have other rights, which vary from state to state. If you cannot obtain parts and accessories at your local retail dealer, then call or write: AutoRight, 1661 94th Lane N.E., Minneapolis, Minnesota 55449-4324, Phone (763) 780-5115 or 1-800-264-5442, 8:00 a.m. to 5:00 p.m. CST.
Register Online Today To Activate Your Two-Year WarrantyRegístrese en línea hoy Para activar su garantía de dos años
http://www.auto-right.com/product-registration