avaya call center little instruction book for advanced ... · aurora technologies, inc. ......
TRANSCRIPT
585-210-505Comcode 700200215
Issue 1May 2002


© 2002, Avaya Inc.All Rights Reserved
NoticeEvery effort was made to ensure that the information in this document was complete and accurate at the time of printing. However, information is subject to change.
Preventing Toll Fraud“Toll fraud” is the unauthorized use of your telecommunications system by an unauthorized party (for example, a person who is not a corporate employee, agent, subcontractor, or working on your company's behalf). Be aware that there may be a risk of toll fraud associated with your system and that, if toll fraud occurs, it can result in substantial additional charges for your telecommunications services.
Avaya Fraud InterventionIf you suspect that you are being victimized by toll fraud and you need technical assistance or support, call Technical Service Center Toll Fraud Intervention Hotline at +1 800 643 2353 for the United States and Canada. For additional support telephone numbers, see the Avaya web site:http://www.avaya.com Click on Support, then click on Escalation Lists US and International. This web site includes telephone numbers for escalation within the United States. For escalation telephone numbers outside the United States, click on Global Escalation List.
Providing Telecommunications SecurityTelecommunications security (of voice, data, and/or video communications) is the prevention of any type of intrusion to (that is, either unauthorized or malicious access to or use of) your company's telecommunications equipment by some party.Your company's “telecommunications equipment” includes both this Avaya product and any other voice/data/video equipment that could be accessed via this Avaya product (that is, “networked equipment”).An “outside party” is anyone who is not a corporate employee, agent, subcontractor, or working on your company's behalf. Whereas, a “malicious party” is anyone (including someone who may be otherwise authorized) who accesses your telecommunications equipment with either malicious or mischievous intent.Such intrusions may be either to/through synchronous (time-multiplexed and/or circuit-based) or asynchronous (character-, message-, or packet-based) equipment or interfaces for reasons of:
• Utilization (of capabilities special to the accessed equipment)
• Theft (such as, of intellectual property, financial assets, or toll-facility access)
• Eavesdropping (privacy invasions to humans)
• Mischief (troubling, but apparently innocu-ous, tampering)
• Harm (such as harmful tampering, data loss or alteration, regardless of motive or intent)
Be aware that there may be a risk of unauthorized intrusions associated with your system and/or its networked equipment. Also realize that, if such an intrusion should occur, it could result in a variety of losses to your company (including but not limited to, human/data privacy, intellectual property, material assets, financial resources, labor costs, and/or legal costs).
Your Responsibility for Your Company’s Telecommunications SecurityThe final responsibility for securing both this system and its networked equipment rests with you - an Avaya customer's system administrator, your telecommunications peers, and your managers. Base the fulfillment of your responsibility on acquired knowledge and resources from a variety of sources including but not limited to:
• Installation documents• System administration documents• Security documents• Hardware-/software-based security tools• Shared information between you and your
peers• Telecommunications security experts
To prevent intrusions to your telecommunications equipment, you and your peers should carefully program and configure:
• your Avaya-provided telecommunications systems and their interfaces
• your Avaya-provided software applica-tions, as well as their underlying hardware/software platforms and interfaces
• any other equipment networked to your Avaya products.
TrademarksThe following trademarks are mentioned in this document:
• MultiVantage and DEFINITY are registered trademarks of Avaya Inc.
• Enterprise, Solaris, SPARCserver, Net-work Terminal Server, Sun, SunSwift, Sol-stice, DiskSuite, and Ultra are trademarks or registered trademarks of Sun Microsys-tems, Inc.
• INFORMIX is a registered trademark of Informix Software, Inc.
• Multiport is a registered trademark of Aurora Technologies, Inc.
• Windows is a registered trademark of Microsoft, Inc.
All other product names mentioned herein are the trademarks of their respective owners.
Ordering InformationCall: Avaya Publications Center
Voice +1 800 457 1235Fax +1 800 457 1764International Voice +1 410 568 3680International Fax+1 410 891 0207
Write: Globalware Solutions200 Ward Hill AvenueHaverhill, MA 01835 USAAttention: Avaya Account Manager
E-mail:[email protected]: Document No. 585-210-505, Issue1
May 2002
Avaya SupportAvaya provides a telephone number for you to use to report problems or to ask questions about your contact center. The support telephone number is 1-800-242-2121 in the United States and Canada. For additional support telephone numbers, see the Avaya web site:
http://www.avaya.com Click on Support, then click on Escalation Lists US and International. This web site includes telephone numbers for escalation within the United States. For escalation telephone numbers outside the United States, click on Global Escalation List.
AcknowledgmentThis document was written by the CRM Development group.
Issue 1.0 May 2002 5
Credits . . . . . . . . . . . . . . . . . . . . . . . . . . . . . . . . . . 9
Chapter 1: WelcomeWhy an advanced book? . . . . . . . . . . . . . . . . . . . . . . . . 11We wrote this book for you! . . . . . . . . . . . . . . . . . . . . . . . 11What this book contains . . . . . . . . . . . . . . . . . . . . . . . . . 12Conventions and terms used in this book . . . . . . . . . . . . . . . . 13Trademarks and service marks . . . . . . . . . . . . . . . . . . . . . 13Related documents . . . . . . . . . . . . . . . . . . . . . . . . . . . 14
CMS software documents . . . . . . . . . . . . . . . . . . . . 15Upgrade documents . . . . . . . . . . . . . . . . . . . . . . . 16Hardware documents . . . . . . . . . . . . . . . . . . . . . . 19Switch documents . . . . . . . . . . . . . . . . . . . . . . . . 20Administration documents . . . . . . . . . . . . . . . . . . . . 20Other documents . . . . . . . . . . . . . . . . . . . . . . . . 20Documentation Web sites . . . . . . . . . . . . . . . . . . . . 22MultiVantage call center books . . . . . . . . . . . . . . . . . 22Before you contact Avaya for support . . . . . . . . . . . . . . 23
Chapter 2: Agent administrationViewing an agent’s
skill assignment (EAS only) . . . . . . . . . . . . . . . . . . . . . . 25Changing an agent’s skill assignment (EAS only) . . . . . . . . . . . . 27
Helpful tips . . . . . . . . . . . . . . . . . . . . . . . . . . . . 27Changing a skill for multiple agents (EAS only) . . . . . . . . . . . . . 30
Helpful tips . . . . . . . . . . . . . . . . . . . . . . . . . . . . 30Changing an agent’s extension split assignment (non-EAS) . . . . . . 33
Helpful tips . . . . . . . . . . . . . . . . . . . . . . . . . . . . 33Moving multiple agents’ extensions between splits
(non-EAS) . . . . . . . . . . . . . . . . . . . . . . . . . . . . . . . 35Helpful tips . . . . . . . . . . . . . . . . . . . . . . . . . . . . 35
Tracing an agent’s call activity . . . . . . . . . . . . . . . . . . . . . . 37Helpful tips . . . . . . . . . . . . . . . . . . . . . . . . . . . . 37
Contents
Avaya™ Call CenterLittle Instruction Book for Advanced Administration
Issue 1.0
6 Avaya Call Center Little Instruction Book for Advanced Administration
Contents
Listing agent trace data. . . . . . . . . . . . . . . . . . . . . . . . . . 38Helpful tips . . . . . . . . . . . . . . . . . . . . . . . . . . . . 38
Chapter 3: Call center administrationAssigning call work codes . . . . . . . . . . . . . . . . . . . . . . . . 41
Helpful tips . . . . . . . . . . . . . . . . . . . . . . . . . . . . 41Changing VDN skill preferences (EAS only) . . . . . . . . . . . . . . . 43
Helpful tips . . . . . . . . . . . . . . . . . . . . . . . . . . . . 43Defining acceptable service levels . . . . . . . . . . . . . . . . . . . . 44Viewing trunk group members . . . . . . . . . . . . . . . . . . . . . . 46Changing VDN-to-vector assignments . . . . . . . . . . . . . . . . . . 47
Helpful tips . . . . . . . . . . . . . . . . . . . . . . . . . . . . 47View vector configurations . . . . . . . . . . . . . . . . . . . . . . . . 48
Chapter 4: Managing system setup parametersChanging from multi-user to single-user mode . . . . . . . . . . . . . . 51
Helpful tips . . . . . . . . . . . . . . . . . . . . . . . . . . . . 52Turning data collection off and on . . . . . . . . . . . . . . . . . . . . 53Modifying data storage capacities . . . . . . . . . . . . . . . . . . . . 54
Early warning signs. . . . . . . . . . . . . . . . . . . . . . . . 54 Preparing for modifications . . . . . . . . . . . . . . . . . . . 55
Summarizing data . . . . . . . . . . . . . . . . . . . . . . . . . . . . 57Helpful tips . . . . . . . . . . . . . . . . . . . . . . . . . . . . 57
Verifying free space . . . . . . . . . . . . . . . . . . . . . . . . . . . 59Viewing storage intervals . . . . . . . . . . . . . . . . . . . . . . . . . 60Viewing switch information . . . . . . . . . . . . . . . . . . . . . . . . 62
Chapter 5: Managing vectorsWhat is Call Vectoring?. . . . . . . . . . . . . . . . . . . . . . . . . . 63
What can call vectoring do for my call center? . . . . . . . . . . 63Where do I start? . . . . . . . . . . . . . . . . . . . . . . . . . . . . . 64How does Call Vectoring work? . . . . . . . . . . . . . . . . . . . . . 66
Vector. . . . . . . . . . . . . . . . . . . . . . . . . . . . . . . 66Vector Directory Number (VDN) . . . . . . . . . . . . . . . . . 66
How do vectors and VDNs work together? . . . . . . . . . . . . . . . . 66Sequential flow . . . . . . . . . . . . . . . . . . . . . . . . . . 66Unconditional branching . . . . . . . . . . . . . . . . . . . . . 67Conditional branching . . . . . . . . . . . . . . . . . . . . . . 67
Expected Wait Time (expected-wait) 68Holiday Vectoring 69Rolling Average Speed of Answer (rolling-ans) 70VDN Calls (counted-calls) 70
Redirecting and queuing calls . . . . . . . . . . . . . . . . . . . . . . 71Multiple skill queuing . . . . . . . . . . . . . . . . . . . . . . . 73Call Prompting . . . . . . . . . . . . . . . . . . . . . . . . . . 74

Issue 1.0 May 2002 7
Contents
Administering Call Vectoring . . . . . . . . . . . . . . . . . . . . . . . 74Non-EAS . . . . . . . . . . . . . . . . . . . . . . . . . . . . . 74EAS . . . . . . . . . . . . . . . . . . . . . . . . . . . . . . . 75Writing vectors . . . . . . . . . . . . . . . . . . . . . . . . . . 75
Performing daily maintenance . . . . . . . . . . . . . . . . . . . . . . 79Interpreting performance. . . . . . . . . . . . . . . . . . . . . . . . . 80
Chapter 6: Multi-site applicationsWhat is Lookahead Interflow? . . . . . . . . . . . . . . . . . . . . . . 83What is Enhanced Lookahead Interflow? . . . . . . . . . . . . . . . . 84How ELAI works . . . . . . . . . . . . . . . . . . . . . . . . . . . . . 84Administering multi-site ELAI . . . . . . . . . . . . . . . . . . . . . . 85
Outflow vector 85Inflow vector 87 Vector commands . . . . . . . . . . . . . . . . . . . . . . . . 87Using the conditional interflow-qpos command . . . . . . . . . 90FIFO example . . . . . . . . . . . . . . . . . . . . . . . . . . 91Setting the minimum expected wait time . . . . . . . . . . . . 92
Interflow-qpos and EWT interactions 93 Tips on administering multi-site ELAI . . . . . . . . . . . . . . 94Performing daily maintenance . . . . . . . . . . . . . . . . . . . . . . 95
Interpreting performance. . . . . . . . . . . . . . . . . . . . . 95Troubleshooting for ELAI . . . . . . . . . . . . . . . . . . . . . . . . 97What is Best Service Routing? . . . . . . . . . . . . . . . . . . . . . 97How BSR works . . . . . . . . . . . . . . . . . . . . . . . . . . . . . 98Administering multi-site BSR applications . . . . . . . . . . . . . . . . 98
Distributed versus centralized systems . . . . . . . . . . . . . 98Defining the purpose of the application . . . . . . . . . . . . . 99Selecting or creating the elements of the application . . . . . . 99the application plan . . . . . . . . . . . . . . . . . . . . . . . 100Linking the application plan to a primary VDN . . . . . . . . . . 102Entering an agent selection strategy. . . . . . . . . . . . . . . 103BSR vector commands . . . . . . . . . . . . . . . . . . . . . 103Sample vectors . . . . . . . . . . . . . . . . . . . . . . . . . 103
Primary 103Status poll vector 104 104 Tips on writing BSR vectors . . . . . . . . . . . . . . . . . . . 104Setting user adjustments. . . . . . . . . . . . . . . . . . . . . 105
Performing daily maintenance . . . . . . . . . . . . . . . . . . . . . . 106Interpreting performance. . . . . . . . . . . . . . . . . . . . . . . . . 107Using BSR and Avaya Business Advocate . . . . . . . . . . . . . . . 108
Chapter 7: Call and agent selection methodsWhat is Avaya Business Advocate? . . . . . . . . . . . . . . . . . . . 109
What should this agent do next?. . . . . . . . . . . . . . . . . 109Which agent should take this call?. . . . . . . . . . . . . . . . 109Does the center need to adjust its operations to bring performance back to the wanted level?. . . . . . . . . . . . . 110
Advocate methods versus traditional methods . . . . . . . . . 110How call selection works . . . . . . . . . . . . . . . . . . . . . . . . . 110
How calls are selected for an agent . . . . . . . . . . . . . . . 111
8 Avaya Call Center Little Instruction Book for Advanced Administration
Contents
Call selection measurements. . . . . . . . . . . . . . . . . . . 111Predicted Wait Time example 112 Call handling preferences . . . . . . . . . . . . . . . . . . . . 112Greatest Need 112Skill Level 112Percent Allocation 113 Service Objective . . . . . . . . . . . . . . . . . . . . . . . . . 113
Call Selection Override . . . . . . . . . . . . . . . . . . . . . . 114What is Call Selection Override? 114How does Call Selection Override work? 114Call Selection Override example 115 Dynamic Queue Position . . . . . . . . . . . . . . . . . . . . . 116How does Dynamic Queue Position work? 116Dynamic Queue Position example 117
Call selection examples . . . . . . . . . . . . . . . . . . . . . . . . . 117Greatest Need without Service Objective . . . . . . . . . . . . 118Greatest Need with Service Objective . . . . . . . . . . . . . . 118Skill Level without Service Objective . . . . . . . . . . . . . . . 119Skill Level with Service Objective . . . . . . . . . . . . . . . . 120Percent Allocation . . . . . . . . . . . . . . . . . . . . . . . . 120
Agent selection methods . . . . . . . . . . . . . . . . . . . . . . . . . 121How agents are selected for calls . . . . . . . . . . . . . . . . 121Agent selection options. . . . . . . . . . . . . . . . . . . . . . 122Most Idle Agent . . . . . . . . . . . . . . . . . . . . . . . . . . 122Least Occupied Agent . . . . . . . . . . . . . . . . . . . . . . 122
Agent occupancy 123 Percent Allocation Distribution . . . . . . . . . . . . . . . . . . 123Agent selection examples . . . . . . . . . . . . . . . . . . . . . . . . 124
Expert Agent Distribution - Least Occupied Agent . . . . . . . . 124Uniform Call Distribution - Least Occupied Agent . . . . . . . . 125Expert Agent Distribution - Most Idle Agent . . . . . . . . . . . 125Uniform Call Distribution - Most Idle Agent . . . . . . . . . . . 126Percent Allocation Distribution . . . . . . . . . . . . . . . . . . 126Call Selection at a glance . . . . . . . . . . . . . . . . . . . . 127Agent Selection at a glance . . . . . . . . . . . . . . . . . . . 128
Automated agent staffing adjustments . . . . . . . . . . . . . . . . . . 128Service Level Supervisor . . . . . . . . . . . . . . . . . . . . . 129What happens when a skill goes over threshold . . . . . . . . . 129Assigning reserve agents. . . . . . . . . . . . . . . . . . . . . 129Activation of reserve agents . . . . . . . . . . . . . . . . . . . 130Considerations for reserve skills . . . . . . . . . . . . . . . . . 130Overload thresholds . . . . . . . . . . . . . . . . . . . . . . . 130Dynamic Threshold Adjustment . . . . . . . . . . . . . . . . . 130Automatic adjustments to target allocations . . . . . . . . . . . 131Auto Reserve Agents . . . . . . . . . . . . . . . . . . . . . . . 132
Developing your strategy . . . . . . . . . . . . . . . . . . . . . . . . . 133Avaya support . . . . . . . . . . . . . . . . . . . . . . . . . . 135Feature compatibility . . . . . . . . . . . . . . . . . . . . . . . 135
Call selection methods (call handling preferences) 135Agent selection methods (hunt group types) 136Feature combination to avoid 137
Administering call and agent selection features . . . . . . . . . . . . . 137Important notes about administration. . . . . . . . . . . . . . . 140
Where should I start?. . . . . . . . . . . . . . . . . . . . . . . . . . . 141Help for Enhanced Customer Segmentation . . . . . . . . . . . 142
Primary Focus: Percent in Service Level Achievement 142Primary Focus: Individual Callers 144Combined Focus: Metrics and Individual Callers 145
Interpreting performance . . . . . . . . . . . . . . . . . . . . . . . . . 147Special considerations . . . . . . . . . . . . . . . . . . . . . . 148
Notes . . . . . . . . . . . . . . . . . . . . . . . . . . . . . . . . . . . 148
Index . . . . . . . . . . . . . . . . . . . . . . . . . . . . . . . . . . . 149
Issue 1.0 May 2002 9
CreditsThe production of this book has been made possible thanks to the contributions of the following personnel:
Writers Liz Stone and Gaye James
Graphics Laurie King
Production Deborah Kurtright
Contributors Mike Bergum— CMS Helpline
Jim Bitner— DEFINITY Helpline
Mike Cozzette—CMS Provisioning
Richard Cohen CallCenter Advocacy
Robin Foster— Manager of Research
Grace Gibson— Technical Instructor
Timy Gonzalez— CMS Documentation
Gaye James— Senior Consultant
Sally Laughlin— Instructional Developer
Mila Maximets— Call Center Specialist
J.P. Pigman— CMS Helpline
Bob Regan— CMS Tier 3
Doug Scherer—CMS Tier 3
Kim Simkins— Technical Instructor
Mike Storesund— CMS Tier 3
Web/CD-ROM Production
Ellen Heffington

10 Avaya Call Center Little Instruction Book for Advanced Administration
Issue 1.0 May 2002 11
Chapter 1: Welcome
Why an advanced book?You’ve told us that you want to understand the features that are available to optimize your call center. This is it! This book contains the information you need for advanced call center administration using the MultiVantage switch, Avaya Call Management System (CMS), and Avaya CMS Supervisor. The administrative steps may vary between the different versions of hardware and software, but the information and instructions will help you through most of the operations.
We wrote this book for you!Use this book if you are a call center system administrator. Use it before you attend training, and take it with you to your class. Mark it up, make notes in it, and use it daily even after you complete training. If you are a new administrator taking over the position from someone else, or your are filling in for your company’s regular administrator temporarily, or if you just want to refresh your memory about advanced call center operations, this book is for you.
12 Avaya Call Center Little Instruction Book for Advanced Administration
Welcome
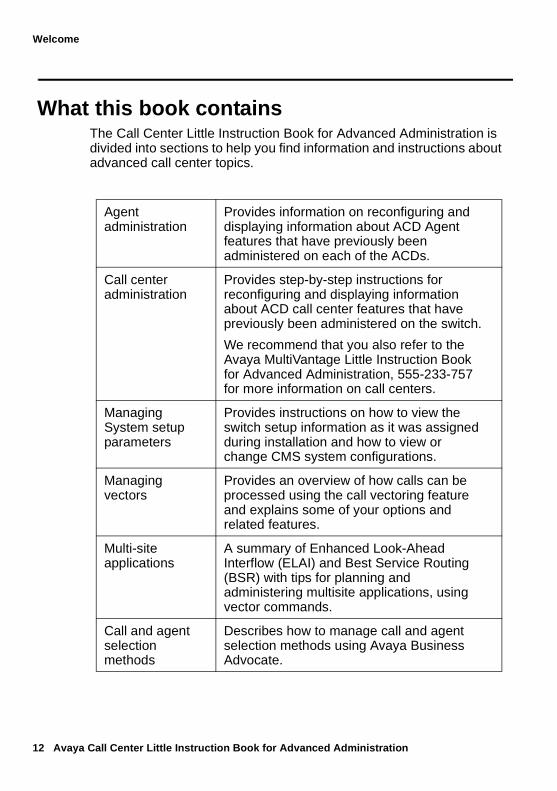
What this book containsThe Call Center Little Instruction Book for Advanced Administration is divided into sections to help you find information and instructions about advanced call center topics.
Agent administration
Provides information on reconfiguring and displaying information about ACD Agent features that have previously been administered on each of the ACDs.
Call center administration
Provides step-by-step instructions for reconfiguring and displaying information about ACD call center features that have previously been administered on the switch.
We recommend that you also refer to the Avaya MultiVantage Little Instruction Book for Advanced Administration, 555-233-757 for more information on call centers.
Managing System setup parameters
Provides instructions on how to view the switch setup information as it was assigned during installation and how to view or change CMS system configurations.
Managing vectors
Provides an overview of how calls can be processed using the call vectoring feature and explains some of your options and related features.
Multi-site applications
A summary of Enhanced Look-Ahead Interflow (ELAI) and Best Service Routing (BSR) with tips for planning and administering multisite applications, using vector commands.
Call and agent selection methods
Describes how to manage call and agent selection methods using Avaya Business Advocate.
Conventions and terms used in this book
Issue 1.0 May 2002 13
Conventions and terms used in this bookBeing familiar with the following terms and conventions will help you to use this book in your call center.
● In this book we use the terms “switch” and “split/skill”. Other Avaya books may refer to the switch as the “PBX”, and a split/skill as a “hunt group”.
● Operational function keys, fields, text boxes, and menu content items are printed in italics, for example, Enter.
● We show screens from the newest CMS systems and refer to the most current books. Please substitute the appropriate commands for your system and refer to the manuals you have available.
● If you need help completing a field entry, you can either:
— Press F1 to access context-sensitive HELP or
— Select HELP from the menu bar.
Trademarks and service marksThe following trademarked names may be used in this document:
● AUDIX® is a registered trademark of Avaya.
● BCMS Vu® is a registered trademark of Avaya.
● Callmaster® is a registered trademark of Avaya.
● CentreVu® is a registered trademark of Avaya.
● Conversant® is a registered trademark of Avaya.
● DEFINITY® is a registered trademark of Avaya.
● MultiVantage® is a registered trademark of Avaya.
● INFORMIX® is a registered trademark of Informix Software, Inc.
● Microsoft®, MS®, MS-DOS®, and Windows® are registered trademarks of Microsoft Corporation.
14 Avaya Call Center Little Instruction Book for Advanced Administration
Welcome
● NetWare®, Novell®, OPEN LOOK®, and UnixWare® are registered trademarks of Novell, Inc.
● Solaris® is a registered trademark and SolsticeTM is a trademark of Sun Microsystems, Inc.
● UNIX® is a registered trademark of Novell, Inc. in the United States and other countries, licensed exclusively through X/Open Corporation.
● X Window SystemTM is a trademark and product of the Massachusetts Institute of Technology.
When used in this book, these trademark and registered trademark product names are shown in italics. If the name is used in a block of text that already incorporates italics, the appropriate symbol is included in the call-out.
Related documentsRelated Documents lists sources for related information about contact center products and features. Not all documents are supported for all CMS releases or equipment.
To order Avaya documentation, call the Avaya Publications Center at 1-800-457-1235 or +1-410-568-3680.

Related documents
Issue 1.0 May 2002 15
CMS software documents
Document title Document number
Installing software on a CMS computer
Avaya Call Management System Release 3 Version 11 Software Installation, Maintenance, and Troubleshooting
585-215-115
CentreVu Call Management System Release 3 Version 9 Software Installation, Maintenance, and Troubleshooting
585-215-956
CentreVu Call Management System Release 3 Version 8 Software Installation, Maintenance, and Troubleshooting
585-210-941
Document title Document number
Setting up a disk-mirrored system
Avaya Call Management System Release 3 Version 11 Software Installation, Maintenance, and Troubleshooting
585-215-115
16 Avaya Call Center Little Instruction Book for Advanced Administration
Welcome
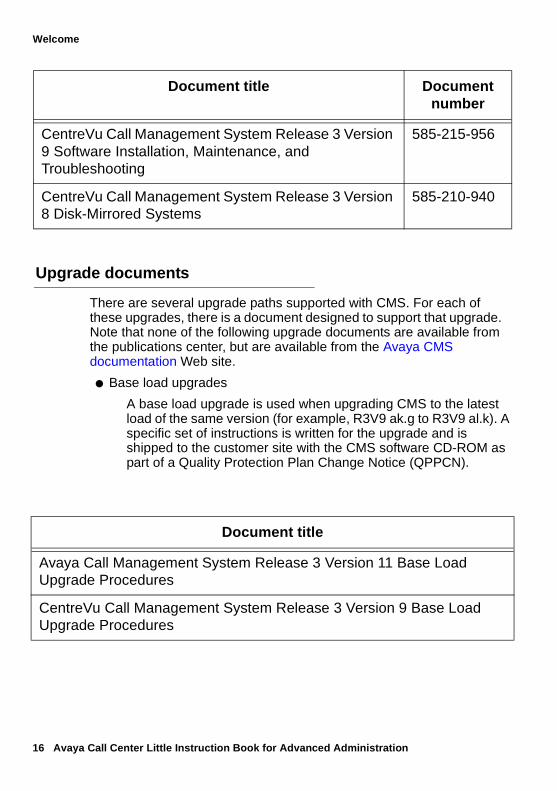
Upgrade documents
There are several upgrade paths supported with CMS. For each of these upgrades, there is a document designed to support that upgrade. Note that none of the following upgrade documents are available from the publications center, but are available from the Avaya CMS documentation Web site.
● Base load upgrades
A base load upgrade is used when upgrading CMS to the latest load of the same version (for example, R3V9 ak.g to R3V9 al.k). A specific set of instructions is written for the upgrade and is shipped to the customer site with the CMS software CD-ROM as part of a Quality Protection Plan Change Notice (QPPCN).
CentreVu Call Management System Release 3 Version 9 Software Installation, Maintenance, and Troubleshooting
585-215-956
CentreVu Call Management System Release 3 Version 8 Disk-Mirrored Systems
585-210-940
Document title Document number
Document title
Avaya Call Management System Release 3 Version 11 Base Load Upgrade Procedures
CentreVu Call Management System Release 3 Version 9 Base Load Upgrade Procedures

Related documents
Issue 1.0 May 2002 17
● Platform upgrades and data migration
A platform upgrade is used when upgrading to a new hardware platform (for example, upgrading from a SPARCserver 5 to an Enterprise 3500). The new hardware platform is shipped from the Avaya factory with the latest CMS load. Therefore, as part of the upgrade you will have the latest CMS load (for example, R3V9 to R3V11, or the latest load of the same CMS version). For R3V11, a specific set of instructions are written for the upgrade and are shipped to the customer site with the new hardware.
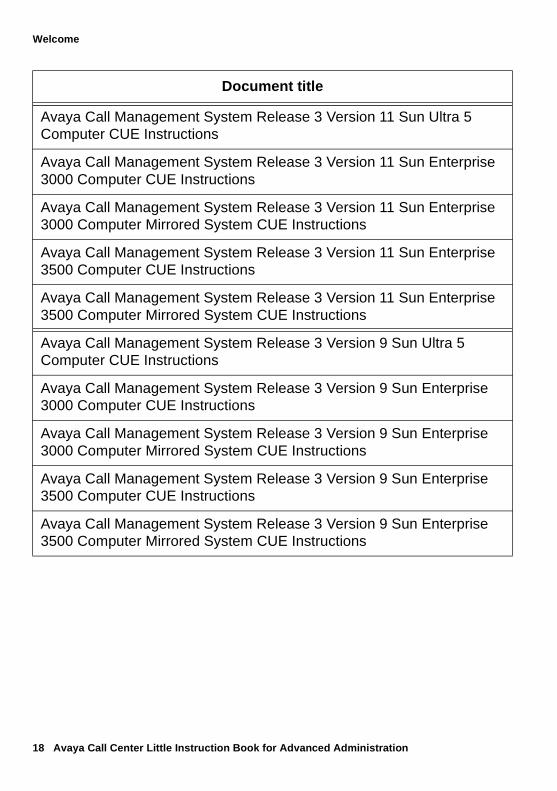
● Avaya Call Management System Upgrade Express (CUE)
CUE is used in the following conditions:
— CMS is being upgraded from an earlier version (for example, R3V5u or R3V6) to the latest version (for example, R3V9 or R3V11).
— The hardware platform is not changing.
A specific set of upgrade instructions is written for the upgrade and is shipped to the customer site with the CUE kit.
Document title
Avaya Call Management System Release 3 Version 11 Platform Upgrade and Data Migration Instructions
CentreVu Call Management System Release 3 Version 9 Platform Upgrade and Data Migration Instructions
Document title
Avaya Call Management System Release 3 Version 11 Sun Blade 100 Computer CUE Instructions
Avaya Call Management System Release 3 Version 11 Sun Blade 100 Computer Mirrored System CUE Instructions
18 Avaya Call Center Little Instruction Book for Advanced Administration
Welcome
Avaya Call Management System Release 3 Version 11 Sun Ultra 5 Computer CUE Instructions
Avaya Call Management System Release 3 Version 11 Sun Enterprise 3000 Computer CUE Instructions
Avaya Call Management System Release 3 Version 11 Sun Enterprise 3000 Computer Mirrored System CUE Instructions
Avaya Call Management System Release 3 Version 11 Sun Enterprise 3500 Computer CUE Instructions
Avaya Call Management System Release 3 Version 11 Sun Enterprise 3500 Computer Mirrored System CUE Instructions
Avaya Call Management System Release 3 Version 9 Sun Ultra 5 Computer CUE Instructions
Avaya Call Management System Release 3 Version 9 Sun Enterprise 3000 Computer CUE Instructions
Avaya Call Management System Release 3 Version 9 Sun Enterprise 3000 Computer Mirrored System CUE Instructions
Avaya Call Management System Release 3 Version 9 Sun Enterprise 3500 Computer CUE Instructions
Avaya Call Management System Release 3 Version 9 Sun Enterprise 3500 Computer Mirrored System CUE Instructions
Document title

Related documents
Issue 1.0 May 2002 19
Hardware documents
Document title Document number
Avaya Call Management System Sun Blade 100 Computer Hardware Installation, Maintenance, and Troubleshooting
585-310-783
Avaya Call Management System Sun Blade 100 Computer Connectivity Diagram
585-310-782
Avaya Call Management System Sun Enterprise 3500 Computer Hardware Installation, Maintenance, and Troubleshooting
585-215-873
Avaya Call Management System Sun Enterprise 3500 Computer Connectivity Diagram
585-215-877
Avaya Call Management System Sun Ultra 5 Computer Hardware Installation, Maintenance, and Troubleshooting
585-215-871
Avaya Call Management System Sun Ultra 5 Computer Connectivity Diagram
585-215-872
Avaya Call Management System Sun Enterprise 3000 and SPARCserver Computers Hardware Maintenance and Troubleshooting
585-214-016
Avaya Call Management System Terminals, Printers, and Modems
585-215-874
20 Avaya Call Center Little Instruction Book for Advanced Administration
Welcome
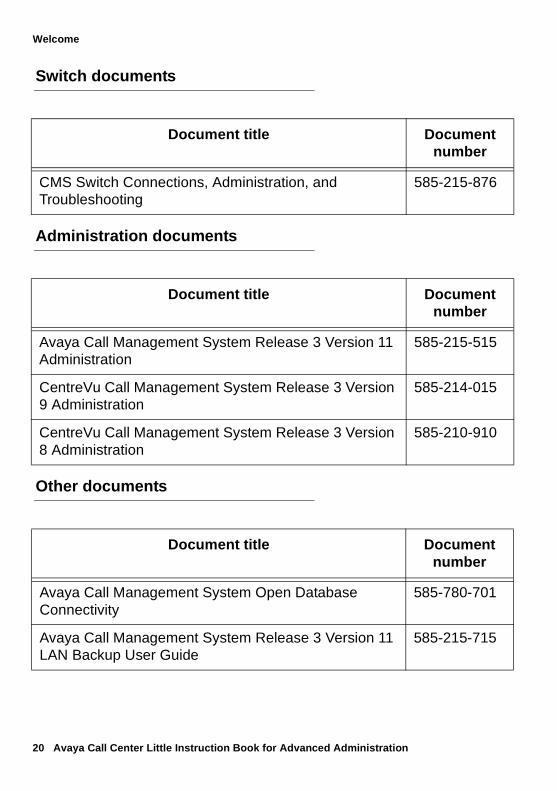
Switch documents
Administration documents
Other documents
Document title Document number
CMS Switch Connections, Administration, and Troubleshooting
585-215-876
Document title Document number
Avaya Call Management System Release 3 Version 11 Administration
585-215-515
CentreVu Call Management System Release 3 Version 9 Administration
585-214-015
CentreVu Call Management System Release 3 Version 8 Administration
585-210-910
Document title Document number
Avaya Call Management System Open Database Connectivity
585-780-701
Avaya Call Management System Release 3 Version 11 LAN Backup User Guide
585-215-715

Related documents
Issue 1.0 May 2002 21
Avaya CMS Release 3 Version 11 External Call History Interface
585-780-700
CentreVu CMS Release 3 Version 9 External Call History Interface
585-215-952
Avaya CMS Custom Reports 585-215-822
Avaya CMS Forecast 585-215-825
Avaya Visual Vectors Version 9 Installation and Getting Started
585-210-947
Avaya Visual Vectors Version 9 User Guide 585-210-944
Avaya Visual Vectors Release 11 Installation and Getting Started
585-210-706
Avaya Visual Vectors Release 11 User Guide 585-210-709
Document title Document number
22 Avaya Call Center Little Instruction Book for Advanced Administration
Welcome
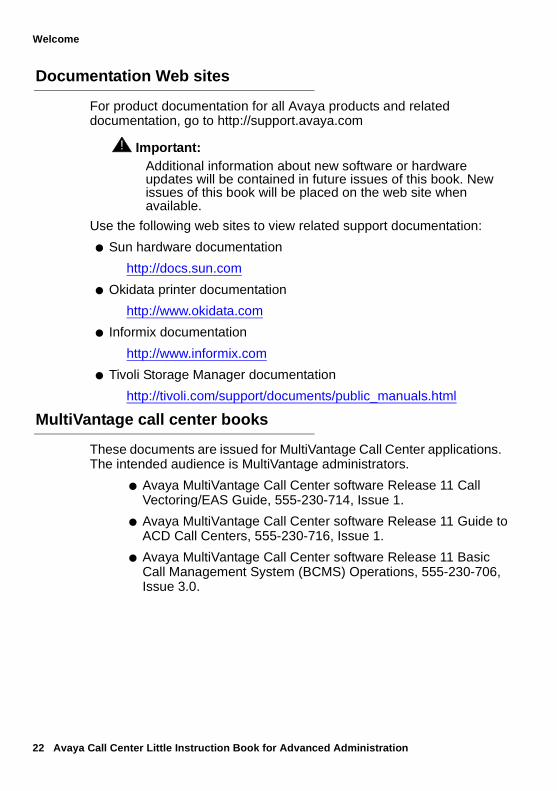
Documentation Web sites
For product documentation for all Avaya products and related documentation, go to http://support.avaya.com
! Important:Additional information about new software or hardware updates will be contained in future issues of this book. New issues of this book will be placed on the web site when available.
Use the following web sites to view related support documentation:
● Sun hardware documentation
http://docs.sun.com
● Okidata printer documentation
http://www.okidata.com
● Informix documentation
http://www.informix.com
● Tivoli Storage Manager documentation
http://tivoli.com/support/documents/public_manuals.html
MultiVantage call center books
These documents are issued for MultiVantage Call Center applications. The intended audience is MultiVantage administrators.
● Avaya MultiVantage Call Center software Release 11 Call Vectoring/EAS Guide, 555-230-714, Issue 1.
● Avaya MultiVantage Call Center software Release 11 Guide to ACD Call Centers, 555-230-716, Issue 1.
● Avaya MultiVantage Call Center software Release 11 Basic Call Management System (BCMS) Operations, 555-230-706, Issue 3.0.
Related documents
Issue 1.0 May 2002 23
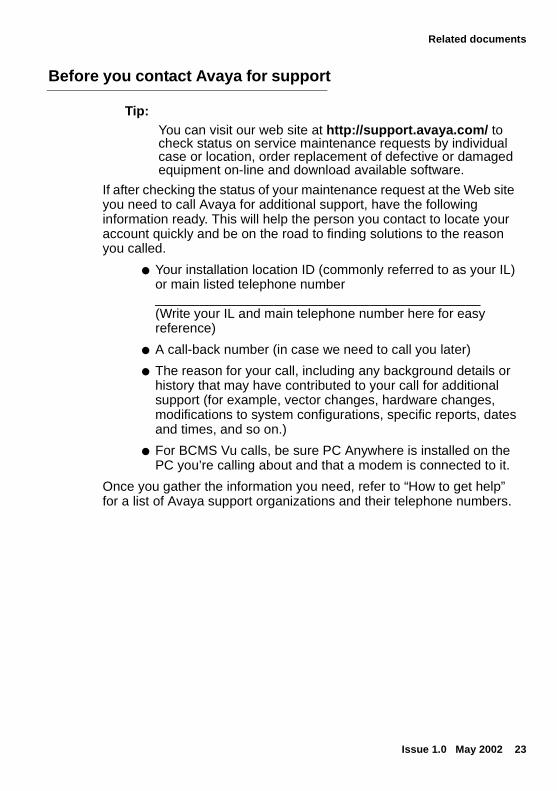
Before you contact Avaya for support
Tip:You can visit our web site at http://support.avaya.com/ to check status on service maintenance requests by individual case or location, order replacement of defective or damaged equipment on-line and download available software.
If after checking the status of your maintenance request at the Web site you need to call Avaya for additional support, have the following information ready. This will help the person you contact to locate your account quickly and be on the road to finding solutions to the reason you called.
● Your installation location ID (commonly referred to as your IL) or main listed telephone number____________________________________________(Write your IL and main telephone number here for easy reference)
● A call-back number (in case we need to call you later)
● The reason for your call, including any background details or history that may have contributed to your call for additional support (for example, vector changes, hardware changes, modifications to system configurations, specific reports, dates and times, and so on.)
● For BCMS Vu calls, be sure PC Anywhere is installed on the PC you’re calling about and that a modem is connected to it.
Once you gather the information you need, refer to “How to get help” for a list of Avaya support organizations and their telephone numbers.

24 Avaya Call Center Little Instruction Book for Advanced Administration
Welcome
Issue 1.0 May 2002 25
Chapter 2: Agent administration
This section contains details on reconfiguring and displaying information about ACD agent features that have previously been administered on each of the ACDs. Avaya CMS Supervisor is used as the interface to communicate changes to the switch.
The topics included in this section are:
● Viewing a agent’s skill assignment (EAS only)
● Changing an agent’s skill assignment (EAS only)
● Changing a skill for multiple agents (EAS only)
● Changing an agent’s extension split assignment (non-EAS)
● Moving multiple agents’ extensions between splits (non-EAS)
● Tracing an agent’s call activity
● Listing agent trace data
Some CMS Administrators give Split Supervisors access to the Agent Administration feature so they can move agents between splits or change agent skills (EAS only) and activate agent traces.
! CAUTION:To retain consistency in your call center’s design and configuration, we recommend you give Split Supervisors limited access to this feature.
Viewing an agent’s skill assignment (EAS only)
The Change Agent Skills/Template window is used to view or change the skill assignment for an agent or template.
To view the current skill assignment for an agent or template:
1. Select Agent Administration from the Commands menu.
2. Select Change Agent Skills from the Operations tab of the Agent Administration window.
26 Avaya Call Center Little Instruction Book for Advanced Administration
Agent administration
3. Select the ACD for which you want to view an agent’s skill assignment.
4. Select OK.
The Select Agent/Template window is displayed.
5. To view the skill assignment for an agent, enter the agent’s name or login ID. To view the skill assignment for a template, enter the name of the template.
6. Select OK.
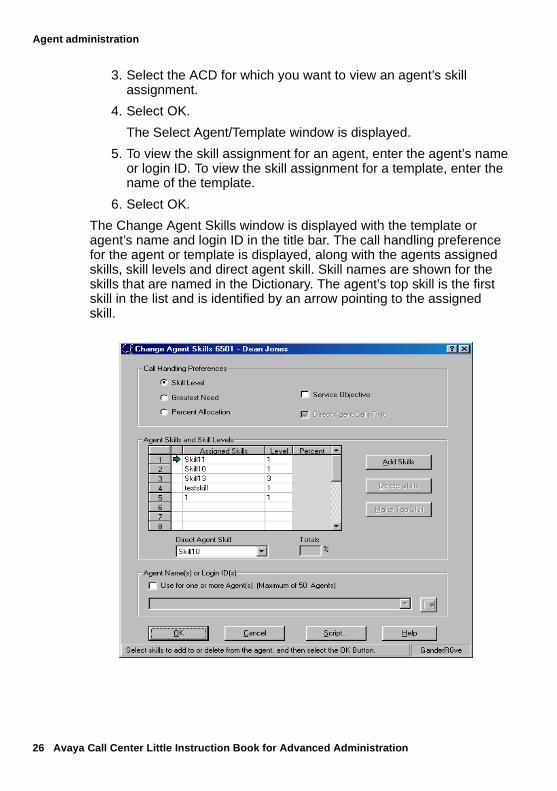
The Change Agent Skills window is displayed with the template or agent’s name and login ID in the title bar. The call handling preference for the agent or template is displayed, along with the agents assigned skills, skill levels and direct agent skill. Skill names are shown for the skills that are named in the Dictionary. The agent’s top skill is the first skill in the list and is identified by an arrow pointing to the assigned skill.
Changing an agent’s skill assignment (EAS only)
Issue 1.0 May 2002 27
Changing an agent’s skill assignment (EAS only)
The Change Agent Skills window is used to view an agent’s or template’s current skill assignments or to change one or more skills and the associated skill type or skill level.
Helpful tips
When used to change skill assignments, the Change Agents Skills window:
● Allows you to change which calls an agent gets first through call handling preferences.
● Allows you to change the skill that is used to queue an agent’s direct agent calls through the Direct Agent Skill field.
● Provides the ability to change the level or type associated with a skill that is already assigned.
● Allows you to change which skills are assigned to this agent or template.
● Provides an opportunity to make an assigned skill the Top Skill for an agent.
● Allows you to select and assign a Percent Allocation (this applies to Business Advocate users only).
● With the EAS-PHD feature, allows 20 skills with one of 16 skill levels for each.
● Allows you to select up to 50 agents at a time when applying an agent template.
● Does not allow you to exit until the switch responds to your requested changes.
● Activates requested skill changes immediately for agents who are in the AUX work mode, available, or logged out. For agents who are handling calls (including non-ACD calls, calls on hold, and direct agent calls waiting in queue) or are in the ACW mode, the change is pending until the agent logs out, changes to the AUX work mode, or completes all calls and ACW and becomes available.
28 Avaya Call Center Little Instruction Book for Advanced Administration
Agent administration
To change an agent’s skill assignment:
1. Select Agent Administration from the Commands menu.
2. Select Change Agent Skills from the Operations tab of the Agent Administration window.
3. Select the ACD for which you want to view an agent’s skill assignment.
4. Select OK.
The Select Agent/Template window is displayed.
5. To view the skill assignment for an agent, enter the agent’s name or login ID. To view the skill assignment for a template, enter the name of the template.
6. Select OK.
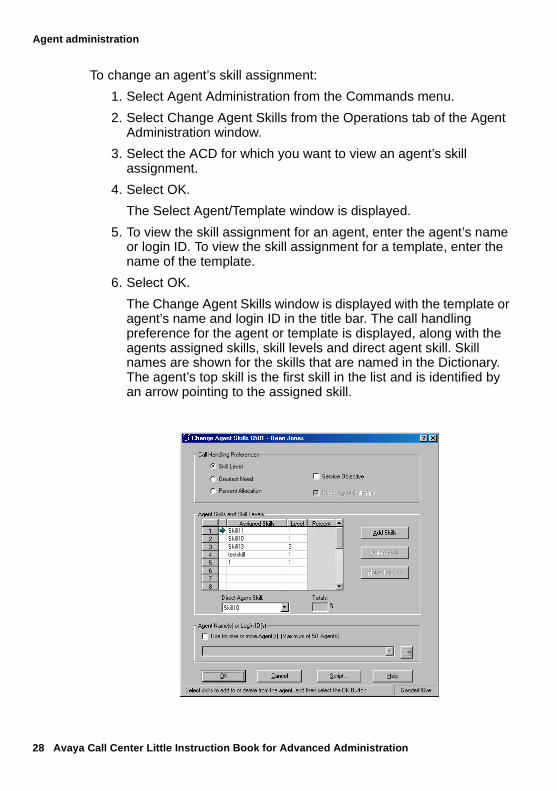
The Change Agent Skills window is displayed with the template or agent’s name and login ID in the title bar. The call handling preference for the agent or template is displayed, along with the agents assigned skills, skill levels and direct agent skill. Skill names are shown for the skills that are named in the Dictionary. The agent’s top skill is the first skill in the list and is identified by an arrow pointing to the assigned skill.
Changing an agent’s skill assignment (EAS only)
Issue 1.0 May 2002 29
7. To add a skill for this agent, select Add Skills.
The Add Agent Skills window is displayed.
8. Select a skill from the list of available skills.
9. Select a skill level to be assigned to the selected skill.
10. Select OK.
The Change Agent Skills window is displayed for the agent with the new skill and skill level displayed.
Follow these optional steps from the Change Agents Skills window to:
a. Select a top skill - select the assigned skill that you want to be the agent’s top skill, and select Make Top Skill.
b. Change the direct agent skill. Select a new direct agent skill from the Direct Agent Skill drop-down list. (Direct Agent Skills are used to queue Direct Agent calls, or calls that are directed to specific agents rather than to any available ACD agents.)
c. Delete a skill. Select the skills you want to delete from the Assigned Skills list and select Delete Skills. Select the skills you want to delete and select OK from the Delete Agent Skills window.
d. Change the agent’s call handling preference. Select a call handling preference from the top of the Change Agent Skills window. Choose between distributing calls to the selected agent based on Skill Level (as shown), Greatest Need, or Percent Allocation (which applies to users who have purchased and enabled Business Advocate on the switch).
Or
e. Apply skill assignments as a template to a group of up to 50 agents. Using the currently displayed skill assignments, check the Use for One or More Agents box at the bottom of the Change Agent Skills window. Enter the names or login IDs of the agents you want to apply these skill assignments to or select agents using the drop-down list or selecting Browse.
Note:The Agent Name(s) or Login Ids) field is enabled only if you have read and write permissions for all of the currently displayed skill assignments on the Change Agent Skills window.
30 Avaya Call Center Little Instruction Book for Advanced Administration
Agent administration
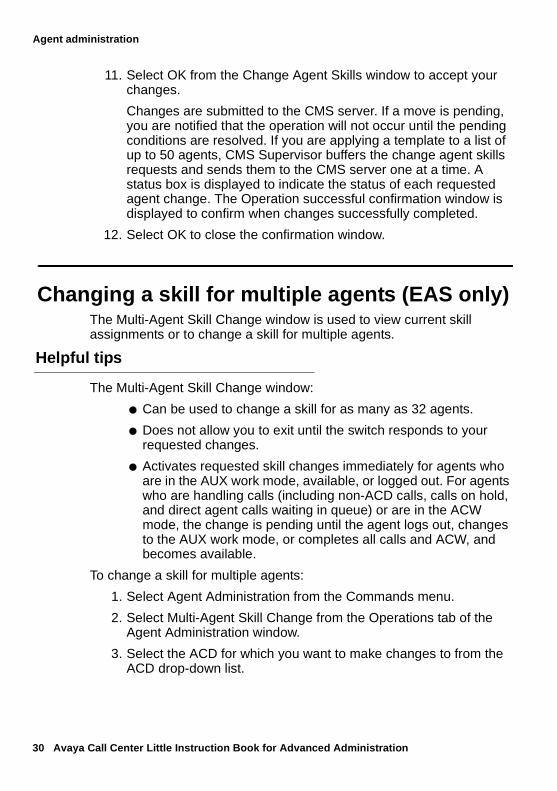
11. Select OK from the Change Agent Skills window to accept your changes.
Changes are submitted to the CMS server. If a move is pending, you are notified that the operation will not occur until the pending conditions are resolved. If you are applying a template to a list of up to 50 agents, CMS Supervisor buffers the change agent skills requests and sends them to the CMS server one at a time. A status box is displayed to indicate the status of each requested agent change. The Operation successful confirmation window is displayed to confirm when changes successfully completed.
12. Select OK to close the confirmation window.
Changing a skill for multiple agents (EAS only)The Multi-Agent Skill Change window is used to view current skill assignments or to change a skill for multiple agents.
Helpful tips
The Multi-Agent Skill Change window:
● Can be used to change a skill for as many as 32 agents.
● Does not allow you to exit until the switch responds to your requested changes.
● Activates requested skill changes immediately for agents who are in the AUX work mode, available, or logged out. For agents who are handling calls (including non-ACD calls, calls on hold, and direct agent calls waiting in queue) or are in the ACW mode, the change is pending until the agent logs out, changes to the AUX work mode, or completes all calls and ACW, and becomes available.
To change a skill for multiple agents:
1. Select Agent Administration from the Commands menu.
2. Select Multi-Agent Skill Change from the Operations tab of the Agent Administration window.
3. Select the ACD for which you want to make changes to from the ACD drop-down list.
Changing a skill for multiple agents (EAS only)
Issue 1.0 May 2002 31
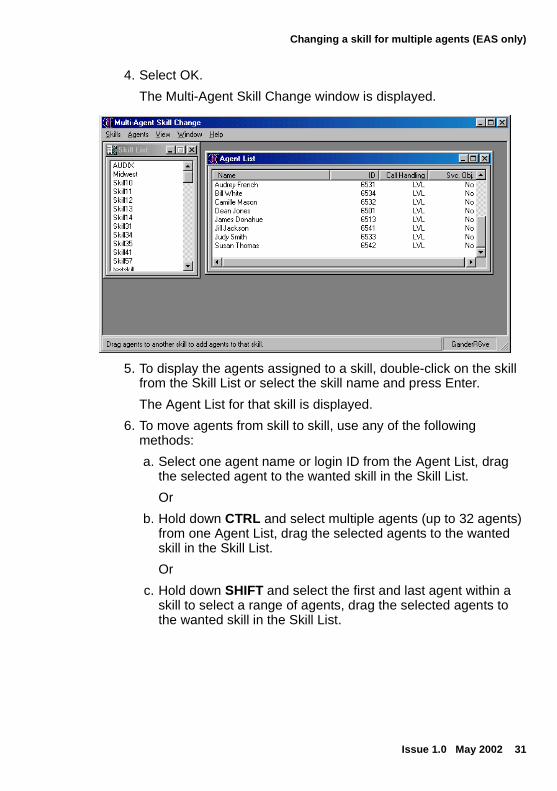
4. Select OK.
The Multi-Agent Skill Change window is displayed.
5. To display the agents assigned to a skill, double-click on the skill from the Skill List or select the skill name and press Enter.
The Agent List for that skill is displayed.
6. To move agents from skill to skill, use any of the following methods:
a. Select one agent name or login ID from the Agent List, drag the selected agent to the wanted skill in the Skill List.
Or
b. Hold down CTRL and select multiple agents (up to 32 agents) from one Agent List, drag the selected agents to the wanted skill in the Skill List.
Or
c. Hold down SHIFT and select the first and last agent within a skill to select a range of agents, drag the selected agents to the wanted skill in the Skill List.
32 Avaya Call Center Little Instruction Book for Advanced Administration
Agent administration
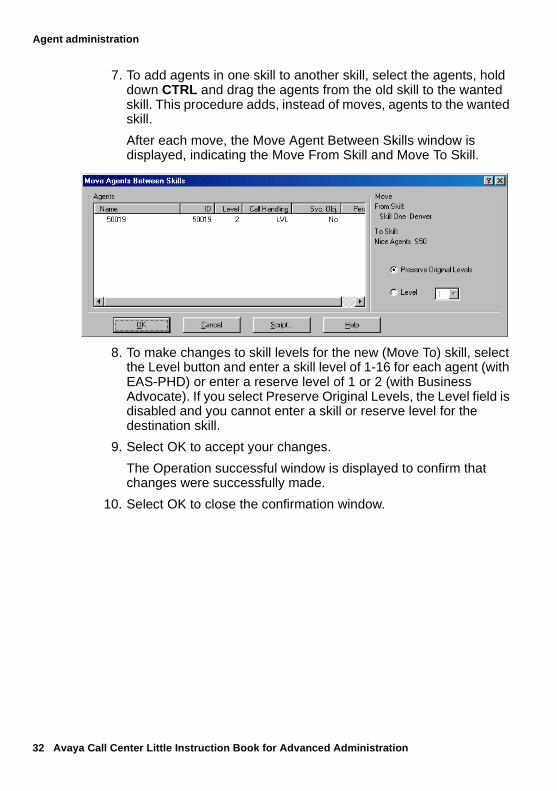
7. To add agents in one skill to another skill, select the agents, hold down CTRL and drag the agents from the old skill to the wanted skill. This procedure adds, instead of moves, agents to the wanted skill.
After each move, the Move Agent Between Skills window is displayed, indicating the Move From Skill and Move To Skill.
8. To make changes to skill levels for the new (Move To) skill, select the Level button and enter a skill level of 1-16 for each agent (with EAS-PHD) or enter a reserve level of 1 or 2 (with Business Advocate). If you select Preserve Original Levels, the Level field is disabled and you cannot enter a skill or reserve level for the destination skill.
9. Select OK to accept your changes.
The Operation successful window is displayed to confirm that changes were successfully made.
10. Select OK to close the confirmation window.
Changing an agent’s extension split assignment (non-EAS)
Issue 1.0 May 2002 33
Changing an agent’s extension split assignment (non-EAS)
The Change Extension Split Assignments window is used to list the currently assigned splits and to change the splits assigned to a specific extension number.
Helpful tips
The Change Extension Split Assignments window:
● Allows you to make changes to extension split assignments for specific extensions.
● Does not allow you to exit until the switch responds to your requested changes.
● Activates requested split changes immediately for agents who are in the AUX work mode, available, or logged out. For agents who are handling calls (including non-ACD calls, calls on hold, and direct agent calls waiting in queue) or are in the ACW mode, the change is pending until the agent logs out, changes to the AUX work mode, or completes all calls and ACW, and becomes available.
● Keeps change-extensions requests pending for agents who frequently have calls on hold.
To change the splits assigned to a specific extension number:
1. Select Agent Administration from the Commands menu.
2. Select Change Extension Split Assignments from the Operations tab of the Agent Administration window.
3. Select the ACD for which you want to make changes to from the ACD drop-down list.
4. Select OK.
The Select Extension window is displayed.
5. Enter the extension number for which you want to change the split assignment, or use the drop-down list to select an extension number.
34 Avaya Call Center Little Instruction Book for Advanced Administration
Agent administration
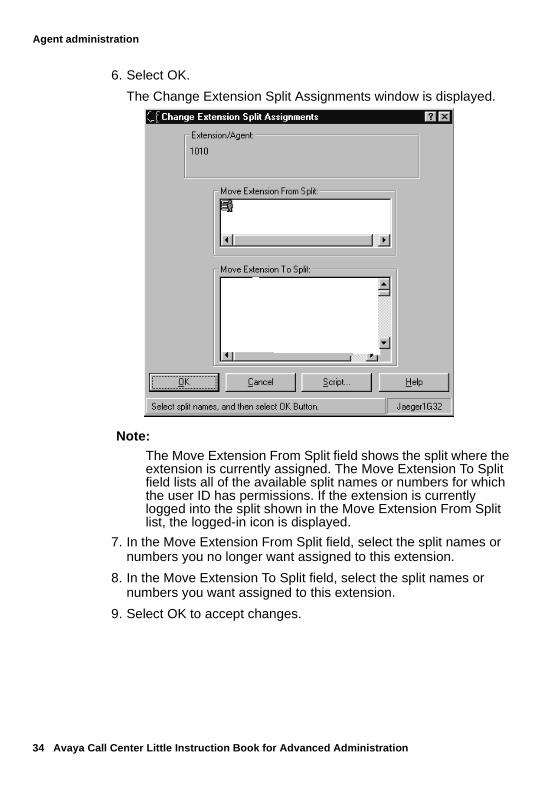
6. Select OK.
The Change Extension Split Assignments window is displayed.
Note:The Move Extension From Split field shows the split where the extension is currently assigned. The Move Extension To Split field lists all of the available split names or numbers for which the user ID has permissions. If the extension is currently logged into the split shown in the Move Extension From Split list, the logged-in icon is displayed.
7. In the Move Extension From Split field, select the split names or numbers you no longer want assigned to this extension.
8. In the Move Extension To Split field, select the split names or numbers you want assigned to this extension.
9. Select OK to accept changes.
Moving multiple agents’ extensions between splits (non-EAS)
Issue 1.0 May 2002 35
Moving multiple agents’ extensions between splits(non-EAS)
The Move Extensions Between Splits window is used to view current extension assignments or to move extensions between measured splits.
Helpful tips
The Move Extensions Between Splits window:
● Allows you to move as many as 32 extensions in a single move.
● Does not allow you to exit until the switch responds to your requested changes.
● Activates requested split changes immediately for agents who are in the AUX work mode, available, or logged out. For agents who are handling calls (including non-ACD calls, calls on hold, and direct agent calls waiting in queue) or are in the ACW mode, the change is pending until the agent logs out, changes to the AUX work mode, or completes all calls and ACW, and becomes available.
● Keeps move-extensions requests pending for agents who frequently have calls on hold.
To move multiple extensions between splits:
1. Select Agent Administration from the Commands menu.
2. Select Move Extensions Between Splits from the Operations tab of the Agent Administration window.
3. Select the ACD for which you want to make changes to from the ACD drop-down list.
36 Avaya Call Center Little Instruction Book for Advanced Administration
Agent administration
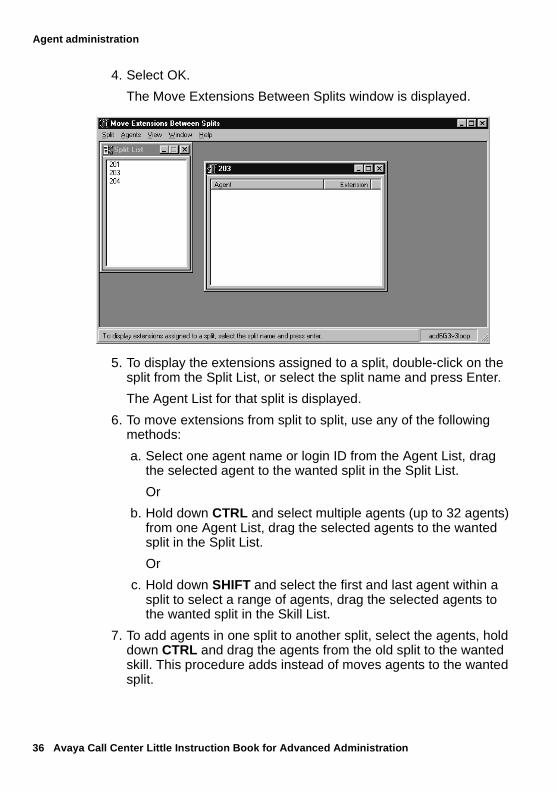
4. Select OK.
The Move Extensions Between Splits window is displayed.
5. To display the extensions assigned to a split, double-click on the split from the Split List, or select the split name and press Enter.
The Agent List for that split is displayed.
6. To move extensions from split to split, use any of the following methods:
a. Select one agent name or login ID from the Agent List, drag the selected agent to the wanted split in the Split List.
Or
b. Hold down CTRL and select multiple agents (up to 32 agents) from one Agent List, drag the selected agents to the wanted split in the Split List.
Or
c. Hold down SHIFT and select the first and last agent within a split to select a range of agents, drag the selected agents to the wanted split in the Skill List.
7. To add agents in one split to another split, select the agents, hold down CTRL and drag the agents from the old split to the wanted skill. This procedure adds instead of moves agents to the wanted split.
Tracing an agent’s call activity
Issue 1.0 May 2002 37
After each move, the Move Extensions Between Splits confirmation window is displayed, indicating the Move From Split and Move To Split. Select OK to accept changes.
Tracing an agent’s call activityThe Activate Agents Trace window is used to start or stop CMS tracing of agent activities, including agent state changes.
Helpful tips
The Activate Agents Trace window allows you to activate traces for up to 400 agents. This limit applies to the number of agents administered to be traced by one CMS server across all ACDs.
Tip:To avoid adversely impacting performance, activate only the traces that are needed.
Note:The agent trace file discards the oldest records as new records are written, based on the number of agent trace records allocated in Data Storage Allocation. If you want to keep old agent traces, you should print them.
To start an agent trace:
1. Select Agent Administration from the Commands menu.
2. Select Activate Agent Trace from the Operations tab of the Agent Administration window.
3. Select the ACD for which you want to make changes to from the ACD drop-down list.
4. Select OK.
The Activate Agent Trace window is displayed.
5. Enter the agent names or login IDs of the agents you want to trace. You can also select agents using the drop-down list or the Browse button, or you can use List All from the Actions menu to list all agents in the ACD and their tracing status.
38 Avaya Call Center Little Instruction Book for Advanced Administration
Agent administration
6. Select the On button and select Modify from the Actions menu to start the trace.
Tip:You can use the same procedure to turn an Agent Trace off. Turning an Agent Trace off does not delete the records for that agent.
Listing agent trace dataThe List Agents Traced window is used to list the agents and the dates for which agent trace data is available on the current ACD.
Helpful tips
The List Agents Traced window:
● Allows you to list all the agents for whom data is available on the current ACD for given dates, all the dates for which data is available for given agents, or all the dates and all the agents for which data is available
● Requires that you have turned on agent trace for some agents at some time in the past, and that those agents must have logged in to produce agent trace records.
To list agent trace data:
1. Select Agent Administration from the Commands menu.
2. Select List Agents Traced from the Operations tab of the Agent Administration window.
3. Select the ACD for which you want to make changes to from the ACD drop-down list.
4. Select OK.
The List Agents Traced window is displayed.
5. Enter the names or login IDs of the agents, use the drop-down list, or use the Browse button to select agents on which to list traces. (If you leave this field blank, all agents for whom agent trace data is available is displayed.)
Listing agent trace data
Issue 1.0 May 2002 39
6. Enter a list or range of dates, use the drop-down list, or use the Browse button to select the dates. (If you leave this field blank, all dates for which agent trace data is available is displayed.)
7. Select List All from the Actions menu.
The List Agents Traced - List All window is displayed with a list of the agents and the dates of available agent trace data.
Tip:If you leave all the entry fields blank, you can use List All from the Actions menu to display all available agent trace data.
Once an agent trace is activated and a daily archive has completed for that time period, you can use the Historical Agent Trace report to view a detailed list of each agent activity and the time it occurred. You may find this information useful when evaluating how well agents are using their time.

40 Avaya Call Center Little Instruction Book for Advanced Administration
Agent administration
Issue 1.0 May 2002 41
Chapter 3: Call center administration
This section provides step-by-step instructions on reconfiguring and displaying information about ACD call center features that have previously been administered on the switch, using Avaya CMS Supervisor as the interface to communicate changes to the switch.
Refer to the Avaya MultiVantage Little Instruction Book for Basic Administration, 555-233-756 and Avaya MultiVantage Little Instruction Book for Advanced Administratio, 555-233-757 for instructions on how to initially administer your call center using the switch.
The topics included in this section are:
● Assigning call work codes
● Changing VDN skill preferences (EAS only)
● Defining acceptable service levels
● Viewing trunk group members
● Changing VDN-to-vector assignments
● View vector configurations
Assigning call work codesIn the Managing Features section of the Call Center Little Instruction Book for Basic Administration, we explained how call work codes (CWCs) can be used to track call activity.
The Call Work Codes window is used to add, delete, or list the call work codes CMS collects data on.
Helpful tips
Here are a few things you’ll want to know before using call work codes:
● Call work code 0 is always assigned and is used to collect information on unadministered call work codes.
● We recommend you specify a fixed number of digits for all call work codes. A fixed number of digits makes it easier to add, delete, and search for call work codes.
42 Avaya Call Center Little Instruction Book for Advanced Administration
Call center administration
● Disk space must be allocated for call work codes in the Data Storage Allocation window in System Setup.
● Names can be assigned to call work codes in the Dictionary subsystem.
● Call work codes must be positive integers with 1 to 16 digits. Codes with 1 to 9 digits may be assigned names in the Dictionary subsystem.
! CAUTION:Once call work codes are administered, the agent must press the # sign after entering the call work code digits to successfully transmit call work code data to CMS for tracking.
Note:Starting with CMS R3V11 an agent can store up to 5 additional call work codes per call segment (CWC1 through CWC5).
The last call work code entered by an agent for a call segment will continue to be stored in the LASTCWC column.
For more information see Avaya Call Management System (CMS) R3V11 Administration, 585-215-515, Avaya CMS Database Items and Calculations, 585-780-702, or Avaya CMS External Call History Interface, 585-780-700.
To administer call work codes:
1. Access Call Center Administration from the Commands menu.
2. Select Call Work Codes from the Operations tab of the Call Center Administration window.
3. Select the ACD for which you want to view an agent’s skill assignment, from the ACD drop-down list.
4. Select OK.
The Call Work Codes window is displayed. The total number of call work codes that are allocated in the CMS database and the total number of call work codes currently administered are shown.
5. Enter the call work codes, or use the drop-down list or Browse button to select the call work codes you want agents to use.
Changing VDN skill preferences (EAS only)
Issue 1.0 May 2002 43
6. Select Add from the Actions menu.
Successful is displayed in the status bar to indicate the call work code has been stored in the database.
Note:Once you have established call work codes, you can use the historical call work code report to track call activities in your call center.
Changing VDN skill preferences (EAS only)The Change VDN Skill Preferences window is used to change the first, second, and third VDN skill preferences for a list of Vector Directory Numbers (VDNs). You can also list the currently assigned skill preferences for VDNS, or list all the VDNs that currently have a specified skill preference assigned.
Helpful tips
Here are a few things you’ll want to know before changing VDN skill preferences.
● You can view the skill preferences currently assigned to VDNs on the Vector Configuration report available in Call Center Administration.
● When changing VDN skill preferences, the changes take effect immediately and can affect the processing of any call currently in progress in the VDN at the time of the change.
! CAUTION:When changing VDN skill preferences, the changes take effect immediately and can affect the processing of any call currently in progress in the VDN at the time of the change.
To change VDN skill preferences:
1. Access Call Center Administration from the Commands menu.
2. Select Change VDN Skill Preferences from the Operations tab of the Call Center Administration window.
3. Select the ACD for which you want to change VDN skill preferences from the ACD drop-down list.
44 Avaya Call Center Little Instruction Book for Advanced Administration
Call center administration
4. Select OK.
The Change VDN Skill Preferences window is displayed.
5. Enter the VDNs, or use the drop-down list or Browse button to select the VDNs for the skill preferences you want to change, .
Tip:You can display which VDNs have a specified skill assigned as their first, second, or third skill preferences, by selecting the List all button on the toolbar three times, once for each skill preference.
6. Enter the first, second and third skill preferences, or use the drop down list or Browse button to select the skill preferences you want to be assigned to the list of VDNs you just entered.
7. Select Modify from the Actions menu.
Successful is displayed in the status bar to indicate the VDN skill preferences have been modified in the database.
Defining acceptable service levels The Split/Skill and VDN Call Profile Setup windows are used to establish an acceptable service level and define service level increments to record the number of calls that are answered or abandoned within each increment. This helps determine how long a caller is willing to wait for an agent before hanging up.
Note:Once you’ve established a call profile, you can use the real-time and historical Split/Skill and VDN Call Profile reports to view the number of calls that are answered or abandoned within each of the increments you established. When the Percent Within Service Level field is calculated on those reports, it is important to remember that there are other types of calls included in the calculation, in addition to ACD calls answered and abandoned.
! CAUTION:Modifications made to existing call profiles will impact the data reported during those time periods on the Split/Skill and VDN Call Profile reports.
Defining acceptable service levels
Issue 1.0 May 2002 45
To define service levels:
1. Access Call Center Administration from the Commands menu.
2. Select Split/Skill Call Profile Setup or VDN Call Profile Setup from the Operations tab of the Call Center Administration window.
3. Select the ACD for which you want to define service levels, from the ACD drop-down list.
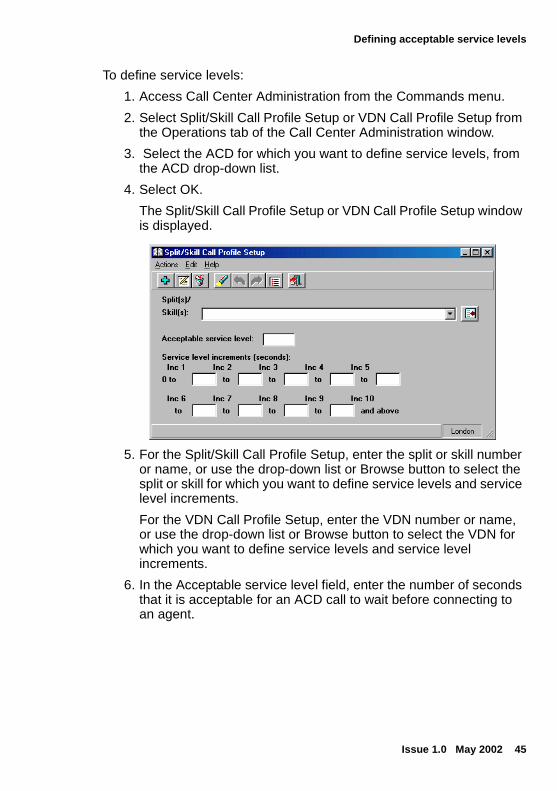
4. Select OK.
The Split/Skill Call Profile Setup or VDN Call Profile Setup window is displayed.
5. For the Split/Skill Call Profile Setup, enter the split or skill number or name, or use the drop-down list or Browse button to select the split or skill for which you want to define service levels and service level increments.
For the VDN Call Profile Setup, enter the VDN number or name, or use the drop-down list or Browse button to select the VDN for which you want to define service levels and service level increments.
6. In the Acceptable service level field, enter the number of seconds that it is acceptable for an ACD call to wait before connecting to an agent.
46 Avaya Call Center Little Instruction Book for Advanced Administration
Call center administration
7. In the Service level increments fields, enter a progressively greater number of seconds in each “to” field. The seconds before and after each word “to” define an increment in seconds of wait time.
Tip:Each of the nine increments can vary in length (for example, 0 to 5, 6 to 10, 11 to 15, 16 to 25, 26 to 40, and so forth). Each increment represents a progressively longer wait time for the call and is used for both answered and abandoned calls.
8. Select Add from the Actions menu.
Successful is displayed in the status bar to indicate the call profile values have been stored in the database.
Viewing trunk group membersThe Trunk Group Members report is used to view selected trunk groups in numerical order, each trunk group’s assigned name (if assigned in the Dictionary), and the equipment location of each trunk in the trunk group.
To view trunk group members:
1. Access Call Center Administration from the Commands menu.
2. Select Trunk Group Members from the Reports tab of the Call Center Administration window.
3. Select the ACD for which you want to view trunk group members, from the ACD drop-down list.
4. Select OK.
The Trunk Group Members window is displayed.
5. Enter the trunk group numbers or names, or use the drop-down list or Browse button to select the trunk groups for which you want to view equipment locations.
Tip:If you leave the Trunk Groups field blank, all Trunk Groups and their assignments will be displayed.
Changing VDN-to-vector assignments
Issue 1.0 May 2002 47
6. Select one of the following report destinations:
View Report on Screen to view the report on the screen.
Or
Print Report on: to print the report to your default printer. Use the Select Printer button to select optional available Windows printers.
7. Select OK.
Changing VDN-to-vector assignmentsThe VDN Assignments window is used to change VDN-to-vector assignments that were initially assigned to vectors on the switch. Some examples of when you would do this are for holidays, during emergencies, or after hours.
Helpful tips
Here are a few things you’ll find helpful when using the VDN Assignments window.
● Multiple VDNs can be assigned to a single vector, but each VDN cannot be assigned to more than one vector.
● You can schedule VDN assignment changes on a timetable. This is useful if you want the changes to take effect after hours or during holidays.
● When scheduling VDN moves on a timetable, you need to combine all the VDN moves onto one timetable, or schedule each VDN assignment timetable far enough apart so that each move has time to complete before the next move starts.
To change VDN-to-vector assignments:
1. Access Call Center Administration from the Commands menu.
2. Select VDN Assignments from the Operations tab of the Call Center Administration window.
3. Select the ACD for which you want to change VDN assignments, from the ACD drop-down list.
48 Avaya Call Center Little Instruction Book for Advanced Administration
Call center administration
4. Select OK.
The VDN Assignments window is displayed.
5. Enter the VDN numbers or names you want to reassign, or use the drop-down list or Browse button to select the VDN.
6. Enter the vector number or name, or use the drop-down list or Browse button to select the vector for which you want to reassign the VDNs to.
Tip:To determine which vectors the VDNs have been assigned, leave the input fields blank and select List All from the Actions menu or the List All button on the Toolbar.
7. Select Modify from the Actions menu.
Successful is displayed in the status bar to indicate the VDN-to-vector assignments have been stored in the database.
You cannot exit this window until the switch responds to your requested changes.
View vector configurationsThe Vector Configuration report is used to view the trunk groups and VDNs that are associated with a given set of vectors and the skill preferences assigned to the VDNs.
To view vector configurations:
1. Access Call Center Administration from the Commands menu.
2. Select Vector Configuration from the Reports tab of the Call Center Administration window.
3. Select the ACD for which you want to view vector configurations, from the ACD drop-down list.
4. Select OK.
The Vector input window is displayed.
5. Enter the vector numbers or names, or use the drop-down list or Browse button to select the vectors for which you want to view trunk groups, VDNs, and VDN skill preferences.

View vector configurations
Issue 1.0 May 2002 49
6. Select one of the following report destinations:
View Report on Screen to view the report on the screen.
Or
Print Report on: to print the report to your default printer. Use the Select Printer button to select optional available Windows printers. The Print window is displayed allowing you to proceed using common print functions.
7. Select OK.

50 Avaya Call Center Little Instruction Book for Advanced Administration
Call center administration
Issue 1.0 May 2002 51
Chapter 4: Managing system setup parameters
This section provides step-by-step instructions on how to use Avaya CMS Supervisor to view the switch setup information as it was assigned during installation. It also includes instructions on how to view or change CMS system configurations.
! CAUTION:It is important that the CMS configurations established on each of the menu items listed under the Operations tab in the CMS Supervisor System Setup window remain stable. You should not be working in the CMS Supervisor System Setup window daily because any changes you make in System Setup could affect CMS performance, disk space, or data collection.
The topics included in this section are:
● Changing from multi-user to single-user mode
● Turning data collection off and on
● Modifying data storage capacities
● Summarizing data
● Verifying free space
● Viewing storage intervals
● Viewing switch information
Changing from multi-user to single-user modeThe CMS State window is used to change CMS between a multi-user mode and a single-user mode. This feature is used in combination with Data Collection, when it is necessary to change values in Data Storage Allocation, Free Space Allocation (for CMS versions prior to R3V6 that don’t have DiskSuite), Storage Intervals, and Restore Data (for System Administration and ACD Administration data).
You can also select the master ACD for clock synchronization from this window.
52 Avaya Call Center Little Instruction Book for Advanced Administration
Managing system setup parameters
Tip:We recommend that you make these changes during off-peak hours to minimize loss of data.
Helpful tips
Here are a few things you’ll want to know before changing the CMS state or the master ACD for clock synchronization.
● Single-user mode means only one person can log into CMS. Data continues to be collected for the ACDs for which data collection is turned on.
● Multi-user mode means any administered CMS user can log into CMS. Data continues to be collected for each ACD for which data collection is turned on.
● Data collection must be turned off for all ACDs in order to change the master ACD for clock synchronization. Use the Data Collection window in CMS System Setup to turn data collection off and on.
To change the CMS state:
1. Access System Setup from the Tools menu.
2. Select CMS State from the Operations tab of the CMS System Setup window.
It is not necessary to select an ACD, since the CMS state is changed regardless of ACD.
3. Select OK.
The CMS State window is displayed.
4. Select either:
Single-user mode - a message will be displayed to all users indicating CMS will be brought down in 1 minute. Users are automatically logged off after 1 minute.
Or
Multi-user mode - CMS will be brought up to a multi-user mode.
5. Select Modify from the Actions menu.
Note:If you log out of CMS while in single-user mode, you must wait at least 10 seconds before logging in again.
Turning data collection off and on
Issue 1.0 May 2002 53
Turning data collection off and onThe Data Collection window is used to turn data collection off and on for real ACDs. This feature is used in combination with the CMS State when it is necessary to change values in Data Storage Allocation, Free Space Allocation (for CMS versions prior to R3V6 that do not have DiskSuite), Storage Intervals, and Restore Data (for System Administration and ACD Administration data).
Tip:We recommend that you make these changes during off-peak hours to minimize the loss of data.
To turn data collection off or on:
1. Access System Setup from the Tools menu.
2. Select Data Collection from the Operations tab of the CMS System Setup window.
It is not necessary to select an ACD from the CMS System Setup window, as you will select an ACD from the Data Collection window that is displayed next.
3. Select OK.
The Data Collection window is displayed.
4. Enter the ACD name, or use the drop-down list to select the ACD you want to modify data collection for.
5. Select either Data Collection:
On - to turn data collection on.
Tip:When you turn data collection on, you should monitor the connection status of the link and make sure data is being transferred. See the Connection Status selection on the Maintenance menu.
OrOff - to turn data collection off.
! CAUTION:When data collection is turned off, calls continue to be processed but you lose any data being recorded by CMS.
54 Avaya Call Center Little Instruction Book for Advanced Administration
Managing system setup parameters
6. Select Modify from the Actions menu.
! WARNING:If you are doing a maintenance restore, do not start Data Collection until all system administration data and ACD-specific administration data are restored. You can determine this by viewing the Restore status details located on the Restore Data window, which can be found on the Operations tab of the Maintenance menu.
Modifying data storage capacities The Data Storage Allocation window is used to specify how much data CMS saves and for how long. The amount of data and the length of time the data is saved affects disk space, and is limited by your specific system configurations.
Early warning signs
Your CMS system provides the following warning signs when it is running low on space.
● A message is displayed each time you log in to CMS indicating that your CMS file system is low on space.
● Messages are logged daily in the Error Log Reports. See the Error Log Reports selection under the Maintenance reports tab.
● If the system has less than 2000 blocks of free space remaining, it is automatically placed in single-user mode and data collection is turned off.
! WARNING:If the number of measured items in the switch was increased and Data Storage Allocation in CMS was not modified to accommodate the increase, the link to CMS will go down when switch translations occur. The link between the switch and CMS will stay down until either Data Storage Allocation in CMS is modified or the number of measured items in the switch is equal to or less than the capacity Data Storage Allocation shows it will accommodate.
Modifying data storage capacities
Issue 1.0 May 2002 55
Preparing for modifications
Here are a some steps to take before making changes to the Data Storage Allocation window.
● Print a copy of the Data Storage Allocation window before changing any values. This will help if you need to refer back to previous parameters.
● If DiskSuite is not being used, check Free Space Allocation to determine where space can be used for data storage.
● Make any changes during off-peak hours to minimize the loss of data.
● Turn data collection off for all real ACDs. (See the Data Collection selection under the System Setup menu.)
● Put CMS into single-user mode. (See the CMS State selection under the System Setup menu.)
To change the data storage values:
1. Access System Setup from the Tools menu.
2. Select Data Storage Allocation from the Operations tab of the CMS System Setup window.
3. Select the ACD for which you want to modify data storage allocation, from the ACD drop-down list.
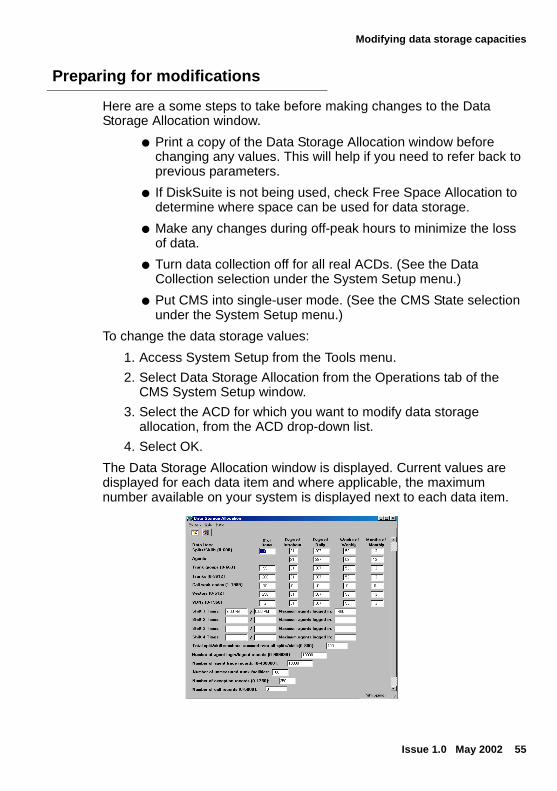
4. Select OK.
The Data Storage Allocation window is displayed. Current values are displayed for each data item and where applicable, the maximum number available on your system is displayed next to each data item.
56 Avaya Call Center Little Instruction Book for Advanced Administration
Managing system setup parameters
5. Enter a new number to change the allocated data storage space in each of your preselected fields:
Field Storage allocation
# of Items Should include expected growth.
Days of Intrahour Maximum 62 days.
Days of Daily Maximum 5 years (1825 days).
Weeks of Weekly Maximum 10 years (520 weeks).
Months of Monthly Maximum 10 years (120 months).
Shift 1 (2, 3, or 4) Times
Used to calculate space reserved for the historical agent table.
Maximum agents logged in
Maximum number of agents logged in during the shift.
Total split/skill members, summed over all splits/skills
For switches, you need to count extensions in multiple splits/skills for each split/skill agents are a member of. This represents the maximum number of split/skill members measured or logged in at any one time. For switches with EAS this represents the maximum agent/skill pairs (skill members), logged in.
Number of agent login/logout records
Multiply the number of days for which you want to save this information by the number of agents who log in and out each day, and multiply that by the number of times each agent logs out each day.
Number of agent trace records
The number of agent trace records for this ACD only.
Number of unmeasured trunk facilities
Set this number high enough to handle the traffic expected over these unmeasured trunk facilities.
Number of exceptions records
The total number of each type of exception (for example: agents, splits/skills, VDNs) for all ACDs.
Number of call records The number of call records for this ACD only.
Summarizing data
Issue 1.0 May 2002 57
6. Once you enter your changes, select Modify from the Actions menu.
Successful is displayed in the status bar to indicate the data storage allocation changes have been stored in the database.
7. Turn data collection back on for all ACDs and restore CMS to a multi-user state.
! CAUTION:It is important to monitor the connection status of the link to be sure data is being transferred. See the Connection Status selection on the Maintenance menu.
Summarizing data The Data Summarizing window is used to archive data into the historical database on demand for daily, weekly, and monthly summaries.
Note:Since data is automatically archived by CMS based on your entries in the Storage Intervals and Data Storage Allocation windows, we recommend that you do not use this tool unless an archive failed or did not occur.
Helpful tips
Here are a few things you’ll want to know before running a manual archive:
● Data summarizing results can be viewed from either the Archiving Status window or the Error Log Report which are available from the Maintenance menu.
● Daily summaries must have successfully completed for each day of the week or month before CMS archives the data for that week or month.
● Partial weekly or monthly data cannot be summarized.
● For weekly archives to summarize, you must enter a date that falls within your predefined week (as specified in the Storage Intervals window) or any date after that week, but before the next week’s start date.
58 Avaya Call Center Little Instruction Book for Advanced Administration
Managing system setup parameters
● For monthly archives to summarize, enter any day during the month for which you want the monthly data summarized.
To run an archive manually:
1. Access System Setup from the Tools menu.
2. Select Data Summarizing from the Operations tab of the CMS System Setup window.
Note:It is not necessary to select an ACD from the CMS System Setup window, as you will select an ACD from the Data Summarizing window that is displayed next.
3. Select OK.
The Data Summarizing window is displayed.
4. Enter the ACD name, or use the drop-down list to select the ACD for which you want to run a manual archive
5. Select one of the following data types:
Daily—To summarize intrahour data into daily data.
Weekly—To summarize daily data into weekly data.
Or
Monthly—To summarize daily data into monthly data.
● Enter the date, or use the drop-down list to select the date for which you want data archived.
● Select Run from the Actions menu.
An acknowledgement window is displayed, to warn you that archiving data can take a long time and cannot be canceled once it starts.
6. Select Yes.
Archiver Started is displayed on the status line for the first request. Archiver request submitted is displayed if there is already a data summarization in progress.
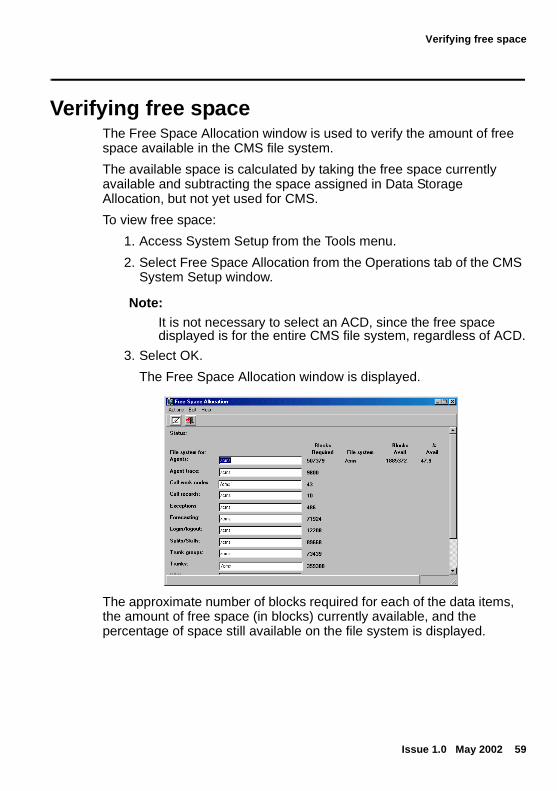
Verifying free space
Issue 1.0 May 2002 59
Verifying free space The Free Space Allocation window is used to verify the amount of free space available in the CMS file system.
The available space is calculated by taking the free space currently available and subtracting the space assigned in Data Storage Allocation, but not yet used for CMS.
To view free space:
1. Access System Setup from the Tools menu.
2. Select Free Space Allocation from the Operations tab of the CMS System Setup window.
Note:It is not necessary to select an ACD, since the free space displayed is for the entire CMS file system, regardless of ACD.
3. Select OK.
The Free Space Allocation window is displayed.
The approximate number of blocks required for each of the data items, the amount of free space (in blocks) currently available, and the percentage of space still available on the file system is displayed.
60 Avaya Call Center Little Instruction Book for Advanced Administration
Managing system setup parameters
Note:Even though you may have more than one disk on your system, you will only see one file system in the Free Space Allocation window because of DiskSuite.
! WARNING:Parentheses around any block values indicates an over allocation of space for that value.
Viewing storage intervalsCMS automatically archives data based on your entries in the Storage Intervals window. This window is used to specify how often intrahour data is archived, the time when the daily, weekly and monthly summaries are done, and the days of the week that begin and end your call center’s week.
Default values were established in the Storage Intervals window during installation of your system and are rarely modified. You may occasionally use this window to view archive intervals that are set in your system.
To view storage intervals:
1. Access System Setup from the Tools menu.
2. Select Storage Intervals from the Operations tab of the CMS System Setup window.
It is not necessary to select an ACD, since the storage intervals are for the entire CMS file system, regardless of ACD.
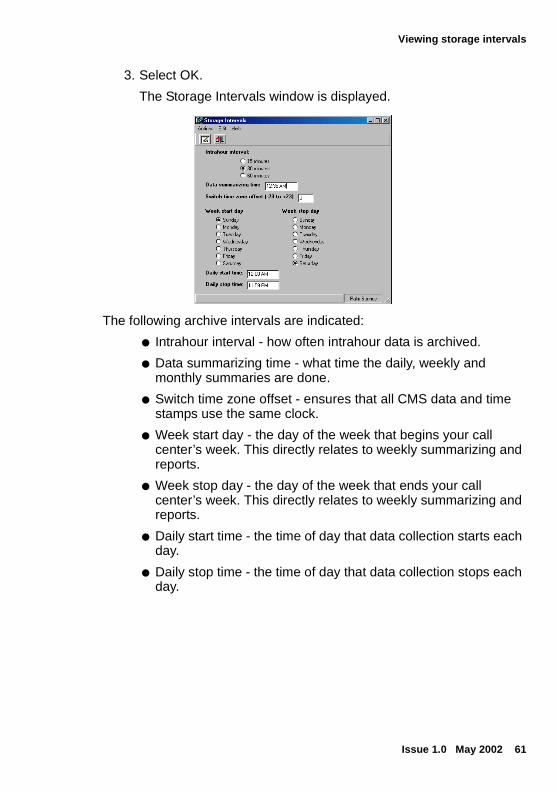
Viewing storage intervals
Issue 1.0 May 2002 61
3. Select OK.
The Storage Intervals window is displayed.
The following archive intervals are indicated:
● Intrahour interval - how often intrahour data is archived.
● Data summarizing time - what time the daily, weekly and monthly summaries are done.
● Switch time zone offset - ensures that all CMS data and time stamps use the same clock.
● Week start day - the day of the week that begins your call center’s week. This directly relates to weekly summarizing and reports.
● Week stop day - the day of the week that ends your call center’s week. This directly relates to weekly summarizing and reports.
● Daily start time - the time of day that data collection starts each day.
● Daily stop time - the time of day that data collection stops each day.

62 Avaya Call Center Little Instruction Book for Advanced Administration
Managing system setup parameters
Viewing switch informationThe Switch Setup window is used to view the CMS release, version, and load, and the switch type, release, and features available that affect CMS data for each ACD assigned during installation.
To view switch setup:
1. Access System Setup from the Tools menu.
2. Select Switch Setup from the Operations tab of the CMS System Setup window.
Note:It is not necessary to select an ACD from the CMS System Setup window, as you will select an ACD from the Switch Setup window that is displayed next.
3. Select OK.
The Switch Setup window is displayed.
4. Select the ACD for which you want to view the switch setup, from the ACD drop-down list.
5. From the Actions menu, select one of the following:
● Find one - for one ACD entry
● List all - for multiple ACD entries
The Switch Setup window is displayed.
Switch setup information that was assigned during installation is displayed.
Issue 1.0 May 2002 63
Chapter 5: Managing vectors
Call Vectoring provides a flexible method for processing your call center’s ACD calls, using instructions and conditions you define. The specific manner in which a call is processed with this feature depends on a number of components within the switch and the call vectoring software. These components include the resources you have available to process a call (such as agents, skills, software, and hardware), vector control flow, and commands used within the relevant vectors. This section provides an overview of how calls can be processed using Call Vectoring, explains some of your options with this and related features, provides an introduction to vector commands, and includes sample vectors and tips to help you use Call Vectoring effectively.
Note:This section is intended as an introduction to Call Vectoring. More details and step-by-step instructions can be found in the Avaya MultiVantage Call Center software Release 11 Call Vectoring/EAS Guide, 555-230-714, Issue 1.0.
What is Call Vectoring?Call Vectoring is software that helps you manage incoming call traffic to the switch. It gives you the flexibility to determine how each of your call center calls will be handled, based on the time of day, the day of week, staffing levels, or other conditions that you define. With Call Vectoring, each call can be treated uniquely, depending on the treatment you plan and program.
What can call vectoring do for my call center?
Call Vectoring can help you effectively process particular types of calls, based on your call center resources and customer needs. Think of Call Vectoring as a tool to help you define the type and level of service your callers will receive. For example, you can use Call Vectoring to:
● Play music or recorded announcements while callers are on hold to encourage them to stay on the line

64 Avaya Call Center Little Instruction Book for Advanced Administration
Managing vectors
● Allow callers to select from options for routing their calls or access recorded information using their touch-tone telephones before or after the call is in queue
● Allow callers to leave a message for a call back
● Route calls to other sites based on estimated wait time
● Play after-hours or holiday messages informing customers of your business hours
● Remove selected calls by providing busy signals or disconnecting the calls
● Route calls according to agent availability to reduce hold times for customers and increase productivity for agents
● Queue calls to multiple skills to minimize callers’ wait time
● Help agents identify the type of call they receive so they can greet customers appropriately (through VDN names displayed on their terminals).
Note:Some of these capabilities require optional features. For example, Call Prompting is needed to allow customers to select routing options using their touch-tone telephones.
Where do I start? The success of your call center’s use of Call Vectoring begins with planning. Start by establishing specific, measurable objectives that you will use to monitor your call center’s performance. These performance standards and the resources available to you (such as staffing levels, number of call center sites, the type and capabilities of your call center’s hardware and software, and trunk line capacity) determine how you can use Call Vectoring. While the following is not a complete list of everything you need to consider before using Call Vectoring, it provides some key points to keep in mind as you read about Call Vectoring and related features.
Where do I start?
Issue 1.0 May 2002 65
First consider performance issues such as:
● How quickly should calls be answered (Average Speed of Answer/ASA)?
● What’s an acceptable percentage of abandoned calls (Abandonment rate)?
● What’s the average amount of time that agents should spend on each call (Talk time)?
● What’s the maximum number of calls we should have in queue?
● How many calls should each agent be able to handle per day?
You’ll then need to determine how to best use your call center resources to achieve those objectives. Consider resource issues such as:
● How many skills are needed to most effectively serve customers and maximize agent utilization?
● What type of call treatment and routing will give us the results we need for each skill?
● What types of announcements will we play for callers on hold, after hours, and so forth?
● Are there any situations in which the center will not accept a call (for example, during certain times of day, on certain days of the week, or if wait times exceed a specified limit)?
● Do we want callers to be able to leave messages?
● Do we want callers to be able to select from routing options (Call Prompting)?
● Which agents will we assign to each skill?
● What skill levels will we assign to each agent (Expert Agent Selection/EAS)?
● Does the center need to adjust service levels or dynamically adjust staffing to take care of bursts of calls (Business Advocate)?
66 Avaya Call Center Little Instruction Book for Advanced Administration
Managing vectors
How does Call Vectoring work?The Call Vectoring process is administered through the programming of two key elements: vectors and vector directory numbers (VDNs).
Vector
A call vector is a set of commands that defines the processing of a call. Each vector can contain up to 32 command steps. Any number of calls can use the same vector and process steps independently. Call vectoring allows the “chaining” of vectors to extend processing capabilities. One vector can direct a call to another vector or VDN, which can in turn direct the call to another vector, and so on. A maximum of 1,000 vector steps can be executed per call.
Vector Directory Number (VDN)
A Vector Directory Number (VDN), is a special extension number that provides access to a vector. VDNs are assigned to different vectors for different services or applications that require specific treatments. It’s important to note that only one vector can be assigned to a VDN. However, several VDNs can be assigned to the same vector so that, if wanted, the same sequence of treatments can be given to calls that reach the system via different numbers or from different locations.
How do vectors and VDNs work together? When a call is placed to a system for which Call Vectoring is activated, the call is routed to a VDN. The VDN points to a vector, which defines the service wanted by the caller. The vector commands (steps) within the vector determine the call’s routing and treatment. Three types of control flow can be used to pass vector-processing control from one vector step to another, as described below.
Sequential flow
Sequential flow, as the name implies, passes vector-processing control in a direct sequence, from the current vector step to the following step.
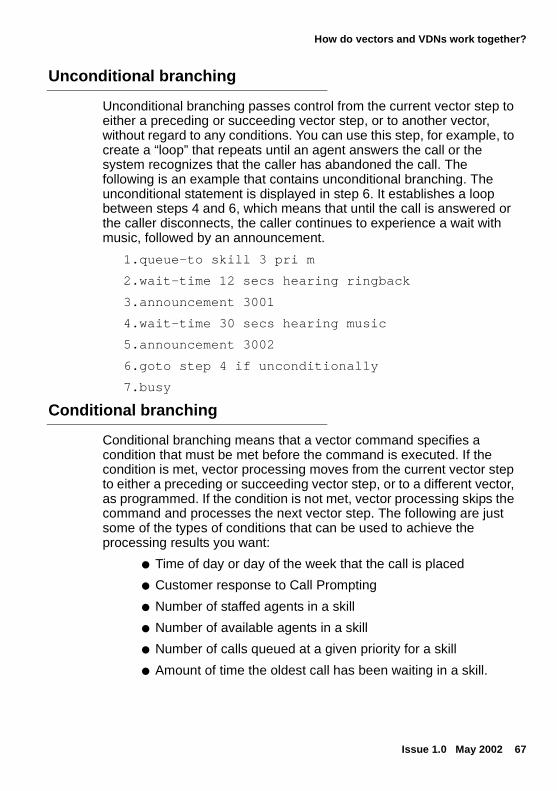
How do vectors and VDNs work together?
Issue 1.0 May 2002 67
Unconditional branching
Unconditional branching passes control from the current vector step to either a preceding or succeeding vector step, or to another vector, without regard to any conditions. You can use this step, for example, to create a “loop” that repeats until an agent answers the call or the system recognizes that the caller has abandoned the call. The following is an example that contains unconditional branching. The unconditional statement is displayed in step 6. It establishes a loop between steps 4 and 6, which means that until the call is answered or the caller disconnects, the caller continues to experience a wait with music, followed by an announcement.
1.queue-to skill 3 pri m
2.wait-time 12 secs hearing ringback
3.announcement 3001
4.wait-time 30 secs hearing music
5.announcement 3002
6.goto step 4 if unconditionally
7.busy
Conditional branching
Conditional branching means that a vector command specifies a condition that must be met before the command is executed. If the condition is met, vector processing moves from the current vector step to either a preceding or succeeding vector step, or to a different vector, as programmed. If the condition is not met, vector processing skips the command and processes the next vector step. The following are just some of the types of conditions that can be used to achieve the processing results you want:
● Time of day or day of the week that the call is placed
● Customer response to Call Prompting
● Number of staffed agents in a skill
● Number of available agents in a skill
● Number of calls queued at a given priority for a skill
● Amount of time the oldest call has been waiting in a skill.
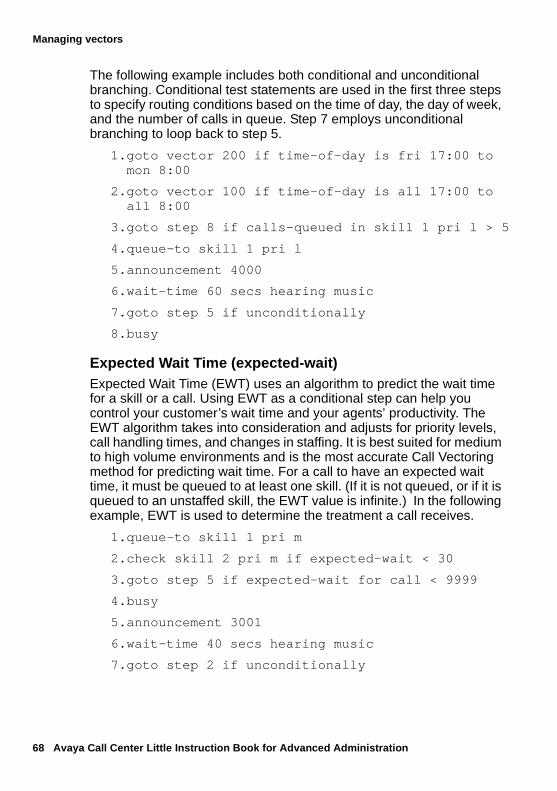
68 Avaya Call Center Little Instruction Book for Advanced Administration
Managing vectors
The following example includes both conditional and unconditional branching. Conditional test statements are used in the first three steps to specify routing conditions based on the time of day, the day of week, and the number of calls in queue. Step 7 employs unconditional branching to loop back to step 5.
1.goto vector 200 if time-of-day is fri 17:00 to mon 8:00
2.goto vector 100 if time-of-day is all 17:00 to all 8:00
3.goto step 8 if calls-queued in skill 1 pri l > 5
4.queue-to skill 1 pri l
5.announcement 4000
6.wait-time 60 secs hearing music
7.goto step 5 if unconditionally
8.busy
Expected Wait Time (expected-wait) Expected Wait Time (EWT) uses an algorithm to predict the wait time for a skill or a call. Using EWT as a conditional step can help you control your customer’s wait time and your agents’ productivity. The EWT algorithm takes into consideration and adjusts for priority levels, call handling times, and changes in staffing. It is best suited for medium to high volume environments and is the most accurate Call Vectoring method for predicting wait time. For a call to have an expected wait time, it must be queued to at least one skill. (If it is not queued, or if it is queued to an unstaffed skill, the EWT value is infinite.) In the following example, EWT is used to determine the treatment a call receives.
1.queue-to skill 1 pri m
2.check skill 2 pri m if expected-wait < 30
3.goto step 5 if expected-wait for call < 9999
4.busy
5.announcement 3001
6.wait-time 40 secs hearing music
7.goto step 2 if unconditionally
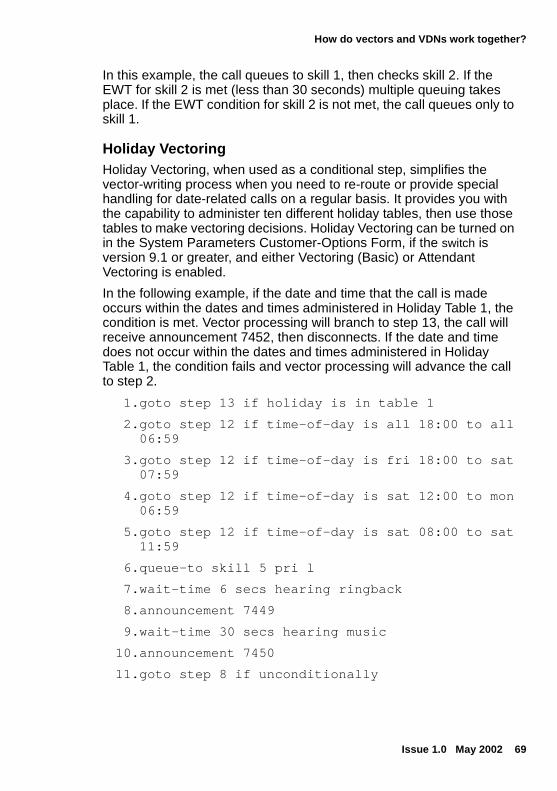
How do vectors and VDNs work together?
Issue 1.0 May 2002 69
In this example, the call queues to skill 1, then checks skill 2. If the EWT for skill 2 is met (less than 30 seconds) multiple queuing takes place. If the EWT condition for skill 2 is not met, the call queues only to skill 1.
Holiday Vectoring Holiday Vectoring, when used as a conditional step, simplifies the vector-writing process when you need to re-route or provide special handling for date-related calls on a regular basis. It provides you with the capability to administer ten different holiday tables, then use those tables to make vectoring decisions. Holiday Vectoring can be turned on in the System Parameters Customer-Options Form, if the switch is version 9.1 or greater, and either Vectoring (Basic) or Attendant Vectoring is enabled.
In the following example, if the date and time that the call is made occurs within the dates and times administered in Holiday Table 1, the condition is met. Vector processing will branch to step 13, the call will receive announcement 7452, then disconnects. If the date and time does not occur within the dates and times administered in Holiday Table 1, the condition fails and vector processing will advance the call to step 2.
1.goto step 13 if holiday is in table 1
2.goto step 12 if time-of-day is all 18:00 to all 06:59
3.goto step 12 if time-of-day is fri 18:00 to sat 07:59
4.goto step 12 if time-of-day is sat 12:00 to mon 06:59
5.goto step 12 if time-of-day is sat 08:00 to sat 11:59
6.queue-to skill 5 pri l
7.wait-time 6 secs hearing ringback
8.announcement 7449
9.wait-time 30 secs hearing music
10.announcement 7450
11.goto step 8 if unconditionally
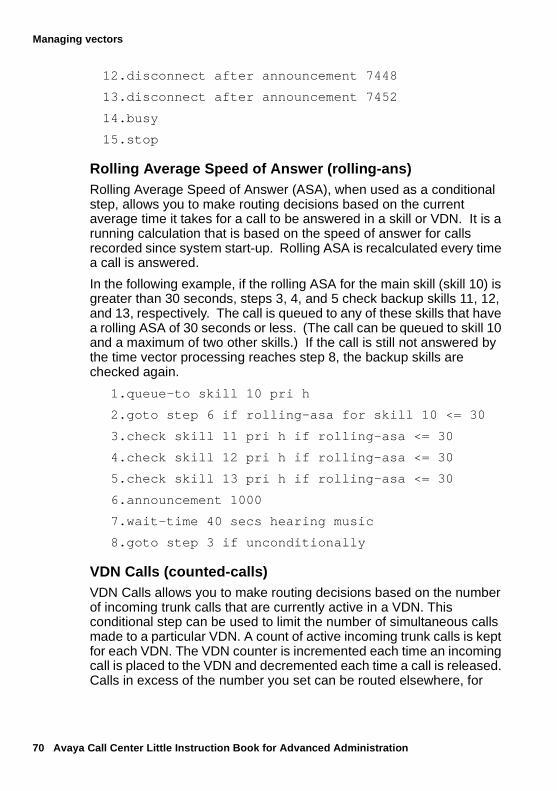
70 Avaya Call Center Little Instruction Book for Advanced Administration
Managing vectors
12.disconnect after announcement 7448
13.disconnect after announcement 7452
14.busy
15.stop
Rolling Average Speed of Answer (rolling-ans) Rolling Average Speed of Answer (ASA), when used as a conditional step, allows you to make routing decisions based on the current average time it takes for a call to be answered in a skill or VDN. It is a running calculation that is based on the speed of answer for calls recorded since system start-up. Rolling ASA is recalculated every time a call is answered.
In the following example, if the rolling ASA for the main skill (skill 10) is greater than 30 seconds, steps 3, 4, and 5 check backup skills 11, 12, and 13, respectively. The call is queued to any of these skills that have a rolling ASA of 30 seconds or less. (The call can be queued to skill 10 and a maximum of two other skills.) If the call is still not answered by the time vector processing reaches step 8, the backup skills are checked again.
1.queue-to skill 10 pri h
2.goto step 6 if rolling-asa for skill 10 <= 30
3.check skill 11 pri h if rolling-asa <= 30
4.check skill 12 pri h if rolling-asa <= 30
5.check skill 13 pri h if rolling-asa <= 30
6.announcement 1000
7.wait-time 40 secs hearing music
8.goto step 3 if unconditionally
VDN Calls (counted-calls) VDN Calls allows you to make routing decisions based on the number of incoming trunk calls that are currently active in a VDN. This conditional step can be used to limit the number of simultaneous calls made to a particular VDN. A count of active incoming trunk calls is kept for each VDN. The VDN counter is incremented each time an incoming call is placed to the VDN and decremented each time a call is released. Calls in excess of the number you set can be routed elsewhere, for
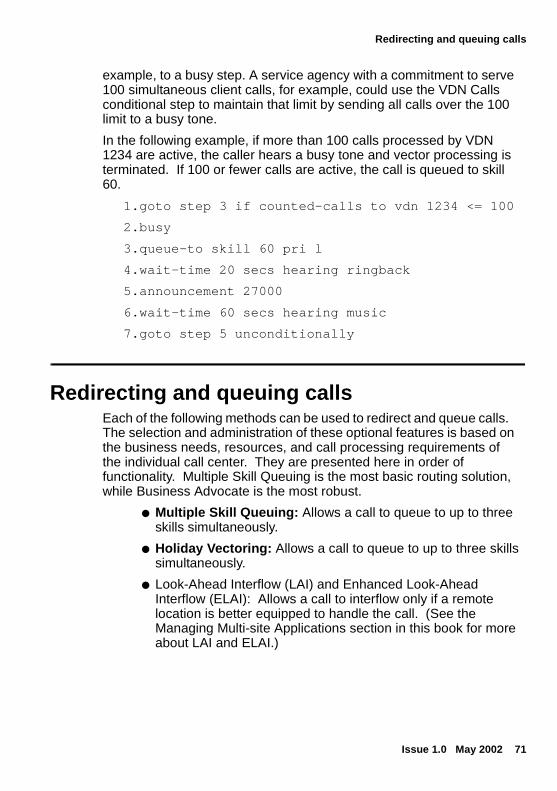
Redirecting and queuing calls
Issue 1.0 May 2002 71
example, to a busy step. A service agency with a commitment to serve 100 simultaneous client calls, for example, could use the VDN Calls conditional step to maintain that limit by sending all calls over the 100 limit to a busy tone.
In the following example, if more than 100 calls processed by VDN 1234 are active, the caller hears a busy tone and vector processing is terminated. If 100 or fewer calls are active, the call is queued to skill 60.
1.goto step 3 if counted-calls to vdn 1234 <= 100
2.busy
3.queue-to skill 60 pri l
4.wait-time 20 secs hearing ringback
5.announcement 27000
6.wait-time 60 secs hearing music
7.goto step 5 unconditionally
Redirecting and queuing calls Each of the following methods can be used to redirect and queue calls. The selection and administration of these optional features is based on the business needs, resources, and call processing requirements of the individual call center. They are presented here in order of functionality. Multiple Skill Queuing is the most basic routing solution, while Business Advocate is the most robust.
● Multiple Skill Queuing: Allows a call to queue to up to three skills simultaneously.
● Holiday Vectoring: Allows a call to queue to up to three skills simultaneously.
● Look-Ahead Interflow (LAI) and Enhanced Look-Ahead Interflow (ELAI): Allows a call to interflow only if a remote location is better equipped to handle the call. (See the Managing Multi-site Applications section in this book for more about LAI and ELAI.)
72 Avaya Call Center Little Instruction Book for Advanced Administration
Managing vectors
● Best Service Routing (BSR): Allows the switch to compare specified skills, identify the skill that will provide the best service to a call, and deliver the call to that resource. (See the Managing Multi-site Applications section in this book for more about this feature.)
● Adjunct Routing: Allows the switch to request a routing destination from an adjunct processor via Adjunct-Switch Application Interface (ASAI). The switch sends the ASAI adjunct a message with information about the calling party. The adjunct uses this information to determine the best place to send the call and passes the routing information back to the switch. (For details on Adjunct Routing, see the “Adjunct Routing” chapter of the Avaya MultiVantage Call Center software Release 11 Call Vectoring/EAS Guide, 555-230-714, Issue 1.0.
● Expert Agent Selection (EAS): Allows you to match the needs of your callers with the talents or abilities of your agents. You can establish skills to which you assign agents based on such criteria as language-speaking abilities, product knowledge, selling skills, technical expertise, customer service skills, ability to handle irate customers, or any other criteria or customer needs. EAS can help you reduce transfers and call-holding time, and can increase customer satisfaction because calls are answered by the most highly skilled agents for specified caller needs. (Details on using EAS with Call Vectoring can be found in the “Expert Agent Selection” chapter of the Avaya MultiVantage Call Center software Release 11 Call Vectoring/EAS Guide, 555-230-714, Issue 1.o
● Business Advocate: Automates call and agent selection and simplifies vector design. With Business Advocate, you define business rules to determine for each skill which calls are selected and which agents receive them. You can determine whether to assign reserve agents for overload conditions, and you can administer service objectives for particular skills to help meet your call center’s goals. (Additional information on Business Advocate can be found in the Managing Call and Agent Selection section of this book.)
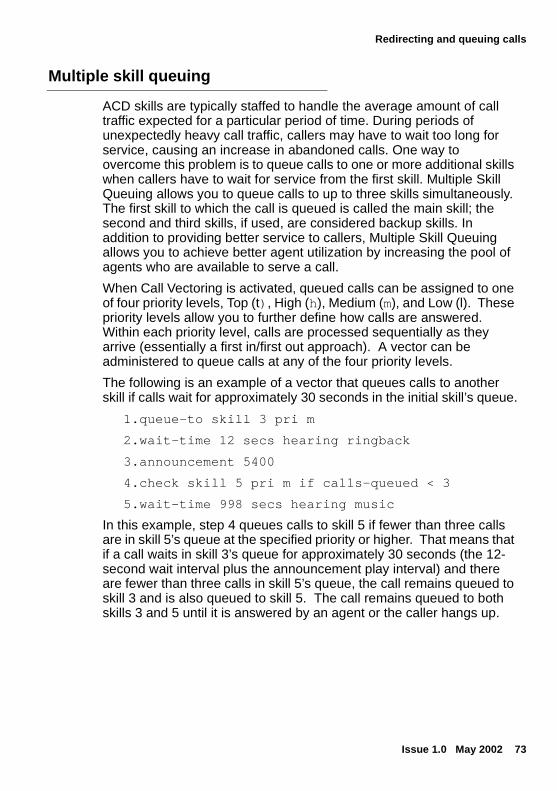
Redirecting and queuing calls
Issue 1.0 May 2002 73
Multiple skill queuing
ACD skills are typically staffed to handle the average amount of call traffic expected for a particular period of time. During periods of unexpectedly heavy call traffic, callers may have to wait too long for service, causing an increase in abandoned calls. One way to overcome this problem is to queue calls to one or more additional skills when callers have to wait for service from the first skill. Multiple Skill Queuing allows you to queue calls to up to three skills simultaneously. The first skill to which the call is queued is called the main skill; the second and third skills, if used, are considered backup skills. In addition to providing better service to callers, Multiple Skill Queuing allows you to achieve better agent utilization by increasing the pool of agents who are available to serve a call.
When Call Vectoring is activated, queued calls can be assigned to one of four priority levels, Top (t), High (h), Medium (m), and Low (l). These priority levels allow you to further define how calls are answered. Within each priority level, calls are processed sequentially as they arrive (essentially a first in/first out approach). A vector can be administered to queue calls at any of the four priority levels.
The following is an example of a vector that queues calls to another skill if calls wait for approximately 30 seconds in the initial skill’s queue.
1.queue-to skill 3 pri m
2.wait-time 12 secs hearing ringback
3.announcement 5400
4.check skill 5 pri m if calls-queued < 3
5.wait-time 998 secs hearing music
In this example, step 4 queues calls to skill 5 if fewer than three calls are in skill 5’s queue at the specified priority or higher. That means that if a call waits in skill 3’s queue for approximately 30 seconds (the 12-second wait interval plus the announcement play interval) and there are fewer than three calls in skill 5’s queue, the call remains queued to skill 3 and is also queued to skill 5. The call remains queued to both skills 3 and 5 until it is answered by an agent or the caller hangs up.
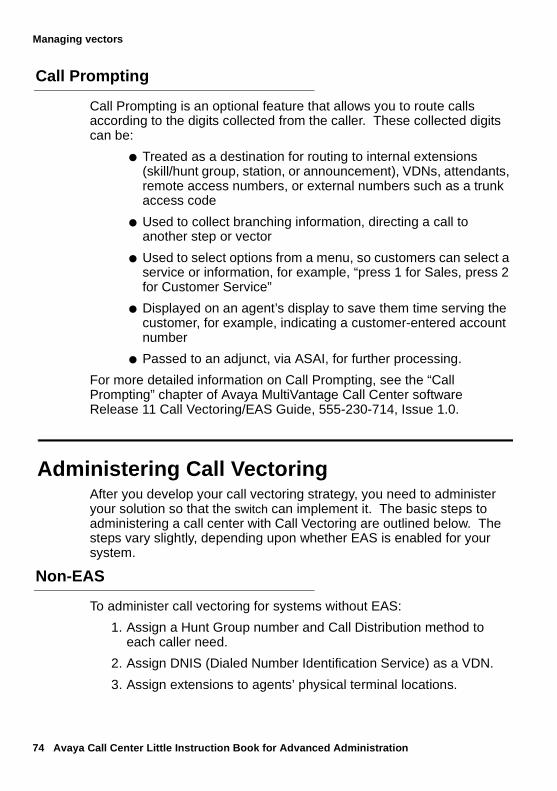
74 Avaya Call Center Little Instruction Book for Advanced Administration
Managing vectors
Call Prompting
Call Prompting is an optional feature that allows you to route calls according to the digits collected from the caller. These collected digits can be:
● Treated as a destination for routing to internal extensions (skill/hunt group, station, or announcement), VDNs, attendants, remote access numbers, or external numbers such as a trunk access code
● Used to collect branching information, directing a call to another step or vector
● Used to select options from a menu, so customers can select a service or information, for example, “press 1 for Sales, press 2 for Customer Service”
● Displayed on an agent’s display to save them time serving the customer, for example, indicating a customer-entered account number
● Passed to an adjunct, via ASAI, for further processing.
For more detailed information on Call Prompting, see the “Call Prompting” chapter of Avaya MultiVantage Call Center software Release 11 Call Vectoring/EAS Guide, 555-230-714, Issue 1.0.
Administering Call VectoringAfter you develop your call vectoring strategy, you need to administer your solution so that the switch can implement it. The basic steps to administering a call center with Call Vectoring are outlined below. The steps vary slightly, depending upon whether EAS is enabled for your system.
Non-EAS
To administer call vectoring for systems without EAS:
1. Assign a Hunt Group number and Call Distribution method to each caller need.
2. Assign DNIS (Dialed Number Identification Service) as a VDN.
3. Assign extensions to agents’ physical terminal locations.
Administering Call Vectoring
Issue 1.0 May 2002 75
4. Assign each agent a unique login ID.
5. Assign agent extensions to splits.
6. Assign a vector to each VDN.
7. Write vectors to match your call center objectives.
For more detailed information on administering Call Vectoring for systems without EAS, please refer to Avaya MultiVantage Little Instruction Book for Basic Administration, 555-233-756 and Avaya MultiVantage Little Instruction Book for Advanced Administratio, 555-233-757.
EAS
To administer call vectoring for systems with EAS:
1. Assign Hunt Groups.
2. Assign VDN/Skill Preferences.
3. Assign agent skills.
4. Write vectors to meet your call center’s objectives.
For specific procedures on administering Call Vectoring with EAS, please refer to the “Expert Agent Selection” chapter of the Avaya MultiVantage Call Center software Release 11 Call Vectoring/EAS Guide, 555-230-714, Issue 1.0.
Writing vectors
There are two basic principles to remember when writing vectors:
● Minimize the amount of call processing, in other words, limit the number of vector steps.
● Avoid vector steps with calls made outside of business hours or queues to groups with less than desirable resources or characteristics.
Vectors can be created, modified, or deleted through the following three methods:
● Switch Basic Screen Administration (Call Vector form)
● Avaya Visual Vectors software (Vector Editor)
● CMS (Call Center Administration: Vector Contents window)
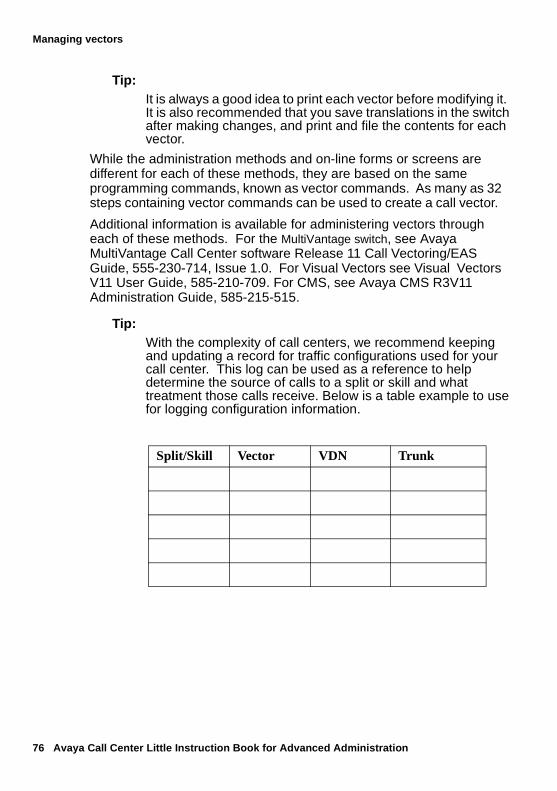
76 Avaya Call Center Little Instruction Book for Advanced Administration
Managing vectors
Tip:It is always a good idea to print each vector before modifying it. It is also recommended that you save translations in the switch after making changes, and print and file the contents for each vector.
While the administration methods and on-line forms or screens are different for each of these methods, they are based on the same programming commands, known as vector commands. As many as 32 steps containing vector commands can be used to create a call vector.
Additional information is available for administering vectors through each of these methods. For the MultiVantage switch, see Avaya MultiVantage Call Center software Release 11 Call Vectoring/EAS Guide, 555-230-714, Issue 1.0. For Visual Vectors see Visual Vectors V11 User Guide, 585-210-709. For CMS, see Avaya CMS R3V11 Administration Guide, 585-215-515.
Tip:With the complexity of call centers, we recommend keeping and updating a record for traffic configurations used for your call center. This log can be used as a reference to help determine the source of calls to a split or skill and what treatment those calls receive. Below is a table example to use for logging configuration information.
Split/Skill Vector VDN Trunk
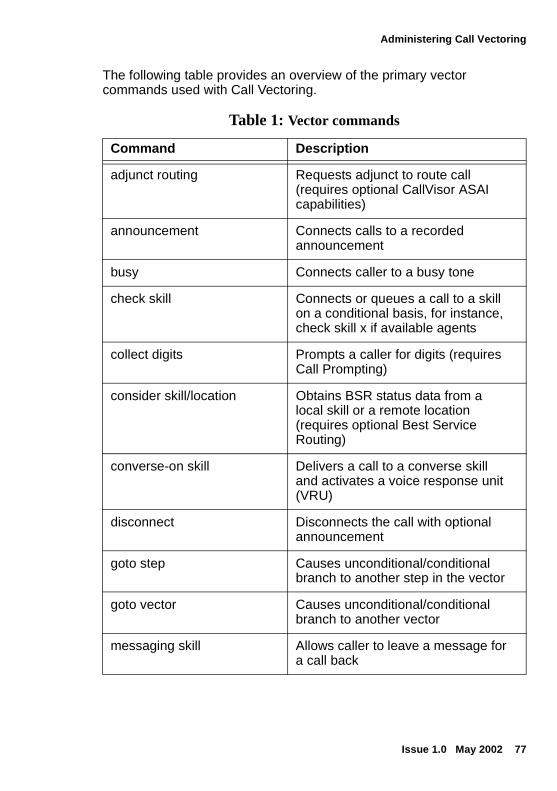
Administering Call Vectoring
Issue 1.0 May 2002 77
The following table provides an overview of the primary vector commands used with Call Vectoring.
Table 1: Vector commands
Command Description
adjunct routing Requests adjunct to route call (requires optional CallVisor ASAI capabilities)
announcement Connects calls to a recorded announcement
busy Connects caller to a busy tone
check skill Connects or queues a call to a skill on a conditional basis, for instance, check skill x if available agents
collect digits Prompts a caller for digits (requires Call Prompting)
consider skill/location Obtains BSR status data from a local skill or a remote location (requires optional Best Service Routing)
converse-on skill Delivers a call to a converse skill and activates a voice response unit (VRU)
disconnect Disconnects the call with optional announcement
goto step Causes unconditional/conditional branch to another step in the vector
goto vector Causes unconditional/conditional branch to another vector
messaging skill Allows caller to leave a message for a call back
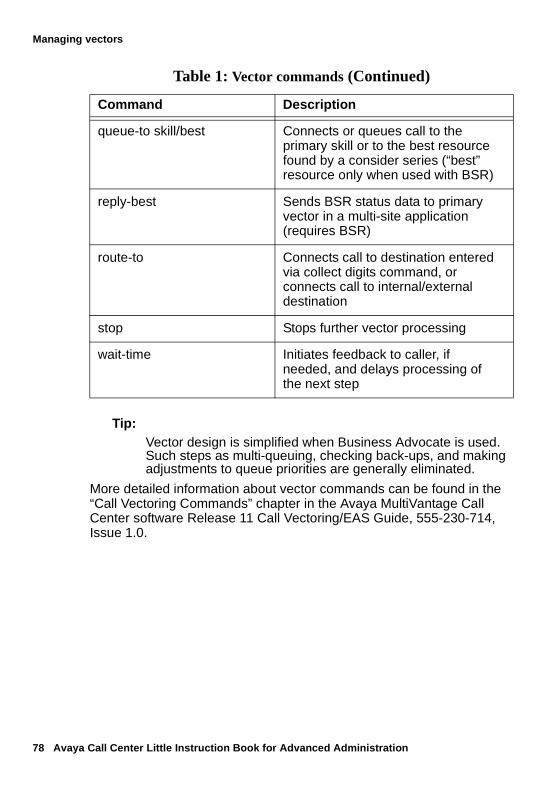
78 Avaya Call Center Little Instruction Book for Advanced Administration
Managing vectors
Tip:Vector design is simplified when Business Advocate is used. Such steps as multi-queuing, checking back-ups, and making adjustments to queue priorities are generally eliminated.
More detailed information about vector commands can be found in the “Call Vectoring Commands” chapter in the Avaya MultiVantage Call Center software Release 11 Call Vectoring/EAS Guide, 555-230-714, Issue 1.0.
queue-to skill/best Connects or queues call to the primary skill or to the best resource found by a consider series (“best” resource only when used with BSR)
reply-best Sends BSR status data to primary vector in a multi-site application (requires BSR)
route-to Connects call to destination entered via collect digits command, or connects call to internal/external destination
stop Stops further vector processing
wait-time Initiates feedback to caller, if needed, and delays processing of the next step
Table 1: Vector commands (Continued)
Command Description
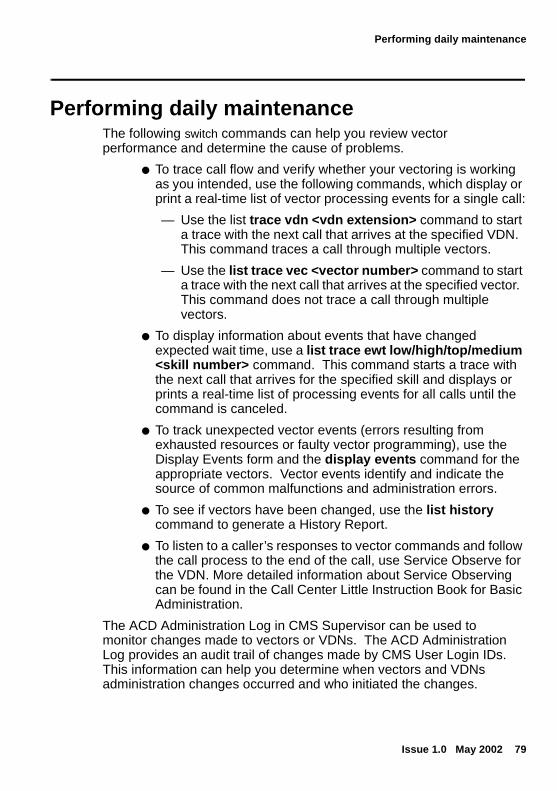
Performing daily maintenance
Issue 1.0 May 2002 79
Performing daily maintenanceThe following switch commands can help you review vector performance and determine the cause of problems.
● To trace call flow and verify whether your vectoring is working as you intended, use the following commands, which display or print a real-time list of vector processing events for a single call:
— Use the list trace vdn <vdn extension> command to start a trace with the next call that arrives at the specified VDN. This command traces a call through multiple vectors.
— Use the list trace vec <vector number> command to start a trace with the next call that arrives at the specified vector. This command does not trace a call through multiple vectors.
● To display information about events that have changed expected wait time, use a list trace ewt low/high/top/medium <skill number> command. This command starts a trace with the next call that arrives for the specified skill and displays or prints a real-time list of processing events for all calls until the command is canceled.
● To track unexpected vector events (errors resulting from exhausted resources or faulty vector programming), use the Display Events form and the display events command for the appropriate vectors. Vector events identify and indicate the source of common malfunctions and administration errors.
● To see if vectors have been changed, use the list history command to generate a History Report.
● To listen to a caller’s responses to vector commands and follow the call process to the end of the call, use Service Observe for the VDN. More detailed information about Service Observing can be found in the Call Center Little Instruction Book for Basic Administration.
The ACD Administration Log in CMS Supervisor can be used to monitor changes made to vectors or VDNs. The ACD Administration Log provides an audit trail of changes made by CMS User Login IDs. This information can help you determine when vectors and VDNs administration changes occurred and who initiated the changes.
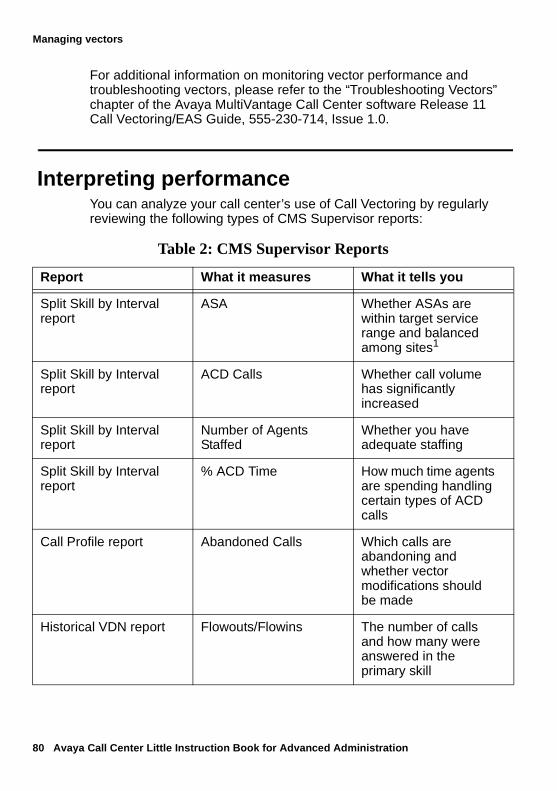
80 Avaya Call Center Little Instruction Book for Advanced Administration
Managing vectors
For additional information on monitoring vector performance and troubleshooting vectors, please refer to the “Troubleshooting Vectors” chapter of the Avaya MultiVantage Call Center software Release 11 Call Vectoring/EAS Guide, 555-230-714, Issue 1.0.
Interpreting performanceYou can analyze your call center’s use of Call Vectoring by regularly reviewing the following types of CMS Supervisor reports:
Table 2: CMS Supervisor Reports
Report What it measures What it tells you
Split Skill by Interval report
ASA Whether ASAs are within target service range and balanced among sites1
Split Skill by Interval report
ACD Calls Whether call volume has significantly increased
Split Skill by Interval report
Number of Agents Staffed
Whether you have adequate staffing
Split Skill by Interval report
% ACD Time How much time agents are spending handling certain types of ACD calls
Call Profile report Abandoned Calls Which calls are abandoning and whether vector modifications should be made
Historical VDN report Flowouts/Flowins The number of calls and how many were answered in the primary skill
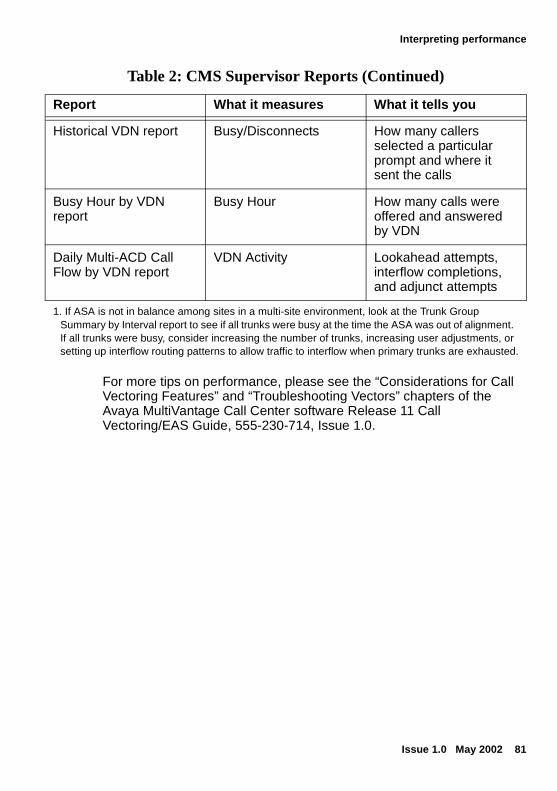
Interpreting performance
Issue 1.0 May 2002 81
For more tips on performance, please see the “Considerations for Call Vectoring Features” and “Troubleshooting Vectors” chapters of the Avaya MultiVantage Call Center software Release 11 Call Vectoring/EAS Guide, 555-230-714, Issue 1.0.
Historical VDN report Busy/Disconnects How many callers selected a particular prompt and where it sent the calls
Busy Hour by VDN report
Busy Hour How many calls were offered and answered by VDN
Daily Multi-ACD Call Flow by VDN report
VDN Activity Lookahead attempts, interflow completions, and adjunct attempts
1. If ASA is not in balance among sites in a multi-site environment, look at the Trunk Group Summary by Interval report to see if all trunks were busy at the time the ASA was out of alignment. If all trunks were busy, consider increasing the number of trunks, increasing user adjustments, or setting up interflow routing patterns to allow traffic to interflow when primary trunks are exhausted.
Table 2: CMS Supervisor Reports (Continued)
Report What it measures What it tells you

82 Avaya Call Center Little Instruction Book for Advanced Administration
Managing vectors
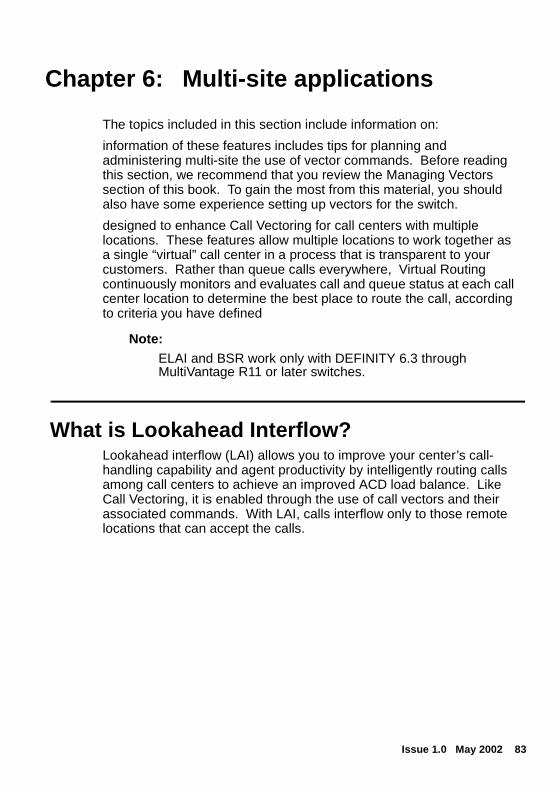
Issue 1.0 May 2002 83
Chapter 6: Multi-site applications
The topics included in this section include information on:
information of these features includes tips for planning and administering multi-site the use of vector commands. Before reading this section, we recommend that you review the Managing Vectors section of this book. To gain the most from this material, you should also have some experience setting up vectors for the switch.
designed to enhance Call Vectoring for call centers with multiple locations. These features allow multiple locations to work together as a single “virtual” call center in a process that is transparent to your customers. Rather than queue calls everywhere, Virtual Routing continuously monitors and evaluates call and queue status at each call center location to determine the best place to route the call, according to criteria you have defined
Note:ELAI and BSR work only with DEFINITY 6.3 through MultiVantage R11 or later switches.
What is Lookahead Interflow?Lookahead interflow (LAI) allows you to improve your center’s call-handling capability and agent productivity by intelligently routing calls among call centers to achieve an improved ACD load balance. Like Call Vectoring, it is enabled through the use of call vectors and their associated commands. With LAI, calls interflow only to those remote locations that can accept the calls.
84 Avaya Call Center Little Instruction Book for Advanced Administration
Multi-site applications
What is Enhanced Lookahead Interflow? Note:
Enhanced Lookahead Interflow (ELAI) uses the same basic vectoring commands as traditional LAI, but adds a new conditional vectoring command that produces first in/first out (FIFO) or near FIFO call processing and uses fewer computer resources during the Lookahead Interflow process. With a FIFO call queue, ELAI polls all eligible sites and selects and routes the calls at the front of the queue. It ensures that the oldest call waiting will be answered by the first available resource, either locally or remotely. ELAI is available with DEFINITY 6.3 through MultiVantage R11 or later switches.
How ELAI worksWhen an ELAI call attempt is made, Call Vectoring at the sending location checks a potential receiving location to determine whether to send or hold the call. The call remains in queue at the sending location while this process takes place. Call Vectoring at the receiving location then decides whether to accept or refuse the call. If the receiving location gives instructions not to accept the call, the sending location can keep the call, check other locations, or provide some other predetermined treatment for the call. If the call is accepted by the receiving switch, the call is removed from queues at the sending switch and call control is passed to the receiving switch. Any Call Prompting digits collected in the sending switch are passed to the receiving switch during the interflow process.
ELAI can be used in a single queue configuration, in which all calls are routed to only one of the switches in a network, or in a tandem switch configuration, which includes multiple switches.
Conditions for sending, refusing, or receiving a call can include:
● Expected Wait Time (EWT) for a split
● Number of staffed or available agents
● Number of calls in queue
● Queue position
Administering multi-site ELAI
Issue 1.0 May 2002 85
● Number of VDN calls
● Average speed of answer (ASA)
● Number of calls active in a VDN
● Time of day/day of week
ELAI is especially effective at load-balancing for locations with lower call volumes, small staffing or in environments with a large discrepancy in agent group sizes from site to site.
Tip:For call centers with high call volumes and multiple sites, BSR is a more effective solution. BSR allows you to determine the “best” network resources to handle the interflowed calls. BSR is explained in detail later in this section.
For more information about single queue and tandem switch configuration, see the “Look-Ahead Interflow” chapter of the Avaya MultiVantage Call Center software Release 11 Call Vectoring/EAS Guide, 555-230-714, Issue 1.0.
Administering multi-site ELAIELAI is performed through call vectors and vector commands. These are included in the sending switch (outflow vector) and receiving switch (inflow vector). Vectors are created or edited in the same way as described in the “Managing Vectors” section of this book. Vector commands are particularly important for effectively administering ELAI, so we have included specific commands and sample vectors in the following sections.
Outflow vectorThe vectors in the sending switch use the goto command to test outflow conditions and determine whether the call should be sent to the receiving switch. If the condition is met, a branch is made to the appropriate route-to command. The following is an example of a sending switch (where the call is queued) outflow vector.
1.goto step 4 if expected-wait for <
2.route-to number with cov if unconditionally
3.wait-time 0 secs hearing ringback
86 Avaya Call Center Little Instruction Book for Advanced Administration
Multi-site applications
4.announcement
5.wait-time secs hearing music
6.step if interflow-qpos < 5
7.wait-time 60 secs hearing music
8.goto step 8 if interflow-qpos >= 5
9.route-to number 40950 with cov n if interflow-qpos = 1
10.wait-time 10 secs hearing music
11.goto step 10 if unconditionally
In this example, step 2 is checking the success of the queuing operation. If wait time is greater than 9999 seconds it recognized by the system as infinite EWT, meaning that skill 401 has no free queue slots or has no working agents, then the call is sent to VDN 40959, where the call is given an alternative treatment (queue to a different skill, disconnect after announcement, and so forth). Step 4 is a precautionary step. This step is executed if EWT is not infinite. If announcement 63600 is unavailable (the announcement board is down), the caller will hear ringing instead of silence. Step 7 allows the call to enter the rapid (10 second wait between lookahead interflow attempts - steps 10-12) lookahead loop if the call has reached one of the top 4 positions in queue. When call waiting times are long, this approach reduces the number of executed vector steps dramatically. If the call does not reach the top 4 positions, it will stay in the slow (60 second wait between lookahead interflow attempts - step 8) loop. Analysis is required to set the values for the rapid loop and the accompanying slow loop. Available agents at the remote site may not receive any calls if the calls can be serviced in the slow loop, therefore adjustments must be made to the loop timing. Step 9 is checking to see if calls reach the top 4 positions after waiting 60 seconds. If the call does not reach the top 4 positions, it will loop to step 8. In step 10, the system will make a lookahead interflow attempt for the oldest call waiting in queue when the call reaches the top 4 positions.
Note:If you are using Network Call Redirection, step on the outflow vector example above would be for: route-to number ~r15016781234 with cov n if interflow-qpos=1
For more information on Network Call Redirection, refer to the Avaya MultiVantage Call Center software Release 11 Call Vectoring/EAS Guide, 555-230-714, Issue 1.0.
Administering multi-site ELAI
Issue 1.0 May 2002 87
Inflow vectorWhen the receiving switch receives the interflow request, the call first routes to a VDN. The VDN maps the call to the receiving switch’s inflow vector. Inflow checking is enabled using conditional goto commands in the inflow vector. Call acceptance or denial is then executed using one of the vector commands listed in the following tables. The following of a receiving switch inflow vector:
1. check skill 1st pri m if available-agents > 0
2.
In this example, if the available agents in skill 1 are greater than 0, the receiving switch returns a call acceptance message to the sending switch, call control is passed to the receiving switch, and the call is connected to an agent in the receiving switch. All treatments for that call are discontinued in the sending switch. If an agent is not available, the call will advance to step 2, a busy signal is sent to the sending switch and the call is denied. The sending switch then drops the Look-Ahead Interflow attempt and continues vector processing at the next vector step.
Note:If the sending switch does not receive a call acceptance or call denial message within 120 seconds after the Look-Ahead Interflow call request, the Look-Ahead Interflow attempt is dropped and the sending switch continues vector processing at the next step.
Vector commands
ELAI vector commands can be categorized in one of three ways: call acceptance, call denial, or neutral. Each is addressed in one of the following tables.
To accept an interflow call, the receiving switch generates a call acceptance message if at least one of the vector conditions are true, shown in Table 3 on the following pages.
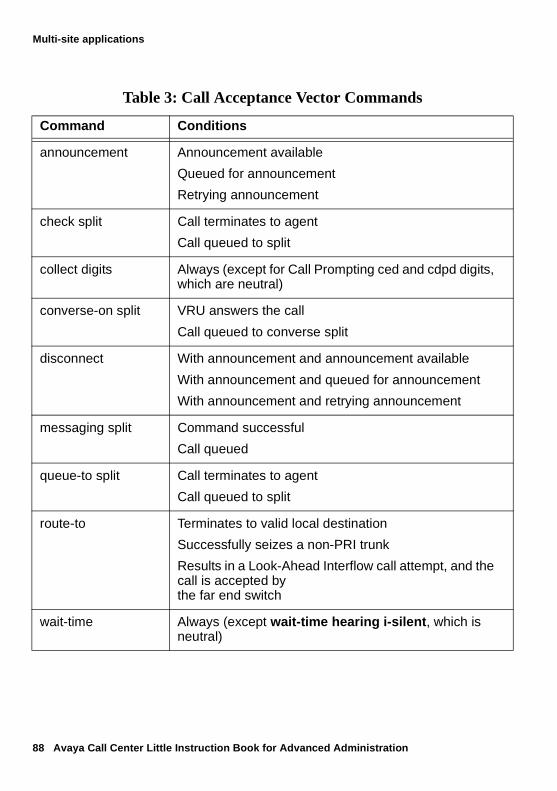
88 Avaya Call Center Little Instruction Book for Advanced Administration
Multi-site applications
Table 3: Call Acceptance Vector Commands
Command Conditions
announcement Announcement available
Queued for announcement
Retrying announcement
check split Call terminates to agent
Call queued to split
collect digits Always (except for Call Prompting ced and cdpd digits, which are neutral)
converse-on split VRU answers the call
Call queued to converse split
disconnect With announcement and announcement available
With announcement and queued for announcement
With announcement and retrying announcement
messaging split Command successful
Call queued
queue-to split Call terminates to agent
Call queued to split
route-to Terminates to valid local destination
Successfully seizes a non-PRI trunk
Results in a Look-Ahead Interflow call attempt, and the call is accepted bythe far end switch
wait-time Always (except wait-time hearing i-silent, which is neutral)
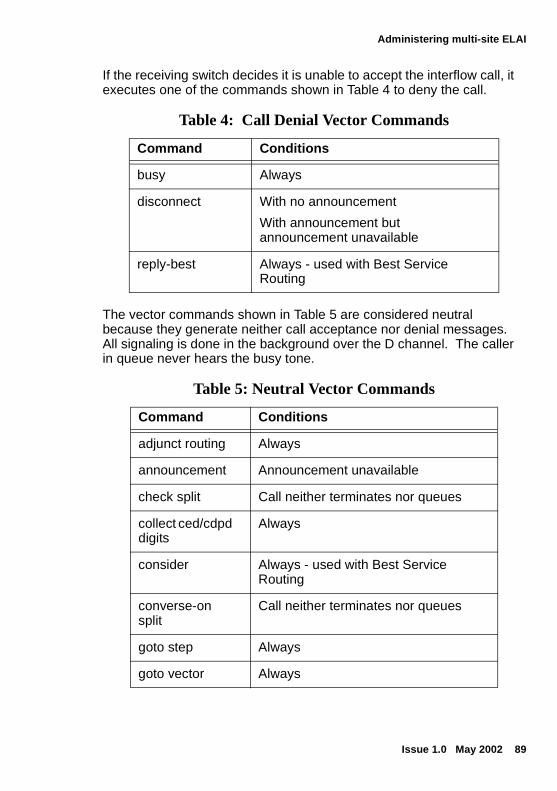
Administering multi-site ELAI
Issue 1.0 May 2002 89
If the receiving switch decides it is unable to accept the interflow call, it executes one of the commands shown in Table 4 to deny the call.
The vector commands shown in Table 5 are considered neutral because they generate neither call acceptance nor denial messages. All signaling is done in the background over the D channel. The caller in queue never hears the busy tone.
Table 4: Call Denial Vector Commands
Command Conditions
busy Always
disconnect With no announcement
With announcement but announcement unavailable
reply-best Always - used with Best Service Routing
Table 5: Neutral Vector Commands
Command Conditions
adjunct routing Always
announcement Announcement unavailable
check split Call neither terminates nor queues
collect ced/cdpd digits
Always
consider Always - used with Best Service Routing
converse-on split
Call neither terminates nor queues
goto step Always
goto vector Always
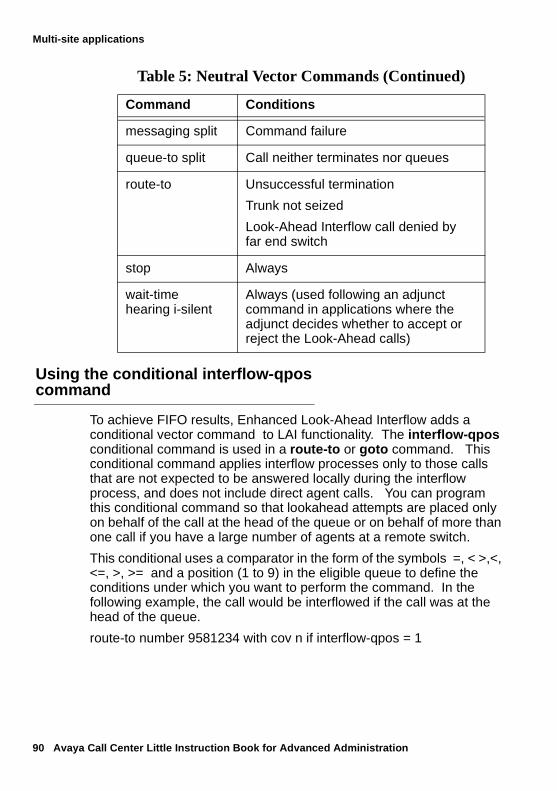
90 Avaya Call Center Little Instruction Book for Advanced Administration
Multi-site applications
Using the conditional interflow-qpos command
To achieve FIFO results, Enhanced Look-Ahead Interflow adds a conditional vector command to LAI functionality. The interflow-qpos conditional command is used in a route-to or goto command. This conditional command applies interflow processes only to those calls that are not expected to be answered locally during the interflow process, and does not include direct agent calls. You can program this conditional command so that lookahead attempts are placed only on behalf of the call at the head of the queue or on behalf of more than one call if you have a large number of agents at a remote switch.
This conditional uses a comparator in the form of the symbols =, < >,<, <=, >, >= and a position (1 to 9) in the eligible queue to define the conditions under which you want to perform the command. In the following example, the call would be interflowed if the call was at the head of the queue.
route-to number 9581234 with cov n if interflow-qpos = 1
messaging split Command failure
queue-to split Call neither terminates nor queues
route-to Unsuccessful termination
Trunk not seized
Look-Ahead Interflow call denied by far end switch
stop Always
wait-time hearing i-silent
Always (used following an adjunct command in applications where the adjunct decides whether to accept or reject the Look-Ahead calls)
Table 5: Neutral Vector Commands (Continued)
Command Conditions
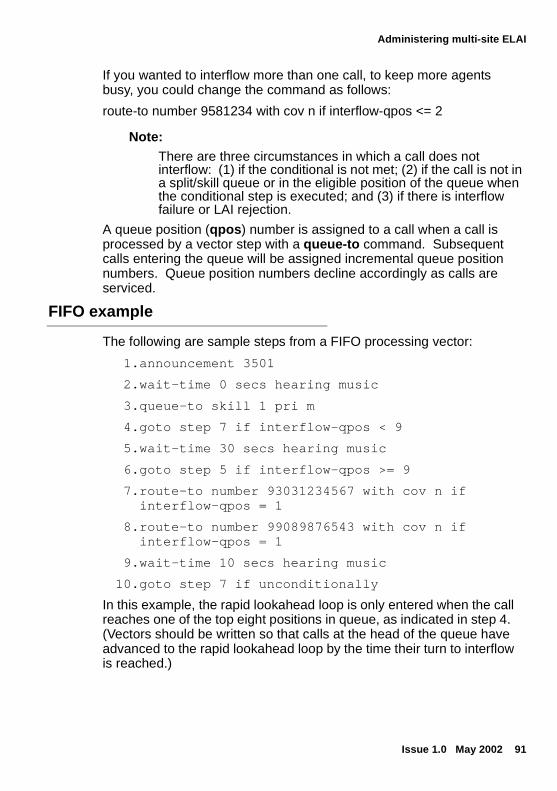
Administering multi-site ELAI
Issue 1.0 May 2002 91
If you wanted to interflow more than one call, to keep more agents busy, you could change the command as follows:
route-to number 9581234 with cov n if interflow-qpos <= 2
Note:There are three circumstances in which a call does not interflow: (1) if the conditional is not met; (2) if the call is not in a split/skill queue or in the eligible position of the queue when the conditional step is executed; and (3) if there is interflow failure or LAI rejection.
A queue position (qpos) number is assigned to a call when a call is processed by a vector step with a queue-to command. Subsequent calls entering the queue will be assigned incremental queue position numbers. Queue position numbers decline accordingly as calls are serviced.
FIFO example
The following are sample steps from a FIFO processing vector:
1.announcement 3501
2.wait-time 0 secs hearing music
3.queue-to skill 1 pri m
4.goto step 7 if interflow-qpos < 9
5.wait-time 30 secs hearing music
6.goto step 5 if interflow-qpos >= 9
7.route-to number 93031234567 with cov n if interflow-qpos = 1
8.route-to number 99089876543 with cov n if interflow-qpos = 1
9.wait-time 10 secs hearing music
10.goto step 7 if unconditionally
In this example, the rapid lookahead loop is only entered when the call reaches one of the top eight positions in queue, as indicated in step 4. (Vectors should be written so that calls at the head of the queue have advanced to the rapid lookahead loop by the time their turn to interflow is reached.)
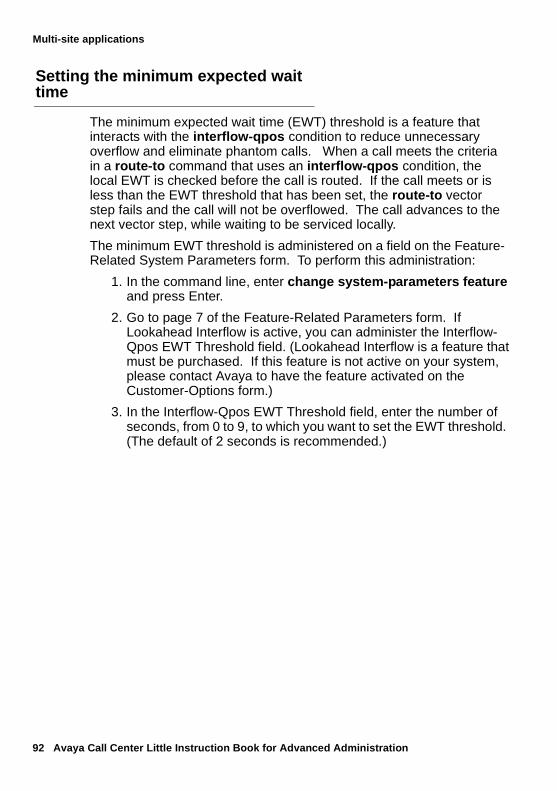
92 Avaya Call Center Little Instruction Book for Advanced Administration
Multi-site applications
Setting the minimum expected wait time
The minimum expected wait time (EWT) threshold is a feature that interacts with the interflow-qpos condition to reduce unnecessary overflow and eliminate phantom calls. When a call meets the criteria in a route-to command that uses an interflow-qpos condition, the local EWT is checked before the call is routed. If the call meets or is less than the EWT threshold that has been set, the route-to vector step fails and the call will not be overflowed. The call advances to the next vector step, while waiting to be serviced locally.
The minimum EWT threshold is administered on a field on the Feature-Related System Parameters form. To perform this administration:
1. In the command line, enter change system-parameters feature and press Enter.
2. Go to page 7 of the Feature-Related Parameters form. If Lookahead Interflow is active, you can administer the Interflow-Qpos EWT Threshold field. (Lookahead Interflow is a feature that must be purchased. If this feature is not active on your system, please contact Avaya to have the feature activated on the Customer-Options form.)
3. In the Interflow-Qpos EWT Threshold field, enter the number of seconds, from 0 to 9, to which you want to set the EWT threshold. (The default of 2 seconds is recommended.)
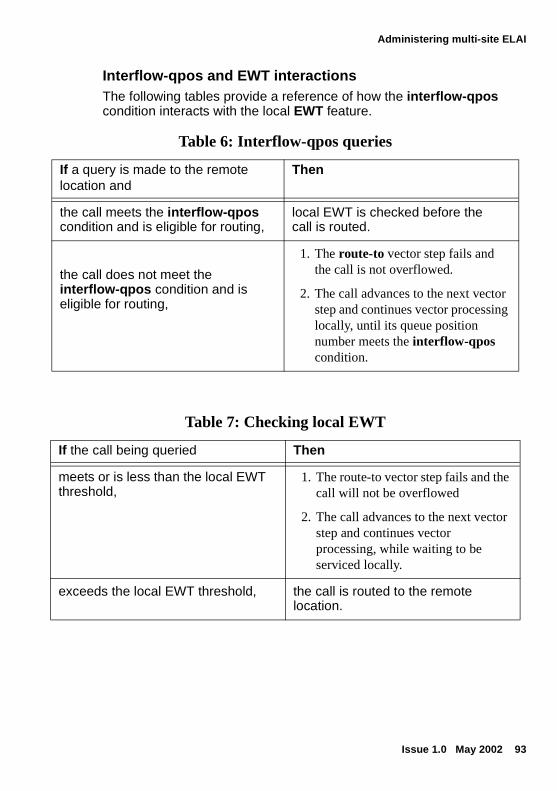
Administering multi-site ELAI
Issue 1.0 May 2002 93
Interflow-qpos and EWT interactionsThe following tables provide a reference of how the interflow-qpos condition interacts with the local EWT feature.
Table 6: Interflow-qpos queries
If a query is made to the remote location and
Then
the call meets the interflow-qpos condition and is eligible for routing,
local EWT is checked before the call is routed.
the call does not meet the interflow-qpos condition and is eligible for routing,
1. The route-to vector step fails and the call is not overflowed.
2. The call advances to the next vector step and continues vector processing locally, until its queue position number meets the interflow-qpos condition.
Table 7: Checking local EWT
If the call being queried Then
meets or is less than the local EWT threshold,
1. The route-to vector step fails and the call will not be overflowed
2. The call advances to the next vector step and continues vector processing, while waiting to be serviced locally.
exceeds the local EWT threshold, the call is routed to the remote location.
94 Avaya Call Center Little Instruction Book for Advanced Administration
Multi-site applications
Tips on administering multi-site ELAI
Keep the following in mind as you administer ELAI:
● The Look-Ahead Interflow and Basic Call Vectoring features must be enabled on the System Parameters Customer-Options form.
● Both the sending switch and receiving switch must have the Basic Call Vectoring and the Look-Ahead Interflow features active.
● Use route-to number with coverage y (or route-to digits with coverage y) on a switch only when you do not want Look-Ahead Interflow call attempts to be made. This command forces the sending switch to assume that the call will always be accepted. This command should only be used when an unconditional interflow is wanted, for example, when you have exhausted all local resources.
● Use route-to number with coverage n (or route-to digits with coverage n) on a switch when you want to ensure that Look-Ahead Interflow attempts are made.
● Never interflow to a remote vector that in turn might interflow back to the same local vector. This can cause a single call to use up all available trunks.
● Do not use oldest-call wait with ELAI vectors. This test condition does not give information about the current state of call overload. Use the EWT conditional command instead.
● Be sure the feedback provided by the receiving switch after a successful LAI attempt is consistent with what the caller has already received. (For example, you do not want the caller to hear a repeated greeting announcement, or hear ringing after listening to music.)
● The LAI time-out in the sending switch occurs after 2 minutes. If the sending switch does not receive a call acceptance or denial message within 120 seconds after the LAI request, the LAI attempt is dropped and the sending switch continues vector processing with the next step.
For detailed information on administering ELAI call vectors for multi-site applications, please refer to the “Look-Ahead Interflow” chapter of the Avaya MultiVantage Call Center software Release 11 Call Vectoring/EAS Guide, 555-230-714, Issue 1.0.
Performing daily maintenance
Issue 1.0 May 2002 95
Performing daily maintenanceFrom the switch, you can view or print the following reports to help monitor trunk traffic and performance and determine the cause of problems.
● Regularly use the Display Events form and execute a display events command for the appropriate vectors. Vector events will identify and indicate the source of common malfunctions and administration errors.
● A Trunk Group Summary report can provide traffic measurements for all trunk groups except for Personal Central Office Line Groups. You can use it to review such information as trunk usage, calls queued, queue overflows, queue abandons, and percentage all trunks busy (% ATB). To display a Trunk Group Summary report, type list measurements trunk-group summary <yesterday-peak/today-peak/last-hour> and press Enter.
● A Trunk Group Performance Report can provide a graphical and numerical display of the peak hour blocking for each trunk group. This allows you to see the percentage of calls that arrive when all trunks are busy. You can display this report for the previous or current day. To display a Trunk Group Performance Report, type list measurements trunk-group <yesterday/today> and press Enter.
Interpreting performance
You will want to review the following types of reports regularly to monitor the performance of your call center sites and the effectiveness of your ELAI implementation.
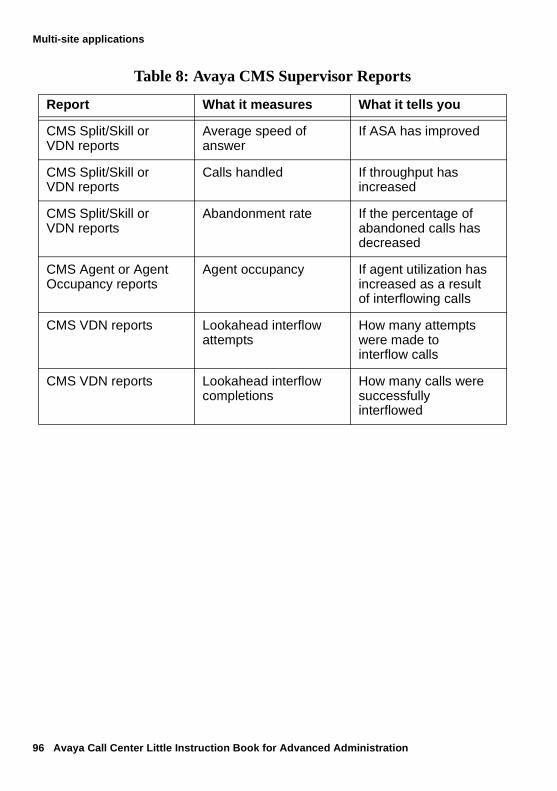
96 Avaya Call Center Little Instruction Book for Advanced Administration
Multi-site applications
Table 8: Avaya CMS Supervisor Reports
Report What it measures What it tells you
CMS Split/Skill or VDN reports
Average speed of answer
If ASA has improved
CMS Split/Skill or VDN reports
Calls handled If throughput has increased
CMS Split/Skill or VDN reports
Abandonment rate If the percentage of abandoned calls has decreased
CMS Agent or Agent Occupancy reports
Agent occupancy If agent utilization has increased as a result of interflowing calls
CMS VDN reports Lookahead interflow attempts
How many attempts were made to interflow calls
CMS VDN reports Lookahead interflow completions
How many calls were successfully interflowed
Troubleshooting for ELAI
Issue 1.0 May 2002 97
Troubleshooting for ELAI● If remote agents experience a high volume of phantom calls,
the Interflow-Qpos EWT Threshold may be set too low or too high.
● If remote agents are experiencing a delay between becoming available and receiving the call:
— Interflow-Qpos EWT Threshold might be set too low.— There may be insufficient LAI attempts from the sending
switch. Try changing the conditional, for example change interflow-qpos = 1 to interflow qpos <= 2. By doing this, you expand the window of eligibility for interflow calls.
— There may be an insufficient number of tie trunks.
● If remote agents are receiving no calls, the maximum number of vector steps executed at the sending switch vector may have been reached before calls reached the head of the queue. If this is the case, rewrite the sending switch vector.
See the “Troubleshooting Vectors” chapter of the Avaya MultiVantage Call Center software Release 11 Call Vectoring/EAS Guide, 555-230-714, Issue 1.0. for more detailed information, including vector commands and unexpected operations.
What is Best Service Routing? Best Service Routing (BSR) is a feature that routes ACD calls to the resource best able to service each call. It allows the switch to compare local and remote splits/skills, identify the split/skill that will provide the best service, and deliver the call to that resource. Using your company’s business rules and call handling preferences, you are able to determine the “best” routing for your call center’s calls. This entire process is transparent to your customers, whose calls are routed according to the strategy you develop.
Note:BSR can be configured for single-site or multi-site operation. This module focuses on the multi-site version, which operates across a network of Definity or MultiVantage switches.

98 Avaya Call Center Little Instruction Book for Advanced Administration
Multi-site applications
For information about the single-site version, please refer to the “Best Service Routing” chapter of the Avaya MultiVantage Call Center software Release 11 Call Vectoring/EAS Guide, 555-230-714, Issue 1.0.
How BSR works BSR determines the best resource to service a call by examining one or all of the following variables:
● availability of agents
● selection strategy for the active VDN
Administering multi-site BSR applicationsThe following forms are required for administering a BSR multi-site application:
Distributed versus centralized systems
Multi-site BSR can be implemented as either distributed or centralized systems. You must determine which method you want to implement before creating your application plan.
● Distributed system: All switches receive incoming calls and query other switches to interflow calls when appropriate.
● Centralized system: One switch serves as a hub, meaning that all calls arrive at this switch and are routed from it to the other switches in the network.
Tip:In a centralized system, only one switch requires application plans and primary VDNs/vectors. In a distributed system, each switch must be set up with application plans and primary VDNs/vectors.
Administering multi-site BSR applications
Issue 1.0 May 2002 99
Defining the purpose of the application
Before you can perform BSR administration tasks on your switch, you need to do some planning and decision making about how your BSR application will work. Then make note of your decisions for each of the following so that you can easily set up your BSR application on the switch.
Note:There are several related steps for the BSR application plan, which are covered in the following four sections. The numbering sequence carries through all related sections to ensure that you don’t overlook any important tasks when preparing your application plan.
1. Select the group of callers for which you want to create the application.
2. Define the goal of the application, for example, faster average speed of answer.
3. Determine which agent selection strategy (on VDNs) will best achieve your goal.
4. Decide whether you will implement BSR in a distributed or centralized system.
Selecting or creating the elements of the application
To select or create the elements of the application:
1. Select the VDNs on each switch that serve the group of callers you’ve identified. On each switch these are the primary VDNs for your application. Record the extensions of each VDN that point to a vector with a BSR application.
2. Select the locations you want to include in each application plan. Assign a number from 1 to 255 and a short name (15 characters or less) to each location to uniquely identify it.
3. Record the node number of the switch at each location. (The node identity is the number entered in the UCID Network Node ID field on page 4 of the Feature-Related System Parameters form.)
100 Avaya Call Center Little Instruction Book for Advanced Administration
Multi-site applications
4. Create Status Poll VDNs on each of the switches in the application plan. Record the full numbers you’ll need to route these calls to these VDNs.
5. Create interflow VDNs on each of the switches in the application.
the application plan
Note:The following procedures assume that you are using the SAT screen or terminal emulator to access the switch software and perform BSR administration.
The plan for each application is identified by a number (the application number) and a name. It specifies the remote switches that might be polled by the application and identifies each with a number called the location number.
1. At the command prompt, type add best-service-routing ### and press Enter. (In place of ###, type the number between 1 and 255 that you want to assign to this BSR application.)
Note:A single switch can have from 1 to 255 application plans, and each application plan can have from 1 to 255 locations. The limitation on a single switch is 1,000 application-location pairs, for example, 100 applications with 10 locations each, or 50 applications with 20 locations each. (If the switches are connected to a CMS, the CMS is limited to eight switches.)
The Best Service Routing Application Form is displayed with the number you typed in the command displayed in the Number field.
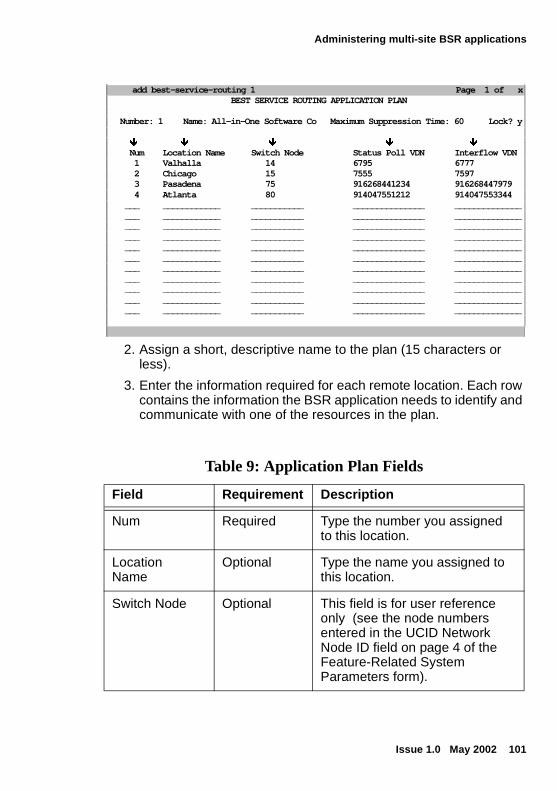
Administering multi-site BSR applications
Issue 1.0 May 2002 101
2. Assign a short, descriptive name to the plan (15 characters or less).
3. Enter the information required for each remote location. Each row contains the information the BSR application needs to identify and communicate with one of the resources in the plan.
Table 9: Application Plan Fields
Field Requirement Description
Num Required Type the number you assigned to this location.
Location Name
Optional Type the name you assigned to this location.
Switch Node Optional This field is for user reference only (see the node numbers entered in the UCID Network Node ID field on page 4 of the Feature-Related System Parameters form).
add best-service-routing 1 Page 1 of x BEST SERVICE ROUTING APPLICATION PLAN
Number: 1 Name: All-in-One Software Co Maximum Suppression Time: 60 Lock? y Ð Ð Ð Ð Ð Num Location Name Switch Node Status Poll VDN Interflow VDN 1 Valhalla 14 6795 6777 2 Chicago 15 7555 7597 3 Pasadena 75 916268441234 916268447979 4 Atlanta 80 914047551212 914047553344 ___ ____________ ___________ _______________ ______________ ___ ____________ ___________ _______________ ______________ ___ ____________ ___________ _______________ ______________ ___ ____________ ___________ _______________ ______________ ___ ____________ ___________ _______________ ______________ ___ ____________ ___________ _______________ ______________ ___ ____________ ___________ _______________ ______________ ___ ____________ ___________ _______________ ______________ ___ ____________ ___________ _______________ ______________ ___ ____________ ___________ _______________ ______________ ___ ____________ ___________ _______________ ______________
102 Avaya Call Center Little Instruction Book for Advanced Administration
Multi-site applications
4. Repeat step 11, completing the application plan fields for each of the locations you want to include in the application plan.
5. Press Enter to save your changes.
Linking the application plan to a primary VDN
To link the application plan to a primary VDN:
1. Go to the Vector Directory Number form for the first VDN you identified earlier. If this is a new application, create the VDN.
2. In the Allow VDN Override? field, type y or n. If the call is directed to another VDN during vector processing:
● y: Allows the settings on the subsequent VDN, including its BSR Available Agent Strategy, to replace the settings on this VDN.
● n: Does not allow the settings on the subsequent VDN, including its BSR Available Agent Strategy, to replace the settings on this VDN.
3. In the BSR Application field, type the application number you assigned to the plan.
Status Poll VDN
Required This string (up to 16 digits long), is the complete digit string your switch will dial for the status poll call.
Interflow VDN Required This string (up to 16 digits long) is the complete digit string your switch will dial to interflow a call to this location.
Table 9: Application Plan Fields (Continued)
Field Requirement Description
Administering multi-site BSR applications
Issue 1.0 May 2002 103
Entering an agent selection strategy
To enter an agent selection strategy:
1. In the BSR Available Agent Strategy field, type the identifier for the agent selection method you want this application to use
Tip:In multi-site BSR applications, the 1st-found available agent strategy results in fewer interflows and minimizes the load on interswitch trunking. Additionally, switch has less processing to perform for each call in BSR vectors, since it may not need to compare as many resources to identify the best. If processing power and tie trunk capacity are issues in your call center, you may want to use this strategy.
The following VDN form shows a VDN that is linked to BSR Application Plan 1. The BSR Available Agent Strategy in this example is EAD-MIA.
2. Press Enter to save your changes.
3. Repeat steps 9 on each switch that needs an application plan and a Primary VDN/vector pair.
BSR vector commands
BSR vector commands must be used when programming the vector steps for BSR, whether you are creating new vectors or editing existing ones. These commands, when activated, implement the strategy you enter in your application plan.
The following table provides vector commands used with BSR.
Sample vectors
This section contains a brief description and sample vector for each of the VDN/vector pairs required for a BSR .
For more detailed information about setting up vectors for BSR, please refer to the “Best Service Routing” chapter of the Avaya MultiVantage Call Center software Release 11 Call Vectoring/EAS Guide, 555-230-714, Issue 1.0.
Primary call arrives at is processed by the primary vector. This vector begins the BSR process by considering specified .
104 Avaya Call Center Little Instruction Book for Advanced Administration
Multi-site applications
Status poll vectorThe status poll obtains information and returns it to the origin switchcall is not connected to the status poll VDN.
Tips on writing BSR vectors
BSR vectors are programmed in the same way as other vectors, using your Basic Screen Administration, Call Management System, or Visual Vectors. Use the BSR vector commands discussed earlier and the following tips when creating or editing vector steps.
Note:The following options must be enabled on the System-Parameters Customer-Options form before programming BSR commands in a vector step: Basic Call Vectoring; “Vectoring (G3V4 Advanced Routing),” “Vectoring (Best Service Routing),” and “Look-Ahead Interflow (LAI).”
● Arrange consider steps in order of preference, for example, the consider step that tests the main, or preferred, resource, should be first in the series.
● Do not enter any commands that would cause a delay (other than goto commands) between steps of a consider series.
● Do not program a consider series in vector loops.
● Confirm that calls queue successfully. This check is recommended for all vectors. Since EWT is infinite for a call that hasn’t queued, a step that checks EWT after a queue attempt is a good confirmation method. After a queue-to best step, for example, use a command such as goto step x if expected-wait <9999.
● If only one split or skill on a remote switch can service the call type handled in a BSR application, you do not need to write a consider series in the interflow vector. You can just queue the call to the appropriate resource.
Administering multi-site BSR applications
Issue 1.0 May 2002 105
Setting user adjustments
You can use adjust-by commands to set preferences for splits/skills at the origin switch and/or remote switches. While these adjustments are not required, they can minimize unnecessary interflows for distributed applications, and thus help to control costs and preserve trunk capacity.
Note:In distributed applications, the smaller the adjustment, the closer the load balance across the network, but the greater the percentage of calls redirected between switches (and the greater the demands on inter-switch trunking). Higher adjustments reduce interflows, but allow greater imbalance in the load between switches. For more details about adjustments, refer to the Avaya MultiVantage Call Center software Release 11 Call Vectoring/EAS Guide, 555-230-714, Issue 1.0.
The adjustment is considered by the status poll vector in selecting the best resource on its switch. The adjustment is then returned to the origin switch along with the other data for that resource. When switch receives this adjustment from the remote switch, it adds it to any adjustment that was assigned to that location in the consider location step.
You can assign a value of 0 to 100 in user adjustments. The units of this value are supplied by the switch depending on the conditions whenever that consider step executes. For example, in the command consider split 1 pri h adjust-by 20, the switch interprets adjust-by 20 to mean add 20% to the EWT, but add at least 20 seconds. For actual EWTs of 1 to 100 seconds, an adjustment of 20 adds 20 seconds. For EWTs greater than 100 seconds, the same adjustment adds 20% to the actual EWT for the split/skill specified in the consider step. For example, if the actual EWT is 120 seconds and an adjust-by value of 20 is assigned, the adjusted EWT would be 144 seconds.
106 Avaya Call Center Little Instruction Book for Advanced Administration
Multi-site applications
In your first multi-site application, we recommend beginning with a remote adjustment of 30, as shown in the primary vector example below. This can easily be reduced later if inter-switch trunking is under utilized.
1) wait time 0 secs hearing ringback
2) consider split 1 pri m adjust-by 0
3) consider location 2 adjust-by 30
4) queue-to best
Tip:User adjustments in status poll vectors are applied to a single split or skill, not to an entire location.
Performing daily maintenanceYou can display the following reports from the switch to help you monitor the effectiveness of your BSR multi-site application and determine the cause of problems.
● Regularly use the Display Events form and execute a display events command for the appropriate vectors. Vector events will identify and indicate the source of common malfunctions and administration errors.
Tip:If it appears that tie-trunks are frequently exhausted, review the design of the BSR application. The user adjustments on consider location steps may be set too low.
● Use a list trace vdn or list trace vec command to observe processing of an individual call to verify that your BSR vectors are operating as intended.
● Use a Trunk Group Summary report for traffic measurements for trunk groups. Review such information as trunk usage, calls queued, queue overflows, queue abandons, and percentage all trunks busy (% ATB). To display a Trunk Group Summary report, type list measurements trunk-group summary <yesterday-peak/today-peak/last-hour> and press Enter.
Interpreting performance
Issue 1.0 May 2002 107
● Use a Trunk Group Performance Report to view a graphical and numerical display of the peak hour blocking for each trunk group. This allows you to see the percentage of calls that arrive when all trunks are busy, for the previous or current day. To display a Trunk Group Performance Report, type list measurements trunk-group <yesterday/today> and press Enter.
For additional tips and methods for tracking unexpected vector events, please refer to the “Troubleshooting” chapter of the Avaya MultiVantage Call Center software Release 11 Call Vectoring/EAS Guide, 555-230-714, Issue 1.0.
Interpreting performanceThe following types of standard reports will help you analyze the effectiveness of your individual sites.
Tip:If you have Network Reporting software, it can be used to view real time key call center performance statistics from as many as 64 call center sites within your switch network.
Table 10: Avaya CMS Supervisor Reports
Report What it measures What it tells you
CMS Split/Skill or VDN reports
Average speed of answer
If ASAs have improved and become fairly equal among BSR-eligible sites
CMS Split/Skill or VDN reports
Calls handled If throughput has increased
CMS Split/Skill or VDN Reports
Abandonment rates If abandonment rates have decreased
CMS Agent Group Report
Agent occupancy distribution
If agent utilization has improved as a result of interflowed calls
108 Avaya Call Center Little Instruction Book for Advanced Administration
Multi-site applications
For more detailed information about reports, please refer to the Avaya CMS Supervisor Version 8 Reports guide.
Using BSR and Avaya Business Advocate BSR can be paired with Advocate to make your multi-site routing even more precise and effective. Once BSR delivers a call to the right call center or split/skill, Advocate can determine the best agent to handle the call based on your callers’ needs and their value to your business. Advocate can prevent a large skill from being overserved to the detriment of smaller skills. It can also prevent a multi-skilled agent from being overworked beyond the workload of single-skilled agents, and can regulate how reserve agents are activated. More detailed information on Advocate can be found in the Managing Call and Agent Selection section of this book.
Note:For help using these features together, contact Avaya’s Call Center Professional Services.
Issue 1.0 May 2002 109
Chapter 7: Call and agent selection methods
This section explains how to manage call and agent selection methods using Avaya Business Advocate. Specifically, the section is designed to help you understand the various call and agent selection features that are available for your call center and help you select the Avaya Business Advocate features that best match your company’s business needs.
For more detailed information about Avaya Business Advocate features and administration, please see the Avaya Business Advocate User Guide, 585-210-711.
What is Avaya Business Advocate?Avaya Business Advocate provides predictive and adaptive methods for call centers that address three fundamental questions in terms of how the most expensive resource of the center, its agents, are used each time a call is handled.
What should this agent do next?
Advocate answers the question "what should this agent do next?" each time an agent becomes available and calls are waiting in queue. The term “should” is used deliberately because it implies a consideration of trade-offs in the decision. With Advocate, the answer to this question does not come from executing a set of preprogrammed directives such as "take the highest priority, oldest waiting call." Such a fixed plan does not consider consequences. Advocate, on the other hand, understands the consequences of the decisions it makes and the business objectives for each type of call.
Which agent should take this call?
Advocate answers the question "which agent should take this call?" when a call arrives and there are available agents waiting for calls. Advocate can make this decision so that workloads are distributed fairly across the agents, to eliminate "hot seats." Advocate can also promote fairer opportunities for compensation by delivering a certain predetermined mix of calls to agents.
110 Avaya Call Center Little Instruction Book for Advanced Administration
Call and agent selection methods
Does the center need to adjust its operations to bring performance back to the wanted level?
Advocate continuously evaluates the call center’s performance to determine "what does the center need to adjust to bring performance back to the wanted level?" Advocate responds, down to the levels of an individual caller, when it detects that agent resources should be used differently to prevent a caller’s wait times from being too high or to accomplish service level goals more consistently.
Advocate methods versus traditional methods
It’s important to note that a center using Advocate generally discards many traditional call center practices. For instance, queue priorities are discarded in favor of the more adaptive service objectives. The simple time-in-queue measurement is discarded in favor of the more consequential view of wait time, known as Predicted Wait Time. Multi-queuing, overflowing, and manual movement of agents and calls are replaced with the use of reserve agents when the need is detected.
Note:Avaya Business Advocate requires Expert Agent Selection (EAS) on switches R6 or later.
How call selection worksWhen calls are in queue and an agent becomes available, the switch considers the call selection method administered for the agent and each of the queues they support in order to determine which skill to serve. These methods are administered as call handling preferences on the Agent LoginID form and they include Greatest Need, Skill Level, and Percent Allocation. Each of these methods is described in this section. Once call selection determines which skill will be served, the call at the head of that queue is delivered to the agent.
Advocate call selection methods take into account more than just traditional issues such as wait time and queue priority. They include:
● Eventual caller wait time● Your service goals● Using each agent for maximum benefit

How call selection works
Issue 1.0 May 2002 111
How calls are selected for an agent
When calls are in queue and an agent becomes available, the switch quickly reviews the following types of information to determine which skill to select for the agent. When the skill is selected, the call from the head of the queue is delivered to the agent.
● What call selection method is administered?
● Is Service Objective activated for call selection?
● What are the eligible agent’s skill levels or reserve levels?
● Are any of the skills in an overload threshold state? If so, which threshold is exceeded, Level 1 or Level 2?
● Is Current Wait Time or Predicted Wait Time selected as the call selection measurement?
● What is the administered queue priority for the calls in queue?
● Is Call Selection Override activated?
Information about each of these elements is included later in this chapter.
Call selection measurements
When administering call selection methods for agents, you must choose from one of two call selection measurements for wait time. This decision is made at the system level, which means this choice applies across all of your skills.
● Current Wait Time (CWT) is a measurement that only considers how long a call has already waited when using the call selection algorithm. This is commonly referred to as Oldest Call Waiting or time in queue.
● Predicted Wait Time (PWT) is a call selection measurement that calculates how long a call will wait in total if the currently available agent does not take the call. This method is recommended because it results in fewer calls with exceedingly long wait times and it can optimize critical agent resources.
112 Avaya Call Center Little Instruction Book for Advanced Administration
Call and agent selection methods
Predicted Wait Time example In a call center, a call may be queued for a specialized skill for which a small number of agents is staffed. Although this call may have only been waiting in queue for 10 seconds, it is estimated that the call will wait an additional 40 seconds because of the small number of agents who are assigned to the skill. Another call is queued for a general skill that is staffed by many agents. This call has been waiting for 20 seconds, but it is estimated that it will wait in queue for an agent for only 5 more seconds. The agent who becomes available is eligible to serve both the specialized and the general skill. Advocate selects the call for the specialized skill first, because its overall predicted wait time is 50 seconds (40 + 10 seconds). The other call continues to wait in queue because its total PWT is only 25 seconds (20 + 5 seconds).
Call handling preferences
Three call handling preferences (call selection methods) are available to assist you with call selection: Greatest Need, Skill Level, and Percent Allocation. You must administer one of these preferences for each agent using the Agent LoginID form. These preferences determine which skill is selected for an agent when calls are in queue for their skills and they become available to serve a call.
Greatest NeedGreatest Need is a call selection method that selects a skill for an agent based on the call at the highest priority whose PWT or CWT for a skill is the longest or whose PWT or CWT is the highest relative to the administered service objective.This method allows you to improve efficiency by lowering the average speed of answer for calls and lowering the maximum delay.
Skill LevelSkill Level is a call handling preference based on the agent’s expertise in one or more skills. Skill Level selects a call for an agent based on highest skill level, highest priority, and greatest CWT or greatest PWT or greatest ratio of CWT/SO or PWT/SO. You assign a preference level of 1 to16, with level 1 as the highest preference, to determine how you want each agent’s time to be spent serving your customers. You may determine, for example, that an agent who is especially good at generating sales should be at a level 1 for the Sales skill, but at a level 4 for handling calls on the Complaints skill. This method can help you
How call selection works
Issue 1.0 May 2002 113
improve your customer service by delivering calls to the most qualified agents.
Tip:Skill Level is most effective when only a few levels are used, with as many skills at each level as possible. We recommend defining only two or three levels per agent, if possible, and assigning two or more skills at each level where possible.
Percent AllocationPercent Allocation allows you to assign a percentage of an agent’s time to each of her assigned skills, to total 100% of her staffed time. Using this method, calls are selected according to the agent’s preassigned percentage allocation plan. Percentage Allocation is designed to assist with agent scheduling so that a percentage of an agent’s time can be dedicated to each of her skills. If you have an agent that is equally qualified to serve two skills, for example, you could allocate 50% of that agent’s time for each skill. Or, if you have an agent who is most proficient at sales, you might allocate 75% of his time to the sales skill and 25% to the service skill.
The Percent Allocation call selection method is intended to be used only with the Percent Allocation Distribution (PAD) agent selection method, which was introduced with Release 9. Using both helps you to control agents’ time in skills under both agent surplus and call surplus conditions. For best results, if you administer Percent Allocation for an agent, you should administer PAD as the hunt group method for all of that agent’s skills. Conversely, if you administer PAD for a skill, you should administer Percent Allocation as the call handling preference for all agents serving that skill.
Service Objective
Service objectives can be used in conjunction with the Greatest Need and Skill Level call handling preferences. It allows you to assign different levels of service to different skills. With this feature, you can assign a more aggressive service objective for a skill that is more important to your call center. For example, you could assign a service level of 20 seconds for a premier customer skill and 45 seconds for a regular customer skill. This ensures that premier calls receive a higher level of service. When Service Objective is administered on the Hunt Group form and selected for usage on the Agent LoginID form, the switch selects calls for agents according to the ratio of Predicted Wait
114 Avaya Call Center Little Instruction Book for Advanced Administration
Call and agent selection methods
Time (PWT) or Current Wait Time (CWT) to the administered service objective for the skill. The ratio used is either Current Wait Time/Service Objective (CWT/SO) or Predicted Wait Time/Service Objective (PWT/SO).
You can also use Service Objective to create the same level of service for all skills if you set all of the service objectives the same and set all agents to use Service Objective in call selection. Later, if you want to make adjustments for faster or slower service, you can easily change the service objective for the skills involved.
Note:Service Objective cannot be used with Percent Allocation.
Call Selection Override
What is Call Selection Override?Call Selection Override is an option within Service Level Supervisor that alters how calls are selected when overload thresholds are exceeded for one or more of an agent’s skills. Calls are selected from skills that are over threshold to the exclusion of calls from skills that are under threshold when the skill in overload has Call Selection Override activated. This feature, when activated, is helpful for call centers that have one or more skills that are critical in nature, for example, those involving emergency-related calls.
Call Selection Override is activated (set to y) at the system level and must also be administered individually for each skill for which you want to use the feature.
Note:The Call Selection Override being activated effects all agents - those that hold the skill as standard and those that hold the skill as reserve.
How does Call Selection Override work? When an agent becomes available, if one of his skills is in overload and Call Selection Override is activated for that skill, the skill that is in overload will be served next. In other words, normal call selection for the agent is overridden. If two or more of the agent’s skills, both with call selection override activated, are in overload when the agent becomes available the call is selected according to the ratio of PWT or CWT and the threshold for the skill.
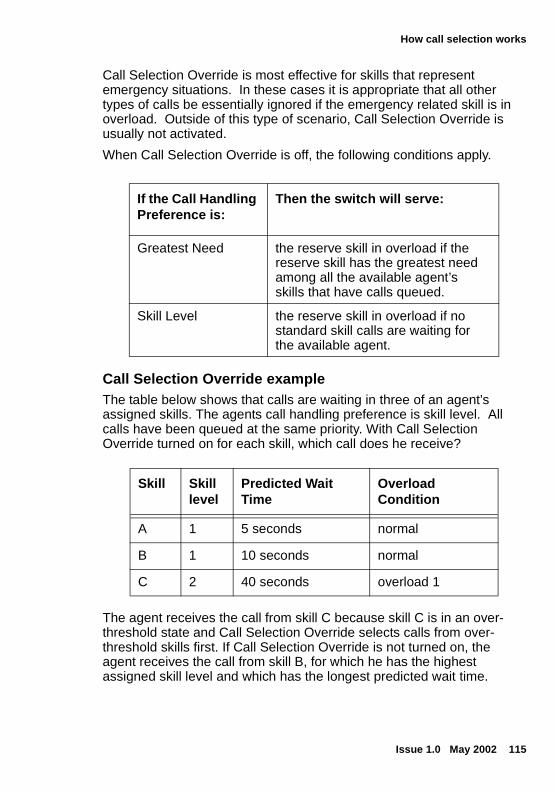
How call selection works
Issue 1.0 May 2002 115
Call Selection Override is most effective for skills that represent emergency situations. In these cases it is appropriate that all other types of calls be essentially ignored if the emergency related skill is in overload. Outside of this type of scenario, Call Selection Override is usually not activated.
When Call Selection Override is off, the following conditions apply.
Call Selection Override exampleThe table below shows that calls are waiting in three of an agent’s assigned skills. The agents call handling preference is skill level. All calls have been queued at the same priority. With Call Selection Override turned on for each skill, which call does he receive?
The agent receives the call from skill C because skill C is in an over-threshold state and Call Selection Override selects calls from over-threshold skills first. If Call Selection Override is not turned on, the agent receives the call from skill B, for which he has the highest assigned skill level and which has the longest predicted wait time.
If the Call Handling Preference is:
Then the switch will serve:
Greatest Need the reserve skill in overload if the reserve skill has the greatest need among all the available agent’s skills that have calls queued.
Skill Level the reserve skill in overload if no standard skill calls are waiting for the available agent.
Skill Skill level
Predicted Wait Time
Overload Condition
A 1 5 seconds normal
B 1 10 seconds normal
C 2 40 seconds overload 1
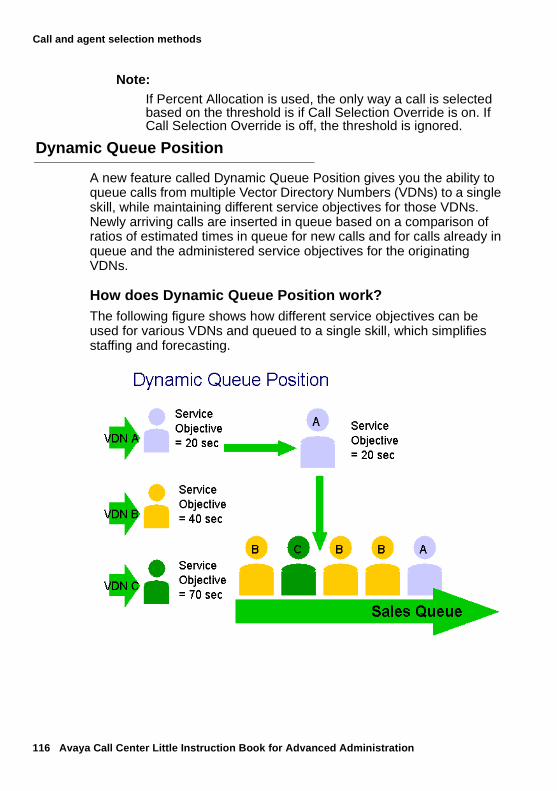
116 Avaya Call Center Little Instruction Book for Advanced Administration
Call and agent selection methods
Note:If Percent Allocation is used, the only way a call is selected based on the threshold is if Call Selection Override is on. If Call Selection Override is off, the threshold is ignored.
Dynamic Queue Position
A new feature called Dynamic Queue Position gives you the ability to queue calls from multiple Vector Directory Numbers (VDNs) to a single skill, while maintaining different service objectives for those VDNs. Newly arriving calls are inserted in queue based on a comparison of ratios of estimated times in queue for new calls and for calls already in queue and the administered service objectives for the originating VDNs.
How does Dynamic Queue Position work?The following figure shows how different service objectives can be used for various VDNs and queued to a single skill, which simplifies staffing and forecasting.
Call selection examples
Issue 1.0 May 2002 117
Dynamic Queue Position exampleDynamic Queue Position is valuable for businesses that want to support customer segmentation. Consider, for example, a business that receives customer service calls from a wide range of customers and wants to support differentiation in how it handles calls from customers with varying service policies. Since each agent is already handling all types of customers, a single skill can suffice. A differentiation is needed, however, in terms of how quickly calls are handled. This is accomplished by assigning a different service objective to the VDNs that correspond to the varying sets of customers. The service objective for the customers with policies is assigned a service objective of 10 seconds. Customers without policies are handled through a VDN with a service objective of 40 seconds.
As calls arrive they are placed in queue so that the average speed with which calls from each VDN are answered is roughly proportional to the service objectives of the VDN. Customers with the most valuable policies will tend to be placed in front of some of the other calls, but will not necessarily be placed in front of all of them. This arrangement allows the call center to continue to operate with a single skill defined, forecasted, and staffed. This also prevents problems that result from just queuing calls at different priority levels within the same queue. For example, calls queued at low priority will be ignored if there is a significant volume of higher-priority calls.
This feature is administered on the VDN form and the Hunt Group form.
Call selection examplesThe following examples show how the various types of call selection work. In each of these examples, assume that calls are in queue for three skills that an agent is eligible to serve. Each scenario is based on the same skills and call wait times so that you can more clearly see the effects of call selection methods. The examples include Greatest Need with and without Service Objective, Skill Level with and without Service Objective, and Percent Allocation, which is not used with Service Objective.
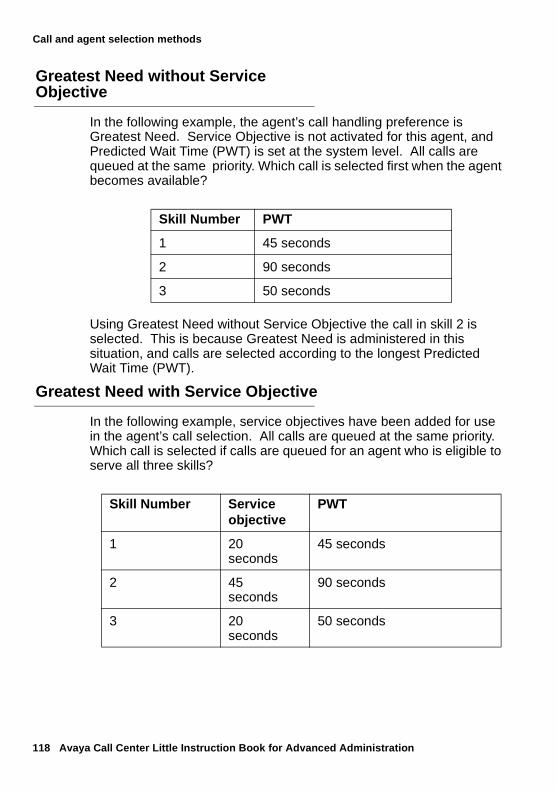
118 Avaya Call Center Little Instruction Book for Advanced Administration
Call and agent selection methods
Greatest Need without Service Objective
In the following example, the agent’s call handling preference is Greatest Need. Service Objective is not activated for this agent, and Predicted Wait Time (PWT) is set at the system level. All calls are queued at the same priority. Which call is selected first when the agent becomes available?
Using Greatest Need without Service Objective the call in skill 2 is selected. This is because Greatest Need is administered in this situation, and calls are selected according to the longest Predicted Wait Time (PWT).
Greatest Need with Service Objective
In the following example, service objectives have been added for use in the agent’s call selection. All calls are queued at the same priority. Which call is selected if calls are queued for an agent who is eligible to serve all three skills?
Skill Number PWT
1 45 seconds
2 90 seconds
3 50 seconds
Skill Number Service objective
PWT
1 20 seconds
45 seconds
2 45 seconds
90 seconds
3 20 seconds
50 seconds

Call selection examples
Issue 1.0 May 2002 119
In this situation, the call in skill 3 is selected because its PWT is at the highest percentage (250%) of the 20-second service objective for that skill. (Remember that the ratio used with Service Objective is PWT/SO.) The 90-second call, in this case, with a service objective of 45 seconds, is only at 200% of the service objective and therefore it is not selected.
Tip:Service Objectives are generally activated on agent’s templates because this aligns each agent’s work with the various objectives.
Skill Level without Service Objective
In the following example, the Skill Level call handling preference is set for the agent’s three skills. Service Objective is not activated for this agent. All calls are queued at the same priority. Which call will the agent receive in this situation?
In this instance, the call waiting for skill 2 is selected because its PWT is the greatest among the skill level 1 calls. Skill 3 cannot be selected even though its PWT is greatest, because there are calls waiting for skill level 1 skills.
Tip:Traditional call centers have often used skill level as a call handling preference in order to try to give the right service level to each skill. Now with Advocate, service objectives generally are a more direct approach to expressing and achieving goals. If you are transitioning into Advocate, consider whether skill level preferences were originally introduced to help achieve the wanted service levels and if so, the greatest need approach with service level will give you a far more robust design.
Skill Number Skill Level PWT
1 1 45 seconds
2 1 90 seconds
3 4 90 seconds
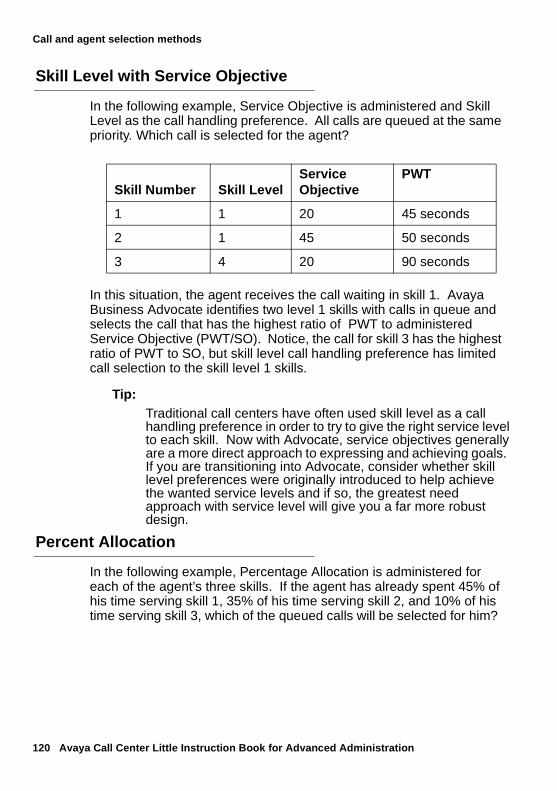
120 Avaya Call Center Little Instruction Book for Advanced Administration
Call and agent selection methods
Skill Level with Service Objective
In the following example, Service Objective is administered and Skill Level as the call handling preference. All calls are queued at the same priority. Which call is selected for the agent?
In this situation, the agent receives the call waiting in skill 1. Avaya Business Advocate identifies two level 1 skills with calls in queue and selects the call that has the highest ratio of PWT to administered Service Objective (PWT/SO). Notice, the call for skill 3 has the highest ratio of PWT to SO, but skill level call handling preference has limited call selection to the skill level 1 skills.
Tip:Traditional call centers have often used skill level as a call handling preference in order to try to give the right service level to each skill. Now with Advocate, service objectives generally are a more direct approach to expressing and achieving goals. If you are transitioning into Advocate, consider whether skill level preferences were originally introduced to help achieve the wanted service levels and if so, the greatest need approach with service level will give you a far more robust design.
Percent Allocation
In the following example, Percentage Allocation is administered for each of the agent’s three skills. If the agent has already spent 45% of his time serving skill 1, 35% of his time serving skill 2, and 10% of his time serving skill 3, which of the queued calls will be selected for him?
Skill Number Skill LevelService Objective
PWT
1 1 20 45 seconds
2 1 45 50 seconds
3 4 20 90 seconds

Agent selection methods
Issue 1.0 May 2002 121
The agent has spent more time on skills 2 and 3 than the plan calls for and needs a skill 1 call to move toward plan. Therefore, he will receive the skill 1 call.
Note:(Neither PWT or CWT is considered in call selection when Percentage Allocation is in effect for an agent.)
Agent selection methodsAgent selection methods are activated when there are more available agents than incoming calls. This is known as an agent surplus condition. Avaya Business Advocate allows you to select agents by idleness in a skill (Most Idle Agent), occupancy across skills (Least Occupied Agent), or by percentage of work time for a skill (Percent Allocation Distribution). These methods are administered on the Hunt Group form and are also known as hunt group types.
How agents are selected for calls
When more than one agent is eligible to serve a call, the switch determines which of the eligible agents should be selected based on the agent selection method that you administered. This process includes consideration of the following:
● Which available agents are eligible to serve a call from that skill?
● What agent selection method is administered for the skill?
● Which of the eligible agents is most appropriate to serve the call based on the administered agent selection method?
Skill Number
Percent Allocation Plan
Actual work time
Adjusted work time
PWT
1 60% 45% 49% 45 seconds
2 30% 35% 40% 90 seconds
3 10% 10% 17% 50 seconds
122 Avaya Call Center Little Instruction Book for Advanced Administration
Call and agent selection methods
Agent selection options
Business Advocate offers the following agent selection methods:
● Most Idle Agent (MIA) selects an agent based on the time since completion of the last ACD call.
● Least Occupied Agent (LOA) selects an agent based on the agent’s occupancy across all skills.
● Percent Allocation Distribution (PAD), new with Release 9, selects an agent based on the available agents’ predefined allocations for their skills and the agents’ adjusted work times for the skills.
Most Idle Agent
Most Idle Agent (MIA) selects the most idle agent with the assigned skill for the incoming call. With this method, the call is delivered to the agent who has been idle the longest.
There are two types of MIA selection:
● Expert Agent Distribution - Most Idle Agent (EAD-MIA): Selects the most idle agent who is at the highest skill level for in the skill to take the call. Note that the switch considers skill level first. If there is only one agent available at that skill level, that agent is selected. If there is more than one agent available at that skill level, idle time in queue is used to determine which agent is selected.
● Uniform Call Distribution - Most Idle Agent (UCD-MIA): Selects the most idle agent in a skill, regardless of the agent’s skill level.
Least Occupied Agent
Least Occupied Agent (LOA) selects agents based upon their occupancy across all skills rather than position in an idle agent queue. The occupancy includes the agent’s time with ACD calls ringing, ACD calls active, ACD calls on hold, and after call work time (ACW) if ACW time is considered work time. It is designed to spread work time more evenly among agents, reducing the number of “hot seats,” that is, situation in which some agents receive many more calls than others.
Agent selection methods
Issue 1.0 May 2002 123
There are two types of LOA selection:
● Expert Agent Distribution - Least Occupied Agent (EAD-LOA): Takes the skill level of agents into consideration before distributing a call. It selects the least occupied agent who is at the highest skill level for the skill to take the incoming call. Note that the switch considers skill level first. If there is only one agent at the highest level, that agent is selected for the call. If there is more than one agent available at that skill level, occupancy is used to determine which agent is selected.
● Uniform Call Distribution - Least Occupied Agent (UCD-LOA): Selects the least occupied agent when more than one agent is available to take a call. UCD-LOA does not consider the agent’s skill level when distributing the call.
Tip:Occupancy levels will be more fair equal under UCD-LOA distribution. EAD-LOA results will vary depending on how skills and the related skill levels are assigned to the agents.
Agent occupancyIt is important to note that occupancy is initialized when the agent logs in and is reinitialized when an agent exits the AUX work mode. The agent’s occupancy, when initialized or reinitialized, is based on the current occupancy of other agents who are administered with similar skills (peer agents.)
Percent Allocation Distribution
Percent Allocation Distribution ( PAD), which was introduced with Release 9, uses an agent’s target percentage allocations and the adjusted work time for her assigned skills to determine whether she is selected to serve a call under an agent surplus condition. Using the Agent LoginID form, you assign a percentage to each of the agent’s assigned skills (for a total of 100%). During the agent selection process, the switch uses the agent’s current work time and target allocation for that skill. It is important to note that the selection process favors agents with higher target allocations over agents with lower allocations. For example, if agent A is assigned a target allocation of 80% and her work time for the skill is at 85%, she may be selected over agent B, who is assigned 20% and is currently at 15% for the skill depending on the expected call handling time for the skill.
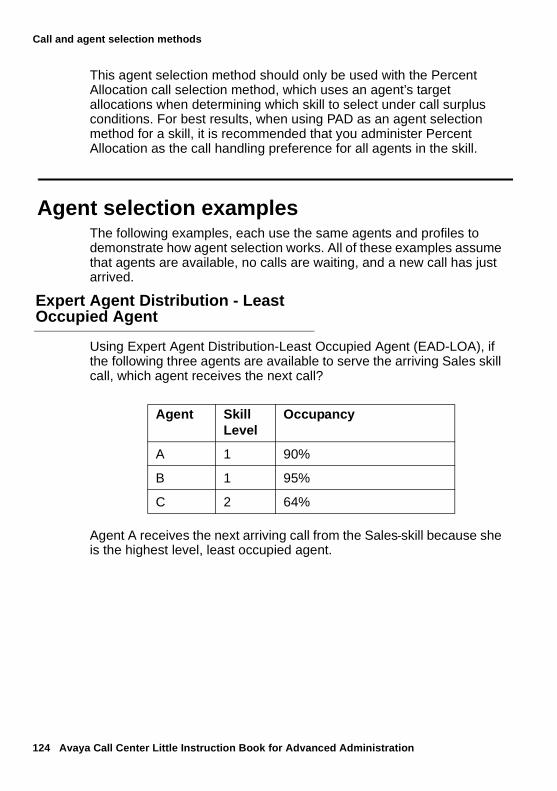
124 Avaya Call Center Little Instruction Book for Advanced Administration
Call and agent selection methods
This agent selection method should only be used with the Percent Allocation call selection method, which uses an agent’s target allocations when determining which skill to select under call surplus conditions. For best results, when using PAD as an agent selection method for a skill, it is recommended that you administer Percent Allocation as the call handling preference for all agents in the skill.
Agent selection examplesThe following examples, each use the same agents and profiles to demonstrate how agent selection works. All of these examples assume that agents are available, no calls are waiting, and a new call has just arrived.
Expert Agent Distribution - Least Occupied Agent
Using Expert Agent Distribution-Least Occupied Agent (EAD-LOA), if the following three agents are available to serve the arriving Sales skill call, which agent receives the next call?
Agent A receives the next arriving call from the Sales skill because she is the highest level, least occupied agent.
Agent Skill Level
Occupancy
A 1 90%
B 1 95%
C 2 64%
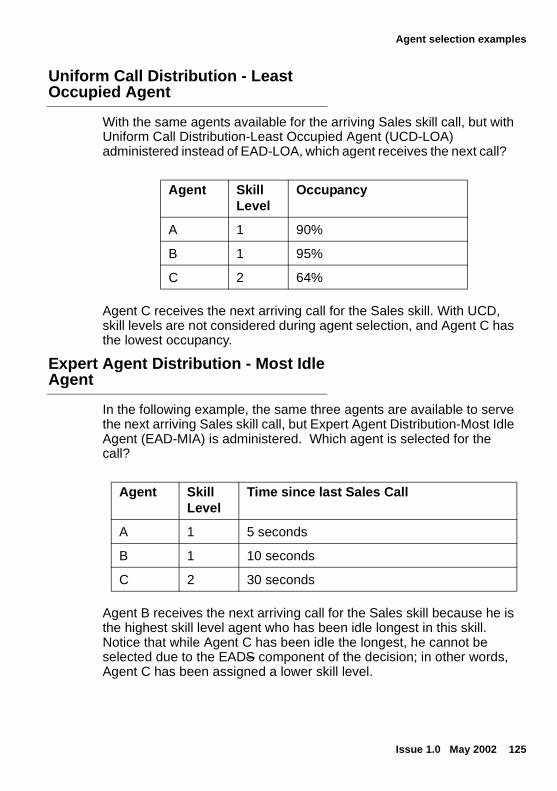
Agent selection examples
Issue 1.0 May 2002 125
Uniform Call Distribution - Least Occupied Agent
With the same agents available for the arriving Sales skill call, but with Uniform Call Distribution-Least Occupied Agent (UCD-LOA) administered instead of EAD-LOA, which agent receives the next call?
Agent C receives the next arriving call for the Sales skill. With UCD, skill levels are not considered during agent selection, and Agent C has the lowest occupancy.
Expert Agent Distribution - Most Idle Agent
In the following example, the same three agents are available to serve the next arriving Sales skill call, but Expert Agent Distribution-Most Idle Agent (EAD-MIA) is administered. Which agent is selected for the call?
Agent B receives the next arriving call for the Sales skill because he is the highest skill level agent who has been idle longest in this skill. Notice that while Agent C has been idle the longest, he cannot be selected due to the EADS component of the decision; in other words, Agent C has been assigned a lower skill level.
Agent Skill Level
Occupancy
A 1 90%
B 1 95%
C 2 64%
Agent Skill Level
Time since last Sales Call
A 1 5 seconds
B 1 10 seconds
C 2 30 seconds
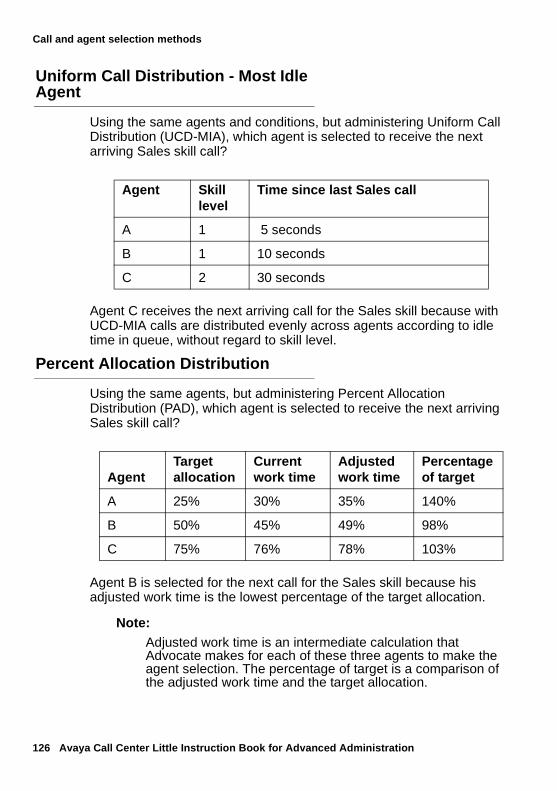
126 Avaya Call Center Little Instruction Book for Advanced Administration
Call and agent selection methods
Uniform Call Distribution - Most Idle Agent
Using the same agents and conditions, but administering Uniform Call Distribution (UCD-MIA), which agent is selected to receive the next arriving Sales skill call?
Agent C receives the next arriving call for the Sales skill because with UCD-MIA calls are distributed evenly across agents according to idle time in queue, without regard to skill level.
Percent Allocation Distribution
Using the same agents, but administering Percent Allocation Distribution (PAD), which agent is selected to receive the next arriving Sales skill call?
Agent B is selected for the next call for the Sales skill because his adjusted work time is the lowest percentage of the target allocation.
Note:Adjusted work time is an intermediate calculation that Advocate makes for each of these three agents to make the agent selection. The percentage of target is a comparison of the adjusted work time and the target allocation.
Agent Skill level
Time since last Sales call
A 1 5 seconds
B 1 10 seconds
C 2 30 seconds
AgentTarget allocation
Current work time
Adjusted work time
Percentage of target
A 25% 30% 35% 140%
B 50% 45% 49% 98%
C 75% 76% 78% 103%
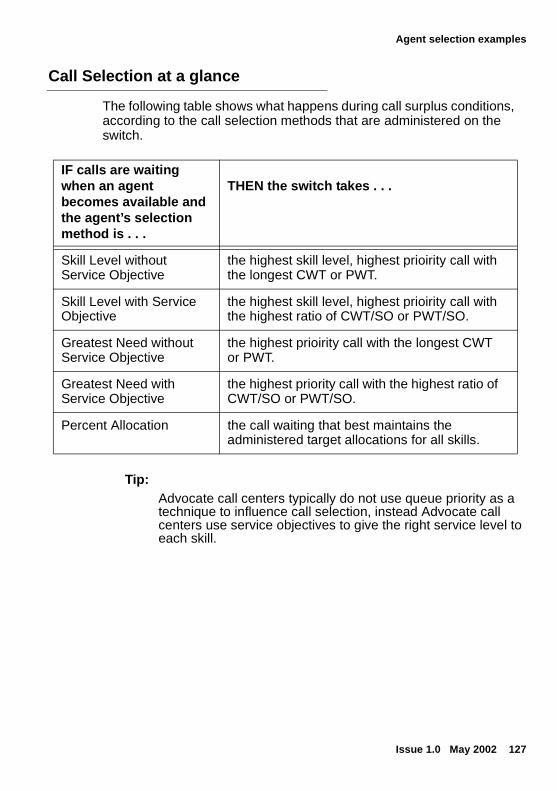
Agent selection examples
Issue 1.0 May 2002 127
Call Selection at a glance
The following table shows what happens during call surplus conditions, according to the call selection methods that are administered on the switch.
Tip:Advocate call centers typically do not use queue priority as a technique to influence call selection, instead Advocate call centers use service objectives to give the right service level to each skill.
IF calls are waiting when an agent becomes available and the agent’s selection method is . . .
THEN the switch takes . . .
Skill Level without Service Objective
the highest skill level, highest prioirity call with the longest CWT or PWT.
Skill Level with Service Objective
the highest skill level, highest prioirity call with the highest ratio of CWT/SO or PWT/SO.
Greatest Need without Service Objective
the highest prioirity call with the longest CWT or PWT.
Greatest Need with Service Objective
the highest priority call with the highest ratio of CWT/SO or PWT/SO.
Percent Allocation the call waiting that best maintains the administered target allocations for all skills.
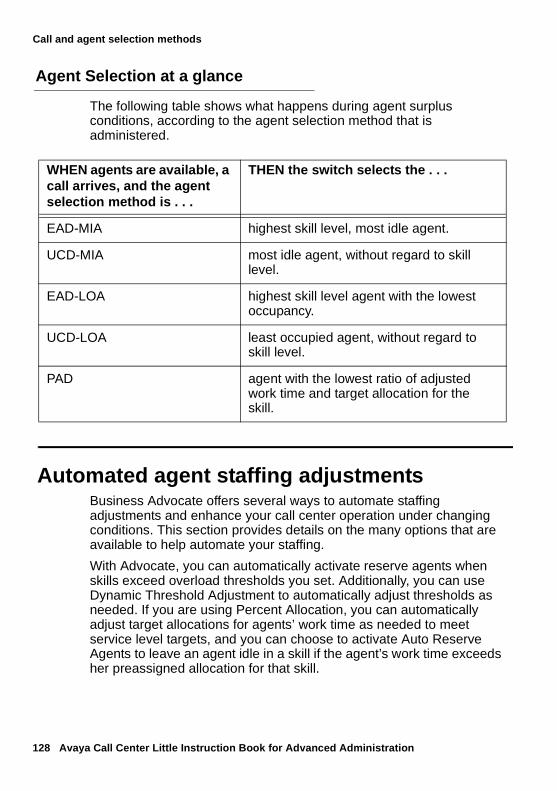
128 Avaya Call Center Little Instruction Book for Advanced Administration
Call and agent selection methods
Agent Selection at a glance
The following table shows what happens during agent surplus conditions, according to the agent selection method that is administered.
Automated agent staffing adjustmentsBusiness Advocate offers several ways to automate staffing adjustments and enhance your call center operation under changing conditions. This section provides details on the many options that are available to help automate your staffing.
With Advocate, you can automatically activate reserve agents when skills exceed overload thresholds you set. Additionally, you can use Dynamic Threshold Adjustment to automatically adjust thresholds as needed. If you are using Percent Allocation, you can automatically adjust target allocations for agents’ work time as needed to meet service level targets, and you can choose to activate Auto Reserve Agents to leave an agent idle in a skill if the agent’s work time exceeds her preassigned allocation for that skill.
WHEN agents are available, a call arrives, and the agent selection method is . . .
THEN the switch selects the . . .
EAD-MIA highest skill level, most idle agent.
UCD-MIA most idle agent, without regard to skill level.
EAD-LOA highest skill level agent with the lowest occupancy.
UCD-LOA least occupied agent, without regard to skill level.
PAD agent with the lowest ratio of adjusted work time and target allocation for the skill.
Automated agent staffing adjustments
Issue 1.0 May 2002 129
Service Level Supervisor
Using Service Level Supervisor, you can administer one or two overload thresholds for a skill that is supported by reserve agents. When the Expected Wait Time (EWT) for an arriving call (or optionally, with Activate on Oldest Call Waiting enabled, the time in queue of the head call in queue) exceeds the threshold, the skill goes into an overload state. When the appropriate overload state exists, agents who are preassigned to assist during overload periods are eligible to receive subsequent calls from the overloaded skill. Service Level Supervisor alleviates the need to move agents from skill to skill during emergencies or unanticipated peaks in call volume.
Service Level Supervisor also enables agents to remain working in their standard skills unless a wait time problem is identified for a reserve skill.
What happens when a skill goes over threshold
A skill goes over threshold when either the EWT or optionally, the time in queue for the head call (Oldest Call Waiting) exceeds a preadministered threshold. When a skill goes over threshold, reserve agents are activated and call selection override is in effect if activated, according to which of these options you administered.
Assigning reserve agents
You can assign reserve agents so that they can assist with skills that might become overloaded during peak times. You can assign reserve skills in addition to an agent’s standard skills or you can assign them to an agent who would not handle any calls unless contingency operations are in effect. Reserve skills are not mandatory, but they are a convenient method for automatically triggering contingency operations for your call center.
Two reserve levels can be administered:
● Reserve Level 1 agents are eligible to receive calls from the overloaded skill when the first or second administered overload threshold is exceeded
● Reserve Level 2 agents are eligible to receive calls from the overloaded skill when the second administered overload threshold is exceeded.
130 Avaya Call Center Little Instruction Book for Advanced Administration
Call and agent selection methods
Activation of reserve agents
Reserve agents can be activated at each overload threshold. These reserve agents are eligible to take calls from a reserve skill only when that skill is in an overload state. When the skill returns to a normal state, calls from that skill are not sent to reserve agents.
Tip:Call centers that use Advocate generally eliminate multiqueuing and overflowing from their vector designs. These techniques to route calls to backup agents are replaced by assigning the backups the appropriate Reserve level skill.
Considerations for reserve skills
If you determine that you want to administer reserve skills, consider the following questions for each skill:
● Which agents are able to back up that skill?
● Are you willing to have agents work differently in order to serve as reserve agents for the skill? Remember that agents are often less effective or more costly when handling calls from skills that are not their primary assignments.
● Which reserve levels will you assign for selected agents?
Overload thresholds
When using reserve agents, you need to assign overload thresholds that determine when contingency operations go into effect for a skill. Overload thresholds determine the conditions under which reserve agents become eligible for work on the over-threshold skill. You can set one or two overload thresholds at the level or length of wait considered too long for that skill, when Reserve agents should be used. These thresholds are set individually on the Hunt Group form for each skill that uses reserve agents.
Dynamic Threshold Adjustment
Dynamic Threshold Adjustment is a new Service Level Supervisor feature that provides you with an increased level of automation for your staffing. With this feature, you administer overload thresholds and a service level target. You establish service level targets for each skill (for example 80% in 20 seconds), on the Hunt Group Form.
Automated agent staffing adjustments
Issue 1.0 May 2002 131
Service level target is an aggregrate measurement that describes how well a group of callers were handled. For example, answering 80 percent of the calls to this skill in 20 seconds or less, is a more challenging target than answering 70 percent of the calls to this skill in 20 seconds.
The switch uses a comparison of your service level target to recent performance for the skill to determine when to automatically adjust overload thresholds to help meet the administered service level. This feature activates reserve agents a bit sooner or a bit later, as needed to maintain your organization’s service levels with minimal over-achievement or under-achievement. Dynamic Threshold Adjustment is administered individually for each skill for which you want to use the feature. If you prefer not to use Dynamic Threshold Adjustment, you can still use Service Level Supervisor; however, automatic adjustments will not be made to the overload thresholds you set.
It is also important to note that there is a minimum and maximum range for Dynamic Threshold Adjustments. The adjustments are made as needed, from 0% to 200% of the administered value. If you have set an overload threshold at 20 seconds, for example, the adjusted thresholds can vary from 0 to 40 seconds as required to meet your service level targets.
Automatic adjustments to target allocations
If service levels are particularly important to you and you want to have more control over the amount of time that an agent spends serving a skill, you might consider the new Dynamic Percentage Adjustment feature. You establish service level targets for each skill, (for example 90% in 20 seconds) on the Hunt Group form, and the switch makes automatic adjustments to agents’ target allocations as needed to ensure that your percent in service level goals are met.
For example, with Dynamic Percentage Adjustment administered, an agent who has a 70% target for Sales and a 30% target for Service may have his plan adjusted to 76% Sales and 24% Service in the morning, when Sales is very busy. Later in the day, the plan may be adjusted to 66% Sales calls and 34% Service calls, as the volume of Service calls increases. Without Dynamic Percentage Adjustment, the level of service for Sales would have been adversely affected in the morning and the level of service for Service would have been adversely affected in the afternoon.
132 Avaya Call Center Little Instruction Book for Advanced Administration
Call and agent selection methods
Auto Reserve Agents
Auto Reserve Agents is a new Percent Allocation feature that intentionally leaves an agent idle in a skill when the agent’s work time for that skill exceeds her assigned target allocation. You can use this feature when it is particularly important to control an agent’s time in a skill. You might activate this feature to ensure that a particularly proficient agent is available for your most important types of calls, or to more closely control where the agent spends his time to better meet your organization’s sales or service goals.
An agent that has just become available can be put into Auto Reserve if the only types of calls in queue are ones for which the agent is over plan and the skill over plan is not presently in an overload state.
When an agent is in Auto Reserve and a call is in queue, one of three things typically happens:
● Another agent becomes available and takes the call in queue.
● A call arrives in a skill for which the agent is not auto reserved and the agent takes that call.
● The agent’s work time in the skill drops below her allocation. Now that she is no longer auto reserved, she takes the waiting call.
This feature is activated on the System-Parameters Features form. Using the Agent LoginID form and skill levels for each of an agent’s skills, you can determine in which (if any) skills you want to leave the agent idle when his work time exceeds his target allocation. You can activate the feature for all of an agent’s skills by entering all in the Auto Reserve Agents field or only for their nonprimary (level 2 to 16) skills by entering secondary-only. If secondary-only is selected, the agent never goes into auto reserve if a level 1 call is waiting.
If Auto Reserve Agents is set to all, an agent that has just become available can be put into Auto Reserve if the only types of calls in queue are ones for which the agent is over-plan and if call selection override is on.
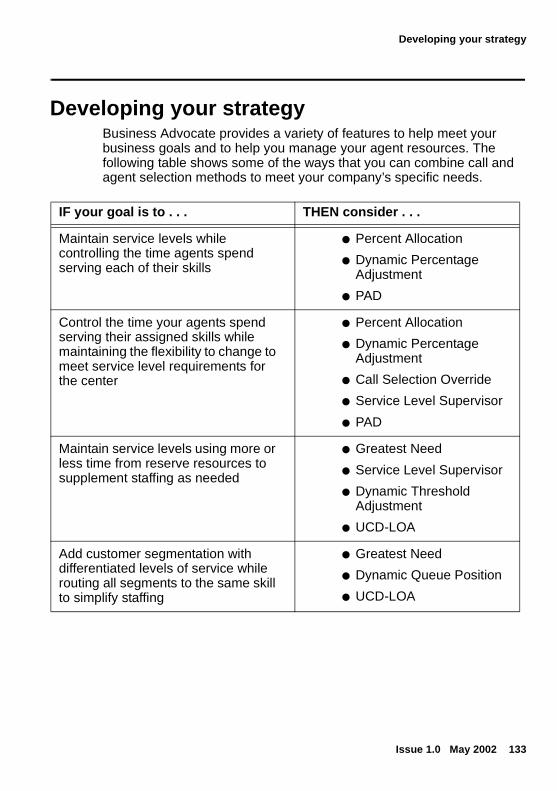
Developing your strategy
Issue 1.0 May 2002 133
Developing your strategyBusiness Advocate provides a variety of features to help meet your business goals and to help you manage your agent resources. The following table shows some of the ways that you can combine call and agent selection methods to meet your company’s specific needs.
IF your goal is to . . . THEN consider . . .
Maintain service levels while controlling the time agents spend serving each of their skills
● Percent Allocation
● Dynamic Percentage Adjustment
● PAD
Control the time your agents spend serving their assigned skills while maintaining the flexibility to change to meet service level requirements for the center
● Percent Allocation
● Dynamic Percentage Adjustment
● Call Selection Override
● Service Level Supervisor
● PAD
Maintain service levels using more or less time from reserve resources to supplement staffing as needed
● Greatest Need
● Service Level Supervisor
● Dynamic Threshold Adjustment
● UCD-LOA
Add customer segmentation with differentiated levels of service while routing all segments to the same skill to simplify staffing
● Greatest Need
● Dynamic Queue Position
● UCD-LOA
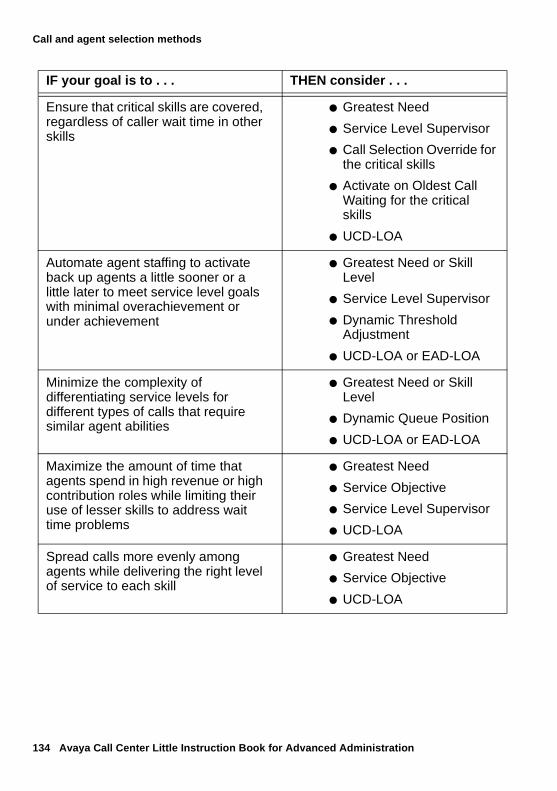
134 Avaya Call Center Little Instruction Book for Advanced Administration
Call and agent selection methods
Ensure that critical skills are covered, regardless of caller wait time in other skills
● Greatest Need
● Service Level Supervisor
● Call Selection Override for the critical skills
● Activate on Oldest Call Waiting for the critical skills
● UCD-LOA
Automate agent staffing to activate back up agents a little sooner or a little later to meet service level goals with minimal overachievement or under achievement
● Greatest Need or Skill Level
● Service Level Supervisor
● Dynamic Threshold Adjustment
● UCD-LOA or EAD-LOA
Minimize the complexity of differentiating service levels for different types of calls that require similar agent abilities
● Greatest Need or Skill Level
● Dynamic Queue Position
● UCD-LOA or EAD-LOA
Maximize the amount of time that agents spend in high revenue or high contribution roles while limiting their use of lesser skills to address wait time problems
● Greatest Need
● Service Objective
● Service Level Supervisor
● UCD-LOA
Spread calls more evenly among agents while delivering the right level of service to each skill
● Greatest Need
● Service Objective
● UCD-LOA
IF your goal is to . . . THEN consider . . .
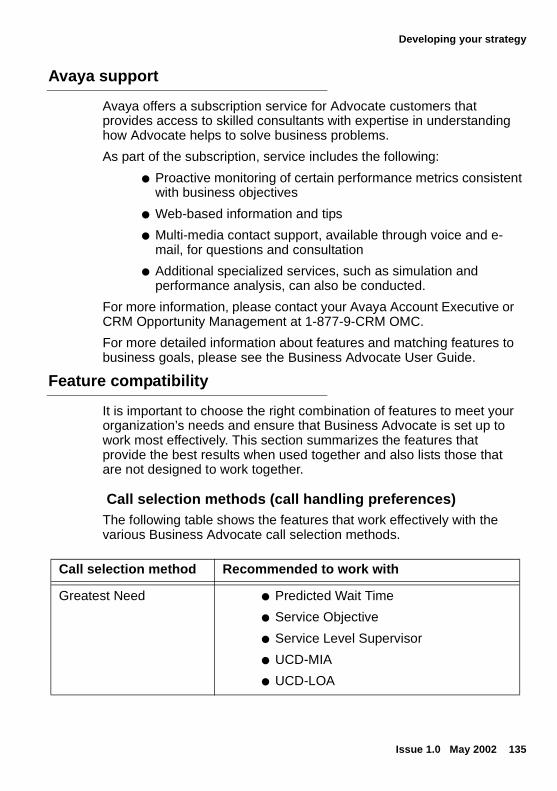
Developing your strategy
Issue 1.0 May 2002 135
Avaya support
Avaya offers a subscription service for Advocate customers that provides access to skilled consultants with expertise in understanding how Advocate helps to solve business problems.
As part of the subscription, service includes the following:
● Proactive monitoring of certain performance metrics consistent with business objectives
● Web-based information and tips
● Multi-media contact support, available through voice and e-mail, for questions and consultation
● Additional specialized services, such as simulation and performance analysis, can also be conducted.
For more information, please contact your Avaya Account Executive or CRM Opportunity Management at 1-877-9-CRM OMC.
For more detailed information about features and matching features to business goals, please see the Business Advocate User Guide.
Feature compatibility
It is important to choose the right combination of features to meet your organization’s needs and ensure that Business Advocate is set up to work most effectively. This section summarizes the features that provide the best results when used together and also lists those that are not designed to work together.
Call selection methods (call handling preferences)The following table shows the features that work effectively with the various Business Advocate call selection methods.
Call selection method Recommended to work with
Greatest Need ● Predicted Wait Time
● Service Objective
● Service Level Supervisor
● UCD-MIA
● UCD-LOA
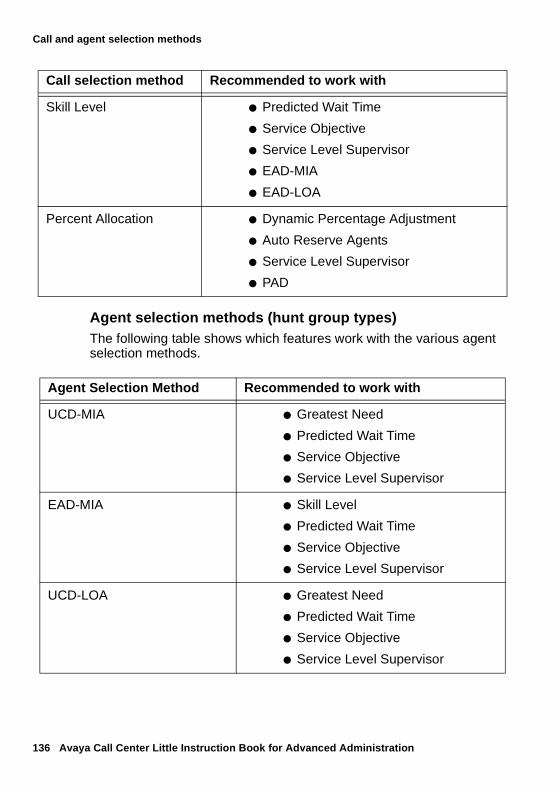
136 Avaya Call Center Little Instruction Book for Advanced Administration
Call and agent selection methods
Agent selection methods (hunt group types)The following table shows which features work with the various agent selection methods.
Skill Level ● Predicted Wait Time
● Service Objective
● Service Level Supervisor
● EAD-MIA
● EAD-LOA
Percent Allocation ● Dynamic Percentage Adjustment
● Auto Reserve Agents
● Service Level Supervisor
● PAD
Call selection method Recommended to work with
Agent Selection Method Recommended to work with
UCD-MIA ● Greatest Need
● Predicted Wait Time
● Service Objective
● Service Level Supervisor
EAD-MIA ● Skill Level
● Predicted Wait Time
● Service Objective
● Service Level Supervisor
UCD-LOA ● Greatest Need
● Predicted Wait Time
● Service Objective
● Service Level Supervisor
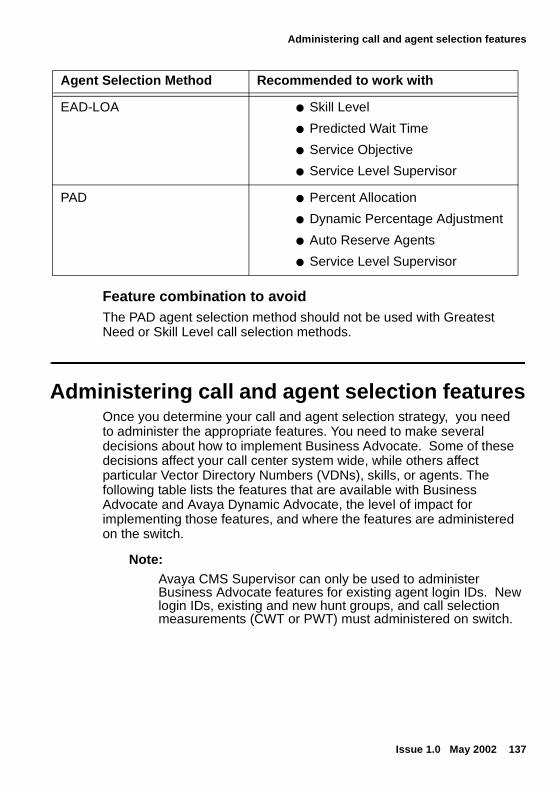
Administering call and agent selection features
Issue 1.0 May 2002 137
Feature combination to avoidThe PAD agent selection method should not be used with Greatest Need or Skill Level call selection methods.
Administering call and agent selection featuresOnce you determine your call and agent selection strategy, you need to administer the appropriate features. You need to make several decisions about how to implement Business Advocate. Some of these decisions affect your call center system wide, while others affect particular Vector Directory Numbers (VDNs), skills, or agents. The following table lists the features that are available with Business Advocate and Avaya Dynamic Advocate, the level of impact for implementing those features, and where the features are administered on the switch.
Note:Avaya CMS Supervisor can only be used to administer Business Advocate features for existing agent login IDs. New login IDs, existing and new hunt groups, and call selection measurements (CWT or PWT) must administered on switch.
EAD-LOA ● Skill Level
● Predicted Wait Time
● Service Objective
● Service Level Supervisor
PAD ● Percent Allocation
● Dynamic Percentage Adjustment
● Auto Reserve Agents
● Service Level Supervisor
Agent Selection Method Recommended to work with
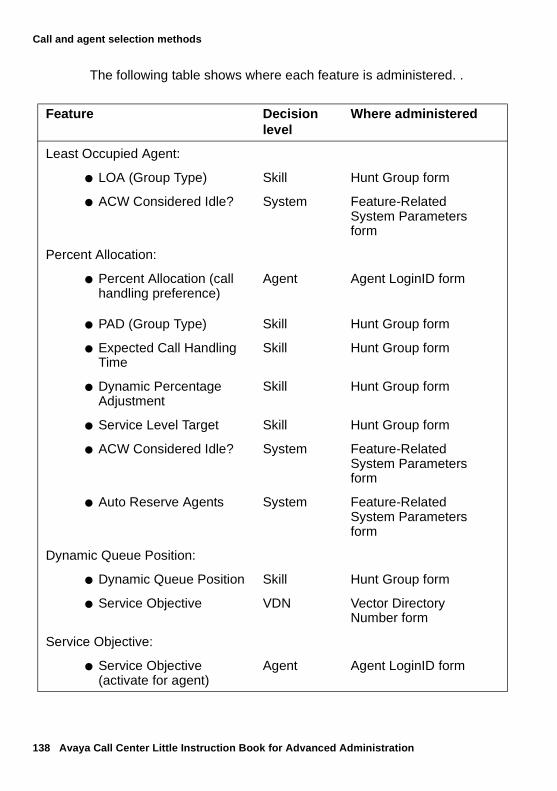
138 Avaya Call Center Little Instruction Book for Advanced Administration
Call and agent selection methods
The following table shows where each feature is administered. .
Feature Decision level
Where administered
Least Occupied Agent:
● LOA (Group Type) Skill Hunt Group form
● ACW Considered Idle? System Feature-Related System Parameters form
Percent Allocation:
● Percent Allocation (call handling preference)
Agent Agent LoginID form
● PAD (Group Type) Skill Hunt Group form
● Expected Call Handling Time
Skill Hunt Group form
● Dynamic Percentage Adjustment
Skill Hunt Group form
● Service Level Target Skill Hunt Group form
● ACW Considered Idle? System Feature-Related System Parameters form
● Auto Reserve Agents System Feature-Related System Parameters form
Dynamic Queue Position:
● Dynamic Queue Position Skill Hunt Group form
● Service Objective VDN Vector Directory Number form
Service Objective:
● Service Objective (activate for agent)
Agent Agent LoginID form
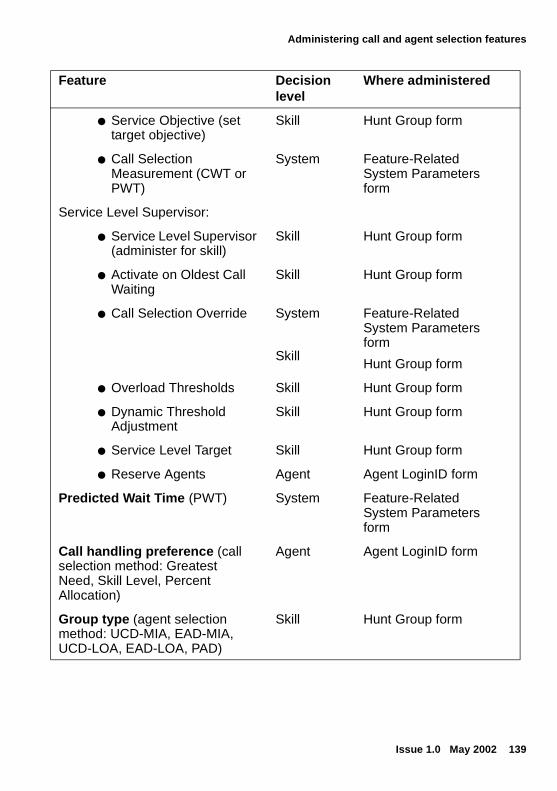
Administering call and agent selection features
Issue 1.0 May 2002 139
● Service Objective (set target objective)
Skill Hunt Group form
● Call Selection Measurement (CWT or PWT)
System Feature-Related System Parameters form
Service Level Supervisor:
● Service Level Supervisor (administer for skill)
Skill Hunt Group form
● Activate on Oldest Call Waiting
Skill Hunt Group form
● Call Selection Override System
Skill
Feature-Related System Parameters form
Hunt Group form
● Overload Thresholds Skill Hunt Group form
● Dynamic Threshold Adjustment
Skill Hunt Group form
● Service Level Target Skill Hunt Group form
● Reserve Agents Agent Agent LoginID form
Predicted Wait Time (PWT) System Feature-Related System Parameters form
Call handling preference (call selection method: Greatest Need, Skill Level, Percent Allocation)
Agent Agent LoginID form
Group type (agent selection method: UCD-MIA, EAD-MIA, UCD-LOA, EAD-LOA, PAD)
Skill Hunt Group form
Feature Decision level
Where administered
140 Avaya Call Center Little Instruction Book for Advanced Administration
Call and agent selection methods
Important notes about administration
Call and agent selection method are a direct result of how you administer Business Advocate. The following are examples of the effect your administration can have on Business Advocate features.
Call selection works in different ways, depending upon:
● Whether Current Wait Time (CWT) or Predicted Wait Time (PWT) is selected as a system-level parameter
● How the agents’ skills (standard and reserve) are administered on the Agent LoginID form
● Which call selection method (Greatest Need, Skill Level, or Percent Allocation) is administered for the agent on the Agent LoginID form
● Whether Service Objective is activated on the Agent LoginID form
● What (if any) overload thresholds are administered for the skills and what reserve skills are assigned to agents.
● Whether Dynamic Threshold Adjustment has been activated with Service Level Supervisor to automatically adjust overload thresholds.
● Whether Dynamic Percentage Adjustment has been activated with Percent Allocation to automatically adjust target allocations to help meet percent in service level goals.
● Whether Auto Reserve Agents has been activated to intentionally leave an agent idle in a skill when her work time in the skill exceeds her target allocation for the skill.
Agent selection works in different ways depending on:
● Whether after call work (ACW) is counted as idle or occupied time on the Feature-Related System Parameters form.
● Which Hunt Group method is administered for the skill on the Hunt Group form (EAD-LOA, EAD-MIA, UCD-LOA, UCD-MIA, or PAD).
For detailed instructions for administering Business Advocate features, please see the Business Advocate User Guide.

Where should I start?
Issue 1.0 May 2002 141
Where should I start? Release 9.1 of Dynamic Advocate permits businesses to more closely match their use of Advocate to their true operational needs. A company’s call center may need to implement different strategies in different parts of the call center. Listed below are the three most distinctive ways to characterize the approaches a call center can take with Dynamic Advocate. Additionally, call centers may want to include in their designs the enhanced customer segmentation possible with Dynamic Queue Position.
● Primary Focus: Percent in Service Level AchievementFor the formal or in-house Service Bureau style call center, the operational demand may be first and foremost to make the contractual “numbers”, which most often are defined as percent in service level targets for each type of call. Collective caller experience is the measure of success. Individual caller experience is significant only to the extent that the caller’s wait time doesn’t hurt the numbers. Over performance is not rewarded, but under performance may carry a penalty.● Primary Focus: Individual CallersFor other centers, managing by the “numbers” is not the focus. Traditional call center performance metrics may be a reference only to determining whether good staffing plans were in place and to evaluate trends. Instead, the goal for this center is to get each caller to the best agent possible, deviating only when necessary based on wait time problems that potentially affect individual callers. This focus on individual customers may best be served by using features found in the original release of Advocate. A center managed by Advocate in this way will see the results of individual caller focus in the collective metrics of the center, but the collective metrics are not used to create control.
● Combined Focus: Metrics and Individual Callers
Many call centers are interested in managing to achieve targets, such as a percent in service level, but also need to be sensitive to individual caller treatment. These centers can have both, using service level targets as the means to determine if Reserve Agents should be brought in a little sooner or a little later in order to keep performance on track. Individual caller experience will still be the trigger that determines if Reserves should be engaged.
142 Avaya Call Center Little Instruction Book for Advanced Administration
Call and agent selection methods
Help for Enhanced Customer Segmentation
All centers may have opportunities where differentiation can be enhanced, for example where higher value callers can gain access to agents quicker, without increasing agent differentiation. Any center may want to examine where Dynamic Queue Position might increase customer satisfaction or reduce caller abandonment for key customer segment while using only a single skill for call routing.
The Dynamic Queue Position feature can help segment skills further simply in terms of differentiating how quickly one segment is served relative to another. For example, customers who have pre-paid for technical support might be routed to the same technical support skill as customer who did not pre-pay, but those who pre-paid could be answered sooner. Rather than priority queue the pre-paying customers, an example would be to route the pre-paid callers through a VDN with a Service Objective of 20 seconds and route the other callers through a VDN with a Service Objective of 40 seconds. Both of these VDNs would route calls to the same technical support skill where the Dynamic Queue Position feature was enabled. On average each pre-paid caller will have one-half the wait of a caller that did not pre-pay. Yet both pre-paid and non pre-paid callers will be routed to the same skill, so agent administration is not affected.
Primary Focus: Percent in Service Level AchievementYour center wants to achieve its numbers with as little over performance or under performance as possible. Your design should use the enhanced Percent Allocation strategy.
The following can be used as the foundation for a design that focuses primarily on achieving service level targets for each skill. In this design, achievement of the collective measurement of percent in service level is the chief guiding factor. Call handling is adapted to maximize accomplishment of this measurement for each skill with minimal over and under performance. This accomplishment is enhanced for centers willing to permit a call to wait in queue while an agent who could take the call is kept available for another type of call that has not yet arrived.
Where should I start?
Issue 1.0 May 2002 143
How to administer – All the skills in the center, or in the part of the center using this strategy, needs to be of a group type of PAD, for percent allocation distribution. This in turn implies that all agents serving these skills should have a call handling presence of Percent Allocation.
Each skill should have a Service Level Target administered. These are of the type___% in ___ seconds, for example 85% in 15 seconds.
Each agent needs a Percent Allocation plan administered.
Dynamic Percentage Adjustment – Shift the agent’s percent allocation plans so that call handling adapts to the dynamic conditions in the center. By doing this, all targets are met as best as possible. For example, you won’t want agents sticking to a plan that is obsolete because an unexpected situation resulted in higher volumes of one type of call to arrive, and you don’t want to re-administer the plans in real time. Therefore, activate Dynamic Percentage Adjustment to allow an agent’s percent allocation plan to respond when a skill is experiencing over performance or under performance.
Auto Reserve Agents – Using Auto Reserve Agent will enhance how call handling adapts to make sure your center’s performance is on track with its goals. When an agent becomes available and the only call waiting is queued to a skill that the agent has had more than enough of according to the agent’s percent allocation plan, Auto Reserve Agent will keep that agent available. An agent may be auto reserved regardless of the performance of the skill. Only time in skill, versus allocation is checked.
The agent’s percent allocation plan will be adjusted dynamically in response to center performance on each skill. The allocation for the type of call that’s waiting would have been dropping if, for example, this type of call was over performing against the target. Keeping this agent available and the call waiting won’t hurt the metrics for the skill with a call in queue, but it creates the opportunity to get another one of the agent’s calls answered in zero seconds, helping achieve the target for that skill.
Allocation versus Skill level – If your auto reserve is set to secondary-only, an agent will never be auto reserved in a skill that is a primary skill for that agent. It could be auto reserved in a skill that was anything other than a primary skill, so primary and secondary is specified by skill level. The administration of skill level for auto reserve
144 Avaya Call Center Little Instruction Book for Advanced Administration
Call and agent selection methods
agents, affects the design. As far as which agent gets selected (excluding auto reserving), skill level doesn’t have any impact. When using a percent allocation design, think of skill level as an equivalent to being the allocations. the agent that you would have made skill level 1, you would give a higher allocation to. The agent you would have made skill level 16, you would have assigned a very small allocation to.
Alternatives for adapting this design further – This design could be adapted further by assigning reserve skills to agents. The Reserve skill will not have a percentage assigned in the agent’s percent allocation plan. Reserve agents will be made eligible when you activate call selection override for this skill. With this activated, when a skill is over threshold, the percent allocation algorithm is replaced with the “normal” call selection algorithm using time in queue, and so forth.
Auto Reserve Agents – Auto Reserve Agents is set to none, all, or secondary-only at the system level. If a choice of secondary-only is used, an agent will never remain idle while a call is waiting for a primary skill. Consequently, the choice of skill levels for each of an agent’s skills will have influence in the design. If an agent is very proficient in a skill and can contribute the most to the business by using that skill quite often, it is likely you would allocate a large percentage of time to that skill. The choice of skill levels will influence the design if you use secondary-only Auto Reserve Agents.
Primary Focus: Individual CallersYour center wants to be responsive to the needs of individual callers. Lack of accomplishment at a collective level should not result in a call being taken by a Reserve agent simply in order to improve a collective statistic, and an individual caller with a long wait time shouldn’t be ignored because the collective statistic was in an over performance level.
How to administration – In order to have a sensitivity to individual caller experiences, the design will use Service Objectives and Overload Thresholds defined for each skill. The Service Objectives set for each skill will define how urgent each type of call is relative to another. The Overload Thresholds should be set to a level that represents a caller wait time problem sufficient to warrant using Reserve Agents.
Where should I start?
Issue 1.0 May 2002 145
Agents will need to administer both standard and Reserve skills. The call handling preference of Greatest Need will permit Advocate the greatest ability to be responsive to caller wait times.
You will also need to assign a group type to each skill to determine how agent selection is performed. A choice of UCD-LOA will do the most to bring about fair workloads across the center.
Alternatives for adapting this design further – This design could be adapted further. If some agents perform better than others in a certain skill, and this difference in performance results in greater revenue per call, shorter calls, or higher customer satisfaction, consider either of the following:
● Use the skill level call handling preference and set skill levels to reflect each agent’s abilities. Use no more than two or three skill levels per agent, and make sure that two or more skills are present at each skill level. Not all agents need to be skill level agents. It may be beneficial for only agents who have superior abilities to work in this fashion. You may also consider whether an EAD-LOA method for agent selection would result in more proficient agents taking the calls that result in higher revenue.
● Concentrate each agent’s time on his or her highest performance skills and assign the less proficient skills to Reserve levels. Take into account that some agents may be over qualified or too costly to use routinely on some types of calls. These are perfect opportunities for using Reserve skills. An approach like this will work best with a Greatest Need call handling preference, or with just one or two skill levels defined in a Skill Level call handling preference.
Some centers have one or more types of calls for which agents are compensated per call. Collections departments are often run in this way, and agents want to get as many of these types of calls as possible. For these types of calls it can be beneficial to make the group types UCD-MIA or EAD-MIA in order that each agent have as fair a chance at getting the next call. This method will tend to create hot seats, but often this is not an issue when per-call compensation is a factor in recruiting or rewarding agents.
Combined Focus: Metrics and Individual CallersYour center wants to achieve its percent in service level goals but not to the extent that individual caller needs are minimized in relevance.
146 Avaya Call Center Little Instruction Book for Advanced Administration
Call and agent selection methods
You can strike a balance between achieving your metrics and being sensitive to individual caller experience using the features of Service Level Targets and Dynamic Threshold Adjustment.
How to administration – First, set Service Level Targets for each skill that represents the collective performance you want to achieve. Then set a single Overload Threshold at the number of seconds equal to the seconds in the Service Level Target. Activate Dynamic Threshold Adjustment in order that the Overload Thresholds can float up by as much as 200% of the administered level or float down to as little as 0% of the administered level. This adjustment lets Reserves engage a little later or a little sooner in order to achieve the collective performance you want, but the limits on how far they can be adjusted maintains focus at the individual caller level.
You will need to assign skills to agents, both standard skills and Reserve skills. A call handling preference of Greatest Need permits Advocate the greatest ability to manage against your targets as well as be sensitive to caller experience. A group type of UCD-LOA for each skill will permit as fair a distribution of workload as possible across the center.
If some agents perform better than others in a certain skill, and this difference in performance results in greater revenue per call or shorter calls or higher customer satisfaction, consider either of the following:
● Use the skill level call handling preference and set skill levels to reflect each agent’s abilities. Use no more than two or three skill levels per agent, and make sure that two or more skills are present at each skill level. Not all agents need to be skill level agents. It may be beneficial for only agents who have superior abilities to work in this fashion. You may also consider whether an EAD-LOA method for agent selection would result in more proficient agents taking the calls that result in higher revenue.
● Concentrate each agent’s time on his or her highest performance skills and assign the less proficient skills to Reserve levels. Take into account that some agents may be over qualified or too costly to use routinely on some types of calls and these are natural cases for using Reserve skills. An approach like this will be best with a Greatest Needs call handling preference, or with just one or two skill levels defined in a Skill Level call handling preference.
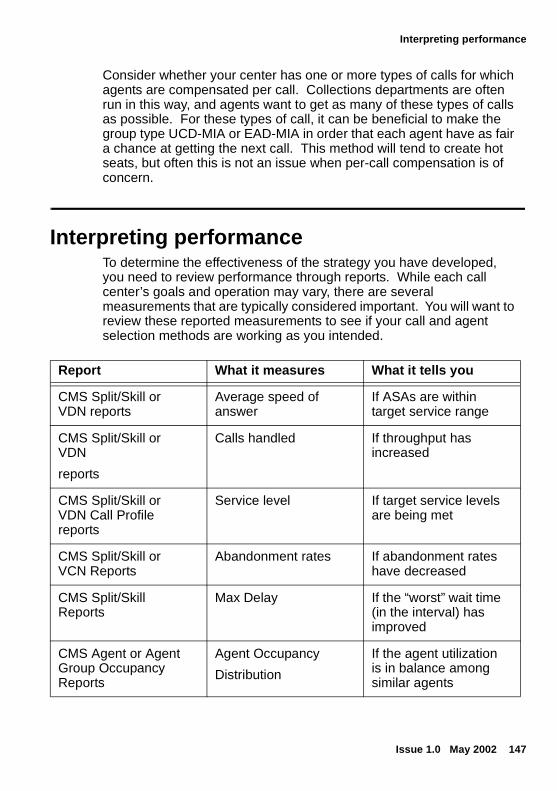
Interpreting performance
Issue 1.0 May 2002 147
Consider whether your center has one or more types of calls for which agents are compensated per call. Collections departments are often run in this way, and agents want to get as many of these types of calls as possible. For these types of call, it can be beneficial to make the group type UCD-MIA or EAD-MIA in order that each agent have as fair a chance at getting the next call. This method will tend to create hot seats, but often this is not an issue when per-call compensation is of concern.
Interpreting performanceTo determine the effectiveness of the strategy you have developed, you need to review performance through reports. While each call center’s goals and operation may vary, there are several measurements that are typically considered important. You will want to review these reported measurements to see if your call and agent selection methods are working as you intended.
Report What it measures What it tells you
CMS Split/Skill or VDN reports
Average speed of answer
If ASAs are within target service range
CMS Split/Skill or VDN
reports
Calls handled If throughput has increased
CMS Split/Skill or VDN Call Profile reports
Service level If target service levels are being met
CMS Split/Skill or VCN Reports
Abandonment rates If abandonment rates have decreased
CMS Split/Skill Reports
Max Delay If the “worst” wait time (in the interval) has improved
CMS Agent or Agent Group Occupancy Reports
Agent Occupancy
Distribution
If the agent utilization is in balance among similar agents
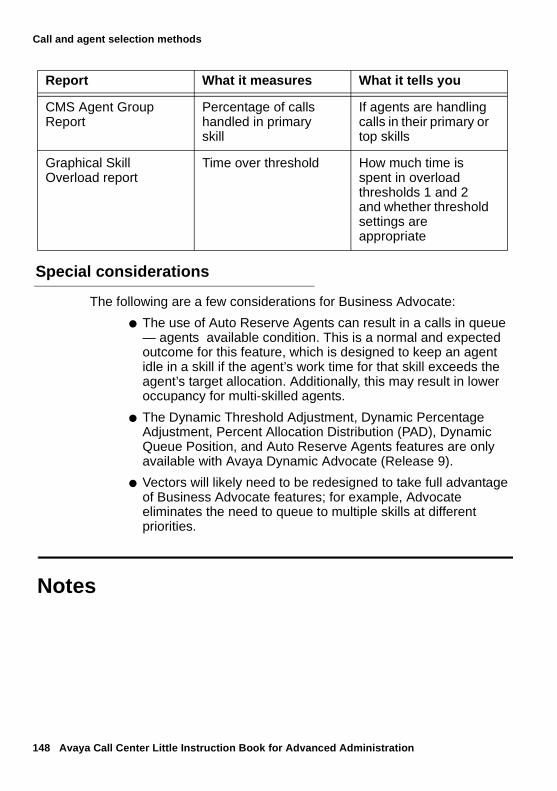
148 Avaya Call Center Little Instruction Book for Advanced Administration
Call and agent selection methods
Special considerations
The following are a few considerations for Business Advocate:
● The use of Auto Reserve Agents can result in a calls in queue — agents available condition. This is a normal and expected outcome for this feature, which is designed to keep an agent idle in a skill if the agent’s work time for that skill exceeds the agent’s target allocation. Additionally, this may result in lower occupancy for multi-skilled agents.
● The Dynamic Threshold Adjustment, Dynamic Percentage Adjustment, Percent Allocation Distribution (PAD), Dynamic Queue Position, and Auto Reserve Agents features are only available with Avaya Dynamic Advocate (Release 9).
● Vectors will likely need to be redesigned to take full advantage of Business Advocate features; for example, Advocate eliminates the need to queue to multiple skills at different priorities.
Notes
CMS Agent Group Report
Percentage of calls handled in primary skill
If agents are handling calls in their primary or top skills
Graphical Skill Overload report
Time over threshold How much time is spent in overload thresholds 1 and 2 and whether threshold settings are appropriate
Report What it measures What it tells you
Issue 1.0 May 2002 149
Index
Symbols% ACD Time . . . . . . . . . . . . . 80
Aabandoned calls . . . . . . . . . . . 80abandonment rate . . . . . . . . . . 65ACD Calls . . . . . . . . . . . . . . 80activation of reserve agents . . . . . 130add best-service-routing. . . . . . . 100adding
agents to skills . . . . . . . . . 32, 36adjunct routing . . . . . . . . . . 72, 77Adjunct-Switch Application Interface . . 72administering
call and agent selection features. . 137Call Vectoring . . . . . . . . . . . 74multi-site BSR applications . . . . . 98multi-site ELAI . . . . . . . . . . . 85
Administration documents . . . . . . . 20Advocate . . . . . . . . . . . . 72, 109
administering call and agent selection fea-tures . . . . . . . . . . . . . . 137
agent selection examples . . . . . 124call handling preferences . . . . . 112call selection . . . . . . . . . . . 110call selection examples . . . . . . 117cautions . . . . . . . . . . . . . 148enhanced customer segmentation . 142feature compatibility . . . . . . . 135fine-tuning . . . . . . . . . . . . 147performance . . . . . . . . . . . 147Service Objective. . . . . . . . . 113support . . . . . . . . . . . . . 135where should I start? . . . . . . . 141
agent occupancy . . . . . . . . . . . 96
Agent Occupancy Reports . . . . . . 96agent selection methods . . . . . . 121
features that work together . . . . 136least occupied agent . . . . . . . 122most idle agent. . . . . . . . . . 122Percent Allocation Distribution . . 123percent allocation distribution . . . 123
agent selection strategy, entering . . 103agent selection, examples . . . . . 124agent template . . . . . . . . . . . . 30agent trace
activating . . . . . . . . . . . . . 37listing . . . . . . . . . . . . . . . 38records . . . . . . . . . . . . . . 37report . . . . . . . . . . . . . . . 39stop . . . . . . . . . . . . . . . . 37
agent’s skilldeleting . . . . . . . . . . . . . . 29viewing . . . . . . . . . . . . . . 25
agent’s skill assignmentchanging . . . . . . . . . . . . . 27
allocation, data storage . . . . . . . . 56allow VDN override . . . . . . . . . 102announcement . . . . . . . . . . . . 77Application Plan, fields . . . . . . . 101Archiver . . . . . . . . . . . . . . . 58ASA . . . . . . . . . . . . . . . . . 65ASAI. . . . . . . . . . . . . . . . . 72assigning call work codes . . . . . . . 41auto reserve agents . . . . . . . . 132automated agent staffing adjustments
Service Level Supervisor . . . . . 129Average Speed of Answer (ASA) . . . 65
BBest Service Routing . . . . . . . . . 72book conventions. . . . . . . . . . . 13branching, conditional . . . . . . . . 67
150 Avaya Call Center Little Instruction Book for Advanced Administration
branching, unconditional. . . . . . . . 67BSR . . . . . . . . . . . . . . . . 103
administering . . . . . . . . . . . . 98agent selection strategy . . . . . . 103Application Plan fields. . . . . . . 101creating an Application Plan . . . . 100creating elements of the Application
Plan . . . . . . . . . . . . . . . 99description . . . . . . . . . . . . . 72forms . . . . . . . . . . . . . . . 98how it works . . . . . . . . . . . . 98linking an Application Plan to a
primary VDN . . . . . . . . . . 102maintenance . . . . . . . . . 105, 106using with CentreVu Advocate . 107, 108vector commands. . . . . . . . . 103what is . . . . . . . . . . . . . . . 97writing vectors . . . . . . . . . . 104
busy . . . . . . . . . . . . . . . 77, 89Busy Hour . . . . . . . . . . . . . . 81Busy Hour by VDN Report . . . . . . . 81Busy/Disconnects . . . . . . . . . . . 81
Ccall acceptance vector commands . . . 88call and agent selection features,
administering . . . . . . . . . . . 137call denial vector commands . . . . . . 89call handling preference . . . . . . . 112
changing . . . . . . . . . . . . . . 29Greatest Need . . . . . . . . . . 112Percent Allocation . . . . . . . . 113Skill Level . . . . . . . . . . . . 112
call handling preferencesfeatures that work together . . . . 135where administered . . . . . . . . 139
Call Profile report . . . . . . . . . . . 80call profile setup . . . . . . . . . . . 44
Call Prompting . . . . . . . . . . . . 65call selection
description . . . . . . . . . . . . 110examples . . . . . . . . . . . . 117measurements . . . . . . . . . . 111
Call Selection Override . . . . . . . 114overview . . . . . . . . . . . . . 114
call vector . . . . . . . . . . . . . . 66Call Vector form . . . . . . . . . . . 75Call Vectoring
administering for EAS. . . . . . . . 75administering for non-EAS . . . . . 74description . . . . . . . . . . . . . 63interpreting performance . . . . . . 80
call work codesassigning . . . . . . . . . . . . . 41reports . . . . . . . . . . . . . . . 43
call work codes (CWC) . . . . . . . . 41cautions, Advocate . . . . . . . . . 148centralized system . . . . . . . . . . 98CentreVu Advocate . . . . . . . 65, 109
definition . . . . . . . . . . . . . 109CentreVu Network Reporting . . . . 107Change Agent Skills window. . . . . . 27changing
agent’s skill assignment. . . . . . . 27call handling preference. . . . . . . 29CMS state . . . . . . . . . . . . . 51data storage allocation . . . . . . . 54direct agent skill . . . . . . . . . . 29extension split assignments . . . . . 33multi-agent skill. . . . . . . . . . . 30skill level . . . . . . . . . . . . . . 32top skill . . . . . . . . . . . . . . 29VDN skill preferences. . . . . . . . 43VDN-to vector assignments . . . . . 47
check skill . . . . . . . . . . . . . . 77check split . . . . . . . . . . . . . . 88
Issue 1.0 May 2002 151
CMS statemulti-user mode . . . . . . . . . . 52single-user mode . . . . . . . . . . 52
collect ced/cdpd digits. . . . . . . . . 89collect digits . . . . . . . . . . . 77, 88commands, vector . . . . . . . . . . 77conditional branching . . . . . . . . . 67consider . . . . . . . . . . . . . . . 89consider location . . . . . . . . . . 105consider skill/location . . . . . . . . . 77converse-on skill . . . . . . . . . . . 77converse-on split . . . . . . . . . . . 88counted-calls . . . . . . . . . . . . . 70creating a BSR Application Plan . . . 100Current Wait Time (CWT) . . . . . . 111CWC. . . . . . . . . . . . . . . . . 41CWC1 . . . . . . . . . . . . . . . . 42CWT . . . . . . . . . . . . . . . . 111
Ddaily data. . . . . . . . . . . . . . . 58Daily Multi-ACD Call Flow by VDN Report81daily start time . . . . . . . . . . . . 61daily stop time . . . . . . . . . . . . 61data collection . . . . . . . . . . . . 53
turning off and on. . . . . . . . . . 53Data Collection window . . . . . . . . 52data storage
capacities . . . . . . . . . . . . . 56modifying . . . . . . . . . . . . . 54warnings . . . . . . . . . . . . . . 54
Data Storage Allocation window . . . . 55data summarizing . . . . . . . . . . . 57
daily . . . . . . . . . . . . . . . . 58monthly . . . . . . . . . . . . . . 58weekly . . . . . . . . . . . . . . . 58
data summarizing time . . . . . . . . 61defining service levels. . . . . . . . . 44deleting
agent’s skill . . . . . . . . . . . . 29Dialed Number Identification Service . . 74
direct agent skill, changing . . . . . . 29disconnect . . . . . . . . . . . . 77, 88display events . . . . . . . . . . . . 79distributed system . . . . . . . . . . 98DNIS . . . . . . . . . . . . . . . . 74Documentation Web sites . . . . . . . 22Dynamic Percentage Adjustment
example . . . . . . . . . . . . . 131Dynamic Queue Position . . . . . . .116
overview. . . . . . . . . . . . . .116where administered . . . . . . . 138
Dynamic Threshold Adjustment . . . 130
EEAD-LOA . . . . . . . . . . . 128, 137
example . . . . . . . . . . . . . 124EAD-MIA . . . . . . . . . . . 128, 136
example . . . . . . . . . . . . . 125EAS . . . . . . . . . . . . . . . . . 65ELAI
administering multi-site . . . . . . . 85description. . . . . . . . . . . . . 71maintenance . . . . . . . . . . . . 95single queue configuration . . . . . 84tandem switch configuration . . . . 84troubleshooting . . . . . . . . . . 97
Enhanced Look-Ahead Interflow. . . . 71Error Log Reports . . . . . . . . . . 54EWT. . . . . . . . . . . . . . .68, 129Expected Wait Time
list changes . . . . . . . . . . . . 79Expected Wait Time (EWT) . . . . . 129
description. . . . . . . . . . . . . 68expected-wait . . . . . . . . . . . . 68Expert Agent Selection (EAS) . . . . . 65extension assignments . . . . . . . . 35extension split assignment
changing . . . . . . . . . . . . . 33extensions
moving between splits . . . . . . . 35
152 Avaya Call Center Little Instruction Book for Advanced Administration
Ffeature compatibility
features that work together . . 135, 136Feature-Related Parameters form . . . 92First in/First out (FIFO) . . . . . . . . 84flow, sequential . . . . . . . . . . . . 66Flowins . . . . . . . . . . . . . . . . 80Flowouts . . . . . . . . . . . . . . . 80form
Display Events . . . . . . . . . . 106Feature-Related System Parameters. 99
Free Space Allocation window . . . . . 59
Ggoto . . . . . . . . . . . . . . . . . 85goto step . . . . . . . . . . . . . . . 77goto vector . . . . . . . . . . . . . . 77Graphical Skill Overload Report . . . 148Greatest Need . . . . . . . . . . . 135
description . . . . . . . . . . . . 112example with Service Objective . . 118example without Service Objective . 118
Greatest Need with Service Objective 127Greatest Need without Service
Objective . . . . . . . . . . . . . 127
HHardware documents . . . . . . . . . 19help
accessing . . . . . . . . . . . . . 13Historical Agent Trace Report . . . . . 39Historical Call Work Code Report . . . 43holiday vectoring . . . . . . . . . . . 69http
//support.lucent.com . . . . . . . . 23hunt group types . . . . . . . . . . 139
Iinflow vector . . . . . . . . . . . . . 87Interflow VDN field . . . . . . . . . 102interflow vector . . . . . . . . . . . 104Interflow, Lookahead . . . . . . . . . 83interflow-qpos command . . . . . . . 90Interflow-Qpos EWT Threshold field . . 92intrahour interval . . . . . . . . . . . 61
LLAI . . . . . . . . . . . . . . . . . 71LASTCWC . . . . . . . . . . . . . . 42Least Occupied Agent (LOA) . . . . 122
where administered. . . . . . . . 138linking an Application Plan to a
primary VDN . . . . . . . . . . . 102list history . . . . . . . . . . . . . . 79list trace ewt . . . . . . . . . . . . . 79list trace vec . . . . . . . . . . . . . 79listing agent trace data . . . . . . . . 38LOA
Expert Agent Distribution (EAD-LOA)123overview . . . . . . . . . . . . . 122Uniform Call Distribution (UCD-LOA)123
Location Name field. . . . . . . . . 101Look-Ahead Interflow . . . . . . . . . 71lookahead interflow attempts . . . . . 96lookahead interflow completions . . . . 96
Mmaintenance
BSR . . . . . . . . . . . . . 105, 106Call Vectoring . . . . . . . . . . . 79ELAI . . . . . . . . . . . . . . . . 95
maintenance requests. . . . . . . . . 23making adjustments
Advocate . . . . . . . . . . . . 148

Issue 1.0 May 2002 153
master ACD . . . . . . . . . . . . . 51messaging skill . . . . . . . . . . . . 77messaging split . . . . . . . . . . . . 88MIA
Expert Agent Distribution (EAD-MIA) 122overview . . . . . . . . . . . . . 122Uniform Call Distribution (UCD-MIA) 122
minimum EWT threshold . . . . . . . 92minimum expected wait time, setting . . 92Most Idle Agent (MIA) . . . . . . . . 124moving
extensions between splits . . . . . . 35multi-agent skill, changing . . . . . . . 30Multiple Skill Queuing . . . . . . . . . 71multi-user mode . . . . . . . . . . . 52
NNum field. . . . . . . . . . . . . . 101Number of Agents Staffed . . . . . . . 80
Ooldest-call wait . . . . . . . . . . . . 94outflow vector . . . . . . . . . . . . 85overload thresholds . . . . . . . . . 129
assigning . . . . . . . . . . . . 130
PPercent Allocation . . . . . 27, 127, 136
Auto Reserve Agents . . . . . . . 132description . . . . . . . . . . . . 113example . . . . . . . . . . . . . 120where administered. . . . . . . . 138
Percent Allocation Distribution (PAD) . . . . . . . . . 123, 128, 137example . . . . . . . . . . . . . 126
phantom call . . . . . . . . . . . . . 97Predicted Wait Time (PWT) . . . . . 111
where administered. . . . . . . . 139
primary vector . . . . . . . . . . . 103publications center . . . . . . . . . . 14PWT. . . . . . . . . . . . . . . . . 111
Qqpos. . . . . . . . . . . . . . . . . 91queue position . . . . . . . . . . . . 91queue-to skill/best . . . . . . . . . . 78queue-to split . . . . . . . . . . 88, 90queuing, multiple skill . . . . . . . . . 71
RRelated documents . . . . . . . . . . 14reply-best . . . . . . . . . . . . 78, 89report
Agent Occupancy . . . . . . . . . 96Call Profile. . . . . . . . . . . . . 80Error Log . . . . . . . . . . . . . 54Graphical Skill Overload . . . . . 148Multi-ACD Call Flow by VDN . . . . 81Split Skill by Interval . . . . . . . . 80Split/Skill . . . . . . . . . . . . . 44Trunk Group Members . . . . . . . 46Trunk Group Summary by Interval. . 81VDN Call Profile . . . . . . . . . . 44Vector Configuration . . . . . . . . 48
reserve agents . . . . . . . . . . . 129activating . . . . . . . . . . . . 130
reserve skills . . . . . . . . . . . . 130Rolling Average Speed of Answer . . . 70rolling-asa . . . . . . . . . . . . . . 70route-to . . . . . . . . . . . 78, 85, 88route-to digits with coverage . . . . . 94route-to number with coverage . . . . 94routing
adjunct . . . . . . . . . . . . . . 72Best Service . . . . . . . . . . . . 72CentreVu Virtual . . . . . . . . . . 83
154 Avaya Call Center Little Instruction Book for Advanced Administration
Sselecting elements of BSR Application
Plan . . . . . . . . . . . . . . . . 99sequential flow . . . . . . . . . . . . 66service level
defining . . . . . . . . . . . . . . 44reports . . . . . . . . . . . . . . . 44
Service Level Supervisor . . . . . . 129description . . . . . . . . . . . . 117Dynamic Threshold Adjustment . . 130reserve agents . . . . . . . . . . 129where administered . . . . . . . . 139
Service Level Supervisor Call Selection Override . . . . . . . . . 114
service level target . . . . . . . . . 131Service Objective . . . . . . . . . . 113
where administered . . . . . . . . 138Service Observe . . . . . . . . . . . 79setting the minimum Expected
Wait Time . . . . . . . . . . . . . . 92setting user adjustments. . . . . . . 105single-user mode . . . . . . . . . . . 52Skill Level . . . . . . . . . . . . . 136
description . . . . . . . . . . . . 112example with Service Objective . . 120example without Service Objective . 119
Skill Level with Service Objective. . . 127Skill Level without Service Objective . 127skill level, changing . . . . . . . . 32, 36Skill List . . . . . . . . . . . . . 31, 36Split Skill by Interval Report . . . . . . 80Split/Skill Report . . . . . . . . . . . 44Status Poll VDN field . . . . . . . . 102status poll vector . . . . . . . . . . 104stop . . . . . . . . . . . . . . . 78, 90storage intervals . . . . . . . . . . . 60Storage Intervals window . . . . . . . 60summarizing data . . . . . . . . . . . 57Switch documents. . . . . . . . . . . 20switch information, viewing . . . . . . 62
Switch Node field . . . . . . . . . . 101switch setup . . . . . . . . . . . . . 62Switch Setup window . . . . . . . . . 62switch time zone offset . . . . . . . . 61
Ttalk time . . . . . . . . . . . . . . . 65timetable . . . . . . . . . . . . . . . 47top skill, changing. . . . . . . . . . . 29trace vdn . . . . . . . . . . . . . . . 79tracing an agent’s call activity . . . . . 37troubleshooting, ELAI . . . . . . . . . 97trunk group members . . . . . . . . . 46Trunk Group Members Report . . . . . 46Trunk Group Summary by Interval
Report . . . . . . . . . . . . . . . 81turning data collection off and on. . . . 53
UUCD-LOA . . . . . . . . . . . 128, 136
example . . . . . . . . . . . . . 125UCD-MIA. . . . . . . . . . . . 128, 136
example . . . . . . . . . . . . . 126unconditional branching . . . . . . . . 67Upgrade documents . . . . . . . . . 16
VVDN . . . . . . . . . . . . . . . . . 66
assignments . . . . . . . . . . . . 47busy hour report . . . . . . . . . . 81description . . . . . . . . . . . . . 66historical report. . . . . . . . . . . 80multi-ACD Call Flow Report . . . . . 81service observe . . . . . . . . . . 79skill preferences, changing . . . . . 43
VDN Activity . . . . . . . . . . . . . 81VDN Call Profile Report . . . . . . . . 44VDN Calls . . . . . . . . . . . . . . 70
Issue 1.0 May 2002 155
vector . . . . . . . . . . . . . . . . 66call acceptance commands . . . . . 88call denial commands. . . . . . . . 89commands . . . . . . . . . . . . . 77configurations . . . . . . . . . . . 48inflow . . . . . . . . . . . . . . . 87interflow . . . . . . . . . . . . . 104list changes . . . . . . . . . . . . 79maintenance . . . . . . . . . . . . 79outflow. . . . . . . . . . . . . . . 85primary . . . . . . . . . . . . . 103reports . . . . . . . . . . . . . 79, 80samples . . . . . . . . . . . . . 103status poll . . . . . . . . . . . . 104trace call flow . . . . . . . . . . . 79tracking events . . . . . . . . . . . 79
vector commands. . . . . . . . . . 103Vector Configuration Report . . . . . . 48Vector Contents window. . . . . . . . 75Vector Directory Number (VDN) . . . . 66Vector Editor . . . . . . . . . . . . . 75vector events . . . . . . . . . . . . . 79vector,call . . . . . . . . . . . . . . 66vectoring, call. . . . . . . . . . . . . 63vectors . . . . . . . . . . . . . . . . 66
holiday. . . . . . . . . . . . . . . 69writing . . . . . . . . . . . . . . . 75writing, BSR . . . . . . . . . . . 104
viewingagent skill . . . . . . . . . . . . . 25free space . . . . . . . . . . . . . 59storage intervals . . . . . . . . . . 60switch information . . . . . . . . . 62trunk group members . . . . . . . . 46vector configurations . . . . . . . . 48
Wwait-time . . . . . . . . . . . . . 78, 88wait-time hearing i-silent . . . . . . . 88warnings,data storage . . . . . . . . 54web access to support . . . . . . . . 23week start day . . . . . . . . . . . . 61week stop day . . . . . . . . . . . . 61weekly data . . . . . . . . . . . . . 58window
Activate Agents Trace . . . . . . . 37Call Profile Setup . . . . . . . . . 44Call Work Codes . . . . . . . . . . 41Change Agents Skills. . . . . . . . 27Change Extension Split
Assignments . . . . . . . . . . . 33Change VDN Skill Preferences . . . 43CMS State. . . . . . . . . . . . . 51Data Collection. . . . . . . . . 52, 53Data Storage Allocation . . . . . . 54Data Summarizing . . . . . . . . . 57Free Space Allocation . . . . . . . 59List Agents Traced . . . . . . . . . 38Move Extensions Between Splits . . 35Multi-Agent Skill Change . . . . . . 30Storage Intervals . . . . . . . . . . 60Switch Setup. . . . . . . . . . . . 62System Setup . . . . . . . . . . . 51VDN Assignments . . . . . . . . . 47Vector Contents . . . . . . . . . . 75
writing BSR vectors. . . . . . . . . 104writing vectors . . . . . . . . . . . . 75

156 Avaya Call Center Little Instruction Book for Advanced Administration