aviation science activities for children · pdf fileaviation science activities ......
TRANSCRIPT
1
Revised 1983
Aviation Science Activitiesfor Elementary GradesU.S. Department
of Transportation
Federal AviationAdministration
GA-20-30-30 Office of Public AffairsAviation Education ProgramsWashington, D.C. 20591

ACKNOWLEDGMENT
For the compilation of the material in this book and the research required,the Civil Air Patrol is indebted to the earnest, fair minded teachers who were apart of the Curriculum Laboratory at the National Aviation EducationWorkshop held at Miami University, Oxford, Ohio. From their own experiencethey knew the needs of the classrooms and willingly and happily gave of theirexperience as well as of their time from school vacations. No one regional needis recognized above another, for on this small committee alone are representedthe States of Hawaii, Indiana, Ohio, and New York, and the Commonwealth ofPuerto Rico.
The ideas for illustrating the demonstration aids are theirs also, but certain ofthe drawings as they appear in the manual are the work of A/2C James E.Tapp, Headquarters Civil Air Patrol, and to him also is offered here ourappreciation. Appreciation is also due Juanita Hilton for editing and combininginto one book the several basic manuscripts prepared by the committee.
Introduction: FROM TEACHER TO TEACHER
This manual is meant to be a springboard toward your own ideas fordemonstrating concepts of the Air Age to your children, whatever the gradelevel. Even little children can learn scientific principles through simple teachingaids; older pupils can benefit by a review using the same demonstrations. Insome instances, these aids may be set up by the teacher; in others, by thechildren as a group project; in still others, by each child with a minimum ofteacher direction.
Many of these suggestions we have used in our own classrooms. All of themwe feel to be of value in illustrating the principles involved. They are not new.Similar demonstrations and experiments may be found scattered throughoutnumerous books, but we have tried to assemble in one manual those we believeto be most helpful to the teacher in introducing her pupils to natural science.We do not pretend to cover the field, but trust in the ingenuity of our fellow-teachers to enlarge upon our beginnings.
Learn as you teach, and have fun!
The Committee:Mary ColemanRamon GonzalesElizabeth HarrisRobert K. IwamuraWathen D. Leasor

CONTENTS
Page
Prologue: WHAT IS AN AIRPLANE?
I. PROPERTIES OF AIR
Air Takes Up Room .............................................................................. 1
Air Has Weight...................................................................................... 3
Air Has Pressure.................................................................................... 3
Air Moves ............................................................................................. 5
Heat Causes Air to Expand.................................................................... 6
Air Contains Moisture ........................................................................... 7
Warm Air Holds More Moisture Than Cold Air..................................... 7
Air Holds Some Things Up.................................................................... 8
Some Things Fly in the Air.................................................................... 9
II. WHAT MAKES AN AIRPLANE FLY?
Wings.................................................................................................. 11
Propellers ............................................................................................ 13
The Jet Airplane .................................................................................. 14
How Is a Plane Controlled? ................................................................. 14
The Wind Tunnel................................................................................. 16
III. WEATHER IS IMPORTANT TO AVIATION
General Weather Conditions................................................................ 19
Wind ................................................................................................... 20
Temperature ........................................................................................ 24
Moisture in the Air .............................................................................. 28
Atmospheric Pressure.......................................................................... 31

It has a body;
and a flat tail;
and wings;
and feet.
An airplane is something like a bird—

Prologue: WHAT IS AN AIRPLANE?
and a dorsal fin;
So when we put the bird parts and the fishparts together we have an airplane.
Then we give it an engine to make itgo and a pilot to steer it.
It is also something like a fish—

1
I PROPERTIES OF AIR
"What is it that you can touchBut cannot feel;That has no size or shapeBut still is real?"
AIR TAKES UP ROOM
1. Equipment:
Soda pop bottleSmall funnelSoda strawModeling clayCupful of water
Seal the funnel tightly into the neck of the bottle withmodeling clay. Pour the cup of water into the funnelquickly. The water stays in the funnel because the air inthe bottle cannot get out.
Pass the straw through the funnel into the bottle.Suck out a mouthful of air. Some of the water goes downinto the bottle, taking the place of the air sucked out.
2. Equipment:
Wide-necked bottle or jar with an air-tight lidSoda strawModeling claySmall balloonThread
Blow the balloon up just enough to fit very loosely inthe bottle. Tie a thread around the neck of the balloon sothe air will not escape. Drop the balloon into the bottle.Punch a hole in the lid and insert the straw; seal it withmodeling clay. Screw the lid on the bottle. Suck some ofthe air out of the bottle through the straw and clamp yourfinger over the top of the straw to prevent air fromrushing back into the bottle. The balloon gets largerbecause the air inside the balloon expands as the airpressure decreases in the bottle.

2
3. Equipment:
Water glassCorkLarge glass bowlFacial tissue
Fill the bowl about three-fourths full of water. Dropthe cork on top of the water. Invert the glass over thecork and push to the bottom of the bowl. The cork goesto the bottom of the bowl under the glass. Air in the glasskeeps the water out.
Remove the glass and the cork. Stuff facial tissue intothe bottom of the glass. Invert the glass and push to thebottom of the bowl. The tissue doesn’t get wet.
4. Equipment:
2 water glassesLarge dish pan or other container filled with water
Air, like water, is fluid-you can pour it. Place oneglass into the container so that it fills with water. Place asecond glass into the water upside down so that the airdoes not escape. Carefully tilt the air-filled glass underthe water-filled glass. By doing this, you can pour the airup in bubbles. Each bubble is a little package of airmade visible by being in the water. With a little practiceyou can keep pouring the air back and forth between theglasses without losing any of it.
5. Equipment:
Soda pop bottlePan of water
Put the bottle into the pan so that it fills up withwater. Before the water can get into the bottle, air mustflow out. Watch the air bubbles as they rise to thesurface of the water.

3
6. Equipment:
Round balloonLong balloonBasketballFootballInner tubePaper bagPlastic bagSoap and waterBubble pipe
Blow air into a round balloon and into a long balloon.Put air into a basketball, a football, and an inner tube.Blow air into a paper bag. Catch some air in a plasticbag. Blow soap bubbles.
Air takes up room and assumes the shape of the objectinto which it is blown or into which it flows.
AIR HAS WEIGHT
7. Equipment:
Wooden dowel stock or tinker toy stick about a foot longString, 1 yard2 balloons exactly alike
Blow up the balloons to the same size, and tie them attheir necks with a piece of string. Tie one balloon to eachend of the dowel stock. Attach another piece of string tothe center of the dowel stock and suspend it from someconvenient place. Balance the dowel stock. Prick oneballoon with a pin. As the air rushes out, the prickedballoon shoots up and the heavier, air-filled one dropsdown.
8. Equipment:
Football or basketballGood scale
Squeeze all the air possible out of the ball; then weighthe ball. Blow the ball up again and weigh it. Theinflated ball should weight a few ounces more.
9. Equipment:
Wooden uprightRod about 4 feet longPail Sand or gravelDeflated ball (basketball, volleyball, or soccerball)Bicycle pump
Nail the rod at the center to the upright. Suspenddeflated hall at one end and the pail at the other. Usingthe sand, balance the two. Inflate the ball, pumping asmuch air as the ball will take. Replace it.
The ball pulls down and unbalances the pail of sand,showing that air does have weight.
AIR HAS PRESSURE
Since moving air particles have weight, they presswith force against whatever they touch. Air pressesupward, downward, sideways-every way. Air presses on

4
all sides of our bodies, but we do not notice it becauseour bodies are made to withstand this pressure.
10. Equipment:
Water glassPiece of thin, fiat cardboard
Fill glass to the top with water. Place the cardboardover the glass. Carefully turn the glass upside down,holding cardboard tightly to the glass. Take your handaway from the cardboard. The cardboard stays in placeagainst the glass. Tilt the glass or hold it sideways, andthe cardboard still remains in place.
At A and B the upward and downward pressuresbalance, but at C the upward pressure of air is greaterthan the downward pressure of water and holds thecardboard in place.
11. Equipment:
Soda straw or glass tube
Put your finger over the top of a soda straw filled withwater. Lift or tilt it. The water will not run out becauseyour finger cuts off the air pressure on top, but air stillpresses up against the water at the bottom of the straw.Take your finger away, and the water runs out of thestraw.
12. Equipment:
Bottle or jar with a tight cap Soda strawModeling clay
Fill the jar up to the cap with water. Punch a hole inthe cap and insert the soda straw. Seal tightly around the
straw with clay. Put the cap on tightly so that no air canget into the bottle. Now try to suck the water out of thebottle. No matter how hard you suck, the water will notflow through the straw. Release the cap on the bottle justenough to let in some air, and try to suck the waterthrough the straw. Now, as you suck through the straw,the air pressure is lowered inside the straw. Air pressingon the surface of the water in the bottle pushes it upthrough the straw as you suck through it.
An elephant has a built-in straw, and he puts airpressure to work every time he takes a drink. He puts histrunk in water and breathes in to draw the air out of histrunk. As he does this the water fills his trunk.
13. Equipment:
Large medicine dropper or any kind of a tube with a suction bulb
Put the dropper or tube in a pan of water and squeezethe attached bulb, forcing the air out of the tube. Releasethe bulb. Water now rushes into the tube. Lift the tubeout of the water. The water does not run out. Air pusheson the water in the tube and holds it there.

5
14. Equipment:
2 large, flat, rubber sink-stoppers
Air pressure tug-of-war: After wetting their surfaces,press the two sink-stoppers together so that no air isbetween them. Ask a friend to pull on one while you pullthe other. You can’t pull them apart. But just let the airget in between the pads or plungers, and presto! theyseparate.
15. Equipment:
Tin can with a screw-on metal cap, such as a maple syrup canHotplate or burner
Make sure the can is clean. Pour about an inch of hotwater into the can. Put it on the burner and heat it untilyou see the steam coming out of the opening. Waitanother few seconds and turn off the heat. Screw the capon tightly and wait for it to cool. The can suddenlybegins to cave in.
When it was heated water turned into steam, drivingout most of the air. Now as the can cools, the steamturns back into water, leaving neither air nor steam insidethe can. A partial vacuum has been created.Consequently, the pressure of air outside the can, beinggreater than that inside the can, crushes the can.
AIR MOVES
The air is moving all the time, whether we feel it ornot.
16. Put some rather strong perfume on a piece ofcotton. Have the children raise their hands as soon asthey smell it.
17. Burn a piece of string or a piece of "punk" in adish. Notice the direction the smoke travels.
18. Notice the trees. Are the leaves moving? Are thetrees bending?
19. Wind is moving air. Create a wind by fanningyourself with a piece of paper, moving your arms rapidlyback and forth and turning rapidly around the room.
6
20. Hold a sheet of paper at mouth level and blowhard.
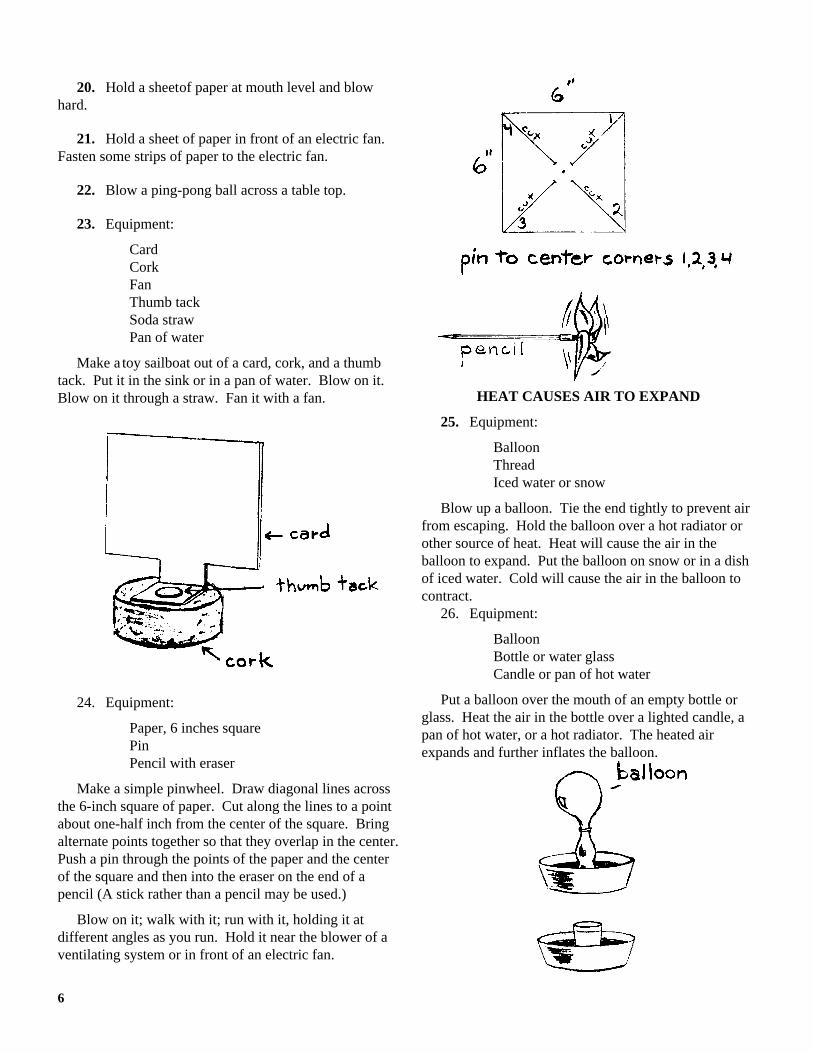
21. Hold a sheet of paper in front of an electric fan.Fasten some strips of paper to the electric fan.
22. Blow a ping-pong ball across a table top.
23. Equipment:
CardCorkFanThumb tackSoda strawPan of water
Make a toy sailboat out of a card, cork, and a thumbtack. Put it in the sink or in a pan of water. Blow on it.Blow on it through a straw. Fan it with a fan.
24. Equipment:
Paper, 6 inches squarePinPencil with eraser
Make a simple pinwheel. Draw diagonal lines acrossthe 6-inch square of paper. Cut along the lines to a pointabout one-half inch from the center of the square. Bringalternate points together so that they overlap in the center.Push a pin through the points of the paper and the centerof the square and then into the eraser on the end of apencil (A stick rather than a pencil may be used.)
Blow on it; walk with it; run with it, holding it atdifferent angles as you run. Hold it near the blower of aventilating system or in front of an electric fan.
HEAT CAUSES AIR TO EXPAND
25. Equipment:
BalloonThreadIced water or snow
Blow up a balloon. Tie the end tightly to prevent airfrom escaping. Hold the balloon over a hot radiator orother source of heat. Heat will cause the air in theballoon to expand. Put the balloon on snow or in a dishof iced water. Cold will cause the air in the balloon tocontract.
26. Equipment:
BalloonBottle or water glassCandle or pan of hot water
Put a balloon over the mouth of an empty bottle orglass. Heat the air in the bottle over a lighted candle, apan of hot water, or a hot radiator. The heated airexpands and further inflates the balloon.

7
27. Equipment:
BalloonWater glassPan of hot waterScissors
Cut the neck of a balloon. Heat an empty glass in apan of hot water. Slip the opening of the balloon over themouth of the glass. Let the glass cool. The cool aircontracts and sucks the balloon into the glass.
28. Equipment:
Bubble pipeSoapy water
Blow soap bubbles. Discuss why they float. (Thebreath is warm; as the bubbles begin to cool they begin tosettle. Observe what happens when you blow bubblesover a hot radiator.)
29. Equipment:
Test tubeCork
Put a cork in a test tube, but not too tightly. Hold thecorked tube over a source of heat. As the air warms andexpands, the cork will pop out.
30. Equipment:
Ordinary thermometer
Find the temperature of the air near the ceiling andnear the floor. Compare the readings and discuss why thewarmest air is near the ceiling.
31. Equipment:
Strips of paperThumb tacks or scotch tape
Open a window at the top and at the bottom. Fastenstrips of paper so that they will hang in the openings andbe moved by the air currents. Notice where the air ismoving into the room and where it is moving out. The aircoming in at the bottom of the window is cooler than theair in the room. It forces the warm air to rise.
AIR CONTAINS MOISTURE
32. When the children paint pictures, discuss wherethe water goes when the pictures dry.
33. Discuss what happens to the water given topotted plants.
34. Put some water in a shallow dish on the windowsill. Leave it for a few days, then observe. Where did thewater go?
35. Boil a small amount of water in a shallow pan.Observe what happens. Discuss what happens whenwater evaporates. Help the children to understand thatwater evaporates from rivers, lakes, streams, and pondsand that when water evaporates it goes into the air aswater vapor.
WARM AIR HOLDS MORE MOISTURE THANCOLD AIR
36. Equipment:
2 water glassesIce cubes
Fill one glass with warm water. Fill another glasswith water and ice cubes. Water collects on the outside

8
of the glass which has the ice cubes in it. This is becausethe cold glass comes in contact with the warm, moist airof the room. Help the children understand why thishappens. (This experiment works better on warm,moist days in the spring, summer, and fall than inartificially heated rooms in the winter.)
37. Equipment:
Teakettle with a spoutHot plate or burnerLarge strainer2 trays of ice cubesMedium-sized pan with handle
Boil water in the teakettle until steam comes from thespout. Notice that the steam disappears into the airalmost immediately. Fill the strainer full of ice cubes andhold it near the spout of the teakettle so the steam will gothrough it. Clouds form as the steam cools. Help thechildren understand why.
Fill the pan with ice cubes and hold it where the steamfrom the teakettle will hit the sides of the pan. When thehot vapor or steam hits the sides of the pan, little drops ofwater gather on the outside of the pan and drip like rain.
AIR HOLDS SOME THINGS UP
The force of gravity acts constantly upon objects,causing them to fall toward the earth. Objects rise onlywhen the force of the air upward is greater than the forceof gravity downward.
Leaves float in the air.
A balloon filled with a gas lighter than air rises andfloats in the air.
A blimp is a kind of balloon filled with a gas which islighter than air.
38. Equipment:
Silk handkerchiefSmall ball or dollString
Make a parachute with a silk handkerchief, somestring, and a small ball or a small doll. Tie about teninches of string to each corner of the handkerchief.Fasten each piece of string to the ball or the doll. Tossthe parachute into the air, or let the children drop it fromthe top of the "monkey bars."
A parachute floats’ downward toward the earththrough the air. When an object falls from a great heightit picks up speed, but the resistance of air finally causes itto fall at a steady speed called terminal velocity. Thelarge surface of a parachute acts as an air brake,checking the velocity of the person or object attached andmaking possible a safe landing.
39. Have the children repeat this experiment withother objects-a feather, a piece of paper, a pencil, a silkscarf, a piece of cotton cloth, a kite, etc. Take the objectsoutside on a windy day and try them out.
Some seeds are carried by the wind.

9
40. Equipment:
1 stick, V4" x Y8" x 24"1 stick, V4" x Y8" x 24"Paper, strong, 16" x 24"GlueLong, narrow strip of clothString
The forces acting on a kite:Wind pressure beneath the kite tends tohold it up.
The tail keeps the kite upright.Gravity tends to pull the kite down.
Wind helps a kite fly, unless the kite is being pulledthrough the air. A kite should be held at an angle to thewind which allows the air to strike against the undersurface of the kite in such a manner as to direct the kiteupward as the air striking the kite is deflected downward.
If you release the kite string, the kite will fall to theearth. It falls because the angle at which the surface ofthe kite has been held toward the wind has been changed.The lift upward caused by the angle at which the kiteattacked the air is now less than the pull of gravitydownward.
SOME THINGS FLY IN THE AIR
A bat is a mammal that flies in the air.
A bird is a fowl that flies in the air.
A butterfly is an insect that flies in the air.
An airplane is a machine that flies in the air.
41. Equipment:
Toy airplane with rubber band motorBalsa glider
Compare a toy airplane having a rubber band motorwith a balsa glider. Let the children fly them. The toyairplane has wings like a big airplane. It has a propellerand a motor. The rubber band is the motor. You turn thepropeller to wind up the rubber band. When you let gothe rubber band unwinds and turns the propeller. Thepropeller pulls the toy airplane through the air.
The glider does not have a propeller or a motor.When you toss the glider into the air, the air pushes up onthe wings. This pressure keeps the glider from comingstraight down.

11
\WINGS
The force that lifts an airplane and holds it up comesin part from the air that flows swiftly over and under itswings.
42. Equipment:
Strip of notebook paper or newspaper, about 2 incheswide and 10 inches long
BookPaper clips
Make an airfoil (wing) by placing one end of the stripof paper between the pages of the book so that the otherend hangs over the top of the book as shown in diagramA. Move the book swiftly through the air, or blow acrossthe top of the strip of paper. It flutters upward.
Hold the book in the breeze of an electric fan so theair blows over the top of the paper
Take the strip of paper out of the book. Grasp oneend of the paper and set it against your chin, just belowyour mouth. Hold it in place with your thumb and blowover the top of the strip. The paper rises. Try the samething after you have fastened a paper clip on the end ofthe strip. See how many paper clips you can lift in thisway.
Hold the strip of paper in your hands and run aroundthe room.
It doesn’t matter whether you move the air over thestrip of paper by blowing or whether you move the paperrapidly through the air-either way it rises.
Bernoulli’s principle states that an increase in thevelocity of any fluid is always accompanied by a decreasein pressure. Air is a fluid. If you can cause the air tomove rapidly on one side of a surface, the pressure onthat side of the surface is less than that on its other side.
II WHAT MAKES AN AIRPLANE FLY?

12
Bernoulli’s principle works with an airplane wing. Inmotion, air hits the leading edge (front edge) of the wing.Some of the air moves under the wing, and some of itgoes over the top. The air moving over the top of thecurved wing must travel farther to reach the back of thewing; consequently it must travel faster than the airmoving under the wing, to reach the trailing edge (backedge) at the same time. Therefore the air pressure on topof the wing is less than that on the bottom of the wing.
43. Equipment:
2 sheets of notebook paper
Hold two sheets of notebook paper about four inchesapart. Blow between them. Instead of flying apart theycome together. The air moving rapidly between
the two pieces of paper has less pressure than the airpressing on the outer sides of the paper.
44. Equipment:
PinSpoolCardboard, 3" x 3", lightweight but firm
Place the pin through the center of the cardboard.Place the spool over the pin so that the pin goes into thehole in the spool. Hold the card against the spool andblow firmly through the spool. Release your hand. Thecard does not fall.
45. Equipment:
Ping-pong ballTank-type vacuum cleaner
Connect the hose to the blower rather than to thesuction end of the vacuum cleaner. Turn the switch on.Hold the hose vertically so the stream of air goes straight
up. Release the ping-pong ball into the stream of airabout a foot from the nozzle. Slowly tip the nose so thatthe air shoots at an angle. The ball will stay suspendedin the airstream. The force of gravity upon the ball tendsto make it drop out of the airstream. However, the fastmoving airstream lessens the air pressure on the portionof the ball remaining in the airstream, overcoming theforce of gravity, with the result that the ball remainssuspended.

13
PROPELLERS
Wings give an airplane lift, but they do not drive itforward. In some airplanes the propeller (turned by anengine) drives the plane forward by pushing the airbackward. The air, reacting to the action of the propeller,pushes it forward. (For every action, there is an equaland opposite reaction—Newton’s Third Law of Motion.)As the propeller is attached to the plane, it pulls the planethrough the air.
46. Equipment:
Wagon or roller skateSmall electric fan with long extension cord
Put a propeller on anything that can move-a wagon ora roller skate. Use a small electric fan with a very longextension cord for a propeller. Set it firmly on the rollerskate or wagon. The fan drives the wagon or skatebackwards. This is because the blades are set to throwthe air in front of the fan.
47. Equipment for making a cardboard propeller:
Cardboard, 3 1/2" x 1 1/4"Soda straw
Cut along the dotted lines as shown in diagram.
Carefully and slowly push a pencil point through thecenter, turning the pencil as you do so. Make the holejust barely big enough to push the soda straw through.Bend the blades at an angle. Spin the straw between yourfingers. Notice where you feel the breeze.
48. Equipment for making a balsa wood propeller:
SpoolKnifeStrong twineSmall finish nailsTenpenny nailBlock of balsa or other soft woodBlock of wood, 2" x 2" x 3"HacksawNail cutter or large pliers
Drive the tenpenny nail into one end of the woodenblock. Cut off the head of the nail so that the nail isshorter than the length of the spool. Drive the finish nailsinto one end of the spool. Space them evenly between thehole and the edge of the spool. Carve a propeller fromthe balsa wood. Drill two holes in it to match the finishnails on the spool. Wind the string on the spool and placethe propeller on it, making sure to match the holes to thefinish nails. Pull the string hard and fast.

14
The spool and propeller are spun with great speed andthe revolving propeller will fly off, high into the air.
49. A simpler demonstration can be done by twistinga pencil or chopstick tightly into the hub of the propeller.Hold the stick between the palms of both hands, propellerup. Roll it back and forth quickly three or four times andpush it forth into the air. The prop, stick and all, will flyoff into the air and attain good height, demonstrating thata revolving prop creates thrust.
THE JET AIRPLANE
A jet aircraft has no propeller. Instead it has areaction engine in which fuel is burned to expand the airand build up great pressures. It also has a tailpipethrough which the expanded air and other gases canescape. The plane is moved forward by the pressure ofthe gases inside its engine. Its rate of speed were it in avacuum would be the same as that of the escaping gases.
50. You can see how a jet works by an experimentwhich uses a toy balloon. Blow up the balloon; pinch theneck to keep in the air. Let the balloon go. It shootsacross the room. The air inside the balloon is pushing inall directions to get out. Some of the air escapes throughthe open neck, but the air at the opposite end of theballoon cannot get out, so it pushes the balloon forward.
HOW IS A PLANE CONTROLLED?
A car can go only right or left, but a plane must besteered up or down as well. It has parts on the wings andtail called control surfaces to help it. These can bedemonstrated by the use of folded paper gliders and balsagliders.
51. Folded paper glider. Use a piece of paper9" x 6".
The finished glider can be held together at the bottomwith a paper clip. The paper clip can also be used for abalance. Experiment with the glider, moving the clip upor back as needed to obtain proper balance.

15
Experiment further by changing the position of the wings(see 52a. Up and dawn).
52. Control surfaces. Real planes have segmentsinserted in wings, in the vertical stabilizer, and in thehorizontal stabilizer. These are called ailerons, rudder,and elevator. The pilot controls their position from theairplane cockpit. When he moves them into the air-stream, they cause the plane to react to air pressure. Byusing them he can go to the right or left and also up anddown.
a. Up and down. Fold the back edges of the paperglider up, as in the diagram. When you throw the glider,the tail should go down and the nose should point up. Itmay take some practice to get the controls set so theglider does what you want it to do.
When the pilot wants his plane to climb, he moves hiscontrols so that the elevators tilt up in the same way thatyou folded the back edges of the glider. The air hittingthe elevators pushes the tail of the plane down, tilting thenose upward, so that the plane can climb.
Fold the back edges of the glider down. When youthrow the glider, the tail should go up and the nose shouldgo down. This same thing happens when the pilot tiltsthe elevators downward.
b. Right and left. Turn the vertical fin on the glidera little to the right; the glider will fly toward the right.The pilot moves his rudder to the right for a right turn,but he must also bank his plane for the turn, the same asyou would do if you were turning on a bicycle. (Youwould lean to the right for a right turn.) The pilot tilts hisplane to one side by using the ailerons. When one tilts upthe other tilts down.
To tilt the plane to the right, the pilot tilts the leftaileron down so the left wing is pushed up. The rightaileron is titled up so the right wing will be pushed down.You can do the same thing with a paper glider. (Thisprinciple can be illustrated also by suspending the gliderin a wind tunnel.)
For a left turn, the pilot reverses the process describedabove.

16
To Suspend a Paper Glider in a Wind Tunnel:
53. Equipment:
Airplane rubberNotebook reinforcement ringsGluePill
Purchase airplane rubber (by the yard) at a hobbyshop. Slip one end of the rubber between two notebookreinforcement rings and glue them together.
Fasten this end to the glider as shown in the diagrambelow; then anchor with a pin. Even kindergartenchildren can use this method of suspending a glider in awind tunnel. (See No. 55.)
54. Equipment:
Balsa glider
A balsa glider may also be used to illustrate thefunction of control surfaces. Assemble the glider andlaunch it a few times for practice. Make ailerons,elevators, and a rudder from rather lightweight paper;glue them to wings and stabilizers. Now, see what youcan do with the glider. With practice you will becomeskilled enough to make the glider fly where you want it tofly.
This kind of glider is excellent to use in a wind tunnelto illustrate the effects of control surfaces. Rememberwhat the control surfaces help the plane do:
Climb............The elevators are up.Glide or dive..The elevators are down.Right turn......Turn the rudder right.Right bank.....The right aileron is up; left aileron is
down.Left turn. .......Turn the rudder left.Left bank.......Turn the left aileron up; right aileron
down.
THE WIND TUNNEL
A wind tunnel is a tunnel-like chamber through whichair is forced at controlled velocities to study the airflowabout the object suspended within it. Some wind tunnelsare large enough to permit the action of wind pressure onhuge airplanes or missiles to be observed, and in these thewind velocity may have a force of several thousand milesper hour. Other wind tunnels are small, with scalemodels of airplanes mounted in them.

17
The wind tunnel described below is a simple one foruse with very young children. This type was used veryeffectively for six weeks with a kindergarten group. Thechildren made their own paper gliders and tested them inthe tunnel.
55. Equipment:
Piece of furnace pipe about 4 feet longPiece of pliofilm, acetate, or some other transparent material for the tunnel windowSeparations from an egg cartonScotch tapeCorrugated box, the same size as the egg carton separatorsSmall electric fanBookbinding tape or similar adhesive tape2 small hooks, the kind used for hanging cupsMetal shears
Open the egg carton separators and reinforce thecorners with scotch tape. Open the corrugated box onboth ends and push the flaps inside the box to make thebox stronger. Fit the egg carton separators into one endof the box. They should fit snugly.
With a pair of metal shears, cut a window near oneend of the furnace pipe. Cover the window with thetransparent material, securing it to the pipe with book-binding tape. Fasten the hooks in the pipe so that whenthe glider is suspended from the top hook it can beobserved from the window.
Set the egg carton separators flush against the furnacepipe, at the end opposite the window. Set the electric faninside the box containing the egg car- ton separators.These separators honeycomb" or straighten the swirlingair currents from the electric fan.

18
GENERAL WEATHER CONDITIONS
There are many kinds of weather; weather may varyfrom day to day.
56. Keep a weather calendar or weather chart. Use alarge, printed school calendar. Circle each day with colorrepresenting the type of weather, such as orange forsunny, blue for cloudy, black for rainy.
57. Chart the weather for a month, using weathersymbols like the following:
Weather changes may take place rapidly. Recordvariations in weather during the day. Try to choose awindy or very humid day. If a storm rises, note howquickly it may have risen.
Weather combinations vary. Note types ofprecipitation accompanying hot days; cold days. Notealso daily cloud formations and their approximate heightsabove the earth.
Weather can often be predicted by observing skyconditions.
58. Note the degree of visibility. Is it affected byhaze, fog, rain, or other forms of. precipitation, or is itclear?
59. Note types of clouds:
cumulus: fluffy, cottony masses; may precedeheavy rains and turbulent winds, forecastingcolder temperatures.
stratus: horizontal layers; may be accompaniedby haze, fog, drizzle, or rain, forecastingwarmer temperatures.
60. Note force of wind (see No. 65). High windsmean weather changes are coming.
61. Make a chemical hygrometer to show themoisture content of the atmosphere.
Equipment:Gum arabic ...........½ ounce Small doll withCobalt chloride......1 ounce cotton skirtSodium chloride....½ ounce CardboardCalcium chloride...75 grains Cotton clothDistilled water.......1 ounce
Mix the chemicals into one solution. Dress a smalldoll with a skirt of cotton cloth treated with the solutionjust mixed. Cut out cardboard rabbits and place on themlarge cotton cloth ears treated with this formula. Totreat, dip cloth into solution; let dry.
III WEATHER IS IMPORTANT TO AVIATION

19
Cloth will be blue on dry, clear days; lavender on dayswhen weather is changing; and pink when it is raining orthe humidity is high.
62. Make clouds.
On a cold or foggy day, let out your breath so that youcan see it.
Boil water in a teakettle. Hold a strainer containingice cubes near the spout. See the clouds of steam.
Make a Wilson Cloud Chamber (see No. 97).
63. Measure precipitation (the observable moisturethat comes out of the air).
Equipment:
Tall glass jar, such as an olive jar, 2-inch diameter preferredStopper with I hole, to fit jarFunnel to fit hole, 4-inch diameter at top preferred
Keep the jar outdoors to trap rainfall. Place it wheresurrounding objects will not interfere with rainfall. Aftereach storm measure the height in the jar of theaccumulated fall.
Insert funnel through stopper, and stopper into jaropening. If 4-inch funnel and 2-inch diameter jar arebeing used, mark jar height into I-inch intervals. Theneach inch of depth will be equivalent to 1A inch ofrainfall. (Note: If jar and funnel are not of thesedimensions, figure markings on jar in proportion.)
64. Keep a detailed weather record.
Make a chart like the one which follows and keep arecord for a week. Make observations at the same timeeach day.
WIND
Wind Has Force
Many devices depend upon the force of the wind fortheir successful operation. Among these are pinwheels,windmills, gliders, balloons, sailboats, fans, and the like.
65. Make a pinwheel, using sheet of paper 9" x 9"(See No.’ 24)
Hold the pinwheel in a strong wind or out the windowof a moving car, or make your “wind by running. Windwill catch the blades of the pinwheel and make it spin.
Wheather Record
Date
Precipitation
Air Temperature
Air pressure
Relative humidity
Wind direction
Wind speed
Sky condition
Type of clouds
20
Experiment to see whether there is any angle towardthe wind at which you might hold your pinwheel withoutit spinning. When does it slow down? Is it when theplane of the blades is parallel to the wind? Each blade isan airfoil. Can you explain why? (See No. 42.)
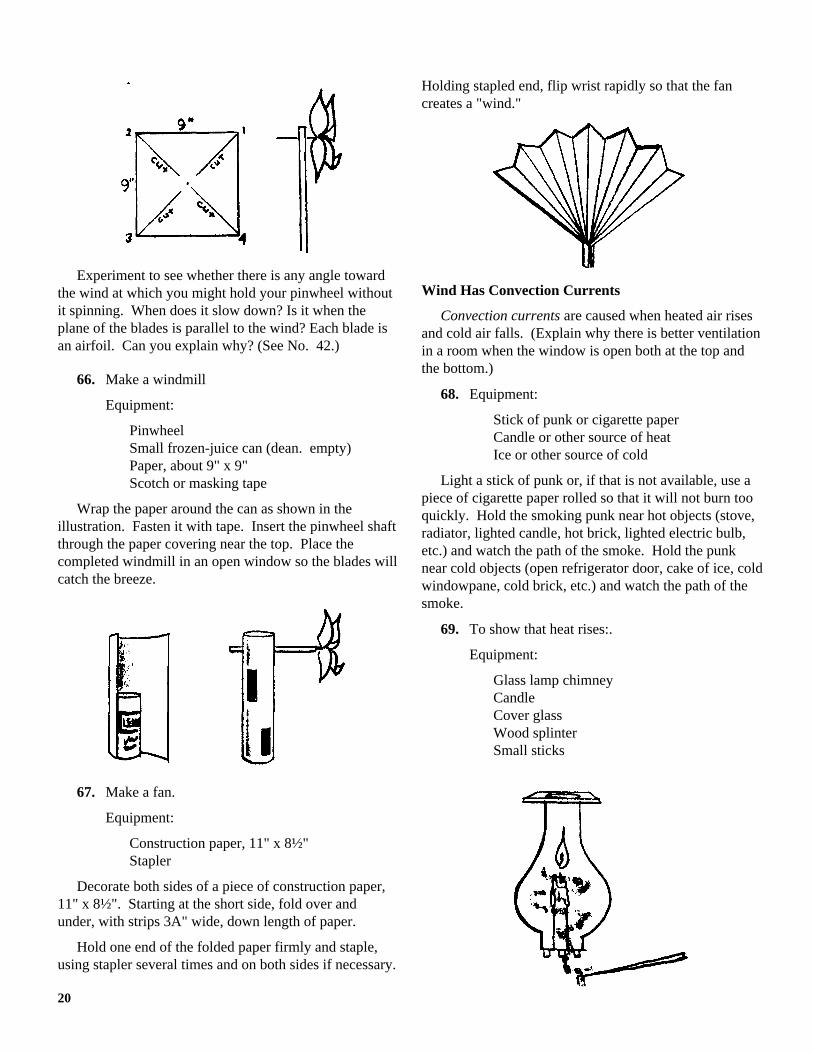
66. Make a windmill
Equipment:
PinwheelSmall frozen-juice can (dean. empty)Paper, about 9" x 9"Scotch or masking tape
Wrap the paper around the can as shown in theillustration. Fasten it with tape. Insert the pinwheel shaftthrough the paper covering near the top. Place thecompleted windmill in an open window so the blades willcatch the breeze.
67. Make a fan.
Equipment:
Construction paper, 11" x 8½"Stapler
Decorate both sides of a piece of construction paper,11" x 8½". Starting at the short side, fold over andunder, with strips 3A" wide, down length of paper.
Hold one end of the folded paper firmly and staple,using stapler several times and on both sides if necessary.
Holding stapled end, flip wrist rapidly so that the fancreates a "wind."
Wind Has Convection Currents
Convection currents are caused when heated air risesand cold air falls. (Explain why there is better ventilationin a room when the window is open both at the top andthe bottom.)
68. Equipment:
Stick of punk or cigarette paperCandle or other source of heatIce or other source of cold
Light a stick of punk or, if that is not available, use apiece of cigarette paper rolled so that it will not burn tooquickly. Hold the smoking punk near hot objects (stove,radiator, lighted candle, hot brick, lighted electric bulb,etc.) and watch the path of the smoke. Hold the punknear cold objects (open refrigerator door, cake of ice, coldwindowpane, cold brick, etc.) and watch the path of thesmoke.
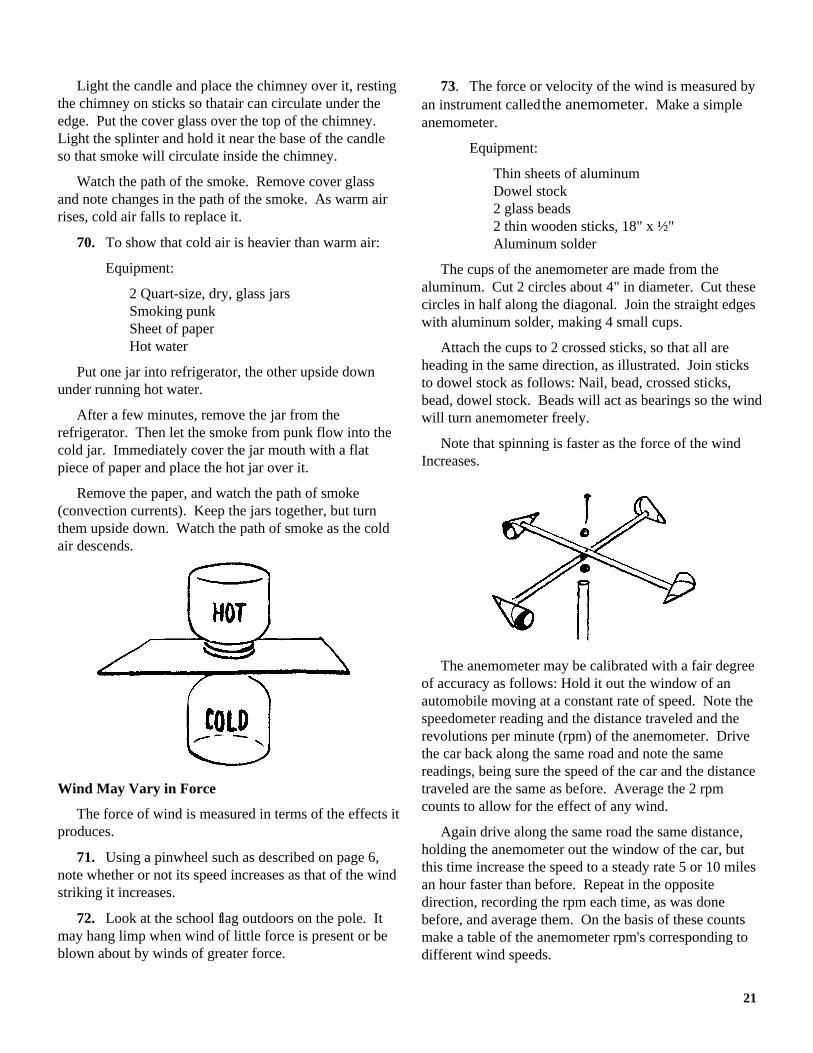
69. To show that heat rises:.
Equipment:
Glass lamp chimneyCandleCover glassWood splinterSmall sticks
21
Light the candle and place the chimney over it, restingthe chimney on sticks so that air can circulate under theedge. Put the cover glass over the top of the chimney.Light the splinter and hold it near the base of the candleso that smoke will circulate inside the chimney.
Watch the path of the smoke. Remove cover glassand note changes in the path of the smoke. As warm airrises, cold air falls to replace it.
70. To show that cold air is heavier than warm air:
Equipment:
2 Quart-size, dry, glass jarsSmoking punkSheet of paperHot water
Put one jar into refrigerator, the other upside downunder running hot water.
After a few minutes, remove the jar from therefrigerator. Then let the smoke from punk flow into thecold jar. Immediately cover the jar mouth with a flatpiece of paper and place the hot jar over it.
Remove the paper, and watch the path of smoke(convection currents). Keep the jars together, but turnthem upside down. Watch the path of smoke as the coldair descends.
Wind May Vary in Force
The force of wind is measured in terms of the effects itproduces.
71. Using a pinwheel such as described on page 6,note whether or not its speed increases as that of the windstriking it increases.
72. Look at the school flag outdoors on the pole. Itmay hang limp when wind of little force is present or beblown about by winds of greater force.
73. The force or velocity of the wind is measured byan instrument called the anemometer. Make a simpleanemometer.
Equipment:
Thin sheets of aluminumDowel stock2 glass beads2 thin wooden sticks, 18" x ½"Aluminum solder
The cups of the anemometer are made from thealuminum. Cut 2 circles about 4" in diameter. Cut thesecircles in half along the diagonal. Join the straight edgeswith aluminum solder, making 4 small cups.
Attach the cups to 2 crossed sticks, so that all areheading in the same direction, as illustrated. Join sticksto dowel stock as follows: Nail, bead, crossed sticks,bead, dowel stock. Beads will act as bearings so the windwill turn anemometer freely.
Note that spinning is faster as the force of the windIncreases.
The anemometer may be calibrated with a fair degreeof accuracy as follows: Hold it out the window of anautomobile moving at a constant rate of speed. Note thespeedometer reading and the distance traveled and therevolutions per minute (rpm) of the anemometer. Drivethe car back along the same road and note the samereadings, being sure the speed of the car and the distancetraveled are the same as before. Average the 2 rpmcounts to allow for the effect of any wind.
Again drive along the same road the same distance,holding the anemometer out the window of the car, butthis time increase the speed to a steady rate 5 or 10 milesan hour faster than before. Repeat in the oppositedirection, recording the rpm each time, as was donebefore, and average them. On the basis of these countsmake a table of the anemometer rpm's corresponding todifferent wind speeds.

22
Wind Has Direction
74. Make a wind vane.
Equipment:
FeatherStraight pinSoda strawNew lead pencil with firm eraser
Insert a 6"-8" feather in one end of the straw, gluinglightly, if desired. Find the balance point by holding thestraw on extended finger so it will not tip; insert pin atthis point and stick pin into eraser. Vane will move withthe wind, always pointing in the direction from which thewind is blowing. Bind the pencil to post outdoors wherevane can swing freely.
75. Make a weather vane.
Equipment:
Thin wood strips (white pine good):1 20" x 4"2 12" x 1"2 8"x 3"Long, slender nailSmall nailsWooden or glass beadPost about 10’ high (or exposed corner of building, such as garage)
Cut arrow and shaft from 20" strip. Cut tailpiecesfrom 8" strips. Nail them to shaft of arrow on each side;spread them apart to form an angle of 200 in order tocatch the wind easily, using a protractor to measure theangle AOB (see illustration). Find the balance point byresting shaft on extended finger until arrowhead andtailpieces balance level; drill hole at this point. Insertlong nail in hole. Place bead on nail to act as bearing.Mount on post, preferably away from buildings.
With compass, determine north. Using the 12" strips,one marked N and S, and the other E and W, as pointers,nail the pointers on the post to show direction from whichthe wind is blowing. Observe the changes.
76. Make a windsock.
Equipment:
Heavy cloth, about 36" x 24"4 lengths (about 10" each) of heavy wireWire coat hangerStick, about 36" longLarge nailWooden spool
Form the hanger into a loop about 9" in diameter.Attach the 4 wires to this circular loop at 4 equidistantpoints on its circumference. Cut cloth into a sleeve (seediagram above). Sew sides together, making a cone, andsew larger end of the cone to loop. Bind exposed ends ofwires to the spool. Place the nail through the spool sothat the spool may pivot freely on the nail, and hammerthe nail into the end of the long stick. Place stickoutdoors; nail it to a tall post or to a rooftop away fromobstructions, so that the sock may swing freely with thewind.

23
The large end of the sock will catch the wind, so thatthe small end will point away from the direction fromwhich the wind is blowing, or will droop if there is notenough wind to keep it extended.
Observe the position of the sock at different times forchanges in direction and force of the wind.
Windsocks are used chiefly at airports to indicatewind direction for takeoffs and landings. They help thepilot select the proper runway.
TEMPERATURE
The atmosphere and the earth receive their warmthfrom the sun. This warmth may vary from place to placeand from day to day. The degree of hotness or coldnessof the air around us is called temperature.
Temperature affects our activities, the amount ofclothing we wear, the kind of outdoor exercise we takeand the amount and kind of food and liquid we consume.
A Thermometer Measures Temperature
77. Make a paper thermometer.
Equipment:
Still white paper about l 2" x 3"Narrow white ribbon, about 18" longRed ink
Dip about half the length of the ribbon into red ink; letit dry. Cut from the center of paper a strip 10" long andthe width of the ribbon. Make a cut in the paper V2"above and another V2" below the space from which thestrip was cut; make these gashes slightly longer than thewidth of the ribbon. Insert the ribbon, with the red halftoward the lower end of the paper. Mark the paper indegrees of temperature to cover the range expected in theclassroom, or wherever the thermometer will be used, toagree with a real one- say, from 500 to 900. Pull ribbonup or down to register the proper temperature.
78. Make an air thermometer.
Equipment:
Glass bottle, 1-pint sizeRubber stopper with l holeGlass tubing to fit hole, 24" longWaterDye or colored inkSealing wax or paraffinScotch or masking tapeCardboard strip, l0" x 2"Ordinary thermometer
Place the glass tubing, sealed at one end, through thestopper. Fill the tube full of water colored with the dye.Quickly invert the tube, placing the lower end in a bottleabout one-fourth full of the colored water. Press thestopper firmly in the bottle. Adjust the liquid in the tubeby loosening the stopper or pressing it further into thebottle until the liquid is about half way along the exposedportion of the tube above the stopper. Then seal withwax the tube in the stopper and the stopper in the bottle.Tape the cardboard to the tube above the stopper.

24
Note the temperature on an accurate thermometer.Record this temperature on the cardboard, which will actas a temperature scale. Place the thermometers in adifferent temperature situation and leave them for a fewminutes to allow the thermometers to register the newtemperature. Note the new reading and mark on thescale. Carefully measure the distance between the tworeadings on the scale, and mark other degrees oftemperature on it, as all other changes will be in the sameproportion.
Temperature Helps Determine the State of theWeather
Types of precipitation depend on temperature: rain inwarm weather; snow and ice in cold weather.
To find what happens to water when temperature goesbelow 32° F:
79. Equipment:
Glass bottle, preferably tall and thinScrew capWaterMasking tape
Fill the bottle to about an inch from the top and marklevel on the outside with masking tape. Put bottleoutdoors in the shade if the day is very cold- below 32° F.If the day is warmer than 32° F., put the bottle, standingupright, in the freezing compartment of a refrigerator.Observe what happens to the level of water as ice crystalsbegin to form in it. Note change in the level when thewater is completely frozen.
The Sun Gives Heat
80. Hold one hand in the sunlight and the other in theshade: feel the difference.
81. Observe that other materials give off heat andlight under certain conditions.
Feel a candlewick, light a candle. See the flame andfeel the heat.
Feel an electric light bulb. Switch the electricity on.See the glow and feel the heat.
Feel a cold steel bar. Place it across a hot flame. Seethe red- or white-hot glow and cautiously feel the heat.
The Sun Gives More Heat In Summer Than In Winter
The sun gives more heat in summer because light andheat rays travel in a straight line from their source.
82. To show what happens when light rays strike asurface:
Equipment:
FlashlightPaper tube, large enough to fit around flashlightLarge sheet of paperTable
Lay the paper on a (able. Put the paper tube aroundthe flashlight. Turn on the flashlight and direct its raysstraight down on the paper. Draw a circle around theoutline of light. Notice brightness of reflected light.
Then hold the flashlight at an angle of about 450Draw around the light reflected on the paper and noticeits brightness. Compare the area of the circle with that ofthe oval.

25
83. To show how the angle of the sun’s rays affectstemperature:
Equipment:
2 small boxes filled with sand2 thermometersWooden blocks
Lay a thermometer in each box, with the bulbs lightlyburied in the sand. Then put the boxes in the sun for afew minutes. Record the temperatures; they should be thesame. Raise one box from the ground by placing smallblocks underneath. Tilt the other by placing blocks underone edge of the box, so that the sun’s rays fallperpendicular to the thermometer (i.e., strike thethermometer at right angle). Leave the boxes in the sunfor a few minutes and then record the temperature.
The tilted thermometer records the result of the directrays of the sun which represent the direct rays of summer.The level thermometer records the angular rays of winter.The tilted thermometer should have a higher reading thanthe level thermometer. It is possible to obtain a greatercontrast of angle, and therefore of temperature readings,when this demonstration is performed in winter.
The Sun’s Heat Varies During the Day
Note that the angle of the sun’s rays varies during theday, reaching its largest angle at midday. Remembering
the preceding experiment, you can conclude that the heatreceived varies also.
84. Make a record of thermometer readings in theshade at regular intervals during the day. Note that as thesun’s rays increase the heat around us, the liquid in thethermometer expands and rises; note that as nightapproaches the temperature begins to fall.
85. Place one thermometer in the sun, another in theshade. Record the readings of each at regular intervalsduring the day.
86. The density of the liquid in a thermometer varieswith the temperature around the bulb. Placethermometers in such places as a dish of ice water,outdoors on a cool day and on a warm day, indoors on avery cold day, in the sun, in the shade, over a radiator, inhot water, in your armpit, in the refrigerator, and near aglowing electric light bulb.
The Temperature Changes With the Seasons
Seasonal changes in temperature are the result ofchanges in the amount of heat received by the earth fromthe sun.
Note the position of the winter sun fairly low in thesky even at midday in temperate zones, accompanied bylong shadows and with little warmth. Compare theseconditions with those of the other seasons (seeNos. 82, 33).
Shadows change in length and position as the sunappears to move in an arc across the sky.
87. Make a shadow stick.
Equipment:
3" nailBoard about 10" square

26
Put nail in the board centered near one edge. Mark anS at edge of board in front of the nail. Place the board ina spot which will have sun all day, being sure that theedge of the board with the S and the nail are facing south.Mark along the line of shadow every hour on the hour.
88. Observe your own shadow at different times ofthe day and during different days of the season.
89. Observe the shadow of the school flagpole.
90. If a school window sash makes a pattern on thefloor, draw, with chalk, outlines of the pattern on thefloor at intervals of an hour or so, and note the apparentpath of the sunlight.
91. Fun with shadows: make shadow pictures againsta light-colored wall or screen. If there is no sunlight, useanother source of light, such as a bright lamp or aprojector.
92. Note that shadows disappear on a cloudy day.
The Sun Gives Light Day and Night
It is shining all the time on some part of the earth.When we look at the moon we see reflected sunlight.
93. Equipment:
Globe of the worldFlashlight
Point the lighted flashlight in the direction of NewYork City on the globe. This side of the globe representsdaylight; the opposite or dark side represents nighttime.(When it is 12 noon in New York City, it is midnight inBangkok, Thailand.) Turn the globe so that the positionsof New York City and Bangkok are reversed. What timeis it in Bangkok? In New York City?
If a globe is not available, mark approximate positionsof these two cities on a basketball, grapefruit, or balloon.

27
94. Equipment:
5 pieces of cardboard, 8" x 12" (cardboard inserted in laundered shirts are good)Cardboard, to make hour and minute handsThumbtacksMasking tape, light coloredRed and black crayon
Draw circle and numerals on each 8" x 12" cardboardto resemble the face of a clock. Cut out minute and hourhands, color them, and attach a set to each clock bymeans of a thumbtack. Label clocks: New York, NewYork; San Francisco, California; Berlin, Germany;Bangkok, Thailand; and Yokohama, Japan.
Make small signs to show daylight and nighttime,using the masking tape and lettering the AM and Noonsigns in red crayon and the PM and Midnight signs inblack. (See p. 27)
Set the clocks as follows: New York at 12 noon; SanFrancisco, 9 a.m.; Berlin, 6 p.m.; Bangkok, 12 midnight;and Yokohama, 2 a.m. (the next day). Attach themasking tape signs above the faces of the clock. Note inwhat parts of the world it is daylight and where it isnighttime. Then move all clocks ahead 3 hours; 6 hours;12 hours; each time be sure to change the AM and PMsigns.
MOISTURE IN THE AIR
Humidity
Humidity is the amount of moisture in the air. (Seepp. 7, 8.)
Relative humidity is the amount of moisture in a givenbody of air compared with the amount it is capable ofholding at the prevailing pressure and temperatureconditions.
Relative humidity is determined with the help of a wetand dry bulb thermometer or a sling psychrometer.
95. Equipment:
2 thermometers, matched for accuracy
Board large enough to hold both thermom- eters nailed side by side on itCotton bag or wick to fit tightly over I bulbWooden spoolLong bolt and nut
To make a sling psychrometer, remove the metalguard from one thermometer and cover its bulb tightlywith the cloth or wick. Nail both the thermometers ontothe board. Using the nut and bolt, attach the spool to theupper corner of the board, so that it will rotate freely.
Dip the cloth in water. Hold the spool and whirl itrapidly above your head. Record the temperatureobserved on each thermometer. The wet bulb should readthe lower.
From the relative humidity chart, determine therelative humidity, using the readings of boththermometers.
HOW TO USE CHART:
When wet-and-dry bulb thermometer readings areknown, find intersection of the two solid temperaturelines. At this spot read relative humidity on long- dottedlines and dew points on short-dotted lines.
For example, if air temperature is 85° and wet bulbtemperature is 75°, their intersection point on the chartshows the relative humidity to be about 63%, and the dewpoint to be about 71°.
To use the sling psychrometer you have made as astationary wet and dry bulb thermometer, put a smallbottle containing water under the wet bulb and let alength of cloth hang down into the bottle so that the clothremains wet. When ready to take readings, use therelative humidity chart as before.
Dew Point
Dew point is the temperature at which the air becomessaturated with water vapor and the relative humiditybecomes 100 percent.

28
96. To determine the dew point:
Equipment:
Polished aluminum water glassCrushed ice or small ice cubesRoom thermometerWater
Fill the glass one-half full of water at roomtemperature, making sure that the glass is dry on theoutside. Put the thermometer into the glass. Add iceslowly, carefully noting changes in the temperature of thewater and watching for condensation (tiny drops ofwater) to occur on the outside of the glass. The
CHART TO DETERMINERELATIVE HUMIDITY AND DEW POINT

29
temperature at which condensation begins is the dewpoint.
Repeat the experiment, using dry ice (CO2) instead ofice cubes, and note "frost" forming on the outside of theglass.
Repeat on different days, and record.
Cool air can hold less water vapor than the samevolume of warm air. If saturated air is cooled below thedew point, condensation occurs.
97. To produce and observe the phenomenon ofcondensation of water vapor, make a Wilson CloudChamber.
Equipment:
Carton. about 20" x 20" x 10"Tall jar with straight sides, such as large size peanut butter jarCoffee can, 1-pound size, clean and emptyPiece of thick felt, cut slightly smaller than the coffee canBox or block to support the jar5 pounds of dry iceHot waterLarge sheet of black construction paperFilmstrip projectorMasking tape
Cut a hole in the top of the carton into which the jarexactly fits. Put the dry ice into the carton. Put asupport under the hole and place the jar on it, so thatabout an inch of the jar is within the carton. Put maskingtape around the jar so that no air can pass around it, intoor out of the carton.
Place the paper behind the jar and carton so that it canbe seen through the jar. Set up the projector so that thebeam passes through the jar horizontally.
Glue the felt to the underside of the coffee can. Soakthe felt. Fill the coffee can almost full with very hotwater. Place the can on the jar, with the felt pressing onthe jar’s edge. (See diagram.)
Observe condensation: water vapor will form intoclouds, and convection currents will cause them tocirculate within the jar, the cold air rising along its sidesand the warm air descending at its center. When thevapor clings to particles of dust within the jar, the fallingof ‘brain" is visible. After about 20 minutes, when thewater in the jar has changed to ice at its bottom, it ispossible to see streaks within the jar. These streaks arecosmic rays.
98. Detecting moisture in the air with a hairhygrometer:
Equipment:
Empty milk cartonLarge sewing needleBroom straw, 2" longScotch or masking tapePenny9" human hair wiped clean of oil4 thumbtacksPaper clipDishpan
Cut the carton so as to make a small horizontal slitnear the top; insert the paper clip. (Fig. l.)

30
Cut a vertical slit near the bottom. Then cuthorizontal slits perpendicular to this cut at its end points-like an H on its side. (Fig. l.)
Pry out the flaps thus made and bend them to anupright position. insert the needle through these flaps.(Fig. 2)
Tie the hair to the paper clip, wind it around theneedle, tape the penny to the other end of the hair, and letthe penny hang over the end of the box, which should belying on its side.
Put a card with a scale on the side of the carton underthe straw which has been pushed through the eye of theneedle. (Fig. 3)
Place the hygrometer on a wet towel in a dishpan andcover with a damp cloth. After 15 minutes remove itfrom the cloths and set the straw at numeral 10 on thescale. Watch to see whether the straw moves.
Since humid air causes the hair to stretch and dry aircauses it to shrink, the straw should move toward the dryend of the scale as the hair dries.
Evaporation
When water evaporates it becomes vapor, taking heatfrom materials around it in the process.
99. Wet your hands. Note that they feel cool whilethe water on them is drying (i.e., evaporating).
100. Equipment:
2 glass jars, the same sizeMasking tape
Fill 2 clean jars with the same amount of water.Cover one of the jars tightly. Put the jars in a con-spicuous place where they will remain undisturbed. Put astrip of masking tape at the water-level line of each jar.Observe them at regular intervals for several days andagain mark the water levels.
The water evaporated mixes with air as water vapor;it is invisible. The water cycle usually is as follows:water-vapor, clouds, and rain.
ATMOSPHERIC PRESSURE
The body of air which surrounds the earth is calledatmosphere. Since air itself exerts pressure (pp. 3, 4 &5), the pressure of the air surrounding the earth isreferred to as atmospheric pressure.
At sea level, air exerts a pressure of 14.7 pounds persquare inch, but a cubic yard of it weighs only about 2pounds.
101. Atmospheric pressure is measured by abarometer.
Equipment:
Small glass or beakerGlass barometer tube 36" long, closed onone endMercuryRing stand with clampCardboard strip, 2" x 10"Scotch or masking tapeYardstick
Pour the mercury into the barometer tube, filling itcompletely. Pour the remaining mercury into a beaker.Place a finger over the open end of the tube and invert thetube, lowering it carefully into the beaker containing theremainder of the mercury. Clamp the tube upright on thestand.

31
Mark a scale of inches and half inches on the card-board, and label it from 24 to 36 inches. With theyardstick, measure the actual height of the mercurycolumn and attach the scale to the proper spot on thetube.
Watch the day-to-day variations in the height of themercury. Record readings of these. Compare them withradio and newspaper reports of local barometric pressureconditions.
NOTE: Be very careful that the mercurydoes not come in contact with any jewelry youmay be wearing.
102. The deeper water or air gets, the greater thepressure becomes.
Equipment:
Large fruit-juice canIce pick
Puncture several holes of the same size, at differentlevels, in the side of a large fruit-juice can. Notice theweakness of force with which water escapes from theupper holes. The ones near the bottom, with the greaterheight of water above them, have water shooting out atsome distance.
Watch what happens as the water runs out and thelevel of the water lowers. Do all the streams run withless force than they did at the start?
103. Make a siphon.
Equipment:
2 identical glass jarsRubber tubingWooden block, 2" thick
Fill one jar with water. Put jars side by side on atable. Fill tube with water, close one end with yourfinger, and lower the other end into the water in the jarbefore removing finger. Watch what happens to the levelof water in each jar.
Raise one jar by putting the block under it. Againwatch water levels. The water remains at the same heightin each jar regardless of the difference in height of thejars, because the atmospheric pressure is the same on thewater surfaces in each jar.
104. To show that air moves from a high to a lowpressure area:
Equipment:
Heavy glass tube, about 6" long and 1" in diameter2 toy balloons of the same size
Place one balloon over one end of the tube. Inflate theother balloon and, holding the neck of the balloon tightlyto avoid losing air, slip it over the other end of the tube.Release the neck and observe results.

32
Air rushes from the inflated balloon to the emptyballoon. When the air pressures inside the two balloonsbecome equal, the air stops moving from one to the other.Are they now the same size?
105. The principles learned about air pressure are putto work in modern instruments, such as the manifoldpressure gauge used in aircraft. Make a simple manifoldpressure gauge:
Equipment:
Small jarRubber from a balloonShort soda strawModel airplane glueVery large jar, with a screw capLength of rubber hoseScotch or masking tape
Cover the small jar tightly with the rubber. Glue sodastraw to it so that one end of the straw is in the center ofthe jar’s top. Put the small jar into the larger one. Punc-ture the lid of the large jar with a nail, forming holes in acircular pattern the size of tee rubber hose. Punch outthis pattern. Insert the hose in the hole thus formed and,with tape, seal any space where the hose enters the screwtop.
Blow through the tube (the manifold pressureincreases) and notice how the straw moves up becausepressure on the small jar increases. If air is sucked out ofthe tube, the straw should move down, because thepressure on the small jar decreases while the pressurewithin it remains the same.
� U.S. GOVERNMENT PRINTING OFFICE: 1990-717-000/03879