avr461: quick start guide for the embedded internet toolkit
TRANSCRIPT
8-bit Microcontroller
Application Note
Rev. 2499B–AVR–05/02
AVR461: Quick Start Guide for the Embedded Internet Toolkit
IntroductionCongratulations with your AVR Embedded Internet Toolkit. This Quick-start Guidegives an introduction to using the AVR Embedded Internet Toolkit and can be used asa guide for getting started with embedded Internet applications
System RequirementsThe minimum hardware and software requirements are:
• PC with 486 Processor (Pentium® is recommended).
• 16 MB RAM.
• 3 MB Free Hard Disk Space.
• Windows® 95/98/2000 or Windows NT® 4.0 or Higher.
• RS-232 Port (COM Port).
• Ethernet Network Connection or Ethernet Network Card with 10BaseT Interface (Twisted Pair, RJ45 Connector), web browser Installed, Internet Explorer or Netscape.
To modify the source code of the Toolkit, the following items are required:
• IAR C-compiler or Imagecraft™ C-compiler.
• STK500 Starter Kit or Other Programming Equipment Capable of In-System Programming megaAVR™.
1
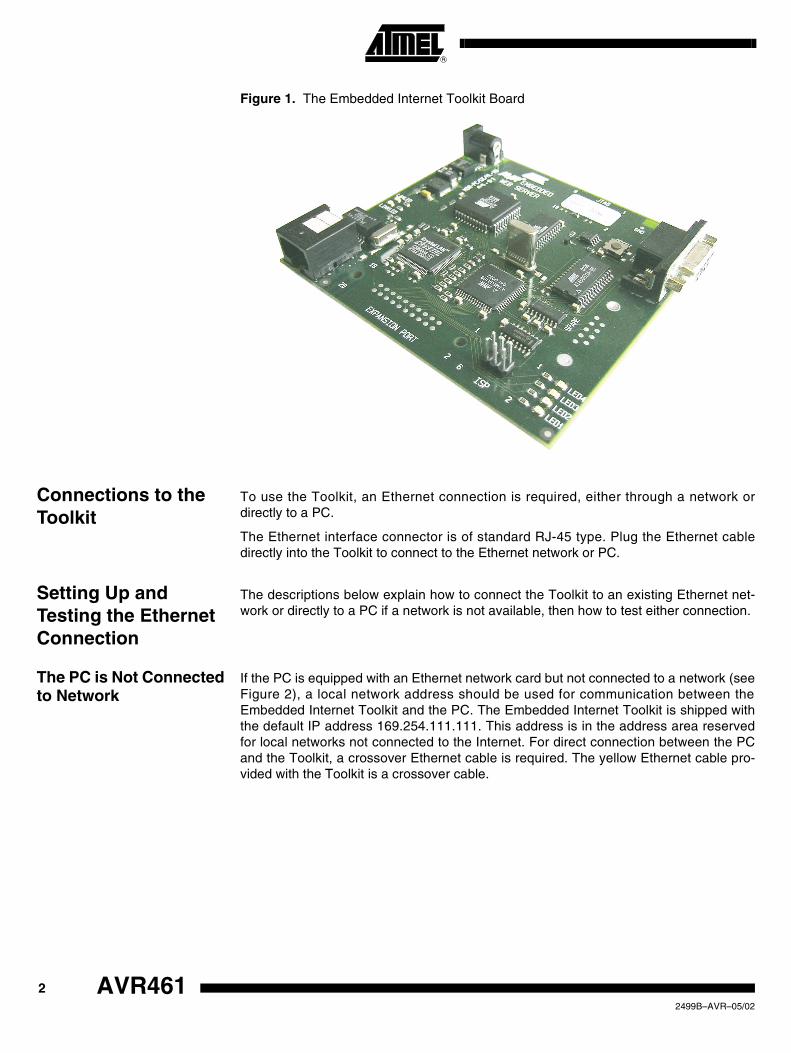
Figure 1. The Embedded Internet Toolkit Board
Connections to the Toolkit
To use the Toolkit, an Ethernet connection is required, either through a network ordirectly to a PC.
The Ethernet interface connector is of standard RJ-45 type. Plug the Ethernet cabledirectly into the Toolkit to connect to the Ethernet network or PC.
Setting Up and Testing the Ethernet Connection
The descriptions below explain how to connect the Toolkit to an existing Ethernet net-work or directly to a PC if a network is not available, then how to test either connection.
The PC is Not Connected to Network
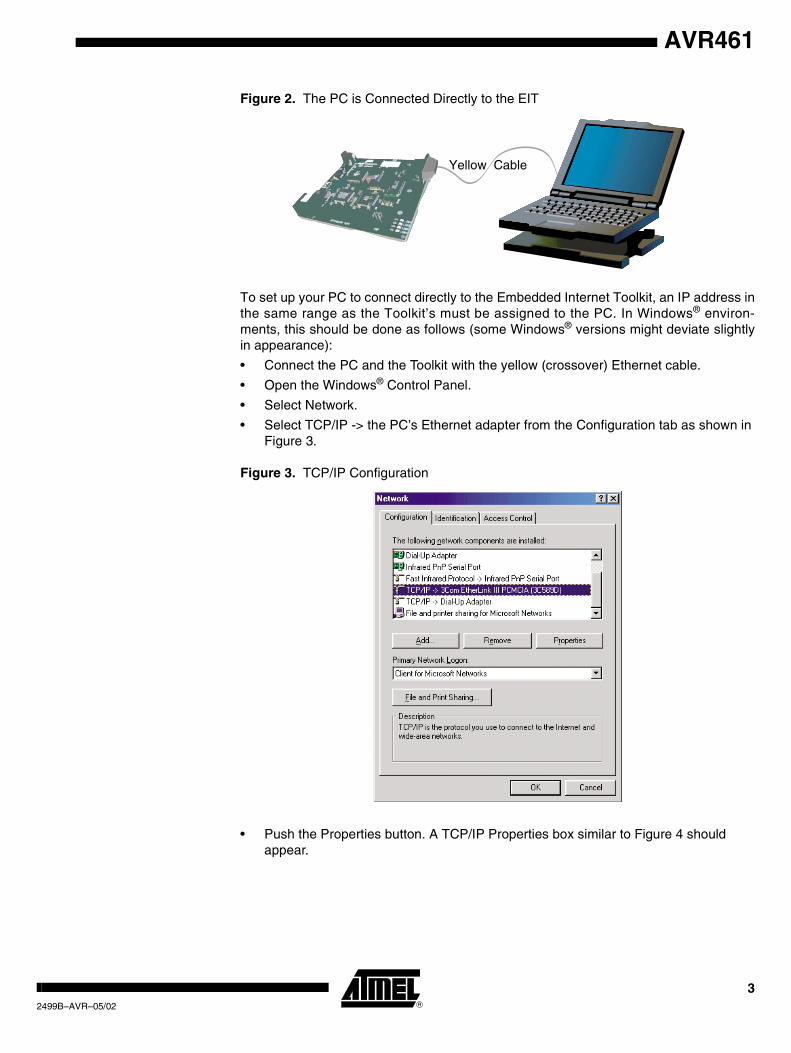
If the PC is equipped with an Ethernet network card but not connected to a network (seeFigure 2), a local network address should be used for communication between theEmbedded Internet Toolkit and the PC. The Embedded Internet Toolkit is shipped withthe default IP address 169.254.111.111. This address is in the address area reservedfor local networks not connected to the Internet. For direct connection between the PCand the Toolkit, a crossover Ethernet cable is required. The yellow Ethernet cable pro-vided with the Toolkit is a crossover cable.
2 AVR461 2499B–AVR–05/02
AVR461
Figure 2. The PC is Connected Directly to the EIT
To set up your PC to connect directly to the Embedded Internet Toolkit, an IP address inthe same range as the Toolkit’s must be assigned to the PC. In Windows® environ-ments, this should be done as follows (some Windows® versions might deviate slightlyin appearance):
• Connect the PC and the Toolkit with the yellow (crossover) Ethernet cable.
• Open the Windows® Control Panel.
• Select Network.
• Select TCP/IP -> the PC’s Ethernet adapter from the Configuration tab as shown in Figure 3.
Figure 3. TCP/IP Configuration
• Push the Properties button. A TCP/IP Properties box similar to Figure 4 should appear.
Yellow Cable
32499B–AVR–05/02

Figure 4. TCP/IP Properties
• Select the IP Address tab.
• Choose to Specify an IP address as shown in Figure 4.
• Insert the IP address 169.254.111.150 and the corresponding subnet mask as shown in Figure 4.
• Save your settings by pressing OK in both TCP/IP properties and Network properties.
• Reboot your PC.
4 AVR461 2499B–AVR–05/02
AVR461
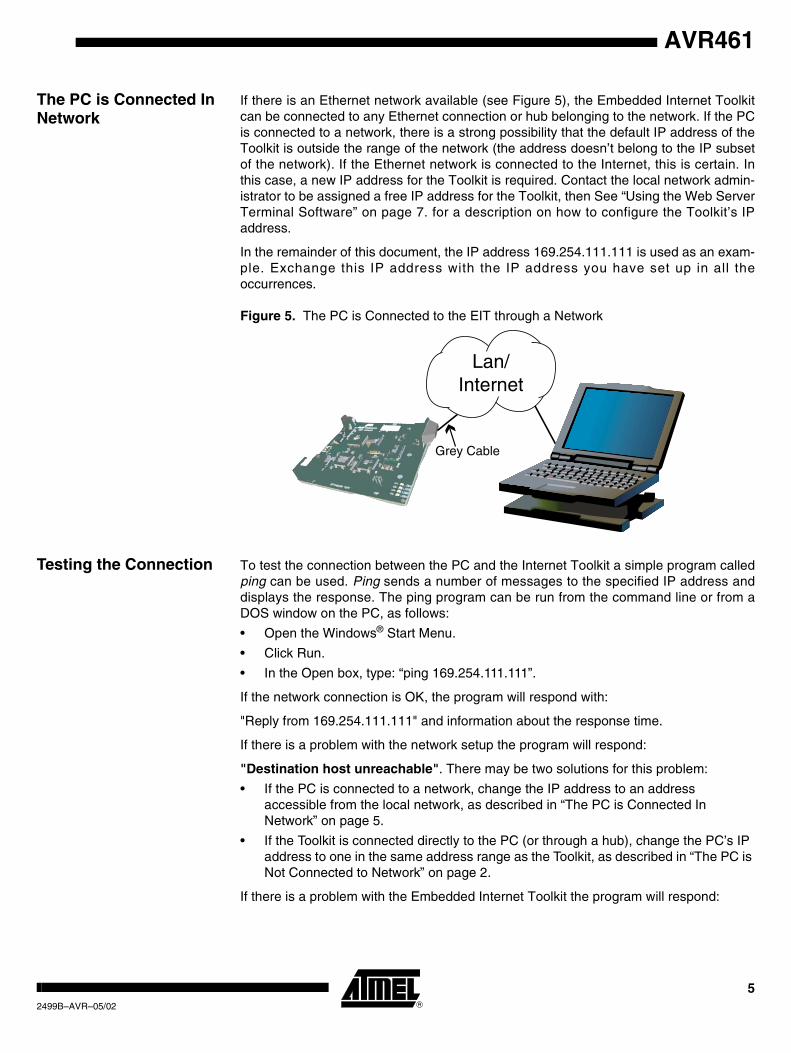
The PC is Connected In Network
If there is an Ethernet network available (see Figure 5), the Embedded Internet Toolkitcan be connected to any Ethernet connection or hub belonging to the network. If the PCis connected to a network, there is a strong possibility that the default IP address of theToolkit is outside the range of the network (the address doesn’t belong to the IP subsetof the network). If the Ethernet network is connected to the Internet, this is certain. Inthis case, a new IP address for the Toolkit is required. Contact the local network admin-istrator to be assigned a free IP address for the Toolkit, then See “Using the Web ServerTerminal Software” on page 7. for a description on how to configure the Toolkit’s IPaddress.
In the remainder of this document, the IP address 169.254.111.111 is used as an exam-ple. Exchange this IP address with the IP address you have set up in all theoccurrences.
Figure 5. The PC is Connected to the EIT through a Network
Testing the Connection To test the connection between the PC and the Internet Toolkit a simple program calledping can be used. Ping sends a number of messages to the specified IP address anddisplays the response. The ping program can be run from the command line or from aDOS window on the PC, as follows:
• Open the Windows® Start Menu.
• Click Run.
• In the Open box, type: “ping 169.254.111.111”.
If the network connection is OK, the program will respond with:
"Reply from 169.254.111.111" and information about the response time.
If there is a problem with the network setup the program will respond:
"Destination host unreachable". There may be two solutions for this problem:
• If the PC is connected to a network, change the IP address to an address accessible from the local network, as described in “The PC is Connected In Network” on page 5.
• If the Toolkit is connected directly to the PC (or through a hub), change the PC’s IP address to one in the same address range as the Toolkit, as described in “The PC is Not Connected to Network” on page 2.
If there is a problem with the Embedded Internet Toolkit the program will respond:
Lan/
Internet
Grey Cable
52499B–AVR–05/02
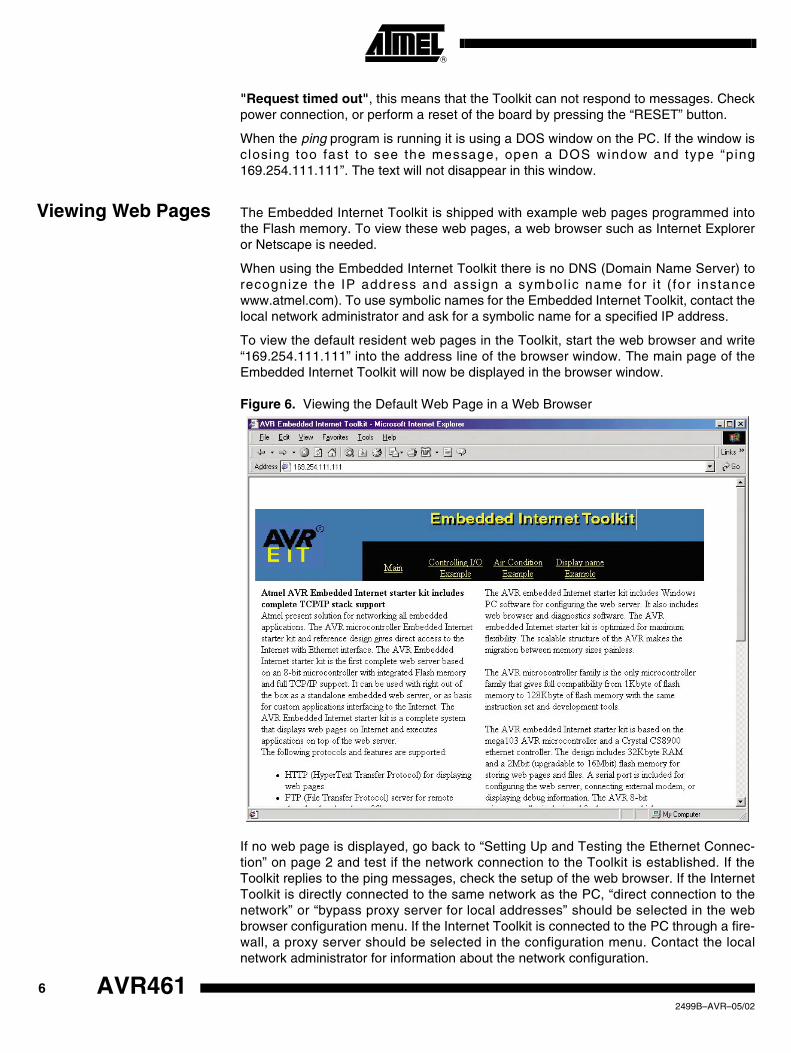
"Request timed out", this means that the Toolkit can not respond to messages. Checkpower connection, or perform a reset of the board by pressing the “RESET” button.
When the ping program is running it is using a DOS window on the PC. If the window isclosing too fast to see the message, open a DOS window and type “ping169.254.111.111”. The text will not disappear in this window.
Viewing Web Pages The Embedded Internet Toolkit is shipped with example web pages programmed intothe Flash memory. To view these web pages, a web browser such as Internet Exploreror Netscape is needed.
When using the Embedded Internet Toolkit there is no DNS (Domain Name Server) torecognize the IP address and assign a symbol ic name for i t ( for instancewww.atmel.com). To use symbolic names for the Embedded Internet Toolkit, contact thelocal network administrator and ask for a symbolic name for a specified IP address.
To view the default resident web pages in the Toolkit, start the web browser and write“169.254.111.111” into the address line of the browser window. The main page of theEmbedded Internet Toolkit will now be displayed in the browser window.
Figure 6. Viewing the Default Web Page in a Web Browser
If no web page is displayed, go back to “Setting Up and Testing the Ethernet Connec-tion” on page 2 and test if the network connection to the Toolkit is established. If theToolkit replies to the ping messages, check the setup of the web browser. If the InternetToolkit is directly connected to the same network as the PC, “direct connection to thenetwork” or “bypass proxy server for local addresses” should be selected in the webbrowser configuration menu. If the Internet Toolkit is connected to the PC through a fire-wall, a proxy server should be selected in the configuration menu. Contact the localnetwork administrator for information about the network configuration.
6 AVR461 2499B–AVR–05/02

AVR461
Installing the Web Server Terminal Software
The Embedded Internet Toolkit includes software for configuring the Toolkit. For a com-plete description of the configuration settings, please see the AVR Web Serverdocumentation.
The web server terminal software is included on the CD-ROM provided with the Toolkit.To install the web server terminal software on the PC, click on the “PC software” link onthe CD-ROM main page. This will copy all required files to the hard disk and add theweb server icon to the start menu on the PC. The PC may need to be restarted after theinstallation.
Using the Web Server Terminal Software
To start the web server terminal software, open the start menu, select Programs andAVR Web Server Terminal to start the software. To load the default setting, open theFile menu and select Load. Figure 7 shows the settings in the web server terminalsoftware.
Note: The Toolkit’s network connection must be running correctly and the LINKLED on theboard must be on in order to successfully connect to the web terminal software. If thenetwork connector is not plugged in, the Embedded Internet Toolkit will not be initialized
Figure 7. Web Server Terminal Window
The various settings are explained below.
72499B–AVR–05/02

Web Server Setup
DHCP Enable If DHCP (Dynamic Host Configuration Protocol) is enabled, the web server will automat-ically initialize the IP address from a DHCP host. Use of DHCP requires a DHCP host tobe set up on the network. “DHCP enable” disables manual IP address setup.
IP Address Sets up the IP (Internet Protocol) address of the web server. Make sure the IP addressis available on the local network. For complete description of IP addresses, see the AVRWeb Server documentation
MAC Address Configures the MAC (Media Access Control) address of the web server. The MACaddress must be a 48-bit hex value. For complete description of MAC address, see theAVR Web Server documentation
E-mail Setup The AVR Embedded Web Server can be configured to send e-mails to an e-mailaddress specified in the web server terminal. The sender and receiver address can bewritten directly into the e-mail setup section. The Host name is used to identify the webserver to the mail server. The e-mail server IP address specifies the address of the e-mail server.
FTP Setup The FTP setup section specifies the user name and password to log on to the AVREmbedded Web Server using FTP (File Transfer Protocol).
Write The software writes the configuration settings to a local file called “server.ini”. When thewrite button is pressed the local file is transferred via the RS-232 serial interface to theInternet Toolkit. Make sure that an RS-232 cable is connected between the PC and theInternet Toolkit and that the Toolkit’s network connection is running correctly beforepressing the write button.
The file is transferred to the Internet Toolkit using the ymodem protocol. The default set-tings are 9600 baud, no parity, 8 data bits, and 1 stop bit (9600, n, 8, 1). In the settingmenu, the UART settings can be changed from their default values in the Settingsmenu.
The new settings become operative the next time the EIT is reset or powered up.
Figure 8. Writing Configuration to the Toolkit
Ping The web server terminal software includes a ping for testing the communication to theInternet Toolkit. When clicking the Ping choice in the Tools menu, the program will pingthe address currently in the IP Address field, and display the result in a DOS window.For an explanation of the ping responses, please see “Setting Up and Testing the Ether-net Connection” on page 2.
8 AVR461 2499B–AVR–05/02
AVR461
Web Browser If Internet Explorer is installed on the PC, the web server terminal can be used as a webbrowser. Simply click the View menu and then web browser to display the web contentsof the address specified in the IP Address field.
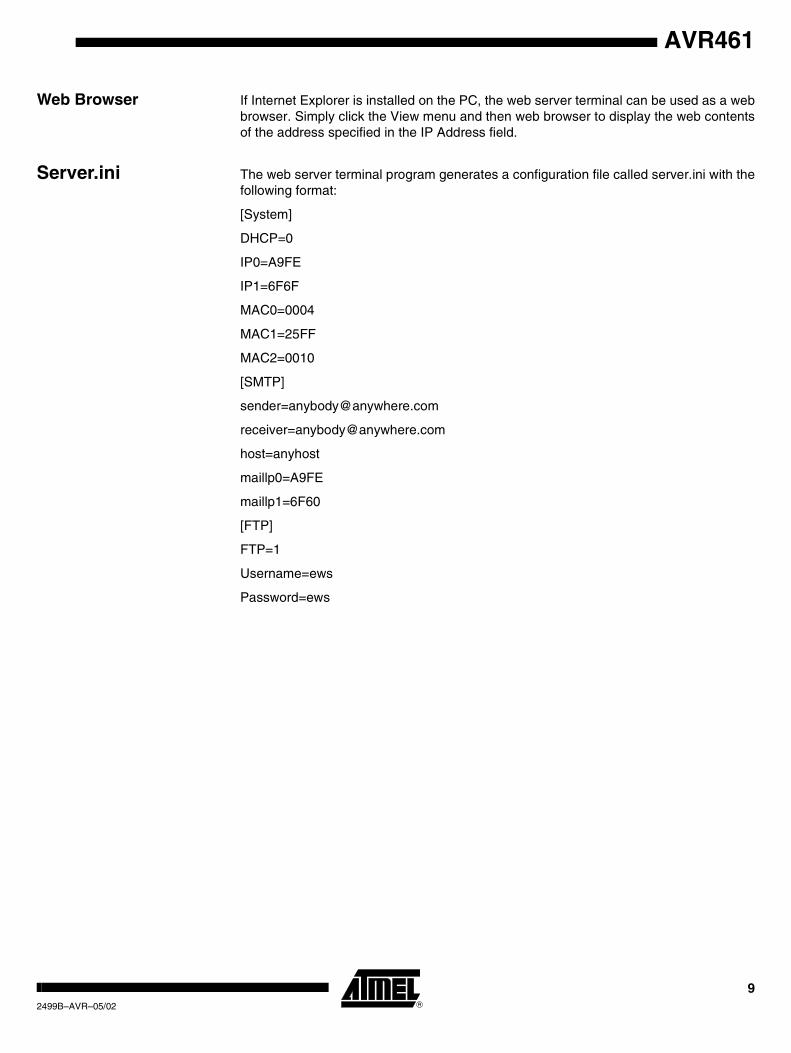
Server.ini The web server terminal program generates a configuration file called server.ini with thefollowing format:
[System]
DHCP=0
IP0=A9FE
IP1=6F6F
MAC0=0004
MAC1=25FF
MAC2=0010
[SMTP]
host=anyhost
maillp0=A9FE
maillp1=6F60
[FTP]
FTP=1
Username=ews
Password=ews
92499B–AVR–05/02
Uploading Web Pages to the Toolkit
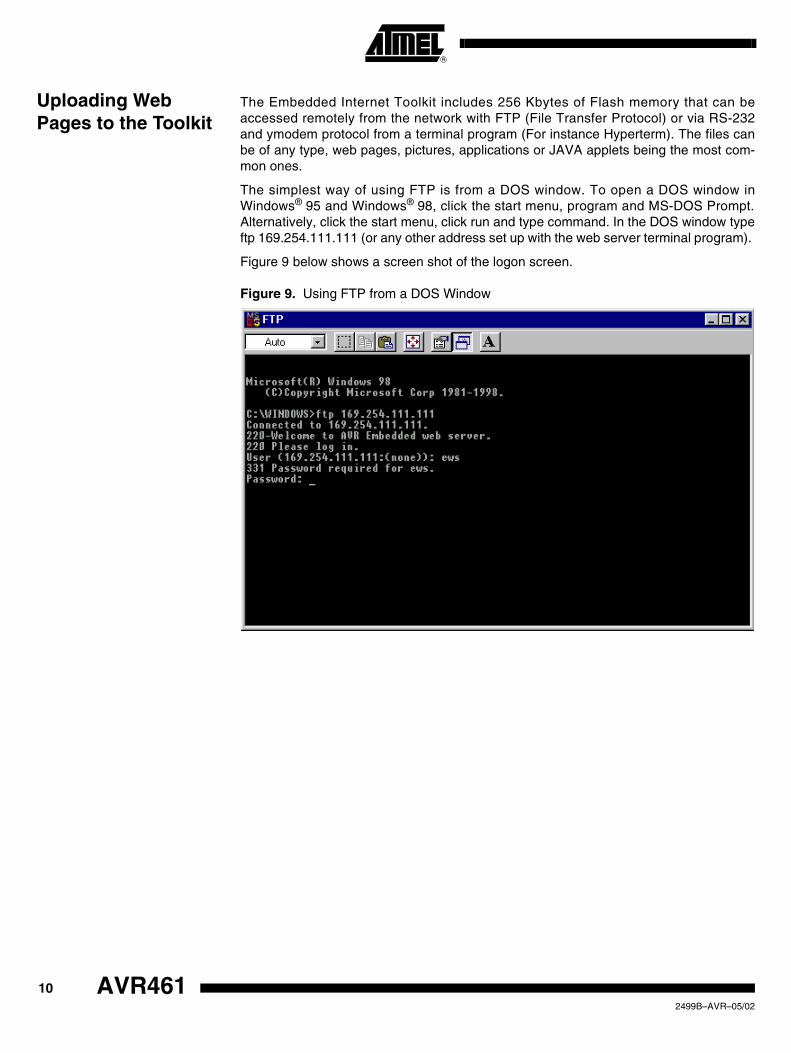
The Embedded Internet Toolkit includes 256 Kbytes of Flash memory that can beaccessed remotely from the network with FTP (File Transfer Protocol) or via RS-232and ymodem protocol from a terminal program (For instance Hyperterm). The files canbe of any type, web pages, pictures, applications or JAVA applets being the most com-mon ones.
The simplest way of using FTP is from a DOS window. To open a DOS window inWindows® 95 and Windows® 98, click the start menu, program and MS-DOS Prompt.Alternatively, click the start menu, click run and type command. In the DOS window typeftp 169.254.111.111 (or any other address set up with the web server terminal program).
Figure 9 below shows a screen shot of the logon screen.
Figure 9. Using FTP from a DOS Window
10 AVR461 2499B–AVR–05/02

AVR461
Figure 10. Listing of Files in the File System
To view the files in the file system, type “ls” or “dir”. To transfer files from a location onthe PC to the Toolkit, type “put name.ext”, where name.ext is the name of the file. Totransfer files from the Toolkit to the PC type “get name.ext” where name.ext is the nameof the file. Files in the file system can not be overwritten, and must therefore be deletedbefore re-written. To delete a file, type “rm name.ext”. To change the directory fromwhich you want to transfer the files from your PC, type “LS directory” where directory isthe target path on your PC. For more information, type “?”.
The file server.ini contains the configuration settings of the Toolkit, and should not bedeleted from the file system. The file index.htm is the default file that is displayed whenthe Toolkit’s IP address is entered in a web browser window.
The dataflash file system can also be accessed from FTP programs with Windows inter-face. The file system has been tested with CuteFTP® (www.globalscape.com).
112499B–AVR–05/02
Modifying the Software
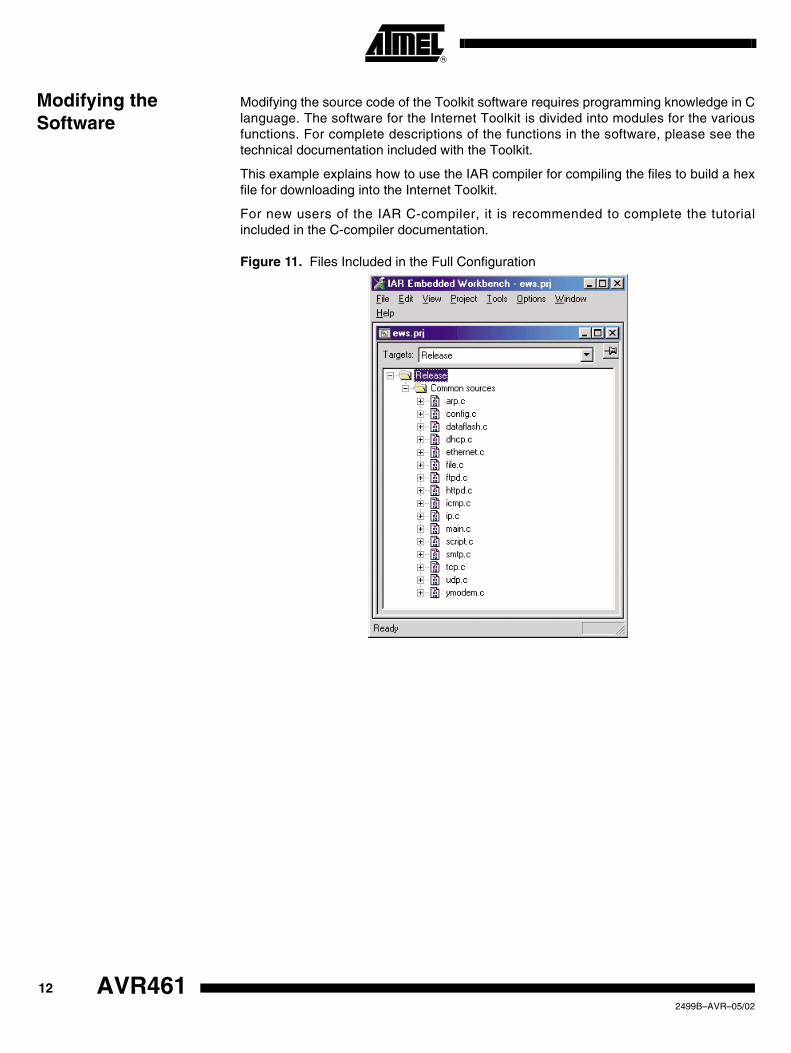
Modifying the source code of the Toolkit software requires programming knowledge in Clanguage. The software for the Internet Toolkit is divided into modules for the variousfunctions. For complete descriptions of the functions in the software, please see thetechnical documentation included with the Toolkit.
This example explains how to use the IAR compiler for compiling the files to build a hexfile for downloading into the Internet Toolkit.
For new users of the IAR C-compiler, it is recommended to complete the tutorialincluded in the C-compiler documentation.
Figure 11. Files Included in the Full Configuration
12 AVR461 2499B–AVR–05/02

AVR461
Figure 12. Setting Output File Format
Figure 11 shows the files an IAR project including all the files necessary to use all soft-ware modules. To save code space, unused modules may be removed. The code sizefor the modules included in Figure 7 is approximately 30 Kbytes with maximum sizecompression. Figure 12 shows the settings for the output file format. Intel-extendedshould be selected as file format.
Figure 13 shows the settings for the linker file. A linker command file is included with thecode. This linker command file should be selected.
The project can now be built. The.hex file can be downloaded to the Toolkit as explainedbelow.
Downloading New Software
When a.hex file has been generated by the C-compiler, it must be downloaded into theToolkit. This downloading can be done with the AT90ISP programing cable or with theSTK500 starter kit. The documentation for these tools explains the required connec-tions. When connecting the programmer to the 6-pin ISP header on the Toolkit board,make sure that the cable is connected the right way round.
132499B–AVR–05/02

Formatting the File System
To format the file system of the EIT Dataflash, short-circuit pins 1 and 2 of the Expan-sion Port header on the EIT while resetting it.
Figure 13. Specifying Linker File
14 AVR461 2499B–AVR–05/02

AVR461
Trouble-shooting guide
To be used with the Embedded Internet Quick Start Guide, which describes how to con-nect the Embedded Internet Toolkit, plus the use of FTP and web browsers.
Table 1. Troubleshooting Guide
No Checkpoint Y/N Solution
1
Is the LAN LED on and is the LINK LED flashing with short pulses?
NO
No network connection is detected. The Ethernet cable is either not plugged in or wrong type of cable is used. For connection to a network with a hub or switch, a normal network cable can be used. For direct connection to a PC network card, a twisted cable must be used.
YESA network connection is detected, the Toolkit is connected to the network
2Does the Toolkit respond to PING requests?
NO
Either the Toolkit or the PC is set up with wrong IP address. To change the IP address of the Toolkit, use the terminal program included on the Toolkit CD. Note that the file must be saved as "server.ini" before pressing the "write" button in the terminal program. A network connection (checkpoint 1) must be established before the terminal program can communicate with the Toolkit.To change the IP address of a PC, use the Windows "control panel ->network ->TCP/IP properties" and set up an IP address close to the Toolkit IP address. I.e. as the Toolkit is shipped with a default IP address of 169.254.111.111, the PC can be set up with IP address 169.254.111.150
YESThe PC and the Toolkit are set up with a correct IP address and they are able to communicate with each other
3Can the Toolkit communicate with a DOS FTP program?
NOThe default user name and password is "ews". Check that the user name and password are written in lowercase
YES The user has access to the flash file system
4Can the default web pages be accessed in a web browser?
NO
This is normally caused by the setup of the web browser.In the "options" or "preferences" menu, check that the web browser is configured for direct network connection or local area network and NOT using a proxy server.
YES No problems
152499B–AVR–05/02
Printed on recycled paper.
© Atmel Corporation 2002.Atmel Corporation makes no warranty for the use of its products, other than those expressly contained in the Company’s standard warrantywhich is detailed in Atmel’s Terms and Conditions located on the Company’s web site. The Company assumes no responsibility for any errorswhich may appear in this document, reserves the right to change devices or specifications detailed herein at any time without notice, and doesnot make any commitment to update the information contained herein. No licenses to patents or other intellectual property of Atmel are grantedby the Company in connection with the sale of Atmel products, expressly or by implication. Atmel’s products are not authorized for use as criticalcomponents in life support devices or systems.
Atmel Headquarters Atmel Operations
Corporate Headquarters2325 Orchard ParkwaySan Jose, CA 95131TEL 1(408) 441-0311FAX 1(408) 487-2600
EuropeAtmel SarlRoute des Arsenaux 41Case Postale 80CH-1705 FribourgSwitzerlandTEL (41) 26-426-5555FAX (41) 26-426-5500
AsiaRoom 1219Chinachem Golden Plaza77 Mody Road TsimhatsuiEast KowloonHong KongTEL (852) 2721-9778FAX (852) 2722-1369
Japan9F, Tonetsu Shinkawa Bldg.1-24-8 ShinkawaChuo-ku, Tokyo 104-0033JapanTEL (81) 3-3523-3551FAX (81) 3-3523-7581
Memory2325 Orchard ParkwaySan Jose, CA 95131TEL 1(408) 441-0311FAX 1(408) 436-4314
Microcontrollers2325 Orchard ParkwaySan Jose, CA 95131TEL 1(408) 441-0311FAX 1(408) 436-4314
La ChantrerieBP 7060244306 Nantes Cedex 3, FranceTEL (33) 2-40-18-18-18FAX (33) 2-40-18-19-60
ASIC/ASSP/Smart CardsZone Industrielle13106 Rousset Cedex, FranceTEL (33) 4-42-53-60-00FAX (33) 4-42-53-60-01
1150 East Cheyenne Mtn. Blvd.Colorado Springs, CO 80906TEL 1(719) 576-3300FAX 1(719) 540-1759
Scottish Enterprise Technology ParkMaxwell BuildingEast Kilbride G75 0QR, Scotland TEL (44) 1355-803-000FAX (44) 1355-242-743
RF/AutomotiveTheresienstrasse 2Postfach 353574025 Heilbronn, GermanyTEL (49) 71-31-67-0FAX (49) 71-31-67-2340
1150 East Cheyenne Mtn. Blvd.Colorado Springs, CO 80906TEL 1(719) 576-3300FAX 1(719) 540-1759
Biometrics/Imaging/Hi-Rel MPU/High Speed Converters/RF Datacom
Avenue de RochepleineBP 12338521 Saint-Egreve Cedex, FranceTEL (33) 4-76-58-30-00FAX (33) 4-76-58-34-80
Web Sitehttp://www.atmel.com
2499B–AVR–05/02 0M
ATMEL® and AVR® are the registered trademarks of Atmel.
Windows® and Windows NT® are registered trademarks of Microsoft Corporation. CuteFTP® are registeredtrademark of GlobalSCAPE, Inc. Imagecraft™ are trademark of Imagecraft.
Other terms and product names may be the trademarks of others.