axis plugin for autodesk revit · 1 introduction this guide will provide basic instructions about...
TRANSCRIPT

Getting-started Guide
Created: 181215 Last updated: 181218
Rev: 1.1
Axis plugin for Autodesk Revit® User Guide
Table of contents
1 INTRODUCTION 3
2 INSTALLING THE PLUGIN 3
3 USING THE PLUGIN 5
3.1 General information 5
3.2 The Product Selector 6
3.3 Settings 7
3.4 Functionality 8
3.5 Finding the right device 9 Search 9 Filters 9 Search / Selector results 10 Product selector link 10 Selection summary 10
4 MODEL UPDATES 11
4.1 Feature update to Axis families 11 Project Browser 11 Camera Properties 12 Field-of-View 13
5 ADDITIONAL INFORMATION 13

1 Introduction This guide will provide basic instructions about installing and getting started with Axis plugin for Autodesk Revit®.
2 Installing the plugin Please go through the following process to successfully install the plugin.
1. Start by closing any running instance of Autodesk Revit.
2. Go to Programs and Features found in the Control Panel, locate Axis Camera View for Revit xxxx and select Uninstall.
Windows 7
Windows 10
3. Download the correct plugin installer file (zip-file) from the (version-specific) file location above and extract the content the file.

4. Double-click on the installation file (*.msi), accept the security warning if this is displayed by
clicking Run. Start the installation and proceed through the installation process with default values.
5. Launch Revit and verify that the plugin is visible and available in the interface.

3 Using the plugin 3.1 General information
The plugin consists of three parts/icons.
- Revit Portal This is a shortcut to the Revit page on axis.com - Product selector This up the product selector, used to select and insert cameras - 3D view Takes users to the 3D scene as captured by the camera

3.2 The Product Selector The actual product selector is used to find, select and insert products into a drawing. This section explains the functionality and usability of the settings.
1. Settings
2. Functionality 1. s
3. Search
4. Selector functionality
6. Search / Selection result
7. Product selector link 8. Selection summary
5. Icon size for selection

3.3 Settings To access the global settings for the plugin, select the Settings icon:
The “Local Folder” is a location that the plugin will use to store and synchronize Axis models. Please select a local or network server to manage these models long-term. Please choose the preferred “Default Unit System” the choices being Metric or Imperial. The Online / Offline mode has a choice to “Clear filter switching between modes”. Generally, when making selections in the available products section, you are able to choose multiple products (models) to be added to a project. Once complete, it is recommended to check this box, so the filter is cleared for the next model search.

3.4 Functionality In this area you can adjust the functionality and how to work with on versus off-line content.
Offline Mode: Available offline families according to number of products Loaded
or/and Downloaded. Download All: Download all visible devices according to the filter. Download Selected: Download only the selected devices. Load: Load families in the project. Place: Place one family with only one mount at the time, directly to the
project. (This will automatically add the device to the “Security Devices” folder.)
Any device that has not been downloaded to the local folder (or is newly added) will have a blue information button on the bottom right of the icon.

3.5 Finding the right device
Search The search window will provide search results based on the product name or part hereof, such as P32.
Filters The filters allow you to identify suitable products based upon specific requirements such as Outdoor ready or Vandal resistant.
You can also decide to include or exclude products that are End-of-Life and to indicate if there are any updates to existing products.
There is a second option for a selection of metric or imperial specifications.

Search / Selector results The result will be provided in the result window. If the “Show Discontinued” box is chosen, the available products area will also include these devices among the presented products that meet the filter criteria.
Product selector link This link will take you to the product selector on axis.com, which can be used when you need to use search criteria’s that are no incorporated in the plugin are required, such as IP- & vandal ratings, WDR-functionality and availability of built-in IR illumination. Once a product has been identified using the product selector, you will go back to Revit and use the Search functionality to find and select the product inside the Revit-plugin.
Selection summary An indicator showing the number of selected products versus the total amount of products supported by the plugin.

4 Model Updates As part of the new Axis plugin for Autodesk deliverable, there are notable changes to the device families for your consideration.
4.1 Feature update to Axis families
Project Browser Under the “Security Devices” tab, the existing families can be differentiated from the new families by the name of the model. The newer families will have an unit designation (Metric or Imperial):
New families
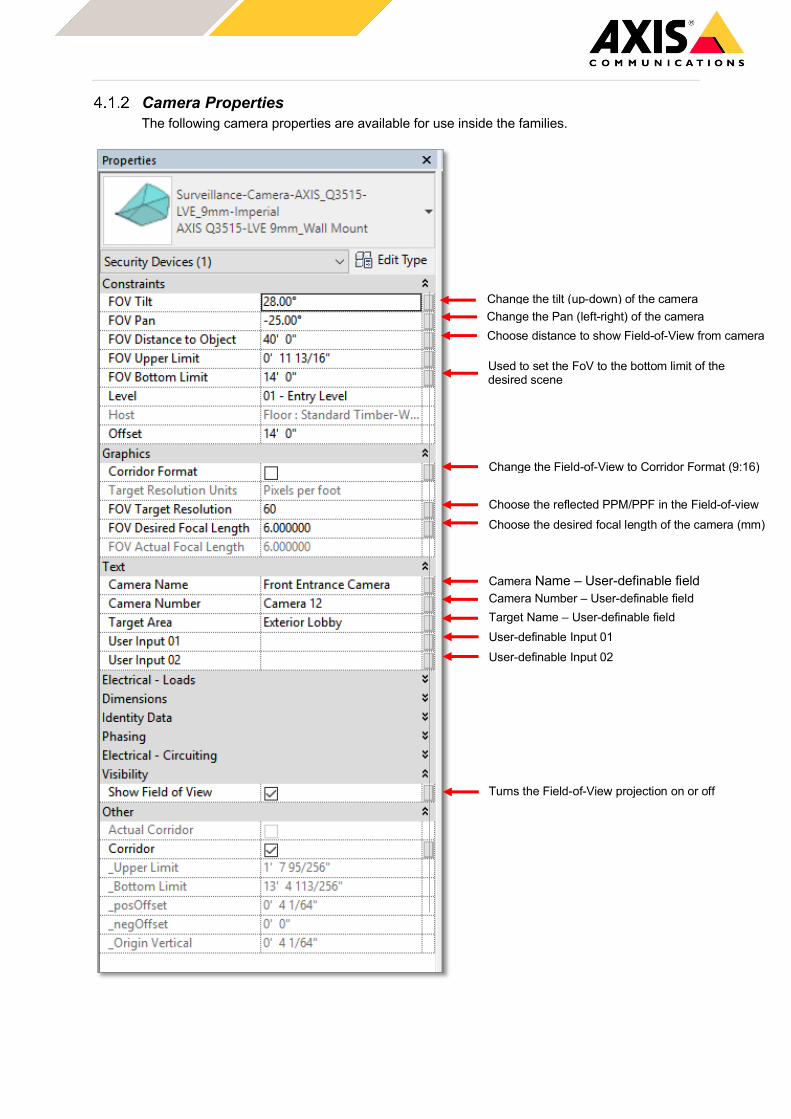
Camera Properties The following camera properties are available for use inside the families.
Change the tilt (up-down) of the camera Change the Pan (left-right) of the camera
Used to set the FoV to the bottom limit of the desired scene
Change the Field-of-View to Corridor Format (9:16)
Camera Name – User-definable field Camera Number – User-definable field
User-definable Input 02
Target Name – User-definable field User-definable Input 01
Choose the reflected PPM/PPF in the Field-of-view
Turns the Field-of-View projection on or off
Choose distance to show Field-of-View from camera
Choose the desired focal length of the camera (mm)

Field-of-View The Field-of-View has been adapted for a more realistic view from the camera. Notice in the views below, the camera has been set to a 60ppf, so the darker green area is the target range (60ppf).
5 Additional information If you need additional help on how to work with Revit, we recommend Autodesk’s Support and Learning area for Revit and different user communities on internet, such as below LinkedIn group. Autodesk Revit – Support & Learning: https://knowledge.autodesk.com/support/revit-products LinkedIn - Revit Users group: https://www.linkedin.com/groups/68075/ If you do encounter something which you believe is an error on incorrect functionality of the Axis-plugin, you can contact your Axis contact person or you can send a mail to [email protected]. Our ability to support Revit is limited and is focusing on the functionality of the Axis unique features, but we will do our best to ensure you get the expected results from the use of the plugin.