axon citizen guide
TRANSCRIPT

Axon Citizen Guide
Document Revision: D March 2020
Axon Citizen Guide
Axon Enterprise, Inc. Page 2 of 34
Apple and iOS are trademarks of Apple, Inc. registered in the US and other countries.
Google and Android are trademarks of Google, Inc.
Microsoft, Windows, and Internet Explorer are trademarks of Microsoft Corporation registered in the US and other countries.
, Axon, Axon Capture, and Evidence.com are trademarks of Axon Enterprise, Inc., some of which are registered in the US and other countries. For more information, visit www.axon.com/legal.
All rights reserved. ©2020 Axon Enterprise, Inc.

Axon Citizen Guide
Axon Enterprise, Inc. Page 3 of 34
Table of Contents
Overview of Axon Citizen Workflows ....................................................................................................... 4
Axon Citizen for Communities Workflow: ....................................................................................... 4
Axon Citizen for Officers Workflow: ................................................................................................ 5
Enabling Axon Citizen at your Agency ...................................................................................................... 5
Axon Citizen Permissions .......................................................................................................................... 5
Example Axon Citizen Management Permissions ......................................................................... 7
Axon Citizen Settings ................................................................................................................................. 8
Citizen Evidence and Portal Detail Page Overview ............................................................................... 11
Working with Public Portals .................................................................................................................... 14
Creating a Public Portal ........................................................................................................................... 14
Editing a Public Portal .............................................................................................................................. 16
Closing a Public Portal ............................................................................................................................. 17
Inviting an Individual ................................................................................................................................ 18
Using Axon Capture to Invite an Individual .......................................................................................... 18
Using Evidence.com to Invite an Individual .......................................................................................... 20
Virus Scan for Axon Citizen ...................................................................................................................... 22
Submission Notifications ......................................................................................................................... 23
Using Evidence.com to Triage Submissions ........................................................................................... 24
Searching for Axon Citizen Evidence in Evidence.com ......................................................................... 26
Additional Information on Citizen Evidence Detail Pages .................................................................. 26
Recorded On and Uploaded On Dates ......................................................................................... 26
Citizen Metadata .............................................................................................................................. 26
Axon Citizen Audit Trail Information ............................................................................................. 27
What Community Members See ............................................................................................................. 28
Public Portals ............................................................................................................................................ 28
Individual Invite - Phone .......................................................................................................................... 30
Individual Invite - Email ........................................................................................................................... 32

Axon Citizen Guide
Axon Enterprise, Inc. Page 4 of 34
Overview of Axon Citizen Workflows
Axon Citizen makes it easy for law enforcement agencies to securely receive evidence submissions from the community and manage that media in Evidence.com. Axon Citizen has two components:
• Axon Citizen for Communities allows agencies to create public evidence submission portals where the public can submit evidence during both large-scale and smaller, day-to-day events.
• Axon Citizen for Officers allows officers to send out individual invites to witnesses directly from Axon Capture or Evidence.com.
Outlines of the Axon Citizen for Communities and Axon Citizen for Officers workflows are provided below:
Axon Citizen for Communities Workflow:
1. Create Public Portal when you need the community’s help.
2. Post the portal link to your website, social media, news outlets, etc.
3. Community members upload files and Evidence.com notifies the portal creator about new submissions.
4. Triage submissions to determine what to accept and decline.
5. Leverage existing tools to manage evidence submissions (search, sharing, access control, redaction, audit trails).

Axon Citizen Guide
Axon Enterprise, Inc. Page 5 of 34
Axon Citizen for Officers Workflow:
1. Invite individual from Axon Capture or Evidence.com
2. The community member uploads files and Evidence.com notifies the officer about the submission.
3. If enabled at agency, triage submissions to determine what to accept and decline.
4. Leverage existing tools to manage evidence submissions (search, sharing, access control, redaction, audit trails).
Enabling Axon Citizen at your Agency
Before users can create public portals, send individual invitations, and use the triage workflow, agency Evidence.com administrators must modify or create new Roles and enable the appropriate Axon Citizen permissions for the Roles.
Axon Citizen Permissions
Before users can create public portals, send individual invitations, and use the triage workflow, agency Evidence.com administrators must modify or create new Roles and enable the appropriate Axon Citizen permissions for the Roles.
Users that will use Axon Citizen with Axon Capture must have the Login Access permission for Axon Capture is set to Allowed.
See Example Axon Citizen Management Permissions for some example permission use cases.
Note: Administrators can modify existing Roles, create a new Role, or copy and modify an existing Role to enable the Axon Citizen permissions.

Axon Citizen Guide
Axon Enterprise, Inc. Page 6 of 34
1. On the menu bar, click Admin and then under Agency Settings, click Roles & Permissions.
The Roles & Permissions page lists available roles in alphabetical order.
2. Click the edit icon ( ) on the same line as the role that you want to edit.
The Configure Role page lists the permissions and their settings for the role.
3. Scroll down to the Citizen Management section and set the following permissions as needed for the Role:
Note: The pre-configured Admin Role has all permissions enabled.
• View Portals (Individual & Public): Allows a user to view information about a portal, but not edit the information or view triage submissions. This can be set to allow the user to view any portal or only portals created by the user.
• Invite Individual: Allows a user to create an individual portal for an individual citizen.
To enable this permission, the View Individual & Public Portal permission cannot be set to Prohibited.
• Create Public Portal: Allows a user to create a public portal that can be used by the community to upload items.
• Edit and Close Public Portal: Allows a user to edit and close (make inactive) a public portal. This can be set to allow the user to edit or close any portal or only the portals created by the user.
To enable this permission, the View Portals permission must be set to Any Portal or Only Their Own. If the Role has Only Their Own View Portals permission, then the user can only select Only Their Own for the Edit and Close Public Portal permission.
• Triage Submissions: Allows a user to accept or decline items from individual invites and public portal submissions. This can be set to allow the user to triage submissions from any portal or only from portals created by the user.

Axon Citizen Guide
Axon Enterprise, Inc. Page 7 of 34
To enable this permission, the View Portals permission must be set to Any Portal or Only Their Own. If the Role has Only Their Own View Evidence permission or Only Their Own View Portals permission, then the user profile is limited to Only Their Own for the Triage Submissions permission.
• Audit Trail PDF: Allows user to view and download a PDF record of who has viewed, edited or triaged portals.
To enable this permission, the View Portals permission must be set to Any Portal or Only Their Own.
Agency Evidence.com administrators should set up the agency Axon Citizen settings as needed for your Axon Citizen implementation before allowing users to create public portals or send individual invitations. See Axon Citizen Settings for more information on the settings.
Example Axon Citizen Management Permissions
The following table provides some example Role permission settings for using Axon Citizen based on different use cases. The Audit Trail PDF permission setting should be determined by your agency policies for reviewing audit trails.
Use case View portal Invite individual
Create public portal
Edit and close public
portal
Triage submissions
Patrol officers that can invite individuals and must triage their own submissions
Only Their Own
Allowed Prohibited Prohibited Only Their Own
Detectives that can create public portals and triage their own submissions.
Only Their Own
Allowed Allowed Only Their Own
Only Their Own
Someone in the public information office that can create a public portal, but not triage themselves.
Any Portal Prohibited Allowed Any Portal Prohibited
You have a centralized group that can triage any portal.
Any Portal Prohibited Prohibited Prohibited Any Portal
Command staff that can access and triage any portal.
Any Portal Allowed Allowed Any Portal Any Portal

Axon Citizen Guide
Axon Enterprise, Inc. Page 8 of 34
Axon Citizen Settings
Agency Evidence.com administrators should set up the agency Axon Citizen settings as needed for your Axon Citizen implementation before allowing users to send individual invitations.
Before allowing users to create portals or invitations, select the Axon Citizen settings for contact information requirement.
1. On the menu bar, click Admin and then under Agency Settings, click Citizen Settings.
The Citizen Settings page is shown.
2. Set the Help Contact Settings options.
This setting allows you to show up to three ways community members can contact your agency in the footer of Axon Citizen evidence upload pages.
To enable the option, toggle Enable contact information to on (blue = on). Then enter the contact method information (email address, phone number, or website URL) and select the contact method type (Email, Phone, or Website).

Axon Citizen Guide
Axon Enterprise, Inc. Page 9 of 34
3. Set the Retention Period for Declined Submission options.
This setting applies for both individual invites and public portals.
If evidence that is declined during triage should have a custom retention date, toggle Use Custom Retention Period to on (blue = on). Select the Retention Period interval (Days, Weeks, Years) and enter the Retention Period length.
4. In the Individual Invite Settings section, select if the ID, Category, and Description fields are required, optional, or not shown to senders for individual invitations.
• If Required is selected, the evidence collector must enter the information before an individual invitation is sent.
• If Do Not Show is selected, the field is not shown to the evidence collector.

Axon Citizen Guide
Axon Enterprise, Inc. Page 10 of 34
5. In the Community Member Info section, select if your agency will Require contact information to be stored in Evidence.com for individual invites.
Selecting this setting removes the Store Contact Information option for evidence collectors when creating individual invitations and the contact phone number or email will be stored in Evidence.com.
• If required, select the information fields that are required whenever contact information is stored in Evidence.com for individual invites.
6. Select the Auto-Accept Submissions setting for individual invites (blue = on).
When on, submissions from individual invites are automatically accepted and place in active status. Otherwise, users must manually accept or decline each evidence submission.
7. In the Public Portals Settings section, select if your agency will Require contact information to be stored in Evidence.com for portals.
• If required, select the information fields that are required whenever contact information is stored in Evidence.com.
8. Click Save Settings.
The Citizen Settings are saved.

Axon Citizen Guide
Axon Enterprise, Inc. Page 11 of 34
Citizen Evidence and Portal Detail Page Overview
To assist with managing submissions from individual invitations, the Citizen Evidence page has been added to the Evidence tab. The Citizen Evidence page lists information about public portals and individual invites the user can access and provides links to Portal Details pages. Each list shows a maximum of 10 entries, with page numbers and navigation arrows below each list. Users can click a page number or use the navigation arrows to change the list results.
Users assigned to roles that have the View Portals (Individual & Public) permission set to Any Portal, will also see a Show/Hide Filters option. When Show Filter is clicked, a toggle switch is shown that allows the user to only show portals they own or show all the portals at the agency.
This page also provides links to create new public portals and individual invites.

Axon Citizen Guide
Axon Enterprise, Inc. Page 12 of 34
The Portal Details pages provide general information about a public portal or individual invites. The information for portals and individual invites that have items to triage are in bold text and there is a blue indicator bar on the left-side of the entry. Users can access a Portal Details page by:
• Clicking View Submission in the email message they receive from Evidence.com after a submission is uploaded.
• In Evidence.com on the menu bar, click Evidence, then click Citizen Evidence. In the Public Portals or Individual Invites list, find the page you want to view and then click View Summary in the Portal Info column.
Portal Details pages for individual invites and public portals display similar information, but with some differences due to the additional requirements for public portals.
The Portal Details Page for an individual invite shows the following information:
• A summary of evidence submissions and whether any items require triage. Each summary item with a value is a link. Clicking the link takes you to an Evidence Search page with evidence associated with the portal. The evidence shown is filtered based on the link clicked.
If there are untriaged items in the submission, a button to review submissions is shown.
• A link to the portal Audit Trail.
• Invite information (created on, created by, associate categories, etc.).

Axon Citizen Guide
Axon Enterprise, Inc. Page 13 of 34
• An Evidence List showing the submitted items.
The Portal Details page for a public portal shows the following information:
• A summary of evidence submissions and whether any items require triage. Each summary item with a value is a link. Clicking the link takes you to an Evidence Search page with evidence associated with the portal. The evidence shown is filtered based on the link clicked.
If there are untriaged items in the submission, a button to review submissions is shown.
• Portal settings information (title, ID, categories, etc.).
• A link to the portal Audit Trail.
• An option to visit the portal, which opens the portal view shown to community members in a new browser tab.
• A toggle switch to close and reopen the portal.
• Public link information for sharing the public portal with new organizations, social media and other websites.
• The location information and map, if the location was added to the portal.
• The ID information for the current portal owner, the date the portal was created, and the ID information for the user that created the portal.

Axon Citizen Guide
Axon Enterprise, Inc. Page 14 of 34
Working with Public Portals
This section provides information on creating, editing, and closing public portals. Only users with the correct permissions can create, edit, and close portals.
Creating a Public Portal
1. Sign in to your Evidence.com account.
2. On the dashboard page, under Axon Citizen, click Create Public Portal.
Alternately, on the menu bar, click Evidence, then click Citizen Evidence, and then click Create Public Portal.
The Create Public Portal page opens.
3. In the Public URL field, enter the incident url. The incident url must be unique and you cannot use upper case letters, spaces, or special characters in the incident url.

Axon Citizen Guide
Axon Enterprise, Inc. Page 15 of 34
This text is appended to your agency’s public url to create the specific url path for the incident. Axon recommends using text that is similar or related to the portal Title.
4. Enter the ID as required by your agency.
5. Add evidence Categories as needed. A public portal can have multiple categories.
6. Enter the Portal Owner information. The Portal Owner is the user that can view and edit portal settings, triage portal submissions, receive email notifications when a submission is added to the portal, and the user will be assigned incoming portal evidence.
When a user is assigned as a portal owner, Evidence.com sends the user an email notification informing them that they are the portal owner. The portal owner can be different than the user creating the portal.
7. Enter a Title for the portal. The title is used in the Evidence.com Public Portal list and as part of the title community members see on the portal welcome page. The title can have a maximum of 127 characters.
8. Enter a Description for the portal. The description text is used on the portal welcome page and social media sites. The description can have a maximum of 2,000 characters. The text automatically wraps on the screen, but you can manually insert line breaks using your keyboard Enter key.
9. Optionally, add a Date and Time. This information can make it easier for triagers to compare the submissions to the incident.

Axon Citizen Guide
Axon Enterprise, Inc. Page 16 of 34
10. Optionally, click the edit icon (image placeholder) in Location of Incident to add a location. The location box expands to show a map.
• Enter the Address of the incident or click on the map to set the address.
• Optionally, enter a friendly name for the location.
• Click Save.
11. Click Submit.
You are taken to the Portal Details Page. From here you can copy and share the portal link on social media and other websites. The Portal Details Page is also used to close the portal when it is no longer needed.
Editing a Public Portal
1. Sign in to your Evidence.com account.
2. On the menu bar, click Evidence, then click Citizen Evidence, and then click the View Summary link for the portal you want to change.
The Portal Details page opens.

Axon Citizen Guide
Axon Enterprise, Inc. Page 17 of 34
3. Click the edit ( ) icon.
The Edit Public Portal page with the current portal information is shown.
4. Change the portal information as needed.
Changes to any fields must meet the same requirements as when creating a portal.
5. Click Save.
You are taken to the Portal Details Page. From here you can copy and share the portal link on social media and other websites. The Portal Details Page is also used to close the portal when it is no longer needed.
Closing a Public Portal
1. Sign in to your Evidence.com account.
2. On the menu bar, click Evidence, then click Citizen Evidence, and then click the View Summary link for the portal you want to close.
The Portal Details page opens.

Axon Citizen Guide
Axon Enterprise, Inc. Page 18 of 34
3. Under the Share Public Link heading, toggle the switch to say Closed for Submissions.
4. This closes the portal and the link is no longer active.
If someone clicks the link, they will get a Page Not Found message in their browser.
The portal can be re-opened later by toggling the switch.
Inviting an Individual
There are two ways to invite an individual, using Axon Capture and using Evidence.com. Evidence.com is used to manually triage and accept or decline evidence submissions, if required by your agency.
To prevent spam, each private link can only be used for one submission. Each submission is limited to a maximum of 16 files, with a maximum size of 60 GB per file and a total submission size of 200 GB. The private link for submissions expires after 3 days.
Note: For agencies that have French set as their default language in Evidence.com, the Axon Citizen individual invite text, Terms of Use, and Privacy Policy information will also appear in French.
Using Axon Capture to Invite an Individual
This section provides an overview of sending an Axon Citizen invitation through Axon Capture.
Note: The user must be allowed to invite individuals with Axon Citizen in Evidence.com and have Axon Capture for Android version 3.6 or later or Axon Capture for iOS version 3.7 or later to invite an individual.
1. Open the Axon Capture app.
Axon Citizen Guide
Axon Enterprise, Inc. Page 19 of 34
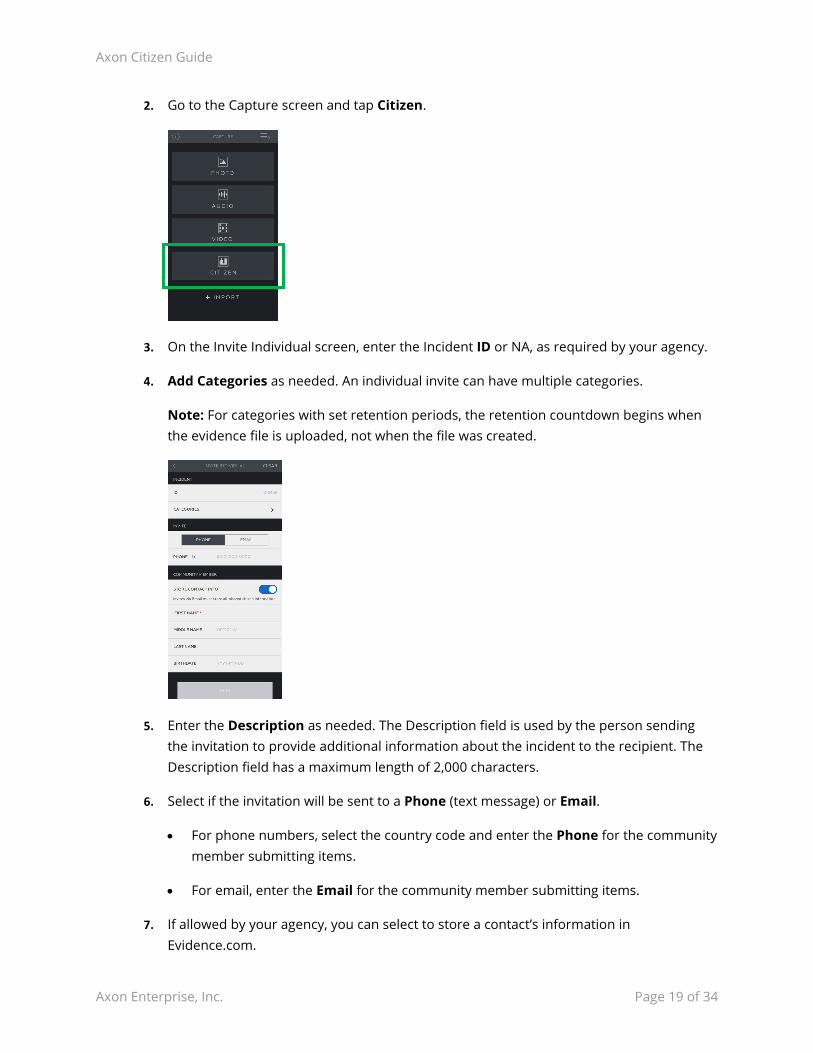
2. Go to the Capture screen and tap Citizen.
3. On the Invite Individual screen, enter the Incident ID or NA, as required by your agency.
4. Add Categories as needed. An individual invite can have multiple categories.
Note: For categories with set retention periods, the retention countdown begins when the evidence file is uploaded, not when the file was created.
5. Enter the Description as needed. The Description field is used by the person sending the invitation to provide additional information about the incident to the recipient. The Description field has a maximum length of 2,000 characters.
6. Select if the invitation will be sent to a Phone (text message) or Email.
• For phone numbers, select the country code and enter the Phone for the community member submitting items.
• For email, enter the Email for the community member submitting items.
7. If allowed by your agency, you can select to store a contact’s information in Evidence.com.

Axon Citizen Guide
Axon Enterprise, Inc. Page 20 of 34
If email was selected as the delivery method, the contact's information is always stored in Evidence.com.
If your agency requires contact information to be stored in Evidence.com, this option will not be shown.
8. If the contact’s information should be stored, enter the name and birth date information for the contact.
9. Tap Send.
The invite is sent to the phone number or email address. The message contains a one-time use link to a website where the citizen can upload video, photo, and audio files for submission.
After the contact uploads the submission, you will receive an email message from Evidence.com. If your agency requires you to triage submissions, you can use the link in the email to go to the triage page for the submission.
10. On the Invite Sent screen, you can:
• Tap OK to return to the main Capture screen.
• Tap Create another invite to use the same Incident ID and Categories for a new invitation. Repeat steps 5 through 7 and tap Send to send a new invite.
Using Evidence.com to Invite an Individual
1. Sign in to your Evidence.com account.
2. On the dashboard page, under Axon Citizen, click Invite Individual.

Axon Citizen Guide
Axon Enterprise, Inc. Page 21 of 34
Alternately, on the menu bar, click Evidence, then click Citizen Evidence, and then click Invite Individual.
3. On the Individual Invite page, enter the ID or NA as required by your agency.
4. Add Categories as needed. An individual invite can have multiple categories.
Note: For categories with set retention periods, the retention countdown begins when the evidence file is uploaded, not when the file was created.
5. Enter the Description as needed. The Description field is used by the person sending the invitation to provide additional information about the incident to the recipient. The Description field has a maximum length of 2,000 characters.
6. Select the Delivery Method, either Text message or Email.
• For Text message, select the country code and enter the Mobile Phone Number for the community member submitting items.
• For email, enter the Email address for the community member submitting items.
7. If allowed by your agency, select if the contact’s information should be stored in Evidence.com.
Axon Citizen Guide
Axon Enterprise, Inc. Page 22 of 34
If email was selected as the delivery method, the contact's information is always stored in Evidence.com.
If the information should be stored, enter the name and birth date information for the contact.
8. Click Submit.
The invite is sent to the phone number or email address. The message contains a one-time use link to a website where the citizen can upload video, photo, and audio files for submission.
After the contact uploads the submission, you will receive an email message from Evidence.com. If your agency requires you to triage submissions, you can use the link in the email to go to the triage page for the submission.
9. Click Done in the Successfully Created Portal dialog box to return to the Individual Invite page.
Virus Scan for Axon Citizen
Because it is critical to limit the possibility of viruses, files submitted through Axon Citizen links will undergo a scan for viruses when the files are ingested into Evidence.com. Files that pass the scan can be managed normally in Evidence.com, like any other evidence.
If a file has been submitted and the virus scan is still in progress, a warning is shown if a user tries to download the file.
Files that failed the scan can only be downloaded by users with Download Infected Files permission set to Allowed. In this situation, the user is shown a warning message informing

Axon Citizen Guide
Axon Enterprise, Inc. Page 23 of 34
them that the file did not pass the virus scan. If they want to download the file, the user selects a check box acknowledging the risk and can download the file.
Files and Cases with files that did not pass the virus scan can be shared inside your agency, with partner agencies, and by download link. Additional controls around sharing files that failed a virus scan will be added in future releases.
Submission Notifications
Each time a submission is received for a public portal or individual invite, Evidence.com sends an email notification to the owner. However, for public portals, if Evidence.com receives additional submissions for a portal before the user visits and triages the portal, then additional emails are not sent to that user.

Axon Citizen Guide
Axon Enterprise, Inc. Page 24 of 34
Using Evidence.com to Triage Submissions
Note: The triage workflow is not supported for Internet Explorer 11 on Windows 7 platforms.
Use the following procedure to review and accept or decline community submissions.
1. Go to the Portal Details Page for the submissions you want to triage. You can get to the page by:
• Click View Submission in the email message you receive from Evidence.com after a submission is uploaded. The email lists the ID, categories, and number of untriaged items in the submission.
• In Evidence.com, on the menu bar, click Evidence, then click Citizen Evidence. In the My Individual Invites list, find the invitation you want to view and then click the Portal Info link.
You are taken to the Portal Details Page.
Note: The example image below shows a Public Portal Detail Page. Individual invite pages show different information, but the instructions to review submissions are the same.

Axon Citizen Guide
Axon Enterprise, Inc. Page 25 of 34
2. Click Triage to review the submission.
The heading shows the contact’s name, if entered as part of the invitation, and number of items that need to be triaged.
This information, along with the upload date, is also shown on the right side of the page.
Click the More info link below the file to see additional information about the file. The information shown depends on type of file.
3. Review all the items in the submission.
• Click the checkmark under the file to accept it. The file is marked as accepted and the Evidence Status changes to Active.
• Click the X under the file to decline it. The file is marked as declined.
If your agency has a custom retention period for declined evidence, that retention period is used to determine how long the evidence is retained. Otherwise the declined evidence uses the retention period for the associated category to determine when the evidence is queued for deletion.
• You can accept or decline all remaining files in the submission by clicking Accept Remaining or Decline Remaining. The number shown in parenthesis on the buttons is the number of files that have not already been accepted or declined.
4. Click Done, for individual invites, or Next Submission, for public portals.
If you exit before accepting or rejecting all the items, you can return to the Submission Details Page later from the Portal Details Page.

Axon Citizen Guide
Axon Enterprise, Inc. Page 26 of 34
Searching for Axon Citizen Evidence in Evidence.com
You can use the evidence search pages — All Evidence, My Evidence, or Shared Evidence - to find evidence submissions from Axon Citizen individual invites and public portals.
1. Enter AXONCitizen in the Tag search filter. This shows all evidence submissions from Axon Citizen.
If needed, you can use User or Group, Date, and Category filters to narrow the search results.
To find evidence submissions that still needs to be triaged, you can select Triage Pending in the Status Advanced Search filter to show items that have not been accepted. To find submissions that are declined, you can select the Declined status filter.
Note: By default, the Status Advanced Search filter is set to Active and will not show evidence submissions with a Triage Pending status.
2. Click on the evidence Title to go to the Evidence Detail Page.
Additional Information on Citizen Evidence Detail Pages
In addition to the usual information on the Evidence Detail page, the following additional information is included for evidence submissions from Axon Citizen.
Recorded On and Uploaded On Dates
Some devices do not include the recorded/created on date for a file when it is submitted to Axon Citizen. In these situations, the Recorded On date is set to the time the file is received in Evidence.com, so the Recorded On and Uploaded On dates will be the same.
Citizen Metadata
This section is added to the right-side of the Evidence Detail page and shows the status, contact information, and caption applied by the contact. If the contact's information is not stored on Evidence.com, then the contact information is listed as Not provided.
Once a submission is accepted, the Triaged By line shows the name and Badge ID for the user that accepted the evidence. Before a submission is triaged, the Triaged By line is

Axon Citizen Guide
Axon Enterprise, Inc. Page 27 of 34
hidden and Status is Pending Triage. When Auto-Accept Submissions is enabled for your agency, the Triaged By line is hidden and the Status is Auto-Accepted for any individual invite submissions.
Note: For evidence that was accepted prior to the September 2018 release, the Triaged By line is hidden and the Status is Accepted.
The examples below show Citizen Metadata where the contact information is stored (left) and not stored (right).
Axon Citizen Audit Trail Information
The information shown audit trail for Axon Citizen evidence varies depending on if the community member’s information is provided. If your agency requires contact information to be stored or if the user sending the invitation selects the store contact information option, then the required community member information, including phone number or email address, is shown in the audit trail. If contact information is not stored, then the audit trail shows the community member information as Unidentified (name not provided) and the phone number or email address is not included.

Axon Citizen Guide
Axon Enterprise, Inc. Page 28 of 34
The first example below shows an audit trail entry where the contact information is stored and the second where the contact information is not stored.
What Community Members See
This section provides information on what community members see when they interact with a public portal or receive an Axon Citizen individual invitation by phone (text) or email.
Public Portals
This section provides an overview of what community members see and how they interact with public portals.
Notes:
• For agencies that have French set as their default language in Evidence.com, the Axon Citizen upload screen text, Terms of Use, and Privacy Policy information will also appear in French.
• If your agency has enabled Help Contact Settings, the information is shown in the footer of the evidence submission screen.
The community member clicks the agency provided link and is taken to the portal welcome page. The community member clicks Submit Evidence, enters their information, and then

Axon Citizen Guide
Axon Enterprise, Inc. Page 29 of 34
clicks Send Link to receive a private link. The private link for submissions expires after 3 days.
After clicking Send Link, the citizen receives the text message on their phone with the private link. Tapping the link takes them to a website where they can upload files.
From the upload screen, the community member can add files for uploading. They also have the option of adding a caption for each file. More files can be added by tapping Add more. Each submission is limited to a maximum of 16 files, with a maximum size of 2 GB per file and a total submission size of 10 GB.

Axon Citizen Guide
Axon Enterprise, Inc. Page 30 of 34
After the community member has added all their files and the files are uploaded to the website, they tap Submit to transfer the files to your agency's Evidence.com account and then can close their browser.
Individual Invite - Phone
This section provides an overview of what a community member sees and how they interact with an individual invite sent to their phone.
Note: If your agency has enabled Help Contact Settings, the information is shown in the footer of the evidence submission screen.
• After the invite is sent, the community member receives the text message on their phone with the private link. Tapping the link takes them to a website where they can upload files.
Axon Citizen Guide
Axon Enterprise, Inc. Page 31 of 34
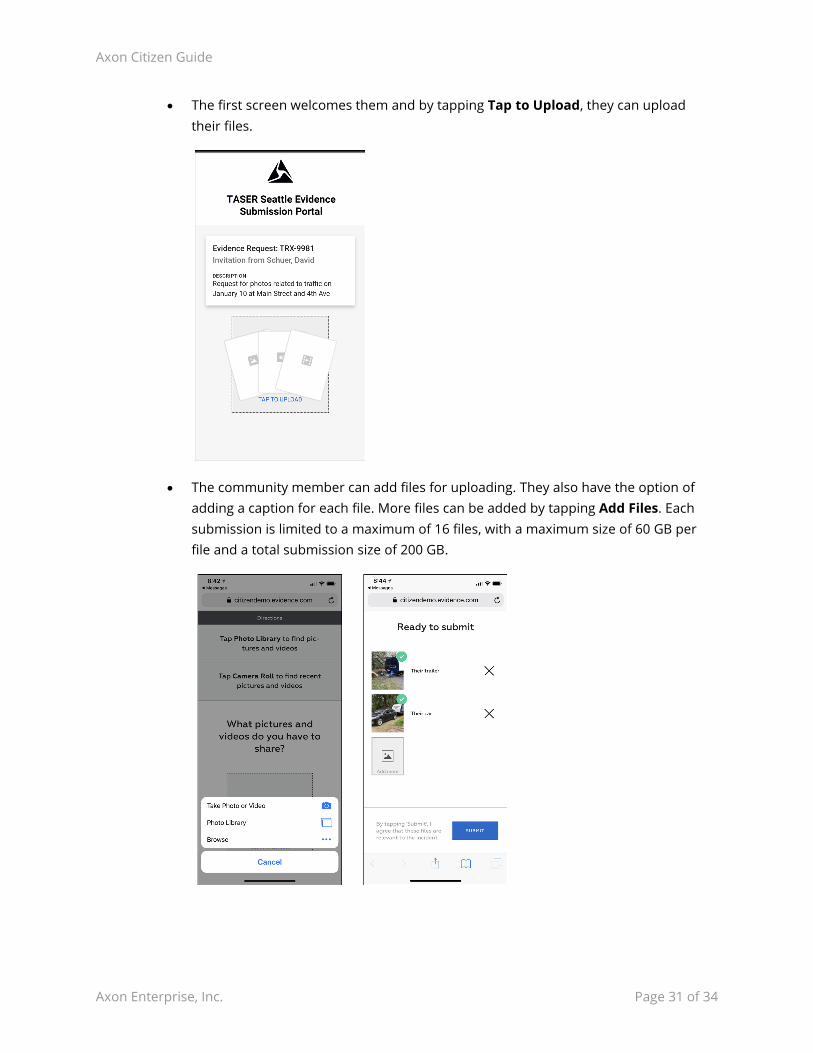
• The first screen welcomes them and by tapping Tap to Upload, they can upload their files.
• The community member can add files for uploading. They also have the option of adding a caption for each file. More files can be added by tapping Add Files. Each submission is limited to a maximum of 16 files, with a maximum size of 60 GB per file and a total submission size of 200 GB.

Axon Citizen Guide
Axon Enterprise, Inc. Page 32 of 34
• After the community member has added all their files and the files are uploaded to the website, they tap Submit to transfer the files to your agency's Evidence.com account and then can close their browser.
Individual Invite - Email
This section provides an overview of what a community member sees and how they interact with an individual invite sent to their email.
Note: If your agency has enabled Help Contact Settings, the information is shown in the footer of the evidence submission screen.

Axon Citizen Guide
Axon Enterprise, Inc. Page 33 of 34
• After the invite is sent, the citizen receives the email message with the private link. Clicking View Request takes them to a website where they can upload files.
• From the upload page, the community member can add files for uploading. They also have the option of adding a caption for each file. More files can be added by clicking Choose Files. Each submission is limited to a maximum of 16 files, with a maximum size of 60 GB per file and a total submission size of 200 GB.

Axon Citizen Guide
Axon Enterprise, Inc. Page 34 of 34
• After the community member has added all their files and the files are uploaded to the website, they click Submit to transfer the files to your agency's Evidence.com account and then can close their browser.