b-bot biped bot · pop out any interior pieces that need removed. 2. lay parts 1 and 2 flat with...
TRANSCRIPT

60073 V0113
User Guide
Cautionary and Warning Statements• Thiskitisdesignedandintendedforeducationalpurposesonly.• Useonlyunderthedirectsupervisionofanadultwhohasreadand
understoodtheinstructionsprovidedinthisuserguide.• Readwarningsonpackagingandinmanualcarefully.• Alwaysexercisecautionwhenusingsharptools.
B-BotBiped Bot
2 B-Bot Biped Bot User Guide 60073 V0113
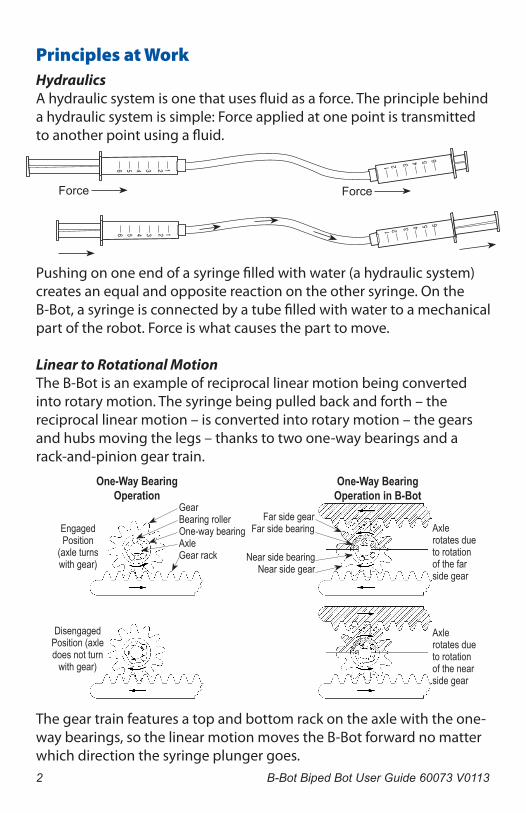
Principles at WorkHydraulicsAhydraulicsystemisonethatusesfluidasaforce.Theprinciplebehindahydraulicsystemissimple:Forceappliedatonepointistransmittedtoanotherpointusingafluid.
Pushingononeendofasyringefilledwithwater(ahydraulicsystem)createsanequalandoppositereactionontheothersyringe.OntheB-Bot,asyringeisconnectedbyatubefilledwithwatertoamechanicalpartoftherobot.Forceiswhatcausestheparttomove.
Linear to Rotational MotionTheB-Botisanexampleofreciprocallinearmotionbeingconvertedintorotarymotion.Thesyringebeingpulledbackandforth–thereciprocallinearmotion–isconvertedintorotarymotion–thegearsandhubsmovingthelegs–thankstotwoone-waybearingsandarack-and-piniongeartrain.
Thegeartrainfeaturesatopandbottomrackontheaxlewiththeone-waybearings,sothelinearmotionmovestheB-Botforwardnomatterwhichdirectionthesyringeplungergoes.
Force Force
One-Way Bearing Operation
One-Way Bearing Operation in B-Bot
Engaged Position
(axle turns with gear)
Disengaged Position (axle does not turn
with gear)
Axle rotates due to rotation of the far side gear
Axle rotates due to rotation of the near side gear
GearBearing rollerOne-way bearingAxleGear rack
Far side gearFar side bearing
Near side bearingNear side gear
B-Bot Biped Bot User Guide 60073 V0113 3
Materials Included• Bagoflaser-cutparts • 4–1"screws• 12ccand6ccsyringe • 2–1/2"screws• Tubing • 7–3/8"screws• Hubandbushingset • 2bushings• Axle • 2–#6flangedspacers• 2one-waybearings • 4–#2flangedspacers• 4spacers • Pieceofthread
Items Required (not included)• CAorwhiteglue(suchasHDBondII)• SmallPhillipsscrewdriver• Fileoremerysandpaper/cloth• Wirecutters• Smallpliers(optional)
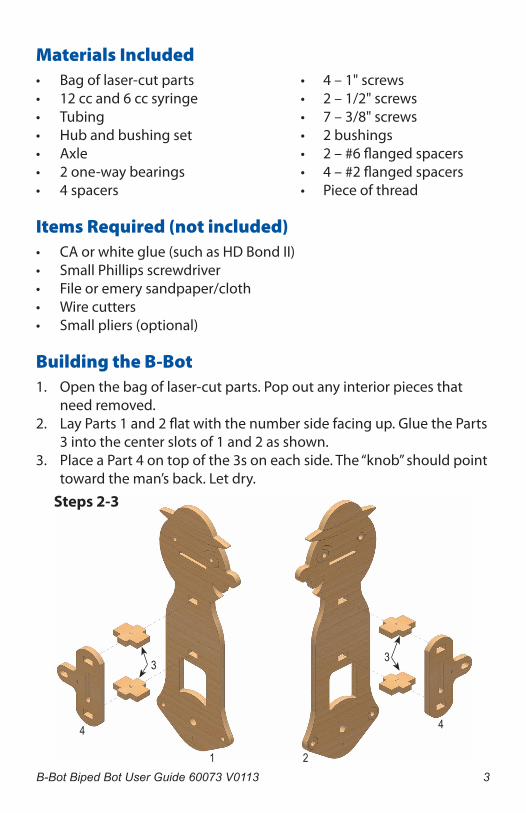
Building the B-Bot1. Openthebagoflaser-cutparts.Popoutanyinteriorpiecesthat
needremoved.2. LayParts1and2flatwiththenumbersidefacingup.GluetheParts
3intothecenterslotsof1and2asshown.3. PlaceaPart4ontopofthe3soneachside.The“knob”shouldpoint
towardtheman’sback.Letdry.
Steps 2-3
1
4
2
3
4
3
4 B-Bot Biped Bot User Guide 60073 V0113
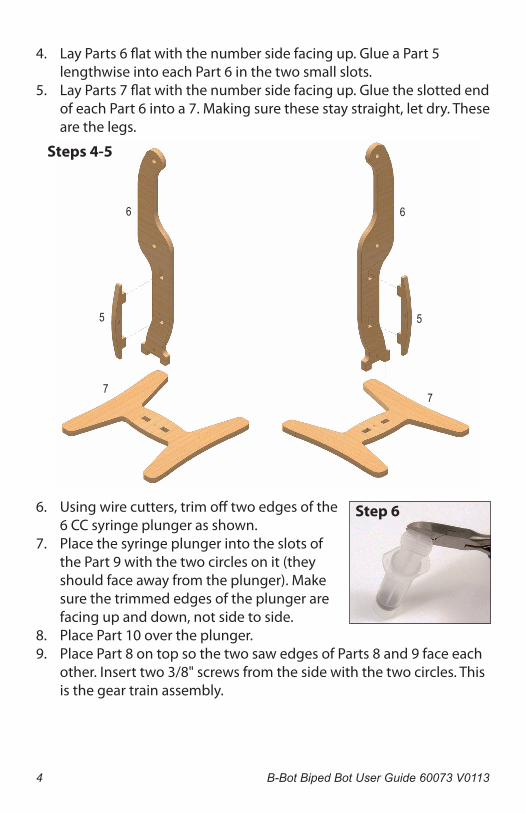
4. LayParts6flatwiththenumbersidefacingup.GlueaPart5lengthwiseintoeachPart6inthetwosmallslots.
5. LayParts7flatwiththenumbersidefacingup.GluetheslottedendofeachPart6intoa7.Makingsurethesestaystraight,letdry.Thesearethelegs.
6. Usingwirecutters,trimofftwoedgesofthe6CCsyringeplungerasshown.
7. PlacethesyringeplungerintotheslotsofthePart9withthetwocirclesonit(theyshouldfaceawayfromtheplunger).Makesurethetrimmededgesoftheplungerarefacingupanddown,notsidetoside.
8. PlacePart10overtheplunger.9. PlacePart8ontopsothetwosawedgesofParts8and9faceeach
other.Inserttwo3/8"screwsfromthesidewiththetwocircles.Thisisthegeartrainassembly.
Step 6
Steps 4-5
66
55
77

B-Bot Biped Bot User Guide 60073 V0113 5
10.Usingafileorsandpaper,fileoffanyroughedgesontheendsoftheaxle.Placeaone-waybearingontheaxleandnoticehowitwillspininonlyonedirectionandthatatinyarrowonthesideindicatesthis.Removethebearing.
11. LaythetwoPart11sonaflatsurfaceandcenterthebearingsinsidethesesobothbearingswillspininthesamedirection.
12.PlaceonePart11overaPart12.PickthisupandplacetheotherPart11ontheothersidesoPart12issandwichedbetweentheothertwopieces.Makesuretokeepthebearingsspinninginthesamedirection.
13. Insertanaxlethroughthebearingsandcenterit.PlaceaPart12onbothsidesofthebearingassembly.
3/8" screws
Steps 7-9Completed assembly
10
9
8
Steps 10-1312
1112
11
12
One-way bearings
Completed assembly
6 B-Bot Biped Bot User Guide 60073 V0113
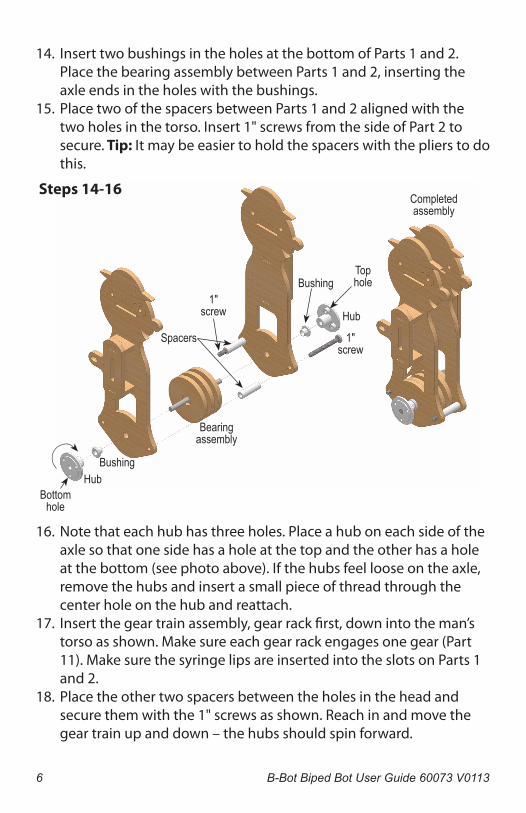
14. InserttwobushingsintheholesatthebottomofParts1and2.PlacethebearingassemblybetweenParts1and2,insertingtheaxleendsintheholeswiththebushings.
15.PlacetwoofthespacersbetweenParts1and2alignedwiththetwoholesinthetorso.Insert1"screwsfromthesideofPart2tosecure. Tip: Itmaybeeasiertoholdthespacerswiththeplierstodothis.
16.Notethateachhubhasthreeholes.Placeahuboneachsideoftheaxlesothatonesidehasaholeatthetopandtheotherhasaholeatthebottom(seephotoabove).Ifthehubsfeellooseontheaxle,removethehubsandinsertasmallpieceofthreadthroughthecenterholeonthehubandreattach.
17. Insertthegeartrainassembly,gearrackfirst,downintotheman’storsoasshown.Makesureeachgearrackengagesonegear(Part11).MakesurethesyringelipsareinsertedintotheslotsonParts1and2.
18.Placetheothertwospacersbetweentheholesintheheadandsecurethemwiththe1"screwsasshown.Reachinandmovethegeartrainupanddown–thehubsshouldspinforward.
Steps 14-16Completed assembly
1" screw
Hub
Spacers
Bushing
Bushing
Hub
Bearing assembly
Top hole
Bottom hole
1" screw
B-Bot Biped Bot User Guide 60073 V0113 7
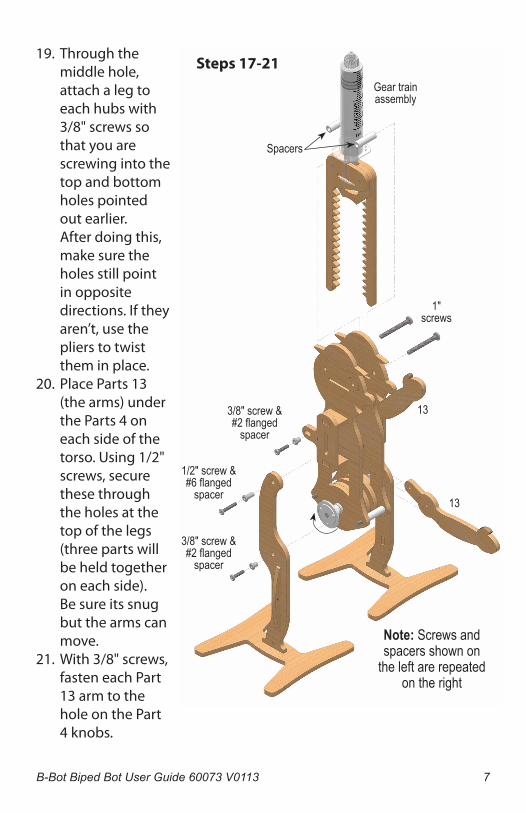
Steps 17-2119. Throughthe
middlehole,attachalegtoeachhubswith3/8"screwssothatyouarescrewingintothetopandbottomholespointedoutearlier.Afterdoingthis,makesuretheholesstillpointinoppositedirections.Iftheyaren’t,usetheplierstotwisttheminplace.
20.PlaceParts13(thearms)undertheParts4oneachsideofthetorso.Using1/2"screws,securethesethroughtheholesatthetopofthelegs(threepartswillbeheldtogetheroneachside).Besureitssnugbutthearmscanmove.
21.With3/8"screws,fasteneachPart13armtotheholeonthePart4knobs.
1" screws
3/8" screw & #2 flanged
spacer
Note: Screws and spacers shown on
the left are repeated on the right
3/8" screw & #2 flanged
spacer
1/2" screw & #6 flanged
spacer
Gear train assembly
13
13
Spacers
8 B-Bot Biped Bot User Guide 60073 V0113
P.O. Box 1708 • Pittsburg, KS 66762shop.pitsco.com
Toll-Free Orders 800-835-0686
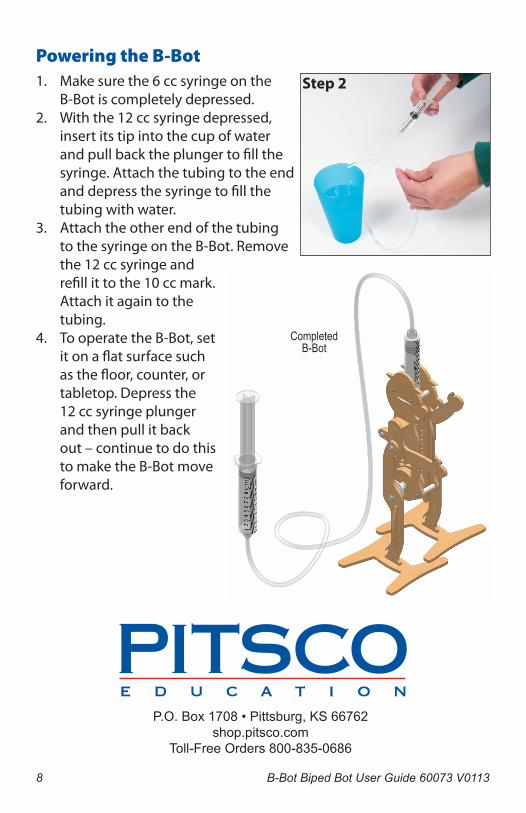
Powering the B-Bot1. Makesurethe6ccsyringeonthe
B-Botiscompletelydepressed.2. Withthe12ccsyringedepressed,
insertitstipintothecupofwaterandpullbacktheplungertofillthesyringe.Attachthetubingtotheendanddepressthesyringetofillthetubingwithwater.
3. AttachtheotherendofthetubingtothesyringeontheB-Bot.Removethe12ccsyringeandrefillittothe10ccmark.Attachitagaintothetubing.
4. TooperatetheB-Bot,setitonaflatsurfacesuchasthefloor,counter,ortabletop.Depressthe12ccsyringeplungerandthenpullitbackout–continuetodothistomaketheB-Botmoveforward.
Step 2
Completed B-Bot