b16 software engineering laboratory - university of...
TRANSCRIPT

B16 Software Engineering Laboratory
Victor Adrian Prisacariu*
Department of Engineering ScienceUniversity of Oxford
Hilary Term 2018
1 Introduction
The lab aims to reinforce aspects of structured and object-oriented programming covered in halfof the B16 Software Engineering course, as well as demystify the use of an integrated develop-ment environment. You will design and implement some C++ classes, bring them together intoa full application. You will explore important notions in object-oriented programming, such asinheritance and interfaces. You will learn how to include and link to your program third-partylibraries and how to use such a library to generate graphical output, including animations.
The lab is designed to take place in the Software Lab, Windows section, using the VisualStudio 2012 development environment. The latest version, Visual Studio 2015 Community, canbe downloaded for free from http://www.visualstudio.com to use with your own computer.The code can also be used with the Linux (GCC and GNU Make) and Mac OS X (Xcode)development environments, which can be obtained free of charge by anyone.
As all lab files are copied to the local drive C:, they will be deleted when youlog out. Please save your work before you log out by, for example, saving it to thecloud.
1.1 General instructions
The lab notes contain a refresher/introduction of several concepts of C/C++ programming.The lab is divided in a number of Tasks, asking you to understand and answer theoreticalquestions, experiment with the programming environment, and create your own code and pro-grams. Annotate in your log book answers to the questions, empirical observations about theoutcome of the experiments, and any note taken during the development of your programs.
Once you are done coding and are satisfied with the results, print the source code of yourprograms as well as a snapshot of the program results. In the case your program generates agraphical output, press Alt + PrtSc (print screen) to capture a snapshot of the current window.The snapshot is saved to the clipboard. You can then paste it into Microsoft Office and save itto disk or print it.
1.2 Getting started
In order to get started with your Windows workstation in the Software Lab, please follow theseinstructions:
1. Before you log on, make sure that you will log on to the ENG domain (this should beshown in the last text box of the login dialog). Then log on using your lab username andpassword. If successful, you should land in Windows.
*This laboratory is derived from a former lab of Frank Wood, which in turn was derived from one by AndreaVedaldi, which in turn was derived from one by Prof. Ian Reid and Dr. E. Sommerlade :).
1
B16 Software Engineering Lab Notes 2
2. Use Windows Explorer find Documentation folder under the Computer group in the leftcolumn browser. Open the Documentation folder and then the folder B16 therein. Find theinstall.bat and double click it. This will copy the b16-lab package to your local Documentsfolder (note: this is neither the Home Area folder, nor the Documentation folder). Beforeyou leave the installation window, take note of the installation location (something likeC:\Users\eng1234\Documents\b16-lab). In the rest of the notes, we will refer to this path as<b16-lab-path>.1
3. Use Windows Explorer to navigate to the b16-lab package just installed. You can accessthis folder from the left browser (Libraries → Documents → b16-lab), or by pasting <b16-
lab-path> into Windows Explorer address bar (see above). Inside you will find a copy ofthese notes in PDF format (<b16-lab-path>\b16-lab.pdf).
4. Inside <b16-lab-path> locate the Visual Studio Solution file <b16-lab-path>\b16-lab.sln.Double click it to open it in the Visual Studio Integrated Development Environment(IDE).
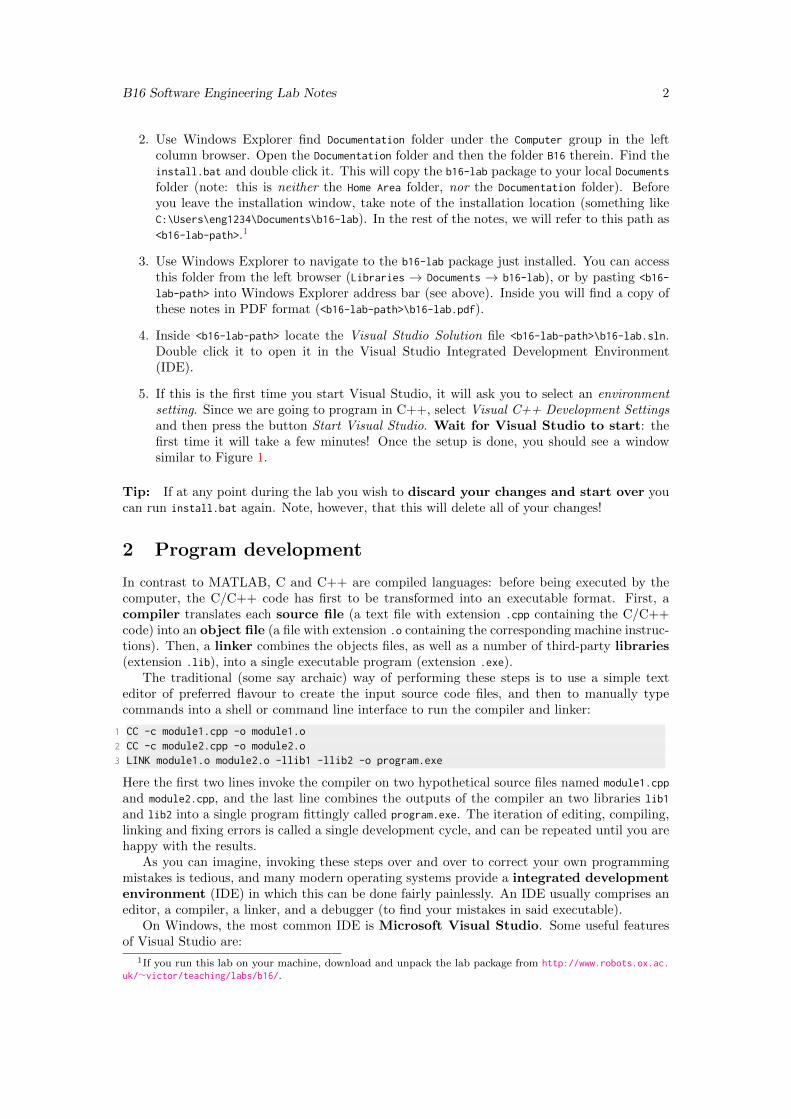
5. If this is the first time you start Visual Studio, it will ask you to select an environmentsetting. Since we are going to program in C++, select Visual C++ Development Settingsand then press the button Start Visual Studio. Wait for Visual Studio to start: thefirst time it will take a few minutes! Once the setup is done, you should see a windowsimilar to Figure 1.
Tip: If at any point during the lab you wish to discard your changes and start over youcan run install.bat again. Note, however, that this will delete all of your changes!
2 Program development
In contrast to MATLAB, C and C++ are compiled languages: before being executed by thecomputer, the C/C++ code has first to be transformed into an executable format. First, acompiler translates each source file (a text file with extension .cpp containing the C/C++code) into an object file (a file with extension .o containing the corresponding machine instruc-tions). Then, a linker combines the objects files, as well as a number of third-party libraries(extension .lib), into a single executable program (extension .exe).
The traditional (some say archaic) way of performing these steps is to use a simple texteditor of preferred flavour to create the input source code files, and then to manually typecommands into a shell or command line interface to run the compiler and linker:
1 CC -c module1.cpp -o module1.o2 CC -c module2.cpp -o module2.o3 LINK module1.o module2.o -llib1 -llib2 -o program.exe
Here the first two lines invoke the compiler on two hypothetical source files named module1.cpp
and module2.cpp, and the last line combines the outputs of the compiler an two libraries lib1
and lib2 into a single program fittingly called program.exe. The iteration of editing, compiling,linking and fixing errors is called a single development cycle, and can be repeated until you arehappy with the results.
As you can imagine, invoking these steps over and over to correct your own programmingmistakes is tedious, and many modern operating systems provide a integrated developmentenvironment (IDE) in which this can be done fairly painlessly. An IDE usually comprises aneditor, a compiler, a linker, and a debugger (to find your mistakes in said executable).
On Windows, the most common IDE is Microsoft Visual Studio. Some useful featuresof Visual Studio are:
1If you run this lab on your machine, download and unpack the lab package from http://www.robots.ox.ac.uk/∼victor/teaching/labs/b16/.

B16 Software Engineering Lab Notes 3
Figure 1: A screenshot of the Visual Studio integrated development environment. (1) Theintegrated editor (2) The Project Explorer shows all projects contained in the solution, andtheir accompanying files. (3) The output window for error messages.
1. A graphical debugging tool. Like any debugger, this tool enables you to step througha compiled program line by line, examine the contents of variables at each stage, traperrors, and set breakpoints where continuous execution will be paused. The debugger isaccessed through the Visual Studio GUI and is integrated in the text editor, which makesits use particularly convenient.
2. A way of organising multiple related source files into a project, and multiple projects ina solution. Projects enable compilation, linking and generation of an executable withouthaving to type all the command line gibberish; one nice related feature is that compilererrors appear as clickable links which then transport you right to the offending bit ofsource code. Within a solution, you can have several projects which share similar code.
3. It has an online help to obtain useful information such as descriptions of the functionscontained in system libraries. You can access this help by pressing F1 and search fora specific term, or by highlighting text in your source code or error messages and thenpressing F1. The online help then searches for the highlighted text in the documentationautomatically.
The IDE then shows a list of projects which correspond to the first assignments in this course,and should look similar to the screenshot in Figure 1. The project you are currently workingon is highlighted in bold in the solution explorer. To enable a different project, highlight thisproject’s name and select Set as StartUp project from the Project menu (or, in short, Project→ Set as StartUp project). Among other things, this tells the debugger to start the programassociated with the active project.
B16 Software Engineering Lab Notes 4
3 A simple program
A small application to perform a dynamic simulation (a ball falling and bouncing under gravity)has been written for you. We will know investigate in detail how this program works and learnabout object classes, their use in constructing a program, and compiling and debugging thelatter.
3.1 An overview
The bouncing ball application is implemented in the project named ball. This projects containsfour source files: simulation.h, ball.h, ball.cpp and test-ball.cpp. You can view these files byclicking first on the ball project, which shows subfolders Header Files and Source Files (seeFigure 1). In each of these you will find required files which open in the editor environment ifdouble-clicked.
Start by inspecting the header file ball.h. As you will remember from lectures, a header filecontains a set of related function declarations and class definitions, constituting a module. Bypacking this information together in a .h file, it is easy to include it in any source code file thatmay need to use the module. In this example, the ball.h header file defines of a single class,called Ball. This is the core of the bouncing ball simulation.
Examine now the way Ball class has been coded. The first thing you will notice are threemember functions:2 Ball(), step() and display() (we occasionally use the () suffix to emphasisethat a name refers to a function). These functions serve the following purposes:
� Ball() is a constructor, a function used to initialise objects of class Ball when they areinstantiated (created) in the program. In this case, the constructor specifies the initialposition and velocity of the ball, among other things.
� display() prints a line of text containing the position of the ball. In practice, this is a pairof numbers x and y separated by a space. When the program runs, this output will beprinted to a console or terminal. You can identify the console as a window with a blackbackground that Windows opens when the program runs.
� step(dt) advances the simulation by dt seconds by taking the current state of the ball andintegrating the differential equations of the motion to obtain the state dt seconds later.The integrator uses Euler method: if g ∈ R2 is the gravity vector, x(t) the position of theball at time t, and v(t) the velocity, the update is
x(t + dt) = x(t) + v(t) dt +1
2g dt2,
v(t + dt) = v(t) + g dt.
Still looking at the file ball.h, notice that, after declaring these three member functions, theclass defines a number of data members, variables of type double storing the position, velocity,etc. of the bouncing ball simulation.
Task 1: Understand the implementation of the member functions. Look now atthe ball.cpp file, containing the implementation of the member functions Ball(), display() andstep(), and answer the following questions:
� What is the initial state of the ball when the object is created (instantiated)?
� How does display() prints information on the screen?
2A member function is a function that “belongs” to a class and can operate on instances of that class. Inother object-oriented languages member functions are known as methods.

B16 Software Engineering Lab Notes 5
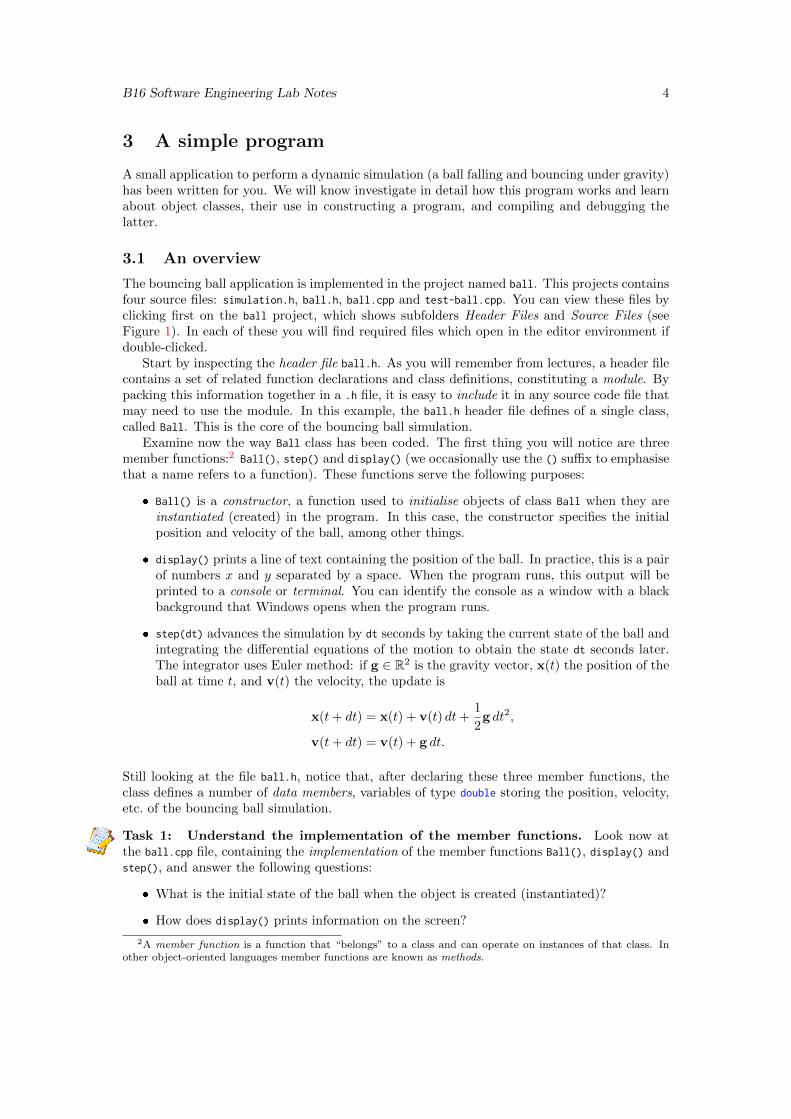
Figure 2: Slightly hidden, but there: The command line and redirection options. Observe the> symbol before the file name.
� The ball is constrained to bounce in the box [−1, 1]× [−1, 1]. How is this handled by theintegrator implemented in step()? Is the total (kinetic + potential) energy of the ballconserved by this integrator?
Now look at test-ball.cpp and answer the following question:
� What do you expect the output of your program to be?
Task 2: Running the program. The last question can be answered empirically, by com-piling and running the program. In order to do so:
� Make sure that ball is the active project (see Sect. 2).
� Select Start Without Debugging in the Debug menu (Debug → Start Without Debugging,or Ctrl+F5).
This will automatically compile and link the program to create and run the executable ball.exe
for you. A console window will pop up, displaying the output of the program.3 Does it lookreasonable?
3.2 Redirecting the output and visualising it in MATLAB
By inspecting a sequence of numbers it may not be obvious whether the program output isreasonable or not. This can be answered more easily by viewing the output graphically. Later
3If you select Start Debugging instead of Start Without Debugging, the program will run, but the consolewindow will close immediately after the program ends, giving you the impression that nothing happened. If theproblem persists, see Appendix C.

B16 Software Engineering Lab Notes 6
in the lab we will incorporate this functionality directly into the program; for now we will usea “trick” to export the program output to MATLAB and use the latter to do the plotting.
Task 3: Use redirection to save the textual output to a file. A way to save thetextual output of the ball.exe program to a file is to redirect the output from the console to afile on disk. This is a convenient trick as it does not require to change the program at all.
To use redirection, open the project properties (from the menu select Project → Propertiesor press Alt+F7) and navigate to the Configuration Properties → Debugging submenu (seeFigure 2). Redirection is specified by appending to the Command arguments the > symbolfollowed by the desired file name, e.g. > "$(OutDir)\ball.txt". Here the macro $(OutDir) isreplaced automatically by VisualStudio with the directory used to store the executable. Thisdirectory is by default <b16-lab-path>\Debug.
Run the program again (Start Without Debugging). This time the output window is emptybecause the output has been redirected to the ball.txt file. Locate the file with WindowsExplorer at <b16-lab-path>\Debug\ball.txt (in the same directory you will find the executableball.exe too). Double click the file to visualise it in a text editor.
Task 4: Load the output in MATLAB and visualise it. Now that the data is theball.txt file, it is easy to load it in MATLAB and plot it. Start MATLAB and issue theinstructions
1 >> cd ’<b16-lab-path>\Debug’2 % OR: drag the Debug directory from Windows Explorer into MATLAB.3 >> load ball.txt4 >> plot(ball(:,1),ball(:,2))
Does the output seem reasonable?
3.3 Public, private, and protected class members
Now that you have a grasp of the basic structure of the program, we will investigate severaldetails of the implementation. Inspect again the file ball.h and notice the following:
� The declaration class Ball consists of the word class followed by the name of the classbeing defined. The declaration tells the compiler that Ball is the name of a class. In thiscase, the complete declaration class Ball : public Simulation tells the compilers some-thing more: the Ball class inherits from the Simulation class (more on this later).
� In this particular example, the declaration is immediately followed by the class definition,enclosed within { } and terminated with a semicolon ;. The definition is the blueprint ofthe class and the compiler requires it to know: (i) which operations (member functions)can be applied to objects of the class, and (ii) the list of data members comprising theclass, so that the correct amount of memory can be allocated to store objects of the class.Note that the definition is divided into two parts, public and protected.
� In this example, the public section of the definition contains the member functions Ball(),step() and display(). Together, these three member functions embody what a user cando with objects of the class (namely, create a new object, advance the simulation, anddisplay the state). They have public scope, and can therefore be called by any part of theprogram.
� In contrast, the scope of anything in the protected section is limited to functions that aremember of the class or one of its descendants. In the Ball example, the protected sectiondefines several data members of type double, representing the state of the ball (2D positionand velocity) as well as other parameters of the simulation. Since these are protected,only Ball(), step() and display() can access them.
� Class members can also be declared in the protected section. In this case, they can onlybe accessed by members of the class, while class descendants are excluded.
B16 Software Engineering Lab Notes 7
Task 5: Member functions and separation of concerns. By isolating data membersin the protected part of the class definition, the representation of the data (protected datamembers) can be separated from the operations that apply to it (public member functions).Answer the following questions:
� How should the class be changed so that a user could be able to get and set the positionof the ball?
� The member functions of a class are often said to encode its “behaviour”. Can youfind a practical example demonstrating why separating the data representation from itsbehaviour is useful?
3.4 Implementing the class by defining the member functions
While the class Ball is defined in ball.h, the member functions are declared but not definedthere. Their definition is found in the ball.cpp file. This file should be self-explanatory, exceptperhaps for the following facts:
� The compiler directive #include "ball.h" causes the compiler to insert on the fly thecontent of the ball.h file into the ball.cpp file. In this manner, the definition of the Ball
class, contained in ball.h, is known during the compilation of ball.cpp. Similar directivescan be used to include and the use system libraries. An example is the directive #include
<iostream> which includes the iostream module of the C++ Standard Template Library(STL). The latter module provides input output functionalities (std::cout and similar).4
� All member function definitions are prefixed with the string Ball::. This tells the compilerthat the function begin defined is a member of the class Ball as opposed to a “global”function.
� The constructor Ball::Ball() is defined as
1 Ball::Ball()2 : r(0.1), x(0), y(0), vx(0.3), vy(-0.1), g(9.8), m(1),3 xmin(-1), xmax(1), ymin(-1), ymax(1)4 { }
The long list of parenthesised expressions after the : symbol is known as an initialisationlist. Its purpose is to construct (initialise) the various data members, for example bychoosing an initial value. A similar effect could be obtained by assigning the variablesexplicitly in the constructor body:
1 Ball::Ball() {2 r = 0.1 ;3 x = 0 ;4 // etc.5 }
For elementary data types like double using an initialisation list or multiple assignmentsis roughly equivalent; however, if a data member is an instance of a user defined class,the assignment operator = may not be defined for it. In this case, the only option isto initialise the class in the initialisation list, as the latter can use the class constructor(always defined) instead of the assignment operator =. We will see an example of this factlater.
4Note the slightly different syntax: when the filename is enclosed in quotes, as in #include "ball.h", thefile ball.h is searched in the same directory of the file ball.cpp which is including it. When the filenameis enclose in the angular brackets, as in #include <iostream>, the file iostream is searched in a number ofsystem directories which contain library header files.

B16 Software Engineering Lab Notes 8
� The statement std::cout<<x<<""<<y<<std::endl ; in the implementation of display() de-serves some further attention. The operator x<<y is meant to pass the object y as input tothe object x. Here, the receiving object is std::cout, an output stream (it is defined in theincluded file <iostream>). std::cout dumps its input to the system console or terminal,and thus can be used to print information on the screen. The symbol std::endl representsan end-of-the-line character.
Task 6: Understanding constructors. The constructor Ball() does not allow the userof the class to choose a custom initial position or velocity of the ball. Design an alternativeconstructor that would allow to do so upon class instantiation.
3.5 Using a class by instantiating it and calling its member functions
At this stage you should have a good understanding of the class Ball. It is now time to put itto work. To this end, inspect the source code in test-ball.cpp.
After including the ball.h header file, test-ball.cpp defines a function called main. This isthe default entry point of the program, i.e. the function that the operating system calls whenthe program is launched. Arguments from the operating system are passed to the programthrough the variables argc (the number of arguments) and argv (the arguments as an array ofstrings), making a program a black box to the operating system as a function definition is to aprogrammer. The main function returns to the operating system an error code, in this case theconstant 0 (i.e. no error). In the implementation of main we note the following:
� The variable dt is defined to contain the simulation step size. By defining this as const,the compiler knows that it is an hard coded parameter that cannot be changed duringthe execution of the program.
� The statement Ball ball ; defines a local variable ball of type Ball. The compiler au-tomatically creates an instance of class Ball, calling implicitly the constructor Ball() toinitialise the object. The variable ball can then be used to refer to this instance. Thisvariable has a local scope, i.e. it is visible only in the context of main().
� The class members are accessed via the . (dot) operator. For example, ball.step(dt)
calls the step member function in ball, advancing the simulation by the specified amount.Data members can be accessed as well; for example ball.x would access the variable x
in Ball(). However, x was declared a protected member of the class, so in practice thiscauses a compilation error.
� The for loop gets a fixed number (100) of iterations. At each iteration, the memberfunctions step and display are called to advance the simulation and dump the location(x, y) of the ball on the screen.
Task 7: Programming principles. Answer the following questions:
� What is the distinction between a class declaration, definition, implementation, and in-stantiation?
3.6 Compiling, testing, and debugging the program
Now that you have a full understanding of the source code, we will investigate in more detailhow to compile, run, and debug the code.
Task 8: Compiling the program. In order to compile the program:
� Select the ball project in the Visual Studio environment and set it as the StartUp projectto select that project as the active one (→ Project → Set as StartupProject). The nameof the project should be rendered bold.
B16 Software Engineering Lab Notes 9
� Build the project (Build → Build ball).
This runs the C++ compiler and linker on your program. After a few seconds translation willbe complete and should leave you with a summary of the process in the error window:
1 1>ball - 0 error(s), 0 warning(s)2 ========== Build: 1 succeeded, 0 failed, 0 up-to-date, 0 skipped ==========
Navigate once more to the output directory <b16-lab-path>\Debug with Windows Explorer; youwill see that a executable file ball.exe has been created. This is your program, ready to belaunched (try double clicking on it!). As we have seen before, the program can be run from theIDE by selecting Debug → Start Without Debugging, or Ctrl+F5).
Task 9: Try the debugger. The debugger component of Visual Studio is very useful. Itenables a programmer to step through a program as it is running, pausing, examining variablevalues, etc. To run the debugger on your executable ball:
� Place a breakpoint on the line where the Ball object is instantiated. Similar to MAT-LAB, you click left to the start of the line. A red dot should appear.
� Select Debug → Start or hit F5.
� If you have changed the source, a small window will pop up, asking you whether you wantto build it. This is a good idea. Keeping this window from appearing, too, and you cantick the little Do not show this dialog again box.
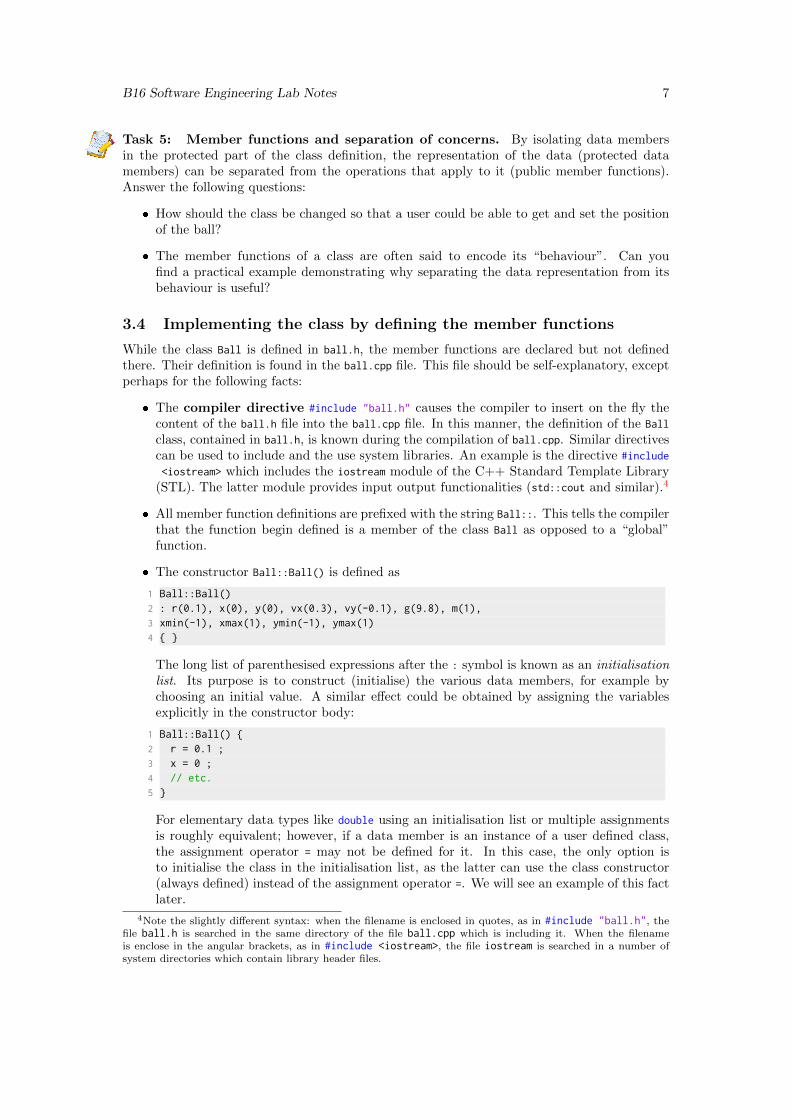
� Placing the cursor over the icons either on the debugger toolbar will tell you briefly whateach does. The most important are summarised below (see Figure 3):
– Stop at: insert a breakpoint at the location of the cursor in the source code. Pro-gram execution will stop at this point giving you the chance to examine variables,etc.
– Step into: execute the current line of code, but if this involves a function call, thenstop at the first line of the function.
– Step over: execute the current line of code then stop again.
– Start/Continue: start debugging or continue execution from the current location(until another breakpoint is met).
You can also halt the program mid-flow by hitting Control-Break, and this will bring youinto the debugger at the current line of execution.
Try out the various options. In particular try to discover how to display the value of avariable (e.g. ball). Once you have done this, step through the program one line at a timeexamining how it changes during the for loop. Also try inserting a breakpoint and continuingexecution to observe the program stopping at the breakpoint.
3.7 Inheritance and virtual functions
Throughout the lab, we will not only define brand new classes, but also derive new ones formexisting ones through the mechanism of inheritance. Inheritance allows to specialise a givenclass by extending or customising it for a given purpose. Consider the following example:
1 #include<iostream>2 class Person {3 public:4 void wakeUp() { std::cout<<"Good morning!"<<std::endl; }5 } ;6 class Worker : public Person {7 public:8 void goToWork() { std::cout<<"Driving."<<std::endl; }9 } ;

B16 Software Engineering Lab Notes 10
Figure 3: The Debugger toolbar (see arrow) pops up only during debugging. (1) shows thevariables currently in scope, and (2) shows the current call stack, which can be navigated bydouble clicks, similarly to the dbup and dbdown commands in MATLAB. The red dot markingone of the line in the editor is the location of the breakpoint, and the yellow arrow the currentlocation (PC) in the program. To reach this particular state, the step into icon was pressedonce after the program stopped at the breakpoint.
Here the derived class Worker has two member functions: goToWork, as given in its definition,and wakeUp, inherited from the base class Person. An object of type Worker is also of type Person,so it can be used whenever Person can. For example:
1 void ringBell(Person &aPerson) {2 aPerson.wakeUp() ;3 }4 void main(int argc, char** argv) {5 Worker aWorker ;6 ringBell(aWorker) ; // prints "Good morning!"7 }
In addition of adding new members, inheritance can be used to override existing ones,modifying the behaviour of the base class. For example:
1 class Person {2 public:3 void wakeUp() { std::cout<<"Good morning!"<<std::endl; }4 void goToWork() { std::cout<<"No way!"<<std::endl; }5 } ;6 class Worker : public Person {7 public:8 void goToWork() { std::cout<<"Driving."<<std::endl; }9 } ;

B16 Software Engineering Lab Notes 11
In this case, a Worker modifies the behaviour of the more generic Person by redefining the functiongoToWork. However, the old behaviour is still associated to objects of class Worker when seen asPerson. For instance:
1 void timeToGo(Person &aPerson) {2 aPerson.goToWork() ;3 }4 int main(int argc, char** argv) {5 Worker aWorker ;6 timeToGo(aWorker) ; // prints "No way!"7 aWorker.goToWork() ; // prints "Driving."8 return 0 ;9 }
What happens is that the timeToGo function accepts a Worker as input, but treats it exactly asit was of type Person. This can be modified by defining the functions in the base class to bevirtual:
1 #include<iostream>2 class Person {3 public:4 virtual void wakeUp() { std::cout<<"Good morning!"<<std::endl; }5 virtual void goToWork() { std::cout<<"No way!"<<std::endl; }6 };7 class Worker : public Person {8 public:9 void goToWork() { std::cout<<"Driving."<<std::endl; }10 };11 void timeToGo(Person &aPerson) {12 aPerson.goToWork() ;13 }14 int main(int argc, char** argv) {15 Worker aWorker ;16 timeToGo(aWorker) ; // prints "Driving."17 aWorker.goToWork() ; // prints "Driving."18 return 0 ;19 }
Now the new definition of the goToWork member function is used when the object is referred toas a Worker or as a Person.
3.8 Interfaces
A particularly important application of virtual member functions is the definition of interfaces.An interface is an “empty class” that specifies a set of operations (virtual member functions)without providing any implementation. Defining an implementation for those functions is leftto any particular class that derives the interface.
Task 10: Understanding interfaces. The class Ball (see ball.h) inherits from the inter-face Simulation, whose definition (see simulation.h) is
1 class Simulation {2 public:3 virtual void step(double dt) = 0 ;4 virtual void display() = 0 ;5 } ;
Thus Simulation declares two virtual member functions step() and display(). The = 0 suffixtells the compiler that it should not expect Simulation to provide a definition of these functions.Rather, this is left to the compiler. Answer the following questions:

B16 Software Engineering Lab Notes 12
� Consider the function
1 void run(Simulation & s, double dt) {2 for (int i = 0 ; i < 100 ; ++i) { s.step(dt) ; s.display() ; }3 }
Can you replace the for loop in the main function defined in test-ball.cpp with the in-struction run(ball, dt)?
� What would happen if Simulation did not declare step and display to be virtual? Wouldrun still work as expected? If not, what would happen?
4 Building your own application
The main task of the lab is to create another more complicated dynamic simulation; a mass-spring system consisting of two masses and one spring (though we would like to bear in mindhow this could be extended to a system of several masses and springs). A skeleton projectspringmass has been created for you to give you an idea of how the classes and files might beorganised. You will need to decide what responsibilities the classes will have, and how theywill interact. Before you proceed, do not forget to make the springmass project active (Set asStartUp Project).
Task 11: Complete the Mass class. Start by completing the implementation Mass classby implementing the member functions getEnergy() and step(). The following definition is givento you in springmass.h:
1 class Mass2 {3 public:4 Mass() ;5 Mass(Vector2 position, Vector2 velocity, double mass, double radius) ;6 void setForce(Vector2 f) ;7 void addForce(Vector2 f) ;8 Vector2 getForce() const ;9 Vector2 getPosition() const ;10 Vector2 getVelocity() const ;11 double getMass() const ;12 double getRadius() const ;13 double getEnergy(double gravity) const ;14 void step(double dt) ;15
16 protected:17 double xmin ;18 double xmax ;19 double ymin ;20 double ymax ;21
22 Vector2 position ;23 Vector2 velocity ;24 Vector2 force ;25 double mass ;26 double radius ;27 } ;
The Mass class is an improved version of Ball, where:
� setForce(f) and addForce(f) set/accumulate a force f in the internal force accumulatorvariable force.

B16 Software Engineering Lab Notes 13
� step(dt) updates the position and velocity of the based on the current value of force andthe other parameters, similarly to the step function member of Ball.
Differently from Ball, the class is making use of the Vector2 class, also defined in springmass.h,in order to simplify basic operations on 2-dimensional vectors. Note that Vector2 is providedfor the sake of the example only; in practice, you would use a fully-fledged off-the-shelf C++math library instead, like Eigen (http://eigen.tuxfamily.org).
Most member functions of Mass have already been defined for you in springmass.cpp. Nowopen that file and complete the implementation by writing the code of the step function.
Task 12: Complete the Spring class. Once you are satisfied with your implementationof Mass, move to the implementation of Spring. In writing this implementation it is helpful tothink how Spring can be used in combination with Mass in the simulation.
� Start by the fact that a spring exerts two opposite forces F1 and F2 = −F1 at its twoextrema x1 and x2, where
F1 = k(l − l0)u12, l = ‖x2 − x1‖, u12 =1
l(x2 − x1).
Thus, the class Spring should have at the very least a member double naturalLength tostore l0 and a member double stiffness to store k.
� Add also a damping factor d (double damping). Similar to stiffness, damping also exertstwo opposite forces F2 = −F1 along the spring, but in this case the forces are proportionalto the elongation velocity:
F1 = dv12, v12 = ((v2 − v1) · u12)u12
where u12 is defined as before and · denotes the inner product (see dot(Vector2,Vector2)).
� Note that the Spring constructor takes two pointers to the masses connected to its extrema:
1 Spring::Spring(Mass * mass1, Mass * mass2, double length, double stiffness, doubledamping)
2 : mass1(mass1), mass2(mass2), naturalLength(length), stiffness(stiffness), damping(damping)
3 { }
Add suitable data members mass1 and mass2 to be able to store this information in theclass.
� Implement the member function getForce() to compute the spring force F1 (note that theforce F2 is the opposite). Since Spring contains pointers to the masses, it can use the Mass
member functions getPosition() and getVelocity() to obtain the information required ofthis calculation.
Task 13: Design and implement SpringMass. Once Mass and Spring are complete, itis time to implement the simulation by constructing a class SpringMass that represents thesimulated “world”. In this case you are expected to work out part of the design of a class itself.
The world contains two masses and a spring connecting them (or, more in general, n massesand m springs). A minimal solution, therefore, must store Mass mass1, Mass mass2, and Spring
spring as data member of SpringMass. Similarly to the Ball class encountered earlier, fur-thermore, SpringMass inherits from the Simulation class and must implement the step() anddisplay() methods.
� Start by implementing the interface necessary to setup the simulation. One way to do thisis to create two masses and a spring in the main program and then pass the latter to aninstance of SpringMass by pointer or reference. Design and implement suitable methods inSpringMass or, alternatively, redesign the constructor to be able to initialise the simulationin this manner.

B16 Software Engineering Lab Notes 14
� Implement the method step() to advance the simulation. To do this:
– Go through both masses and set the initial force to be gravity (or zero) by using thesetForce function of mass.
– Examine the spring and compute the forces F1 and F2 that it applies to the connectedmasses. Accumulate these forces to the respective masses by using the addForce
function of Mass (by doing so, the spring forces will be summed to gravity).
– Go through all masses again and update their state (position and velocity) by callingstep() on them.
� Define the method display() to dump the sate of all mass locations.
� Optional. Think whether your design would easily extend to the case of more than twomasses and more than one spring in the simulation. If not, what could you change?
Task 14: Initialise and run the simulation. Modify the file test-springmass.cpp to runyour simulation. Write code to setup a new SpringMass instances with two masses and one spring(or a more complex configuration) using the interface that you just designed and implemented.
Task 15: Redirect the program output to a file and visualise it in MATLAB.Try the same trick we used for the Ball simulation in order to redirect your program outputto a file, load it in MATLAB, and visualise it. Note that in this case more than one mass perline of output should be included.
5 Graphics
The dynamic simulation you have created would be much more interesting if it could be graph-ically viewed in “real-time” rather than as a static plot. Displaying graphics on the screenrequires interfacing to the graphics subsystem built in your machine. At the core of this sub-system there usually is a dedicated graphical processor unit (GPU), a specialised hardwarecomponent that can execute graphical operations, such as drawing a line, very efficiently.
Rather than coding the GPU directly, programmers normally use an abstraction known asa device driver, that lives in the operating system. Most graphic drivers support one or morestandard interfaces, made available to the C/C++ programmer as libraries. In this manner aprogram can work without modification with GPU of different vendors (e.g. nVidia, ATI, Intel,or PowerVR).
The graphics library we will use is called OpenGL, an industry standard implemented inmany environments (e.g. Windows, Mac OS X, Linux, iOS and Android). By using OpenGL,a program can use the powerful graphic accelerators built into modern computers and mobilegadgets. Although we will focus on simple 2D drawing capabilities, OpenGL allow accessingall the features required to generate complex 3D graphics as well. You can view the OpenGLmanual by going to http://www.opengl.org/sdk/docs/man2/ in Internet Explorer.
In general, it is very common to rely on system and third-party libraries when codingcomplex programs. Knowing how to use them optimally is a key programming skill. This isnot always a simple matter. For example, using OpenGL requires dealing with several details,such as opening a window to display the output, handling events such as a user resizing thewindow, and updating the window content at a regular interval to generate an animation. Weshall approach this problem in an organised manner, using a few classes and inheritance to helpus along.
5.1 Understanding graphics and animations
OpenGL is a fairly complex library. In order to help you getting started with it, the labpackage provides a graphics.h module. This module contains a class Figure that simplifies

B16 Software Engineering Lab Notes 15
timeStep passedevent
Simulation DrawableFigure
window resizedevent
window needs redisplay event
draw()
drawCircle()
drawString()
drawLine()
step()
display()
draw()
Drawable
draw()
OpenGL (and GLUT)
display mouse/keyboard
update()
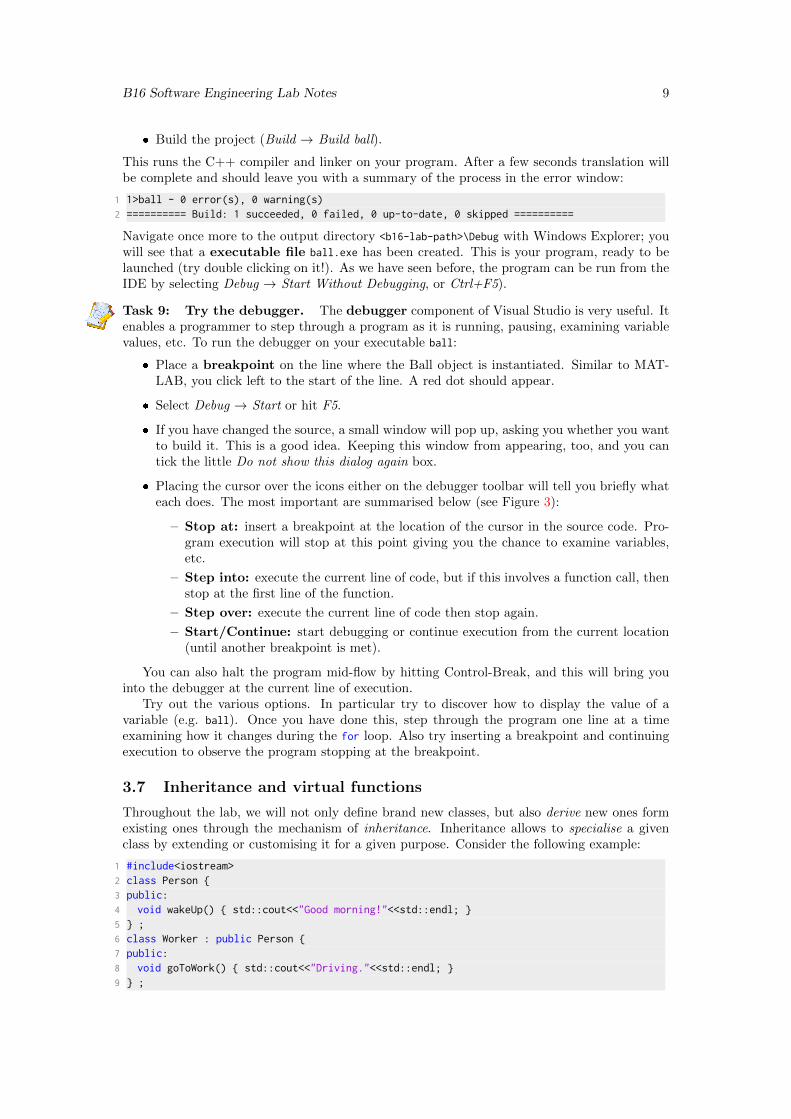
Figure 4: Overview of the graphical subsystem. Simulation, Figure and Drawable show instancesof objects of the corresponding classes. In practice, the same object can implement two or moreclasses by multiple inheritance.
creating figures and drawing into them. Furthermore, the lab package contains an exampleproject ball-graphics that demonstrates using Figure to visualise the bouncing ball simulationin real time.
Task 16: Understand how to open a window and draw in it. Make the ball-graphics
project active (Set as StartUp Project). Then navigate in Visual Studio to the file graphics.h
file and double click to inspect it. This module does a few things:
� It includes the OpenGL header files (glut.h). This means that, by including graphics.
h, your program will have access to the OpenGL functions as well. GLUT is an utilitylibrary, companion to OpenGL, which handles windows and events — more on this later.
� It declares a function run() that takes as input an object of type Simulation and a timeStep.This function never returns; instead, it enters a loop that handles the stream of eventsfrom the graphical user interface (e.g. a window being resized). It also runs the simulationby repeatedly calling the member functions step (to advance the simulation) and display
(to update a corresponding figure).
� It defines a class Figure which simplifies opening a window and drawing in it.
The class Figure handles the basic workflow of displaying a window on screen and updatingits content during an animation. It also provides a few functions to draw basic primitives thatare simpler to use than OpenGL directly (but you can still use OpenGL with it). The workflowis summarised in Figure 4 and described next.

B16 Software Engineering Lab Notes 16
Upon creation of an instance, the class Figure opens a new window on the screen. It alsotells OpenGL to call the class member function draw() whenever the window content must bedrawn on screen. OpenGL decides to (re)draw the content in response to events such as: thewindow is first displayed on the screen, the window is resized by the user, or the window isoccluded and then displayed again as the user manipulates other windows. While most of theseevents are caused by the user, your program can also request the window to be redrawn, forexample because the content of the figure should be updated to reflect the new status of thesimulation. Explicitly requesting a window update is done by calling the update() function ofFigure.
Given that OpenGL calls draw() in Figure to draw the window, how does Figure knowswhat should be drawn? By default, the draw() function in Figure starts by painting a whitebackground and a 10× 10 reference grid. It then goes through a list of other drawable objectsthat the user has “attached” to the figure. Each such object inherits from the class Drawable
and as such has its own draw() member function, different from the one of Figure. An object isattached to the figure list by using the addObject function of Figure. To summarise, you must:define an object of class Drawable, define its function draw() (this does the actual work), andadd an instance of that object to the figure by calling addObject.
This leaves us with the design of the function draw() in the Drawable object. In order topaint something on the screen, your program must use OpenGL function calls. While thisis not particularly difficult, Figure provides functions that simplify drawing basic primitives:drawString, drawCircle and drawLine. The meaning and usage of these functions should beobvious from their declaration in graphics.h. It is however very instructive to inspect theirimplementation in graphics.cpp to know how to call OpenGL directly instead. You can thenrefer to OpenGL reference manual or, preferably, to one of the many tutorials available onlineto go past (see for example http://www3.ntu.edu.sg/home/ehchua/programming/opengl/CGIntroduction.html).
Task 17: Understand how to generate an animation. So far, it was shown how touse Figure and Drawable objects to draw figures on the screen. The last piece of the puzzleis to understand how to generate an animation by iteratively calling the simulation code andredrawing the window content. This is done by calling the function run declared in graphics.h.This function takes a Simulation object implementing the step and display functions. It alsotakes a time step timeStep as a parameter and tries to call the step and display functions withthat frequency. Here step will advance the simulation as before; however, display must bechanged to update the figure rather than printing a message on the screen. As seen above, thelatter is done by calling figure.update().
Task 18: Understand how this is implemented by using inheritance. Once how tosolve the previous two tasks is clear, open test-ball-graphics.cpp and understand how this hasbeen done by defining a BallDrawable class, inheriting from Ball and Drawable. This is calledmultiple inheritance, and can be used to create “hybrid” classes which combine more thanone parent classes. Look in particular at the implementation of the member functions draw()
and update(). Compare this with Figure 4 and answer the following questions:
1. Which objects are of type Simulation and which of type Drawable?
2. Which objects are creating an instance of Figure and when?
3. Which objects are added as Drawable to the figure and when?
4. Which objects implement respectively: display, draw, and update?
5. Which different purposes do these functions serve?
Note also that the very first line of the main function in test-ball-graphics.cpp contains a callto glutInit(). This function initialises GLUT and OpenGL, making them ready for use. Donot forget to use it in your code later!
B16 Software Engineering Lab Notes 17
Task 19: Compile and run code using the graphics library. Visual Studio mustbe instructed to link your program to OpenGL before it can be compiled correctly. In fact,this example code uses an additional utility library known as GLUT (http://www.opengl.org/documentation/specs/glut/spec3/spec3.html) which adds to OpenGL functions to manipu-late windows and user events. Linking to GLUT is sufficient, as the latter causes OpenGL tobe linked as well.
A further complication is that, differently from OpenGL, GLUT is not part of the standardWindows SDK. This means that it has to be downloaded and installed as a third part library. Inpractice, your <b16-lab-path> folder already contains a copy of GLUT (<b16-lab-path>\support\GLUT). Furthermore, the project ball-graphics is already setup to correctly link to the latter,so compiling and running the program should work without a problem (try this now). If youare curious, the process is described in some detail in Appendix A.
5.2 Adding a graphical display to the mass-spring simulation
Now that you have seen how to add a graphical display to Ball, it should be straightforward todo so for SpringMass. Do not forget to make the springmass-graphics project active.
Task 20: Create a graphic version of SpringMass. In the test-springmass-graphics
.cpp file, derive a SpringMassDrawable class from SpringMass in a manner similar to the wayBallDrawable was derived from Ball (see test-ball-graphics.cpp). In particular, override thedisplay() function to draw all the masses and all the springs (as simple sticks connecting themasses). Then run the simulation physically by using the run function.
5.3 Further extensions
If all this was too easy and you have time left, try the following:
Task 21: Compute and display the energy of the spring-mass system. Design andadd getEnergy() member functions to your classes for the masses and the springs. Then modifythe step() function of the SpringMass simulation to compute and remember the energy of thesystem, by summing the energy of all masses and springs. Make this value available to theuser by adding a function getEnergy() to this class as well. Finally, extend the draw() methodof SpringMassDrawabe to overlay this information on the figure (use the drawString function ofFigure to do so). Then answer the following questions:
� What happens to the energy as the simulation progresses? Why?
� Now set the damping factor of the spring to zero. What happens now to the energy? Isthis result correct? If not, what may be the problem?
Task 22: Generalise the mass-spring simulation to multiple masses. Extend theSpringMass simulation to handle multiple masses and springs, with an arbitrary topology. Thisrequires handling a graph of springs connecting the different masses, but it is otherwise a rathersimple task.
Task 23: Extend the simulation to a 3D world. The physics extends trivially to the3D case by adding a third coordinate. Develop a Vector3 version of Vector2, then modify theSpring, Mass, and SpringMass simulation to handle the third coordinate.
Task 24: Visualize a 3D simulation. OpenGL makes it very easy to draw three dimen-sional graphics as well. Understand how to do so from the WWW, staring from the tutorial anddocumentation pointers include before, and then using Google to fill in the remaining informa-tion. Note: most programmers find the WWW an invaluable tool to extend their knowledge,sometimes preferable to books. Learn how to use this tool best!

B16 Software Engineering Lab Notes 18
Figure 5: Setting up Visual Studio to link to GLUT. In writing order: setting up the includesearch path, the linker search path, the linked libraries, and the post-build rule to copy GLUTto the output directory. See the text for details.
A Configuring Visual C to link to a third-party library(GLUT)
This appendix shows hot to configure Visual Studio to do link to a third party library usingGLUT as an example. In this example, the following steps must be taken (Figure 5):
� Add GLUT to the #include search path, so that the compiler may correctly execute thestatement #include <GLUT/glut.h> (see graphics.h). This is done by adding the directory$(SolutionDir)\support to Project → Properties → Configuration Properties → C/C++→ Additional Include Directories. Here $(SolutionDir) is a variable that is automaticallyexpanded by Visual Studio to the directory containing the solution, which is in this caseequal to <b16-lab-path>.
� Add the directory containing the GLUT library to the linker search path, so that glut32.
lib can be successfully linked to your program. This directory is $(SolutionDir)\support\
GLUT and should be added to Project → Properties (Alt + F7) → Configuration Properties→ Linker → Additional Library Directories.
� Add glut32.lib to the list of libraries to be linked in Project → Properties (Alt + F7)→ Configuration Properties → Linker → Input → Additional Dependencies. Note thatthere are seemingly two libraries in the <b16-lab-path>\support\GLUT\ folder: glut32.lib
and glut32.dll. The former is needed by the linker during compilation; the latter is theactual library which is dynamically loaded and attached to your program by the operatingsystem when the executable is run. This is known as a dynamically linked library (DLL)for this reason.

B16 Software Engineering Lab Notes 19
� Finally, the GLUT DLL must be copied to a place that can be found by the operatingsystem (Windows) when the executable is run. While there are several standard placeswhere such DLLs are usually stored, here we do not want to permanently add softwareto the Windows machine in the laboratory! The alternative is to copy glut32.dll in thesame directory of the executable ball-graphics.exe. As you should know by know, thisdirectory is <b16-lab-path>\Debug, or simply $(OutDir)$ using a Visual Studio macro. Inorder to copy GLUT to this directory after the compilation is complete, we will add apost-build rule, in this case the command
1 copy /y $(SolutionDir)\support\GLUT\glut32.dll $(OutDir)\
This string should be added to Project → Properties (Alt + F7) → Configuration Prop-erties → Build Events → Post-Build Event → Command Line.
B References
� General programming questions
– Google. Seriously.
– Stack Exchange http://stackexchange.com and, in particular, Stack Overflow http://stackoverflow.com.
� OpenGL
– OpenGL 2 reference manual: http://ewww.opengl.org/sdk/docs/man2/.
– GLUT refernce manual: http://www.opengl.org/documentation/specs/glut/spec3/spec3.html.
– OpenGL tutorial on 2D graphics: http://www3.ntu.edu.sg/home/ehchua/programming/opengl/CG Introduction.html.
– OpenGL tutorial on 3D graphics: http://www.cs.uccs.edu/∼ssemwal/indexGLTutorial.html.
� When all else fails:
– Demonstrator.
C Troubleshooting
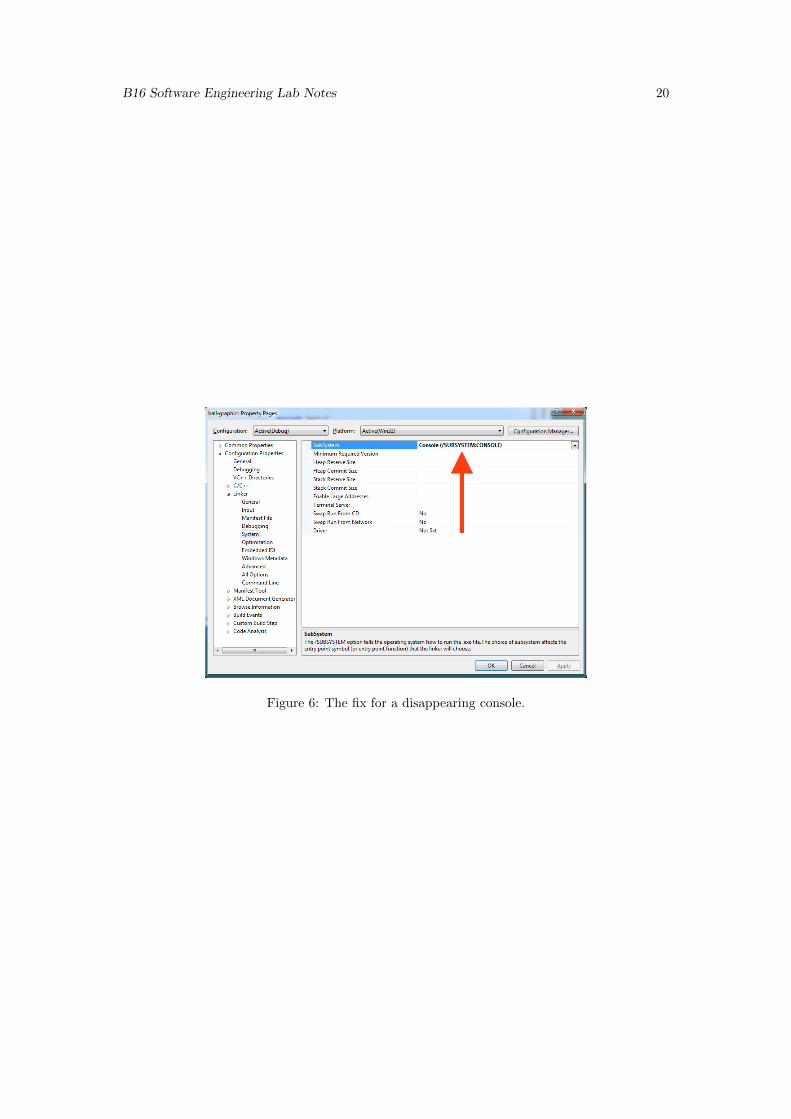
� Disappearing console. Differently from Visual Studio 2008, in Visual Studio 2010 evenwhen running with Start Without Debugging the console may disappear quickly after theprogram terminates. In this case set Project → Properties → Configuration Properties →Linker → System → SubSystem to Console (/SUBSYSTEM:CONSOLE) (Figure 6).
B16 Software Engineering Lab Notes 20
Figure 6: The fix for a disappearing console.