backup & recovery manager release 1.2 user guide · emc® backup & recovery manager®...
TRANSCRIPT
EMC®
Backup & Recovery Manager®Version 1.2
User Guide302-000-784
REV 04
Copyright © 2012-2016 EMC Corporation. All rights reserved. Published in the USA.
Published March, 2016
EMC believes the information in this publication is accurate as of its publication date. The information is subject to changewithout notice.
The information in this publication is provided as is. EMC Corporation makes no representations or warranties of any kind withrespect to the information in this publication, and specifically disclaims implied warranties of merchantability or fitness for aparticular purpose. Use, copying, and distribution of any EMC software described in this publication requires an applicablesoftware license.
EMC², EMC, and the EMC logo are registered trademarks or trademarks of EMC Corporation in the United States and othercountries. All other trademarks used herein are the property of their respective owners.
For the most up-to-date regulatory document for your product line, go to EMC Online Support (https://support.emc.com).
EMC CorporationHopkinton, Massachusetts 01748-91031-508-435-1000 In North America 1-866-464-7381www.EMC.com
2 Backup & Recovery Manager 1.2 User Guide
9
13
15
Getting Started 19
Product architecture......................................................................................20IPv6 support..................................................................................................21Requirements................................................................................................21
Backup & Recovery Manager server software requirements.............. 21Operating system software requirements for the Avamar andNetWorker adaptors......................................................................... 22Mobile application requirements......................................................22Backup & Recovery Manager server installation requirements..........22Backup & Recovery Manager server support for the 1.2 adaptors .....24System requirements....................................................................... 24Data storage requirements............................................................... 25Browser requirements...................................................................... 25Display requirements....................................................................... 25
User Interface 27
Backup & Recovery Manager user interface................................................... 28Header and Status bars....................................................................29
Backup & Recovery Manager for Mobile.........................................................29Obtain the Backup & Recovery Manager mobile application............. 30Mobile security and access.............................................................. 30Mobile navigation, views, sorting and filtering................................. 31Actions available for mobile............................................................. 34Details on mobile.............................................................................36
Using online help.......................................................................................... 36Viewing context sensitive help...................................................................... 38Enable single sign-on.................................................................................... 38
Enabling Single sign-on....................................................................39Selecting the Avamar system from Preferences > Product launch links........................................................................................................ 39Exporting the security certificate to the Avamar system.................... 40Importing the certificate to the Avamar server.................................. 44Launching Avamar applications....................................................... 45Web browser authentication using Apache.......................................46
Using search................................................................................................. 46Viewing search results..................................................................... 47
Errors and Warnings pop ups.........................................................................48Views menu filters.........................................................................................50
Common views.................................................................................50Alerts views......................................................................................51Activities views................................................................................ 52
Figures
Tables
Preface
Chapter 1
Chapter 2
CONTENTS
Backup & Recovery Manager 1.2 User Guide 3
Events views.................................................................................... 53Systems views................................................................................. 54
Exporting data to CSV....................................................................................54
Installation 55
Install the Backup & Recovery Manager server...............................................56Installing the Backup & Recovery Manager server on a VM............... 56Installing the Backup & Recovery Manager server on physicalhardware......................................................................................... 58
Build to build upgrade of the Backup & Recovery Manager server..................59Upgrading to the current Backup & Recovery Manager server........... 59Regenerate the SSL certificates........................................................ 60
Changing the server name post installation...................................................61Backup & Recovery Manager adaptor installation..........................................62
Backup & Recovery Manager adaptor for Avamar installation andupgrade........................................................................................... 62NetWorker adaptor installation and upgrade on Windows and Linux........................................................................................................ 68Adding a Data Domain system..........................................................75
Logging in to the Backup & Recovery Manager...............................................76Reestablishing an expired session................................................... 78
Disable the Backup & Recovery Manager adaptor for Avamar........................ 79Disabling the Backup & Recovery Manager adaptor for Avamar 7.0 andearlier.............................................................................................. 79Disabling the Backup & Recovery Manager adaptor for Avamar 7.1 andlater................................................................................................. 80
Uninstalling the Backup & Recovery Manager adaptor...................................80Uninstalling the Avamar adaptor...................................................... 80Uninstalling the NetWorker adaptor................................................. 81
Alerts 83
Overview of Alerts......................................................................................... 84System Summary.......................................................................................... 84Alerts columns.............................................................................................. 85Alert categories............................................................................................. 86
Excluding and including columns from the Alerts display................. 86Viewing repeated alerts....................................................................87
Hiding alerts..................................................................................................87Viewing hidden alerts....................................................................................88Unhiding alerts..............................................................................................88Acknowledging alerts.................................................................................... 89
Activities 91
Overview of Activities.................................................................................... 92Activities columns......................................................................................... 92
Excluding and including columns from the Activities display............ 92Activities details............................................................................................93
Avamar backup activity details summary..........................................94NetWorker backup activity details summary..................................... 95
Starting, stopping and restarting backup jobs............................................... 97Avamar replication........................................................................................ 98
Avamar replication fields..................................................................98
Chapter 3
Chapter 4
Chapter 5
CONTENTS
4 Backup & Recovery Manager 1.2 User Guide
Events 101
Overview of Events...................................................................................... 102Events columns...........................................................................................102Events categories........................................................................................ 102Excluding columns from the display............................................................ 103View repeated events.................................................................................. 103Hide events.................................................................................................104View hidden events.....................................................................................104Unhide events.............................................................................................105
Systems 107
Systems usage graph.................................................................................. 108Systems Display..........................................................................................108
Excluding columns from Systems................................................... 110Editing systems details............................................................................... 110
Avamar system information............................................................111NetWorker system information....................................................... 111Data Domain system information................................................... 112Systems Status column icons.........................................................112
Launching the native system consoles........................................................ 112Managing Data Domain systems................................................................. 115Removing a system..................................................................................... 118Adding or modifying customer information..................................................119
Configuration 121
Overview of Configuration........................................................................... 122Excluding and including columns from Configuration.................................. 122Adding or modifying Avamar replication jobs...............................................123Starting and stopping Avamar replication jobs............................................ 127Disabling and enabling replication jobs...................................................... 127
Settings 129
Introduction to settings............................................................................... 130User Administration.................................................................................... 130
Users............................................................................................. 130Roles............................................................................................. 133
Preferences................................................................................................. 135Date/Time Format.......................................................................... 135Database....................................................................................... 136Product launch links...................................................................... 138Security......................................................................................... 139
Changing a password..................................................................................140Resetting the admin password.................................................................... 141
Reports 143
Types of reports.......................................................................................... 144Running a report............................................................................ 144
Report Options............................................................................................147Timeframe Options.........................................................................147Display Options............................................................................. 148Status Options............................................................................... 148
Chapter 6
Chapter 7
Chapter 8
Chapter 9
Chapter 10
CONTENTS
Backup & Recovery Manager 1.2 User Guide 5
Report Content Options..................................................................148Exporting reports.........................................................................................149
Security Configuration 151
Communication security..............................................................................152Port usage......................................................................................152Network encryption........................................................................ 153Cryptographic modules in the Backup & Recovery Manager............153
Login, session and password protection......................................................154Firewall rules...............................................................................................155REST API......................................................................................................155Data security............................................................................................... 155Access control.............................................................................................155
Default accounts............................................................................155Authentication configuration..........................................................155User authorization......................................................................... 156Component access control............................................................. 156Certificate management................................................................. 156Web browser authentication using Apache.....................................157Installing a self-signed or trusted certificate................................... 157Creating a private key.....................................................................158Generating a certificate signing request......................................... 159Changing the Backup & Recovery Manager Apache from self-signed toissued............................................................................................159
Troubleshooting 163
Managing the Backup & Recovery Manager server.......................................164The regroup-alerts-events script.................................................................. 164
Running the regroup-alerts-events script........................................164Customizing the log rotation policy schedule ..............................................165Adaptor log file location.............................................................................. 165View log files...............................................................................................166
Apache web server log files............................................................166Tomcat log files..............................................................................166Mongo database log file.................................................................167Backup & Recovery Manager application log files...........................167
The bundlelogs utility..................................................................................167Bundlelogs utility options.............................................................. 168Running the bundlelogs utility........................................................168
NetWorker adaptor options......................................................................... 168Editing adaptor options on Windows..............................................168Editing adaptor options on Linux....................................................169NetWorker adaptor command line options..................................... 169
Avamar adaptor control script..................................................................... 172Backup & Recovery Manager error messages...............................................173
Disaster Recovery 175
Clone a Virtual Machine in the vSphere Client............................................. 176Prerequisites..................................................................................176Cloning the Backup & Recovery Manager server............................. 176
Recovering the Backup & Recovery Manager server..................................... 177Re-registering the Avamar or NetWorker servers if required............ 177
Appendix A
Appendix B
Appendix C
CONTENTS
6 Backup & Recovery Manager 1.2 User Guide

179Glossary
CONTENTS
Backup & Recovery Manager 1.2 User Guide 7

CONTENTS
8 Backup & Recovery Manager 1.2 User Guide
Backup & Recovery Manager product architecture......................................................... 20Backup & Recovery Manager user interface....................................................................28Header bar.....................................................................................................................29Status bar......................................................................................................................29Mobile enabled............................................................................................................. 30Mobile dashboard......................................................................................................... 31Mobile device navigation...............................................................................................32Sort fields......................................................................................................................33Mobile filters................................................................................................................. 34Supported mobile actions..............................................................................................35Drill down details...........................................................................................................36Backup & Recovery Manager help..................................................................................37Product Launch Links.....................................................................................................39Avamar system.............................................................................................................. 40Security certificate information...................................................................................... 41Certificate details.......................................................................................................... 42Certificate Export Wizard................................................................................................43Certificate export status.................................................................................................43Security exception information...................................................................................... 44Launch icon...................................................................................................................45Specify Avamar system.................................................................................................. 46Search list..................................................................................................................... 47Search results................................................................................................................48Errors.............................................................................................................................4910 most recent warnings................................................................................................50Alerts views................................................................................................................... 51Activities views..............................................................................................................52Events views..................................................................................................................53Systems views............................................................................................................... 54Avamar Enterprise Manager........................................................................................... 63Go to Package Page status.............................................................................................64Avamar Installation Manager......................................................................................... 66Hostname validation..................................................................................................... 66Hostname Validation message...................................................................................... 66Overwrite prompt...........................................................................................................69Upgrade information......................................................................................................69Setup wizard................................................................................................................. 70License Agreement........................................................................................................ 70Installation Directory..................................................................................................... 71Configuration Settings................................................................................................... 72Installation prompt........................................................................................................ 73Installation status..........................................................................................................73Installation completion..................................................................................................74Login window................................................................................................................ 76Failed login....................................................................................................................77Change Password window............................................................................................. 78Expired login session.....................................................................................................78Logout status.................................................................................................................79Alerts summary chart.....................................................................................................84Worst Systems...............................................................................................................85Worst system launch..................................................................................................... 85
123456789101112131415161718192021222324252627282930313233343536373839404142434445464748495051
FIGURES
Backup & Recovery Manager 1.2 User Guide 9
Sort Alerts columns....................................................................................................... 87Repeated Alerts............................................................................................................. 87Expanded repeated Alerts..............................................................................................87Hide Alerts.....................................................................................................................88View previously hidden Alerts........................................................................................88Hidden Alerts.................................................................................................................89Acknowledge Alerts....................................................................................................... 89Dismiss Alerts................................................................................................................90Sort Activities columns.................................................................................................. 93Backup activity details...................................................................................................94NetWorker backup activity details..................................................................................95Message text................................................................................................................. 96Show backups since: options........................................................................................ 96Start, Stop and Restart permission.................................................................................97Start, Restart and Stop backup jobs...............................................................................97Sort Events columns.................................................................................................... 103List repeated Events.................................................................................................... 104Hide events................................................................................................................. 104View Hidden ............................................................................................................... 105Hidden Events............................................................................................................. 105Unhide Selected events............................................................................................... 105System Usage graph.................................................................................................... 108Available systems........................................................................................................108System details.............................................................................................................109Avamar System details with Meta Data usage graph.................................................... 109Available columns....................................................................................................... 110Launch the Management Console................................................................................ 113Java Web Start............................................................................................................. 113Avamar Administrator Logon........................................................................................114NMC logon...................................................................................................................114Data Domain Enterprise Manager logon....................................................................... 115Data Domain system....................................................................................................115Manage Data Domain Systems.................................................................................... 116Add a Data Domain System..........................................................................................116Connection failed error................................................................................................ 116Successful connection test.......................................................................................... 117Change Data Domain credentials.................................................................................117Change Credentials fields............................................................................................ 117Test Connection window.............................................................................................. 118Remove Data Domain systems.....................................................................................118Remove the selected system prompt........................................................................... 119Customer Information..................................................................................................119Configuration columns.................................................................................................123Avamar Target system..................................................................................................123Avamar systems list.....................................................................................................124Replication schedule................................................................................................... 124Timeout and Limit network bandwidth fields................................................................125Available options for backup retention........................................................................ 125Backup Clients............................................................................................................ 126Completion status....................................................................................................... 126Change status............................................................................................................. 126Configuration error...................................................................................................... 126Start a replication........................................................................................................ 127Replication started...................................................................................................... 127Settings menu............................................................................................................. 130User Administration.....................................................................................................130
525354555657585960616263646566676869707172737475767778798081828384858687888990919293949596979899100101102103104105106107
FIGURES
10 Backup & Recovery Manager 1.2 User Guide
Add a user................................................................................................................... 131Edit an existing user.................................................................................................... 132User is locked message............................................................................................... 133Modify Administrator role error.................................................................................... 134New role...................................................................................................................... 134Role Privileges............................................................................................................. 135Preferences................................................................................................................. 135Date/Time Format options........................................................................................... 136Percentage Used setting.............................................................................................. 137Database options........................................................................................................ 138Product Launch Links...................................................................................................138Security options.......................................................................................................... 139Change Password........................................................................................................ 140New password fields....................................................................................................141Report types................................................................................................................ 145Report system options................................................................................................. 145Backup Summary report options..................................................................................146System Summary report options.................................................................................. 146Capacity usage report chart......................................................................................... 146Expired login session...................................................................................................154
108109110111112113114115116117118119120121122123124125126127
FIGURES
Backup & Recovery Manager 1.2 User Guide 11

FIGURES
12 Backup & Recovery Manager 1.2 User Guide
Revision history............................................................................................................. 15Style conventions.......................................................................................................... 16Backup & Recovery Manager architecture...................................................................... 20Data storage requirements............................................................................................ 23Hyper-V virtual machine requirements........................................................................... 23Non-clustered memory, CPU and disk............................................................................ 24Data storage requirements............................................................................................ 25Backup & Recovery Manager user interface sections .....................................................28Header components ......................................................................................................29Available help menu options ........................................................................................ 37Common views filters.....................................................................................................50Alerts views filters......................................................................................................... 51Activities views filters ................................................................................................... 52Events views filters........................................................................................................ 53Systems views filters .................................................................................................... 54Data storage requirements............................................................................................ 58Installation Progress details.......................................................................................... 64Alerts icons....................................................................................................................84Alerts section columns.................................................................................................. 85Alert categories..............................................................................................................86Backup details systems columns................................................................................... 92Avamar backup details systems fields .......................................................................... 94NetWorker backup details systems fields ......................................................................95Avamar replication activities fields ............................................................................... 98Avamar replication details summary fields ....................................................................98Events section columns............................................................................................... 102Event categories ......................................................................................................... 102System types and states..............................................................................................109Avamar server information .......................................................................................... 111NetWorker server information...................................................................................... 111Data Domain system information ................................................................................ 112Status columns............................................................................................................112Avamar replication configuration columns................................................................... 122Backup Retention options............................................................................................125User roles.................................................................................................................... 133Product Launch Links option........................................................................................138Available reports by system type .................................................................................144Report option icons .....................................................................................................147Default ports using the TCP protocol............................................................................ 152Encryption strategies................................................................................................... 153Cryptographic modules................................................................................................153Default account names and passwords........................................................................155Built-in user roles........................................................................................................ 156Log file locations......................................................................................................... 166Apache log files........................................................................................................... 166Tomcat log files........................................................................................................... 166Mongo logs..................................................................................................................167Backup & Recovery Manager logs................................................................................ 167Bundlelogs utility usage.............................................................................................. 168NetWorker adaptor options .........................................................................................169Avamar adaptor control script use ...............................................................................172
123456789101112131415161718192021222324252627282930313233343536373839404142434445464748495051
TABLES
Backup & Recovery Manager 1.2 User Guide 13

Backup & Recovery Manager error codes..................................................................... 17352
TABLES
14 Backup & Recovery Manager 1.2 User Guide
Preface
As part of an effort to improve its product lines, EMC periodically releases revisions of itssoftware and hardware. Therefore, some functions described in this document might notbe supported by all versions of the software or hardware currently in use. The productrelease notes provide the most up-to-date information on product features.
Contact your EMC technical support professional if a product does not function properlyor does not function as described in this document.
Note
This document was accurate at publication time. Go to EMC Online Support (https://support.emc.com) to ensure that you are using the latest version of this document.
PurposeThis document describes how to install, configure and administer Backup & RecoveryManager.
AudienceThis document is intended for the host system administrator, system programmer, oroperator who will be involved in managing Backup & Recovery Manager for Avamar orNetWorker deployments.
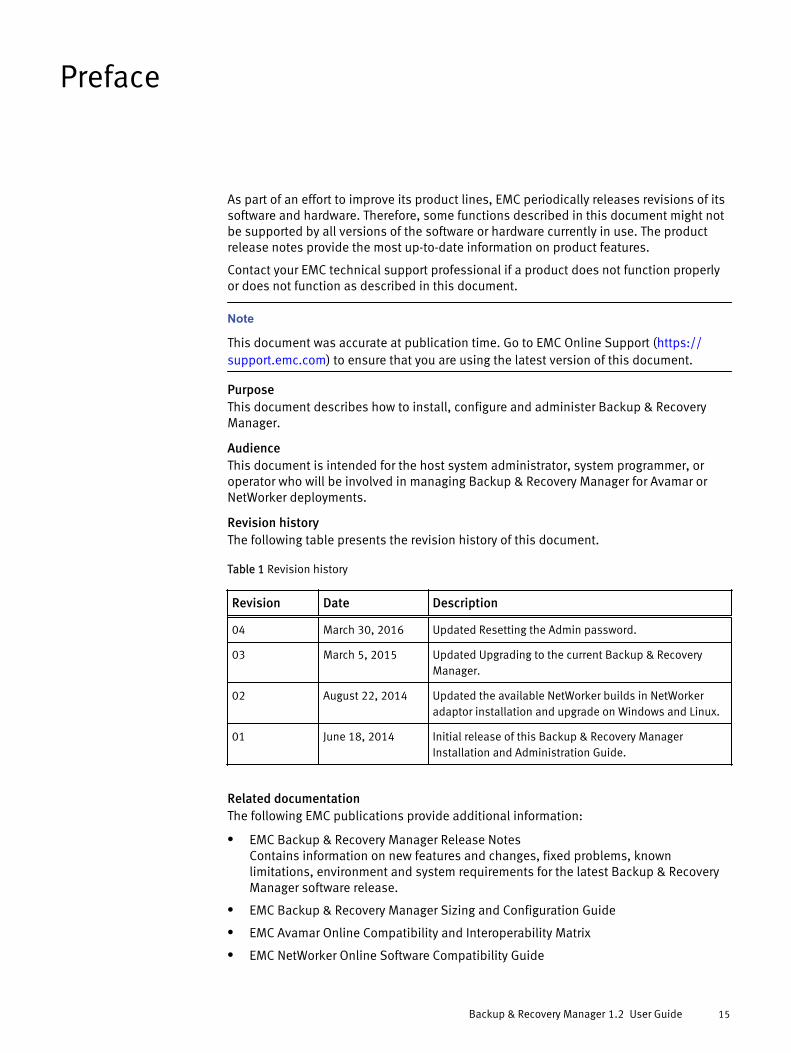
Revision historyThe following table presents the revision history of this document.
Table 1 Revision history
Revision Date Description
04 March 30, 2016 Updated Resetting the Admin password.
03 March 5, 2015 Updated Upgrading to the current Backup & RecoveryManager.
02 August 22, 2014 Updated the available NetWorker builds in NetWorkeradaptor installation and upgrade on Windows and Linux.
01 June 18, 2014 Initial release of this Backup & Recovery ManagerInstallation and Administration Guide.
Related documentationThe following EMC publications provide additional information:
l EMC Backup & Recovery Manager Release NotesContains information on new features and changes, fixed problems, knownlimitations, environment and system requirements for the latest Backup & RecoveryManager software release.
l EMC Backup & Recovery Manager Sizing and Configuration Guide
l EMC Avamar Online Compatibility and Interoperability Matrix
l EMC NetWorker Online Software Compatibility Guide
Backup & Recovery Manager 1.2 User Guide 15
You can access the Online Software Compatibility Guides on the EMC Online Supportsite at https://support.emc.com. From the Support by Product pages, search forNetWorker using "Find a Product".
l EMC Avamar documentationl EMC NetWorker documentation
Special notice conventions that are used in this documentEMC uses the following conventions for special notices:
NOTICE
Identifies content that warns of potential business or data loss.
Note
Contains information that is incidental, but not essential, to the topic.
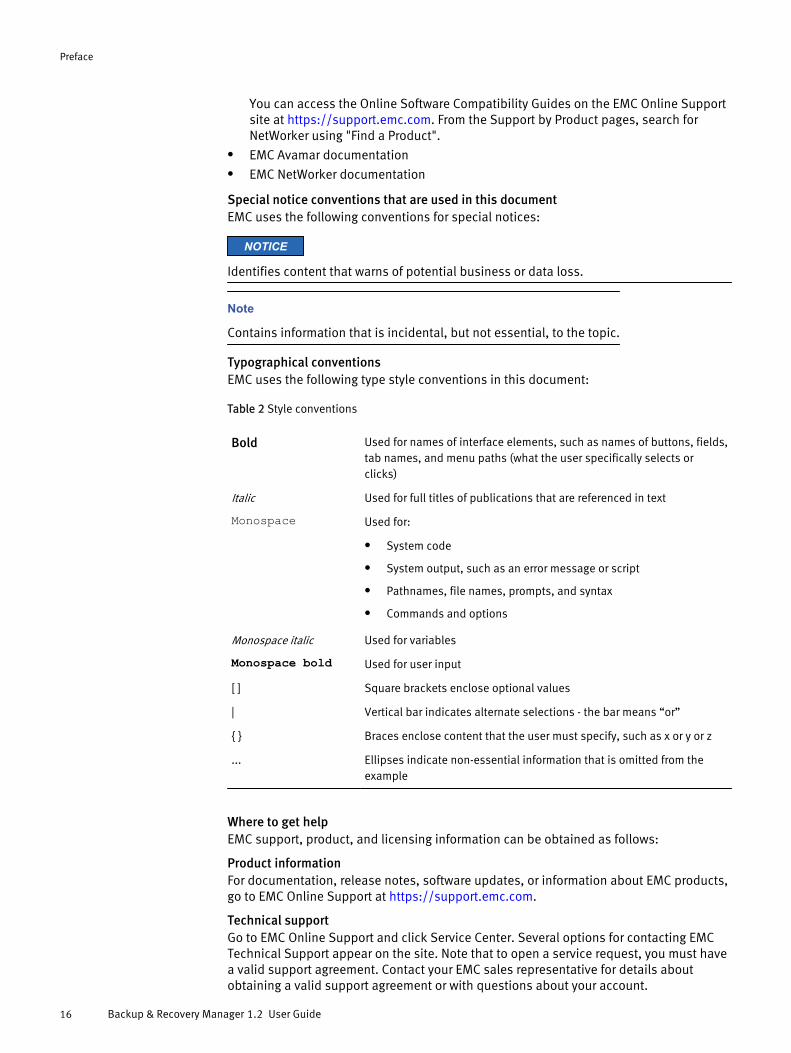
Typographical conventionsEMC uses the following type style conventions in this document:
Table 2 Style conventions
Bold Used for names of interface elements, such as names of buttons, fields,tab names, and menu paths (what the user specifically selects orclicks)
Italic Used for full titles of publications that are referenced in text
Monospace Used for:
l System code
l System output, such as an error message or script
l Pathnames, file names, prompts, and syntax
l Commands and options
Monospace italic Used for variables
Monospace bold Used for user input
[ ] Square brackets enclose optional values
| Vertical bar indicates alternate selections - the bar means “or”
{ } Braces enclose content that the user must specify, such as x or y or z
... Ellipses indicate non-essential information that is omitted from theexample
Where to get helpEMC support, product, and licensing information can be obtained as follows:
Product informationFor documentation, release notes, software updates, or information about EMC products,go to EMC Online Support at https://support.emc.com.
Technical supportGo to EMC Online Support and click Service Center. Several options for contacting EMCTechnical Support appear on the site. Note that to open a service request, you must havea valid support agreement. Contact your EMC sales representative for details aboutobtaining a valid support agreement or with questions about your account.
Preface
16 Backup & Recovery Manager 1.2 User Guide

Online communitiesGo to EMC Community Network at https://community.emc.com for peer contacts,conversations, and content on product support and solutions. Interactively engage onlinewith customers, partners, and certified professionals for all EMC products.
Your commentsYour suggestions help to improve the accuracy, organization, and overall quality of theuser publications. Send your opinions of this document to [email protected].
Preface
Backup & Recovery Manager 1.2 User Guide 17

Preface
18 Backup & Recovery Manager 1.2 User Guide

CHAPTER 1
Getting Started
The Backup & Recovery Manager runs in a server, supporting Avamar® and NetWorker®
servers and Data Domain® backup targets. The Backup & Recovery Manager runs on bothphysical or virtual servers. Avamar and NetWorker adaptors are installed on therespective Avamar & NetWorker systems to transmit messages and information over themessage bus to be viewed in the Backup & Recovery Manager UI.
l Product architecture..............................................................................................20l IPv6 support..........................................................................................................21l Requirements........................................................................................................21
Getting Started 19
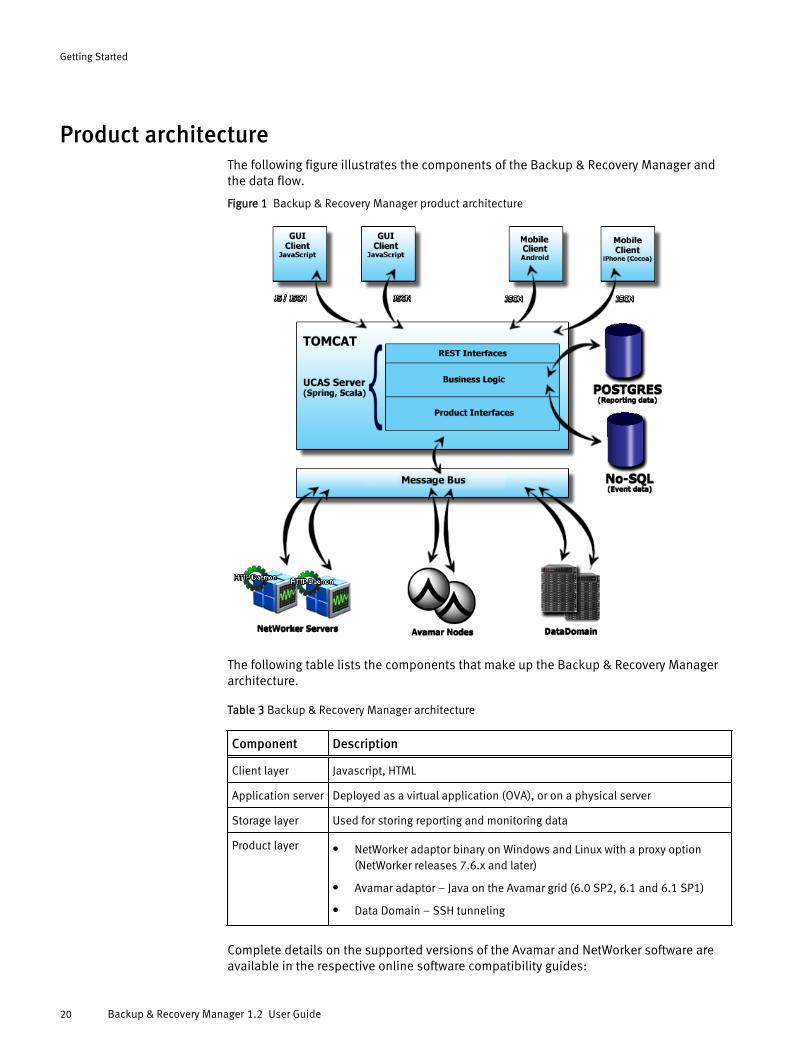
Product architectureThe following figure illustrates the components of the Backup & Recovery Manager andthe data flow.
Figure 1 Backup & Recovery Manager product architecture
The following table lists the components that make up the Backup & Recovery Managerarchitecture.
Table 3 Backup & Recovery Manager architecture
Component Description
Client layer Javascript, HTML
Application server Deployed as a virtual application (OVA), or on a physical server
Storage layer Used for storing reporting and monitoring data
Product layer l NetWorker adaptor binary on Windows and Linux with a proxy option(NetWorker releases 7.6.x and later)
l Avamar adaptor – Java on the Avamar grid (6.0 SP2, 6.1 and 6.1 SP1)
l Data Domain – SSH tunneling
Complete details on the supported versions of the Avamar and NetWorker software areavailable in the respective online software compatibility guides:
Getting Started
20 Backup & Recovery Manager 1.2 User Guide
l The Avamar Compatibility and Interoperability Matrix
l The NetWorker Software Compatibility Guide
IPv6 supportBackup & Recovery Manager, a web service accessed through a browser is certified andsupported in a dual-stack IPv4/IPv6 network environment. Avamar and NetWorker serversand browsers with either IPv4 or IPv6 addresses can communicate with the Backup &Recovery Manager server.
NOTICE
A pure IPv6 environment is not currently a supported configuration for a Backup &Recovery Manager server, however there are actions that allow this configuration to work.
If you choose to run in a pure IPv6 environment, the following actions are necessary:
l Deployment:After the Backup & Recovery Manager server OVA is deployed, use the yast lancommand as root from the VMware console to manually configure the IPv6networking and IPv6 DNS servers.
l Web access:When accessing Backup & Recovery Manager that is deployed on a dual-stackenabled network from an IPv6 web browser, ensure the network path from thebrowser to the BRM server supports IPv6 from end to end. Test the IP connection byusing one of the following methods:
n The ping6 utility from the desktop to the IPv6 address of the Backup & RecoveryManager server.
n Verify the connection with the network administrator.If the IPv6 path is available from end to end, the Backup & Recovery Managerappliance can be accessed by surrounding the IPv6 address with square brackets[] and specifying the application path.
For example, if the IPv6 address of Backup & Recovery Manager is2620:0:170:718:250:56ff:fe96:f998, then the URL for access is https://[2620:0:170:718:250:56ff:fe96:f998]/brm/ for initial login. This provides full,normal access to Backup & Recovery Manager.
RequirementsThere are minimum hardware and software requirements that must be met tosuccessfully deploy and install the Backup & Recovery Manager software.
Ensure that all current operating system patches or updates are installed.
Backup & Recovery Manager server software requirementsThe Backup & Recovery Manager server can be installed on both a virtual host (vApp) anda physical host by using the SLES native installer.
l Minimum required versions for the Virtual Application (vApp):
n ESXi
n ESX 5.1 and 5.5
n VCenter Server 5.0
Getting Started
IPv6 support 21
n VSphere Client 5.0 and 5.1
l Native installer for SLES Linux:
n Bootable ISO image requires a minimum of 3.3 GB free space on any of thefollowing:
– Network PXE server
– USB/DVD
n 2 disks (operating system and MongoDB disks)
n A minimum of 4 CPUs
n A minimum 8 GB of RAM
n A minimum 110 GB Disk
n A DHCP server must be available on the network on which the server is running fora Backup & Recovery Manager deployment
Operating system software requirements for the Avamar and NetWorker adaptorsFor the supported version of Avamar or NetWorker , there are minimum requiredoperating system software versions needed to run the Backup & Recovery Managersoftware.
l Avamar 6.0 SP2, 6.1, 6.1 SP1, and later
n SLES Linux 11
n RHEL 4
Note
Backup and Recovery Manager is not supported on Avamar Extended RetentionMedia Access Nodes.
l NetWorker 7.6 and later
n Microsoft Windows 2003, 2008, 2008 R2 and Windows 7
n SLES Linux 11
Mobile application requirementsThe Backup & Recovery Manager is available for use on mobile devices.
l The Backup & Recovery Manager mobile apps require Backup & Recovery Manager1.2 or later server.
l The Backup & Recovery Manager mobile application is compatible with the followingmobile devices:
n iPad 2, iPad 3rd generation and later
n iPad mini (iOS 6 and 7)
n Android version 3.1 and later on Android tablets
Backup & Recovery Manager server installation requirementsThe Backup & Recovery Manager server (OVA) raw database is a temporary buffer forstoring messages until they are processed.
Near the end of a Hyper_V or physical installation using ISO, the Backup & RecoveryManager server post installation script displays a premature login prompt.
Getting Started
22 Backup & Recovery Manager 1.2 User Guide
The following 4 post-install scripts run:
l 01_OS_post_script.sh
l 02_BRM_UPGRADER_post_script.sh
l 03_BRM_INSTALLER_post_script.sh
l 04_CLEANUP_post_script.sh
While the 3rd script (03_BRM_INSTALLER_post_script) is running, the security patchinstallation of the new OS kernel displays a node: login prompt while the last of theupdates are applied. When the post-install scripts complete, a reboot occurs.
Disregard the login prompt and wait for the process to complete and reboot rather thanattempting to login at the prompt.
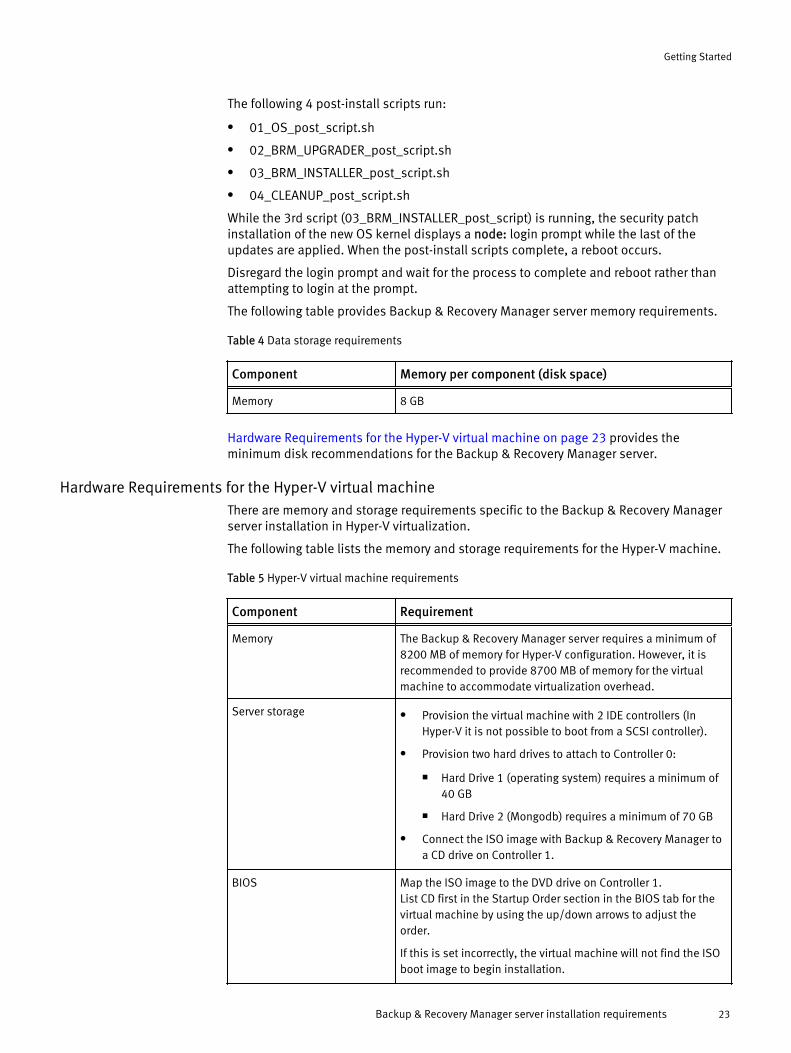
The following table provides Backup & Recovery Manager server memory requirements.
Table 4 Data storage requirements
Component Memory per component (disk space)
Memory 8 GB
Hardware Requirements for the Hyper-V virtual machine on page 23 provides theminimum disk recommendations for the Backup & Recovery Manager server.
Hardware Requirements for the Hyper-V virtual machineThere are memory and storage requirements specific to the Backup & Recovery Managerserver installation in Hyper-V virtualization.
The following table lists the memory and storage requirements for the Hyper-V machine.
Table 5 Hyper-V virtual machine requirements
Component Requirement
Memory The Backup & Recovery Manager server requires a minimum of8200 MB of memory for Hyper-V configuration. However, it isrecommended to provide 8700 MB of memory for the virtualmachine to accommodate virtualization overhead.
Server storage l Provision the virtual machine with 2 IDE controllers (InHyper-V it is not possible to boot from a SCSI controller).
l Provision two hard drives to attach to Controller 0:
n Hard Drive 1 (operating system) requires a minimum of40 GB
n Hard Drive 2 (Mongodb) requires a minimum of 70 GB
l Connect the ISO image with Backup & Recovery Manager toa CD drive on Controller 1.
BIOS Map the ISO image to the DVD drive on Controller 1.List CD first in the Startup Order section in the BIOS tab for thevirtual machine by using the up/down arrows to adjust theorder.
If this is set incorrectly, the virtual machine will not find the ISOboot image to begin installation.
Getting Started
Backup & Recovery Manager server installation requirements 23
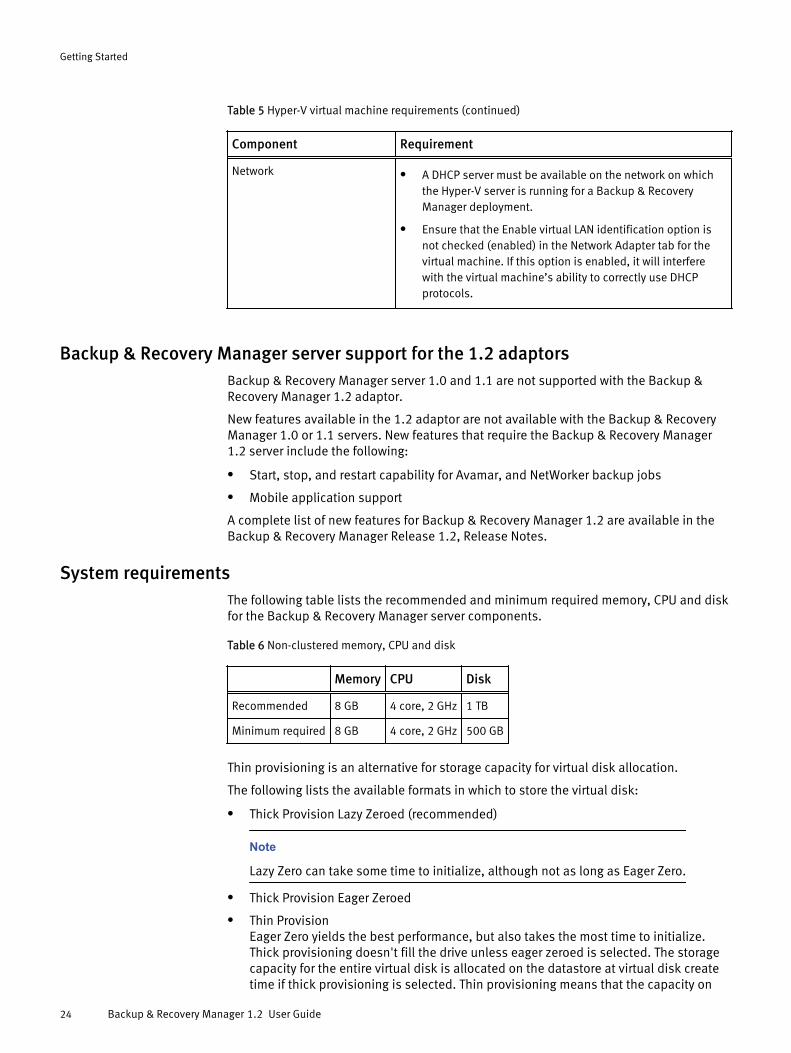
Table 5 Hyper-V virtual machine requirements (continued)
Component Requirement
Network l A DHCP server must be available on the network on whichthe Hyper-V server is running for a Backup & RecoveryManager deployment.
l Ensure that the Enable virtual LAN identification option isnot checked (enabled) in the Network Adapter tab for thevirtual machine. If this option is enabled, it will interferewith the virtual machine’s ability to correctly use DHCPprotocols.
Backup & Recovery Manager server support for the 1.2 adaptorsBackup & Recovery Manager server 1.0 and 1.1 are not supported with the Backup &Recovery Manager 1.2 adaptor.
New features available in the 1.2 adaptor are not available with the Backup & RecoveryManager 1.0 or 1.1 servers. New features that require the Backup & Recovery Manager1.2 server include the following:
l Start, stop, and restart capability for Avamar, and NetWorker backup jobs
l Mobile application support
A complete list of new features for Backup & Recovery Manager 1.2 are available in theBackup & Recovery Manager Release 1.2, Release Notes.
System requirementsThe following table lists the recommended and minimum required memory, CPU and diskfor the Backup & Recovery Manager server components.
Table 6 Non-clustered memory, CPU and disk
Memory CPU Disk
Recommended 8 GB 4 core, 2 GHz 1 TB
Minimum required 8 GB 4 core, 2 GHz 500 GB
Thin provisioning is an alternative for storage capacity for virtual disk allocation.
The following lists the available formats in which to store the virtual disk:
l Thick Provision Lazy Zeroed (recommended)
Note
Lazy Zero can take some time to initialize, although not as long as Eager Zero.
l Thick Provision Eager Zeroed
l Thin ProvisionEager Zero yields the best performance, but also takes the most time to initialize.Thick provisioning doesn't fill the drive unless eager zeroed is selected. The storagecapacity for the entire virtual disk is allocated on the datastore at virtual disk createtime if thick provisioning is selected. Thin provisioning means that the capacity on
Getting Started
24 Backup & Recovery Manager 1.2 User Guide

the datastore is allocated to the virtual disk as required, up to the full size of thevirtual disk.
Data storage requirementsThe Backup & Recovery Manager server (OVA) raw database is a temporary buffer forstoring messages until they are processed. Both Avamar and NetWorker have minimumdisk space requirements.
The following table provides a summary of storage requirements.
Table 7 Data storage requirements
Recommended raw storage for 24 hours ofmessages
Memory per server (disk space)
Avamar 50 Mb
NetWorker 2000 Mb
NOTICE
This requirement is for both live message display and reports.
Browser requirementsThere are minimum browser requirements for Google Chrome, Microsoft Internet Explorer,and Mozilla Firefox to run the Backup & Recovery Manager.
A list of browsers currently supported by the Backup & Recovery Manager is provided in:
l The Avamar Compatibility and Interoperability Matrix
l The NetWorker Software Compatibility Guide
l The Backup & Recovery Manager Release 1.2 Release Notes
Note
Be sure that the pop-up blocker is turned off to allow UI and online help pop-ups.
Display requirementsThe minimum recommended screen resolution is 1280 x 1024 for running the Backup &Recovery Manager in a web browser.
Getting Started
Data storage requirements 25

Getting Started
26 Backup & Recovery Manager 1.2 User Guide
CHAPTER 2
User Interface
The Backup & Recovery Manager runs in a server, supporting Avamar® and NetWorker®
servers and Data Domain® backup targets. The Backup & Recovery Manager runs on avirtual server. The Backup & Recovery Manager runs on a virtual server. Backup &Recovery Manager 1.2 is now available as a mobile application for both Apple, andAndroid tablets. Details on the Backup & Recovery mobile app and its requirements areavailable in Backup & Recovery Manager mobile application on page 29 and Backup &Recovery Manager mobile support on page 22 respectively.
l Backup & Recovery Manager user interface........................................................... 28l Backup & Recovery Manager for Mobile.................................................................29l Using online help.................................................................................................. 36l Viewing context sensitive help.............................................................................. 38l Enable single sign-on............................................................................................ 38l Using search......................................................................................................... 46l Errors and Warnings pop ups.................................................................................48l Views menu filters.................................................................................................50l Exporting data to CSV............................................................................................54
User Interface 27
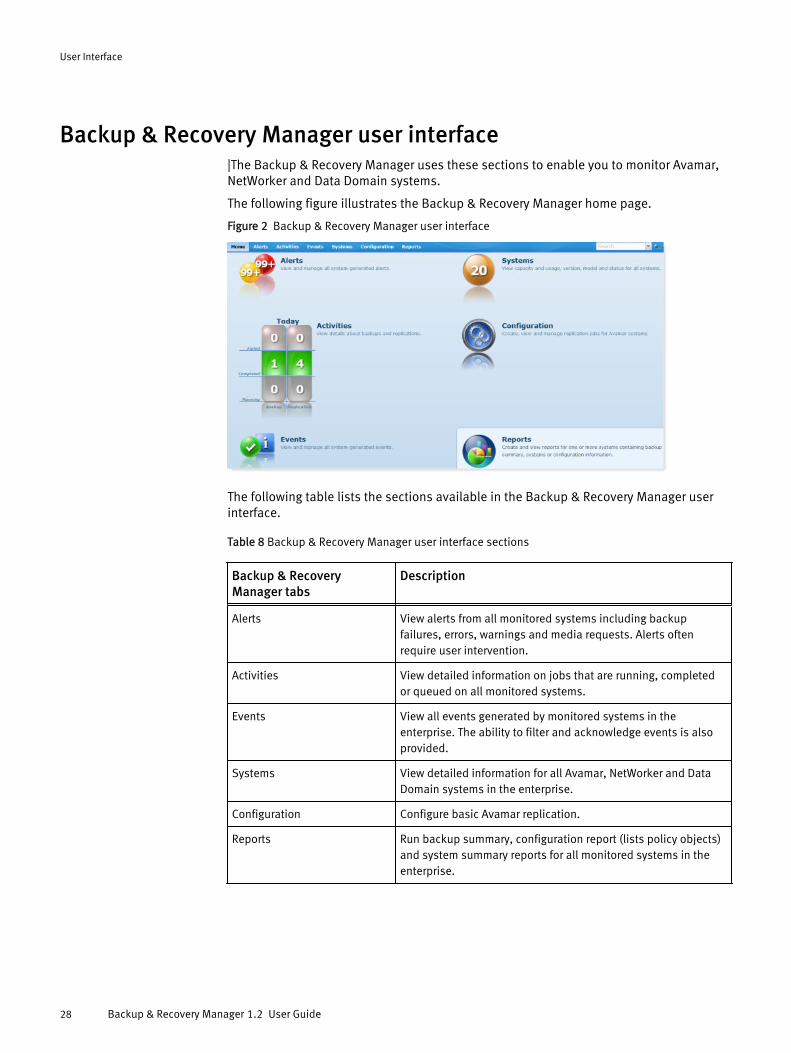
Backup & Recovery Manager user interface|The Backup & Recovery Manager uses these sections to enable you to monitor Avamar,NetWorker and Data Domain systems.
The following figure illustrates the Backup & Recovery Manager home page.
Figure 2 Backup & Recovery Manager user interface
The following table lists the sections available in the Backup & Recovery Manager userinterface.
Table 8 Backup & Recovery Manager user interface sections
Backup & RecoveryManager tabs
Description
Alerts View alerts from all monitored systems including backupfailures, errors, warnings and media requests. Alerts oftenrequire user intervention.
Activities View detailed information on jobs that are running, completedor queued on all monitored systems.
Events View all events generated by monitored systems in theenterprise. The ability to filter and acknowledge events is alsoprovided.
Systems View detailed information for all Avamar, NetWorker and DataDomain systems in the enterprise.
Configuration Configure basic Avamar replication.
Reports Run backup summary, configuration report (lists policy objects)and system summary reports for all monitored systems in theenterprise.
User Interface
28 Backup & Recovery Manager 1.2 User Guide
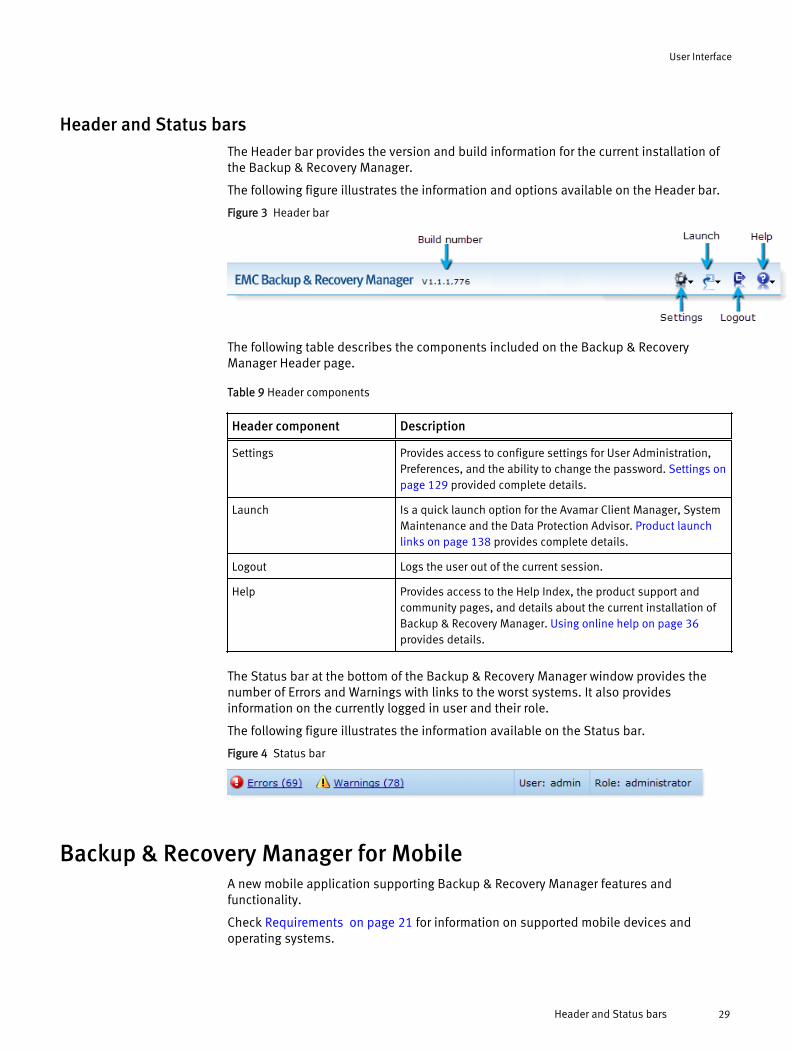
Header and Status barsThe Header bar provides the version and build information for the current installation ofthe Backup & Recovery Manager.
The following figure illustrates the information and options available on the Header bar.
Figure 3 Header bar
The following table describes the components included on the Backup & RecoveryManager Header page.
Table 9 Header components
Header component Description
Settings Provides access to configure settings for User Administration,Preferences, and the ability to change the password. Settings onpage 129 provided complete details.
Launch Is a quick launch option for the Avamar Client Manager, SystemMaintenance and the Data Protection Advisor. Product launchlinks on page 138 provides complete details.
Logout Logs the user out of the current session.
Help Provides access to the Help Index, the product support andcommunity pages, and details about the current installation ofBackup & Recovery Manager. Using online help on page 36provides details.
The Status bar at the bottom of the Backup & Recovery Manager window provides thenumber of Errors and Warnings with links to the worst systems. It also providesinformation on the currently logged in user and their role.
The following figure illustrates the information available on the Status bar.
Figure 4 Status bar
Backup & Recovery Manager for MobileA new mobile application supporting Backup & Recovery Manager features andfunctionality.
Check Requirements on page 21 for information on supported mobile devices andoperating systems.
User Interface
Header and Status bars 29
Obtain the Backup & Recovery Manager mobile applicationThe Backup & Recovery Manager mobile application is available from the Apple App Storefor iOS devices and Google Play for Android devices. You can test drive the applicationwith canned data by using Demo mode.
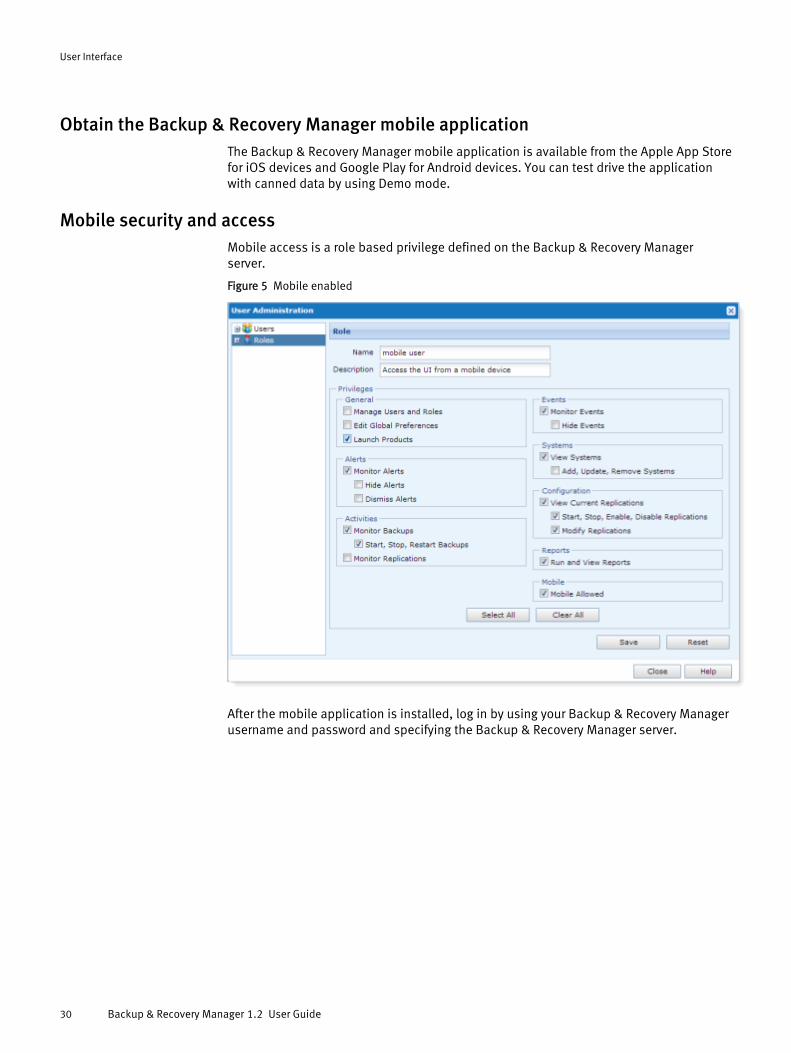
Mobile security and accessMobile access is a role based privilege defined on the Backup & Recovery Managerserver.
Figure 5 Mobile enabled
After the mobile application is installed, log in by using your Backup & Recovery Managerusername and password and specifying the Backup & Recovery Manager server.
User Interface
30 Backup & Recovery Manager 1.2 User Guide
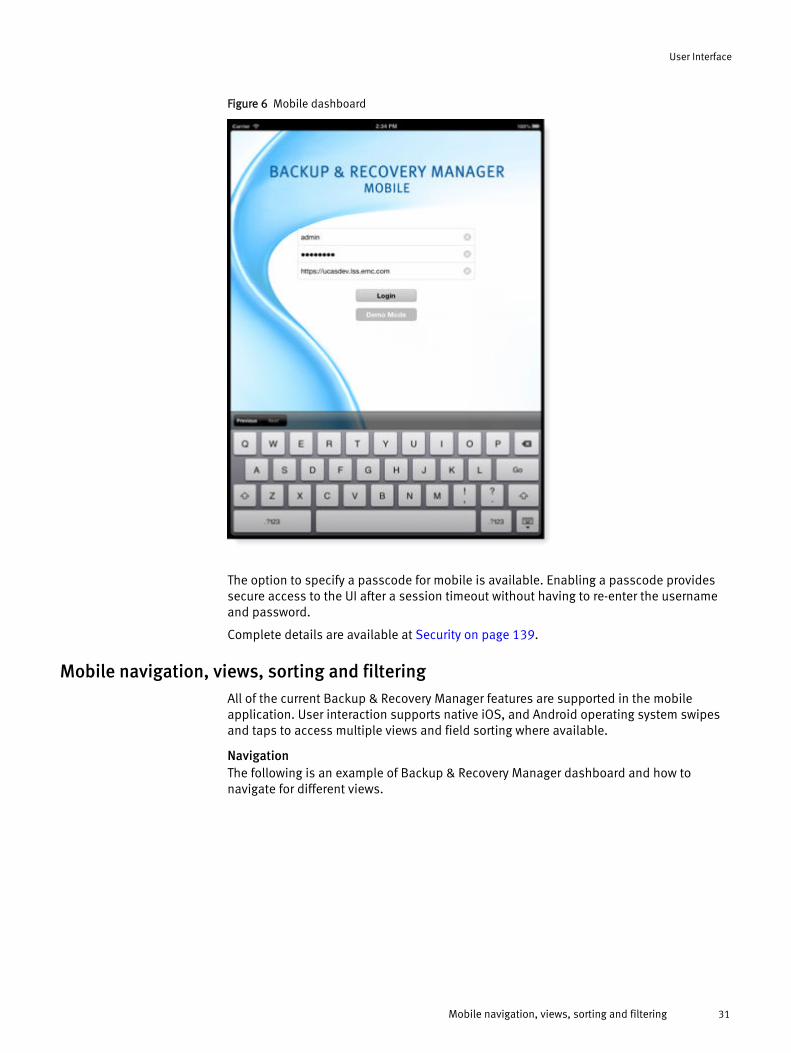
Figure 6 Mobile dashboard
The option to specify a passcode for mobile is available. Enabling a passcode providessecure access to the UI after a session timeout without having to re-enter the usernameand password.
Complete details are available at Security on page 139.
Mobile navigation, views, sorting and filteringAll of the current Backup & Recovery Manager features are supported in the mobileapplication. User interaction supports native iOS, and Android operating system swipesand taps to access multiple views and field sorting where available.
NavigationThe following is an example of Backup & Recovery Manager dashboard and how tonavigate for different views.
User Interface
Mobile navigation, views, sorting and filtering 31
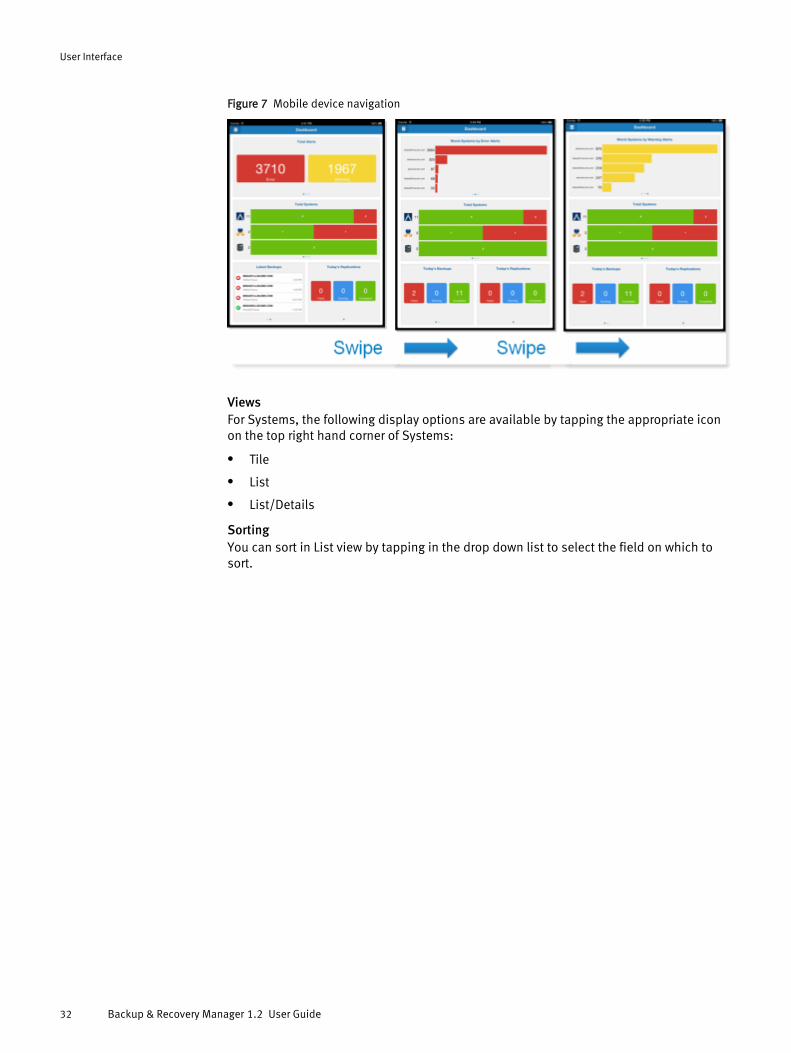
Figure 7 Mobile device navigation
ViewsFor Systems, the following display options are available by tapping the appropriate iconon the top right hand corner of Systems:
l Tile
l List
l List/Details
SortingYou can sort in List view by tapping in the drop down list to select the field on which tosort.
User Interface
32 Backup & Recovery Manager 1.2 User Guide
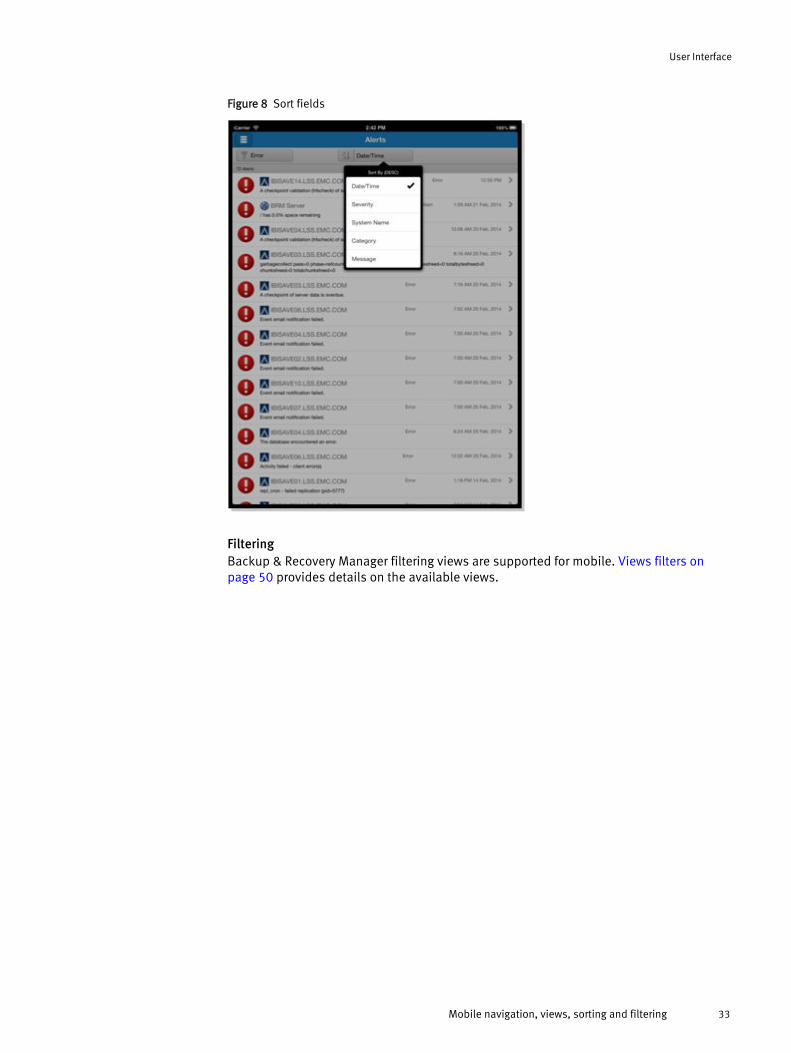
Figure 8 Sort fields
FilteringBackup & Recovery Manager filtering views are supported for mobile. Views filters onpage 50 provides details on the available views.
User Interface
Mobile navigation, views, sorting and filtering 33
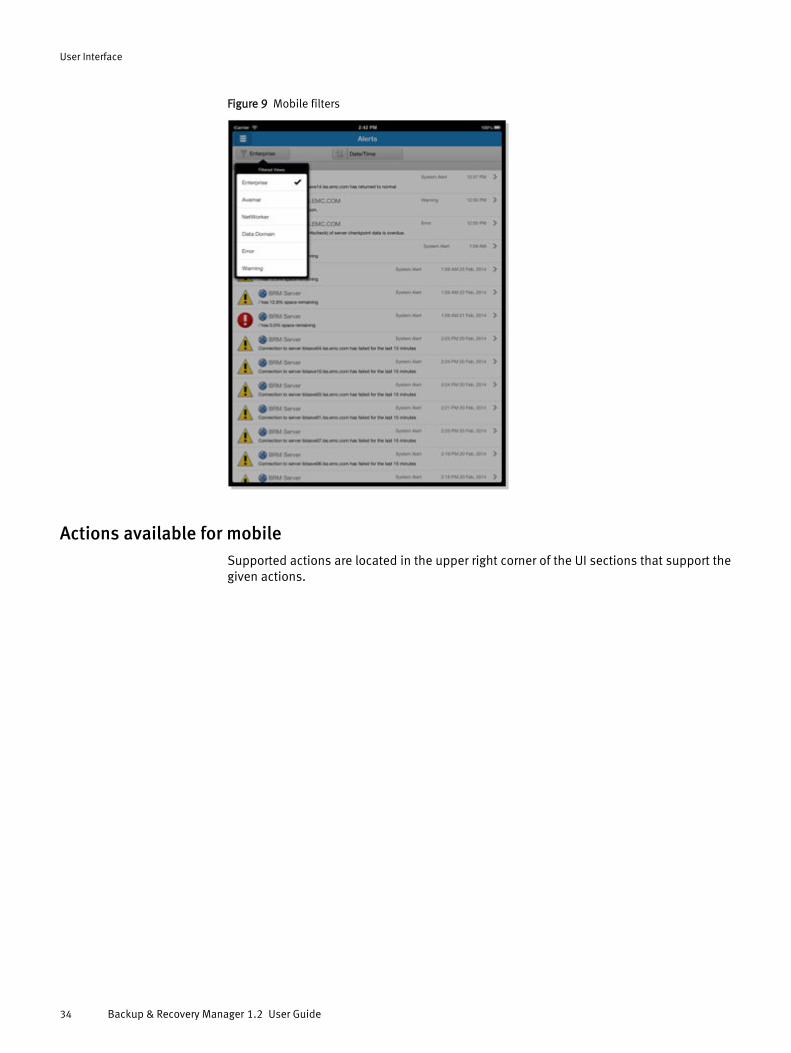
Figure 9 Mobile filters
Actions available for mobileSupported actions are located in the upper right corner of the UI sections that support thegiven actions.
User Interface
34 Backup & Recovery Manager 1.2 User Guide
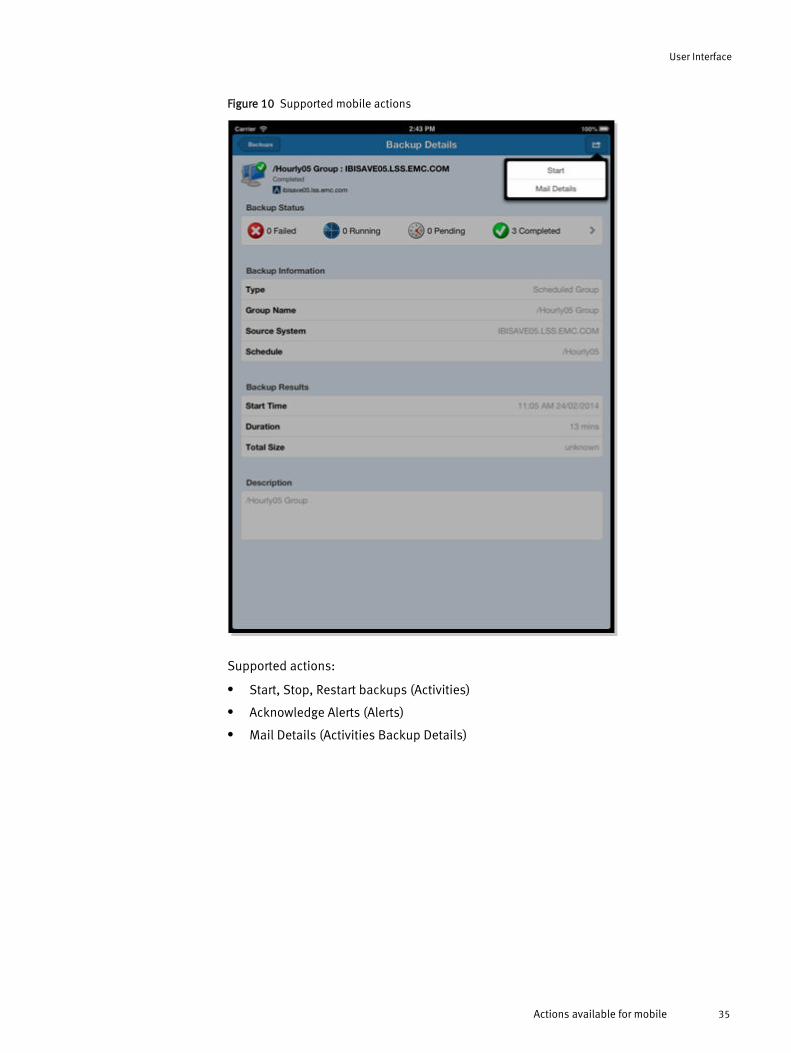
Figure 10 Supported mobile actions
Supported actions:
l Start, Stop, Restart backups (Activities)
l Acknowledge Alerts (Alerts)
l Mail Details (Activities Backup Details)
User Interface
Actions available for mobile 35
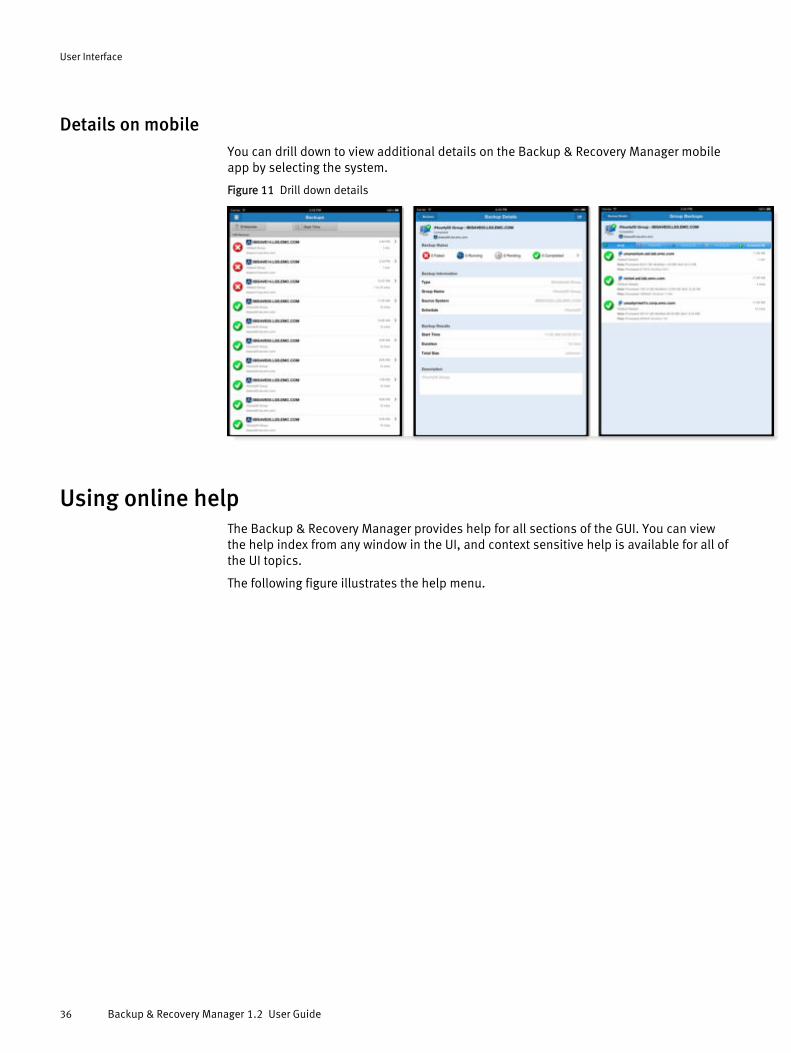
Details on mobileYou can drill down to view additional details on the Backup & Recovery Manager mobileapp by selecting the system.
Figure 11 Drill down details
Using online helpThe Backup & Recovery Manager provides help for all sections of the GUI. You can viewthe help index from any window in the UI, and context sensitive help is available for all ofthe UI topics.
The following figure illustrates the help menu.
User Interface
36 Backup & Recovery Manager 1.2 User Guide
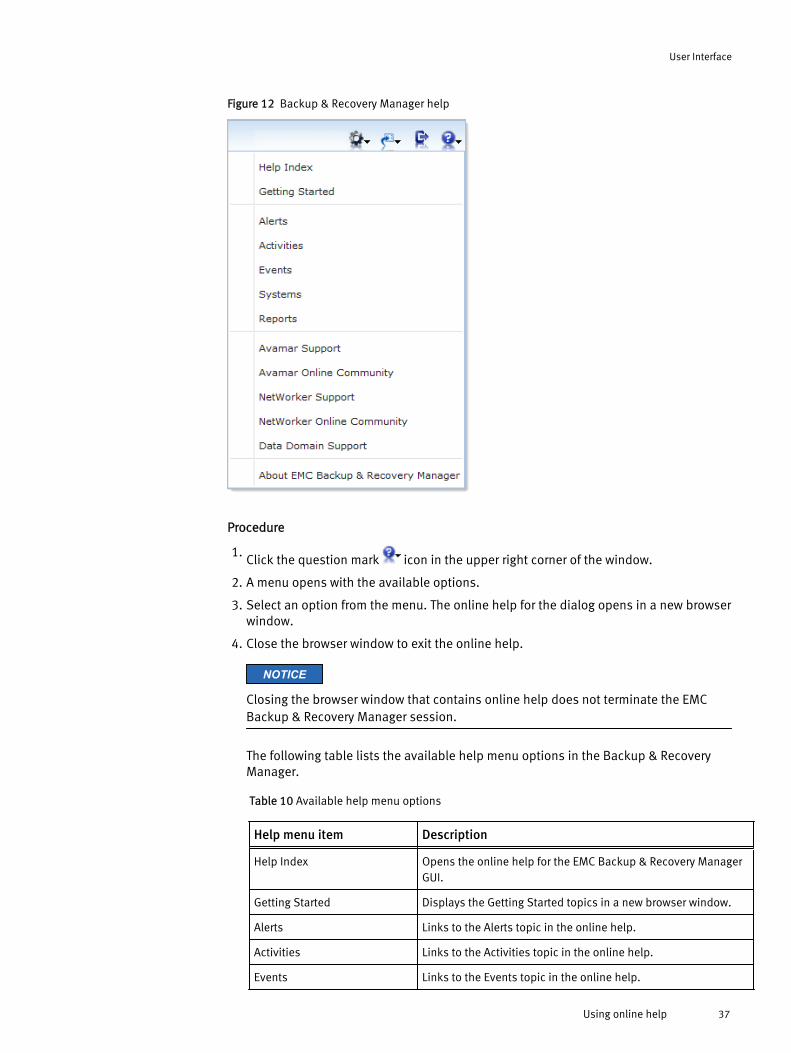
Figure 12 Backup & Recovery Manager help
Procedure
1.Click the question mark icon in the upper right corner of the window.
2. A menu opens with the available options.
3. Select an option from the menu. The online help for the dialog opens in a new browserwindow.
4. Close the browser window to exit the online help.
NOTICE
Closing the browser window that contains online help does not terminate the EMCBackup & Recovery Manager session.
The following table lists the available help menu options in the Backup & RecoveryManager.
Table 10 Available help menu options
Help menu item Description
Help Index Opens the online help for the EMC Backup & Recovery ManagerGUI.
Getting Started Displays the Getting Started topics in a new browser window.
Alerts Links to the Alerts topic in the online help.
Activities Links to the Activities topic in the online help.
Events Links to the Events topic in the online help.
User Interface
Using online help 37
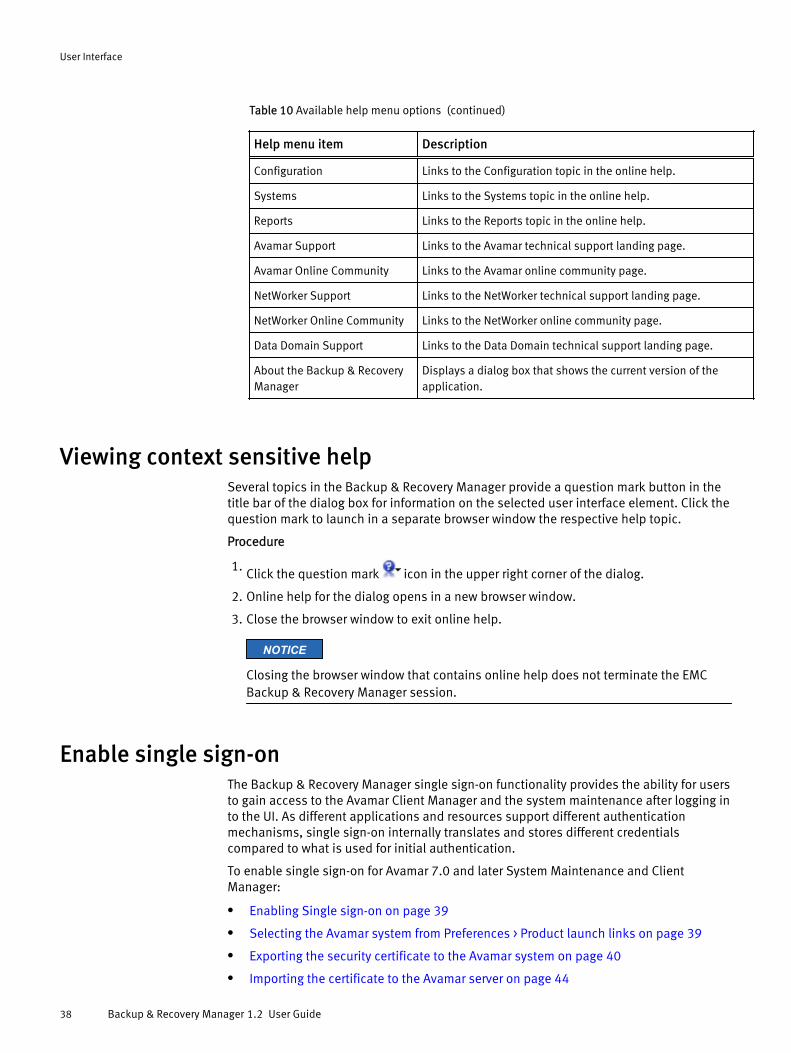
Table 10 Available help menu options (continued)
Help menu item Description
Configuration Links to the Configuration topic in the online help.
Systems Links to the Systems topic in the online help.
Reports Links to the Reports topic in the online help.
Avamar Support Links to the Avamar technical support landing page.
Avamar Online Community Links to the Avamar online community page.
NetWorker Support Links to the NetWorker technical support landing page.
NetWorker Online Community Links to the NetWorker online community page.
Data Domain Support Links to the Data Domain technical support landing page.
About the Backup & RecoveryManager
Displays a dialog box that shows the current version of theapplication.
Viewing context sensitive helpSeveral topics in the Backup & Recovery Manager provide a question mark button in thetitle bar of the dialog box for information on the selected user interface element. Click thequestion mark to launch in a separate browser window the respective help topic.
Procedure
1.Click the question mark icon in the upper right corner of the dialog.
2. Online help for the dialog opens in a new browser window.
3. Close the browser window to exit online help.
NOTICE
Closing the browser window that contains online help does not terminate the EMCBackup & Recovery Manager session.
Enable single sign-onThe Backup & Recovery Manager single sign-on functionality provides the ability for usersto gain access to the Avamar Client Manager and the system maintenance after logging into the UI. As different applications and resources support different authenticationmechanisms, single sign-on internally translates and stores different credentialscompared to what is used for initial authentication.
To enable single sign-on for Avamar 7.0 and later System Maintenance and ClientManager:
l Enabling Single sign-on on page 39
l Selecting the Avamar system from Preferences > Product launch links on page 39
l Exporting the security certificate to the Avamar system on page 40
l Importing the certificate to the Avamar server on page 44
User Interface
38 Backup & Recovery Manager 1.2 User Guide
Enabling Single sign-onThe Preferences section of the Backup & Recovery Manager settings provides the abilityfor users to enable the single sign on functionality.
Verify that Preferences > Security > Single Sign-on > Enable Single Sign-on is enabled. Ifnot click the check box to enable single sign-on.
NOTICE
Single sign-on is enabled by default at the time of installation or upgrade.
Selecting the Avamar system from Preferences > Product launch linksYou can select the Avamar system for which to enable single sign-on in the Backup &Recovery Manager. Available Avamar systems are listed in Settings > Preferences >Product launch links..
NOTICE
Only users with Launch Products privileges can launch Avamar Client Manager or SystemMaintenance. By default, the administrator role has Launch Products privileges and canassign these privileges to other users.
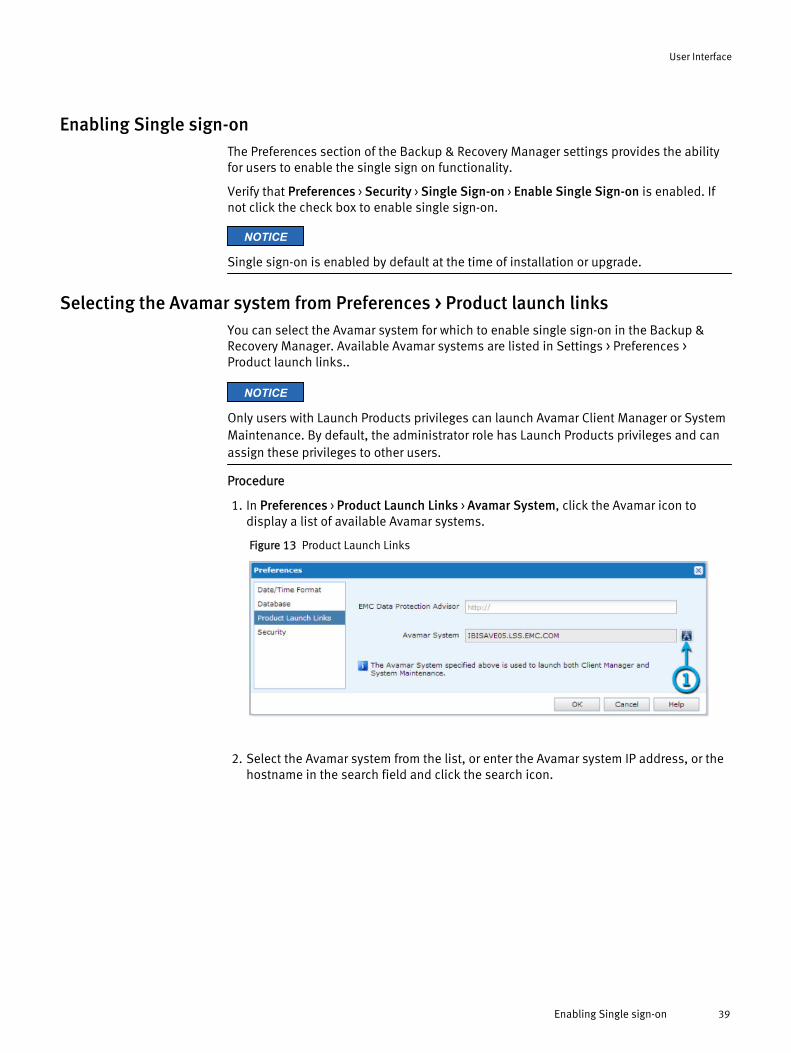
Procedure
1. In Preferences > Product Launch Links > Avamar System, click the Avamar icon todisplay a list of available Avamar systems.
Figure 13 Product Launch Links
2. Select the Avamar system from the list, or enter the Avamar system IP address, or thehostname in the search field and click the search icon.
User Interface
Enabling Single sign-on 39
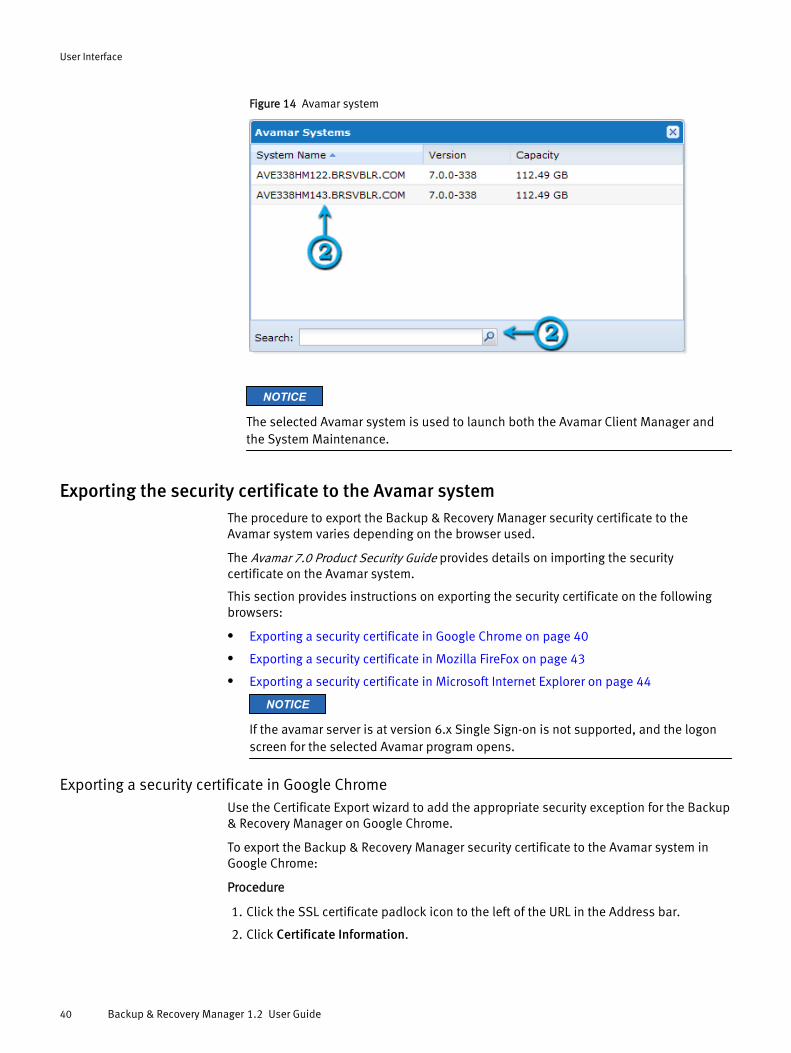
Figure 14 Avamar system
NOTICE
The selected Avamar system is used to launch both the Avamar Client Manager andthe System Maintenance.
Exporting the security certificate to the Avamar systemThe procedure to export the Backup & Recovery Manager security certificate to theAvamar system varies depending on the browser used.
The Avamar 7.0 Product Security Guide provides details on importing the securitycertificate on the Avamar system.
This section provides instructions on exporting the security certificate on the followingbrowsers:
l Exporting a security certificate in Google Chrome on page 40
l Exporting a security certificate in Mozilla FireFox on page 43
l Exporting a security certificate in Microsoft Internet Explorer on page 44
NOTICE
If the avamar server is at version 6.x Single Sign-on is not supported, and the logonscreen for the selected Avamar program opens.
Exporting a security certificate in Google ChromeUse the Certificate Export wizard to add the appropriate security exception for the Backup& Recovery Manager on Google Chrome.
To export the Backup & Recovery Manager security certificate to the Avamar system inGoogle Chrome:
Procedure
1. Click the SSL certificate padlock icon to the left of the URL in the Address bar.
2. Click Certificate Information.
User Interface
40 Backup & Recovery Manager 1.2 User Guide
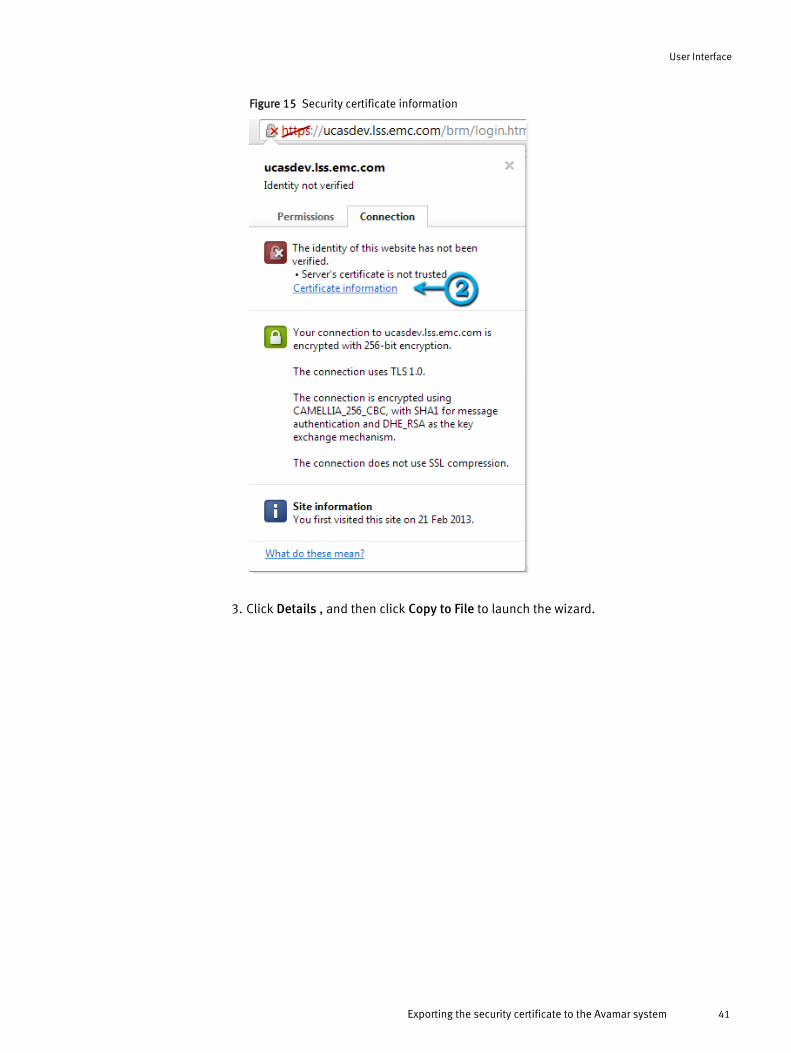
Figure 15 Security certificate information
3. Click Details , and then click Copy to File to launch the wizard.
User Interface
Exporting the security certificate to the Avamar system 41
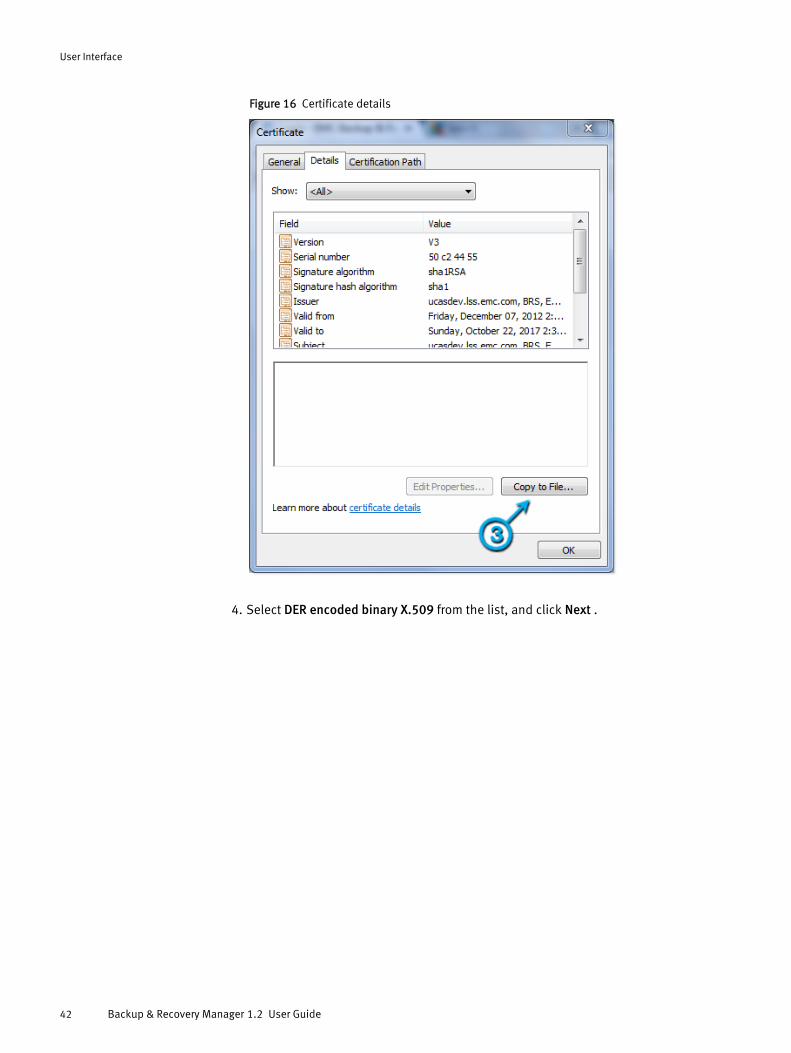
Figure 16 Certificate details
4. Select DER encoded binary X.509 from the list, and click Next .
User Interface
42 Backup & Recovery Manager 1.2 User Guide
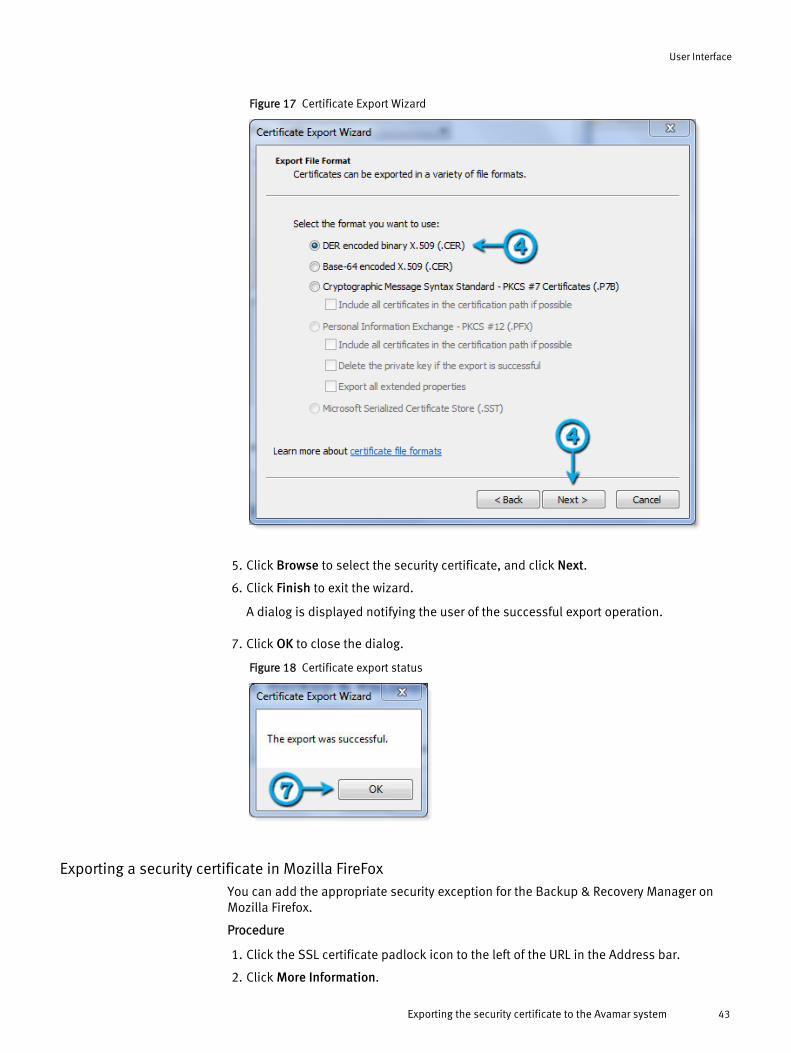
Figure 17 Certificate Export Wizard
5. Click Browse to select the security certificate, and click Next.
6. Click Finish to exit the wizard.
A dialog is displayed notifying the user of the successful export operation.
7. Click OK to close the dialog.
Figure 18 Certificate export status
Exporting a security certificate in Mozilla FireFoxYou can add the appropriate security exception for the Backup & Recovery Manager onMozilla Firefox.
Procedure
1. Click the SSL certificate padlock icon to the left of the URL in the Address bar.
2. Click More Information.
User Interface
Exporting the security certificate to the Avamar system 43
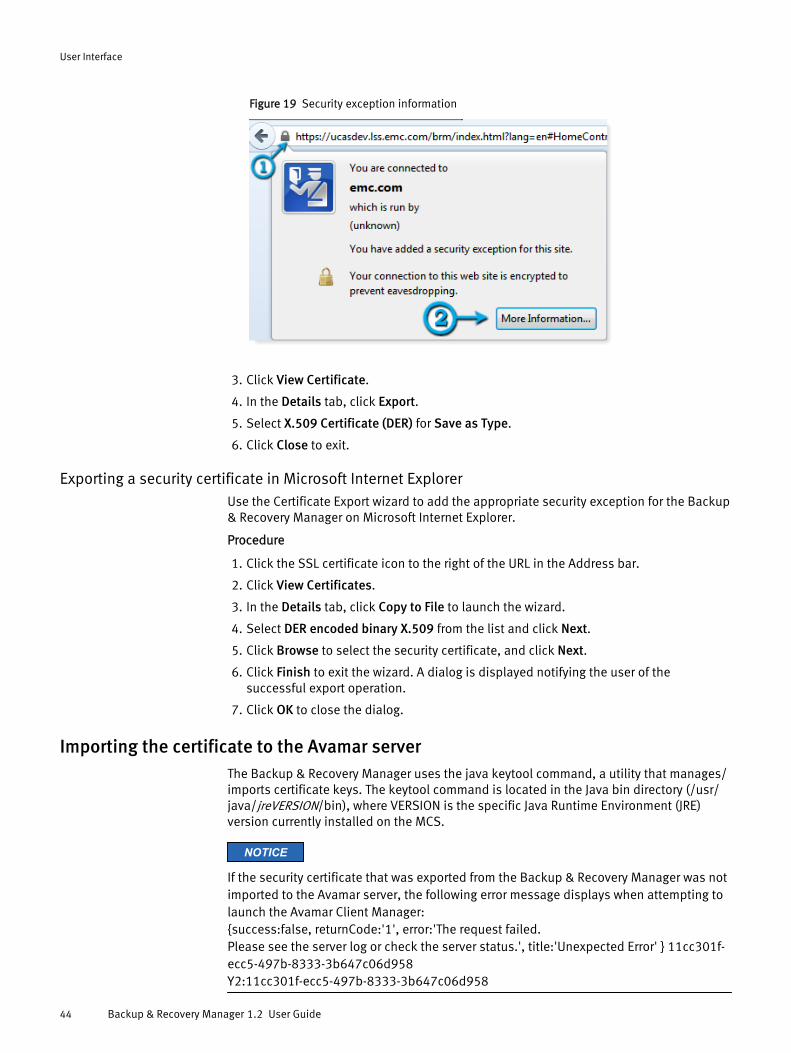
Figure 19 Security exception information
3. Click View Certificate.
4. In the Details tab, click Export.
5. Select X.509 Certificate (DER) for Save as Type.
6. Click Close to exit.
Exporting a security certificate in Microsoft Internet ExplorerUse the Certificate Export wizard to add the appropriate security exception for the Backup& Recovery Manager on Microsoft Internet Explorer.
Procedure
1. Click the SSL certificate icon to the right of the URL in the Address bar.
2. Click View Certificates.
3. In the Details tab, click Copy to File to launch the wizard.
4. Select DER encoded binary X.509 from the list and click Next.
5. Click Browse to select the security certificate, and click Next.
6. Click Finish to exit the wizard. A dialog is displayed notifying the user of thesuccessful export operation.
7. Click OK to close the dialog.
Importing the certificate to the Avamar serverThe Backup & Recovery Manager uses the java keytool command, a utility that manages/imports certificate keys. The keytool command is located in the Java bin directory (/usr/java/jreVERSION/bin), where VERSION is the specific Java Runtime Environment (JRE)version currently installed on the MCS.
NOTICE
If the security certificate that was exported from the Backup & Recovery Manager was notimported to the Avamar server, the following error message displays when attempting tolaunch the Avamar Client Manager:{success:false, returnCode:'1', error:'The request failed. Please see the server log or check the server status.', title:'Unexpected Error' } 11cc301f-ecc5-497b-8333-3b647c06d958Y2:11cc301f-ecc5-497b-8333-3b647c06d958
User Interface
44 Backup & Recovery Manager 1.2 User Guide

If the /usr/java/jreVERSION/bin directory is not in your path, either add it to the path, orspecify the complete path when using keytool.
Procedure
1. Copy the .keystore from the /root directory of the Avamar server to a local directory.
2. Open Backup & Recovery Manager and export the certificate by clicking the lock iconon the browser tab and following the wizard. Complete details on exporting the certificate from the Backup & Recovery Manager areavailable in Exporting the security certificate to the Avamar system on page 40.
3. Copy the previously exported certificate to a folder in the Avamar server’s rootdirectory.
4. Verify whether or not the certificate already exists in the .keystore:
Keytool –-list --keystore <pathname>.keystore
5. If the certificate exists, delete it by using the following command:
Keytool –delete –alias ucashostname -keystore <pathname>.keystore
6. Import the certificate to the .keystore:
keytool --list -importcert --trustcacerts -alias ucashostname -file Exportedcertificate -keystore <pathname>.keystore
7. Replace the .keystore to the Avamar server /root directory and restart emtomcat:
emwebapp –stop, start
8. Log in the Backup & Recovery Manager and launch the Client Manager.
Launching Avamar applicationsThe launch feature provides the ability to enable the CAS single-sign-on capability inBackup & Recovery Manager for Avamar Client Manager, and System Maintenance.
Figure 20 Launch icon
Procedure
1. Click the required option:
l Client Manager
User Interface
Launching Avamar applications 45
l System Maintenance (AVinstaller)
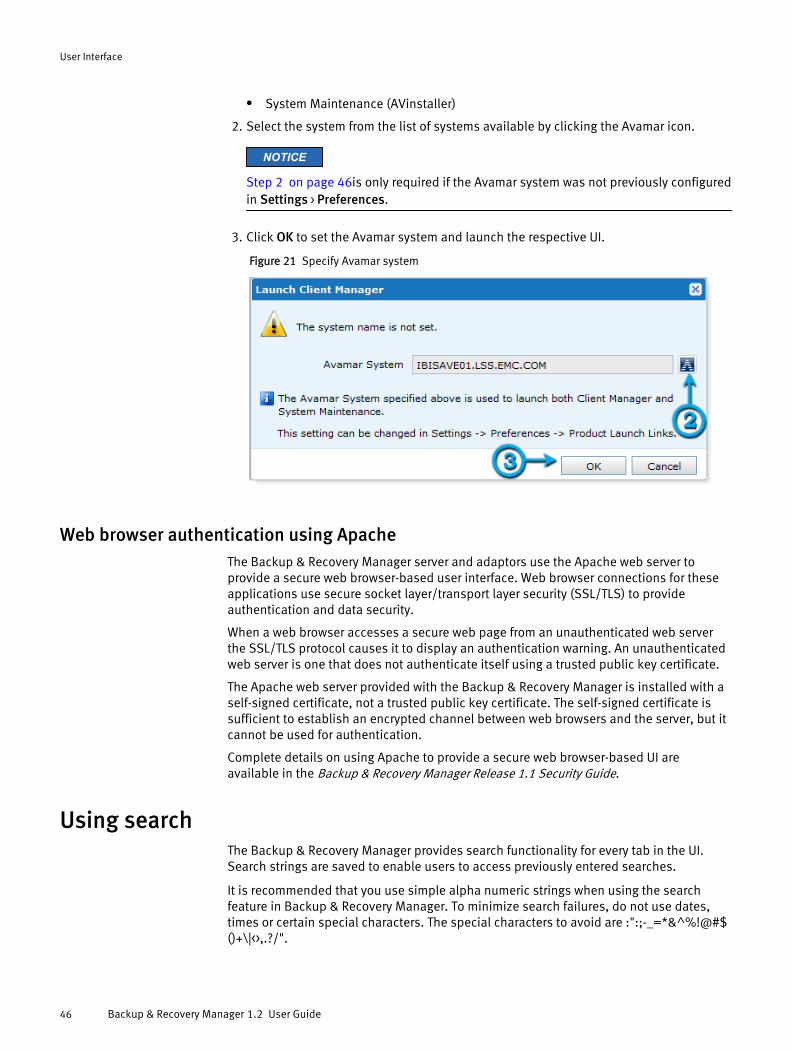
2. Select the system from the list of systems available by clicking the Avamar icon.
NOTICE
Step 2 on page 46is only required if the Avamar system was not previously configuredin Settings > Preferences.
3. Click OK to set the Avamar system and launch the respective UI.
Figure 21 Specify Avamar system
Web browser authentication using ApacheThe Backup & Recovery Manager server and adaptors use the Apache web server toprovide a secure web browser-based user interface. Web browser connections for theseapplications use secure socket layer/transport layer security (SSL/TLS) to provideauthentication and data security.
When a web browser accesses a secure web page from an unauthenticated web serverthe SSL/TLS protocol causes it to display an authentication warning. An unauthenticatedweb server is one that does not authenticate itself using a trusted public key certificate.
The Apache web server provided with the Backup & Recovery Manager is installed with aself-signed certificate, not a trusted public key certificate. The self-signed certificate issufficient to establish an encrypted channel between web browsers and the server, but itcannot be used for authentication.
Complete details on using Apache to provide a secure web browser-based UI areavailable in the Backup & Recovery Manager Release 1.1 Security Guide.
Using searchThe Backup & Recovery Manager provides search functionality for every tab in the UI.Search strings are saved to enable users to access previously entered searches.
It is recommended that you use simple alpha numeric strings when using the searchfeature in Backup & Recovery Manager. To minimize search failures, do not use dates,times or certain special characters. The special characters to avoid are :":;-_=*&^%!@#$()+\|<>,.?/".
User Interface
46 Backup & Recovery Manager 1.2 User Guide
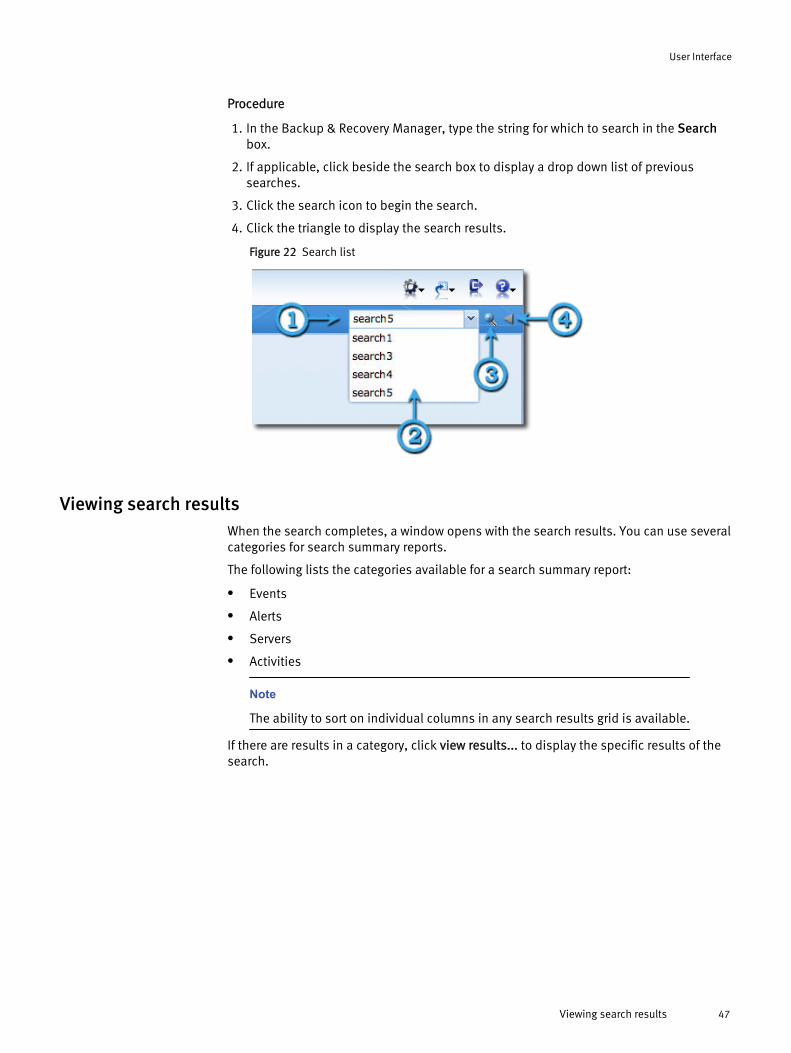
Procedure
1. In the Backup & Recovery Manager, type the string for which to search in the Searchbox.
2. If applicable, click beside the search box to display a drop down list of previoussearches.
3. Click the search icon to begin the search.
4. Click the triangle to display the search results.
Figure 22 Search list
Viewing search resultsWhen the search completes, a window opens with the search results. You can use severalcategories for search summary reports.
The following lists the categories available for a search summary report:
l Events
l Alerts
l Servers
l Activities
Note
The ability to sort on individual columns in any search results grid is available.
If there are results in a category, click view results... to display the specific results of thesearch.
User Interface
Viewing search results 47
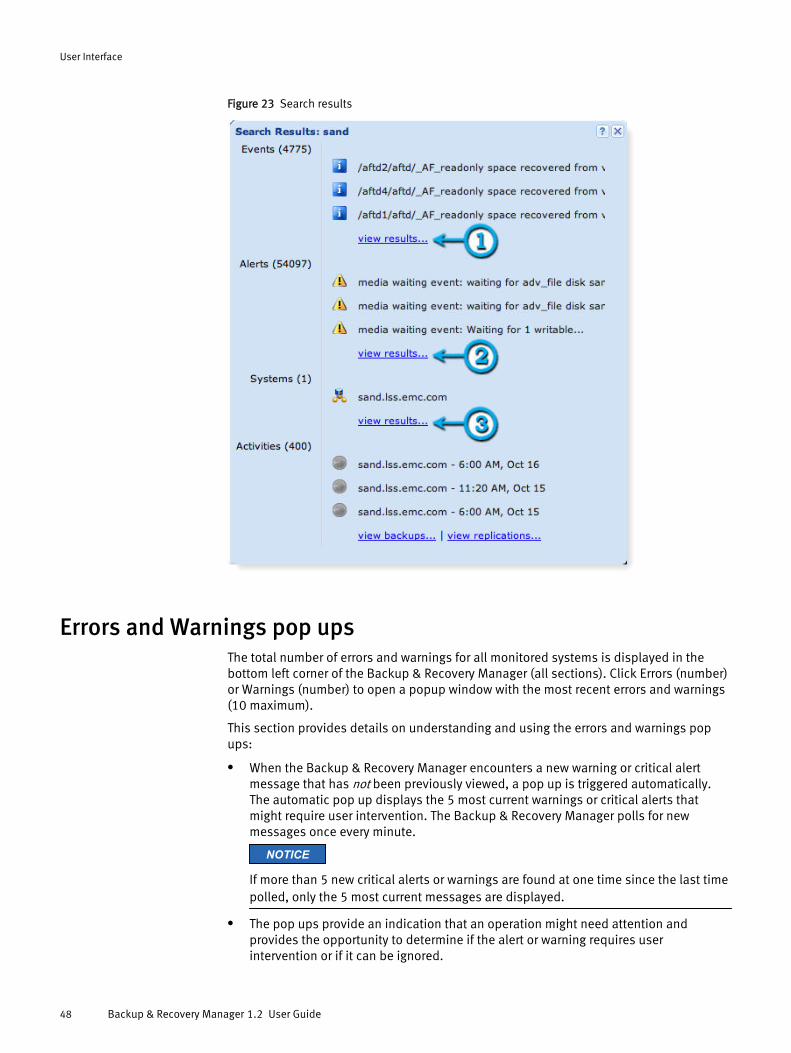
Figure 23 Search results
Errors and Warnings pop upsThe total number of errors and warnings for all monitored systems is displayed in thebottom left corner of the Backup & Recovery Manager (all sections). Click Errors (number)or Warnings (number) to open a popup window with the most recent errors and warnings(10 maximum).
This section provides details on understanding and using the errors and warnings popups:
l When the Backup & Recovery Manager encounters a new warning or critical alertmessage that has not been previously viewed, a pop up is triggered automatically.The automatic pop up displays the 5 most current warnings or critical alerts thatmight require user intervention. The Backup & Recovery Manager polls for newmessages once every minute.
NOTICE
If more than 5 new critical alerts or warnings are found at one time since the last timepolled, only the 5 most current messages are displayed.
l The pop ups provide an indication that an operation might need attention andprovides the opportunity to determine if the alert or warning requires userintervention or if it can be ignored.
User Interface
48 Backup & Recovery Manager 1.2 User Guide
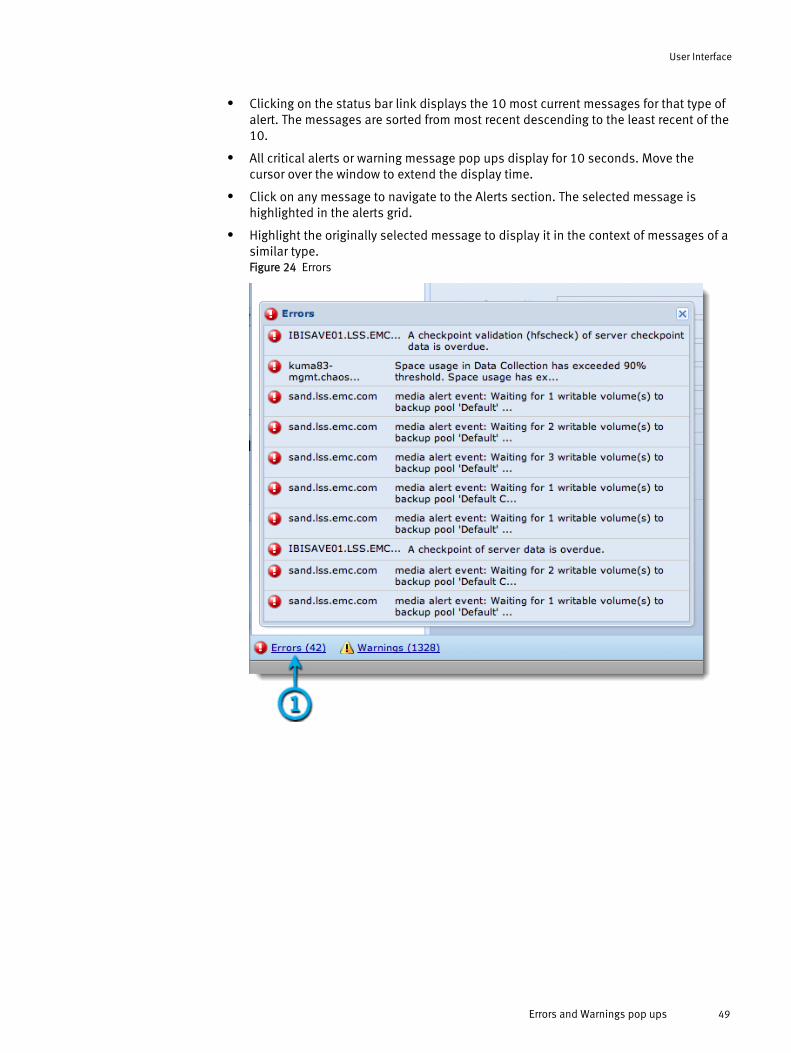
l Clicking on the status bar link displays the 10 most current messages for that type ofalert. The messages are sorted from most recent descending to the least recent of the10.
l All critical alerts or warning message pop ups display for 10 seconds. Move thecursor over the window to extend the display time.
l Click on any message to navigate to the Alerts section. The selected message ishighlighted in the alerts grid.
l Highlight the originally selected message to display it in the context of messages of asimilar type.Figure 24 Errors
User Interface
Errors and Warnings pop ups 49
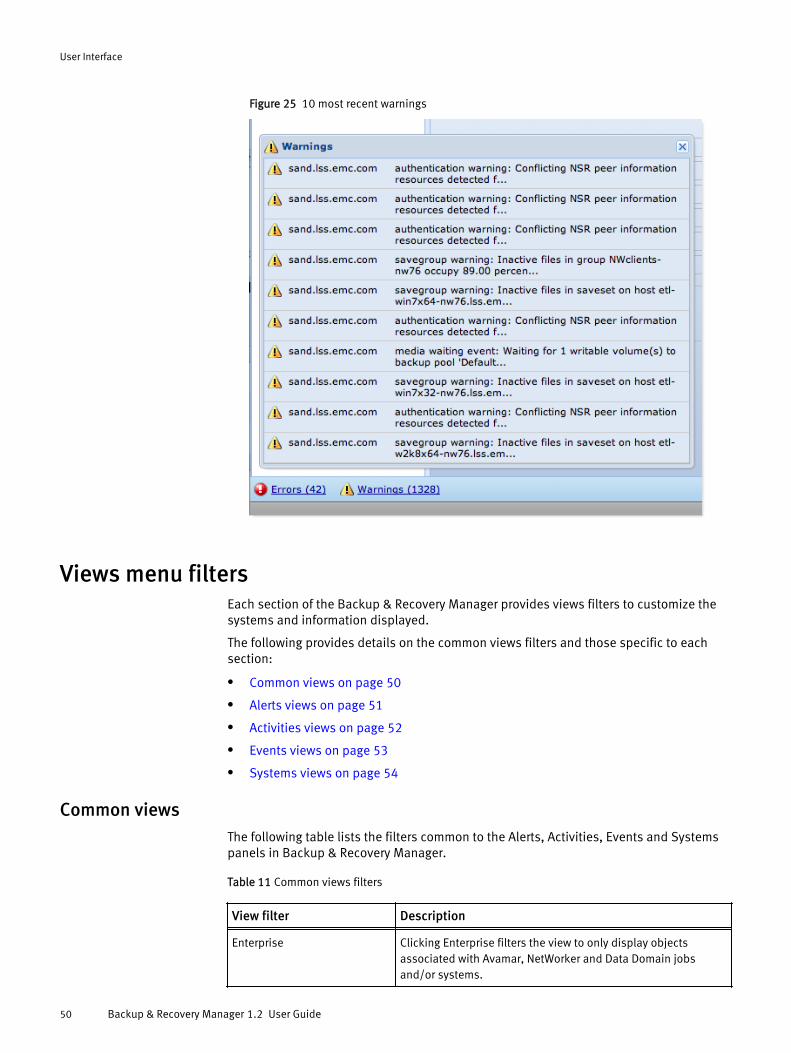
Figure 25 10 most recent warnings
Views menu filtersEach section of the Backup & Recovery Manager provides views filters to customize thesystems and information displayed.
The following provides details on the common views filters and those specific to eachsection:
l Common views on page 50
l Alerts views on page 51
l Activities views on page 52
l Events views on page 53
l Systems views on page 54
Common viewsThe following table lists the filters common to the Alerts, Activities, Events and Systemspanels in Backup & Recovery Manager.
Table 11 Common views filters
View filter Description
Enterprise Clicking Enterprise filters the view to only display objectsassociated with Avamar, NetWorker and Data Domain jobsand/or systems.
User Interface
50 Backup & Recovery Manager 1.2 User Guide
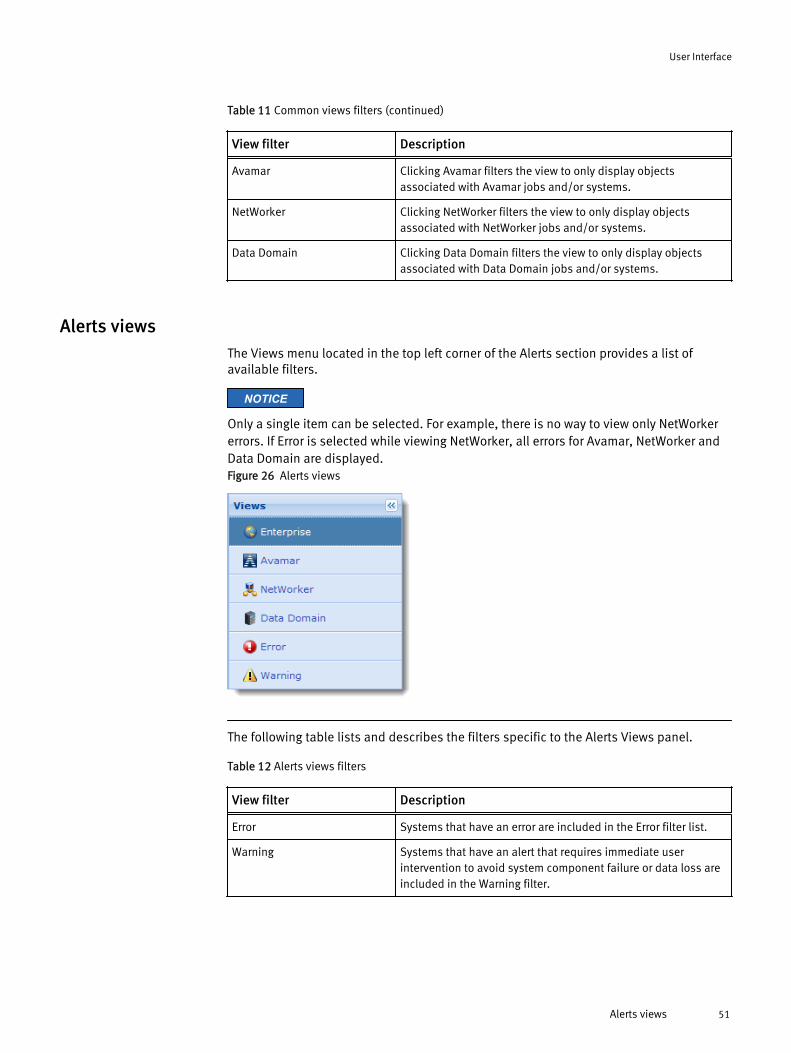
Table 11 Common views filters (continued)
View filter Description
Avamar Clicking Avamar filters the view to only display objectsassociated with Avamar jobs and/or systems.
NetWorker Clicking NetWorker filters the view to only display objectsassociated with NetWorker jobs and/or systems.
Data Domain Clicking Data Domain filters the view to only display objectsassociated with Data Domain jobs and/or systems.
Alerts viewsThe Views menu located in the top left corner of the Alerts section provides a list ofavailable filters.
NOTICE
Only a single item can be selected. For example, there is no way to view only NetWorkererrors. If Error is selected while viewing NetWorker, all errors for Avamar, NetWorker andData Domain are displayed.Figure 26 Alerts views
The following table lists and describes the filters specific to the Alerts Views panel.
Table 12 Alerts views filters
View filter Description
Error Systems that have an error are included in the Error filter list.
Warning Systems that have an alert that requires immediate userintervention to avoid system component failure or data loss areincluded in the Warning filter.
User Interface
Alerts views 51
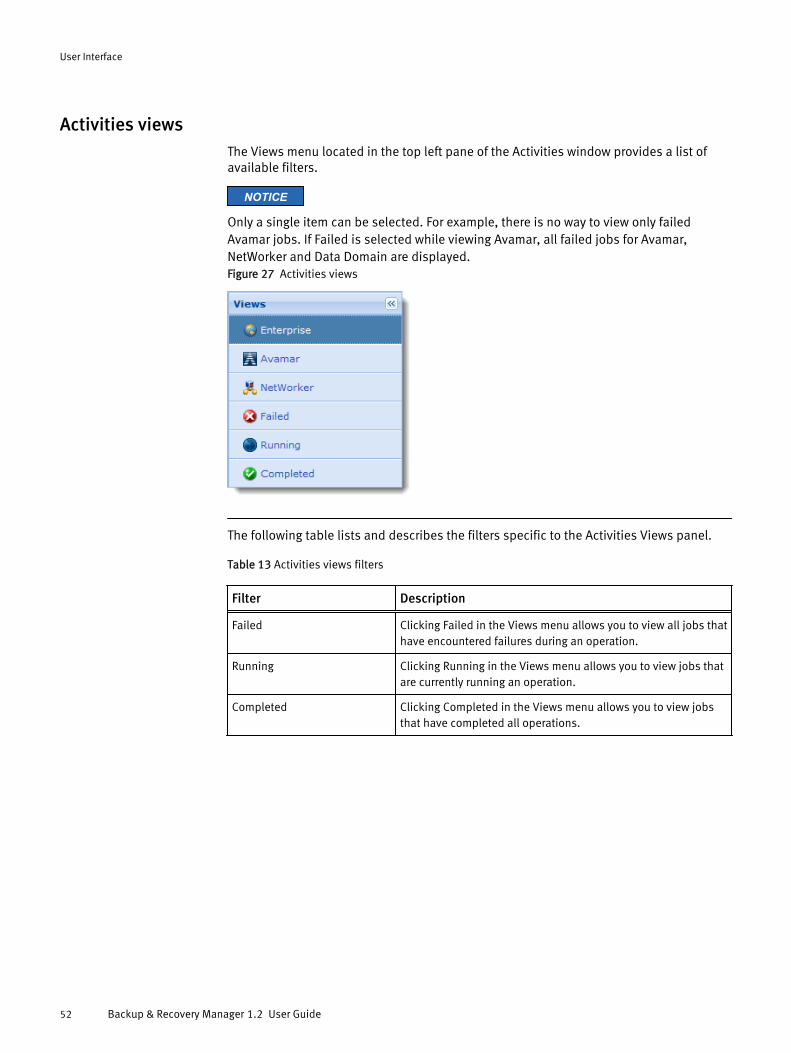
Activities viewsThe Views menu located in the top left pane of the Activities window provides a list ofavailable filters.
NOTICE
Only a single item can be selected. For example, there is no way to view only failedAvamar jobs. If Failed is selected while viewing Avamar, all failed jobs for Avamar,NetWorker and Data Domain are displayed.Figure 27 Activities views
The following table lists and describes the filters specific to the Activities Views panel.
Table 13 Activities views filters
Filter Description
Failed Clicking Failed in the Views menu allows you to view all jobs thathave encountered failures during an operation.
Running Clicking Running in the Views menu allows you to view jobs thatare currently running an operation.
Completed Clicking Completed in the Views menu allows you to view jobsthat have completed all operations.
User Interface
52 Backup & Recovery Manager 1.2 User Guide
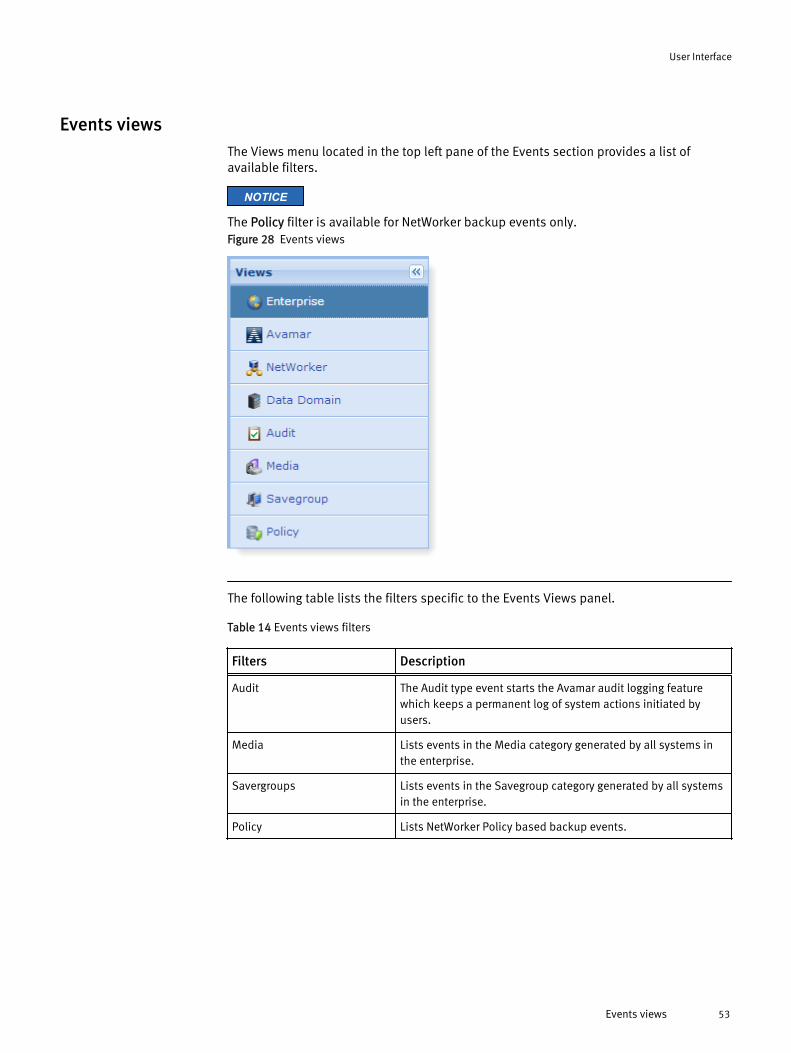
Events viewsThe Views menu located in the top left pane of the Events section provides a list ofavailable filters.
NOTICE
The Policy filter is available for NetWorker backup events only.Figure 28 Events views
The following table lists the filters specific to the Events Views panel.
Table 14 Events views filters
Filters Description
Audit The Audit type event starts the Avamar audit logging featurewhich keeps a permanent log of system actions initiated byusers.
Media Lists events in the Media category generated by all systems inthe enterprise.
Savergroups Lists events in the Savegroup category generated by all systemsin the enterprise.
Policy Lists NetWorker Policy based backup events.
User Interface
Events views 53
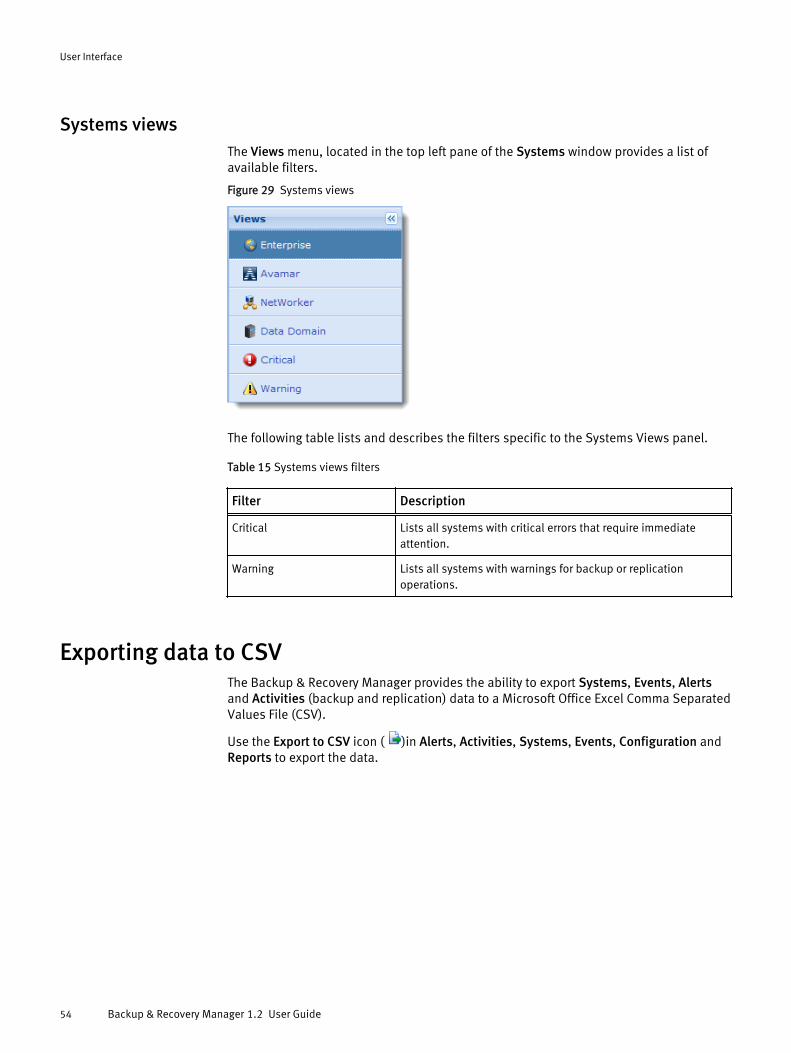
Systems viewsThe Views menu, located in the top left pane of the Systems window provides a list ofavailable filters.
Figure 29 Systems views
The following table lists and describes the filters specific to the Systems Views panel.
Table 15 Systems views filters
Filter Description
Critical Lists all systems with critical errors that require immediateattention.
Warning Lists all systems with warnings for backup or replicationoperations.
Exporting data to CSVThe Backup & Recovery Manager provides the ability to export Systems, Events, Alertsand Activities (backup and replication) data to a Microsoft Office Excel Comma SeparatedValues File (CSV).
Use the Export to CSV icon ( )in Alerts, Activities, Systems, Events, Configuration andReports to export the data.
User Interface
54 Backup & Recovery Manager 1.2 User Guide
CHAPTER 3
Installation
Install the EMC Backup & Recovery Manager to monitor Avamar, NetWorker and DataDomain systems. Review Requirements on page 21 before beginning the installation ofthe Backup & Recovery Manager software.
l Install the Backup & Recovery Manager server.......................................................56l Build to build upgrade of the Backup & Recovery Manager server..........................59l Changing the server name post installation...........................................................61l Backup & Recovery Manager adaptor installation..................................................62l Logging in to the Backup & Recovery Manager.......................................................76l Disable the Backup & Recovery Manager adaptor for Avamar................................ 79l Uninstalling the Backup & Recovery Manager adaptor...........................................80
Installation 55
Install the Backup & Recovery Manager serverThe Backup & Recovery Manager server can be installed on both virtual and physicalhosts. A vSphere client is required for a virtual host and a DHCP server is required for aphysical host.
Note
Configure Backup & Recovery Manager and all Avamar and NetWorker backup serverswith the same network time protocol (NTP) server. If the clocks are not reasonablysynchronized, it can result in a communication failure between Backup & RecoveryManager and the backup server.
The Backup & Recovery Manager server is deployed by using the following methods:
l Installing the Backup & Recovery Manager server on a VM on page 56
l Installing the Backup & Recovery Manager server on physical hardware on page 58
NOTICE
You must log in as root user to successfully complete the Backup & Recovery Managerserver installation. Also, it is strongly recommended that you change the password forthe ucas user, root and admin from the default (changeme) after installation.
Installing the Backup & Recovery Manager server on a VMYou can install the Backup & Recovery Manager server on a VM by first deploying andconfiguring the vApp and then verifying the deployment.
l Deploying and configuring the Virtual Application (vApp): on page 56
l Verifying the deployment on page 57
Deploying and configuring the Virtual Application (vApp):
NOTICE
If the IP address must be manually configured in the network environment, use theVMware console, rather than the ssh session to the Backup & Recovery Manager server.The VMware console is able to maintain a connection during the process, while the SSHmight lose the connection during the IP change.
Procedure
1. From a vSphere client that connects to a VMware vCenter server with ESX hosts, clickFile > Deploy OVF Template.
Note
A vCenter server is required to deploy the OVA.
2. Browse to the BRS_EM_OVF.ova file and click Next.
3. In the .ova Template Details window, specify a Name and Location for the deployedtemplate and click Next.
4. Select a destination storage for the VMFiles from the list and click Next.
Installation
56 Backup & Recovery Manager 1.2 User Guide
5. Select the format in which to store the virtual disk:
l Thick Provision Lazy Zeroed (recommended)
l Thick Provision Eager Zeroed
l Thin Provision
NOTICE
Eager Zero yields the best performance, but also takes the most time to initialize.Thick provisioning doesn't fill the drive unless eager zeroed is selected. Thestorage capacity for the entire virtual disk is allocated on the datastore at virtualdisk create time if thick provisioning is selected. Thin provisioning means that thecapacity on the datastore is allocated to the virtual disk as required, up to the fullsize of the virtual disk.
6. Choose the networks for the deployed template to use:
a. Select the appropriate subnet from the Destination Networks drop down list.
b. Click Next.
7. Complete the fields in the Networking Properties section of the window to customizethe software for the deployment and click Next. The fields include the following:
l DNS
l Network1 IP address
l Network1 Netmask
8. In the Ready to Complete window, verify that the options are correct and click Finish,or click Back to change options.
9. When the deployment completes successfully, click the deployed server in thevCenter and click Power on the virtual machine.
10. Use a secure shell client such as PuTTY or SSH to connect to the Backup & RecoveryManager server.
11. Type the Hostname or IP address to specify the destination in which to connect.
NOTICE
Port 1315 must be available for SSH connections.
12. Connect to the Backup & Recovery Manager server as the ucas user:
ssh ucas@SERVER -p1315
The password is the default changeme.
13. Change to root user:
su -<root password>
Verifying the deploymentWhen the installation is complete, ensure the Backup & Recovery Manager server wasinstalled correctly on the vApp:
Installation
Installing the Backup & Recovery Manager server on a VM 57

Procedure
1. Open a browser and type the following in the Address field, and then press Enter:
https://<brm_server_IP>/brm
The IP address might be different depending on the DNS setup in the environment.
NOTICE
It is recommended to bookmark the server location in order to easily navigate to itwhen required.
2. Type the default user name admin in the User field.
3. Type the default password changeme in the Password field.
4. Change the password when prompted. The Backup & Recovery Manager opens in thebrowser window.
Logging in to the Backup & Recovery Manager on page 76 provides detailedinstructions on logging in to the Backup & Recovery Manager.
NOTICE
It is recommended that you change the password for the ucas user, root and adminfrom the default (changeme) after installation.
Installing the Backup & Recovery Manager server on physical hardwareThe Backup & Recovery Manager server can be installed on physical hardware by usingan ISO image.
Before beginning, verify that the following hardware recommendations and requirementsare met:
l A DHCP server must be available on the network on which the server is running for aBackup & Recovery Manager deployment.
l The Backup & Recovery Manager should be configured with an NTP (network timeprotocol) server to avoid timing issues.
NOTICE
NTP is configured in the operating system after Backup & Recovery Manager isdeployed.
The following table provides a summary of Backup & Recovery Manager serverhardware requirements.
Table 16 Data storage requirements
Component Memory per component (disk space)
Memory 8 GB
System disk 40 GB
Database disk 70 GB
Installation
58 Backup & Recovery Manager 1.2 User Guide
Procedure
1. Make the ISO image available to the server:
a. Put the ISO image on any of the following:
l Network PXE server
l DVD
b. Configure the server to boot from the device on which the ISO image resides.
2. Boot from the native ISO image and allow it to check the system for hardwarerequirements.
NOTICE
If the system does not meet the requirements, an error message is displayed.
3. Set the lang/keyboard and configure the network when the installation completes.
NOTICE
The installation takes approximately 20 - 30 minutes on most hardware.
Build to build upgrade of the Backup & Recovery Manager serverWhen upgrading to the current release of the Backup & Recovery Manager server, youshould take a snapshot of the current installation.
Upgrading to the current Backup & Recovery Manager serverBefore you begin
On the Purchase Order for Avamar and/or Networker and/or the DPSuite, EMC Sales listsBackup & Recovery Manager as a $0 order. When the order is fulfilled, the required keys,download instructions including passwords are sent in an automated email. Obtain fromthe email, the password for the Backup & Recovery Manager .zip file before beginning theupgrade.
NOTICE
It is recommended that you change the password for the ucas user, root and admin fromthe default (changeme) immediately after installation.
Procedure
1. Take a snapshot of the Backup & Recovery Manager VMware appliance beforebeginning. This creates a working installation in the event there are problems duringthis procedure.
2. Copy the .run installer binary to the Backup & Recovery Manager server by using a toolsuch as PuTTy (pscp):
pscp -P1315 brm-installer-<version>-Linux-x64.run ucas@BRM-SERVER:/tmp
Installation
Build to build upgrade of the Backup & Recovery Manager server 59
Note
FTP is not supported for Backup & Recovery Manager. The Backup & RecoveryManager is a light weight operating system, and does not have an FTP agentconfigured.
3. Connect to the Backup & Recovery Manager server as the ucas user:
ssh ucas@SERVER -p1315
4. Change to root user:
su - <root password>
5. Change to the /tmp directory:
cd /tmp
6. Make sure the installer binary (.run file) is executable:
chmod 755 brm-installer-<version>-Linux-x64.run
7. Become root user:
sudo /bin/bash
Ucas password:The default password is changeme.
8. Confirm that you are root user by using the id command:
# id
uid=0(root) gid=0(root) groups=0(root),104(mysql)
9. Run the installer.
Any required data migrations occur automatically during the installation.
If you attempt to run the Backup & Recovery Manager installer as a non-root user, thefollowing error message displays and the installer exits:
ucas@brm12-test2:/tmp $ ./brm-installer-Linux-x64.run Error: There has been an error.This installer requires root privileges. Please become superuser before executing the installerPress [Enter] to continue:
10. If problems occur during the installation, revert to the previous version by using thesnapshot was taken in Step 1 of this procedure.
Regenerate the SSL certificatesWhen the hostname or IP address changes, run the following command to regenerate theSSL certificates for the Backup & Recovery Manager server:
sudo service tomcat-ucas gencert
Installation
60 Backup & Recovery Manager 1.2 User Guide

Changing the server name post installationYou can change the Backup & Recovery Manager server name after the initial installationby using the yast set up tool.
Procedure
1. Connect to the Backup & Recovery Manager server as the ucas user:
ssh ucas@SERVER -p1315
2. Change to root user:
su - <root password>
3. Change the server name by using yast:
a. Navigate to yast > Network Devices > Network Settings.
b. Use the tab or the arrow keys to open the Hostname/DNS dialog.
c. Type the new name in the Hostname/DNS dialog.
4. Add the new hostname to the certificate to avoid errors:
/etc/init.d/tomcat-ucas gencertThe command stops Tomcat, updates the security certificates, reboots Apache andrestarts Tomcat. Messages similar to the following are displayed:
wd /opt/emc/ucaspath is /sbin:/usr/sbin:/usr/local/sbin:/usr/local/bin:/bin:/usr/bin:/usr/X11R6/binpath is now /usr/java/default/bin:/opt/emc/ucas/tomcat/bin:/sbin:/usr/sbin:/usr/local/sbin:/root/bin:/usr/local/bin:/usr/bin:/bin:/usr/bin/X11:/usr/X11R6/bin:/usr/games:/usr/lib/mit/bin:/usr/lib/mit/sbinlibrary path is nowStopping Tomcat Using CATALINA_BASE: /opt/emc/ucas/tomcatUsing CATALINA_HOME: /opt/emc/ucas/tomcatUsing CATALINA_TMPDIR: /opt/emc/ucas/tomcat/tempUsing JRE_HOME: /usr/java/ucasjreUsing CLASSPATH: /opt/emc/ucas/tomcat/bin/bootstrap.jar:/opt/emc/ucas/tomcat/bin/tomcat-juli.jar0allowing 30 seconds for graceful shutdown...Checking certificates... JMS Certificates already existRemoving old certificate from keystoreGenerating web certificates in /opt/emc/ucasCertificate stored in file </opt/emc/ucas/security/ucasWebCert.pem>Certificate stored in file </opt/emc/ucas/security/ucasWebCert.cert>Certificate was added to keystore[Storing /usr/java/ucasjre/lib/security/cacerts]Finished generating web certificatesUpdating server name in ssl confRestarting apache...httpd running, stoppinghttpd stoppedhttpd NOT runningstarted httpdStarting Tomcat Using CATALINA_BASE: /opt/emc/ucas/tomcatUsing CATALINA_HOME: /opt/emc/ucas/tomcatUsing CATALINA_TMPDIR: /opt/emc/ucas/tomcat/tempUsing JRE_HOME: /usr/java/ucasjreUsing CLASSPATH: /opt/emc/ucas/tomcat/bin/bootstrap.jar:/opt/emc/ucas/tomcat/bin/tomcat-juli.jarstarting
Installation
Changing the server name post installation 61
tomcat...tomcat pid 12968
Backup & Recovery Manager adaptor installationBackup & Recovery Manager server 1.0 and 1.1 are not supported with the Backup &Recovery Manager 1.2 adaptors. Installing the Backup & Recovery Manager server 1.2ensures that all new functionality in Backup & Recovery Manager 1.2 is available for use.
This section provides instructions for installing the Backup & Recovery Manager adaptorsfor Avamar and NetWorker.
l Backup & Recovery Manager adaptor for Avamar installation and upgrade on page62
l NetWorker adaptor installation and upgrade on Windows and Linux on page 68
l Adding a Data Domain system on page 75
Note
Before proceeding with the installation of the Backup & Recovery Manager adaptor onAvamar 6.1 SP1 and later systems, you must contact EMC Support to obtain the mostcurrent MC hotfix. The hotfix is necessary for the Backup & Recovery Manager to workwith the Avamar software.
Backup & Recovery Manager adaptor for Avamar installation and upgradeThere are different methods for installing the adaptor on Avamar 6.0.2 and 6.1 than 6.1Service Pack 1 and later. You can configure the Backup & Recovery Manager adaptor forAvamar during the Avamar installation or upgrade.
If the Avamar software has already been installed or upgraded, reconfigure the serverhostname as described in Reconfiguring the server hostname for the Avamar adaptor onpage 67.
Note
Backup and Recovery Manager is not supported on Avamar Extended Retention MediaAccess Nodes.
Install the Backup & Recovery Manager adaptor for the following versions of the Avamarsoftware:
l Installing the adaptor for Avamar 6.0.2 and Avamar 6.1.0 on page 63
l Configuring the adaptor for Avamar 6.1 SP1 and 7.0 on page 65
Installation
62 Backup & Recovery Manager 1.2 User Guide

Installing the adaptor for Avamar 6.0.2 and Avamar 6.1.0Install the Backup & Recovery Manager adaptor for Avamar 6.0.2 and Avamar 6.1 byusing the Avamar Enterprise Manager.
Note
Before proceeding with the Backup & Recovery Manager adaptor installation, you mustcontact EMC Support to obtain the most current MC hotfix. If the MC hotfix is not installed, the installation will fail and this error will be reported inthe Information Log: ERROR: The required MC hotfix has not been installed. You must abort and install thehotfix first. operation failed.
Procedure
1. Copy the Avamar MC patch package and the Backup & Recovery Manager adaptor forAvamar on the Avamar utility node or single node server:
/data01/avamar/repo/packages
2. Log in to the Enterprise Manager. An example URL for the Avamar Enterprise Manageris:
http://avamar.example.com/em
3. Navigate to the System Maintenance window in the Avamar Enterprise Manager.
Figure 30 Avamar Enterprise Manager
4. Click Continue.
5. When the installation completes, click Go to Package Page, and then click Install onthe BrmAdaptorInstall package. Complete the adaptor installation:
a. Enter the Backup & Recovery Manager server hostname and click Save.
NOTICE
If you do not specify a hostname, the adaptor is installed but not configured toreport to a Backup & Recovery Manager server. Configure the adaptor later if youdo not complete the configuration at installation. Reconfiguring the serverhostname for the Avamar adaptor on page 67 provides instructions on entering aBackup & Recovery Manager server hostname for the Avamar adaptor.
b. Click Continue.
Installation
Backup & Recovery Manager adaptor for Avamar installation and upgrade 63
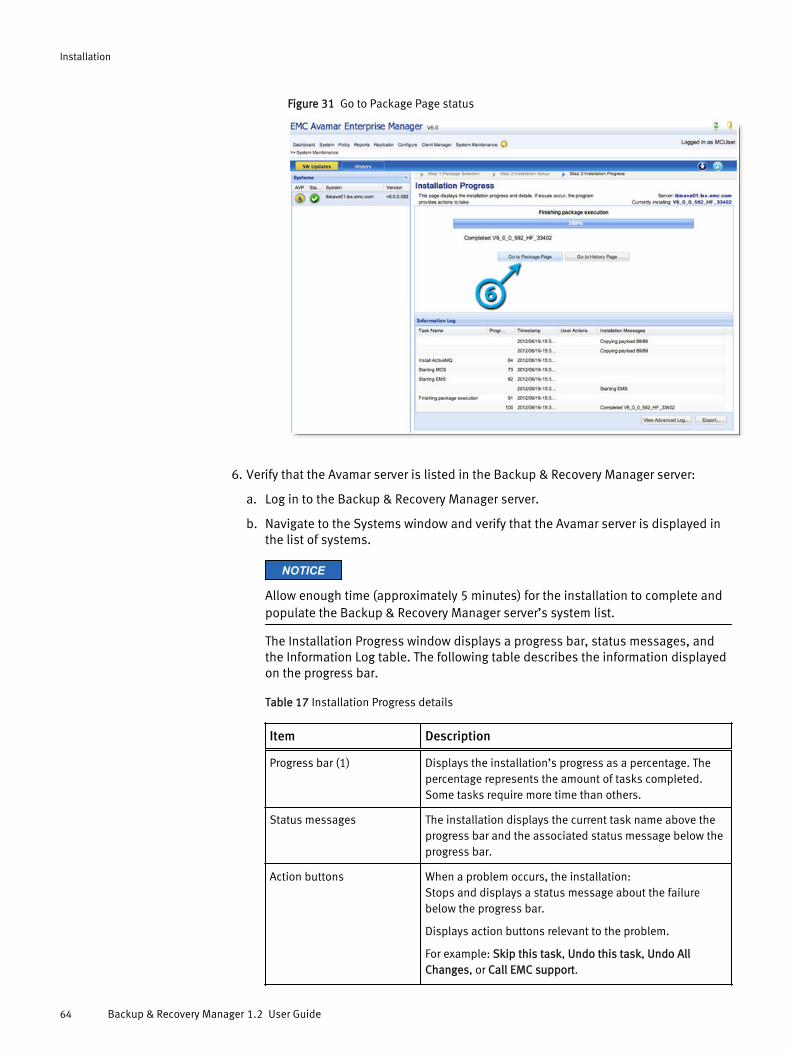
Figure 31 Go to Package Page status
6. Verify that the Avamar server is listed in the Backup & Recovery Manager server:
a. Log in to the Backup & Recovery Manager server.
b. Navigate to the Systems window and verify that the Avamar server is displayed inthe list of systems.
NOTICE
Allow enough time (approximately 5 minutes) for the installation to complete andpopulate the Backup & Recovery Manager server’s system list.
The Installation Progress window displays a progress bar, status messages, andthe Information Log table. The following table describes the information displayedon the progress bar.
Table 17 Installation Progress details
Item Description
Progress bar (1) Displays the installation’s progress as a percentage. Thepercentage represents the amount of tasks completed.Some tasks require more time than others.
Status messages The installation displays the current task name above theprogress bar and the associated status message below theprogress bar.
Action buttons When a problem occurs, the installation:Stops and displays a status message about the failurebelow the progress bar.
Displays action buttons relevant to the problem.
For example: Skip this task, Undo this task, Undo AllChanges, or Call EMC support.
Installation
64 Backup & Recovery Manager 1.2 User Guide
Table 17 Installation Progress details (continued)
Item Description
Undo All Changes returns the system to the kickstart state.The installation displays a confirmation dialog box, whichrequires a response before the undo operation can takeplace.
Details button Opens the error log file that is specific to the failure.This button only appears if you are logged in to the EMCCustomer Support account.
Information Log table (2) Provides details about each installation task.
View Advanced Log (3) Click View Advanced Log to open the workflow log file forthis package installation.The View Advanced Log button is only available if you arelogged in to the EMC Customer Support account.
Export (4) Click Export to save log information to a file. The Export asdialog box appears.Choose one of command buttons: Excel or PDF.
Follow the prompts to save the log information to a file.
Configuring the adaptor for Avamar 6.1 SP1 and 7.0In Avamar 6.1 SP1 and 7.0, the Backup & Recovery Manager adaptor for Avamar ispackaged with the Avamar software. Install the adaptor by using the Avamar InstallationManager.
NOTICE
Before proceeding with the installation of the Backup & Recovery Manager adaptor onAvamar 6.1 SP1 and earlier systems, contact EMC Support to obtain the most current MChotfix. If the MC hotfix is not installed, the installation will fail and this error will be reported inthe Information Log: ERROR: The required MC hotfix has not been installed. You must abort and install thehotfix first. operation failed. Avamar 6.1 SP2 and 7.0 and later do not require a hotfix.
If the Avamar software has already been installed or upgraded, complete the procedure in Reconfiguring the server hostname for the Avamar adaptor on page 67.
Procedure
1. In the Avamar Installation Manager, select the Backup & Recovery Manager tab.
2. Enter the Backup & Recovery Manager server hostname or IP address in the Valuefield.
Installation
Backup & Recovery Manager adaptor for Avamar installation and upgrade 65
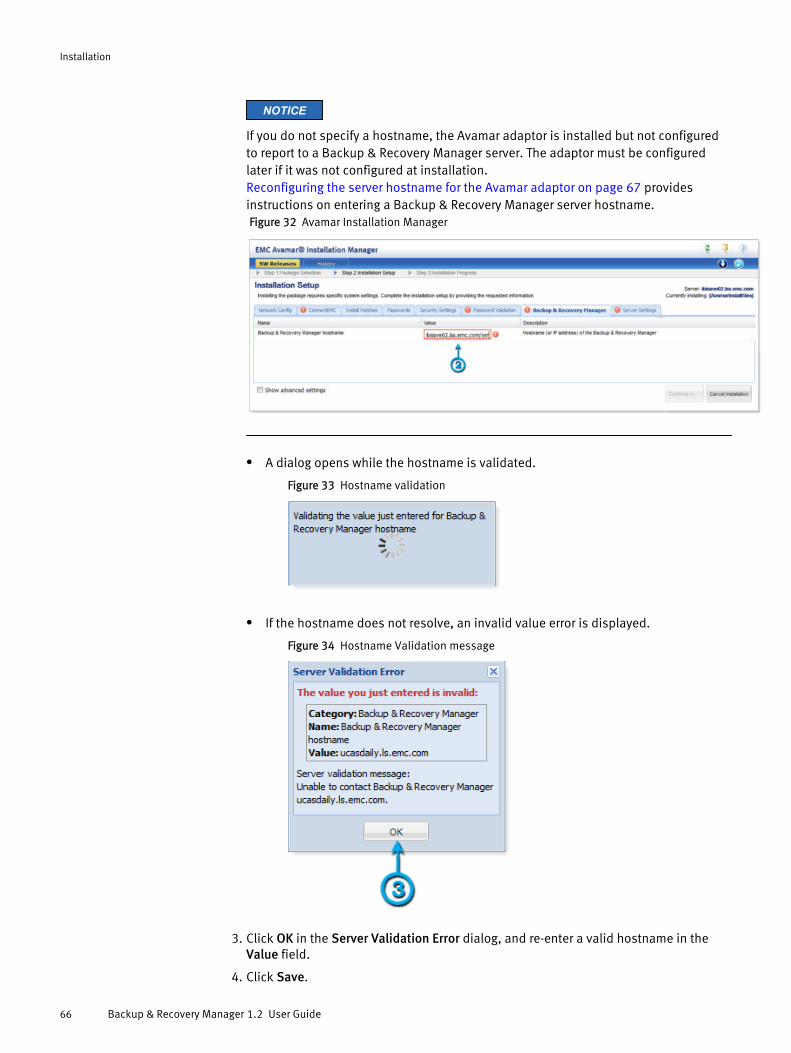
NOTICE
If you do not specify a hostname, the Avamar adaptor is installed but not configuredto report to a Backup & Recovery Manager server. The adaptor must be configuredlater if it was not configured at installation. Reconfiguring the server hostname for the Avamar adaptor on page 67 providesinstructions on entering a Backup & Recovery Manager server hostname.Figure 32 Avamar Installation Manager
l A dialog opens while the hostname is validated.
Figure 33 Hostname validation
l If the hostname does not resolve, an invalid value error is displayed.
Figure 34 Hostname Validation message
3. Click OK in the Server Validation Error dialog, and re-enter a valid hostname in theValue field.
4. Click Save.
Installation
66 Backup & Recovery Manager 1.2 User Guide
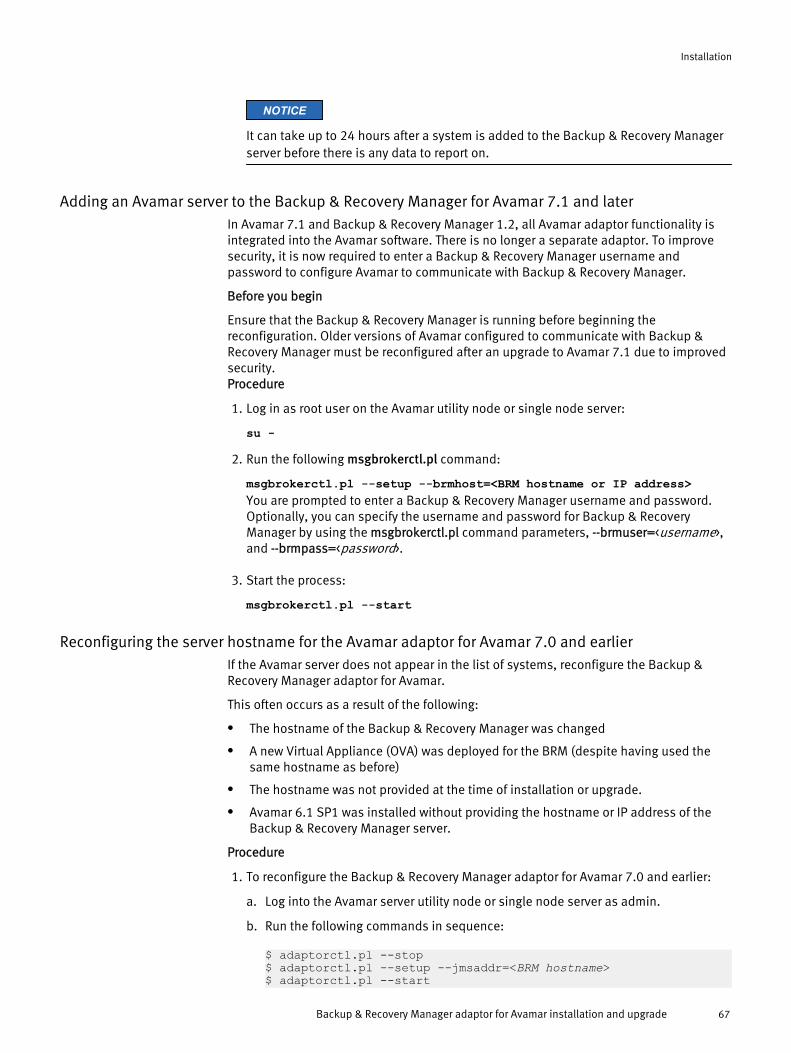
NOTICE
It can take up to 24 hours after a system is added to the Backup & Recovery Managerserver before there is any data to report on.
Adding an Avamar server to the Backup & Recovery Manager for Avamar 7.1 and laterIn Avamar 7.1 and Backup & Recovery Manager 1.2, all Avamar adaptor functionality isintegrated into the Avamar software. There is no longer a separate adaptor. To improvesecurity, it is now required to enter a Backup & Recovery Manager username andpassword to configure Avamar to communicate with Backup & Recovery Manager.
Before you begin
Ensure that the Backup & Recovery Manager is running before beginning thereconfiguration. Older versions of Avamar configured to communicate with Backup &Recovery Manager must be reconfigured after an upgrade to Avamar 7.1 due to improvedsecurity.Procedure
1. Log in as root user on the Avamar utility node or single node server:
su -
2. Run the following msgbrokerctl.pl command:
msgbrokerctl.pl --setup --brmhost=<BRM hostname or IP address>You are prompted to enter a Backup & Recovery Manager username and password.Optionally, you can specify the username and password for Backup & RecoveryManager by using the msgbrokerctl.pl command parameters, --brmuser=<username>,and --brmpass=<password>.
3. Start the process:
msgbrokerctl.pl --start
Reconfiguring the server hostname for the Avamar adaptor for Avamar 7.0 and earlierIf the Avamar server does not appear in the list of systems, reconfigure the Backup &Recovery Manager adaptor for Avamar.
This often occurs as a result of the following:
l The hostname of the Backup & Recovery Manager was changed
l A new Virtual Appliance (OVA) was deployed for the BRM (despite having used thesame hostname as before)
l The hostname was not provided at the time of installation or upgrade.
l Avamar 6.1 SP1 was installed without providing the hostname or IP address of theBackup & Recovery Manager server.
Procedure
1. To reconfigure the Backup & Recovery Manager adaptor for Avamar 7.0 and earlier:
a. Log into the Avamar server utility node or single node server as admin.
b. Run the following commands in sequence:
$ adaptorctl.pl --stop$ adaptorctl.pl --setup --jmsaddr=<BRM hostname>$ adaptorctl.pl --start
Installation
Backup & Recovery Manager adaptor for Avamar installation and upgrade 67
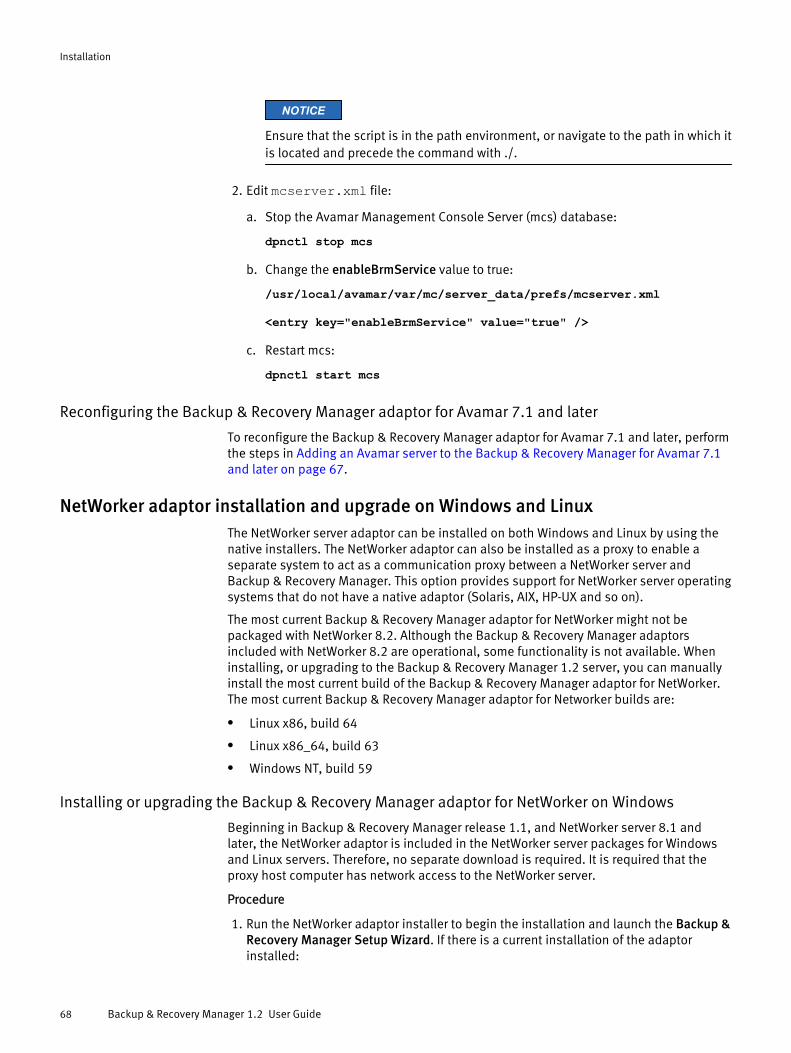
NOTICE
Ensure that the script is in the path environment, or navigate to the path in which itis located and precede the command with ./.
2. Edit mcserver.xml file:
a. Stop the Avamar Management Console Server (mcs) database:
dpnctl stop mcs
b. Change the enableBrmService value to true:
/usr/local/avamar/var/mc/server_data/prefs/mcserver.xml
<entry key="enableBrmService" value="true" />
c. Restart mcs:
dpnctl start mcs
Reconfiguring the Backup & Recovery Manager adaptor for Avamar 7.1 and later
To reconfigure the Backup & Recovery Manager adaptor for Avamar 7.1 and later, performthe steps in Adding an Avamar server to the Backup & Recovery Manager for Avamar 7.1and later on page 67.
NetWorker adaptor installation and upgrade on Windows and LinuxThe NetWorker server adaptor can be installed on both Windows and Linux by using thenative installers. The NetWorker adaptor can also be installed as a proxy to enable aseparate system to act as a communication proxy between a NetWorker server andBackup & Recovery Manager. This option provides support for NetWorker server operatingsystems that do not have a native adaptor (Solaris, AIX, HP-UX and so on).
The most current Backup & Recovery Manager adaptor for NetWorker might not bepackaged with NetWorker 8.2. Although the Backup & Recovery Manager adaptorsincluded with NetWorker 8.2 are operational, some functionality is not available. Wheninstalling, or upgrading to the Backup & Recovery Manager 1.2 server, you can manuallyinstall the most current build of the Backup & Recovery Manager adaptor for NetWorker.The most current Backup & Recovery Manager adaptor for Networker builds are:
l Linux x86, build 64
l Linux x86_64, build 63
l Windows NT, build 59
Installing or upgrading the Backup & Recovery Manager adaptor for NetWorker on Windows
Beginning in Backup & Recovery Manager release 1.1, and NetWorker server 8.1 andlater, the NetWorker adaptor is included in the NetWorker server packages for Windowsand Linux servers. Therefore, no separate download is required. It is required that theproxy host computer has network access to the NetWorker server.
Procedure
1. Run the NetWorker adaptor installer to begin the installation and launch the Backup &Recovery Manager Setup Wizard. If there is a current installation of the adaptorinstalled:
Installation
68 Backup & Recovery Manager 1.2 User Guide
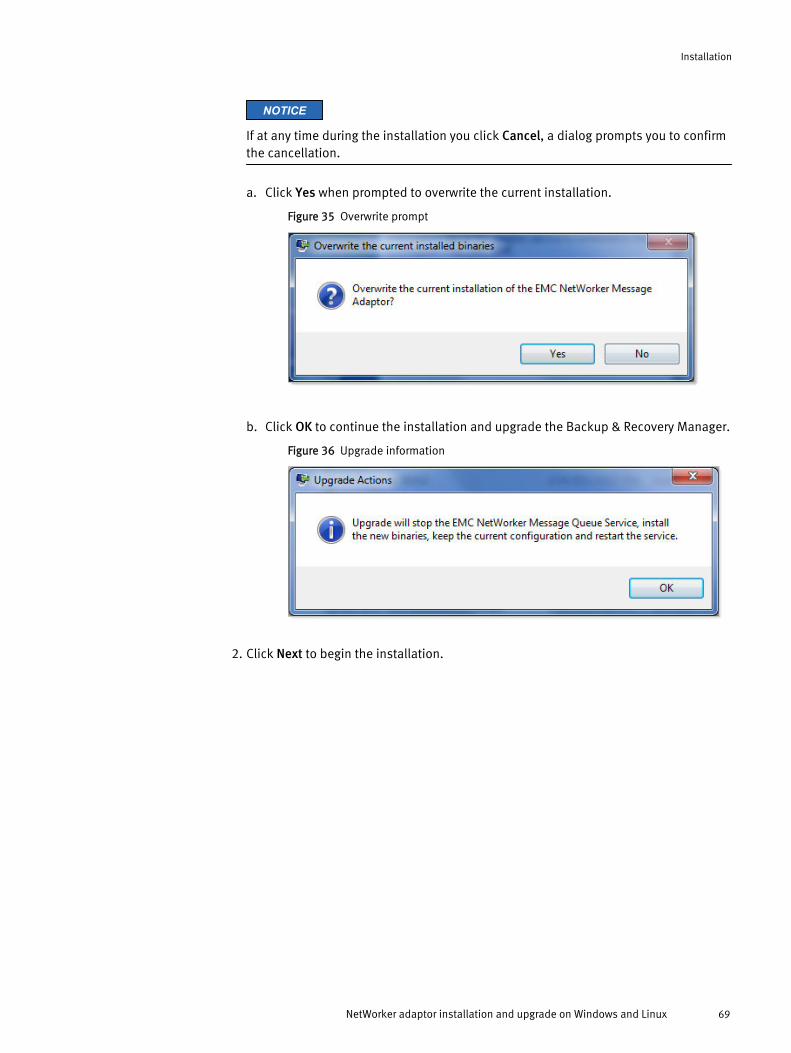
NOTICE
If at any time during the installation you click Cancel, a dialog prompts you to confirmthe cancellation.
a. Click Yes when prompted to overwrite the current installation.
Figure 35 Overwrite prompt
b. Click OK to continue the installation and upgrade the Backup & Recovery Manager.
Figure 36 Upgrade information
2. Click Next to begin the installation.
Installation
NetWorker adaptor installation and upgrade on Windows and Linux 69
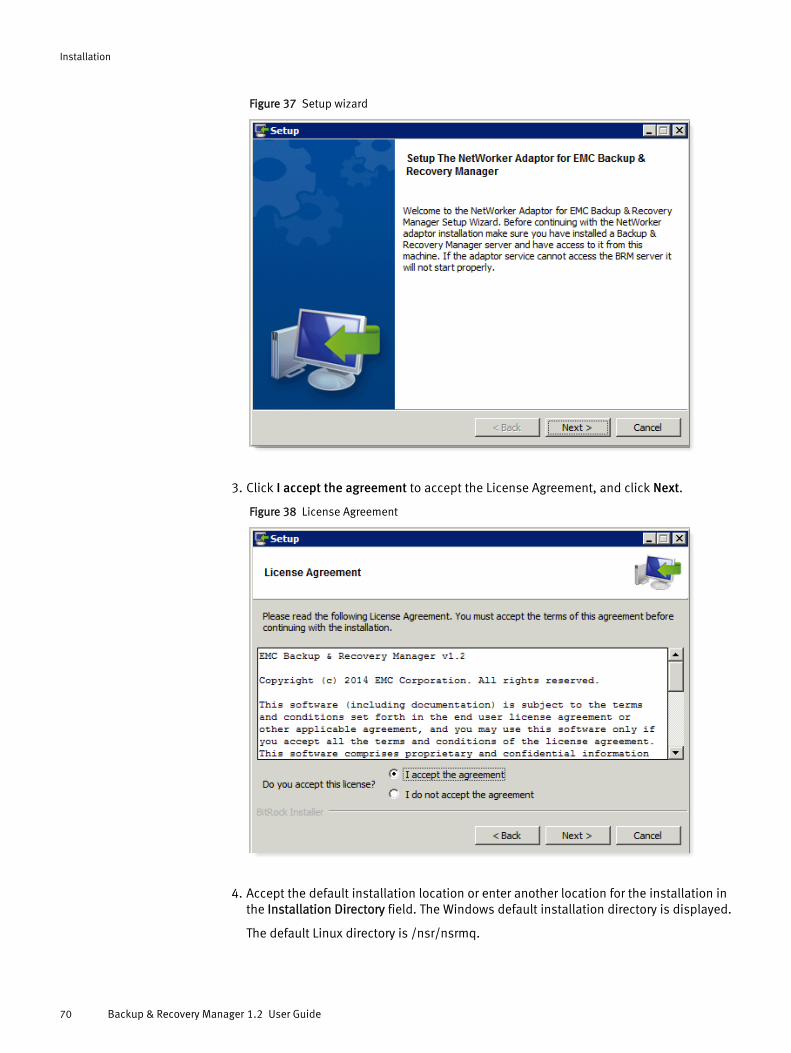
Figure 37 Setup wizard
3. Click I accept the agreement to accept the License Agreement, and click Next.
Figure 38 License Agreement
4. Accept the default installation location or enter another location for the installation inthe Installation Directory field. The Windows default installation directory is displayed.
The default Linux directory is /nsr/nsrmq.
Installation
70 Backup & Recovery Manager 1.2 User Guide
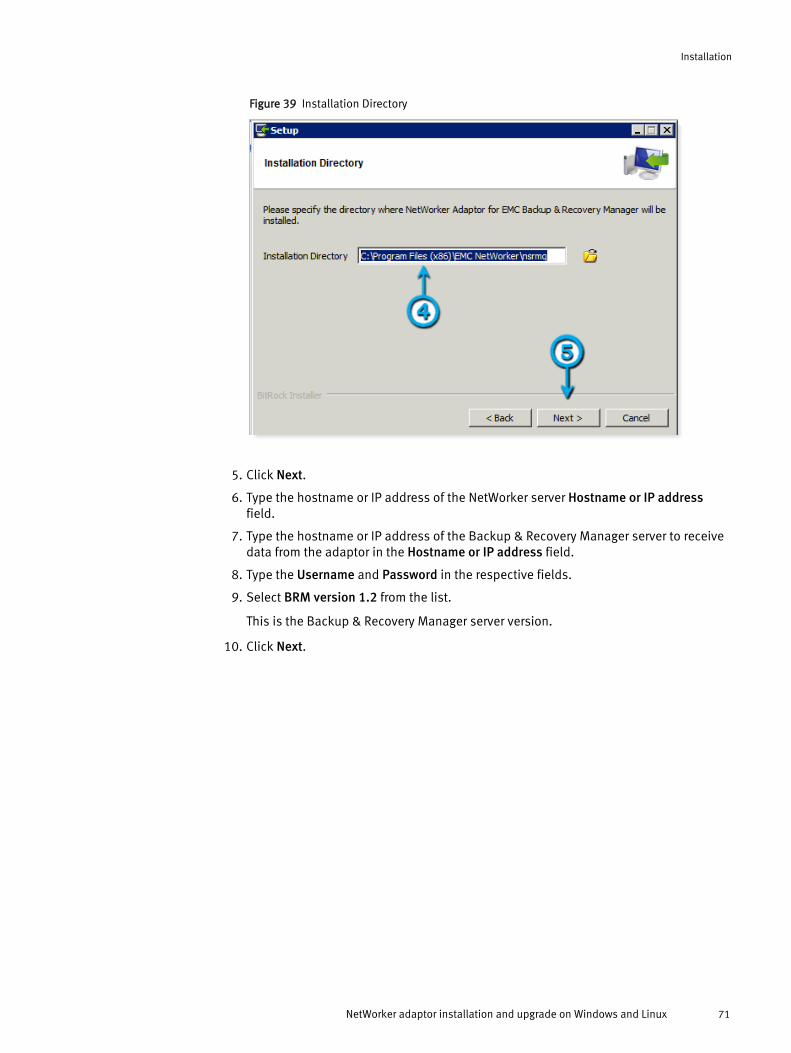
Figure 39 Installation Directory
5. Click Next.
6. Type the hostname or IP address of the NetWorker server Hostname or IP addressfield.
7. Type the hostname or IP address of the Backup & Recovery Manager server to receivedata from the adaptor in the Hostname or IP address field.
8. Type the Username and Password in the respective fields.
9. Select BRM version 1.2 from the list.
This is the Backup & Recovery Manager server version.
10. Click Next.
Installation
NetWorker adaptor installation and upgrade on Windows and Linux 71
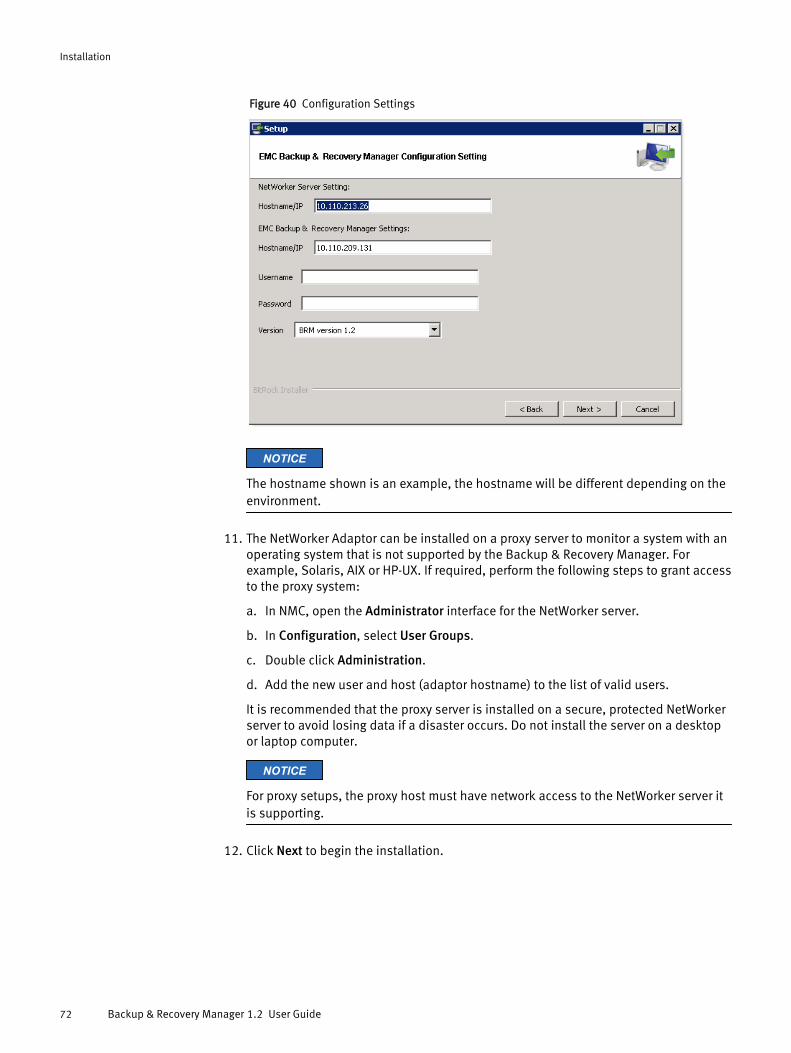
Figure 40 Configuration Settings
NOTICE
The hostname shown is an example, the hostname will be different depending on theenvironment.
11. The NetWorker Adaptor can be installed on a proxy server to monitor a system with anoperating system that is not supported by the Backup & Recovery Manager. Forexample, Solaris, AIX or HP-UX. If required, perform the following steps to grant accessto the proxy system:
a. In NMC, open the Administrator interface for the NetWorker server.
b. In Configuration, select User Groups.
c. Double click Administration.
d. Add the new user and host (adaptor hostname) to the list of valid users.
It is recommended that the proxy server is installed on a secure, protected NetWorkerserver to avoid losing data if a disaster occurs. Do not install the server on a desktopor laptop computer.
NOTICE
For proxy setups, the proxy host must have network access to the NetWorker server itis supporting.
12. Click Next to begin the installation.
Installation
72 Backup & Recovery Manager 1.2 User Guide
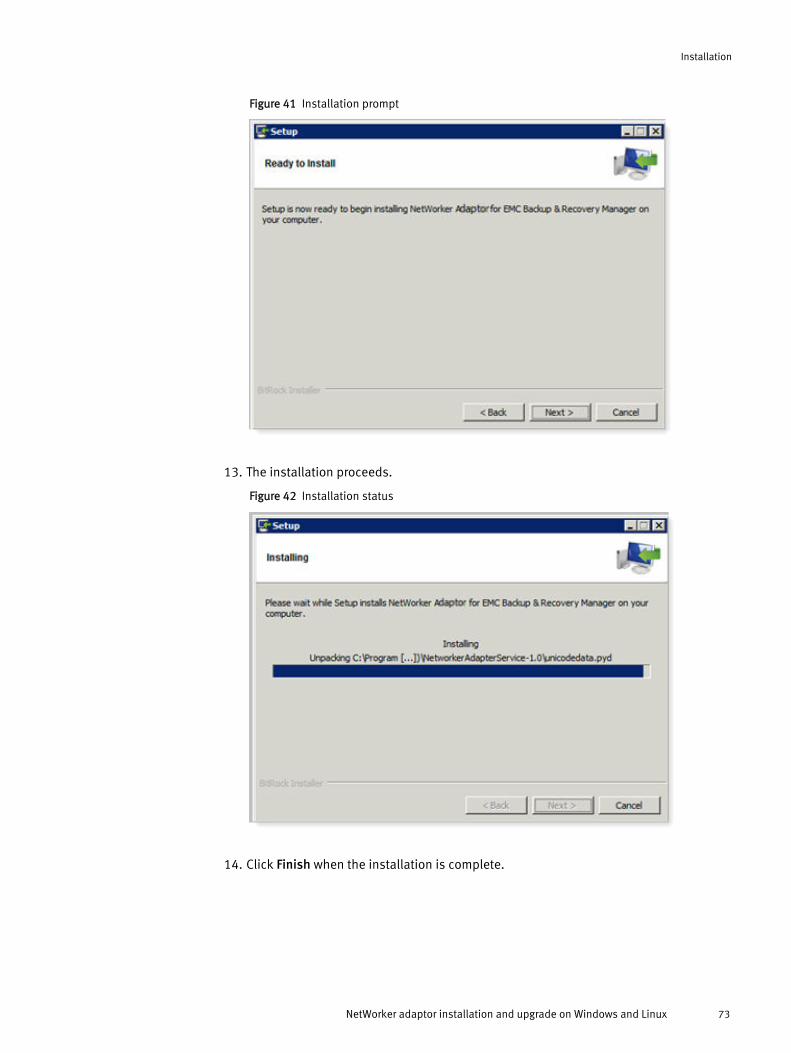
Figure 41 Installation prompt
13. The installation proceeds.
Figure 42 Installation status
14. Click Finish when the installation is complete.
Installation
NetWorker adaptor installation and upgrade on Windows and Linux 73

Figure 43 Installation completion
The installation will verify the connection to both the Backup & Recovery Managerserver and the NetWorker server.
After the installation completes a new Windows service called NetWorker ActiveMQAdaptor starts on the host system. The adaptor will automatically begin sendinginformation to the Backup & Recovery Manager.
Installing or upgrading the Backup & Recovery Manager adaptor for NetWorker on Linux
Beginning in Backup & Recovery Manager release 1.1, and NetWorker server 8.1 andlater, the NetWorker adaptor is included in the NetWorker server packages for Windowsand Linux servers. Therefore, no separate download is required.
Procedure
1. Download NetWorker adaptor for Linux installer.
The adaptor is available with the NetWorker software package.
2. Run the installer:
sles64sptn21328:/ # NetWorkerAdaptor-1.2.0-44-linux-x64.run
3. Press Enter to view the License agreement, and type Y to accept it.
4. Type the installation path:
/nsr/nsrmq5. Enter the hostname or IP address of the NetWorker server, .
6. Type the hostname or IP address of the Backup & Recovery Manager server to receivedata from the adaptor, .
NOTICE
The hostnames shown in steps 5 and 6 are examples and will be different dependingon your environment.
Installation
74 Backup & Recovery Manager 1.2 User Guide
7. Type the Username, admin, and Password, changeme.
8. Select Version 1.2 from the list.
This is the Backup & Recovery Manager server version.
9. Type Y to confirm the installation when prompted, Do you want to continue?
You can check the log, /nsr/nsrmq/logs/nsrmq.log for any issues.
Reconfiguring the server hostname for the NetWorker adaptorIf the NetWorker server does not appear in the list of systems, you can reconfigure theBackup & Recovery Manager adaptor for NetWorker.
This often occurs as a result of the following:
l The hostname of the Backup & Recovery Manager was changed.
l A new Virtual Appliance (OVA) was deployed for the Backup & Recovery Manager(despite having used the same hostname as before).
l The hostname was not provided at the time of installation or upgrade.
Note
To reconfigure a previously registered Backup & Recovery Manager NetWorker adaptor forthe server hostname, you must provide the same username and password used duringthe initial installation. The error message, unable to load SSL certificatedisplays if the incorrect credentials are used.
Procedure
1. Stop the NetWorker adaptor:
l On Windows, stop the adaptor service (nsrmqd)
l On Linux, type the following command:
/etc/init.d/nsrmqd stop2. Edit the nsrmq.cfg file:
l Change the nsrmq.cfg file to update the mq-host entry to the new server.
l Change the nsrmq.cfg file to update the cert-file entry to:http://<new BRM hostname>/ucasCert
3. Register the NetWorker adaptor by using the following command:
nsrmqd.exe --mq-host=<brmhost> server=<NW server> --brm-username=<BRM user> --brm-password=<BRM user password>
4. Start the NetWorker adaptor:
l On Windows, start the adaptor service (nsrmqd).
l On Linux:
/etc/init.d/nsrmqd start
Adding a Data Domain systemManaging Data Domain systems on page 115 provides instructions on how to add,remove and modify Data Domain systems in the Backup & Recovery Manager.
Installation
Adding a Data Domain system 75
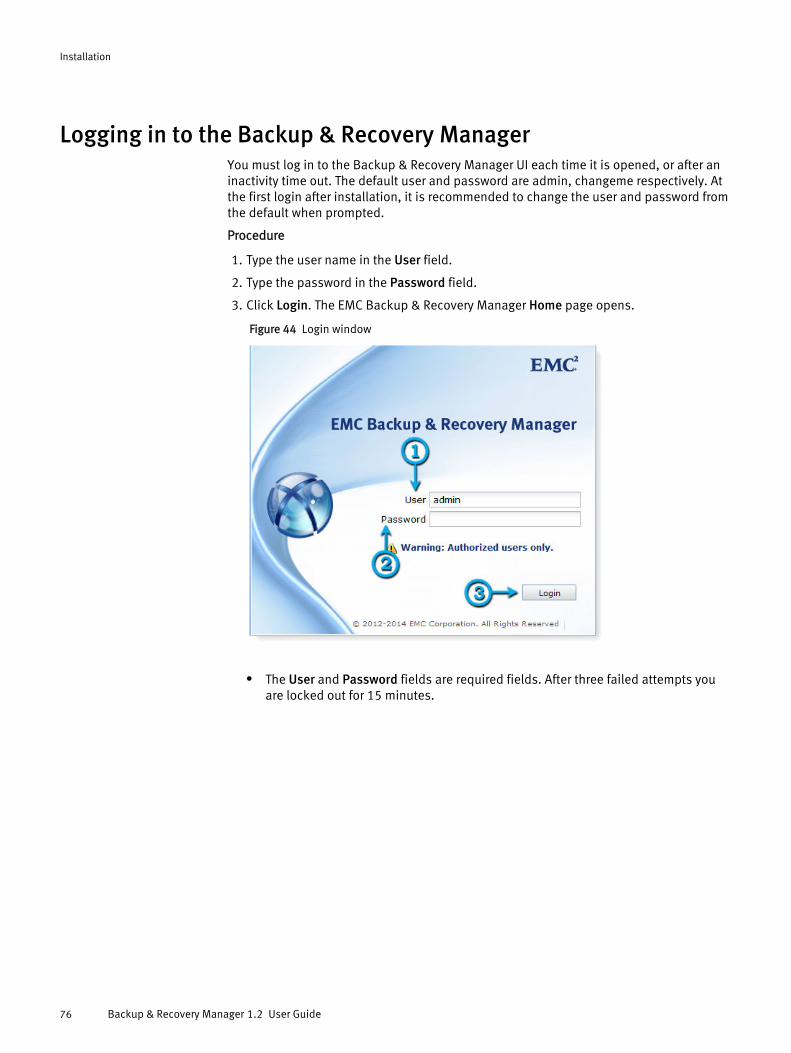
Logging in to the Backup & Recovery ManagerYou must log in to the Backup & Recovery Manager UI each time it is opened, or after aninactivity time out. The default user and password are admin, changeme respectively. Atthe first login after installation, it is recommended to change the user and password fromthe default when prompted.
Procedure
1. Type the user name in the User field.
2. Type the password in the Password field.
3. Click Login. The EMC Backup & Recovery Manager Home page opens.
Figure 44 Login window
l The User and Password fields are required fields. After three failed attempts youare locked out for 15 minutes.
Installation
76 Backup & Recovery Manager 1.2 User Guide
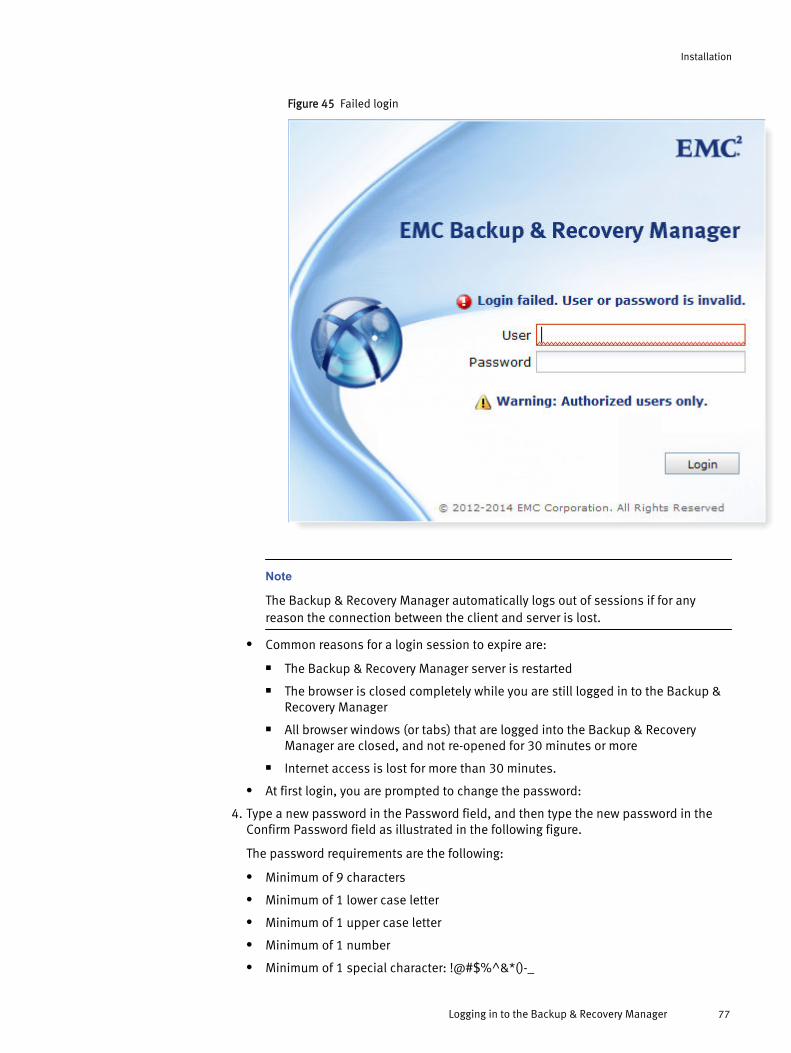
Figure 45 Failed login
Note
The Backup & Recovery Manager automatically logs out of sessions if for anyreason the connection between the client and server is lost.
l Common reasons for a login session to expire are:
n The Backup & Recovery Manager server is restarted
n The browser is closed completely while you are still logged in to the Backup &Recovery Manager
n All browser windows (or tabs) that are logged into the Backup & RecoveryManager are closed, and not re-opened for 30 minutes or more
n Internet access is lost for more than 30 minutes.
l At first login, you are prompted to change the password:
4. Type a new password in the Password field, and then type the new password in theConfirm Password field as illustrated in the following figure.
The password requirements are the following:
l Minimum of 9 characters
l Minimum of 1 lower case letter
l Minimum of 1 upper case letter
l Minimum of 1 number
l Minimum of 1 special character: !@#$%^&*()-_
Installation
Logging in to the Backup & Recovery Manager 77
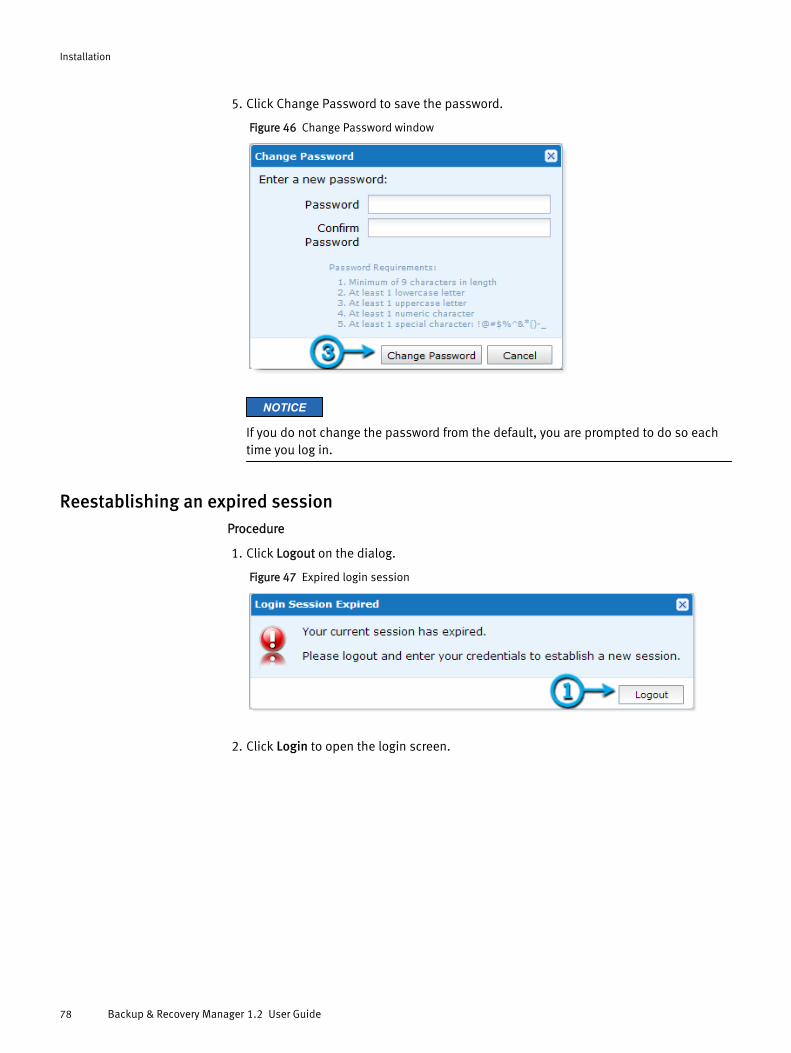
5. Click Change Password to save the password.
Figure 46 Change Password window
NOTICE
If you do not change the password from the default, you are prompted to do so eachtime you log in.
Reestablishing an expired sessionProcedure
1. Click Logout on the dialog.
Figure 47 Expired login session
2. Click Login to open the login screen.
Installation
78 Backup & Recovery Manager 1.2 User Guide
Figure 48 Logout status
Disable the Backup & Recovery Manager adaptor for AvamarUninstalling the Avamar adaptor is only possible on Avamar 6.0.2 and 6.1.0. Beginning in6.1 Service Pack 1, the adaptor is integrated into the Avamar software, and uninstalling itcan cause problems. Instead, disable the Backup & Recovery Manager adaptor forAvamar.
Disabling the Backup & Recovery Manager adaptor for Avamar 7.0 and earlierProcedure
1. Stop the Avamar Management Console Server (mcs):
dpnctl stop mcs
2. Stop the adaptor:
adaptorctl.pl --stop
3. Disable the BrmService preference:
vi /usr/local/avamar/var/mc/server_data/prefs/mcserver.xml
4. Change value for enableBrmService to false.
5. Remove the Backup & Recovery Manager files:
rm -rf /usr/local/avamar/var/brm
6. Start the Avamar mcs:
dpnctl start mcs
Installation
Disable the Backup & Recovery Manager adaptor for Avamar 79
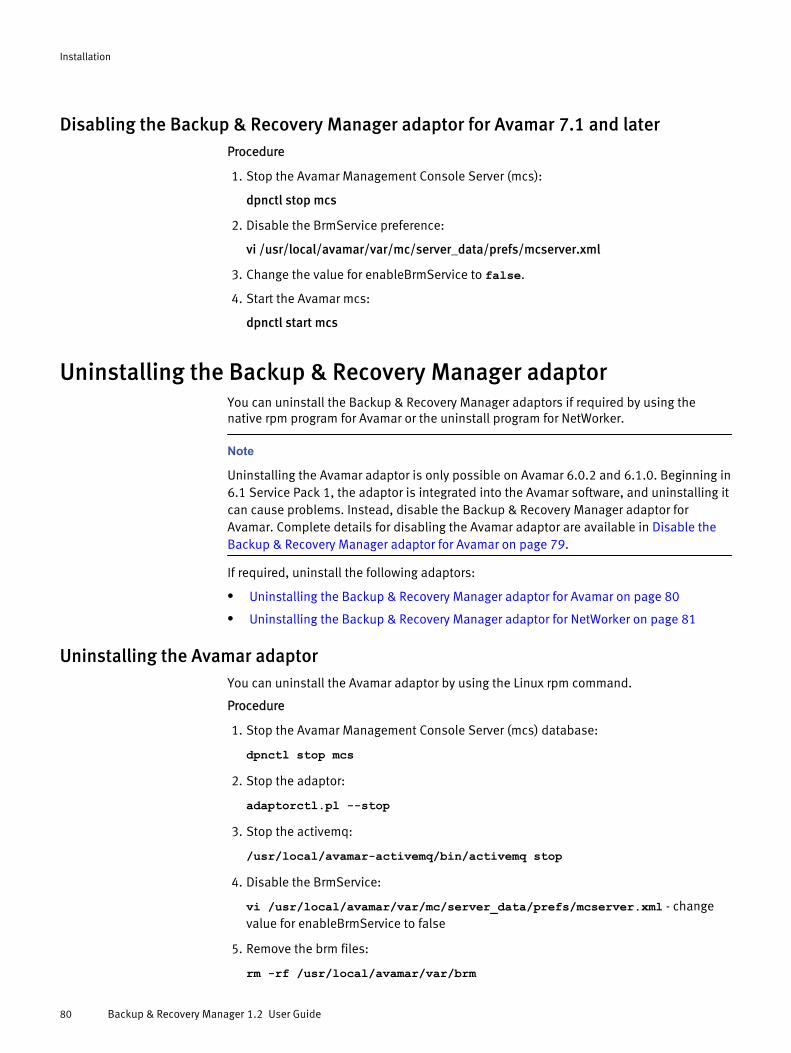
Disabling the Backup & Recovery Manager adaptor for Avamar 7.1 and laterProcedure
1. Stop the Avamar Management Console Server (mcs):
dpnctl stop mcs
2. Disable the BrmService preference:
vi /usr/local/avamar/var/mc/server_data/prefs/mcserver.xml
3. Change the value for enableBrmService to false.
4. Start the Avamar mcs:
dpnctl start mcs
Uninstalling the Backup & Recovery Manager adaptorYou can uninstall the Backup & Recovery Manager adaptors if required by using thenative rpm program for Avamar or the uninstall program for NetWorker.
Note
Uninstalling the Avamar adaptor is only possible on Avamar 6.0.2 and 6.1.0. Beginning in6.1 Service Pack 1, the adaptor is integrated into the Avamar software, and uninstalling itcan cause problems. Instead, disable the Backup & Recovery Manager adaptor forAvamar. Complete details for disabling the Avamar adaptor are available in Disable theBackup & Recovery Manager adaptor for Avamar on page 79.
If required, uninstall the following adaptors:
l Uninstalling the Backup & Recovery Manager adaptor for Avamar on page 80
l Uninstalling the Backup & Recovery Manager adaptor for NetWorker on page 81
Uninstalling the Avamar adaptorYou can uninstall the Avamar adaptor by using the Linux rpm command.
Procedure
1. Stop the Avamar Management Console Server (mcs) database:
dpnctl stop mcs
2. Stop the adaptor:
adaptorctl.pl --stop
3. Stop the activemq:
/usr/local/avamar-activemq/bin/activemq stop
4. Disable the BrmService:
vi /usr/local/avamar/var/mc/server_data/prefs/mcserver.xml - changevalue for enableBrmService to false
5. Remove the brm files:
rm -rf /usr/local/avamar/var/brm
Installation
80 Backup & Recovery Manager 1.2 User Guide
6. Remove the Avamar adaptor:
sudo rpm -e avamar-adaptor
7. Start the Avamar mcs database:
dpnctl start mcs
Uninstalling the NetWorker adaptorYou can uninstall the NetWorker server adaptor on Windows from the command prompt.
Procedure
1. Run the uninstall program located at, C:\Program Files (x86)\NetWorkerAdaptor Service-1.0\Uninstall NetWorker Adapter for EMCBackup & Recovery Manager
2. Uninstall the NetWorker server adaptor on Linux and remove the Backup & RecoveryManager adaptor software package:
rpm -e Uninstall NetWorkerAdaptor-1.0-linux-x64-installer.run
Installation
Uninstalling the NetWorker adaptor 81

Installation
82 Backup & Recovery Manager 1.2 User Guide

CHAPTER 4
Alerts
l Overview of Alerts................................................................................................. 84l System Summary.................................................................................................. 84l Alerts columns...................................................................................................... 85l Alert categories..................................................................................................... 86l Hiding alerts..........................................................................................................87l Viewing hidden alerts............................................................................................88l Unhiding alerts......................................................................................................88l Acknowledging alerts............................................................................................ 89
Alerts 83
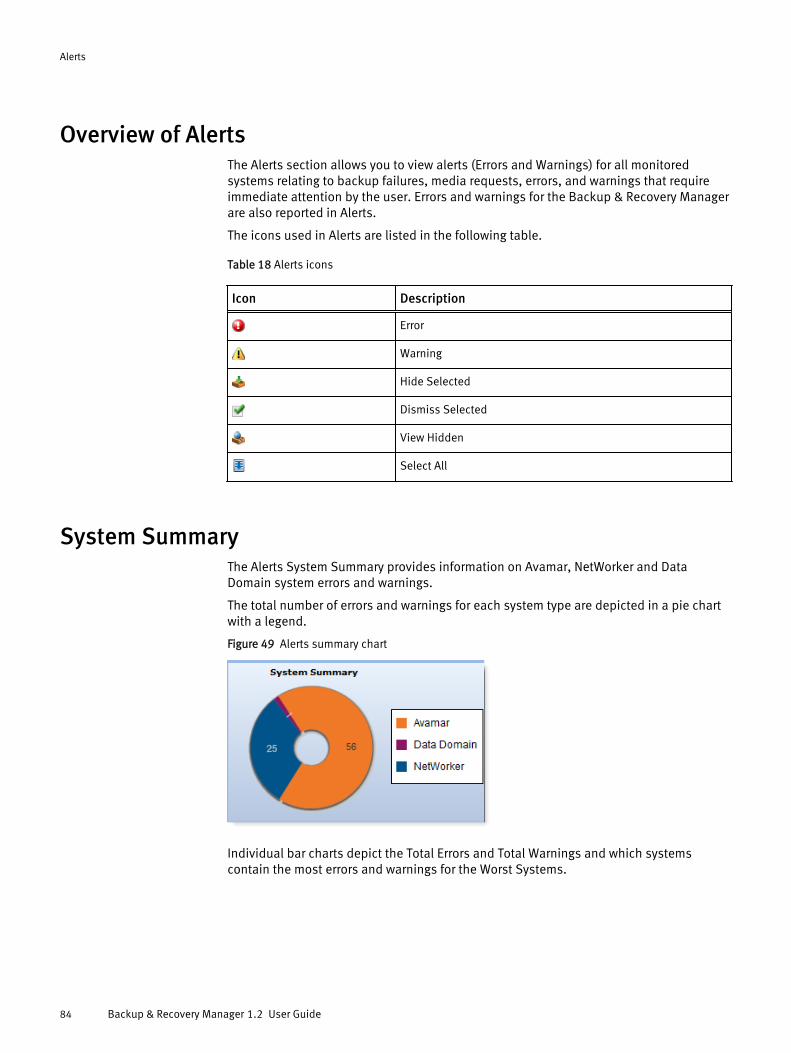
Overview of AlertsThe Alerts section allows you to view alerts (Errors and Warnings) for all monitoredsystems relating to backup failures, media requests, errors, and warnings that requireimmediate attention by the user. Errors and warnings for the Backup & Recovery Managerare also reported in Alerts.
The icons used in Alerts are listed in the following table.
Table 18 Alerts icons
Icon Description
Error
Warning
Hide Selected
Dismiss Selected
View Hidden
Select All
System SummaryThe Alerts System Summary provides information on Avamar, NetWorker and DataDomain system errors and warnings.
The total number of errors and warnings for each system type are depicted in a pie chartwith a legend.
Figure 49 Alerts summary chart
Individual bar charts depict the Total Errors and Total Warnings and which systemscontain the most errors and warnings for the Worst Systems.
Alerts
84 Backup & Recovery Manager 1.2 User Guide
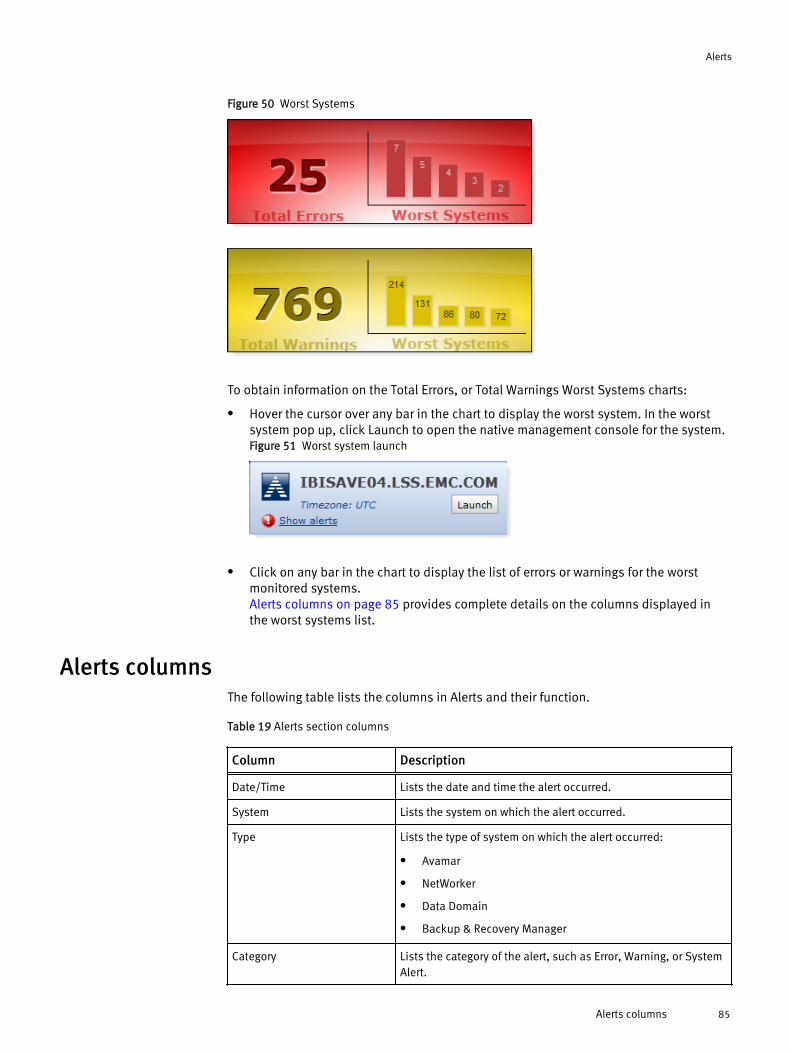
Figure 50 Worst Systems
To obtain information on the Total Errors, or Total Warnings Worst Systems charts:
l Hover the cursor over any bar in the chart to display the worst system. In the worstsystem pop up, click Launch to open the native management console for the system.Figure 51 Worst system launch
l Click on any bar in the chart to display the list of errors or warnings for the worstmonitored systems.Alerts columns on page 85 provides complete details on the columns displayed inthe worst systems list.
Alerts columnsThe following table lists the columns in Alerts and their function.
Table 19 Alerts section columns
Column Description
Date/Time Lists the date and time the alert occurred.
System Lists the system on which the alert occurred.
Type Lists the type of system on which the alert occurred:
l Avamar
l NetWorker
l Data Domain
l Backup & Recovery Manager
Category Lists the category of the alert, such as Error, Warning, or SystemAlert.
Alerts
Alerts columns 85
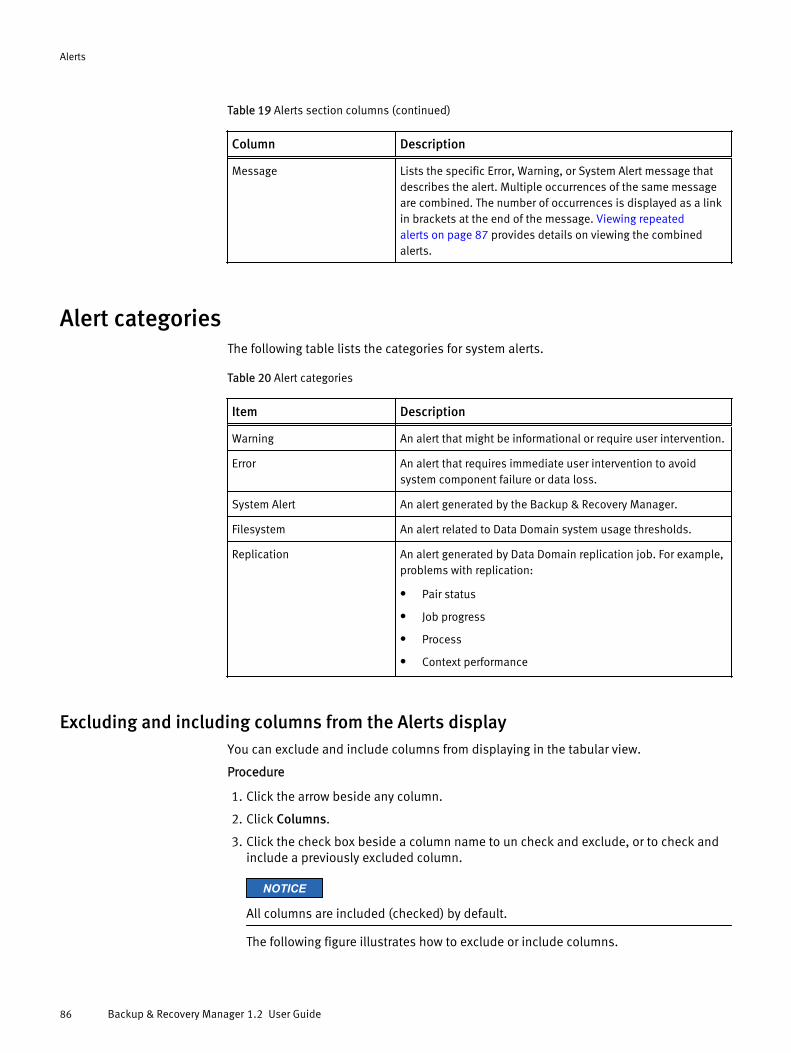
Table 19 Alerts section columns (continued)
Column Description
Message Lists the specific Error, Warning, or System Alert message thatdescribes the alert. Multiple occurrences of the same messageare combined. The number of occurrences is displayed as a linkin brackets at the end of the message. Viewing repeatedalerts on page 87 provides details on viewing the combinedalerts.
Alert categoriesThe following table lists the categories for system alerts.
Table 20 Alert categories
Item Description
Warning An alert that might be informational or require user intervention.
Error An alert that requires immediate user intervention to avoidsystem component failure or data loss.
System Alert An alert generated by the Backup & Recovery Manager.
Filesystem An alert related to Data Domain system usage thresholds.
Replication An alert generated by Data Domain replication job. For example,problems with replication:
l Pair status
l Job progress
l Process
l Context performance
Excluding and including columns from the Alerts displayYou can exclude and include columns from displaying in the tabular view.
Procedure
1. Click the arrow beside any column.
2. Click Columns.
3. Click the check box beside a column name to un check and exclude, or to check andinclude a previously excluded column.
NOTICE
All columns are included (checked) by default.
The following figure illustrates how to exclude or include columns.
Alerts
86 Backup & Recovery Manager 1.2 User Guide
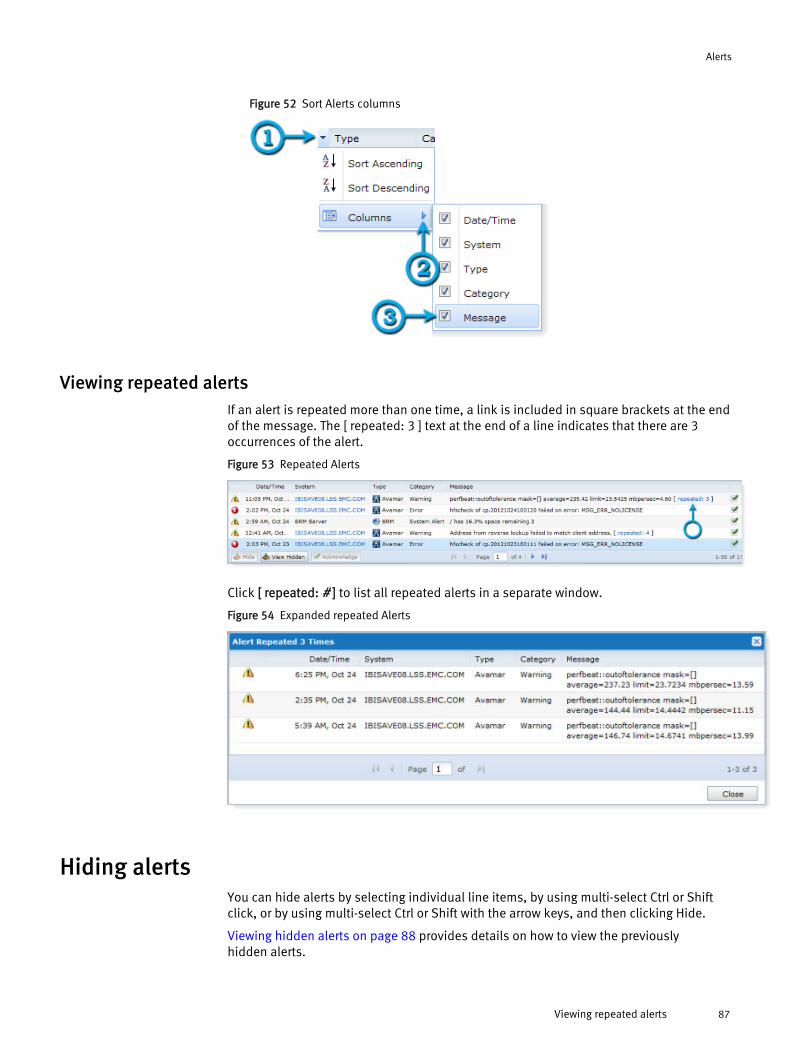
Figure 52 Sort Alerts columns
Viewing repeated alertsIf an alert is repeated more than one time, a link is included in square brackets at the endof the message. The [ repeated: 3 ] text at the end of a line indicates that there are 3occurrences of the alert.
Figure 53 Repeated Alerts
Click [ repeated: # ] to list all repeated alerts in a separate window.
Figure 54 Expanded repeated Alerts
Hiding alertsYou can hide alerts by selecting individual line items, by using multi-select Ctrl or Shiftclick, or by using multi-select Ctrl or Shift with the arrow keys, and then clicking Hide.
Viewing hidden alerts on page 88 provides details on how to view the previouslyhidden alerts.
Alerts
Viewing repeated alerts 87
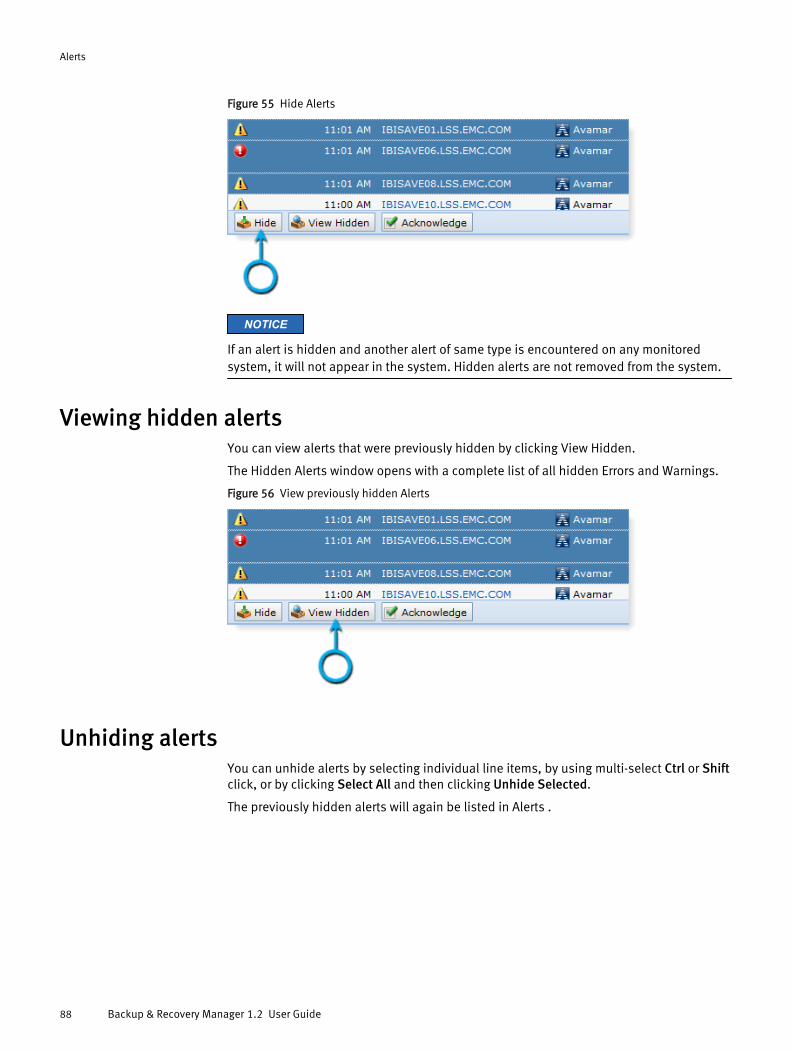
Figure 55 Hide Alerts
NOTICE
If an alert is hidden and another alert of same type is encountered on any monitoredsystem, it will not appear in the system. Hidden alerts are not removed from the system.
Viewing hidden alertsYou can view alerts that were previously hidden by clicking View Hidden.
The Hidden Alerts window opens with a complete list of all hidden Errors and Warnings.
Figure 56 View previously hidden Alerts
Unhiding alertsYou can unhide alerts by selecting individual line items, by using multi-select Ctrl or Shiftclick, or by clicking Select All and then clicking Unhide Selected.
The previously hidden alerts will again be listed in Alerts .
Alerts
88 Backup & Recovery Manager 1.2 User Guide

Figure 57 Hidden Alerts
Acknowledging alertsYou can acknowledge alerts to dismiss, and remove them from the list.
Procedure
1. Click the alerts to dismiss:
l Select individual line items.
l Use multi-select Ctrl or Shift click.
l Use multi-select Ctrl or Shift with the arrow keys.
2. Click Acknowledge.
NOTICE
Acknowledging alerts permanently removes the alerts from the Backup & RecoveryManager.
Figure 58 Acknowledge Alerts
3. Click Yes to confirm the permanent removal of the selected alerts.
Alerts
Acknowledging alerts 89
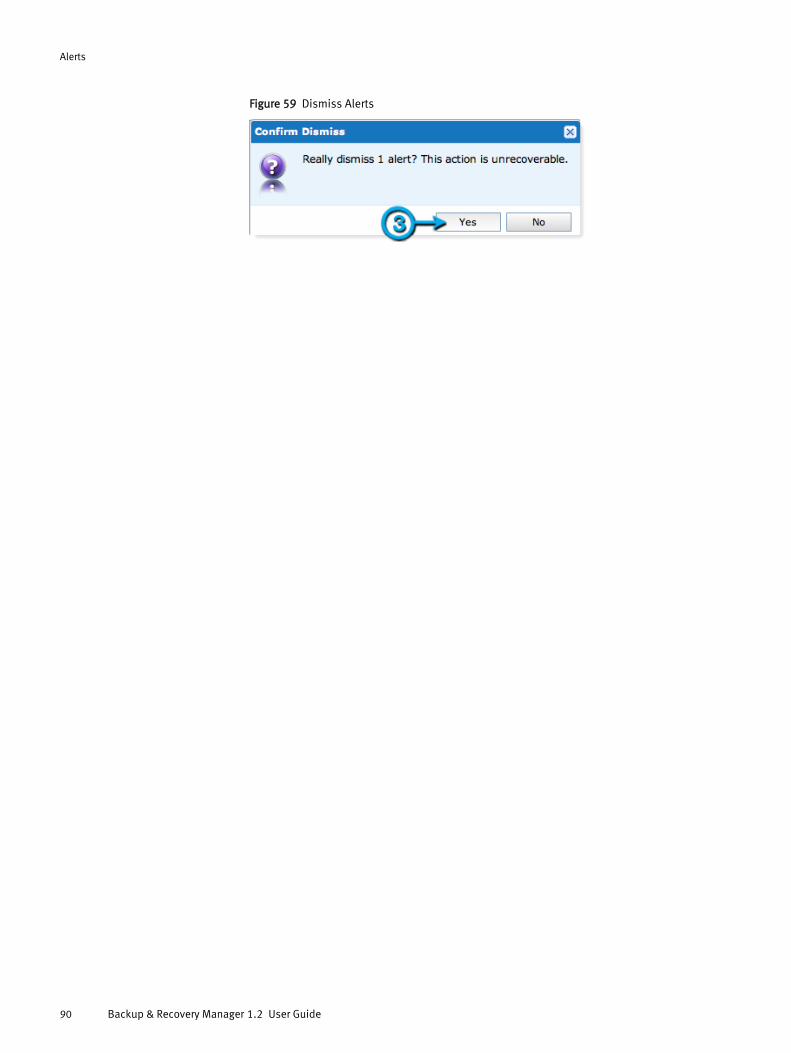
Figure 59 Dismiss Alerts
Alerts
90 Backup & Recovery Manager 1.2 User Guide

CHAPTER 5
Activities
l Overview of Activities............................................................................................ 92l Activities columns................................................................................................. 92l Activities details....................................................................................................93l Starting, stopping and restarting backup jobs....................................................... 97l Avamar replication................................................................................................ 98
Activities 91
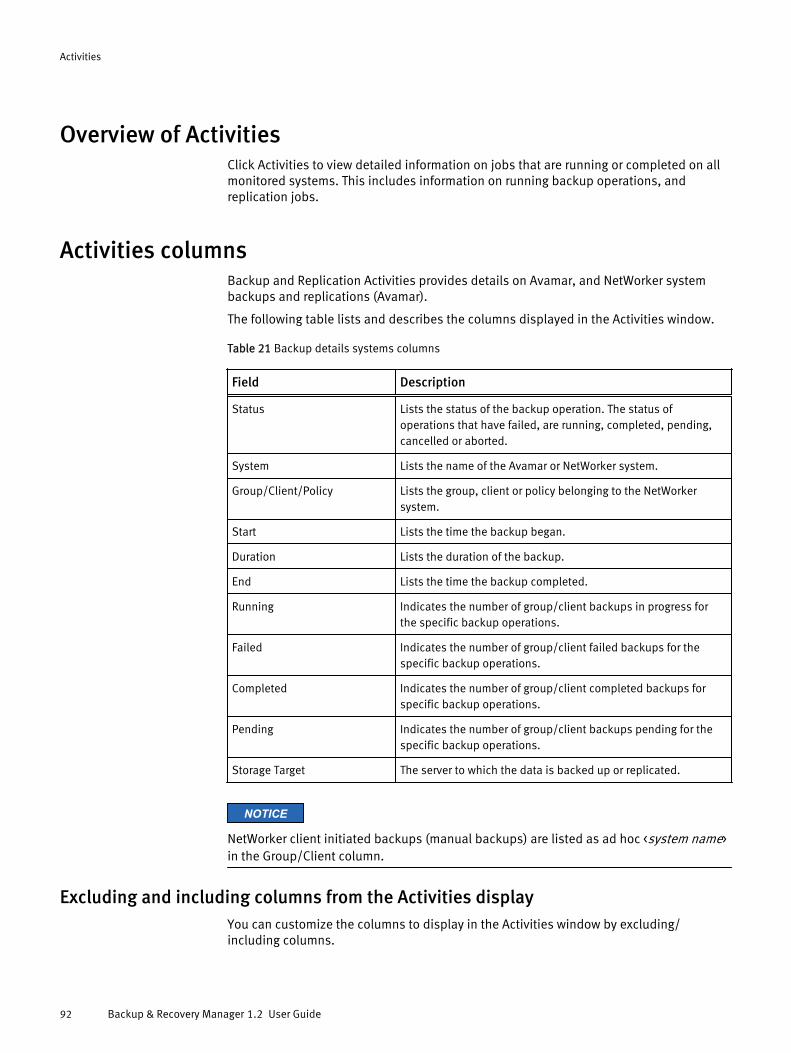
Overview of ActivitiesClick Activities to view detailed information on jobs that are running or completed on allmonitored systems. This includes information on running backup operations, andreplication jobs.
Activities columnsBackup and Replication Activities provides details on Avamar, and NetWorker systembackups and replications (Avamar).
The following table lists and describes the columns displayed in the Activities window.
Table 21 Backup details systems columns
Field Description
Status Lists the status of the backup operation. The status ofoperations that have failed, are running, completed, pending,cancelled or aborted.
System Lists the name of the Avamar or NetWorker system.
Group/Client/Policy Lists the group, client or policy belonging to the NetWorkersystem.
Start Lists the time the backup began.
Duration Lists the duration of the backup.
End Lists the time the backup completed.
Running Indicates the number of group/client backups in progress forthe specific backup operations.
Failed Indicates the number of group/client failed backups for thespecific backup operations.
Completed Indicates the number of group/client completed backups forspecific backup operations.
Pending Indicates the number of group/client backups pending for thespecific backup operations.
Storage Target The server to which the data is backed up or replicated.
NOTICE
NetWorker client initiated backups (manual backups) are listed as ad hoc <system name>in the Group/Client column.
Excluding and including columns from the Activities displayYou can customize the columns to display in the Activities window by excluding/including columns.
Activities
92 Backup & Recovery Manager 1.2 User Guide

Procedure
1. Click the arrow beside any column.
2. Click Columns.
3. Click the check box beside a column name to uncheck and exclude, or to check andinclude a previously excluded column.
NOTICE
All columns are included (checked) by default.
Figure 60 Sort Activities columns
Activities detailsThe Backup Activities Details panel displays all configured systems with backup,replication (Avamar) jobs that failed, are pending, running or completed. Click on anindividual server to display the Details panel with summary information.
Activities
Activities details 93
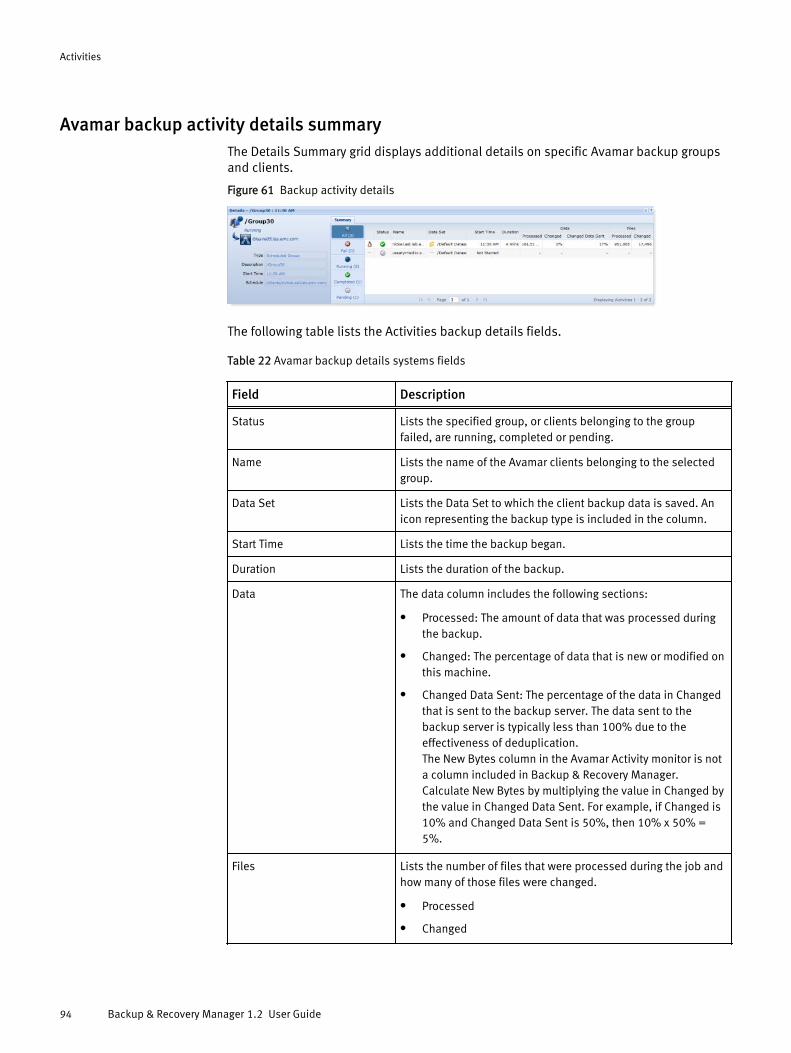
Avamar backup activity details summaryThe Details Summary grid displays additional details on specific Avamar backup groupsand clients.
Figure 61 Backup activity details
The following table lists the Activities backup details fields.
Table 22 Avamar backup details systems fields
Field Description
Status Lists the specified group, or clients belonging to the groupfailed, are running, completed or pending.
Name Lists the name of the Avamar clients belonging to the selectedgroup.
Data Set Lists the Data Set to which the client backup data is saved. Anicon representing the backup type is included in the column.
Start Time Lists the time the backup began.
Duration Lists the duration of the backup.
Data The data column includes the following sections:
l Processed: The amount of data that was processed duringthe backup.
l Changed: The percentage of data that is new or modified onthis machine.
l Changed Data Sent: The percentage of the data in Changedthat is sent to the backup server. The data sent to thebackup server is typically less than 100% due to theeffectiveness of deduplication.The New Bytes column in the Avamar Activity monitor is nota column included in Backup & Recovery Manager.Calculate New Bytes by multiplying the value in Changed bythe value in Changed Data Sent. For example, if Changed is10% and Changed Data Sent is 50%, then 10% x 50% =5%.
Files Lists the number of files that were processed during the job andhow many of those files were changed.
l Processed
l Changed
Activities
94 Backup & Recovery Manager 1.2 User Guide
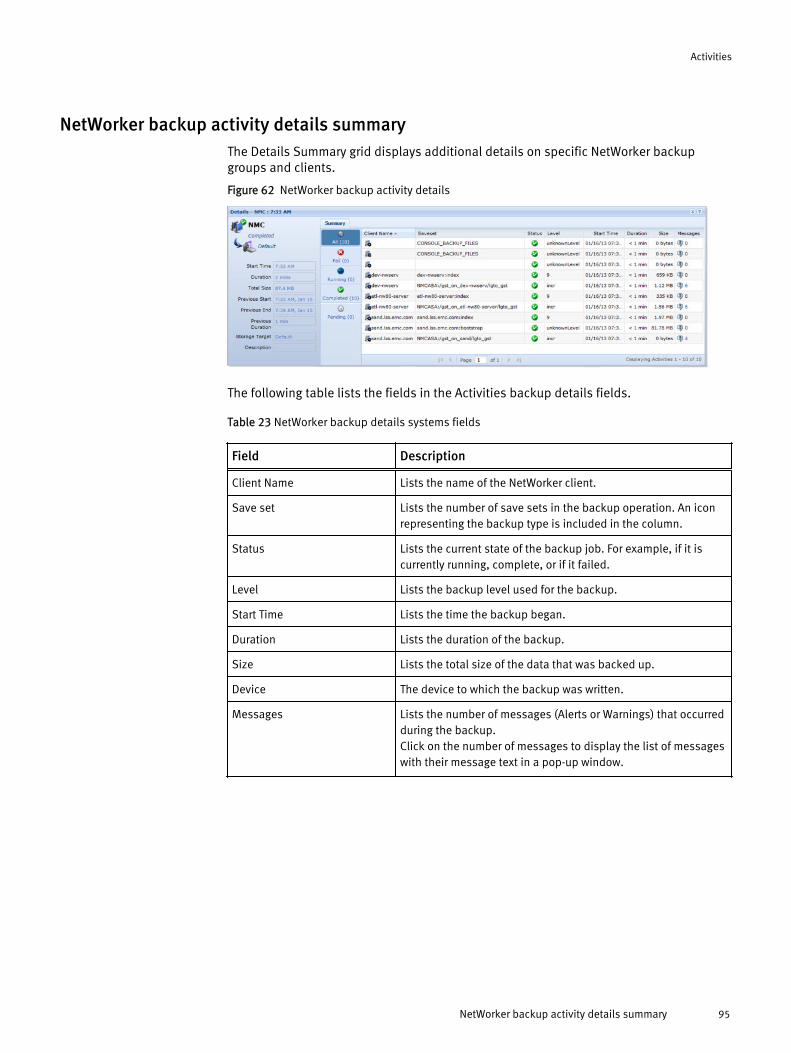
NetWorker backup activity details summaryThe Details Summary grid displays additional details on specific NetWorker backupgroups and clients.
Figure 62 NetWorker backup activity details
The following table lists the fields in the Activities backup details fields.
Table 23 NetWorker backup details systems fields
Field Description
Client Name Lists the name of the NetWorker client.
Save set Lists the number of save sets in the backup operation. An iconrepresenting the backup type is included in the column.
Status Lists the current state of the backup job. For example, if it iscurrently running, complete, or if it failed.
Level Lists the backup level used for the backup.
Start Time Lists the time the backup began.
Duration Lists the duration of the backup.
Size Lists the total size of the data that was backed up.
Device The device to which the backup was written.
Messages Lists the number of messages (Alerts or Warnings) that occurredduring the backup.Click on the number of messages to display the list of messageswith their message text in a pop-up window.
Activities
NetWorker backup activity details summary 95
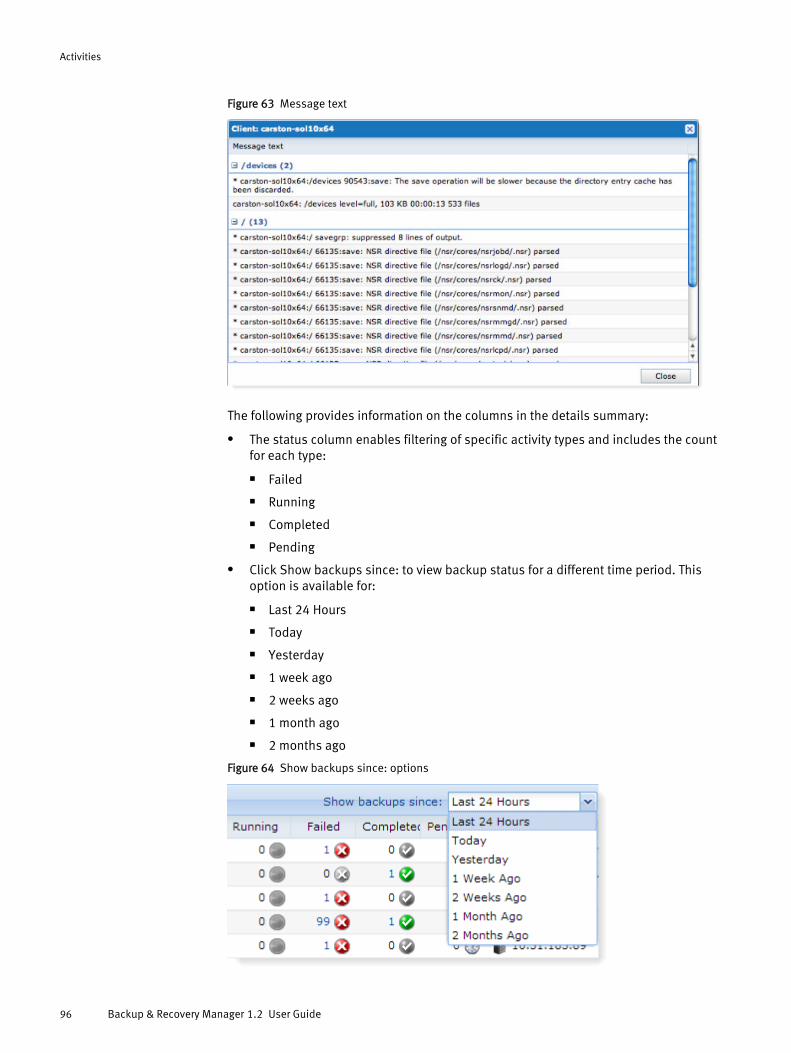
Figure 63 Message text
The following provides information on the columns in the details summary:
l The status column enables filtering of specific activity types and includes the countfor each type:
n Failed
n Running
n Completed
n Pending
l Click Show backups since: to view backup status for a different time period. Thisoption is available for:
n Last 24 Hours
n Today
n Yesterday
n 1 week ago
n 2 weeks ago
n 1 month ago
n 2 months ago
Figure 64 Show backups since: options
Activities
96 Backup & Recovery Manager 1.2 User Guide
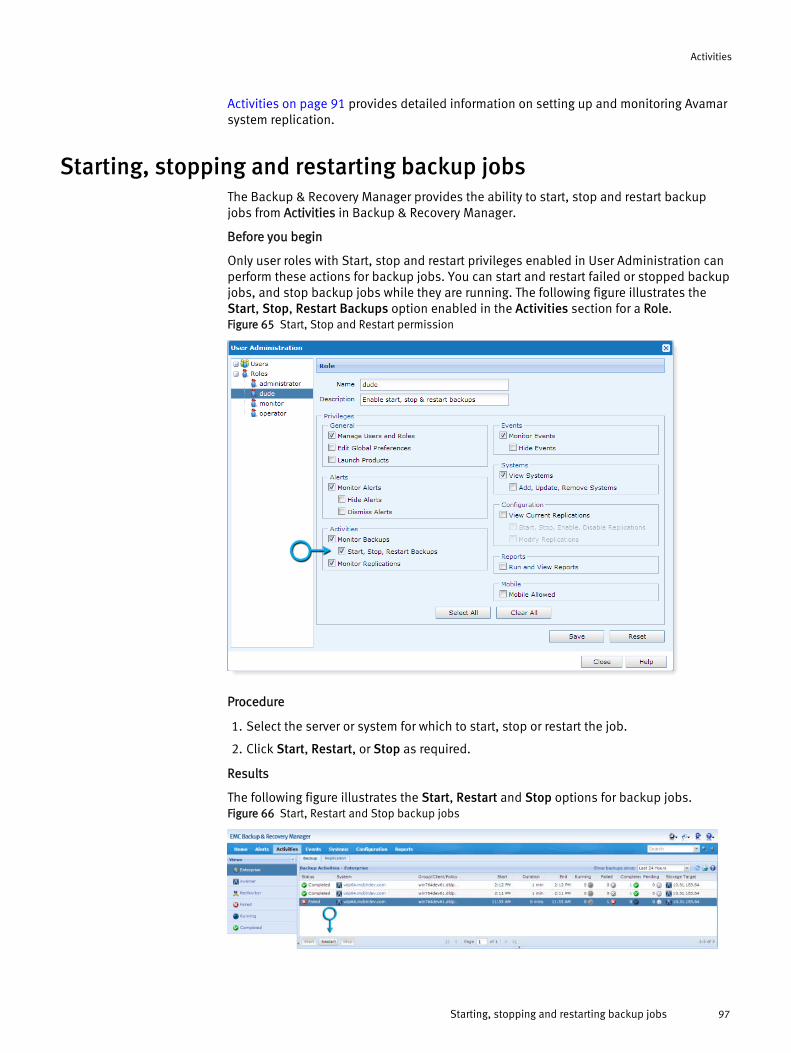
Activities on page 91 provides detailed information on setting up and monitoring Avamarsystem replication.
Starting, stopping and restarting backup jobsThe Backup & Recovery Manager provides the ability to start, stop and restart backupjobs from Activities in Backup & Recovery Manager.
Before you begin
Only user roles with Start, stop and restart privileges enabled in User Administration canperform these actions for backup jobs. You can start and restart failed or stopped backupjobs, and stop backup jobs while they are running. The following figure illustrates theStart, Stop, Restart Backups option enabled in the Activities section for a Role.Figure 65 Start, Stop and Restart permission
Procedure
1. Select the server or system for which to start, stop or restart the job.
2. Click Start, Restart, or Stop as required.
Results
The following figure illustrates the Start, Restart and Stop options for backup jobs.Figure 66 Start, Restart and Stop backup jobs
Activities
Starting, stopping and restarting backup jobs 97
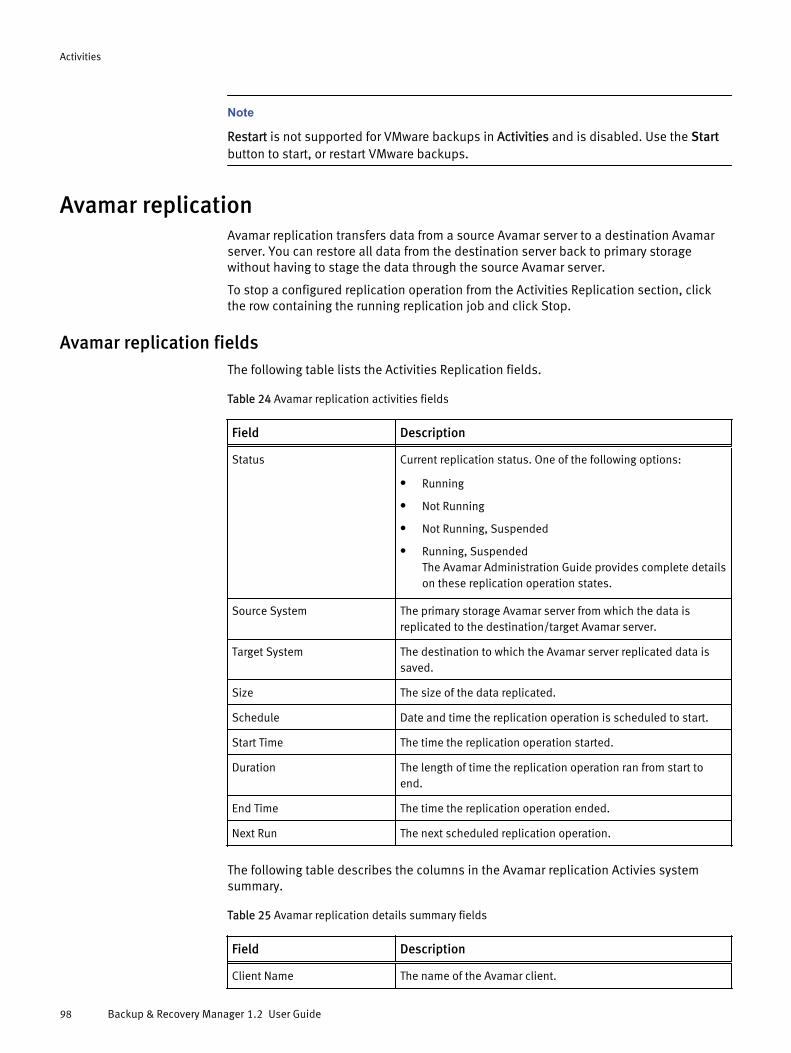
Note
Restart is not supported for VMware backups in Activities and is disabled. Use the Startbutton to start, or restart VMware backups.
Avamar replicationAvamar replication transfers data from a source Avamar server to a destination Avamarserver. You can restore all data from the destination server back to primary storagewithout having to stage the data through the source Avamar server.
To stop a configured replication operation from the Activities Replication section, clickthe row containing the running replication job and click Stop.
Avamar replication fieldsThe following table lists the Activities Replication fields.
Table 24 Avamar replication activities fields
Field Description
Status Current replication status. One of the following options:
l Running
l Not Running
l Not Running, Suspended
l Running, SuspendedThe Avamar Administration Guide provides complete detailson these replication operation states.
Source System The primary storage Avamar server from which the data isreplicated to the destination/target Avamar server.
Target System The destination to which the Avamar server replicated data issaved.
Size The size of the data replicated.
Schedule Date and time the replication operation is scheduled to start.
Start Time The time the replication operation started.
Duration The length of time the replication operation ran from start toend.
End Time The time the replication operation ended.
Next Run The next scheduled replication operation.
The following table describes the columns in the Avamar replication Activies systemsummary.
Table 25 Avamar replication details summary fields
Field Description
Client Name The name of the Avamar client.
Activities
98 Backup & Recovery Manager 1.2 User Guide
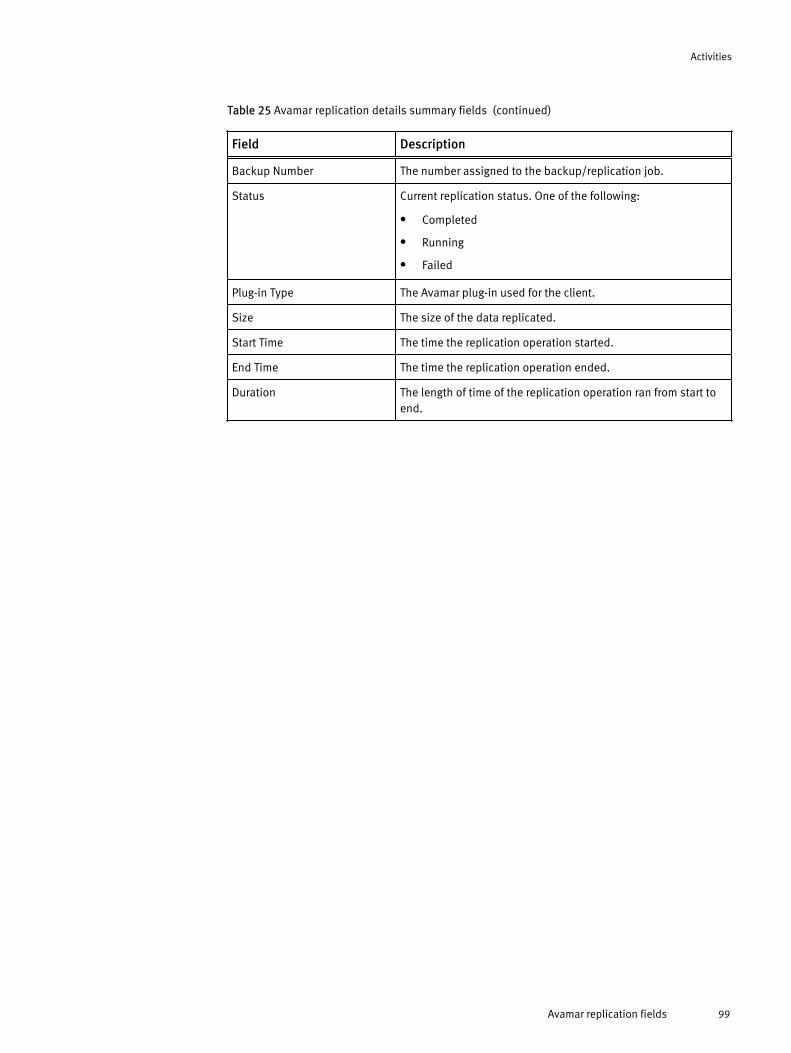
Table 25 Avamar replication details summary fields (continued)
Field Description
Backup Number The number assigned to the backup/replication job.
Status Current replication status. One of the following:
l Completed
l Running
l Failed
Plug-in Type The Avamar plug-in used for the client.
Size The size of the data replicated.
Start Time The time the replication operation started.
End Time The time the replication operation ended.
Duration The length of time of the replication operation ran from start toend.
Activities
Avamar replication fields 99

Activities
100 Backup & Recovery Manager 1.2 User Guide

CHAPTER 6
Events
l Overview of Events.............................................................................................. 102l Events columns...................................................................................................102l Events categories................................................................................................ 102l Excluding columns from the display.................................................................... 103l View repeated events.......................................................................................... 103l Hide events.........................................................................................................104l View hidden events.............................................................................................104l Unhide events.....................................................................................................105
Events 101
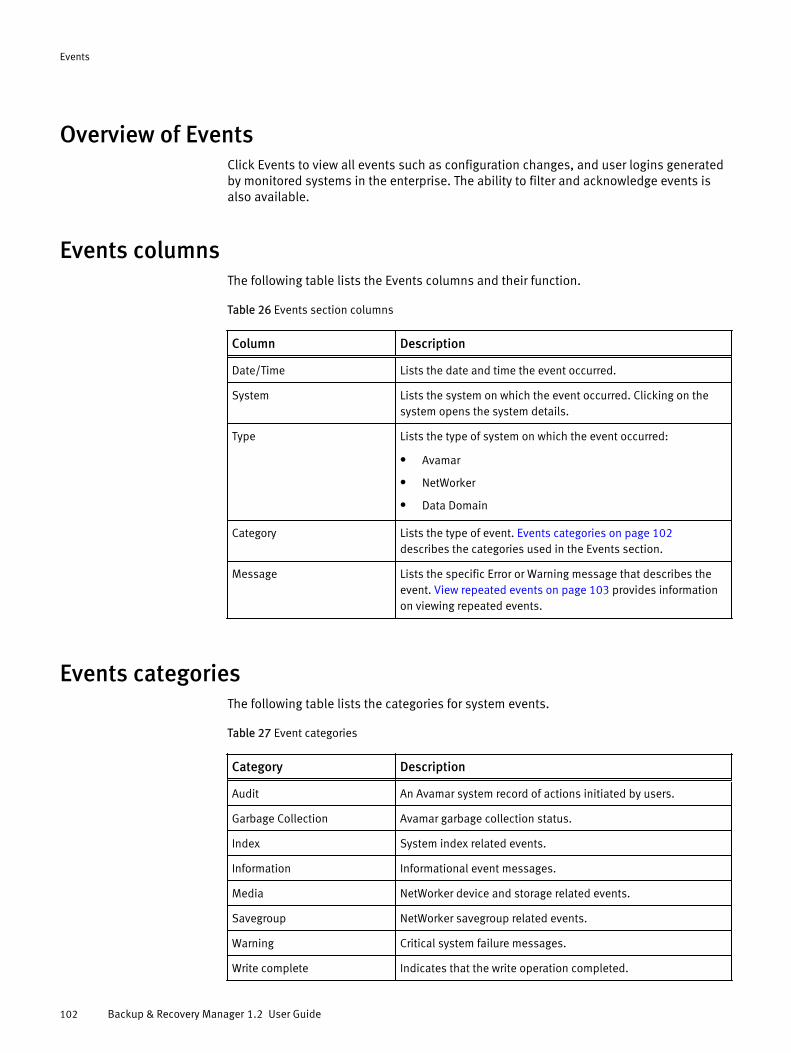
Overview of EventsClick Events to view all events such as configuration changes, and user logins generatedby monitored systems in the enterprise. The ability to filter and acknowledge events isalso available.
Events columnsThe following table lists the Events columns and their function.
Table 26 Events section columns
Column Description
Date/Time Lists the date and time the event occurred.
System Lists the system on which the event occurred. Clicking on thesystem opens the system details.
Type Lists the type of system on which the event occurred:
l Avamar
l NetWorker
l Data Domain
Category Lists the type of event. Events categories on page 102describes the categories used in the Events section.
Message Lists the specific Error or Warning message that describes theevent. View repeated events on page 103 provides informationon viewing repeated events.
Events categoriesThe following table lists the categories for system events.
Table 27 Event categories
Category Description
Audit An Avamar system record of actions initiated by users.
Garbage Collection Avamar garbage collection status.
Index System index related events.
Information Informational event messages.
Media NetWorker device and storage related events.
Savegroup NetWorker savegroup related events.
Warning Critical system failure messages.
Write complete Indicates that the write operation completed.
Events
102 Backup & Recovery Manager 1.2 User Guide
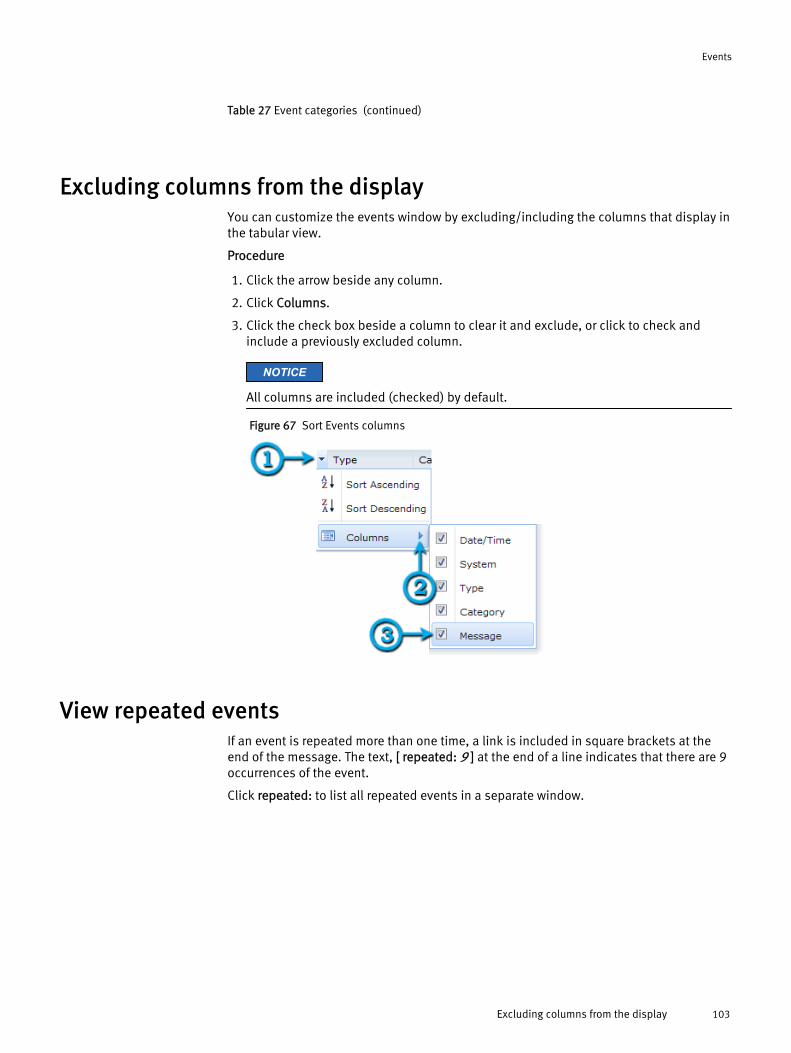
Table 27 Event categories (continued)
Excluding columns from the displayYou can customize the events window by excluding/including the columns that display inthe tabular view.
Procedure
1. Click the arrow beside any column.
2. Click Columns.
3. Click the check box beside a column to clear it and exclude, or click to check andinclude a previously excluded column.
NOTICE
All columns are included (checked) by default.
Figure 67 Sort Events columns
View repeated eventsIf an event is repeated more than one time, a link is included in square brackets at theend of the message. The text, [ repeated: 9 ] at the end of a line indicates that there are 9occurrences of the event.
Click repeated: to list all repeated events in a separate window.
Events
Excluding columns from the display 103
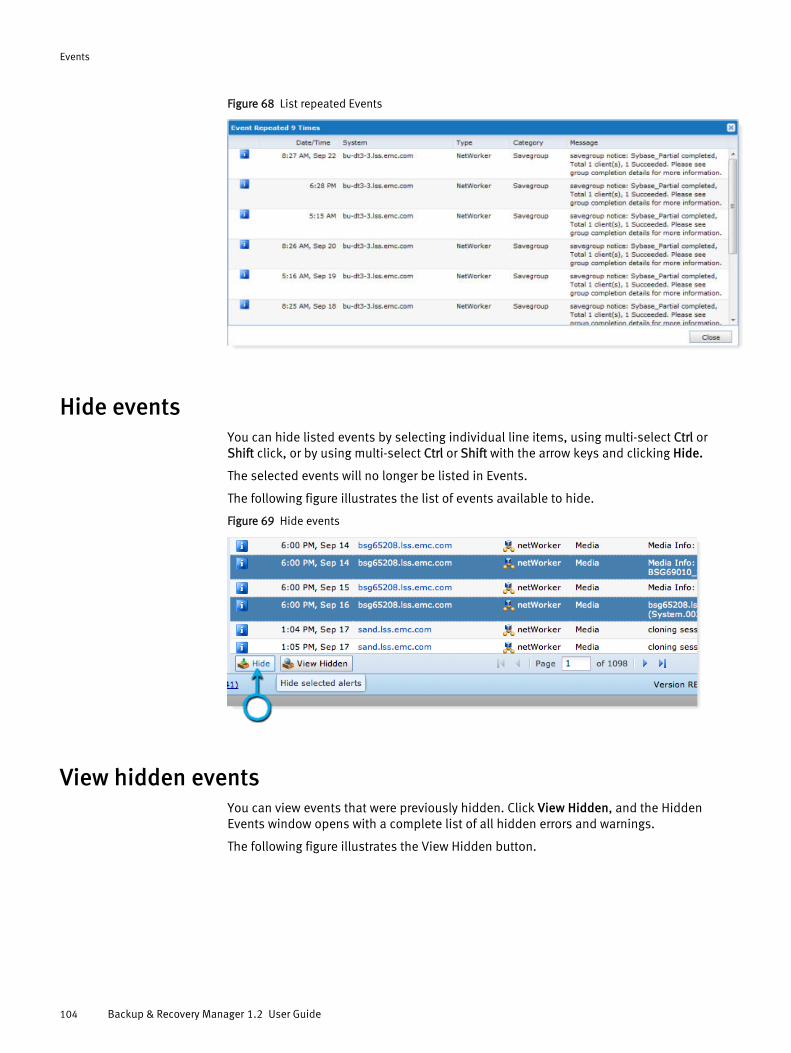
Figure 68 List repeated Events
Hide eventsYou can hide listed events by selecting individual line items, using multi-select Ctrl orShift click, or by using multi-select Ctrl or Shift with the arrow keys and clicking Hide.
The selected events will no longer be listed in Events.
The following figure illustrates the list of events available to hide.
Figure 69 Hide events
View hidden eventsYou can view events that were previously hidden. Click View Hidden, and the HiddenEvents window opens with a complete list of all hidden errors and warnings.
The following figure illustrates the View Hidden button.
Events
104 Backup & Recovery Manager 1.2 User Guide
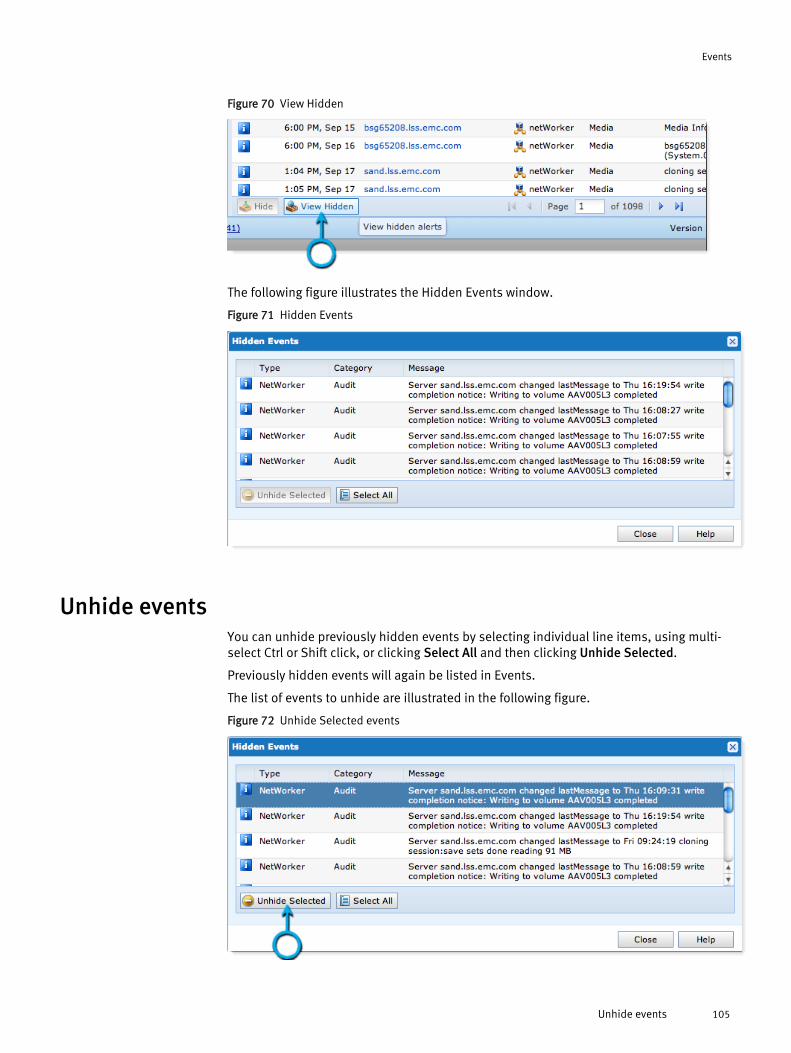
Figure 70 View Hidden
The following figure illustrates the Hidden Events window.
Figure 71 Hidden Events
Unhide eventsYou can unhide previously hidden events by selecting individual line items, using multi-select Ctrl or Shift click, or clicking Select All and then clicking Unhide Selected.
Previously hidden events will again be listed in Events.
The list of events to unhide are illustrated in the following figure.
Figure 72 Unhide Selected events
Events
Unhide events 105

Events
106 Backup & Recovery Manager 1.2 User Guide
CHAPTER 7
Systems
Click Systems to view detailed information for all systems in the enterprise.
l Systems usage graph.......................................................................................... 108l Systems Display..................................................................................................108l Editing systems details....................................................................................... 110l Launching the native system consoles................................................................ 112l Managing Data Domain systems......................................................................... 115l Removing a system............................................................................................. 118l Adding or modifying customer information..........................................................119
Systems 107
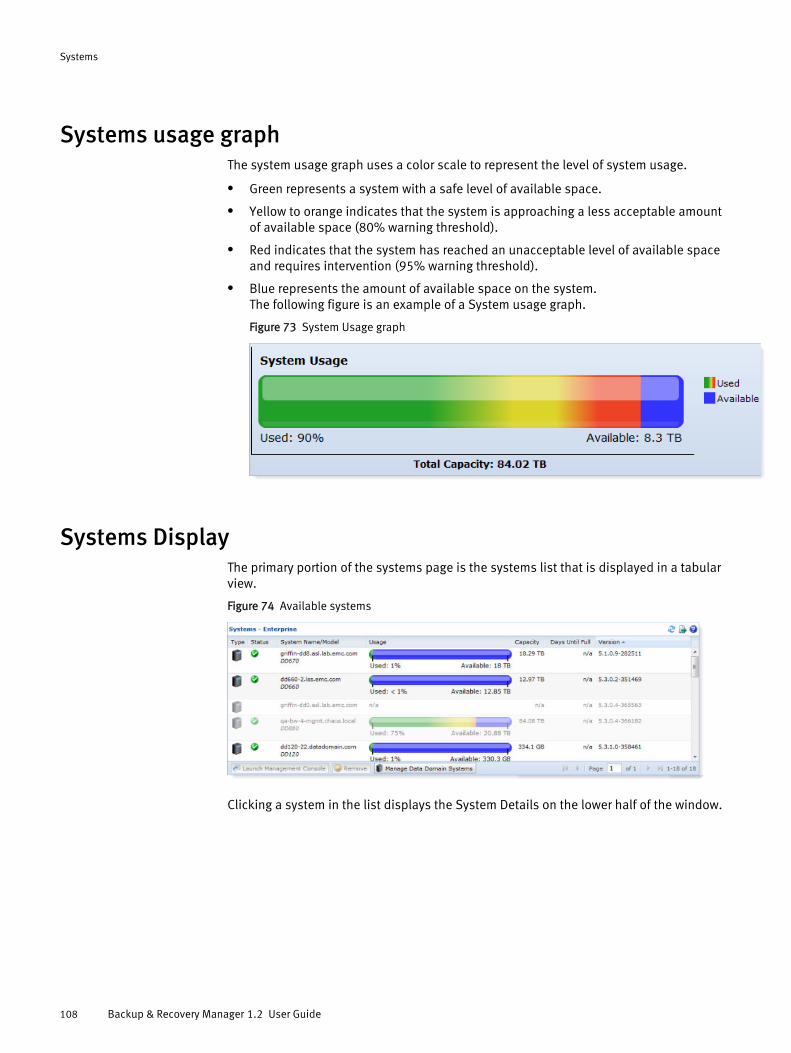
Systems usage graphThe system usage graph uses a color scale to represent the level of system usage.
l Green represents a system with a safe level of available space.
l Yellow to orange indicates that the system is approaching a less acceptable amountof available space (80% warning threshold).
l Red indicates that the system has reached an unacceptable level of available spaceand requires intervention (95% warning threshold).
l Blue represents the amount of available space on the system.The following figure is an example of a System usage graph.
Figure 73 System Usage graph
Systems DisplayThe primary portion of the systems page is the systems list that is displayed in a tabularview.
Figure 74 Available systems
Clicking a system in the list displays the System Details on the lower half of the window.
Systems
108 Backup & Recovery Manager 1.2 User Guide
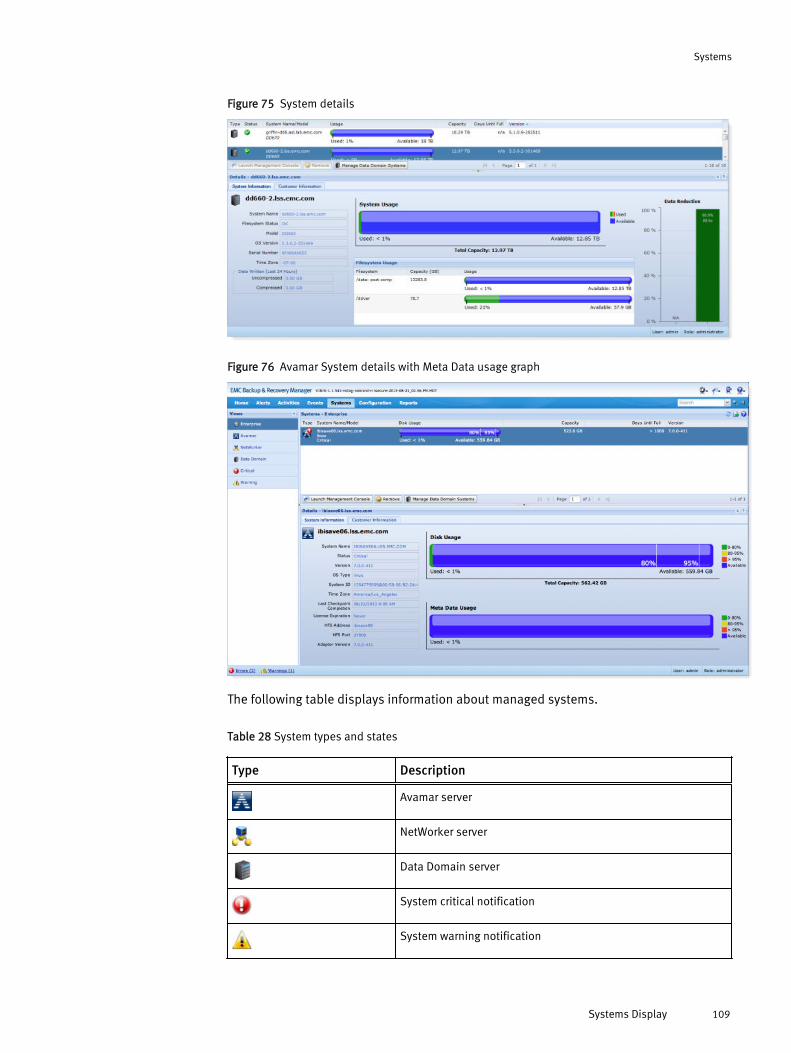
Figure 75 System details
Figure 76 Avamar System details with Meta Data usage graph
The following table displays information about managed systems.
Table 28 System types and states
Type Description
Avamar server
NetWorker server
Data Domain server
System critical notification
System warning notification
Systems
Systems Display 109
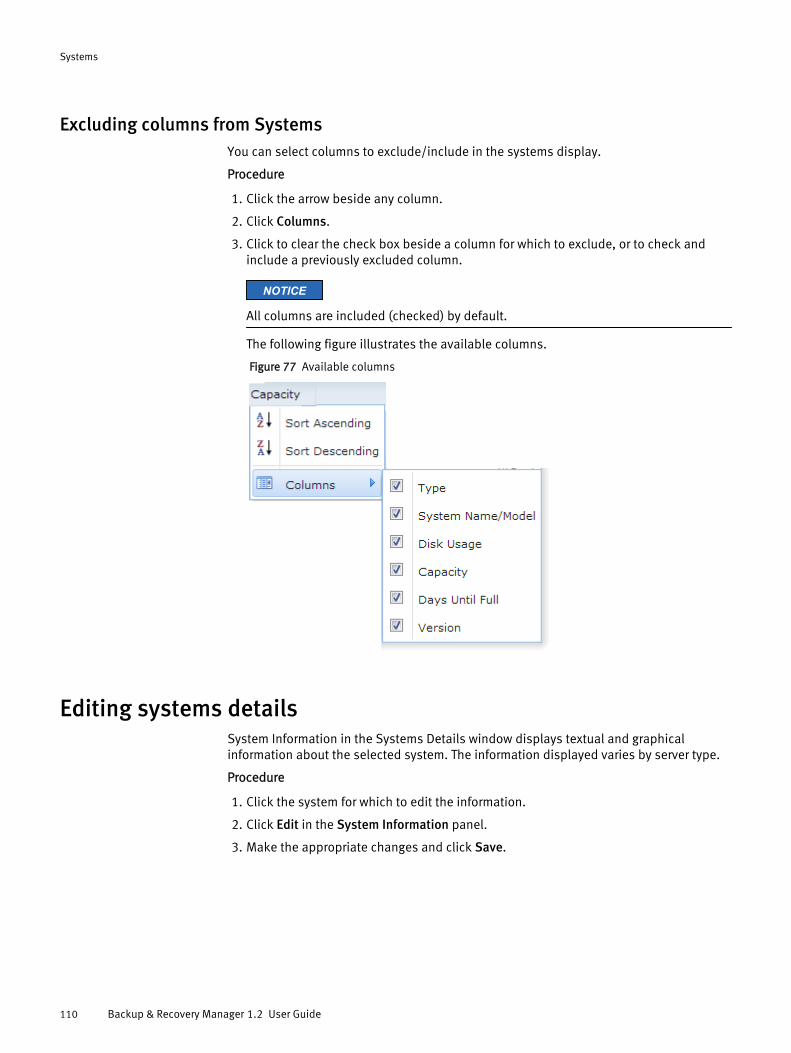
Excluding columns from SystemsYou can select columns to exclude/include in the systems display.
Procedure
1. Click the arrow beside any column.
2. Click Columns.
3. Click to clear the check box beside a column for which to exclude, or to check andinclude a previously excluded column.
NOTICE
All columns are included (checked) by default.
The following figure illustrates the available columns.
Figure 77 Available columns
Editing systems detailsSystem Information in the Systems Details window displays textual and graphicalinformation about the selected system. The information displayed varies by server type.
Procedure
1. Click the system for which to edit the information.
2. Click Edit in the System Information panel.
3. Make the appropriate changes and click Save.
Systems
110 Backup & Recovery Manager 1.2 User Guide
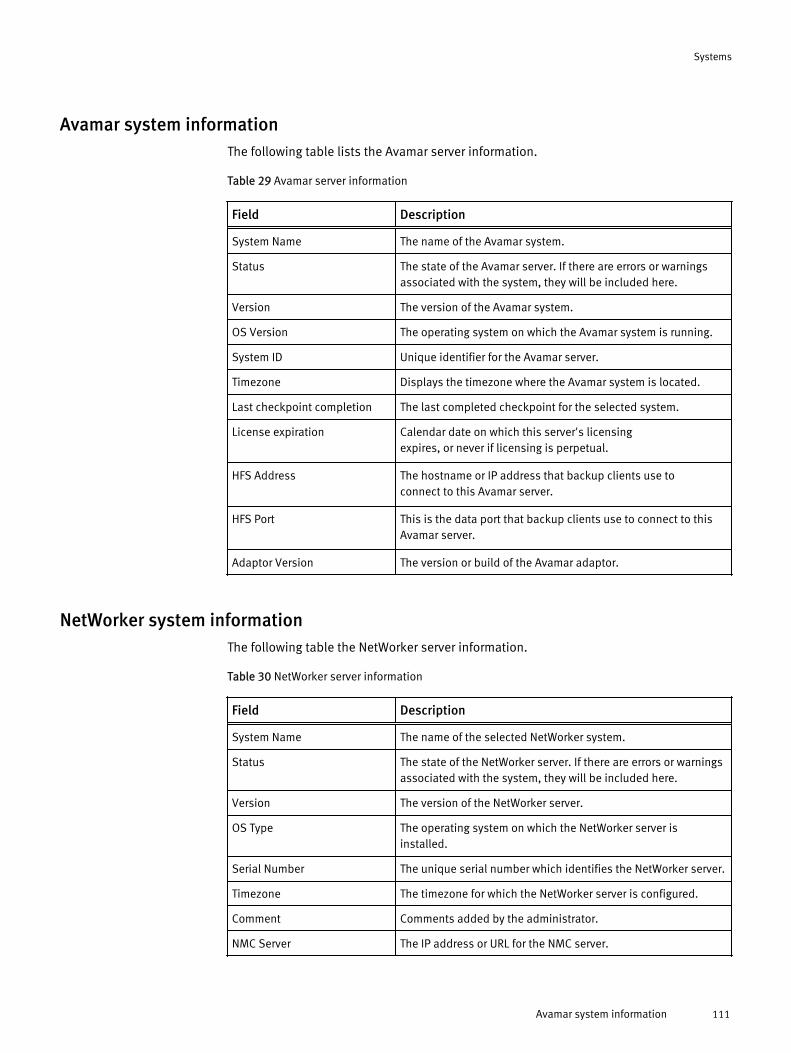
Avamar system informationThe following table lists the Avamar server information.
Table 29 Avamar server information
Field Description
System Name The name of the Avamar system.
Status The state of the Avamar server. If there are errors or warningsassociated with the system, they will be included here.
Version The version of the Avamar system.
OS Version The operating system on which the Avamar system is running.
System ID Unique identifier for the Avamar server.
Timezone Displays the timezone where the Avamar system is located.
Last checkpoint completion The last completed checkpoint for the selected system.
License expiration Calendar date on which this server's licensingexpires, or never if licensing is perpetual.
HFS Address The hostname or IP address that backup clients use toconnect to this Avamar server.
HFS Port This is the data port that backup clients use to connect to thisAvamar server.
Adaptor Version The version or build of the Avamar adaptor.
NetWorker system informationThe following table the NetWorker server information.
Table 30 NetWorker server information
Field Description
System Name The name of the selected NetWorker system.
Status The state of the NetWorker server. If there are errors or warningsassociated with the system, they will be included here.
Version The version of the NetWorker server.
OS Type The operating system on which the NetWorker server isinstalled.
Serial Number The unique serial number which identifies the NetWorker server.
Timezone The timezone for which the NetWorker server is configured.
Comment Comments added by the administrator.
NMC Server The IP address or URL for the NMC server.
Systems
Avamar system information 111
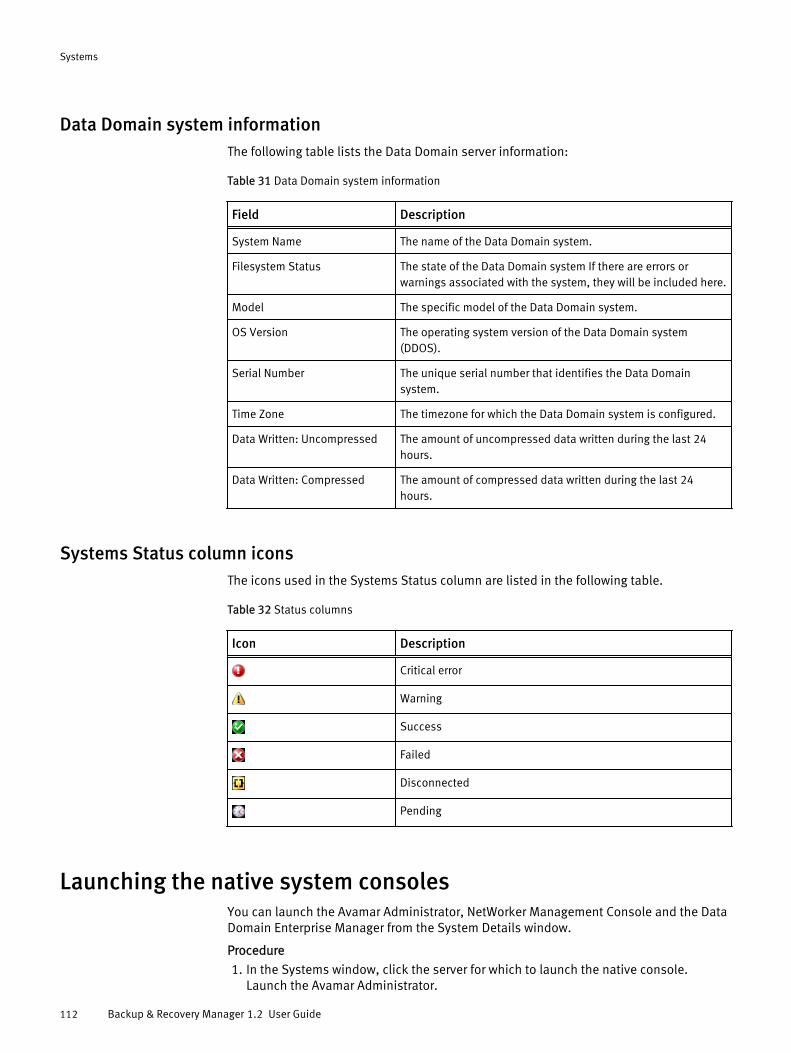
Data Domain system informationThe following table lists the Data Domain server information:
Table 31 Data Domain system information
Field Description
System Name The name of the Data Domain system.
Filesystem Status The state of the Data Domain system If there are errors orwarnings associated with the system, they will be included here.
Model The specific model of the Data Domain system.
OS Version The operating system version of the Data Domain system(DDOS).
Serial Number The unique serial number that identifies the Data Domainsystem.
Time Zone The timezone for which the Data Domain system is configured.
Data Written: Uncompressed The amount of uncompressed data written during the last 24hours.
Data Written: Compressed The amount of compressed data written during the last 24hours.
Systems Status column iconsThe icons used in the Systems Status column are listed in the following table.
Table 32 Status columns
Icon Description
Critical error
Warning
Success
Failed
Disconnected
Pending
Launching the native system consolesYou can launch the Avamar Administrator, NetWorker Management Console and the DataDomain Enterprise Manager from the System Details window.
Procedure
1. In the Systems window, click the server for which to launch the native console.Launch the Avamar Administrator.
Systems
112 Backup & Recovery Manager 1.2 User Guide
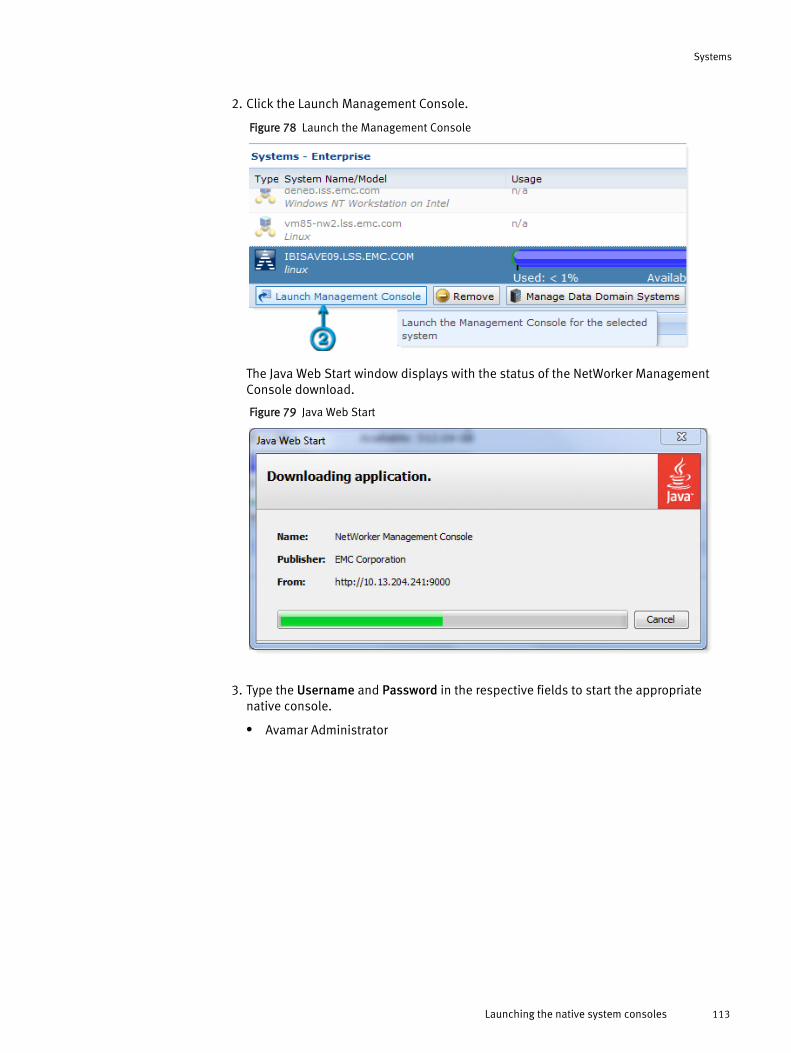
2. Click the Launch Management Console.
Figure 78 Launch the Management Console
The Java Web Start window displays with the status of the NetWorker ManagementConsole download.
Figure 79 Java Web Start
3. Type the Username and Password in the respective fields to start the appropriatenative console.
l Avamar Administrator
Systems
Launching the native system consoles 113
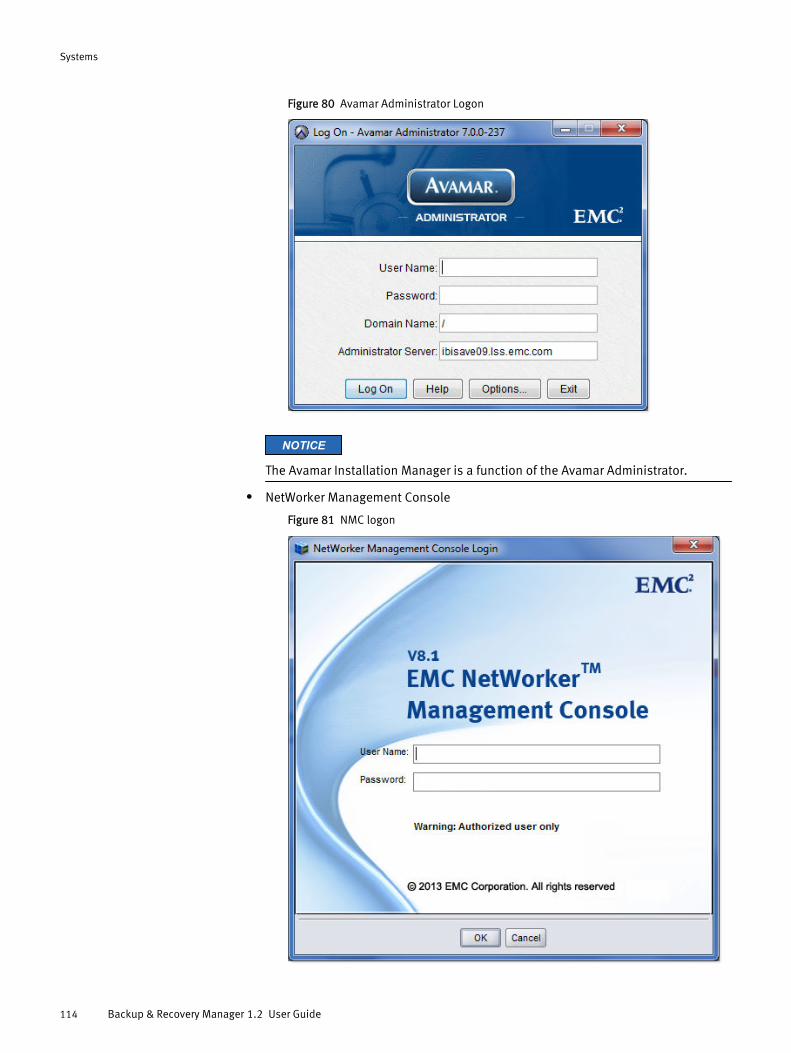
Figure 80 Avamar Administrator Logon
NOTICE
The Avamar Installation Manager is a function of the Avamar Administrator.
l NetWorker Management Console
Figure 81 NMC logon
Systems
114 Backup & Recovery Manager 1.2 User Guide
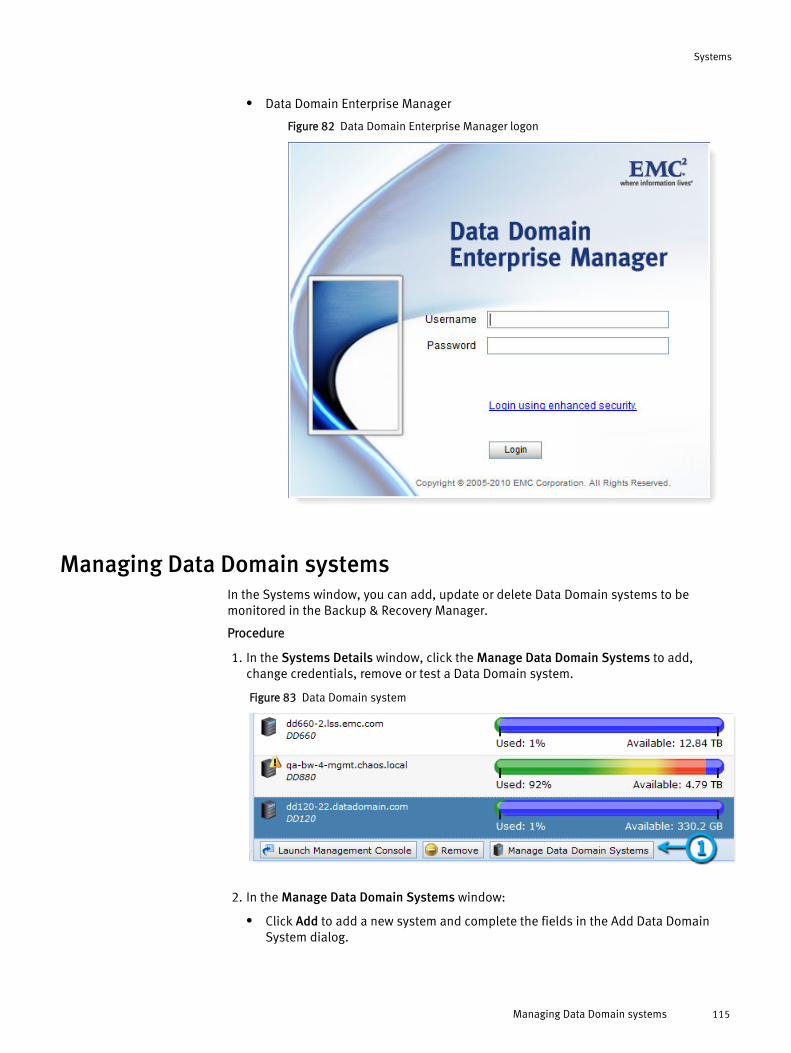
l Data Domain Enterprise Manager
Figure 82 Data Domain Enterprise Manager logon
Managing Data Domain systemsIn the Systems window, you can add, update or delete Data Domain systems to bemonitored in the Backup & Recovery Manager.
Procedure
1. In the Systems Details window, click the Manage Data Domain Systems to add,change credentials, remove or test a Data Domain system.
Figure 83 Data Domain system
2. In the Manage Data Domain Systems window:
l Click Add to add a new system and complete the fields in the Add Data DomainSystem dialog.
Systems
Managing Data Domain systems 115
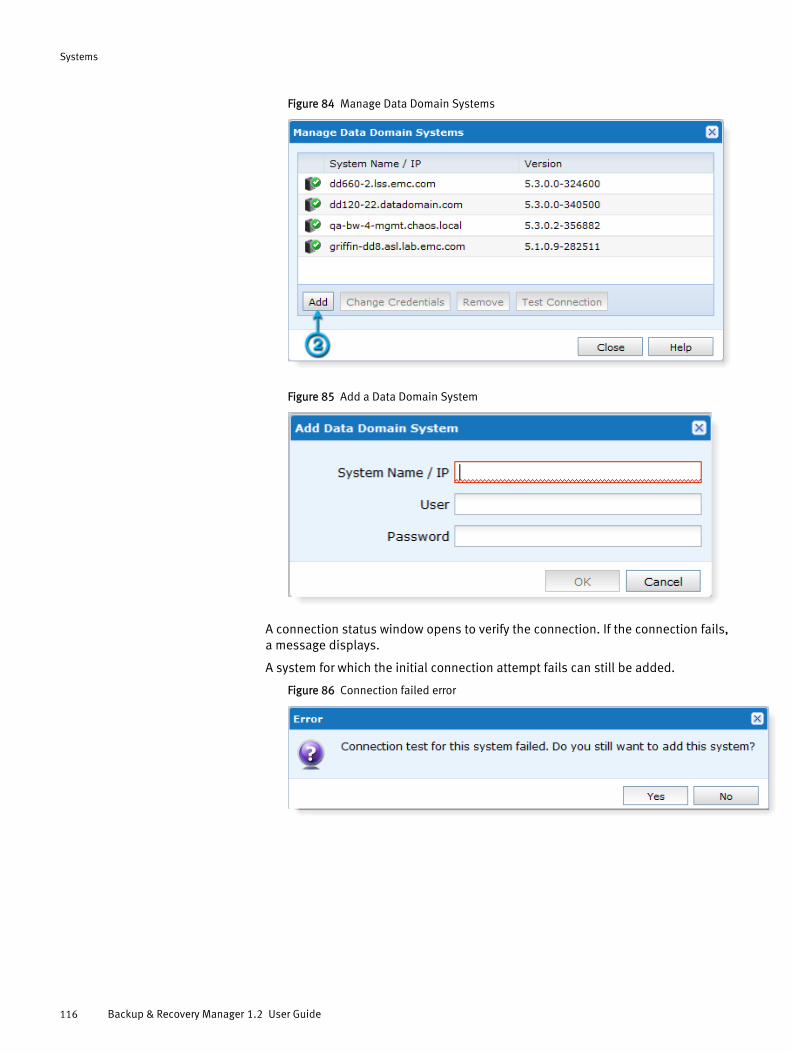
Figure 84 Manage Data Domain Systems
Figure 85 Add a Data Domain System
A connection status window opens to verify the connection. If the connection fails,a message displays.
A system for which the initial connection attempt fails can still be added.
Figure 86 Connection failed error
Systems
116 Backup & Recovery Manager 1.2 User Guide
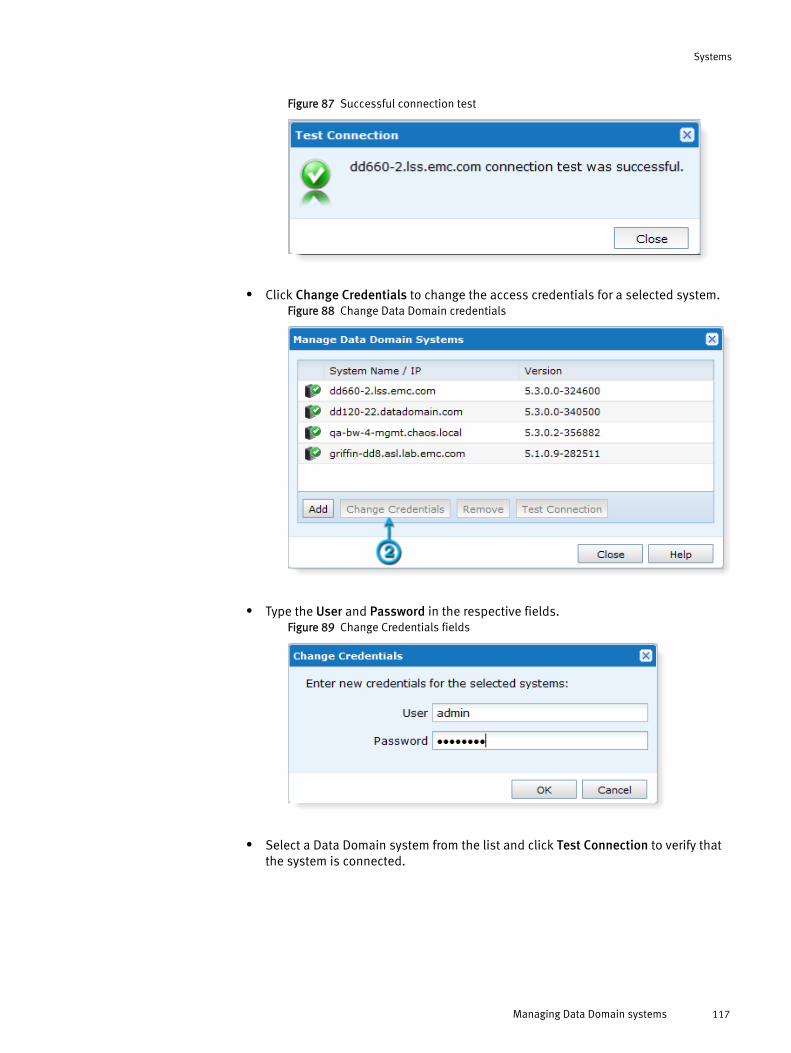
Figure 87 Successful connection test
l Click Change Credentials to change the access credentials for a selected system.Figure 88 Change Data Domain credentials
l Type the User and Password in the respective fields.Figure 89 Change Credentials fields
l Select a Data Domain system from the list and click Test Connection to verify thatthe system is connected.
Systems
Managing Data Domain systems 117
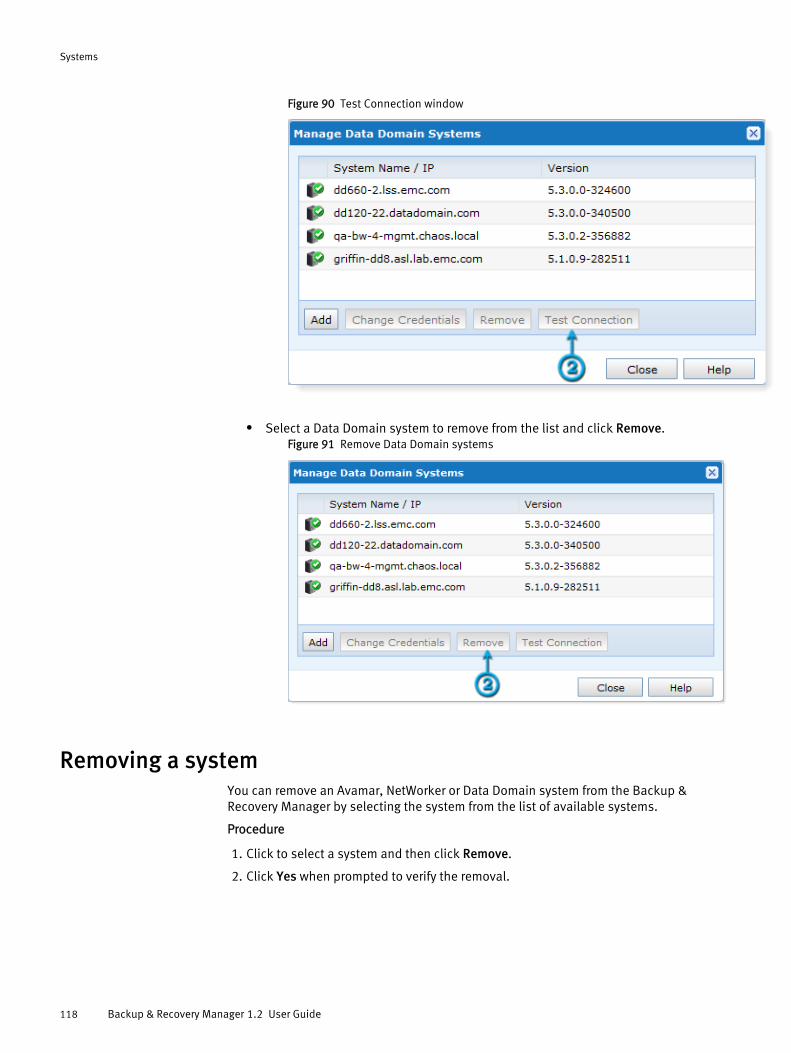
Figure 90 Test Connection window
l Select a Data Domain system to remove from the list and click Remove.Figure 91 Remove Data Domain systems
Removing a systemYou can remove an Avamar, NetWorker or Data Domain system from the Backup &Recovery Manager by selecting the system from the list of available systems.
Procedure
1. Click to select a system and then click Remove.
2. Click Yes when prompted to verify the removal.
Systems
118 Backup & Recovery Manager 1.2 User Guide
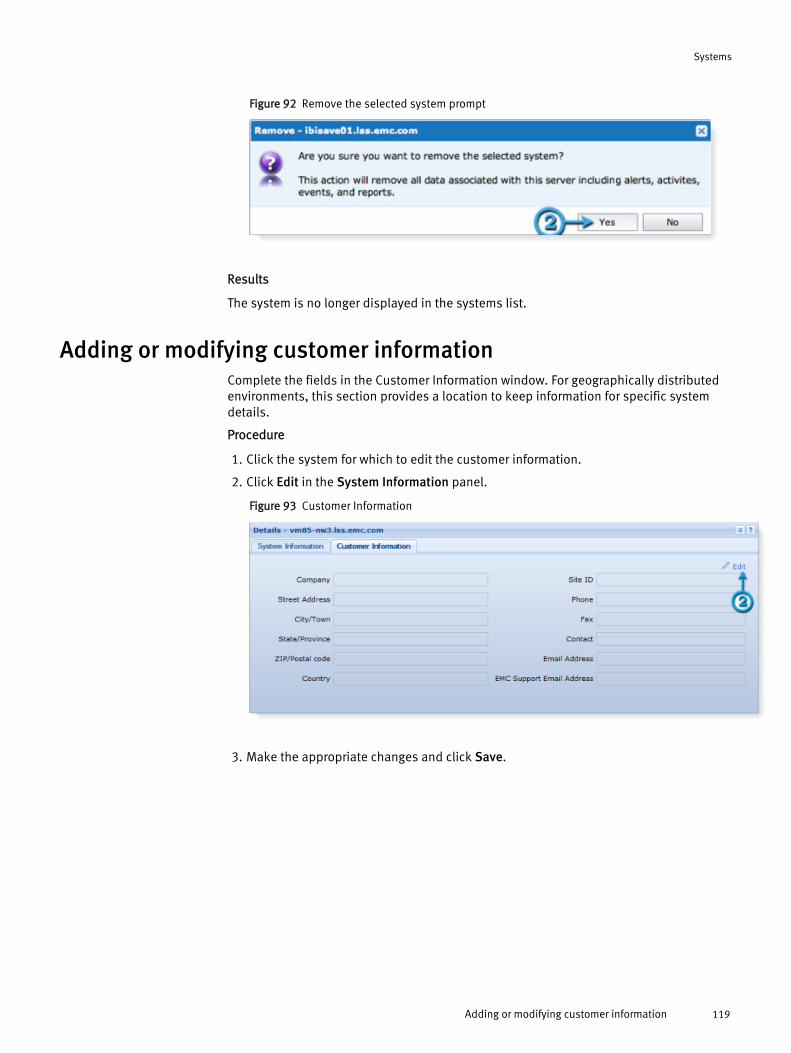
Figure 92 Remove the selected system prompt
Results
The system is no longer displayed in the systems list.
Adding or modifying customer informationComplete the fields in the Customer Information window. For geographically distributedenvironments, this section provides a location to keep information for specific systemdetails.
Procedure
1. Click the system for which to edit the customer information.
2. Click Edit in the System Information panel.
Figure 93 Customer Information
3. Make the appropriate changes and click Save.
Systems
Adding or modifying customer information 119

Systems
120 Backup & Recovery Manager 1.2 User Guide
CHAPTER 8
Configuration
l Overview of Configuration................................................................................... 122l Excluding and including columns from Configuration.......................................... 122l Adding or modifying Avamar replication jobs.......................................................123l Starting and stopping Avamar replication jobs.................................................... 127l Disabling and enabling replication jobs.............................................................. 127
Configuration 121
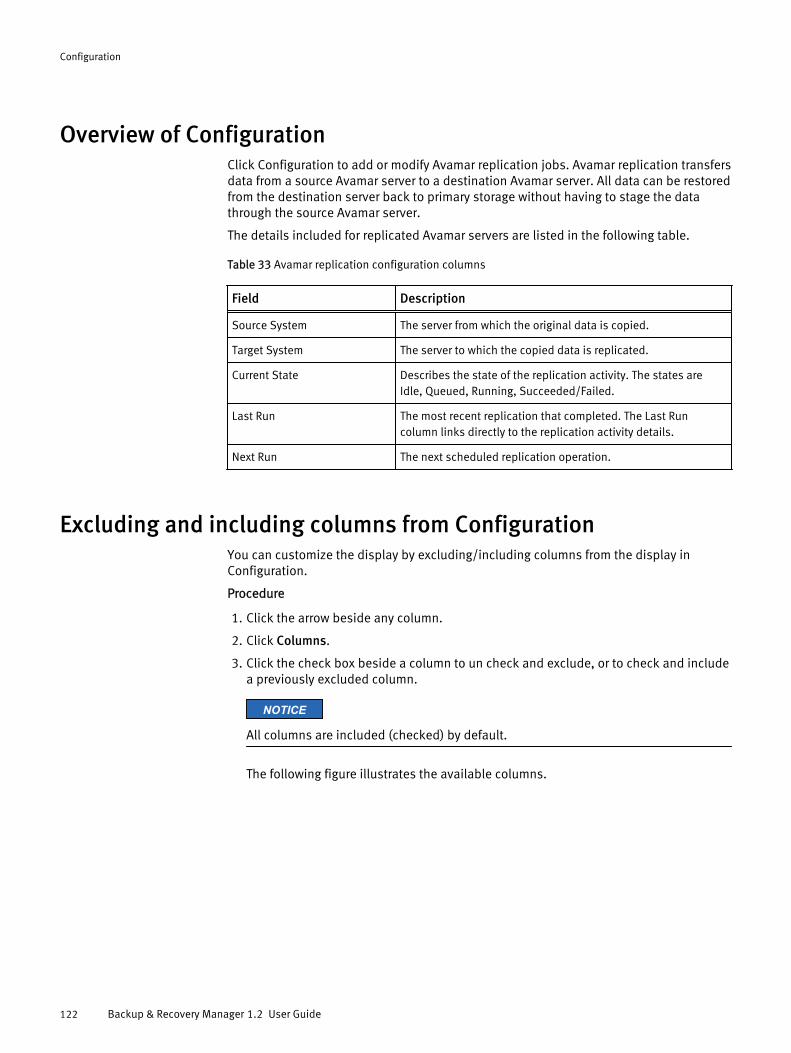
Overview of ConfigurationClick Configuration to add or modify Avamar replication jobs. Avamar replication transfersdata from a source Avamar server to a destination Avamar server. All data can be restoredfrom the destination server back to primary storage without having to stage the datathrough the source Avamar server.
The details included for replicated Avamar servers are listed in the following table.
Table 33 Avamar replication configuration columns
Field Description
Source System The server from which the original data is copied.
Target System The server to which the copied data is replicated.
Current State Describes the state of the replication activity. The states areIdle, Queued, Running, Succeeded/Failed.
Last Run The most recent replication that completed. The Last Runcolumn links directly to the replication activity details.
Next Run The next scheduled replication operation.
Excluding and including columns from ConfigurationYou can customize the display by excluding/including columns from the display inConfiguration.
Procedure
1. Click the arrow beside any column.
2. Click Columns.
3. Click the check box beside a column to un check and exclude, or to check and includea previously excluded column.
NOTICE
All columns are included (checked) by default.
The following figure illustrates the available columns.
Configuration
122 Backup & Recovery Manager 1.2 User Guide
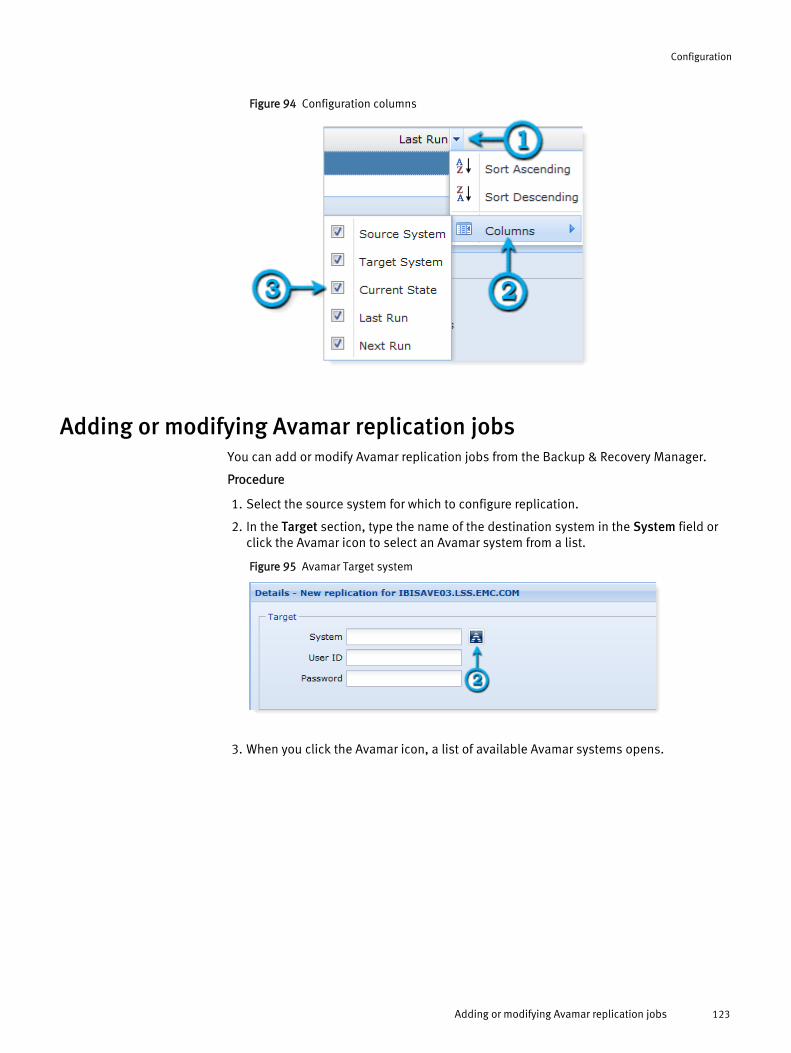
Figure 94 Configuration columns
Adding or modifying Avamar replication jobsYou can add or modify Avamar replication jobs from the Backup & Recovery Manager.
Procedure
1. Select the source system for which to configure replication.
2. In the Target section, type the name of the destination system in the System field orclick the Avamar icon to select an Avamar system from a list.
Figure 95 Avamar Target system
3. When you click the Avamar icon, a list of available Avamar systems opens.
Configuration
Adding or modifying Avamar replication jobs 123
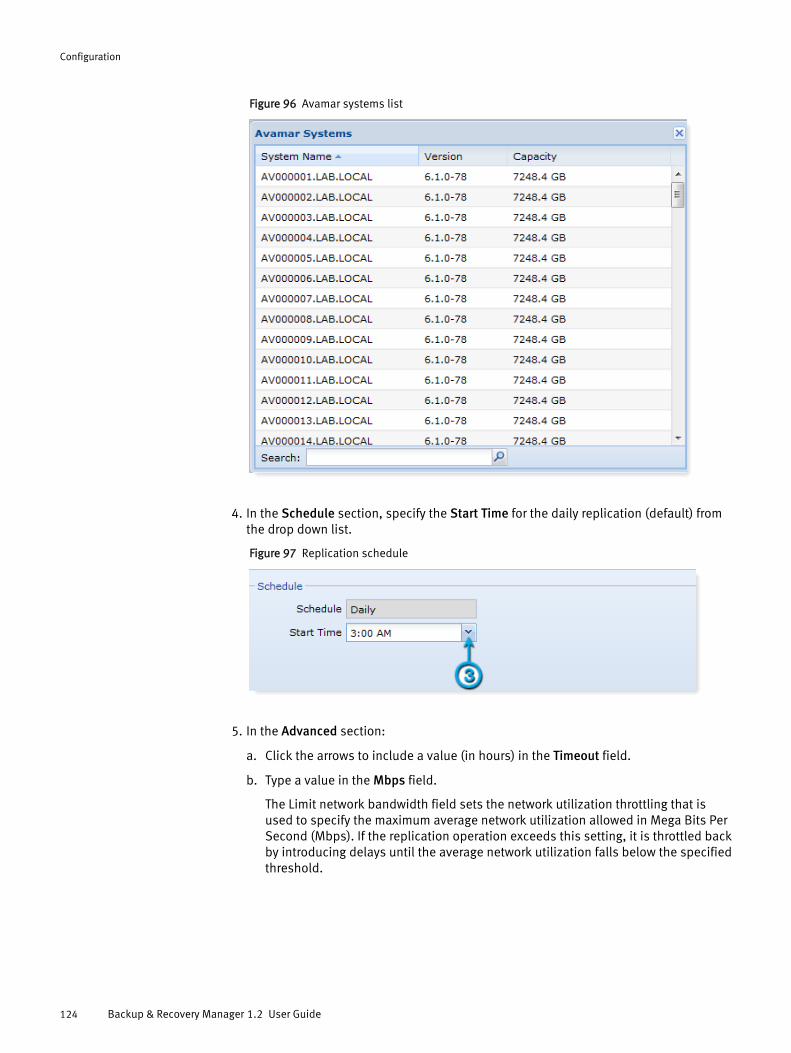
Figure 96 Avamar systems list
4. In the Schedule section, specify the Start Time for the daily replication (default) fromthe drop down list.
Figure 97 Replication schedule
5. In the Advanced section:
a. Click the arrows to include a value (in hours) in the Timeout field.
b. Type a value in the Mbps field.
The Limit network bandwidth field sets the network utilization throttling that isused to specify the maximum average network utilization allowed in Mega Bits PerSecond (Mbps). If the replication operation exceeds this setting, it is throttled backby introducing delays until the average network utilization falls below the specifiedthreshold.
Configuration
124 Backup & Recovery Manager 1.2 User Guide
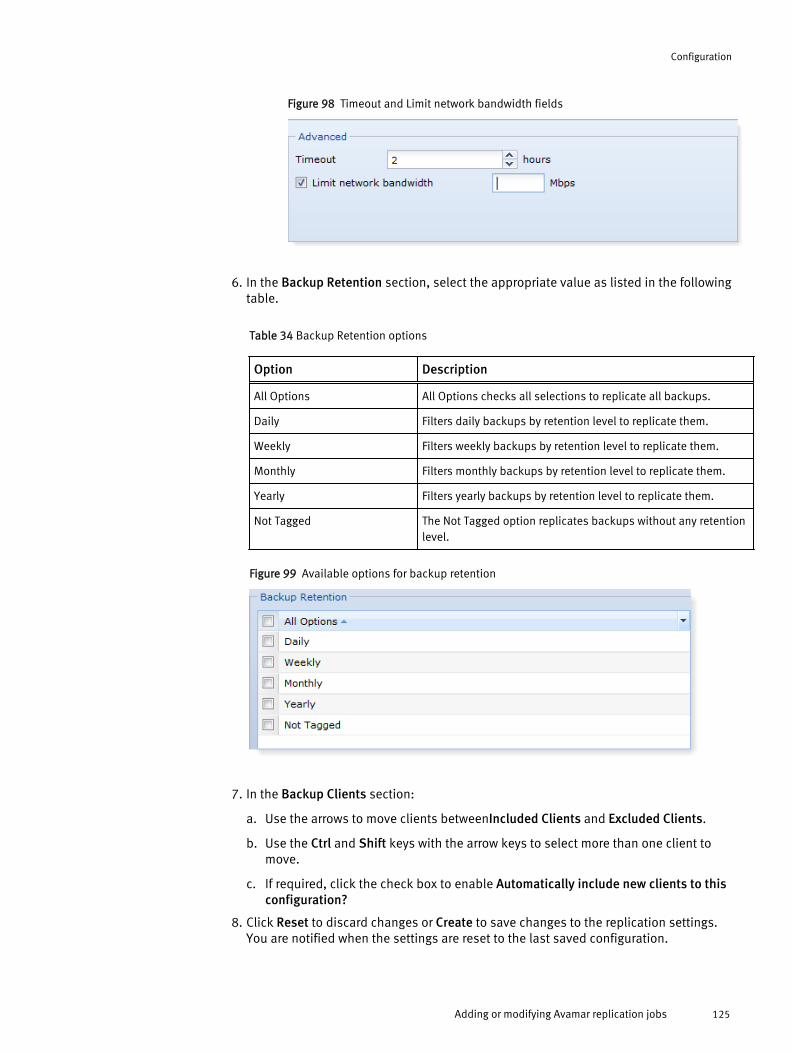
Figure 98 Timeout and Limit network bandwidth fields
6. In the Backup Retention section, select the appropriate value as listed in the followingtable.
Table 34 Backup Retention options
Option Description
All Options All Options checks all selections to replicate all backups.
Daily Filters daily backups by retention level to replicate them.
Weekly Filters weekly backups by retention level to replicate them.
Monthly Filters monthly backups by retention level to replicate them.
Yearly Filters yearly backups by retention level to replicate them.
Not Tagged The Not Tagged option replicates backups without any retentionlevel.
Figure 99 Available options for backup retention
7. In the Backup Clients section:
a. Use the arrows to move clients betweenIncluded Clients and Excluded Clients.
b. Use the Ctrl and Shift keys with the arrow keys to select more than one client tomove.
c. If required, click the check box to enable Automatically include new clients to thisconfiguration?
8. Click Reset to discard changes or Create to save changes to the replication settings.You are notified when the settings are reset to the last saved configuration.
Configuration
Adding or modifying Avamar replication jobs 125
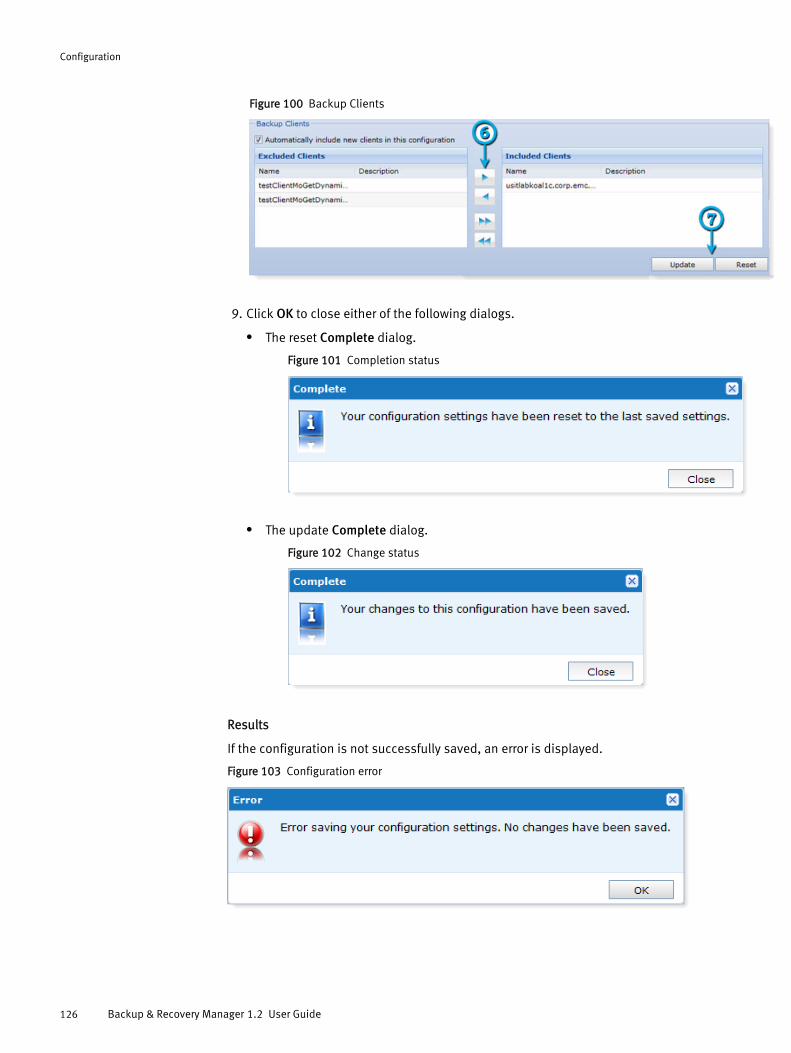
Figure 100 Backup Clients
9. Click OK to close either of the following dialogs.
l The reset Complete dialog.
Figure 101 Completion status
l The update Complete dialog.
Figure 102 Change status
Results
If the configuration is not successfully saved, an error is displayed.
Figure 103 Configuration error
Configuration
126 Backup & Recovery Manager 1.2 User Guide
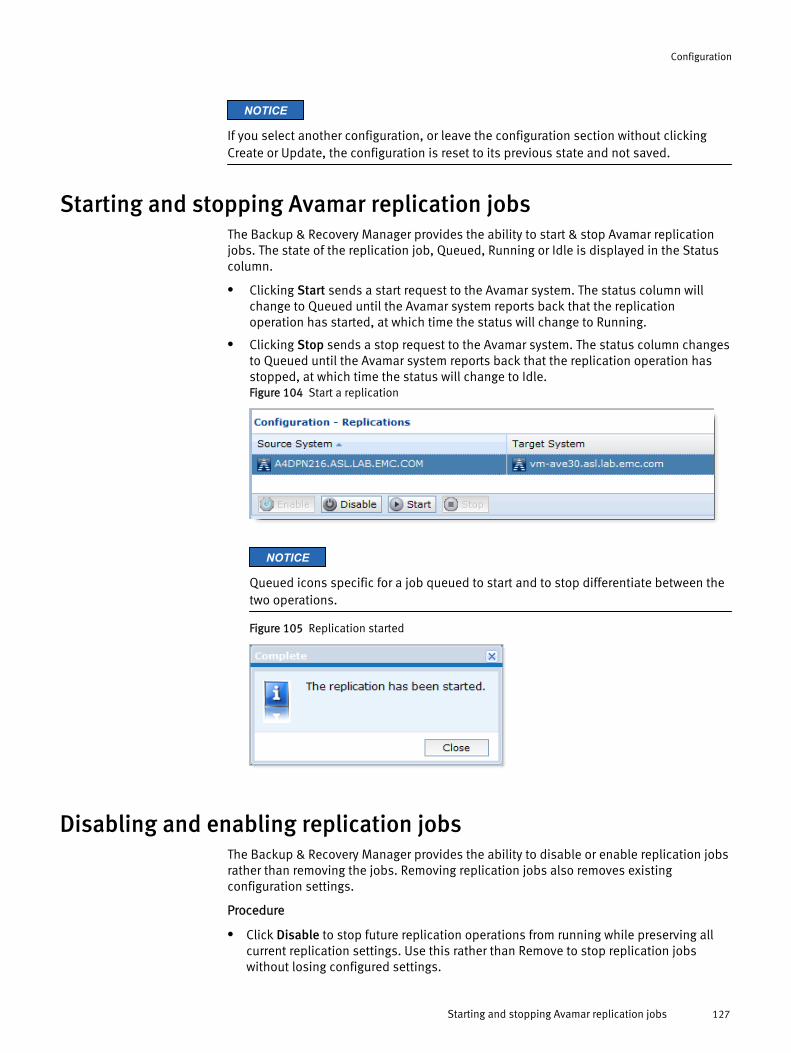
NOTICE
If you select another configuration, or leave the configuration section without clickingCreate or Update, the configuration is reset to its previous state and not saved.
Starting and stopping Avamar replication jobsThe Backup & Recovery Manager provides the ability to start & stop Avamar replicationjobs. The state of the replication job, Queued, Running or Idle is displayed in the Statuscolumn.
l Clicking Start sends a start request to the Avamar system. The status column willchange to Queued until the Avamar system reports back that the replicationoperation has started, at which time the status will change to Running.
l Clicking Stop sends a stop request to the Avamar system. The status column changesto Queued until the Avamar system reports back that the replication operation hasstopped, at which time the status will change to Idle.Figure 104 Start a replication
NOTICE
Queued icons specific for a job queued to start and to stop differentiate between thetwo operations.
Figure 105 Replication started
Disabling and enabling replication jobsThe Backup & Recovery Manager provides the ability to disable or enable replication jobsrather than removing the jobs. Removing replication jobs also removes existingconfiguration settings.
Procedure
l Click Disable to stop future replication operations from running while preserving allcurrent replication settings. Use this rather than Remove to stop replication jobswithout losing configured settings.
Configuration
Starting and stopping Avamar replication jobs 127

l Click Enable to begin running configured replication jobs again as previouslyscheduled.
Configuration
128 Backup & Recovery Manager 1.2 User Guide
CHAPTER 9
Settings
l Introduction to settings....................................................................................... 130l User Administration............................................................................................ 130l Preferences......................................................................................................... 135l Changing a password.......................................................................................... 140l Resetting the admin password............................................................................ 141
Settings 129
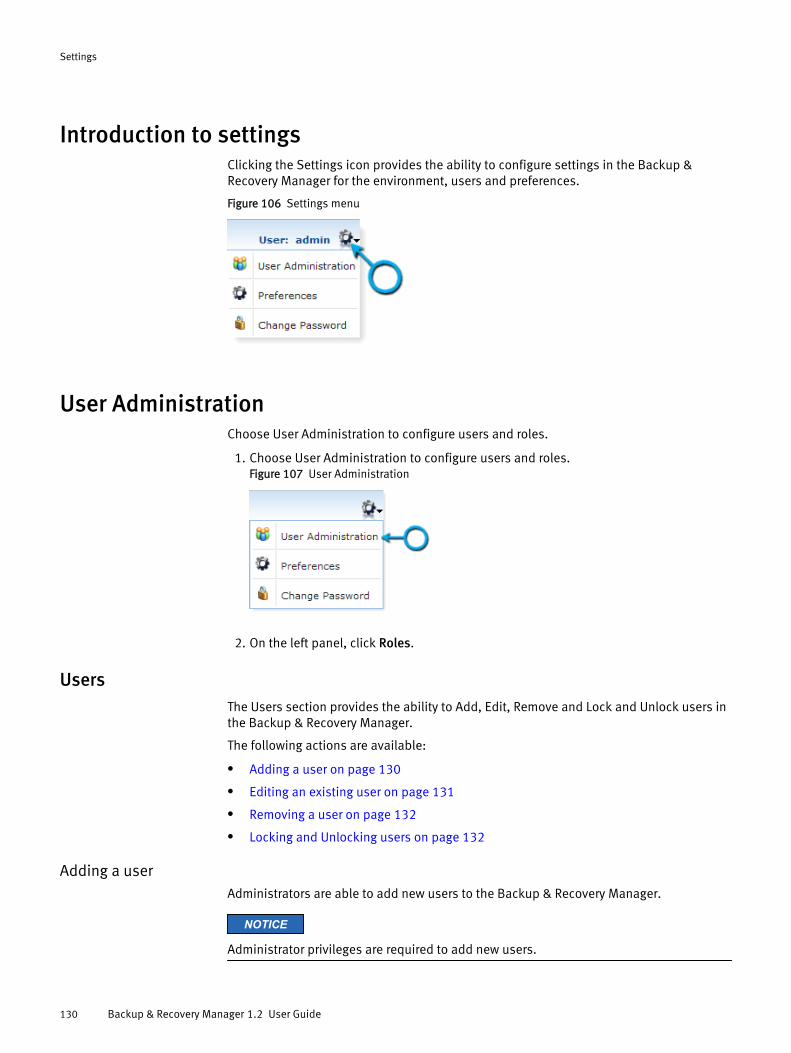
Introduction to settingsClicking the Settings icon provides the ability to configure settings in the Backup &Recovery Manager for the environment, users and preferences.
Figure 106 Settings menu
User AdministrationChoose User Administration to configure users and roles.
1. Choose User Administration to configure users and roles.Figure 107 User Administration
2. On the left panel, click Roles.
UsersThe Users section provides the ability to Add, Edit, Remove and Lock and Unlock users inthe Backup & Recovery Manager.
The following actions are available:
l Adding a user on page 130
l Editing an existing user on page 131
l Removing a user on page 132
l Locking and Unlocking users on page 132
Adding a userAdministrators are able to add new users to the Backup & Recovery Manager.
NOTICE
Administrator privileges are required to add new users.
Settings
130 Backup & Recovery Manager 1.2 User Guide
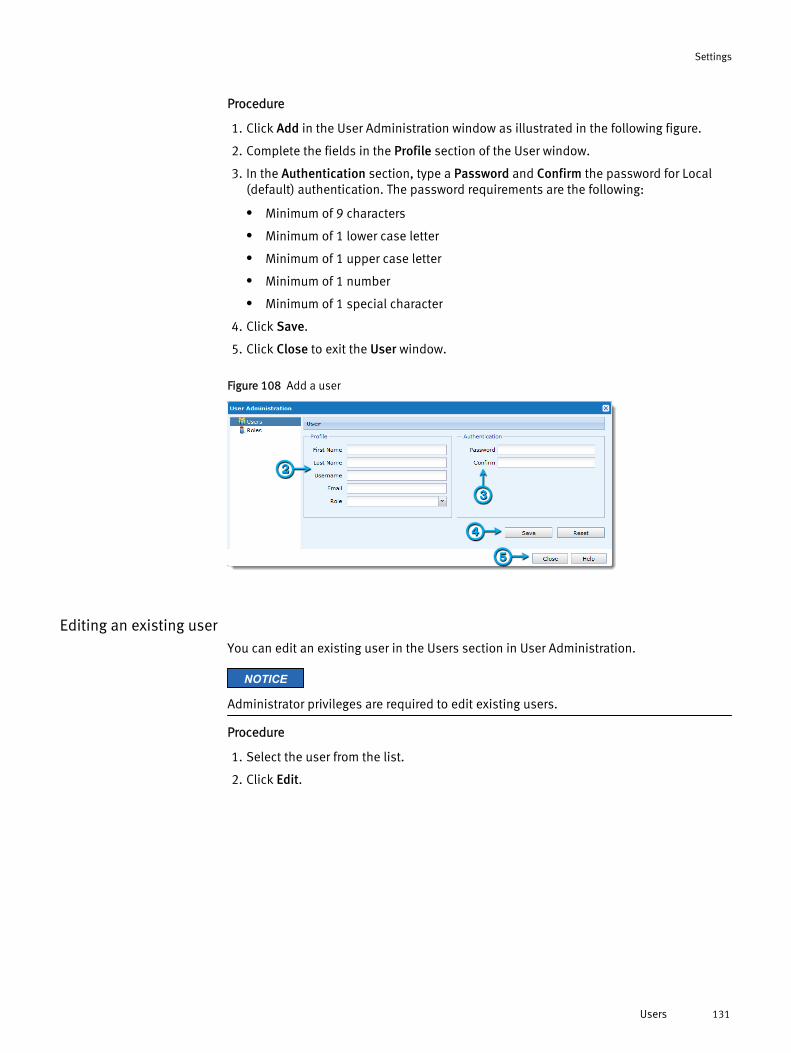
Procedure
1. Click Add in the User Administration window as illustrated in the following figure.
2. Complete the fields in the Profile section of the User window.
3. In the Authentication section, type a Password and Confirm the password for Local(default) authentication. The password requirements are the following:
l Minimum of 9 characters
l Minimum of 1 lower case letter
l Minimum of 1 upper case letter
l Minimum of 1 number
l Minimum of 1 special character
4. Click Save.
5. Click Close to exit the User window.
Figure 108 Add a user
Editing an existing userYou can edit an existing user in the Users section in User Administration.
NOTICE
Administrator privileges are required to edit existing users.
Procedure
1. Select the user from the list.
2. Click Edit.
Settings
Users 131
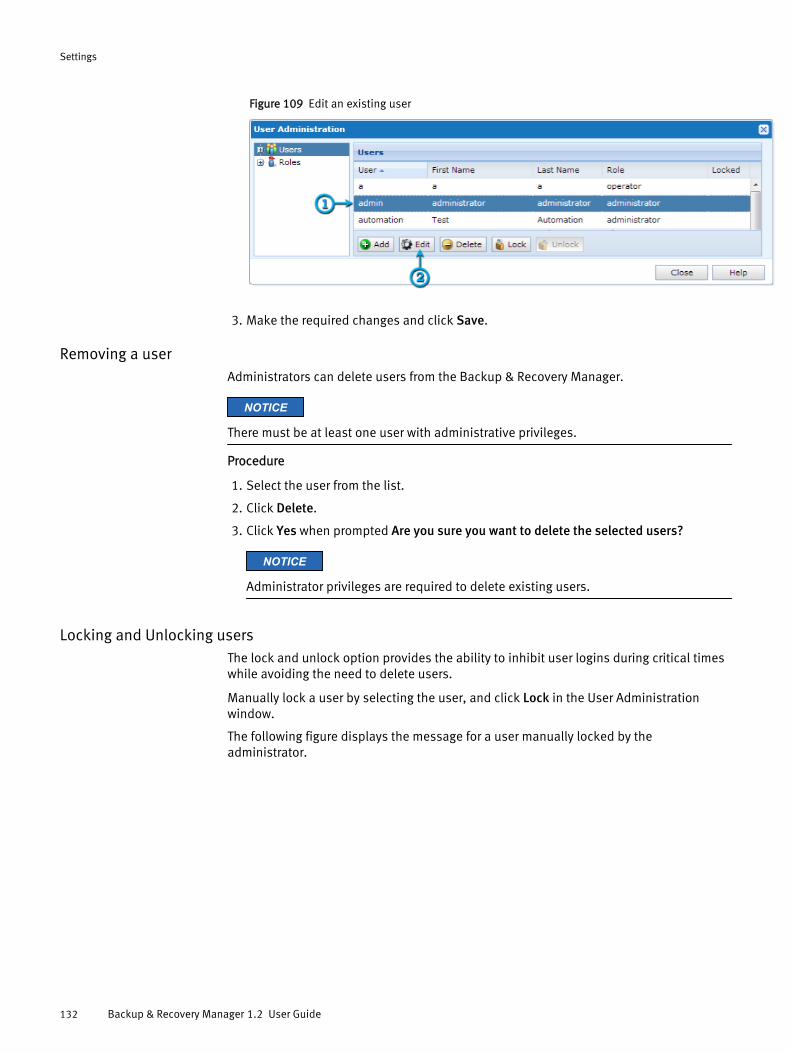
Figure 109 Edit an existing user
3. Make the required changes and click Save.
Removing a userAdministrators can delete users from the Backup & Recovery Manager.
NOTICE
There must be at least one user with administrative privileges.
Procedure
1. Select the user from the list.
2. Click Delete.
3. Click Yes when prompted Are you sure you want to delete the selected users?
NOTICE
Administrator privileges are required to delete existing users.
Locking and Unlocking usersThe lock and unlock option provides the ability to inhibit user logins during critical timeswhile avoiding the need to delete users.
Manually lock a user by selecting the user, and click Lock in the User Administrationwindow.
The following figure displays the message for a user manually locked by theadministrator.
Settings
132 Backup & Recovery Manager 1.2 User Guide
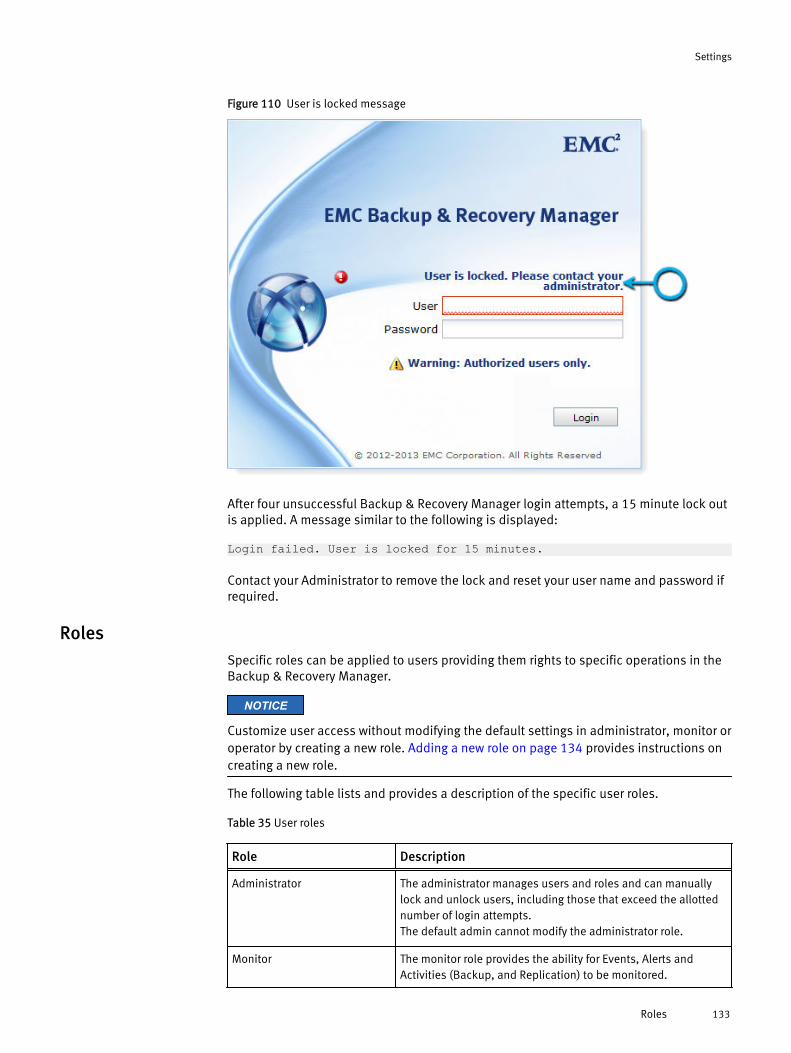
Figure 110 User is locked message
After four unsuccessful Backup & Recovery Manager login attempts, a 15 minute lock outis applied. A message similar to the following is displayed:
Login failed. User is locked for 15 minutes.
Contact your Administrator to remove the lock and reset your user name and password ifrequired.
RolesSpecific roles can be applied to users providing them rights to specific operations in theBackup & Recovery Manager.
NOTICE
Customize user access without modifying the default settings in administrator, monitor oroperator by creating a new role. Adding a new role on page 134 provides instructions oncreating a new role.
The following table lists and provides a description of the specific user roles.
Table 35 User roles
Role Description
Administrator The administrator manages users and roles and can manuallylock and unlock users, including those that exceed the allottednumber of login attempts.The default admin cannot modify the administrator role.
Monitor The monitor role provides the ability for Events, Alerts andActivities (Backup, and Replication) to be monitored.
Settings
Roles 133

Table 35 User roles (continued)
Role Description
Operator The operator can manage Systems, Reports and is able toperform all monitor functions as well.
Customize the monitor and operator user roles by adding or removing access by using theavailable attribute check boxes.
If you attempt to modify or remove the administrator role, an error is displayed.
Figure 111 Modify Administrator role error
Adding a new roleYou can add a new role to customize user access without changing the administrator,monitor or operator role defaults.
Procedure
1. Click Add.
2. Select the attributes for the new role, and click Save.
Figure 112 New role
Settings
134 Backup & Recovery Manager 1.2 User Guide
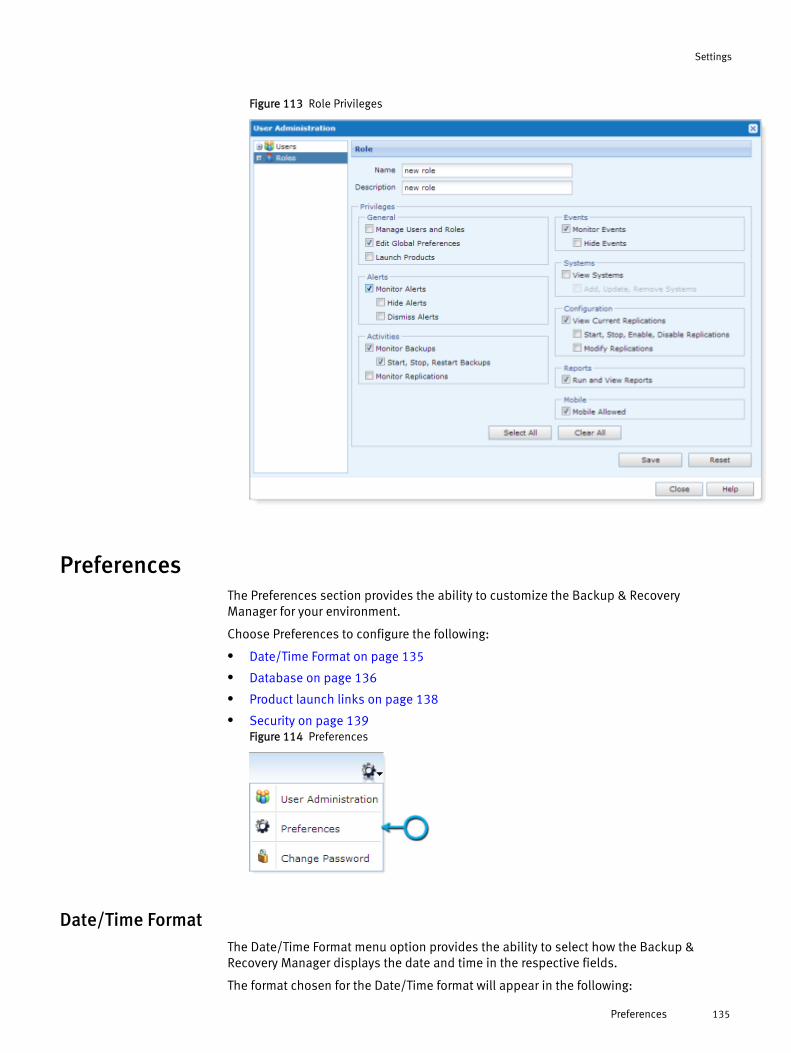
Figure 113 Role Privileges
PreferencesThe Preferences section provides the ability to customize the Backup & RecoveryManager for your environment.
Choose Preferences to configure the following:
l Date/Time Format on page 135
l Database on page 136
l Product launch links on page 138
l Security on page 139Figure 114 Preferences
Date/Time FormatThe Date/Time Format menu option provides the ability to select how the Backup &Recovery Manager displays the date and time in the respective fields.
The format chosen for the Date/Time format will appear in the following:
Settings
Preferences 135
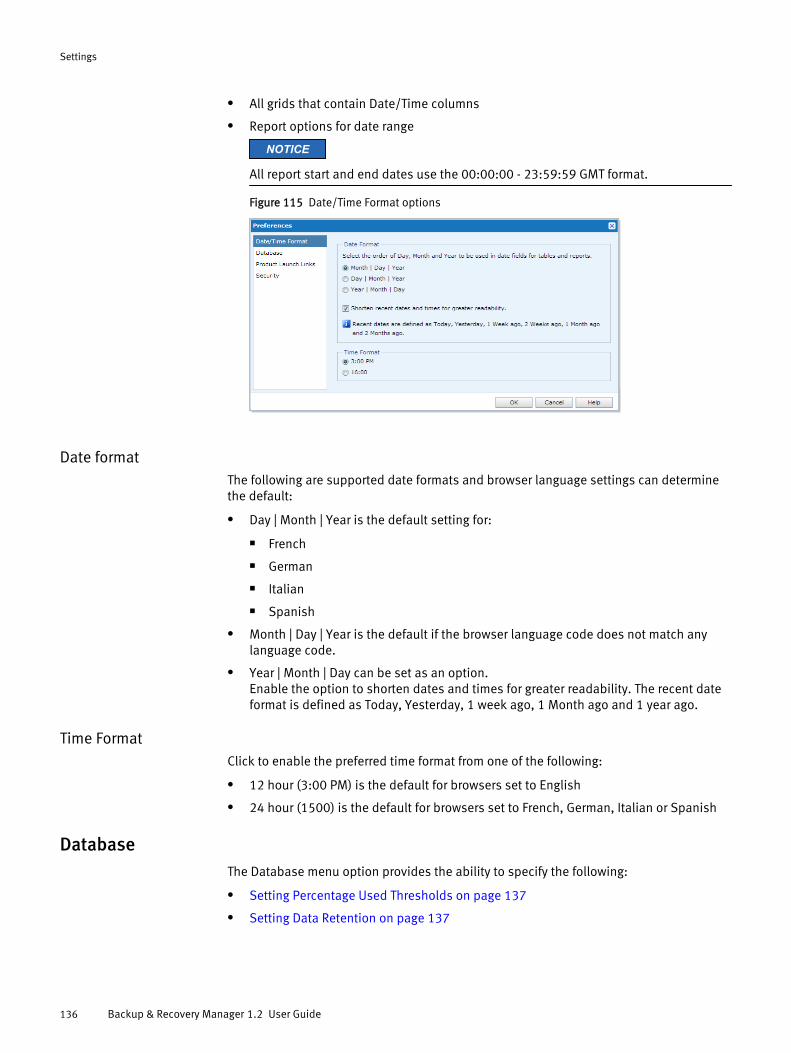
l All grids that contain Date/Time columns
l Report options for date range
NOTICE
All report start and end dates use the 00:00:00 - 23:59:59 GMT format.
Figure 115 Date/Time Format options
Date formatThe following are supported date formats and browser language settings can determinethe default:
l Day | Month | Year is the default setting for:
n French
n German
n Italian
n Spanish
l Month | Day | Year is the default if the browser language code does not match anylanguage code.
l Year | Month | Day can be set as an option.Enable the option to shorten dates and times for greater readability. The recent dateformat is defined as Today, Yesterday, 1 week ago, 1 Month ago and 1 year ago.
Time FormatClick to enable the preferred time format from one of the following:
l 12 hour (3:00 PM) is the default for browsers set to English
l 24 hour (1500) is the default for browsers set to French, German, Italian or Spanish
DatabaseThe Database menu option provides the ability to specify the following:
l Setting Percentage Used Thresholds on page 137
l Setting Data Retention on page 137
Settings
136 Backup & Recovery Manager 1.2 User Guide
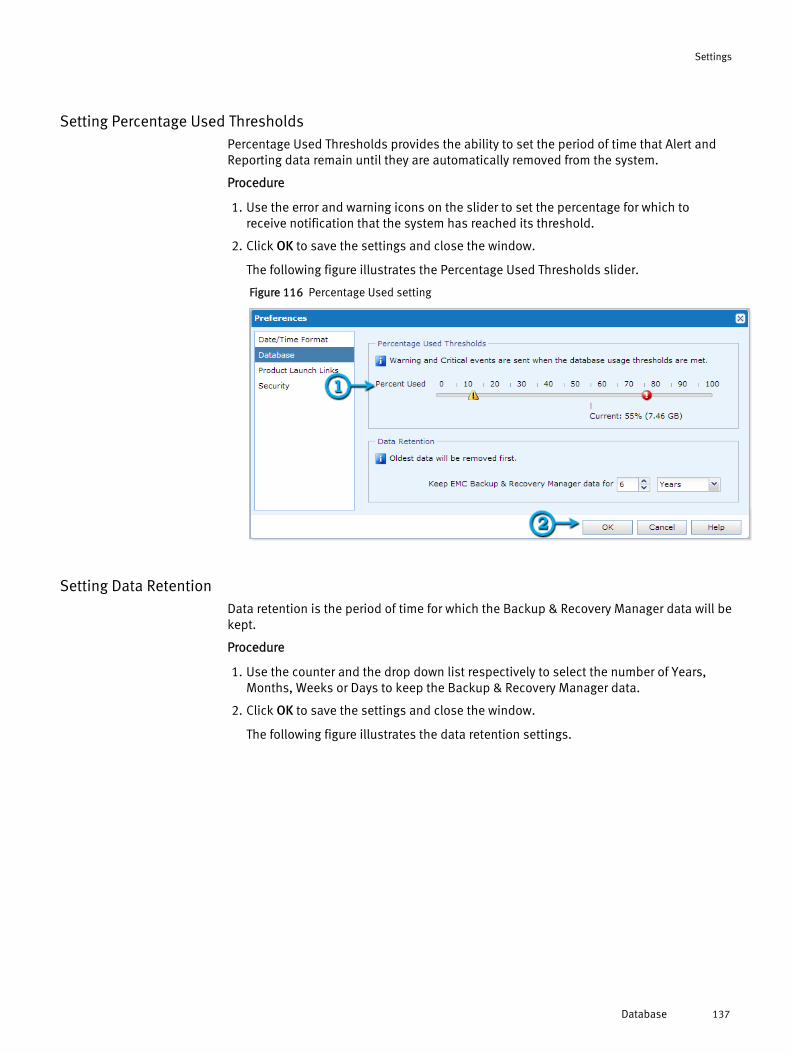
Setting Percentage Used ThresholdsPercentage Used Thresholds provides the ability to set the period of time that Alert andReporting data remain until they are automatically removed from the system.
Procedure
1. Use the error and warning icons on the slider to set the percentage for which toreceive notification that the system has reached its threshold.
2. Click OK to save the settings and close the window.
The following figure illustrates the Percentage Used Thresholds slider.
Figure 116 Percentage Used setting
Setting Data RetentionData retention is the period of time for which the Backup & Recovery Manager data will bekept.
Procedure
1. Use the counter and the drop down list respectively to select the number of Years,Months, Weeks or Days to keep the Backup & Recovery Manager data.
2. Click OK to save the settings and close the window.
The following figure illustrates the data retention settings.
Settings
Database 137
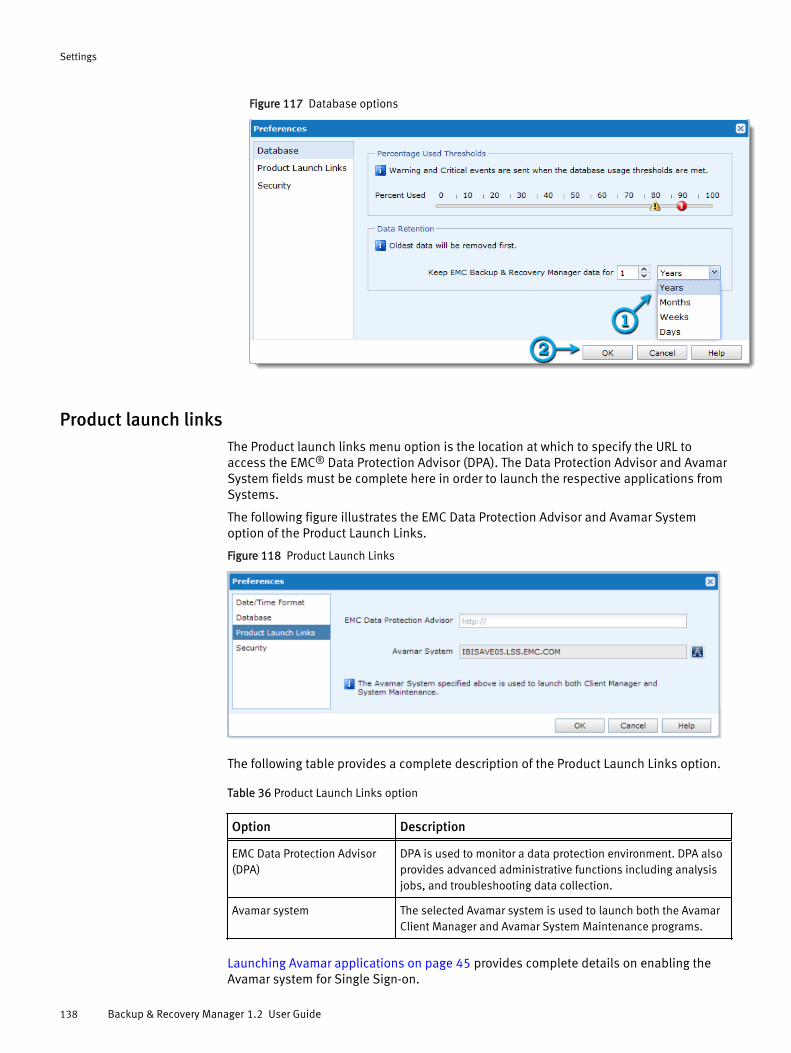
Figure 117 Database options
Product launch linksThe Product launch links menu option is the location at which to specify the URL toaccess the EMC® Data Protection Advisor (DPA). The Data Protection Advisor and AvamarSystem fields must be complete here in order to launch the respective applications fromSystems.
The following figure illustrates the EMC Data Protection Advisor and Avamar Systemoption of the Product Launch Links.
Figure 118 Product Launch Links
The following table provides a complete description of the Product Launch Links option.
Table 36 Product Launch Links option
Option Description
EMC Data Protection Advisor(DPA)
DPA is used to monitor a data protection environment. DPA alsoprovides advanced administrative functions including analysisjobs, and troubleshooting data collection.
Avamar system The selected Avamar system is used to launch both the AvamarClient Manager and Avamar System Maintenance programs.
Launching Avamar applications on page 45 provides complete details on enabling theAvamar system for Single Sign-on.
Settings
138 Backup & Recovery Manager 1.2 User Guide
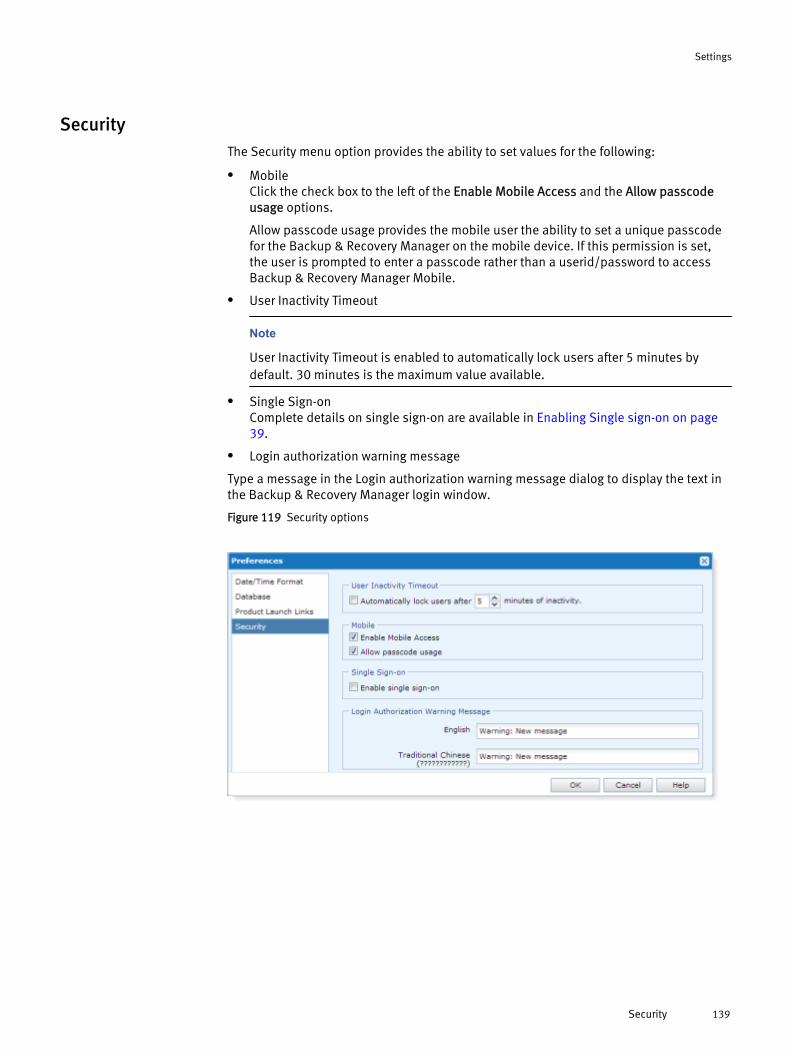
SecurityThe Security menu option provides the ability to set values for the following:
l MobileClick the check box to the left of the Enable Mobile Access and the Allow passcodeusage options.
Allow passcode usage provides the mobile user the ability to set a unique passcodefor the Backup & Recovery Manager on the mobile device. If this permission is set,the user is prompted to enter a passcode rather than a userid/password to accessBackup & Recovery Manager Mobile.
l User Inactivity Timeout
Note
User Inactivity Timeout is enabled to automatically lock users after 5 minutes bydefault. 30 minutes is the maximum value available.
l Single Sign-onComplete details on single sign-on are available in Enabling Single sign-on on page39.
l Login authorization warning message
Type a message in the Login authorization warning message dialog to display the text inthe Backup & Recovery Manager login window.
Figure 119 Security options
Settings
Security 139
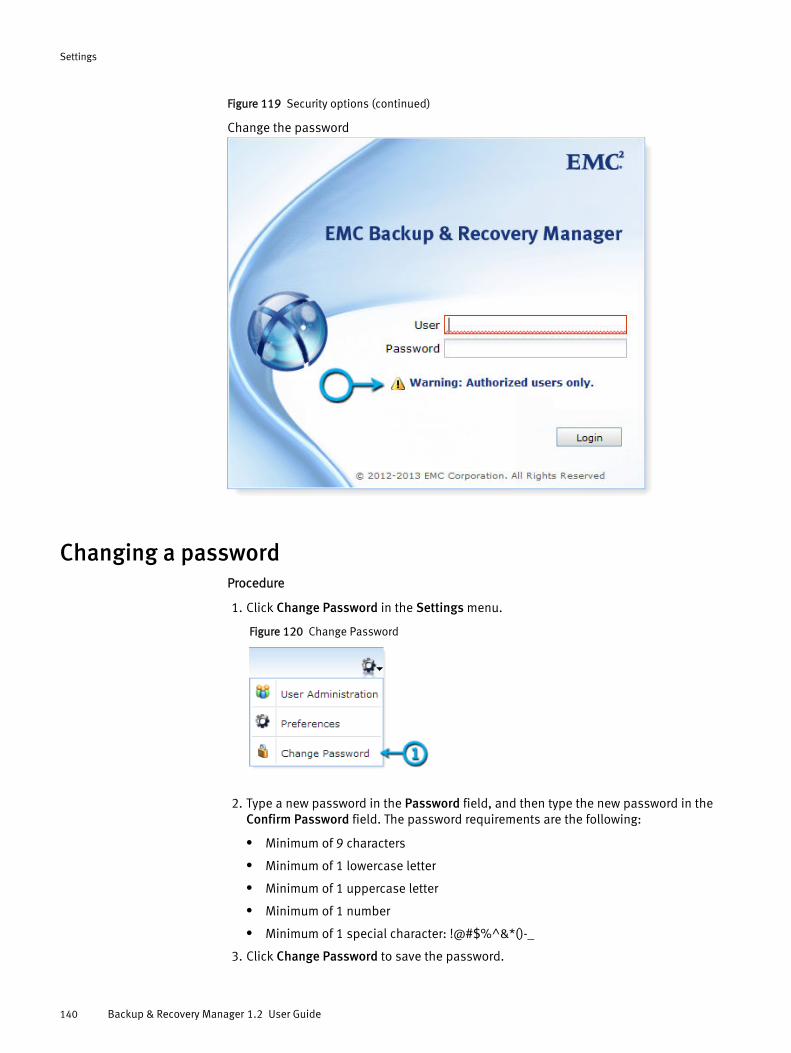
Figure 119 Security options (continued)
Change the password
Changing a passwordProcedure
1. Click Change Password in the Settings menu.
Figure 120 Change Password
2. Type a new password in the Password field, and then type the new password in theConfirm Password field. The password requirements are the following:
l Minimum of 9 characters
l Minimum of 1 lowercase letter
l Minimum of 1 uppercase letter
l Minimum of 1 number
l Minimum of 1 special character: !@#$%^&*()-_
3. Click Change Password to save the password.
Settings
140 Backup & Recovery Manager 1.2 User Guide
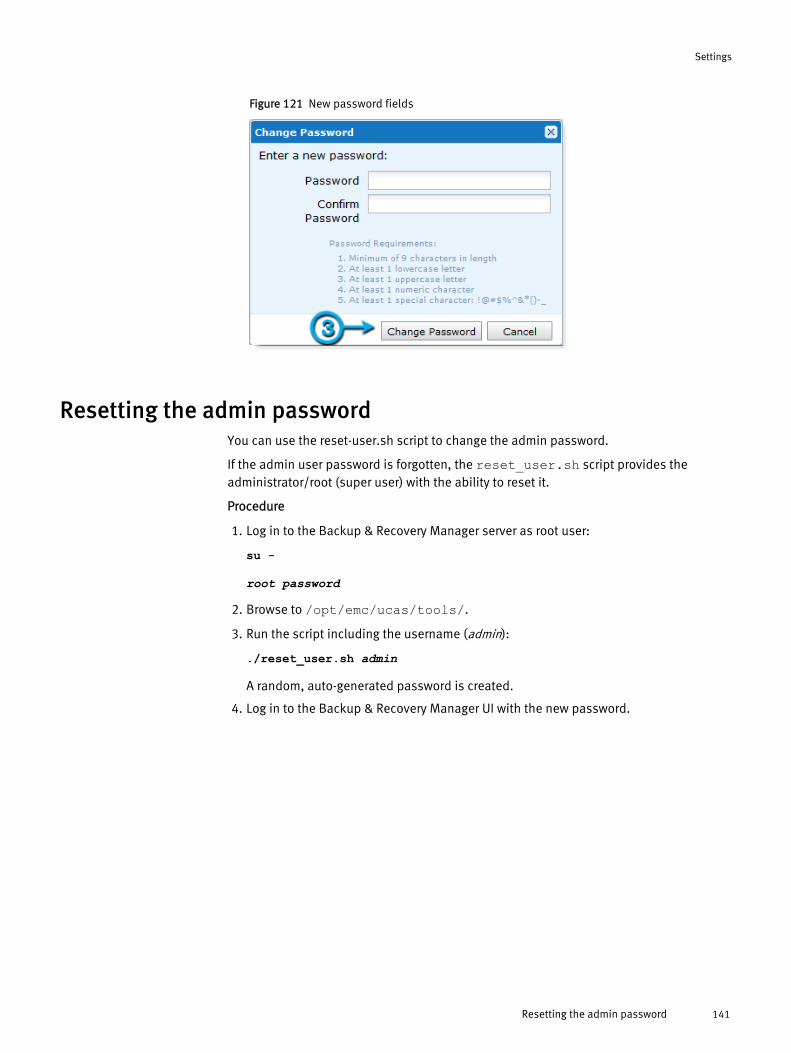
Figure 121 New password fields
Resetting the admin passwordYou can use the reset-user.sh script to change the admin password.
If the admin user password is forgotten, the reset_user.sh script provides theadministrator/root (super user) with the ability to reset it.
Procedure
1. Log in to the Backup & Recovery Manager server as root user:
su -
root password
2. Browse to /opt/emc/ucas/tools/.
3. Run the script including the username (admin):
./reset_user.sh admin
A random, auto-generated password is created.
4. Log in to the Backup & Recovery Manager UI with the new password.
Settings
Resetting the admin password 141

Settings
142 Backup & Recovery Manager 1.2 User Guide
CHAPTER 10
Reports
Reports provides the ability to run preconfigured reports for activities on all monitoredsystems in the enterprise.
Note
Running and exporting reports is not available for the Backup & Recovery Managermobile applications.
l Types of reports.................................................................................................. 144l Report Options....................................................................................................147l Exporting reports.................................................................................................149
Reports 143
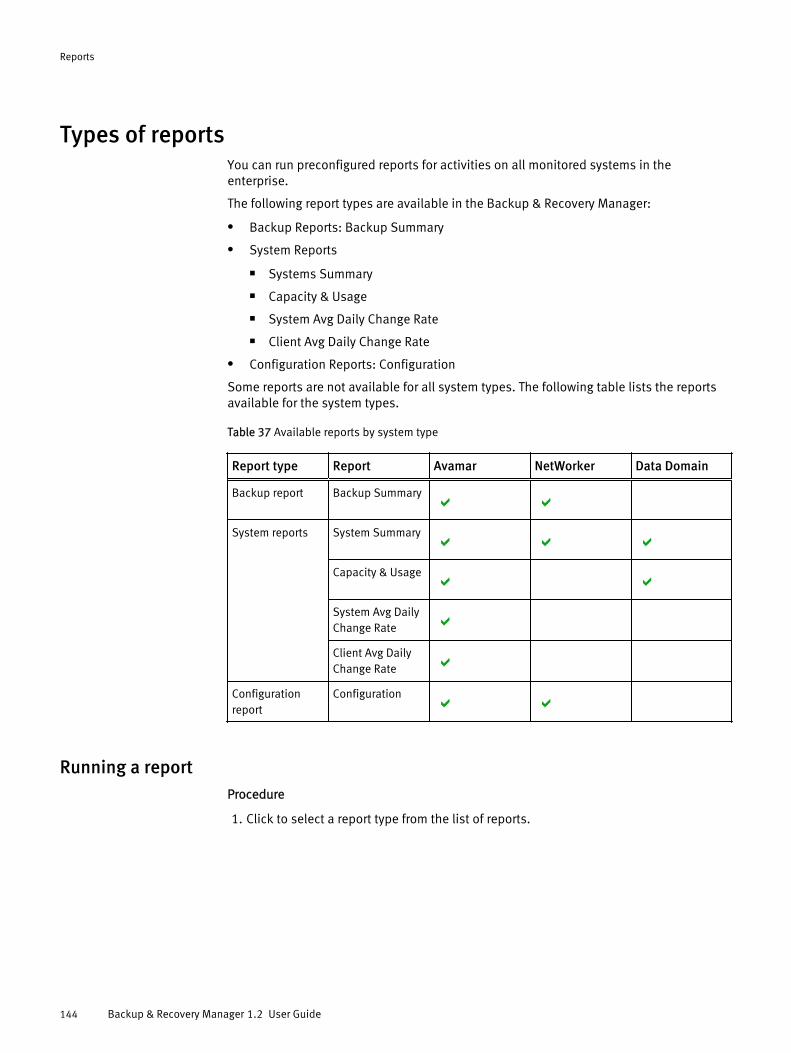
Types of reportsYou can run preconfigured reports for activities on all monitored systems in theenterprise.
The following report types are available in the Backup & Recovery Manager:
l Backup Reports: Backup Summary
l System Reports
n Systems Summary
n Capacity & Usage
n System Avg Daily Change Rate
n Client Avg Daily Change Rate
l Configuration Reports: Configuration
Some reports are not available for all system types. The following table lists the reportsavailable for the system types.
Table 37 Available reports by system type
Report type Report Avamar NetWorker Data Domain
Backup report Backup Summary
System reports System Summary
Capacity & Usage
System Avg DailyChange Rate
Client Avg DailyChange Rate
Configurationreport
Configuration
Running a reportProcedure
1. Click to select a report type from the list of reports.
Reports
144 Backup & Recovery Manager 1.2 User Guide
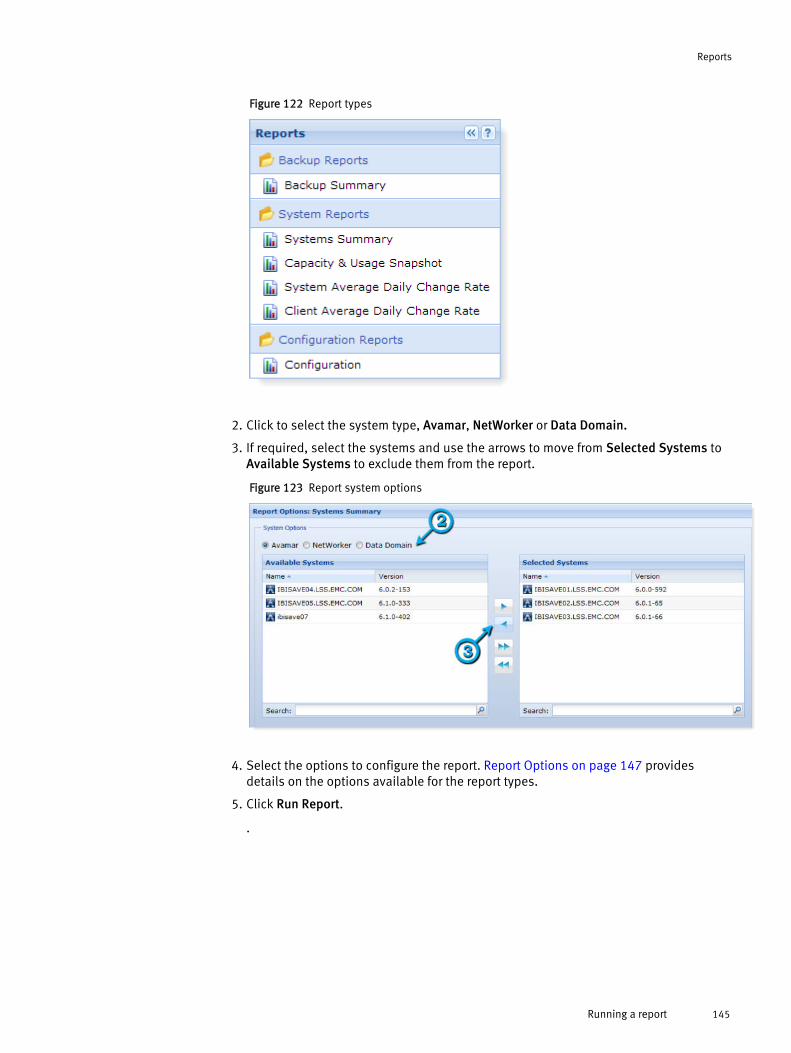
Figure 122 Report types
2. Click to select the system type, Avamar, NetWorker or Data Domain.
3. If required, select the systems and use the arrows to move from Selected Systems toAvailable Systems to exclude them from the report.
Figure 123 Report system options
4. Select the options to configure the report. Report Options on page 147 providesdetails on the options available for the report types.
5. Click Run Report.
.
Reports
Running a report 145
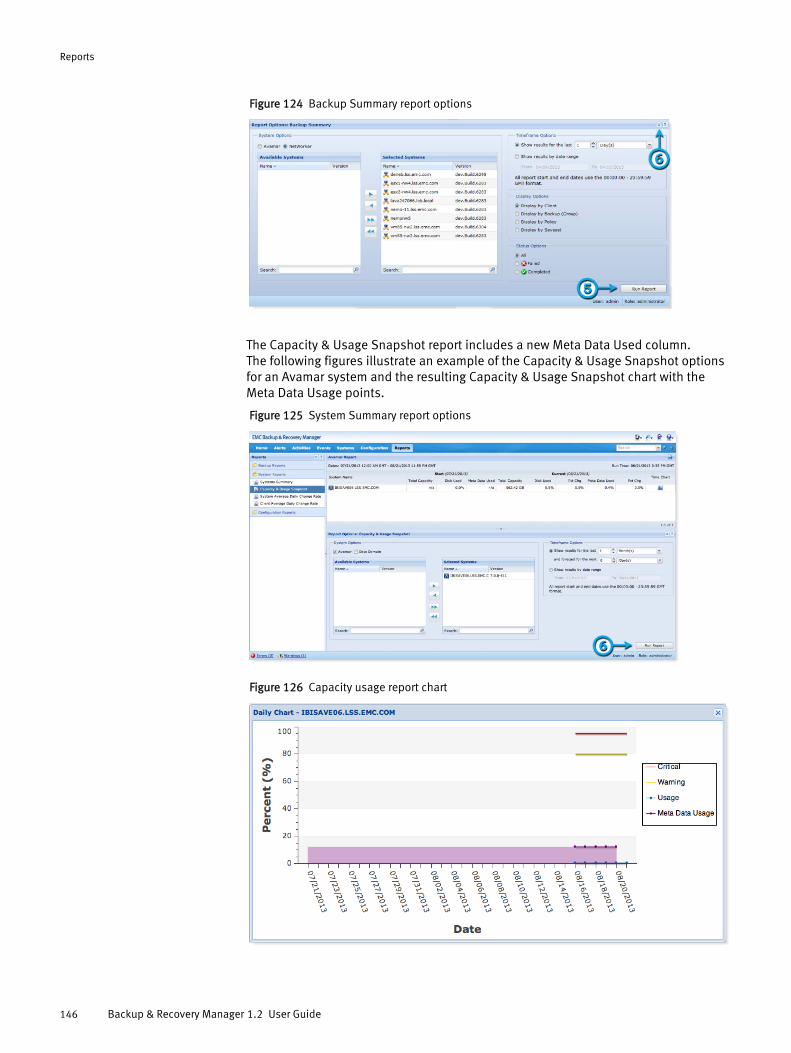
Figure 124 Backup Summary report options
The Capacity & Usage Snapshot report includes a new Meta Data Used column.The following figures illustrate an example of the Capacity & Usage Snapshot optionsfor an Avamar system and the resulting Capacity & Usage Snapshot chart with theMeta Data Usage points.
Figure 125 System Summary report options
Figure 126 Capacity usage report chart
Reports
146 Backup & Recovery Manager 1.2 User Guide
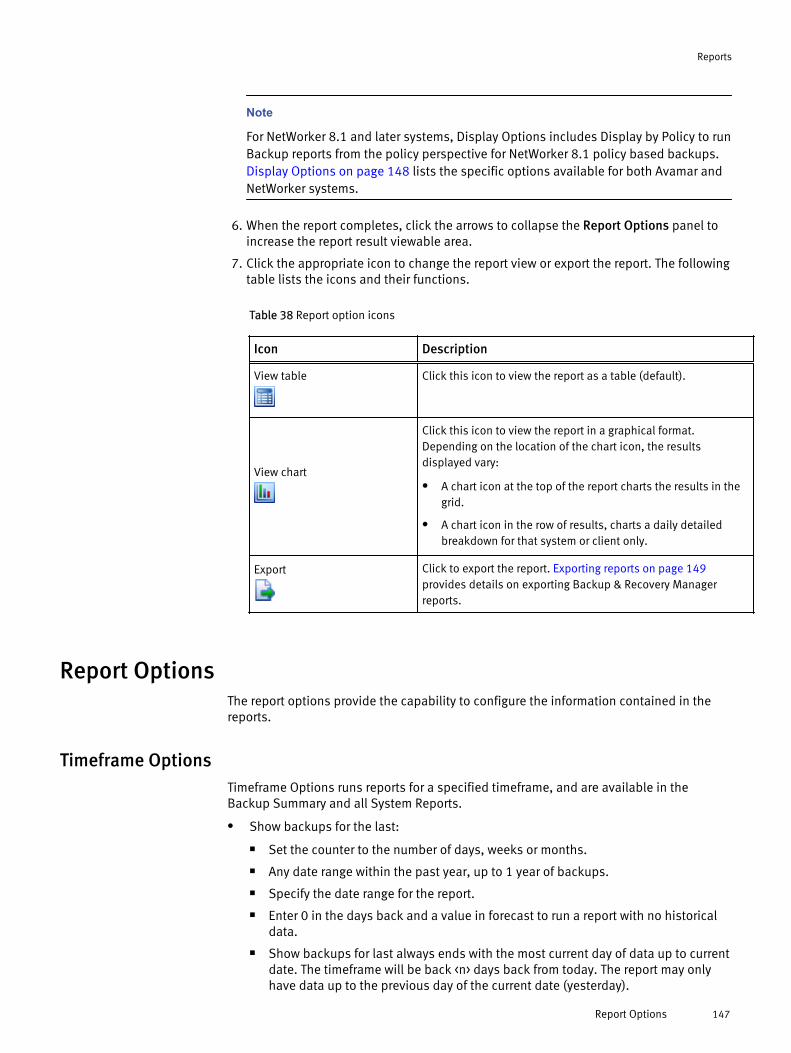
Note
For NetWorker 8.1 and later systems, Display Options includes Display by Policy to runBackup reports from the policy perspective for NetWorker 8.1 policy based backups. Display Options on page 148 lists the specific options available for both Avamar andNetWorker systems.
6. When the report completes, click the arrows to collapse the Report Options panel toincrease the report result viewable area.
7. Click the appropriate icon to change the report view or export the report. The followingtable lists the icons and their functions.
Table 38 Report option icons
Icon Description
View table Click this icon to view the report as a table (default).
View chart
Click this icon to view the report in a graphical format.Depending on the location of the chart icon, the resultsdisplayed vary:
l A chart icon at the top of the report charts the results in thegrid.
l A chart icon in the row of results, charts a daily detailedbreakdown for that system or client only.
Export Click to export the report. Exporting reports on page 149provides details on exporting Backup & Recovery Managerreports.
Report OptionsThe report options provide the capability to configure the information contained in thereports.
Timeframe OptionsTimeframe Options runs reports for a specified timeframe, and are available in theBackup Summary and all System Reports.
l Show backups for the last:
n Set the counter to the number of days, weeks or months.
n Any date range within the past year, up to 1 year of backups.
n Specify the date range for the report.
n Enter 0 in the days back and a value in forecast to run a report with no historicaldata.
n Show backups for last always ends with the most current day of data up to currentdate. The timeframe will be back <n> days back from today. The report may onlyhave data up to the previous day of the current date (yesterday).
Reports
Report Options 147
l And forecast for the next (Capacity & Usage system report only):
n Set the counter to the number of days, weeks or months.
n Enter 0 in the forecast counter to exclude the forecast data from the report.
n Forecast any date range back 1 year to forward 1 year.
Display OptionsDisplay Options is available for the Backup Summary report, and allow you to configurethe report for the following options:
l Avamar:
n Display by Backup
n Display by Client
n Display by Group
l NetWorker:
l Display by Client
l Display by Backup (Group)
l Display by Policy (NetWorker only)
l Display by Saveset
Status OptionsStatus Options allow you to specify which backups are included in the report. StatusOptions is available for the Backup Summary report. You can select the following:
l All
l Failed
l Succeeded
Report Content OptionsConfiguration reports list the configuration items for the given systems. The configurationitems make up the backup and replication configurations for the system.
Report Content Options is available for the Configuration report only and provides thefollowing options:
l Avamar:
n Clients
n Datasets
n Groups
n Retention Policies
n Schedules
l NetWorker:
n Devices
n Clients
n Clones
n Groups
Reports
148 Backup & Recovery Manager 1.2 User Guide
n Policies
n Pools
n Schedules
n Storage Nodes
Exporting reportsReports can be exported for use and contain all rows and columns in the grid (all data inthe report) in csv format.
To export the report to csv format, click Export. Depending on the browser, one of thefollowing will occur:
Procedure
l The csv file is downloaded to the configured download folder
l A dialog displays prompting for the location in which to download the report
Reports
Exporting reports 149

Reports
150 Backup & Recovery Manager 1.2 User Guide
APPENDIX A
Security Configuration
l Communication security......................................................................................152l Login, session and password protection..............................................................154l Firewall rules.......................................................................................................155l REST API..............................................................................................................155l Data security....................................................................................................... 155l Access control.....................................................................................................155
Security Configuration 151
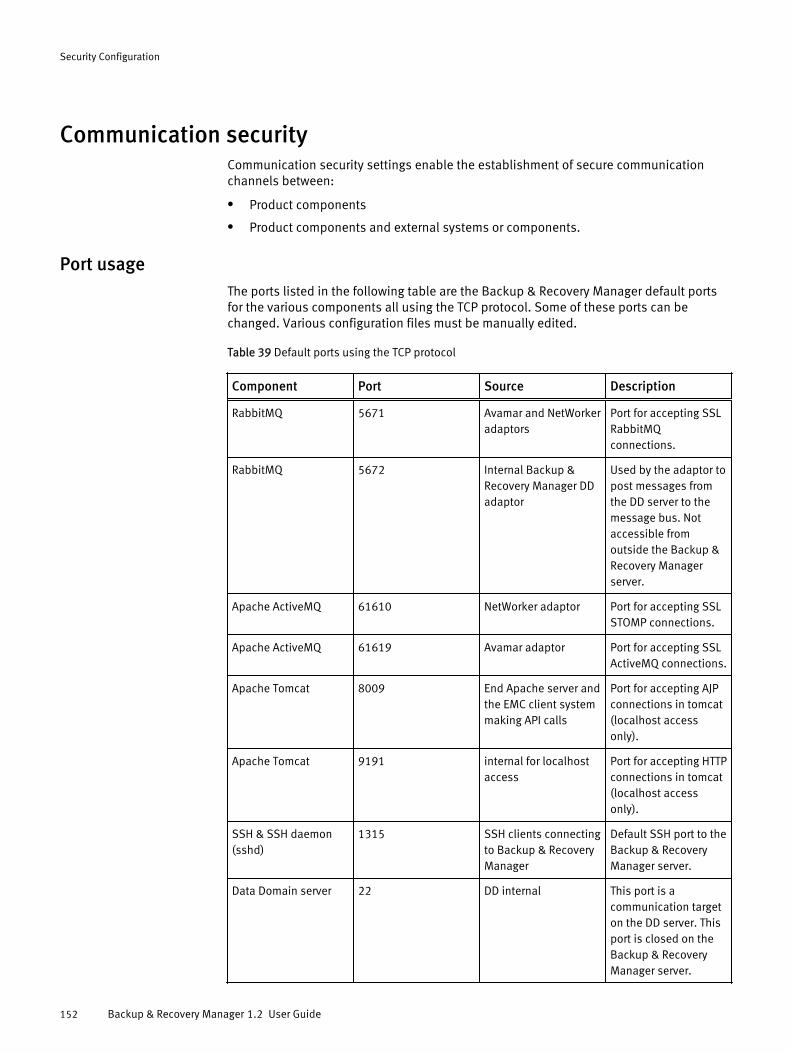
Communication securityCommunication security settings enable the establishment of secure communicationchannels between:
l Product components
l Product components and external systems or components.
Port usageThe ports listed in the following table are the Backup & Recovery Manager default portsfor the various components all using the TCP protocol. Some of these ports can bechanged. Various configuration files must be manually edited.
Table 39 Default ports using the TCP protocol
Component Port Source Description
RabbitMQ 5671 Avamar and NetWorkeradaptors
Port for accepting SSLRabbitMQconnections.
RabbitMQ 5672 Internal Backup &Recovery Manager DDadaptor
Used by the adaptor topost messages fromthe DD server to themessage bus. Notaccessible fromoutside the Backup &Recovery Managerserver.
Apache ActiveMQ 61610 NetWorker adaptor Port for accepting SSLSTOMP connections.
Apache ActiveMQ 61619 Avamar adaptor Port for accepting SSLActiveMQ connections.
Apache Tomcat 8009 End Apache server andthe EMC client systemmaking API calls
Port for accepting AJPconnections in tomcat(localhost accessonly).
Apache Tomcat 9191 internal for localhostaccess
Port for accepting HTTPconnections in tomcat(localhost accessonly).
SSH & SSH daemon(sshd)
1315 SSH clients connectingto Backup & RecoveryManager
Default SSH port to theBackup & RecoveryManager server.
Data Domain server 22 DD internal This port is acommunication targeton the DD server. Thisport is closed on theBackup & RecoveryManager server.
Security Configuration
152 Backup & Recovery Manager 1.2 User Guide
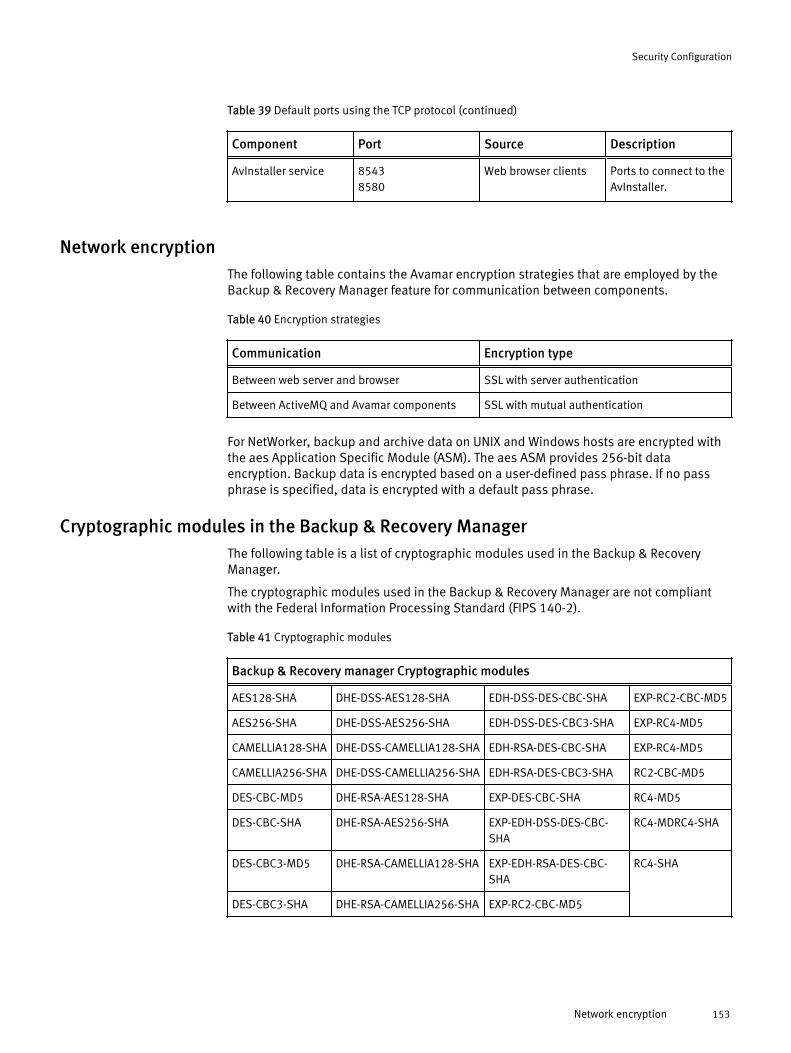
Table 39 Default ports using the TCP protocol (continued)
Component Port Source Description
AvInstaller service 85438580
Web browser clients Ports to connect to theAvInstaller.
Network encryptionThe following table contains the Avamar encryption strategies that are employed by theBackup & Recovery Manager feature for communication between components.
Table 40 Encryption strategies
Communication Encryption type
Between web server and browser SSL with server authentication
Between ActiveMQ and Avamar components SSL with mutual authentication
For NetWorker, backup and archive data on UNIX and Windows hosts are encrypted withthe aes Application Specific Module (ASM). The aes ASM provides 256-bit dataencryption. Backup data is encrypted based on a user-defined pass phrase. If no passphrase is specified, data is encrypted with a default pass phrase.
Cryptographic modules in the Backup & Recovery ManagerThe following table is a list of cryptographic modules used in the Backup & RecoveryManager.
The cryptographic modules used in the Backup & Recovery Manager are not compliantwith the Federal Information Processing Standard (FIPS 140-2).
Table 41 Cryptographic modules
Backup & Recovery manager Cryptographic modules
AES128-SHA DHE-DSS-AES128-SHA EDH-DSS-DES-CBC-SHA EXP-RC2-CBC-MD5
AES256-SHA DHE-DSS-AES256-SHA EDH-DSS-DES-CBC3-SHA EXP-RC4-MD5
CAMELLIA128-SHA DHE-DSS-CAMELLIA128-SHA EDH-RSA-DES-CBC-SHA EXP-RC4-MD5
CAMELLIA256-SHA DHE-DSS-CAMELLIA256-SHA EDH-RSA-DES-CBC3-SHA RC2-CBC-MD5
DES-CBC-MD5 DHE-RSA-AES128-SHA EXP-DES-CBC-SHA RC4-MD5
DES-CBC-SHA DHE-RSA-AES256-SHA EXP-EDH-DSS-DES-CBC-SHA
RC4-MDRC4-SHA
DES-CBC3-MD5 DHE-RSA-CAMELLIA128-SHA EXP-EDH-RSA-DES-CBC-SHA
RC4-SHA
DES-CBC3-SHA DHE-RSA-CAMELLIA256-SHA EXP-RC2-CBC-MD5
Security Configuration
Network encryption 153
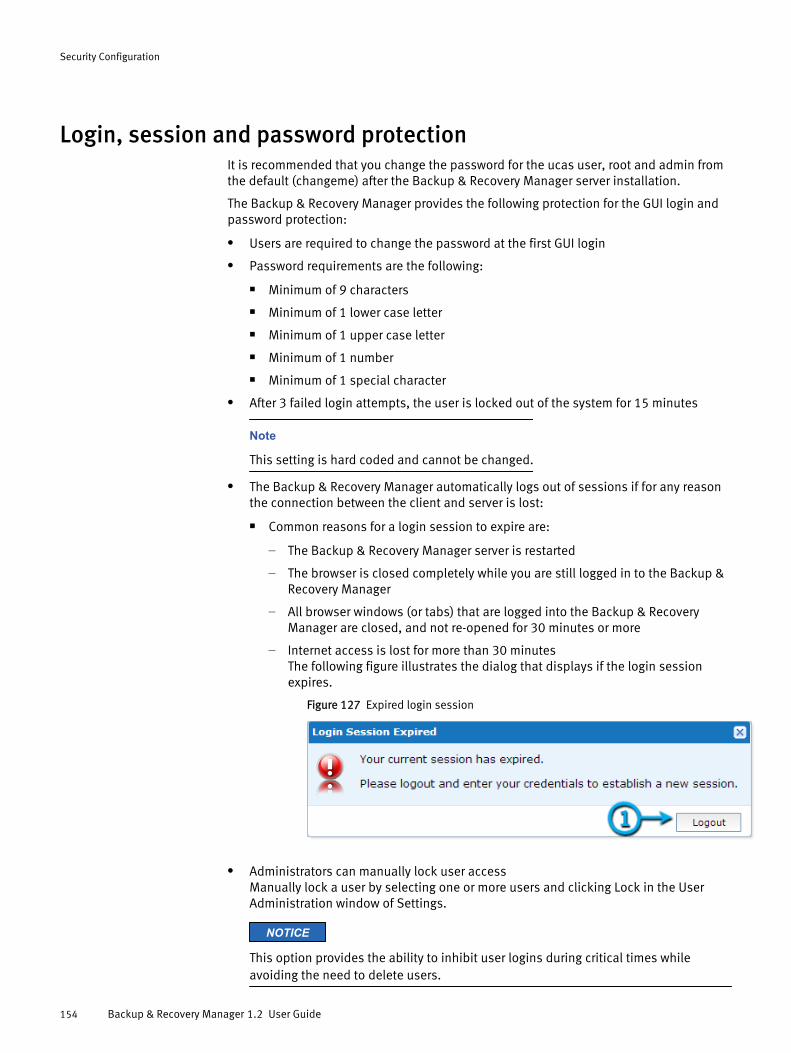
Login, session and password protectionIt is recommended that you change the password for the ucas user, root and admin fromthe default (changeme) after the Backup & Recovery Manager server installation.
The Backup & Recovery Manager provides the following protection for the GUI login andpassword protection:
l Users are required to change the password at the first GUI login
l Password requirements are the following:
n Minimum of 9 characters
n Minimum of 1 lower case letter
n Minimum of 1 upper case letter
n Minimum of 1 number
n Minimum of 1 special character
l After 3 failed login attempts, the user is locked out of the system for 15 minutes
Note
This setting is hard coded and cannot be changed.
l The Backup & Recovery Manager automatically logs out of sessions if for any reasonthe connection between the client and server is lost:
n Common reasons for a login session to expire are:
– The Backup & Recovery Manager server is restarted
– The browser is closed completely while you are still logged in to the Backup &Recovery Manager
– All browser windows (or tabs) that are logged into the Backup & RecoveryManager are closed, and not re-opened for 30 minutes or more
– Internet access is lost for more than 30 minutesThe following figure illustrates the dialog that displays if the login sessionexpires.
Figure 127 Expired login session
l Administrators can manually lock user accessManually lock a user by selecting one or more users and clicking Lock in the UserAdministration window of Settings.
NOTICE
This option provides the ability to inhibit user logins during critical times whileavoiding the need to delete users.
Security Configuration
154 Backup & Recovery Manager 1.2 User Guide
Firewall rulesThe Backup & Recovery Manager has firewall rules on the Backup & Recovery Managerserver appliance (OVA). These firewall rules control what network connections can bemade to the system, and can be used to throttle SSH connection attempts or slow downport scans at the network layer.
The firewall rule set is available at /opt/emc/ucas/packages/ucas-iptables for the OVA.
REST APIIt is possible to implement custom applications or widgets that make use of the REST API,but any such software will not be supported by EMC. This is not supported as the RESTAPI might be subject to change without notice in future versions of the Backup &Recovery Manager.
Data securityThe Backup & Recovery Manager encrypts all in-flight data.
Access controlAccess control settings provide protection of resources against unauthorized access.
Default accountsThe following table contains the default Backup & Recovery Manager default account andits default password.
Table 42 Default account names and passwords
Account Password Description
admin Set when the Backup & Recovery Manager feature isinstalled.The default password is changeme
You are prompted to change the default password atfirst login.
The default user for theBackup & Recovery Manager.
Authentication configurationThe Backup & Recovery Manager requires configuration of an administrator at installationtime. The administrator can create additional users after the Backup & Recovery Manageris installed.
Security Configuration
Firewall rules 155
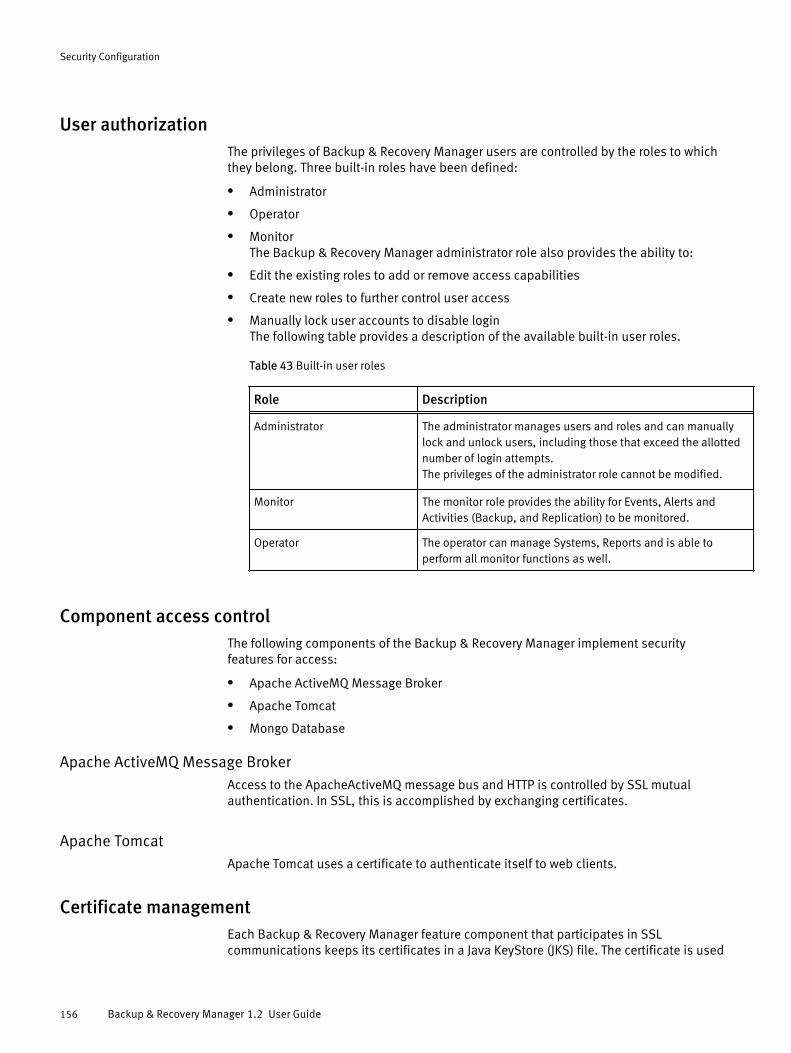
User authorizationThe privileges of Backup & Recovery Manager users are controlled by the roles to whichthey belong. Three built-in roles have been defined:
l Administrator
l Operator
l MonitorThe Backup & Recovery Manager administrator role also provides the ability to:
l Edit the existing roles to add or remove access capabilities
l Create new roles to further control user access
l Manually lock user accounts to disable loginThe following table provides a description of the available built-in user roles.
Table 43 Built-in user roles
Role Description
Administrator The administrator manages users and roles and can manuallylock and unlock users, including those that exceed the allottednumber of login attempts.The privileges of the administrator role cannot be modified.
Monitor The monitor role provides the ability for Events, Alerts andActivities (Backup, and Replication) to be monitored.
Operator The operator can manage Systems, Reports and is able toperform all monitor functions as well.
Component access controlThe following components of the Backup & Recovery Manager implement securityfeatures for access:
l Apache ActiveMQ Message Broker
l Apache Tomcat
l Mongo Database
Apache ActiveMQ Message BrokerAccess to the ApacheActiveMQ message bus and HTTP is controlled by SSL mutualauthentication. In SSL, this is accomplished by exchanging certificates.
Apache TomcatApache Tomcat uses a certificate to authenticate itself to web clients.
Certificate managementEach Backup & Recovery Manager feature component that participates in SSLcommunications keeps its certificates in a Java KeyStore (JKS) file. The certificate is used
Security Configuration
156 Backup & Recovery Manager 1.2 User Guide
for secure http access (https), and secure communication to the Backup & RecoveryManager adaptors.
“Key store” files contain certificates that components use to identify themselves as wellas the certificates of entities they trust. Some components keep their certificates and thecertificates of trusted entities in the same key store file while others keep the certificatesof trusted entities in a separate file called a trust store. Although key store and trust storefiles have the same JKS format, the Backup & Recovery Manager feature trust store fileshave a .ts suffix whereas the key store files have a .ks suffix.
NOTICE
JKS files can be managed with a Java tool called keytool. Keytool is part of the standardJDK, which is included in the Backup & Recovery Manager feature software.
In the Backup & Recovery Manager feature, there are JKS files for the followingcomponents:
l Message broker clients — containing a “key store” (and sometimes a “trust store”)containing certificates used for mutual authentication with the message broker
l Apache Tomcat — containing the certificate that Tomcat uses to authenticate itself toweb clients
Web browser authentication using ApacheThe Backup & Recovery Manager server and adaptors use the Apache web server toprovide a secure web browser-based user interface. Web browser connections for theseapplications use secure socket layer/transport layer security (SSL/TLS) to provideauthentication and data security.
When a web browser accesses a secure web page from an unauthenticated web serverthe SSL/TLS protocol causes it to display an authentication warning. An unauthenticatedweb server is one that does not authenticate itself using a trusted public key certificate.
The Apache web server provided with the Backup & Recovery Manager is installed with aself-signed certificate, not a trusted public key certificate. The self-signed certificate issufficient to establish an encrypted channel between web browsers and the server, but itcannot be used for authentication. By using a secure second channel to verify thecertificate’s fingerprint, authentication can be achieved with self-signed certificates.
If required, a self-signed certificate other than the one provided by EMC can be inserted.The certificate signing request (CSR) is used to apply for a trusted certificate. To provideserver authentication, and thereby prevent web browser warnings complete the followingtasks:
l Installing a self-signed or trusted certificate on page 157
l Creating a private key on page 158
l Generating a certificate signing request on page 159The tools used in these tasks are part of the OpenSSL toolkit. OpenSSL is providedwith Backup & Recovery Manager.
Installing a self-signed or trusted certificateThe Apache web server provided with the Backup & Recovery Manager is installed with aself-signed certificate, not a trusted public key certificate. The self-signed certificate is
Security Configuration
Web browser authentication using Apache 157
sufficient to establish an encrypted channel between web browsers and the server, but itcannot be used for authentication.
NOTICE
Ensure that the trusted certificate is issued for the correct hostname. Configuring ahostname for the Backup & Recovery Manager appliance is a function that EMC cannotcontrol and is the responsibility of the customer's IT department.
To install either a self-signed, or trusted certificate for the Backup & Recovery ManagerApache database, perform the following:
Procedure
1. Connect to the Backup & Recovery Manager server as the ucas user:
ssh ucas@SERVER -p1315NOTICE
The Backup & Recovery Manager server does not provide an ssh agent, use an sshclient of your choice and be sure to specify port 1315 as the port for command linessh.
2. Change to root user:
su -
3. Save in a temporary location, the EMC-provided certificate files:
l ucasWebCert.pem
l ucas-web-private.key
4. Copy their own certificate files to /opt/emc/ucas/security.
5. Set the owner and group of the new certificate files to the following:
l Owner: ucas
l Group: ucas
6. Set the permissions of the new certificate files to 0644:
chmod 0644
7. Edit /opt/emc/ucas/apache-fips/conf/conf.d/ucas-sles-ssl-standalone.conf. Changereferences to the certificate files to point to the new certificate files.
8. Restart the Apache webserver.
NOTICE
This procedure should only be performed by advanced system administrators withknowledge of Apache web browser authentication.
Creating a private keyA private key can be generated with pass phrase protection and without pass phraseprotection. It can also be generated using a random key generation algorithm. Use themethod that is appropriate for the level of security required by your organization.
Procedure
1. Open a command shell and log in to Backup & Recovery Manager server:
Security Configuration
158 Backup & Recovery Manager 1.2 User Guide
a. Log in to the server as admin.
b. Switch user to root by typing:
su -
2. Generate the private key by typing:
openssl genrsa -out server.key 3072where server.key is a name you provide for the private key.
The private key is created in the current working directory.
Generating a certificate signing requestApply for a public key certificate from a Commercial CA, by sending the CA a certificatesigning request (CSR).
Procedure
1. Open a command shell and log in to the Backup & Recovery Manager server as admin.
2. Switch user to root by typing:
su -
3. Generate the CSR by typing:
openssl genrsa -out server.key 3072where server.key is a name you provide for the private key.
The private key is created in the current working directory.
Changing the Backup & Recovery Manager Apache from self-signed to issuedChange the Backup & Recovery Manager Apache from self-signed to issued to inhibit thecertificate warning from displaying when connecting to the Backup & Recovery Managerappliance.
NOTICE
The keystore is /opt/emc/ucas/security/ucas-web-keystore.ks and the certificate isstored in this location as well.
This procedure replaces the self-signed descriptive information in the deployed cert withreal information from your company. The security of an issued cert over the defaultinstallation a self-signed certificate is not improved, it only eliminates the warning. Youcan also view the certificate when connecting to the appliance by clicking the check boxto trust the issuer.
The main purpose of a Certificate is to verify the identities of hostnames and networkaddresses. It is recommended that the Backup & Recovery Manager has a DNS enteredhostname and that the external IP of Backup & Recovery Manager must resolve to thathostname. If this is not in sync, then your cert can still result in a warning.
Procedure
1. Take a snapshot of the Backup & Recovery Manager VMware appliance beforebeginning. This creates a working installation in the event there are problems duringthis procedure.
2. View the current key entry by entering the following command:
keytool -list -keystore /opt/emc/ucas/security/ucas-web-keystore.ksEnter keystore password:
Security Configuration
Generating a certificate signing request 159
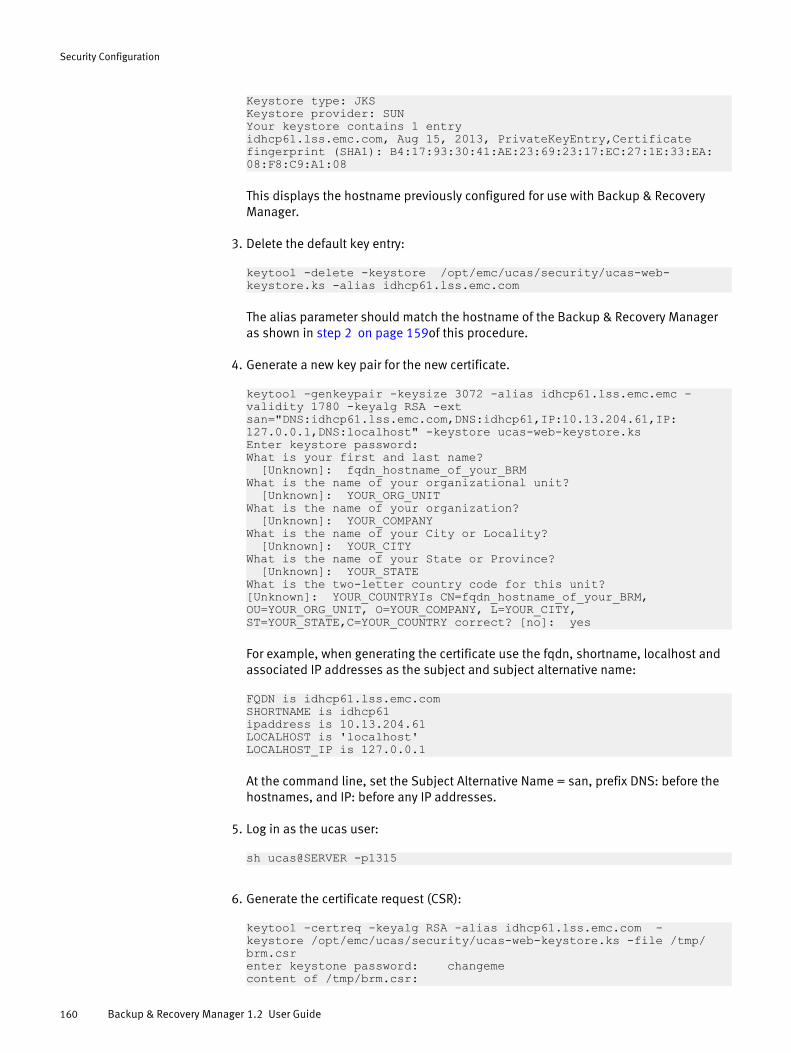
Keystore type: JKSKeystore provider: SUNYour keystore contains 1 entryidhcp61.lss.emc.com, Aug 15, 2013, PrivateKeyEntry,Certificate fingerprint (SHA1): B4:17:93:30:41:AE:23:69:23:17:EC:27:1E:33:EA:08:F8:C9:A1:08
This displays the hostname previously configured for use with Backup & RecoveryManager.
3. Delete the default key entry:
keytool -delete -keystore /opt/emc/ucas/security/ucas-web-keystore.ks -alias idhcp61.lss.emc.com
The alias parameter should match the hostname of the Backup & Recovery Manageras shown in step 2 on page 159of this procedure.
4. Generate a new key pair for the new certificate.
keytool -genkeypair -keysize 3072 -alias idhcp61.lss.emc.emc -validity 1780 -keyalg RSA -ext san="DNS:idhcp61.lss.emc.com,DNS:idhcp61,IP:10.13.204.61,IP:127.0.0.1,DNS:localhost" -keystore ucas-web-keystore.ksEnter keystore password:What is your first and last name? [Unknown]: fqdn_hostname_of_your_BRMWhat is the name of your organizational unit? [Unknown]: YOUR_ORG_UNITWhat is the name of your organization? [Unknown]: YOUR_COMPANYWhat is the name of your City or Locality? [Unknown]: YOUR_CITYWhat is the name of your State or Province? [Unknown]: YOUR_STATEWhat is the two-letter country code for this unit?[Unknown]: YOUR_COUNTRYIs CN=fqdn_hostname_of_your_BRM, OU=YOUR_ORG_UNIT, O=YOUR_COMPANY, L=YOUR_CITY, ST=YOUR_STATE,C=YOUR_COUNTRY correct? [no]: yes
For example, when generating the certificate use the fqdn, shortname, localhost andassociated IP addresses as the subject and subject alternative name:
FQDN is idhcp61.lss.emc.comSHORTNAME is idhcp61ipaddress is 10.13.204.61LOCALHOST is 'localhost'LOCALHOST_IP is 127.0.0.1
At the command line, set the Subject Alternative Name = san, prefix DNS: before thehostnames, and IP: before any IP addresses.
5. Log in as the ucas user:
sh ucas@SERVER -p1315
6. Generate the certificate request (CSR):
keytool -certreq -keyalg RSA -alias idhcp61.lss.emc.com -keystore /opt/emc/ucas/security/ucas-web-keystore.ks -file /tmp/brm.csrenter keystone password: changemecontent of /tmp/brm.csr:
Security Configuration
160 Backup & Recovery Manager 1.2 User Guide
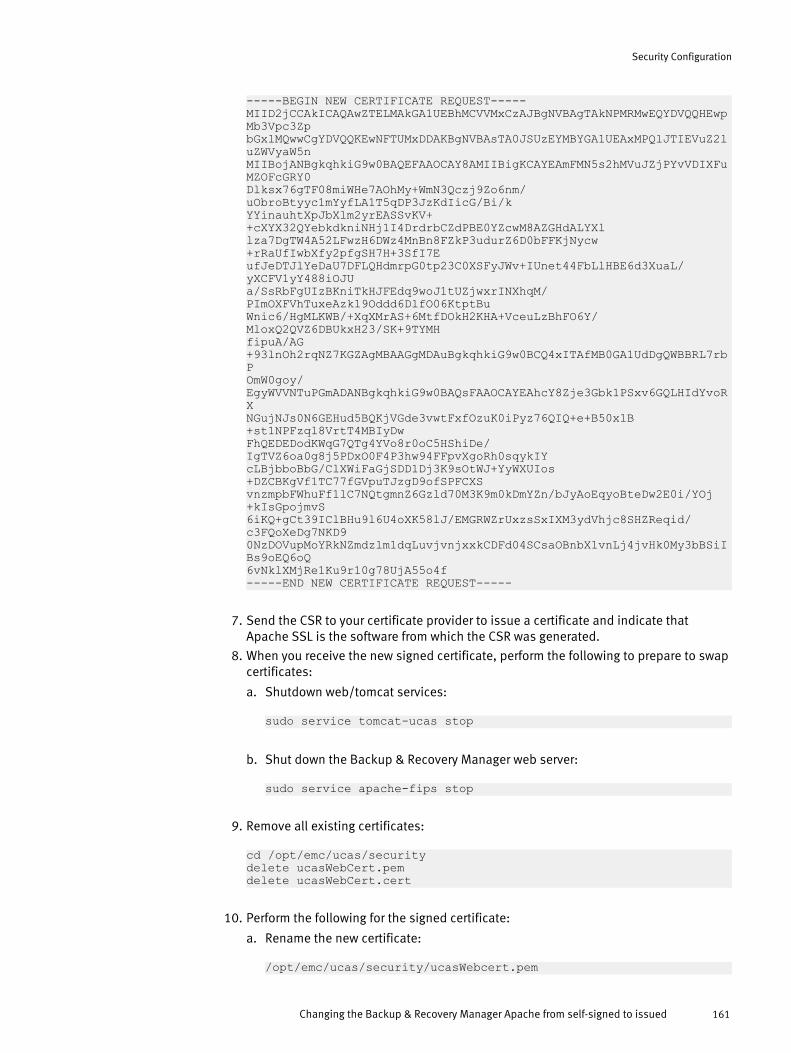
-----BEGIN NEW CERTIFICATE REQUEST-----MIID2jCCAkICAQAwZTELMAkGA1UEBhMCVVMxCzAJBgNVBAgTAkNPMRMwEQYDVQQHEwpMb3Vpc3ZpbGxlMQwwCgYDVQQKEwNFTUMxDDAKBgNVBAsTA0JSUzEYMBYGA1UEAxMPQlJTIEVuZ2luZWVyaW5nMIIBojANBgkqhkiG9w0BAQEFAAOCAY8AMIIBigKCAYEAmFMN5s2hMVuJZjPYvVDIXFuMZOFcGRY0Dlksx76gTF08miWHe7AOhMy+WmN3Qczj9Zo6nm/uObroBtyyc1mYyfLA1T5qDP3JzKdIicG/Bi/kYYinauhtXpJbXlm2yrEASSvKV++cXYX32QYebkdkniNHj1I4DrdrbCZdPBE0YZcwM8AZGHdALYXllza7DgTW4A52LFwzH6DWz4MnBn8FZkP3udurZ6D0bFFKjNycw+rRaUfIwbXfy2pfgSH7H+3SfI7EufJeDTJlYeDaU7DFLQHdmrpG0tp23C0XSFyJWv+IUnet44FbLlHBE6d3XuaL/yXCFV1yY488iOJUa/SsRbFgUIzBKniTkHJFEdq9woJ1tUZjwxrINXhqM/PImOXFVhTuxeAzk19Oddd6DlfO06KtptBuWnic6/HgMLKWB/+XqXMrAS+6MtfDOkH2KHA+VceuLzBhFO6Y/MloxQ2QVZ6DBUkxH23/SK+9TYMHfipuA/AG+93lnOh2rqNZ7KGZAgMBAAGgMDAuBgkqhkiG9w0BCQ4xITAfMB0GA1UdDgQWBBRL7rbPOmW0goy/EgyWVVNTuPGmADANBgkqhkiG9w0BAQsFAAOCAYEAhcY8Zje3Gbk1PSxv6GQLHIdYvoRXNGujNJs0N6GEHud5BQKjVGde3vwtFxfOzuK0iPyz76QIQ+e+B50x1B+st1NPFzql8VrtT4MBIyDwFhQEDEDodKWqG7QTg4YVo8r0oC5HShiDe/IgTVZ6oa0g8j5PDxO0F4P3hw94FFpvXgoRh0sqykIYcLBjbboBbG/ClXWiFaGjSDD1Dj3K9sOtWJ+YyWXUIos+DZCBKgVf1TC77fGVpuTJzgD9ofSPFCXSvnzmpbFWhuFf1lC7NQtgmnZ6Gzld70M3K9m0kDmYZn/bJyAoEqyoBteDw2E0i/YOj+kIsGpojmvS6iKQ+gCt39IClBHu9l6U4oXK58lJ/EMGRWZrUxzsSxIXM3ydVhjc8SHZReqid/c3FQoXeDg7NKD90NzDOVupMoYRkNZmdzlm1dqLuvjvnjxxkCDFd04SCsaOBnbX1vnLj4jvHk0My3bBSiIBs9oEQ6oQ6vNklXMjRe1Ku9r10g78UjA55o4f-----END NEW CERTIFICATE REQUEST-----
7. Send the CSR to your certificate provider to issue a certificate and indicate thatApache SSL is the software from which the CSR was generated.
8. When you receive the new signed certificate, perform the following to prepare to swapcertificates:
a. Shutdown web/tomcat services:
sudo service tomcat-ucas stop
b. Shut down the Backup & Recovery Manager web server:
sudo service apache-fips stop
9. Remove all existing certificates:
cd /opt/emc/ucas/securitydelete ucasWebCert.pemdelete ucasWebCert.cert
10. Perform the following for the signed certificate:
a. Rename the new certificate:
/opt/emc/ucas/security/ucasWebcert.pem
Security Configuration
Changing the Backup & Recovery Manager Apache from self-signed to issued 161
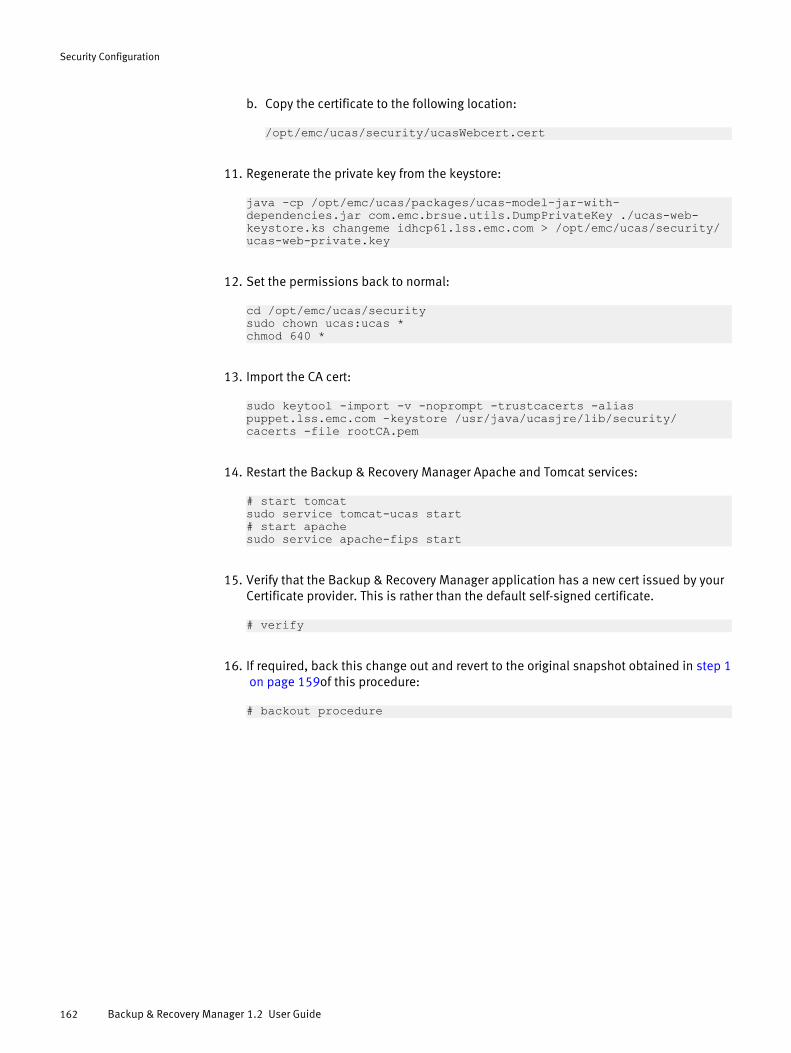
b. Copy the certificate to the following location:
/opt/emc/ucas/security/ucasWebcert.cert
11. Regenerate the private key from the keystore:
java -cp /opt/emc/ucas/packages/ucas-model-jar-with-dependencies.jar com.emc.brsue.utils.DumpPrivateKey ./ucas-web-keystore.ks changeme idhcp61.lss.emc.com > /opt/emc/ucas/security/ucas-web-private.key
12. Set the permissions back to normal:
cd /opt/emc/ucas/securitysudo chown ucas:ucas *chmod 640 *
13. Import the CA cert:
sudo keytool -import -v -noprompt -trustcacerts -alias puppet.lss.emc.com -keystore /usr/java/ucasjre/lib/security/cacerts -file rootCA.pem
14. Restart the Backup & Recovery Manager Apache and Tomcat services:
# start tomcatsudo service tomcat-ucas start# start apachesudo service apache-fips start
15. Verify that the Backup & Recovery Manager application has a new cert issued by yourCertificate provider. This is rather than the default self-signed certificate.
# verify
16. If required, back this change out and revert to the original snapshot obtained in step 1 on page 159of this procedure:
# backout procedure
Security Configuration
162 Backup & Recovery Manager 1.2 User Guide
APPENDIX B
Troubleshooting
Troubleshooting provides information on the log files available for the variouscomponents of the Backup & Recovery Manager for debugging and troubleshootingpurposes.
l Managing the Backup & Recovery Manager server...............................................164l The regroup-alerts-events script.......................................................................... 164l Customizing the log rotation policy schedule ......................................................165l Adaptor log file location...................................................................................... 165l View log files.......................................................................................................166l The bundlelogs utility..........................................................................................167l NetWorker adaptor options................................................................................. 168l Avamar adaptor control script............................................................................. 172l Backup & Recovery Manager error messages.......................................................173
Troubleshooting 163

Managing the Backup & Recovery Manager serverYou can restart all the Backup & Recovery Manager server daemons when the networkingis configured.
Procedure
1. Restart the mongod and apache2 daemons:
sudo service mongod restartsudo service apache2 restart
2. Stop the tomcat-ucas daemon:
cd /opt/emc/ucas/tomcat/binsudo service tomcat-ucas stop
3. Verify that the tomcat-ucas daemon is shutdown:
ps -ef | /bin/grep tomcat\/bin\/bootstrap | grep ucas | grep -v grep | grep ucas
If the tomcat-ucas process did not stop, type kill process id to stop the daemon.
If kill process id also does not stop the daemon, type kill -9 process id.
4. Restart the tomcat-ucas daemon:
sudo service tomcat-ucas start
Results
The daemon options are start, restart and stop.
The regroup-alerts-events scriptBackup & Recovery Manager uses rules to group similar events and alerts together tomake the alerts and events tables more readable. If new rules are added by using aBackup & Recovery Manager upgrade or patch, any events or alerts that occur after theupgrade are grouped according to the new rules. However, older events and alerts are notaffected. The regroup-alerts-events script re-processes all the old events and alerts usingthe new rules. This organizes the alerts and events tables to make them more usefulespecially for Backup & Recovery Manager installations with large numbers of alerts andevents.
During the upgrade process from BRM 1.0 to BRM 1.1-GA, this process runsautomatically. The regroup script is only required in special cases.
Running the regroup-alerts-events scriptYou can add or modify the grouping rules manually. If it is required to modify the rules,run this script after an upgrade to apply the new rules to the old events and alerts.
Procedure
1. From a command terminal, connect to the Backup & Recovery Manager server as theucas user:
Troubleshooting
164 Backup & Recovery Manager 1.2 User Guide
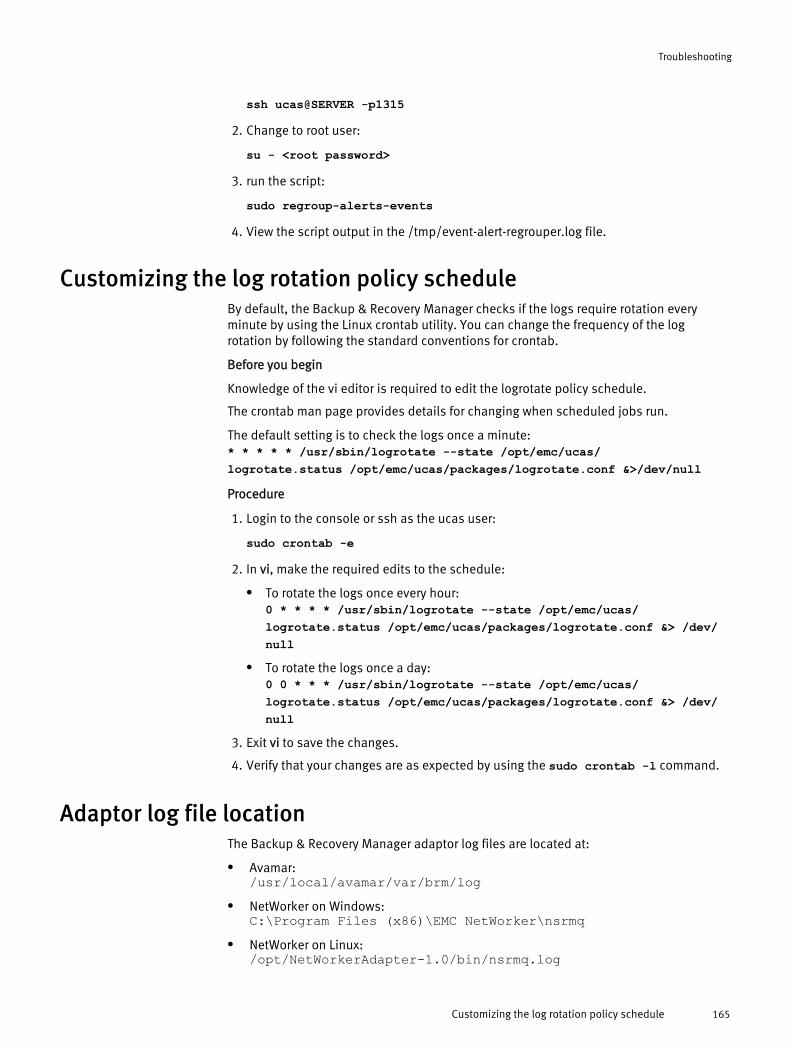
ssh ucas@SERVER -p1315
2. Change to root user:
su - <root password>
3. run the script:
sudo regroup-alerts-events
4. View the script output in the /tmp/event-alert-regrouper.log file.
Customizing the log rotation policy scheduleBy default, the Backup & Recovery Manager checks if the logs require rotation everyminute by using the Linux crontab utility. You can change the frequency of the logrotation by following the standard conventions for crontab.
Before you begin
Knowledge of the vi editor is required to edit the logrotate policy schedule.
The crontab man page provides details for changing when scheduled jobs run.
The default setting is to check the logs once a minute:* * * * * /usr/sbin/logrotate --state /opt/emc/ucas/logrotate.status /opt/emc/ucas/packages/logrotate.conf &>/dev/null
Procedure
1. Login to the console or ssh as the ucas user:
sudo crontab -e
2. In vi, make the required edits to the schedule:
l To rotate the logs once every hour:0 * * * * /usr/sbin/logrotate --state /opt/emc/ucas/logrotate.status /opt/emc/ucas/packages/logrotate.conf &> /dev/null
l To rotate the logs once a day:0 0 * * * /usr/sbin/logrotate --state /opt/emc/ucas/logrotate.status /opt/emc/ucas/packages/logrotate.conf &> /dev/null
3. Exit vi to save the changes.
4. Verify that your changes are as expected by using the sudo crontab -l command.
Adaptor log file locationThe Backup & Recovery Manager adaptor log files are located at:
l Avamar:/usr/local/avamar/var/brm/log
l NetWorker on Windows:C:\Program Files (x86)\EMC NetWorker\nsrmq
l NetWorker on Linux:/opt/NetWorkerAdapter-1.0/bin/nsrmq.log
Troubleshooting
Customizing the log rotation policy schedule 165
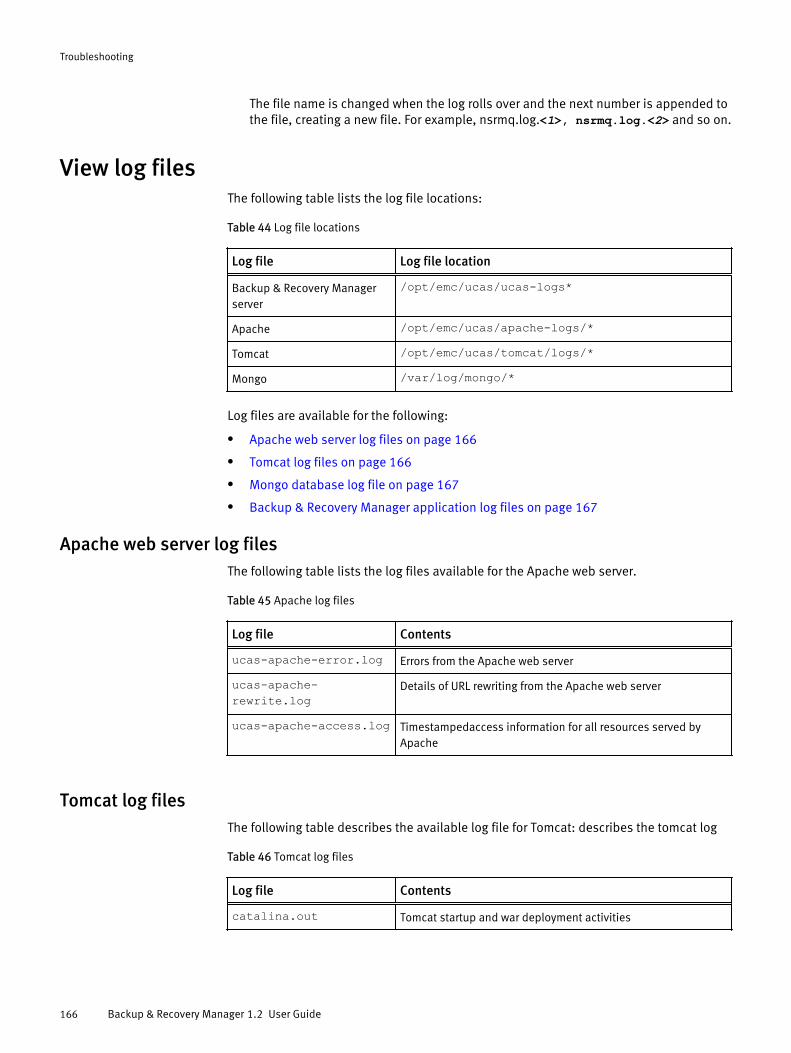
The file name is changed when the log rolls over and the next number is appended tothe file, creating a new file. For example, nsrmq.log.<1>, nsrmq.log.<2> and so on.
View log filesThe following table lists the log file locations:
Table 44 Log file locations
Log file Log file location
Backup & Recovery Managerserver
/opt/emc/ucas/ucas-logs*
Apache /opt/emc/ucas/apache-logs/*
Tomcat /opt/emc/ucas/tomcat/logs/*
Mongo /var/log/mongo/*
Log files are available for the following:
l Apache web server log files on page 166
l Tomcat log files on page 166
l Mongo database log file on page 167
l Backup & Recovery Manager application log files on page 167
Apache web server log filesThe following table lists the log files available for the Apache web server.
Table 45 Apache log files
Log file Contents
ucas-apache-error.log Errors from the Apache web server
ucas-apache-rewrite.log
Details of URL rewriting from the Apache web server
ucas-apache-access.log Timestampedaccess information for all resources served byApache
Tomcat log filesThe following table describes the available log file for Tomcat: describes the tomcat log
Table 46 Tomcat log files
Log file Contents
catalina.out Tomcat startup and war deployment activities
Troubleshooting
166 Backup & Recovery Manager 1.2 User Guide
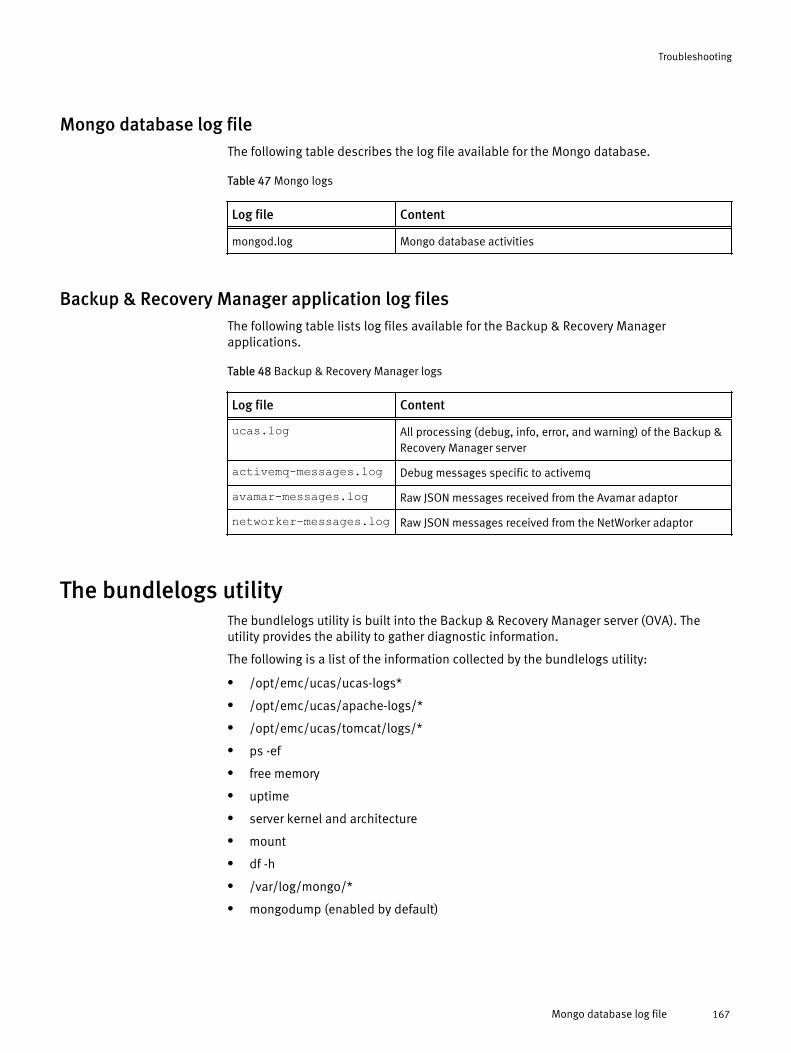
Mongo database log fileThe following table describes the log file available for the Mongo database.
Table 47 Mongo logs
Log file Content
mongod.log Mongo database activities
Backup & Recovery Manager application log filesThe following table lists log files available for the Backup & Recovery Managerapplications.
Table 48 Backup & Recovery Manager logs
Log file Content
ucas.log All processing (debug, info, error, and warning) of the Backup &Recovery Manager server
activemq-messages.log Debug messages specific to activemq
avamar-messages.log Raw JSON messages received from the Avamar adaptor
networker-messages.log Raw JSON messages received from the NetWorker adaptor
The bundlelogs utilityThe bundlelogs utility is built into the Backup & Recovery Manager server (OVA). Theutility provides the ability to gather diagnostic information.
The following is a list of the information collected by the bundlelogs utility:
l /opt/emc/ucas/ucas-logs*
l /opt/emc/ucas/apache-logs/*
l /opt/emc/ucas/tomcat/logs/*
l ps -ef
l free memory
l uptime
l server kernel and architecture
l mount
l df -h
l /var/log/mongo/*
l mongodump (enabled by default)
Troubleshooting
Mongo database log file 167
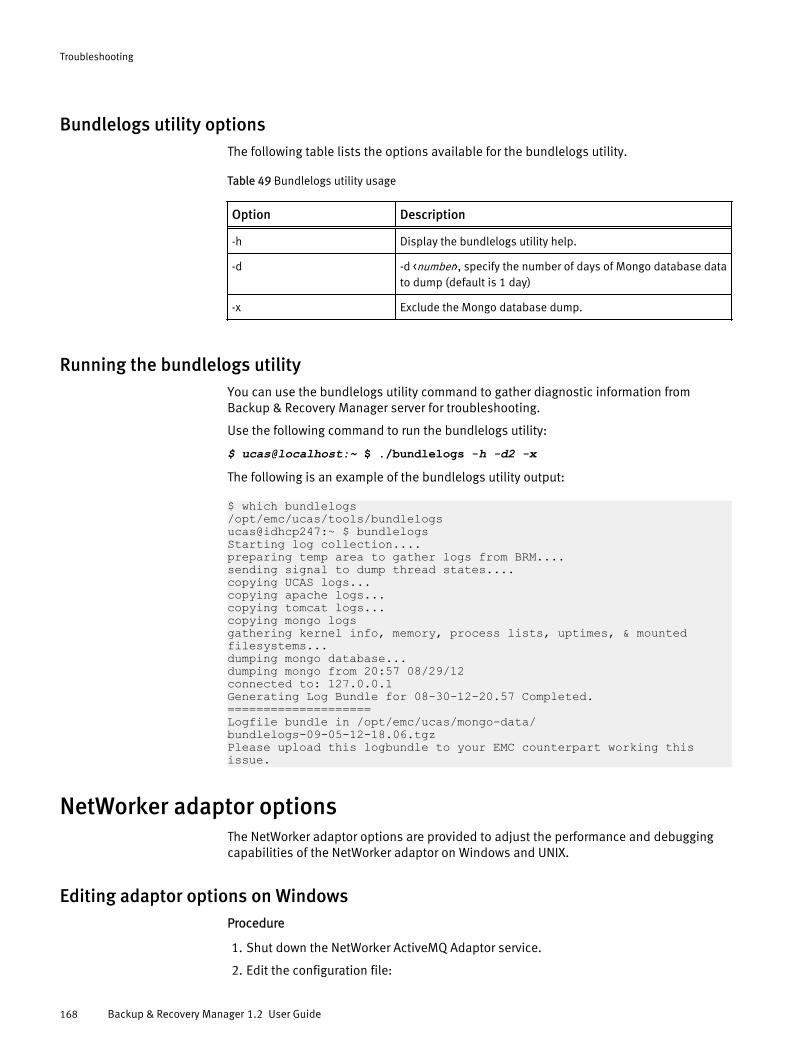
Bundlelogs utility optionsThe following table lists the options available for the bundlelogs utility.
Table 49 Bundlelogs utility usage
Option Description
-h Display the bundlelogs utility help.
-d -d <number>, specify the number of days of Mongo database datato dump (default is 1 day)
-x Exclude the Mongo database dump.
Running the bundlelogs utilityYou can use the bundlelogs utility command to gather diagnostic information fromBackup & Recovery Manager server for troubleshooting.
Use the following command to run the bundlelogs utility:
$ ucas@localhost:~ $ ./bundlelogs -h -d2 -xThe following is an example of the bundlelogs utility output:
$ which bundlelogs/opt/emc/ucas/tools/bundlelogsucas@idhcp247:~ $ bundlelogsStarting log collection....preparing temp area to gather logs from BRM....sending signal to dump thread states....copying UCAS logs...copying apache logs...copying tomcat logs...copying mongo logsgathering kernel info, memory, process lists, uptimes, & mounted filesystems...dumping mongo database...dumping mongo from 20:57 08/29/12connected to: 127.0.0.1Generating Log Bundle for 08-30-12-20.57 Completed.====================Logfile bundle in /opt/emc/ucas/mongo-data/bundlelogs-09-05-12-18.06.tgzPlease upload this logbundle to your EMC counterpart working this issue.
NetWorker adaptor optionsThe NetWorker adaptor options are provided to adjust the performance and debuggingcapabilities of the NetWorker adaptor on Windows and UNIX.
Editing adaptor options on WindowsProcedure
1. Shut down the NetWorker ActiveMQ Adaptor service.
2. Edit the configuration file:
Troubleshooting
168 Backup & Recovery Manager 1.2 User Guide
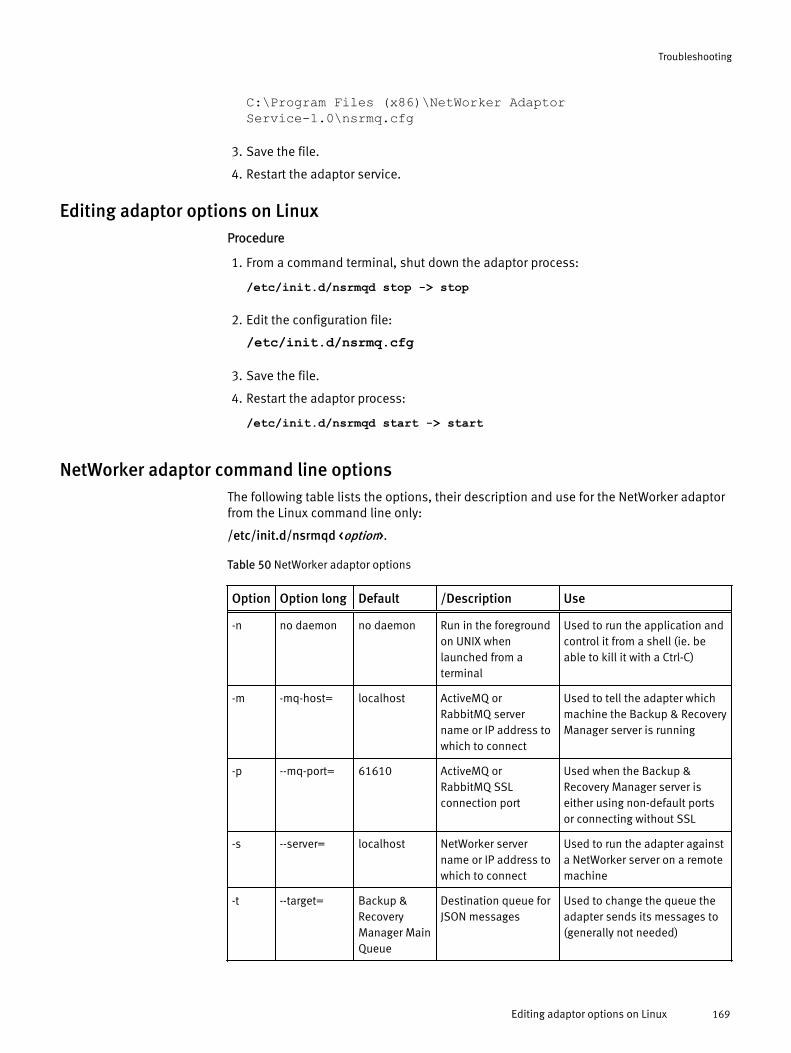
C:\Program Files (x86)\NetWorker AdaptorService-1.0\nsrmq.cfg
3. Save the file.
4. Restart the adaptor service.
Editing adaptor options on LinuxProcedure
1. From a command terminal, shut down the adaptor process:
/etc/init.d/nsrmqd stop -> stop
2. Edit the configuration file:
/etc/init.d/nsrmq.cfg
3. Save the file.
4. Restart the adaptor process:
/etc/init.d/nsrmqd start -> start
NetWorker adaptor command line optionsThe following table lists the options, their description and use for the NetWorker adaptorfrom the Linux command line only:
/etc/init.d/nsrmqd <option>.
Table 50 NetWorker adaptor options
Option Option long Default /Description Use
-n no daemon no daemon Run in the foregroundon UNIX whenlaunched from aterminal
Used to run the application andcontrol it from a shell (ie. beable to kill it with a Ctrl-C)
-m -mq-host= localhost ActiveMQ orRabbitMQ servername or IP address towhich to connect
Used to tell the adapter whichmachine the Backup & RecoveryManager server is running
-p --mq-port= 61610 ActiveMQ orRabbitMQ SSLconnection port
Used when the Backup &Recovery Manager server iseither using non-default portsor connecting without SSL
-s --server= localhost NetWorker servername or IP address towhich to connect
Used to run the adapter againsta NetWorker server on a remotemachine
-t --target= Backup &RecoveryManager MainQueue
Destination queue forJSON messages
Used to change the queue theadapter sends its messages to(generally not needed)
Troubleshooting
Editing adaptor options on Linux 169
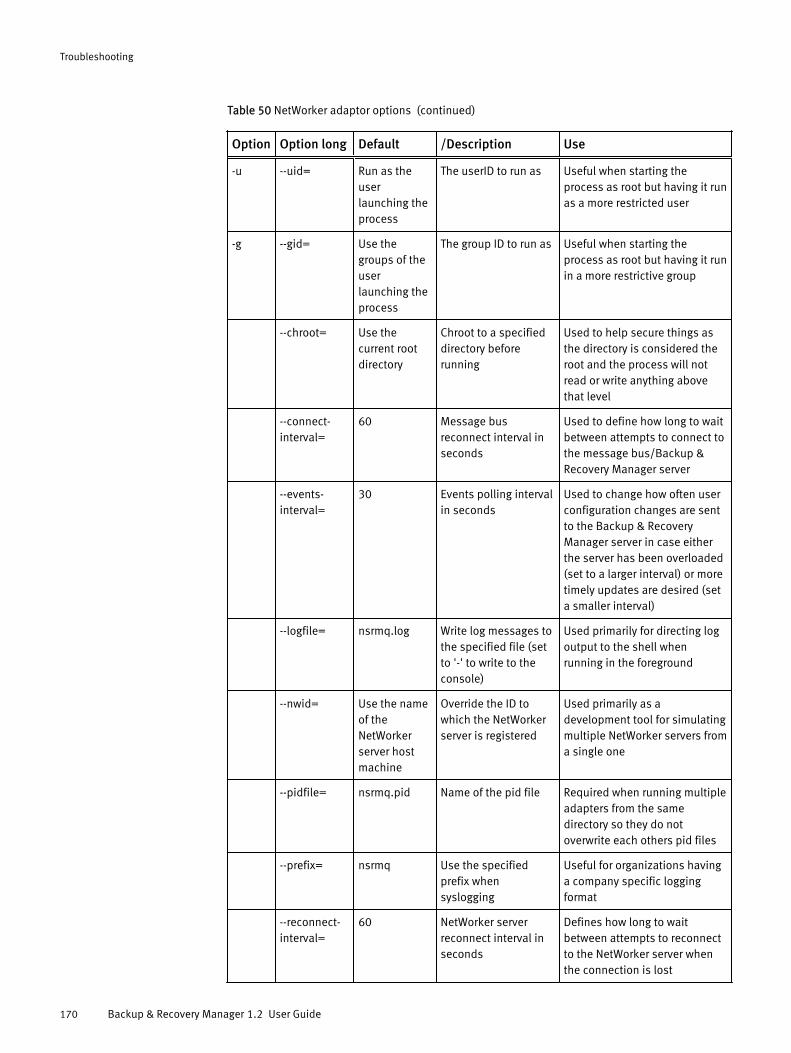
Table 50 NetWorker adaptor options (continued)
Option Option long Default /Description Use
-u --uid= Run as theuserlaunching theprocess
The userID to run as Useful when starting theprocess as root but having it runas a more restricted user
-g --gid= Use thegroups of theuserlaunching theprocess
The group ID to run as Useful when starting theprocess as root but having it runin a more restrictive group
--chroot= Use thecurrent rootdirectory
Chroot to a specifieddirectory beforerunning
Used to help secure things asthe directory is considered theroot and the process will notread or write anything abovethat level
--connect-interval=
60 Message busreconnect interval inseconds
Used to define how long to waitbetween attempts to connect tothe message bus/Backup &Recovery Manager server
--events-interval=
30 Events polling intervalin seconds
Used to change how often userconfiguration changes are sentto the Backup & RecoveryManager server in case eitherthe server has been overloaded(set to a larger interval) or moretimely updates are desired (seta smaller interval)
--logfile= nsrmq.log Write log messages tothe specified file (setto '-' to write to theconsole)
Used primarily for directing logoutput to the shell whenrunning in the foreground
--nwid= Use the nameof theNetWorkerserver hostmachine
Override the ID towhich the NetWorkerserver is registered
Used primarily as adevelopment tool for simulatingmultiple NetWorker servers froma single one
--pidfile= nsrmq.pid Name of the pid file Required when running multipleadapters from the samedirectory so they do notoverwrite each others pid files
--prefix= nsrmq Use the specifiedprefix whensyslogging
Useful for organizations havinga company specific loggingformat
--reconnect-interval=
60 NetWorker serverreconnect interval inseconds
Defines how long to waitbetween attempts to reconnectto the NetWorker server whenthe connection is lost
Troubleshooting
170 Backup & Recovery Manager 1.2 User Guide

Table 50 NetWorker adaptor options (continued)
Option Option long Default /Description Use
--register-interval=
3600 NetWorker serverregistration interval inseconds
Used to change how often theadapter sends the “baseline”registration messages includingall the group results (running ornot) and configurationparameters
--result-interval=
60 Group results pollinginterval in seconds
Used to change how oftenresults are sent for runninggroups in case the querying isoverloading the NetWorkerserver
--rundir= Run in thecurrentdirectory
Change to thespecified directorybefore running
Used for alternative way to startmultiple adapters in the samedirectory but not have themoverwrite each others pid andlog files
--status-interval=
10 Status polling intervalin seconds
Used to change how often thedynamic attributes are queriedfrom the NetWorker server andsent as activities messages ifeither the NetWorker server ithas been overloaded (set to alarger interval) or more timelyupdates are desired (set asmaller interval)
--timeout= 600 NetWorker querytimeout interval inseconds
Used to define how long to waitfor the NetWorker server torespond before considering itunavailable and attempting toreconnect
--umask= 077 The (octal) filecreation mask toapply (non-worldreadable)
The default file creation mask isused to only enable access tothe user for which the processis running (for example, root),this option is useful for allowingothers to view the files such asthe log file. --umask=022 isused to enable log files as worldreadable
--debug Do not run inthe debugger
Run the reactor in thePython debugger
--euid Use thecurrent userID
Run as the effectiveuser id rather than thereal user id
Similar to uid, enables theprocess to be started by rootbut with lesser privileges.Retains the ability to regainprivileges as needed
Troubleshooting
NetWorker adaptor command line options 171
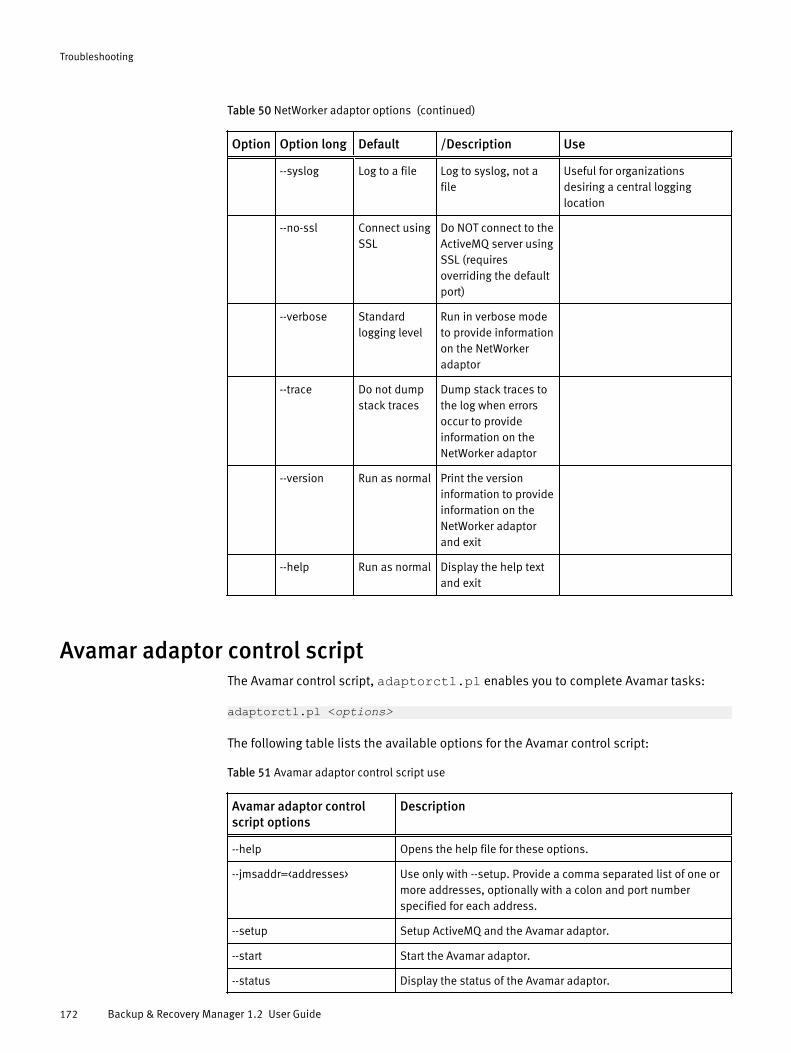
Table 50 NetWorker adaptor options (continued)
Option Option long Default /Description Use
--syslog Log to a file Log to syslog, not afile
Useful for organizationsdesiring a central logginglocation
--no-ssl Connect usingSSL
Do NOT connect to theActiveMQ server usingSSL (requiresoverriding the defaultport)
--verbose Standardlogging level
Run in verbose modeto provide informationon the NetWorkeradaptor
--trace Do not dumpstack traces
Dump stack traces tothe log when errorsoccur to provideinformation on theNetWorker adaptor
--version Run as normal Print the versioninformation to provideinformation on theNetWorker adaptorand exit
--help Run as normal Display the help textand exit
Avamar adaptor control scriptThe Avamar control script, adaptorctl.pl enables you to complete Avamar tasks:
adaptorctl.pl <options>
The following table lists the available options for the Avamar control script:
Table 51 Avamar adaptor control script use
Avamar adaptor controlscript options
Description
--help Opens the help file for these options.
--jmsaddr=<addresses> Use only with --setup. Provide a comma separated list of one ormore addresses, optionally with a colon and port numberspecified for each address.
--setup Setup ActiveMQ and the Avamar adaptor.
--start Start the Avamar adaptor.
--status Display the status of the Avamar adaptor.
Troubleshooting
172 Backup & Recovery Manager 1.2 User Guide
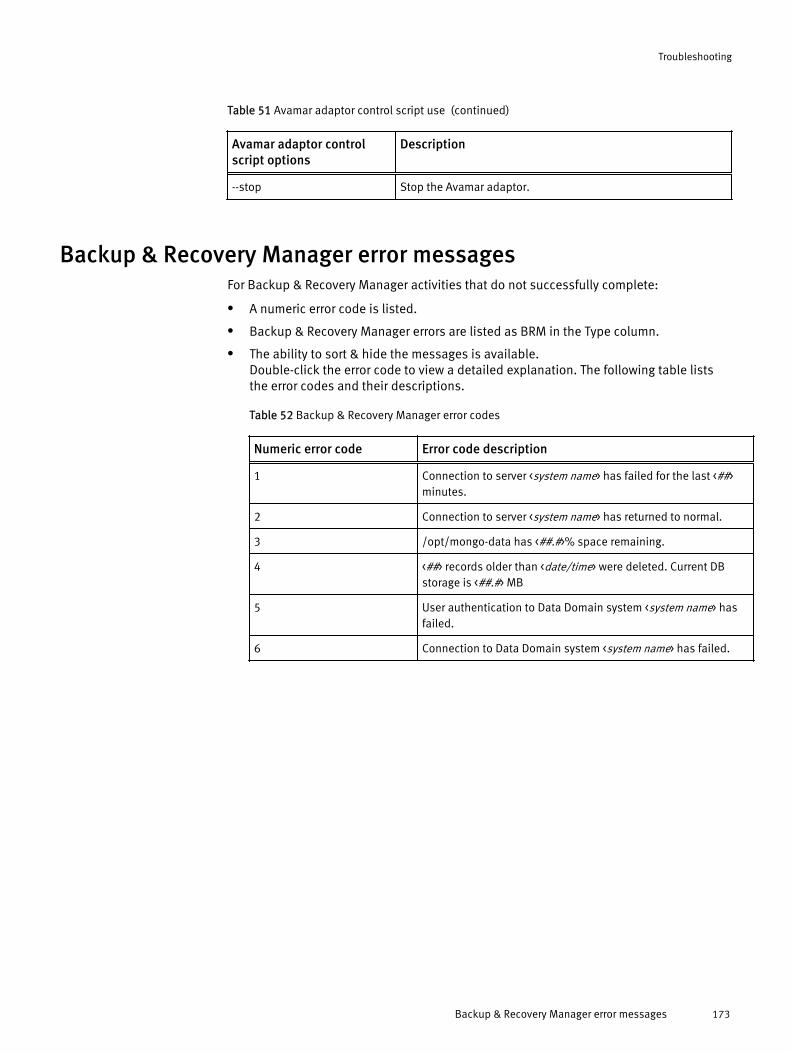
Table 51 Avamar adaptor control script use (continued)
Avamar adaptor controlscript options
Description
--stop Stop the Avamar adaptor.
Backup & Recovery Manager error messagesFor Backup & Recovery Manager activities that do not successfully complete:
l A numeric error code is listed.
l Backup & Recovery Manager errors are listed as BRM in the Type column.
l The ability to sort & hide the messages is available.Double-click the error code to view a detailed explanation. The following table liststhe error codes and their descriptions.
Table 52 Backup & Recovery Manager error codes
Numeric error code Error code description
1 Connection to server <system name> has failed for the last <##>minutes.
2 Connection to server <system name> has returned to normal.
3 /opt/mongo-data has <##.#>% space remaining.
4 <##> records older than <date/time> were deleted. Current DBstorage is <##.#> MB
5 User authentication to Data Domain system <system name> hasfailed.
6 Connection to Data Domain system <system name> has failed.
Troubleshooting
Backup & Recovery Manager error messages 173

Troubleshooting
174 Backup & Recovery Manager 1.2 User Guide
APPENDIX C
Disaster Recovery
This section provides the information on how to prevent a disaster by creating a duplicateof the Backup & Recovery Manager server for protection in the event of catastrophic dataloss:
l Clone a Virtual Machine in the vSphere Client..................................................... 176l Recovering the Backup & Recovery Manager server............................................. 177
Disaster Recovery 175
Clone a Virtual Machine in the vSphere ClientCloning creates a duplicate of the virtual machine with the same configuration, installedsoftware and application data as the original at the point-in-time of the clone.
Optionally, customize the guest operating system of the clone to change the virtualmachine name, network settings, and other properties. This prevents conflicts that canoccur if a virtual machine and a clone with identical guest operating system settings aredeployed simultaneously.
Complete details on cloning a virtual machine is available in the ESXi and vCenter Server5 documentation.
PrerequisitesThe following prerequisites must be met before you begin the clone operation:
l Connect directly to the vCenter Server in order to clone a virtual machine. Virtualmachines connected directly to an ESXi host cannot be cloned.
l To customize the guest operating system of the virtual machine, check that the guestoperating system meets the requirements for customization.
l To use a customization specification, first create or import the customizationspecification.
l To use a custom script to generate the host name or IP address for the new virtualmachine, configure the script.
Cloning the Backup & Recovery Manager serverCloning provides the abiltiy to create a duplicate of the virtual machine with the sameconfiguration, installed software and application data as the original at the point-in-timeof the clone.
Procedure
1. Right-click the virtual machine and select Clone.
2. Enter a virtual machine name, select a location, and click Next.
3. Select a host or cluster on which to run the new virtual machine.
4. Select a resource pool in which to run the virtual machine and click Next.
5. Select the datastore location to store the virtual machine files.
6. Select the format for the virtual machine's disks and click Next.
7. Select a guest operating system customization option.
8. Review your selections and select whether to power on the virtual machine or editvirtual machine settings.
Results
The cloned virtual machine is deployed. The virtual machine cannot be used or editeduntil the cloning is complete. This might take several minutes if the cloning involvescreating a virtual disk. If required, cancel the cloning at any point before thecustomization stage.
Disaster Recovery
176 Backup & Recovery Manager 1.2 User Guide
Recovering the Backup & Recovery Manager serverYou can recover the Backup & Recovery Manager server by using the Avamar VMwareplugin.
Procedure
1. Configure VMware proxy with vCenter. The Avamar for VMware User Guide providesdetails on configuring the VMware proxy with vCenter.
2. Take a VM backup of the Backup & Recovery Manager server by using the AvamarPlugin. The Avamar for VMware User Guide provides details on backing up the Backup& Recovery Manager with the Avamar Plugin.
3. Restore the backed up VM by using Restore to New Virtual Machine. The Backup &Recovery Manager server is successfully recovered.
4. When the restore operation completes, edit the network configuration with same IPaddress.
NOTICE
This is a restriction for Linux VMs in VMware VM backups.
A new virtual NIC ID is created in the restored Backup & Recovery Manager server:
a. Delete the old NIC card and provide all the Network information for the new NICcard.
b. Restart the network services.
c. Restart the Backup & Recovery Manager server.
d. Login Backup & Recovery Manager.
Re-registering the Avamar or NetWorker servers if requiredYou can register or re-register the Avamar or Networker servers if they become offline inSystems. The server appears grayed out if it is offline.
Procedure
l For Avamar, use the following command:
adaptorctl.pl --setup --jmsaddr=<ucas server>l For NetWorker, restart the Networker adaptor service.
Disaster Recovery
Recovering the Backup & Recovery Manager server 177

Disaster Recovery
178 Backup & Recovery Manager 1.2 User Guide
GLOSSARY
This glossary contains terms related to disk storage subsystems. Many of these terms areused in this manual.
A
adaptor A Backup & Recovery Manager adaptor is the appliance that is used to interface with theBackup & Recovery Manager server on Avamar, NetWorker and Data Domain.
Avinstaller A backend service that executes and reports package installations. The Avinstaller is usedto install the Avamar Backup & Recovery Manager adaptor.
B
Backup & RecoveryManager server
The Backup & Recovery Manager server is the appliance which must be deployed in orderto run the Backup & Recovery Manager adaptors.
C
cache Random access electronic storage used to retain frequently used data for faster access bythe channel.
checkpoint Checkpoints are system-wide backups taken for the express purpose of assisting withdisaster recovery.
clone Duplicate copy of:
l Backed-up data, which is indexed and tracked by the NetWorker server. Single savesets or entire volumes can be cloned.
l Virtual machine with the same configuration, installed software and application dataas the original at the point-in-time of the clone.
D
dataset A policy that defines a set of files, directories, and filesystems for each supported platformthat are included or excluded in backups across a group of clients. A dataset is apersistent and reusable Avamar policy that can be named and attached to multiple groups.
E
enterprise Computers and folders organized into a tree-based visual representation.
Backup & Recovery Manager 1.2 User Guide 179

Enterprise ManagerServer (EMS)
The Avamar Enterprise Manager Server (EMS) provides essential services required todisplay Avamar system information, and provides a mechanism for managing Avamarsystems using a standard web browser. The EMS also communicates directly withManagement Console Servers (MCS).
F
full replication A full “root-to-root” replication creates a complete logical copy of an entire source systemon the destination system. The replicated data is not copied to the REPLICATE domain.Instead, it is added to the root domain just as if source clients had registered with thedestination system. Also, source server data replicated in this manner is fully modifiableon the destination system. This replication method is typically used for system migration(from a smaller Avamar configuration to a larger, possibly multi-node configuration) orsystem replacement (for instance, in a case of disaster recovery).
G
gigabyte (GB) 109 bytes.
group l A level of organization in Avamar Administrator for one or more Avamar clients. Allclients in an Avamar group use the same group policies, which include the dataset,backup schedule, and retention policy.
l Client computer or group of clients that are configured to back up files during aNetWorker scheduled backup, according to a single designated schedule or set ofconditions.
H
HFS Hash Filesystem. The content addressed storage area inside the Avamar server used tostore client backups.
I
I/O device An addressable input/output unit, such as a disk or tape device.
ID Identifier, a sequence of bits or characters that identifies a program, device, controller, orsystem.
J
Java Type of high-level programming language that enables the same, unmodified Java programto run on most computer operating systems. See Java Virtual Machine (JVM)
Java archive (JAR) File that contains compressed components needed for a Java applet or application.
Java plug-in JVM that can be used by a web browser to run Java applets.
Java Virtual Machine(JVM)
Execution environment for interpreting the Java programming language. Each operatingsystem runs a unique JVM to interpret Java code.
Glossary
180 Backup & Recovery Manager 1.2 User Guide
K
K Kilobyte, 1024 bytes.
L
label Electronic header on a volume used for identification by NetWorker or other data moverapplication.
Logical Volume Manager(LVM)
Software that controls disk resources by mapping data between a logical view of storagespace and the actual physical disks.
M
MB Megabyte, 106 bytes.
N
NetWorker ManagementConsole (NMC)
Software program that is used to manage NetWorker servers and clients. The NMC serveralso provides reporting and monitoring capabilities for all NetWorker processes.
O
OVA Is the application server deployed as a virtual machine. The Backup & Recovery Managerserver (OVA) raw database is a temporary buffer for storing messages until they areprocessed.
P
promotion The process of moving data from a track on the disk device to cache slot.
R
replication Replication is an optional feature that enables one Avamar server to store a read-only copyof its data on another Avamar server to support future disaster recovery of that server.
restore File or object restore. An operation that retrieves one or more filesystems, directories, files,or data objects from a backup and writes the data to a designated location.
roles A setting in the Backup & Recovery Manager that controls which operations each user canperform. Roles are assigned on a user-by-user basis.
S
save set Group of data from a single NetWorker client computer that is backed up on storage media.
Glossary
Backup & Recovery Manager 1.2 User Guide 181
U
user 1. A NetWorker user who can back up and recover files from a computer.
2. A Console user who has standard access privileges to the Console server.
V
volume l Unit of physical storage medium, such as a magnetic tape, optical disk, or filesystemused to store data. Backup data must be stored on a backup volume and cannot bestored on an archive volume or a clone volume.
l Identifiable unit of data storage that may reside on one or more computer disks.
Glossary
182 Backup & Recovery Manager 1.2 User Guide