banner document management suite · is the minimum version that supports mep. • banner document...
TRANSCRIPT

Banner Document Management SuiteMulti-Entity ProcessingImplementation Guide
Release 8.4May 2012

Banner®, Colleague®, PowerCAMPUS®, Luminis® and Datatel® are trademarks of Ellucian or its affiliates and are registered in the U.S. and other countries. Ellucian, Advance, DegreeWorks, fsaATLAS, Course Signals, SmartCall, Recruiter, MOX, ILP, and WCMS are trademarks of Ellucian or its affiliates. Other names may be trademarks of their respective owners.
©2012 Ellucian. All rights reserved. The unauthorized possession, use, reproduction, distribution, display or disclosure of this material or the information contained herein is prohibited.
Contains confidential and proprietary information of Ellucian and its subsidiaries. Use of these materials is limited to Ellucian licensees, and is subject to the terms and conditions of one or more written license agreements between Ellucian and the licensee in question.
In preparing and providing this publication, Ellucian is not rendering legal, accounting, or other similar professional services. Ellucian makes no claims that an institution's use of this publication or the software for which it is provided will insure compliance with applicable federal or state laws, rules, or regulations. Each organization should seek legal, accounting and other similar professional services from competent providers of the organization’s own choosing.
Prepared by: Ellucian4375 Fair Lakes CourtFairfax, Virginia 22033United States of America
Revision History
Publication Date Summary
May 2012 New version that supports Banner Document Management Suite 8.4 software.

Contents
May 201
Overview . . . . . . . . . . . . . . . . . . . . . . . . . . . . . . . . . . . . . . . . . . . . . . . . . . . . . . . . . . . . . . . . 7
What is Multiple-Entity Processing? . . . . . . . . . . . . . . . . . . . . . . . . . . . . . . . . . . . . . 7
BDMS and Multi-Entity Processing. . . . . . . . . . . . . . . . . . . . . . . . . . . . . . . . . . . . . . . 7
Understanding your BDMS configuration for Multi-Entity Processing. . . . . . . 8
Additional documentation. . . . . . . . . . . . . . . . . . . . . . . . . . . . . . . . . . . . . . . . . . . . . . . 10
Prerequisites. . . . . . . . . . . . . . . . . . . . . . . . . . . . . . . . . . . . . . . . . . . . . . . . . . . . . . . . . . . . 11
Baseline MEP implementation and configuration . . . . . . . . . . . . . . . . . . . . . . . . . 11
BDMS prerequisite . . . . . . . . . . . . . . . . . . . . . . . . . . . . . . . . . . . . . . . . . . . . . . . . . . . . . 12
Other Ellucian product prerequisites. . . . . . . . . . . . . . . . . . . . . . . . . . . . . . . . . . . . . 12
Third-party product prerequisite . . . . . . . . . . . . . . . . . . . . . . . . . . . . . . . . . . . . . . . . . 12
Implementation Steps . . . . . . . . . . . . . . . . . . . . . . . . . . . . . . . . . . . . . . . . . . . . . . . . . . 13
Step 1 Upgrade BDMS . . . . . . . . . . . . . . . . . . . . . . . . . . . . . . . . . . . . . . . . . . . . . . . . . 13
Step 2 Locate your institution codes . . . . . . . . . . . . . . . . . . . . . . . . . . . . . . . . . . . . . 14
Step 3 Create a sequence for every data source. . . . . . . . . . . . . . . . . . . . . . . . . . . 15
Step 4 Create an OTGMGR schema for each institution . . . . . . . . . . . . . . . . . . . . 15
Step 5 Add OTGMGR schema owners to GSAVPDI . . . . . . . . . . . . . . . . . . . . . . . 16
Step 6 Add data sources to ApplicationXtender Administrator . . . . . . . . . . . . . . . 17
Step 7 Verify that each data source is visible . . . . . . . . . . . . . . . . . . . . . . . . . . . . . . 18
Step 8 Register each data source . . . . . . . . . . . . . . . . . . . . . . . . . . . . . . . . . . . . . . . 18
Step 9 Apply the security package for MEP . . . . . . . . . . . . . . . . . . . . . . . . . . . . . . . 19
Step 10 Apply VPD/MEP to the AE_LOGIN table . . . . . . . . . . . . . . . . . . . . . . . . . . 20
Step 11 Locate the application IDs for BDMS applications . . . . . . . . . . . . . . . . . . 20
Step 12 Apply VPD/MEP triggers to the AE_DT, AE_AI, and AE_RF tables . . . 21
2 Banner Document Management Suite 8.4 3Multi-Entity Processing Implementation Guide
Contents

4
Step 13 Recreate the index on the AE_RF tables . . . . . . . . . . . . . . . . . . . . . . . . . . 21
Step 14 Apply VPD/MEP policies to the AE_DT, AE_AI, and AE_RF tables . . . 22
Step 15 Apply VPD/MEP to the user-defined list (UL) tables (optional). . . . . . . . 22
Step 16 Apply VPD/MEP to the AE_BS table (optional) . . . . . . . . . . . . . . . . . . . . . 23
Step 17 Apply VPD/MEP to the AE_PATHS table (optional) . . . . . . . . . . . . . . . . . 24
Administration . . . . . . . . . . . . . . . . . . . . . . . . . . . . . . . . . . . . . . . . . . . . . . . . . . . . . . . . . . 25
Data sources and OTGMGR users . . . . . . . . . . . . . . . . . . . . . . . . . . . . . . . . . . . . . . . 25
User and group management. . . . . . . . . . . . . . . . . . . . . . . . . . . . . . . . . . . . . . . . . . . . 26
Import Banner users into BDMS . . . . . . . . . . . . . . . . . . . . . . . . . . . . . . . . . . . . . . . . . . 26
Create non-Banner users in BDMS . . . . . . . . . . . . . . . . . . . . . . . . . . . . . . . . . . . . . . . . 27
Assign privileges (non-group) to users in BDMS . . . . . . . . . . . . . . . . . . . . . . . . . . . . 28
Define user groups in BDMS . . . . . . . . . . . . . . . . . . . . . . . . . . . . . . . . . . . . . . . . . . . . . 29
Assign users to a group in BDMS . . . . . . . . . . . . . . . . . . . . . . . . . . . . . . . . . . . . . . . . . 30
User restrictions . . . . . . . . . . . . . . . . . . . . . . . . . . . . . . . . . . . . . . . . . . . . . . . . . . . . . . . 30
Login restrictions . . . . . . . . . . . . . . . . . . . . . . . . . . . . . . . . . . . . . . . . . . . . . . . . . . . . . . . 30
Access restrictions on INB forms . . . . . . . . . . . . . . . . . . . . . . . . . . . . . . . . . . . . . . . . . . 33
Allowable ApplicationXtender functions . . . . . . . . . . . . . . . . . . . . . . . . . . . . . . . . . . . . 33
Document indexing. . . . . . . . . . . . . . . . . . . . . . . . . . . . . . . . . . . . . . . . . . . . . . . . . . . . . 35
VPDI_CODE in application indexes . . . . . . . . . . . . . . . . . . . . . . . . . . . . . . . . . . . . . . . 35
Auto index feature . . . . . . . . . . . . . . . . . . . . . . . . . . . . . . . . . . . . . . . . . . . . . . . . . . . . . . 36
Key reference feature . . . . . . . . . . . . . . . . . . . . . . . . . . . . . . . . . . . . . . . . . . . . . . . . . . . 36
Document queries . . . . . . . . . . . . . . . . . . . . . . . . . . . . . . . . . . . . . . . . . . . . . . . . . . . . . . 37
BDMS users who are Banner users . . . . . . . . . . . . . . . . . . . . . . . . . . . . . . . . . . . . . . . 37
BDMS users who are not Banner users . . . . . . . . . . . . . . . . . . . . . . . . . . . . . . . . . . . . 37
Saved and cross-application queries . . . . . . . . . . . . . . . . . . . . . . . . . . . . . . . . . . . . 38
Batches. . . . . . . . . . . . . . . . . . . . . . . . . . . . . . . . . . . . . . . . . . . . . . . . . . . . . . . . . . . . . . . . 38
Custom applications enabled for VPD/MEP. . . . . . . . . . . . . . . . . . . . . . . . . . . . . . . 39
BDMS user for Banner Workflow . . . . . . . . . . . . . . . . . . . . . . . . . . . . . . . . . . . . . . . . 40
Banner Document Management Suite 8.4 May 2012Multi-Entity Processing Implementation Guide
May 201
User Instructions . . . . . . . . . . . . . . . . . . . . . . . . . . . . . . . . . . . . . . . . . . . . . . . . . . . . . . . 41
Direct access to ApplicationXtender . . . . . . . . . . . . . . . . . . . . . . . . . . . . . . . . . . . . . 41
Log in to ApplicationXtender. . . . . . . . . . . . . . . . . . . . . . . . . . . . . . . . . . . . . . . . . . . . . . 41
Log in to a different data source . . . . . . . . . . . . . . . . . . . . . . . . . . . . . . . . . . . . . . . . . . 42
Access to BDMS from INB . . . . . . . . . . . . . . . . . . . . . . . . . . . . . . . . . . . . . . . . . . . . . . 42
Tools menu . . . . . . . . . . . . . . . . . . . . . . . . . . . . . . . . . . . . . . . . . . . . . . . . . . . . . . . . . . . . 42
Icons on the toolbar . . . . . . . . . . . . . . . . . . . . . . . . . . . . . . . . . . . . . . . . . . . . . . . . . . . . . 43
Document indexing in BDMS . . . . . . . . . . . . . . . . . . . . . . . . . . . . . . . . . . . . . . . . . . . . 43
Indexing in a VPD/MEP environment . . . . . . . . . . . . . . . . . . . . . . . . . . . . . . . . . . . . . . 44
Auto index feature . . . . . . . . . . . . . . . . . . . . . . . . . . . . . . . . . . . . . . . . . . . . . . . . . . . . . . 44
Key reference feature . . . . . . . . . . . . . . . . . . . . . . . . . . . . . . . . . . . . . . . . . . . . . . . . . . . 45
Banner requirements linking . . . . . . . . . . . . . . . . . . . . . . . . . . . . . . . . . . . . . . . . . . . . 45
Cross-Reference of Tables . . . . . . . . . . . . . . . . . . . . . . . . . . . . . . . . . . . . . . . . . . . . 47
Banner Advancement . . . . . . . . . . . . . . . . . . . . . . . . . . . . . . . . . . . . . . . . . . . . . . . . . . . 47
Banner Finance . . . . . . . . . . . . . . . . . . . . . . . . . . . . . . . . . . . . . . . . . . . . . . . . . . . . . . . . 47
Banner Financial Aid . . . . . . . . . . . . . . . . . . . . . . . . . . . . . . . . . . . . . . . . . . . . . . . . . . . 48
Banner Human Resources . . . . . . . . . . . . . . . . . . . . . . . . . . . . . . . . . . . . . . . . . . . . . . 49
Banner Student . . . . . . . . . . . . . . . . . . . . . . . . . . . . . . . . . . . . . . . . . . . . . . . . . . . . . . . . 49
2 Banner Document Management Suite 8.4 5Multi-Entity Processing Implementation Guide

6
Banner Document Management Suite 8.4 May 2012Multi-Entity Processing Implementation Guide
May 201
Overview
This section provides overview information about implementing Banner® Document Management Suite (BDMS) in a Multi-Entity Processing (MEP) environment.
What is Multiple-Entity Processing?
Multi-Entity Processing (MEP) provides the architecture and processes that enable two or more entities to coexist in a single application architecture. MEP facilitates data segmentation and business processing so that entities can function as autonomous units while taking advantage of shared concepts and architecture when appropriate.
MEP incorporates data from all affiliated entities within the region or consortium into a single system. MEP provides the following benefits:
• Allows you to host multiple institutions from one location, centralizing technical administration and support
• Effectively uses technology resources by reducing the distribution of hardware and system administration resources
• Reuses system and security administration models across products
• Preserves familiar user experiences and business processes
• Improves data aggregation for reporting purposes
All Banner products can implement MEP functionality by using Oracle’s Virtual Private Database (VPD), which implements row-level security using Fine Grained Access Control (FGAC).
BDMS and Multi-Entity Processing
BDMS in a MEP environment allows you to segregate documents by the entities (campuses, institutions, locations, and so on) that you define in your MEP environment.
To accomplish this, all BDMS-delivered applications, beginning with BDMS 8.4, include a VPDI_CODE index field. To enable a BDMS application for VPD/MEP, VPDI policies must be applied to the VPDI_CODE index field of the application. “Cross-Reference of Tables” on page 47 lists the conditions when a BDMS application must be enabled for VPD/MEP. Enabling a BDMS application for VPD/MEP ensures that Banner table data integrates appropriately with the BDMS application based on the VPDI_CODE.
2 Banner Document Management Suite 8.4 7Multi-Entity Processing Implementation Guide
Overview
8
If a BDMS application is enabled for VPD/MEP, the VPDI_CODE for a document index is populated with an institution code, based on the data source under which the user logged into ApplicationXtender (Document Manager or Web Access).
Flexibility is built into BDMS. You can choose which BDMS applications to enable for VPD/MEP, based on which Banner tables are enabled for VPD/MEP. If a BDMS-delivered application is enabled for VPD/MEP, you need to enable a user-defined list for the application only if the Banner table that is used to populate the user-defined list is enabled for VPD/MEP.
In addition, you can choose to enable ApplicationXtender batches for MEP. This allows you to enforce an additional layer of security to batch creation and processing based on a BDMS user’s institution privileges as defined in your MEP environment.
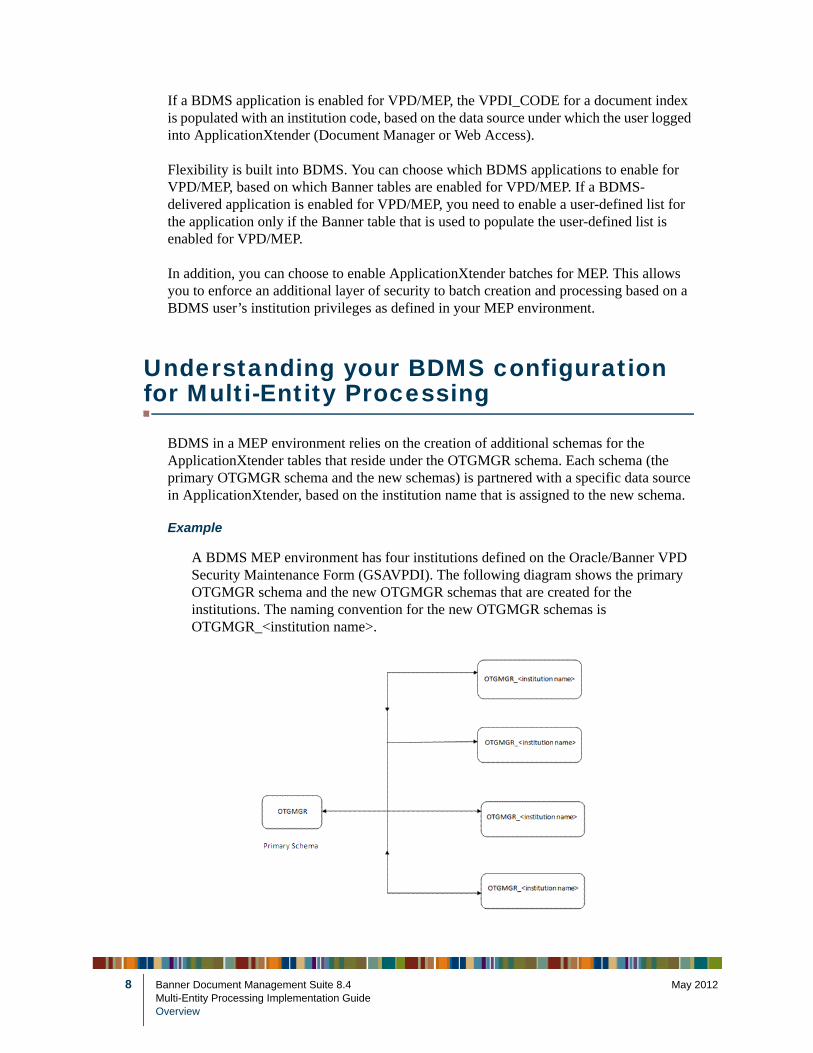
Understanding your BDMS configuration for Multi-Entity Processing
BDMS in a MEP environment relies on the creation of additional schemas for the ApplicationXtender tables that reside under the OTGMGR schema. Each schema (the primary OTGMGR schema and the new schemas) is partnered with a specific data source in ApplicationXtender, based on the institution name that is assigned to the new schema.
Example
A BDMS MEP environment has four institutions defined on the Oracle/Banner VPD Security Maintenance Form (GSAVPDI). The following diagram shows the primary OTGMGR schema and the new OTGMGR schemas that are created for the institutions. The naming convention for the new OTGMGR schemas is OTGMGR_<institution name>.
Banner Document Management Suite 8.4 May 2012Multi-Entity Processing Implementation GuideOverview
May 201
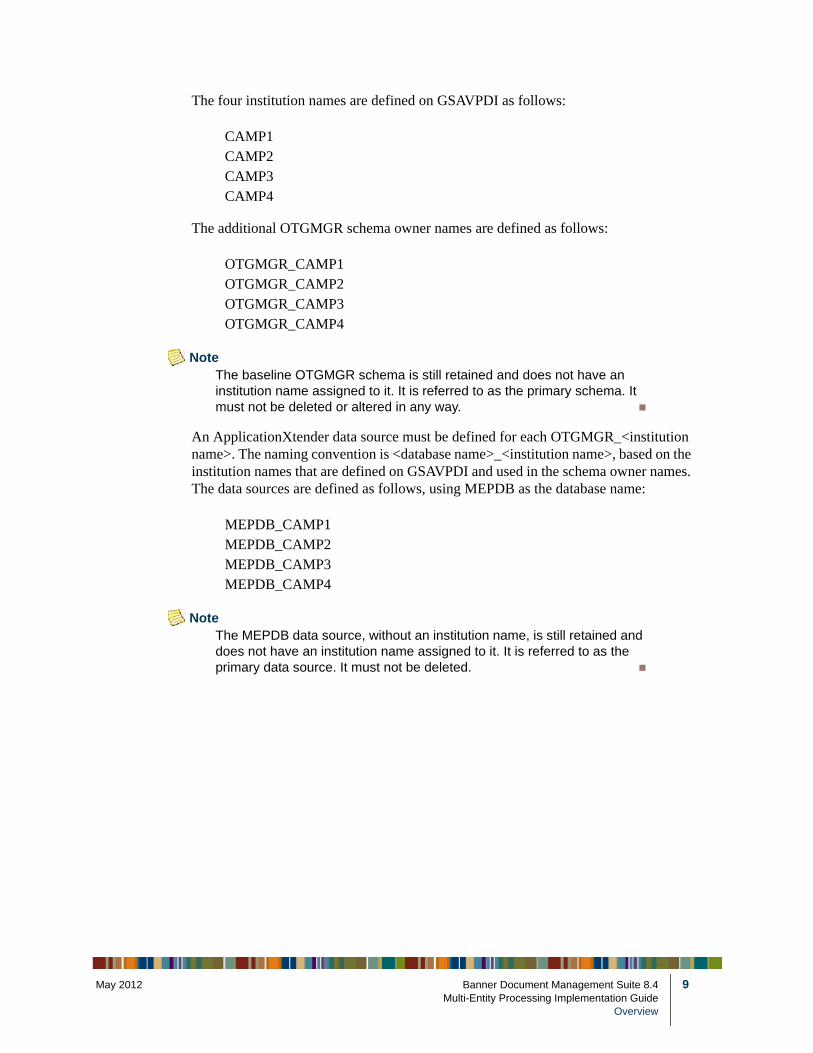
The four institution names are defined on GSAVPDI as follows:
The additional OTGMGR schema owner names are defined as follows:
NoteThe baseline OTGMGR schema is still retained and does not have an institution name assigned to it. It is referred to as the primary schema. It must not be deleted or altered in any way.
An ApplicationXtender data source must be defined for each OTGMGR_<institution name>. The naming convention is <database name>_<institution name>, based on the institution names that are defined on GSAVPDI and used in the schema owner names. The data sources are defined as follows, using MEPDB as the database name:
NoteThe MEPDB data source, without an institution name, is still retained and does not have an institution name assigned to it. It is referred to as the primary data source. It must not be deleted.
CAMP1CAMP2CAMP3CAMP4
OTGMGR_CAMP1OTGMGR_CAMP2OTGMGR_CAMP3OTGMGR_CAMP4
MEPDB_CAMP1MEPDB_CAMP2MEPDB_CAMP3MEPDB_CAMP4
2 Banner Document Management Suite 8.4 9Multi-Entity Processing Implementation Guide
Overview
10
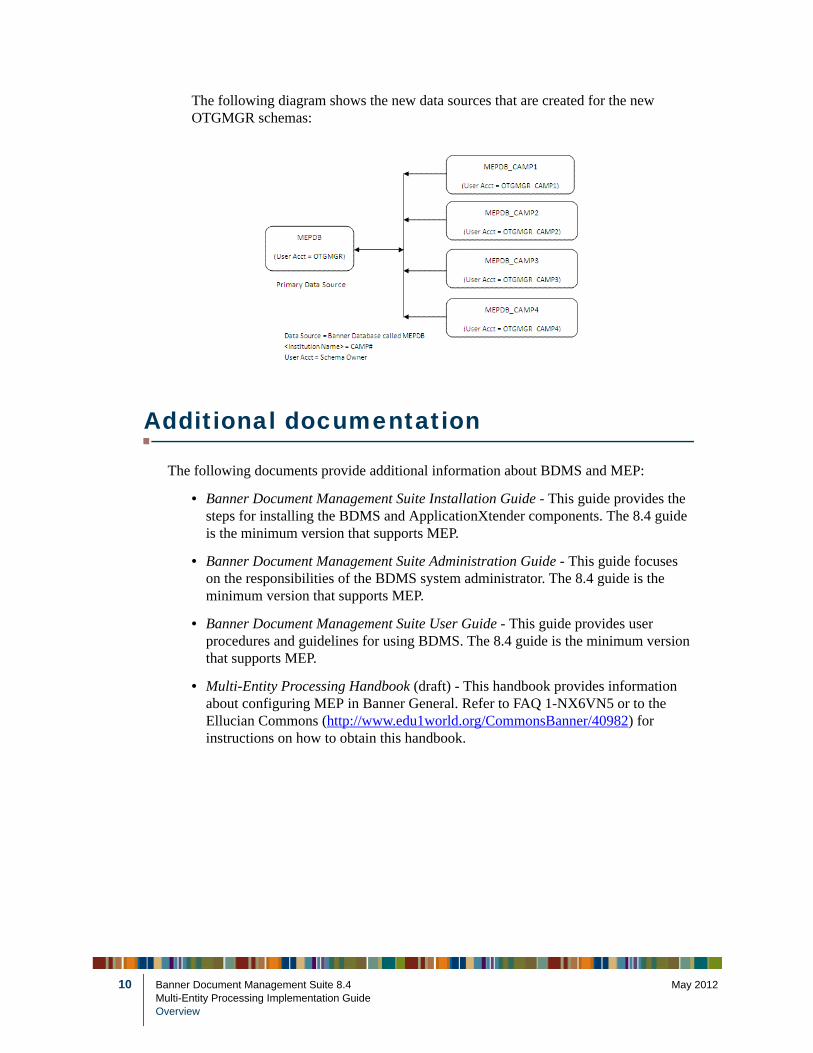
The following diagram shows the new data sources that are created for the new OTGMGR schemas:
Additional documentation
The following documents provide additional information about BDMS and MEP:
• Banner Document Management Suite Installation Guide - This guide provides the steps for installing the BDMS and ApplicationXtender components. The 8.4 guide is the minimum version that supports MEP.
• Banner Document Management Suite Administration Guide - This guide focuses on the responsibilities of the BDMS system administrator. The 8.4 guide is the minimum version that supports MEP.
• Banner Document Management Suite User Guide - This guide provides user procedures and guidelines for using BDMS. The 8.4 guide is the minimum version that supports MEP.
• Multi-Entity Processing Handbook (draft) - This handbook provides information about configuring MEP in Banner General. Refer to FAQ 1-NX6VN5 or to the Ellucian Commons (http://www.edu1world.org/CommonsBanner/40982) for instructions on how to obtain this handbook.
Banner Document Management Suite 8.4 May 2012Multi-Entity Processing Implementation GuideOverview

May 201
Prerequisites
BDMS in a MEP environment has the following prerequisites.
Baseline MEP implementation and configuration
Before implementing BDMS in a MEP environment, you must set up and configure a MEP environment for your university or college by performing the following steps in Banner General.
1. Add the VPDI_CODE column to all required Banner tables.
You can add the column manually, or you can add the column by executing the Database Extension Utility. To manually add the column, log in to the required module owner schema of the table and execute the following commands:
ALTER TABLE <table name>ADD (<table name>_VPDI_CODE VARCHAR2(6) NOT NULL);
Example
Log in to the FAISMGR schema and execute the following commands:
ALTER TABLE RRRAREQADD (RRRAREQ_VPDI_CODE VARCHAR2(6) NOT NULL);
2. For each required Banner table, check if an index exists:
• If an index exists, add <table>_VPDI_CODE to the index.
• If an index does not exist, skip this step.
3. Create institutions and users on the Oracle/Banner VPD Security Maintenance Form (GSAVPDI).
4. Apply the VPDI trigger to the selected Banner tables. This trigger populates <table>_VPDI_CODE with the logged in institution code.
5. Apply the VPDI policy to the selected Banner tables.
2 Banner Document Management Suite 8.4 11Multi-Entity Processing Implementation Guide
Prerequisites

12
The Multi-Entity Processing Handbook (draft) contains additional configuration information. Refer to FAQ 1-NX6VN5 or to the Ellucian Commons (http://www.edu1world.org/CommonsBanner/40982) for instructions on how to obtain this handbook.
BDMS prerequisite
BDMS 8.4 is the minimum required version for implementing BDMS in a MEP environment.
Other Ellucian product prerequisites
BDMS in a MEP environment requires Banner General 8.4.1.2 or later. The following minimum version of other products is also required for those products that are licensed at your university or college:
If the minimum version or later is not installed, you must perform the product upgrade before you start the implementation steps in this document.
Third-party product prerequisite
ApplicationXtender 6.50 Patch 1 is the minimum required version for implementing BDMS in a MEP environment.
Product Required Minimum Version
Banner Advancement 8.1Banner Finance 8.2Banner Financial Aid 8.11Banner Human Resources 8.1Banner Position Control 8.1Banner Student 8.1Banner Travel and Expense Management 8.2Banner Web Tailor 8.4.2Banner Workflow 8.0Luminis® Platform IV
Banner Document Management Suite 8.4 May 2012Multi-Entity Processing Implementation GuidePrerequisites

May 201
Implementation Steps
The following steps are used to implement BDMS in a MEP environment. Details for each step are provided in the following sections.
• Step 1, “Upgrade BDMS”
• Step 2, “Locate your institution codes”
• Step 3, “Create a sequence for every data source”
• Step 4, “Create an OTGMGR schema for each institution”
• Step 5, “Add OTGMGR schema owners to GSAVPDI”
• Step 6, “Add data sources to ApplicationXtender Administrator”
• Step 7, “Verify that each data source is visible”
• Step 8, “Register each data source”
• Step 9, “Apply the security package for MEP”
• Step 10, “Apply VPD/MEP to the AE_LOGIN table”
• Step 11, “Locate the application IDs for BDMS applications”
• Step 12, “Apply VPD/MEP triggers to the AE_DT, AE_AI, and AE_RF tables”
• Step 13, “Recreate the index on the AE_RF tables”
• Step 14, “Apply VPD/MEP policies to the AE_DT, AE_AI, and AE_RF tables”
• Step 15, “Apply VPD/MEP to the user-defined list (UL) tables (optional)”
• Step 16, “Apply VPD/MEP to the AE_BS table (optional)”
• Step 17, “Apply VPD/MEP to the AE_PATHS table (optional)”
Step 1 Upgrade BDMS
BDMS 8.4, or a later version, must be installed before you perform the following steps. BDMS 8.4 contains the packages, library object, and scripts that fully support BDMS in a MEP environment. BDMS 8.4 adds the VPDI_CODE field to BDMS application structures and to other pertinent ApplicationXtender tables for indexing.
If you are not on BDMS 8.4, download the Banner Document Management Suite 8.4 Installation Guide from the Customer Support Center - Documentation Download. Then follow the instructions to download the required objects and upgrade to BDMS 8.4.
2 Banner Document Management Suite 8.4 13Multi-Entity Processing Implementation Guide
Implementation Steps
14
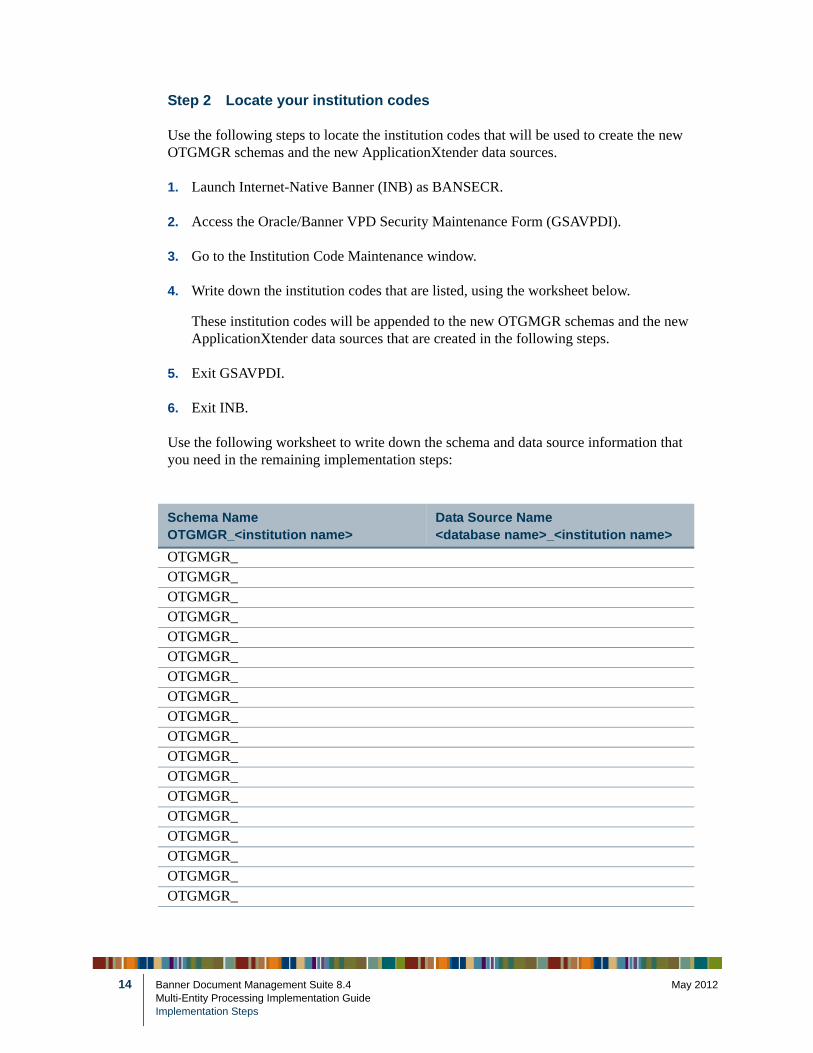
Step 2 Locate your institution codes
Use the following steps to locate the institution codes that will be used to create the new OTGMGR schemas and the new ApplicationXtender data sources.
1. Launch Internet-Native Banner (INB) as BANSECR.
2. Access the Oracle/Banner VPD Security Maintenance Form (GSAVPDI).
3. Go to the Institution Code Maintenance window.
4. Write down the institution codes that are listed, using the worksheet below.
These institution codes will be appended to the new OTGMGR schemas and the new ApplicationXtender data sources that are created in the following steps.
5. Exit GSAVPDI.
6. Exit INB.
Use the following worksheet to write down the schema and data source information that you need in the remaining implementation steps:
Schema NameOTGMGR_<institution name>
Data Source Name<database name>_<institution name>
OTGMGR_OTGMGR_OTGMGR_OTGMGR_OTGMGR_OTGMGR_OTGMGR_OTGMGR_OTGMGR_OTGMGR_OTGMGR_OTGMGR_OTGMGR_OTGMGR_OTGMGR_OTGMGR_OTGMGR_OTGMGR_
Banner Document Management Suite 8.4 May 2012Multi-Entity Processing Implementation GuideImplementation Steps
May 201
Step 3 Create a sequence for every data source
A BDMS-specific sequence must be used for every data source in ApplicationXtender Administrator. This sequence creates a unique cfgvalue for every data source to avoid conflicts when ApplicationXtender Administrator is opened from the ApplicationXtender server. Refer to Step 2, “Locate your institution codes” for assistance in identifying the new data sources. Use the following steps to create the BDMS-specific sequence.
1. Execute the following script to create the BDMS-specific sequence for data sources:
sqlplus /nolog
start edrseed_080400_04.sql;
2. Review the edrseed_080400_04 listing.
NoteThe following error can be ignored: ORA-00955: name is already used by an existing object.
Step 4 Create an OTGMGR schema for each institution
You must create an OTGMGR schema for each institution name that is set up on GSAVPDI. The name of each new OTGMGR schema has the following format:
OTGMGR_<institution name>
NoteThe OTGMGR schema that is not attached to an institution is still retained.
Use the following steps for each institution. Refer to Step 2, “Locate your institution codes” for assistance in locating your institution codes.
1. Create an institution as follows:
1.1. Invoke SQL*Plus and execute the following procedure to grant DBA privileges to the BANIMGR user:
sqlplus /nolog @egivedba_mep
1.2. Connect to the database as BANIMGR:
sqlplus BANIMGR/password
1.3. Execute the following script to create an institution:
start otgmgr_080300_01.sql;
1.4. Respond to the prompts for the institution name, password, and tablespace.
2 Banner Document Management Suite 8.4 15Multi-Entity Processing Implementation Guide
Implementation Steps

16
2. Grant privileges to the new institution on all objects of OTGMGR as follows:
2.1. Connect to the database as OTGMGR:
sqlplus OTGMGR/password
2.2. Execute the following script:
start otgmgr_080300_02.sql;
2.3. Respond to the prompts for the institution name and password.
3. Create the necessary objects in the new schema as follows:
3.1. Connect to the database as the new institution:
sqlplus OTGMGR_<institution_name>/password
3.2. Execute the following script:
start otgmgr_080300_03.sql;
Step 5 Add OTGMGR schema owners to GSAVPDI
BDMS packages are executed under the OTGMGR schema owner. For MEP, the packages are also executed under the OTGMGR_<institution_name> schema owners. For each institution code that is defined on GSAVPDI, use the following steps to associate each new schema owner with the appropriate institution. Refer to Step 2, “Locate your institution codes” for assistance in locating your OTGMGR schema owner names.
1. Launch Internet-Native Banner (INB) as BANSECR.
2. Access the Oracle/Banner VPD Security Maintenance Form (GSAVPDI).
3. Go to the User/Institution Maintenance window.
4. Add a user record for each OTGMGR schema owner:
5. Save your changes.
6. Exit GSAVPDI.
7. Exit INB.
User ID Enter OTGMGR_<institution name>.
User Default Select the check box to indicate that the institution code is the default for the OTGMGR_<institution_name> user ID.
Banner Document Management Suite 8.4 May 2012Multi-Entity Processing Implementation GuideImplementation Steps
May 201
Step 6 Add data sources to ApplicationXtender Administrator
A data source must be created for each institution name that is defined on GSAVPDI. (This relates to the OTGMGR_<institution_name> schema owners that were defined in the previous step.) The following naming convention is used in ApplicationXtender:
<data source name>_<institution_name>
The data source name must be constructed with this format. BDMS relies on the underscore between <data source name> and <institution_name> to parse the institution name and identify the institution under which the BDMS user is operating in ApplicationXtender. This ties back to the BDMS user’s assigned institution(s) in Banner.
Use the following steps to add each new data source. Refer to Step 2, “Locate your institution codes” for assistance in locating your data source names.
1. Launch ApplicationXtender Administrator as SYSOP.
2. Expand the Environment node and select Data Sources.
3. Click Add. The Data Source Identification page is displayed.
4. Enter the following information:
5. Click Next. The next page of the Data Source Identification page is displayed.
6. Click Data Link. The Data Link Properties dialog box is displayed.
7. On the Provider tab, select Microsoft OLE DB Provider for Oracle.
8. Click Next. The Connection tab is displayed.
9. Enter the following information:
10. Make sure that the Allow saving password check box is selected.
Name <data source name>_<institution name>
Description Description of the data source
Server name Oracle database alias name for your Banner/Oracle database. This is the same as the server name defined for the primary data source.
User name OTGMGR_<institution name>.
Password Password assigned to OTGMGR_<institution name>.
2 Banner Document Management Suite 8.4 17Multi-Entity Processing Implementation Guide
Implementation Steps

18
11. Click Test Connection.
If the text is successful, continue to the next step. If the test fails, click Cancel and re-enter the data source information.
12. Click OK. The Data Source Identification page is redisplayed with a value in the Database field.
13. Click Next. The Authentication Method page is displayed.
14. Make sure that the Global User Credentials radio button is selected.
15. Click Next. The Data Source Licensing page is displayed.
16. Select the connection that you want to use from the License Server drop-down list.
17. Click Next. The Data Source Security Provider page is displayed.
18. Click Finish. The ApplicationXtender Administrator list of available data sources now includes the new data source.
Step 7 Verify that each data source is visible
Use the following steps to verify that each new data source is visible.
1. Launch Data Source Selector as SYSOP.
2. Select each data source that you added.
3. Click the Show/Hide button. A check mark is displayed next to each data source that is visible.
Step 8 Register each data source
Use the following steps to register each data source.
1. Connect to the ApplicationXtender server.
2. Exit ApplicationXtender Administrator, if it is open.
3. Launch ApplicationXtender Component Registration. The welcome page of the ApplicationXtender Component Registration wizard is displayed.
4. Click Next. The Component Type page lists all ApplicationXtender components that are installed on the machine. If a component is installed, then it must be registered.
5. Select ApplicationXtender Web Access .Net Server.
Banner Document Management Suite 8.4 May 2012Multi-Entity Processing Implementation GuideImplementation Steps
May 201
6. Click Next. The Component Information page is displayed.
7. (Optional) Enter a component description.
8. Click Next. The last page of the wizard is displayed.
9. Select the Would you like to run the AppXtender Component Registration again? check box.
10. Click Finish.
11. Click Next.
12. Select Rendering Server.
13. Click Next. The Component Information page is displayed.
14. (Optional) Enter a component description.
15. Click Next. The last page of the wizard is displayed.
16. Clear the Would you like to run the AppXtender Component Registration again? check box.
17. Click Finish.
18. Click Yes to restart the Rendering Server service.
19. Click OK when the “service started” message is displayed.
20. Exit ApplicationXtender Component Registration.
21. Perform an IISRESET on the server where ApplicationXtender Web Access is installed.
Step 9 Apply the security package for MEP
Use the following steps to create the BDMS-specific VPDI security package for your MEP environment.
1. Connect to the database as BANSECR:
sqlplus BANSECR/password
2. Execute the following script to apply the security policy:
start extdbpr2;
2 Banner Document Management Suite 8.4 19Multi-Entity Processing Implementation Guide
Implementation Steps
20
3. Review the extdbpr2 listing.
4. Invoke SQL*Plus and run the following procedure to compile all functions, views, packages, procedures, and triggers that are in an invalid state:
sqlplus /nolog @gurutlrp
5. Review the gurutlrp listing.
Step 10 Apply VPD/MEP to the AE_LOGIN table
Use the following steps to apply the VPDI policy and predicates to the AE_LOGIN table. Applying the policy on AE_LOGIN ensures that BDMS users can only log in to those institutions (data sources) that are assigned to them.
1. Execute the following script to apply the VPD/MEP policy for AE_LOGIN:
sqlplus /nolog
start edrseed_080400_05.sql;
2. Review the edrseed_080400_05 listing.
Step 11 Locate the application IDs for BDMS applications
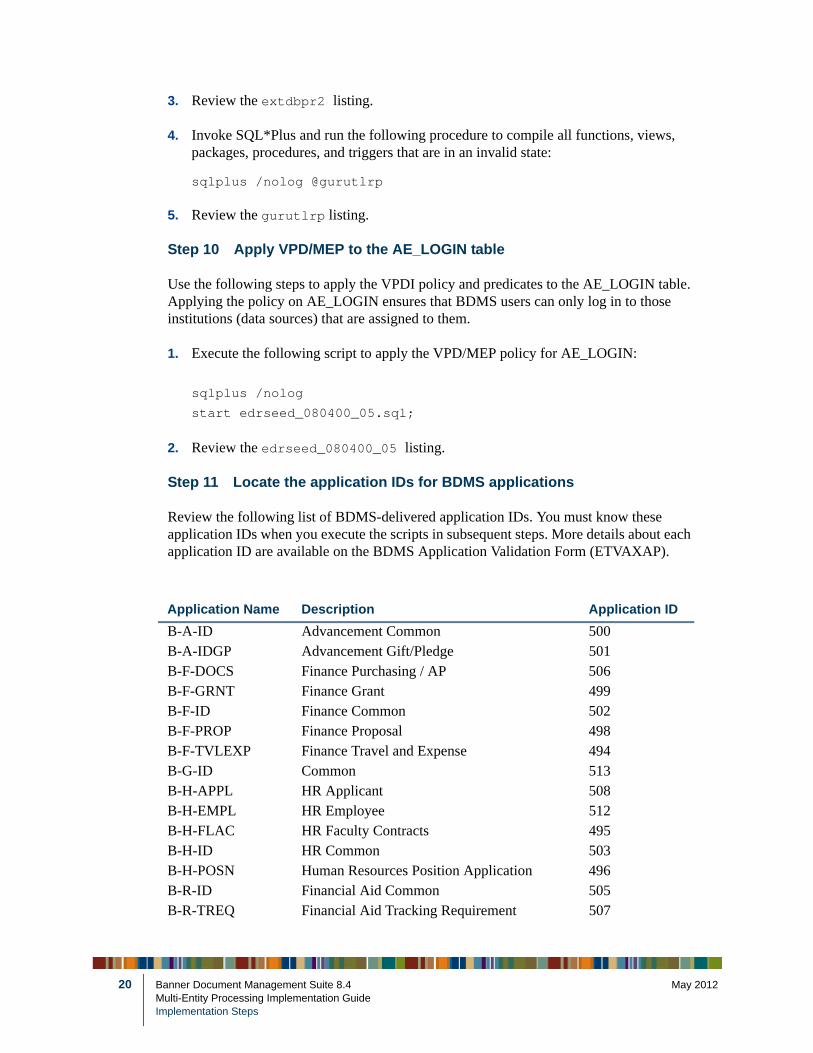
Review the following list of BDMS-delivered application IDs. You must know these application IDs when you execute the scripts in subsequent steps. More details about each application ID are available on the BDMS Application Validation Form (ETVAXAP).
Application Name Description Application ID
B-A-ID Advancement Common 500B-A-IDGP Advancement Gift/Pledge 501B-F-DOCS Finance Purchasing / AP 506B-F-GRNT Finance Grant 499B-F-ID Finance Common 502B-F-PROP Finance Proposal 498B-F-TVLEXP Finance Travel and Expense 494B-G-ID Common 513B-H-APPL HR Applicant 508B-H-EMPL HR Employee 512B-H-FLAC HR Faculty Contracts 495B-H-ID HR Common 503B-H-POSN Human Resources Position Application 496B-R-ID Financial Aid Common 505B-R-TREQ Financial Aid Tracking Requirement 507
Banner Document Management Suite 8.4 May 2012Multi-Entity Processing Implementation GuideImplementation Steps

May 201
Step 12 Apply VPD/MEP triggers to the AE_DT, AE_AI, and AE_RF tables
A trigger must be created on the AE_DTxxx table for each BDMS application that you want to enable for VPD/MEP. If a BDMS application has an auto index table (AE_AIxxx) and a key reference table (AE_RFxxx), triggers must also be created on these tables. Use the following steps to apply the necessary triggers for each application that you are enabling for VPD/MEP.
NoteIn the table name, xxx identifies the application ID based on user input.
1. Execute the following script for the application that your are enabling for VPD/MEP:
sqlplus /nolog
start edrseed_080400_06;
2. Respond to the prompt for the application ID. Make sure that the correct application ID is specified. For example, if you are enabling the B-R-TREQ application for MEP, the application ID is 507.
3. Review the edrseed_080400_06 listing.
Step 13 Recreate the index on the AE_RF tables
Use the following steps to recreate the index on the AE_RFxxx table for each application that you are enabling for VPD/MEP. The new indexes include VPDI_CODE as part of the unique index.
NoteIn the table name, xxx identifies the application ID based on user input.
1. Execute the following script for the application that you are enabling for VPD/MEP:
sqlplus /nolog
start edrseed_080400_07;
2. Respond to the prompt for the application ID. Make sure that the correct application ID is specified. For example, if you are recreating the index for AE_RF506 tables, the application ID is 506.
B-S-ADMN Student Admissions 509B-S-CRSE Student Course 510B-S-DGRE Student Degree 511B-S-ID Student Common 504B-S-SECT Student Catalog/Course Section Application 497
Application Name Description Application ID
2 Banner Document Management Suite 8.4 21Multi-Entity Processing Implementation Guide
Implementation Steps
22
3. Review the edrseed_080400_07 listing.
4. Resynchronize the AE table data by executing the re-baselining script for the BDMS application table.
Refer to the Banner Document Management Suite Administration Guide, Appendix C “Data Synchronization Scripts” for a list of re-baselining scripts. The scripts are listed by BDMS product (General, Student, Financial Aid, Human Resources, Advancement, and Finance).
Example
If you MEPed the BDMS B-F-DOCS key reference table, AE_RF506, then you would execute eifdtai.sql.
Step 14 Apply VPD/MEP policies to the AE_DT, AE_AI, and AE_RF tables
Use the following steps to apply the VPDI policy and predicates to each application that is being enabled for MEP. Policies are applied on the AE_DTxxx, AE_AIxxx, and AE_RFxxx tables.
NoteIn the table name, xxx identifies the application ID.
1. Execute the following script for the application that your are enabling for VPD/MEP:
sqlplus /nolog
start edrseed_080400_08.sql;
2. Respond to the prompt for the application ID. Make sure that the correct application ID is specified. For example, if you are enabling the B-R-TREQ application for MEP, the application ID is 507.
3. Review the edrseed_080400_08 listing.
Step 15 Apply VPD/MEP to the user-defined list (UL) tables (optional)
The need to enable a user-defined list (UL) table for VPD/MEP depends on whether the corresponding Banner table is enabled for VPD/MEP. For example, if the Banner Financial Aid RFRBASE table for FUND is enabled for VPD/MEP, then the B-R-TREQ UL507_11 table must be enabled for VPD/MEP.
NoteThe user-defined list tables for DOCUMENT TYPE are not candidates for VPD/MEP, because the corresponding Banner table (ETVDTYP) is not a candidate for VPD/MEP.
Banner Document Management Suite 8.4 May 2012Multi-Entity Processing Implementation GuideImplementation Steps

May 201
Use the following steps to add VPDI_CODE to each UL table.
1. Identify the name of the UL table to be enabled for VPD/MEP. Refer to “Cross-Reference of Tables” on page 47 for a list of UL tables for each BDMS application and the corresponding Banner table.
2. Execute the following script to add VPDI_CODE to the UL table:
sqlplus /nolog
start edrseed_080400_09.sql;
3. Respond to the prompt for the UL table name.
4. Review the edrseed_080400_09 listing.
5. Resynchronize the AE table data by executing the re-baselining script for the BDMS application table.
Refer to the Banner Document Management Suite Administration Guide, Appendix C “Data Synchronization Scripts” for a list of re-baselining scripts. The scripts are listed by BDMS product (General, Student, Financial Aid, Human Resources, Advancement, and Finance).
Example
If you MEPed the BDMS B-R-TREQ UL table UL507_11, then you would execute the BDMS Financial Aid UL table script eirul.sql.
6. Perform an IISRESET on the server where ApplicationXtender Web Access is installed to commit the UL table change.
Step 16 Apply VPD/MEP to the AE_BS table (optional)
The batch tables contain information for all applications and are keyed by the application ID. The AE_BS table, which contains information about batch scan jobs, is the only batch table that requires changes for VPD/MEP. When the AE_BS table is enabled for VPD/MEP, the VPDI_CODE and policy apply to all batches, regardless of whether a specific application is enabled for VPD/MEP. Any changes to an application structure must be done before the batches are enabled for VPD/MEP.
2 Banner Document Management Suite 8.4 23Multi-Entity Processing Implementation Guide
Implementation Steps

24
Use the following steps to apply VPD/MEP to the AE_BS table.
1. Execute the following script to add the VPDI_CODE column to AE_BS, recreate the unique constraint, and create the policy and triggers to enable VPD/MEP:
sqlplus /nolog
start edrseed_080400_10.sql;
2. Review the edrseed_080400_10 listing.
Step 17 Apply VPD/MEP to the AE_PATHS table (optional)
Consider the following factors if you plan to enable AE_PATHS for VPD/MEP:
• Any changes to an application structure in Application Generator, excluding PATHs, must be done before AE_PATHS is enabled for VPD/MEP.
• If you need to change an application structure after AE_PATHs is enabled for VPD/MEP, you must change the structure in a non-primary data source (<data source>_<institution code>).
• Once the AE_PATHS table is altered, Application Generator cannot be used to modify AE_PATHS. Instead, you can use Oracle PL/SQL Developer, SQL Developer, or TOAD.
Use the following steps to apply VPD/MEP to the AE_PATHS table.
1. Execute the following script to add the VPDI_CODE column to AE_PATHS, recreate the unique constraint, and create the policy and triggers to enable VPD/MEP:
sqlplus /nolog
start edrseed_080400_11.sql;
2. Review the edrseed_080400_11 listing.
3. Populate the VPDI_CODE in AE_PATHS with the institution code.
A sample script (ae_paths_080300_04.sql) is provided in the BDMS 8.4 release. The script provides a model for creating the insertion script to populate AE_PATHS with the VPDI_CODE values. When executing the script, you must log in as the SYSTEM user due to the VPD/MEP policies.
4. Execute the rresroled_mep.sql script to restore the original roles for those accounts that were modified by the egivedba_mep.sql script, which was run as part of Step 4, “Create an OTGMGR schema for each institution”.
Banner Document Management Suite 8.4 May 2012Multi-Entity Processing Implementation GuideImplementation Steps

May 201
Administration
This section provides information about administering BDMS in a MEP environment.
Data sources and OTGMGR users
Each data source in BDMS uses the schema owner OTGMGR as the generic user account for the database connection between ApplicationXtender and the Banner database. For BDMS to support a MEP environment, an OTGMGR schema owner must be created for each institution name that is defined on the Oracle/Banner VPD Security Maintenance Form (GSAVPDI). The name of each OTGMGR schema owner has the following format:
OTGMGR_<institution name>
NoteThe OTGMGR schema owner, without an institution name attached to it, is the primary schema owner. This schema owner is created during the baseline installation of BDMS. Do not modify or delete this schema owner.
In ApplicationXtender, a data source is set up for each institution name defined on GSAVPDI. The name of the data source has the following format:
<database name>_<institution name>
NoteThe underscore between <database name> and <institution name> is required.
When an additional data source is set up in ApplicationXtender Administrator, OTGMGR_<institution name> is used for the generic user account.
Example
You have four institutions defined on GSAVPDI for your university or college:
CAMP1CAMP2CAMP3CAMP4
2 Banner Document Management Suite 8.4 25Multi-Entity Processing Implementation Guide
Administration

26
For BDMS MEP, you would create the following OTGMGR schema owners:
You would create the following data sources:
Note“MEPDB” is an example. For your university or college, use the database name that is assigned to the primary data source in ApplicationXtender Administrator.
User and group management
You can use Application Generator to import Banner users into BDMS. You can also use Application Generator to create non-Banner BDMS users. After importing or creating the BDMS users, you can use Application Generator to assign privileges to users, define user groups, and assign users to groups in a BDMS MEP environment.
Import Banner users into BDMS
The integration between Banner and BDMS allows you to create users based on existing Banner user IDs. In a BDMS MEP environment, all BDMS users are created or imported under the primary data source (the data source that does not have an institution name attached to it).
Only Oracle accounts may be imported through the import users function of Application Generator. Any user name, however, may be manually created as a BDMS user. Manually-created BDMS users do not need an Oracle account, but are restricted to ApplicationXtender functions such as batch creation, document queries, and indexing documents for a BDMS application that is not enabled for MEP. See “Login restrictions” on page 30 for more details on the functional limitations of these types of users.
OTGMGR_CAMP1OTGMGR_CAMP2OTGMGR_CAMP3OTGMGR_CAMP4
Database Name Generic User Account
MEPDB_CAMP1 OTGMGR_CAMP1MEPDB_CAMP2 OTGMGR_CAMP2MEPDB_CAMP3 OTGMGR_CAMP3MEPDB_CAMP4 OTGMGR_CAMP4
Banner Document Management Suite 8.4 May 2012Multi-Entity Processing Implementation GuideAdministration

May 201
Use the following steps to import Banner users into BDMS.
1. Launch ApplicationXtender Application Generator as SYSOP. The main page for ApplicationXtender Application Generator is displayed.
NoteSelect the primary data source (the data source that does not have an institution name attached to it) during the login.
2. Right-click the Users node and select Import... The Import Users dialog box is displayed.
3. Expand the list of available users to display existing Oracle accounts in the system.
Banner schema owners (GENERAL, SATURN, PAYROLL, and so on) are filtered from this list because they do not represent potential BDMS users. The list of filtered names is maintained in the EXBUFLT table.
4. For each user that you want to import, select the user name and click Add. Selected users are displayed in the Users to Be Imported list.
5. When you are done selecting names, click OK.
After all users are imported, you must grant user privileges to one or more applications (see “Assign privileges (non-group) to users in BDMS” on page 28). Optionally, you can assign a user to a group with the desired access level (see “Assign users to a group in BDMS” on page 30).
Create non-Banner users in BDMS
Use the following steps to create non-Banner users in BDMS.
1. Launch ApplicationXtender Application Generator as SYSOP. The main page for ApplicationXtender Application Generator is displayed.
NoteSelect the primary data source (the data source that does not have an institution name attached to it) during the login.
2. Right-click the Users node and select New. The User page is displayed.
3. Enter information in the User Name, Full Name, Password, and Verification fields.
4. Click Next. The Groups page is displayed.
2 Banner Document Management Suite 8.4 27Multi-Entity Processing Implementation Guide
Administration

28
5. Choose one of the following on the Groups page:
5.1. If you do not want to assign the user to a group, perform the following steps:
5.1.1. Click Next. The Profile page is displayed.
5.1.2. In the Application drop-down list, select an application name if the user’s privileges apply to a specific application, or keep the value <Global Profile> if the same privileges apply to all applications.
5.1.3. Select specific check boxes or click Full Privileges to assign the user’s privileges.
5.1.4. Click Next. The Security Mapping page is displayed.
5.2. If you want to assign the user to a group, perform the following steps:
5.2.1. Scroll through the list of groups in the Not Member Of pane to find the group name.
5.2.2. Double-click the group name. The group name moves to the Member Of pane.
5.2.3. Repeat these steps for each group in which the user is a member.
5.2.4. When you are done, click Next. The Profile page is displayed.
5.2.5. Click Next. The Security Mapping page is displayed.
6. Make sure that the Alternative security check box is cleared.
7. Click Finish.
Assign privileges (non-group) to users in BDMS
Use the following steps to assign a security profile to a specific user.
1. Launch ApplicationXtender Application Generator as SYSOP. The main page for ApplicationXtender Application Generator is displayed.
NoteSelect the primary data source (the data source that does not have an institution name attached to it) during the login.
2. Expand the Users node. A list of existing users is displayed.
3. Double-click the user name. The User page is displayed.
4. (Optional) Enter or modify user information.
Banner Document Management Suite 8.4 May 2012Multi-Entity Processing Implementation GuideAdministration

May 201
5. Select the Profile tab.
6. In the Application drop-down list, select an application name if the user’s privileges apply to a specific application, or select <Global Profile> if the same privileges apply to all applications.
7. Select specific check boxes or click Full Privileges to assign the user’s privileges.
8. Click Apply.
9. Select the Security Mapping tab.
10. Make sure that the Alternative security check box is cleared.
11. Click Apply.
Define user groups in BDMS
Use the following steps to create a new group.
1. Launch ApplicationXtender Application Generator as SYSOP. The main page for ApplicationXtender Application Generator is displayed.
NoteSelect the primary data source (the data source that does not have an institution name attached to it) during the login.
2. Right-click the Groups node and select New. The Group page is displayed.
3. Enter information in the Group Name and Description fields.
4. Click Next. The Users page is displayed.
5. Scroll through the list of users in the Non-Members pane to find the user name.
6. Double-click the user name. The user name moves to the Members pane.
NoteYou can also click and drag a user name from the Non-Members pane to the Members pane.
7. Repeat steps 5 and 6 for each user you want to add to the group.
8. When you are done, click Next. The Profile page is displayed.
9. Select <Global Profile> from the Application drop-down list.
10. Select specific check boxes or click Full Privileges to assign the group’s privileges.
2 Banner Document Management Suite 8.4 29Multi-Entity Processing Implementation Guide
Administration
30
11. Click Next. The Security Mapping page is displayed.
12. Make sure that the Alternative security check box is cleared.
13. Click Finish.
Assign users to a group in BDMS
Use the following steps to assign users to a group.
1. Launch ApplicationXtender Application Generator as SYSOP. The main page for ApplicationXtender Application Generator is displayed.
NoteSelect the primary data source (the data source that does not have an institution name attached to it) during the login.
2. Expand the Groups node. A list of existing groups is displayed.
3. Double-click the group name. The Group tab is displayed.
4. Select the Users tab.
5. Scroll through the list of users in the Non-Members pane to find the user name.
6. Double-click the user name. The user name moves to the Members pane.
NoteYou can also click and drag a user name from the Non-Members pane to the Members pane.
7. Repeat steps 5 and 6 for each user you want to add to the group.
8. Click Apply.
User restrictions
Certain restrictions apply to BDMS users in a MEP environment. These restrictions are related to login, access to functions on Internet-Native Banner (INB) forms, and access to ApplicationXtender functions.
Login restrictions
A VPD policy on the ApplicationXtender user login table (AE_LOGIN) filters users when they access ApplicationXtender (Document Manger and Web Access). This filtering
Banner Document Management Suite 8.4 May 2012Multi-Entity Processing Implementation GuideAdministration
May 201
occurs when users log in directly to ApplicationXtender or when users access ApplicationXtender from an Internet-Native Banner (INB) form.
The VPD policy filters a user into one of the following categories:
• The BDMS user is a valid Banner user with assigned institution codes on the User/Institution Maintenance window of GSAVPDI.
• The BDMS user is a valid Banner user without an assigned institution code on GSAVPDI. In this case, the system default institution code defined on the Institution Code Maintenance window of GSAVPDI is used as the BDMS user’s institution code.
• The BDMS user is not a Banner user. This type of user is considered an ApplicationXtender-only user.
• The BDMS user is SYSOP.
BDMS users can log in to specific data sources, depending on whether they are Banner users or non-Banner users.
BDMS users who are Banner users
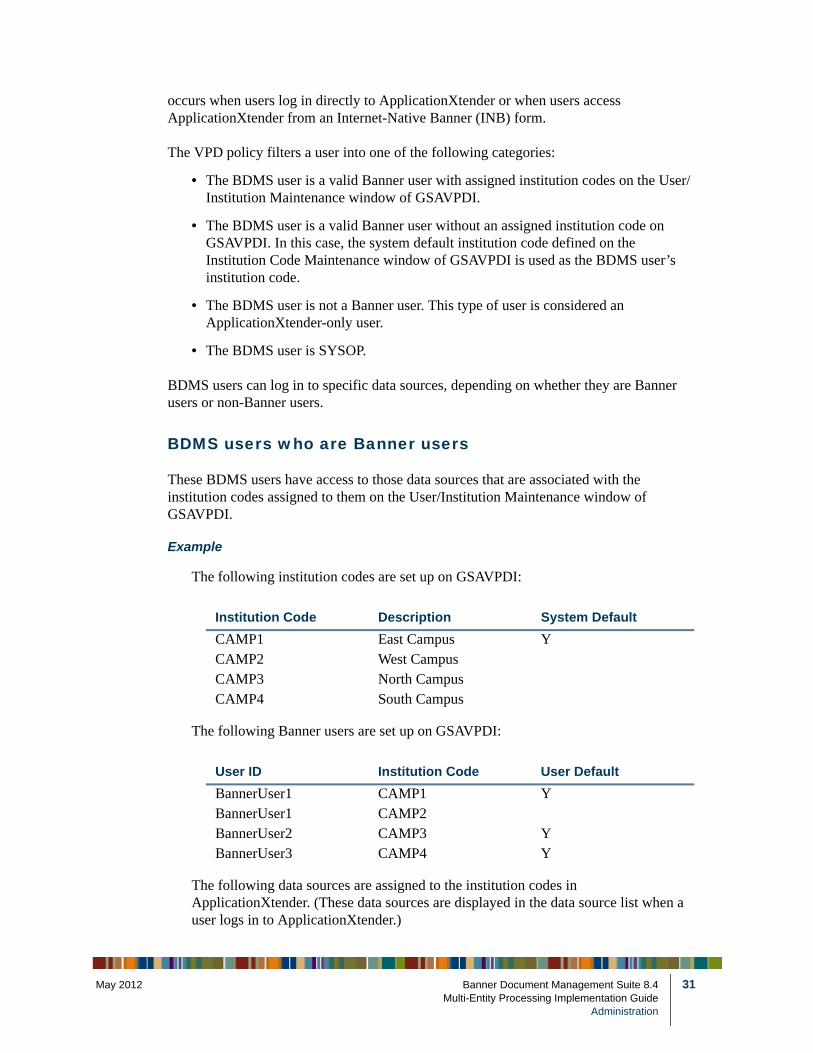
These BDMS users have access to those data sources that are associated with the institution codes assigned to them on the User/Institution Maintenance window of GSAVPDI.
Example
The following institution codes are set up on GSAVPDI:
The following Banner users are set up on GSAVPDI:
The following data sources are assigned to the institution codes in ApplicationXtender. (These data sources are displayed in the data source list when a user logs in to ApplicationXtender.)
Institution Code Description System Default
CAMP1 East Campus YCAMP2 West CampusCAMP3 North CampusCAMP4 South Campus
User ID Institution Code User Default
BannerUser1 CAMP1 YBannerUser1 CAMP2BannerUser2 CAMP3 YBannerUser3 CAMP4 Y
2 Banner Document Management Suite 8.4 31Multi-Entity Processing Implementation Guide
Administration

32
The primary data source in ApplicationXtender is not set up with an institution code. In this example, the primary data source is MEPDB.
The following table shows the login access to ApplicationXtender (Document Manager and Web Access). The character “X” indicates the user has log in access to that data source.
BannerUser4 does not have an institution code assigned on GSAVPDI. Therefore, BannerUser4 inherits institution code CAMP1, the default institution code as defined on GSAVPDI.
Multi-campus BDMS users are those Banner users who are assigned to more than one institution code on GSAVPDI. These users are allowed to log in to ApplicationXtender under any data source that is associated with one of their assigned institution codes. When a multi-campus BDMS user logs in under an authorized data source, the institution code associated with that data source becomes the Banner user’s default institution code in BDMS, regardless of the Banner user’s default institution code defined in Banner.
Multi-campus BDMS users can save, modify, and delete indexes and documents while logged in under an authorized data source in ApplicationXtender as long as their ApplicationXtender privileges allow that function.
BDMS users who are not Banner users
These BDMS users do not have an institution code assigned to them, because they are not set up in Banner as valid users. They can only log in to ApplicationXtender under the primary data source. In the preceding example, MEPDB is the primary data source.
Institution Code Data Source
MEPDBCAMP1 MEPDB_CAMP1CAMP2 MEPDB_CAMP2CAMP3 MEPDB_CAMP3CAMP4 MEPDB_CAMP4
User ID ME
PD
B
ME
PD
B_
CA
MP
1
ME
PD
B_
CA
MP
2
ME
PD
B_
CA
MP
3
ME
PD
B_
CA
MP
4
BannerUser1 X XBannerUser2 XBannerUser3 XBannerUser4 X
Banner Document Management Suite 8.4 May 2012Multi-Entity Processing Implementation GuideAdministration

May 201
Access restrictions on INB forms
In a MEP environment, the title bar of an INB form shows two institution codes in the following format:
(HOME_CONTEXT):: PROCESS_CONTEXT
HOME_CONTEXT is the user’s default institution code. INB uses PROCESS_CONTEXT to process a transaction on the form, such as query data or update data. When a Banner user first logs in to INB, HOME_CONTEXT and PROCESS_CONTEXT contain the same institution code.
Depending on how your MEP INB environment is configured, an INB form might allow a Banner user to switch to another institution code to query Banner data under another institution code. If the Banner user chooses to do this, then the PROCESS_CONTEXT is updated to contain this institution code. At this point, the HOME_CONTEXT institution code and the PROCESS_CONTEXT institution code are different.
Depending on the policies applied to Banner tables, Banner users might be allowed to query Banner data on an INB form for any institution code that is set up on GSAVPDI. However, a Banner user is allowed to update, insert, or delete a Banner record only when working under his or her user default institution code as defined for his or her Banner ID on GSAVPDI. If PROCESS_CONTEXT is not the Banner user’s default institution code, then the user can only query data.
When a BDMS user connects to ApplicationXtender from an INB form, the BDMS process always passes the PROCESS_CONTEXT institution code to connect to the appropriate <data source>_<institution code>. The following access restrictions are specific to BDMS users:
• While Banner users can query Banner data on an INB form for any institution code, BDMS users can only view documents for their assigned institution codes, as defined for them on GSAVPDI.
• While Banner users can update/insert/delete Banner data for their default institution only, BDMS users can update/insert/delete documents for any of their assigned institution codes as shown on GSAVPDI.
Allowable ApplicationXtender functions
Access to ApplicationXtender functions depends on whether a BDMS user is a Banner user or a non-Banner user.
BDMS users who are Banner users
If a BDMS user is a Banner user, the following criteria determine whether the user can access an ApplicationXtender function:
2 Banner Document Management Suite 8.4 33Multi-Entity Processing Implementation Guide
Administration
34
• The user’s privileges in ApplicationXtender must allow access to the function.
• The user’s institution code(s) must match the <data source>_<institution name> used to log in to ApplicationXtender.
A BDMS user who meets these criteria can access the following ApplicationXtender functions for applications that are enabled for VPD/MEP and applications that are not enabled for VPD/MEP.
• Upload
• Save Index
• Modify Index
• View Documents
• Query Documents
• Delete Documents
• Create Batches
• Index Batches
BDMS users who are not Banner users
These BDMS users do not have an institution code assigned to them. They must log in to the primary data source in ApplicationXtender. They can only save, modify, and delete indexes and documents for applications that have not been enabled for VPD/MEP.
If a BDMS user is not a Banner user, the following criteria determine whether the user can access an ApplicationXtender function:
• The user’s privileges in ApplicationXtender must allow access to the function.
• The user must log in to ApplicationXtender under the primary data source (no institution name is attached to it).
A BDMS user who meets these criteria can access the following ApplicationXtender functions for applications that are not enabled for VPD/MEP. (They cannot access functions for applications that are enabled for VPD/MEP.)
• Upload
• Save Index
• Modify Index
• View Documents
• Query Documents
• Delete Documents
Banner Document Management Suite 8.4 May 2012Multi-Entity Processing Implementation GuideAdministration

May 201
• Create Batches
• Index Batches
Document indexing
The VPDI_CODE index field is used in a VPD/MEP environment to identify the institution code of an indexed document. The auto index and key reference features can be used when indexing documents in a VPD/MEP environment.
VPDI_CODE in application indexes
Starting with BDMS 8.4, VPDI_CODE is an index field in all BDMS-delivered applications. The VPDI_CODE is a six-character, read-only text field. Updates to the VPDI_CODE depend on whether a BDMS application is enabled for VPD/MEP.
If a BDMS application is enabled for VPD/MEP
In this scenario, a policy and a trigger are applied to the VPDI_CODE in the application’s index. When an index is saved, the trigger updates the VPDI_CODE to the institution code of the data source and OTGMGR schema owner.
Example
The BDMS user logs in to ApplicationXtender under data source MEPDB_CAMP1. The BDMS user indexes a document for an application that is enabled for VPD/MEP. VPDI_CODE is saved with the value CAMP1.
If the BDMS user indexes a document for an application that is enabled for VPD/MEP and manually enters the VPDI_CODE, the trigger on VPDI_CODE overwrites the manually entered value when the index is saved.
If a BDMS application is not enabled for VPD/MEP
In this scenario, no policy or trigger is applied to the VPDI_CODE in the application’s index. The VPDI_CODE field is not automatically updated when the index is saved.
The BDMS user can, however, manually enter a VPDI_CODE when indexing the document. In this case, VPDI_CODE is updated with the manually entered value when the index is saved. The VPDI_CODE is not validated to ensure that the value is a valid institution code. This can result in a VPDI_CODE in a document index that does not match any institution codes defined by your university or college on GSAVPDI.
2 Banner Document Management Suite 8.4 35Multi-Entity Processing Implementation Guide
Administration

36
Auto index feature
If a BDMS application is enabled for VPD/MEP and if the application has an auto index (AI) table, then the AI table is also enabled for VPD/MEP. When a BDMS user indexes a document and clicks Auto Index on the index’s toolbar, auto index records are returned with the VPDI_CODE equal to the institution code that the BDMS user used to log in to ApplicationXtender.
Example
A BDMS user is indexing documents in B-S-ADMN (Student Admissions) for admissions requirements. The student admissions requirements in Banner for the student ID show the following records:
The BDMS user logs in to ApplicationXtender under MEPDB_CAMP1. The user clicks Auto Index to use the auto index feature to index the document. The following list is returned for the ID in the auto index window:
Key reference feature
If a BDMS application is enabled for VPD/MEP and if the application has a key reference (RF) table other than the shared key reference table (RFSCT), then the RF table is also enabled for VPD/MEP. When a BDMS user indexes a document and clicks Key Reference on the index’s toolbar, key reference records are returned with the VPDI_CODE equal to the institution code that the BDMS user used to log in to ApplicationXtender.
Example
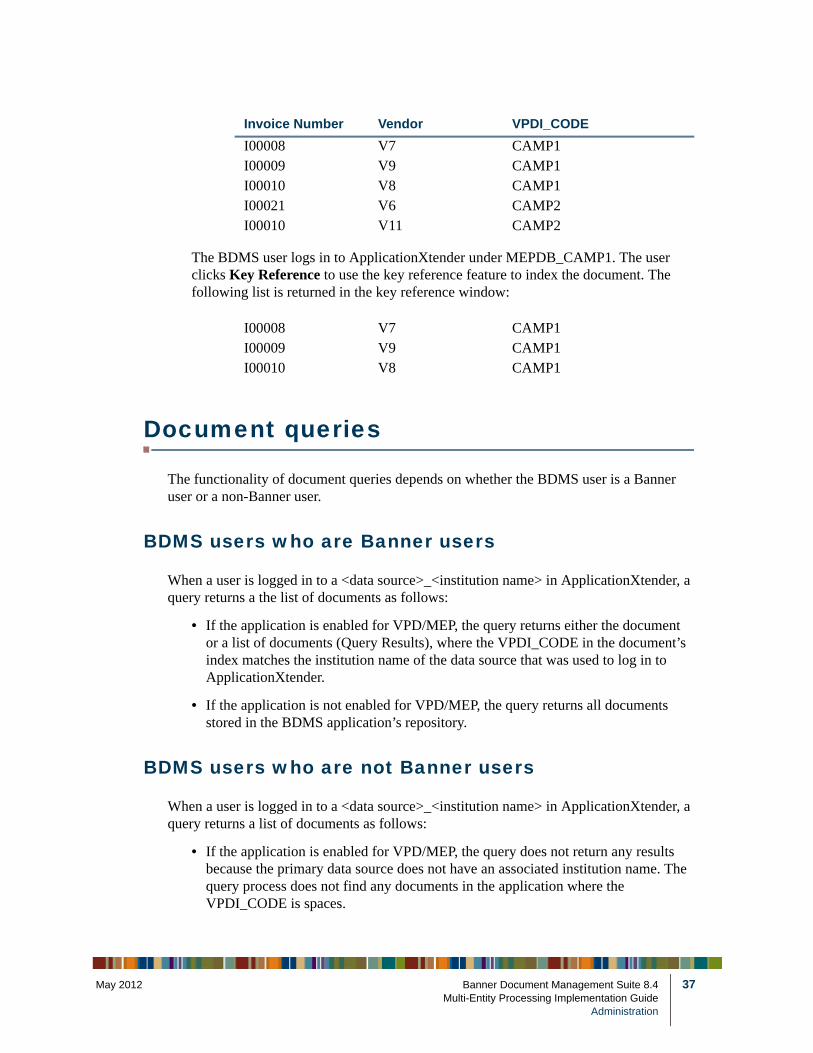
B-F-DOCS (Finance Purchasing/AP) uses the AE_RF506 table to store information for invoices, purchase orders, and requisitions. Based on the Banner tables that contain the finance data, the RF table may contain the following data. Invoices are used in this example.
Term CodeApplication Number
Admissions Requirement VPDI_CODE
201110 1 AP25 CAMP1201110 1 CLT1 CAMP1201110 1 HST1 CAMP1201111 1 ESSY CAMP2201111 1 DLIC CAMP2
201110 1 AP25 CAMP1201110 1 CLT1 CAMP1201110 1 HST1 CAMP1
Banner Document Management Suite 8.4 May 2012Multi-Entity Processing Implementation GuideAdministration
May 201
The BDMS user logs in to ApplicationXtender under MEPDB_CAMP1. The user clicks Key Reference to use the key reference feature to index the document. The following list is returned in the key reference window:
Document queries
The functionality of document queries depends on whether the BDMS user is a Banner user or a non-Banner user.
BDMS users who are Banner users
When a user is logged in to a <data source>_<institution name> in ApplicationXtender, a query returns a the list of documents as follows:
• If the application is enabled for VPD/MEP, the query returns either the document or a list of documents (Query Results), where the VPDI_CODE in the document’s index matches the institution name of the data source that was used to log in to ApplicationXtender.
• If the application is not enabled for VPD/MEP, the query returns all documents stored in the BDMS application’s repository.
BDMS users who are not Banner users
When a user is logged in to a <data source>_<institution name> in ApplicationXtender, a query returns a list of documents as follows:
• If the application is enabled for VPD/MEP, the query does not return any results because the primary data source does not have an associated institution name. The query process does not find any documents in the application where the VPDI_CODE is spaces.
Invoice Number Vendor VPDI_CODE
I00008 V7 CAMP1I00009 V9 CAMP1I00010 V8 CAMP1I00021 V6 CAMP2I00010 V11 CAMP2
I00008 V7 CAMP1I00009 V9 CAMP1I00010 V8 CAMP1
2 Banner Document Management Suite 8.4 37Multi-Entity Processing Implementation Guide
Administration
38
• If the application is not enabled for VPD/MEP, the query returns all documents stored in the BDMS application’s repository.
Saved and cross-application queries
Saved and cross-application queries can be created in ApplicationXtender by logging in under any <data source>_<institution name>. These queries are available to all BDMS users (Banner and non-Banner), regardless of which <data source>_<institution name> is used to log in to ApplicationXtender.
Example
A BDMS users logs in to ApplicationXtender under MEPDB_CAMP1 and creates a saved query. The saved query is available to BDMS users (both Banner and non-Banner) logged in to ApplicationXtender under MEPDB_CAMP2 or MEPDB_CAMP3.
When executing a saved or cross-application query, the same rules apply as described in “Document queries” on page 37.
Batches
The ApplicationXtender batch tables (AE_BS***) are not specific to a single BDMS application. The batch tables contain information for all applications and are keyed by the application ID (APPID). When the batch tables are enabled for VPD/MEP, the VPDI_CODE and policy apply to all batches, regardless of whether a specific application is enabled for VPD/MEP.
All BDMS Banner users and non-Banner users can create batches in ApplicationXtender. It does not matter whether the BDMS application is enabled for VPD/MEP or not. The VPDI_CODE is assigned according to the <data source>_<institution name> used to log in to ApplicationXtender.
When documents in a batch are indexed, the same rules apply as described in “Document indexing” on page 35.
When querying batches for a BDMS application, the same rules apply as described in “Document queries” on page 37.
Banner Document Management Suite 8.4 May 2012Multi-Entity Processing Implementation GuideAdministration

May 201
Custom applications enabled for VPD/MEP
BDMS 8.4 includes the scripts that are used to enable BDMS-delivered applications for VPD/MEP. These same scripts can be modified and used to enable VPD/MEP for custom applications. Use the following steps to enable a custom application for VPD/MEP.
1. Use ApplicationXtender Application Generator to add VPDI_CODE to the custom application. Define the following values:
Refer to the EMC ApplicationXtender Core Components Administrator's Guide for instructions on how to add an index field.
2. Use one of the following methods to locate the application ID for the custom application:
2.1. Method 1:
2.1.1. Launch Internet-Native Banner (INB).
2.1.2. Access the BDMS Application Validation Form (ETVAXAP).
2.1.3. Locate the application ID.
2.1.4. Exit ETVAXAP.
2.1.5. Exit INB.
2.2. Method 2:
2.2.1. Connect to the database as OTGMGR:
sqlplus OTGMGR/password
2.2.2. Execute the following select statement, replacing <custom app name> with the application name (for example, B-S-TRANSCRIPTS):
select APPID from AE_APPS where APPNAME = “<custom app name>”;
The application ID is the result of the query.
Data Type TextLength 6Read-Only Selected
2 Banner Document Management Suite 8.4 39Multi-Entity Processing Implementation Guide
Administration

40
3. Modify the following scripts to include the application ID of the custom application:
4. Apply VPD/MEP triggers to the AE_DT, AE_AI, and AE RF tables (see Step 12, “Apply VPD/MEP triggers to the AE_DT, AE_AI, and AE_RF tables”).
5. Apply VPD/MEP policies to the AE_DT, AE_AI, and AE_RF tables (see Step 14, “Apply VPD/MEP policies to the AE_DT, AE_AI, and AE_RF tables”).
6. (Optional) Apply VPD/MEP to the user-defined list (UL) tables (see Step 15, “Apply VPD/MEP to the user-defined list (UL) tables (optional)”).
BDMS user for Banner Workflow
If BDMS is integrated with Banner Workflow, a specific user in ApplicationXtender owns the queries that filter BDMS events for Banner Workflow. This user name begins with WORKFLOW (for example, WORKFLOW_BDMSADMIN).
In a MEP environment, this BDMS user must be set up as a Banner user on the Banner Security Form (GSASECR), using procedures established by your university or college to create Banner users. You must then give this BDMS user privileges for each institution defined on GSAVPDI. Use the following steps to grant these privileges to the BDMS user.
1. Launch Internet-Native Banner (INB) as BANSECR.
2. Access the Oracle/Banner VPD Security Maintenance Form (GSAVPDI).
3. Go to the User/Institution Maintenance window.
4. Add a BDMS user record for each institution defined on the Institution Code Maintenance window.
The default institution code of the BDMS users must be the system default institution code that is defined on the Institution Code Maintenance window.
5. Save your changes.
6. Exit GSAVPDI.
7. Exit INB.
eaeadefsi_080300.sql
eaeadefsu_080300.sql
erdseed_80400_01.sql
erdseed_80400_02.sql
erdseed_80400_03.sql
Banner Document Management Suite 8.4 May 2012Multi-Entity Processing Implementation GuideAdministration
May 201
User Instructions
The following sections provide instructions for using BDMS in a MEP environment.
Direct access to ApplicationXtender
When you launch ApplicationXtender (Document Manager or Web Access), you must choose a data source on the login prompt. The data source selection list shows data sources in the format <database name>_<institution name>, where <institution name> is an institution code that is defined in Banner for MEP.
If you are a Banner user, meaning your ID allows you to log in to Internet-Native Banner, institution codes are assigned to you in Banner. As a BDMS user, the data sources that are authorized for your login to ApplicationXtender are directly tied to the institution codes that are assigned to you in Banner. If you do not know which institution codes are assigned to you in Banner, contact your BDMS administrator.
Log in to ApplicationXtender
Use the following steps to log in to ApplicationXtender (Document Manager or Web Access).
1. Launch ApplicationXtender (Document Manager or Web Access).
The login prompt displays the data source selection list. The number of data sources in the list depends on how many institution codes are defined in the Banner MEP database for your university or college.
2. Select the data source name that includes the institution code assigned to you in Banner. If you are assigned multiple institution codes in Banner, you can select any of the authorized data sources.
Example
The university or college uses MEPDB as the database name and defines three institution codes in Banner: CAMP1 CAMP2, and CAMP3. When you launch ApplicationXtender, you see the following data sources in the data source selection list:
2 Banner Document Management Suite 8.4 41Multi-Entity Processing Implementation Guide
User Instructions
42
You are assigned to institution code CAMP2 in Banner. Therefore, you would select MEPDB_CAMP2.
3. Enter your user name.
4. Enter your password.
5. Click Login.
If you try to log in to a data source that is not assigned to you in Banner, the error message Invalid user name or password is displayed.
Log in to a different data source
If you are currently logged in to an ApplicationXtender data source, use the following steps to log in to a different data source.
1. Right-click the name of the current, logged-in data source and select Logout.
2. Right-click the name of the new data source and select Login.
You must be assigned to the institution code in Banner to login to the data source.
3. Enter your user name.
4. Enter your password.
5. Click Login.
Access to BDMS from INB
In a MEP environment, you can use the INB Tools menu or the INB toolbar icons to access BDMS from an INB form. Login restrictions related to authorized data sources are applicable. See “Direct access to ApplicationXtender” on page 41 for details.
Tools menu
The INB Tools menu has the following BDMS options:
MEPDBMEPDB_CAMP1MEPDB_CAMP2MEPDB_CAMP3
Banner Document Management Suite 8.4 May 2012Multi-Entity Processing Implementation GuideUser Instructions

May 201
Icons on the toolbar
The following INB toolbar icons are used to access BDMS:
Document indexing in BDMS
Starting with BDMS 8.4, the VPDI_CODE index field is included in all BDMS-delivered applications. The VPDI_CODE index field is a six-character text field. When you index a document, the VPDI_CODE field is displayed in the document’s index.
The VPDI_CODE index field is used for BDMS applications that are enabled for VPD/MEP. The VPDI_CODE is updated automatically when the index is saved, based on the <database name>_<institution name> under which you logged in to ApplicationXtender.
Option Description
Retrieve Documents Launches ApplicationXtender Document Manager or ApplicationXtender Web Access, depending on the settings defined on the BDMS User Preferences Form (EXAUPRF)
Passes a query to ApplicationXtender (Document Manager or Web Access), and retrieves desired images and documents
Count Matched Documents Runs a query to determine whether supporting documents exist for the current Banner record
Add New Document/Page Creates a new BDMS record using current Banner data
User Preferences Defines user-specific settings for default behavior of BDMS
Icon Description
Display Document Launches ApplicationXtender Document Manager or ApplicationXtender Web Access, depending on the settings defined on the BDMS User Preferences Form (EXAUPRF)
Passes a query to ApplicationXtender (Document Manager or Web Access), and retrieves desired images and documents
Add Document Initiates the addition of a new document or page
2 Banner Document Management Suite 8.4 43Multi-Entity Processing Implementation Guide
User Instructions
44
Check with your BDMS administrator if you are unsure about which BDMS applications are enabled for VPD/MEP.
Indexing in a VPD/MEP environment
Once you log in to your authorized <database name>_<institution name> in ApplicationXtender, BDMS tracks which institution code (institution name) you are using to index documents.
Updates to VPDI_CODE depend on whether the application is enabled for VPD/MEP.
If the application is enabled for VPD/MEP
In this scenario, BDMS automatically updates the VPDI_CODE index field when the document index is saved. The BDMS user does not have to enter the VPDI_CODE when indexing a document.
If the BDMS user manually enters a VPDI_CODE when indexing the document, the manually entered value is overwritten when the index is saved. VPDI_CODE is saved with the correct institution code, based on the data source used to log in to ApplicationXtender.
If you need to index documents for a different institution code, you must log out of the current ApplicationXtender data source, then log in to the data source for the other institution code.
If the application is not enabled for VPD/MEP
In this scenario, BDMS does not automatically update the VPDI_CODE index field when the document’s index is saved. This is because the VPD/MEP policy is not applied to the BDMS application.
Auto index feature
If you are using a BDMS application that has an auto index (AI) table, then the auto index feature is available in a VPD/MEP environment. Results depend on whether the application is enabled for VPD/MEP:
• If the BDMS application is enabled for VPD/MEP, then auto index records are segregated by institution code. You only see those auto index records for the ID/DOCUMENT ID, etc. where the VPDI_CODE is the same as the institution code used to log in to ApplicationXtender.
• If the BDMS application is not enabled for VPD/MEP, then the auto index records are not segregated by institution code. You see all auto index records for the ID/DOCUMENT ID, etc.
Banner Document Management Suite 8.4 May 2012Multi-Entity Processing Implementation GuideUser Instructions
May 201
Key reference feature
If you are using a BDMS application that has a key reference (RF) table, then the key reference feature is available in a VPD/MEP environment. Results depend on whether the application is enabled for VPD/MEP:
• If the BDMS application is enabled for VPD/MEP, then key reference records are segregated by institution code. You only see those key reference records for the ID/DOCUMENT ID, etc. where the VPDI_CODE is the same as the institution code used to log in to ApplicationXtender.
• If the BDMS application is not enabled for VPD/MEP, then the key reference records are not segregated by institution code. You see all key reference records for the ID/DOCUMENT ID, etc.
NoteMost BDMS applications use the shared key reference table, which is integrated with the SPRIDEN table. It is unlikely that the SPRIDEN table will be enabled for VPD/MEP, so the shared key reference table is not enabled for VPD/MEP.
Banner requirements linking
Banner requirements linking is the functionality within BDMS where a Banner table is updated automatically when documents are indexed in BDMS. This functionality is provided in the following BDMS applications:
• B-R-TREQ (Financial Aid Tracking Requirement)
• B-S-ADMN (Student Admissions)
Indexing a document in one of these BDMS applications essentially marks the Banner record as “received.” There is no need to manually update Banner.
The following INB forms define the requirements linking rules:
• BDMS FinAid Requirements Linking Form (ERALINK) defines the rules for financial aid tracking requirements.
• BDMS Student Admission Requirements Linking Form (ESALINK) defines the rules for student admissions requirements.
The BDMS-delivered tables that support requirements linking are not enabled for VPD/MEP. Your university or college can enable these tables for VPD/MEP, assigning a VPDI_CODE to every record in each table. If the tables are enabled for VPD/MEP, then the associated BDMS applications must also be enabled for VPD/MEP. When BDMS updates a record in a Banner table, the VPDI_CODE is used to determine which Banner record to update.
2 Banner Document Management Suite 8.4 45Multi-Entity Processing Implementation Guide
User Instructions

46
Banner Document Management Suite 8.4 May 2012Multi-Entity Processing Implementation GuideUser Instructions
Multi-E
ntity Processing Im
plemen
tation Guide
Cro
ss-Reference of T
ables
ed applications.
field. An application is enabled for VPD/x data to be segregated by institution code. D policies were applied to the
table
table
May 2012
Banne
r Docum
ent Man
agement S
uite 8.447
Cross-Reference of Tables
The following sections provide a cross-reference of the Banner tables that are used by the BDMS-deliver
Each BDMS application has an AE_DT table that contains index data, including the VPDI_CODE indexMEP by applying VPD polices to VPDI_CODE in the AE_DT table for that application. This allows indeIn the following tables, the column You must enable this BDMS application for VPD/MEP means that VPVPDI_CODE in the AE_DT table for that application.
Banner Advancement
Banner Finance
If you enable this Banner table for VPD/MEP
You must enable this BDMS application for VPD/MEP
You must enable this AX table for VPD/MEP Purpose of ApplicationXtender
AGBGIFT B-A-IDGP AE_AI501 Auto indexAGBPLDG B-A-IDGP AE_AI501 Auto indexAGRGPAY B-A-IDGP AE_AI501 Auto index
If you enable this Banner table for VPD/MEP
You must enable this BDMS application for VPD/MEP
You must enable this AX table for VPD/MEP Purpose of ApplicationXtender
FABCHKS B-F-DOCS AE_RF506 Key referenceFABINCK B-F-DOCS AE_RF506 Key referenceFABINVH B-F-DOCS AE_RF506 Key reference
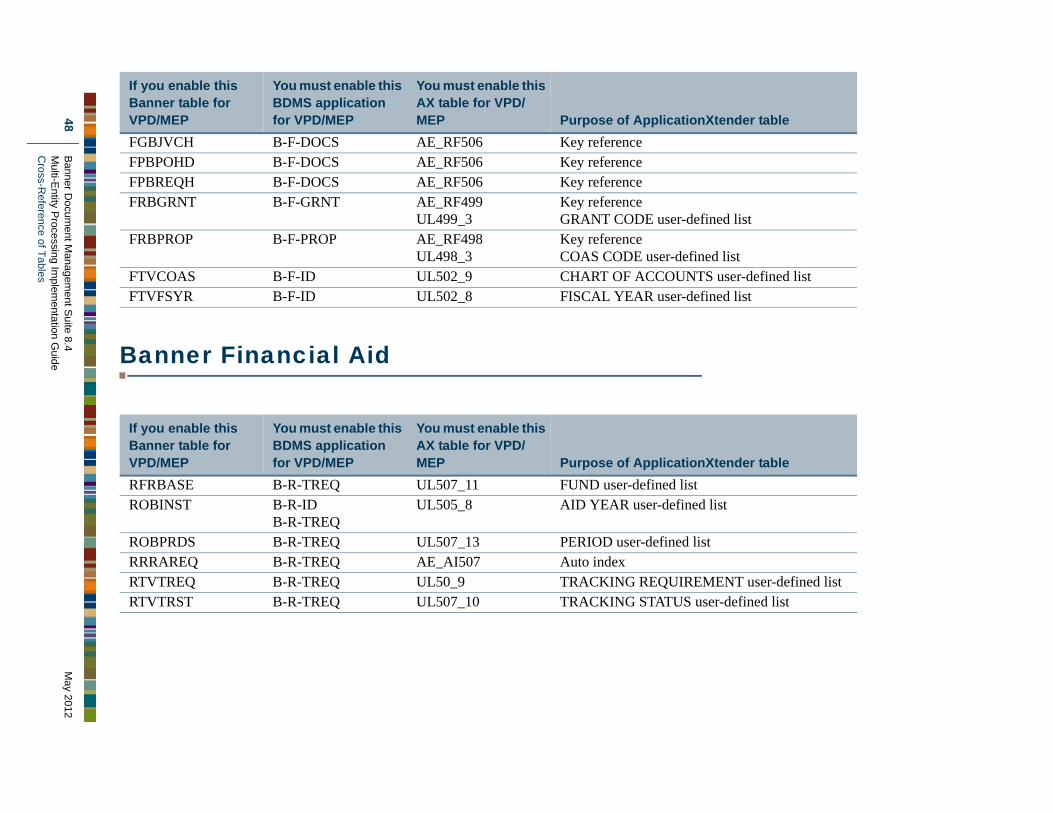
Multi-E
ntity P
rocessing Implem
entation Guid
eC
ross-R
eference of Tables fined list
table
ser-defined listd list
table
48Banner D
ocum
ent Managem
ent S
uite 8.4
May 2012
Banner Financial Aid
FGBJVCH B-F-DOCS AE_RF506 Key referenceFPBPOHD B-F-DOCS AE_RF506 Key referenceFPBREQH B-F-DOCS AE_RF506 Key referenceFRBGRNT B-F-GRNT AE_RF499
UL499_3Key referenceGRANT CODE user-defined list
FRBPROP B-F-PROP AE_RF498UL498_3
Key referenceCOAS CODE user-defined list
FTVCOAS B-F-ID UL502_9 CHART OF ACCOUNTS user-deFTVFSYR B-F-ID UL502_8 FISCAL YEAR user-defined list
If you enable this Banner table for VPD/MEP
You must enable this BDMS application for VPD/MEP
You must enable this AX table for VPD/MEP Purpose of ApplicationXtender
RFRBASE B-R-TREQ UL507_11 FUND user-defined listROBINST B-R-ID
B-R-TREQUL505_8 AID YEAR user-defined list
ROBPRDS B-R-TREQ UL507_13 PERIOD user-defined listRRRAREQ B-R-TREQ AE_AI507 Auto indexRTVTREQ B-R-TREQ UL50_9 TRACKING REQUIREMENT uRTVTRST B-R-TREQ UL507_10 TRACKING STATUS user-define
If you enable this Banner table for VPD/MEP
You must enable this BDMS application for VPD/MEP
You must enable this AX table for VPD/MEP Purpose of ApplicationXtender

Multi-E
ntity Processing Im
plemen
tation Guide
Cro
ss-Reference of T
ables
table
list
listd list
listd listlist
list
d list
table
May 2012
Banne
r Docum
ent Man
agement S
uite 8.449
Banner Human Resources
Banner Student
If you enable this Banner table for VPD/MEP
You must enable this BDMS application for VPD/MEP
You must enable this AX table for VPD/MEP Purpose of ApplicationXtender
NBBFISC B-H-POSN UL496_6 EFF FISCAL YEAR user-definedNBBPOSN B-H-APPL
B-H-POSNAE_AI508UL496_4UL496_5
Auto indexPOSITION CLASS user-defined EMPLOYEE CLASS user-define
NBRJOBS B-H-EMPL AE_AI512 Auto indexNBRPOSH B-H-POSN AE_AI496
UL496_4UL496_5
Auto indexPOSITION CLASS user-defined EMPLOYEE CLASS user-define
NTRPCLS B-H-POSN UL496_4 POSITION CLASS user-defined PABAPPL B-H-APPL AE_AI508 Auto indexPEBEMPL B-H-EMPL AE_AI512 Auto indexPERFCNT B-H-FLAC AE_AI495
UL495_6UL495_7
Auto indexCONTRACT TYPE user-definedTERM CODE user-defined list
PTRECLS B-H-POSN UL496_5 EMPLOYEE CLASS user-define
If you enable this Banner table for VPD/MEP
You must enable this BDMS application for VPD/MEP
You must enable this AX table for VPD/MEP Purpose of ApplicationXtender
SARCHKL B-S-ADMIN AE_AI509 Auto indexSCBCRSE B-S-SECT AE_AI497
UL497_1Auto indexSUBJECT user-defined list
SFRSTCR B-S-CRSE AE_AI510 Auto index
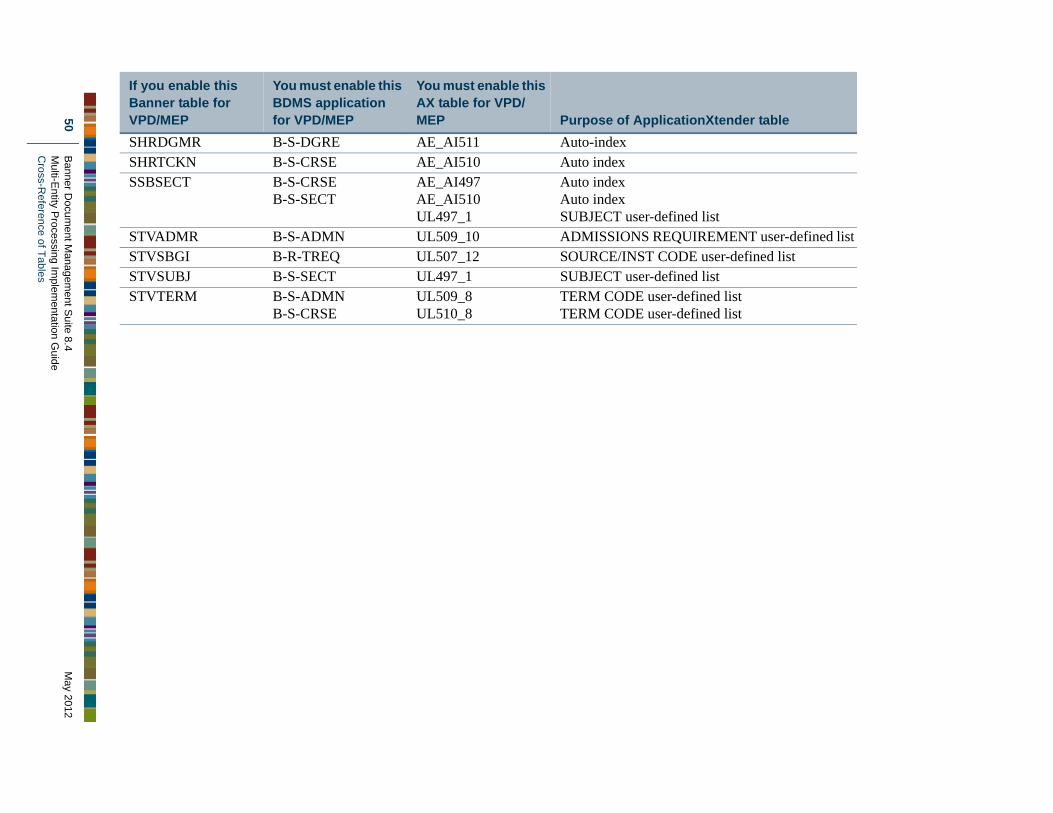
Multi-E
ntity P
rocessing Implem
entation Guid
eC
ross-R
eference of Tables
user-defined listed list
table
50Banner D
ocum
ent Managem
ent S
uite 8.4
May 2012
SHRDGMR B-S-DGRE AE_AI511 Auto-indexSHRTCKN B-S-CRSE AE_AI510 Auto indexSSBSECT B-S-CRSE
B-S-SECTAE_AI497AE_AI510UL497_1
Auto indexAuto indexSUBJECT user-defined list
STVADMR B-S-ADMN UL509_10 ADMISSIONS REQUIREMENTSTVSBGI B-R-TREQ UL507_12 SOURCE/INST CODE user-definSTVSUBJ B-S-SECT UL497_1 SUBJECT user-defined listSTVTERM B-S-ADMN
B-S-CRSEUL509_8UL510_8
TERM CODE user-defined listTERM CODE user-defined list
If you enable this Banner table for VPD/MEP
You must enable this BDMS application for VPD/MEP
You must enable this AX table for VPD/MEP Purpose of ApplicationXtender