bar coding basic user guide - home | gs1nz coding – basic user guide bar code quick start guide...
TRANSCRIPT

Bar coding basic user guide v3
Bar Code Quick Start GuideBar coding – basic user guide
GS1 New Zealand is part of the worldwide GS1 network. We are a not-for-profit association with over 4,600 New Zealand members who join over a million member companies worldwide. GS1 New Zealand aims to make supply chain standards and the adoption of related technology accessible and affordable for the largest to the smallest companies.
Our standards and services for bar coding, electronic business messaging, data synchronisation and radio frequency technology are founded on the global GS1 System. GS1 standards allow businesses to seize opportunities in areas such as traceability, inventory management, point-of-sale/use and collaborative planning.
Contact
Ph: 04 494 1050
Fax: 04 494 1051
Email: [email protected]
www.gs1nz.org
Acknowledgement
This booklet is substantially based on the GS1 UK publication Bar coding - getting it right. GS1 New Zealand gratefully acknowledges the permission of GS1 UK for the use of the material. We also acknowledge the assistance of GS1 Australia and GS1 US in compiling Appendix 6 of this version. Appendix 6 photographs courtesy of the Canadian Produce Marketing Association.
Version 3 April 2011

Bar Code Quick Start GuideBar coding – basic user guide
Step one: identify your retail product
Create a 13-digit bar code number (GTIN-13) to identify each variant of your product. See Appendix 2 Creating retail global trade item numbers p52.
Step two: identify your inners and cartons
Is this necessary? You should make enquiries among your customers to see whether they require bar codes on inners and/or cartons. If you do not know whom to ask, assume that bar codes are required on all levels of packaging.
• Willtheunitsberetailed?IfsocreatenewnumbersforeachasinStepOne.
• Willtheunitsbescannedonlyinwarehousesordistributioncentres?Ifsocreatea14-digit number (GTIN-14) for each. See Appendix 2 Creating GTIN-14 global trade item numbers p52.
Step three: identify your pallets
Is this necessary? Ask your customers. If you do not know whom to ask, do not worry about this until a customer asks you to identify pallets.
If required create serial shipping container codes for each pallet. See Appendix 2 Creating SSCCs p52.
Step four: select your bar codes
• Consumerunits(includinginnersorcartonsifyouintendthemforretailsaleasintactunits)willbebarcoded with EAN-13 bar codes containing GTIN-13 numbers. See Sections 8, 9 and 10 pp. 13-16.
• CartonsidentifiedwithGTIN-14numbersandrequiringnoadditionalinformationsuchasuse-bydatesin the bar code should be bar coded with Interleaved Two of Five (ITF-14) bar codes. See Section 8 p13 and Section10 pp.17-20.
• CartonsidentifiedwithGTIN-14numbersthatrequireadditionalinformationsuchasuse-bydatesinthe bar code must be bar coded with GS1-128 bar code. See Section 8 p13 and Section10 pp. 21-23.
• Innersmaybebarcodedwithanyofthebarcodesmentionedabove,orwithnone,asdecidedbetween you and your customers.
• Pallets(andanyunitusedasalogisticsunit)shouldbebarcodedwithaGS1-128barcode. See Section 11 pp. 24-26.
Step five: having the bar code printed
GS1 New Zealand provides electronic bar code images or they can be obtained from prepress service providers. Lists of companies able to print bar codes for you or supply equipment or software for the purpose are shown in ‘Solution Providers’ on the GS1 New Zealand web site www.gs1nz.org. See Section 6 p7. Electronic files containing bar code graphics are obtainable through your MyGS1 page on the GS1 New Zealand website. See Section 17 pp. 38-47.
Step six: getting the bar code right
Physical requirements such as size, height, colour and location are very important. Products on which the bar codes do not comply may be rejected by customers or may cause inefficiency in the supply chain by not scanning. See Sections 15 and 16, pp. 35-37. Ensure that anyone printing bar codes for you is familiar with the information they contain. See section 17 pp. 38-47.
Step seven: bar code quality testing
Many major retailers will require you to show evidence of a GS1 verification test on your bar codes. Without evidence of a successful test your product may be rejected or you may be required to relabel it before acceptance. Whichever sector you supply, a verification test is a wise precaution to ensure that your customers will not be disappointed with your product when they receive it. See Section 13 p30.
i
Following this Quick Start Guide will get you started as a user of the GS1 System but will not be a substitute for the whole of this booklet. GS1 New Zealand strongly recommends that you study the whole booklet. Not doing so creates the risk of embarrassment in the market place because of bar codes that fail or trading partners who reject products on which the bar codes do not meet GS1 specifications or industry requirements.
Bar Code Quick Start guide i
1. The origins of the GS1 System 1
2. GS1 New Zealand services 2
GS1 Accreditation Certificate in Automatic Data Capture (ADC) standards
3. What bar codes do 3
4. Grocery Industry Requirements in Australia and New Zealand 4
5. Number allocation 5
What happens when a consumer unit is also a traded unit? Number notification Re-using item numbers
6. Turning a GTIN into a bar code 7
7. The ideal bar code 8
For consumer units For traded units For logistics units, for example pallets Bar code origination Bar code colours
8. Choosing the correct bar code 13
9. Bar codes on consumer units 14
Main requirements X-dimension Light margins or quiet zones
10. Bar codes on traded units 16
Using retail bar codes on a traded unit Using ITF-14 bar codes
Main requirements Bearer bars Light margin indicators H Gauges Software
Using GS1-128 bar codes
Main requirements Bearer bars Light margin indicators
Products with a shelf life of up to 90 days Variable measure product Software
11. Logistics labels (SSCC) 24
Position of label on pallet
12. The verification process 27
ISO/ANSI grade comparison Pass grade requirements
13. GS1 Verification reports 30
Obtaining a GS1 verification report
14. Common problems to avoid 31
15. Bar code quality checklist 35
16. Summary of best practice recommendations 36
iiiii
Contents

17. Bar code management: using MyGS1 38
The benefits of MyGS1
Accessing MyGS1
Your dashboard
Your transactions and payments
ProductVault™ for data storage
To create a number and allocate it to a product
To access your product file
Bar code generator
Bar code verification reports
18. Glossary of terms 47
Appendix 1 Bar code dimensions 49
Dimensions of EAN-13 and EAN-8
EAN-13 and EAN-8 light margins
UPC-A and UPC-E
Appendix 2 Creating GTINs and SSCCs and calculating check digits 52
Exporting to the USA and Canada
Global trade item numbers (GTINs)
Creating retail GTINs
If EAN-13 is too big
Special cases
Creating variable measure GTINs
Creating own-label GTINs for restricted distribution items
Creating shipper GTINs (GTIN-14s)
Component parts of GTIN-14s
Creating SSCCs
Check digit calculation
Appendix 3 Printing techniques 57
General
Printing on demand (thermal, ink jet etc.)
Appendix 4 Printing GS1-128 bar codes 59
Function 1
Choosing the correct character set
Fixed length and variable length fields
Choosing the correct size
Height of bars
Keeping adequate light margins
When are brackets required around the application identifiers?
Determining the length of a GS1-128 bar code
Choosing the correct application identifiers (AIs)
Appendix 5 Symbol show through 62
Appendix 6 GS1 DataBar 63
Appendix 7 GS1 DataMatrix Symbology 66
iiiii

21
2. GS1 New Zealand services to members 1. The Origins of the GS1 System
The bar code was one of several methods developed for the automatic reading of numbers in the years following World War II. The American grocery industry realised that the new technology had the potential to revolutionise supply chain management and in 1972 the Uniform Code Council (UCC) was formed by a coalition of interested companies and industry organisations. The new organisation’s mission was to design and implement a suitable identification and bar code system usable in any industry, throughout the whole supply chain. In April 1974 retail scanning began in the USA.
Several European countries cooperated to form the European Article Number (EAN) Association to roll out the American system for worldwide use. EAN International was established in 1977 and other countries quickly became involved. The first scanning store opened in New Zealand in 1982, just three years after the New Zealand Product Number Association (now GS1 New Zealand) was founded.
By 1993, New Zealand led the world in the degree of scanning penetration in supermarkets. In that year 85 cents in every dollar’s worth of groceries was sold through scanning checkouts. Since then the System has become established well beyond grocery in all retail sectors and throughout most of their supply chains.
In January 2005 EAN International and the UCC merged into one organisation, now known as GS1.
Since 2001 there has been a radio frequency identification (RFID) equivalent of the bar code standard, and all the advantages of a global open system are now available to RFID users also. The RFID standard is known as Electronic Product Code (EPC) and is administered world wide by GS1’s wholly owned subsidiary EPC global, represented in New Zealand by GS1 New Zealand.
21
2. GS1 New Zealand services to members 1. The Origins of the GS1 System
GS1 New Zealand works to support users of the GS1 System and to promote the use of the System in new environments and sectors. Services available to members include:
• 0800helpdesk
• barcodeverificationtesting
• technicalliterature
• seminars
• customisedon-sitetraining
• consultancy
• datasynchronisationservices
• websitewww.gs1nz.org
• globalpartyinformationregistrywww.gepir.org
• barcodegraphics
• webbasedproductfiles
GS1 New Zealand has offices in Auckland, Wellington and Christchurch.
GS1 accreditation
GS1 New Zealand conducts a programme to accredit companies that have completed advanced training in the GS1 specifications and have put in place quality systems to ensure that everything they do involving bar codes is fully compliant with the specifications. Accredited companies are recommended to users obtaining bar codes and related services such as printers or labelling equipment.
Certificate in Automatic Data Capture (ADC) Standards
GS1 New Zealand in conjunction with GS1 Head Office in Brussels offers an NZQA-recognised extramural course in ADC Standards covering all aspects of GS1 numbering and bar codes. The course is designed for designers, packaging technologists, printers, inventory managers and anyone else whose work involves identification and/or bar codes, such as sales personnel selling packaging or label printers. It is also useful for marketing personnel with an interest in design issues or data collection relating to their products.
Printers may complete the course as a component of the Diploma in Print Management.
GS1 New Zealand recommends the services of persons who have completed this course.

43
4. Grocery industry requirements in Australia and New Zealand
3. What bar codes do
All bar codes represent data in a machine-readable form. The different widths of bars and spaces in a bar code symbol represent different numbers or letters which can be decoded by a bar code scanner. The data is then sent back to the appropriate computer system where it is recorded and used as a prompt for further action.
It is important to realise that numbers and bar codes are different things, and that there are hundreds of types of bar codes. When this booklet mentions bar codes it will be referring to those bar codes that are part of the GS1 System. Because scanning systems can only decode those bar codes for which they have been set up, selecting the correct bar code to encode data is very important.
Bar codes used at the retail point-of-sale represent a global trade item number (GTIN), which acts as a ‘key’ to information held on a database. It is important that each GTIN correctly identifies the product and that the bar code representing this number can easily be seen and scanned successfully.
The bar codes used on outer cases (trade items that do not cross a retail point-of-sale) will often represent only the GTIN. When it is also necessary to have additional information such as expiry dates, batch information or serial numbers in a machine-readable form, this information can also be included in a bar code symbol.
Logistics labels are used to identify the units transported in the supply chain. Pallets are the best and most common example but any unit used to ship and store products may be suitable for identification with a logistics label.
All of the bar codes in the GS1 System use the GS1 business data standards. These standards are agreed, unambiguous communications between companies in value chains and their final customers, who may be consumers at the retail point-of-sale. The numbers that this booklet will explain are only those used for identification but please note that the GS1 System provides numbers for many other purposes as well. These include asset tracking and the use of numbers as addresses to identify locations and functional entities in electronic communications or bar coded delivery addresses. Global Location Numbers (GLNs) and other specialist applications are not discussed in this booklet but information about them is available from GS1 New Zealand.
This booklet will provide essential information about the printing and positioning of bar codes, but it is not intended as a replacement for the GS1 specifications. These specifications are available free of charge to members via the GS1 New Zealand website at www.gs1nz.org.
Members are ultimately responsible for the quality of bar codes on their products and should ensure that they correctly specify all aspects of the bar codes they require when ordering print or packaging.
43
4. Grocery industry requirements in Australia and New Zealand
3. What bar codes do
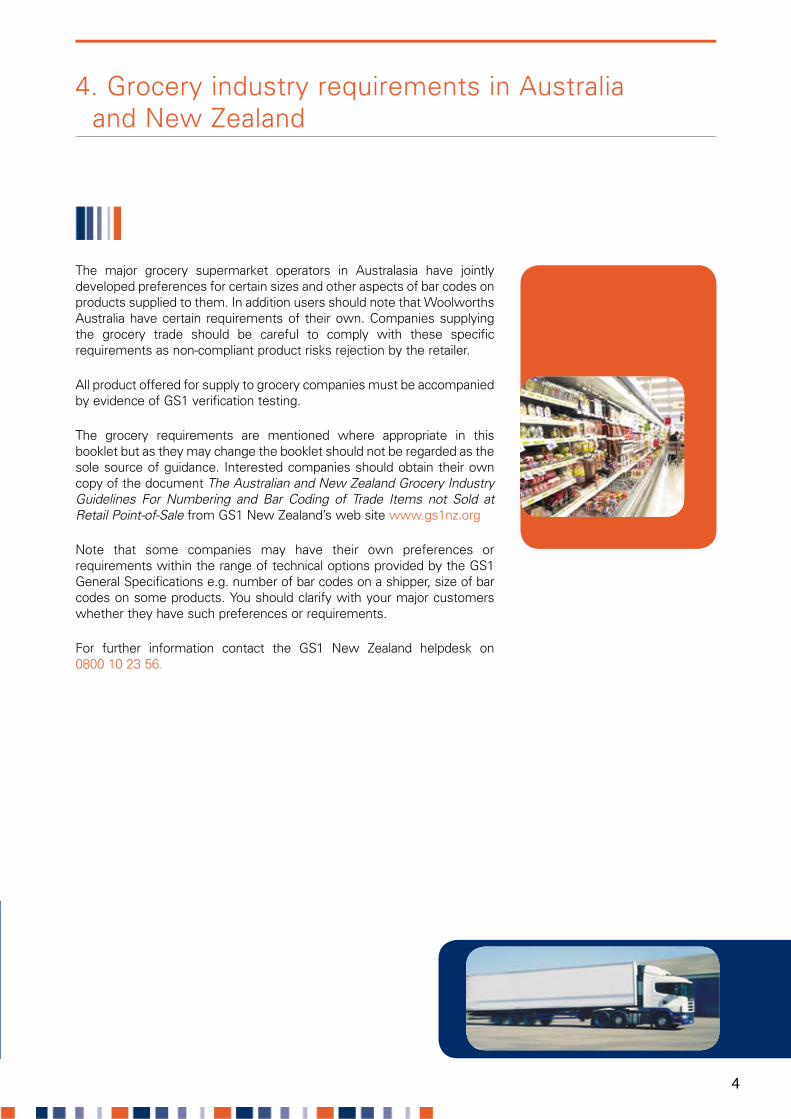
The major grocery supermarket operators in Australasia have jointly developed preferences for certain sizes and other aspects of bar codes on products supplied to them. In addition users should note that Woolworths Australia have certain requirements of their own. Companies supplying the grocery trade should be careful to comply with these specific requirements as non-compliant product risks rejection by the retailer.
All product offered for supply to grocery companies must be accompanied by evidence of GS1 verification testing.
The grocery requirements are mentioned where appropriate in this booklet but as they may change the booklet should not be regarded as the sole source of guidance. Interested companies should obtain their own copy of the document The Australian and New Zealand Grocery Industry Guidelines For Numbering and Bar Coding of Trade Items not Sold at Retail Point-of-Sale from GS1 New Zealand’s web site www.gs1nz.org
Note that some companies may have their own preferences or requirements within the range of technical options provided by the GS1 General Specifications e.g. number of bar codes on a shipper, size of bar codes on some products. You should clarify with your major customers whether they have such preferences or requirements.
For further information contact the GS1 New Zealand helpdesk on 0800 10 23 56.

65
5. Number allocation
It is vitally important that each company bar coding its products has a unique company prefix number from GS1 New Zealand or another GS1 member organisation. This number, which can vary in length, is then used as the basis for the creation of unique global trade item numbers (GTINs) as explained in Appendix 2.
Each company must ensure that every different product line has a different number. If particular levels of packaging also need to be identified for trading purposes, then each level being identified requires a different number.
The number allocated to a consumer unit (an item that could be sold at a retail point-of-sale) must be changed when:
• thedeclaredweightisdifferent
• extraproductisprovidedfree,forexample10%extra
• thenameoftheproductchanges,forexamplefromMarathon™toSnickers™
• afreegiftisattachedtotheitem
• differentpricesarepre-printedonthepackaging
Numbers allocated to consumer units should remain unaltered when:
• afreegiftisincludedinsidetheitem
• apromotionalofferisbeingadvertised
• theundeclaredweightchangesbyanamountthatdoesnotaffectitshandlingwithinanysupplychain
• aminorpackagingchangeoccurs,forexampleadifferentbutsimilarpackagingmaterialisused
Different numbers are required on outer cases (traded units or trade items that do not cross a retail point-of-sale) when:
• theycontaindifferentquantitiesofthesameconsumerunit
• theproductsinsidetheoutercasehaveanewitemnumber
• apromotionneedstobedistinguishedfororderingandinvoicingpurposes
• thepackagingoftheconsumerunitchangessignificantly,forexamplewhenaglasscontainerreplacesa plastic container
Changes of number are required when the outer case needs to be distinguished from any other outer case. Changes in packaging material may affect the gross weight of the item even though all other aspects are unaltered. This weight change may affect the logistics processes involved in the product’s handling, so a different number is required.
For further guidance on number change decisions, see the GTIN rules link on the GS1 international web site www.gs1.org

65
5. Number allocation
What happens when a consumer unit is also a traded unit?
When a product is traded between companies and also sold at the retail point-of-sale, the product is both a traded unit and a consumer unit. Examples are a sack of potatoes, a toaster or a 12-pack of canned drinks. The same bar code serves both purposes but because it will be scanned in warehouses and distribution centres as well as in retail environments it needs to be larger than a bar code intended only for retail use.
Number notification
Poor communication of item numbers between trading partners prevents effective handling of trade information. Following good practice will achieve immediate improvements at no extra cost.
• ForproprietarybrandedproductsthemanufacturerorsupplierwillnotifythewholesalersorretailersoftheGTINs being used
• Forownbrandproducts,theretailerorwholesalerwillletthemanufacturerknowwhichnumbersaretobeused to identify new products
When a new product is being introduced, all the GTINs that relate to it must be notified to all the trading partners before the products are first supplied
Re-using item numbers
Best practice is to never re-use numbers so that accidental duplication is impossible. For this reason numbers on medical and pharmaceutical products must never be re-used.
The GTIN for any other product may be re-used if it is at least four years since the number was last used to identify something else. Even if the first product had a very short shelf life the number should not be re-used before this time has elapsed or it may cause confusion with your trading partners.
The only exception is for clothing, when numbers can be re-used after 30 months. This is because many of these are used to identify fashion items that are normally sold for only one season.
It is always worth checking whether re-using numbers will cause any problems with your major customers. In the music industry, for example, re-using numbers may cause problems because a re-issued recording may require the same number it had 10, 20 or 30 years ago.

Your label or packaging supplier will be able to print a bar code for you once you have created the number. Print and packaging companies that are GS1 New Zealand members will be better equipped to provide you with accurate bar codes than non-members.
You are able to obtain electronic (Postscript) files containing bar code images through your MyGS1 page on the GS1 New Zealand web site www.gs1nz.org. Designers and printers can use these files.
First you will need to know your user name and password to gain access to MyGS1. These will have been given to you when you joined GS1. If you do not know them call GS1 for assistance.
• InMyGS1select‘BarcodeGenerator’
• EntertheGTINintheindicatedspace
• Selectthesymbology(barcodetype)yourrequire
• Providethecontactinformationrequired
• Select‘EmailmemyBarcodeGraphic’
The file will be sent to the email address you have indicated. Note that you will not be able to open it unless you have advanced publishing software. The image is intended for use by professional printers. It cannot be used in on-demand print systems e.g. thermal, ink jet. Users of on-demand systems should be able to create bar codes using the software in their equipment.
Forward the image to your print or packaging supplier. Remind your supplier that the image is best used at the size at which the file opens. Dragging and dropping or editing the image in any way contains potential difficulties because of the possibility that the relative widths of the bars and spaces may be distorted.
Members receive some free images each year (ten at the time of writing) and are charged a modest fee for each image thereafter. The Bar Code Generator is not available to non-members.
GS1 New Zealand recommends the services of print and packaging companies that have completed the GS1 Accreditation Programme. Companies that are members are not automatically accredited. You are encouraged to ask your suppliers about their GS1 membership status and their knowledge of current GS1 specifications, which may change from time to time.
Be sure to insist on full compliance with GS1 specifications including print quality requirements when you place the order for the job. As the brand owner you are responsible for ensuring that the product reaches the market place with a correct bar code that will work reliably when retailers scan it.
GS1 New Zealand does not provide bar code printing equipment or software although a list of suppliers is available on the GS1 New Zealand website www.gs1.org
87
7. The ideal bar code6. Turning a GTIN into a bar code
GS1 New Zealand does not provide bar code printing equipment or software. A list of suppliers is available on the GS1 New Zealand website.

87
7. The ideal bar code6. Turning a GTIN into a bar code
The ideal bar code is one that represents the correct data and is scannable when printed within the allowable rangeofsizes.Barcodesizeisusuallyexpressedasapercentagebasedonatheoreticallyideal100%size.Itis sometimes expressed as the width of the thinnest bar or space in the bar code, known as the X-dimension. The GS1 specifications provide a basis for determining the correct size of a bar code symbol and also recommend the use of verification equipment which can measure how well a bar code has been printed and give an indication of how well it will be scanned in practice.
The correct bar code symbol must be chosen before including it on the packaging of the product.
If supplying the grocery industry in Australia or New Zealand be careful to comply with the specific requirements of that industry. See Section 4, p4.
For consumer units
Scanners at the retail point-of-sale are designed to read EAN-13, UPC-A, EAN-8 and UPC-E bar codes only, so one of these symbols must be used. Most New Zealand users will use EAN-13 bar codes on their products (or EAN-8 bar codes for very small products). The four retail bar codes, EAN-13, UPC-A, EAN-8 and UPC-E are generally known as ‘EAN/UPC’, or simply ‘retail bar codes.’ All four will work anywhere in the world.
• Barcodesshouldbeinthesamelocationonallsimilarshapedproducts
• Thebarcodeshouldbenocloserthan8mmtoaseam,edgeorpackagingfold
• Thebarcodeshouldbeonaflatorconsistentlycurvedsurface
• Thebarcodesonconsumerunitsshouldnotbevisiblethroughtheouterpackagingofasixpackorother grouping of products
• Forsmallcylindricalproducts,thebarcodeshouldbepositionedvertically(ladderorientation)sothatthe bars are horizontal. See illustration overleaf.
• Onebarcodeissufficientforaconsumerunit
See Section 9, p14.
For traded units
Scanners at inward goods and at the wholesale point-of-sale are designed to read retail bar codes as well as ITF-14 and GS1-128 bar codes so any of these may be used. The symbols used on very small products, the EAN-8 and UPC-E bar codes, will not generally be used on traded units.
Traded units may be handled automatically by inward goods systems and so the bar codes must normally be printed so that the bars of the symbol are vertical when the unit is in its normal storage position. GS1 can advise on the small range of exceptions in special cases. Traded units will often be sold intact at a wholesale point-of-sale, so it is very important that the bar codes on the consumer units inside them cannot be scanned through the packaging material.
Two bar codes should usually be provided on each item. One bar code should be on a short side and the other on the adjacent long right hand side. Note that the required number of bar codes may vary according to the sector or company you are supplying. See Section 16, p36.

109
• Thebarcodesonconsumerunitsinsidetheoutercaseshouldnotbescannablethroughtheouterpackaging
• Thebarcodesmustbehorizontal,in‘picketfence’orientation,sothatthebarsarevertical
• Theminimumheightofthebarsinthebarcodeshouldbe32mm
• Thebarcodesincludingtheirlightmarginsmustbenocloserthan19mmtoaverticaledge
• Thebarcodesmustnotbeobscuredbyanyfinalpackaging
See Section 10, p16
For logistics units, for example pallets
Scanners used to read labels on logistics units are designed to read GS1-128 bar codes.
All the bar codes on the logistics label must be GS1-128 bar codes.
• Thereshouldbetwoidenticallabelsoneachunit
• Onelabelshouldbeplacedonashortsideandthesecondlabelshouldbeplacedontheadjacentlong right hand side
• Thebarcodesincludingtheirlightmarginsmustbenocloserthan50mmtoaverticaledge
• Theminimumheightofthebarsofallthebarcodesshouldbe32mm
• Thebarcodesmustbehorizontal,inpicketfenceorientation,sothatthebarsarevertical
See Section 11, p24
Bar code origination
Bar codes can be sourced as film masters (positive or negative images as required by the production process), as digital EPS (Encapsulated PostScript) files sent electronically, or through the use of bar code production software used in-house. See Section 6 page 7. Whichever method is used it is important to determine the correct size for the particular use of the bar code, and for the choice of substrate and printing technique.
More details are provided in Appendix 3.
‘Picket Fence’ orientation
‘Ladder’ orientation

109
The use of verification equipment is recommended to check these master images, especially when artwork has been created digitally. Verifiers are special scanning systems that scientifically assess bar code quality. Film masters will already have been verified by the film master supplier to ensure that they have been accurately produced. This does not remove the need for verification of the printed product. Verification at this stage is a different process and the printing process will have changed the characteristics of the bar code from its film form.
It is recommended that the bar codes on the finished products are then verified to ensure that all the production processes have resulted in a scannable bar code symbol or symbols. Verification equipment meeting the requirements of ISO/IEC 15426-1 should be used, as it will provide a check on all the required criteria.
More information about verification is provided in Sections 12 and 13 pp 27 - 30.
Verification is strongly recommended because wholesalers and retailers are increasingly using automated scanning systems at their inwards goods and points-of-sale, and poor quality, unscannable, bar codes create additional cost and delay for their operations. Grocery companies require evidence of verification before accepting new products.
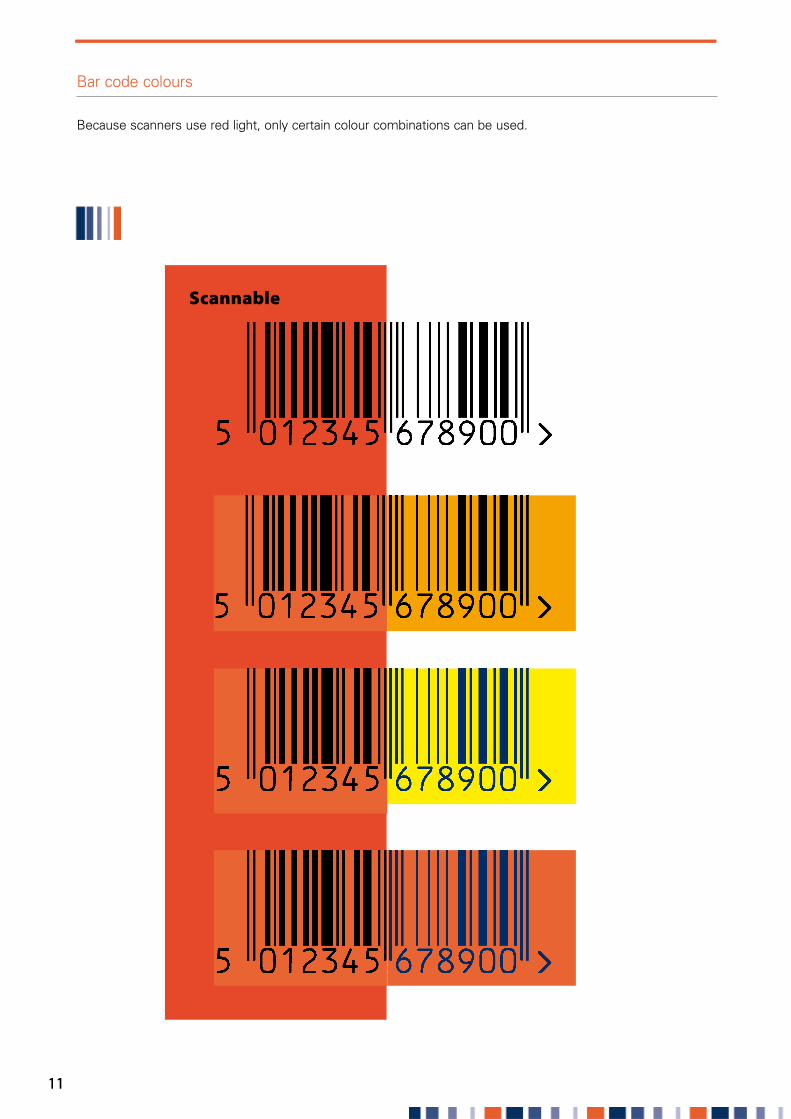
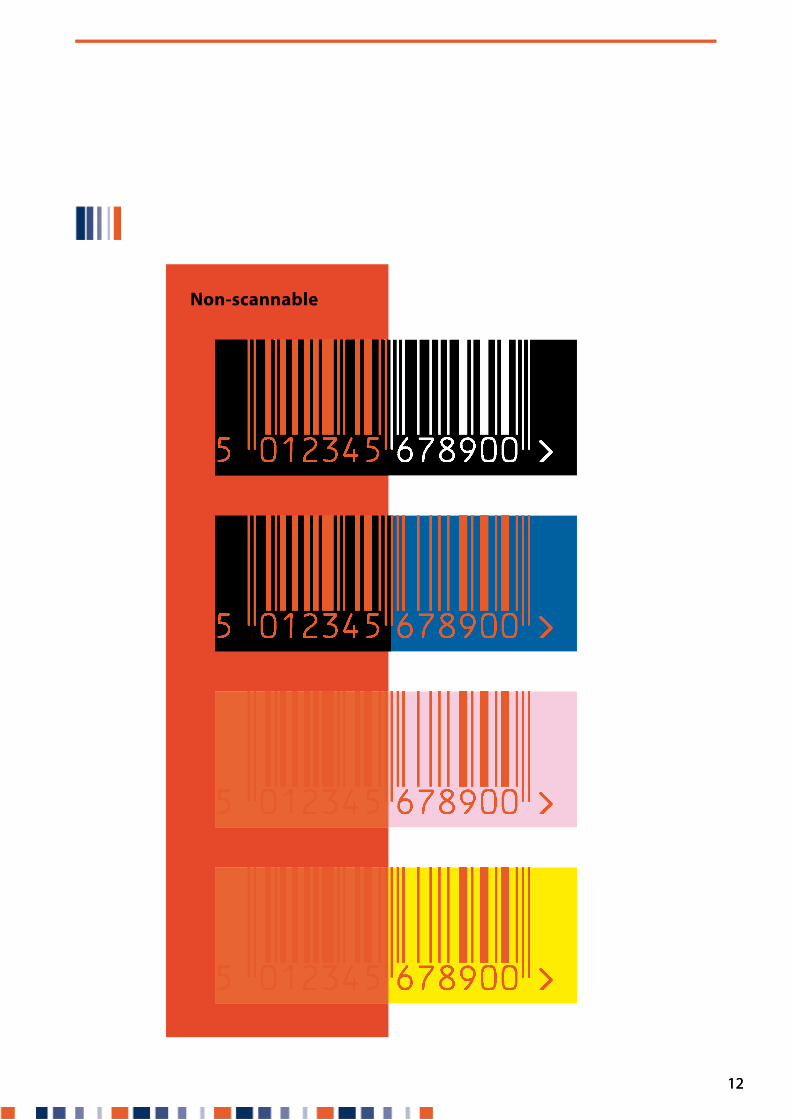
Bar code colours
Bar codes must be printed so that the darker bars appear against a paler background. It is not possible to read a bar code that is printed with light bars against a darker background. Scanners detect the difference in contrast between the bars and spaces using red light, and it is important to use colours that will maximise this contrast.
If using a semi-transparent substrate, do not rely on the colour of the contents of the packaging to provide a background colour: print a background in white, yellow, orange or red to provide a solid contrast with the bars of the symbol. Black bars on a white background are a good combination, but other colours may be used provided the bars have a high blue, black or green content and are printed on a background that is white, yellow, orange or red. The illustrations overleaf show examples of scannable and non-scannable colour combinations.
Verifiers that meet the requirements of the international specification ISO/IEC 15426-1 are able to measure the contrast of a printed bar code, and they should be used to check that particular colour combinations are scannable.
Any colours used for the printing of the bars must be pure or ‘spot’ colours, and not printed out of the conventional four-colour (CMYK) process. It is not always necessary to introduce black as an extra colour to print the bars if one of the colours already used in the design will appear black under red light. Use a verifier compliant with ISO/IEC 15426-1 to check that the chosen combination will work effectively, or consult GS1.
Grocery companies require evidence of verification before accepting new products.
1211 1211 1211
Bar code colours
Because scanners use red light, only certain colour combinations can be used.
Scannable
1211 1211 1211
Bar code colours
Because scanners use red light, only certain colour combinations can be used.
Non-scannable

1413
9. Bar codes on consumer units8. Choosing the correct bar code
All Canadian and US retailers should now be able to scan EAN-8 and EAN-13 symbols but if exporting check with your agent. Note that Americans generally refer to all retail bar codes as ‘UPC’ but may mean ‘EAN/UPC’, which includes EAN-8 and EAN-13.
The unit is too small to accommodate the bar
codes you need. GS1 DataBar may be an option in future.
See Appendix 6for information
about GS1 DataBar*Note that this option means that the bar code you will use can not be scanned at retail. Operators will have to open the carton, scan one of the items inside, and manually enter “x12”, “x24” etc to indicate the number of units in the carton.
1413
9. Bar codes on consumer units8. Choosing the correct bar code
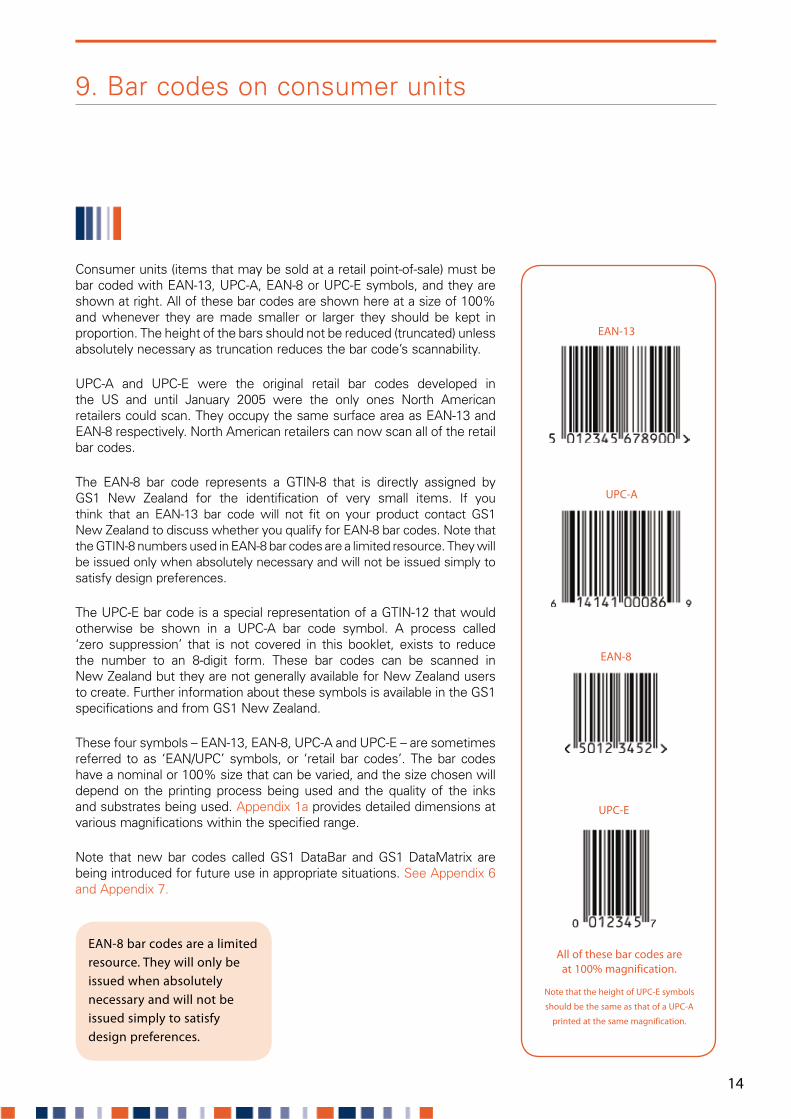
Consumer units (items that may be sold at a retail point-of-sale) must be bar coded with EAN-13, UPC-A, EAN-8 or UPC-E symbols, and they are shownatright.Allofthesebarcodesareshownhereatasizeof100%and whenever they are made smaller or larger they should be kept in proportion. The height of the bars should not be reduced (truncated) unless absolutely necessary as truncation reduces the bar code’s scannability.
UPC-A and UPC-E were the original retail bar codes developed in the US and until January 2005 were the only ones North American retailers could scan. They occupy the same surface area as EAN-13 and EAN-8 respectively. North American retailers can now scan all of the retail bar codes.
The EAN-8 bar code represents a GTIN-8 that is directly assigned by GS1 New Zealand for the identification of very small items. If you think that an EAN-13 bar code will not fit on your product contact GS1 New Zealand to discuss whether you qualify for EAN-8 bar codes. Note that the GTIN-8 numbers used in EAN-8 bar codes are a limited resource. They will be issued only when absolutely necessary and will not be issued simply to satisfy design preferences.
The UPC-E bar code is a special representation of a GTIN-12 that would otherwise be shown in a UPC-A bar code symbol. A process called ‘zero suppression’ that is not covered in this booklet, exists to reduce the number to an 8-digit form. These bar codes can be scanned in New Zealand but they are not generally available for New Zealand users to create. Further information about these symbols is available in the GS1 specifications and from GS1 New Zealand.
These four symbols – EAN-13, EAN-8, UPC-A and UPC-E – are sometimes referred to as ‘EAN/UPC’ symbols, or ‘retail bar codes’. The bar codes haveanominalor100%sizethatcanbevaried,andthesizechosenwilldepend on the printing process being used and the quality of the inks and substrates being used. Appendix 1a provides detailed dimensions at various magnifications within the specified range.
Note that new bar codes called GS1 DataBar and GS1 DataMatrix are being introduced for future use in appropriate situations. See Appendix 6 and Appendix 7.
EAN-13
UPC-A
EAN-8
UPC-E
All of these bar codes are at 100% magnification.
Note that the height of UPC-E symbols
should be the same as that of a UPC-A
printed at the same magnification.
EAN-8 bar codes are a limited resource. They will only be issued when absolutely necessary and will not be issued simply to satisfy design preferences.

Main requirements
• Thebarsofthecodesmustnotbetruncatedunlesstheproduct’ssizemakesthisabsolutelynecessary
• Adequatelightmarginsorquietzonesmustbeprovidedtotheleftandrightofeachbarcode
Sizesbetween80%and200%areallowedbutnotethatiftheunitwillbeusedfordistributionaswellasretailsale the size requirements for traded units will apply.
• Biggerbarcodesareeasiertoprintandscanthansmalleronessoasageneralprincipleusersshould favour larger size options
Whenprintingbarcodessmallerthan100%rememberthattheprintingtolerancesaremuchtighterandyoumust use high quality printing processes. It is not always possible to improve the quality of the printing process so tests must be carried out before committing to a particular size of symbol. If the consumer unit is also a traded unit, see section 10, p16 for advice on the bar code’s size.
X-dimension
Whenanyofthesebarcodesisatitsnominalor100%sizethewidthofthenarrowestbarorspaceis0.33mm. This measurement is also known as the X-dimension or the module width, and this expression may sometimes be used to specify the size of a bar code. The width of the other bars and spaces is two, three or four times the X-dimension.
Light margins or quiet zones
The clear spaces to the left and right of each bar code symbol are very important as they are used by the scanner to determine where the bar code starts and finishes. These light margins or quiet zones must be the same background colour as the rest of the bar code and nothing should be printed in these areas except for the symbol’s light margin indicators. These light margin indicators are optional, but they are strongly recommended to help safeguard the light margins.
The nominal dimensions for these light margins are provided in Appendix 1b, but it is important to allow slightly more than this space at each side to allow for variation in printing tolerances and placement. Light margins can be critical. A fraction of a millimetre’s shortfall in margin width may render a bar code unscannable or may mean that only some scanners can scan it.
1615
10. Bar codes on traded units

1615
10. Bar codes on traded units
Traded units are sometimes called trade items not crossing a retail point-of-sale. They may be known as outers, cases, cartons or shippers. These units may cross a wholesale point-of-sale, and may also be scanned in automated goods handling systems. They are the items handled by manufacturers, distributors, wholesalers, and retailers at inwards goods and they usually contain a predefined number of consumer units.
These items can be bar coded with retail bar codes, ITF-14 or GS1-128 symbols depending on the type of outer case packaging material being used and the type of information required by trading partners.
Some products, such as washing machines, furniture or large multipacks of canned drinks, are both traded units and consumer units. If this is the case the item number is the same for both uses. A retail bar code symbol is required for the retail point-of-sale.
GS1 DataBar and GS1 DataMatrix are intended for special uses. See Appendix 6 and Appendix 7. They are not intended for general use on traded units.

Using retail bar codes on a traded unit
If a retail bar code is printed on the packaging of a traded unit:
• Thebarcodemusthaveamagnificationofatleast150%,sothatthewidthofthenarrowestbarsisat least0.495mm,uptoamaximumof200%,whenthenarrowestbarswouldbe0.660mm
• GS1specificationsrecommendfourbarcodesbutwillacceptalessernumberdowntoone. The Australasian grocery trade minimum is two and Woolworths Australia require six, one on each surface of the unit
• Whereonlytwobarcodesareappliedoneshouldbeonashortendandthesecondontheadjacentlong right hand side
• Itmustnotbepossibletoscananyofthebarcodesonanyoftheitemsinsidethroughoraroundthe outer packaging
For further information see Appendix 4
• Thebarcodemusthavelightmarginstotheleftandright,andtheuseoflightmarginindicatorsis strongly recommended as a means of safeguarding these
• Thebarcodemustbehorizontal,inpicketfenceorientation,sothatthebarsarevertical
• Wherepossiblecentrethebarcodeonthepanelbutifthisisnotpossible,thebarcodeincludingitslight margins must be no closer than 19 mm to a vertical edge
• Positionthebarcodesothattheverticalbarsfillahorizontalband32mmto64mmabovethebaseofthe unit. If your printer has trouble positioning the bar code precisely one option is to print it with vertical bars taller than the specified minimum height so that the required band is filled and some extra bar height protrudes above and/or below it
• Ifyouareprintingretailbarcodesstraightontocorrugatedboardbearerbarsaroundthebarcodearenot required but they are helpful in improving print quality and their use is recommended
Using ITF-14 bar codes
Users will generally use ITF-14 symbols when bar codes are being printed directly on to corrugated outer cases. If you have to provide extra variable information such as expiry dates or batch numbers, you will have to use GS1-128 bar codes that are explained later.
ExamplesofanITF-14symbolprintedat itsnominalsize(amagnificationof100%which isequivalenttoan X-dimensionof1.016mm)andatareducedsizeof62.5%areshownatright.AswiththeEAN/UPCsymbolsthe aim is to print a scannable bar code within the specified size range. For ITF-14 symbols the range of sizes is from50%to100%,whichisequivalenttoanX-dimensionrangeof0.495mmto1.016mm.
Sizesupto120%areacceptableonoldpackagingandlabelsbutallnewdesignsmustrecognizethe100%upper limit and larger symbols should be resized when any redesign occurs.
1817
UPC-AEAN-13
Examples of EAN-13 and UPC-A bar codes printed at a magnification of 150% are shown below:

1817
Inthefollowingillustrationsthe100%and62.5%barcodesillustratetheformatrequiredwhenprintingplatesareused.The50%barcode illustrates the format thatmaybeusedwithotherprintmethodsand includesoptional light margin indicators.
ITF-14 bar code at 100% magnification
ITF-14 bar code at 62.5% magnification
ITF-14 bar code at 50% magnification

Main requirements
• Whenprintingdirectlyontocorrugatedcasesuse100%sizedsymbolswhichhaveanX-dimensionof 1.016 mm. Using this size addresses the size requirements of all supply chain participants
• GS1specificationsrecommendfourbarcodes,oneoneachside,butwillacceptalessernumberdowntoone. The Australasian grocery trade minimum is two and Woolworths Australia require six, one on each surface of the unit
• Whereonlytwobarcodesareappliedoneshouldbeonashortendandthesecondontheadjacentlongright hand side
• Thebarsshouldbeatleast32mmtallregardlessofmagnification,measuredfromtoptobottomofverticalbars and not including the thickness of the bearer bars
• Positionthebarcodesothattheverticalbars(notincludingthebearerbars)fillahorizontalband32mmto64mm above the base of the unit. If your printer has trouble positioning the bar code precisely one option is to print it with vertical bars taller than 32mm so that the required band is filled and some extra bar height protrudes above and/or below it
• Clearlightmarginsshouldbeprovidedonbothsidesofthesymbol
• Thebarcodesontheconsumerunitsinsidetheoutercaseshouldnotbescannablethroughtheouterpackaging
• Thebarcodesmustbehorizontal,inpicketfenceorientation,sothatthebarsarevertical
• Thebarcodesincludingtheirlightmarginsmustbenocloserthan19mmtoaverticaledge
• TheminimumacceptablesizeforanITF-14barcodeprinteddirectlyontopaperis50%butwhenprintingdirectlyontoKraftpaperorcorrugatedboardGS1specifiesaminimumof62.5%,theAustralasiangrocerytraderequires90%andWoolworthsAustraliarequires100%
• Therecommendedbarwidthratioforwidetonarrowbarsis2.5to1.Theallowablerangeis2.2-3.0to1
• OnlyuseITF-14symbolssmallerthan62.5%whenprintingontolabels,ordirectlyontohighqualitysubstrates; samples will need to be checked to ensure that these symbols are scannable
Bearer bars
The heavy box around the ITF-14 symbol is called the bearer bar and it must always be included when printing by any method that involves using plates. Bearer bars maximise the area of the plate and improve the registration of the print. They may be printed around any type of bar code to assist in maintaining quality.
If the ITF-14 symbol is printed using on-demand label printing equipment it is only necessary to print the top and bottom bearer bars and these should be at least twice as wide as the narrow bars in the bar code.
Bearer bars also prevent any mis-scanning of the ITF-14 symbols, and help prevent the top and bottom of the bars from splaying apart when using flexographic printing plates. When these bar codes are printed on demand the bearer bar still prevents mis-scans and may also provide a visible check that all the print head elements are working.
2019
The bars should be at least 32mm tall excluding the thickness of the bearer bars.
2019
Light margin indicators
Light margin indicators are not required by the GS1 specifications, but they can be used to indicate the presence of the light margins or quiet zones. Users of ITF-14 symbols must be confident that adequate light margins are being provided.
It is also important to check that any final wrapping or treatment of the item does not obscure the bar codes.
H Gauges
These are used by the printer to aid visual inspection of the plate pressure during printing. They are recommended for plate printing of ITF bar codes. They need not be used for thermal printing of ITF bar codes or where the printer has other means of monitoring the printing quality. When used the H gauge should be placed outside the light margins specified, but inside the vertical lines of the box surrounding the ITF code.
Software
Some software packages for bar code production have not been updated to reflect the changes to GS1 specifications that were introduced in January 2000. These altered the allowable sizes of both ITF-14 and GS1-128 bar codes. These software packages may still allow for the printing of these bar codes at sizes that are now outside the specifications.
Please consult software suppliers for possible updates.

Using GS1-128 bar codes
These bar codes are now referred to as GS1-128 but will be specified as EAN-128, UCC/EAN-128 or UCC-128 in most literature and software as the current name has only recently been introduced. Note that GS1-128 is not the same as Code 128. GS1-128 enables companies to provide additional information about a product alongside the GTIN for the product itself. These bar codes cannot be scanned at the retail point-of-sale so they are restricted to use on traded units or pallets.
GS1-128 is recommended when it is necessary to scan:
• Use-byandbest-beforedates
• Measurementsforvariablemeasureproducts
• Batchandserialnumbers
• Anyothervariableinformationaboutaproduct
Application identifiers are significant sets of digits that are used in GS1-128 number formats and bar codes to signal to the processing software what the associated data represents. For example (17) 071103 means a use-by date of 3 November 2007. In this case (17) is the application identifier. Dates are expressed in the format YYMMDD.
See Appendix 4 for information about GS1-128 bar codes and application identifiers. The different types of data must be specified by the application identifiers that appear in brackets before each data field. Remember that the brackets are not data and should not be encoded in the symbol. The brackets are only shown around the human readable numbers below each bar code.
The size of the GS1-128 bar code will depend on the amount of information it includes so:
• Makesurenobarcode,includingitslightmargins,islongerthan165mm
• Ifthebarcodewouldbetoolong,usetwoormorebarcodeseachabovetheothertoshowtheinformation
Main requirements
• GS1specificationsrequireatleastoneGS1-128barcodedlabelonaunitbuttheAustralasiangrocerytradeincluding Woolworths Australia require two
• Whenprintingonlabels,theminimumallowablesizeis50%,whichmeansthenarrowestbarsandspaceshave a width of 0.5mm
• PrintingGS1-128oncorrugatedboardisverydifficultandbestavoidedbutifitmustbedoneprintonlyat100%withanX-dimensionof1.016mm.Theminimumbarheightis32mm
• Thebarcodesmustbehorizontal,inpicketfenceorientation,sothatthebarsarevertical
• Thebarcodesincludingtheirlightmarginsmustbenocloserthan19mmtoaverticaledge
• IfyouareprintingGS1-128straightontocorrugatedboardbearerbarsarenotrequiredbuttheywouldbehelpful in improving print quality and their use is recommended in this situation. Note: GS1 does not recommend printing GS1-128 straight on to corrugated board
• Positionthebarcodesothattheverticalbarsfillahorizontalband32mmto64mmabovethebaseofthe unit. If your printer has trouble positioning the bar code precisely one option is to print it with vertical bars taller than 32mm so that the required band is filled and some extra bar height protrudes above and/or below it
The bar codes on the consumer units inside the outer case must not be scannable through the outer packaging. For further information see Appendices 4 and 5.
2221

2221
Bearer bars
These are not required by the GS1 specifications but users will find them a helpful addition. When GS1-128 bar codes are printed on demand in picket fence orientation any missing print head elements will show up as white gaps in the bearer bars at the top and bottom of the symbol. The use of bearer bars will help ensure accurate production of these symbols.
Light margin indicators
These are not required by the GS1 specifications but they can be used to ensure that adequate light margins or quiet zones are being provided. Users must be confident that sufficient light margins are provided at each side of the symbol. The diagram below provides an example of a suitable format for these.
Products with a shelf life of up to 90 days
In Australia and New Zealand most retailers expect use-by or best-before dates to be bar coded on products whose shelf life is less than 90 days.
An example of a bar code for a short life product is shown below.
The AI (01) defines the GTIN for the product while the AI (15) defines the best-before date in the format YYMMDD. If a use-by date is required, the AI (17) is used.
The data in this bar code provides the information that the GTIN is 25012345678904 and that the product’s best- before date is 5 November 2004.
The GS1-128 bar code shown has light margins to the left and right that are also indicated by the optional light margin indicators. Light margins are 10 times the X-dimension of the bar code.

For further information about on-demand printing, see Appendix 3.
2423
11. Logistics labels (SSCC)
Variable measure products
When traded units contain variable weight items (items that do not have a predefined weight), then the net weight of the contents must be shown in a GS1-128 bar code. Other variable measures such as length, area and volume can be shown using different application identifiers, but weight is the most common variable measure. For further details about the other application identifiers, see choosing the correct application identifiers, page 54, or GS1 specifications available through GS1 New Zealand’s web site.
• UsetheAI(3102)togivethenetweightinkilogramstotwodecimalplaces.OtherAIscanbeusedtogive weight to a different number of decimal places
• TheGTINmustbea14-digitnumberbeginningwith9
The data in this bar code provides the information that the GTIN is 95012345678903, that the product’s net weight is 12.75 kilograms, and that the expiry date is 3 November 2004.
Software
Some software packages for bar code production have not been updated to reflect the changes to GS1 specifications that were introduced in January 2000. These altered the allowable sizes of both ITF-14 and GS1-128 bar codes. These software packages may still allow for the printing of these bar codes at sizes that are now outside the specifications.
Please consult software suppliers for possible updates.

Pallets and other transport units must be labelled with a GS1 logistics label and an example of one is given overleaf. The number used is a unique tracking number called a Serial Shipping Container Code (SSCC). Do not confuse this with the American term Shipping Container Code (SCC). See Glossary of Terms page 48.
The X-dimension for the GS1-128 bar codes shown here is 0.495 mm, and this is the minimum that should be used.Thisisequaltoamagnificationof50%.
The GS1 specifications stipulate that GS1-128 bar codes must be used on these labels to represent the GS1 data.
The most common size is close to A5 which is 148 mm wide and 210 mm tall. If less information is required, some companies will choose to use a label size closer to A6 which is 105 mm wide and 148 mm tall. The actual size of the label will depend on the requirements of the trading partners, and any size of label may be used.
The label uses GS1-128 bar codes and provides information that will be useful to all the participants in the transport and distribution chain.
• Eachshippingcontainer,transportunitorpalletisidentifiedwithauniquetrackingnumbercalledaSerial Shipping Container Code (SSCC)
• TheSSCCisan18-digitnumberthatisuniqueforeachunit
• TheSSCCisspecifiedbytheAI(00)
• ThebarcodecontainingtheSSCCshouldalwaysbethelowestbarcodeonthelabelandmustalwaysbe printedat50%magnificationormore
In addition to the SSCC most users will provide details of the contents of the pallet.
• UseAI(01)togivetheGTINofthecasesonthepalletifthepallethasapre-definedquantityofcases, and it is a traded unit. AI (01) must not be used together with AIs (02) and (37)
• Ifthenumberofcasesonthepalletisnotpre-defineduseAI(02)togivetheGTINandthenAI(37)to provide the quantity. AI (37) must always be used when AI (02) is used
• UsewhicheverextraAIsyouneedtoprovideextrainformationforyourselforyourtradingpartners, for example AI (400) for purchase order number
• Theheightofthebarsofallthebarcodesshouldbeaminimumof32mm
Two labels will be required for each pallet and they must both bear the same SSCC.
2423
11. Logistics labels (SSCC)

2625
A5 sized label

2625
Position of label on pallet
Many pallets will be handled on automatic systems so it is important that scanners can find the bar codes easily.
For pallets taller than 1 metre:
• Placethelabelsothatthebarcodesarenohigherthan800mmandnolowerthan400mm,measuringfrom the floor on which the pallet stands, not the floor of the pallet
• Usetwoidenticallabelsforeachpallet,oneonashortsideandoneonthelongrighthandsideasshownbelow
• Ensurethatthebarcodesincludingtheirlightmarginsonthelabelarenocloserthan50 mm to a vertical edge
For pallets less than 1 metre in height:
• Placethelabelashighaspossiblebutmakesurethatthebarcodesarenohigherthan800mmandnolower than 32mm from the base of the unit
• Ensurethebarcodeswiththeirlightmarginsarenocloserthan50mmtoaverticaledge
The accurate printing of bar codes is fundamental for effective value chain management as the rapid and accurate scanning of GS1 data provides the basis for all inventory or freight control, and any electronic business transactions that follow.
Bar code scanning provides no indication of bar code quality, as it gives no information about the symbol other than whether it can be scanned or not by that particular scanner. Because scanners perform differently it is possible for one scanner to scan a bar code that another cannot scan. Only a verifier will reliably test bar code quality.
The GS1 specifications provide a process for the production of bar codes that should result in scannable symbols, but a verification procedure needs to be followed to provide more information about symbol quality.
Staff need to be trained in the use of verification equipment, and must always check symbols visually before using a verifier that meets the requirements of ISO/IEC 15426-1 to provide detailed information. Each symbol should be checked to see that the bars are the correct size and height, and that no horizontal lines or spaces cut through the symbol. Any marks crossing the bars and spaces of a symbol will reduce its effective height and make it very difficult to scan.
The position of the bar code on the packaging will need to be checked to see that it meets the GS1 specifications. Any final labelling or wrapping should also be examined to ensure that the bar codes remain visible and scannable.
When checking symbol quality, you should attempt to simulate the final, filled product or package. If for example a white background is printed on to a clear substrate, check the colour of the contents of the item. If it is not possible to simulate the contents, verify the bar code twice, once over a black background and next over a white background. The poorer of the two grades will provide information about the worst possible outcome.
Having checked that the bar codes are in the correct position and are not shortened in height (truncated), you can use verification equipment to obtain an overall grade for each symbol. A very important final check is to read the number the verifier has decoded from the bar code to ensure that it is the number that should be encoded, that it matches the human-readable number underneath the bar code and it is the number that was assigned to the product.
2827
12. The verification process
It is possible for one scanner to scan a bar code that another cannot scan. Only a verifier will reliably test bar code quality.

2827
12. The verification process
Verifiers that meet the international requirements will make measurements of and grade the following seven parameters of the code:
• Thesymbolcontrast(ameasureofthecontrastdifferencebetweenthedarkbarsandthepalerbackground)
• Theminimumreflectance(acheckthatthebarsappeardarkenoughinrelationtothespaces)
• Theminimumedgecontrast(ameasureoftheleastdifferenceincontrastbetweenanadjacentbarandspace). If this is a low grade the bar code may scan poorly or not at all
• Modulation(aratiooftheminimumedgecontrasttothesymbolcontrast).Thisgradewillbelowifreflectances vary considerably within the code or if the size of either bars or spaces become much smaller than ideal
• Defects(whichmaybelightvoidswithindarkbarsordarkspotsinthespacesbetweenthebars).Adefectmay artificially create an extra bar or space that will prevent a scan
• Decode(anindicationthatthesymbolwilldecodesuccessfullyifitconformstothespecifications,notablyinrespect of character encoding, check digits and light margins)
• Decodability(anindicationoftheaccuracyofwidthsandpositionsofthebarsandspaces)
All of these criteria are measured separately and the grade given to the bar code is the lowest score for any one of these measurements.
All of these characteristics can be measured by verification equipment that meets the requirements of ISO/IEC 15426-1, which incorporates the CEN (Comité Européen de Normalisation, the European Standards Committee) standards. These standards are compatible with those from ANSI (the American National Standards Institute) and the table below shows how they compare. Verification to the ISO Standard, sometimes referred to as the ANSI Standard, is the only correct test of quality for GS1 bar codes.
ISO/ANSI grade comparison
Numeric range (ISO/CEN) Alphabetic grade (ANSI)
3.5 to 4.0 A
2.5 to 3.4 B
1.5 to 2.4 C
0.5 to 1.4 D
below 0.5 F
Axicon Auto ID Ltd
This standard applies to all the bar codes used by the GS1 System, and provides a basis for agreeing the quality of symbols acceptable with trading partners. The grade given by a verifier is only an indication of the quality of a symbol. The verifier should be used to scan each symbol 10 times, using different paths through the symbol each time. Higher grades mean that the bar code in question is closer to the ideal than lower scoring symbols, but there may still be some faults that will prevent it from being decoded successfully by all scanners.
The aim is to produce bar codes with grades 4 or A, although this will be difficult with some printing processes and materials. Note that when a bar code is tested certain scanner aperture sizes must be used depending on the type and sometimes the size of the symbol. Minimum pass grades with the appropriate scanner aperture size and light source wavelength are shown below, expressed according in both the ISO and ANSI terminology.
Pass grade requirements
Bar Code Min.grade/aperture (mils)/wavelength (nm) ANSI
EAN-8, EAN-13, UPC-A, UPC-E, GS1 DataBar 1.5/06/670 C
GS1-128 1.5/10/670 C
ITF-14<62.5% 1.5/10/670 C
ITF-14>62.5% GS1 specifications and Australasian grocery industry
0.5/20/670 D
ITF-14>62.5% Woolworths Australia requirements
1.0/20/670 D
GS1 DataMatrix See ‘verification’ in Appendix 7 C
As a minimum all bar codes should be grade 1.5 or C or above, except for ITF-14 symbols printed at or above 62.5%magnification, forwhichgrade0.5orD isacceptable in termsofGS1specificationsbutWoolworthsAustralia specify 1.0 - which is still within the D range - as the minimum.
In general, higher quality bar codes can be expected to scan more easily and quickly than lower quality bar codes of the same size.
Note that there are several methods of verifying bar codes. GS1 recognises only the method defined in ISO/IEC 15416.
3029
13. GS1 verification reports
Hand Held Products Inc
Address of the GS1 Verification Service
Verification Service
GS1 New Zealand
Level 2
Woolstore Design Centre
L2, 262 Thorndon Quay (or P O Box 11 110)
WELLINGTON

3029
13. GS1 verification reports
A GS1 Verification Report reports the correctness of a bar code in terms of all the attributes listed in this booklet. These reports are not the same as the reports printed off by proprietary verification equipment. GS1 verification reports can be produced by GS1 accredited manufacturers reporting on their own products only, or by GS1 in New Zealand or Australia on behalf of any user of the GS1 System.
GS1 accredited label and packaging suppliers are authorised to issue de facto GS1 verification reports that are not printed on GS1 stationery but which imply full GS1 compliance. Because bar codes can be changed by manufacturers after printing, for example by filling a packet with a product whose colour shows through and changes the bar code colours, you the supplier remain responsible for obtaining the final GS1 verification report. An accredited packaging supplier or printer’s verification report is not an acceptable substitute for a GS1 verification report because of the possibility that the bar code has been changed since printing.
How to apply for a verification report
To apply for a verification report go to your MyGS1 page on the GS1 web site www.gs1nz.org and use your username and password to access MyGS1. Call GS1 for assistance if you do not know your user name and password. In MyGS1 select Verify your bar code scans and then Order a verification report. Provide the information requested on the page that will open, then select Send application. See Section 17 pp. 38-46.
The system will automatically send you an email acknowledging your application. Print a copy of the email and enclose it with the sample of the product that you send to GS1 for testing. The address is shown on the facing page. Courier is the preferred means of delivery. If you are sending electronic images, forward the email to [email protected] with the images attached.
Consumer units should preferably be complete, made up and filled as for sale. Inners and shippers may be folded and empty but should be entire so that testing staff can reassemble them to assess the correctness of the bar code location. Be careful not to fold across bar codes as creases can affect test results.
Products sent for testing are donated to charity unless their return is requested. Items will be returned at the member’s expense if requested.
Where a report is required before final bar codes are printed GS1 will report on artwork of proposed labels or packaging. Proofs should be sent by post or courier, as for finished bar codes. Artwork may be sent electronically, preferably in PDF format to: [email protected]
Reports on artwork will be endorsed with the word ‘interim’ and must be followed by a report on a finished bar code no more than six weeks after the initial test.
Note: Verification of artwork is a useful check for correctness during the pre-press stage of artwork production and is recommended for that purpose. It is not complete assurance that the final product will pass verification however. Verification tests, among other things, the reflective properties of a bar code and these will change with different printing materials and methods. A proof may have reflective properties different to those of the final label or package.
GS1 New Zealand members receive some free tests each year and a small charge per test applies thereafter. Non-members are charged for all tests. Details of current charges are available from GS1 New Zealand.
You the supplier remain responsible for obtaining the final GS1 verification report
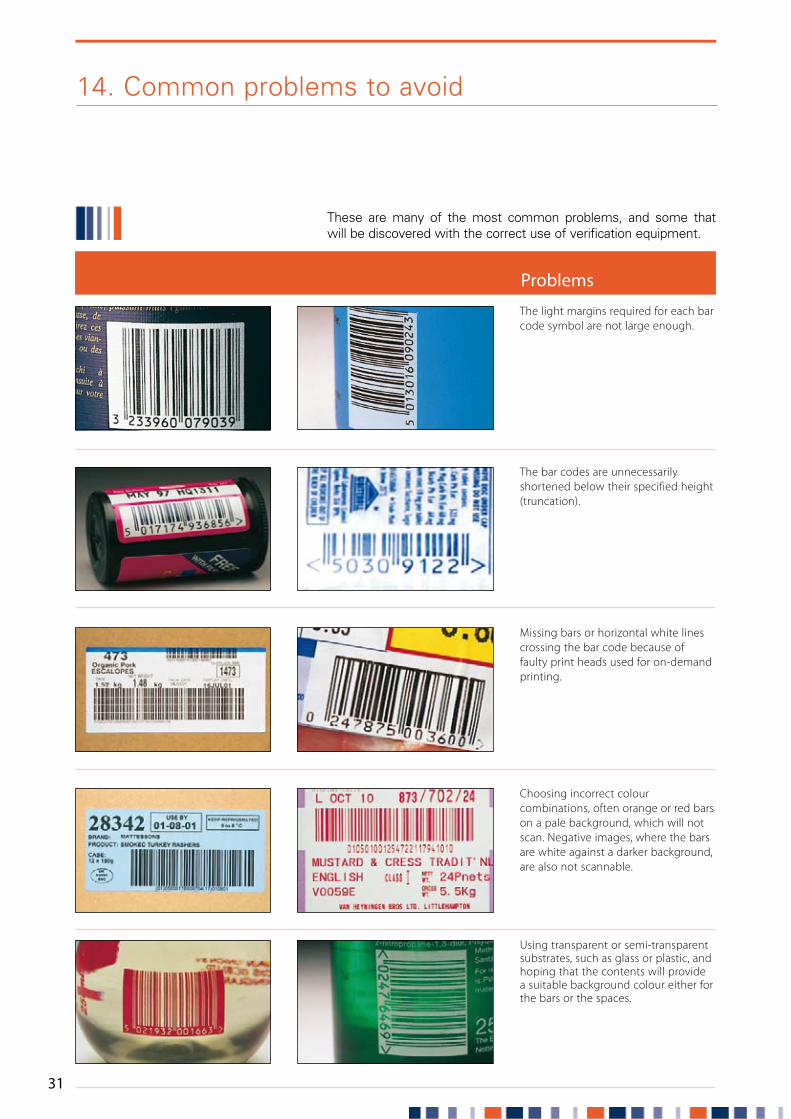
These are many of the most common problems, and some that will be discovered with the correct use of verification equipment.
Problems
The light margins required for each bar code symbol are not large enough.
The bar codes are unnecessarily shortened below their specified height (truncation).
Missing bars or horizontal white lines crossing the bar code because of faulty print heads used for on-demand printing.
Choosing incorrect colour combinations, often orange or red bars on a pale background, which will not scan. Negative images, where the bars are white against a darker background, are also not scannable.
Using transparent or semi-transparent substrates, such as glass or plastic, and hoping that the contents will provide a suitable background colour either for the bars or the spaces.
3231
14. Common problems to avoid

3231
14. Common problems to avoid
Problems
Printing bar codes that are either too large or too small.
Incorrect adjustment for ink spread (the bar width reduction). The printed bars are out of specification, either being too narrow or too wide.
Printing ITF-14 bar code (right) without bearer bars.
Placing labels too close to vertical corners or wrapping them around corners so that the bar codes are too close to the edge.
Peeling or creased labels.
Show through of the bar codes on consumer units through the outer packaging.
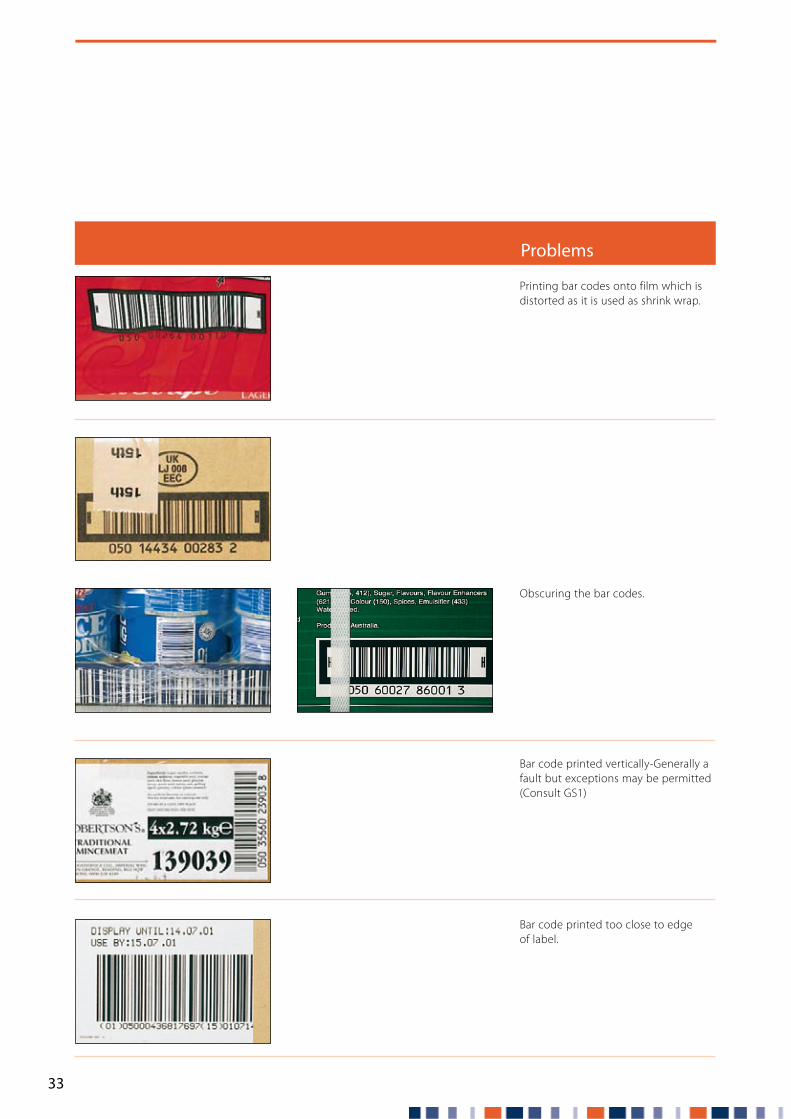
Problems
Printing bar codes onto film which is distorted as it is used as shrink wrap.
Obscuring the bar codes.
Bar code printed vertically-Generally a fault but exceptions may be permitted (Consult GS1)
Bar code printed too close to edge of label.
3433
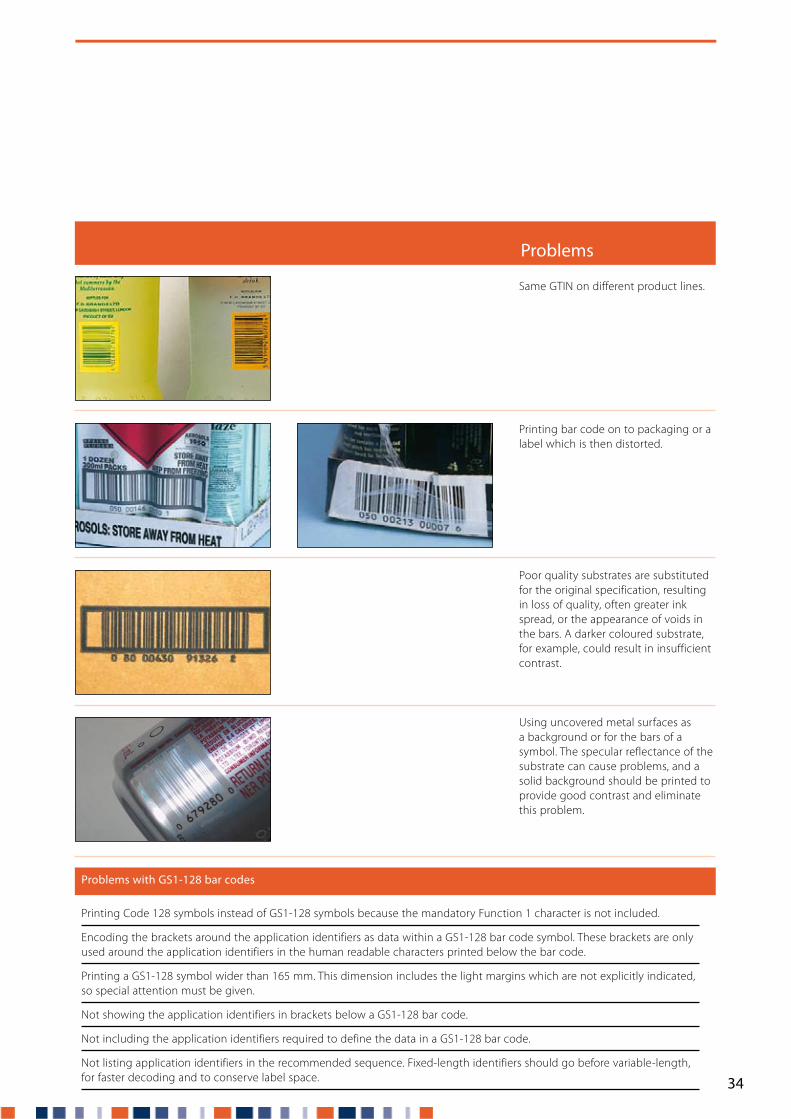
Problems
Printing bar code on to packaging or a label which is then distorted.
Poor quality substrates are substituted for the original specification, resulting in loss of quality, often greater ink spread, or the appearance of voids in the bars. A darker coloured substrate, for example, could result in insufficient contrast.
Using uncovered metal surfaces as a background or for the bars of a symbol. The specular reflectance of the substrate can cause problems, and a solid background should be printed to provide good contrast and eliminate this problem.
Same GTIN on different product lines.
Problems with GS1-128 bar codes
Printing Code 128 symbols instead of GS1-128 symbols because the mandatory Function 1 character is not included.
Encoding the brackets around the application identifiers as data within a GS1-128 bar code symbol. These brackets are only used around the application identifiers in the human readable characters printed below the bar code.
Printing a GS1-128 symbol wider than 165 mm. This dimension includes the light margins which are not explicitly indicated, so special attention must be given.
Not showing the application identifiers in brackets below a GS1-128 bar code.
Not including the application identifiers required to define the data in a GS1-128 bar code.
Not listing application identifiers in the recommended sequence. Fixed-length identifiers should go before variable-length, for faster decoding and to conserve label space. 3433

All of the following must be checked. Read in conjunction with the summary at right.
✔ Check that the GTIN is the one assigned to the product.
✔ Ensure that the check digit is correct.
✔ Check that the symbology you have selected is appropriate for the intended use – retail, distribution, retail and distribution, or logistics.
✔ Check with a verifier or an ordinary scanner that the number you intend to use is the one encoded in the symbol.
✔ Check that the symbol is being produced at a size that is within the specified size range for its type and that the bar height and light margins are correct.
✔ Ensure that you have complied with any industry or trading partner requirements as to the size or number of bar codes on your products.
✔ Throughout the printing process use a verifier – not a scanner – to verify symbol quality to at least the ISO standard grades specified on page 36. Ensure that the contents of the packaging will not affect the contrast between the bars and spaces.
✔ Check that the shape of the product inside the package does not distort or otherwise affect the barcode.
✔ Ensure that no shrink-wrap, tape or other printing will obscure the bar code symbol on the finished product.
✔ Ensure that no other bar code symbols will show through from the inside of the pack.
✔ Carry out routine verification at all levels of packaging to ensure that the bar code complies with the required quality standard, and to identify any potential problems.
✔ Keep records of verification for the shelf life of the product.
✔ Notify trading partners of the GTINs and the products they identify in good time.
✔ Keep a record of the GTIN and the product to which it is assigned.
3635
16. Summary of best practice recommendations15. Checklist
Verification to the ISO Standard, sometimes referred to as the ANSI Standard, is the only correct test of quality for GS1 bar codes. Ordinary scanners do not test bar code quality.

EAN-8, EAN-13, ITF-14 printed ITF-14 printed GS1-128 UPC-E or UPC-A on label on board
Consumer unit
Traded unit EAN-13 or UPC-A only If variable data required
Number of bar codes on consumer unit1 1
Number of bar codes on traded unit (GS1 specifications) 4 (pref ) 1 (min) 1 4 (pref ) 1 (min) 1 (if on a label)
Number of bar codes on traded unit2 (Aust/NZ grocery industry requirements) 6 (pref ) 2 (min) 2 6 (pref ) 2 (min) 2
Range of X-dimension sizes 0.264 mm to 0.495 mm to 0.635 mm to 0.495 mm to 0.66 mm3 1.016 mm 1.016 mm 1.016 mm
Magnification range (GS1 specifications) 80% to 200%4 50% to 100% 62.5% to 100% 50% to 100%
Magnification sizes (Aust/NZ grocery industry requirements) 80% to 200%4 50% to 100% 100% 50% to 100%
Bar height for depends on size, consumer units5 see Appendix 1a
Minimum bar height for depends on size, traded units5 see Appendix 1 32mm 32mm 32mm
Bearer bar6 Optional - Mandatory top Mandatory right Optional- recommended and bottom round recommended
Optional light margin indicators7 YES YES YES YES
Minimum ISO verification grade8 C C D9 C
1 More than one symbol may be used if necessary but the practice is not encouraged. Where more than one symbol is used symbols should be as close together as possible and in no case further apart than 150mm.
2 Woolworths Australia require 6 if retail bar codes or ITF-14 printed on board are used.
3 A minimum X-dimension of 0.25 mm is allowed for on-demand bar code production.
4 A minimum magnification of 75.8% is allowed for on-demand bar code production.
5 There is no maximum bar height. Bar codes may be printed as tall as the user wishes. Over-height bar codes may be helpful in overcoming problems of packaging shape or texture by providing a greater area of potentially scannable bar code.
6 Bearer bars are mandatory when printing ITF-14. They are useable with all types of bar code when printing with plates and will be helpful in achieving good quality in any case where printing is directly on to corrugated board. GS1 recommends using bearer bars whenever bar codes of any type are printed on corrugated board.
7 Light margin indicators are not formally required but they may be used to provide a visual indication of the space required to the left and right of each symbol.
8 Note that even where grades are the same different scanner apertures must be used on verifiers testing different bar code types. Ensure that the verifier operator is aware of these requirements and uses the correct aperture for each type. See page 29.
9 Woolworths Australia require a minimum ISO grade of 1.0/20/670. See page 29.
3635
16. Summary of best practice recommendations15. Checklist
✔
✔✔
(see notes overleaf)
✔ ✔

3837
1. Ensure EAN-13, UPC-A, EAN-8 or UPC-E bar codes are used on any product that might be sold at a retail point-of-sale. Be aware of GS1 DataBar (Appendix 6) and the future possibilities it may offer you.
2. If a traded unit might also be sold at a retail point-of-sale, it must be bar coded with an EAN-13 or UPC-A bar codeofatleast150%magnification(equaltoanX-dimensionofatleast0.495mm).Theactualsizechosenwill depend on the choice of printing materials being used.
3. GS1 specifications state minimum bar code heights. There is no objection to printing over-height bar codes. This can be prudent on soft packaging where parts of the barcode may be distorted during handling.
4. Traded units can be bar coded with any of these symbols – EAN-13, UPC-A, ITF-14 or GS1-128. Short shelf life traded units (those with a shelf life of less than 90 days) will need to be bar coded with GS1-128 bar code including the best-before or use-by date.
5. Inners may be bar coded with any GS1 bar code or with none, as agreed between you and your trading partners. If you do not know your trading partners’ preference, assume that bar codes are required.
6. Remember that the light margins of any of the bar codes vary in proportion when you increase or decrease their size. Ensure that the light margins you provide at each side of the bar code will be adequate. Allowing extra width over and above the stated minimum is good practice to allow for movement during printing.
7. When printing any of the GS1 bar codes on demand, incorporate horizontal check bars that will allow you to see easily whether any print head elements are failing. These may be placed above or below the symbol.
8. Make sure it is not possible to scan any of the bar codes on individual items when they are inside any outer packaging.

3837
It is good practice to assign the role of bar code quality manager to a specific individual in the organisation. Depending on the type of organisation, retailer or manufacturer, the use of bar codes will differ, which will affect the specific role of the assigned manager. However, their primary objective will be the same, to ensure accurate use of GTINs and good quality bar codes. Where appropriate this person should also be responsible for issuing GTINs and maintaining a register of GTINs created, including the products to which they have been assigned.
For a retailer the manager will ensure that the symbols scan properly at the retail or wholesale checkout and at the distribution centre.
A bar code quality manager for a manufacturer will ensure that good quality bar codes are accurately and consistently applied to products.
You must keep your own records of products to which GTINs have been assigned. GS1 recommends that you use ProductVault for this purpose. See page 42.
The following pages introduce you to MyGS1 and ProductVault. Please note that these are constantly being improved so this guide is intended as a generic overview only and may differ from the current site in some specifics.
Visit www.gs1nz.org/mygs1_0.php for a totally up to date view of MyGS1.
17. Bar code management: using MyGS1

4039 4039
Each member has their own MyGS1 site for easy and secure access to the information and services available from GS1 New Zealand, and to their own membership account details. Established and enhanced service options are:
• JoinGS1andsetyourselfuptousetheGS1System.
• Getstartedwithastep-by-stepbeginner’sguidetousingtheGS1System.
• PaymembershipfeesforspecificGS1services.
• RetrieveaforgottenpasswordforMyGS1accessorchangeanexisting one.
• SecurenewblocksofGlobalTradeItemNumbers(GTINs)
•ObtainGlobalLocationNumbers(GLNs)forallocationwithinyourbusiness.
• Storenewly-allocatedGTINsandGLNsintheProductVaultfacilityofMyGS1, and thereafter have a secure, easily accessible inventory of numbers used in your businesses.
• GenerateGS1-complaintbarcodegraphics,includingnewGS1DataBar graphics, to the size you require and to a standard of resolution that makes them print ready.
• SubmitproductlabelsorpackagingtoGS1sbarcodeverificationservice - and receive reports on the outcome of verification testing.
• TrackallyourdealingswithGS1throughanautomaticallyupdatedstatement of requests made, services received and payments transacted
The benefits of MyGS1
• Memberscanobtainprint-readybarcodegraphicsatreducedcostand with an annual allocation of free images.
• SavestimeandmoneyindealingwithGS1(eg,noneedfor phone calling in business hours).
• Abilitytoorderverificationtestsonline,monitortheprogressofeach test and retrieve reports of previous tests.
• Abilitytocreateandallocatenumbersforproductsandsourcerecords of the number and the associated products.
MyGS1 is being constantly improved and may differ slightly from the description provided in this guide.

4039 4039
Accessing MyGS1
GS1 members can access MyGS1 from www.gs1nz.org. Click on the ‘Log into MyGS1’ button and enter your membership number and password. It is recommended that each member organisation restricts access to MyGS1 to a few authorised employees.
MyGS1 Dashboard
A summary of your relationship with GS1, including key information held by GS1 about your business and your GS1 activity.
Here are parts of the dashboard for a fictional business, Chatsworth Stationers, where Buzz Lightyear is the administrator and one of three employees who are authorised contacts of GS1. They can update their own contact details on this site whenever necessary.
The dashboard includes all Global Location Numbers (GLNs) in use by the member, a record of its bar code verification activity and lots of other summary information.
Visit www.gs1nz.org/mygs1_0.php for a totally up to date view of MyGS1.

4241 4241
Transaction Summary
A complete record of your transactions with GS1 and a secure online payment facility for any outstanding amounts.
Here, Chatsworth Stationers is shown to have paid $1,225.00 in September for its joining licence fee and the allocation of 100 bar code numbers (GTINs). The page shows that, as part of its fee, the member was allocated free verification tests, free bar code graphics and free Global Location Numbers (GLNs).
Any outstanding amount can be settled easily using Visa, Mastercard or American Express, with assurance of certified, industry-standard security on the transaction.
4241 4241
1GS
ProductVault™ for data storage
ProductVault has been added to MyGS1 as a facility for members to store their GTINs and GLNs, and a wealth of associated information on the products and places that are uniquely identified.
This is a service option available to new members as they begin using the GS1 System and allocate their first GTINs and GLNs – and also to established members when they acquire and begin allocating their next block of numbers. At the time of writing (April 2011) ProductVault is not yet ready for members to upload numbers allocated in the past. This functionality will be added.
With ProductVault, members have their data hosted and backed up by GS1 New Zealand (note that the facility is subject to particular terms and conditions that you need to accept). You can build up an inventory of key information on all your products, and be assured that it remains secure, well-organised and readily accessible from now into the future.
To create a number and allocate it to a product
Go to ‘Bar codes’ on the menu or by selecting ‘Getting Started’. Either route will take you to ‘Your bar code numbers’.
• Select‘Createnewproducts’
• Workthroughsuccessivescreensprovidingthedetailsrequested
• Whenaskedtosupplymeasurements:
– For measuring consumer units place the unit in front of you as you would expect a customer to see it displayed for sale
– ‘Height’ and ‘width’ are the height and width of the face of the product as you see it and ‘depth’ is the distance front to rear
– For measuring a dispatch unit place the unit on its natural base
– ‘Depth’ is the longest measurement and ‘height’ and ‘width’ are as measured on the ends
To access your product file
From your MyGS1 Dashboard
• Scrolldownto‘BarcodesAllocated(GTINs)’andidentifythelinecontainingyourprefix
• Clickon‘BlockofXGTINs’inthe‘Type’column
• Clickon‘Viewcreatedproducts’
• Yourproductfilewillappearunder‘Myentereditems’
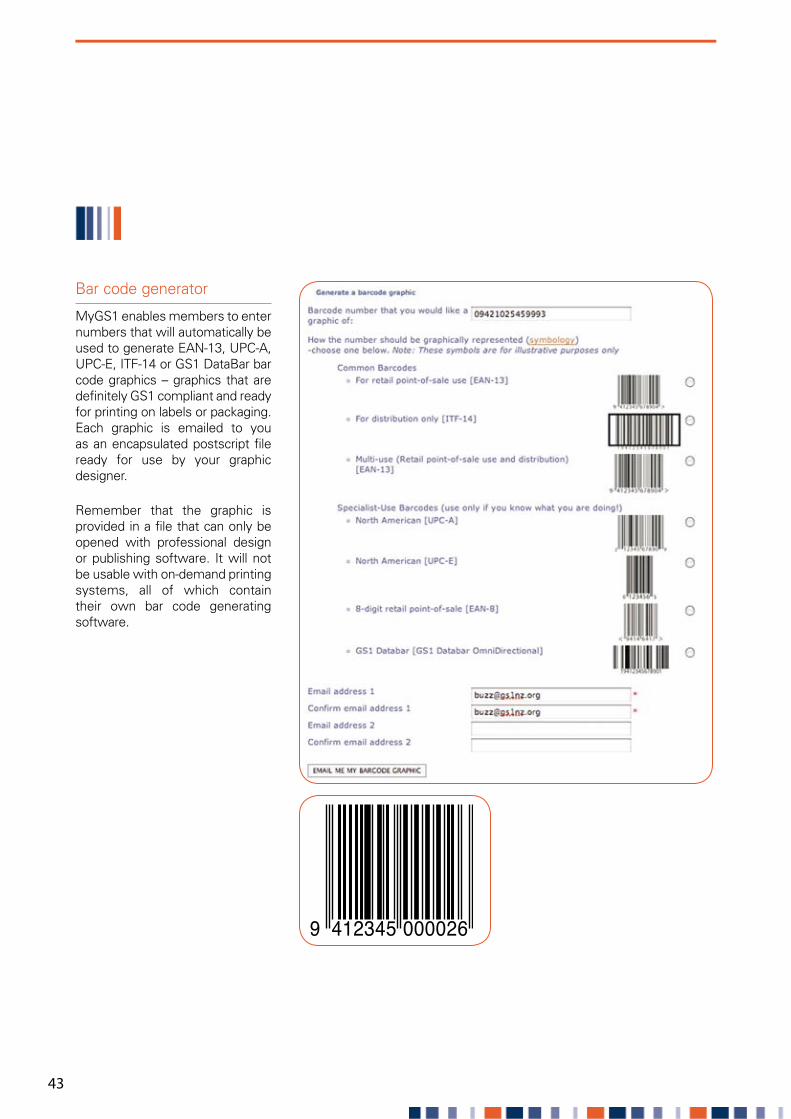
4443 4443
Bar code generator
MyGS1 enables members to enter numbers that will automatically be used to generate EAN-13, UPC-A, UPC-E, ITF-14 or GS1 DataBar bar code graphics – graphics that are definitely GS1 compliant and ready for printing on labels or packaging. Each graphic is emailed to you as an encapsulated postscript file ready for use by your graphic designer.
Remember that the graphic is provided in a file that can only be opened with professional design or publishing software. It will not be usable with on-demand printing systems, all of which contain their own bar code generating software.
9 412345 000026

4443 4443
Bar code verification reports
MyGS1 enables members to make online requests for the verification testing of bar codes whatever their origins – and to receive the verification reports that result.
You can access this screen through ‘Verify your bar code scans’ on the Main Menu then ‘Order a verification report’ or through ‘Search past reports’.
An explanation of some of the terminology used on the application page is provided overleaf.

4645 4645
Things to note when applying for a verification report
If you have a large number of items to submit for testing, a bulk upload template is available. Look for the template download link on the ‘Order a bar code verification report’ page.
• Insertapurchaseordernumberifyouwishtouseonetoorderthetest, otherwise disregard that request. Before doing so please be sure that your company will accept GS1 invoices with no PO number. For non-priority requests GS1s target is to complete tests within two working days of receipt of the sample.
• Indicateinthethreetickboxesprovidedifyouwanttheproductreturned, kept confidential or given priority attention – 1 working day turnaround from the time of receipt of the sample at GS1. Note that ‘priority’ attracts an additional charge. Prices may vary and are available from GS1.
• GTIN(GlobalTradeItemNumber)isthenumberinthebarcodeyouwant GS1 to test.
• Brandistheprincipalbrandnameoftheproducte.g.Fresho. Note that if you will be entering multiple items with the same brand name you can click the padlock icon alongside the box to lock the Brand in, removing the need to restate it each time.
• SubBrandisasecondarypartofthebrandname,ifusede.g.Eco-sensitive. If none, leave this box blank. It also has a padlock if required.
• FunctionalNameisthesimplestatementofwhattheproductise.g.wine, soap, hammer etc., preferably expressed in a single word with any necessary additional words incorporated into the ‘Sub Brand’ or ‘Variant’ boxes. This box also has a padlock if required.
• Variantistheflavour,variety,typeetc.e.g.strawberry,large.
• SupplierSKU/ItemNumberenablesyoutorecordyourowninternalnumber on the verification report if you wish. You may disregard this.
• NetContentasksforthenumber,weightorcontentoftheitemoritems involved. Note that this is a total e.g. a 12x750ml wine carton would contain 9 litres.
• NetContentUnitofMeasureprovidesadrop-downmenufromwhich you can select the appropriate unit to enter.
• HandScanningisautomaticallyselectedforallbarcodessubmittedfor testing. This dictates certain features of the bar code that GS1 must test to ensure that the bar code is fit for scanning with hand held scanners. You must choose to select or disregard the other two ‘scanning environment’ boxes.
• Omnidirectionalscanningisscanningwiththetypeofscannerusedinsupermarkets, service stations and a growing number of hardware stores. GS1 recommends this test option be selected for all retail bar codes. It is not relevant to bar codes that will only be scanned in warehouses and distribution centres.

4645 4645
• AutomatedScanningiscarriedoutinwarehousesanddistributioncentres equipped with basic automated systems for conveying products around the site and scanning them as they move along conveyors. It is not relevant to bar codes that will only be scanned in retail outlets.
• TradeItemDescriptionisthedescriptionoftheproductasitwillappear on the verification report. This box will automatically fill as you complete the boxes above it. If you wish to express the description differently on the report itself untick the ‘Auto-fill’ box and edit the description as you wish.
An email will be automatically sent to your email address when you submit your application. Print that email out and enclose it with the samples when you forward them to GS1. If you are sending electronic images for artwork verification forward the email to [email protected] with the files containing the artwork attached.
You can check the progress of a test or retrieve a copy of a report completed in the preceding twelve months by using the ‘Search past reports’ link under ‘Verify your barcode scans’ on your MyGS1 home page. After twelve months completed reports are no longer valid and drop off the system.
Visit www.gs1nz.org/mygs1_0.php for a totally up to date view of MyGS1.

47
18. Glossary of terms
Terms Meaning
Automated scanning Scanning in a warehouse or distribution centre that has moving conveyors with scanners mounted alongside.
Automatic Data Capture (ADC)
The use of technology such as bar codes or radio frequency identification to automatically read numbers, text or symbols and enter the data in to computer systems.
Application identifier (AI)
The 2, 3 or 4 digit number that specifies the data that immediately follows it in a GS1-128 bar code or number string. For example AI (21) means ‘serial number’ hence (21) ABC123.
Article number The former name for the GTIN.
Bearer bars The bars that surround an ITF-14 symbol to equalise the pressure exerted by the flexographic printing process over the entire surface of the symbol. Bearer bars are mandatory on all four sides of ITF-14 symbols printed with plates and at the top and bottom of ITF-14 symbols printed by other methods. They are optional with other types of bar codes but will always help improve print quality when printing on corrugated board.
Check bars Horizontal bars printed above any of the bar codes when they are printed on demand that will indicate any missing print head elements.
Company prefix The combination of country indicator and GS1 membership number that provides the first part of every GTIN created by a user of the GS1 system.
Consumer unit An item that may be sold at a retail point-of-sale. Also referred to as a retail trade item.
EAN-8 The bar code that represents a GTIN-8
EAN-13 The bar code that represents a GTIN-13.
EAN•UCC The former name of the international system, prior to the Uniform Code Council/EAN International merger in January 2005. It was generally known as ‘The EAN System’ outside the US and is now universally known as ‘The GS1 System.’
EAN/UPC The name of the symbology used by EAN-8, EAN-13, UPC-A and UPC-E bar codes. Used to generically refer to the four GS1 bar codes used in retail.
GTIN-8 The name given to the 8-digit GTIN that is shown in an EAN-8 or UPC-E bar code. Formerly known as EAN-8.
GTIN-12 The name given to the 12-digit GTIN formed from a prefix allocated by GS1 US prior to January 2005, and shown in a UPC-A bar code.
GTIN-13 The name given to the 13-digit GTIN that may be shown in EAN-13, ITF-14 or GS1-128 bar codes. Formerly known as EAN-13.
GTIN-14 The name given to the 14-digit GTIN that may be shown in either ITF-14 or GS1-128 bar codes on traded units. Formerly known as EAN-14.
GS1 The governing body of the GS1 System. See Page 1.
GTIN Global trade item number. The unique number for a product variant. This number is used in a bar code and electronic data interchange messages.
Hand scanning Scanning with a scanner held in the hand
Item Number Global Trade Item Number. The new term that has replaced article number.
ITF-14 Interleaved Two of Five 14. The bar code symbol used to show EAN-14 numbers on trade items not crossing a retail point-of-sale. ITF is not exclusively a GS1 bar code and is used in many applications.
Kraft A coarse brown paper used for heavy paper bags and for making corrugated board.
Ladder orientation Printing the bar code so that the bars are horizontal to the base of the product.

48
Terms Meaning
Light margin indicators < and/or > marks to indicate the light margins required.
Light margins The clear spaces required to the left and right of any bar code symbol. These differ for each bar code symbol as shown in Appendix 1. As a general rule the width of the light margin will be 10 times the X-dimension or thinnest bar in the bar code.
Mil (in scanners) (American terminology) One thousandth of an inch. Aperture size.
Magnification The factor used to vary the nominal size of each bar code symbol to ensure it is scannable.
Module The smallest element (i.e. thinnest bar or space) of a bar code.
nm Nanometer. A measure of wavelength. Scanners on verifiers testing GS1 bar codes must have a light source of 670 nanometers ± 10 nanometers.
Omnidirectional scanning Scanning by the type of scanner used in supermarkets, service stations and some hardware stores. It projects a pattern of beams in many directions at once.
Outer case (Outer) Alternative term for a traded unit.
Pallet label The GS1 logistics label that is used to track and identify pallets and any other transport units.
Picket fence orientation Printing a bar code so that the bars are vertical to the base of the product.
Quiet zones Another term for light margins.
Shipper Alternative term for a traded unit.
SCC (American terminology) Shipping container code. A GTIN and/or bar code used on a traded unit. Depending on context the user may intend to refer to the GTIN or the symbol. Be careful not to confuse with SSCC
SSCC Serial shipping container code. The unique eighteen-digit identifier for a transport unit.
Specular reflectance The reflectance of light from highly polished surfaces.
Substrate The material on to which a bar code is printed.
Symbol Bar code symbol.
Symbology The type of bar code symbol.
Trade item Any item that is identified for pricing, ordering and invoicing purposes. This includes both consumer units and traded units.
Traded unit An item that is priced, ordered and invoiced between manufacturers, retailers and wholesalers. Also known as an outer case or a trade item not crossing a retail point-of-sale, shipper or carton.
Truncation The reduction in height of a bar code symbol when its width is unaltered.
UCC Uniform Code Council (now GS1 US). The American organisation that formerly coordinated the GS1 System in the USA. In January 2005 EAN International and the UCC merged into GS1.
UPC-A The name given to the bar code used to encode a GTIN-12.
UPC Universal Product Code. Used to describe the UPC-A bar code that represents a GTIN-12. Note: American users may use the term ‘UPC’ incorrectly to refer to any retail bar code so it is important to clarify their intentions when the term is encountered.
UPC-E The name given to the bar code used to encode a shortened GTIN-12 with 8 digits. Equivalent of EAN-8.
X-dimension The nominal dimension of the narrowest bars or spaces in a printed bar code.
YYMMDD Year-year, month-month, day-day, the format in which dates are expressed in GS1-128 number format. All six digits must be used with zeroes filling any spaces that may not be required.
Zero suppression A process that enables some specially formulated GTIN-12s to be reduced to an 8-digit form for use in UPC-E bar codes.

49
Appendix 1 Bar code dimensions
Nominal dimensions of EAN/UPC and ITF-14 bar codes. These illustrations are not to scale. All measurements are in millimetres.
EAN-8UPC-E
EAN-13 UPC-A
ITF-14
The overall dimensions of a GS1-128 bar code will vary according to how much data is encoded, but when printed at 100%themodulewidthofaGS1-128symbolis1mmandbarheightis32mm*.Seemethodofcalculatinglengthon p53.
The light margin dimensions shown above are the minimum for nominal sized symbols and in practice extra space must be provided to allow for printing
variations. These light margins also change in proportion with any increase or decrease in the magnification of these symbols. Light margins should
generally be 10 times the X-dimension but note that EAN-8 and EAN-13 have wider left light margins than right.
*Minimum.Doesnotvarywithsize
*
GS1-128
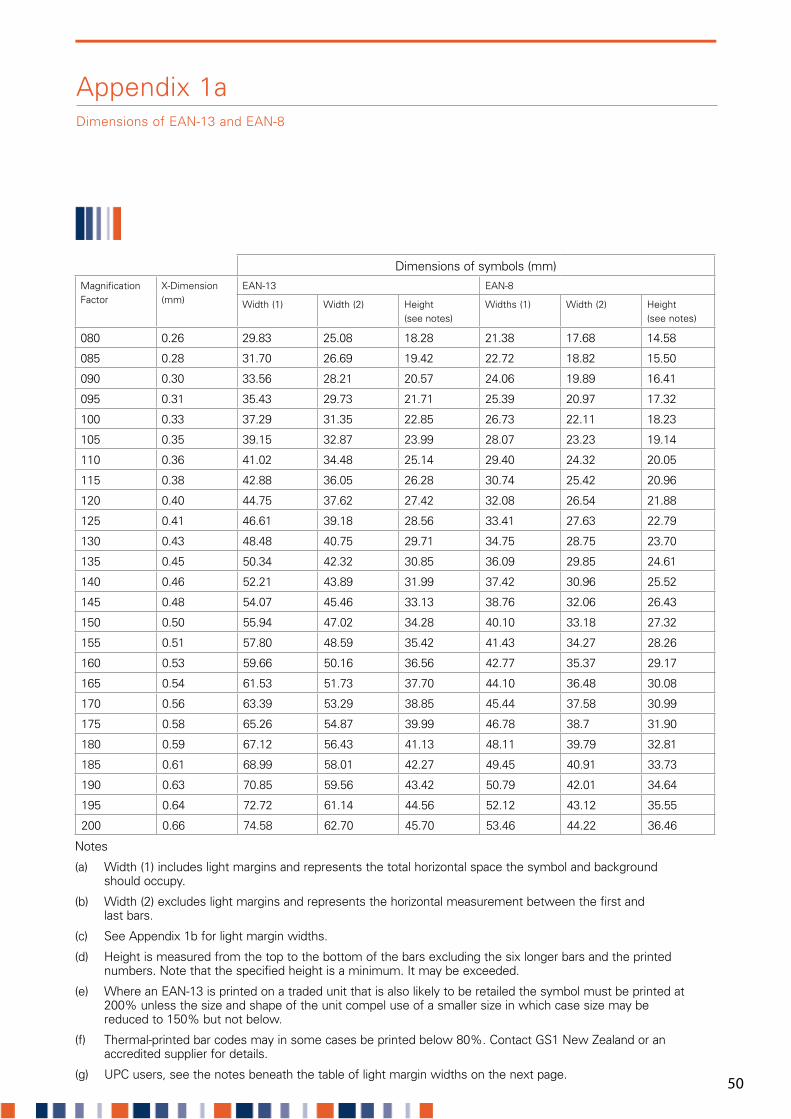
50
Dimensions of symbols (mm)
Magnification Factor
X-Dimension (mm)
EAN-13 EAN-8
Width (1) Width (2) Height (see notes)
Widths (1) Width (2) Height (see notes)
080 0.26 29.83 25.08 18.28 21.38 17.68 14.58
085 0.28 31.70 26.69 19.42 22.72 18.82 15.50
090 0.30 33.56 28.21 20.57 24.06 19.89 16.41
095 0.31 35.43 29.73 21.71 25.39 20.97 17.32
100 0.33 37.29 31.35 22.85 26.73 22.11 18.23
105 0.35 39.15 32.87 23.99 28.07 23.23 19.14
110 0.36 41.02 34.48 25.14 29.40 24.32 20.05
115 0.38 42.88 36.05 26.28 30.74 25.42 20.96
120 0.40 44.75 37.62 27.42 32.08 26.54 21.88
125 0.41 46.61 39.18 28.56 33.41 27.63 22.79
130 0.43 48.48 40.75 29.71 34.75 28.75 23.70
135 0.45 50.34 42.32 30.85 36.09 29.85 24.61
140 0.46 52.21 43.89 31.99 37.42 30.96 25.52
145 0.48 54.07 45.46 33.13 38.76 32.06 26.43
150 0.50 55.94 47.02 34.28 40.10 33.18 27.32
155 0.51 57.80 48.59 35.42 41.43 34.27 28.26
160 0.53 59.66 50.16 36.56 42.77 35.37 29.17
165 0.54 61.53 51.73 37.70 44.10 36.48 30.08
170 0.56 63.39 53.29 38.85 45.44 37.58 30.99
175 0.58 65.26 54.87 39.99 46.78 38.7 31.90
180 0.59 67.12 56.43 41.13 48.11 39.79 32.81
185 0.61 68.99 58.01 42.27 49.45 40.91 33.73
190 0.63 70.85 59.56 43.42 50.79 42.01 34.64
195 0.64 72.72 61.14 44.56 52.12 43.12 35.55
200 0.66 74.58 62.70 45.70 53.46 44.22 36.46
Notes
(a) Width (1) includes light margins and represents the total horizontal space the symbol and background should occupy.
(b) Width (2) excludes light margins and represents the horizontal measurement between the first and last bars.
(c) See Appendix 1b for light margin widths.
(d) Height is measured from the top to the bottom of the bars excluding the six longer bars and the printed numbers. Note that the specified height is a minimum. It may be exceeded.
(e) Where an EAN-13 is printed on a traded unit that is also likely to be retailed the symbol must be printed at 200%unlessthesizeandshapeoftheunitcompeluseofasmallersizeinwhichcasesizemaybe reducedto150%butnotbelow.
(f) Thermal-printedbarcodesmayinsomecasesbeprintedbelow80%.ContactGS1NewZealandoran accredited supplier for details.
(g) UPC users, see the notes beneath the table of light margin widths on the next page.
Appendix 1a Dimensions of EAN-13 and EAN-8

51
Appendix 1b – EAN-13 and EAN-8 Light Margins
Magnification Factor %
EAN-13 EAN-8
Left mm Right mm Left mm Right mm
80 2.90 1.85 1.85 1.85
85 3.08 1.96 1.96 1.96
90 3.27 2.08 2.08 2.08
95 3.45 2.19 2.19 2.19
100 3.63 2.31 2.31 2.31
105 3.81 2.42 2.42 2.42
110 3.99 2.54 2.54 2.54
115 4.17 2.66 2.66 2.66
120 4.36 2.77 2.77 2.77
125 4.54 2.89 2.89 2.89
130 4.72 3.00 3.00 3.00
135 4.90 3.12 3.12 3.12
140 5.08 3.23 3.23 3.23
145 5.26 3.35 3.35 3.35
150 5.44 3.46 3.46 3.46
155 5.63 3.58 3.58 3.58
160 5.81 3.70 3.70 3.70
165 5.99 3.81 3.81 3.81
170 6.17 3.93 3.93 3.93
175 6.35 4.04 4.04 4.04
180 6.53 4.16 4.16 4.16
185 6.71 4.27 4.27 4.27
190 6.90 4.39 4.39 4.39
195 7.08 4.50 4.50 4.50
200 7.26 4.62 4.62 4.62
UPC-A and UPC-E
UPC-A dimensions are the same as those for EAN-13 symbols of the same magnification except that the light margins are of equal width. The margin widths stated for EAN-13 should be added and halved for use with UPC-A.
UPC-E symbols occupy the same total width as the corresponding EAN-8 bar codes but the light margins are not of equal width and the distance between the first and last printed bars is less. Bar height for UPC-E symbols is that of a UPC-A bar code of the same magnification.
See the American manuals that will have been provided to you if you are a UPC user, or contact GS1 New Zealand.

52
Companies wishing to bar code their products for open trade will need to join GS1 member organisation to be assigned a company prefix number that can be used to create global trade item numbers (GTINs), serial shipping container codes (SSCCs), or any of the other GS1 identifiers. The New Zealand member organisation is GS1 New Zealand, previously known as EAN New Zealand.
Companies joining GS1 New Zealand will be given a GS1 company prefix number beginning with 94. Other member organisations allocate company prefix numbers beginning with different numbers. For example Australia uses 93 and Great Britain uses 50. (This booklet was first produced by GS1 UK which is why many of the bar code illustrations in it show GTINs that start with 50).
Companies will be allocated different length company prefix numbers according to their numbering requirements. Company prefix numbers from GS1 New Zealand are 7, 8, 9 or 10 digits in length and they will be used to create 13 or 14 digit GTINs and SSCCs in the manner described in the following sections of this booklet.
Exporting to the USA and Canada
Companies with established customers in North America may also have a prefix allocated by GS1 US, previously known as the Uniform Code Council. If so, they should continue using that prefix as before to create UPC numbers. Companies establishing new relationships in North America should be able to use their GS1 New Zealand prefix to create GTINs as for any other market. All North American retailers should have been enabled for EAN-13 and EAN-8 bar codes by January 2005. If any problems arise in this regard contact GS1 New Zealand.
Note that most Americans will continue to use the term ‘UPC’ to refer to retail bar codes when in fact EAN-13 and EAN-8 will also be acceptable. Clarify American partners’ use of the term ‘UPC’ before assuming that they cannot in fact accept EAN-13 or EAN-8.
Global trade item numbers (GTINs)
GTINs are unique numbers that are used to identify every different product line. GS1 company prefix numbers can be used to create 13 and 14 digit GTINs. Every user should ensure that their database can record 14- digit GTINs as these numbers may be used on products that are supplied to them, even if a user decides not to create 14 digit numbers. This is especially important as future developments may include a 14-digit option for the retail point-of-sale.
GTIN-14s, to give 14 digit numbers their correct name, are explained in more detail below, and they can only be used to identify traded units (cartons, shippers) at the moment. They will need to be shown in either ITF-14 or GS1-128 bar codes.
GTIN-8s, for very small products are allocated individually by GS1 New Zealand, and members requiring these should contact GS1 New Zealand for further information.
When any GTIN is recorded in a database, it should be treated as a fixed length 14-digit number. This is equivalent to prefixing an GTIN-13 with a zero, a GTIN-12 with two zeros, and a GTIN-8 with six zeros.
Appendix 2 Creating GTINs and SSCCs and calculating check digits

53
Creating retail GTINs
Your consumer units will usually be identified with GTIN-13s encoded in EAN-13 bar codes. The GTIN-13 is made up of your company prefix, some digits that you will vary to identify individual products, and a check digit that is calculated using the other digits that make up the number. Company prefix numbers allocated by GS1 New Zealand will begin with 94, but 94 does not imply anything about the origination of the product being identified. It simply indicates that you are a member of GS1 New Zealand. A GTIN made up using your prefix may be used on your products anywhere in the world. When GS1 DataBar and GS1 DataMatrix bar codes are introduced—not necessarily in retail—they will contain GTINs made up as for shippers. See ‘Creating shipper GTINs’ page 55.
You need to create a different 13-digit number for each variant of each product that you wish to identify. The prefix will always provide the first 7, 8, 9, or 10 digits – depending on its length – of the 13 digits in each number. You will be able to put whatever you like in the next five, four, three or two spaces to make up a total of 12 different digits for each number you create. The thirteenth digit, represented by the letter C in the table below, is the check digit.
The check digit must be calculated. Its purpose is to signal to the computer that decodes the bar code when the bar code is correctly decoded. The software will repeat the check digit calculation when it has decoded the bar code. If the software’s calculation agrees with the answer that is already in the bar code the software knows that the decoding is correct. This turns it off that bar code and starts it looking for another one.
The calculation for the check digit is provided at the end of this Appendix, and a check digit calculator on CD is available on request from GS1 New Zealand or on the GS1 New Zealand web site at www.gs1nz.org
Prefix (allocated by GS1) Item Reference (allocated by you) Check Digit (calculated)
94 XXXXX XXXXX C
94 XXXXXX XXXX C
94 XXXXXXX XXX C
94 XXXXXXXX XX C
It is your responsibility to allocate item reference numbers and to maintain records of number allocation. Basically every different product line (whether a single item or a box of them) requires a different number. The numbers have no meaning so it will always be simpler and easier to use a row of zeroes for the item reference in the first GTIN you create and then increment it by one for each subsequent number 00…0, 00…1, 00…2 and so on.
There is no purpose to be served by trying to build significance into GTINs, for example by grouping all products of a particular type into a certain range of numbers. Any unique and correctly structured GTIN will identify a product perfectly, without having to be similar to the GTIN on any similar product. Attempts at creating patterns or other significance in GTINs will only complicate the management of the numbers and increase the chances of errors.
5453
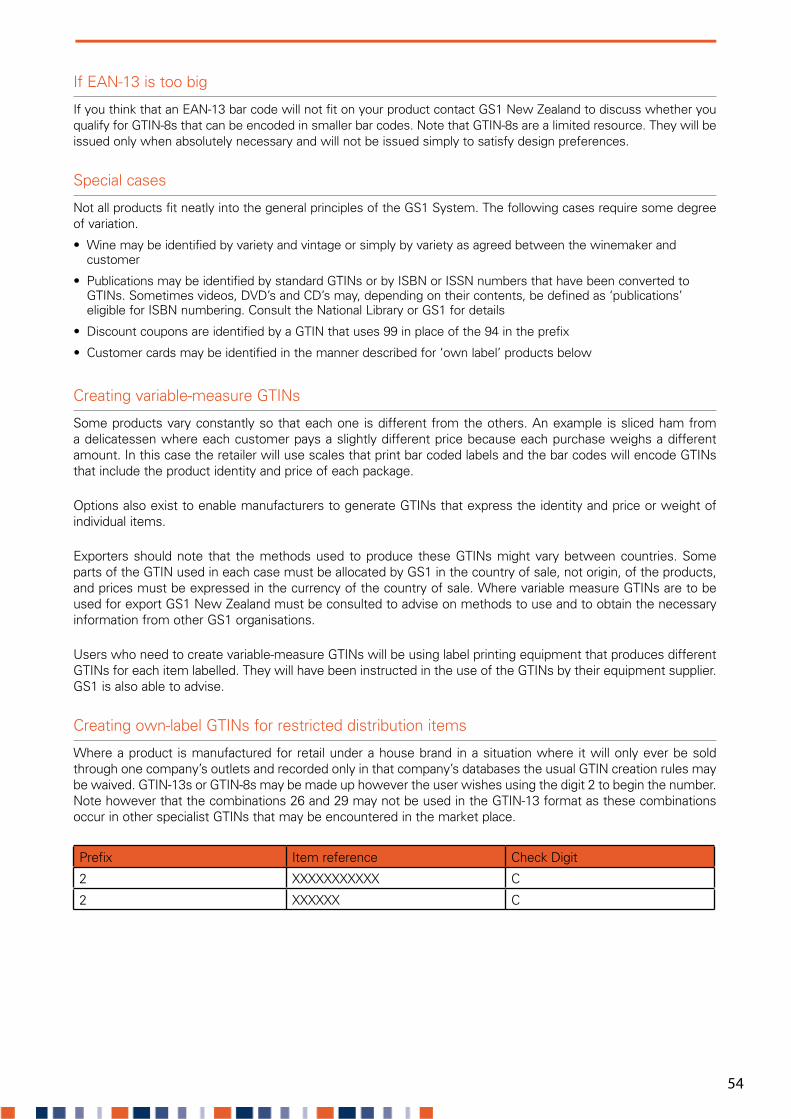
If EAN-13 is too big
If you think that an EAN-13 bar code will not fit on your product contact GS1 New Zealand to discuss whether you qualify for GTIN-8s that can be encoded in smaller bar codes. Note that GTIN-8s are a limited resource. They will be issued only when absolutely necessary and will not be issued simply to satisfy design preferences.
Special cases
Not all products fit neatly into the general principles of the GS1 System. The following cases require some degree of variation.
• Winemaybeidentifiedbyvarietyandvintageorsimplybyvarietyasagreedbetweenthewinemakerandcustomer
• PublicationsmaybeidentifiedbystandardGTINsorbyISBNorISSNnumbersthathavebeenconvertedtoGTINs. Sometimes videos, DVD’s and CD’s may, depending on their contents, be defined as ‘publications’ eligible for ISBN numbering. Consult the National Library or GS1 for details
• DiscountcouponsareidentifiedbyaGTINthatuses99inplaceofthe94intheprefix
• Customercardsmaybeidentifiedinthemannerdescribedfor‘ownlabel’productsbelow
Creating variable-measure GTINs
Some products vary constantly so that each one is different from the others. An example is sliced ham from a delicatessen where each customer pays a slightly different price because each purchase weighs a different amount. In this case the retailer will use scales that print bar coded labels and the bar codes will encode GTINs that include the product identity and price of each package.
Options also exist to enable manufacturers to generate GTINs that express the identity and price or weight of individual items.
Exporters should note that the methods used to produce these GTINs might vary between countries. Some parts of the GTIN used in each case must be allocated by GS1 in the country of sale, not origin, of the products, and prices must be expressed in the currency of the country of sale. Where variable measure GTINs are to be used for export GS1 New Zealand must be consulted to advise on methods to use and to obtain the necessary information from other GS1 organisations.
Users who need to create variable-measure GTINs will be using label printing equipment that produces different GTINs for each item labelled. They will have been instructed in the use of the GTINs by their equipment supplier. GS1 is also able to advise.
Creating own-label GTINs for restricted distribution items
Where a product is manufactured for retail under a house brand in a situation where it will only ever be sold through one company’s outlets and recorded only in that company’s databases the usual GTIN creation rules may be waived. GTIN-13s or GTIN-8s may be made up however the user wishes using the digit 2 to begin the number. Note however that the combinations 26 and 29 may not be used in the GTIN-13 format as these combinations occur in other specialist GTINs that may be encountered in the market place.
Prefix Item reference Check Digit
2 XXXXXXXXXXX C
2 XXXXXX C
5453

5655 5655
Creating shipper GTINs (GTIN-14)
The preferred method of making up GTIN-14s is to simply make up a new GTIN-13 and place a zero at the front of it to expand it to fourteen digits. The GTIN-13 must be a new unique number. Avoid placing a zero at the start of an existing GTIN-13 that is already in use on another item. Computers do not recognise zeroes at the start of numbers. A GTIN-14 made up in this manner from an existing GTIN-13 will be the same as the original GTIN-13 to a computer decoding a bar code and the system will be unable to distinguish between the traded unit and the consumer unit.
There are other methods of creating GTIN-14s and companies that are correctly using these methods may continue to do so. The zero filler method described here is the better method to accommodate potential future developments in bar code and radio tag technology. GS1 recommends the ‘zero filler’ method and encourages users of other methods to migrate when practical.
Creating SSCCs
The same company prefix number used to create GTINs is used to create serial shipping container codes (SSCCs) that are unique serial numbers for each logistics unit. Companies that have a 7-digit GS1 company prefix number can create up to 10 billion different SSCCs. Users with longer company prefix numbers have fewer numbers to use, but they will still create unique 18 digit numbers.
The number has four components but it should always be used as one complete number within companies’ computer systems. Whenever the SSCC is shown in a GS1-128 bar code the application identifier (00) will precede it.
The application identifier (AI) for SSCCs is always (00), and defines the data structure.
The extension digit can take any value between 0 and 9 and allows users to create more SSCCs. It was previously known as the packaging indicator but is no longer used for that purpose. Any digit may be used to fill the space. By convention most users use 3. Companies still using GTIN-12s should note however that a GS1 US company prefix number will be prefixed with a zero when used to create SSCCs.
The serial number is between 7 to 9 digits in length, depending on the length of the company prefix number, and is allocated by the company making up the unit. The number must not be reused for at least one year or until the unit to which it was assigned has been broken down and no longer exists, whichever is the later.
Application
identifier
Extension
digit
Company prefix
number
Serial
number
Check
digit
00 X XXXXXXX XXXXXXXXX C
00 X XXXXXXXX XXXXXXXX C
00 X XXXXXXXXX XXXXXXX C
00 X XXXXXXXXXX XXXXXX C
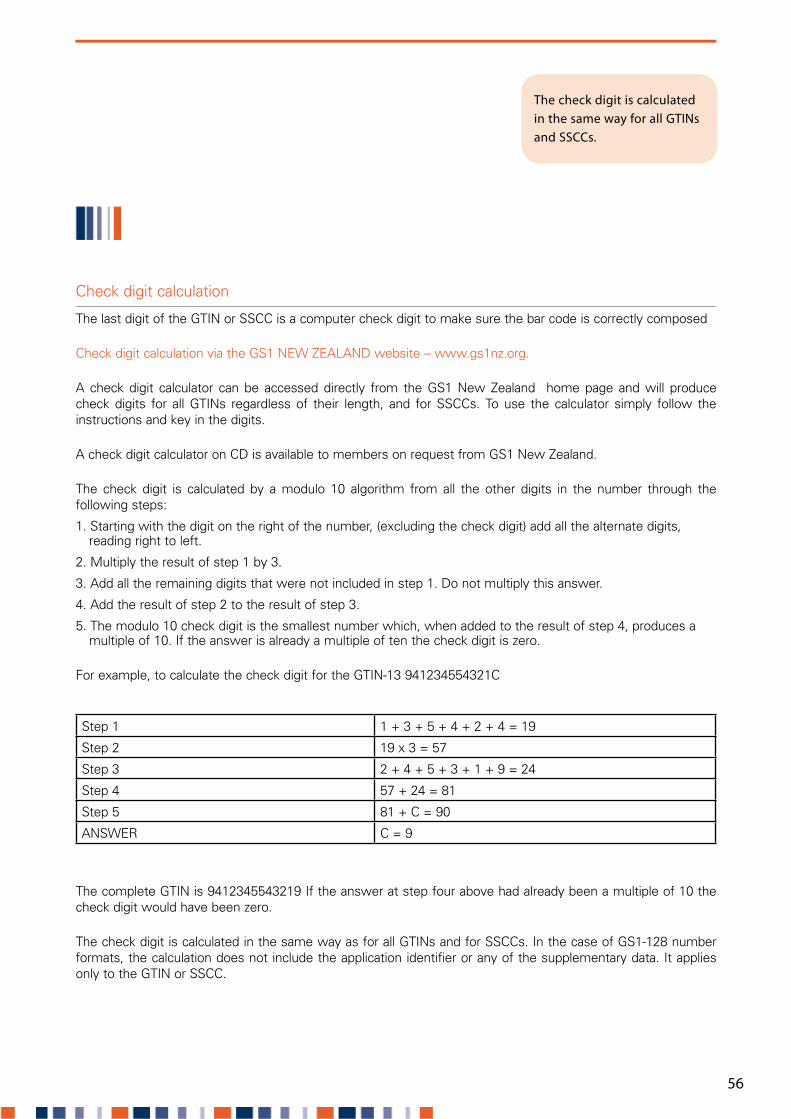
5655 5655
The check digit is calculated in the same way for all GTINs and SSCCs.
Check digit calculation
The last digit of the GTIN or SSCC is a computer check digit to make sure the bar code is correctly composed
Check digit calculation via the GS1 NEW ZEALAND website – www.gs1nz.org.
A check digit calculator can be accessed directly from the GS1 New Zealand home page and will produce check digits for all GTINs regardless of their length, and for SSCCs. To use the calculator simply follow the instructions and key in the digits.
A check digit calculator on CD is available to members on request from GS1 New Zealand.
The check digit is calculated by a modulo 10 algorithm from all the other digits in the number through the following steps:
1. Starting with the digit on the right of the number, (excluding the check digit) add all the alternate digits, reading right to left.
2. Multiply the result of step 1 by 3.
3. Add all the remaining digits that were not included in step 1. Do not multiply this answer.
4. Add the result of step 2 to the result of step 3.
5. The modulo 10 check digit is the smallest number which, when added to the result of step 4, produces a multiple of 10. If the answer is already a multiple of ten the check digit is zero.
For example, to calculate the check digit for the GTIN-13 941234554321C
Step 1 1 + 3 + 5 + 4 + 2 + 4 = 19
Step 2 19 x 3 = 57
Step 3 2 + 4 + 5 + 3 + 1 + 9 = 24
Step 4 57 + 24 = 81
Step 5 81 + C = 90
ANSWER C = 9
The complete GTIN is 9412345543219 If the answer at step four above had already been a multiple of 10 the check digit would have been zero.
The check digit is calculated in the same way as for all GTINs and for SSCCs. In the case of GS1-128 number formats, the calculation does not include the application identifier or any of the supplementary data. It applies only to the GTIN or SSCC.

5857 5857
General
Virtually all consumer units (products that will be sold at a retail point-of-sale) and very many traded units (the outer cases for the consumer units) will be sold in packaging that is printed with the appropriate bar code. Some items will use bar coded labels and advice about using these is provided in the following section of this Appendix.
The image of the bar code that is included in the artwork will need to be adjusted to take account of the spread of ink. This is necessary because direct contact printed bars in bar codes print wider than the actual width of bars on the printing plate. The difference between the width of the bar as it is printed and the specified width on the printing plate is called print gain.
Each bar on the printing plate needs to be reduced in width by the average print gain and this is known as bar width reduction. All widths of bar have the same bar width reduction so that the spaces on the printing plate will be wider than they will be when they are printed. This adjustment in the width of the bars can be determined by the use of printability gauges. Printers will be able to offer advice about the use of printability gauges and film master suppliers will be able to supply images that have been correctly adjusted for the particular printing process being used.
Different printing techniques have different tolerances for printing accuracy and different print gains so it is important to check what these are before choosing a particular size of bar code symbol. The choice of substrate used in the printing process will also affect the size of the bar code that can be accurately printed.
If possible, when using flexographic printing, the bars should run parallel to the press web direction. If the bars are required to be perpendicular to the press direction, try to avoid distorting the symbol for the plate roll circumference. This lack of distortion will alter the overall width of the symbol, but will provide dimensional integrity.
In printing on corrugated board higher print quality will be achieved when the bars of the bar code lie in the same direction as the corrugations. Regardless of bar orientation, bearer bars will always improve the quality of any bar codes printed on corrugated board. Their use is mandatory with ITF-14 but highly recommended in all cases involving corrugated board.
When using either silkscreen or rotogravure printing processes, the symbol should be aligned parallel to the cell structure on the screen or gravure plate cylinder to provide the smoothest bar edge possible.
Remember to test printed bar codes with a verifier that conforms to ISO/IEC 15426-1. Ordinary scanners cannot perform a valid test of bar code quality.
Appendix 3 Printing techniques

5857 5857
Printing on demand
Printing bar codes on demand is necessary when including variable information, such as expiry dates, in GS1-128 bar codes for traded units. Some users will want to print bar coded labels on demand for some consumer units, especially when these items are not contained in pre-printed packaging. On-demand printing techniques include direct thermal, thermal transfer, laser, ion deposition, ink jet and mechanical matrix.
Whether printing EAN/UPC, ITF-14 or GS1-128 bar codes the same principles apply.
First of all check that your label design software is compatible with the printer hardware you are planning to use, and that the printer resolution is adequate for the bar codes you are printing. In general this means that your printer must have a resolution of at least 8 dots per mm (approximately 200 dots per inch) as it has to use a whole number of dots to make up the width of the narrowest bars required.
An 8 dpmm printer will be able to print bar codes whose X-dimensions are 0.25 mm, 0.375 mm, and 0.50 mm. A 12 dpmm printer (approximately 300 dots per inch) will be able to print bars with X-dimensions of 0.25 mm, 0.333 mm, 0.416 mm, 0.50 mm and so on.
All on-demand printers, whether they are direct thermal, thermal transfer, dot matrix, ink jet or laser, will print better bar codes with well-defined edges if they are printing the bar codes in picket fence orientation. This means that the bars go in the same direction as the substrate when it passes through the printer.
Printing in picket fence orientation means that the width of the bar code can be no wider than the print head.
If it is necessary to print a bar code that would be wider than the print head, then it must be printed in ladder orientation. This means that any failure in the print head elements will cause white lines to appear across the bar code. These faults in effect reduce the height of the bar code and make it more difficult to scan.
Matching the label stock with the technique being used is also important, as poor quality paper can create dust, which can cause the print heads to burn out sooner than expected. It is also necessary to match thermal transfer ribbons to the equipment being used, and ensure that the correct pressures are being used with the print heads. The incorrect choice of ribbon and paper may be workable, but the machinery is likely to require much higher maintenance costs and require much more frequent servicing.
It is highly recommended to use validated combinations of ribbons and labels, and to use verification equipment to check the print quality.
Regular cleaning and maintenance of your thermal printer is very important for bar code quality. Clean print heads gently with a good quality solvent and avoid scratching them with any hard materials or objects.
Direct thermal printing may be appropriate for some products, and the correct label stock must be sourced. Bear in mind that these labels remain heat sensitive and may be inappropriate if goods are kept in direct sunlight or if the labels are heated in any subsequent process. The whole label may turn black if heated.
Remember to test printed bar codes with a verifier that conforms to ISO/IEC 15426-1. Ordinary scanners cannot perform a valid test of bar code quality.
Bearer bars will always improve the quality of bar codes printed on corrugated board.

59
These bar codes are nearly always printed on demand using thermal or ink jet printers, so the operator of the equipment needs to be aware of certain requirements.
Function 1
GS1-128 symbols are a subset of Code 128 and they require a special symbol character (a pattern of three bars and three spaces) called Function 1 to be used as part of the start pattern. If the Function 1 character is not correctly included as part of the start pattern the symbol will not meet the requirements of the GS1 System.
Choosing the correct character set
There is a choice of character sets to help users minimise the space taken up by these bar codes. Use character set C to print pairs of digits using one symbol character (a pattern of three bars and three spaces) rather than two symbol characters whenever possible. If single letters or numbers are required use character sets B or A.
Fixed length and variable length fields
GS1-128 bar codes can represent several different element strings in one bar code symbol. This joining together of information in one bar code symbol is called concatenation. When these element strings are fixed in length, such as those for the GTIN and expiry dates, they simply follow one another.
If a variable length field such as that for batch number is used, it must appear at the end of a bar code. Where multiple variable length fields are required, the data is followed by the Function 1 character, which acts as a punctuation mark in the bar code to separate one variable length element string from the one that follows it.
The principle to observe in concatenating GS1-128 is: GTIN; fixed length fields; variable length fields. This minimises bar code length and makes the processing simpler for the software that decodes the bar code.
Choosing the correct size
GS1-128 bar codes can vary in size according to how much data is in them, and how well they can be printed. The maximum width for the X-dimension (the width of the narrowest bars and spaces) is 1.016 mm and the minimum X-dimension is 0.495 mm when these bar codes are used on trade items not crossing a retail point-of-sale.(ThisrangeofX-dimensionsisequivalenttoamagnificationrangeof100%to50%).
Users must choose an X-dimension that can be reproduced by their on-demand printing equipment. The X-dimension must be a multiple of the size of the smallest line that can be printed, and if an 8 dpmm (200 dpi) printer is used, the X-dimensions can be 0.50 mm, 0.625 mm, 0.75 mm, 0.875 mm and 1.00 mm.
If users are using labels, an X-dimension of 0.50 mm may be acceptable, provided the printed bar codes, when verified, meet the minimum grade required.
If users are printing these GS1-128 bar codes directly on to corrugated cartons an X-dimension of 1.00 mm is recommended, but verifiers must still be used to check that the bar codes meet the minimum grade required. Further information about verification is provided in Section 9.
Appendix 4 Printing GS1-128 bar codes
Enlarged section of the first part of a GS1-128 bar code showing the Function 1 character in blue.

Height of bars
Whichever X-dimension is chosen, the height of the bars should be at least 32 mm.
Keeping adequate light margins
The light margins on each side of a symbol which has an X-dimension of 1 mm are 10 mm. The light margin is always equal to 10 times the X-dimension, but when the X-dimension is 0.50 mm it is recommended that the light margins are at least 6.5 mm on each side.
When are brackets required around the application identifiers?
Brackets are used around each application identifier (AI) when the data is printed below the bar code. This makes it easier for people to read the AI and the data it defines. The brackets are not encoded in the GS1-128 bar code itself.
Determining the length of a GS1-128 bar code
GS1-128 bar codes will vary in length according to how much information they contain, so it is important to check that the intended length of the bar code and light margins is no longer than 165mm, the maximum allowable width, including light margins. Each symbol character (except the stop character) has a width of 11 mm if an X-dimension of 1 mm is chosen, and each symbol must include four symbol characters to begin and complete the bar code.
For example, how long will a GS1-128 bar code be that includes a GTIN and an expiry date? The data required in the bar code is all numeric so character set C will be chosen. Character set C is one of three sets of bar code characters available within GS1-128. It contains single bar code characters that represent any 2 digit combination 00-99 so when even numbers of digits are involved it is always used to conserve label space.
The data required in the bar code will be as follows, remembering that the brackets around the human-readable AIs are not included in the bar code:
010501234567890015010211
The formula for calculating the minimum symbol length including quiet zones is:
The start character and FNC1, stop character, the symbol check character, and the quiet zones are accounted for in the constant value “66”,
Therefore the length of the bar code in our example can be calculated like this:
11 x 12 (24 digits encoded in Code Set C will require 12 bar code characters) = 132
Plus 66 = 198
X1(at100%magnificationthex-dimensionwillbe1mm)
Answer: our bar code will be 198mm wide – too wide. The maximum allowable width is 165mm. We can reduce the x-Dimension to decide the magnification we want to use.
0.5mmx-dimension(50%)willgiveushalfthewidth–99mm
To calculate the width of an GS1-128 bar code use this method to calculate the width required at 100%magnification and then divide your answer to find the X-dimension usable within the available space. Remember thattheminimumallowablemagnificationis50%,representinganX-dimensionof0.5mm.
60
L = (11N + 66) (X)
Where: L = the minimum symbol length (in millimetres) X = the narrow bar width N = the number of symbol characters needed in the bar code. In code setC, two numeric digits are encoded in one symbol character

61
Choosing the correct application identifiers
When providing extra information on a traded unit, most users will encode the GTIN for the product with information such as an expiry date. The GTIN on the item must be specified by the AI (01), and the extra information defined using the AIs as explained in the GS1 specifications. The most commonly used AIs and their field lengths are given below.
When labelling pallets, the GS1 logistics label must be used. All the data shown on the label must refer to the contents of the whole pallet. The SSCC is the only compulsory element, and will be the only reference used on pallets of mixed product.
For pallets with uniform contents, any of the AIs listed below can be used. Please remember that you cannot use AIs (01) and (02) together. AI (01) should only be used when the pallet is also a traded unit, i.e. it is ordered and invoiced as a single item. In all other cases, use the AIs (02) and (37) to describe the contents of the pallet.
AI Description AI Data
00 Serial Shipping Container Code – SSCC n2 n18
01 Identification number (GTIN) of a traded item n2 n14
02 Identification of traded items contained in a logistic unit n2 n14
10 Batch or Lot number n2 an…20
11 Production date (YYMMDD) n2 n6
12 Due date (YYMMDD) n2 n6
13 Packaging date (YYMMDD) n2 n6
15 Best-before date (YYMMDD) n2 n6
17 Use-by date (Safety) (YYMMDD) n2 n6
21 Serial number n2 an..20
310n Net weight, kilograms n4 n6
320n Net weight, pounds n4 n6
37 Count of items contained in a logistics unit n2 n..8
400 Customer’s purchase order number n3 an…30
401 Consignment number n3 an..30
402 Shipment identification number n3 n17
410 Ship to (deliver to) GS1 Global Location Number n3 n13
411 Bill to (invoice to) GS1 Global Location Number n3 n13
412 Purchase from GS1 Global Location Number n3 n13
414 Identification of a Physical Location, GS1 Global Location Number n3 n13
422 Country of origin of a trade item n3 n3
8003 Global returnable asset identification (GRAI) n4 n14+an…16
8007 International Bank Account Number n4 an..30
8008 Date & time of production n4 n8+n.4
90 Information mutually agreed between trading partners n2 an…30
This is not an exhaustive list of all the application identifiers that can be used on traded units or on pallets. Please consult the GS1 specifications to find a complete listing of all the AIs.
n: numeric characters (number)
an: alphabetical or numeric characters (number)
Dotted line preceding number indicates variable length up to maximum shown

62
When a traded unit is bar coded it should not be possible to read any of the bar codes on the consumer units inside the packaging. If the bar codes can be read, there is a good chance that one of these will be read instead of the correct one on the outside of the case. This problem is called symbol show through.
When show through takes place it makes it very difficult to use an automatic scanning system reliably as the wrong item may be scanned. This means incorrect data capture and the wrong price being charged at the point-of-sale.
This is a particular problem for wholesalers who sell both traded and consumer units to their customers. They need to be able scan all GS1 bar codes at the point-of-sale so are particularly vulnerable to problems when more than one bar code shows on a unit.
This problem also affects grocery and other retailers who sell large multipacks that are also traded units. Care must be taken to avoid packaging consumer units so that their bar codes are visible in their entirety. Recent packaging waste initiatives are encouraging many manufacturers to make more use of shrink wrapping, and using patterned or obscuring film may be considered as a means of making consumer unit bar codes unreadable.
If the consumer units are rectangular in plan it may be possible to ensure that all the bar codes on the individual items face inside the outer case, but this will not be feasible with round products such as cans and bottles. When consumer units are packed on cardboard trays and then shrink wrapped, show through can be avoided by printed the bar codes in ladder orientation and towards the bottom of each consumer unit. This will mean that the edges of the tray will obscure part of the consumer unit’s bar codes and make them unscannable.
Appendix 5 Symbol show through

63
Appendix 6 GS1 DataBar Symbology
The GS1 DataBar symbology, previously known as Reduced Space Symbology (RSS) is a suite of seven bar code symbol variants capable of containing GTINs with or without supplementary information, usually in less space than other GS1 symbologies. The effect of using GS1 DataBar is to encode information in less space than is generally possible with other GS1 symbologies. As well, data such as batch numbers and use by dates that can currently be encoded only in larger bar codes used on pallets and cartons can now be encoded in bar codes that can be scanned at retail point-of-sale.
Four of the variants, are useable at the point-of-sale (POS) once the scanning systems are enabled. The other three are intended for use in specific environments such as laboratories, hospitals and manufacturing facilities where small dense bar code symbols are required. They cannot be scanned with the omnidirectional scanners that are typically used in retail environments.
Note that this appendix is written for users of GS1 DataBar in retail environments and in the supply chains of goods bound for retail. Separate specifications exist in other sectors, notably health. Note also that some application guidelines are still being developed at the time of writing (April 2011) so intending users should consult GS1 before implementing GS1 DataBar. This appendix is an introduction and overview only and may not be definitive in particular applications.
For information on GS1 DataBar specifications for other sectors please contact GS1.
Examples of GS1 DataBar symbols
The other two POS-compatible GS1 DataBar bar code variants, GS1 DataBar Expanded and GS1 DataBar Expanded Stacked are similar in appearance but may be larger depending on the amount of data encoded. In any case bar code size will vary with the size choices made by the user.
GS1 has endorsed GS1 DataBar for use at POS with effect from January 2014. Scanner users should be aware of the date and should plan to have equipment and systems enabled for GS1 DataBar by them.
Parties may begin using it before that date by mutual consent.
*Thisillustratesavariable-weightproductinanon-retailenvironment.NotethatinretailenvironmentsGTINswillstartwithzero.
GS1 has endorsed GS1 DataBar for use at POS with effect from January 2014.
GS1 DataBar Omnidirectional
(01)98898765432106(3202)012345(15)991231
(01)09501101420021
GS1 DataBar Stacked Omnidirectional*

64
Creating a GTIN for use with GS1 DataBar
GS1 DataBar encodes fourteen-digit numbers only. Users must use GTIN-13 with a filler zero (leading zero). This is created by allocating a unique GTIN-13, which is then preceded with a filler zero (leading zero). When a GTIN is formed with a filler zero (leading zero), the 13 characters must be unique, that is, you must not repeat the GTIN allocated to any other trade item1.
Where the symbol contains additional data AIs must be used in the usual manner (page 61). This applies when GS1 DataBar Expanded or GS1 DataBar Expanded Stacked is used.
Basic Technical Information
Size
The X-Dimensions useable in GS1 DataBar are currently the same as those for EAN/UPC symbols, with the exception of GS1 DataBar Stacked Omnidirectional symbols used on the Price Lookup (PLU) labels used on some fresh produce. These may be printed at X-Dimensions down to 0.2032mm which will produce a symbol 8mm wide2.
Height
Truncation is not permitted unless intending to use GS1 DataBar in its ‘truncated’ format, which is not permissible inretail.(POS-compatiblesymbolsindicatedwith*)
Symbol Height
GS1DataBarOmnidirectional* 33X to…(no maximum)
GS1 DataBar Truncated 13X to 33X
GS1 DataBar Stacked 13X (5X + 1X + 7X)…(no maximum)
GS1DataBarStackedOmnidirectional* 69X (33X + 3X + 33X) 2 rows max., no max total height.
GS1 DataBar Limited 10X ……(no maximum)
GS1DataBarExpanded* 34X…….(no maximum)
GS1DataBarExpandedStacked* 71X (34X + 3X + 34X) per 2 rows, to max 11 rows (404X)3
Data Encoded
GS1 DataBar Omnidirectional (both versions, and GS1 DataBar Limited)
AI (01) plus GTIN-14 (i.e. 16n)
GS1 DataBar Expanded 74n or 41a
Separator Pattern
When a symbol is stacked there should be a ‘Separator Pattern’ between the rows. This serves a purpose similar to the horizontal bearer bars above and below the data bars in ITF symbols and prevents scanners scanning two lines at once and being unable to process the data. It is a precise pattern of light and dark squares that are printed in positive and negative at different points along its length.
The Separator Pattern in the case of the symbols useable at retail is always 3X in height.
DataBar requires a 14-digit number. It must be a GTIN-13 with a filler zero.

65
Human readable
Human readable data must be printed beneath symbols. The allowable exception is in fresh produce when label size precludes this, but in that case the price look-up number (PLU) must always be present.
When using GS1 DataBar the AI(01) and the GTIN should be shown.
Light margins (Quiet zones)
Light margins are not required with GS1 DataBar. The symbols contain ‘finder patterns’ which alert the software to the presence of the data carrying characters. However users must ensure that a light bar (background space) is on the outside of the symbol. Graphics or other colours must not contact any printed bar.
GS1 DataBar on non-consumer units
GS1 DataBar is not intended for use on non-consumer units such as inners, shippers and pallets. These units should always be large enough to allow use of the pre-existing range of GS1 bar codes.
Verification
The required minimum grade is 1.5./06/660. Provided the verifier is capable of verifying GS1 DataBar symbols there will be no difference in the report that is produced. The same parameters are reported and all the same interpretations apply.
The Separator Pattern is not tested in the verification test as its quality is not critical to bar code performance. Nevertheless maintaining print quality in the Separator Pattern is best practice.
Note that not all verifiers that are approved for use in verifying the pre-existing range of GS1 bar codes are capable of verifying GS1 DataBar. Intending users should seek advice on suitable verification equipment.
Scanners
Most modern scanners, once enabled, are capable of reading GS1 DataBar Omnidirectional and GS1 DataBar Expanded and their stacked variants. Because not all scanners currently in use are enabled or capable of being enabled users should not consider implementing GS1 DataBar without the knowledge and consent of their trading partners even after 2014.
Users should not consider implementing GS1 DataBar without the knowledge and consent of their trading partners even after 2014.
1 UPC users would use GTIN-12 preceded by two zeroes to achieve the same outcome
2 This is a special exception permitted as an interim measure in the fresh produce sector because of the ubiquity of PLU labels and the impossibility of replacing them in the short term. Final minimum GS1 DataBar size specifications will be established for all retail users by further empirical testing to be completed in or by 2009.
3 * Need not be even numbers of rows: 2 – 11 permissible

66
Appendix 7 GS1 DataMatrix Symbology
Introduction
This appendix addresses some of the technical aspects of the two-dimensional bar code symbology called GS1 DataMatrix. GS1 DataMatrix is a standalone, two-dimensional matrix symbology that is made up of square modules arranged within a perimeter finder pattern. GS1 DataMatrix does not require a linear symbol. It has been used in the public domain since 1994.
This document provides only a brief technical description and overview of the GS1 DataMatrix symbology. A more detailed technical specification can be found in the International Standard ISO/IEC 16022. The GS1 System has adopted GS1 DataMatrix because it can encode GS1 System data structures and offers other technical advantages. Its compact design and the existence of various production methods that accommodate placing the symbology onto various substrates offer certain advantages over other symbologies currently in the GS1 System.
Data Matrix ISO version ECC 200 is the only version that supports GS1 System data structures, including Function 1 Symbol Character. The ECC 200 version of Data Matrix uses Reed-Solomon error correction, and this feature helps correct for partially damaged symbols. In the remainder of this section, the ECC 200 version of Data Matrix is assumed when the symbology is described as GS1 DataMatrix. This version of Data Matrix is similar in stability to ISO versions of current GS1 System symbologies.
Implementation of GS1 DataMatrix shall be done per approved GS1 System application guidelines. For these refer to GS1 for advise specific to your sector and application. Some of the production processes that can be used to produce GS1 DataMatrix Symbols are as follows:
Direct part marking, such as is done by dot peening on items, such as automotive, aircraft metal parts, medical instruments, and surgical implants
Laser or chemically etched parts with low contrast or light marked elements on a dark background (e.g., circuit boards and electronic components, medical instruments, surgical implants)
High-speed ink jet printed parts and components where the marked dots cannot form a scannable linear symbol.
Very small items that require a symbology with a square aspect ratio that cannot be marked within the allocated packaging space by existing GS1 DataBar or Composite Symbols
GS1 DataMatrix Symbols are read by two-dimensional imaging scanners or vision systems. Most other scanners that are not two-dimensional imagers cannot read GS1 DataMatrix. GS1 DataMatrix Symbols are restricted for use with new niche applications that will involve imaging scanners throughout the supply chain.

6867 6867
GS1 DataMatrix Features and Symbol Basics
GS1 DataMatrix Symbol
Illustrated above is a GS1 DataMatrix Symbol with 20 rows and 20 columns (including the perimeter finder pattern but not including Quiet Zones).
GS1 DataMatrix solid “L” shaped finder or alignment pattern is one module wide.•
GS1 DataMatrix Quiet Zone is one module wide on all four sides. As with other bar code Quiet Zones, do •not print in this area.
ECC 200 symbols can always be recognized from older versions of Data Matrix because the corner •opposite the middle of the finder pattern is a zero module or white in normal print.
For square GS1 DataMatrix symbols, only an even number of rows and columns exist. Depending on data •requirements, symbols can range from 10 row by 10 columns (10 x10) to 144x144 (including finder pattern but not the Quiet Zone).
For normal printing, a module is one X by one X in dimension. Representation of data: A dark module is a •binary one and a light module is a binary zero (or a light module is a binary one and a dark module is a binary zero for a symbol with reflectance reversal).
ECC 200 (ECC = Error Checking and Correction) that uses Reed-Solomon error correction. Figure 5.7.3.2 – •1 ECC 200 Square Symbol Attributes, shows the fixed amounts of error correction associated for each allowable Data Matrix Symbol size.
FNC1 for GS1 System compatibility must be encoded at the beginning of the data string and should be •used as a group separator. When a FNC1 is used as a group separator, it shall be represented in the transmitted message by the ASCII character <GS> (ASCII value 29).
Encodable character set:•
– Values 0 - 127 in accordance with ISO/IEC 646 International Reference Version (e.g., all 128 ASCII characters)
– Values 128 - 255 in accordance with ISO/IEC 8859-1; Latin alphabet No. 1. These are referred to as extended ASCII.
– The GS1 System requires that only the subset of ISO/IEC 646 International Reference Version defined in these GS1 General Specifications be used for Application Identifier (AI) Element Strings.
Data characters per symbol (for the maximum symbol size):•
– Alphanumeric data: up to 2335 characters
– Eight-bit byte data: 1556 characters
– Numeric data: 3116 digits
This corner is always a white square for ECC 200
“L” shaped finder pattern

6867 6867
Large, square ECC symbols (at least 32 X32) will include alignment patterns to separate the data regions.•
Code type: matrix (Composite Component is a stacked type)•
Orientation independence: Yes (requires a two-dimensional imaging scanner)•
Summary of additional features inherent or optional in GS1 DataMatrix:•
– Reflectance reversal: (Inherent) Symbols can be read when marked so that the image is either dark on light or light on dark.
– Rectangular symbols: Six symbol formats are specified in a rectangular form.
– Extended Channel Interpretation (ECI) capability allows GS1 DataMatrix to encode data from other alphabets
GS1 DataMatrix Symbology
The technical description of GS1 DataMatrix contained herein provides additional information based on ISO technical specification 16022, and it is provided as a further aid in the development of specific applications. GS1 DataMatrix Symbols shown in the following illustrations have been magnified to show detail.
Square and Rectangular Formats
GS1 DataMatrix may be printed in a square or rectangular format. The square format is usually used as it has a larger range of sizes and is the only format available for symbols encoding a large amount of data. The largest rectangular symbol can encode 98 digits, while the largest square symbol can encode 3,116 digits. An enlarged rectangular symbol and an equivalent square symbol are shown in the illustration below.
Rectangular and Square GS1 DataMatrix Symbols (Specific applications are not used in the data encodation. Both symbols contain the same data)
GS1 DataMatrix Symbol Sizes
GS1 DataMatrix Symbology has multiple sizes to match various data content. GS1 DataMatrix Symbols have 24 sizes of the square format ranging from 10 by 10 modules up to 144 by 144 modules, not including the 1-X surrounding Quiet Zone. The rectangular format has 6 sizes from 8 by 18 modules up to 16 by 48 modules, not including the 1-X surrounding Quiet Zone. GS1 DataMatrix sizes of 52 by 52 or larger have 2 to 10 interleaved blocks of Reed-Solomon error correction codewords.
The term “codeword” is used often to describe attributes concerning the encodation of data into GS1 DataMatrix Symbols. ISO 16022 defines codeword as “A symbol character value. An intermediate level of coding between source data and the graphical encodation in the symbol.” Codewords are typically eight bits of data. FNC1, two numerics, and one alpha all take up one codeword each.

7069 7069
1 ECC 200 Square Symbol Attributes***
Sym
bol S
ize
Row
*
Sym
bol S
ize
Col
*
Dat
a R
egio
n S
ize
Dat
a R
egio
n N
o.
Map
ping
Mat
rix
S
ize
Tota
l Cod
ewor
ds
Dat
a
Tota
l Cod
ewor
ds
Erro
r
Ree
d-S
olom
on
Blo
ck D
ata
Ree
d-S
olom
on
Blo
ck E
rror
Inte
r-le
aved
B
lock
s
Dat
a C
apac
ity
Num
Cap
.
Dat
a C
apac
ity
Alp
hanu
m. C
ap.
Dat
a C
apac
ity
Byt
e C
ap.
Erro
r C
orre
ctio
n
Ove
rhea
d %
Max
. Cor
rect
able
C
odew
ord
Er
ror/
Eras
ure
10 10 8x8 1 8x8 3 5 3 5 1 6 3 1 62.5 2/0
12 12 10x10 1 10x10 5 7 5 7 1 10 6 3 58.3 3/0
14 14 12x12 1 12x12 8 10 8 10 1 16 10 6 55.6 5/7
16 16 14x14 1 14x14 12 12 12 12 1 24 16 10 50 6/9
18 18 16x16 1 16x16 18 14 18 14 1 36 25 16 43.8 7/11
20 20 18x18 1 18x18 22 18 22 18 1 44 31 20 45 9/15
22 22 20x20 1 20x20 30 20 30 20 1 60 43 28 40 10/17
24 24 22x22 1 22x22 36 24 36 24 1 72 52 34 40 12/21
26 26 24x24 1 24x24 44 28 44 28 1 88 64 42 38.9 14/25
32 32 14x14 4 28x28 62 36 62 36 1 124 91 60 36.7 18/33
36 36 16x16 4 32x32 86 42 86 42 1 172 127 84 32.8 21/39
40 40 18x18 4 36x36 114 48 114 48 1 228 169 112 29.6 24/45
44 44 20x20 4 40x40 144 56 144 56 1 288 214 142 28 28/53
48 48 22x22 4 44x44 174 68 174 68 1 348 259 172 28.1 34/65
52 52 24x24 4 48x48 204 84 102 42 2 408 304 202 29.2 42/78
64 64 14x14 16 56x56 280 112 140 56 2 560 418 277 28.6 56/106
72 72 16x16 16 64x64 368 144 92 36 4 736 550 365 28.1 72/132
80 80 18x18 16 72x72 456 192 114 48 4 912 682 453 29.6 96/180
88 88 20x20 16 80x80 576 224 144 56 4 1152 862 573 28 112/212
96 96 22x22 16 88x88 696 272 174 68 4 1392 1042 693 28.1 136/260
104 104 24x24 16 96x96 816 336 136 56 6 1632 1222 813 29.2 168/318
120 120 18x18 36 108x108 1050 408 175 68 6 2100 1573 1047 28 204/390
132 132 20x20 36 120x120 1304 496 163 62 8 2608 1954 1301 27.6 248/472
144 144 22x22 36 132x132 1558 620 156 62 8** 3116 2335 1556 28.5 310/590
155 62 2**

7069 7069
ECC 200 Rectangular Symbol Attributes***
Sym
bol S
ize
Row
*
Sym
bol S
ize
Col
*
Dat
a R
egio
n S
ize
Dat
a R
egio
n N
o.
Map
ping
Mat
rix
S
ize
Tota
l Cod
ewor
ds
Dat
a
Tota
l Cod
ewor
ds
Erro
r
Ree
d-S
olom
on
Blo
ck D
ata
Ree
d-S
olom
on
Blo
ck E
rror
Inte
r-le
aved
B
lock
s
Dat
a C
apac
ity
Num
Cap
.
Dat
a C
apac
ity
Alp
hanu
m. C
ap.
Dat
a C
apac
ity
Byt
e C
ap.
Erro
r C
orre
ctio
n
Ove
rhea
d %
Max
. Cor
rect
able
C
odew
ord
Er
ror/
Eras
ure
8 18 6x16 1 6x16 5 7 5 7 1 10 6 3 58.3 3/+
8 32 6x14 2 6x28 10 11 10 11 1 20 13 8 52.4 5/+
12 26 10x24 1 10x24 16 14 16 14 1 32 22 14 46.7 7/11
12 36 10x16 2 10x32 22 18 22 18 1 44 31 20 45.0 9/15
16 36 14x16 2 14x32 32 24 32 24 1 64 46 30 42.9 12/21
16 48 14x22 2 14x44 49 28 49 28 1 98 72 47 36.4 14/25
Notes:
* SymbolsizedoesnotincludeQuietZones.
** Inthelargestsymbol(144x144),thefirsteightReed-Solomonblocksshallbe218codewordslongencoding156data codewords. The last two blocks shall encode 217 codewords (155 data codewords). All the blocks have 62 error correction codewords.
*** EquivalenttoTable7intheinternationalstandardISO-16022,secondedition,2006-09-15.
The square format is divided into 4 to 36 data regions for symbols sized 32 by 32 modules and larger. The rectangular format symbols may also be divided into two data regions. Each data region is separated from the other regions by alignment patterns that consist of an alternating pattern of ones and zeroes and a solid line of ones (a dark line when there is no reflectance reversal). Figure 5.7.3.2 - 3 shows a four-segment square symbol on the left and a two-segment rectangular symbol on the right, each with hypothetical data shown to create the effect.
Segmented GS1 DataMatrix Symbols: Square and Rectangular Formats (These illustrations are enlarged so that typical alignment patterns can be easily seen.)
7271 7271
Data Transmission and Symbology Identifier Prefixes
The GS1 System requires the use of symbology identifiers. GS1 DataMatrix uses the symbology identifier of “]d2” (see Figure 5.7.3.3 - 1) for GS1 System compliant symbols that have a leading FNC1 character. This indicates that Application Identifier (AI) data is encoded equivalent to the symbology identifier “]C1” for GS1-128 Symbols and “]e0” for GS1 DataBar and Composite Symbols. For more information on symbology identifiers, see the International standard ISO/IEC 15424 Information technology — Automatic identification and data capture techniques — Data Carrier Identifiers.
For example, a GS1 DataMatrix Symbol encoding AI (01) Element String 10012345678902 produces the transmitted data string “]d20110012345678902.” Data transmission follows the same principles that apply to the concatenation of AI Element Strings in any GS1 Bar code that encodes Application Identifiers.
Symbology Identifier for Data Matrix ECC 200
Message Content Separator
]d2 Standard AI Element Strings None
Width and Height of a Module (X)
The range of the X-dimensions will be defined by the application specification, having due regard to the availability of equipment for the production and reading of symbols and complying with the general requirements of the application.
The X-dimension shall be constant throughout a given symbol. The X-dimension should apply to both the width and height of the modules.
Symbol Quality Grade
The International Standard ISO/IEC 15415 Information technology - Automatic identification and data capture techniques - Bar code symbol print quality test specification - Two-dimensional symbols methodology shall be used for measuring and grading GS1 DataMatrix. The print quality grade is measured by verifiers that comply with the standard. The grade includes a grade level, measuring aperture, the wavelength of light used for the measurement, and the illumination angle relative to the symbol.
A symbol grade is only meaningful if it is reported in conjunction with the illumination and aperture used. It should be shown in the format grade/aperture/light/angle, where:
“grade” is the overall symbol grade as defined in ISO/IEC 15415 Information technology - Automatic identification and data capture techniques - Bar code symbol print quality test specification - Two-dimensional symbols (e.g., the arithmetic mean to one decimal place of the Scan Reflectance Profile or scan grades). For GS1DataMatrix,thegradenumbermaybefollowedbyanasterisk(*)whichindicatesthatthesurroundingsof the symbol contain extremes of reflectance that may interfere with reading. For most applications, this should be specified as causing the symbol to fail.
“aperture” is the diameter in thousandths of an inch (to the nearest thousandth) of the synthetic aperture defined in ISO/IEC 15415 Information technology - Automatic identification and data capture techniques - Bar code symbol print quality test specification - Two-dimensional symbols.

7271 7271
“light” defines the illumination: A numeric value indicates the peak light wavelength in nanometres (for narrow band illumination); the alphabetic character W indicates that the symbol has been measured with broadband illumination (white light) the spectral response characteristics of which must imperatively be defined or have their source specification clearly referenced.
“angle” is an additional parameter defining the angle of incidence (relative to the plane of the symbol) of the illumination. It shall be included in the reporting of the overall symbol grade when the angle of incidence is other than 45 degrees. Its absence indicates that the angle of incidence is 45 degrees.
Note: This international standard provides for 30 degrees and 90 degrees illumination in addition to the default 45 degrees.
Theapertureisnormallyspecifiedasbeing80%oftheminimumX-dimensionallowedfortheapplication.TheprintingmethodmustproducetheGS1DataMatrix“L”patternwithgapsbetweenthedotslessthan25%ofthe specified aperture. If symbols with greater than the minimum X dimension are allowed by the application, the same absolute maximum gap dimension must be maintained.
Examples:
2.8/05/660 would indicate that the average of the grades of the Scan Reflectance Profiles, or of the scan grades, was 2.8 when these were obtained with the use of a 0.125 millimetre aperture (ref. no. 05) and a 660 nanometre light source, incident at 45 degrees.
2.8/10/W/30 would indicate the grade of a symbol intended to be read in broadband light, measured with light incident at 30 degrees and using a 0.250 millimetre aperture (ref. no. 10), but would need to be accompanied either by a reference to the application specification defining the reference spectral characteristics used for measurement or a definition of the spectral characteristics themselves.
2.8/10/670*wouldindicatethegradeofasymbolmeasuredusinga0.250millimetreaperture(ref.no.10),anda 670 nanometre light source, and indicates the presence of a potentially interfering extreme reflectance value in the surroundings of the symbol.
Verification of GS1 DataMatrix Symbols
The pass grade for GS1 DataMatrix bar code symbols is C but the aperture used for the test will depend on the method of marking and the application.
Because of the physics of optical systems, label based GS1 DataMatrix should be printed at approximately 1.5 times the equivalent printing density allowed for linear symbols in the same application.
There are two basic types of non ink based Direct Part Marks, those with “connected modules” in the “L” shaped finder pattern (GS1 DataMatrix Direct Part Marking – A) created by DPM marking technologies such as laser or chemical etching and those with “non connected modules” in the “L” shaped finder pattern (GS1 DataMatrix Direct Part Marking – B) created by DPM marking technologies such as dot peen. Due to the marking technologies and characteristics of reading they each have varied ranges of X-Dimensions and different quality criteria recommended and may require different reading equipment.

73
GS1 DataMatrix – A is suggested for marking of small medical /surgical instruments. The Minimum X-Dimension of 0.100mm is based upon the specific need for permanence in direct marking of small medical instruments which have limited marking area available on the instrument with a target useable area of 2.5mm x 2.5mm and a data content of GTIN (AI 01) plus Serial Number (AI 21).
The effective aperture for GS1 DataMatrix quality measurements should be taken at 80 percent of the minimum X-dimension allowed for the application. For Direct Part Marking - A this would equate to an aperture of 3; for Direct Park Marking – B this would equate to an aperture of 6 and for general healthcare label printing, an aperture of 8. See ISO/IEC 15415 and AIM DPM-1-2006.
GS1 New Zealand and GS1 Australia are equipped with verifiers for GS1 DataMatrix bar codes. Tests should be requested in the usual way.
Advice for Selecting the Symbology
Any use of GS1 DataMatrix should comply with GS1 System global application guidelines and be restricted to those applications defined by the GS1 System for GS1 DataMatrix. GS1 DataMatrix will not replace other GS1 System Symbologies. Existing applications that are satisfactorily utilising EAN/UPC Symbols, ITF-14 Symbols, GS1-128 Symbols, GS1 DataBar Symbols, or Composite Symbols should continue to use them.
When using GS1 DataMatrix Symbols to encode the Global Trade Item Number (GTIN), any required additional data should be included within the same symbol.
Note: Scanning systems that need to read GS1 DataMatrix Symbols must be 2D imaging scanners and be appropriately programmed to read the GS1 System version of Data Matrix or ECC 200.
Human Readable Interpretation of GS1 DataMatrix Symbols
The Human Readable Interpretation of the primary Application Identifier (AI) Element String encoded in the GS1 DataMatrix Symbol should be shown with the symbol. How the human readable data will be shown shall be determined by the specific application guidelines. Typical conventions, as used for GS1 DataBar and Composite Component Symbols, place the key information, such as the Global Trade Item Number (GTIN), in the human readable data underneath the bar code, while secondary information is placed above. The characters should be clearly legible (such as OCR-B) and must be obviously associated with the symbol.
AIs should be clearly recognisable to facilitate key entry. This is achieved by putting the AI between parentheses in the Human Readable Interpretation.
Note: The parentheses are not part of the data and are not encoded in the bar code, following the same principles that apply to GS1-128 Symbols and GS1 DataBar Expanded Symbols.
For GS1 DataMatrix Symbols encoding large amounts of data, it may not be practical to display all the data in Human Readable Interpretation form. Even if there is space to show it in this form, it may not be practical to key enter that much data. In these instances, some of the data may be omitted from the Human Readable Interpretation. However, primary identification data (GS1 System keys), such as the GTIN, must always be shown. Application specifications may provide additional guidance on Human Readable Interpretation.

This booklet only provides a summary of the GS1 specifications for the bar coding of goods that are handled in open trade. If the application of any of this advice is unclear, please contact the staff at GS1 New Zealand for clarification.
The complete GS1 specifications are available free of charge to members via the GS1 New Zealand website at www.gs1nz.org.
Further information and advice are also available from the bar code manager at each relevant retailer and wholesaler, as well as from the staff of GS1 New Zealand. Initial calls to GS1 New Zealand should be made via the membership services helpdesk on 0800 10 23 56 or e-mail [email protected].
Disclaimer The objective of this document is to provide GS1 New Zealand members with user-friendly and simple bar coding best practice guidelines. The document is not exhaustive and does not replace the GS1 Specifications which remain the standard reference document.Whilst every effort has been made to ensure that the contents of this document are correct, GS1 New Zealand, and any other party involved in the creation of the document hereby state that the document is provided without warranty, either expressed or implied, of accuracy or fitness for purpose, and hereby disclaim any liability, direct or indirect, for damages or loss relating to the use of the document. The document may be modified from time to time, subject to developments in technology, changes to the standards, or new legal requirements.

Level 2
The Woolstore Design Centre
262 Thorndon Quay
PO Box 11 110
Wellington
New Zealand
Ph: 04 494 1050
Fax: 04 494 1051
Email: [email protected]
www.gs1nz.org9 421000 005481