baseball pitching grips
TRANSCRIPT

I. Introduction
Welcome and Introduction 1
About the Authors 2
Myth of Pitching Grips Explained 3
Pitching Philosophy 4
The Four-Seam Fastball 5-7
The Two-Seam Fastball 8-10
The Cut-Fastball 11-13
The Curveball 14-16
The Slider 17-19
The Circle Change-Up 20-22
The Split-Finger Fastball 23-25
Final Thoughts 26
Stance Mistakes Table of Contents
II. Baseball Pitching Grips
Congratulations on receiving your copy of Baseball Pitching Grips
101 I’m happy to tell you that you’ve found the right resource for
improving your knowledge and understanding baseball pitching
grips. In this illustrated pitching guide you will find a step by step
process of pitching grips broken down into an easy-to-follow guide.
You will find pictures, strategies, drills, and helpful tips that will
give you all you need while you develop your own repertoire of
pitches to use effectively.
The philosophy, fundamentals, and pitching grips within these pages
have been used to successfully instruct countless athletes. The
information accumulated has been learned and practiced at all levels
of baseball and countless hours of practice, research, and develop-
ment. Pitching a baseball and developing proper pitching grips and
arm motions is one of the toughest athletic activities to master as a
baseball player. We fully understand that it is equally challenging to
coach pitching grips and usages. As you continue to work through
this guide, we at The Pitching Academy welcome your
communication of thoughts, successes, and questions. Come and
visit often and join us in our mission to improve the baseball com-
munity in America.
Let’s learn some pitching grips!
Welcome and Intro Welcome and Introduction 1
Dan Gazaway is the owner and founder of The Pitching Academy and Your Sport
Guru. Based out of Utah County, Dan is one of the foremost pitching instructors
and teachers in the region. His Pitching Mechanics DVD and other training
information has become very popular online and utilized by countless athletes
across the nation. Coach Gazaway has instructed over 1,000 pitchers in the last
seven years; is certified as a professional pitching instructor. Dan is fully dedicated
to helping athletes excel as leaders on and off the field.
Dan’s contribution to this manual is his extensive knowledge, research, and instruc-
tion on pitching grips and pitching theory.
Welcome and Intro About the Authors 2
Dan Gazaway
Nate Barnett
Nate Barnett is owner of BMI Baseball, The Pitching Academy, and Your Sport
Guru. Nate teaches hitting, pitching, and the mental side of baseball to youth
athletes throughout the Puget Sound, Washington. Nate writes baseball training
articles for many websites and continues to publish work on the fundamentals of
baseball. Nate graduated from college at George Fox University as All-American
and GFU Hall of Fame honors. He finished his career in the minor leagues as a
first baseman in the Seattle Mariners organization.
Nate’s contribution to this ebook is from both a pitcher and hitter’s perspective.
Playing both pitcher and first base throughout college, Nate adds a unique
perspective on what hitters think and feel about hitting different baseball pitches.
You will find these comments through the ebook.
The Myth of Pitching Grips
Explained
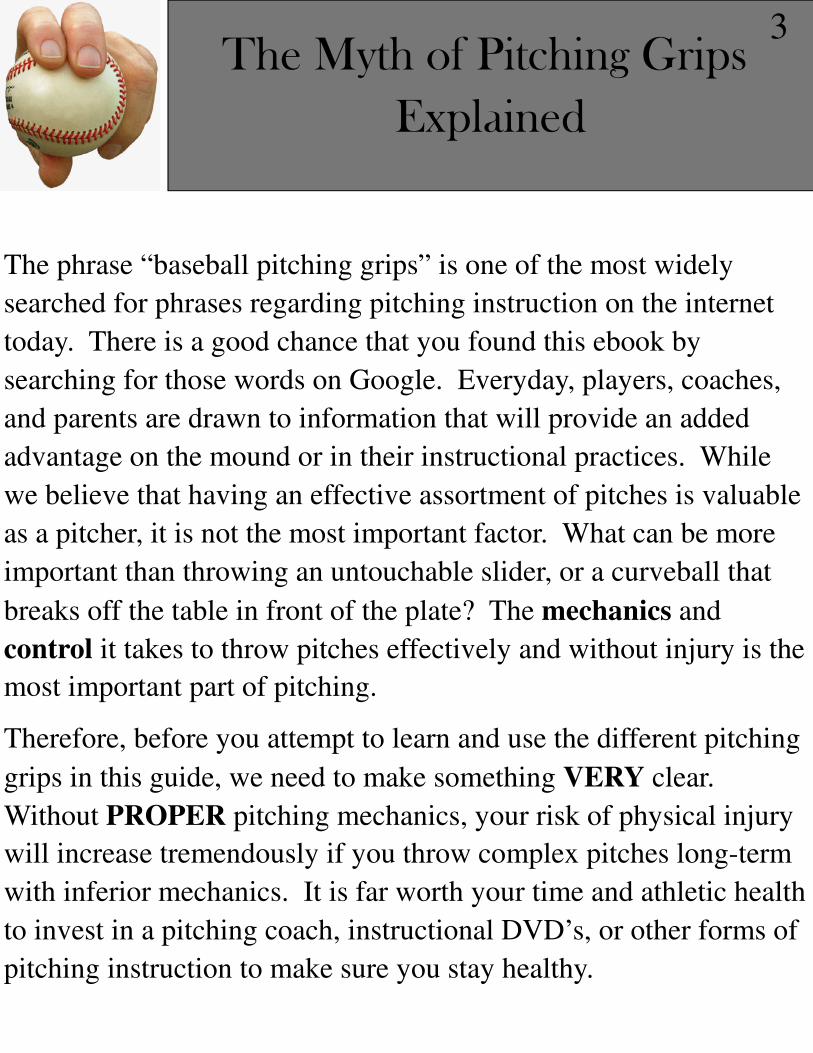
The phrase “baseball pitching grips” is one of the most widely
searched for phrases regarding pitching instruction on the internet
today. There is a good chance that you found this ebook by
searching for those words on Google. Everyday, players, coaches,
and parents are drawn to information that will provide an added
advantage on the mound or in their instructional practices. While
we believe that having an effective assortment of pitches is valuable
as a pitcher, it is not the most important factor. What can be more
important than throwing an untouchable slider, or a curveball that
breaks off the table in front of the plate? The mechanics and
control it takes to throw pitches effectively and without injury is the
most important part of pitching.
Therefore, before you attempt to learn and use the different pitching
grips in this guide, we need to make something VERY clear.
Without PROPER pitching mechanics, your risk of physical injury
will increase tremendously if you throw complex pitches long-term
with inferior mechanics. It is far worth your time and athletic health
to invest in a pitching coach, instructional DVD’s, or other forms of
pitching instruction to make sure you stay healthy.
3
If you have made it this far without jumping ahead to the pitching
grips themselves, you’ve made a wise decision. Having a personal
pitching philosophy will help you better approach learning the
pitching grips on the following pages. Let us share our pitching
philosophy with you.
There are pitchers and throwers in the world of baseball. Pitchers
are those athletes who choose to work hard daily in learning new
physical, mental, and emotional strategies that will propel them to
the next level. Throwers do the opposite. These “athletes” get on
the mound in the spring without having properly conditioned their
body in the offseason. Nor do they care, since they have always
done it this way and had some success “last year”. Unfortunately,
dark days are ahead for this type of athlete as the competition will
soon punish the lack of work ethic and force change.
In order to be a good pitcher, you will need three pitches you can
throw for a strike near 60% of the time. It is far, far more valuable
for you to develop two to three really good pitches, than five to six
pitches that you don’t have much control over. Because hitting is a
matter of timing, it's your job to throw off that timing. When you
are successful at doing that, you will become a great pitcher.
Pitching Philosophy 4
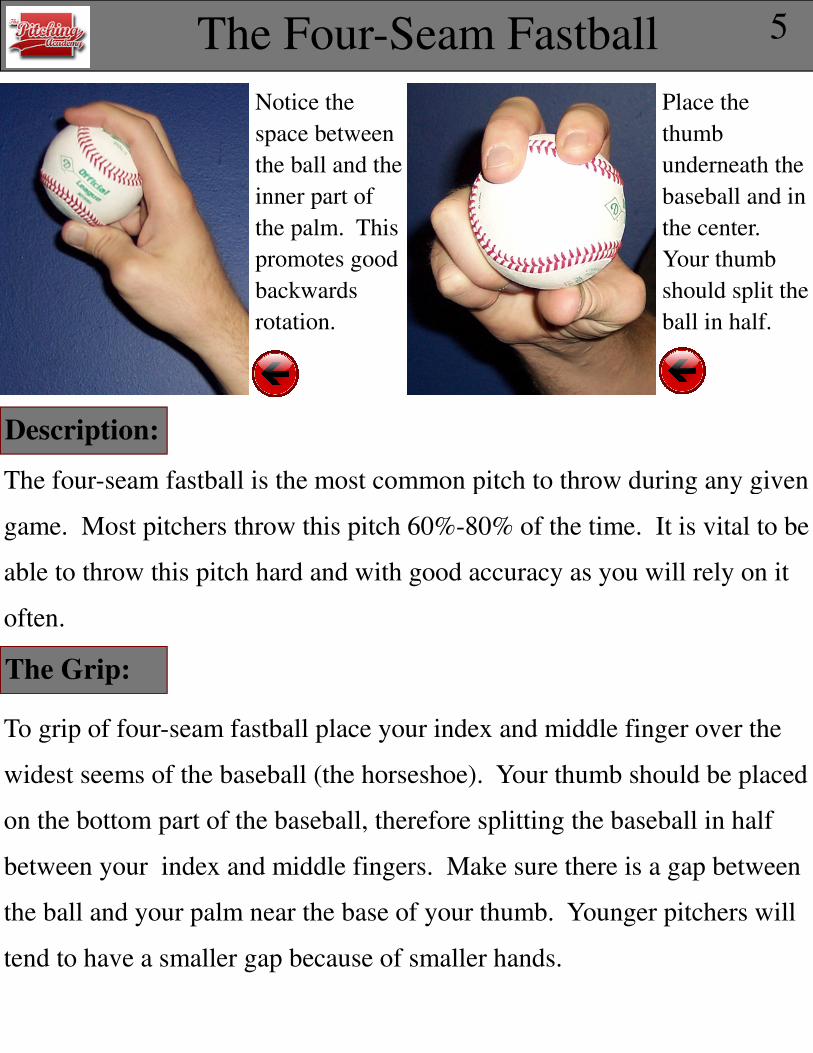
The four-seam fastball is the most common pitch to throw during any given
game. Most pitchers throw this pitch 60%-80% of the time. It is vital to be
able to throw this pitch hard and with good accuracy as you will rely on it
often.
To grip of four-seam fastball place your index and middle finger over the
widest seems of the baseball (the horseshoe). Your thumb should be placed
on the bottom part of the baseball, therefore splitting the baseball in half
between your index and middle fingers. Make sure there is a gap between
the ball and your palm near the base of your thumb. Younger pitchers will
tend to have a smaller gap because of smaller hands.
The Four-Seam Fastball 5
Description:
The Grip:
Notice the
space between
the ball and the
inner part of
the palm. This
promotes good
backwards
rotation.
Place the
thumb
underneath the
baseball and in
the center.
Your thumb
should split the
ball in half.
This pitch is designed to be thrown with maximum velocity and backspin
rotation. A loose wrist will allow this pitch to be released from your
fingers with severe backspin and with a 12 o’clock 6 o’clock rotation. This
pitch is designed to be straight and hard. In order to make sure this
happens, finish with your finger tips moving towards the catcher as long as
possible to insure maximum extension.
The Four-Seam Fastball cont. 6
Timing:
Release:
This pitch is most often used early in the count to get ahead of hitters. It is
also used to set up off speed pitches often making them more effective. It
should be said that throwing a good fastball in a count that typically favors
an off speed pitch is a good weapon from time to time. Be careful
throwing this pitch with the same velocity too many times in a row.
Because of its straight trajectory, the four-seam fastball is a pitch that can
be timed relatively easily by many hitters.
The Four-Seam Fastball cont. 7
The Hitter’s Perspective - Nate Barnett
“From a hitter’s stand point, the four-seam fastball was the pitch I was
looking for the most. Because I was an aggressive hitter I would look for
this pitch early in the count in the location I wanted. If the location was
right, I wouldn’t wait to hit the pitcher’s off speed stuff later in the count as
he wanted.
The only trouble a four-seam fastball gave me was when a pitcher was
smart enough to learn to throw it in counts that he knew I was expecting
something off speed. Especially during the 0-1,1-2 counts. It was during
these counts that I was the most vulnerable to a four-seam fastball because
I wasn’t necessarily expecting it. But the pitcher still had to be careful
because while I wasn’t necessarily expecting the fastball, that didn’t mean
for one minute that I would miss the pitch if he made a mistake with it.
Good hitters love to hit this pitch when they expect it. But, if you learn
hitters’ habits during the game, you can predict what they are looking for
and throw the opposite. You’ll win a lot of games if you can get inside the
head of your opposing hitters.”
The two-seam fastball is the sister of the four-seam fastball. Any pitcher
should mix this pitch with his four-seam as the hitter will see different
movement from both pitches. This pitch is a “movement” pitch.
Your index and middle finger cradle the two sides of the seams. The grip is
slightly tighter and deeper in the throwing hand than the four seam.
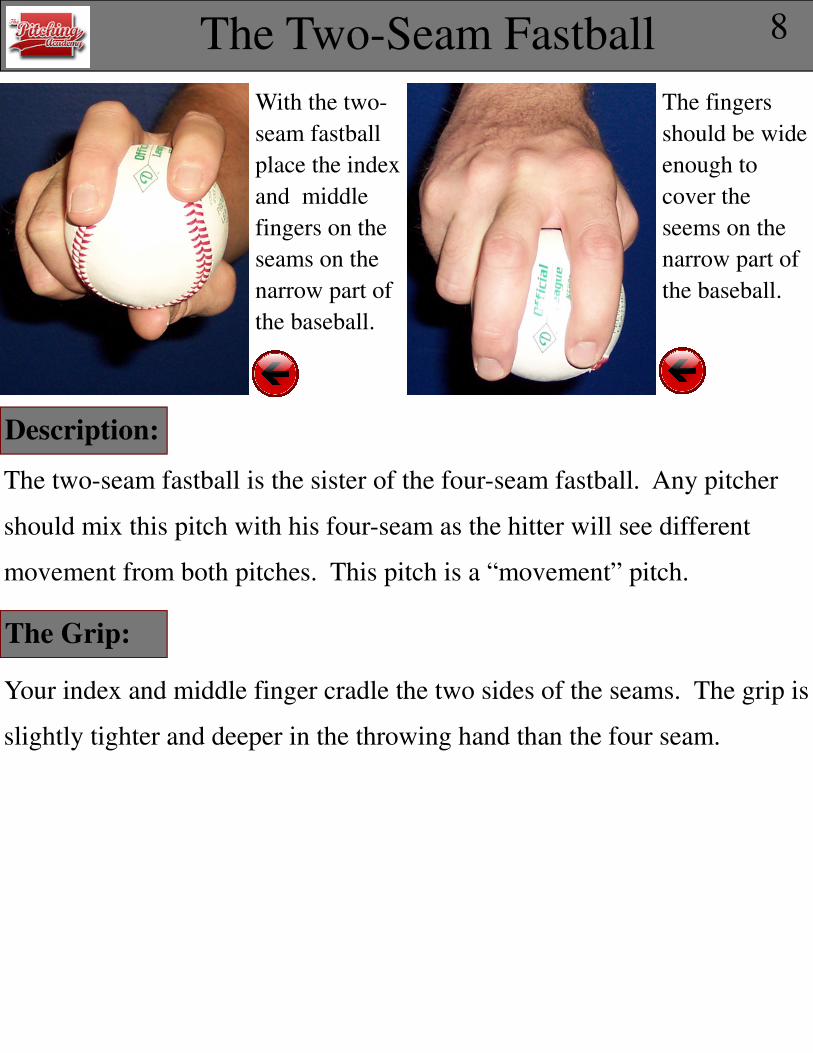
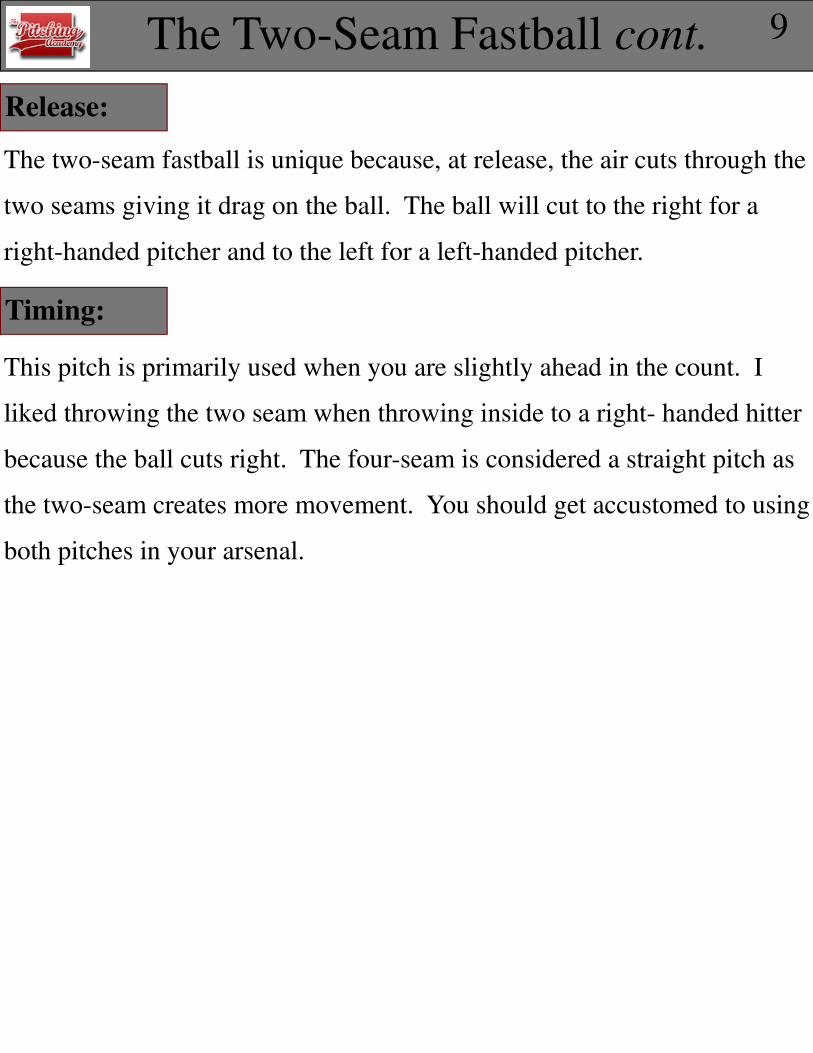
The Two-Seam Fastball 8
Description:
The Grip:
With the two-
seam fastball
place the index
and middle
fingers on the
seams on the
narrow part of
the baseball.
The fingers
should be wide
enough to
cover the
seems on the
narrow part of
the baseball.
The two-seam fastball is unique because, at release, the air cuts through the
two seams giving it drag on the ball. The ball will cut to the right for a
right-handed pitcher and to the left for a left-handed pitcher.
The Two-Seam Fastball cont. 9
Timing:
Release:
This pitch is primarily used when you are slightly ahead in the count. I
liked throwing the two seam when throwing inside to a right- handed hitter
because the ball cuts right. The four-seam is considered a straight pitch as
the two-seam creates more movement. You should get accustomed to using
both pitches in your arsenal.
The Two-Seam Fastball cont. 10
The Hitter’s Perspective - Nate Barnett
“As mentioned in the previous section on the four-seam fastball, I loved to
hit straight and hard pitches, as do most hitters. This is why a two-seamer
was a bit troublesome when I saw it. The good news for me was that most
pitchers chose the easy road and neglected to really learn how to throw a
two-seam fastball and use it to their advantage. I think that the best way to
fool good hitters is to have a couple different pitches that are initially
perceived as the same from a hitter’s point of view. A two-seam fastball
does just that. It comes out hard and straight, but the extra movement can
be enough to keep the pitch off of the sweet part of the bat.
Pitchers who can develop this pitch now have an extra bullet in their gun so
-to-speak. More options, mean more questions in a hitter’s mind. Once a
pitcher goes through the lineup once, good hitter’s will begin to pick up
patterns in pitches. At this point it’s apparent to all those paying attention
which pitch a pitcher has working and which he does not. The good thing
about the two-seam fastball, from a pitchers perspective, is that it is not too
far different from a four-seam fastball grip.”
The cut-fastball acts as two pitches in one – slider and fastball – The cut-
fastball has a fastball rotation, but around 55 feet it cuts. For a right
handed pitcher it cuts into a left handed batter. Just opposite for a left
handed pitcher.
The grip on the cut-fastball is similar to that of a regular four-seam fastball.
Grip it like you do a four-seamer but instead bring your thumb up the
inside of the ball. The cutter is like throwing an off-center fastball. The
index and middle fingers are close together. Like any other pitch, don't
grip it too tight. Experiment with different amounts of pressure on the ball
to get a feel of what is going to work best for you.
The Cut-Fastball 11
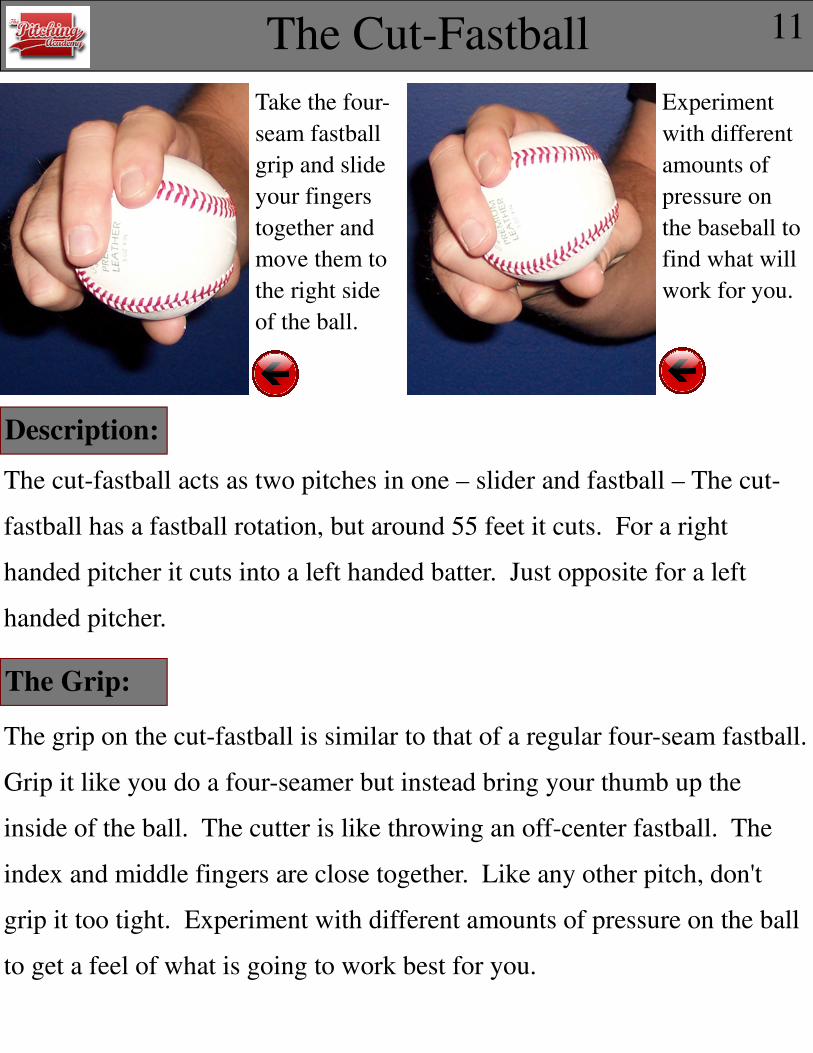
Description:
The Grip:
Take the four-
seam fastball
grip and slide
your fingers
together and
move them to
the right side
of the ball.
Experiment
with different
amounts of
pressure on
the baseball to
find what will
work for you.
This pitch is designed to throw just like your regular four-seam fastball,
only slightly off center. Pull this pitch out of your glove the exact same
way you would your fastball and give it a ride.
The Cut-Fastball cont. 12
Timing:
Release:
The purpose of throwing a cut fastball is to make the hitter hit the ball
without connecting with the fat part of the bat on the baseball. The hitter
will see a fastball and will not expect the ball to move. This is a good 3rd
or 4th pitch and doesn’t have to be used much, but used strategically. If it
is a pitch that you can get to work, but doesn’t become a dominant pitch for
you, throw it to hitters who have figured out the timing of your regular fast-
ball. The movement will be just enough to reduce their confidence and
throw off their timing.
The Cut-Fastball cont. 13
The Hitter’s Perspective - Nate Barnett
“The cut fastball is sneaky. Most of the time right-handed pitchers would
throw this pitch off the outside corner and let it slide back over the outside
corner to me (a lefty). It was really a pitch I didn’t see coming many times
because it typically breaks less than a slider; it looks just like a regular fast-
ball. Most of the time I would not recognize a great cutter until after I
swung and made contact. It would puzzle me because I wouldn’t make as
solid of contact as I thought I should. Good cutters simply sabotage a hit-
ter’s confidence because it prevents solid contact if thrown correctly.
For a good example of how a cutter can mess with hitters, take a look at
some footage of Mariano Rivera throwing a cutter if you can get your
hands on it. Otherwise watch closely on television if you get the chance
during the season. What you will see is that hitters will take a solid swing
at what they think is a straight fastball, only to have the contact be less than
solid.”
The curveball is a staple pitch for any good pitcher. It is one of the most
common off speed pitches thrown and is relied upon 20-25% of the time in
an any given outing. It is quite important to be able to create the right
rotation with this pitch and maintain consistent control. Hanging or loopy
curveballs can get hit a long way by good hitters.
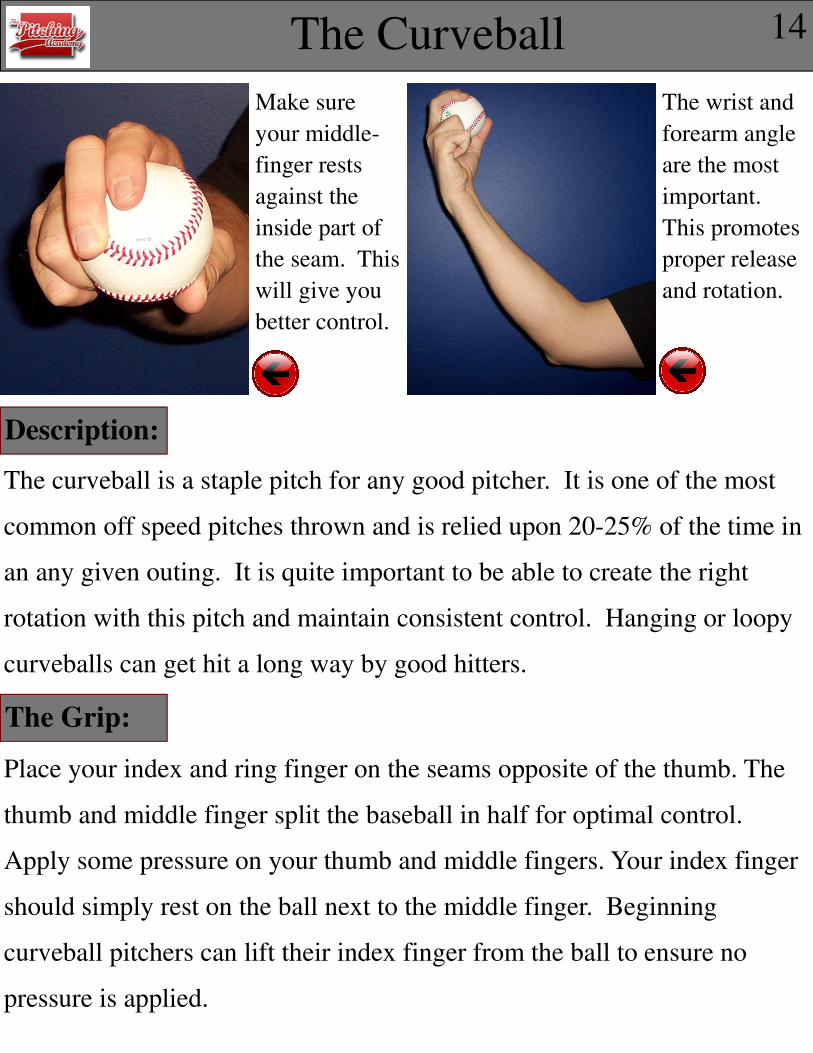
Place your index and ring finger on the seams opposite of the thumb. The
thumb and middle finger split the baseball in half for optimal control.
Apply some pressure on your thumb and middle fingers. Your index finger
should simply rest on the ball next to the middle finger. Beginning
curveball pitchers can lift their index finger from the ball to ensure no
pressure is applied.
The Curveball 14
Description:
The Grip:
Make sure
your middle-
finger rests
against the
inside part of
the seam. This
will give you
better control.
The wrist and
forearm angle
are the most
important.
This promotes
proper release
and rotation.

The curveball is thrown with the same arm speed and arm angle as your
fastball. Wrist and forearm angle is the most important factor when
learning proper rotation and release of the curveball. Make sure when you
take the ball out of the glove that your palm is facing you. While a 12 to 6
o’clock break on a curveball is best, it is very rare. Since most pitchers
throw with a three-quarter arm slot it is not reasonable to expect a 12 to 6
o’clock rotation. A 1 to 7 break is more realistic for a right-handed pitcher;
11 to 5 o’clock break for a lefty.
The Curveball cont. 15
Timing:
Release:
Pitchers who play in youth leagues (below high school) will benefit greatly
by throwing a curveball on an 0-0 count if it can be thrown consistently for
a strike. When competing in high school or higher, a good time to throw a
curveball is on a 1-2 count. It is important that pitchers understand that
you only need to throw a curveball 20-25% of the time to be effective.
Unfortunately, many youth pitchers have early success with this pitch and
use it much too often.
The Curveball cont. 16
The Hitter’s Perspective - Nate Barnett
“Being a fastball hitter, it was my goal to never get buried in a count where
I would be susceptible to a pitcher’s curveball. Many pitchers worked hard
on this pitch, and good ones were tough to hit.
One of the best strategies used against me were when pitchers chose to
throw me backwards. What I mean is that I would sometimes (with good
pitchers) see curveballs during 1-0 and 2-0 counts. This did two things to
throw off my approach:
1. Because the pitcher had confidence in his curveball, no longer were
reliable fastball counts 2-0, 3-1, times when I could fully expect to see a
nice fat fastball. Even if I didn’t see a curveball on those counts, the
thought had crossed my mind a curveball may be coming, and
sometimes that was all it took for me to keep from “pulling the trigger”
when I normally would.
2. If any doubt entered my mind about my ability to hit the pitcher hard, it
would negatively effect my decision making. If I knew a pitcher had a
good curveball, it made his fastball that much better. I say this because
an average fastball could sneak up on me if I wasn’t looking for it.”
It is said that the slider is the hardest pitch on the throwing arm. This is
true! The reason is that when you apply force and rotation on the ball at
the same time, your arm can truly feel the effects. The key is to limit the
number of sliders you throw per game. Rely on the slider only a maximum
of 20% of the time.
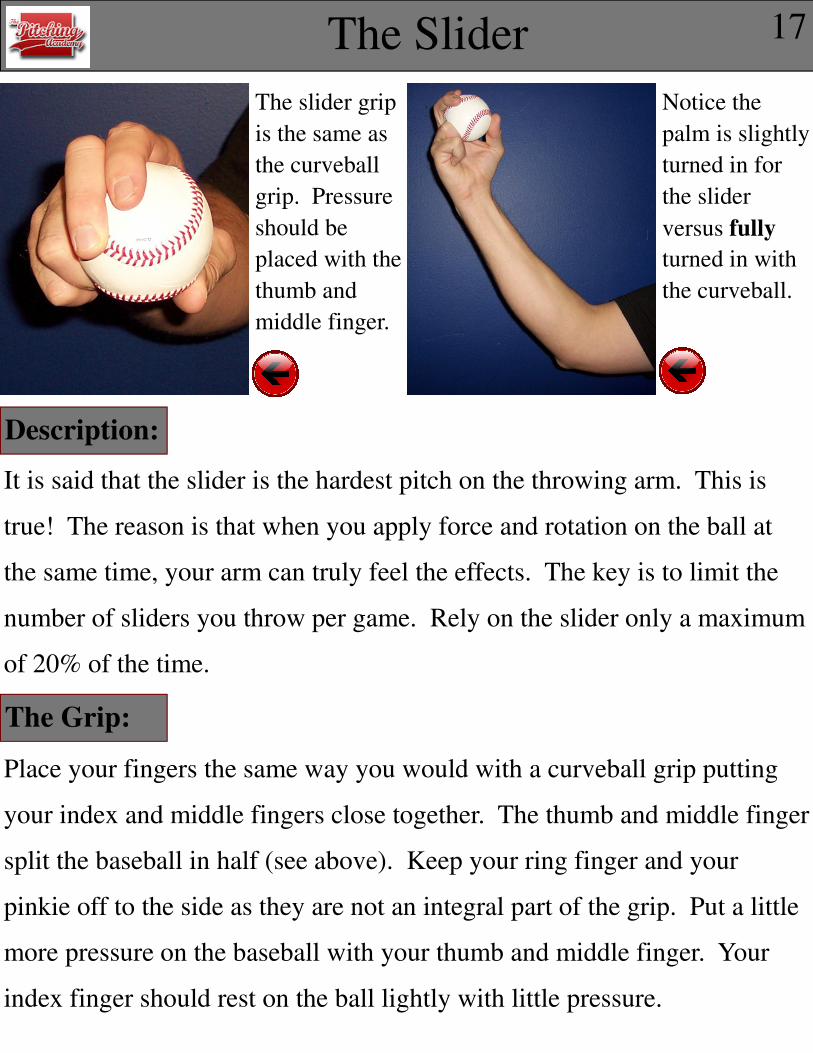
Place your fingers the same way you would with a curveball grip putting
your index and middle fingers close together. The thumb and middle finger
split the baseball in half (see above). Keep your ring finger and your
pinkie off to the side as they are not an integral part of the grip. Put a little
more pressure on the baseball with your thumb and middle finger. Your
index finger should rest on the ball lightly with little pressure.
The Slider 17
Description:
The Grip:
The slider grip
is the same as
the curveball
grip. Pressure
should be
placed with the
thumb and
middle finger.
Notice the
palm is slightly
turned in for
the slider
versus fully
turned in with
the curveball.
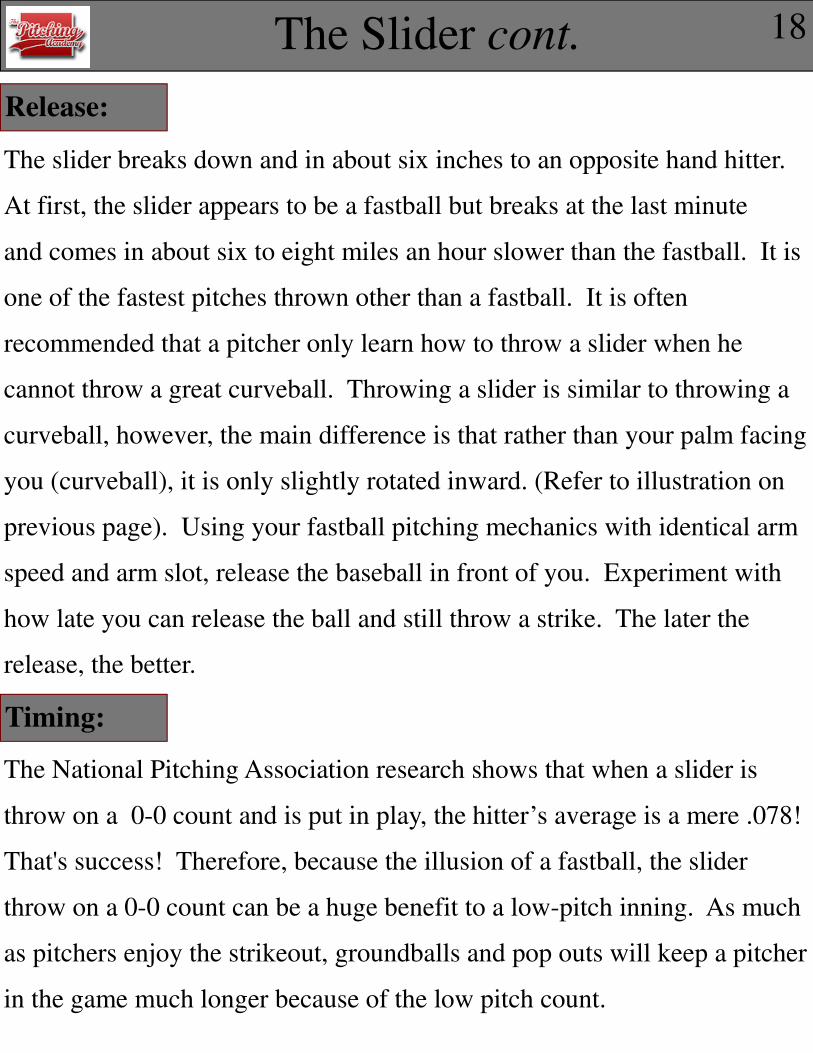
The slider breaks down and in about six inches to an opposite hand hitter.
At first, the slider appears to be a fastball but breaks at the last minute
and comes in about six to eight miles an hour slower than the fastball. It is
one of the fastest pitches thrown other than a fastball. It is often
recommended that a pitcher only learn how to throw a slider when he
cannot throw a great curveball. Throwing a slider is similar to throwing a
curveball, however, the main difference is that rather than your palm facing
you (curveball), it is only slightly rotated inward. (Refer to illustration on
previous page). Using your fastball pitching mechanics with identical arm
speed and arm slot, release the baseball in front of you. Experiment with
how late you can release the ball and still throw a strike. The later the
release, the better.
The National Pitching Association research shows that when a slider is
throw on a 0-0 count and is put in play, the hitter’s average is a mere .078!
That's success! Therefore, because the illusion of a fastball, the slider
throw on a 0-0 count can be a huge benefit to a low-pitch inning. As much
as pitchers enjoy the strikeout, groundballs and pop outs will keep a pitcher
in the game much longer because of the low pitch count.
The Slider cont. 18
Timing:
Release:
The Slider cont. 19
The Hitter’s Perspective - Nate Barnett
“A good slider was by far the most difficult pitch for me to handle as a
hitter. The reason for this is because it’s thrown hard and resembles a
fastball initially (if thrown well). Of course late in the delivery, this pitch
would take off and break hard; it was sometimes nearly impossible to read
consistently.
I remember a time when I got the chance to face Francisco Rodriguez (now
a premier closer in the Bigs) when he was in the minor leagues. It was his
rookie season and he was throwing his slider around 87 mph. As a lefty I
was fortunate to never see his slider when I faced him. I guess I was lucky
and got to see his 101 mph fastball instead. It was the lesser of two evils
for sure! What I do remember is that the righties who faced him had a
terrible time picking up the late break of his slider and looked foolish as on
many pitches.
I was fortunate to face fewer great slider pitchers as compared to great
curveball pitchers. And if given the choice I’d take a good curveball
pitcher any day to hit off of.
The Circle Change has a screwball type movement and it breaks down and
away. It appears to look like a fastball and, when it is thrown correctly, can
be very deceiving to the batter. Throwing the pitch correctly means you
pronate your wrist and forearm slightly inwards. Your arm slot is the same
as your fastball pitching mechanics. Arm speed is the exactly the same as
your fastball.
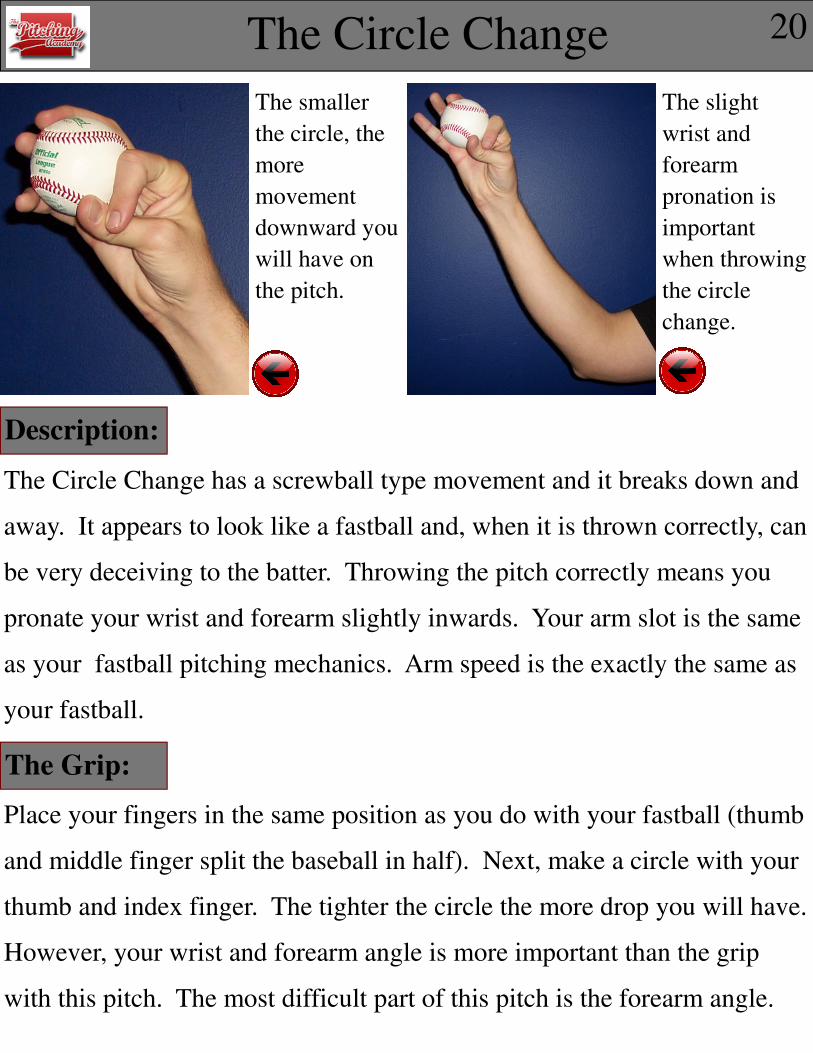
Place your fingers in the same position as you do with your fastball (thumb
and middle finger split the baseball in half). Next, make a circle with your
thumb and index finger. The tighter the circle the more drop you will have.
However, your wrist and forearm angle is more important than the grip
with this pitch. The most difficult part of this pitch is the forearm angle.
The Circle Change 20
Description:
The Grip:
The smaller
the circle, the
more
movement
downward you
will have on
the pitch.
The slight
wrist and
forearm
pronation is
important
when throwing
the circle
change.

You will not find success with this pitch unless you throw the circle (or
okay sign) toward home plate; that is what truly slows the pitch down.
Keep your arm speed the same so that the pitch will be deceivingly slow to
the hitter. Arguably the most challenging pitch to learn is the circle change
because of how the pitch is released. While the pitch can be tricky to learn,
do not alter your body movement or motion in any way while attempting to
throw it. Instead, work hard on the wrist and forearm angle.
The Circle Change cont. 21
Timing:
Release:
Throw the circle change early in the count and try to get a ground ball out
of it. Remember, it is best to throw fewer pitches in an inning than to try
for strikeouts. The best change-up counts are the same as the split-finger
fastball counts 3-1, 2-1, and 2-0. Also, whenever a fastball is in order a
changeup can be thrown in its place. Becoming a successful pitcher simply
means you mess with and throw off a hitter’s timing. When you are
successful at doing that you will get any hitter out. The circle change-up is
perfect for that when it is implemented correctly.

The Circle Change cont. 22
The Hitter’s Perspective - Nate Barnett
“Besides the slider, a good change-up is terribly frustrating for most hitters.
Because of its resemblance to a fastball initially, it can be particularly
deceiving in fastball counts. I’m not sure why I don’t see more good
change-ups in youth baseball today, but it’s a very much underutilized
pitch.
Hitters hate facing pitchers who change speeds well, it’s tough to get good
timing on anything. For a great example of this, you have to look no
further than Jamie Moyer, who at age 45, helped his Phillies win a World
Series championship in 2008. His signature pitch throughout his entire
career has been his outstanding change-up. With a fastball that rarely ever
reached 85 mph, Moyer’s ability to keep hitters off balance has paid off big
time.
Circle change-ups with movement are deceiving and I would argue are
nearly unhittable if thrown in the right location and in the right count.
Being a pitcher also throughout my collegiate career, I relied on the change
-up a lot to keep hitters off balance. Early in my pitching career I was leery
of developing it because the thought of throwing a pitch slower to hitters
seemed backwards. Wow, was I mistaken as it became my best pitch!”
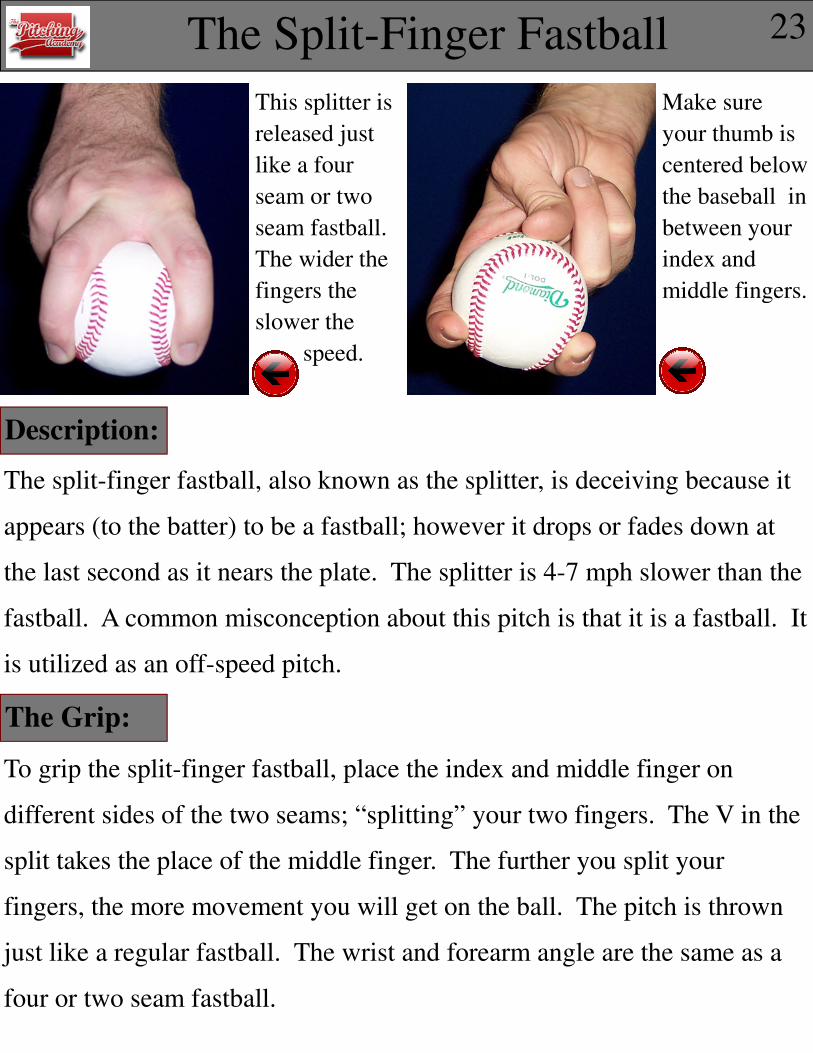
The split-finger fastball, also known as the splitter, is deceiving because it
appears (to the batter) to be a fastball; however it drops or fades down at
the last second as it nears the plate. The splitter is 4-7 mph slower than the
fastball. A common misconception about this pitch is that it is a fastball. It
is utilized as an off-speed pitch.
To grip the split-finger fastball, place the index and middle finger on
different sides of the two seams; “splitting” your two fingers. The V in the
split takes the place of the middle finger. The further you split your
fingers, the more movement you will get on the ball. The pitch is thrown
just like a regular fastball. The wrist and forearm angle are the same as a
four or two seam fastball.
The Split-Finger Fastball 23
Description:
The Grip:
This splitter is
released just
like a four
seam or two
seam fastball.
The wider the
fingers the
slower the
speed.
Make sure
your thumb is
centered below
the baseball in
between your
index and
middle fingers.

The toughest part about this pitch is the grip. When you release the
baseball, it can feel like it is slipping through your fingertips. This is a
normal feeling until you get used to the release. Because this is one of the
only pitches your thumb and middle finger don't split the baseball in half, it
is easy to twist the ball at release. You need to pretend that there is an
imaginary middle finger splitting the ball in half with your thumb. Pitchers
who tend to "twist" the ball at release are the ones who are prone to injury
with this pitch.
The Split-Finger Fastball cont. 24
Timing:
Release:
Once you have established your fastball (meaning the hitter has seen it)
you can throw your splitter. Anytime you have a fastball count, a splitter
can be thrown. Some of the best counts to throw the pitch are a 3-1, 2-1, or
a 2-0 count.
The Split-Finger Fastball cont. 25
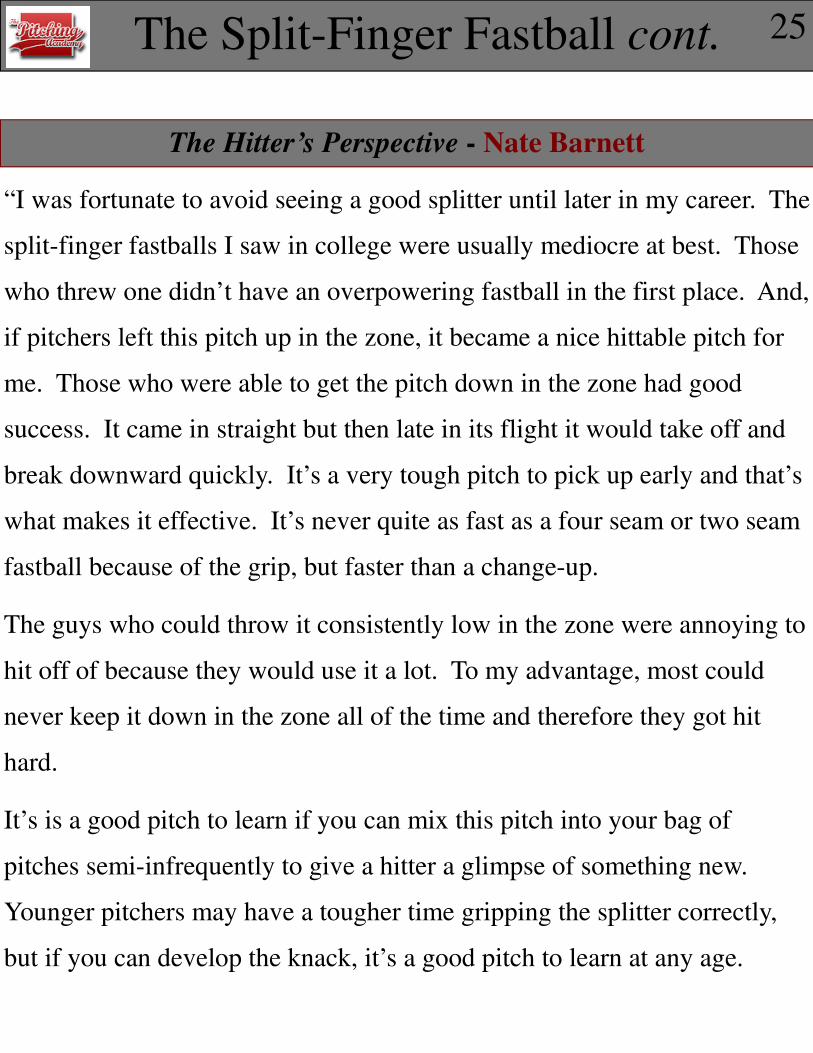
The Hitter’s Perspective - Nate Barnett
“I was fortunate to avoid seeing a good splitter until later in my career. The
split-finger fastballs I saw in college were usually mediocre at best. Those
who threw one didn’t have an overpowering fastball in the first place. And,
if pitchers left this pitch up in the zone, it became a nice hittable pitch for
me. Those who were able to get the pitch down in the zone had good
success. It came in straight but then late in its flight it would take off and
break downward quickly. It’s a very tough pitch to pick up early and that’s
what makes it effective. It’s never quite as fast as a four seam or two seam
fastball because of the grip, but faster than a change-up.
The guys who could throw it consistently low in the zone were annoying to
hit off of because they would use it a lot. To my advantage, most could
never keep it down in the zone all of the time and therefore they got hit
hard.
It’s is a good pitch to learn if you can mix this pitch into your bag of
pitches semi-infrequently to give a hitter a glimpse of something new.
Younger pitchers may have a tougher time gripping the splitter correctly,
but if you can develop the knack, it’s a good pitch to learn at any age.
Final Thoughts
You now have a road map for developing some useful and highly effective
pitching grips! Remember, consistent practice is the key. And because I
don’t want you to feel like you are on your own, you will be included in
our emails that will provide you with additional helpful tips as you develop
these important pitching grips.
26
2008, The Pitching Academy, Inc.
This book is copyrighted. No commercial usage or
changes. Duplication is prohibited.