basic excel training module
TRANSCRIPT

BASIC EXCEL TRAININGBusiness Quality Development

Objective
To provide the participants with a working understanding of the basic features of MS Excelthe basic features of MS Excel
BASIC EXCEL TRAININGAnna Torrijos

B i EXCEL® T iBasic EXCEL® Topics
Introduction to Excel AutoFill Introduction to Excel
Working with Rows ands Columns
AutoFill Using Formula & Fu tioColumns
Formatting CellsFunctions
Absolute Cell Conditional Formatting Addressing
Simple Charts Simple Charts Shortcuts
BASIC EXCEL TRAININGAnna Torrijos

Introduction to Excel
BASIC EXCEL TRAININGAnna Torrijos

Viewing the Excel Window and Task Panes
When you start Excel, the Excel program window opens with a blank y p g pworkbook-ready for you to begin working. This view includes features such as: Menu Bar, Status Bar, Toolbars, Formula Bar, Cell Addresses,
k h b d h l llMouse Pointer, Worksheet Tab, and the Select All Button
BASIC EXCEL TRAININGAnna Torrijos

The Excel WindowMenu BarMenu Bar
Name BoxTool Bars
Formula Bar
Columns
RowsRows
Cells
Worksheet Tab
BASIC EXCEL TRAININGAnna Torrijos
Status Bar

Working with Rows and Columns
BASIC EXCEL TRAININGAnna Torrijos

Adjust Column Width & Adjust Column Width & Row Height
Click the column or row header button for the first column or the row you want to adjustyou want to adjust
If you want, drag to select more columns or rows
Right click the selected column(s) or ro (s) and then click Column Right-click the selected column(s) or row(s), and then click Column Width or Row Height
Type a new column width or row height in points Type a new column width or row height in points
Click OK
BASIC EXCEL TRAININGAnna Torrijos

Adjust Column Width & Adjust Column Width & Row Height Using Mouse
Position the mouse pointer on the right edge of the column header button or the bottom edge of the row header button for the column or button or the bottom edge of the row header button for the column or row you want to change.
When the mouse pointer changes to a double-headed arrow, click and p g ,drag the pointer to a new width or height.
BASIC EXCEL TRAININGAnna Torrijos

Deleting Columns or Rows
Select the column header(s) or row header(s) button that you want to deletedelete.
Click the Edit menu, and then click delete.
For shortcuts just highlight the ro (s) or the column(s) that ou ant For shortcuts, just highlight the row(s) or the column(s) that you want to delete, Right-click and then click Delete
BASIC EXCEL TRAININGAnna Torrijos

Inserting Columns or Rows
Click to the right of the location of the new column you want to insert
To insert a row click the row immediately below the location of the To insert a row, click the row immediately below the location of the row you want to insert
Click the Insert Menu and then click Columns or RowsClick the Insert Menu, and then click Columns or Rows.
For shortcuts, just highlight location of the row(s) or the column(s) that you want to insert, Right-click and then click Inserty , g
BASIC EXCEL TRAININGAnna Torrijos

Rows & Columns
Adjust column width & row height Using a value Using a value Using the mouse
Delete columns or rows Delete columns or rows Using the edit menu Using the mouse Using the mouse
Insert columns or rows U i th i t Using the insert menu Using the mouse
BASIC EXCEL TRAININGAnna Torrijos

Formatting Cells
BASIC EXCEL TRAININGAnna Torrijos

Formatting Cells Applying formats Applying formats From the formatting toolbar Currency % date formats Currency, % , date formats Custom formats
Text Control Text Control Wrap text Shrink to fit Shrink to fit Merge cells
Borders and shading Borders and shading
BASIC EXCEL TRAININGAnna Torrijos
Applying Currency Formats Select a cell or range with the number(s) you want to
format. Click one of the buttons on the Formatting toolbar to apply
that attribute to the selected range:C St l Currency Style
Percent Style Comma Style Comma Style Increase / Decrease Decimal
(Note: You can apply multiple attributes to the range.)
BASIC EXCEL TRAININGAnna Torrijos

Applying Date Formats Select a cell or range that contains the date format you
want to change Click the Format menu, and then click cells. Click the Number tab. Click Date Click the Date or time format. Click OK
BASIC EXCEL TRAININGAnna Torrijos

Merge and Center Select a cell or range you want to change Click the Format menu, and then click cells Click the Alignment Tab Click to select one or more Text Control check boxes: Wrap Text moves the text to multiple lines within a cell Shrink to Fit reduces character size to fit within a cell
M C ll bi l d ll i i l ll Merge Cells combines selected cell into a single cell
BASIC EXCEL TRAININGAnna Torrijos

Borders and Shading Select a cell or range to which you want to apply borders
Click the Format Menu, and then click Cells
Cli k h B d T b Click the Border Tab
Select a Line style
Click the Color list arrow and then click a color for the borderClick the Color list arrow, and then click a color for the border
If you want a border on the outside of a cell or range, click Outline. If between cells, click Inside. If you want to remove border, click None.
To set a custom border, click a border button, or click the Preview Border box where you want o add the border.
Click OK Click OK.
BASIC EXCEL TRAININGAnna Torrijos

Conditional Formatting
BASIC EXCEL TRAININGAnna Torrijos

Setting up Conditional Formats• Select the cells you want to highlight.y g g• On the Format menu, click Conditional Formatting.• Do one of the following:
• To use values in the selected cells as the formatting To use values in the selected cells as the formatting criteria, click Cell Value Is.
• To use a formula as the formatting criteria (to evaluate data or a condition other than the values in selected cells), ata o a co t o ot e t a t e va ues se ecte ce s), click Formula Is
• Click Format.• Select the font style font color underlining borders shading or patterns Select the font style, font color, underlining, borders, shading, or patterns
you want to apply. Microsoft Excel applies the selected formats only if the cell value meets the condition or if the formula returns a value of TRUE.
• To add another condition, click Add, and then repeat steps 3 through 5. You , , p p gcan specify up to three conditions. If none of the specified conditions are true, the cells keep their existing formats.
BASIC EXCEL TRAININGAnna Torrijos
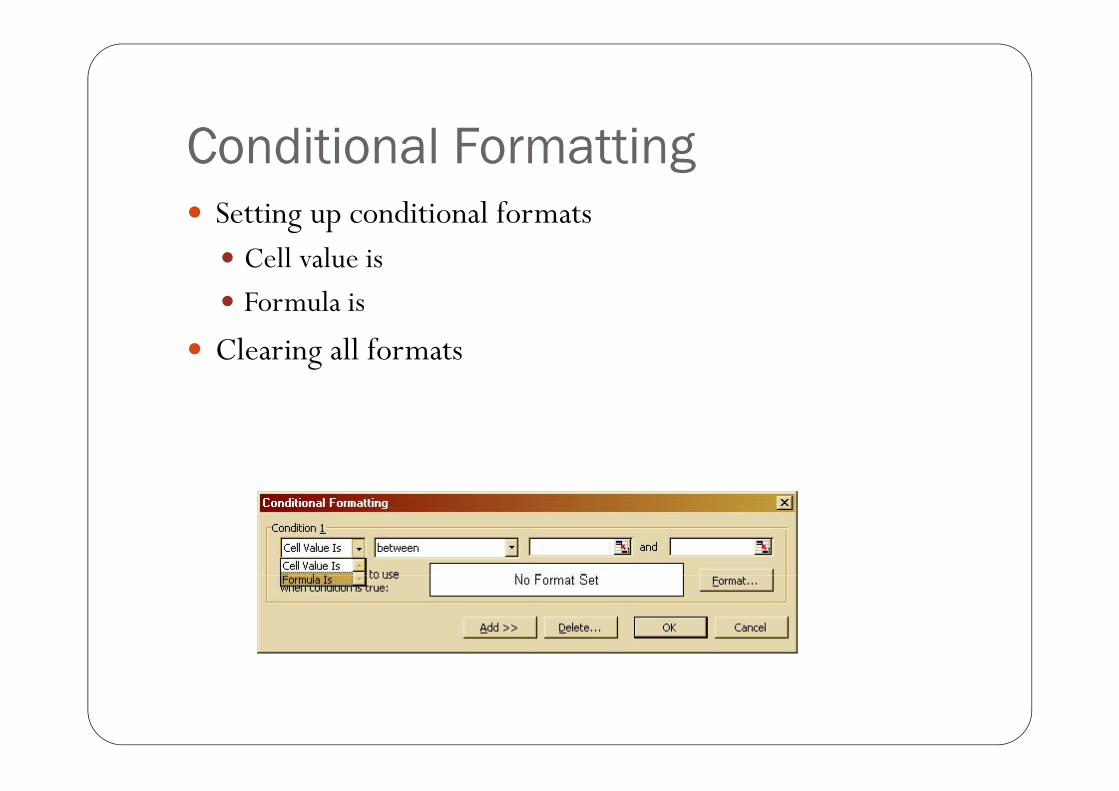
Conditional Formatting Setting up conditional formats Setting up conditional formats Cell value is Formula is Formula is
Clearing all formats
BASIC EXCEL TRAININGAnna Torrijos

Using Formula in Conditional Formats
• To use a formula as the formatting • To use a formula as the formatting criteria (to evaluate data or a condition other than the values in selected cells), click Formula Is
Tip: To remove all conditional formats as well as all other cell p:formats for selected cells, point to Clear on the Edit menu, and then click Formats.
BASIC EXCEL TRAININGAnna Torrijos

Auto Fill
BASIC EXCEL TRAININGAnna Torrijos

Using AutoFill Select the first cell in the range you want to fill Select the first cell in the range you want to fill
Enter the starting value to be repeated
P iti th i t th l i ht f th l t d Position the pointer on the lower-right corner of the selected cell. The pointer changes to the fill handle ( a black plus sign)
D h fill h dl h i hi h h Drag the fill handle over the range in which you want the value repeated
BASIC EXCEL TRAININGAnna Torrijos

Fast AutoFill Tips Suppose you have a column full of values in column A. For Suppose you have a column full of values in column A. For
instance, you have values in the cells A3 through A417. Now, suppose you want to fill adjacent cells in column B with sequential
l 1 th h 415 T thivalues, 1 through 415. Try this: In cell B3, place the value 1. In cell B4 place the value 2 In cell B4, place the value 2. Select the range B3:B4. Double-click on the AutoFill handle Double-click on the AutoFill handle. That's it! No dragging at all, and you now have cells B5:B417 filled
with sequential values !!!q
BASIC EXCEL TRAININGAnna Torrijos
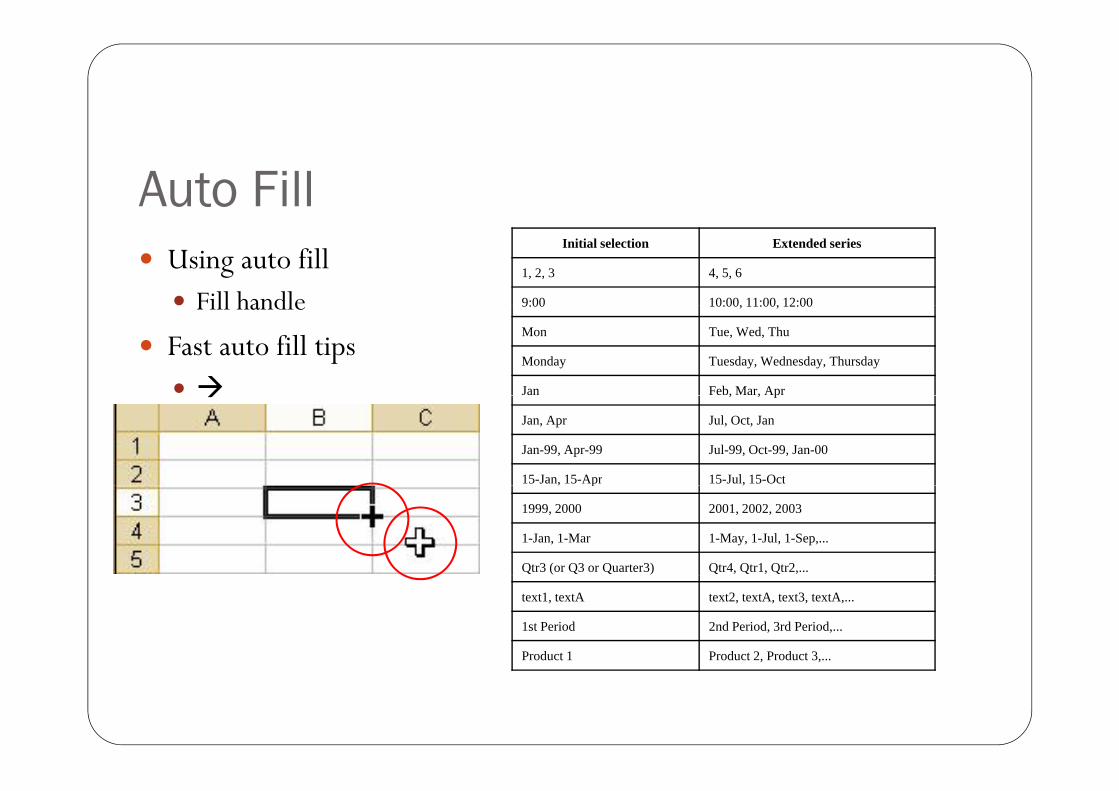
Auto Fill Using auto fill Fill handle
Initial selection Extended series
1, 2, 3 4, 5, 6
9:00 10:00, 11:00, 12:00Fill handle
Fast auto fill tips
9:00 10:00, 11:00, 12:00
Mon Tue, Wed, Thu
Monday Tuesday, Wednesday, Thursday
Jan Feb, Mar, Apr , , p
Jan, Apr Jul, Oct, Jan
Jan-99, Apr-99 Jul-99, Oct-99, Jan-00
15-Jan, 15-Apr 15-Jul, 15-Oct, p ,
1999, 2000 2001, 2002, 2003
1-Jan, 1-Mar 1-May, 1-Jul, 1-Sep,...
Qtr3 (or Q3 or Quarter3) Qtr4, Qtr1, Qtr2,...
text1, textA text2, textA, text3, textA,...
1st Period 2nd Period, 3rd Period,...
Product 1 Product 2, Product 3,...
BASIC EXCEL TRAININGAnna Torrijos
Using Formula and Functions
BASIC EXCEL TRAININGAnna Torrijos
How to Enter Formula Click the cell where you want to enter formulaClick the cell where you want to enter formula Type =. Enter the first argument which can be a number or cell Enter the first argument, which can be a number or cell
reference Enter an arithmetic operatorp Repeat steps 4 and 5 as needed to complete the formula Click the enter button on the formula bar, or just press Enter, j p
BASIC EXCEL TRAININGAnna Torrijos

Formula & Functions Enter a formula Enter a formula Insert function window Using the formula bar Using the formula bar Edit directly in cell
AutoSum AutoSum
Basic functions Sum & A erage Sum & Average Count & Counta Min & Max Min & Max
BASIC EXCEL TRAININGAnna Torrijos

Edit a Formula Using the Formula Bar
The quickest way to do this is simply to press F2. This tells Excel that you want q y p y p yto edit the contents of a cell. When you press F2, it is highly possible that Excel will simply expand the information in the cell and allow you to edit the information directly in the cell itself. If you don't like this behavior, but instead y ywant F2 to activate the Formula bar, follow these steps:
Choose Options from the Tools menu. Excel displays the Options dialog box. Make sure the Edit tab is selected Make sure the Edit tab is selected. Clear the Edit Directly In Cell check box. Click on OK. Now, whenever you press F2, the Formula bar is selected and you can edit the
formula there.
BASIC EXCEL TRAININGAnna Torrijos

AutoSum Click the cell where you want to display calculation Click the cell where you want to display calculation
Click the AutoSum button on the Standard toolbar
Cli k E t Click Enter
BASIC EXCEL TRAININGAnna Torrijos
Functions? The Insert Function feature simplifies the process of writing The Insert Function feature simplifies the process of writing
a formula that calculates various pieces of data by organizing Excel’s built-in formulas into categories so that they are easy ce s u t o u as to catego es so t at t ey a e easy to find and use
BASIC EXCEL TRAININGAnna Torrijos

Sum, Count, AverageUsing SUM Function
Enter the formula =SUM(range), where range is any range. This sums the numerical values i h
g
in the range
Using COUNT Function
Enter the formula =COUNT(range), where range is any range. This produces the number of numerical values in the rangeof numerical values in the range
Using AVERAGE Function
Enter the formula =AVERAGE(range) where range is any range. This produces the average of the numerical values in the range
BASIC EXCEL TRAININGAnna Torrijos

Example
In the diagram above the three functions used are as follows:
= SUM(B4:B7) 352 in cell B9
= AVERAGE(B4:B7) 88 in cell B10( )
= COUNT(B4:B7) 4 in cell B11
BASIC EXCEL TRAININGAnna Torrijos

Min and MaxUsing MAX and MIN Function
Enter the formula =MAX(range) or =MIN(range) where range is any range. These produce th b i lt th i ( i i ) l i ththe obvious results: the maximum (or minimum) value in the range
BASIC EXCEL TRAININGAnna Torrijos

Converting Text
Use the PROPER function to convert text to its proper case.The Proper function is in the Text category in the Insert Function dialog box.Example:Text in uppercase: GEORGE W BUSH (in A1 Cell)Text in uppercase: GEORGE W. BUSH (in A1 Cell)
The function: =PROPER(A1)Result: George W. Bush
Use the UPPER & LOWER function to convert text to uppercase & lowercase.The UPPER and LOWER function is in the Text category in the Insert Function dialog box.Example:Text in lowercase: george w bush (in A1 Cell) Text in lowercase: george w. bush (in A1 Cell)
The function: =UPPER(A1)Result: GEORGE W. BUSHText in Upper case: C:\MY DOCUMENTS\EXCELTIP.XLS (in A1 Cell)
The Function: =LOWER(A1)
Result -Text in Lower case : c:\my documents\exceltip.xls
BASIC EXCEL TRAININGAnna Torrijos

Joining text using formula
Much like writing a formula to join text, as described, the Concatenate function allows you to merge values from multiple cells into a single cell.
Concatenating text in Excel is easy. For instance, if you have something in cell A2 and you want to concatenate it with what is in cell B2, you can do so with this formula:
=A2 & B2
You could include the // delimiters between the two values by simply adding them into the proper placeinto the proper place:
=A2 & "//" & B2
BASIC EXCEL TRAININGAnna Torrijos

Absolute cell addressingUsing Absolute / Relative Reference
g
Relative references - When you create a formula, references to cells or ranges are usually based on their position relative to the cell that contains the formula.Absolute references - If you don't want Excel to adjust references when you copy a formulaAbsolute references - If you don t want Excel to adjust references when you copy a formula to a different cell, use an absolute reference.Switching between relative and absolute references If you created a formula and want to change relative references to absolute (and vice versa), select the cell that contains the g ( ),formula.
In the formula bar, select the reference you want to change and then press F4 KeyF4 Key. Each time you press F4, Excel toggles through the combinations:
Absolute column and Absolute row (for example, $C$1); Relative column and Absolute row (C$1); Absolute column and Relative row ($C1);
BASIC EXCEL TRAININGAnna Torrijos
Absolute column and Relative row ($C1); Relative column and Relative row (C1).

Charts Select the data range you want to chart. Make sure you include the data, and the column g y y
and row labels Click the Chart Wizard button on the Standard toolbar Click a Chart Type Click a Chart Sub Type Click Next Verify the Data range, and then select to plot the data series in rows or columns Click Next Click on Chart Options Tab
Titles tab Axes Tab Gridlines Tab Legend Tab D t L b l T b Data Labels Tab Data Table Tab
BASIC EXCEL TRAININGAnna Torrijos

Charts continued… Preview the options then click Next Preview the options, then click Next
Select to place on a new sheet or as an embedded object
Cli k Fi i h Click Finish
BASIC EXCEL TRAININGAnna Torrijos

Make that Chart Quickly! Sometimes going through the Chart Wizards seems to take g g g
forever. If you want to put a chart into your workbook very quickly, you can follow these two simple steps:
Select the table on which the chart is to be based Select the table on which the chart is to be based. Press F11. That's it! Excel inserts a new Chart worksheet before the
current worksheet, and bases the chart on the data in your table and the default chart type you have set up. At this point you can perform whatever customization you desire on the chart and p ywork with it as normal.
BASIC EXCEL TRAININGAnna Torrijos

Best Shortcuts Keys in ExcelCtrl+Z Undo
Ctrl+C
Enter, Ct l V
Copy,
Paste, M lti l P t
Ctrl+Shift+End Select from active cell to last cell in used range.
Shift+F3 Paste function window
=+FunctionName+Ctrl+A
Insert new function
Ctrl+V Ctrl+X
Multiple Paste,Cut
Ctrl+F, Ctrl+H
Find, Find&Replace
Ctrl+Shift+Home Select from active cell to A1 Alt+F11 Open
VBE
Ctrl+Shift+Enter Array formula
Ctrl+P, Ctrl+S, Ctrl+F4, Alt+F4
Print, Save, Close, Close Excel
Ctrl+Arrow Move
Ctrl+Page Down Ctrl+Page Up
Move to the next sheet, Move to the previous sheet
Ctrl+F3, F3
Define name, Paste name
Ctrl+Spacebar Select Ctrl+Arrow Move to edge of region
Ctrl+* Select current region
Ctrl+Tab Move to next open workbook
pShift+Spacebar columns, Select rows
Ctrl+1, Ctrl+B, Ctrl+U
Format cells, Bold, Underline
Ctrl+A Select all cells
Ctrl+HomeCtrl+End
Select A1
Ctrl+N Open new workbook
Shift+F11 Insert
Ctrl+; , Ctrl+shift+:
Current date, Current time
BASIC EXCEL TRAININGAnna Torrijos
Ctrl+End A1, Select last cell in used range
Shift+F11 Insert new worksheet

Using keyboard shortcuts
To open the Insert Function dialog box:
Select an empty cell and press Shift+F3.To open a Function Arguments dialog box: p g gSelect a cell containing a formula and press Shift+F3.
To insert a new Formula into a cell using the Function Arguments dialog box:
1. Select an empty cell, and then type the = sign.2. Type the formula name and press Ctrl+A.Example: type =SUM, and press Ctrl+A to open the Function Arguments window
To insert a formula by typing it while being guided by the formula syntax tooltip:1. Select an empty cell, and then type the = sign followed by the formula name and a ( sign.Example: type = Average, and then press Ctrl+Shift+A. You will now see the syntax of the function.
BASIC EXCEL TRAININGAnna Torrijos

Thank you !!!
BASIC EXCEL TRAININGAnna Torrijos