basic key commands - villanova universitymdamian/past/graphicsfa10/assign/blender2...basic key...
TRANSCRIPT

4
Basic Key Commands
Basic Blender CommandsThis is just a partial list of Blender commands. Please visit the Blender.org website for more details.
TAB key- Toggles between edit mode (vertex editing) and object select mode. If you’re in
edit mode when you create a new object, it will be joined to the selected object.
Ctrl “Z” The global UNDO command. With each press, one step will be undone (up to 32 steps
possible by default). If in edit mode, it will only undo editing steps on the selected object.
Alt “U” Brings up a list of Global UNDO steps to choose from (default- last 32 steps you’ve done).
“Z” key- Toggles view from wireframe to solid.
Alt “Z”- Toggles a texture/shaded view.
“R” key- Rotates an object or selected vertices.
“S” key- Scales a selected object or vertices.
“G” key- Grabs or moves the object or selected vertices.
“A” key- While in edit mode it’s good for selecting all vertices for commands like remove
doubles and subdivide. “A” twice will clear selected and reselect.
Alt “A” Plays animation in selected window. Your cursor must be in that window for it to play.
Ctrl “A”- After an object has been resized and/or rotated, this can reset the object’s data to 1 and 0.
“W” key- Brings up a “Specials” menu while in edit mode of specific edit mode options.
Shift-“D”- Duplicates or copies selected objects or selected vertices.
“E” key- While in edit mode, selected vertices can be extruded by pressing E.
“O” key- The “O” key (not zero) will put you into proportional vertex editing while in edit mode.
“B” key- Gives you a box (window drag) to select multiple objects. In edit mode, works the
same to select multiple vertices, but hitting “B” twice gives you a circle select that
can be sized by scrolling the mouse wheel. Press LMB to select, press wheel to deselect.
Space Bar- Brings up the tools menu where you can add meshes, cameras, lights, etc.
Number Pad- Controls your views. “7” top, “1” front, “3” side, “0” camera, “5” perspective, “.” Zooms on
selected object, “+ and –“ zoom in and out. The + - buttons also control affected vertices size
in proportional vertex editing.
Mouse- Left to manipulate (LMB), right to select (RMB), center wheel to zoom and rotate view. If you
hold down “shift” and center wheel you can pan around on the screen.
Shift Key- Hold down the shift key to make multiple selections with the right mouse button. Holding
down the Shift key while clicking in a text box allows for easier keyboard entry of numbers.
Arrow Keys- Used to advance frames in animation. Left/right goes 1 frame at a time, up/down goes 10
frames at a time.
“P” key- While in edit mode, pressing P will seperate selected verticies. In object mode, pressing P
will cause you to enter into the game (real-time) mode. Press Esc to exit game mode.
ATL/CTRL “P”-Creates or breaks child/parent relationships. To create C/P relationships, hold
down shift key and select child first, then parent. Hit Ctrl P. To clear a relationship, do the
same except hit Alt P.
“U” key- In Object Mode, brings up the Single-User menu to unlink materials, animations (IPOs),
etc. for linked or copied objects.
“M” key- Moves selected objects to other layers. Mirror in edit mode, “M” will give you a mirror
command (all verticies selected, then press x,y,z for axis of mirror).
“N” key- Brings up the numeric info. on a selected object (location, rotation and size). Info.
can then be changed in the window.
Ctrl “J”- Joins selected objects together.
“F” key- Makes a face in edit mode of the selected vertices. You can only select 3-4 vertices at a
time to make a face. By selecting 2 verticies and pressing F will close shape.
Shift-”F”- Makes all faces on a selection of closed verticies (as opposed to only one face with F).
Ctrl “F”- Brings up a “Face Specials” menu with other face options.
“X” or Delete- Delete selected objects, vertices or faces.
“K” Key In edit mode, K will bring up the Knife tool menu with specific options for slicing faces.
Shift- “S” In both edit and object modes, this will give you options to locate objects or the cursor to
assist in precise placement.

5
Basic Key Commands
Function Keys- F1-Load File; F2-Save File; F3-Save Image; F4-Lamp Buttons; F5-Material
Buttons; F6-Texture Buttons; F7-Animation Buttons; F8-Real Time Buttons; F9-
Edit Buttons; F10-Display Buttons; F11-Last Render; F12-Render
“I” Key- The “I” key is used to insert animation keys for various things. Objects can be
animated with basic Rotation, Location and Size keys and combinations there of.
If your cursor is down in the buttons portion of the screen, animation keys can be
added to lights, materials and world settings.
Ctrl “T”- Used to create a Track To Constraint to make one object follow another (like a camera with
a target).
Ctrl “S”- Used to Save your Blender file
Alt “C”- Used to convert meshes, text and curves. For example, text can be converted into a
mesh for other transform options.
“Shift” “Space” Toggles between multiple screens to full screen of active viewport.
Ctrl “0”- If using multiple cameras, this will switch to the selected camera. (Number pad
“0”)
Armatures- Meshes can be controlled by “bones” or armatures. Create a mesh with vertices
at the joint locations, then create an armature string within it. Child/Parent the
mesh to the armature using the armature option. You can then animate the
armature in Pose Mode.
Ctrl-Tab- Puts you into Pose mode for manipulating armatures.
Import/Export- Blender accepts .DXF and VRML(.wrl) files. Just use the OPEN option from the
file menu to insert these types of files into an already existing scene. When
inserting other Blender files or objects into another scene, use the APPEND
option from the file menu and select the appropriate options. Multiple objects can
be selected with Shift-Right mouse button.
Springs/Screw-Blender can create these objects in the edit buttons. You need a profile of theobject, the cursor at the center of revolution, and 2 vertices to show the length of
the revolution. The profile and the length vertices need to be in the same object.
All vertices need to be selected when performing the operation. You will also
need to be in the front view. There are several tutorials to help with this
operation. Results are great!
Multiple Viewports- To create multiple viewports, move your cursor over the edge of the
viewport (to start, you only have the drawing window and the button window-
move your cursor to the break between them). Right click on the break and select
split area.
Basic Button Panels
Game Logic Buttons
(F4 Key)
Scripting Buttons
Shading Buttons
(F5 Key)
Object Buttons
(F7 Key)
Edit Buttons
(F9 Key)
Scene Buttons
(F10 Key)
These buttons change depending on
left-hand button options

21
Chapter 3- Creating & Editing Objects
Edit Mode- Mesh Vertex Editing
After you have created a mesh, you can go into Edit mode (Tab key)
and change its shape. In edit mode, you can work with the shape’s
individual verticies (mesh intersections) to create the shape you want.
You know you’re in edit mode when you see pink or yellow dots on the
selected object. Pink dots are unselected verticies while yellow dots
are selected verticies.
Edit Mode for Sphere
Object Mode for Sphere
RoboDude Asks: How Do I UNDO a mistake?Pressing CTRL-Z will take you back 1 step at a
time (edit or object modes). ALT-U will show you a
list of steps.
Selecting Verticies:
While in edit mode, to select a single vertex, RMB click on the vertex. To select multiple
verticies, hold down the Shift key while RMB clicking on them. To drag a window around
verticies, type “B” key and drag a window to select. Typing the “B” key twice will bring up a
circular selection tool that can be sized by pressing the “+ or -” keys on the number pad.
Scrolling the center mouse wheel will do the same as “+ and -” keys. Pressing “Esc” will get
you out of the circular selection tool. In order to select all verticies or deselect currently
selected ones, hit the “A” key (for all) once or twice.
Basic Modifiers:
After selecting the verticies, you can use the same basic modifiers we talked about in the
previous exercise (“G”-grab or move, “S”-scale, “R”-rotate).
Creating More Verticies:
Sometimes you need to add more verticies to some or all of the mesh in order to manipulate
it to your desired detail. To do this, you must first select all the verticies you wish to split, then
look at the bottom Buttons Window and find the edit button (looks like a plane in edit
mode). Find the
Subdivide button and
click it as many times as
you need to.
Edit Mode Selection Options:
By default, you are selecting
verticies, but you can also select
edges and faces.You can find
these options at the bottom of the
3D window while in edit mode. Vertex Select Edge Select Face Select
In solid view mode, this button will
hide back faces

22
Chapter 3- Creating & Editing Objects
Specials Menu:
In edit mode, pressing the “W” key will bring up a shortcut menu that will give you
a variety of editing options. Most of these options can also be selected in the
edit buttons as discussed on the previous page.
Center Points:
Every object you create in Blender has a small dot somewhere in the object (by
default, usually in the center of that object). This is the object’s center, or pivot
point. Beginners in Blender often get these center points moved around to points
other than where they want them. This happens because they move all the verticies of the
object in edit mode, but the center point fails to move. If you want to move an entire object,
hit tab to get out of edit mode and into object select mode. Using the “G” key to move
the object in this mode will move the center point along with the object. If you ever need to
relocate an object’s center point, move the 3D cursor to the desired center location, then find
the “Center Cursor” button in the edit buttons. This will change the object’s center location. If
you select “Center”, The object’s data (points and faces) will move to center around the
object’s center. If you select “Center New” , the program will move the center point to the
object data’s mathematical center.
Viewport Shading
Usually by default, the viewport is set to Solid shading. Many times, you will
need to work with your objects in Wireframe mode. All shading does is
changing the way you see your objects. Shading also affects the way you
can select verticies in edit mode. In solid shading, only visible verticies can
be selected. In Wireframe, all verticies can
be selected. To change between
Solid and Wire modes, press the “Z” key
or select the shading mode from the
toolbar.
Wire
SolidYou will notice several other shading
options in the menu. Experiment with the
other options.

23
Chapter 3- Creating & Editing Objects
Using the Set Smooth-Set Solid Options and Auto Smooth
As you add objects and view them in Solid shad-
ing, you will notice that circular objects are not being displayed smooth. In the Edit buttons,
you will see two buttons labeled Set Smooth and Set Solid. These 2 buttons not only
effect the way things look on the screen, but how they will be rendered in a final image. Be
aware that the appearance of objects on the screen are not displayed at the same
quality as a final rendered image. The computer needs to conserve memory because
3D applications can be very memory intensive on your computer. There are other smooth-
ing options available in the Edit panel, but they will be discussed in a later chapter. Auto
Smooth is used to smooth objects when faces meet at a certain degree or less. This is a
great feature when Set Smooth does not work properly alone. To use
Auto Smooth on an entire object, hit the Auto Smooth button. To smooth
just a selected area, enter edit mode, select the verticies you wish to
smooth, then hit Auto Smooth.
Extruding shapes:
Shapes can be lengthened by selecting a group of verticies, then by pressing the “E” key
and confirming by clicking “ok”, you will make a duplicate of those verticies. They can then be
“G” (moved), “S” (scaled), and “R” (rotated). Blender has added a few more options to the
extrude menu. Feel free to experiment with them. The one that you will usually want to use is
the Region option. When you select the region option, the verticies will be extruded along a
locked axis. To free the verticies so you can move them in any direction you wish, click the
Center Mouse Wheel once or twice (don’t scroll, press the wheel like it’s a button). Below is
an example of a cube, extruded from the right side several times using scale and rotate.
Set SolidSet Smooth
Basic Cube
Extrude is a great command for making long tubes and tunnels. It is also good when you don’t
want to subdivide an object too much in order to add detail.

24
Chapter 3- Creating & Editing Objects
Proportional Vertex Editing:
Proportional Vertex Editing is used to create a flow
in the shape when editing vertices. To turn
proportional vertex editing on, press the “O” key
while in edit mode or by selecting the small circle
button on the toolbar. Note: you will only be able
to select this option while in edit mode. You
have several options for effecting
verticies in proportional editing. We
usually use Sharp or Smooth falloff,
but feel free free to experiment with
the other options.
Proportional Vertex
Editing “Off”
Proportional Vertex
Editing “On”
Large AreaSharp Falloff Smooth Falloff Small Area
RoboDude Asks: How do I control the number of verticies affected?By pressing the “+ and -” arrows on the number pad or by scrolling the
center mouse wheel.
Creating Ground:
You can use proportional vertex editing to create flowing landscape easily.
The first thing you need to do is create a plane in the top view (7 key). While
in edit mode, make sure all verticies are selected (verticies are yellow). You
can use the “A” key to select them all. Press “W” key for specials menu, then
select “Subdivide”. Do this a few times. Select a single vertex somewhere
near center.
Next, switch to a front view (“1” key on number pad) and press the “O”
key to enter proportional vertex editing mode. Select sharp or smooth
falloff depending on what effect you want. Type “G” to grab (move) the
vertex. Use the “+ -” keys on number pad or scroll mouse wheel to
change the size of the selection.
Experiment with different size selections and different falloffs.
To see your final work in a smooth display, exit edit mode (“Tab”
key) and ,with the object selected, go to the edit buttons and
find the “Set Smooth” button. This will smooth the mesh in display
and final output. Finally, hit the “Z” key to shade your view.
Knife Tool:
The Knife Tool allows you to split edges differently than the subdivide
command. To use the knife tool, type “K”, choose your option, draw your
line and then hit “Enter” on the keyboard to create the cut.

25
Basic Editing- Landscape and Lighthouse
Over the next several chapters, we will be developing a nice landscape scene in an effort to
build your Blender skills while you become more comfortable with the program. Below is an
example of what we will be completing:
This is the basic scene, but as you work through the chapters, you will be encouraged to add
more elements and details to your lighthouse and landscape to make it your own. We will
eventually add rain to our “stormy night at sea” scene and animate the water, light and camera.
The first thing we need to do is create a new Blender scene and save it as “LandscapeScene”. Again, we will be using this file for the next several chapters, so keep it safe and
save often! Split the workspace into 2 viewports as shown on
the next page. We will use the left viewport for working in and
the right one for camera and 3D views.
While in the top view (number pad 7) erase the initial cube
from the scene, then add a plane from the mesh menu (space
bar- add- mesh- plane).

26
Basic Editing- Landscape and Lighthouse
This plane will be used for our ground. Our next step is
to scale it up a bit. To do this precisely, we will use the
numeric input window (transform properties). With the
plane selected and out of edit mode (tab), press “N” to
bring up the transform window. Press the “Link Scale”
button and set the Scale X number to 10.000. The Link
Scale button will change them all. Close the Transform
window (x).
Next, go back into edit mode (tab) and make sure all
verticies are selected. Press the “W” key for the Specials
menu. Select “Subdivide Multi” and set the number to
40. Your plane should have 40 subdivisions.
Deselect all verticies using “A” and
press “B” twice for the circular
selection tool. While holding down the
LMB, select half the verticies as
shown. Keep the edge random
similar to what is shown so it looks
like a rough shoreline. If you select too
many verticies, remember that by
holding down the mouse wheel, you
can deselect verticies.
Now switch to the front
view (number pad 1).
Your plane will now just
look like a line. Type “G”
to grab and move the
selected verticies. Move
them up about 2 Blender
grid blocks. You may want
to type “Z” to keep the
move locked to the verticle
axis. Use your right side
viewport to spin around
and get a nice look at the
landscape.
Selected
Deselected
27
Basic Editing- Landscape and Lighthouse
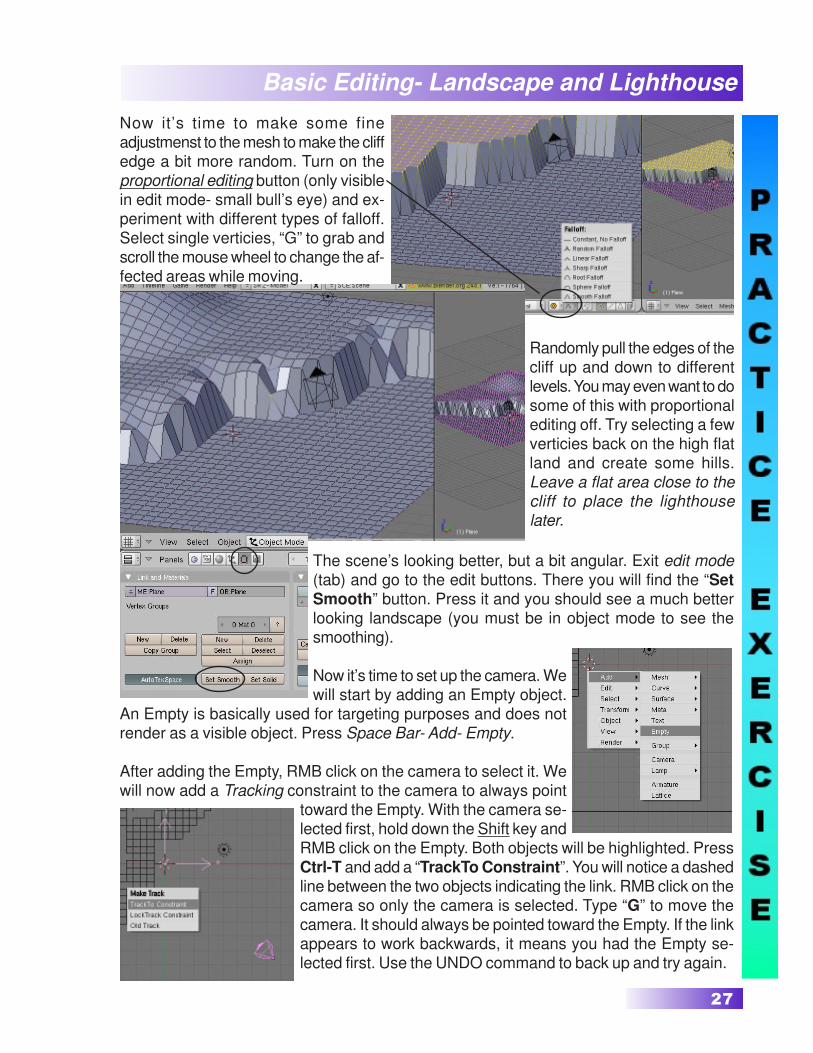
Now it’s time to make some fine
adjustmenst to the mesh to make the cliff
edge a bit more random. Turn on the
proportional editing button (only visible
in edit mode- small bull’s eye) and ex-
periment with different types of falloff.
Select single verticies, “G” to grab and
scroll the mouse wheel to change the af-
fected areas while moving.
Randomly pull the edges of the
cliff up and down to different
levels. You may even want to do
some of this with proportional
editing off. Try selecting a few
verticies back on the high flat
land and create some hills.
Leave a flat area close to the
cliff to place the lighthouse
later.
The scene’s looking better, but a bit angular. Exit edit mode
(tab) and go to the edit buttons. There you will find the “Set
Smooth” button. Press it and you should see a much better
looking landscape (you must be in object mode to see the
smoothing).
Now it’s time to set up the camera. We
will start by adding an Empty object.
An Empty is basically used for targeting purposes and does not
render as a visible object. Press Space Bar- Add- Empty.
After adding the Empty, RMB click on the camera to select it. We
will now add a Tracking constraint to the camera to always point
toward the Empty. With the camera se-
lected first, hold down the Shift key and
RMB click on the Empty. Both objects will be highlighted. Press
Ctrl-T and add a “TrackTo Constraint”. You will notice a dashed
line between the two objects indicating the link. RMB click on the
camera so only the camera is selected. Type “G” to move the
camera. It should always be pointed toward the Empty. If the link
appears to work backwards, it means you had the Empty se-
lected first. Use the UNDO command to back up and try again.

28
Basic Editing- Landscape and Lighthouse
It’s time to place the camera and Empty into good rendering locations. You will need to use
the move command (“G” key) and place the Empty and camera using your principle views of
Top (#7), Front (#1), and Side (#3). Try to get the camera low so it looks as though you are
viewing the shore line from a boat. Place the Empty on the cliff line. Use the picture below to
frame up your view. You do not want to see any edges on your rendering. Use the “F12” key
to render out a picture.
Camera View
(0 on the number pad)
Use Shift “D” to
duplicate the light if
your scene seems
dark when rendered
Here is the final render. We’re still missing water, textures and a few other things, but it’s a
good start. Feel free to develop and refine the landscape contour any way you wish. The
more time you spend with it, the quicker you will become comfortable with the program and
the more realistic it will become.
Save the scene and start a new
Blender file (I hope you’ve been sav-
ing every few minutes anyways). We
are finished with the landscape for
now and will now begin developing
the lighthouse as a separate scene
that we’ll add to the landscape at a
later time. Save this new Blender file
as “Lighthouse”.

29
Basic Editing- Landscape and Lighthouse
Now it’s time to start shaping a lighthouse using the Extrude and Scale commands. Begin
by deleting the default cube and add a Circle (Space Bar- Add- Mesh- Circle) in the Top
View (#7). Use the default set-
ting of 32 verticies, radius of 1,
and Fill off. These setting will be
fine for what we are making. De-
pending on what you are mak-
ing and what it will be used for,
you may require more or less
verticies.
You will now need to switch to the Front View (#1) so the
circle appears as a line. Make sure all verticies are selected
(yellow) and press “E” to Extrude, se-
lecting the “Only Edges” option. As
you extrude, you will need to press the
“Z” key to lock your movement verticle.
Extrude the lighthouse 2-4 Blender grid
blocks high and LMB click to place
them. Hit “S” to Scale them in slightly. This is your lighthouse- feel
free to adjust sizes as desired. Remember to stay in the front view
throughout this process! Rotated views will cause a distored light-
house.
It is now time to make the small
walkway around the top. Press “E”
to extrude again, then “S” to scale immediately (no LMB click
in between). Pull your mouse away from the lighthouse and
scale the walkway outward as desired. LMB click when you
have a good size. Remember, you can always UNDO if it
doesn’t seem right. Extrude
again to give the walkway
some height. You will then Extrude and Scale again to re-
duce the size back inward.
Continue extruding and shaping to get the light area and the
roof. The point of the roof will actually have 32 verticies which
you could scale very small so that it appears to be a single
point, but we will use a Specials command in the next step
to correct this.

30
Basic Editing- Landscape and Lighthouse
You now need to turn the top into a point. With the top 32
verticies selects, press “W” to bring up the editing short-
cut “Specials” menu. Select the “Merge” option and “At
Center”. It will tell you that 31 verticies are being removed,
leaving only one.
Move your camera to a location that displays the lighthouse
well and press “F12” to render an image. The lighthouse
looks good, but angular. It will take more than Set Smooth
to make it look good. Some edges actually need to stay
sharp. This is where Auto Smooth becomes important.
Exit edit mode (tab key). In the Edit Buttons, press the
“Auto Smooth” button, then the “Set Smooth” button. Ig-
nore how the lighthouse look on the screen. Render a pic-
ture with “F12” to see the results. You will notice a degree
angle below the Auto Smooth button. Leaving it a the de-
fault of 30 degrees should work well, but feel free to ex-
periment with other setting. Basically, this setting deter-
mines which faces are smoothed and which ones are kept
sharp.
Finally, press “F12” to render
a picture and check your re-
sults. If you haven’t saved
your file, do so now and re-
member to save often. We
are finished with our light-
house for now. If you have the
time, feel free to modify the
lighthouse, change the style,
add more features, etc.
** Show the instructor when finished**

31
Chapter 3- Creating & Editing Objects
Joining/Separating Meshes and Boolean Operations
Now that you have some experience with basic editing, here’s a few more options:
Joining Meshes:
To join 2 or more meshes together, Hold down the “Shift” key to select
them, then press “Ctrl” and “J” to join them. They will retain any
materials you have placed on them, but will be one object.
Separating Meshes:
In order to break up a mesh, you need to be in edit mode (Tab Key) and
select the verticies you wish to separate from the rest of the mesh. With
verticies selected, type the “P” key (I like to think of it as partition) and
select your option. You also an option to separate all loose parts.
Deleting Vertices/Edges/Faces:
If you want to make a hole in a mesh, select the verticies, edges, or faces you wish to remove,
then hit the “Delete” key.
Adding Faces:
Sometimes, you need to fill in holes in a mesh by creating your
own faces. To do this, go into edit mode and select the verticies
you wish to face together (you are limited to 4 verticies in a
group). With verticies selected, hit the “F” key. A face will be
formed. Here is an example of 2 cubes joined
together with a space that needs filled between
them. In edit mode, select the 4 verticies (hold
down shift key and right click on them), then type
F. A face will be created. If a shape or area is
closed, you can select more than 4 verticies and
use the Shift-F option to auto-face the area. Ctrl-
F will give a Face Specials menu of options.
Bevel Command:
In edit mode, bevels (chamfers) can be applied to an object by
bringing up the shortcut menu (W key) and selecting bevel. Bevel
may not work on complex objects however.

32
Chapter 3- Creating & Editing Objects
Boolean Operations:
Boolean operations allow you to cut or join meshes by using
other meshes. There are 2 ways to do this in Blender. The
first method is older and less reliable. This is done by selecting
the 2 meshes (not in edit mode), then typing the “W” key. You
will see the options “Intersection, Union, and Difference”.
You will also see 3 Modifier options which will allow you to
keep the 2 original objects, but will modify their shapes
according to how they intersect each other. Below, you will see the results of each:
Basic shapes (before boolean
operation)- Cube selected 1st
Intersection Option
Union Option
Difference option
Basic shapes (before boolean
operation)- Cylinder selected 1st
Intersection Option
Union Option
Difference option
RoboDude Says: When using the older Boolean operations, a newobject is created while the original shapes are retained. You will needto delete or move the original shapes to view the newly created shape.
Boolean Modifier Option
The newer, more reliable method is the Boolean modifier panel. This
is just another way of creating a Difference, Union or Intersect. To
add a modifier, select the ob-
ject you wish to modify, then
go to the Edit buttons
, Modifier Panel, then
select Boolean. In the modi-
fier panel, type the name of
the other mesh, select Differ-
ence, Union or Intersect and hit
Apply. The mesh should show
the operation.To find the name of a mesh, select
the mesh. The name will be displayed
in the lower left of the viewport.
Names are Case Sensitive!

33
Boolean Editing - Lighthouse Windows
To begin this exercise, start by opening up your Lighthouse file from the last exercise. We
are going to use Boolean operations to cut some simple windows in your lighthouse.
Begin by adding a cube (Space Bar-
Add-Mesh-Cube) to your scene, exit edit
mode, and scale it to an appropriate size
and shape. Using your principle views of
#1,#3, and #7, place the cube in a good
location for a window. With the cube still
selected, make note of the cubes name,
displayed in the lower left corner of the
viewport. We will need to know that name
later (case sensitive-so note capital
letters).
Now select the Lighthouse and go to
the edit buttons. Find the Modifiers
panel and Add a Boolean modifier.
Remember that there are two methods for Boolean operations in Blender. We are using the
newer method of adding a modifier since it has received the most recent amount of work
and upgrades.

34
Boolean Editing - Lighthouse Windows
Below, you will see the information needed to complete the Boolean operation.You first need
to type the name of the mesh you are cutting out in the Ob: box. The default option above
that block is Intersection which will probably give you something you don’t want. It will re-
move everything not shared by the two shapes. Don’t worry- you can continue to make changes
before you hit the “Apply” button. Try all three Boolean options to see the results. The one
you probably want is
“Difference”. You
should notice the mesh
change to reflect the
cut-out of the cube. If
the mesh appears cor-
rect, hit the “Apply” but-
ton which sets the
mesh permanently to
that shape and re-
moves the modifier
from the list. Move the
cube from the light-
house and render
(F12) a picture to see
your results.
After completing the first win-
dow, move the cube around
to other points of the light-
house and cut a few more win-
dows. You can even try creat-
ing other window shape be-
sides cubes for your model.
RoboDude Asks: Why can’t I enter the mesh name in the OB: block?Reason #1- Check to see if you need capital letters. Reason #2- you
forgot to select the lighthouse and still have the cube selected.
** Show to the instructor when finished**