basic manual - kddimedia.kddi.com/app/publish/torisetsu/pdf/w42s_basic.pdfwelcome thank you for...
TRANSCRIPT

Contents/Before use
Phone call
Text input
Phone book
Pair function
Hello Messenger
Camera
EZweb
EZ Navi
au Music
EZ・FM
PC site viewer
Troubleshooting/Remote lock
Other features/Index
Basic Manual

WelcomeThank you for purchasing a W42S.
Before using your W42S, read this W42S Basic Manual (PDF manual) to ensure correct use of your
W42S. After you have fi nished reading this manual, save this PDF manual on your PC or recordable
media, and store the printed manuals in a safe place so you can retrieve them whenever they are
needed.
If you lose any of these manuals, contact an au shop or Customer Service Center.
The W42S comes with the "W42S かんたんマニュアル" and the "W42S 取扱説明書."
"W42S かんたんマニュアル"
Contents/Before use
Phone call
Text input
Phone book
Pair function
Hello Messenger
Camera
EZweb
EZ Navi
au Music
EZ・FM
PC site viewer
Troubleshooting/Remote lock
Other features/Index
Basic Manual
"W42S 取扱説明書"
目次
ご利用の準備au ICカード
基本機能
ペア機能
メール
EZ・FM
EZweb
カメラ
メニュー(設定)
Hello Messenger
EZナビ
au Music
EZアプリ(BREW )
データフォルダ
メモリースティック(市販品)
auのネットワークサービス
付録/索引クイックガイド
赤外線通信
PCサイトビューアー
The following manuals are also available from the au homepage:・ The downloadable "W42S かんたんマニュアル" and "W42S 取扱説明書"
(http://au-pro.kddi.com/phone/torisetu/index.html)・ The au online manual (Japanese) for searching by keyword
(http://www.au.kddi.com/manual/index.html)The au online manual (Japanese) is also available from the EZweb:<To access>
EZ Top menu → 料金・申込・インフォ → au オンラインマニュアル
If you have any trouble with your cellphone, please visit the Sony Ericsson Mobile Communications
Japan, Inc. web site and fi nd out your problem before calling for professional repairs.
・From your W42S ⇒ e(EZ)(for at least one second)(SonyEricsson@ez)
・From your PC ⇒ http://www.SonyEricsson.co.jp/
The font, typeface, shape and color used in this manual may differ from those used on actual screen or may
be omitted.
Printed manuals for W42S (Japanese)
Equivalent to this PDF
manual.
English version is not
available.
1
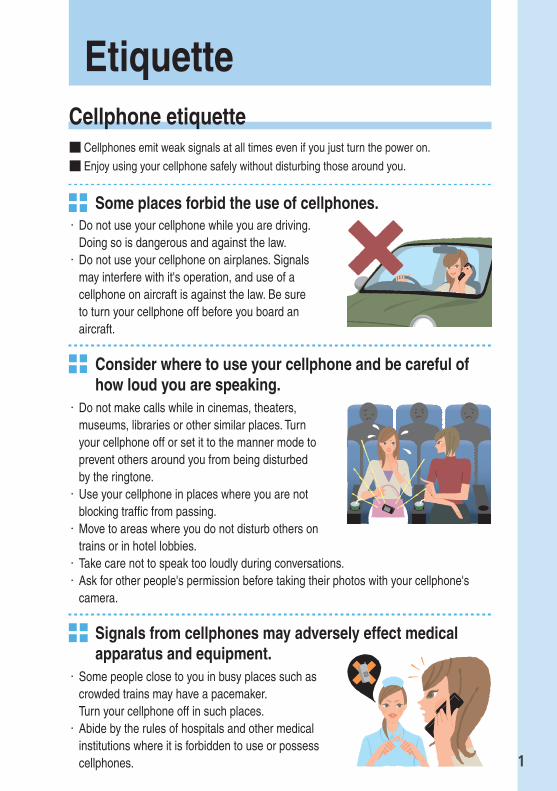
EtiquetteCellphone etiquette■ Cellphones emit weak signals at all times even if you just turn the power on.
■ Enjoy using your cellphone safely without disturbing those around you.
Some places forbid the use of cellphones.・ Do not use your cellphone while you are driving.
Doing so is dangerous and against the law.・ Do not use your cellphone on airplanes. Signals
may interfere with it's operation, and use of a cellphone on aircraft is against the law. Be sure to turn your cellphone off before you board an aircraft.
Consider where to use your cellphone and be careful of how loud you are speaking.
・ Do not make calls while in cinemas, theaters, museums, libraries or other similar places. Turn your cellphone off or set it to the manner mode to prevent others around you from being disturbed by the ringtone.・ Use your cellphone in places where you are not
blocking traffi c from passing.・ Move to areas where you do not disturb others on
trains or in hotel lobbies.・ Take care not to speak too loudly during conversations.・ Ask for other people's permission before taking their photos with your cellphone's
camera.
Signals from cellphones may adversely effect medical apparatus and equipment.
・ Some people close to you in busy places such as crowded trains may have a pacemaker.Turn your cellphone off in such places.・ Abide by the rules of hospitals and other medical
institutions where it is forbidden to use or possess cellphones.
2
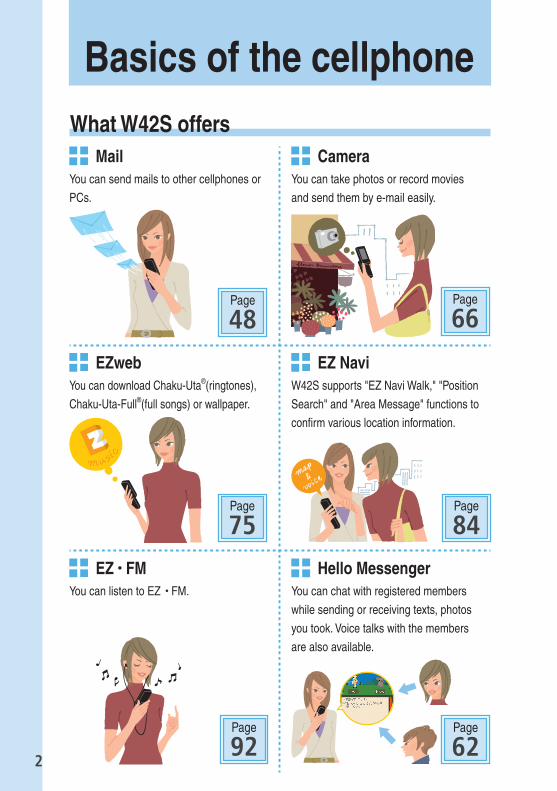
What W42S offers Mail
You can send mails to other cellphones or
PCs.
Page
48
CameraYou can take photos or record movies
and send them by e-mail easily.
Page
66
EZwebYou can download Chaku-Uta®(ringtones),
Chaku-Uta-Full®(full songs) or wallpaper.
Page
75
EZ NaviW42S supports "EZ Navi Walk," "Position
Search" and "Area Message" functions to
confi rm various location information.
Page
84
EZ・FMYou can listen to EZ・FM.
Page
92
Hello MessengerYou can chat with registered members
while sending or receiving texts, photos
you took. Voice talks with the members
are also available.
Page
62
Basics of the cellphone

3
Manner mode and record message Manner mode
You can use the manner mode to turn
ringtones and other tones off to prevent
others from being disturbed.
Hold down m for at least one second
on the idle screen.
Page
29
Record messageYou can record messages from other
parties using answering message when
you are unable to answer the call.
Hold down M for at least one
second on the idle screen.
Page
32
Check the power, the signal, and the battery! Usually, keep the cellphone's "power" on.
To make or receive calls, turn the power on.
Hold down t for at least one second.
You cannot connect where you are not able to get a "signal."
It is sometimes diffi cult to get a signal in places even within the
service area.
indicates the reception strength.
Page
18
Pay attention to the remaining "battery" power.
The cellphone may not function properly if the remaining battery
power is low.
indicates the remaining battery power.
Page
18
Page
18

4
Do not use the cellphone while drivingIt is against the law to even handle a cellphone while driving.
(November 1, 2004 Implementation of the Revised Road Traffi c Law Enforcement)
Glancing at the screen to see mail Holding the cellphone to talk
Use drive mode or turn the power off while driving Drive mode
When the drive mode is set, the answering message saying "I am driving right now. Please
leave your name and message after the beep." plays in Japanese and the caller's message
can be recorded.
Press m on the idle screen, press j and p to select "Drive."
・・・

5
Watch out for spam and one-ring call! If you get a incoming spam…
You can use the mail fi lter function to block the
mail you specify or mail marked with "未承諾広告※" (which may be spam).
The following mail functions are available for
preventing spam:
・ "未承諾広告フィルター": To block spam
・ "アドレスフィルター": To fi lter various addresses
"指定拒否設定": To reject specifi ed mails "指定受信設定": To receive specifi ed mails only
If you have an incoming call from an unknown number…Such calls may be a scam to get you to return a
call to the service with a very high charges. This
is called a "one-ring call."
The icon will appear in the Received calls when you receive
a one-ring call.
Be careful when you return a call to a number you don't know.
Page
56
DialedReceived Jul 4 11:05 030001XXXX Jul 3 10:00 030004XXXX Jul 3 9:00 Carol Adams Jul 2 22:00 John Smith
6
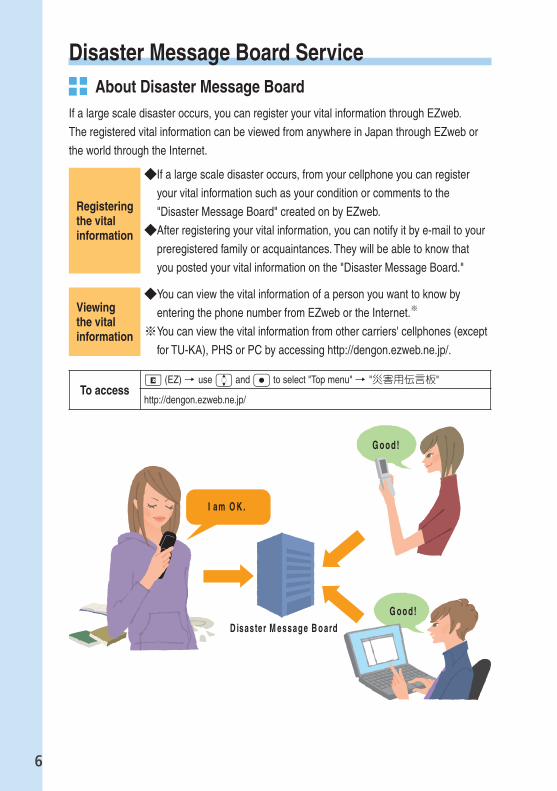
Disaster Message Board Service About Disaster Message Board
If a large scale disaster occurs, you can register your vital information through EZweb.
The registered vital information can be viewed from anywhere in Japan through EZweb or
the world through the Internet.
Registering the vital information
◆ If a large scale disaster occurs, from your cellphone you can register
your vital information such as your condition or comments to the
"Disaster Message Board" created on by EZweb.
◆ After registering your vital information, you can notify it by e-mail to your
preregistered family or acquaintances. They will be able to know that
you posted your vital information on the "Disaster Message Board."
Viewingthe vital information
◆ You can view the vital information of a person you want to know by
entering the phone number from EZweb or the Internet.※
※ You can view the vital information from other carriers' cellphones (except
for TU-KA), PHS or PC by accessing http://dengon.ezweb.ne.jp/.
To accesse (EZ) → use j and p to select "Top menu" → "災害用伝言板"
http://dengon.ezweb.ne.jp/
7
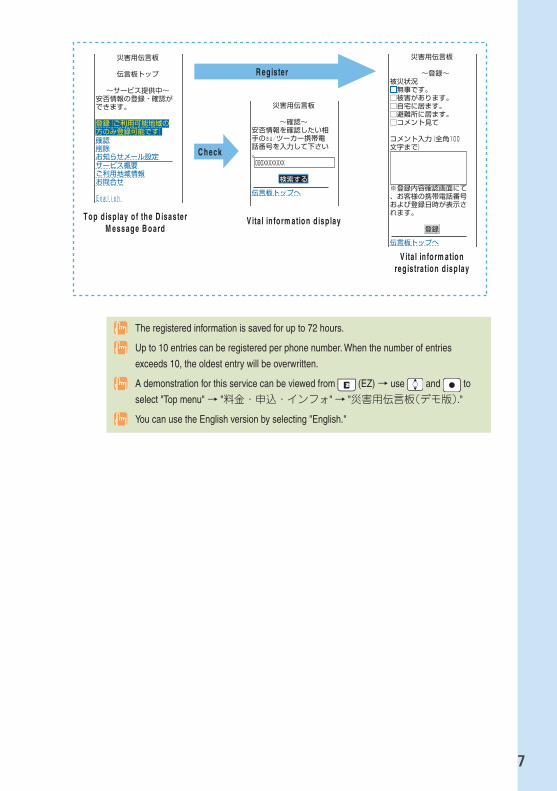
災害用伝言板 伝言板トップ ~サービス提供中~安否情報の登録・確認ができます。
登録(ご利用可能地域の方のみ登録可能です)確認削除お知らせメール設定サービス概要ご利用地域情報お問合せ
English
災害用伝言板 ~確認~安否情報を確認したい相手のau/ツーカー携帯電話番号を入力して下さい。 090XXXXXXXX
検索する
伝言板トップへ
災害用伝言板 ~登録~被災状況□無事です。□被害があります。□自宅に居ます。□避難所に居ます。□コメント見て
コメント入力(全角100文字まで)
※登録内容確認画面にて、お客様の携帯電話番号および登録日時が表示されます。
登録
伝言板トップへ
The registered information is saved for up to 72 hours.
Up to 10 entries can be registered per phone number. When the number of entries
exceeds 10, the oldest entry will be overwritten.
A demonstration for this service can be viewed from (EZ) → use and to
select "Top menu" → "料金・申込・インフォ" → "災害用伝言板(デモ版)."
You can use the English version by selecting "English."

8
Contents
ContentsEtiquette 1
Cellphone etiquette ................................................................................................. 1
Basics of the cellphone 2What W42S offers ................................................................................................... 2Manner mode and record message ........................................................................ 3Check the power, the signal, and the battery! ......................................................... 3Do not use the cellphone while driving ................................................................... 4Use drive mode or turn the power off while driving ................................................. 4Watch out for spam and one-ring call! .................................................................... 5Disaster Message Board Service ........................................................................... 6
Before use 10Checking the package .......................................................................................... 10Names of parts ..................................................................................................... 11How to charge the battery ..................................................................................... 12How to use the "Memory Stick Duo" (sold separately) ......................................... 13How to connect stereo earphone to W42S ........................................................... 14How to use the keys .............................................................................................. 15How to use Music Shuttle ..................................................................................... 17How to use stereo earphone ................................................................................. 17Opening/Closing W42S ......................................................................................... 18Turning the power on ............................................................................................ 18Default settings ..................................................................................................... 19Before using English display ................................................................................. 19How to read the display ........................................................................................ 19Using the Main menu ............................................................................................ 20Initial settings for e-mail and EZweb ..................................................................... 22Confi rming your cellphone number/e-mail address .............................................. 23Changing your e-mail address .............................................................................. 24
Phone call 26Making a call ......................................................................................................... 26Receiving a call ..................................................................................................... 27Redialing the number (Dialed/Received) .............................................................. 28Changing the volume during a call ........................................................................ 28Setting the manner mode ..................................................................................... 29Changing the volume and tone of the ringtone ...................................................... 30Setting the record message .................................................................................. 32Playing back recorded messages ......................................................................... 33
Text input 34Changing the input mode ...................................................................................... 34Inputting text ......................................................................................................... 35
Phone book 40Saving to the phone book ..................................................................................... 40Editing the phone book ......................................................................................... 42Making a call from the phone book ....................................................................... 44Saving from Dialed/Received calls ....................................................................... 45
Pair function 46Saving to the pair function .................................................................................... 46Making a call by using pair function ...................................................................... 47

9
Contents
Mail 48Using e-mail .......................................................................................................... 48Creating and sending e-mail ................................................................................. 49Opening a received e-mail .................................................................................... 52Replying to a received e-mail ................................................................................ 54Reading e-mails with photo or movie attached ..................................................... 55Filtering spam ....................................................................................................... 56Using C-mail ......................................................................................................... 57Creating and sending C-mail ................................................................................ 58Opening a received C-mail ................................................................................... 60
Hello Messenger 62What you can do with Hello Messenger ................................................................ 62Displaying Hello Messenger menu ....................................................................... 63Inviting members to join ........................................................................................ 64When you receive an invitation from other members ............................................ 65
Camera 66What you can do with the camera ......................................................................... 66Successful taking of photos/movies ...................................................................... 67Taking photos ........................................................................................................ 68Recording movies ................................................................................................. 70Viewing photos/movies you have taken ................................................................ 72Attaching a photo/a movie to e-mail ...................................................................... 73Photo mail ............................................................................................................. 74
EZweb 75About EZweb ........................................................................................................ 75Displaying the EZ Top menu ................................................................................. 76Saving your favorite sites ...................................................................................... 77Viewing a site saved to the Favorite site ............................................................... 78Confi rming your call costs ..................................................................................... 79Downloading a Chaku-Uta®(ringtone) ................................................................... 80Downloading a Chaku-Uta-Full®(full song) ............................................................ 82EZ Channel ........................................................................................................... 83
EZ Navi 84What you can do with EZ Navi .............................................................................. 84What you can do with Security Navi ..................................................................... 86
au Music 88What you can do with au Music ............................................................................ 88Playing back a Chaku-Uta-Full® (full song) ........................................................... 90
EZ・FM 92How to listen to EZ・FM ....................................................................................... 92Listening to EZ・FM .............................................................................................. 93
PC site viewer 95What you can do with PC site viewer .................................................................... 95Mastering operation basics ................................................................................... 96Using "待受指定" (Standby assignment) ............................................................ 97
Troubleshooting 99
Remote lock 100In the case you have lost your W42S .................................................................. 100
Other features 102
Index 104

10
Before use
Checking the package
◆ USB cable (sample)
目次
ご利用の準備au ICカード
基本機能
ペア機能
メール
EZ・FM
EZweb
カメラ
メニュー(設定)
Hello Messenger
EZナビ
au Music
EZアプリ(BREW )
データフォルダ
メモリースティック(市販品)
auのネットワークサービス
付録/索引クイックガイド
赤外線通信
PCサイトビューアー
目次/準備
通話
文字入力
アドレス帳
ペア機能
メール
Hello Messenger
カメラ
EZweb
EZナビ
au Music
EZ・FM
PCサイトビューアー
困ったときは遠隔オートロック
その他/索引
English( 英語 )(中国語)
◆ Main unit ◆ Battery pack ◆ Desktop holder
◆ Stereo earphone (sample)
◆ Remote controller with microphone
◆ "W42S かんたんマニュアル" (Japanese)
◆ "W42S 取扱説明書" (Japanese)
◆ CD-ROM
◆ Safety Precautions (Japanese)
◆ Global Expert User's Guide (Japanese)
◆ Warranty (Japanese)
"Memory Stick Duo" (sold separately) and Memory Stick Duo adaptor (sold separately)
are not included in this package.
AC adaptor is not included in this package. Please purchase our standard AC adaptor 01
(optional).
Before use
※Please use the earphone pads come with stereo earphone.

11
Before use
Names of parts
※
※

12
Before use
How to charge the batteryThe battery pack is not fully charged at the time of purchase.
Before you use the W42S, charge the battery pack.
1Connect the standard AC adaptor 01 (optional) to the
connecting terminal (power source) on the desktop holder's
base (upwards). Then place the power cord in the notch of
the base.
Carefully check the connector shape, and then connect it.
2Fold out the power plug of the standard AC adaptor 01
(optional), and plug it into a 100 V AC power outlet.
3Straight upon the desktop holder, place W42S (closed and
the battery pack installed) in the direction of the arrows (as
shown below).
• Charge start tone sounds and the charge indicator lights up in red → Charging is in progress.
appears.
• Charge completed tone sounds and the charge indicator light turns off → Charging is fi nished.
When the battery is fully charged, pull out W42S upwards.
13
Before use
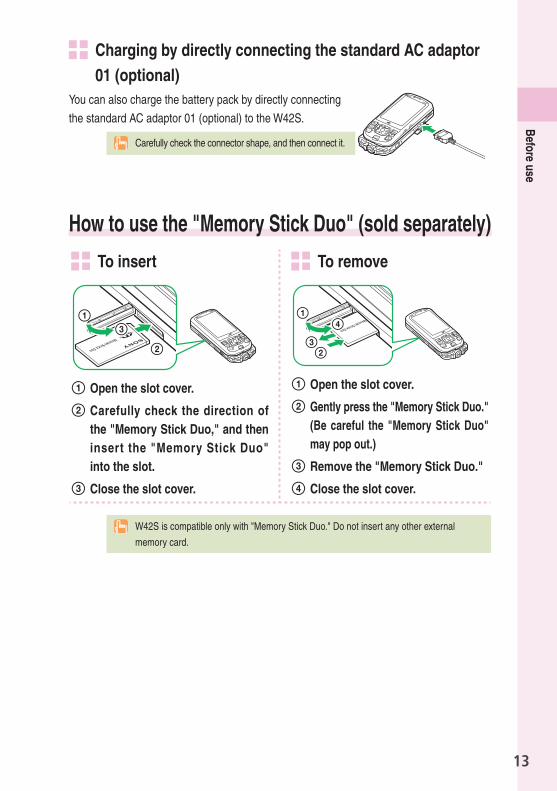
Charging by directly connecting the standard AC adaptor 01 (optional)
You can also charge the battery pack by directly connecting
the standard AC adaptor 01 (optional) to the W42S.
Carefully check the connector shape, and then connect it.
How to use the "Memory Stick Duo" (sold separately)
To insert
Open the slot cover.
Carefully check the direction of the "Memory Stick Duo," and then insert the "Memory Stick Duo" into the slot.
Close the slot cover.
To remove
Open the slot cover.
Gently press the "Memory Stick Duo."(Be careful the "Memory Stick Duo" may pop out.)
Remove the "Memory Stick Duo."
Close the slot cover.
W42S is compatible only with "Memory Stick Duo." Do not insert any other external
memory card.

14
Before use
How to connect stereo earphone to W42S
1Connect the stereo earphone to the remote controller with
microphone.
2Slide the earphone terminal cover to open in the direction
of the arrow (as shown below).
3 Insert the stereo earphone to the earphone terminal.
Do not force to connect in the wrong direction. Otherwise, it may cause damage. Please
connect in the direction as shown in the illustration above.

15
Before use
How to use the keys
、、~
:
:
・
・
:
:
%#
:
:
:
:
:
:
:
:
:

16
Before use
How to use the keys (continued)
How to use cross controllerTM
guideselectbackpattern
DisplayDescription in this manual
Operation Explanation
select JPress up and downMove the cursor up and down
Operations in the idle screen^:Open scheduleD:Open data folder (page 72)
select n
Press left and rightMove the cursor left or right and display previous or next screen
Operations in the idle screen<:Open Received calls (page 28)>:Open Dialed calls (page 28)
select PPress center (center key)Select the item
Operations in the idle screenOpen Main menu
Soft keysSoft keys work according to the displayed indication as shown in the illustration below.
The displayed indications and function of the keys will vary accordingly depending on the
operation selected.
mailphone book start EZ
EZapps

17
Before use
How to use Music ShuttleWith au Music Player or EZ・FM active, you can use Music Shuttle to perform operations
described below.
OperationExplanation
au Music Player active EZ・FM activePress Music Shuttle
Pause or play backOperations in the idle screen
Hold down (1 second):
Start Shuttle Player (play back)
Operations during BGM playing
End au Music Player
─
Turn Music Shuttle
Skip to the beginning of the next (or the current) audio fi le
Turn and hold (1 second):
First forward or rewind
Turn Music Shuttle
Select radio stationTurn and hold (1 second):
Auto tuning
Press volume keys
Adjust the volume
Press volume keys
Adjust the volume
How to use stereo earphoneWith au Music Player or EZ・FM active, you can use stereo earphone to perform operations
described below.
OperationExplanation
au Music Player active EZ・FM activePress center
End au Music PlayerOperations in the idle screen
Start BGM playingOperations during BGM playing
End au Music Player
Hold center down (1 second)
End EZ・FMOperations in the idle screen
Hold center down (1 second):
Start EZ・FM
Press left and right
Skip to the beginning of the next (or the current) audio fi le
Hold down (1 second):
First forward or rewind
Press left and right
Select radio stationHold down (1 second):
Auto tuning
Press up and down
Adjust the volume
Press up and down
Adjust the volume

18
Before use
Opening/Closing W42STo open W42S, slide the front part (with the screen on) upwards;
or slide it downwards to close W42S.
When you open W42S, do not touch any key. Otherwise, it
may cause malfunction.
Turning the power on
1Hold down t for at least
one second. Retrieving card(UIM) info (user operation is disabled)
mailphone book start EZ
EZapps
To turn the power off
Hold down t for at least two seconds.

19
Before use
Default settingsThe followings are set by default.
Chg Lock No. (Change Lock No.) 1234Font size
EZweb font:Large font
E-mail font:Large fontCaller ID ON
Before using English display To set English display
Press p (スタート) in the idle screen→press 34.
Use j and p to select "English."
How to read the display
・
①
②
③
④
⑤
⑥
⑦
⑧
⑨
⑩
⑪
⑫
⑬

20
Before use
P n
・
mailphone book start EZ
EZapps
The default menu color and design varies by W42S body color. The menu color and design
also changes depending on the time frame.
Using the Main menuYou can access "Main menu" by pressing p (start) in the idle screen to use various
settings and menus. Use a and p for operation.

21
Before use
P
J
P

22
Before use
Initial settings for e-mail and EZwebIf you subscribed to the EZweb service, make the following initial settings.
1Press q (mail) in the idle
screen.
EZwebを利用するための初期設定を行いますPCサイトヒ゛ューアーの初期設定も行われます「OK」を押してしばらくお待ちください
2Press p (ok).
ようこそEZwebへお客様のEメールアト゛レスは、△△△@ezweb.ne.jpです。 -ヒント-
ただいま初期設定を行っています。
しばらくお待ちください。(30秒~3分程度かかり
3Press p (OK).
The E-mail menu appears.
Create newInboxOutboxCheck new mailFriend boxInfo boxSettings
Eーmail
You can also initialize the settings by pressing (EZ) or (EZapps).
Your e-mail address is automatically determined when you initialize the settings.
If you have not subscribed to EZweb service yet,Contact an au shop or Customer Service Center. You need to subscribe to the EZweb
service to use e-mail, EZweb or other EZ services.

23
Before use
Confi rming your cellphone number/e-mail address
1Press p (start) in the idle
screen.
2Press 0.
You can confi rm your cellphone number and e-mail address.
XXXX
DetailBasic Phone no.
My address△△△△@ezweb.ne.jp ICCID1234XXXXXXXXXXXXXXX
You can also confi rm your cellphone number and e-mail address by pressing (start)
in the idle screen, and use and to select "Func/Settings" → "Profi le."

24
Before use
Changing your e-mail address
△△△
1Press q (mail) in the idle
screen. Press j to select
"Settings," and press
p (select).
E-mail settingsReceive/ReadSend/Write
Mail filterOtherCurr settingMemoryStatus
MailRestrict OFF
2Press j to select "Other,"
and press p (select).
Press j to select "Yes,"
and press p (select).
その他の設定1 Eメールアト゛レスの変更2 自動転送先3 メールフィルター4 Eメールヘッタ゛情報表示(通 信料有料)5 その他の設定の確認
auのメルマガサービス設定(メルマガの登録・変更・解
3Press j to select "Eメールアドレスの変更," and press
p (Select).<対象サーヒ゛ス>
お客様の暗証番号を入力してください。下記の対象サーヒ゛スで同日内に連続3回間違えると、翌日までご利用できなくなりますのでご注意ください。
リセット送信
4Press j to select the input
fi eld, and press p (Edit).
Enter your security code, and
press p (ok).
お客様の暗証番号を入力してください。下記の対象サーヒ゛スで同日内に連続3回間違えると、翌日までご利用できなくなりますのでご注意ください。
リセット送信<対象サーヒ゛ス>
Security code is the 4-digit number that you wrote in the application form when subscribing.
Note that no setting operation is allowed until the following day if you enter the wrong
security code three times a day.

25
Before use
5Press j to select "送信,"
and press p (Select). Press
j to select "承諾する,"
and press p (Select).
@ezweb.ne.jp
前のページへ
Eメールアドレスを変更します。ご希望のEメールアドレスを入力してください。
リセット送信
6Press j to select the input
fi eld, and press p (Edit).
Enter the text before @, and
press p (ok).
△△△@ezweb.ne.jp
前のページへ
Eメールアドレスを変更します。ご希望のEメールアドレスを入力してください。
リセット送信
For details on how to input e-mail addresses, see page 35.
7Press j to select "送信,"
and press p (Select).
新しいEメールアドレスは
△△△@ezweb.ne.jp
ご注意アト゛レスを変更した場合は変更前のアト゛レスを再度利用することはできません。
OK キャンセル
When the e-mail address cannot be changedThe e-mail address that you entered is already used. Enter a different e-mail address.
8Press j to select "OK,"
and press p (Select).
Update is complete.
For details on how to confi rm your e-mail address, see page 23.

26
Phone call
Making a call
1Press 0 to 9 to
enter the other party's phone
number.
XXXX
To call a regular phone, enter the phone number starting with the area code.
To notify the other party of your cellphone numberEnter "186" before the cellphone number of the other party.
Not to notify the other party of your cellphone numberEnter "184" before the cellphone number of the other party.
2Press T.
When you have fi nished the call, press .
Phone call

27
Phone call
Receiving a call
1Press T or p (call) to
answer the call.Duration 4
When you have fi nished the call, press .
The display when you receive a call
Phone number When the other party has set to notify Caller ID※If the other party's name and phone number
is already saved in the phone book, that person's name is also displayed
" ID Unsent" When the other party has set not to notify Caller ID
"Payphone" When you have received a call from a payphone
"Not support" When you have received a call from a party that is not able to notify Caller ID
XXXXSusan Jones
Incoming call ID Unsent
The display if you are unable to answer a callIf you are unable to answer a call, you are notifi ed that you had a call
on the display.
If you press p (select), you can confi rm the phone number of the
other party that called you and redial that party.
Missed call 1

28
Phone call
Redialing the number (Dialed/Received)
1Press n in the idle screen.
<( ):Display Received calls.>( ):Display Dialed calls.
DialedReceived
Jul 3 10:00 030004XXXX Jul 3 9:00 Carol Adams Jul 2 22:00 John Smith
Jul 4 11:05 030001XXXX
Icons of Received calls :The call that you did not answer (missed call) :The call within three seconds (one-ring call)
2Press j to select the phone
number you want to call, and
press T.
The call is connected to the phone number you selected.
In each memory, the phone numbers of the latest 30 calls will be saved.
Changing the volume during a call
1Press j during a call.
U: The volume increases (Level 1 to 5).
v: The volume decreases (Level 5 to 1).
Volume4

29
Phone call
Setting the manner modeThe W42S vibrates to notify you of incoming calls.
1Hold down m for
at least one second in
the idle screen.
The manner mode is set, and
, and appear in the display. At the same time, record
message is set, and appears in the display.
To cancel the manner mode
Hold down m for at least one second in the idle screen.
There are four types of manner settings: "Manner," "Silent," "Drive" and "Original."

30
Phone call
Changing the volume and tone of the ringtoneExample: When setting a "preset" ringtone
1Press p (start) in the idle
screen. Press n to select
(Menu).
2Press j to select "Func/
Settings," and press
p (select).
Time/Toll/SubSound/VibratorScreenPrivacyUser supportProfileGuide
Func/Settings
3Press j to select "Sound/
Vibrator," and press
p (select).
Sound/Vibrator M2_
E-mail recv Msg receive C-mail recv Keypad tone OFF Earphone set Sound effect Sche alarm 3
Incom. call
4Press j to select "Incom.
call," and press p (select).
Incoming call M21Volume 3Vibrator OFFMelody Snow boundImage StandardIndicator Standard
5Press j to select "Volume,"
and press p (select).
Incoming call3

31
Phone call
6Press j to adjust the
volume, and press p (ok).
Incoming call M21Volume 4Vibrator OFFMelody Snow boundImage StandardIndicator Standard
"OFF" :The ringtone does not sound."1" to "5" :The ringtone sounds at the level you set."STEP DOWN" :The volume of the ringtone decreases."STEP UP" :The volume of the ringtone increases.
"STEP DOWN" and "STEP UP" can be selected by pressing over "5."
7Press j to select "Melody,"
and press p (select).
Incoming call Silent Preset ⇒ Data folder ⇒ Memory Stick ⇒ Search EZweb
"Snow bound" is set by default.
8Press j to select "Preset,"
and press p (select).
Incoming call Snow bound Wannabe No break Studs Valencia Ring tone1 Ring tone2 Ring tone3
If you press (play), the ringtone you selected plays back.
If you press ( ■ ) while the ringtone is being played, the ringtone stops playing.
9 Press j to select a ringtone,
and press e (save).

32
Phone call
Setting the record message
1Hold down M for
at least one second in
the idle screen.
Record message is set, and appears in the display.
You can also use the record message to record a message from the other party by
pressing (memo) while receiving a call.
You can record up to three messages within 20 seconds each.
To cancel record message
Hold down M for at least one second in the idle screen.
If the record message still contains any message, remains in the display even after
canceling record message. disappears when record message data is deleted.
When you turn the power off or when you are in a place where the signal is weak, use
Voice Mail.

33
Phone call
Playing back recorded messages
When a message is recorded
A message and (number of recorded messages) appear in the idle screen.
Missed call 1
1Press M in the
idle screen.
Memo functionRecord msgVoice memoMy voiceMemo
2Press j to select "Record
msg," and press p (select).
Record msg
Set ON Play msg
3Press j to select "Play
msg," and press p (select).
Play msg Jul 4 10:32 John Smith
4Press j to select the
recorded message to play
back, and press p (play).
Play msg Jul 4 10:32 John Smith
Playing 5sec.
You can delete recorded messages by pressing (delete) while the recorded message
is playing back or by pressing (delete) after playing the recorded message.

34
Text input
Changing the input modeInput text by changing the input modes below.
Memo
512byte 漢カナaA12
Press (mode) Press ( /smb)
Input mode
漢 :Kanji/Hiragana :E MOJI
カ/カナ :Kana (double/single byte) 記 :Symbols (double byte)
A/aA :English (double/single byte) キ :Symbols (single byte)
1/12 :Number (double/single byte) 顔 :KAO MOJI
1Press e (mode) in the text
input screen.
Each time you press e (mode), the input mode changes to Kanji/Hiragana → Kana → English → Number → Kanji/Hiragana...
Pressing (A/A) in the Kana, English, or Number mode changes the byte (double/single).
Kanji/Hiragana mode
e
Kana mode (single byte) English mode (single byte) Number mode (single byte)
e e
Kana mode (double byte) English mode (double byte) Number mode (double byte)
B B B
e
Memo
512byte 漢カナaA12 512byte 漢カナaA12
Memo
512byte 漢カナaA12
Memo
512byte 漢カナaA12
Memo
512byte 漢カaA12
Memo
512byte 漢カナA12
Memo
512byte 漢カナaA1
Memo
The input mode that you can select is different depending on the current input screen.
For details on how to input pictorial characters, symbols and emoticons, see page 38.
Text input

35
Text input
Inputting text
To input alphanumericsChange the input mode to the English mode (page 34).
In the text input screen, press the keys as described in the table below.
→ → → → → →2 2 2 2 2 2 2
◆ Character key assignment table (single byte alphanumerics)
Key
Number of times to press the key1 2 3 4 5 6 7 8 9 10 11 12 13
1 . @ / : - _ ~ 1
2 a b c A B C 2
3 d e f D E F 3
4 g h i G H I 4
5 j k l J K L 5
6 m n o M N O 6
7 p q r s P Q R S 7
8 t u v T U V 8
9 w x y z W X Y Z 9
0 Space ! ? - , ’ ; ( ) ” & ¥ 0
*※1 ! ? - , ’ ; ( ) ” & ¥
#※2 Break lines
※1 * is also used to switch between uppercase and lowercase of current displayed
characters.
※2 When you enter the characters by pressing keys, # is used to reverse the order of
characters to be appeared (Back Space function).
Example: 2→2→# a → b → a
You can input your e-mail address using up to 30 single bytes alphanumeric in lowercase
including "-" (hyphen), "." (dot), and "_" (underscore). You can use "." (dot) in a row.
Note, however, "." (dot) and "0" cannot be used at the beginning of your e-mail address.
Characters and symbols with blue background in the above table cannot be used before
@ of "△△△@ezweb.ne.jp."

36
Text input
Inputting text (continued)Example: To input "tomy1" in the mail address
1Input the text before @.
t : Press 8 once.
o : Press 6 three times and press > once.
m : Press 6 once.
y : Press 9 three times.
1 : Press 1 eight times.
635byte 漢カナaA12
To(mandatory)tomy1
For details on how to input "@ezweb.ne.jp," see page 39.

37
Text input
To consecutively input characters assigned to the same keyInput the fi rst character, press > and press the next character key.
Example: To input "ab"
2 > 2
9999byte 漢カaA12
Input texta
9999byte 漢カaA12
Input texta
9998byte 漢カaA12
Input textab
To input uppercase characters
2 * *→ →
To delete characters
c
c

38
Text input
Inputting text (continued)
To input pictorial characters, symbols and emoticons
1Press A ( /smb) in the text input screen.
Each time you press A ( /smb), the input mode changes to
E MOJI → Symbols (double byte) → Symbols (single byte) → KAO MOJI → E MOJI...
E MOJI
Face
10000byte 記 キ 顔 10000byte 記 キ 顔
KAO MOJI
Smile
10000byte 記 キ 顔
Symbols
10000byte 記 キ 顔
Halfsize Symbols
A A A
A You can switch categories of pictorial characters or emoticons by pressing (category)
on each selection screen.
2Press a to select the icon
you want to use, and press
p (select).
9998byte 漢カaA12
Input text
The input mode that you can select is different depending on the current input screen.

39
Text input
To input sentencesYou can enter your frequently used sentences using our useful sentence list.
Example: To input "@ezweb.ne.jp" in the mail address
1Press q (option) in the text
input screen. input sel conversion save predict
cut copy
paste select paste application
2Press j to select "input,"
and press p (select). beginning sign(C-mail)
sign(E-mail)
useful sentence
3Press j to select "useful
sentence," and press
p (select).
Category Profile Internet Greetings Business Private Reply Original
4Press j to select
"Internet," and press
p (select).
Select @ezweb.ne.jp .dion.ne.jp http://www. .co.jp .ne.jp .ac.jp .or.jp .com
5Press j to select
"@ezweb.ne.jp," and press
p (select).
@ezweb.ne.jpTo(mandatory)
628byte 漢カナaA12

40
Phone book
You can save up to 1,000 phone numbers or e-mail addresses.
Saving to the phone book
1Hold down B (phone book)
for at least one second in the
idle screen.
DetailBasic(Name)
2Press j to select
(Name), and press
p (select).
Name
24byte 漢カナaA12
3Enter the name, and press
p (ok).
(JP reading) is automatically entered.
DetailBasicNancy BrandNancyBrand
000
For details on how to enter text, see page 34.
4Press j to select
(Phone no.1), and press
p (select).
Phone no.
Phone book
41
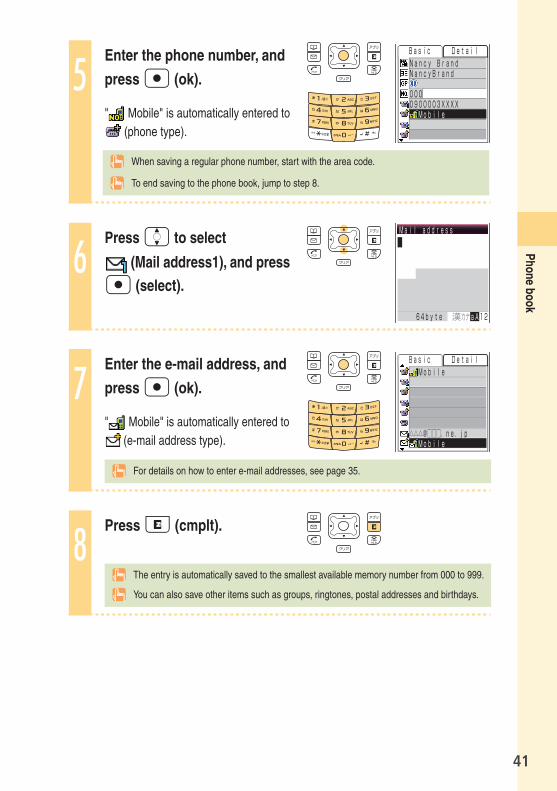
Phone book
5Enter the phone number, and
press p (ok).
" Mobile" is automatically entered to (phone type).
DetailBasicNancy BrandNancyBrand
0000900003XXXX Mobile
When saving a regular phone number, start with the area code.
To end saving to the phone book, jump to step 8.
6Press j to select
(Mail address1), and press
p (select).
Mail address
64byte 漢カナaA12
7Enter the e-mail address, and
press p (ok).
" Mobile" is automatically entered to (e-mail address type).
DetailBasic Mobile
△△△@□□□.ne.jp Mobile
For details on how to enter e-mail addresses, see page 35.
8Press e (cmplt).
The entry is automatically saved to the smallest available memory number from 000 to 999.
You can also save other items such as groups, ringtones, postal addresses and birthdays.

42
Phone book
Editing the phone bookExample: To edit phone numbers
1Press B (phone book) in
the idle screen.
あ かさ やたな はま
青木一郎赤坂花子阿部井田伊藤宇野江口
相原太一
To switch from the "あ" to "ETC" display lines
Press n.
た なは Aまや らわ
Brian MillerCarol AdamsJane MooreJohn Smith Kate DickensNancy BrandRon Edwards
Alan Nelson
2Press a to select the entry
to edit, and press
p (select).
DetailBasicNancy BrandNancyBrand0000900003XXXX030002XXXX030001XXXX△△△@□□□.ne.jp□□□@△△△.ne.jp
3Press e (edit). DetailBasic
Nancy BrandNancyBrand
0000900003XXXX Mobile030002XXXX Home
4Press j to select the item
you want to edit (in this case,
), and press p (select).
Phone no.
XXXX

43
Phone book
5Edit the information, and press
p (ok).
DetailBasicNancy BrandNancyBrand 0000900004XXXX Mobile030002XXXX Home
Press to delete a saved character. To delete all characters, hold down for at least one second.
6 Press e (cmplt).

44
Phone book
Making a call from the phone book
1Press B (phone book) in
the idle screen.
あ かさ やたな はま
青木一郎赤坂花子阿部井田伊藤宇野江口
相原太一
To switch from the "あ" to "ETC" display lines
Press n.
た なは Aまや らわ
Brian MillerCarol AdamsJane MooreJohn Smith Kate DickensNancy BrandRon Edwards
Alan Nelson
2Press a to select the
person to call, and press
p (select).
DetailBasicNancy BrandNancyBrand0000900003XXXX030002XXXX030001XXXX△△△@□□□.ne.jp□□□@△△△.ne.jp
3Press j to select the
phone number, and press
T.
Nancy Brand

45
Phone book
Saving from Dialed/Received calls
1Press n in the idle screen.
<( ) : Display Received calls.>( ) : Display Dialed calls.
DialedReceived Jul 4 11:05 030004XXXX Jul 3 10:22 Jane Moore Jul 3 9:35 Carol Adams Jul 2 22:00 John Smith
2Press j to select the
phone number to save in the
phone book, and press
e (save).
"New" : Create and save a new address. "Add" : Add and save newly added information.
宛先入力
phone book save to Select way to
New Add
3Press j to select "New,"
and press p (select).
The phone book edit screen appears. The phone number you selected is automatically entered.
For details on how to save information in the phone book, see steps 2 to 8 on pages 40
and 41.

46
Pair function
Saving to the pair functionYou can save up to three phone numbers (like frequently used ones) from the phone book,
and make calls, send mails or use Hello Messenger with a simple operation.
You need to save pair partners to the phone book beforehand. For details on how to save
numbers in the phone book, see pages 40 and 41.
1Press T in the idle screen,
press n to display the tab
you want to save a partner to.
31 2
2Press e (save).
あ かさ やたな はま
青木一郎赤坂花子阿部井田伊藤宇野江口
相原太一
3Press a to select the
person to save, and press
e (save).
Name, Phone no., Mail address and image of the person you selected are saved.
Pair function

47
Pair function
Making a call by using pair function
1Press T in the idle screen.
31 2
Nancy Brand 0900003XXXX △△△@□□□.ne.jp
2Press n to select the
person to call.
31 2
Nancy Brand 0900003XXXX △△△@□□□.ne.jp
3Press j to select
(Call), and press
p (select).
Nancy Brand
To send mail
Press j to select (E-mail) or (C-mail), and press p (select) in step 3.
For details on how to create or send e-mail, see steps 7 to 12 on pages 50 and 51.
For details on how to create or send C-mail, see steps 3 to 4 on page 58.
To use Hello Messenger
Press j to select (Hello), and press p (select) in step 3.
For details on how to use Hello Messenger to invite people to join, see step 5 on page 65.

48
Using e-mail EZweb subscription required
About e-mailE-mail allows you to exchange mail with PCs or cellphones that support e-mail. You can
send mail of 5,000 double/10,000 single byte characters and photos and movies.
Before using e-mail
・ You need to subscribe to the EZweb service to use the e-mail service. Contact an au shop or Customer Service Center if you did not subscribe to the service at the time of purchase.
・ Make initial settings before using the e-mail and EZweb services. See page 22 to make initial settings.
・ You can send e-mail to up to fi ve recipients at a time.・ You can send up to 1,000 e-mails (including recipients of messages) in one day.・ It may take a short while to send/receive mails when they have attachments.
△△△ □□□ □□

49
Creating and sending e-mail
1Press q (mail) in the idle
screen.
E-mailCreate newInboxOutboxCheck new mailFriend boxInfo boxSettings
2Press j to select "Create
new," and press p (select).
Create
Icons
(Address) : The e-mail address of the recipient (Subject) : The subject of the e-mail (Attachment) : The data attached to e-mail (Main text) : The main text of the e-mail
3Press j to select
(address), and press
p (select). Phone book groupE-mail recordManually
input address Select way to
Phone book
There are three types of destinations: To, Cc and Bcc. You can send e-mail to up to fi ve
destinations at a time (up to 640 single byte characters including To, Cc and Bcc).

50
Creating and sending e-mail (continued)
4Press j to select "Phone
book," and press
p (select).
あ かさ やたな はま
青木一郎赤坂花子阿部井田伊藤宇野江口
相原太一
You can select an address from sent/received messages or enter an address manually.
5Press a to select a person
you want to send an e-mail to,
and press p (select).
DetailBasicNancy BrandNancyBrand000△△△@□□□.ne.jp□□□@△△△.ne.jp
6Press j to select an e-mail
address, and press
p (select).
CreateNancy Brand
7Press j to select
(subject), and press
p (select).
Subject
100byte 漢カaA12
8Enter the subject, and press
p (ok).
CreateNancy BrandTomorrow’s meetin

51
9Press j to select (main text), and press p (select).
Input text
10000byte 漢カaA12
10Enter the main text, and press
p (ok).
Create
Hi, tomorrow’s meeting is held at 10:00.
Nancy BrandTomorrow’s meetin
11Press e (send). Select sending
My e moji Easy e moji
Send Photo mail
12Press j to select "Send,"
and press p (select).
The e-mail is sent.

52
Opening a received e-mail
When you receive an e-mail
A message and appear in the idle screen. E-mail 1
1Press p (select).
Icon:The folder containing new mail
Inbox UnreadM folder 1Folder1Folder2Folder3Folder4Folder5Folder6Folder7
2Press j to select the folder
containing new mail, and
press p (select).
Icons:The "read mail" that has already been read:The "unread mail" that has not yet been read
001 △△△@□□□.ne.002 Jane Moore003 Kate Dicken004 Jane Moore005 John Smith006 Kate Dicken007 John Smith008 John Smith
Mainfldr New 1/020
3Press j to select the new
mail, and press p (viewer).
How to view received mail
00107/04 11:45 △△△@□□□.ne.jp HelloI will go to ticket gate of the ○○ station at 12 o’clock tomorrow.
Hold down for at least one second to change the font size.
Press or to return to the received messages.

53
To open an e-mail in the Inbox
1Press q (mail) in the idle
screen.
Icon: The "unread mail" that has not yet been read
The number on the right side is the number of unread mails.
Settings
E-mailCreate newInbox 1OutboxCheck new mailFriend boxInfo box
2Press j to select "Inbox,"
and press p (select).
Inbox UnreadM folder 1Folder1Folder2Folder3Folder4Folder5Folder6Folder7
3Press j to select the folder
containing the mail you want
to read, and press
p (select).
001 △△△@□□□.ne.002 Jane Moore003 Kate Dicken004 Jane Moore005 John Smith006 Kate Dicken007 John Smith008 John Smith
Mainfldr New 1/020
4Press j to select the mail
you want to read, and press
p (viewer).
00107/04 11:45 △△△@□□□.ne.jp HelloI will go to ticket gate of the ○○ station at 12 o’clock tomorrow.

54
Replying to a received e-mail
1See steps 1 to 4 in "To open an e-mail in
the Inbox" (page 53) to display the e-mail
to reply.
00107/04 11:16 Kate Dickens Meet with youTomorrow morning I’m waiting in the square in front of the △△ station.
2Press j to select
(sender) or (subject), and press p (reply).
(subject) is prefi xed with "Re:," and the main text of the
e-mail is quoted.
Create Kate Dickens Re:Meet with you
Tomorrow morning I’m waiting in the square in front of the △
3Press j to select (main text), and press p (select).
Input text
Tomorrow morning I’m waiting in the square in front of the △△ station.
9926byte 漢カaA12
4Input the main text, and press
p (ok).Thanks for your mail. I’m looking forward to seeing you.
Create Kate Dickens Re:Meet with you
5Press e (send). Press
j to select "Send," and
press p (select).
The e-mail is sent.

55
Reading e-mails with photo or movie attachedExample: To read an e-mail with a photo attached
1See steps 1 to 3 in "Opening a received
e-mail" (page 52) to view a mail.
Icon
:An image attached to the mail
00107/04 10:47 △△△@□□□.ne.jp HelloI send you a picture I took in the park. (28KB)060702_1044~01.j pg
2Press j to select a fi le
name, and press p (recv).
When the fi le is received, the photo is displayed.
00107/04 10:47 △△△@□□□.ne.jp HelloI send you a picture I took in the park. (28KB)060702_1044~01.j pg
Receiving attached data
Press to select a photo, and press (view) to display the entire photo on the
screen.
Depending on the size of photo or movie, you can display a fi le in step 1, or display by
pressing to select a fi le name and press (play) in step 2.
It may take a short while to send/receive mails depending on the data attached to them or
the reception strength of the place you are in.

56
Filtering spamWe recommend that you set our mail fi lter function to block spam.
We, KDDI Corporation, launched a new service to provide some tips to help you choose
from our mail fi lter options.
Setting the mail fi lterExample:To access the Supportive setting
Press q (mail) in the idle screen, and use j and p to select "Settings" → "Mail fi lter."
Use j and p to select "Yes" → "次へ ."
Enter your security code and use j and p to select "送信 ."Then, follow the on-screen instructions.
Simple settings
フィルターレベル(高)
フィルターレベル(中)
フィルターレベル(低) 未承諾広告※ なりすましメール.
サポート設定
By changing your e-mail address, you can prevent spam from being received. For details
on how to change e-mail address, see pages 24 and 25.
メールフィルター
■カンタン設定1 サホ゜ート設定2 フィルターレヘ゛ル(高)3 フィルターレヘ゛ル(中)4 フィルターレヘ゛ル(低)※カンタン設定とは?
■個別設定5 未承諾広告フィルター6 アト゛レスフィルター※個別設定とは?
■その他7 拒否通知メール返信設定
9 設定にあたって8 設定確認
戻る
サホ゜ート設定サホ゜ート設定を使えば質問に答えるだけでお客様にぴったりのフィルターを自動で設定します。
※現在メールフィルターを設定している方は現在の設定はリセットされますのでご注意ください。
質問へ
戻る
57
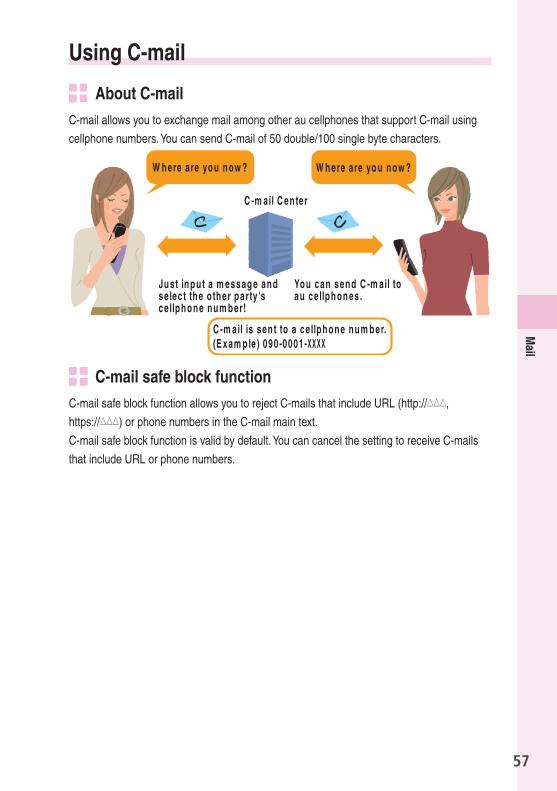
Using C-mail
About C-mailC-mail allows you to exchange mail among other au cellphones that support C-mail using
cellphone numbers. You can send C-mail of 50 double/100 single byte characters.
C-mail safe block functionC-mail safe block function allows you to reject C-mails that include URL (http://△△△,
https://△△△) or phone numbers in the C-mail main text.
C-mail safe block function is valid by default. You can cancel the setting to receive C-mails
that include URL or phone numbers.

58
Creating and sending C-mail
1Hold down q (mail) for at
least one second in the idle
screen.
C-mailCreate newInboxOutboxSettings
2Press j to select "Create
new," and press p (select).
100byte 漢カナaA12
Input text
3Enter the main text, and press
p (ok).To:UnsentToday the meeting is held at 3:00 pm.
01 07/04 11:45
4Press e (send). 宛先入力
phone number Enter
Phone book C-mail record Manually
59
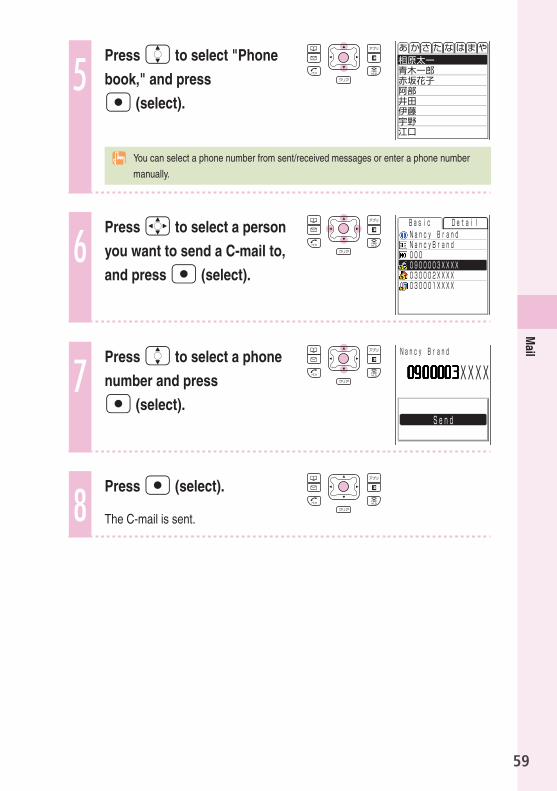
5Press j to select "Phone
book," and press
p (select).
あ かさ やたな はま
青木一郎赤坂花子阿部井田伊藤宇野江口
相原太一
You can select a phone number from sent/received messages or enter a phone number
manually.
6Press a to select a person
you want to send a C-mail to,
and press p (select).
DetailBasicNancy BrandNancyBrand0000900003XXXX030002XXXX030001XXXX
7Press j to select a phone
number and press
p (select).
XXXX
Send
Nancy Brand
8Press p (select).
The C-mail is sent.

60
Opening a received C-mail
When you receive a C-mail
A message and appear in the idle screen. C-mail 1
1Press p (select).
Tomorrow the meeting will be held at 3:00 pm.
Jane Moore001 07/04 11:40

61
To open a C-mail in the Inbox
1Hold down q (mail) for at
least one second in the idle
screen.
C-mail
Inbox 1OutboxSettings
Create new
Icon: The "unread mail" that has not yet been readThe number on the right side is the number of unread mails.
2Press j to select "Inbox,"
and press p (select).001 07/04 11:40
002 07/03 10:00
003 07/03 9:32
004 07/02 10:30
Inbox New 1/005
Jane Moore
John Smith
Ron Edwards
John Smith
3Press j to select the
C-mail you want to read, and
press p (viewer).
Tomorrow the meeting will be held at 3:00 pm.
Jane Moore001 07/04 11:40

62
Hello Messenger
Hello MessengerWhat you can do with Hello MessengerHello Messenger is like a portable private chat room service for au cellphones supporting
this service. Hello Messenger allows you to send text, sounds, and photos to all the
members in real time. Each member can select his/her original cartoon-style character.
The host can pick up 4 members maximum from the phone book memory.
According to the conditions such as frequent use, your location, or reception strength,
battery may be discharged sooner than usual.
The fi xed number of members for this service are 2 to 5.

63
Hello Messenger
Displaying Hello Messenger menu
1Press p (start) in the idle
screen. Press n to select
(Entertainment).
2Press j to select "Hello
Messenger," and press
p (select).
When you use Hello Messenger for the fi rst time, press (OK). You can set your
character from the below list. Press to select your character, and press (設定).
Character listYou can choose your character from these 12 original characters.
©Yamashita Kohei/mountain mountain

64
Hello Messenger
Inviting members to joinYou can invite the members saved in the member list to start chatting.
1Press p (start) in the idle screen, and press n to select (Entertainment). Press j to select "Hello Messenger," and pressp (select).
2Press j to select
"スタート," and press
p (選択).
3Press j to select
"アドレス帳," and press
p (選択).
See page 44 to register the members from phone book.
4Press a to select the
members to register, and
press p (選択).
The member list appears.
You can register 5 members maximum including your own name in the member list. Your
name is shown on the top of the list (or "私" is shown when your name is not registered in
the profi le). Your name or "私" cannot be changed or deleted.
To add the member, select the blank fi eld highlighted, repeat steps 3 to 4.
65
Hello Messenger
5Press A (お誘い).
The member saved in your member list gets an invitation message. When you see "○○さんが参加しました"(○○ joined) appears on your display, you can start chatting with the joined member.
You can register members from "ハローランキング"(hello ranking) or "グループ"
(group).
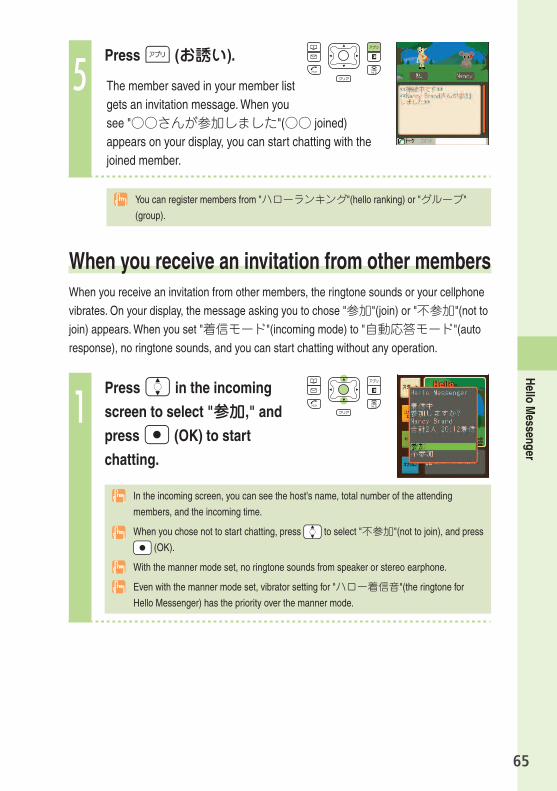
When you receive an invitation from other membersWhen you receive an invitation from other members, the ringtone sounds or your cellphone
vibrates. On your display, the message asking you to chose "参加"(join) or "不参加"(not to
join) appears. When you set "着信モード"(incoming mode) to "自動応答モード"(auto
response), no ringtone sounds, and you can start chatting without any operation.
1Press j in the incoming
screen to select "参加," and
press p (OK) to start
chatting.
In the incoming screen, you can see the host's name, total number of the attending
members, and the incoming time.
When you chose not to start chatting, press to select "不参加"(not to join), and press
(OK).
With the manner mode set, no ringtone sounds from speaker or stereo earphone.
Even with the manner mode set, vibrator setting for "ハロー着信音"(the ringtone for
Hello Messenger) has the priority over the manner mode.

66
Camera
The W42S has a 1.25 Megapixel camera and allows you to take photos and record movies.
What you can do with the camera You can have fun with photos and movies on the W42S.
You can set photos you have taken as the
image for the idle screen, or display them
when you have an incoming call, or save
photos or movies to the phone book.
mailphone book start EZ
EZapps
option E-mailsaveretake
You can mail photos and movies.You can send images up to 500 KB※ by attaching to an e-mail.
・ The VGA, SXGA format is ideal for using photos on PCs.
※ It may take a short while to send/receive mails depending on the reception strength of the place you are in.
Page
73 You can print out photos or browse them using a PC.
You can save photos you took in the
"Memory Stick Duo" (sold separately)
and print them out with a printer or at
a DPE shop, or browse them using a
PC.
Camera

67
Camera
Successful taking of photos/movies
How to hold the W42S
To take "QVGA" or "QQVGA" photos To take "VGA," "SXGA" photos or record movie
To take photos with W42S closed
How to set the W42S
Hold your bent arm tight against your body. Hold the main unit not to shake it. If your armpits are open or your arms are stretched, the main unit may move and it may
cause a blur.
Be sure not to cover the lens with your fi ngers.
To stabilize the shot
Do not move the main unit. Do not move the main unit since you press the shutter until the shutter sound stops. Be
careful especially when you shoot in the dark.
Use self-timer You can prevent a blur caused by pressing the shutter.

68
Camera
Taking photos
1Press Q (camera key) on the
side of your cellphone in the idle
screen.
The photo monitor screen appears.
2View the subject you want
to take on the photo monitor
screen.
option moviemode sceneshoot
3Press p (shoot).
You hear the shutter sound, and the photo you have taken is displayed (preview screen).
option E-mailretake save
You can also take photos by pressing (camera key) on the side of your cellphone.

69
Camera
4 Press p (save).
"Saved in data folder" appears, and the display returns to the monitor screen.
Saved in data folder
You can also save photos by pressing (camera key) on the side of your cellphone.
Photos are saved in the "Photo folder" of the data folder. Each photo is titled as follows:
060704_1245̃02
There are four photo shoot modes: "QVGA," "QQVGA," "VGA" and "SXGA."
QQVGA
QVGA
VGA
SXGA
Photo titles are different from the above if "VGA" or "SXGA" photos are taken.
About the "Memory Stick Duo" (sold separately)
If you take photos with "VGA" or "SXGA" by inserting the "Memory Stick Duo" in the
W42S, the images are saved in the "DigiCame folder" in the "Memory Stick Duo."

70
Camera
Recording movies
1Hold down Q (camera key) on
the side of your cellphone for at
least one second in the idle screen.
The movie monitor screen appears.
You can also display the movie monitor screen by pressing (movie) in the photo
monitor screen.
2Hold the W42S horizontally with both hands. View the
subject you want to take on the movie monitor screen.
option
photo
mode
scene
rec
3Press Q (camera key) on the side of your cellphone.
You hear the shutter sound, and
blinks when recording starts.
■■cancel
■
You can also record movies by pressing (rec).
To cancel recordingPress q (cancel).
To stop recordingPress Q (camera key) or p (■).

71
Camera
When you stop recording or the recording time endsThe fi rst recorded screen is displayed vertically (preview screen).
option E-mailagain save
4 Press p (save).
"Saved in data folder" appears, and the display returns to the movie monitor screen.
Saved in data folder
You can also save movies by pressing (camera key) on the side of your cellphone.
Movies are saved in the "Movie folder" of the data folder.
Each movie is titled as follows:
060704_1245̃02
There are fi ve movie record modes: "Standard S," "Standard M," "High quality M," "High
quality L" and "Video QVGA."
Standard S
Standard M, High quality M High quality L
Video QVGA
Movie titles are different from the above if "Standard S" movies are recorded.
About the "Memory Stick Duo" (sold separately)
If you record movies with "Video QVGA" by inserting the "Memory Stick Duo" in the
W42S, the images are saved in the "Movie folder" in the "Memory Stick Duo."
72
Camera
Viewing photos/movies you have taken
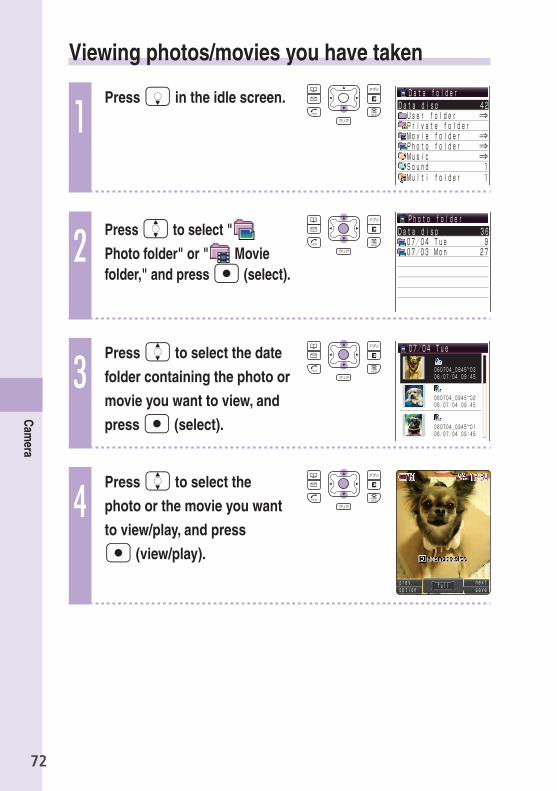
1Press D in the idle screen. Data disp 42
User folder ⇒Private folderMovie folder ⇒Photo folder ⇒Music ⇒Sound 1Multi folder 1
Data folder
2 Press j to select "
Photo folder" or " Movie folder," and press p (select).
Photo folderData disp 3607/04 Tue 907/03 Mon 27
3Press j to select the date
folder containing the photo or
movie you want to view, and
press p (select).
07/04 Tue
060704_0945~0306/07/04 09:45
060704_0945~0206/07/04 09:45
060704_0945~0106/07/04 09:45
4Press j to select the
photo or the movie you want
to view/play, and press
p (view/play).
prev.option full save
next

73
Camera
Attaching a photo/a movie to e-mail
1Press e (E-mail) in the
preview screen immediately
after you have taken the
image.
Create
(12KB)060704_1200
The create screen appears.For details on how to create and send e-mail, see steps 3 to 12 on page 49 to 51.
The photo or the movie you have taken is automatically attached to an e-mail
(attachment).
"Other phone cannot play size over case happen" may appear. Press to select "Attach
on," and press (select).
74
Camera
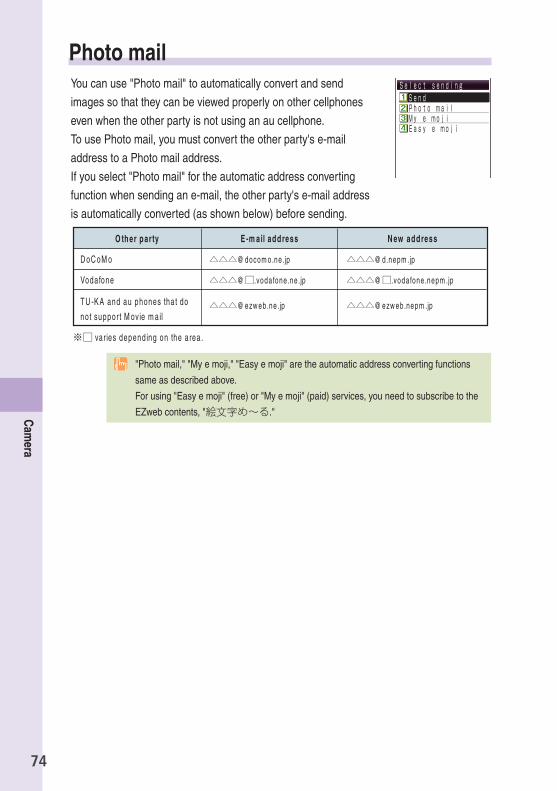
Photo mailYou can use "Photo mail" to automatically convert and send
images so that they can be viewed properly on other cellphones
even when the other party is not using an au cellphone.
To use Photo mail, you must convert the other party's e-mail
address to a Photo mail address.
If you select "Photo mail" for the automatic address converting
function when sending an e-mail, the other party's e-mail address
is automatically converted (as shown below) before sending.
Select sendingSendPhoto mailMy e mojiEasy e moji
※□
△△△ △△△
△△△ □ △△△ □
△△△ △△△
"Photo mail," "My e moji," "Easy e moji" are the automatic address converting functions
same as described above.
For using "Easy e moji" (free) or "My e moji" (paid) services, you need to subscribe to the
EZweb contents, "絵文字め~る."

75
EZweb
EZweb EZweb subscription required
About EZwebYou need to subscribe to the EZweb service to use the EZweb service. Contact an au shop
or Customer Service Center if you did not subscribe to the service at the time of purchase.
Make initial settings before using. If you have not made initial settings yet, see page 22.
EZweb is an information service that allows you to enjoy the Internet on your cellphone.
With EZweb, you can obtain Chaku-Uta-Full®(full songs), the latest news, and other contents
from information sites.
76
EZweb
Displaying the EZ Top menu
1Press e (EZ) in the idle
screen.
Press ( ) in the EZmenu, and you can access to
"SonyEricsson@ez."
2Press j to select " Top
menu," and press p (ok).
①②③
④
⑤
⑥
⑦
⑧
⑨
⑩⑪⑫
⑮⑭⑬
①
②
⑤
⑧
⑫
⑬
⑭
④
⑥
③
⑩
⑮
⑨
⑦
⑪
It may take a short while for each screen to appear.
The screen layout and contents are just an examples. These are subject to change.

77
EZweb
Saving your favorite sites
1Display the site you want to
save, and press
e (Browser Menu).
New bookmark Save Items Take snapshot Reload Bookmark(s) View snapshots Go To URL Current Certificate
2Press j to select "New
bookmark," and press
p (Select).
Save favoriteTitle天気予報URLhttp://△△△.ezweb.ne.jpFolder:Folder1
3Press e (cmplt).
You can save up to 100 sites in the Favorite site. However, some sites may not be saved.
78
EZweb
Viewing a site saved to the Favorite site
1Press e (EZ) in the idle
screen.
2Press j to select "Favorite
site," and press p (ok).
Favorite site Folder1 Folder2 Folder3 Folder4 Folder5 Folder6 Folder7 Folder8
3Press j to select a folder,
and press p (select). お気に入りリスト URLタ゛イレクト入力 前回画面表示 テ゛ータフォルタ゛ 画面メモリスト フ゛ラウサ゛履歴クリア EZ設定
天気予報Folder1
4Press j to select the site
you want to view, and press
p (select).

79
EZweb
Confi rming your call costsYou can confi rm call and communication charges.
1Press p (start) in the idle
screen.
2Press 1.
PCSiteTraffc
Time/Toll/Sub M1_Inquire tollTime/Toll
Toll rate 1.0SubscriptionMin. minder OFF
Toll display OFF
3Press 1.
Connect?
YesNo
4Press j to select "Yes,"
and press p (select).
Select the item you want to confi rm.
■料金照会■1 料金お知らせサーヒ゛ス2 通話料・通信料照会 説明3 ご請求金額照会 説明4 未払い料金照会 説明5 料金のお支払 説明6 累計ポイント照会 説明

80
EZweb
Downloading a Chaku-Uta®(ringtone)Example: To download a Chaku-Uta® (ringtone) and specify it as an ringtone
1Press e (EZ) in the idle
screen.
2Press j to select " Top
menu," and press p (ok).
3Press j to select "カテゴリで探す," and press
p (OK).
カテコ゛リで探す
EZサーヒ゛スで探す auのおすすめサーヒ゛スはこ ニュース・天気 着うたフル 着うた 着ムーヒ゛ー 着Flash(アニメ)
4Press j to select
"着うた," and press
p (Select).
JーPOP(73) ロック・洋楽(46) ワールト゛ミューシ゛ック(9) TV・映画(43) アニメ・ケ゛ーム(38) クラフ゛・インテ゛ィース゛(51) クラシック・シ゛ャス゛(25) アレンシ゛(36)
着うた
81
EZweb
5Press j to select the
desired site, and press
p (Select).
Follow the on-screen instructions to select the melody you want to download.
When the additional information fee is charged to use the site, you must enter your EZ
password or Premium EZ password.
EZ password:
4-digit number to be set when you fi rst subscribe to the paid contents
Premium EZ password:
4 to 8-digit number to be set when you fi rst apply to "まとめてau支払い" Follow the on-screen instructions to enter either of the above passwords. Set the password
when using the site for the fi rst time.
6Select and download a melody.
Download the melody by following the on-screen instructions.
△△△Downloaded
7When downloading fi nishes,
press q (play) to play back
the Chaku-Uta®(ringtone), and
press e (save) while the
Chaku-Uta®(ringtone) is playing.
Save to
E-mail alertServer alertC-mail alert Alarm1 Alarm2 Alarm3 Alarm4
Phone ring tone
8Press j to select "Phone
ring tone," and press
p (select).
The downloaded Chaku-Uta®(ringtone) is specifi ed as the ringtone.

82
EZweb
Downloading a Chaku-Uta-Full®(full song)
1Press p (start) in the idle
screen.
2Press n to select
(au Music).
3Press j to select
"EZ Music!," and press
p (select).
Download the Chaku-Uta-Full®(full song) by following the on-screen instructions.
You can also download the Chaku-Uta-Full®(full song) by performing the following operation.
Press (EZ) in the idle screen → use and to select "Top menu" → "カテゴリで探す" → "着うたフル."
The Premium EZ password is needed to register a paid program. Premium EZ password is
the 4 to 8-digit number to be set when you fi rst apply to "まとめてau 支払い."
Make sure to write down your Premium EZ password and keep it safe.
The screen layout and contents are just examples. These are subject to change.

83
EZweb (EZ Channel)
EZ ChannelWith EZ Channel, the unique au mobile program, the latest contents are automatically
delivered and you can enjoy them just like TV or magazines simply by registering your
favorite programs on W42S.
Displaying EZ Channel menu
Enjoying EZ Channel1 Register for the programs you are interested in.
You can register for up to three programs in the "Program Guide."They are downloaded automatically since late at night to early morning, then saved to the "Registered Program" directory.
2 Play back the program.You can watch the program saved to the "Registered Program" directory anytime.
3 Save the program.When a registered program is updated, the program is overwritten to old one. You should save the programs you do not want to delete in "Multi folder" etc..※In some cases, you may not be able to save a program because of copyright
protection.
Be sure to make initial settings before using the EZ Channel. See page 22 to make initial
settings.
EZ Channel downloads a large amount of data (maximum total approximately 5Mbytes),
for each program. To use EZ Channel, it is recommended to subscribe to the discount
service of the data communications charges.
When programs arrive, they are automatically downloaded. Keep the battery full and the
power turned on within the service area.
The screen layout and contents are just examples. These are subject to change.

84
EZ Navi
What you can do with EZ Navi EZweb subscription required
EZ Navi is a convenient system based on the geographic (GPS) information.
mailphone book start EZ
EZapps
A
CD
B
A When you want to know where your child is: "Position Search"
B When you want to be notifi ed of a specifi ed period of time or area: "Area Message"
With the operation from W42S, you can check the position of a cellphone supporting "Position Search." There are two kinds of services: "Auto Position Search" (paid), "Position Search Mail" (free).
First you specify area and time frame. And as the one (for example, your child) enter (or stay)/leave (or are not) there, this feature sends a notice message automatically to another your specifi ed au phone.
C When you go out: "EZ Navi Walk"
You can display various menus convenient for going out.
オススメ Provide new and recommended information
※Experience the demonstration of voice navigation system or voice input function by "おためしナビ."
乗換検索★ Search the train transfer guide and train scheduleナビ★ Voice navigation service to a destination or registration of "My-Spot"現在地 Search the map, shops, etc. of the area you are in道路情報 Search nationwide road information in real time設定登録 Make various settings and registers membershipsThe star symbol shows that you can use your voice to enter search terms. This is called "Voice input" function.
EZ Navi

85
EZ Navi
Return home
Select "ルート案内開始"
→"はい"
(Search result display)
After registering your home location beforehand, you can easily navigate a route to your home from wherever you are.
My-SpotMy-Spot Home Office Tokyo tower
After registering frequently visited places or your home, this system navigates you to your destination.
View My MapThe result of the fi rst measurement is displayed as
on the map. Your current location will be displayed as in real time by successive measurement.
(Map display)
If you simply select "View My Map," a map of your current location appears in real time.
E-mail My Map
【GPS information】http://walk.eznavi.jp/map/△△△△△△△
Create
I’m here!
Nancy BrandI’m waiting
You can inform your partner where you are by mail when you plan to meet him or her.
D When Left front passenger check for driving route information: "PassengerSeatNavi"
Left front passenger can use this feature with W42S to check the route information for the
destination on map or by voice.
For the use of EZ Navi, the information fee is charged in addition to the data
communications charges.

86
EZ Navi
What you can do with Security Navi EZweb subscription required
What you can do with Position SearchWhen your child does not come home on time and you are worried if your child may be lost,
you can confi rm his/her geographic location on a map with a simple operation. There are
two kinds of "Position Search" services: "Auto Position Search" and "Position Search Mail."
Auto Position Search
Where is he?
Example: When the parent searches the
current position of his/her child.
◆ Feature・ When the parent searches where his/her
child is, he/she can be notifi ed of where the
child is. The child does not have to make any
operation.
This service is recommended for little children
who are not accustomed to the operations of
cellphones.
Note : Monthly fee is charged separately.
Position Search Mail
Where are you?
Example: When the parent sent a mail to
his/her child.
◆ Feature・ The parent can send a mail with a message to
his/her child.
・ The child can confi rm the message from the
parent and inform him/her where he/she is
now.
87
EZ Navi
What you can do with Area MessageFirst you specify area and time frame. And as your child enter (or stay)/leave (or are not)
there, this feature sends a notice message automatically to your W42S.
Area Message
Example: When the parent confi rms the area
his/her child is in.
◆ Feature・ The parent can confi rm his/her child's safety
when the child goes to after school lessons
and he/she is worried about the child's way
home. The child's cellphone automatically
informs the parent's cellphone that the child is
taking the usual route.
"Security Navi" services are available only among the cellphones supporting this feature.
To use "Security Navi" services, both cellphones must support this feature, and need to
save each other's phone number in their phone book.
To use "Security Navi" services, review the terms of service and user agreement, and also
set navi password before the fi rst use.
In places like underground shopping mall or inside buildings, you may not be able to
get accurate location information. Because GPS Satellite signals can be affected by
surrounding terrain-buildings, canyon walls, hard ground, etc.; then signals may not be
received properly.
Area Message may not function properly due to the inaccurate location information
obtained by your W42S.
You cannot confi rm the location if the other cellphone is out of the service area, in some
operations, set to reject the call, or without the application.
The screen layout and contents are just examples, and may differ from the actual screen.
"Security Navi" services are not available, after canceling C-mal service or with EZ apps
restriction function.
Free calling time provided by your price plan can be applied to EZ apps transmission fees;
but family discount of C-mails or discount service of the data communications charges
cannot be applied.
The data communication is charged separately for obtaining information or displaying map.

88
au Music
You can enjoy a variety of music with au Music services.
What you can do with au Music To play back audio fi les
With au Music Player, you can play back audio fi les, such as
downloaded Chaku-Uta-Full® (full song), or transferred data from au
Music Port.
Play listYou can save your favorite audio fi les to play list and play back them
in desired order.
Photo albumYou can save your favorite image fi les to photo album and view
them in slide show mode. Also, you can view the slide show and
play back audio fi les at the same time.
au Music

89
au Music
Uta-tomoTM EZweb subscription required
With this service, you can fi nd someone having same preferences
in music or local hits.
Listening Search EZweb subscription required
"Listening Search" is the search service using your W42S's
microphone. With this service, you can fi nd out song title, artist
name, or album title by playing back music close to the microphone.
The screen layout and contents are just examples, and may differ from the actual screen.

90
au Music
Playing back a Chaku-Uta-Full® (full song)
1Press p (start) in the idle
screen.
2Press n to select
(au Music).
3Press j to select "au
Music Player," and press
p (select).
4Press j to select "au
Music ライブラリ," and
press p (選択).
5Press j to select "全曲一覧," and press
p (選択).

91
au Music
6Press p ( ).
You can enjoy sounds though speaker (with no stereo earphone connected). You can also
enjoy audio fi les with no sound from the speaker by connecting stereo earphone to W42S
beforehand (page 14).
The screen layout and contents are just examples, and may differ from the actual screen.
Operations during playing back< : Skip to the beginning of the current audio fi le
<(1 second) : Rewind
> : Skip to the next audio fi le
>(1 second) : Fast forward
p : Pause/play back
j : Adjust the volume
To end au Music Player
1 With au Music Player active, press t.
2 Press j to select "Close player" and press p (select).
To play back audio fi les with Shuttle PlayerHold down i for at least one second in the idle screen.
After 25 seconds with no operation, W42S displays the idle screen and starts BGM playing.
To switch to BGM playingYou can perform other operations with play back operation at the same time.
1 During playing back an audio fi le, press t.
2 Press j to select "PlayBackground," and press p (select).

92
EZ • FM
EZ・FM EZweb subscription required
With W42S, you can listen to the FM radio.
You can check titles of songs or download the songs you liked (when provided by Chaku-Uta®),
while listening to EZ・FM.
How to listen to EZ・FMThere are two ways to listen to EZ・FM:
1 By connecting a stereo earphone to the
W42S.
2 By connecting the standard AC adaptor 01 (optional) to the
desktop holder and inserting the W42S into the desktop holder.
When you want to use the speaker, set "スピーカー /イヤホン切替" (Switching speaker/earphone) to "スピーカー" (Speaker). For details on the setting, see page 94.
EZ・FM sounds from a stereo earphone by default.
To listen to EZ・FM clearlyThe stereo earphone cord and standard AC adaptor 01 (optional) cord work as antennas. Extend
the cord as long as possible and search for a direction that enables EZ・FM to sound better.
For indoor use, we also recommend listening to EZ・FM near a window in order to get a signal.

93
EZ • FM
Listening to EZ・FM
1Press p (start) in the idle
screen, and press n to
select (Entertainment).
You can also listen to EZ・FM by pressing (EZapps) in the idle screen, pressing
to select "EZ・FM," and pressing (起動).
2Press J to select "EZ・FM," and press p (select).
EZ・FM is received and appears.
How to read the EZ・FM screen
When you use EZ・FM for the fi rst time, the prior written notice appears. Select "承諾する."
When you select "承諾(次回から非表示)," the prior written notice does not appear
again.
You can change the selected item by pressing in the EZ・FM screen. Pressing
allows you to operate the selected item.
When there is an incoming call with stereo earphone connected to your W42S, you can
answer the call by pressing . Pressing incoming switch on stereo earphone also allows
you to answer the call using stereo earphone.
The specifi cation is subject to change without prior notice. The screen shown is an
example.

94
EZ • FM
Listening to EZ・FM (continued)
To adjust volumeYou can adjust the volume (Level 1 to 20).
Press j in the EZ・FM screen.
To select a radio stationPress n in the EZ・FM screen.
To display the song titleYou can display the information such as the name of the artist or the title of the song you
are listening.
Press P (曲名表示 ) in the EZ・FM screen.
Information may not be provided depending on the programs.
The data communication charges are needed for displaying the song title or other web
based services.
The data communications charges are not needed for using EZ・FM.
To switch the sound output (Speaker/earphone)
1 Press A (MENU) in the EZ・FM screen.
2 Use J and P to select "設定 " → "ラジオ機能設定 " → "スピーカー /イヤホン切替 " → "スピーカー " or "イヤホン " → "決定 ," and press P (決定 ).
To Minimize/End EZ・FMYou can minimize or end EZ・FM. If you minimize EZ・FM, you can perform other
operations such as creating, sending and receiving mail while listening to EZ・FM.
Press t in the EZ・FM screen.
Press j to select "Suspend" or "Quit," and press p (select).
EZ・FM ends automatically when no operation is made for two hours by default.
While minimizing EZ・FM, pressing in the idle screen displays confi rmation screen
asking whether you end EZ・FM or not. When you press to select "Quit," and press (select), you can end EZ・FM.
While minimizing EZ・FM, pressing (EZapps) in the idle screen, EZ・FM screen
appears again.

95
PC site viewer
PC site viewer EZweb subscription required
You need to subscribe to the EZ WIN course to use the PC site viewer service. Contact an
au shop or Customer Service Center if you did not subscribe to the service at the time of
purchase.
With PC site viewer, you can view WEB sites just like the ones shown on your personal
computers on your cellphone. WIN ensures high-speed (up to 2.4Mbps downlink) data
communications.
What you can do with PC site viewer
1 You can view WEB sites intended for personal computers with W42S.
表示モードスモールスクリーン
表示モードPCスクリーン
2 You can display or automatically-update a part of the WEB site information.待受指定
待受指定

96
PC site viewer
The screen layout and contents are just examples, and may differ from the actual screen.
When you press (接続) displaying the idle screen selected by "待受指定" (Standby
assignment), you can operate the PC site viewer from the top of the page as usual.
Mastering operation basics
1Press p (start) in the idle
screen, and press n to
select (Entertainment).
2Press j to select "PC site
viewer," and press
p (select). Press A (OK).
Warning message about data communications charges appears.
3Press j to select "トップページ," and press
p (選択).
"Duogate" (http://duogate.jp/) is set by default.
The contents on the top page are just examples, and may differ from the actual screen.
4Press n.
The screen scrolls.Press j and you can select the links on the screen. When you select a link and press p (選択), the linked site appears.

97
PC site viewer
Using "待受指定" (Standby assignment)You can set a part of the WEB site as the idle screen. You can set it to be automatically-
updated at specifi ed intervals.
A specifi ed time passes in the idle screen, the WEB site selected by "待受指定" (Standby
assignment) is displayed.
1See steps 1 to 4 in "Mastering operation
basics" (page 96) to display a site.
2Press A (メニュー ).
Press j to select "待受指定" (Standby assignment)
and press p (選択).
3Press A (オプション).
Press j to select "新規作成" and press p (選択).
Pressing a narrows area displayed by "待受指定"(Standby assignment).Pressing A (拡大) and a widens area displayed by "待受指定" (Standby assignment).Pressing A (縮小) again narrows area displayed by "待受指定" (Standby assignment).
4Press p (OK) twice.

98
PC site viewer
Using "待受指定" (Standby assignment) (continued)
5Press p (編集), and enter
the title, and press p (ok).
6Press A (登録), and press
A (設定).
7Press j to select the
interval to update the idle
screen.
When you select the interval to automatically-update the page displayed as the idle screen from among "24時間/12時間/8時間/4時間/2時間/1時間/30分/更新しない" (24 hours/12 hours/8 hours/4 hours/2 hours/1 hour/30 minutes/no update), and press p (OK). "待受指定警告表示" (Standby assignment warning sign) appears.Press A (OK) and press p (OK) to complete the setting.
As the data communication like viewing homepages include many images charges you so
much that you may want to subscribe to the discount service of the data communications
charges. Data communication charges for every update operation with automatically-update (set by
"待受指定" (Standby assignment)) are needed separately.
You can use Charge Reference Service. This service estimates this month's data
communications charges with no discount. By this service, you can see the rough number
that was billed 1 or 2 days ago. From au cellphone ⇒ (EZ) → Use and to select "Top menu" → "料金・申込・インフォ" (Charges, Applications, and Info)
From your PC ⇒ http://my.kddi.com/ (MyKDDI) ※Subscription is required for the fi rst use.

99
Troubleshooting
Symptom Items to check Solution Page
Unable to turn the power on.
Is the battery pack properly installed? Properly install the battery pack. —
Is the battery pack charged? Charge the battery pack. 12
Did you hold down t for at least one second?
Hold down t for at least one second.
18
Unable to make calls.
Is " " displayed on the screen? Make a call from a location where
" " is not displayed.18
Did you enter the area code when entering the phone number?
When making a call to a phone other than a cellphone, fi rst enter the area code even when both parties are inside the same city.
26
Is the power turned on? Hold down t for at least one second.
18
Did you press T ? Press T. 26
Unable to receive calls.
Is " " displayed on the screen? Move to a location where " " is not displayed.
18
Is the power turned on? Hold down t for at least one second.
18
No reaction when a key is pressed.
Is the power turned on? Hold down t for at least one second.
18
Is the keylock set? Slide the lock key down to cancel keylock.
15
Warning tone sounds, and power turns off.
There is not enough power remaining in the battery pack.
Charge the battery pack.12
Incoming calls are automatically answered.
Is the record message set? Hold down M for at least one second to cancel the record message.
32
Unable to hear the other party.
Is the volume during a call set too low?
Press ^ while you are talking. The volume during a call will increase.
28
Please visit the Sony Ericsson Mobile Communications Japan, Inc. web site for more
information.
・From W42S ⇒ e(EZ)(at least one second)(SonyEricsson@ez)
・From your PC ⇒ http://www.SonyEricsson.co.jp/
Troubleshooting

100
Remote lock
In the case you have lost your W42SUsing Remote lock, you can lock your W42S (Auto lock) remotely against unauthorized use.
To set up the working environment of Remote lockAuto lock is enabled by calling to your W42S specifi c times from the phone number specifi ed
beforehand.
1 Press p (start) in the idle screen → press 4 1 2.
2 Enter Lock No., and press p (OK).
3 Use j and p to select "Set" → "ON."
4 Use j and p to select "Duration," and input time intervals.Duration means the time intervals from the fi rst call till a specifi ed times of calls are received. You can set by the range of 1 to 10 minutes.
5 Use j and p to select "Frequency," and input the number of calls.Frequency means the number of times of calls till Remote lock is set. You can set by the range of 3 to 10 times.
6 Use j and p to select "Caller," → the number (1 to 3) where you want to save.Caller 1 to Caller 3 means the phone number used for setting Remote lock.
7 Use j and p to select "Manually," and input the phone number.You can also enter phone number by selecting "Phone book." You can save up to 3 phone numbers.
8 Press e (cmplt).
Remote lock
ONRemote lock M412SetDuration 03min (01-10)
Caller 0/3 (03-10)Frequency 05cnt

101
Remote lock
To set Auto lock on W42S by Remote lock
Make a call to W42S under the working condition set by Remote lock.Remote lock is set, and announcement is played notifying that Auto lock is set.
Remote lock cannot be set if W42S is turned off or in the area where reception strength is
not good.

102
Other features
Other featuresVarious ways to get audio fi les
You can use SonicStage to transfer ATRAC (Adaptive Transform Acoustic
Coding) 3 audio fi les from CDs, Internet, and PCs to "Memory Stick Duo";
and play them back with W42S.
Global ExpertW42S supports Global Expert Service using au IC card.
Global Expert is an international roaming service for the customers to use
the phone replacing its au IC card with a GSM card for overseas use.
No special application procedure or daily/monthly fee is required, and the
call cost is added to domestic call, making the payment procedure is simple.
Menu design settingsYou can select a pattern for the menu screen. You can also set the pattern
data you downloaded.
Infrared data exchange featureYou can exchange such data as a phone book, profi le, or the data in the
data folder between au cellphones that support infrared data exchange.
EZ apps (BREW®)You can download game software from EZweb sites and play games.
"Memory Stick Duo" (sold separately) supportYou can save photos and movies you took with the camera, back up
personal data such as a phone book, and save received e-mails to it.

MEMO
103
104
Index
IndexA
accessories ......................................... 10au IC card ............................................ 11au Music .............................................. 88
BGM playing ..................................... 91ending au Music Player .................... 91playing back ..................................... 90playing back with Shuttle Player ....... 91
Bbattery pack .................................. 10, 11battery power, remaining ............... 3, 18before use ........................................... 10
CC-mail ................................................... 57
C-mail safe block function ................ 57creating and sending ........................ 58icon ................................................... 61opening ...................................... 60, 61receiving ........................................... 60
camera ................................................. 66movie ................................................ 70photo ................................................ 68successful taking .............................. 67
cellphone etiquette ............................... 1charge indicator ............................ 11, 12charging the battery pack .................. 12confi rming your call costs ................. 79confi rming your cellphone number.............................................................. 23cross controllerTM ............................... 16
Ddesktop holder .............................. 10, 12Dialed calls .......................................... 28Disaster Message Board Service (demonstration) .................................... 6display ................................................. 19domain ................................................. 24
downloading Chaku-Uta-Full®
(full songs) .......................................... 82downloading Chaku-Uta®(ringtones).............................................................. 80drive mode ............................................ 4
Ee-mail ................................................... 48
attaching photo or movie .................. 73creating and sending ........................ 49icons ............................... 49, 52, 53, 55initial settings .................................... 22opening ...................................... 52, 53receiving ........................................... 52replying ............................................. 54viewing attached photo/movie .......... 55
e-mail addresschanging ........................................... 24confi rming ........................................ 23
EZ Channel .......................................... 83EZ・FM ................................................. 92
listening ............................................ 93minimizing/ending ............................ 94
EZ Navi ................................................ 84Security Navi .................................... 86
EZ Top menu ....................................... 76EZweb .................................................. 75
confi rming your call costs ................. 79Favorite site ................................ 77, 78initial settings .................................... 22
FFavorite site
saving ............................................... 77viewing ............................................. 78
HHello Messenger ................................. 62
inviting members .............................. 64

105
Iicons .................................................... 19idle screen ........................................... 18ID Unsent ............................................. 27incoming indicator ............................. 11initial settings ..................................... 22Internet (See "EZweb")
Mmail
C-mail ............................................... 57e-mail ............................................... 48
mail fi lter .............................................. 56Main menu ........................................... 20manner mode .................................. 3, 29"Memory Stick Duo" ........................... 13movie
attaching to e-mail ............................ 73recording .......................................... 70saving ............................................... 71viewing ............................................. 72
Music Shuttle ...................................... 17
Nnames of parts .................................... 11
Oone-ring call .......................................... 5opening/closing .................................. 18optional accessories .......................... 10
Ppair function ........................................ 46
making a call .................................... 47saving ............................................... 46
PC site viewer ..................................... 95Using "待受指定" (Standby assignment) ...................... 97
phone book ......................................... 40editing ............................................... 42making a call .................................... 44saving ............................................... 40saving from dialed/received calls ..... 45
Phone call ............................................ 26if you are unable to answer .............. 27making .............................................. 26
notify/not notify the other party ......... 26receiving ........................................... 27
photoattaching to e-mail ............................ 73saving ............................................... 69taking ................................................ 68viewing ............................................. 72
Photo mail ........................................... 74playing back Chaku-Uta-Full® (full songs) .......................................... 90power ............................................... 3, 18
RReceived calls ..................................... 28reception strength .......................... 3, 18record message .............................. 3, 32
playing back ..................................... 33redialing ............................................... 28remote controller with microphone.............................................................. 14remote lock ....................................... 100ringtone ............................................... 30
Ssoft key ................................................ 16spam ................................................ 5, 56stereo earphone ............................ 14, 17
Ttext input ............................................. 34
alphanumerics .................................. 35Back Space function ........................ 35changing input mode ........................ 34characters assigned to the same key ......................................................... 37character key assignment table ........ 35deleting characters ........................... 37emoticons ......................................... 38pictorial characters ........................... 38sentences ......................................... 39symbols ............................................ 38uppercase characters ....................... 37
troubleshooting .................................. 99
Vvolume during a call ........................... 28

Pressing "zero" will connect you to an operator, after calling "157" on your au cellphone.
フリーコール
古紙配合率100%再生紙を使用しています
How to access 5 5 7 5 6EZ Top menu "料金・申込・インフォ" "お問い合わせ"
※Menu structure is subject to change without prior notice.
or