basic operating instructions - panasonic · dedicated battery (vw-vbn130/vw-vbn260) supports this...
TRANSCRIPT
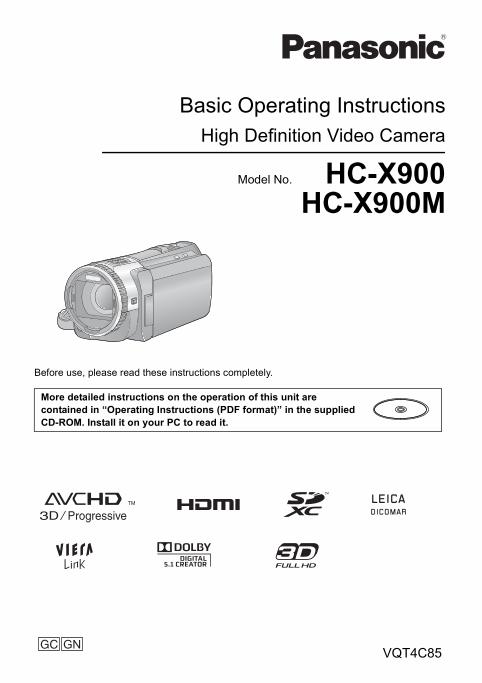
Basic Operating InstructionsHigh Definition Video Camera
Model No. HC-X900HC-X900M
Before use, please read these instructions completely.
More detailed instructions on the operation of this unit are contained in “Operating Instructions (PDF format)” in the supplied CD-ROM. Install it on your PC to read it.
VQT4C85
until 2012/1/31
simplified_HC-X900&X909&X900MGCGN_eng.book 1 ページ 2012年1月16日 月曜日 午後4時36分
2VQT4C85
∫ Concerning the battery
Button-type battery: CR2025
Use only the recommended accessories.≥ Always use a genuine Panasonic HDMI
mini cable (RP-CDHM15, RP-CDHM30: optional).
∫ Product identification marking
Information for Your SafetyWARNING:To reduce the risk of fire, electric shock or product damage,≥ Do not expose this unit to rain,
moisture, dripping or splashing.≥ Do not place objects filled with liquids,
such as vases, on this unit.≥ Use only the recommended
accessories.≥ Do not remove covers.≥ Do not repair this unit by yourself.
Refer servicing to qualified service personnel.
CAUTION!To reduce the risk of fire, electric shock or product damage,≥ Do not install or place this unit in a
bookcase, built-in cabinet or in another confined space. Ensure this unit is well ventilated.
≥ Do not obstruct this unit’s ventilation openings with newspapers, tablecloths, curtains, and similar items.
≥ Do not place sources of naked flames, such as lighted candles, on this unit.
Install this unit so that the AC mains lead can be unplugged from the socket outlet immediately if any problem occurs.
WarningRisk of fire, explosion and burns. Do not disassemble.Do not heat the batteries above the following temperatures or incinerate.Button-type battery 60 oCBattery pack 60 oC
CAUTION≥ Danger of explosion if battery is
incorrectly replaced. Replace only with the type recommended by the manufacturer.
≥ When disposing the batteries, please contact your local authorities or dealer and ask for the correct method of disposal.
WarningKeep the Button-Type battery out of the reach of children. Never put Button-Type battery in mouth. If swallowed call your doctor.
Product LocationHigh Definition Video Camera Battery holder
AC adaptor Bottom
simplified_HC-X900&X909&X900MGCGN_eng.book 2 ページ 2012年1月16日 月曜日 午後4時36分
3VQT4C85
-If you see this symbol-
∫ Cautions for useFor Australia and New ZealandIn the event of abnormal operation (e.g. if the unit emits smoke or an unusual smell), immediately stop operating the unit and consult the Panasonic Customer Care Centre on 132600.Keep this unit as far away as possible from electromagnetic equipment (such as microwave ovens, TVs, video games etc.).≥ If you use this unit on top of or near a TV,
the pictures and/or sound on this unit may be disrupted by electromagnetic wave radiation.
≥ Do not use this unit near cell phones because doing so may result in noise adversely affecting the pictures and/or sound.
≥ Recorded data may be damaged, or pictures may be distorted, by strong magnetic fields created by speakers or large motors.
≥ Electromagnetic wave radiation generated by microprocessors may adversely affect this unit, disturbing the pictures and/or sound.
≥ If this unit is adversely affected by electromagnetic equipment and stops functioning properly, turn this unit off and remove the battery or disconnect AC adaptor. Then reinsert the battery or reconnect AC adaptor and turn this unit on.
Do not use this unit near radio transmitters or high-voltage lines.≥ If you record near radio transmitters or
high-voltage lines, the recorded pictures and/or sound may be adversely affected.
About connecting to a PC≥ Do not use any other USB cables except
the supplied one.About using a headphone≥ Excessive sound pressure from
earphones and headphones can cause hearing loss.
≥ Listening at full volume for long periods may damage the user’s ears.
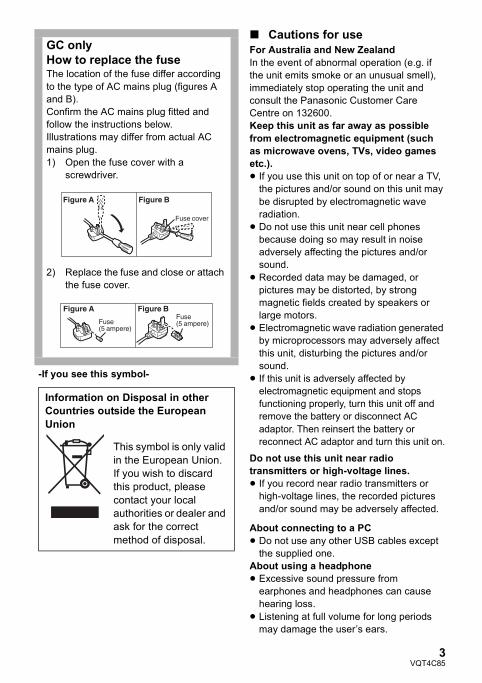
GC onlyHow to replace the fuseThe location of the fuse differ according to the type of AC mains plug (figures A and B).Confirm the AC mains plug fitted and follow the instructions below.Illustrations may differ from actual AC mains plug.1) Open the fuse cover with a
screwdriver.
2) Replace the fuse and close or attach the fuse cover.
Information on Disposal in other Countries outside the European Union
This symbol is only valid in the European Union.If you wish to discard this product, please contact your local authorities or dealer and ask for the correct method of disposal.
simplified_HC-X900&X909&X900MGCGN_eng.book 3 ページ 2012年1月16日 月曜日 午後4時36分
4VQT4C85
∫ About the recording format for recording motion pictures
You can select from AVCHD* or iFrame recording formats to record motion pictures using this unit.* It is compatible with AVCHD 3D or AVCHD
Progressive (1080/50p).
AVCHD 3D:It is possible to record powerful, life-like 3D full high definition images.A 3D compatible television compatible to the frame sequential format is required to view the 3D full high definition images.
AVCHD Progressive:It is possible to record 2D image in the highest quality (1080/50p) for this unit.
iFrame:This is a recording format suitable for viewing or editing on Mac (iMovie’11). Using iMovie’11, iFrame motion pictures can be imported faster than AVCHD motion pictures. Also, the imported file size of iFrame motion pictures will be smaller than that of AVCHD motion pictures.≥ It is not compatible with motion pictures
recorded in AVCHD format.
∫ Indemnity about recorded content
Panasonic does not accept any responsibility for damages directly or indirectly due to any type of problems that result in loss of recording or edited content, and does not guarantee any content if recording or editing does not work properly. Likewise, the above also applies in a case where any type of repair is made to the unit (including any other non-built-in memory related component).
∫ About Condensation (When the lens, the viewfinder or LCD Monitor is fogged up)
Condensation occurs when the ambient temperature or humidity changes. Be careful of condensation since it causes lens, viewfinder and LCD monitor stains, fungus and camera malfunction.
∫ Cards that you can use with this unit
SD Memory Card, SDHC Memory Card and SDXC Memory Card≥ 4 GB or more Memory Cards that do not
have the SDHC logo or 48 GB or more Memory Cards that do not have the SDXC logo are not based on SD Memory Card Specifications.
≥ Refer to page 13 for more details on SD cards.
simplified_HC-X900&X909&X900MGCGN_eng.book 4 ページ 2012年1月16日 月曜日 午後4時36分
5VQT4C85
∫ For the purposes of these operating instructions
≥ SD Memory Card, SDHC Memory Card and SDXC Memory Card are referred to as the “SD card”.
≥ Functions that can be used for Motion Picture Recording Mode: Functions that can be used for Still Picture Recording Mode:
≥ Function that can be used for the Playback Mode: Function that can be used for the Playback Mode (motion picture only): Function that can be used for the Playback Mode (still pictures only):
≥ Scene(s) recorded in 1080/50p, 1080/50i, AVCHD 3D or side-by-side ([SbS 3D]): AVCHD scene(s)
≥ Pages for reference are indicated by an arrow, for example: l 00
These operating instructions are designed for use with models and
. Pictures may be slightly different from the original.≥ The illustrations used in these operating
instructions show model , however, parts of the explanation refer to different models.
≥ Depending on the model, some functions are not available.
≥ Features may vary, so please read carefully.
≥ Not all models may be available depending on the region of purchase.
HC-X900HC-X900M
HC-X900
simplified_HC-X900&X909&X900MGCGN_eng.book 5 ページ 2012年1月16日 月曜日 午後4時36分
6VQT4C85
Information for Your Safety......................2Accessories...............................................7
PreparationPower supply.............................................9
Inserting/removing the battery..............9Charging the battery ..........................10Charging and recording time.............. 11
Recording to a card ................................13Cards that you can use with this unit .......................................13Inserting/removing an SD card...........14
Turning the unit on/off............................15Selecting a mode ....................................15Preparation of the LCD monitor/Viewfinder................................................16How to use the touch screen .................16
About the Touch Menu .......................17Setting date and time..............................18
BasicSelecting a media to record [HC-X900M]..............................................19Intelligent Auto Mode .............................19Recording motion pictures ....................20Recording still pictures ..........................20Motion picture/Still picture playback ....21
Watching Video/Pictures on your TV .........................................22
Using the menu screen ..........................23Language selection ............................23
Using the zoom .......................................24Formatting ...............................................24
OthersSpecifications..........................................25About copyright ......................................29Reading the Operating Instructions(PDF format) ............................................30
Contents
simplified_HC-X900&X909&X900MGCGN_eng.book 6 ページ 2012年1月16日 月曜日 午後4時36分
7VQT4C85
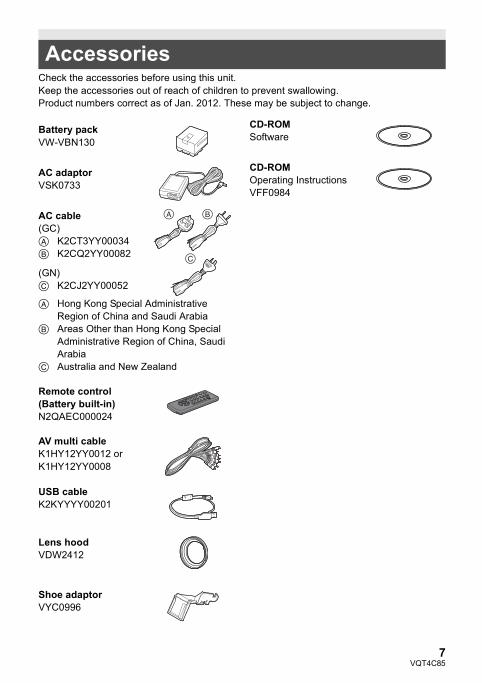
Check the accessories before using this unit.Keep the accessories out of reach of children to prevent swallowing.Product numbers correct as of Jan. 2012. These may be subject to change.
Accessories
Battery packVW-VBN130
AC adaptorVSK0733
AC cable(GC)A K2CT3YY00034B K2CQ2YY00082
(GN)C K2CJ2YY00052
A Hong Kong Special Administrative Region of China and Saudi Arabia
B Areas Other than Hong Kong Special Administrative Region of China, Saudi Arabia
C Australia and New Zealand
Remote control(Battery built-in)N2QAEC000024
AV multi cableK1HY12YY0012 or K1HY12YY0008
USB cableK2KYYYY00201
Lens hoodVDW2412
Shoe adaptorVYC0996
CD-ROMSoftware
CD-ROMOperating InstructionsVFF0984
simplified_HC-X900&X909&X900MGCGN_eng.book 7 ページ 2012年1月16日 月曜日 午後4時36分
8VQT4C85
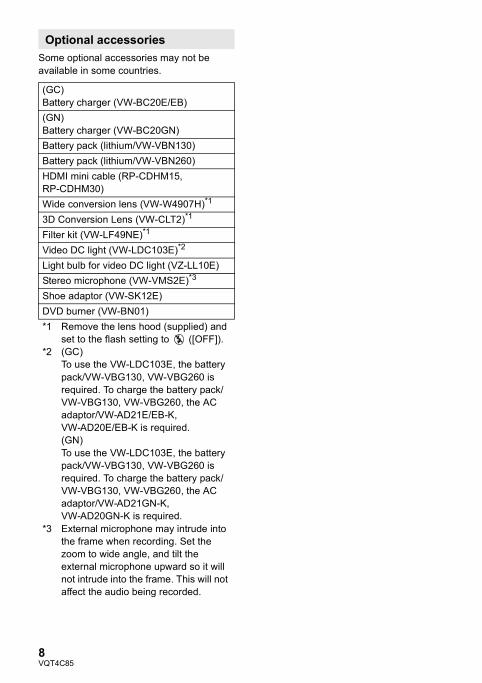
Some optional accessories may not be available in some countries.
Optional accessories
(GC)Battery charger (VW-BC20E/EB)(GN)Battery charger (VW-BC20GN)Battery pack (lithium/VW-VBN130)Battery pack (lithium/VW-VBN260)HDMI mini cable (RP-CDHM15, RP-CDHM30)Wide conversion lens (VW-W4907H)*1
3D Conversion Lens (VW-CLT2)*1
Filter kit (VW-LF49NE)*1
Video DC light (VW-LDC103E)*2
Light bulb for video DC light (VZ-LL10E)Stereo microphone (VW-VMS2E)*3
Shoe adaptor (VW-SK12E)DVD burner (VW-BN01)*1 Remove the lens hood (supplied) and
set to the flash setting to ([OFF]).*2 (GC)
To use the VW-LDC103E, the battery pack/VW-VBG130, VW-VBG260 is required. To charge the battery pack/VW-VBG130, VW-VBG260, the AC adaptor/VW-AD21E/EB-K, VW-AD20E/EB-K is required.(GN)To use the VW-LDC103E, the battery pack/VW-VBG130, VW-VBG260 is required. To charge the battery pack/VW-VBG130, VW-VBG260, the AC adaptor/VW-AD21GN-K, VW-AD20GN-K is required.
*3 External microphone may intrude into the frame when recording. Set the zoom to wide angle, and tilt the external microphone upward so it will not intrude into the frame. This will not affect the audio being recorded.
simplified_HC-X900&X909&X900MGCGN_eng.book 8 ページ 2012年1月16日 月曜日 午後4時36分
9VQT4C85
∫ About batteries that you can use with this unitThe battery that can be used with this unit is VW-VBN130/VW-VBN260.≥ The unit has a function for distinguishing batteries which can be used safely. The
dedicated battery (VW-VBN130/VW-VBN260) supports this function. The only batteries suitable for use with this unit are genuine Panasonic products and batteries manufactured by other companies and certified by Panasonic. (Batteries which do not support this function cannot be used). Panasonic cannot in any way guarantee the quality, performance or safety of batteries which have been manufactured by other companies and are not genuine Panasonic products.
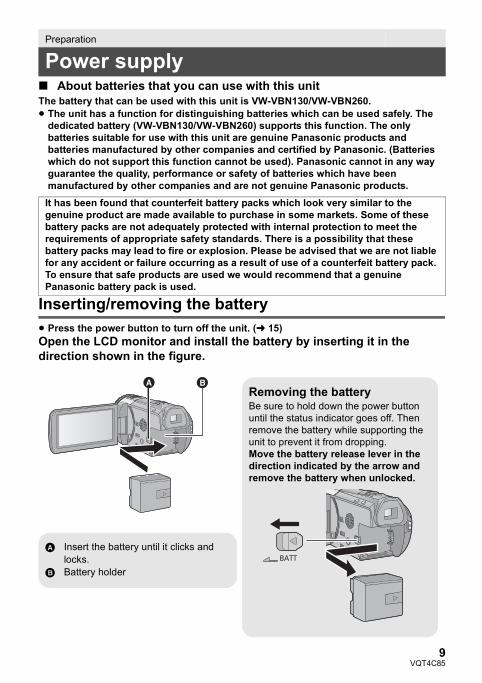
Inserting/removing the battery≥ Press the power button to turn off the unit. (l 15)Open the LCD monitor and install the battery by inserting it in the direction shown in the figure.
Preparation
Power supply
It has been found that counterfeit battery packs which look very similar to the genuine product are made available to purchase in some markets. Some of these battery packs are not adequately protected with internal protection to meet the requirements of appropriate safety standards. There is a possibility that these battery packs may lead to fire or explosion. Please be advised that we are not liable for any accident or failure occurring as a result of use of a counterfeit battery pack. To ensure that safe products are used we would recommend that a genuine Panasonic battery pack is used.
Removing the batteryBe sure to hold down the power button until the status indicator goes off. Then remove the battery while supporting the unit to prevent it from dropping.Move the battery release lever in the direction indicated by the arrow and remove the battery when unlocked.
BATTA Insert the battery until it clicks and
locks.B Battery holder
simplified_HC-X900&X909&X900MGCGN_eng.book 9 ページ 2012年1月16日 月曜日 午後4時36分

10VQT4C85
Charging the battery
The unit is in the standby condition when the AC adaptor is connected. The primary circuit is always “live” as long as the AC adaptor is connected to an electrical outlet.Important:≥ Use the supplied AC adaptor. Do not use the AC adaptor of another device.≥ Do not use the AC cable with any other equipment as it is designed only for this unit.
Also, do not use the AC cable from other equipment with this unit.≥ (GC)
The battery can also be charged using a battery charger (VW-BC20E/EB: optional).≥ (GN)
The battery can also be charged using a battery charger (VW-BC20GN: optional).≥ The battery will not be charged if the unit is turned on.≥ It is recommended to charge the battery in a temperature between 10 °C and 30 °C.
(The battery temperature should also be the same.)
A DC input terminal≥ Insert the plugs as far as they will go.
1 Connect the AC cable to the AC adaptor, then the AC outlet.
2 Connect the AC adaptor to the DC input terminal.≥ The status indicator will flash red at an interval of 2 seconds (approximately 1 second on, 1 second
off), indicating that charging has begun. It will turn off when the charging is completed.∫ Connecting to the AC outletIf you turn on the unit while connecting with the AC adaptor, you can use the unit with power supplied from the outlet.When recording for a long time, keep the AC adaptor connected and use it together with the battery.
When this unit is purchased, the battery is not charged. Charge the battery fully before using this unit for the first time.
simplified_HC-X900&X909&X900MGCGN_eng.book 10 ページ 2012年1月16日 月曜日 午後4時36分
11VQT4C85
≥ Do not use any other AC adaptors except the supplied one.≥ We recommend using Panasonic batteries (l 7, 8).≥ If you use other batteries, we cannot guarantee the quality of this product.≥ Do not heat or expose to flame.≥ Do not leave the battery(ies) in a car exposed to direct sunlight for a long period of time
with doors and windows closed.
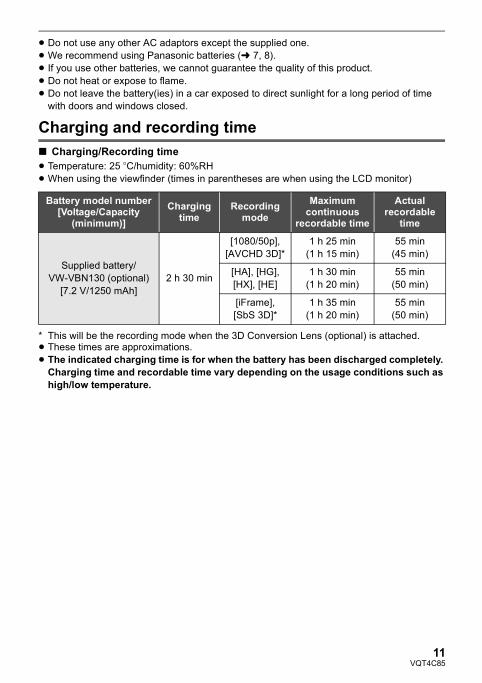
Charging and recording time∫ Charging/Recording time≥ Temperature: 25 oC/humidity: 60%RH≥ When using the viewfinder (times in parentheses are when using the LCD monitor)
* This will be the recording mode when the 3D Conversion Lens (optional) is attached.≥ These times are approximations.≥ The indicated charging time is for when the battery has been discharged completely.
Charging time and recordable time vary depending on the usage conditions such as high/low temperature.
Battery model number[Voltage/Capacity
(minimum)]Charging
timeRecording
modeMaximum
continuous recordable time
Actual recordable
time
Supplied battery/VW-VBN130 (optional)
[7.2 V/1250 mAh]2 h 30 min
[1080/50p], [AVCHD 3D]*
1 h 25 min(1 h 15 min)
55 min(45 min)
[HA], [HG], [HX], [HE]
1 h 30 min(1 h 20 min)
55 min(50 min)
[iFrame], [SbS 3D]*
1 h 35 min(1 h 20 min)
55 min(50 min)
simplified_HC-X900&X909&X900MGCGN_eng.book 11 ページ 2012年1月16日 月曜日 午後4時36分
12VQT4C85
≥ The actual recordable time refers to the recordable time when repeatedly starting/stopping recording, turning the unit on/off, moving the zoom lever etc.
≥ The batteries heat up after use or charging. This is not a malfunction.
Battery capacity indication≥ The display changes as the battery capacity reduces.
# # # # If there is less than 3 minutes remaining, then will become red. If the battery discharges, then will flash.
≥ Screen display will disappear when no touch operation is performed. However, it will be constantly displayed when the remaining battery time becomes less than 30 minutes.
≥ The remaining battery capacity is displayed when using the Panasonic battery that you can use for this unit. The actual time can vary depending on your actual use.
≥ When using the AC adaptor or batteries made by other companies, the remaining battery capacity will not be shown.
simplified_HC-X900&X909&X900MGCGN_eng.book 12 ページ 2012年1月16日 月曜日 午後4時36分
13VQT4C85
The unit can record still pictures or motion pictures to an SD card or built-in memory. To record to an SD card, read the following.
Cards that you can use with this unitUse SD cards conforming to Class 4 or higher of the SD Speed Class Rating* for motion picture recording.
* SD Speed Class Rating is the speed standard regarding continuous writing. Check via the label on the card, etc.
≥ Please confirm the latest information about SD Memory Cards/SDHC Memory Cards/SDXC Memory Cards that can be used for motion picture recording on the following website.
http://panasonic.jp/support/global/cs/e_cam(This website is in English only.)≥ Operation of the SD Memory Card 256 MB or less is not guaranteed. Also, the SD Memory
Card 32 MB or less cannot be used for the motion picture recording.≥ 4 GB or more Memory Cards that do not have the SDHC logo or 48 GB or more Memory
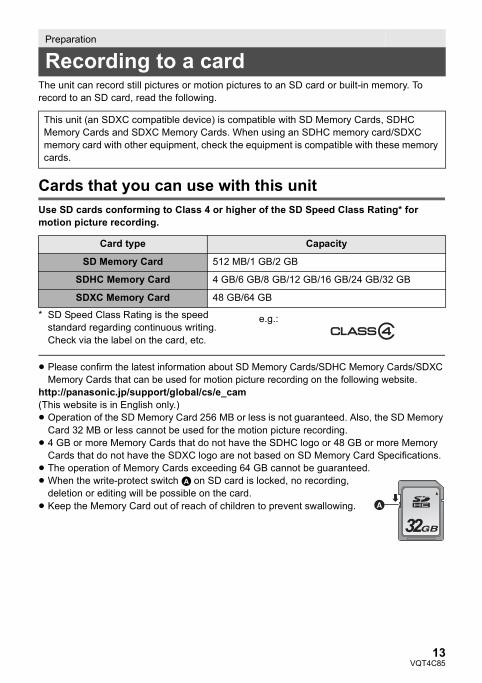
Cards that do not have the SDXC logo are not based on SD Memory Card Specifications.≥ The operation of Memory Cards exceeding 64 GB cannot be guaranteed.≥ When the write-protect switch A on SD card is locked, no recording,
deletion or editing will be possible on the card.≥ Keep the Memory Card out of reach of children to prevent swallowing.
Preparation
Recording to a card
This unit (an SDXC compatible device) is compatible with SD Memory Cards, SDHC Memory Cards and SDXC Memory Cards. When using an SDHC memory card/SDXC memory card with other equipment, check the equipment is compatible with these memory cards.
Card type Capacity
SD Memory Card 512 MB/1 GB/2 GB
SDHC Memory Card 4 GB/6 GB/8 GB/12 GB/16 GB/24 GB/32 GB
SDXC Memory Card 48 GB/64 GB
e.g.:
32
simplified_HC-X900&X909&X900MGCGN_eng.book 13 ページ 2012年1月16日 月曜日 午後4時36分

14VQT4C85
Inserting/removing an SD card
Caution:Check that the access lamp has gone off.
1 Open the SD card cover and insert (remove) the SD card into (from) the card slot.
≥ Face the label side B in the direction shown in the illustration and press it straight in as far as it will go.
≥ Press the centre of the SD card and then pull it straight out.
2 Press the C part of the SD card cover and close the SD card cover.
≥ Securely close it until it clicks.
≥ Do not touch the terminals on the back of the SD card.
≥ Do not apply strong shocks, bend, or drop the SD card.
≥ Electrical noise, static electricity or the failure of this unit or the SD card may damage or erase the data stored on the SD card.
≥ When the card access lamp is lit, do not:jRemove the SD cardjTurn the unit offj Insert and remove the USB cablejExpose the unit to vibrations or shockPerforming the above while the lamp is on may result in damage to data/SD card or this unit.
≥ Do not expose the terminals of the SD card to water, garbage or dust.
≥ Do not place SD cards in the following areas:j In direct sunlightj In very dusty or humid areasjNear a heaterjLocations susceptible to significant
difference in temperature (condensation can occur.)
jWhere static electricity or electromagnetic waves occur
≥ To protect SD cards, return them to their cases when you are not using them.
≥ About disposing of or giving away the SD card.(Refer to the Operating Instructions (PDF format))
When using an SD card not from Panasonic, or one previously used on other equipment, for the first time on this unit, format the SD card. (l 24) When the SD card is formatted, all of the recorded data is deleted. Once the data is deleted, it cannot be restored.
Access lamp [ACCESS] A≥ When this unit is accessing the SD
card or built-in memory, the access lamp lights up.
simplified_HC-X900&X909&X900MGCGN_eng.book 14 ページ 2012年1月16日 月曜日 午後4時36分
15VQT4C85
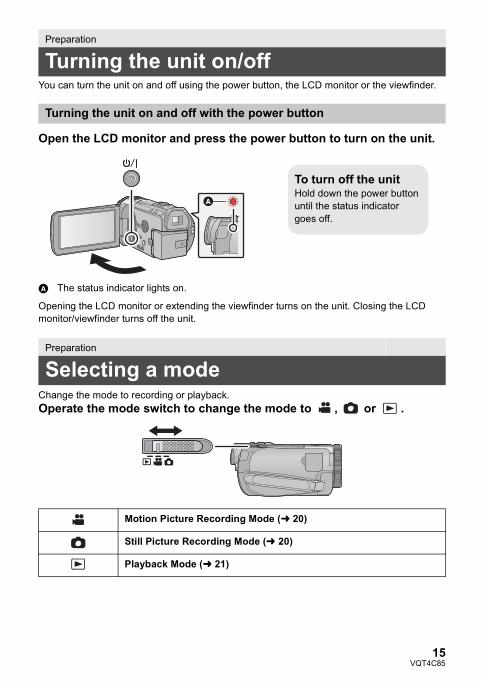
You can turn the unit on and off using the power button, the LCD monitor or the viewfinder.
Open the LCD monitor and press the power button to turn on the unit.
A The status indicator lights on.
Opening the LCD monitor or extending the viewfinder turns on the unit. Closing the LCD monitor/viewfinder turns off the unit.
Change the mode to recording or playback.Operate the mode switch to change the mode to , or .
Preparation
Turning the unit on/off
Turning the unit on and off with the power button
Preparation
Selecting a mode
Motion Picture Recording Mode (l 20)
Still Picture Recording Mode (l 20)
Playback Mode (l 21)
To turn off the unitHold down the power button until the status indicator goes off.
simplified_HC-X900&X909&X900MGCGN_eng.book 15 ページ 2012年1月16日 月曜日 午後4時36分
16VQT4C85
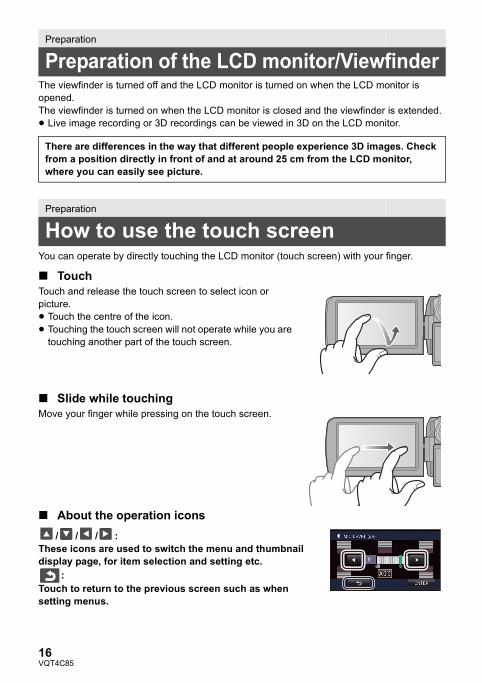
The viewfinder is turned off and the LCD monitor is turned on when the LCD monitor is opened.The viewfinder is turned on when the LCD monitor is closed and the viewfinder is extended.≥ Live image recording or 3D recordings can be viewed in 3D on the LCD monitor.
You can operate by directly touching the LCD monitor (touch screen) with your finger.
∫ TouchTouch and release the touch screen to select icon or picture.≥ Touch the centre of the icon.≥ Touching the touch screen will not operate while you are
touching another part of the touch screen.
∫ Slide while touchingMove your finger while pressing on the touch screen.
∫ About the operation icons/ / / :
These icons are used to switch the menu and thumbnail display page, for item selection and setting etc.
:Touch to return to the previous screen such as when setting menus.
Preparation
Preparation of the LCD monitor/Viewfinder
There are differences in the way that different people experience 3D images. Check from a position directly in front of and at around 25 cm from the LCD monitor, where you can easily see picture.
Preparation
How to use the touch screen
simplified_HC-X900&X909&X900MGCGN_eng.book 16 ページ 2012年1月16日 月曜日 午後4時36分
17VQT4C85
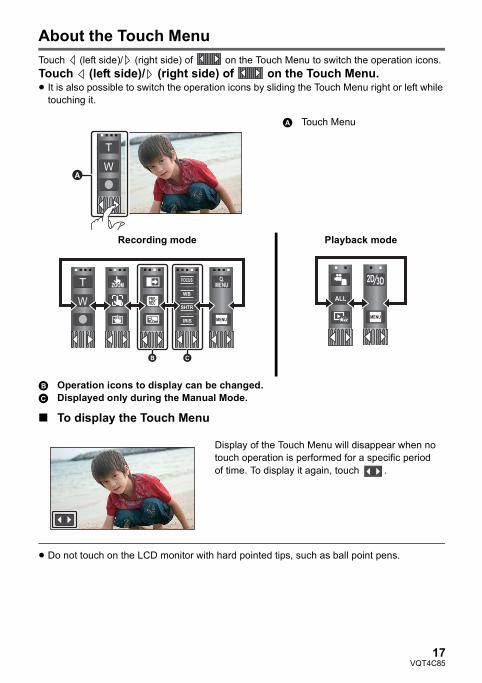
About the Touch MenuTouch (left side)/ (right side) of on the Touch Menu to switch the operation icons.Touch (left side)/ (right side) of on the Touch Menu.≥ It is also possible to switch the operation icons by sliding the Touch Menu right or left while
touching it.
B Operation icons to display can be changed.C Displayed only during the Manual Mode.
∫ To display the Touch Menu
≥ Do not touch on the LCD monitor with hard pointed tips, such as ball point pens.
A Touch Menu
Recording mode Playback mode
Display of the Touch Menu will disappear when no touch operation is performed for a specific period of time. To display it again, touch .
T
W
T
W
FOCUS
WB
SHTR
IRIS
MENU
Q.MENU
MENU
ALL
simplified_HC-X900&X909&X900MGCGN_eng.book 17 ページ 2012年1月16日 月曜日 午後4時36分
18VQT4C85
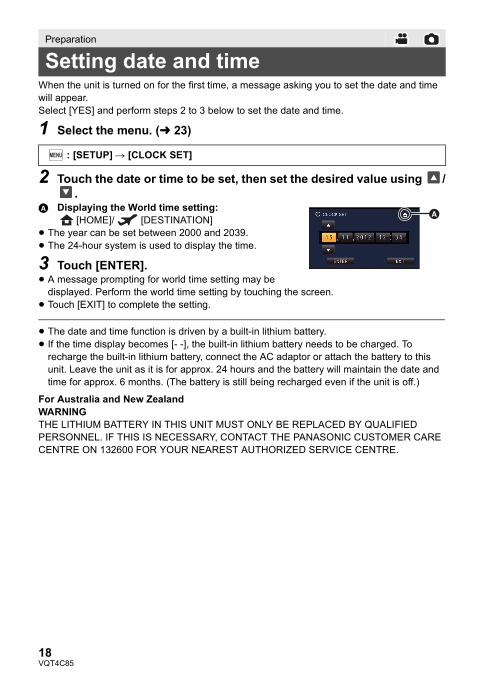
When the unit is turned on for the first time, a message asking you to set the date and time will appear.Select [YES] and perform steps 2 to 3 below to set the date and time.
1 Select the menu. (l 23)
2 Touch the date or time to be set, then set the desired value using /.
A Displaying the World time setting:[HOME]/ [DESTINATION]
≥ The year can be set between 2000 and 2039.≥ The 24-hour system is used to display the time.
3 Touch [ENTER].≥ A message prompting for world time setting may be
displayed. Perform the world time setting by touching the screen.≥ Touch [EXIT] to complete the setting.
≥ The date and time function is driven by a built-in lithium battery.≥ If the time display becomes [- -], the built-in lithium battery needs to be charged. To
recharge the built-in lithium battery, connect the AC adaptor or attach the battery to this unit. Leave the unit as it is for approx. 24 hours and the battery will maintain the date and time for approx. 6 months. (The battery is still being recharged even if the unit is off.)
Preparation
Setting date and time
: [SETUP] # [CLOCK SET]
For Australia and New ZealandWARNINGTHE LITHIUM BATTERY IN THIS UNIT MUST ONLY BE REPLACED BY QUALIFIED PERSONNEL. IF THIS IS NECESSARY, CONTACT THE PANASONIC CUSTOMER CARE CENTRE ON 132600 FOR YOUR NEAREST AUTHORIZED SERVICE CENTRE.
MENU
simplified_HC-X900&X909&X900MGCGN_eng.book 18 ページ 2012年1月16日 月曜日 午後4時36分
19VQT4C85
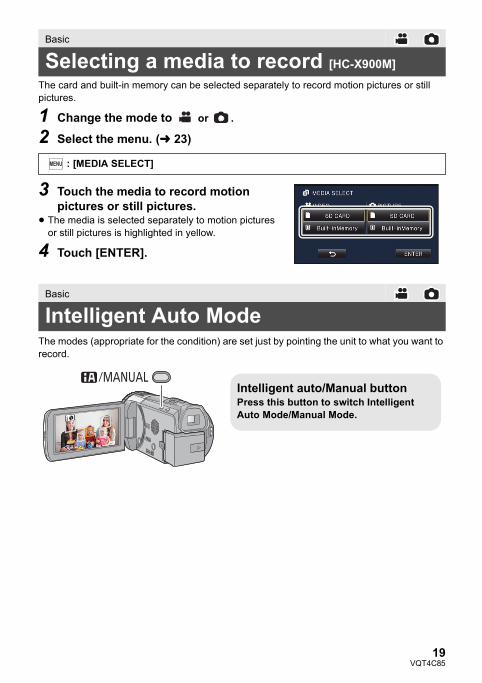
The card and built-in memory can be selected separately to record motion pictures or still pictures.
1 Change the mode to or .
2 Select the menu. (l 23)
3 Touch the media to record motion pictures or still pictures.
≥ The media is selected separately to motion pictures or still pictures is highlighted in yellow.
4 Touch [ENTER].
The modes (appropriate for the condition) are set just by pointing the unit to what you want to record.
Basic
Selecting a media to record [HC-X900M]
: [MEDIA SELECT]
Basic
Intelligent Auto Mode
MENU
Intelligent auto/Manual buttonPress this button to switch Intelligent Auto Mode/Manual Mode.
/MANUAL
simplified_HC-X900&X909&X900MGCGN_eng.book 19 ページ 2012年1月16日 月曜日 午後4時36分

20VQT4C85
1 Change the mode to . (l 15)
2 Open the LCD monitor or extend the viewfinder.
3 Press the recording start/stop button to start recording.
A Recording button iconB When you begin recording, ; changes to ¥.
4 Press the recording start/stop button again to pause recording.
≥ Recording can also be started/stopped by touching the recording button icon. This icon functions in the same manner as the recording start/stop button.
1 Change the mode to . (l 15)
2 Open the LCD monitor or extend the viewfinder.
3 Press the button halfway. (For Auto Focus only)
4 Press the button fully.
Basic
Recording motion pictures
Basic
Recording still pictures
T
W
simplified_HC-X900&X909&X900MGCGN_eng.book 20 ページ 2012年1月16日 月曜日 午後4時36分
21VQT4C85
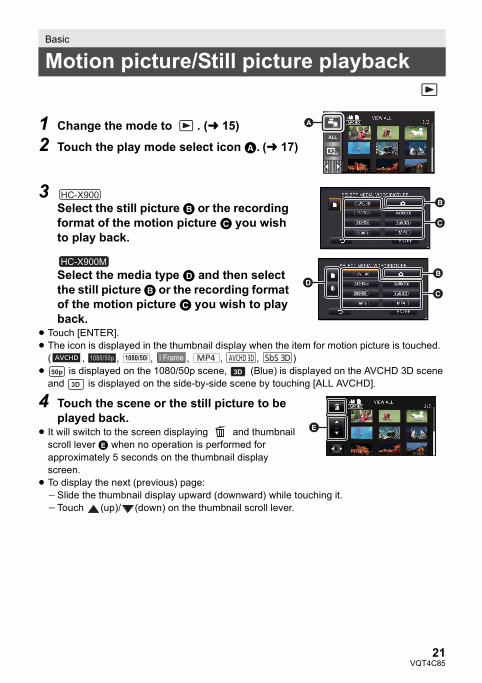
1 Change the mode to . (l 15)
2 Touch the play mode select icon A. (l 17)
3Select the still picture B or the recording format of the motion picture C you wish to play back.
Select the media type D and then select the still picture B or the recording format of the motion picture C you wish to play back.
≥ Touch [ENTER].≥ The icon is displayed in the thumbnail display when the item for motion picture is touched.
( , , , , , , )≥ is displayed on the 1080/50p scene, (Blue) is displayed on the AVCHD 3D scene
and is displayed on the side-by-side scene by touching [ALL AVCHD].
4 Touch the scene or the still picture to be played back.
≥ It will switch to the screen displaying and thumbnail scroll lever E when no operation is performed for approximately 5 seconds on the thumbnail display screen.
≥ To display the next (previous) page:jSlide the thumbnail display upward (downward) while touching it.jTouch (up)/ (down) on the thumbnail scroll lever.
Basic
Motion picture/Still picture playback
ALL
HC-X900
HC-X900M
1080/50i
50p 3D
3D
simplified_HC-X900&X909&X900MGCGN_eng.book 21 ページ 2012年1月16日 月曜日 午後4時36分
22VQT4C85
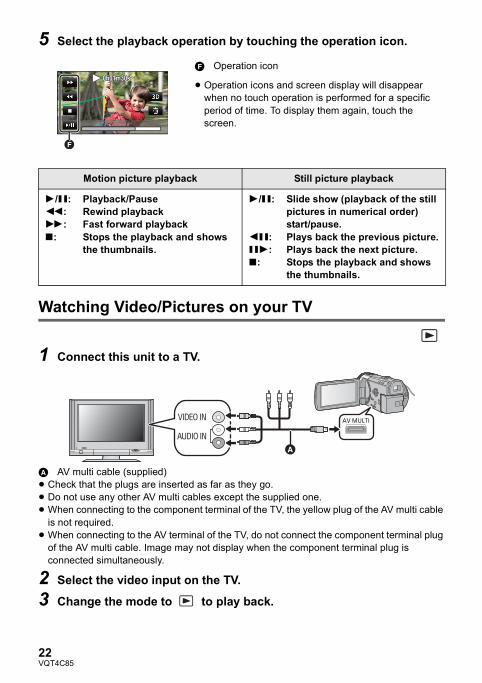
5 Select the playback operation by touching the operation icon.
Watching Video/Pictures on your TV
1 Connect this unit to a TV.
A AV multi cable (supplied)≥ Check that the plugs are inserted as far as they go.≥ Do not use any other AV multi cables except the supplied one.≥ When connecting to the component terminal of the TV, the yellow plug of the AV multi cable
is not required.≥ When connecting to the AV terminal of the TV, do not connect the component terminal plug
of the AV multi cable. Image may not display when the component terminal plug is connected simultaneously.
2 Select the video input on the TV.
3 Change the mode to to play back.
F Operation icon
≥ Operation icons and screen display will disappear when no touch operation is performed for a specific period of time. To display them again, touch the screen.
Motion picture playback Still picture playback
1/;: Playback/Pause6: Rewind playback5: Fast forward playback∫: Stops the playback and shows
the thumbnails.
1/;: Slide show (playback of the still pictures in numerical order) start/pause.
2;: Plays back the previous picture.;1: Plays back the next picture.∫: Stops the playback and shows
the thumbnails.
0h01m30s0h01m30s0h01m30s
AV MULTI
simplified_HC-X900&X909&X900MGCGN_eng.book 22 ページ 2012年1月16日 月曜日 午後4時36分
23VQT4C85
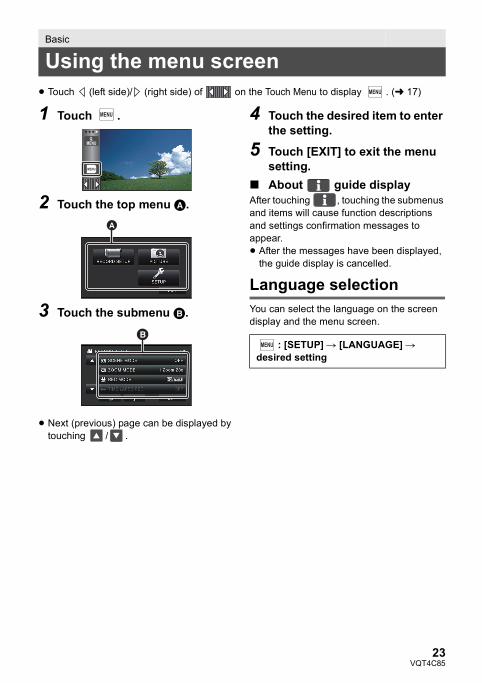
≥ Touch (left side)/ (right side) of on the Touch Menu to display . (l 17)
1 Touch .
2 Touch the top menu A.
3 Touch the submenu B.
≥ Next (previous) page can be displayed by touching / .
4 Touch the desired item to enter the setting.
5 Touch [EXIT] to exit the menu setting.
∫ About guide displayAfter touching , touching the submenus and items will cause function descriptions and settings confirmation messages to appear.≥ After the messages have been displayed,
the guide display is cancelled.
Language selectionYou can select the language on the screen display and the menu screen.
Basic
Using the menu screenMENU
MENU
MENU
Q.MENUQ.
MENU
: [SETUP] # [LANGUAGE] # desired settingMENU
simplified_HC-X900&X909&X900MGCGN_eng.book 23 ページ 2012年1月16日 月曜日 午後4時36分

24VQT4C85
Please be aware that if a medium is formatted, then all the data recorded on the medium will be erased and cannot be restored. Back up important data on a PC, DVD disc etc.
Select the menu.
Basic
Using the zoom
Basic
Formatting
: [SETUP] # [FORMAT CARD]
: [SETUP] # [FORMAT MEDIA] # [SD CARD] or [Built-inMemory]
Zoom lever/Zoom button iconsT side:Close-up recording (zoom in)W side:Wide-angle recording (zoom out)≥ The zoom speed varies depending on the
range over which the zoom lever is moved.
A Zoom barThe zoom bar is displayed during the zoom operation.
6W T6W TT
W
T
W
HC-X900
MENU
HC-X900M
MENU
simplified_HC-X900&X909&X900MGCGN_eng.book 24 ページ 2012年1月16日 月曜日 午後4時36分
25VQT4C85
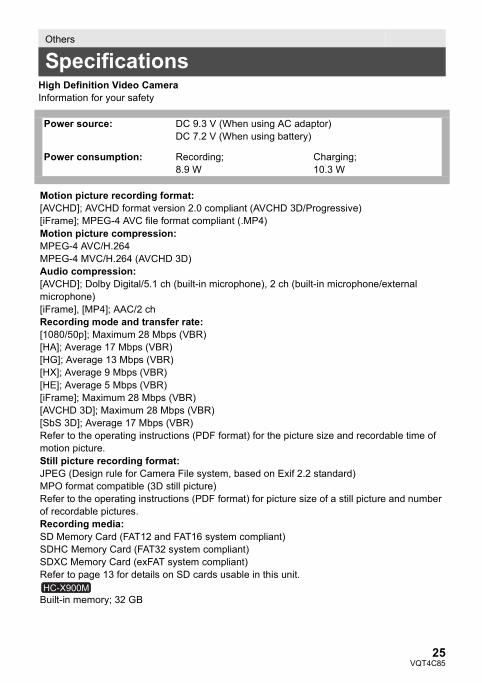
High Definition Video CameraInformation for your safety
Others
Specifications
Power source: DC 9.3 V (When using AC adaptor)DC 7.2 V (When using battery)
Power consumption: Recording;8.9 W
Charging;10.3 W
Motion picture recording format:[AVCHD]; AVCHD format version 2.0 compliant (AVCHD 3D/Progressive)[iFrame]; MPEG-4 AVC file format compliant (.MP4)Motion picture compression:MPEG-4 AVC/H.264MPEG-4 MVC/H.264 (AVCHD 3D)Audio compression:[AVCHD]; Dolby Digital/5.1 ch (built-in microphone), 2 ch (built-in microphone/external microphone)[iFrame], [MP4]; AAC/2 chRecording mode and transfer rate:[1080/50p]; Maximum 28 Mbps (VBR)[HA]; Average 17 Mbps (VBR)[HG]; Average 13 Mbps (VBR)[HX]; Average 9 Mbps (VBR)[HE]; Average 5 Mbps (VBR)[iFrame]; Maximum 28 Mbps (VBR)[AVCHD 3D]; Maximum 28 Mbps (VBR)[SbS 3D]; Average 17 Mbps (VBR)Refer to the operating instructions (PDF format) for the picture size and recordable time of motion picture.Still picture recording format:JPEG (Design rule for Camera File system, based on Exif 2.2 standard)MPO format compatible (3D still picture)Refer to the operating instructions (PDF format) for picture size of a still picture and number of recordable pictures.Recording media:SD Memory Card (FAT12 and FAT16 system compliant)SDHC Memory Card (FAT32 system compliant)SDXC Memory Card (exFAT system compliant)Refer to page 13 for details on SD cards usable in this unit.
Built-in memory; 32 GBHC-X900M
simplified_HC-X900&X909&X900MGCGN_eng.book 25 ページ 2012年1月16日 月曜日 午後4時36分

26VQT4C85
Image sensor:1/4.1 type (1/4.1z) 3MOS image sensorTotal; 3050 Kk3Effective pixels;
Motion picture; 2190 K to 2070 K k3 (16:9)Still picture; 2290 Kk3 (4:3), 2370 Kk3 (3:2), 2190 K to 2070 K k3 (16:9)
Lens:Auto Iris, 12k Optical Zoom, F1.5 to F2.8Focal length; 2.84 mm to 34.1 mmMacro (Full range AF)35 mm equivalent;
Motion picture; 29.8 mm to 368.8 mm (16:9)Still picture; 31 mm to 372 mm (4:3), 29.8 mm to 357.7 mm (3:2), 29.8 mm to 368.8 mm (16:9)
Minimum focus distance;Normal; Approx. 3.5 cm (Wide)/Approx. 1.2 m (Tele)Tele Macro; Approx. 95 cm (Tele)Intelligent Auto Macro; Approx. 1 cm (Wide)/Approx. 95 cm (Tele)
Filter diameter:49 mmZoom:12k optical zoom, 23k i.Zoom, 30k/700k digital zoomImage stabilizer function:Optical (Hybrid Optical Image Stabilizer, Active Mode (Rotation correction), Optical Image Stabilizer Lock function)Monitor:8.8 cm (3.5z) wide LCD monitor (Approx. 1152 K dots)Viewfinder:0.61 cm (0.24z) wide EVF (Approx. 263 K dots equivalent)Microphone:5.1 channel surround microphone (with a zoom microphone/focus microphone functions)/Stereo microphoneSpeaker:1 round speaker, dynamic typeWhite balance adjustment:Auto tracking white balance systemStandard illumination:1,400 lxMinimum required illumination:Approx. 1.6 lx (1/25 with Low Light mode in the Scene Mode)Approx. 1 lx with the Colour Night View functionAV multi connector video output level:Component video out put level;
Y; 1.0 Vp-p, 75 hPb; 0.7 Vp-p, 75 hPr; 0.7 Vp-p, 75 h
AV video output level;1.0 Vp-p, 75 h, PAL system
simplified_HC-X900&X909&X900MGCGN_eng.book 26 ページ 2012年1月16日 月曜日 午後4時36分
27VQT4C85
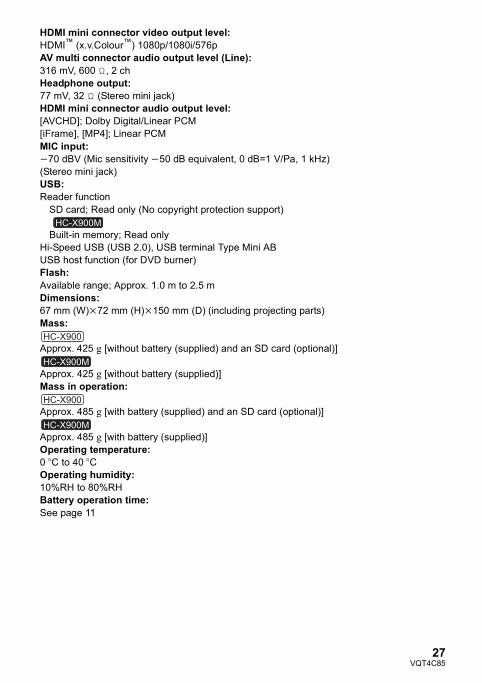
HDMI mini connector video output level:HDMI™ (x.v.Colour™) 1080p/1080i/576pAV multi connector audio output level (Line):316 mV, 600 h, 2 chHeadphone output:77 mV, 32 h (Stereo mini jack)HDMI mini connector audio output level:[AVCHD]; Dolby Digital/Linear PCM[iFrame], [MP4]; Linear PCMMIC input:j70 dBV (Mic sensitivity j50 dB equivalent, 0 dB=1 V/Pa, 1 kHz)(Stereo mini jack)USB:Reader function
SD card; Read only (No copyright protection support) Built-in memory; Read only
Hi-Speed USB (USB 2.0), USB terminal Type Mini ABUSB host function (for DVD burner)Flash:Available range; Approx. 1.0 m to 2.5 mDimensions:67 mm (W)k72 mm (H)k150 mm (D) (including projecting parts)Mass:
Approx. 425 g [without battery (supplied) and an SD card (optional)]
Approx. 425 g [without battery (supplied)]Mass in operation:
Approx. 485 g [with battery (supplied) and an SD card (optional)]
Approx. 485 g [with battery (supplied)]Operating temperature:0 oC to 40 oCOperating humidity:10%RH to 80%RHBattery operation time:See page 11
HC-X900M
HC-X900
HC-X900M
HC-X900
HC-X900M
simplified_HC-X900&X909&X900MGCGN_eng.book 27 ページ 2012年1月16日 月曜日 午後4時36分
28VQT4C85
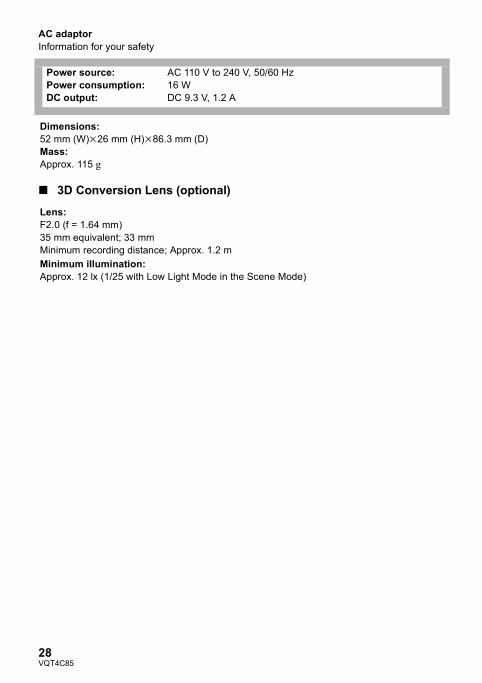
AC adaptorInformation for your safety
∫ 3D Conversion Lens (optional)
Power source:Power consumption:DC output:
AC 110 V to 240 V, 50/60 Hz16 WDC 9.3 V, 1.2 A
Dimensions:52 mm (W)k26 mm (H)k86.3 mm (D)Mass:Approx. 115 g
Lens:F2.0 (f = 1.64 mm)35 mm equivalent; 33 mmMinimum recording distance; Approx. 1.2 mMinimum illumination:Approx. 12 lx (1/25 with Low Light Mode in the Scene Mode)
simplified_HC-X900&X909&X900MGCGN_eng.book 28 ページ 2012年1月16日 月曜日 午後4時36分
29VQT4C85
∫ Carefully observe copyright laws
Recording of pre-recorded tapes or discs or other published or broadcast material for purposes other than your own private use may infringe copyright laws. Even for the purpose of private use, recording of certain material may be restricted.
∫ Licenses≥ SDXC Logo is a trademark of SD-3C,
LLC.≥ “AVCHD”, “AVCHD 3D”, “AVCHD
Progressive”, “AVCHD 3D/Progressive” and the “AVCHD 3D/Progressive” logo are trademarks of Panasonic Corporation and Sony Corporation.
≥ Manufactured under license from Dolby Laboratories. Dolby and the double-D symbol are trademarks of Dolby Laboratories.
≥ HDMI, the HDMI Logo, and High-Definition Multimedia Interface are trademarks or registered trademarks of HDMI Licensing LLC in the United States and other countries.
≥ x.v.Colour™ is a trademark.≥ LEICA is a registered trademark of Leica
Microsystems IR GmbH and DICOMAR is a registered trademark of Leica Camera AG.
≥ Microsoft®, Windows® and Windows Vista® are either registered trademarks or trademarks of Microsoft Corporation in the United States and/or other countries.
≥ iMovie, Mac and Mac OS are trademarks of Apple Inc. registered in the U.S. and other countries.
≥ Other names of systems and products mentioned in these instructions are usually the registered trademarks or trademarks of the manufacturers who developed the system or product concerned.
This product is licensed under the AVC patent portfolio license for the personal and non-commercial use of a consumer to (i) encode video in compliance with the AVC Standard (“AVC Video”) and/or (ii) decode AVC Video that was encoded by a consumer engaged in a personal and non-commercial activity and/or was obtained from a video provider licensed to provide AVC Video. No license is granted or shall be implied for any other use. Additional information may be obtained from MPEG LA, LLC. See http://www.mpegla.com.
Others
About copyright
simplified_HC-X900&X909&X900MGCGN_eng.book 29 ページ 2012年1月16日 月曜日 午後4時36分
30VQT4C85
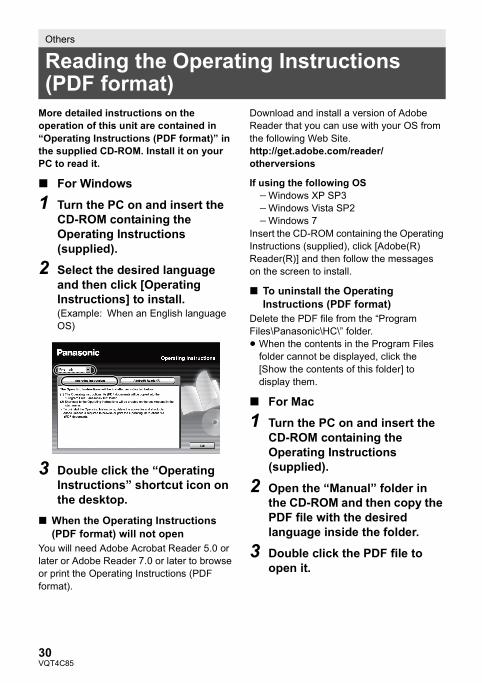
More detailed instructions on the operation of this unit are contained in “Operating Instructions (PDF format)” in the supplied CD-ROM. Install it on your PC to read it.
∫ For Windows
1 Turn the PC on and insert the CD-ROM containing the Operating Instructions (supplied).
2 Select the desired language and then click [Operating Instructions] to install.(Example: When an English language OS)
3 Double click the “Operating Instructions” shortcut icon on the desktop.
∫ When the Operating Instructions (PDF format) will not open
You will need Adobe Acrobat Reader 5.0 or later or Adobe Reader 7.0 or later to browse or print the Operating Instructions (PDF format).
Download and install a version of Adobe Reader that you can use with your OS from the following Web Site.http://get.adobe.com/reader/otherversions
If using the following OSjWindows XP SP3jWindows Vista SP2jWindows 7
Insert the CD-ROM containing the Operating Instructions (supplied), click [Adobe(R) Reader(R)] and then follow the messages on the screen to install.
∫ To uninstall the Operating Instructions (PDF format)
Delete the PDF file from the “Program Files\Panasonic\HC\” folder.≥ When the contents in the Program Files
folder cannot be displayed, click the [Show the contents of this folder] to display them.
∫ For Mac
1 Turn the PC on and insert the CD-ROM containing the Operating Instructions (supplied).
2 Open the “Manual” folder in the CD-ROM and then copy the PDF file with the desired language inside the folder.
3 Double click the PDF file to open it.
Others
Reading the Operating Instructions (PDF format)
simplified_HC-X900&X909&X900MGCGN_eng.book 30 ページ 2012年1月16日 月曜日 午後4時36分

31VQT4C85
simplified_HC-X900&X909&X900MGCGN_eng.book 31 ページ 2012年1月16日 月曜日 午後4時36分

Panasonic CorporationWeb site: http://panasonic.net
© Panasonic Corporation 2012VQT4C85
F0112SL0 ( 1300 )
simplified_HC-X900&X909&X900MGCGN_eng.book 32 ページ 2012年1月16日 月曜日 午後4時36分