basic texture techniques – by kenneth williams 7-27-2020
TRANSCRIPT
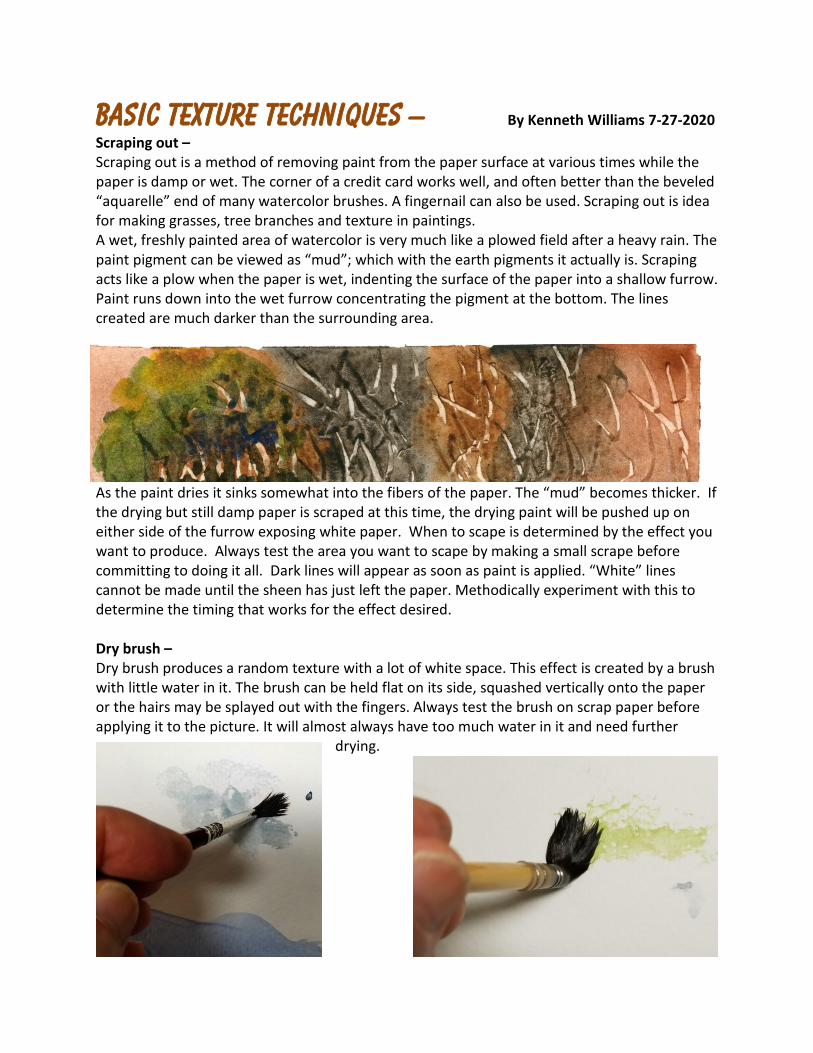
Basic texture techniques – By Kenneth Williams 7-27-2020 Scraping out – Scraping out is a method of removing paint from the paper surface at various times while the paper is damp or wet. The corner of a credit card works well, and often better than the beveled “aquarelle” end of many watercolor brushes. A fingernail can also be used. Scraping out is idea for making grasses, tree branches and texture in paintings. A wet, freshly painted area of watercolor is very much like a plowed field after a heavy rain. The paint pigment can be viewed as “mud”; which with the earth pigments it actually is. Scraping acts like a plow when the paper is wet, indenting the surface of the paper into a shallow furrow. Paint runs down into the wet furrow concentrating the pigment at the bottom. The lines created are much darker than the surrounding area.
As the paint dries it sinks somewhat into the fibers of the paper. The “mud” becomes thicker. If the drying but still damp paper is scraped at this time, the drying paint will be pushed up on either side of the furrow exposing white paper. When to scape is determined by the effect you want to produce. Always test the area you want to scape by making a small scrape before committing to doing it all. Dark lines will appear as soon as paint is applied. “White” lines cannot be made until the sheen has just left the paper. Methodically experiment with this to determine the timing that works for the effect desired. Dry brush – Dry brush produces a random texture with a lot of white space. This effect is created by a brush with little water in it. The brush can be held flat on its side, squashed vertically onto the paper or the hairs may be splayed out with the fingers. Always test the brush on scrap paper before applying it to the picture. It will almost always have too much water in it and need further
drying.

Dry brush technique can make interesting sky and cloud effects. It is also used for grasses, foliage and light on water effects. The sky below was made with a “dry” hog bristle brush held flat against the paper. The grasses below were made by splaying out the hairs of a synthetic, #8, round brush. The tree foliage was created with the tip of a flat #4 hog bristle brush. The slightly dampened brush was pushed into almost pure paint; then lightly dabbed onto the paper. The brush was held vertically as shown.
A dry brushed sky.
Dry brushed grass.
Dry brushing tree foliage. Brush held vertically.
Brush dragged flat against the paper.

Sparkling water created with a small pen
Blotting and lifting – Blotting is a way to remove wet paint from the surface of the paper with a tissue, paper towel, cotton ball or other means. A crumpled paper towel is a good choice for blotting clouds from a wet sky. The crumples add random lines and shapes to the cloud that would be impossible to make by other means. Tissue and cotton balls leave much softer edges and are useful for soft, “gauzy” effects. Lifting out is done after the paper is completely dry. The area to be lifted is wetted with clear water. After setting a few seconds, a damp brush can be wiped over the area removing some or all of the color. A sponge works well for lifting out areas of color. A “Magic Sponge” works very well to lift almost all the paint from the paper. It is capable of damaging paper if applied with too much vigor. Highly staining paints like Phthalo blue and Phthalo green do not lift very well because they stain the actual paper fibers. Pen knife scratches – Sparkles across water can be made by holding a sharp-pointed knife against a ruler and dragging it horizontally across previously painted areas of water. The point of the knife will slightly tear and skip over the paper to create the effect. The knife blade should be perpendicular to the ruler and facing away from its edge.
Clouds blotted with paper towel.
Area lifted with sponge.
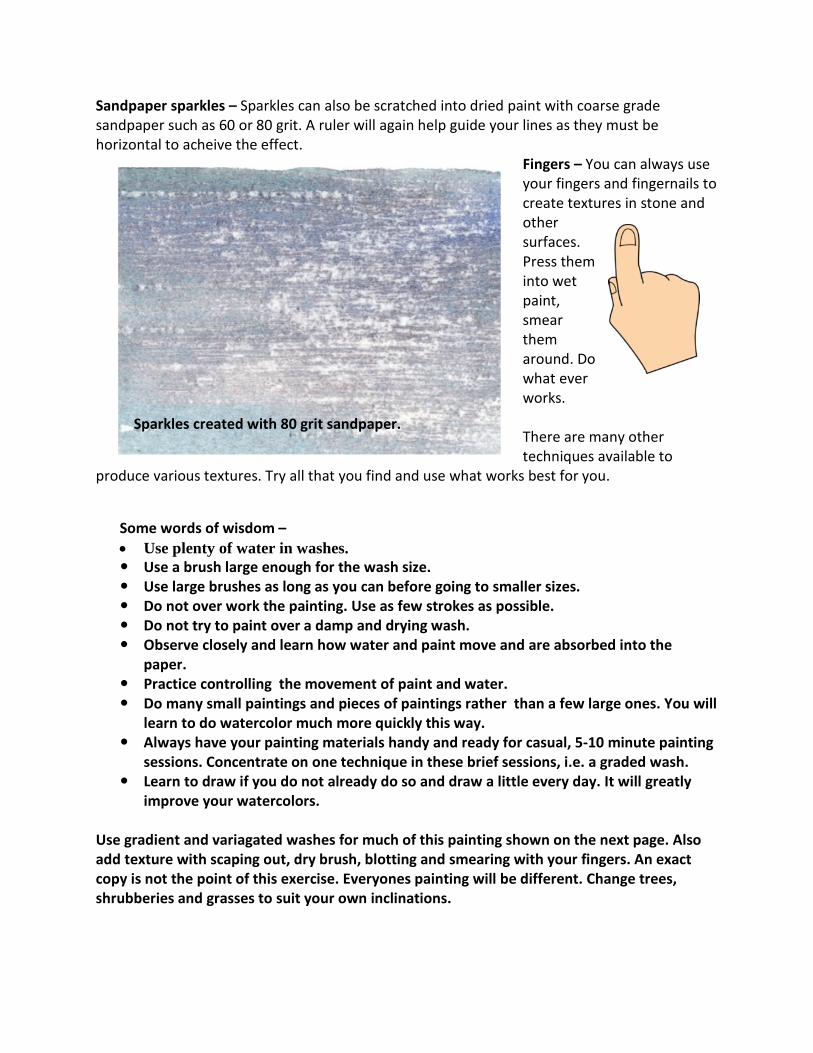
Sparkles created with 80 grit sandpaper.
Sandpaper sparkles – Sparkles can also be scratched into dried paint with coarse grade sandpaper such as 60 or 80 grit. A ruler will again help guide your lines as they must be horizontal to acheive the effect.
Fingers – You can always use your fingers and fingernails to create textures in stone and other surfaces. Press them into wet paint, smear them around. Do what ever works. There are many other techniques available to
produce various textures. Try all that you find and use what works best for you.
Some words of wisdom – • Use plenty of water in washes. Use a brush large enough for the wash size. Use large brushes as long as you can before going to smaller sizes. Do not over work the painting. Use as few strokes as possible. Do not try to paint over a damp and drying wash. Observe closely and learn how water and paint move and are absorbed into the
paper. Practice controlling the movement of paint and water. Do many small paintings and pieces of paintings rather than a few large ones. You will
learn to do watercolor much more quickly this way. Always have your painting materials handy and ready for casual, 5-10 minute painting
sessions. Concentrate on one technique in these brief sessions, i.e. a graded wash. Learn to draw if you do not already do so and draw a little every day. It will greatly
improve your watercolors. Use gradient and variagated washes for much of this painting shown on the next page. Also add texture with scaping out, dry brush, blotting and smearing with your fingers. An exact copy is not the point of this exercise. Everyones painting will be different. Change trees, shrubberies and grasses to suit your own inclinations.

Liftin g