batch & import guide for researchpoint
TRANSCRIPT

Batch & Import GuideLast Updated: 08/10/2016 for ResearchPoint 4.91
ContentsBatch Overview 2
Batch and Import: The Big Picture 2Batch Configuration 11Batch Entry 131
Import 157
Configure Import File Templates 157Configure Import Sources 162Generate Import Header File 164Manage Import Processes 165Import Process Page 177Generate a Header File 183Go to Batch Entry 184

Batch OverviewTo add or update information in your database, you can add or edit an individual record with theappropriate information. When you add or edit many records at once, this process may take a longtime, depending on the number of records affected. Batch is an alternate method to add or updaterecords in your database.
With Batch, you enter and update information on records quickly because you do not open eachindividual record. Instead, you create a batch template to specify the fields to add or update in eachvarious type of record. The program lists the selected fields as fields in a spreadsheet, called a batch,so you can efficiently enter information in the database. When you create a batch template, you alsoselect a batch workflow, which defines the process a batch goes through to add or update its recordsin your database.
Batch and Import: The Big PictureFull Circle View 3Life of a Batch 4Life of an Import Process 7Tips and Considerations 10
pg. 2www.blackbaud.com/howto/researchpoint
chapter 2: BATCH OVERVI EW

Effective time and data management are integral to the success of your organization. When yourefforts are streamlined and consistent, you can devote more time to your organization's mission andgoals.
In this guide, we outline two powerful tools for data management: Batch and Import.
With Batch, you can add or update multiple records in your database at once. This is an efficientalternative to working with records individually and saves time. When you work with records in bulk,you eliminate the need to open and work with each individual record. For example, when you havesimilar information such as a group of volunteer timesheets from Saturday's Walk-A-Thon, it is mucheasier to add that information to your database in a group format using a timesheet batch.
A batch has the look and feel of a spreadsheet and can contain as few or as many fields as you need.When you commit (apply and save) the batch to your database, a record is created for each row of datayou entered in the batch spreadsheet. When rows include edits to existing records, upon committal,those records are updated in your database.
Import is a tool that relies heavily on Batch and helps you manage external data that you want to add toyour database. For example, using a spreadsheet, you gathered a large amount of information aboutpotential donors including names, addresses, and other related data. It is logical to bring this data intoyour database, in bulk, using a batch. Together, Batch and Import can help you organize and work withlarge amounts of data, which saves time and promotes a consistent workflow.
Show Me: Watch this video for a high-level overview of Batch
Show Me: Watch this video for a high-level overview of Import
Full Circle ViewBatch is divided into three main areas: Batch entry, Batch search, and Commit multiple batches. Toaccess Batch, click Batch from Administration. From the Batch page that displays, you can access thethree areas and the associated tasks.
Import is located in Administration. While Import can be accessed from Administration, you can alsoaccess import tasks directly from Batch.
Batch EntryFrom Batch entry, you can access several configuration tasks to ensure a consistent environment foryour batch processes. Before you create and manage batches, you must first specify batch numberingschemes, workflows, and templates. For more information about these configuration tasks, see BatchConfiguration on page 11.
Once you complete the necessary configuration options, you can begin to create and manage batchesusing the Uncommitted Batches and Committed Batches tabs. For information about these tabs andthe tasks associated with them, see Batch Entry.
Tip: Several reports are available to help you track the records entered in a batch and correct theexceptions generated when you commit a batch. For more information, see Batch Entry Reports.
Batch SearchFrom Batch search, you can search for and open a batch. Before you create and manage batches, we
www.blackbaud.com/howto/researchpoint
chapter 2: BATCH OVERVI EW
pg. 3

recommend you search for a batch to see if it already exists. You can use Batch search inAdministration or from the action bar on the Batch Entry page. For more information, see Batch Searchon page 142.
ImportImport relies heavily on Batch as you must base your import on a batch template. You can work withImport tasks directly from Administration or within Batch. For more information, see Import.
Life of a BatchRegardless of the batch type you create, the process or "life" of a batch includes similar steps. Use thefollowing list to review descriptions for each step and how they relate to each other.
1. Configure batch numbering schemeFirst, you must configure a manual or auto-generated batch numbering scheme. With manualnumbering schemes, you enter a batch number for the specific batch. With auto-generated numberingschemes, you define the batch identifier, date formats, and the order they display. For details, seeConfigure Batch Numbering Schemes on page 12.
2. Configure batch workflowNext, configure a batch workflow. The batch workflow determines the series of statuses the batch mustcomplete before its records can commit to the database. For details, see Configure Batch Workflowson page 15.
3. Configure batch templateBefore you can enter data into a batch, you must create a batch template to select the batch type,numbering scheme, and workflow. Batch templates define basic information about a batch, such asfields and default values for the fields. Once you specify a template and create a batch, the specifiedfields appear in the batch spreadsheet, so you can quickly enter information in the database. Fordetails, see Configure Batch Templates on page 19.
4. Create an uncommitted batchNext, create an uncommitted batch. When you enter data into a batch, the batch is considereduncommitted (not yet applied or saved to your database). You can add a batch from Batch entry, orthe program can create a batch using an import process. When a batch is uncommitted, its data has notyet created or updated records in your database. You can continue to edit the data entered in anuncommitted batch or move an uncommitted batch through its workflow. For details, seeUncommitted Batches on page 131.
5. Search for a batchOnce you create a batch, you can use Batch search to locate it. For details, see Batch Search on page
www.blackbaud.com/howto/researchpoint
chapter 2: BATCH OVERVI EW
pg. 4

142.
6. Commit a batchOnce data entry is complete, you can commit the batch. When you commit the batch, the programuses the data entered in the batch to create or update records in your database. For details, seeCommitted Batches on page 139.
Tip: Constituent batch is an example of a batch that adds new records. Other batch types, includingconstituent update batch, applies updated information to existing records.
7. Review batch reportsOnce a batch is committed, you can use several batch reports to review committed data as well as anyexceptions (records that did not commit) that occurred. For details, see Batch Entry Reports.
www.blackbaud.com/howto/researchpoint
chapter 2: BATCH OVERVI EW
pg. 5

www.blackbaud.com/howto/researchpoint
chapter 2: BATCH OVERVI EW
pg. 6

Life of an Import ProcessImport relies heavily on Batch as you must base your import on a batch template. You can work withImport tasks directly from Administration or within Batch. Regardless of the import you create, theprocess or "life" of an import includes similar steps. Use the following list to review descriptions foreach step and how they relate to each other.
1. Configure import sourcesBefore you can create import processes, the system administrator must configure the import sourcelocations where import files are stored on Secured FTP servers or a shared network directory. Eachsource includes a URL or file path and the credentials to access the location. When you create a newimport process, you select the import source file location for that process. For details, see ConfigureImport Sources on page 162.
2. Configure import file mapping templatesAn import file mapping template specifies how to map fields from an import file to a batch template.The template allows you to map fields once rather than manually mapping them each time you createan import process. After you create an import file mapping template, you can use it with any importprocess associated with the same batch template. For details, see Configure Import File Templates onpage 157.
3. Generate import header fileTo ease the mapping of fields to their corresponding header values in an import field, you cangenerate a comma-separated value (*.csv) file that automatically includes the header values for a batchtemplate. After you generate the header file, you can enter data into the header file rows and save thefile. It is important to save the file in a location recognized by SFTP or the network directory. Fordetails, see Generate Import Header File on page 164.
4. Add an import processCreate an import process that generates a batch to add or update information from a file created inanother application. For example, during an event, you may not have access to the program. Instead,you enter data in a spreadsheet program such as Microsoft Excel. After you save the spreadsheet, youcan create an import process to bring that information into your database. When you add an importprocess, you select a batch template to use as the basis for the process. For details, see Add an ImportProcess on page 165
5. Start an import processWhen you start an import process, the program uses the selected batch template to import theinformation in the selected import file into a new batch. After the process runs, the new batch appearson the Uncommitted Batches tab of the Batch Entry page. For details, see Start an Import Process onpage 176.
www.blackbaud.com/howto/researchpoint
chapter 2: BATCH OVERVI EW
pg. 7

6. Commit a batchFrom the Uncommitted Batches tab, you can commit the batch. The program uses the data entered inthe batch to create or update records in your database. For details, see Committed Batches on page139.
7. Batch reportsOnce a batch is committed, you can use several batch reports to review committed data as well as anyexceptions (records that did not commit) that occurred. For details, see Batch Entry Reports.
www.blackbaud.com/howto/researchpoint
chapter 2: BATCH OVERVI EW
pg. 8

www.blackbaud.com/howto/researchpoint
chapter 2: BATCH OVERVI EW
pg. 9

Tips and ConsiderationsThe following list highlights specific tips and considerations to help you save time and streamline yourworkflow.
Data Managementl Take care of your data - carefully consider best practices and streamlined workflows before youbegin working in the program. Consistent data entry promotes healthy data management.
l Think about instances where you may need to export (push out) data from your database withplans to import the data back in at a later time. For example, you create an import file ofconstituent addresses and export them out of your database to be reviewed by an outsidesource. When the addresses are updated, you create an import process (based on a batchtemplate) to bring that data back in. As a best practice, we recommend you use caution whenyou import or export data to or from your database.
l Carefully consider whether or not it is a best practice for you to delete a batch after committingit to the database. You can select the Delete batch after committing option when you add abatch template, a new batch, and when you specify commit parameters. When you delete abatch, it is permanently removed from your database and you cannot reuse its batch number.Each batch number must be unique.
Save Timel To automatically save each row in the batch data entry grid as you work, select Enable auto-save. Each time you tab to a new row in the grid, the batch automatically saves. Saving frequentlyprotects your data and offers one less step to think about. You can set this option when you adda batch template as well as a new batch. For more information, see Add a Batch Template onpage 20.
l You can create recurring import processes for imports used multiple times with different importfiles. For example, an import process can pull files with similar names repeatedly from the samelocation. For more information, see Import.
l When creating a new batch template and batch, or when you customize fields for a batch, youcan work with default fields and values. Defaults are guidelines you set up to simplify data entry.For more information, see Add a Batch Template on page 20.
Navigationl When you minimize a batch data entry screen, the screen appears as a link at the bottom right ofyour browser. To maximize the screen, click the link.
l As you enter information into a batch, you can use the toolbar ribbon to quickly find commandsyou need to complete a task. The tasks on the toolbar ribbon are unique to each batch type, andare grouped together under sections. Each section on the toolbar ribbon relates to a type ofactivity, such as Configuration, Processes, orMessages. For more information, see Batch EntryToolbar on page 144.
l On the batch data entry screen, to quickly perform tasks on the toolbar ribbon using your
www.blackbaud.com/howto/researchpoint
chapter 2: BATCH OVERVI EW
pg. 10

keyboard, click Ctrl + M. Shortcut keys are then displayed over each task that is available in thecurrent view.
To access a task on the toolbar ribbon, click the corresponding letter. To exit the shortcut keydisplay mode, you can select Esc, or simply click your mouse.
l To move quickly to the first field of the next batch row, click CTRL ENTER on your keyboard.l In the batch data entry grid, some fields also include a sub grid that displays several associatedfields for data entry. For example, when you click in the Phones field in the batch data entry grid,a sub grid displays additional fields, such as Phone type, Seasonal start, and Seasonal end.
l At times, fields on the batch data entry screen may be disabled. Certain actions may also bedisabled in the toolbar. Disabled fields and actions are directly related to the type of batch youare using as well as the type of action you are trying to complete. For example, in an constituentupdate batch, you must select a constituent in the Constituent field to enable the Set rowmessage task on the toolbar.
l When a batch is ready to move to the next step in the workflow, you can update its status.
For example, your organization’s workflow for a constituent batch specifies that after you enterdata into a batch, an approver must validate the data entry before the program commits thebatch to the database. To submit the batch for approval, you must update its status to the nextstatus of the workflow. You can update a batch to the next workflow status from the Batch Entrypage or the batch data entry screen. For more information, see Update a Batch to the NextWorkflow Status on page 137.
Helpful Referencesl You can import a variety of record types into your database. For details about data entry fieldsfor a specific record type, you can review the relevent user guide located on our How-toDocumentation page. For example, you can use the Constituent Batch Basic template to add orimport multiple new constituent records. For more information, see the Constituents Guide. Youcan also use the Event Batch Basic template to add or import multiple new event records. Formore information, see the Events Guide.
Batch ConfigurationConfigure Batch Numbering Schemes 12Add Batch Numbering Schemes 13Configure Batch Workflows 15Add a Batch Workflow 15Batch Workflow Record 16Configure Batch Templates 19Add a Batch Template 20Copy a Batch Template 29Import Data into a Batch Template 30
www.blackbaud.com/howto/researchpoint
chapter 2: BATCH OVERVI EW
pg. 11
Mark a Batch Template as Inactive or Active 30
In Batch entry, before you create and manage batches, we recommend you work with the followingbatch configuration tasks to ensure a consistent environment for your batch processes:
l Configure a batch numbering scheme to determine how the program generates numbers toidentify a batch.
l Configure a batch workflow to determine the states the batch must complete before its recordscan commit to the database.
l Configure a batch template to define basic information about the batch, such as fields includedin the batch and default values for the fields.
Note: Before you work with batch configuration tasks, we recommend you review Life of a Batch onpage 4.
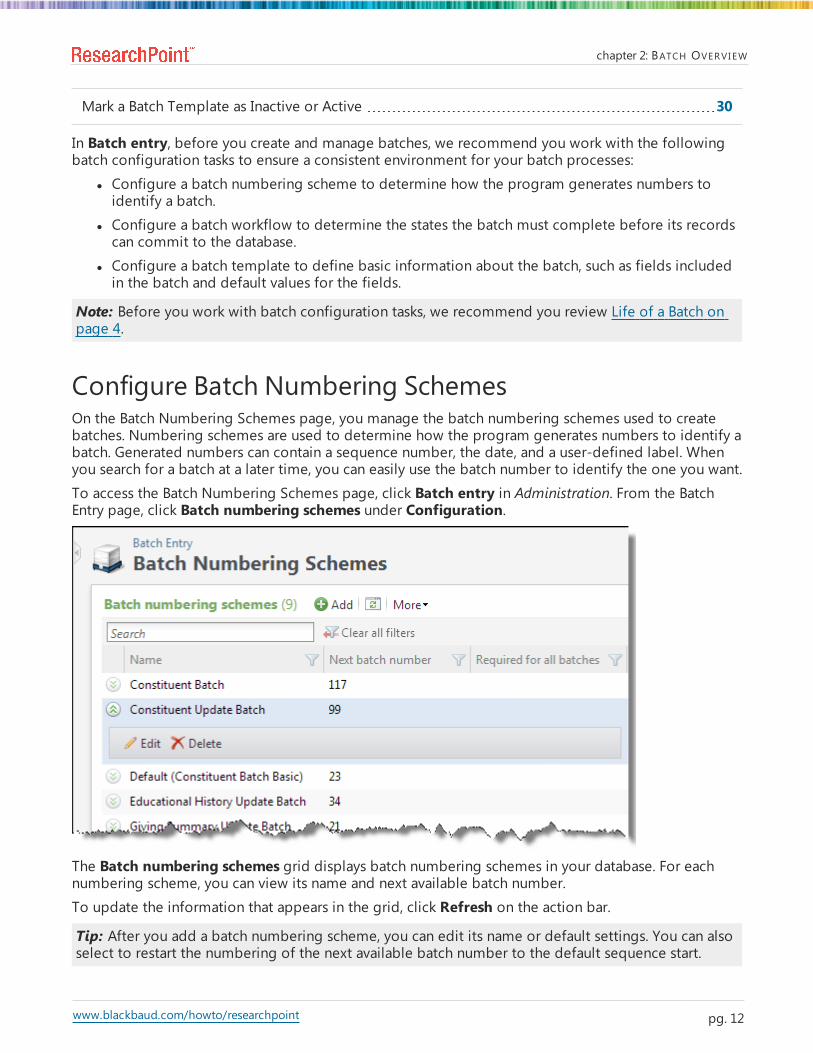
Configure Batch Numbering SchemesOn the Batch Numbering Schemes page, you manage the batch numbering schemes used to createbatches. Numbering schemes are used to determine how the program generates numbers to identify abatch. Generated numbers can contain a sequence number, the date, and a user-defined label. Whenyou search for a batch at a later time, you can easily use the batch number to identify the one you want.
To access the Batch Numbering Schemes page, click Batch entry in Administration. From the BatchEntry page, click Batch numbering schemes under Configuration.
The Batch numbering schemes grid displays batch numbering schemes in your database. For eachnumbering scheme, you can view its name and next available batch number.
To update the information that appears in the grid, click Refresh on the action bar.
Tip: After you add a batch numbering scheme, you can edit its name or default settings. You can alsoselect to restart the numbering of the next available batch number to the default sequence start.
www.blackbaud.com/howto/researchpoint
chapter 2: BATCH OVERVI EW
pg. 12

Warning: You cannot delete a numbering scheme currently in use by a batch template.
Add Batch Numbering SchemesYou can create two types of numbering schemes: manual or auto-generated.
With manual numbering schemes, you enter the batch number as you create batches. The batchnumber options are disabled and you specify only the exception identifier.
Note: Integration batches and import batches cannot use a template that contains a "Manual"numbering scheme.
When you want the program to assign numbers to new batches automatically, create an auto-generated numbering scheme. For auto-generated numbering schemes, you can define the batchidentifier and date formats, as well as the order they display.
Add a batch numbering scheme1. From the Batch page in Administration, click Batch entry. The Batch Entry page appears.2. Under Configuration, click Batch numbering schemes. The Batch Numbering Schemes page
appears.
3. On the action bar of the Batch numbering schemes grid, click Add. The Add a batchnumbering scheme screen appears.
4. In the Name field, enter a unique name to help identify the numbering scheme. For example,enter a name related to the type of batch that will be used with this numbering scheme.
5. In the Type field, select how the batch number scheme will be created.
www.blackbaud.com/howto/researchpoint
chapter 2: BATCH OVERVI EW
pg. 13
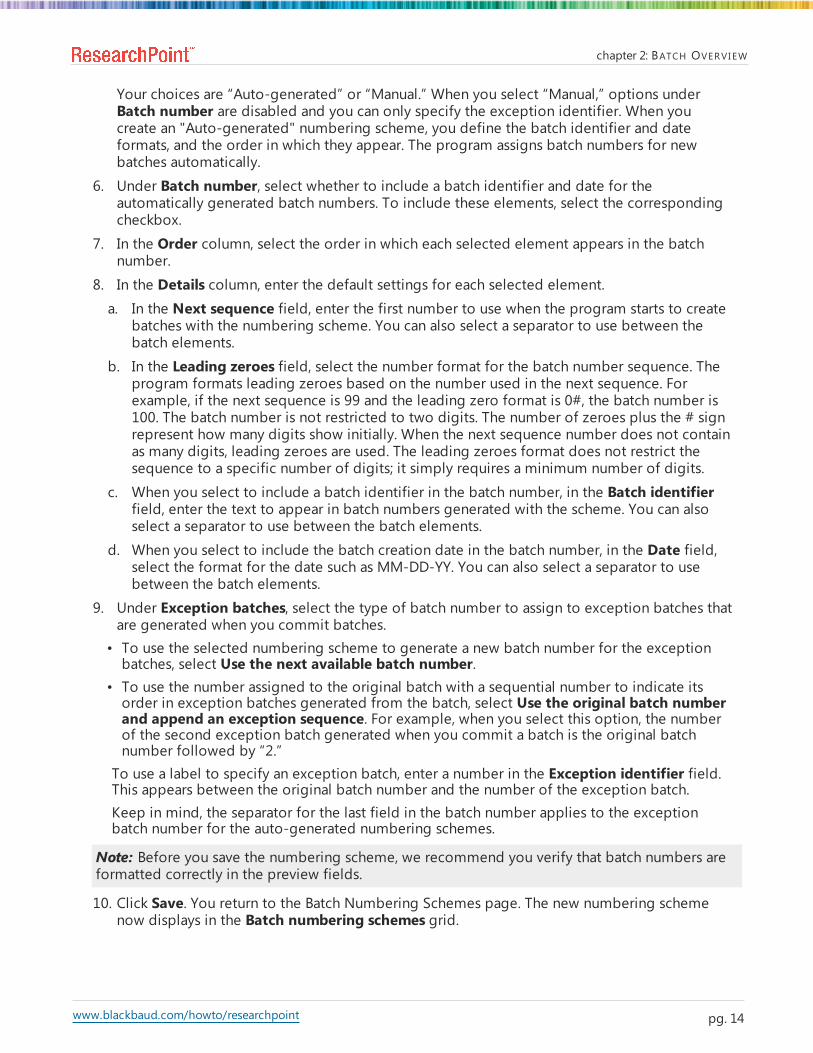
Your choices are “Auto-generated” or “Manual.” When you select “Manual,” options underBatch number are disabled and you can only specify the exception identifier. When youcreate an "Auto-generated" numbering scheme, you define the batch identifier and dateformats, and the order in which they appear. The program assigns batch numbers for newbatches automatically.
6. Under Batch number, select whether to include a batch identifier and date for theautomatically generated batch numbers. To include these elements, select the correspondingcheckbox.
7. In the Order column, select the order in which each selected element appears in the batchnumber.
8. In the Details column, enter the default settings for each selected element.a. In the Next sequence field, enter the first number to use when the program starts to create
batches with the numbering scheme. You can also select a separator to use between thebatch elements.
b. In the Leading zeroes field, select the number format for the batch number sequence. Theprogram formats leading zeroes based on the number used in the next sequence. Forexample, if the next sequence is 99 and the leading zero format is 0#, the batch number is100. The batch number is not restricted to two digits. The number of zeroes plus the # signrepresent how many digits show initially. When the next sequence number does not containas many digits, leading zeroes are used. The leading zeroes format does not restrict thesequence to a specific number of digits; it simply requires a minimum number of digits.
c. When you select to include a batch identifier in the batch number, in the Batch identifierfield, enter the text to appear in batch numbers generated with the scheme. You can alsoselect a separator to use between the batch elements.
d. When you select to include the batch creation date in the batch number, in the Date field,select the format for the date such as MM-DD-YY. You can also select a separator to usebetween the batch elements.
9. Under Exception batches, select the type of batch number to assign to exception batches thatare generated when you commit batches.• To use the selected numbering scheme to generate a new batch number for the exceptionbatches, select Use the next available batch number.
• To use the number assigned to the original batch with a sequential number to indicate itsorder in exception batches generated from the batch, select Use the original batch numberand append an exception sequence. For example, when you select this option, the numberof the second exception batch generated when you commit a batch is the original batchnumber followed by “2.”To use a label to specify an exception batch, enter a number in the Exception identifier field.This appears between the original batch number and the number of the exception batch.Keep in mind, the separator for the last field in the batch number applies to the exceptionbatch number for the auto-generated numbering schemes.
Note: Before you save the numbering scheme, we recommend you verify that batch numbers areformatted correctly in the preview fields.
10. Click Save. You return to the Batch Numbering Schemes page. The new numbering schemenow displays in the Batch numbering schemes grid.
www.blackbaud.com/howto/researchpoint
chapter 2: BATCH OVERVI EW
pg. 14
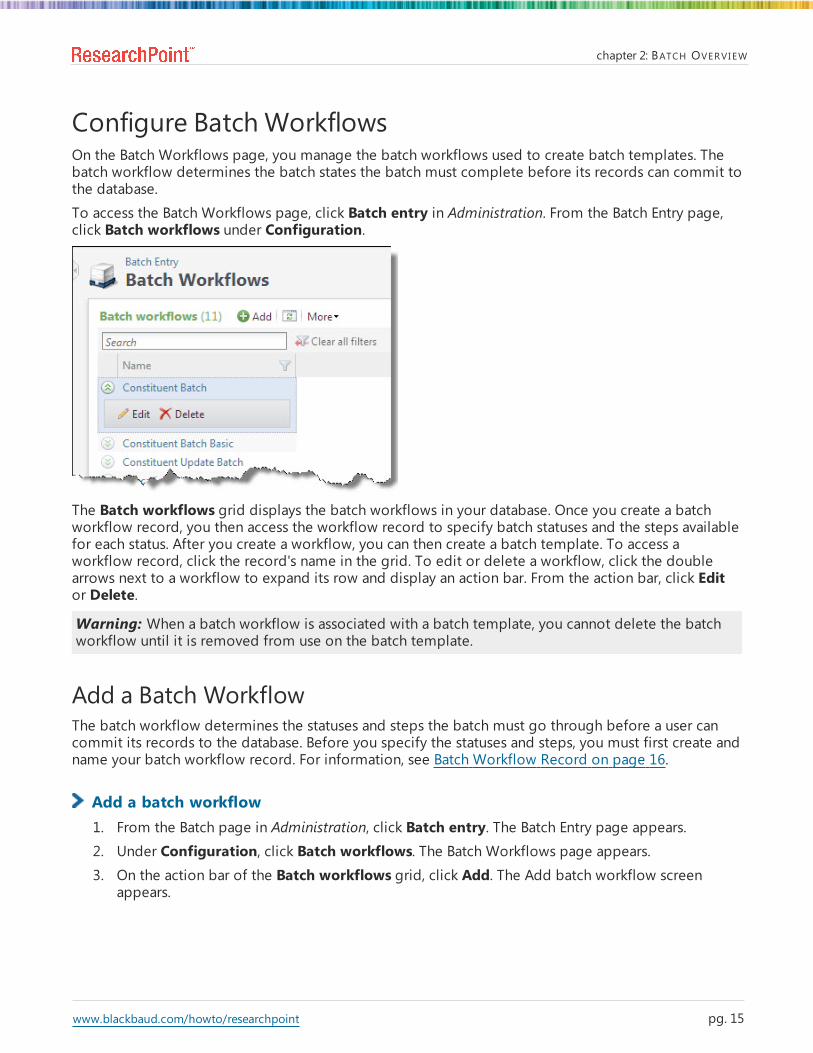
Configure Batch WorkflowsOn the Batch Workflows page, you manage the batch workflows used to create batch templates. Thebatch workflow determines the batch states the batch must complete before its records can commit tothe database.
To access the Batch Workflows page, click Batch entry in Administration. From the Batch Entry page,click Batch workflows under Configuration.
The Batch workflows grid displays the batch workflows in your database. Once you create a batchworkflow record, you then access the workflow record to specify batch statuses and the steps availablefor each status. After you create a workflow, you can then create a batch template. To access aworkflow record, click the record's name in the grid. To edit or delete a workflow, click the doublearrows next to a workflow to expand its row and display an action bar. From the action bar, click Editor Delete.
Warning: When a batch workflow is associated with a batch template, you cannot delete the batchworkflow until it is removed from use on the batch template.
Add a Batch WorkflowThe batch workflow determines the statuses and steps the batch must go through before a user cancommit its records to the database. Before you specify the statuses and steps, you must first create andname your batch workflow record. For information, see Batch Workflow Record on page 16.
Add a batch workflow1. From the Batch page in Administration, click Batch entry. The Batch Entry page appears.2. Under Configuration, click Batch workflows. The Batch Workflows page appears.3. On the action bar of the Batch workflows grid, click Add. The Add batch workflow screen
appears.
www.blackbaud.com/howto/researchpoint
chapter 2: BATCH OVERVI EW
pg. 15

4. Enter a unique name to help identify the batch workflow.
5. Click Save. The batch workflow record appears. On the batch workflow record, you mustspecify statuses and steps. For information, see Batch Workflow Record on page 16.
Once you specify a workflow's statuses and steps, review the workflow to make sure it iscomplete and correctly moves a batch to committal.
Batch Workflow RecordFrom the batch workflow record, you can define and manage the status values of the batch workflowand the steps used to transition a batch from one status to another.
Each batch template in your database can have a unique workflow. For example, in the workflow for aconstituent batch, your organization may allow the batch to be committed directly from the data entrystatus. Or, your organization may require that the data entry of a batch be approved before committal.
To access a batch workflow record, in the Batch workflows grid, click the name of the workflow.
Note: To return to the Batch Workflows page, click Batch Workflows at the top of the record.
On the batch workflow record, the Step 1: Define status values used with the workflow grid lists thebatch status values associated with the workflow. For each status, you can view whether or not it is theinitial status of the workflow and whether or not users can edit and commit the data of a batch in thatstatus. For more information about workflow statuses, see Add a Batch Workflow Status on page 16.
The Step 2: Define the steps used to transition a batch from on status to another grid displays thesteps used to transition a batch from one status to another. For more information, see Add or Edit aBatch Workflow Step on page 18.
Add a Batch Workflow StatusThe batch workflow defines the basic process of the batch. When you add a batch workflow, you mustadd status values to determine the process a batch must complete before its records commit to thedatabase.
www.blackbaud.com/howto/researchpoint
chapter 2: BATCH OVERVI EW
pg. 16

Add a batch workflow status1. On the batch workflow record, click Add on the action bar of the Define status values used
with the workflow grid. The Add a batch workflow status screen appears.
Note: You can also access the Add a batch workflow status screen within the From status and Tostatus fields on the Edit batch workflow steps screen.
2. On the General tab, enter a unique name to help identify the batch workflow status.
3. Select how to handle a batch in this status and whether this is the first status in the workflow.• To designate this as the first status in the workflow, select This is the initial status for theworkflow. You can select this option for only one status in the workflow. When an existingstatus in the workflow is currently specified as the initial status, the program automaticallydeselects This is the initial status for the workflow for that status.
Note: To use a workflow on a batch template, the workflow must include one status where This isthe initial status for the workflow is selected.
• In this status, to enable users to edit a batch, select Allow batch to be edited in this status.When you select this option, users can edit the data entry of the batch.
• In this status, to enable users to commit the records of a batch to the database, select Allowbatch to be committed when in this status. Depending on the workflow, you can enable abatch to be committed from multiple statuses. If you select this option, Only allow commitwhen projected totals match batch totals is enabled. Select this option to ensure projectedtotals and batch totals match before committing the batch.
• In the Days allowed before batch is overdue field, enter the number of days the batch canbe in this status before it is considered overdue. The maximum number of days you can enteris 255. When you set this field to be greater than zero for a workflow status, an exclamationpoint appears in the Batch number column for any batches on the Uncommitted Batches tabthat have been in the status longer than the specified number of days. To specify no time limiton the workflow status, leave the default setting of “0.”
www.blackbaud.com/howto/researchpoint
chapter 2: BATCH OVERVI EW
pg. 17
4. Select the Permissions tab. On this tab, you specify roles that have access to batches in thisstatus.
5. The System roles box displays all roles that have access to batches in this status. For eachsystem role, specify access rights as necessary.• To enable users in a specific system role to access batches in this status, select the role in theSystem roles box and click Grant on the action bar. A green checkmark appears next to thesystem role you selected.
• To prevent users in a specific system role from accessing batches in this status, select the rolein the System roles box and click Deny on the action bar. A lock icon appears next to thesystem role you selected. When a user is associated with multiple system roles and one ofthose roles is denied access rights to a batch in this status, the user cannot access the batcheven when another of the user's system roles is granted rights.
• To neither grant nor deny a system role access rights to a batch in this status, select the role inthe System roles box and click Clear on the action bar. When left clear, and the user does nothave system administrator rights, the user cannot access the batch in this status.
• To remove all granted and denied statuses assigned to the system roles, click Clear all on theaction bar.
6. Click Save. You return to the batch workflow record. The new workflow status appears in theStep 1: Define status values used with the workflow grid.
Add or Edit a Batch Workflow StepOnce you define a workflow status, you can then specify the steps the user can perform with a batch inthat status. The step you select determines the next status in the batch workflow.
For example:
From status: “Open” Step name: “Submit for Review” To status: “Submitted”From status: “Submitted” Step name: “Approve” To status: “Approved”From status: “Submitted” Step name: “Reject” To status: “Open”You add batch workflow step from the Step 2: Define the steps used to transition a batch from onestatus to another grid on the workflow record.
Add or edit a batch workflow step1. On the batch workflow record, click Edit on the action bar of the Step 2: Define the steps
used to transition a batch from one status to another grid. The Edit batch workflow stepsscreen appears.
www.blackbaud.com/howto/researchpoint
chapter 2: BATCH OVERVI EW
pg. 18

2. In the From status field, select the status the batch moves when the user performs the step.When necessary, you can add a new workflow status from this field.
3. In the Step name field, enter a unique name to help identify the workflow step.4. In the To status field, select the status to which the batch moves when the user performs the
step. When necessary, you can add a new workflow status from this field.
5. Click Save. You return to the batch workflow record.
Configure Batch TemplatesOn the Batch Templates page, you manage the batch templates used to create batches. Batchtemplates define basic information about the batch, such as fields included in the batch and defaultvalues for the fields.
When you create a batch template, you select the batch type (such Constituent) and a workflow. Theworkflow defines the process a batch goes through during the add or update process.
To access the Batch Templates page, click Batch entry in Administration. From the Batch Entry page,click Batch templates under Configuration.
The Batch templates grid displays all batch templates currently in your database. To limit the batchtemplates that appear in the grid to those of a specific type of data, click Filters on the action bar. TheCategory field appears. In the Category field, select the category by which to filter the templates andclick Apply. For example, if you manage multiple batch types and want to view only templates forconstituent batches, select “Constituent” and click Apply. You can also select whether to includeinactive batch templates in the grid. To update the information that appears in the grid, click Refreshon the action bar.
www.blackbaud.com/howto/researchpoint
chapter 2: BATCH OVERVI EW
pg. 19

When you create a batch template, you select the batch type, numbering scheme, and workflow, andspecify any additional fields and defaults to use in the batch’s records. From the grid, you can performseveral tasks to manage your batch templates.
Tip: You can use the same batch template for multiple batches.
Add a Batch TemplateBefore you can add a batch to the database, you must create the batch template. Batch templatesdefine basic information about the batch, such as the fields included in the batch and default values forthe fields.
To add a batch template, select Add on the action bar of the Batch Templates page in Batch entry.The Select a batch type screen appears where you can select a batch type to use as the basis for yournew batch template. Use the Category field to narrow the batch types that display.After you select a batch type, click OK.The Add a batch template screen displays and includes a series of tabs designed to walk you throughthe process of creating a batch template.
l On the Let's Get Started tab, work with the batch template name, workflow, and numberingscheme.
l On the Select Fields and Defaults tab, specify how the template be used.l On the Configure Options tab, specify options for commit, constituent matching, andconstituent updates.
l On the Set Permissions tab, assign permissions to the batch template.l On the Confirm and Save tab, review batch template information to ensure the fields andoptions you selected are accurate, and save.
From any of the tabs, use Previous and Next to move between the tabs, or click the links at the top ofthe screen.
Tip: A blue circle indicates the tab you are currently using. When required information is missing, ayellow warning appears.
Let's get started1. From the Add a batch template screen, click Let's get started. The Let's get started tab
appears. For more information about how to access the Add a batch template screen, see Adda Batch Template on page 20.
Tip: Use Previous and Next to move between the tabs, or click the links at the top of the screen.A blue circle indicates the tab you are currently using. When required information is missing, ayellow warning appears.
www.blackbaud.com/howto/researchpoint
chapter 2: BATCH OVERVI EW
pg. 20

2. In theWorkflow name field, select the workflow to use with this template. This field displaysall workflows in your database that have a status designated as an initial state. When theworkflow you want does not appear in the drop-down list, you can add the workflow to thedatabase. For more information about batch workflows, see Configure Batch Workflows onpage 15.
3. In the Numbering scheme field, select the numbering scheme to use with this template. Youcan also select to add a new numbering scheme from this field.
When you use a global numbering scheme (one that has been marked required), theNumbering scheme field displays the name of the global scheme and is disabled. For moreinformation about numbering schemes, see Configure Batch Numbering Schemes on page 12.
4. Select Enable auto-save when you want the batch to automatically save each row as you work.5. Click Next to move to the Select fields and defaults tab.
Select fields and defaults1. From the Add a batch template screen, click Select fields and defaults. The Select fields and
defaults tab appears. For more information about how to access the Add a batch templatescreen, see Add a Batch Template on page 20.
Tip: Use Previous and Next to move between the tabs, or click the links at the top of the screen.A blue circle indicates the tab you are currently using. When required information is missing, ayellow warning appears.
www.blackbaud.com/howto/researchpoint
chapter 2: BATCH OVERVI EW
pg. 21

2. Under Select fields and defaults, in the Template use field, specify how the template is used.This field is enabled only with certain batch types.• Select “Batch entry and import” to make the template available for both importing and batchentry.
• Select “Batch entry only” to make the template available only for batch entry.• Select “Import only” to make the template available only for importing. When you select thisoption, the template is not available for selection when creating a new batch.
3. In the Available field options box, a list of all the fields available to use in the batch templateappears. The selected batch type determines which fields appear in this box. When a + symbolappears next to an entry in the Available field options box, you can click the + symbol toview a list of field names grouped under the heading.
In the Selected fields box, fields required by the selected batch type are marked Required.Any fields that cannot be removed from the Selected fields box are marked Locked. Add anyadditional fields to include in the batch template. To move fields to the Selected fields box,select them in the Available field options box and click the right arrow. You can selectmultiple fields and move groups, and move entire folders. When a field appears in theSelected fields box, it is disabled in the Available field options box.
Note: To move fields to the Selected fields box, you can also drag and drop them from one boxto another.
Note: When you design a constituent batch, you can select to add the Constituent securityattribute field. When you add this field and select a security group as a field default or duringbatch data entry, only users in the selected security group can manage constituent records createdduring batch committal.
www.blackbaud.com/howto/researchpoint
chapter 2: BATCH OVERVI EW
pg. 22

Note: When creating an Event Registrant template, when you select a status of “Registered (willnot attend),” the application automatically sets the Attended field to “No.”
4. The order of the fields in the Selected fields box is the order the fields appear in the batch.Once you select all the fields to use in the batch, use the up and down arrows to arrange theirorder. You can also drag the fields up and down to arrange their order.
5. Under Default value, set the default setting for the fields or checkboxes in the Selected fieldsbox as necessary.
a. To set a default setting for a field, select it in the Selected fields box and, under Defaultvalue, enter its default value.
b. To mark a checkbox in the Selected fields box by default, select it in the Selected fields boxand, under Default value, mark its checkbox. When you enter data into the batch, theselected checkbox is automatically marked. For example, when you include the Do not sendmail to this address checkbox in a constituent batch and want it automatically marked in thebatch, select it in the Selected fields box and mark its checkbox under Default value.
c. When you set a default value for an item in the Selected fields box and do not expect itsvalue to change for any record entered in the batch, you can hide the field. When you hide afield or checkbox, it does not appear in the batch for data entry. Records added to the batchautomatically include the default value. To hide a field or checkbox, select it in the Selectedfields box and mark Hidden under Default value.
d. To make a field or checkbox required in the batch, select it in the Selected fields box andmark Required under Default value.
Note: Some fields are automatically marked as Required, as specified by the selected batch type.When the batch type requires a field, you cannot deselect the Required checkbox for the field.
Tip: To prevent the creation of blank address records, we recommend you delete default addressinformation from the batch row when you add a record with no address data.
6. Click Next to move to the Configure options tab.
Configure options1. From the Add a batch template screen, click Configure options. The Configure options tab
appears. For more information about how to access the Add a batch template screen, see Adda Batch Template on page 20.
Tip: Use Previous and Next to move between the tabs, or click the links at the top of the screen.A blue circle indicates the tab you are currently using. When required information is missing, ayellow warning appears.
www.blackbaud.com/howto/researchpoint
chapter 2: BATCH OVERVI EW
pg. 23
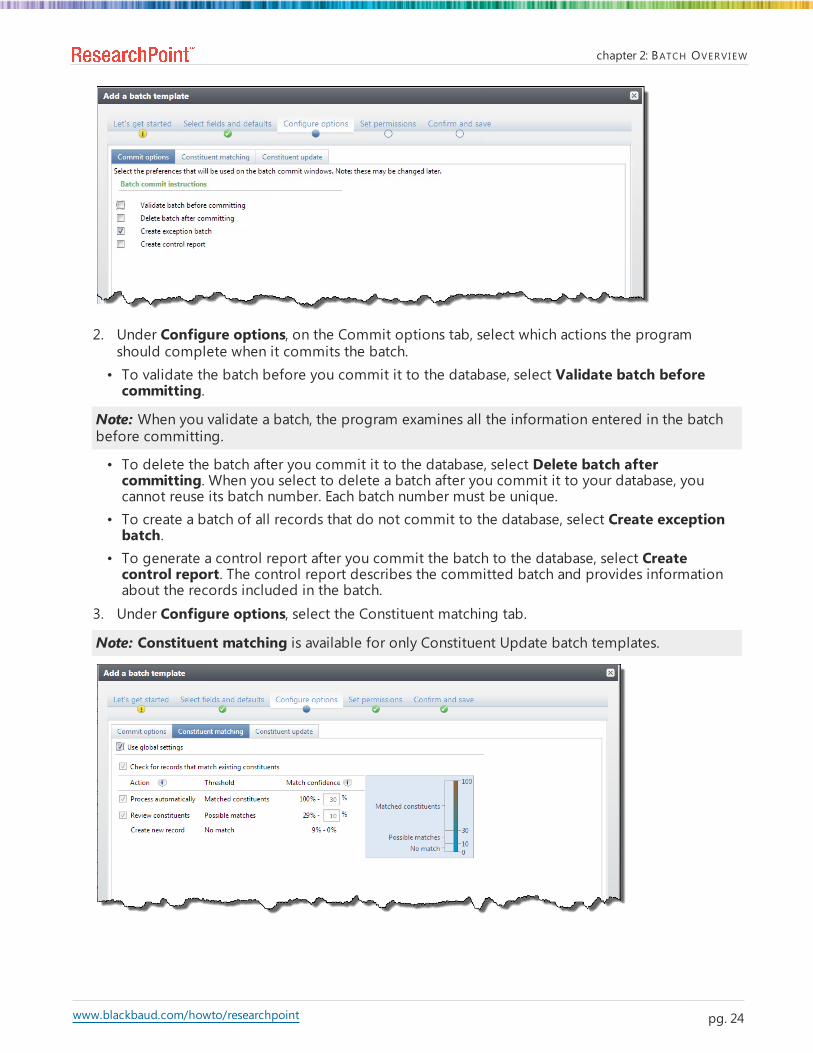
2. Under Configure options, on the Commit options tab, select which actions the programshould complete when it commits the batch.• To validate the batch before you commit it to the database, select Validate batch beforecommitting.
Note: When you validate a batch, the program examines all the information entered in the batchbefore committing.
• To delete the batch after you commit it to the database, select Delete batch aftercommitting. When you select to delete a batch after you commit it to your database, youcannot reuse its batch number. Each batch number must be unique.
• To create a batch of all records that do not commit to the database, select Create exceptionbatch.
• To generate a control report after you commit the batch to the database, select Createcontrol report. The control report describes the committed batch and provides informationabout the records included in the batch.
3. Under Configure options, select the Constituent matching tab.
Note: Constituent matching is available for only Constituent Update batch templates.
www.blackbaud.com/howto/researchpoint
chapter 2: BATCH OVERVI EW
pg. 24
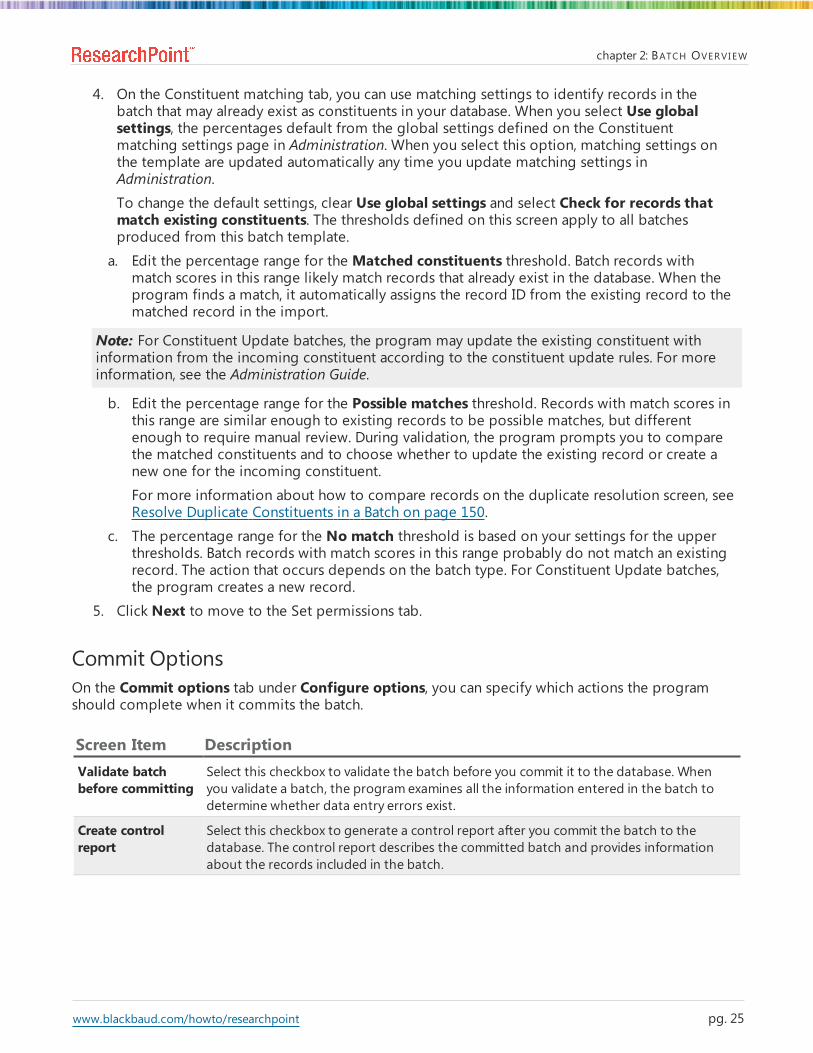
4. On the Constituent matching tab, you can use matching settings to identify records in thebatch that may already exist as constituents in your database. When you select Use globalsettings, the percentages default from the global settings defined on the Constituentmatching settings page in Administration. When you select this option, matching settings onthe template are updated automatically any time you update matching settings inAdministration.
To change the default settings, clear Use global settings and select Check for records thatmatch existing constituents. The thresholds defined on this screen apply to all batchesproduced from this batch template.
a. Edit the percentage range for the Matched constituents threshold. Batch records withmatch scores in this range likely match records that already exist in the database. When theprogram finds a match, it automatically assigns the record ID from the existing record to thematched record in the import.
Note: For Constituent Update batches, the program may update the existing constituent withinformation from the incoming constituent according to the constituent update rules. For moreinformation, see the Administration Guide.
b. Edit the percentage range for the Possible matches threshold. Records with match scores inthis range are similar enough to existing records to be possible matches, but differentenough to require manual review. During validation, the program prompts you to comparethe matched constituents and to choose whether to update the existing record or create anew one for the incoming constituent.
For more information about how to compare records on the duplicate resolution screen, seeResolve Duplicate Constituents in a Batch on page 150.
c. The percentage range for the No match threshold is based on your settings for the upperthresholds. Batch records with match scores in this range probably do not match an existingrecord. The action that occurs depends on the batch type. For Constituent Update batches,the program creates a new record.
5. Click Next to move to the Set permissions tab.
Commit OptionsOn the Commit options tab under Configure options, you can specify which actions the programshould complete when it commits the batch.
Screen Item DescriptionValidate batchbefore committing
Select this checkbox to validate the batch before you commit it to the database. Whenyou validate a batch, the program examines all the information entered in the batch todetermine whether data entry errors exist.
Create controlreport
Select this checkbox to generate a control report after you commit the batch to thedatabase. The control report describes the committed batch and provides informationabout the records included in the batch.
www.blackbaud.com/howto/researchpoint
chapter 2: BATCH OVERVI EW
pg. 25

Constituent MatchingNote: Options on the Constituent matching tab do not apply if the feature is not turned on via theEnable/disable matching configuration task in Administration.
On the Constituent matching tab under Configure options, use the threshold settings to define threepercentage ranges or "thresholds" for match confidences that determine when incoming records arematches, possible matches, or not matches based on their match scores.Match confidence comparesfield values from the new record with existing records and assigns match scores for fields weighted byfield type. Match confidence is calculated based on the degree of similarity between the first names,last/organization names, middle names, suffixes, titles, addresses, and zip codes. For more informationabout how match confidence scores are calculated, see the Administration Guide.
Note: The Constituent matching tab is available for Constituent Update batch templates.
The program performs different actions for each threshold as described in this table:
Screen Item DescriptionUse global settings When you select Use global settings, matching thresholds default from the Constituent
Matching Settings page in Administration. If you update the matching settings inAdministration, the program updates the settings on this batch template accordingly.
Check for recordsthat match existingconstituents
To set different matching settings for a batch template, clear Use global settings, selectCheck for records that match existing constituents, and then adjust the thresholds.
Processautomatically
Edit the percentage range for theMatched constituents threshold. Batch records withmatch scores in this range likely match records that already exist in the database. Whenthe program finds a match, it automatically assigns the record ID from the existing recordto the matched record in the batch. This process occurs behind the scenes and requiresno actions from users.
Note: For Constituent Update batches, the programmay update the existing constituentwith information from the incoming constituent according to the constituent updaterules. For more information, see the Administration Guide.
You can clear Process automatically to turn off automatic updates.
Review matches Edit the percentage range for the Possible matches threshold. Batch records with matchscores in this range are similar enough to existing records to be possible matches, butdifferent enough to require manual review. The program prompts you to compare thematched constituents and to choose whether to update the existing record or create anew one for the incoming constituent.
For more information about how to compare records on the duplicate resolution screen,see Resolve Duplicate Constituents in a Batch on page 150.
You can clear Review matches to turn off manual reviews.
Create new record The percentage range for the Create new record threshold is based on your settings forthe upper thresholds. Batch records with match scores in this range probably do notmatch an existing record.
The program creates a new record behind the scenes and requires no actions from users.
www.blackbaud.com/howto/researchpoint
chapter 2: BATCH OVERVI EW
pg. 26

Set permissions1. From the Add a batch template screen, click Set permissions. The Set permissions tab appears.
For more information about how to access the Add a batch template screen, see Add a BatchTemplate on page 20.
Tip: Use Previous and Next to move between the tabs, or click the links at the top of the screen.A blue circle indicates the tab you are currently using. When required information is missing, ayellow warning appears.
2. Under Set permissions, in the System roles box on the left, you can assign permissions to editthis batch template.• To enable users in a specific system role to edit the batch template, select the system role andclick Grant on the action bar. The status of the selected system role changes to GRANTED.
• To prevent users in a specific system role from administering the batch template, select thesystem role and click Deny on the action bar. The status of the selected system role changesto DENIED. When a user has multiple system roles and one of those roles is denied accessrights, the user cannot administer the batch template, even when another of the user's systemroles is granted rights.
• To remove the GRANTED or DENIED status assigned to a system role, select the role and clickClear on the action bar. In this case, you do not want to grant a user in a specific system roleaccess rights, but you also do not want to prevent the user from administering the batchtemplate. This situation may occur for users with multiple system roles. The Clear optionneither grants nor denies the system role administrator rights to the batch template.
• To remove all GRANTED and DENIED statuses assigned to the system roles, click Clear all onthe action bar.
www.blackbaud.com/howto/researchpoint
chapter 2: BATCH OVERVI EW
pg. 27

3. In the System roles box on the right, you can assign permissions to customize fields within abatch.• To enable users in a specific system role to customize the fields within a batch, select thesystem role and click Grant on the action bar. The status of the selected system role changesto GRANTED.
• To prevent users in a specific system role from customizing the batch template, select the rolein the System role box and click Deny on the action bar. The status of the selected systemrole changes to DENIED. If a user has multiple system roles and one of those roles is deniedaccess rights, the user cannot customize the batch template, even if another of the user'ssystem roles is granted rights.
• To remove the GRANTED or DENIED status assigned to a system role, select the role in theSystem role box and click Clear on the action bar. In this case, you do not want to grant a userin a specific system role access rights, but you also do not want to prevent the user fromcustomizing the batch template. This situation may occur for users with multiple system roles.The Clear option neither grants nor denies the system role rights to customize the batchtemplate.
• To remove all GRANTED and DENIED statuses assigned to the system roles, click Clear all onthe action bar.
4. Click Next to move to the Confirm and save tab.
Confirm and save1. From the Add a batch template screen, click Confirm and save. The Confirm and save tab
appears. For more information about how to access the Add a batch template screen, see Adda Batch Template on page 20.
Tip: Use Previous and Next to move between the tabs, or click the links at the top of the screen.A blue circle indicates the tab you are currently using. When required information is missing, ayellow warning appears.
www.blackbaud.com/howto/researchpoint
chapter 2: BATCH OVERVI EW
pg. 28

2. Under Confirm and save, review the batch template information to ensure the fields andoptions you selected are accurate.
3. Click Save to save the template and return to the Batch Templates page.
Copy a Batch TemplateWith Batch entry, you can easily create a new batch template based on a template already in yourdatabase. When you copy a batch template, you create a new batch template with the same batch typeand workflow and same selected fields and field defaults as the selected batch template. This savesyou time, as you do not need to recreate the field selection already used in another batch template.Once you create the new batch template, you can edit it, such as to adjust the selected fields or fielddefaults.
Copy a batch template1. From the Batch page in Administration, click Batch entry. The Batch Entry page appears.2. Under Configuration, click Batch templates. The Batch Templates page appears.3. In the Batch templates grid, click the double arrows next to the template you want to copy.
From the expanded row that appears, click Copy on the action bar. The Copy batch templatescreen appears.
Tip: You can limit the batch templates that appear in the Batch templates grid to those of aspecific type of data. To filter the grid, click Filters and, in the Category field, select the categoryby which to filter the batches. To display inactive batch templates in the grid, mark Includeinactive. To view the batch templates that meet the specified filters, click Apply.
www.blackbaud.com/howto/researchpoint
chapter 2: BATCH OVERVI EW
pg. 29

4. Enter a unique name and description to identify the new batch template.
5. Click Save. You return to the Batch Templates page. In the Batch templates grid, the newbatch template appears.
6. Edit the new batch template as necessary. For example, adjust the selected fields or fielddefaults.
Import Data into a Batch TemplateIn Batch entry, you can import data from a spreadsheet created in another application into thedatabase. For example, you enter information about new constituents into a spreadsheet applicationsuch as Microsoft Excel. You can then create a business process to easily import the information fromthe spreadsheet into a batch template.
You can add an import process from the Batch Templates page. In the Batch templates grid, click thedouble arrows next to the batch template you want to use to capture the imported data. From theexpanded row that appears, click Create import on the action bar. The Add import process screenappears. For information about this process, see Add an Import Process on page 165.
Mark a Batch Template as Inactive or ActiveWhen you mark a batch template as inactive, users can no longer use it to create batches. For example,your organization may no longer use a specific template.
To mark a batch template inactive, from the Batch Entry page in Administration, click Batch templatesunder Configuration. The Batch Templates page appears. In the Batch templates grid, click thedouble arrows next to a template to expand its row. On the action bar, clickMark inactive.
Tip: Inactive batch templates do not display in the Batch templates grid. To view them, ensure youselect Include inactive as a filter.
Alternatively, you can mark an inactive batch template as active to ensure your organization can use itto create a batch. To do this, from the same action bar, clickMark active.
www.blackbaud.com/howto/researchpoint
chapter 2: BATCH OVERVI EW
pg. 30

ResearchPoint Batch Templates
pg. 31www.blackbaud.com/howto/researchpoint
chapter 3:

To help you work with Batch entry, several batch templates are included in the program. These batchtemplates provide the necessary fields to add basic information to create or update records. You canalso use these templates to import information from a comma-separated value (*.csv) file.
Batch templates use batch types and workflows. Corresponding types and workflows for each templateare described in the following sections. Note that the batch type "Constituent Address Update Batch"is not associated with a batch template, but you can add one as necessary. For more information aboutthis batch type, see Constituent Address Update Batch on page 79. All other tables in the followingsections describe batch templates.
When you add attributes, some may become available to include in a batch template.
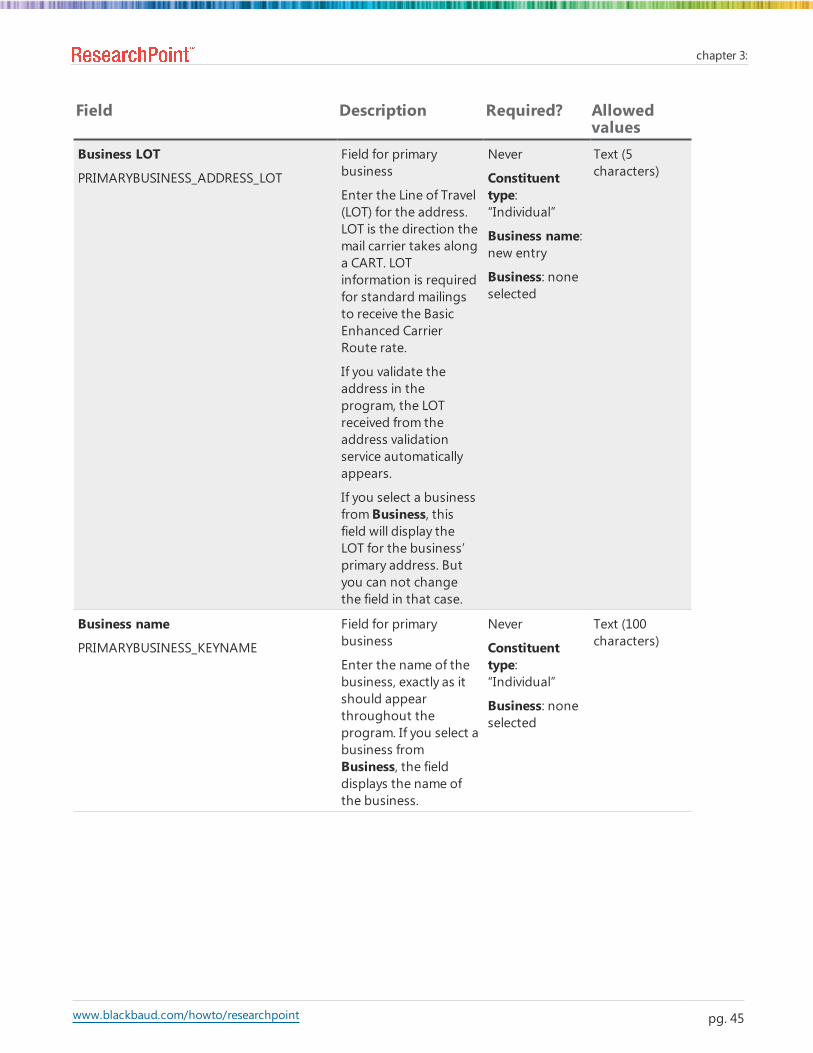
Constituent BatchThe table below explains the fields in the Constituent Batch template. You can use this batch templateto add or import multiple new constituent records. When a field is not required, you can leave it blankas necessary. For more information about the constituent data entry fields, see the Prospect Wealth &Management Guide.
Fields marked “Never” are never required. Fields marked “Conditionally” are required in somesituations, such as when another field is selected. Some fields are only accessible when another field isselected or when another field has a specific value. Some fields are display-only when other fields areselected. This information is in the “Required” column of the table below.
Field Description Required? Allowedvalues
Academic catalog additional information
AFFILIATEDADDITIONALINFORMATION
Educational historyfield
Enter additionalinformation about theprogram, such as itscollege or school,department, or degreetype at the educationalinstitution.
Never
Educationalinstitution:affiliated andcontained in theacademiccatalog
Constituenttype:“Individual”
Text
www.blackbaud.com/howto/researchpoint
chapter 3:
pg. 32

Field Description Required? Allowedvalues
Academic catalog degree
EDUCATIONALHISTORY_ACADEMICCATALOGDEGREEID
Educational historyfield
Select the degree ofthe program theconstituent attends atthe institution.
Never
Educationalinstitution:affiliated andcontained in theacademiccatalog
Constituenttype:“Individual”
Academiccatalogdegreesdefined in thesystem
Academic catalog program
EDUCATIONALHISTORY_ACADEMICCATALOGPROGRAMID
Educational historyfield
Select the program theconstituent attends atthe institution, such as“Undergraduate.”
Never
Educationalinstitution:affiliated andcontained in theacademiccatalog
Constituenttype:“Individual”
Academiccatalogprogramsdefined in thesystem
Address
ADDRESS_ADDRESSBLOCK
Address field
Enter the streetaddress or post officebox for theconstituent.
Never Text (150characters)
Address start date
ADDRESS_HISTORICALSTARTDATE
Address field
Select the date whenthe constituent beginsuse of the address.
Never Date
Address type
ADDRESS_ADDRESSTYPECODEID
Address field
Enter the type ofaddress to add for theconstituent, such as“Home” or “Business.”
Never Address typesin Address Typetable
Addressee name format
PRIMARYADDRESSEE_NAMEFORMATFUNCTIONID
Enter the name as itshould appear whenthe constituent is anaddressee.
Never
Constituenttype:“Individual”
Addresseename formatsdefined in thesystem
www.blackbaud.com/howto/researchpoint
chapter 3:
pg. 33

Field Description Required? Allowedvalues
Addressee type
PRIMARYADDRESSEE_NAMEFORMATTYPECODEID
Select the type of nameformat to add such as“Formal Addressee.”
Never
Constituenttype:“Individual”
Addresseetypes defined inthe system
Alternate lookup IDs
ALTERNATELOOKUPIDS
When you select thisfield, a second gridappears. You can enterthe Alternate lookupID type code ID andAlternate lookup ID.
With Alternate lookupIDs, you can manuallyassign more lookup IDsto a record, withoutaltering the primarylookup ID.
Alternate lookup IDappears in theconnected grid forAlternate lookup IDs.Enter the lookup ID.
Alternate lookup typecode ID appears in theconnected grid forAlternate lookup IDs.Enter the type.
Never
Alternatelookup ID andAlternatelookup typecode ID:Conditionally aspart ofAlternatelookup IDs
Select from aconnected grid
Birth date
BIRTHDATE
Enter the individual’sdate of birth, such as“10/10/1941.” If you areunsure of the exactbirth date, you canenter a “fuzzy” date,such as the month andyear or the year only.
Never
Constituenttype:“Individual”
A "fuzzy" date
Birthplace
BIRTHPLACE
Demographic field
Enter the constituent’sbirthplace.
Constituenttype:“Individual”
Text (50characters)
www.blackbaud.com/howto/researchpoint
chapter 3:
pg. 34
Field Description Required? Allowedvalues
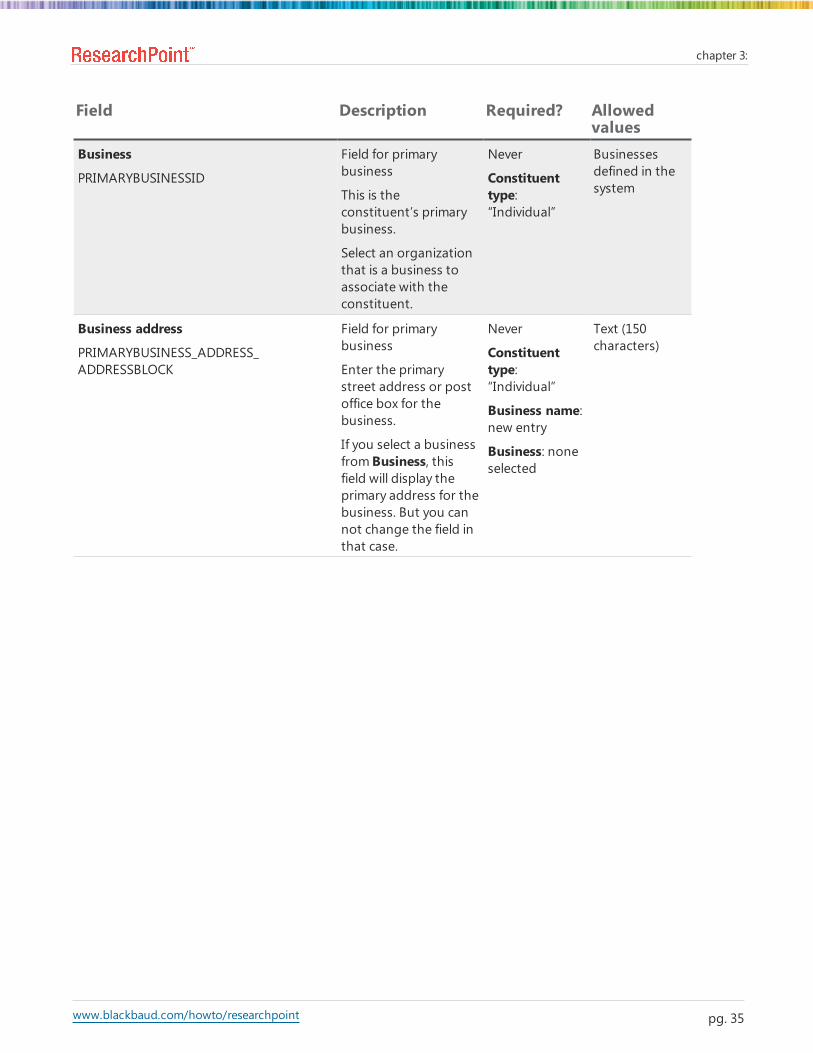
Business
PRIMARYBUSINESSID
Field for primarybusiness
This is theconstituent’s primarybusiness.
Select an organizationthat is a business toassociate with theconstituent.
Never
Constituenttype:“Individual”
Businessesdefined in thesystem
Business address
PRIMARYBUSINESS_ADDRESS_ADDRESSBLOCK
Field for primarybusiness
Enter the primarystreet address or postoffice box for thebusiness.
If you select a businessfromBusiness, thisfield will display theprimary address for thebusiness. But you cannot change the field inthat case.
Never
Constituenttype:“Individual”
Business name:new entry
Business: noneselected
Text (150characters)
www.blackbaud.com/howto/researchpoint
chapter 3:
pg. 35

Field Description Required? Allowedvalues
Business address type
PRIMARYBUSINESS_ADDRESS_ADDRESSTYPECODEID
Field for primarybusiness
Select the type ofaddress to use as theprimary contact for thebusiness, such as“Business.”
When you add a newconstituent, you canadd only the primaryaddress information.On the constituentrecord, you can addadditional addresseson the Contact tab.
If you select a businessfromBusiness, thisfield will display theaddress type for thebusiness. But you cannot change the field inthat case.
Never
Constituenttype:“Individual”
Business name:new entry
Business: noneselected
Address typesdefined in thesystem
Business career level
PRIMARYBUSINESS_CAREERLEVELCODEID
Field for primarybusiness
Enter the career levelfor the constituent atthe business.
Never
Constituenttype:“Individual”
Either Businessname enteredor Businessselected
Business careerlevels defined inthe system
www.blackbaud.com/howto/researchpoint
chapter 3:
pg. 36

Field Description Required? Allowedvalues
Business CART
PRIMARYBUSINESS_ADDRESS_CART
Field for primarybusiness
Enter the Carrier Route(CART) for the address.CART refers to theaddresses served bythe postal carrier andthe route used todeliver the mail. TheCART can include thecity, rural, and highwaycontract routes. Toease the delivery ofmail and receive apostal discount, youcan add CARTinformation toaddresses in yourmailings.
If you validate theaddress in theprogram, the CARTreceived from theaddress validationservice automaticallyappears.
If you select a businessfromBusiness, thisfield will display theCART for the business’primary address. Butyou can not changethe field in that case.
Never
Constituenttype:“Individual”
Business name:new entry
Business: noneselected
Text (10characters)
www.blackbaud.com/howto/researchpoint
chapter 3:
pg. 37

Field Description Required? Allowedvalues
Business city
PRIMARYBUSINESS_ADDRESS_CITY
Field for primarybusiness
Enter the city or townfor the business’primary address.
If you select a businessfromBusiness, thisfield will display the cityfor the business’primary address. Butyou can not changethe field in that case.
Never
Constituenttype:“Individual”
Business name:new entry
Business: noneselected
Text (50characters)
Business country
PRIMARYBUSINESS_ADDRESS_COUNTRYID
Field for primarybusiness
Select the country ofthe business’ primaryaddress.
If you select a businessfromBusiness, thisfield will display thecountry for thebusiness’ primaryaddress. But you cannot change the field inthat case.
Never
Constituenttype:“Individual”
Business name:new entry
Business: noneselected
Countriesdefined in thesystem
Business do not mail
PRIMARYBUSINESS_ADDRESS_DONOTMAIL
Field for primarybusiness
If the businessrequests that you notsend mail to theprimary address, selectthis checkbox.
If you select a businessfromBusiness, thisfield will displaywhether the option isselected for thebusiness. But you cannot change the field inthat case.
Never
Constituenttype:“Individual”
Business name:new entry
Business: noneselected
Selected or notselected
www.blackbaud.com/howto/researchpoint
chapter 3:
pg. 38

Field Description Required? Allowedvalues
Business do not mail reason
PRIMARYBUSINESS_ADDRESS_DONOTMAILREASONCODEID
Field for primarybusiness
If you select Businessdo not mail, select whythe business requeststo not receive mail atthe primary address.
Never
Constituenttype:“Individual”
Business name:new entry
Business: noneselected
Do not mailreasonsdefined in thesystem
www.blackbaud.com/howto/researchpoint
chapter 3:
pg. 39

Field Description Required? Allowedvalues
Business DPC
PRIMARYBUSINESS_ADDRESS_DPC
Field for primarybusiness
Enter the Delivery PointCode (DPC) for theaddress. DPC is aPOSTNET barcode thatcontains a ZIP+4barcode plus twoadditional digits (or 10additional bars) todesignate a specificdelivery point. Thebarcode consists of 62bars total, withbeginning and endingframe bars and fivebars each for the ninedigits of the ZIP+4, thelast two digits of theprimary street addressor post office box, anda correction digit.
If you receive a three-digit DPC from yourvendor, enter only thefirst two digits. The firsttwo digits of the DPCare the last two digitsof the street addressnumber.
If you validate theaddress in theprogram, the DPCreceived from theaddress validationservice automaticallyappears.
If you select a businessfromBusiness, thisfield will display theDPC for the business’address. But you cannot change the field inthat case.
Never
Constituenttype:“Individual”
Business name:new entry
Business: noneselected
Text (8characters)
www.blackbaud.com/howto/researchpoint
chapter 3:
pg. 40

Field Description Required? Allowedvalues
Business email address
PRIMARYBUSINESS_EMAILADDRESS_EMAILADDRESS
Field for primarybusiness
Enter the primary emailaddress for theorganization. On theconstituent record, theprimary email addressbecomes a link thatyou can click to quicklysend an email to theorganization.
If you select a businessfromBusiness, thisfield will display theemail address for thebusiness. But you cannot change the field inthat case.
Never
Constituenttype:“Individual”
Business name:new entry
Business: noneselected
A valid emailaddress
Business email type
PRIMARYBUSINESS_EMAILADDRESS_EMAILADDRESSTYPECODEID
Field for primarybusiness
Select the type of emailaddress to use as theprimary contact for theorganization, such as“Business.”
When you add a newconstituent, you canadd only the primaryemail addressinformation. On theconstituent record, youcan add additionalemail addresses on theContact tab.
If you select a businessfromBusiness, thisfield will display theemail type for thebusiness. But you cannot change the field inthat case.
Never
Constituenttype:“Individual”
Business name:new entry
Business: noneselected
Email typesdefined in thesystem
www.blackbaud.com/howto/researchpoint
chapter 3:
pg. 41
Field Description Required? Allowedvalues
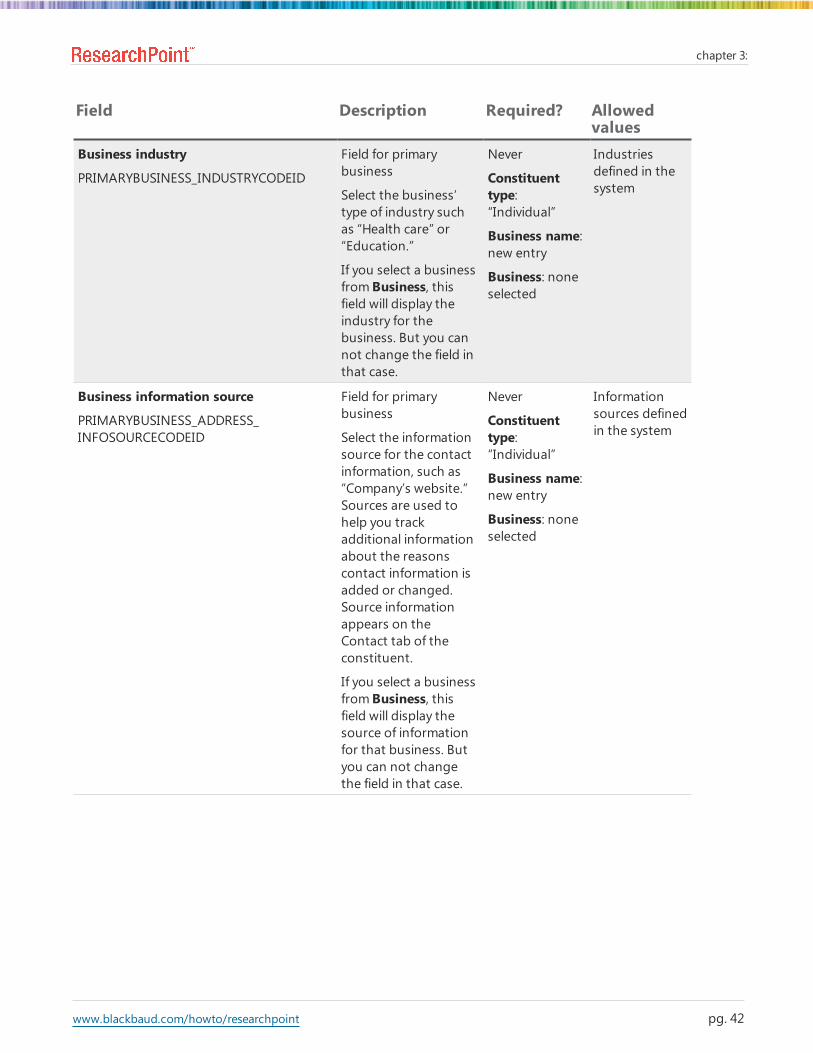
Business industry
PRIMARYBUSINESS_INDUSTRYCODEID
Field for primarybusiness
Select the business’type of industry suchas “Health care” or“Education.”
If you select a businessfromBusiness, thisfield will display theindustry for thebusiness. But you cannot change the field inthat case.
Never
Constituenttype:“Individual”
Business name:new entry
Business: noneselected
Industriesdefined in thesystem
Business information source
PRIMARYBUSINESS_ADDRESS_INFOSOURCECODEID
Field for primarybusiness
Select the informationsource for the contactinformation, such as“Company’s website.”Sources are used tohelp you trackadditional informationabout the reasonscontact information isadded or changed.Source informationappears on theContact tab of theconstituent.
If you select a businessfromBusiness, thisfield will display thesource of informationfor that business. Butyou can not changethe field in that case.
Never
Constituenttype:“Individual”
Business name:new entry
Business: noneselected
Informationsources definedin the system
www.blackbaud.com/howto/researchpoint
chapter 3:
pg. 42

Field Description Required? Allowedvalues
Business is primary org
PRIMARYBUSINESS_ISPRIMARYORGANIZATION
Field for primarybusiness
If the related businessis the primaryorganization, selectthis checkbox.
If you select a businessfromBusiness, thisfield will displaywhether the businessis the primaryorganization. But youcan not change thefield in that case.
Never
Constituenttype:“Individual”
Business name:new entry
Business: noneselected
Selected or notselected
Business job category
PRIMARYBUSINESS_JOBCATEGORYCODEID
Field for primarybusiness
Enter the job categoryfor the individual’semploymentinformation.
Never
Constituenttype:“Individual”
Business nameentered orBusiness:selected
Job categoriesdefined in thesystem
Business job department
PRIMARYBUSINESS_JOBDEPARTMENT
Field for primarybusiness
Enter the jobdepartment for theindividual’semploymentinformation.
Never
Constituenttype:“Individual”
Business nameentered orBusiness:selected
Text (100characters)
Business job division
PRIMARYBUSINESS_JOBDIVISION
Field for primarybusiness
Enter the job divisionfor the individual’semploymentinformation.
Never
Constituenttype:“Individual”
Business nameentered orBusiness:selected
Text (100characters)
www.blackbaud.com/howto/researchpoint
chapter 3:
pg. 43

Field Description Required? Allowedvalues
Business job schedule
PRIMARYBUSINESS_JOBSCHEDULECODEID
Field for primarybusiness
Enter the job schedulefor the individual’semploymentinformation.
Never
Constituenttype:“Individual”
Business nameentered orBusiness:selected
Job schedulesdefined in thesystem
Business job title
PRIMARYBUSINESS_JOBTITLE
Field for primarybusiness
Enter the job title forthe individual’semploymentinformation.
Never
Constituenttype:“Individual”
Business nameentered orBusiness:selected
Text (100characters)
www.blackbaud.com/howto/researchpoint
chapter 3:
pg. 44
Field Description Required? Allowedvalues
Business LOT
PRIMARYBUSINESS_ADDRESS_LOT
Field for primarybusiness
Enter the Line of Travel(LOT) for the address.LOT is the direction themail carrier takes alonga CART. LOTinformation is requiredfor standard mailingsto receive the BasicEnhanced CarrierRoute rate.
If you validate theaddress in theprogram, the LOTreceived from theaddress validationservice automaticallyappears.
If you select a businessfromBusiness, thisfield will display theLOT for the business’primary address. Butyou can not changethe field in that case.
Never
Constituenttype:“Individual”
Business name:new entry
Business: noneselected
Text (5characters)
Business name
PRIMARYBUSINESS_KEYNAME
Field for primarybusiness
Enter the name of thebusiness, exactly as itshould appearthroughout theprogram. If you select abusiness fromBusiness, the fielddisplays the name ofthe business.
Never
Constituenttype:“Individual”
Business: noneselected
Text (100characters)
www.blackbaud.com/howto/researchpoint
chapter 3:
pg. 45

Field Description Required? Allowedvalues
Business no. of employees
PRIMARYBUSINESS_NUMEMPLOYEES
Field for primarybusiness
Enter the number ofpeople employed atthe business.
If you select a businessfromBusiness, thisfield displays thenumber of employeesfor the business. Butyou can not changethe field in that case.
Never
Constituenttype:“Individual”
Business name:new entry
Business: noneselected
Integer
Business no. of subsidiary orgs
PRIMARYBUSINESS_NUMSUBSIDIARIES
Field for primarybusiness
If the business is theparent of anotherorganization, enter thenumber of companiesthe business owns andcontrols.
If you select a businessfromBusiness, thisfield displays thenumber of subsidiariesfor the business. Butyou can not changethe field in that case.
Never
Constituenttype:“Individual”
Business name:new entry
Business: noneselected
Integer
www.blackbaud.com/howto/researchpoint
chapter 3:
pg. 46

Field Description Required? Allowedvalues
Business parent org
PRIMARYBUSINESS_PARENTCORPID
Field for primarybusiness
If the business is thesubsidiary of anotherorganization, you canselect the organizationthat owns and controlsthe new business.
If you select a businessfromBusiness, thisfield displays theparent organization forthe business. But youcan not change thefield in that case.
Never
Constituenttype:“Individual”
Business name:new entry
Business: noneselected
Businessesdefined in thesystem
Business phone number
PRIMARYBUSINESS_PHONE_NUMBER
Field for primarybusiness
Enter the primaryphone number for thebusiness.
If phone formatting isenabled, the programapplies the phoneformat associated withthe selected country.
If phone formatting isdisabled, you canmanually enter thephone number as itshould appear.
If you select a businessfromBusiness, thisfield displays thephone number for thebusiness. But you cannot change the field inthat case.
Never
Constituenttype:“Individual”
Business name:new entry
Business: noneselected
Text (100characters)
www.blackbaud.com/howto/researchpoint
chapter 3:
pg. 47
Field Description Required? Allowedvalues
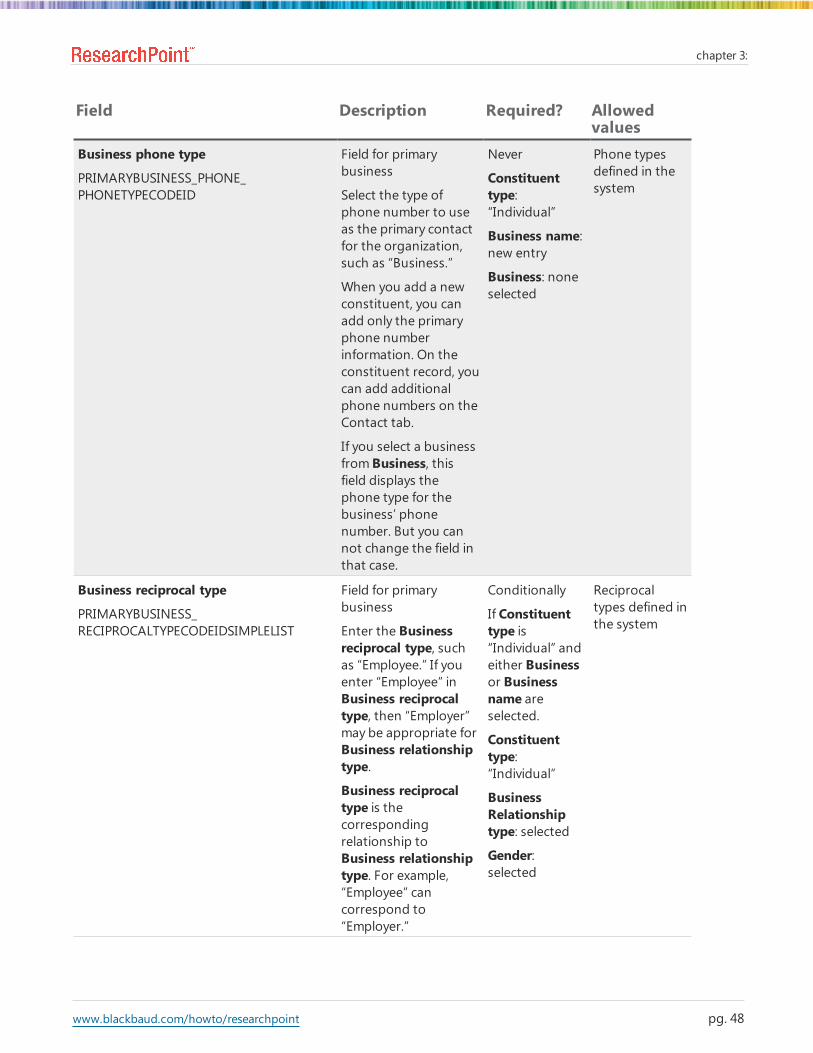
Business phone type
PRIMARYBUSINESS_PHONE_PHONETYPECODEID
Field for primarybusiness
Select the type ofphone number to useas the primary contactfor the organization,such as “Business.”
When you add a newconstituent, you canadd only the primaryphone numberinformation. On theconstituent record, youcan add additionalphone numbers on theContact tab.
If you select a businessfromBusiness, thisfield displays thephone type for thebusiness’ phonenumber. But you cannot change the field inthat case.
Never
Constituenttype:“Individual”
Business name:new entry
Business: noneselected
Phone typesdefined in thesystem
Business reciprocal type
PRIMARYBUSINESS_RECIPROCALTYPECODEIDSIMPLELIST
Field for primarybusiness
Enter the Businessreciprocal type, suchas “Employee.” If youenter “Employee” inBusiness reciprocaltype, then “Employer”may be appropriate forBusiness relationshiptype.
Business reciprocaltype is thecorrespondingrelationship toBusiness relationshiptype. For example,“Employee” cancorrespond to“Employer.”
Conditionally
If Constituenttype is“Individual” andeither Businessor Businessname areselected.
Constituenttype:“Individual”
BusinessRelationshiptype: selected
Gender:selected
Reciprocaltypes defined inthe system
www.blackbaud.com/howto/researchpoint
chapter 3:
pg. 48
Field Description Required? Allowedvalues
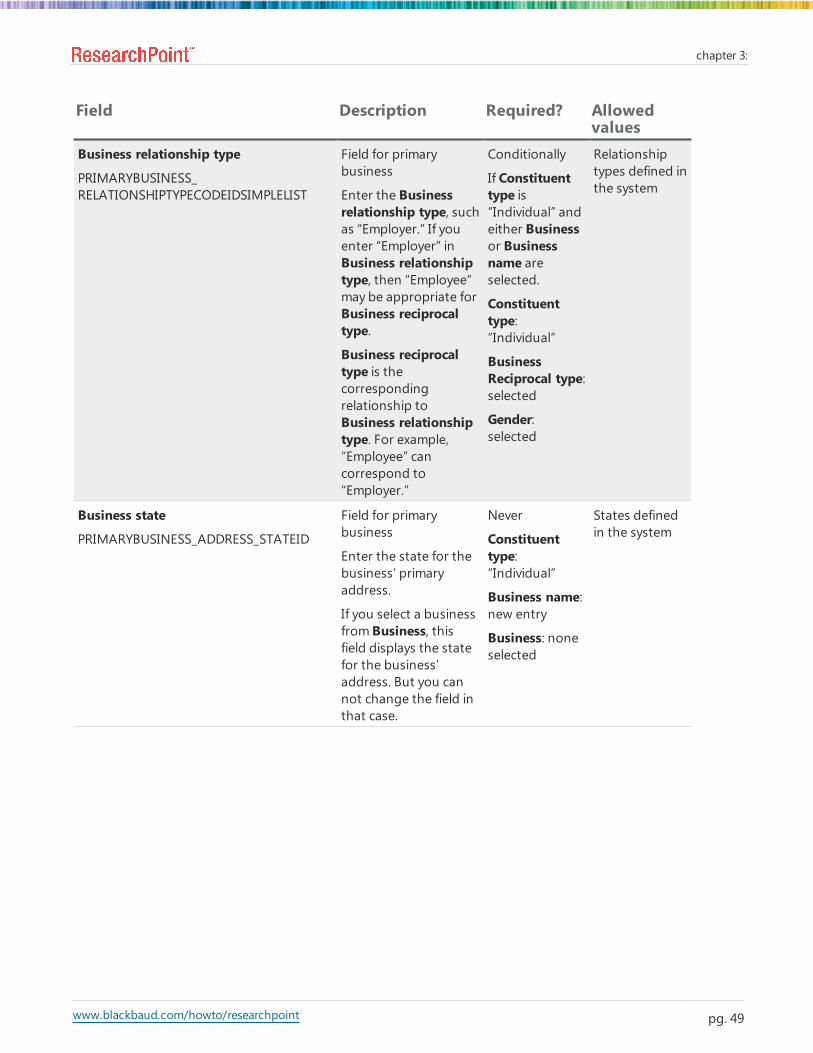
Business relationship type
PRIMARYBUSINESS_RELATIONSHIPTYPECODEIDSIMPLELIST
Field for primarybusiness
Enter the Businessrelationship type, suchas “Employer.” If youenter “Employer” inBusiness relationshiptype, then “Employee”may be appropriate forBusiness reciprocaltype.
Business reciprocaltype is thecorrespondingrelationship toBusiness relationshiptype. For example,“Employee” cancorrespond to“Employer.”
Conditionally
If Constituenttype is“Individual” andeither Businessor Businessname areselected.
Constituenttype:“Individual”
BusinessReciprocal type:selected
Gender:selected
Relationshiptypes defined inthe system
Business state
PRIMARYBUSINESS_ADDRESS_STATEID
Field for primarybusiness
Enter the state for thebusiness’ primaryaddress.
If you select a businessfromBusiness, thisfield displays the statefor the business’address. But you cannot change the field inthat case.
Never
Constituenttype:“Individual”
Business name:new entry
Business: noneselected
States definedin the system
www.blackbaud.com/howto/researchpoint
chapter 3:
pg. 49

Field Description Required? Allowedvalues
Business web site address
PRIMARYBUSINESS_WEBADDRESS
Field for primarybusiness
Enter the address tothe business’corporate website. Onthe constituent record,the address enteredappears as a link to theorganization’s website.
If you select a businessfromBusiness, thisfield displays the website for the business.But you can notchange the field in thatcase.
Never
Constituenttype:“Individual”
Business name:new entry
Business: noneselected
A valid webaddress
Business ZIP
PRIMARYBUSINESS_ADDRESS_POSTCODE
Field for primarybusiness
Enter the Zip code forthe business’ primaryaddress.
If you select a businessfromBusiness, thisfield displays the ZIPfor the business’address. But you cannot change the field inthat case.
Never
Constituenttype:“Individual”
Business name:new entry
Business: noneselected
Text (12characters)
www.blackbaud.com/howto/researchpoint
chapter 3:
pg. 50
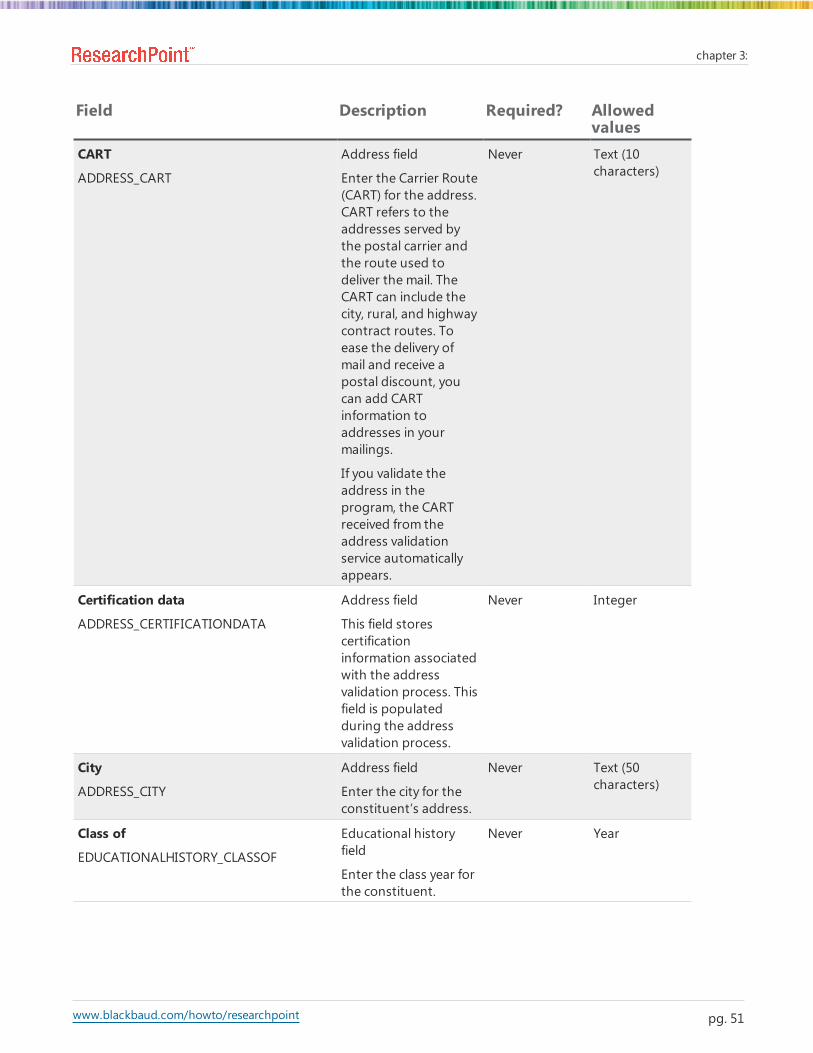
Field Description Required? Allowedvalues
CART
ADDRESS_CART
Address field
Enter the Carrier Route(CART) for the address.CART refers to theaddresses served bythe postal carrier andthe route used todeliver the mail. TheCART can include thecity, rural, and highwaycontract routes. Toease the delivery ofmail and receive apostal discount, youcan add CARTinformation toaddresses in yourmailings.
If you validate theaddress in theprogram, the CARTreceived from theaddress validationservice automaticallyappears.
Never Text (10characters)
Certification data
ADDRESS_CERTIFICATIONDATA
Address field
This field storescertificationinformation associatedwith the addressvalidation process. Thisfield is populatedduring the addressvalidation process.
Never Integer
City
ADDRESS_CITY
Address field
Enter the city for theconstituent’s address.
Never Text (50characters)
Class of
EDUCATIONALHISTORY_CLASSOF
Educational historyfield
Enter the class year forthe constituent.
Never Year
www.blackbaud.com/howto/researchpoint
chapter 3:
pg. 51

Field Description Required? Allowedvalues
Comments
EDUCATIONALHISTORY_COMMENT
Educational historyfield
Enter educationalhistory comments.
Never Text (500characters)
Congressional district
ADDRESS_CONGRESSIONALDISTRICTCODEID
Select thecongressional districtfor the address. If youvalidate the address inthe program, thedistrict received fromthe address validationservice automaticallyappears.
Never Congressionaldistrictsdefined in thesystem
www.blackbaud.com/howto/researchpoint
chapter 3:
pg. 52

Field Description Required? Allowedvalues
Constituencies
CONSTITUENCY
When you select thisfield, a connected gridappears. Enterconstituencies alreadydefined in theprogram, such as“Board Member” or“Staff.” You can alsoenter constituenciesdefined by yourorganization, such as“Friend” or “Trustee.”You can enter thedates when theconstituency is valid.
Constituency appearsin the connected gridfor Constituencies.Select theconstituency.
Start date appears inthe connected grid forConstituencies. Enterthe start date for theconstituency.
End date appears inthe connected grid forConstituencies. Enterthe end date for theconstituency.
Never
Constituency:Conditionally aspart ofConstituencies
Start date andEnd date: Never
Select from aconnected grid
www.blackbaud.com/howto/researchpoint
chapter 3:
pg. 53

Field Description Required? Allowedvalues
Constituent information source
ADDRESS_INFOSOURCECODEID
Select the informationsource for the contactinformation, such as“Family member.”Sources are used tohelp you trackadditional informationabout the reasonscontact information isadded or changed. Theinformation sourceappears next to thenew or updatedcontact information onthe Contact tab of theconstituent.
Never Informationsources definedin the system
Constituent security attribute
CONSTIT_SECURITY_ATTRIBUTEID
Depending upon yoursettings, when youselect this field, aconnected gridappears. Select theconstituent securityattributes that apply.
Never Constituentsecurityattributesdefined in thesystem
Constituent site
CONSTITUENT_SITEID
Select the site youwant to associate withthe record. Recordsthat can be associatedwith more than onesite have a Site grid,instead of a Site field.
Never Constituentsites defined inthe system
www.blackbaud.com/howto/researchpoint
chapter 3:
pg. 54

Field Description Required? Allowedvalues
Constituent type
ISORGANIZATION
Enter the type ofconstituent to add.
To add a person suchas a donor or anemployee as aconstituent, enter“Individual.”
To add a business orcompany that supportsyour mission as aconstituent, enter“Organization.”
To add a householdthat supports yourmission as aconstituent, enter“Household.”
To add a group ofconstituents whodonate together underone entity such as agiving circle, enter“Constituent group.”
Always ConstituentType table
“Individual”
“Organization”
“Household”
“Constituentgroup”
Country
ADDRESS_COUNTRYID
Address field
Enter the country forthe constituent’saddress, such as“United States.”
Never Countriesdefined in thesystem
Countries tabof Countriesand Statespage
www.blackbaud.com/howto/researchpoint
chapter 3:
pg. 55
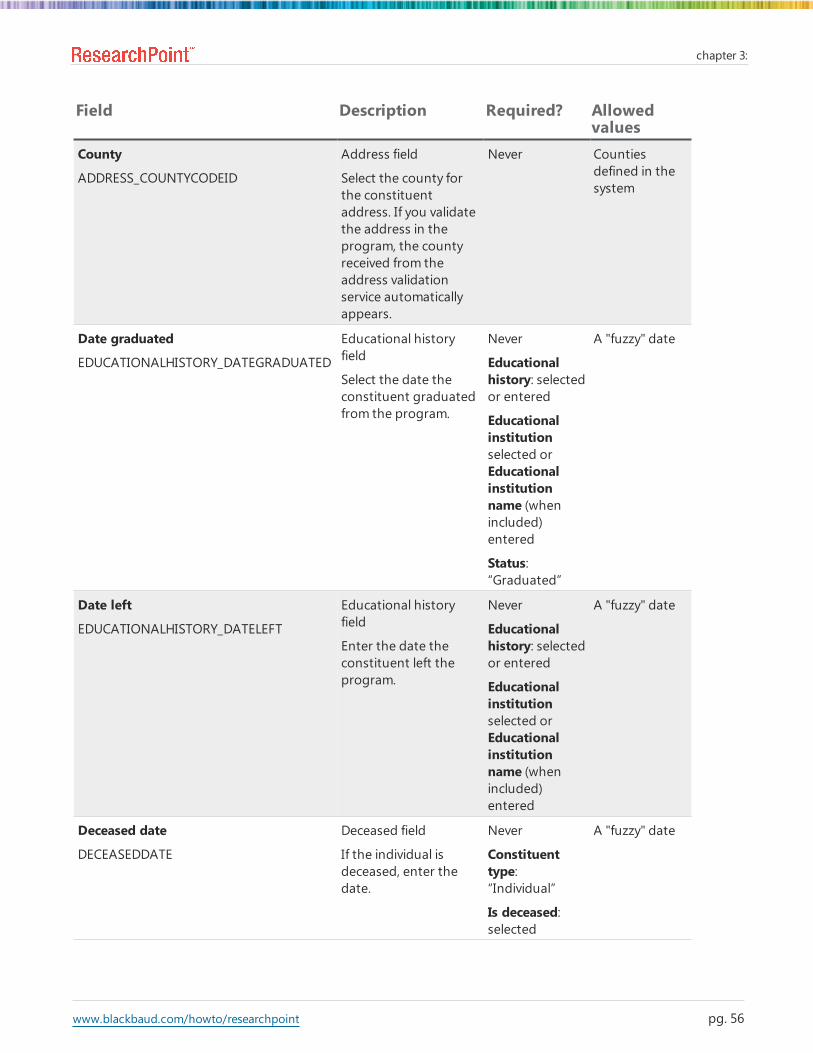
Field Description Required? Allowedvalues
County
ADDRESS_COUNTYCODEID
Address field
Select the county forthe constituentaddress. If you validatethe address in theprogram, the countyreceived from theaddress validationservice automaticallyappears.
Never Countiesdefined in thesystem
Date graduated
EDUCATIONALHISTORY_DATEGRADUATED
Educational historyfield
Select the date theconstituent graduatedfrom the program.
Never
Educationalhistory: selectedor entered
Educationalinstitutionselected orEducationalinstitutionname (whenincluded)entered
Status:“Graduated”
A "fuzzy" date
Date left
EDUCATIONALHISTORY_DATELEFT
Educational historyfield
Enter the date theconstituent left theprogram.
Never
Educationalhistory: selectedor entered
Educationalinstitutionselected orEducationalinstitutionname (whenincluded)entered
A "fuzzy" date
Deceased date
DECEASEDDATE
Deceased field
If the individual isdeceased, enter thedate.
Never
Constituenttype:“Individual”
Is deceased:selected
A "fuzzy" date
www.blackbaud.com/howto/researchpoint
chapter 3:
pg. 56

Field Description Required? Allowedvalues
Do not mail reason
ADDRESS_DONOTMAILREASONCODEID
Address field
If you select Do notsend mail to thisaddress, select why theconstituent requeststo not receive mail atthe address.
Never Do not mailreasonsdefined in thesystem
Do not send mail to this address
ADDRESS_DONOTMAIL
Address field
If the constituentrequests that you notsend mail to theaddress, select thischeckbox.
Never Selected or notselected
www.blackbaud.com/howto/researchpoint
chapter 3:
pg. 57

Field Description Required? Allowedvalues
DPC
ADDRESS_DPC
Address field
Enter the Delivery PointCode (DPC) for theaddress. DPC is aPOSTNET barcode thatcontains a ZIP+4barcode plus twoadditional digits (or 10additional bars) todesignate a specificdelivery point. Thebarcode consists of 62bars total, withbeginning and endingframe bars and fivebars each for the ninedigits of the ZIP+4, thelast two digits of theprimary street addressor post office box, anda correction digit.
If you receive a three-digit DPC from yourvendor, enter only thefirst two digits. The firsttwo digits of the DPCare the last two digitsof the street addressnumber.
If you validate theaddress in theprogram, the DPCreceived from theaddress validationservice automaticallyappears.
Never Text (8characters)
Educational additional information
UNAFFILIATEDADDITIONALINFORMATION
Educational historyfield
Enter additionalinformation about theprogram, such as itscollege or school,department, or degreetype at the educationalinstitution.
Never
Educationalinstitution:selected andunaffiliated
Constituenttype:“Individual”
Select from aconnected grid
www.blackbaud.com/howto/researchpoint
chapter 3:
pg. 58

Field Description Required? Allowedvalues
Educational date from
EDUCATIONALHISTORY_STARTDATE
Educational historyfield
Enter the date fromwhich the educationalhistory starts.
Never
Educationalinstitution:selected
Constituenttype:“Individual”
A "fuzzy" date
Educational degree
EDUCATIONALHISTORY_EDUCATIONALDEGREECODEID
Educational historyfield
Enter the degree forthe educationalhistory.
Never
Educationalinstitution:selected andunaffiliated
Constituenttype:“Individual”
Educationaldegreesdefined in thesystem
Educational institution
EDUCATIONALHISTORY_EDUCATIONALINSTITUTIONID
Educational historyfield
Enter the institutionfor the educationalhistory.
Never
Constituenttype:“Individual”
Educationalinstitutionsdefined in thesystem
Educational is primary
EDUCATIONALHISTORY_ISPRIMARYRECORD
Educational historyfield
To indicate that this isthe primaryeducational history,select this.
Never
Educationalinstitution:selected
Constituenttype:“Individual”
Selected or notselected
www.blackbaud.com/howto/researchpoint
chapter 3:
pg. 59

Field Description Required? Allowedvalues
Educational program
EDUCATIONALHISTORY_EDUCATIONALPROGRAMCODEID
Educational historyfield
Enter the program forthe educationalhistory.
Never
Educationalinstitution:selected
Constituenttype:“Individual”
Educationalprogramsdefined in thesystem
Educational status
EDUCATIONALHISTORY_CONSTITUENCYSTATUSCODE
Educational historyfield
Select the educationalstatus of theconstituent with theinstitution, such as“Currently attending”or “Graduated.”
If you are aneducational institutionwith an affiliation withthe selectedinstitution, theselected statusdetermines theeducationalconstituency of theconstituent. If youselect “Currentlyattending,” theprogram assigns aconstituency of“Student.” If you select“Graduated,” theprogram assigns aconstituency of“Alumnus.” If you select“Unknown” or“Incomplete,” theprogram does notassign an educationalconstituency.
Never
Educationalinstitution:selected
Constituenttype:“Individual”
TinyInt
Educationalstatusesdefined in thesystem
www.blackbaud.com/howto/researchpoint
chapter 3:
pg. 60

Field Description Required? Allowedvalues
Email address
EMAILADDRESS_EMAILADDRESS
Email address field
Enter the email addressfor the constituent.
Never A valid emailaddress
Email type
EMAILADDRESS_EMAILADDRESSTYPECODEID
Email address field
Select the type of emailaddress for theconstituent, such as“Business” or “Home.”
Never Email typesdefined in thesystem
Ethnicity
ETHNICITYCODEID
Demographic field
Select the ethnicity forthe constituent.
Never Ethnicitiesdefined in thesystem
First name
FIRSTNAME
Field for Individual
Enter the first name ofthe individualconstituent exactly as itshould appearthroughout yourdatabase such as onpages and reports.
Never
Constituenttype:“Individual”
Text (50characters)
Gender
GENDERCODE
Field for Individual
Select whether theindividual is a male orfemale. If you areunsure of theindividual’s gender,select “Unknown.”
Never
Constituenttype:“Individual”
TinyInt
Group description
GROUPDESCRIPTION
Field forGroup/household
Enter a description tohelp identify the group.
Never
Constituenttype:“Constituentgroup” or“Household”
Text (300characters)
www.blackbaud.com/howto/researchpoint
chapter 3:
pg. 61

Field Description Required? Allowedvalues
Group members
GROUPMEMBERS
Field forGroup/household
When you select thisfield, a connected gridappears. Select theconstituents who aremembers of the group.For one of theconstituents, select Isprimary contact.
Never
Constituenttype:“Constituentgroup” or“Household”
Select from aconnected grid
Group start date
GROUPSTARTDATE
Field for Group
Enter the start date forthe group.
Never
Constituenttype:“Constituentgroup”
Date
Group type
GROUPTYPEID
Field for Group
Select the type of thegroup, such as “Givingcircle” or “Familyfoundation.” Yourorganizationdetermines theavailable group types.
Conditionally
If Constituenttype is“Constituentgroup”
Constituenttype:“Constituentgroup”
Group typesdefined in thesystem
Honor awarded
EDUCATIONALHISTORY_EDUCATIONALAWARDCODEID
Educational historyfield
Select whether theinstitution awardedthe constituent withthe selected degree. Ifyou are unsure, leavethis field blank.
Never
Educationalinstitution:selected andunaffiliated
Constituenttype:“Individual”
Honors definedin the system
Income
INCOMECODEID
Demographic field
Select the income forthe constituent.
Never Incomesdefined in thesystem
Industry
INDUSTRYCODEID
Field for Organization
Select theorganization’s type ofindustry such as“Health care” or“Education.”
Never
Constituenttype:“Organization”
Industriesdefined in thesystem
www.blackbaud.com/howto/researchpoint
chapter 3:
pg. 62

Field Description Required? Allowedvalues
Information source
EDUCATIONALHISTORY_EDUCATIONALSOURCECODEID
Educational historyfield
Select the source forthe educational historyinformation.
Educationalinstitution:selected andunaffiliated
Constituenttype:“Individual”
Informationsources definedin the system
Interests
INTEREST
Select the type ofinterest theconstituent has, suchas “Golf,”“Volunteering,” or“Wine tasting.”Interests can includehobbies, travel,technology, andspecific issues.
Never
Constituenttype:“Individual”
Select from aconnected grid
Is deceased
ISDECEASED
Deceased field
If the individual isdeceased, select thischeckbox.
Never
Constituenttype:“Individual”
Selected or notselected
Is primary org
ISPRIMARYORGANIZATION
Field for Organization
If the location enteredis the mainheadquarters or officeof operation for theorganization, selectthis checkbox.
When you search foran organization, youcan select to includeonly primaryorganizations in thesearch results.
Never
Constituenttype:“Organization”
Selected or notselected
www.blackbaud.com/howto/researchpoint
chapter 3:
pg. 63

Field Description Required? Allowedvalues
Last validation attempt date
ADDRESS_LASTVALIDATIONATTEMPTDATE
Address field
This field stores thedate of the lastvalidation attempt. Thisfield is populatedduring the addressvalidation process.
Never Date
Last/org/group/household name
KEYNAME
For an individualconstituent, enter thelast name of theindividual.
For a groupconstituent, enter thename of the group.
For a householdconstituent, enter thename of thehousehold.
For an organizationconstituent, enter thename of theorganization.
Always Text (100characters)
Level
EDUCATIONALHISTORY_LEVELCODEID
Educational historyfield
If you select a status of“Currently attending”from Educationalstatus, select the levelthat the constituentmost recently achievedin the program.
Never
Educationalstatus:“Currentlyattending”
Levels definedin the system
Local precinct
ADDRESS_LOCALPRECINCTCODEID
Address field
Select the local precinctfor the address. If youvalidate the address inthe program, theprecinct received fromthe address validationservice automaticallyappears.
Never Local precinctsdefined in thesystem
www.blackbaud.com/howto/researchpoint
chapter 3:
pg. 64

Field Description Required? Allowedvalues
Lookup ID
CUSTOMIDENTIFIER
Enter the Lookup ID forthe constituent whenyou add a record.
This primary lookup IDappears in the LookupID field on theconstituent record.Rather than edit theprimary lookup ID, youcan also assignalternate lookup IDsfor the constituent.
Never Text (100characters)
LOT
ADDRESS_LOT
Address field
Enter the Line of Travel(LOT) for the address.LOT is the direction themail carrier takes alonga CART. LOTinformation is requiredfor standard mailingsto receive the BasicEnhanced CarrierRoute rate.
If you validate theaddress in theprogram, the LOTreceived from theaddress validationservice automaticallyappears.
Never Text (5characters)
www.blackbaud.com/howto/researchpoint
chapter 3:
pg. 65

Field Description Required? Allowedvalues
Maiden name
MAIDENNAME
Field for Individual
Enter a maiden namefor the individual asnecessary. On theconstituent record, themaiden name enteredappears as an alias onthe Names tab. Whenyou search forindividual constituents,you can select toinclude maiden namesin the search criteria.
Never
Constituenttype:“Individual”
Text (100characters)
Middle name
MIDDLENAME
Field for Individual
Enter the middle nameof the individualconstituent exactly as itshould appearthroughout yourdatabase such as onpages and reports.
Never
Constituenttype:“Individual”
Text (50characters)
Nickname
NICKNAME
Field for Individual
Enter a nickname forthe individual asnecessary. When yousearch for individualconstituents, you canselect to includenicknames in thesearch criteria.
Never
Constituenttype:“Individual”
Text (50characters)
No. of employees
NUMEMPLOYEES
Field for Organization
Enter the number ofpeople employed atthe organization.
Never
Constituenttype:“Organization”
Integer
www.blackbaud.com/howto/researchpoint
chapter 3:
pg. 66

Field Description Required? Allowedvalues
No. of subsidiary orgs
NUMSUBSIDIARIES
Field for Organization
If the organization isthe parent of anotherorganization, enter thenumber of companiesthe organization ownsand controls.
Never
Constituenttype:“Organization”
Integer
Omit from validation
ADDRESS_OMITFROMVALIDATION
With Data Tune-Up, youcan run an addressvalidation process toverify addressesentered in thedatabase exist. Whenyou run the addressvalidation process, theprogram automaticallyupdates missing orincomplete addressinformation,standardizes streetaddresses, andupdates the CodingAccuracy SupportSystem (CASS) certifiedinformation.
To exclude the addressentered when yourorganization runs theaddress validationprocess, select thischeckbox.
Never Selected or notselected
www.blackbaud.com/howto/researchpoint
chapter 3:
pg. 67

Field Description Required? Allowedvalues
Parent org
PARENTCORPID
Field for Organization
If the organization isthe subsidiary ofanother organization,you can select theorganization that ownsand controls the neworganization.
Never
Constituenttype:“Organization”
Organizationsdefined in thesystem
Phones
PHONES
When you select thisfield, a connected gridfor phones appears
Phone type, Phonenumber, Primary, Callafter, Call before, andStart date appear inthe connected grid forPhones.
Select the type ofphone number for theconstituent, such as“Cell Phone” or “Home.”
Enter the phonenumber for theconstituent.
To designate thenumber as theconstituent’s primaryphone number forcommunications, selectPrimary. By default, thefirst phone numberyou enter for aconstituent is theprimary number. Youcan enter only oneprimary phone numberfor a constituent.Under Phone numberson the Contact tab, theprimary numberappears first.
Never
Phone type,Call after, Callbefore, Startdate: Never
Phone number,Primary:Conditionally aspart of Phones
You can onlyselect Phoneprimary for oneof the numbersin the collection.
Select from aconnected grid
www.blackbaud.com/howto/researchpoint
chapter 3:
pg. 68

Field Description Required? Allowedvalues
Preferred class of
EDUCATIONALHISTORY_PREFERREDCLASSYEAR
Educational historyfield
If the constituentidentifies with a classyear other than theactual class year, enterthe preferred class yearof the constituent.
Never
Educationalinstitution:selected andunaffiliated
Constituenttype:“Individual”
Year
Reason
EDUCATIONALHISTORY_REASONCODEID
Educational historyfield
Select the reason forthe unknown status.
Never
Educationalstatus:“Unknown”
Reasonsdefined in thesystem
Region
ADDRESS_REGIONCODEID
Address field
Select the region forthe address, such as“North” or “Southeast.”
Never Regionsdefined in thesystem
Religion
RELIGIONCODEID
Demographic field
Select the religion forthe constituent.
Never Religionsdefined in thesystem
Salutation name format
PRIMARYSALUTATION_NAMEFORMATFUNCTIONID
Field for Primary nameformats
Enter the name as itshould appear in asalutation.
Never
Constituenttype:“Individual”
Salutationname formatsdefined in thesystem
Salutation type
PRIMARYSALUTATION_NAMEFORMATTYPECODEID
Field for Primary nameformats
Select the type of nameformat to add such as“Informal Salutation.”
Never
Constituenttype:“Individual”
Salutationtypes defined inthe system
www.blackbaud.com/howto/researchpoint
chapter 3:
pg. 69
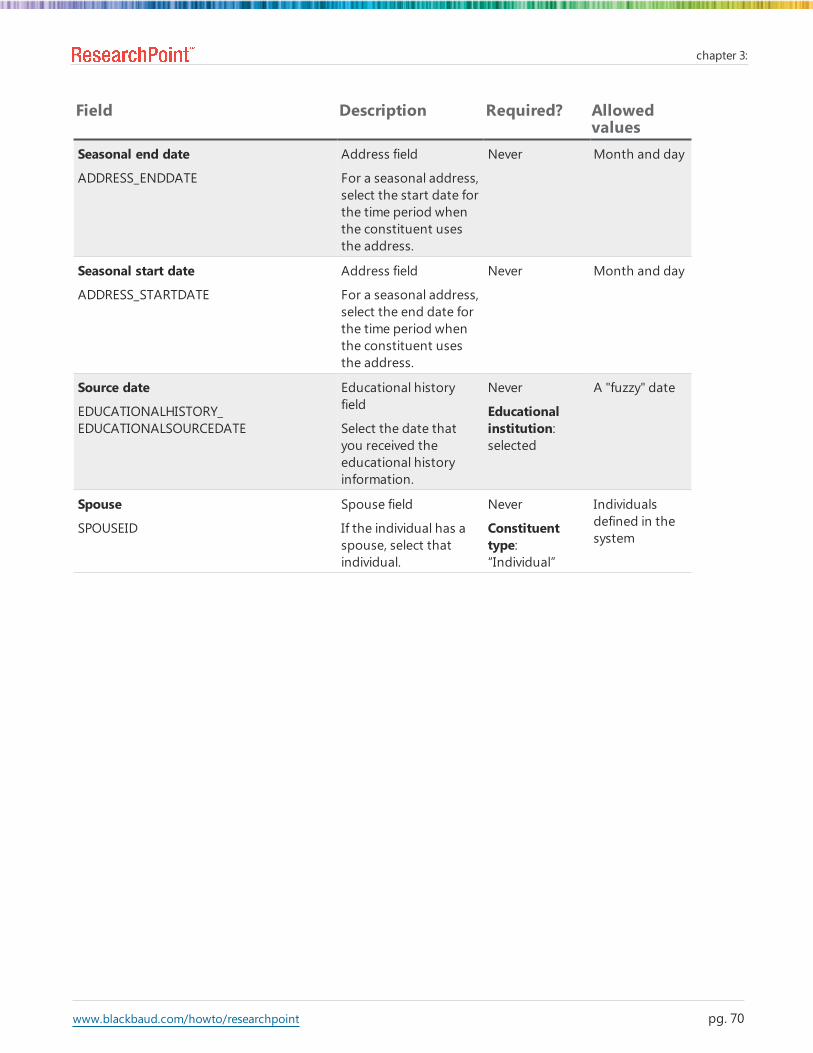
Field Description Required? Allowedvalues
Seasonal end date
ADDRESS_ENDDATE
Address field
For a seasonal address,select the start date forthe time period whenthe constituent usesthe address.
Never Month and day
Seasonal start date
ADDRESS_STARTDATE
Address field
For a seasonal address,select the end date forthe time period whenthe constituent usesthe address.
Never Month and day
Source date
EDUCATIONALHISTORY_EDUCATIONALSOURCEDATE
Educational historyfield
Select the date thatyou received theeducational historyinformation.
Never
Educationalinstitution:selected
A "fuzzy" date
Spouse
SPOUSEID
Spouse field
If the individual has aspouse, select thatindividual.
Never
Constituenttype:“Individual”
Individualsdefined in thesystem
www.blackbaud.com/howto/researchpoint
chapter 3:
pg. 70
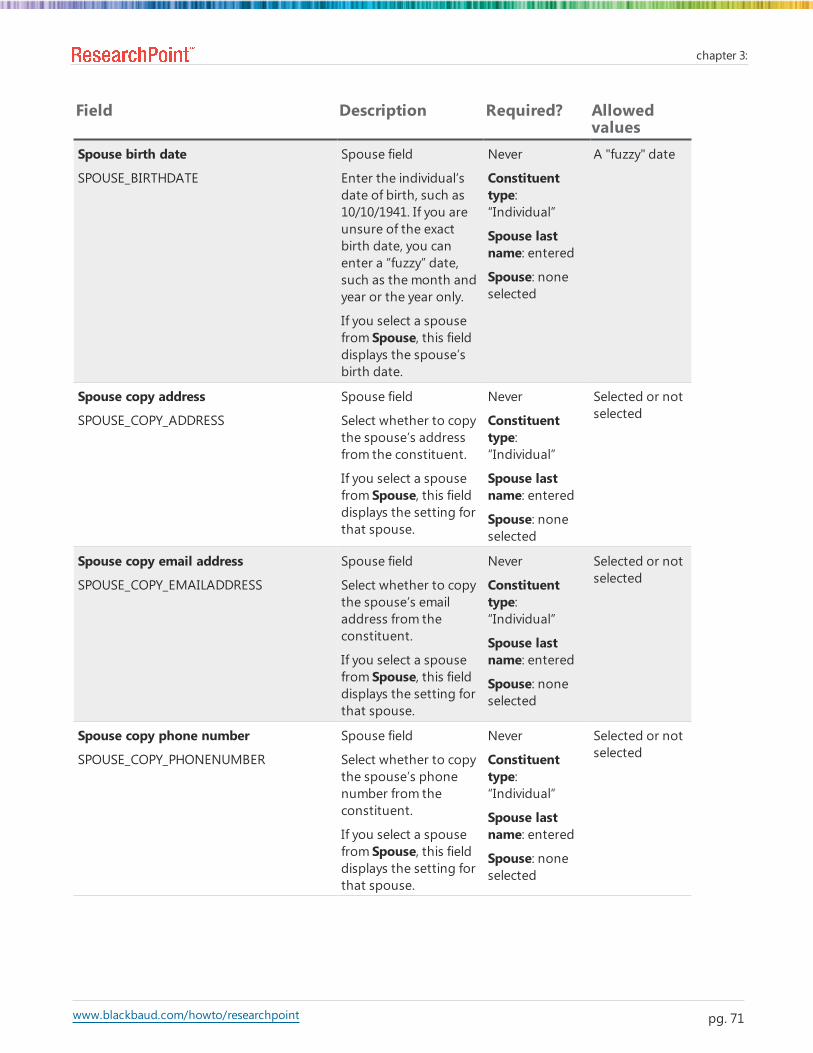
Field Description Required? Allowedvalues
Spouse birth date
SPOUSE_BIRTHDATE
Spouse field
Enter the individual’sdate of birth, such as10/10/1941. If you areunsure of the exactbirth date, you canenter a “fuzzy” date,such as the month andyear or the year only.
If you select a spousefrom Spouse, this fielddisplays the spouse’sbirth date.
Never
Constituenttype:“Individual”
Spouse lastname: entered
Spouse: noneselected
A "fuzzy" date
Spouse copy address
SPOUSE_COPY_ADDRESS
Spouse field
Select whether to copythe spouse’s addressfrom the constituent.
If you select a spousefrom Spouse, this fielddisplays the setting forthat spouse.
Never
Constituenttype:“Individual”
Spouse lastname: entered
Spouse: noneselected
Selected or notselected
Spouse copy email address
SPOUSE_COPY_EMAILADDRESS
Spouse field
Select whether to copythe spouse’s emailaddress from theconstituent.
If you select a spousefrom Spouse, this fielddisplays the setting forthat spouse.
Never
Constituenttype:“Individual”
Spouse lastname: entered
Spouse: noneselected
Selected or notselected
Spouse copy phone number
SPOUSE_COPY_PHONENUMBER
Spouse field
Select whether to copythe spouse’s phonenumber from theconstituent.
If you select a spousefrom Spouse, this fielddisplays the setting forthat spouse.
Never
Constituenttype:“Individual”
Spouse lastname: entered
Spouse: noneselected
Selected or notselected
www.blackbaud.com/howto/researchpoint
chapter 3:
pg. 71

Field Description Required? Allowedvalues
Spouse email address
SPOUSE_EMAILADDRESS_EMAILADDRESS
Spouse field
Enter the email addressfor the spouse.
If you select a spousefrom Spouse, this fielddisplays the spouse’semail address.
Never
Constituenttype:“Individual”
Spouse lastname: entered
Spouse: noneselected
A valid emailaddress
Spouse email address type
SPOUSE_EMAILADDRESS_EMAILADDRESSTYPECODEID
Spouse field
Select the type of emailaddress for the spouse,such as “Business” or“Home.”
If you select a spousefrom Spouse, this fielddisplays the spouse’semail address type.
Never
Constituenttype:“Individual”
Spouse lastname: entered
Spouse: noneselected
Email addresstypes defined inthe system
Spouse first name
SPOUSE_FIRSTNAME
Spouse field
Enter the first name ofthe spouse exactly as itshould appearthroughout yourdatabase such as onpages and reports.
If you select a spousefrom Spouse, this fielddisplays the spouse’sfirst name.
Never
Constituenttype:“Individual”
Spouse lastname: entered
Spouse: noneselected
Text (50characters)
Spouse gender
SPOUSE_GENDERCODE
Spouse field
Select whether thespouse is a male orfemale. If you areunsure of the spouse’sgender, select“Unknown.”
If you select a spousefrom Spouse, this fielddisplays the spouse’sgender.
Never
Constituenttype:“Individual”
Spouse lastname: entered
Spouse: noneselected
TinyInt
www.blackbaud.com/howto/researchpoint
chapter 3:
pg. 72

Field Description Required? Allowedvalues
Spouse last name
SPOUSE_KEYNAME
Spouse field
To add a new spouse,enter the last name ofthe spouse exactly as itshould appearthroughout yourdatabase, such as onpages and reports.
If you select a spousefrom Spouse, this fielddisplays the spouse’slast name.
Never
Constituenttype:“Individual”
Spouse: noneselected
Text (100characters)
Spouse maiden name
SPOUSE_MAIDENNAME
Spouse field
Enter a maiden namefor the spouse asnecessary. On theconstituent record, themaiden name enteredappears as an alias onthe Names tab. Whenyou search forindividual constituents,you can select toinclude maiden namesin the search criteria.
If you select a spousefrom Spouse, this fielddisplays the spouse’smaiden name.
Never
Constituenttype:“Individual”
Spouse lastname: entered
Spouse: noneselected
Text (100characters)
www.blackbaud.com/howto/researchpoint
chapter 3:
pg. 73

Field Description Required? Allowedvalues
Spouse middle name
SPOUSE_MIDDLENAME
Spouse field
Enter the middle nameof the spouse exactlyas it should appearthroughout yourdatabase such as onpages and reports.
If you select a spousefrom Spouse, this fielddisplays the spouse’smiddle name.
Never
Constituenttype:“Individual”
Spouse lastname: entered
Spouse: noneselected
Text (50characters)
Spouse nickname
SPOUSE_NICKNAME
Spouse field
Enter a nickname forthe spouse asnecessary. When yousearch for individualconstituents, you canselect to includenicknames in thesearch criteria.
If you select a spousefrom Spouse, this fielddisplays the spouse’snickname.
Never
Constituenttype:“Individual”
Spouse lastname: entered
Spouse: noneselected
Text (50characters)
www.blackbaud.com/howto/researchpoint
chapter 3:
pg. 74

Field Description Required? Allowedvalues
Spouse reciprocal type
SPOUSE_RECIPROCALTYPECODEIDSIMPLELIST
Spouse field
Enter the Spousereciprocal type, suchas “Wife” and Spouserelationship type, suchas “Husband.”
Spouse reciprocal typeis the correspondingrelationship to Spouserelationship type. Forexample, “Husband”can correspond to“Wife.”
Conditionally
If Spouse orSpouse lastname is selected
Constituenttype:“Individual”
Spouserelationshiptype: selected
Reciprocaltypes defined inthe system
Spouse relationship type
SPOUSE_RELATIONSHIPTYPECODEIDSIMPLELIST
Spouse field
Enter the Spouserelationship type, suchas “Husband.” andSpouse reciprocaltype, such as “Wife.”
Spouse reciprocal typeis the correspondingrelationship to Spouserelationship type. Forexample, “Husband”can correspond to“Wife.”
Conditionally
If Spouse orSpouse lastname is selected
Constituenttype:“Individual”
Gender:selected,“Unknown” bydefault
Relationshiptypes defined inthe system
www.blackbaud.com/howto/researchpoint
chapter 3:
pg. 75

Field Description Required? Allowedvalues
Spouse suffix
SPOUSE_SUFFIXCODEID
Spouse field
Select a suffix for thespouse such as “Sr.” or“M.D.” You can select asecond suffix ifnecessary, such as “IIIEsq.”
If you select a spousefrom Spouse, this fielddisplays the suffix forthe spouse’s name.
Never
Constituenttype:“Individual”
Spouse lastname: entered
Spouse: noneselected
Suffixes definedin the system
Spouse suffix 2
SPOUSE_SUFFIX2CODEID
Spouse field
You can select asecond suffix ifnecessary, such as “IIIEsq.”
If you select a spousefrom Spouse, this fielddisplays the secondsuffix for the spouse’sname.
Never
Constituenttype:“Individual”
Spouse lastname: entered
Spouse: noneselected
Suffixes definedin the system
Spouse title
SPOUSE_TITLECODEID
Spouse field
Select a title for thespouse such as “Mr.,”“Mrs.,” or “Ms.” You canselect a second title ifnecessary, such as“Reverend Dr.”
If you select a spousefrom Spouse, this fielddisplays the spouse’stitle.
Never
Constituenttype:“Individual”
Spouse lastname: entered
Spouse: noneselected
Titles defined inthe system
Spouse title 2
SPOUSE_TITLE2CODEID
Spouse field
You can select asecond title ifnecessary, such as“Reverend Dr.”
If you select a spousefrom Spouse, this fielddisplays the spouse’ssecond title.
Never
Constituenttype:“Individual”
Spouse lastname: entered
Spouse: noneselected
Titles defined inthe system
www.blackbaud.com/howto/researchpoint
chapter 3:
pg. 76

Field Description Required? Allowedvalues
State
ADDRESS_STATEID
Address field
Enter the state for theconstituent’s address.
Never State defined inthe system
State list for theselectedcountry
Exceptionmessage:Constituent’s‘State’ is notvalid for its‘Country’.
State House district
ADDRESS_STATEHOUSEDISTRICTCODEID
Address field
Select the state Housedistrict for the address.If you validate theaddress in theprogram, the districtreceived from theaddress validationservice automaticallyappears.
Never State Housedistrictsdefined in thesystem
State Senate district
ADDRESS_STATESENATEDISTRICTCODEID
Address field
Select the state Senatedistrict for the address.If you validate theaddress in theprogram, the districtreceived from theaddress validationservice automaticallyappears.
Never State Senatedistrictsdefined in thesystem
Suffix
SUFFIXCODEID
Field for Individual
Select a suffix for theindividual such as “Sr.”or “M.D.” You canselect a second suffix ifnecessary, such as “IIIEsq.”
Never
Constituenttype:“Individual”
Suffixes definedin the system
www.blackbaud.com/howto/researchpoint
chapter 3:
pg. 77

Field Description Required? Allowedvalues
Suffix 2
SUFFIX2CODEID
Field for Individual
You can select asecond suffix ifnecessary, such as “IIIEsq.”
Never
Constituenttype:“Individual”
Suffixes definedin the system
Target
TARGETCODEID
Demographic field Never Targets definedin the system
Title
TITLECODEID
Field for Individual
Select a title for theindividual such as“Mr.,” “Mrs.,” or “Ms.”You can select asecond title ifnecessary, such as“Reverend Dr.”
Never
Constituenttype:“Individual”
Titles defined inthe system
Title 2
TITLE2CODEID
Field for Individual
You can select asecond title ifnecessary, such as“Reverend Dr.”
Never
Constituenttype:“Individual”
Titles defined inthe system
Use primary member contact info
PRIMARYMEMBER_COPYCONTACTINFO
Field forGroup/household
To use the informationfor the primarymember of the groupas the contactinformation, select thischeckbox.
Never
Constituenttype:“Constituentgroup” or“Household”
Selected or notselected
Validation message
ADDRESS_VALIDATIONMESSAGE
Address field
This field stores themessage associatedwith the last validationattempt. This field ispopulated during theaddress validationprocess.
Never Text (200characters)
www.blackbaud.com/howto/researchpoint
chapter 3:
pg. 78

Field Description Required? Allowedvalues
Web site address
WEBADDRESS
Enter the constituent’swebsite address.
Never A valid webaddress
ZIP
ADDRESS_POSTCODE
Address field
Enter the Zip code orthe constituent’saddress.
Never Text (12characters)
Constituent Address Update BatchThe table below explains the fields included in the Constituent Address Update Batch type. You canuse this batch type to create a template to update multiple constituent address records. When a fieldis not required, you can leave it blank as necessary. For more information about the constituent dataentry fields, see the Prospect Wealth & Management Guide.
Note: The other tables in this document describe batch templates. ResearchPoint includes defaultbatch templates that are based on corresponding batch types. With the Constituent Address UpdateBatch type there is no default template. But you can create a batch template based on the ConstituentAddress Update Batch type.
Fields marked “Always” are always required. Fields marked “Never” are never required. Fields marked“Conditionally” are required in some situations, such as when another field is selected. Some fields areonly accessible when another field is selected or when another field has a specific value. Some fieldsare display-only when other fields are selected. Fields marked “Unavailable” are not accessible undersome or all conditions. This information is in the “Required” column of the table below. Fields that areincluded in an unmodified Constituent Address Update Batch type are marked “Initially included.”
Field Description Required? Allowedvalues
Address
ADDRESSBLOCK
Enter the streetaddress or postoffice box for theconstituent’saddress.
Never
Initiallyincluded
Text (150characters)
www.blackbaud.com/howto/researchpoint
chapter 3:
pg. 79
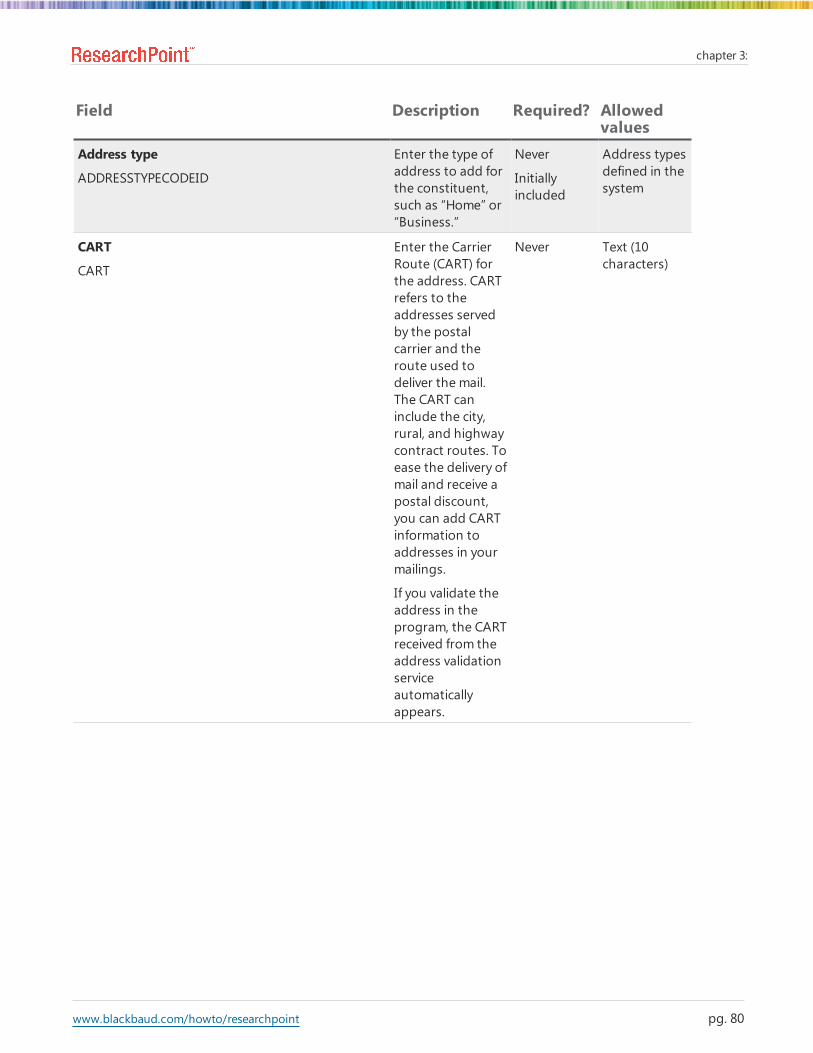
Field Description Required? Allowedvalues
Address type
ADDRESSTYPECODEID
Enter the type ofaddress to add forthe constituent,such as “Home” or“Business.”
Never
Initiallyincluded
Address typesdefined in thesystem
CART
CART
Enter the CarrierRoute (CART) forthe address. CARTrefers to theaddresses servedby the postalcarrier and theroute used todeliver the mail.The CART caninclude the city,rural, and highwaycontract routes. Toease the delivery ofmail and receive apostal discount,you can add CARTinformation toaddresses in yourmailings.
If you validate theaddress in theprogram, the CARTreceived from theaddress validationserviceautomaticallyappears.
Never Text (10characters)
www.blackbaud.com/howto/researchpoint
chapter 3:
pg. 80

Field Description Required? Allowedvalues
City
CITY
Enter the city forthe constituent’saddress.
Never
Initiallyincluded
Text (50characters)
Congressional district
CONGRESSIONALDISTRICTCODEID
Select thecongressionaldistrict for theaddress. If youvalidate theaddress in theprogram, thedistrict receivedfrom the addressvalidation serviceautomaticallyappears.
Never Congressionaldistrictsdefined in thesystem
Constituent address
ADDRESSID
To update anaddress record,search for andselect an address.
Always
Initiallyincluded
Addressesdefined in thesystem
Country
COUNTRYID
Enter the countryfor theconstituent’saddress, such as“United States.”
Alwaysrequired
Initiallyincluded
Countriesdefined in thesystem
County
COUNTYCODEID
Select the countyfor the constituentaddress. If youvalidate theaddress in theprogram, thecounty receivedfrom the addressvalidation serviceautomaticallyappears.
Never Countiesdefined in thesystem
Do not mail reason
DONOTMAILREASONCODEID
If you select Donot send mail tothis address,select why theindividual requeststo not receive mailat the address.
Never
Do not sendmail to thisaddress:selected
Do not mailreasonsdefined in thesystem
www.blackbaud.com/howto/researchpoint
chapter 3:
pg. 81

Field Description Required? Allowedvalues
Do not send mail to this address
DONOTMAIL
If the individualrequests that younot send mail tothe address, selectthis checkbox.
Never Selected ornot selected
www.blackbaud.com/howto/researchpoint
chapter 3:
pg. 82
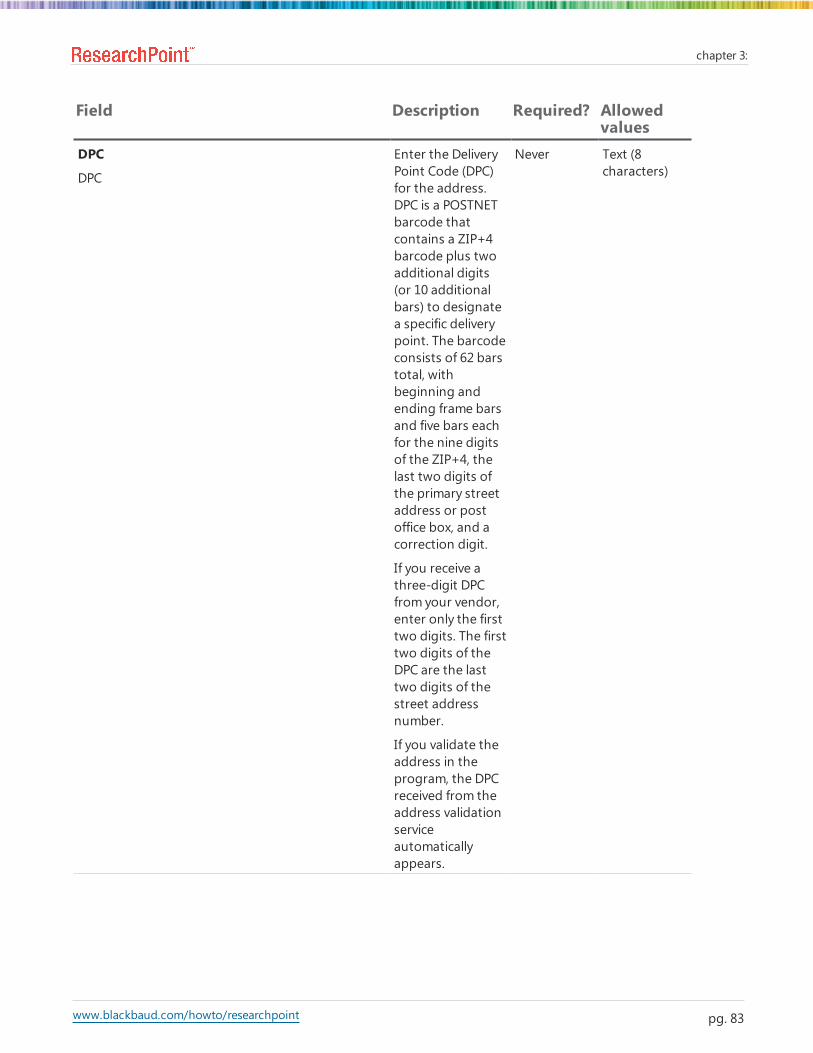
Field Description Required? Allowedvalues
DPC
DPC
Enter the DeliveryPoint Code (DPC)for the address.DPC is a POSTNETbarcode thatcontains a ZIP+4barcode plus twoadditional digits(or 10 additionalbars) to designatea specific deliverypoint. The barcodeconsists of 62 barstotal, withbeginning andending frame barsand five bars eachfor the nine digitsof the ZIP+4, thelast two digits ofthe primary streetaddress or postoffice box, and acorrection digit.
If you receive athree-digit DPCfrom your vendor,enter only the firsttwo digits. The firsttwo digits of theDPC are the lasttwo digits of thestreet addressnumber.
If you validate theaddress in theprogram, the DPCreceived from theaddress validationserviceautomaticallyappears.
Never Text (8characters)
www.blackbaud.com/howto/researchpoint
chapter 3:
pg. 83

Field Description Required? Allowedvalues
End date
ENDDATE
For a seasonaladdress, select theend date for thetime period whenthe constituentuses the address.The format for thisfield is mm/dd.
Conditionally
When a startdate isentered
Month andday
Information source
INFOSOURCECODEID
When you add ormake changes toan address, youcan select a sourcefor theinformation. Forexample, if thespouse of aconstituent letsyou know about achange of address,you can make thechanges and select“FamilyMember”for the informationsource.
Never Informationsourcesdefined in thesystem
www.blackbaud.com/howto/researchpoint
chapter 3:
pg. 84

Field Description Required? Allowedvalues
Local precinct
LOCALPRECINCTCODEID
Select the localprecinct for theaddress. If youvalidate theaddress in theprogram, theprecinct receivedfrom the addressvalidation serviceautomaticallyappears.
Never Localprecinctsdefined in thesystem
LOT
LOT
Enter the Line ofTravel (LOT) for theaddress. LOT is thedirection the mailcarrier takes alonga CART. LOTinformation isrequired forstandard mailingsto receive the BasicEnhanced CarrierRoute rate.
If you validate theaddress in theprogram, the LOTreceived from theaddress validationserviceautomaticallyappears.
Never Text (5characters)
www.blackbaud.com/howto/researchpoint
chapter 3:
pg. 85
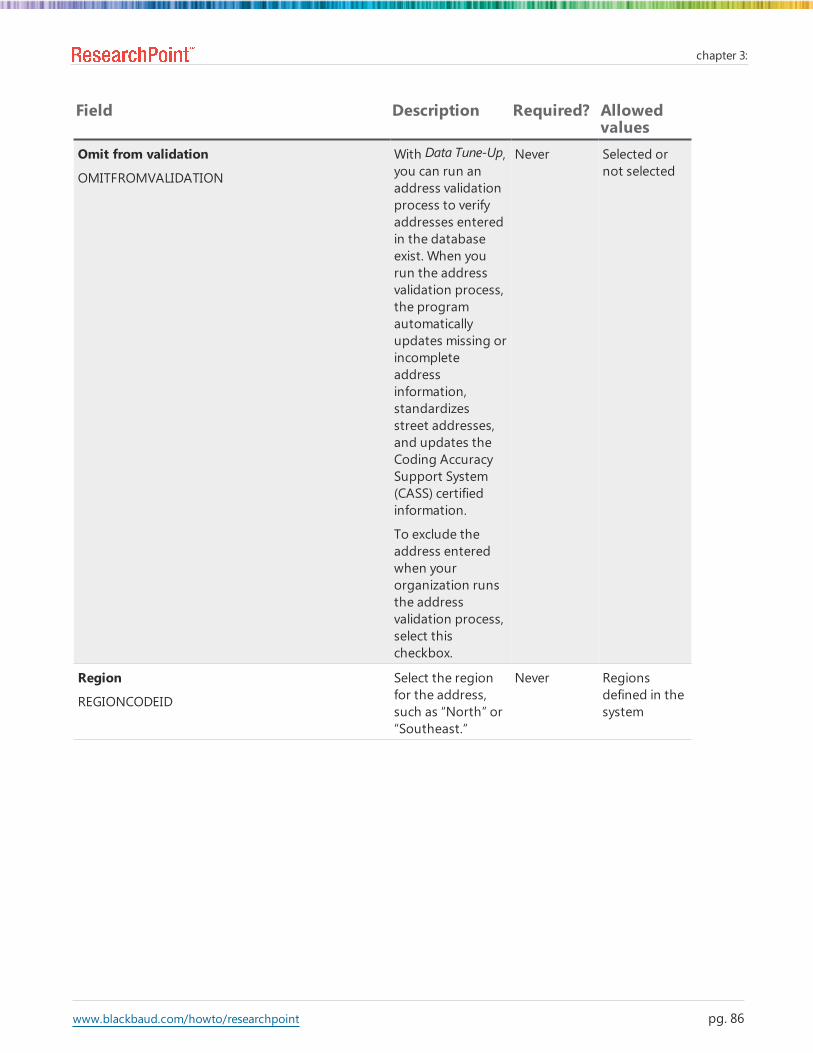
Field Description Required? Allowedvalues
Omit from validation
OMITFROMVALIDATION
With Data Tune-Up,you can run anaddress validationprocess to verifyaddresses enteredin the databaseexist. When yourun the addressvalidation process,the programautomaticallyupdates missing orincompleteaddressinformation,standardizesstreet addresses,and updates theCoding AccuracySupport System(CASS) certifiedinformation.
To exclude theaddress enteredwhen yourorganization runsthe addressvalidation process,select thischeckbox.
Never Selected ornot selected
Region
REGIONCODEID
Select the regionfor the address,such as “North” or“Southeast.”
Never Regionsdefined in thesystem
www.blackbaud.com/howto/researchpoint
chapter 3:
pg. 86

Field Description Required? Allowedvalues
Set as primary address
ISPRIMARY
To designate theaddress as theconstituent’s mainaddress forcommunications,select thischeckbox. If youdefine otheraddresses, youmust select oneaddress as theprimary address.You can enter onlyone primaryaddress for aconstituent. UnderAddresses on theContact tab, theprimary addressappears first.
Never
You can onlyselect this forone of theconstituent’saddresses.
Selected ornot selected
Start date
STARTDATE
For a seasonaladdress, select thestart date for thetime period whenthe constituentuses the address.The format for thisfield is mm/dd
Conditionally
When an enddate isentered
Month andday
State
STATEID
Enter the state forthe constituent’saddress.
Never
Initiallyincluded
State definedin the system
State House district
STATEHOUSEDISTRICTCODEID
Select the stateHouse district forthe address. If youvalidate theaddress in theprogram, thedistrict receivedfrom the addressvalidation serviceautomaticallyappears.
Never State Housedistrictsdefined in thesystem
www.blackbaud.com/howto/researchpoint
chapter 3:
pg. 87

Field Description Required? Allowedvalues
State Senate district
STATESENATEDISTRICTCODEID
Select the stateSenate district forthe address. If youvalidate theaddress in theprogram, thedistrict receivedfrom the addressvalidation serviceautomaticallyappears.
Never State Senatedistrictsdefined in thesystem
Update matching addresses in household
UPDATEMATCHINGHOUSEHOLDADDRESSES
When theconstituent is amember of ahousehold withadditionalmembers, thischeckbox isenabled. To copythe address to thehousehold and itsmembers, selectthis checkbox.
Never
Constituentis not amember of ahousehold:unavailable
Initiallyincluded
Selected ornot selected
Update spouse address
UPDATEMATCHINGSPOUSEADDRESSES
To update theaddress for theconstituent’sspouse, select thischeckbox.
Never Selected ornot selected
ZIP
POSTCODE
Enter the Zip codefor theconstituent’saddress.
Never
Initiallyincluded
Text (12characters)
Constituent Update BatchThe table below explains the fields in the Constituent Update Batch template. You can use this batchtemplate to add or update constituent records. When a field is not required, you can leave it blank asnecessary. For more information about the constituent data entry fields, see the Prospect Wealth &Management Guide.
Fields marked “Always” are always required. Fields marked “Never” are never required. Fields marked“Conditionally” are required in some situations, such as when another field is selected. Some fields areonly accessible when another field is selected or when another field has a specific value. Some fieldsare display-only when other fields are selected. Fields marked “Unavailable” are not accessible undersome or all conditions. This information is in the “Required” column of the table below.
www.blackbaud.com/howto/researchpoint
chapter 3:
pg. 88
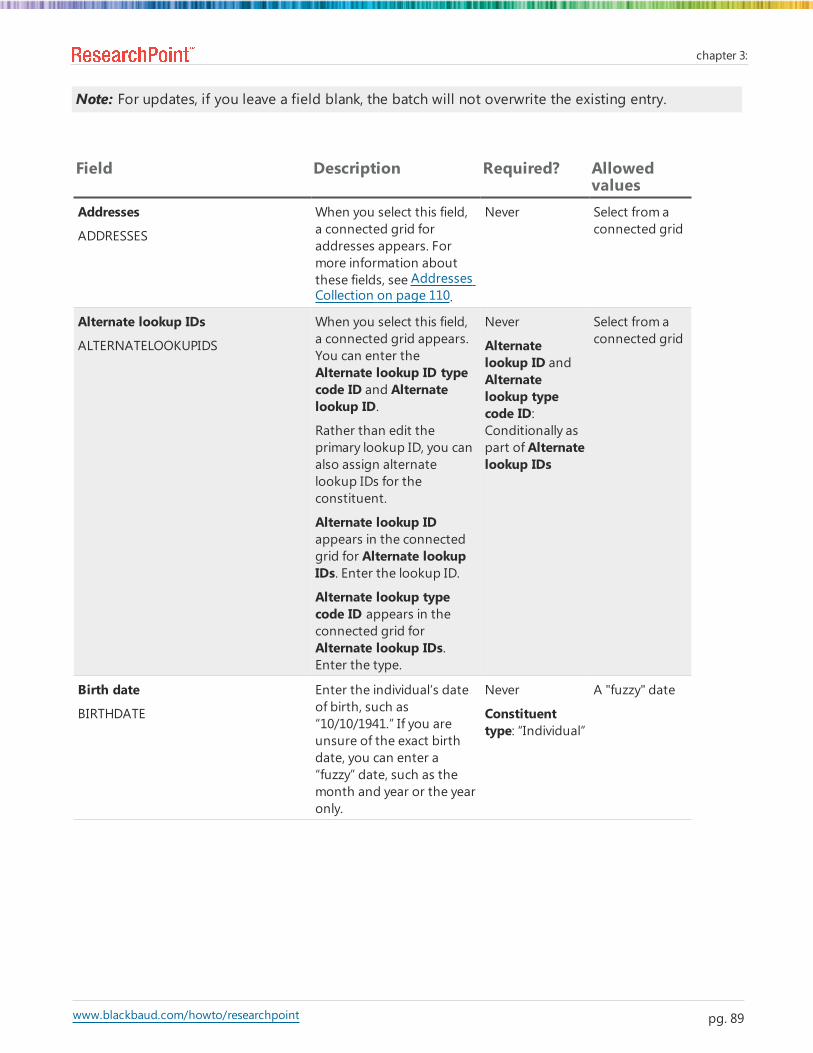
Note: For updates, if you leave a field blank, the batch will not overwrite the existing entry.
Field Description Required? Allowedvalues
Addresses
ADDRESSES
When you select this field,a connected grid foraddresses appears. Formore information aboutthese fields, see AddressesCollection on page 110.
Never Select from aconnected grid
Alternate lookup IDs
ALTERNATELOOKUPIDS
When you select this field,a connected grid appears.You can enter theAlternate lookup ID typecode ID and Alternatelookup ID.
Rather than edit theprimary lookup ID, you canalso assign alternatelookup IDs for theconstituent.
Alternate lookup IDappears in the connectedgrid for Alternate lookupIDs. Enter the lookup ID.
Alternate lookup typecode ID appears in theconnected grid forAlternate lookup IDs.Enter the type.
Never
Alternatelookup ID andAlternatelookup typecode ID:Conditionally aspart of Alternatelookup IDs
Select from aconnected grid
Birth date
BIRTHDATE
Enter the individual’s dateof birth, such as“10/10/1941.” If you areunsure of the exact birthdate, you can enter a“fuzzy” date, such as themonth and year or the yearonly.
Never
Constituenttype: “Individual”
A "fuzzy" date
www.blackbaud.com/howto/researchpoint
chapter 3:
pg. 89

Field Description Required? Allowedvalues
Business
BUSINESS_ID
Select an organization thatis a business to associatewith the constituent.
Never
Constituenttype: “Individual”
Business name:not entered
Businessesdefined in thesystem
Business address
BUSINESS_ADDRESSBLOCK
Enter the primary streetaddress or post office boxfor the business.
To update this field, youmust select a business. Toadd business address for anew business, you mustenter a Business name.
Never
Constituenttype: “Individual”
Businessselected orBusiness nameentered
Text (150characters)
www.blackbaud.com/howto/researchpoint
chapter 3:
pg. 90
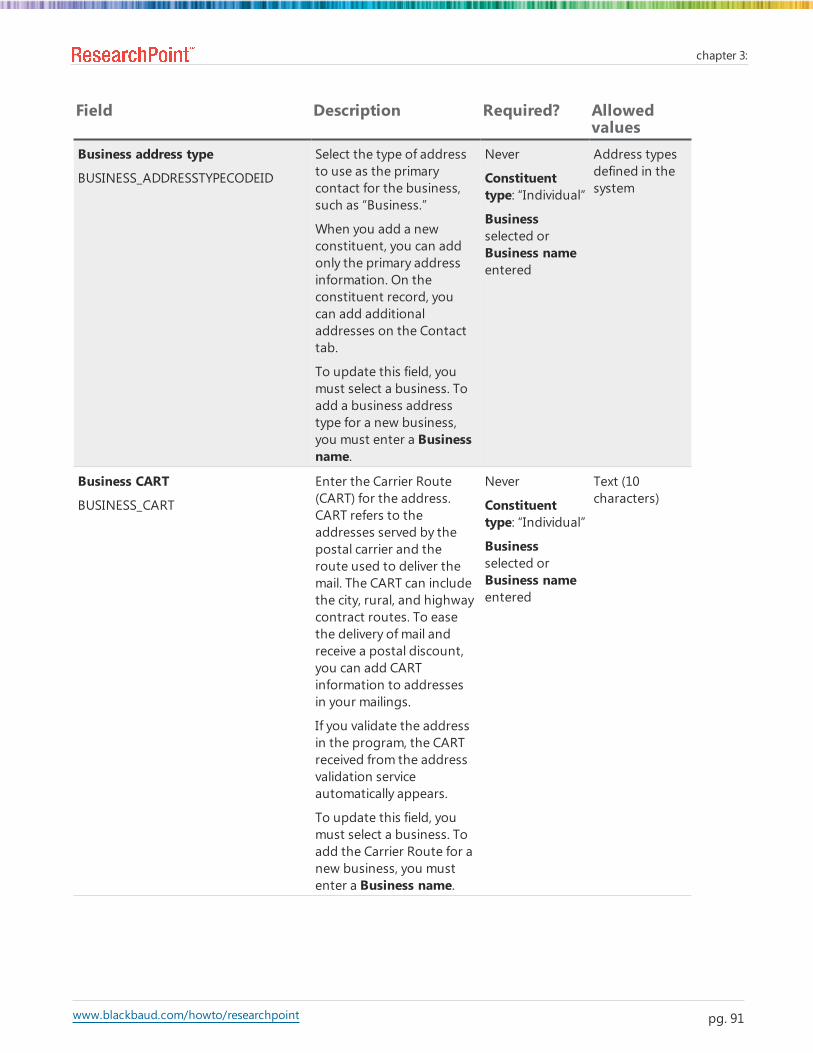
Field Description Required? Allowedvalues
Business address type
BUSINESS_ADDRESSTYPECODEID
Select the type of addressto use as the primarycontact for the business,such as “Business.”
When you add a newconstituent, you can addonly the primary addressinformation. On theconstituent record, youcan add additionaladdresses on the Contacttab.
To update this field, youmust select a business. Toadd a business addresstype for a new business,you must enter a Businessname.
Never
Constituenttype: “Individual”
Businessselected orBusiness nameentered
Address typesdefined in thesystem
Business CART
BUSINESS_CART
Enter the Carrier Route(CART) for the address.CART refers to theaddresses served by thepostal carrier and theroute used to deliver themail. The CART can includethe city, rural, and highwaycontract routes. To easethe delivery of mail andreceive a postal discount,you can add CARTinformation to addressesin your mailings.
If you validate the addressin the program, the CARTreceived from the addressvalidation serviceautomatically appears.
To update this field, youmust select a business. Toadd the Carrier Route for anew business, you mustenter a Business name.
Never
Constituenttype: “Individual”
Businessselected orBusiness nameentered
Text (10characters)
www.blackbaud.com/howto/researchpoint
chapter 3:
pg. 91

Field Description Required? Allowedvalues
Business city
BUSINESS_CITY
Enter the city or town forthe business’ primaryaddress.
To update this field, youmust select a business. Toadd a city for a newbusiness, you must enter aBusiness name.
Never
Constituenttype: “Individual”
Businessselected orBusiness nameentered
Text (50characters)
Business country
BUSINESS_COUNTRYID
Select the country of thebusiness’ primary address.
To update this field, youmust select a business. Toadd a country for a newbusiness, you must enter aBusiness name.
Never
Constituenttype: “Individual”
Businessselected orBusiness nameentered
Countriesdefined in thesystem
Business do not mail
BUSINESS_DONOTMAIL
If the business requeststhat you not send mail tothe primary address, selectthis checkbox.
To update this field, youmust select a business. Toselect this field for a newbusiness, you must enter aBusiness name.
Never
Constituenttype: “Individual”
Businessselected orBusiness nameentered
Selected or notselected
Business do not mail reason
BUSINESS_DONOTMAILREASONCODEID
If you select Do not sendmail to this address, selectwhy the business requeststo not receive mail at theprimary address.
To update this field, youmust select a business. Toselect this field for a newbusiness, you must enter aBusiness name.
Never
Constituenttype: “Individual”
Businessselected orBusiness nameentered
Do not mailreasonsdefined in thesystem
www.blackbaud.com/howto/researchpoint
chapter 3:
pg. 92

Field Description Required? Allowedvalues
Business DPC
BUSINESS_DPC
Enter the Delivery PointCode (DPC) for the address.DPC is a POSTNET barcodethat contains a ZIP+4barcode plus twoadditional digits (or 10additional bars) todesignate a specificdelivery point. The barcodeconsists of 62 bars total,with beginning and endingframe bars and five barseach for the nine digits ofthe ZIP+4, the last twodigits of the primary streetaddress or post office box,and a correction digit.
If you receive a three-digitDPC from your vendor,enter only the first twodigits. The first two digitsof the DPC are the last twodigits of the street addressnumber.
If you validate the addressin the program, the DPCreceived from the addressvalidation serviceautomatically appears.
To update this field, youmust select a business. Toadd the Delivery PointCode for a new business,you must enter a Businessname.
Never
Constituenttype: “Individual”
Businessselected orBusiness nameentered
Text (8characters)
www.blackbaud.com/howto/researchpoint
chapter 3:
pg. 93
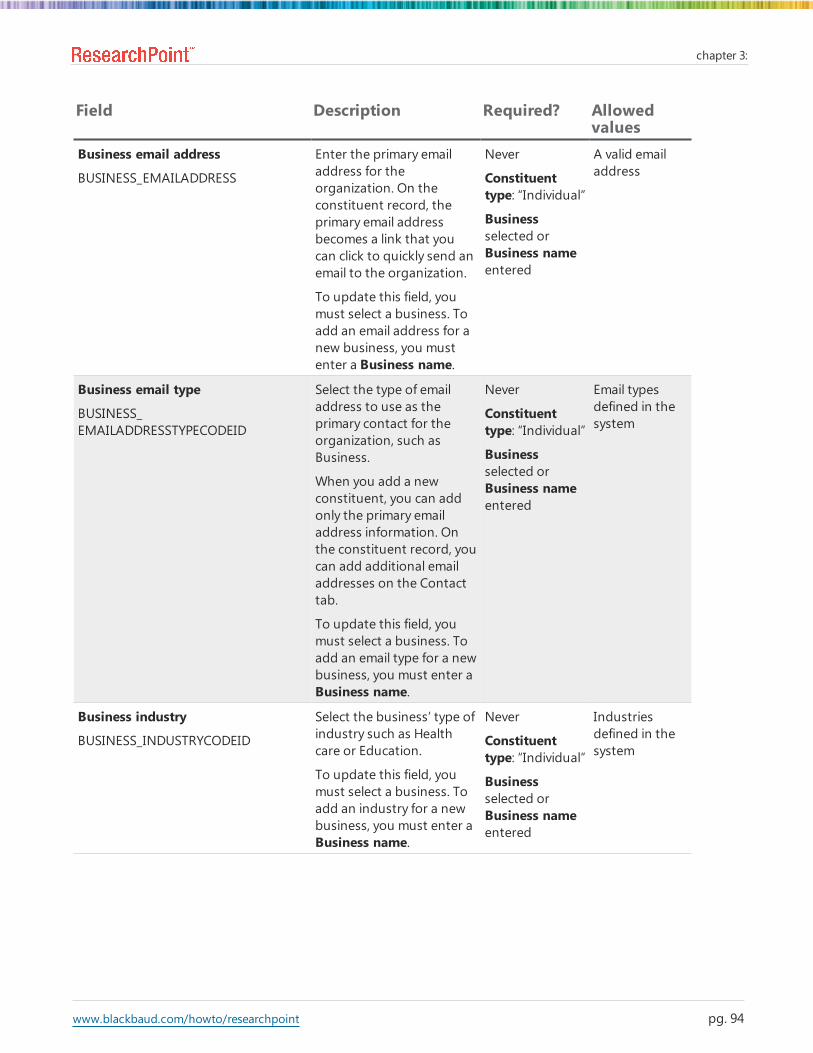
Field Description Required? Allowedvalues
Business email address
BUSINESS_EMAILADDRESS
Enter the primary emailaddress for theorganization. On theconstituent record, theprimary email addressbecomes a link that youcan click to quickly send anemail to the organization.
To update this field, youmust select a business. Toadd an email address for anew business, you mustenter a Business name.
Never
Constituenttype: “Individual”
Businessselected orBusiness nameentered
A valid emailaddress
Business email type
BUSINESS_EMAILADDRESSTYPECODEID
Select the type of emailaddress to use as theprimary contact for theorganization, such asBusiness.
When you add a newconstituent, you can addonly the primary emailaddress information. Onthe constituent record, youcan add additional emailaddresses on the Contacttab.
To update this field, youmust select a business. Toadd an email type for a newbusiness, you must enter aBusiness name.
Never
Constituenttype: “Individual”
Businessselected orBusiness nameentered
Email typesdefined in thesystem
Business industry
BUSINESS_INDUSTRYCODEID
Select the business’ type ofindustry such as Healthcare or Education.
To update this field, youmust select a business. Toadd an industry for a newbusiness, you must enter aBusiness name.
Never
Constituenttype: “Individual”
Businessselected orBusiness nameentered
Industriesdefined in thesystem
www.blackbaud.com/howto/researchpoint
chapter 3:
pg. 94

Field Description Required? Allowedvalues
Business lookup ID
BUSINESS_LOOKUPID
Enter the lookup ID for thebusiness.
To update this field, youmust select a business. Toadd a lookup ID for a newbusiness, you must enter aBusiness name.
Never
Constituenttype: “Individual”
Businessselected orBusiness nameentered
Text (100characters)
Business LOT
BUSINESS_LOT
Enter the Line of Travel(LOT) for the address. LOTis the direction the mailcarrier takes along a CART.LOT information is requiredfor standard mailings toreceive the Basic EnhancedCarrier Route rate.
If you validate the addressin the program, the LOTreceived from the addressvalidation serviceautomatically appears.
To update this field, youmust select a business. Toadd a Line of Travel for anew business, you mustenter a Business name.
Never
Constituenttype: “Individual”
Businessselected orBusiness nameentered
Text (5characters)
Business name
BUSINESS_NAME
Enter the name of thebusiness, exactly as itshould appear throughoutthe program.
Never
Constituenttype: “Individual”
Business: notselected
Text (100characters)
Business no. of employees
BUSINESS_NUMEMPLOYEES
Enter the number ofpeople employed at thebusiness.
To update this field, youmust select a business. Toadd the number ofemployees for a newbusiness, you must enter aBusiness name.
Never
Constituenttype: “Individual”
Businessselected orBusiness nameentered
Integer
www.blackbaud.com/howto/researchpoint
chapter 3:
pg. 95

Field Description Required? Allowedvalues
Business no. of subsidiary orgs
BUSINESS_NUMSUBSIDIARIES
If the business is theparent of anotherorganization, enter thenumber of companies thebusiness owns andcontrols.
To update this field, youmust select a business. Toadd the number ofsubsidiary organizationsfor a new business, youmust enter a Businessname.
Never
Constituenttype: “Individual”
Businessselected orBusiness nameentered
Integer
Business parent org
BUSINESS_PARENTCORPID
If the business is thesubsidiary of anotherorganization, you canselect the organizationthat owns and controls thenew business.
To update this field, youmust select a business. Toadd a parent organizationfor a new business, youmust enter a Businessname.
Never
Constituenttype: “Individual”
Businessselected orBusiness nameentered
Organizationsdefined in thesystem
www.blackbaud.com/howto/researchpoint
chapter 3:
pg. 96
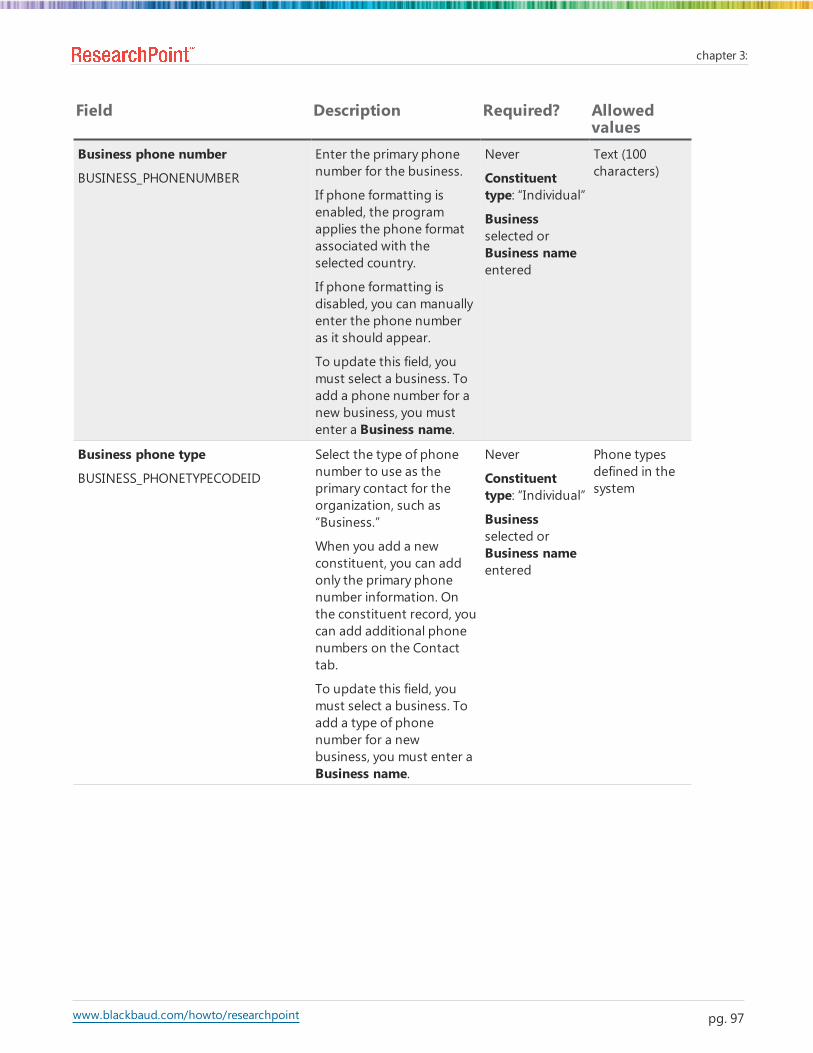
Field Description Required? Allowedvalues
Business phone number
BUSINESS_PHONENUMBER
Enter the primary phonenumber for the business.
If phone formatting isenabled, the programapplies the phone formatassociated with theselected country.
If phone formatting isdisabled, you can manuallyenter the phone numberas it should appear.
To update this field, youmust select a business. Toadd a phone number for anew business, you mustenter a Business name.
Never
Constituenttype: “Individual”
Businessselected orBusiness nameentered
Text (100characters)
Business phone type
BUSINESS_PHONETYPECODEID
Select the type of phonenumber to use as theprimary contact for theorganization, such as“Business.”
When you add a newconstituent, you can addonly the primary phonenumber information. Onthe constituent record, youcan add additional phonenumbers on the Contacttab.
To update this field, youmust select a business. Toadd a type of phonenumber for a newbusiness, you must enter aBusiness name.
Never
Constituenttype: “Individual”
Businessselected orBusiness nameentered
Phone typesdefined in thesystem
www.blackbaud.com/howto/researchpoint
chapter 3:
pg. 97

Field Description Required? Allowedvalues
Business reciprocal type
BUSINESS_RECIPROCALTYPECODEIDSIMPLELIST
Enter the Businessreciprocal type, such as“Employee.” If you enter“Employee” in Businessreciprocal type, then“Employer” may beappropriate for Businessrelationship type.
Business reciprocal type isthe correspondingrelationship to Businessrelationship type. Forexample, “Employer” cancorrespond to “Employee.”
Never
Constituenttype: “Individual”
Businessselected orBusiness nameentered
BusinessRelationshiptype: selected
Reciprocaltypes defined inthe system
Business relationship type
BUSINESS_RELATIONSHIPTYPECODEIDSIMPLELIST
Enter the Businessrelationship type, such as“Employer.” If you enter“Employee” in Businessrelationship type, then“Employer” may beappropriate for Businessreciprocal type.
Business reciprocal type isthe correspondingrelationship to Businessrelationship type. Forexample, “Employer” cancorrespond to “Employee.”
Never
Constituenttype: “Individual”
Businessselected orBusiness nameentered
Gender: selected
Relationshiptypes defined inthe system
www.blackbaud.com/howto/researchpoint
chapter 3:
pg. 98
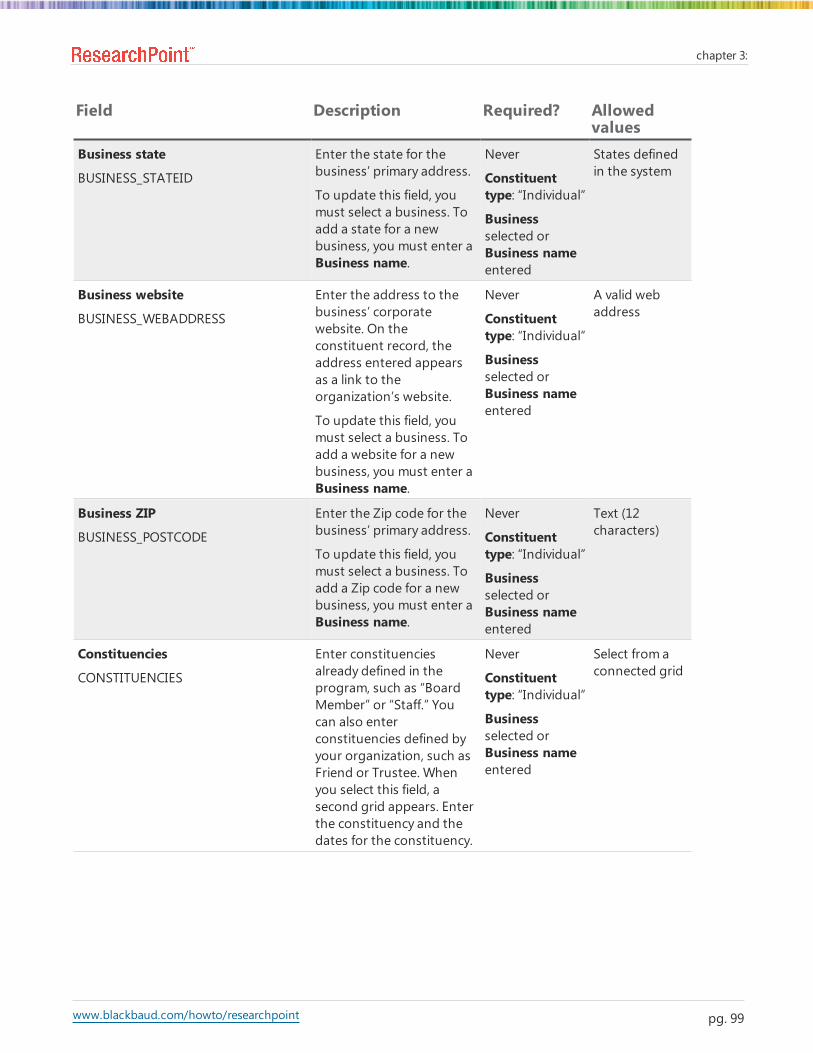
Field Description Required? Allowedvalues
Business state
BUSINESS_STATEID
Enter the state for thebusiness’ primary address.
To update this field, youmust select a business. Toadd a state for a newbusiness, you must enter aBusiness name.
Never
Constituenttype: “Individual”
Businessselected orBusiness nameentered
States definedin the system
Business website
BUSINESS_WEBADDRESS
Enter the address to thebusiness’ corporatewebsite. On theconstituent record, theaddress entered appearsas a link to theorganization’s website.
To update this field, youmust select a business. Toadd a website for a newbusiness, you must enter aBusiness name.
Never
Constituenttype: “Individual”
Businessselected orBusiness nameentered
A valid webaddress
Business ZIP
BUSINESS_POSTCODE
Enter the Zip code for thebusiness’ primary address.
To update this field, youmust select a business. Toadd a Zip code for a newbusiness, you must enter aBusiness name.
Never
Constituenttype: “Individual”
Businessselected orBusiness nameentered
Text (12characters)
Constituencies
CONSTITUENCIES
Enter constituenciesalready defined in theprogram, such as “BoardMember” or “Staff.” Youcan also enterconstituencies defined byyour organization, such asFriend or Trustee. Whenyou select this field, asecond grid appears. Enterthe constituency and thedates for the constituency.
Never
Constituenttype: “Individual”
Businessselected orBusiness nameentered
Select from aconnected grid
www.blackbaud.com/howto/researchpoint
chapter 3:
pg. 99

Field Description Required? Allowedvalues
Constituent
PRIMARYRECORDID
To update a constituentrecord, select theconstituent. To addconstituent records, leavethis field blank.
Conditionally
Updates:required
New records:unavailable
Constituentsdefined in thesystem
Constituent security attribute
SECURITYATTRIBUTES
When you select this field,a second grid appears.Select the constituentsecurity attributes thatapply.
Never Select from aconnected grid
Constituent site
CONSTITUENT_SITEID
Select the site you want toassociate with the record.Records that can beassociated with more thanone site have a Site grid,instead of a Site field.
Never Constituentsites defined inthe system
Constituent type
CONSTITUENTTYPECODE
Select the type ofconstituent.
To add a person such as adonor or an employee as aconstituent, select“Individual.”
To add a household thatsupports your mission as aconstituent, select“Household.”
To add a business orcompany that supportsyour mission as aconstituent, select“Organization.”
To add a group ofconstituents who donatetogether under one entitysuch as a giving circle,select “Constituent group.”
Conditionally
New records:required
Always required
Updates:unavailable
TinyInt
Values from theConstituentType table
“Individual”
“Organization”
“Household”
“Constituentgroup”
www.blackbaud.com/howto/researchpoint
chapter 3:
pg. 100

Field Description Required? Allowedvalues
Deceased date
DECEASEDDATE
To update or add to thisfield, you must select Isdeceased. If theconstituent is deceased,enter the date.
Never
Constituenttype: “Individual”
Is deceased:selected
A "fuzzy" date
Email addresses
EMAILADDRESSES
Enter the email addresstype and email address.Then select Email addressprimary, Do not sendemail to this address, andUpdate household emailaddresses as necessary.
Enter the email address.
If the email address is theprimary email address,select Email addressprimary.
If the constituent does notwant email sent to thisemail address, select Donot send email to thisaddress.
To update household emailaddresses with thisaddress, select Updatehousehold emailaddresses.
Never
Email addresstype, Do notsend email tothis address,Updatehouseholdemail addresses:Never
Email address,Email addressprimary:Conditionally aspart of Emailaddresses
You can onlyselect Emailaddress primaryfor one of theaddresses in thecollection.
Select from aconnected grid
First name
FIRSTNAME
Enter the first name of theconstituent.
Never
Constituenttype: “Individual”
Text (50characters)
Gender
GENDERCODE
Select whether theindividual is a male orfemale. If you are unsure ofthe individual’s gender,select “Unknown.”
Conditionally
If Constituenttype is“Individual.”
TinyInt
Gendersdefined in thesystem
www.blackbaud.com/howto/researchpoint
chapter 3:
pg. 101
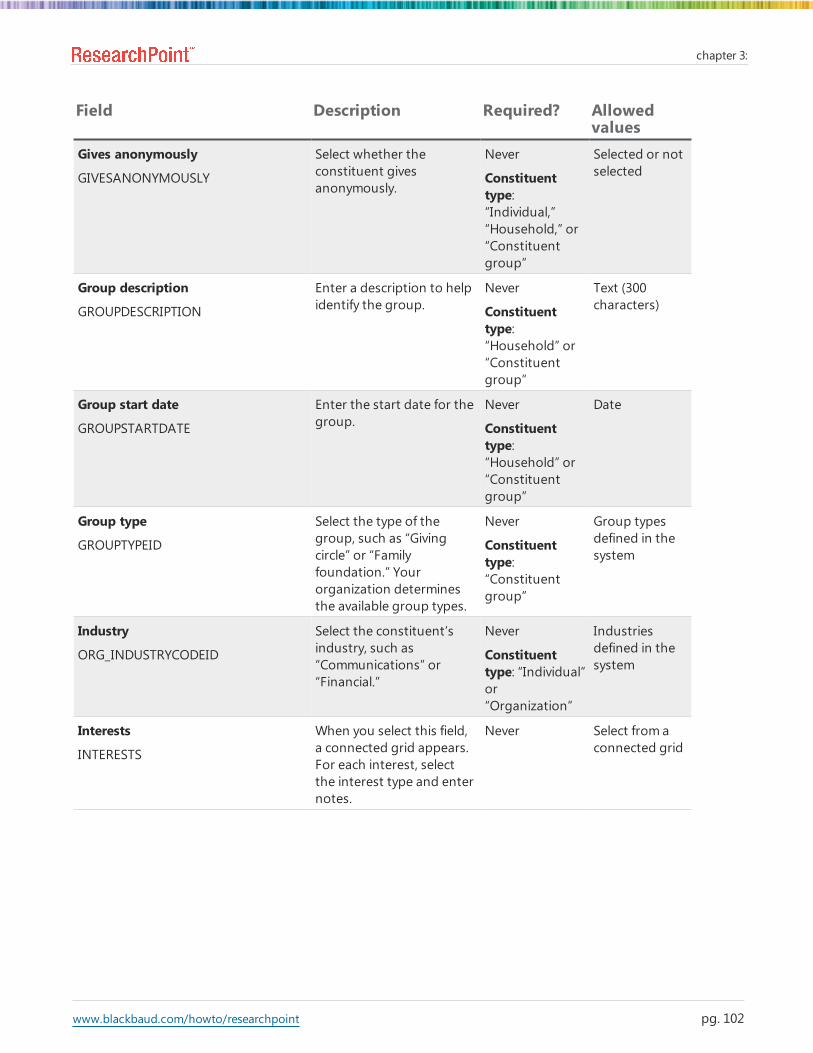
Field Description Required? Allowedvalues
Gives anonymously
GIVESANONYMOUSLY
Select whether theconstituent givesanonymously.
Never
Constituenttype:“Individual,”“Household,” or“Constituentgroup”
Selected or notselected
Group description
GROUPDESCRIPTION
Enter a description to helpidentify the group.
Never
Constituenttype:“Household” or“Constituentgroup”
Text (300characters)
Group start date
GROUPSTARTDATE
Enter the start date for thegroup.
Never
Constituenttype:“Household” or“Constituentgroup”
Date
Group type
GROUPTYPEID
Select the type of thegroup, such as “Givingcircle” or “Familyfoundation.” Yourorganization determinesthe available group types.
Never
Constituenttype:“Constituentgroup”
Group typesdefined in thesystem
Industry
ORG_INDUSTRYCODEID
Select the constituent’sindustry, such as“Communications” or“Financial.”
Never
Constituenttype: “Individual”or“Organization”
Industriesdefined in thesystem
Interests
INTERESTS
When you select this field,a connected grid appears.For each interest, selectthe interest type and enternotes.
Never Select from aconnected grid
www.blackbaud.com/howto/researchpoint
chapter 3:
pg. 102

Field Description Required? Allowedvalues
Is deceased
DECEASED
If the individual isdeceased, select thischeckbox.
Never
Constituenttype: “Individual”
Selected or notselected
Last/Org/Group/Household name
KEYNAME
For an individualconstituent, enter the lastname of the individual.
For a group constituent,enter the name of thegroup.
For a householdconstituent, enter thename of the household.
For an organizationconstituent, enter thename of the organization.
Always required Text (100characters)
Lookup ID
LOOKUP_ID
When you add a record,you can enter the LookupID for the constituent. Youcannot update this field.
This primary lookup IDappears in the Lookup IDfield on the constituentrecord. Rather than editthe primary lookup ID, youcan also assign alternatelookup IDs for theconstituent.
Never
Updates:unavailable
Text (100characters)
Maiden name
MAIDENNAME
Enter a maiden name forthe individual as necessary.On the constituent record,the maiden name enteredappears as an alias on theNames tab. When yousearch for individualconstituents, you canselect to include maidennames in the searchcriteria.
Never
Constituenttype: “Individual”
Text (100characters)
www.blackbaud.com/howto/researchpoint
chapter 3:
pg. 103

Field Description Required? Allowedvalues
Marital status
MARITALSTATUSCODEID
Select the marital status forthe constituent, such as“Married” or “Single.”
Never
Constituenttype: “Individual”
Maritalstatusesdefined in thesystem
Middle name
MIDDLENAME
Enter the middle name ofthe individual constituentexactly as it should appearthroughout your databasesuch as on pages andreports.
Never
Constituenttype: “Individual”
Text (50characters)
Nickname
NICKNAME
Enter a nickname for theindividual as necessary.When you search forindividual constituents,you can select to includenicknames in the searchcriteria.
Never
Constituenttype: “Individual”
Text (50characters)
No. of employees
ORG_NUMEMPLOYEES
Enter the number ofpeople employed at theorganization.
Never
Constituenttype:“Organization”
Integer
No. of subsidiary orgs
ORG_NUMSUBSIDIARIES
If the organization is theparent of anotherorganization, enter thenumber of companies theorganization owns andcontrols.
Never
Constituenttype:“Organization”
Integer
Parent org
ORG_PARENTCORPID
If the organization is thesubsidiary of anotherorganization, you canselect the organizationthat owns and controls thenew organization.
Never
Constituenttype:“Organization”
Organizationsdefined in thesystem
www.blackbaud.com/howto/researchpoint
chapter 3:
pg. 104
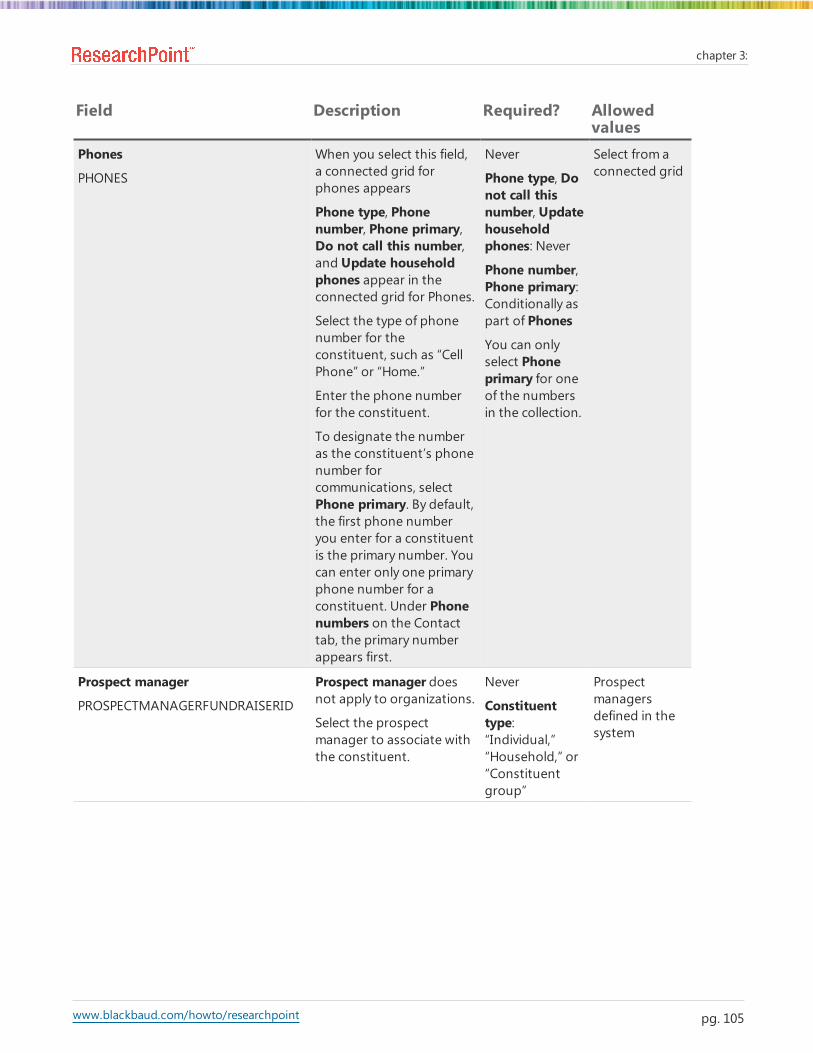
Field Description Required? Allowedvalues
Phones
PHONES
When you select this field,a connected grid forphones appears
Phone type, Phonenumber, Phone primary,Do not call this number,and Update householdphones appear in theconnected grid for Phones.
Select the type of phonenumber for theconstituent, such as “CellPhone” or “Home.”
Enter the phone numberfor the constituent.
To designate the numberas the constituent’s phonenumber forcommunications, selectPhone primary. By default,the first phone numberyou enter for a constituentis the primary number. Youcan enter only one primaryphone number for aconstituent. Under Phonenumbers on the Contacttab, the primary numberappears first.
Never
Phone type, Donot call thisnumber, Updatehouseholdphones: Never
Phone number,Phone primary:Conditionally aspart of Phones
You can onlyselect Phoneprimary for oneof the numbersin the collection.
Select from aconnected grid
Prospect manager
PROSPECTMANAGERFUNDRAISERID
Prospect manager doesnot apply to organizations.
Select the prospectmanager to associate withthe constituent.
Never
Constituenttype:“Individual,”“Household,” or“Constituentgroup”
Prospectmanagersdefined in thesystem
www.blackbaud.com/howto/researchpoint
chapter 3:
pg. 105

Field Description Required? Allowedvalues
Spouse
SPOUSE_ID
If the individual has aspouse, select thatindividual.
Never
Constituenttype: “Individual”
Spousesdefined in thesystem
Spouse birth date
SPOUSE_BIRTHDATE
Enter the individual’s dateof birth, such as10/10/1941. If you areunsure of the exact birthdate, you can enter a“fuzzy” date, such as themonth and year or the yearonly.
To update this field, youmust select a spouse. Toadd the birth date for anew spouse, you mustenter the Spouse lastname.
Never
Constituenttype: “Individual”
Spouse selectedor Spouse lastname entered
A "fuzzy" date
Spouse first name
SPOUSE_FIRSTNAME
Enter the first name of thespouse exactly as it shouldappear throughout yourdatabase such as on pagesand reports.
To update this field, youmust select a spouse. Toadd the first name for anew spouse, you mustenter the Spouse lastname.
Never
Constituenttype: “Individual”
Spouse selectedor Spouse lastname entered
Text (50characters)
Spouse gender
SPOUSE_GENDERCODE
Select whether the spouseis a male or female. If youare unsure of the spouse’sgender, select “Unknown.”
To update this field, youmust select a spouse. Toadd the gender for a newspouse, you must enter theSpouse last name.
Never
Constituenttype: “Individual”
Spouse selectedor Spouse lastname entered
TinyInt
Gendersdefined in thesystem
www.blackbaud.com/howto/researchpoint
chapter 3:
pg. 106
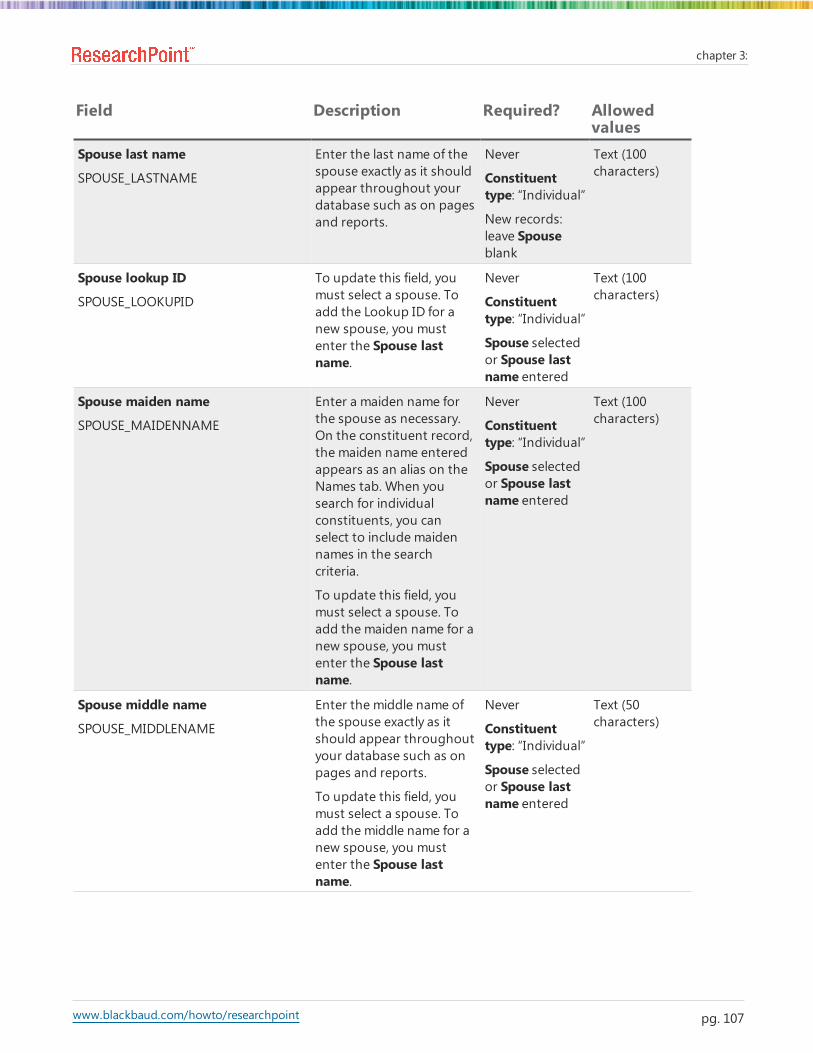
Field Description Required? Allowedvalues
Spouse last name
SPOUSE_LASTNAME
Enter the last name of thespouse exactly as it shouldappear throughout yourdatabase such as on pagesand reports.
Never
Constituenttype: “Individual”
New records:leave Spouseblank
Text (100characters)
Spouse lookup ID
SPOUSE_LOOKUPID
To update this field, youmust select a spouse. Toadd the Lookup ID for anew spouse, you mustenter the Spouse lastname.
Never
Constituenttype: “Individual”
Spouse selectedor Spouse lastname entered
Text (100characters)
Spouse maiden name
SPOUSE_MAIDENNAME
Enter a maiden name forthe spouse as necessary.On the constituent record,the maiden name enteredappears as an alias on theNames tab. When yousearch for individualconstituents, you canselect to include maidennames in the searchcriteria.
To update this field, youmust select a spouse. Toadd the maiden name for anew spouse, you mustenter the Spouse lastname.
Never
Constituenttype: “Individual”
Spouse selectedor Spouse lastname entered
Text (100characters)
Spouse middle name
SPOUSE_MIDDLENAME
Enter the middle name ofthe spouse exactly as itshould appear throughoutyour database such as onpages and reports.
To update this field, youmust select a spouse. Toadd the middle name for anew spouse, you mustenter the Spouse lastname.
Never
Constituenttype: “Individual”
Spouse selectedor Spouse lastname entered
Text (50characters)
www.blackbaud.com/howto/researchpoint
chapter 3:
pg. 107

Field Description Required? Allowedvalues
Spouse nickname
SPOUSE_NICKNAME
Enter a nickname for thespouse as necessary. Whenyou search for individualconstituents, you canselect to include nicknamesin the search criteria.
To update this field, youmust select a spouse. Toadd the nickname for anew spouse, you mustenter the Spouse lastname.
Never
Constituenttype: “Individual”
Spouse selectedor Spouse lastname entered
Text (50characters)
Spouse reciprocal type
SPOUSE_RECIPROCALTYPECODEIDSIMPLELIST
Enter the Spousereciprocal type, such as“Wife” and the Spouserelationship type, such as“Husband.”
Spouse reciprocal type isthe correspondingrelationship to Spouserelationship type. Forexample, “Husband” cancorrespond to “Wife.”
Never
Constituenttype: “Individual”
Spouse selectedor Spouse lastname entered
Gender: selected
Reciprocaltypes defined inthe system
www.blackbaud.com/howto/researchpoint
chapter 3:
pg. 108

Field Description Required? Allowedvalues
Spouse relationship type
SPOUSE_RELATIONSHIPTYPECODEIDSIMPLELIST
Enter the Spouserelationship type, such as“Husband” and the Spousereciprocal type, such as“Wife.”
Spouse reciprocal type isthe correspondingrelationship to Spouserelationship type. Forexample, “Husband” cancorrespond to “Wife.”
Never
Constituenttype: “Individual”
Spouse selectedor Spouse lastname entered
Gender: selected
Relationshiptypes defined inthe system
Spouse suffix
SPOUSE_SUFFIXCODEID
Select a suffix for thespouse such as “Sr.” or“M.D.” You can select asecond suffix if necessary,such as “III Esq.”
To update this field, youmust select a spouse. Toadd the suffix to a newspouse’s name, you mustenter the Spouse lastname.
Never
Constituenttype: “Individual”
Spouse selectedor Spouse lastname entered
Suffixes definedin the system
Spouse title
SPOUSE_TITLECODEID
Select a title for the spousesuch as “Mr.,” “Mrs.,” or“Ms.” You can select asecond title if necessary,such as “Reverend Dr.”
To update this field, youmust select a spouse. Toadd the title to a newspouse’s name, you mustenter the Spouse lastname.
Never
Constituenttype: “Individual”
Spouse selectedor Spouse lastname entered
Titles defined inthe system
Suffix
SUFFIXCODEID
Select a suffix for theindividual such as “Sr.” or“M.D.” You can select asecond suffix if necessary,such as “III Esq.”
Never
Constituenttype: “Individual”
Suffixes definedin the system
www.blackbaud.com/howto/researchpoint
chapter 3:
pg. 109

Field Description Required? Allowedvalues
Title
TITLECODEID
Select a title for theindividual such as “Mr.,”“Mrs.,” or “Ms.” You canselect a second title ifnecessary, such as“Reverend Dr.”
Never
Constituenttype: “Individual”
Titles defined inthe system
Website
WEBADDRESS
Enter the constituent’swebsite address.
Never A valid webaddress
Addresses CollectionThe following table describes fields for the Addresses collection.
Field Description Required?Address type This field appears in the connected grid for Addresses.
Select the type of address for the constituent, such as “Business” or“Home.”
Conditionally
As part ofAddresses
Country This field appears in the connected grid for Addresses.
Select the country for the constituent’s address. The country you selectdetermines the fields that appear on the screen. For example, if youselect “United Kingdom” instead of “United States,” the County andPostcode fields appear instead of State and ZIP.
Conditionally
As part ofAddresses
Address This field appears in the connected grid for Addresses.
Enter the street address or post office box for the constituent’s address.
Never
City This field appears in the connected grid for Addresses.
Enter the city or town for the constituent’s address.
Never
State This field appears in the connected grid for Addresses.
Select the state for the constituent’s address.
Never
ZIP This field appears in the connected grid for Addresses.
Enter the Zip code for the constituent’s address.
Never
Address startdate
This field appears in the connected grid for Addresses.
Select the date when the constituent begins use of the address.
Never
www.blackbaud.com/howto/researchpoint
chapter 3:
pg. 110

Field Description Required?Addressprimary
This field appears in the connected grid for Addresses.
To designate the address as the constituent’s main address forcommunications, select this checkbox. If you define other addresses, youmust select one address as the primary address. You can enter only oneprimary address for a constituent. Under Addresses on the Contact tab,the primary address appears first.
Conditionally
As part ofAddresses
You can onlyselect thisfor one oftheaddresses inthecollection.
Do not sendmail to thisaddress
This field appears in the connected grid for Addresses.
If the individual requests that you not send mail to the address, selectthis checkbox.
Never
Do not mailreason
This field appears in the connected grid for Addresses.
If you select Do not send mail to this address, select why the individualrequests to not receive mail at the address.
Never
Updatehouseholdaddress
This field appears in the connected grid for Addresses.
When the constituent is a member of a household with additionalmembers, this checkbox appears. To copy the address to the householdand its members, select this checkbox.
Never
Seasonalinformation
This field appears in the connected grid for Addresses.
For a seasonal address, select the start and end dates for the time periodwhen the constituent uses the address.
Never
Info source This field appears in the connected grid for Addresses.
When you add or make changes to an address, you can select a sourcefor the information. For example, if the spouse of a constituent lets youknow about a change of address, you can make the changes and select“FamilyMember” for the information source.
Never
www.blackbaud.com/howto/researchpoint
chapter 3:
pg. 111

Field Description Required?County This field appears in the connected grid for Addresses.
Select the county for the constituent address. If you validate the addressin the program, the county received from the address validation serviceautomatically appears.
Never
DPC This field appears in the connected grid for Addresses.
Enter the Delivery Point Code (DPC) for the address. DPC is a POSTNETbarcode that contains a ZIP+4 barcode plus two additional digits (or 10additional bars) to designate a specific delivery point. The barcodeconsists of 62 bars total, with beginning and ending frame bars and fivebars each for the nine digits of the ZIP+4, the last two digits of theprimary street address or post office box, and a correction digit.
If you receive a three-digit DPC from your vendor, enter only the first twodigits. The first two digits of the DPC are the last two digits of the streetaddress number.
If you validate the address in the program, the DPC received from theaddress validation service automatically appears.
Never
CART This field appears in the connected grid for Addresses.
Enter the Carrier Route (CART) for the address. CART refers to theaddresses served by the postal carrier and the route used to deliver themail. The CART can include the city, rural, and highway contract routes.To ease the delivery of mail and receive a postal discount, you can addCART information to addresses in your mailings.
If you validate the address in the program, the CART received from theaddress validation service automatically appears.
Never
LOT This field appears in the connected grid for Addresses.
Enter the Line of Travel (LOT) for the address. LOT is the direction themail carrier takes along a CART. LOT information is required for standardmailings to receive the Basic Enhanced Carrier Route rate.
If you validate the address in the program, the LOT received from theaddress validation service automatically appears.
Never
Region This field appears in the connected grid for Addresses.
Select the region for the address, such as “North” or “Southeast.”
Never
Congressionaldistrict
This field appears in the connected grid for Addresses.
Select the congressional district for the address. If you validate theaddress in the program, the district received from the address validationservice automatically appears.
Never
www.blackbaud.com/howto/researchpoint
chapter 3:
pg. 112

Field Description Required?State Housedistrict
This field appears in the connected grid for Addresses.
Select the state House district for the address. If you validate the addressin the program, the district received from the address validation serviceautomatically appears.
Never
State Senatedistrict
This field appears in the connected grid for Addresses.
Select the state Senate district for the address. If you validate theaddress in the program, the district received from the address validationservice automatically appears.
Never
Local precinct This field appears in the connected grid for Addresses.
Select the local precinct for the address. If you validate the address in theprogram, the precinct received from the address validation serviceautomatically appears.
Never
Certificationdata
This field appears in the connected grid for Addresses.
You typically do not update this field through batch.
Never
Lastvalidationattempt date
This field appears in the connected grid for Addresses.
Enter the date of the last validation attempt. You typically do not updatethis field through batch.
Never
Omit fromvalidation
This field appears in the connected grid for Addresses.
With Data Tune-Up, you can run an address validation process to verifyaddresses entered in the database exist. When you run the addressvalidation process, the program automatically updates missing orincomplete address information, standardizes street addresses, andupdates the Coding Accuracy Support System (CASS) certifiedinformation.
To exclude the address entered when your organization runs theaddress validation process, select this checkbox.
Never
Validationmessage
This field appears in the connected grid for Addresses.
Enter the message received from the last validation attempt. You typicallydo not update this field through batch.
Never
Educational History Update BatchThe table below explains the fields in the Educational History Update Batch template. You can use thisbatch template to add or update educational history records. When a field is not required, you canleave it blank as necessary. For more information about the fields in a constituent’s educational history,see the Prospect Wealth & Management Guide.
Fields marked “Never” are never required. Fields marked “Conditionally” are required in somesituations, such as when another field is selected. Some fields are only accessible when another field isselected or when another field has a specific value. Some fields are display-only when other fields areselected. Fields marked “Unavailable” are not accessible under some or all conditions. This informationis given in the “Required” column of the table below.
www.blackbaud.com/howto/researchpoint
chapter 3:
pg. 113
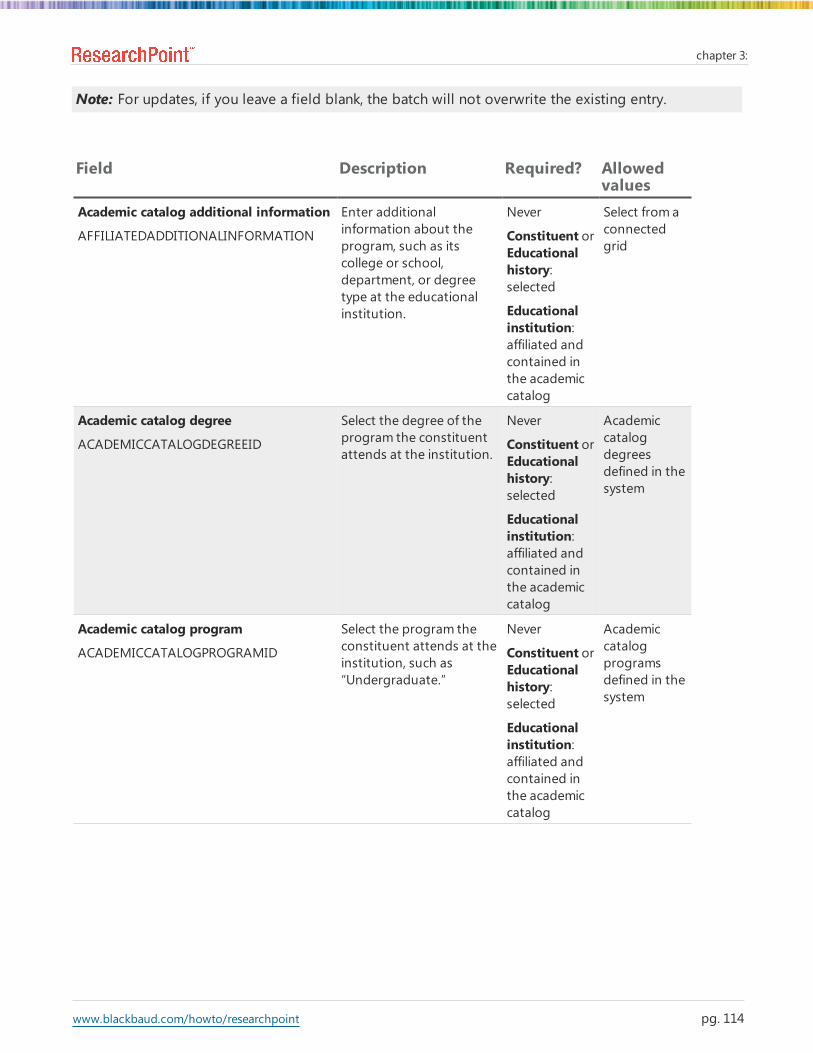
Note: For updates, if you leave a field blank, the batch will not overwrite the existing entry.
Field Description Required? Allowedvalues
Academic catalog additional information
AFFILIATEDADDITIONALINFORMATION
Enter additionalinformation about theprogram, such as itscollege or school,department, or degreetype at the educationalinstitution.
Never
Constituent orEducationalhistory:selected
Educationalinstitution:affiliated andcontained inthe academiccatalog
Select from aconnectedgrid
Academic catalog degree
ACADEMICCATALOGDEGREEID
Select the degree of theprogram the constituentattends at the institution.
Never
Constituent orEducationalhistory:selected
Educationalinstitution:affiliated andcontained inthe academiccatalog
Academiccatalogdegreesdefined in thesystem
Academic catalog program
ACADEMICCATALOGPROGRAMID
Select the program theconstituent attends at theinstitution, such as“Undergraduate.”
Never
Constituent orEducationalhistory:selected
Educationalinstitution:affiliated andcontained inthe academiccatalog
Academiccatalogprogramsdefined in thesystem
www.blackbaud.com/howto/researchpoint
chapter 3:
pg. 114

Field Description Required? Allowedvalues
Class of
CLASSYEAR
Enter the class yearassociated with thiseducational history.
Never
Constituent orEducationalhistory:selected orentered
Educationalinstitutionselected orEducationalinstitutionname (whenincluded)entered
Year
Comments
COMMENT
Enter any additionalinformation about theeducation history with theprogram.
Never
Constituent orEducationalhistory:selected orentered
Educationalinstitutionselected orEducationalinstitutionname (whenincluded)entered
Text (500characters)
www.blackbaud.com/howto/researchpoint
chapter 3:
pg. 115

Field Description Required? Allowedvalues
Constituent
PRIMARYCONTEXTRECORDID
Enter or select the nameof the individualconstituent associatedwith this educationalhistory. This field isrequired when you add aneducational history.
Conditionally
New records:required
Updates:unavailable
Constituentsdefined in thesystem
Date attended from
STARTDATE
Select the date fromwhichthe constituent attended.
Never
Constituent orEducationalhistory:selected orentered
Educationalinstitutionselected orEducationalinstitutionname (whenincluded)entered
A "fuzzy" date
www.blackbaud.com/howto/researchpoint
chapter 3:
pg. 116

Field Description Required? Allowedvalues
Date attended to
DATELEFT
Select the date to whichthe constituent attended.
Never
Constituent orEducationalhistory:selected orentered
Educationalinstitutionselected orEducationalinstitutionname (whenincluded)entered
A "fuzzy" date
Educational additional information
UNAFFILIATEDADDITIONALINFORMATION
Enter any additionalinformation associatedwith this educationalhistory.
Never
Constituent orEducationalhistory:selected orentered
Educationalinstitutionselected orEducationalinstitutionname (whenincluded)entered
Select from aconnectedgrid
www.blackbaud.com/howto/researchpoint
chapter 3:
pg. 117

Field Description Required? Allowedvalues
Educational degree
EDUCATIONALDEGREECODEID
Enter the educationaldegree associated withthis educational history.
Never
Constituent orEducationalhistory:selected orentered
Educationalinstitutionselected orEducationalinstitutionname (whenincluded)entered
Educationaldegreesdefined in thesystem
Educational history
PRIMARYRECORDID
Select from existingeducational histories. Thisfield is required forupdates to records.
Conditionally
Updates:required
New records:leave blank
Educationalhistoriesdefined in thesystem
Educational institution
EDUCATIONALINSTITUTIONID
Select the primary school,university, or othereducational institution theconstituent attends. Thisfield is required when youadd an educationalhistory.
Never Educationalinstitutionsdefined in thesystem
Educational institution city
EDUCATIONALINSTITUTIONCITY
Enter the city or town forthe educationalinstitution’s primaryaddress.
Never
Constituent:selected
Educationalinstitutionname: entered
Educationalinstitution:not selected
Text (150characters)
www.blackbaud.com/howto/researchpoint
chapter 3:
pg. 118
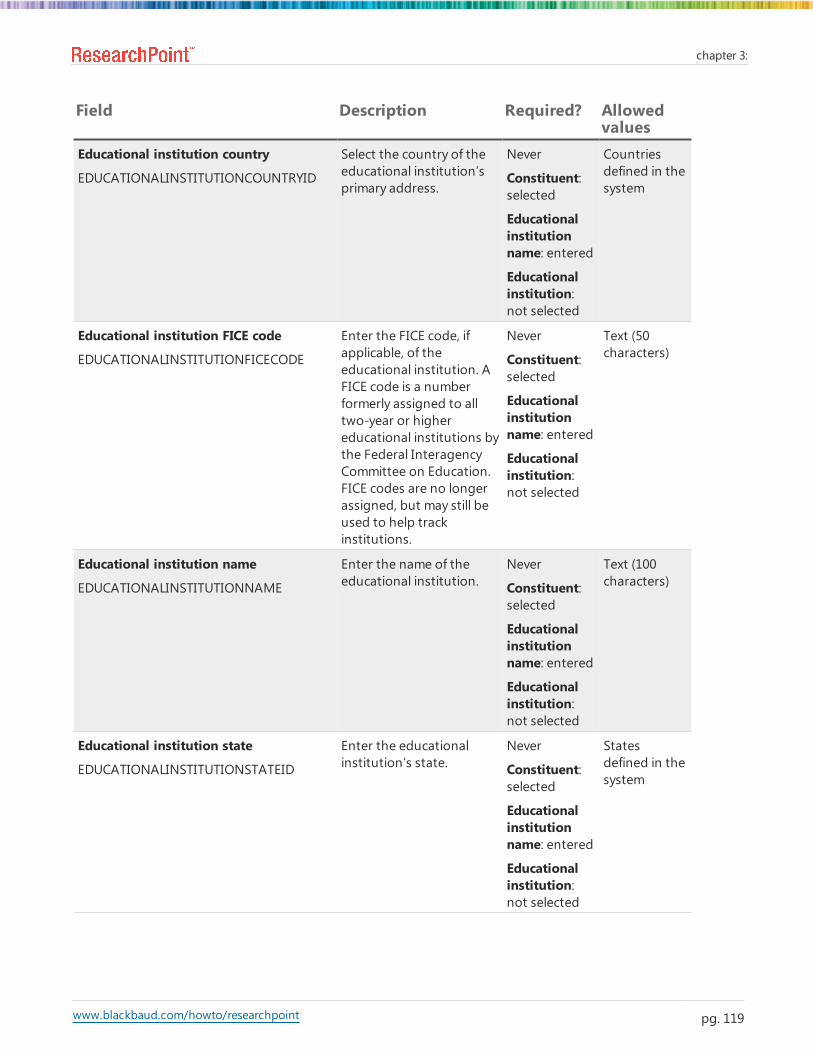
Field Description Required? Allowedvalues
Educational institution country
EDUCATIONALINSTITUTIONCOUNTRYID
Select the country of theeducational institution’sprimary address.
Never
Constituent:selected
Educationalinstitutionname: entered
Educationalinstitution:not selected
Countriesdefined in thesystem
Educational institution FICE code
EDUCATIONALINSTITUTIONFICECODE
Enter the FICE code, ifapplicable, of theeducational institution. AFICE code is a numberformerly assigned to alltwo-year or highereducational institutions bythe Federal InteragencyCommittee on Education.FICE codes are no longerassigned, but may still beused to help trackinstitutions.
Never
Constituent:selected
Educationalinstitutionname: entered
Educationalinstitution:not selected
Text (50characters)
Educational institution name
EDUCATIONALINSTITUTIONNAME
Enter the name of theeducational institution.
Never
Constituent:selected
Educationalinstitutionname: entered
Educationalinstitution:not selected
Text (100characters)
Educational institution state
EDUCATIONALINSTITUTIONSTATEID
Enter the educationalinstitution’s state.
Never
Constituent:selected
Educationalinstitutionname: entered
Educationalinstitution:not selected
Statesdefined in thesystem
www.blackbaud.com/howto/researchpoint
chapter 3:
pg. 119
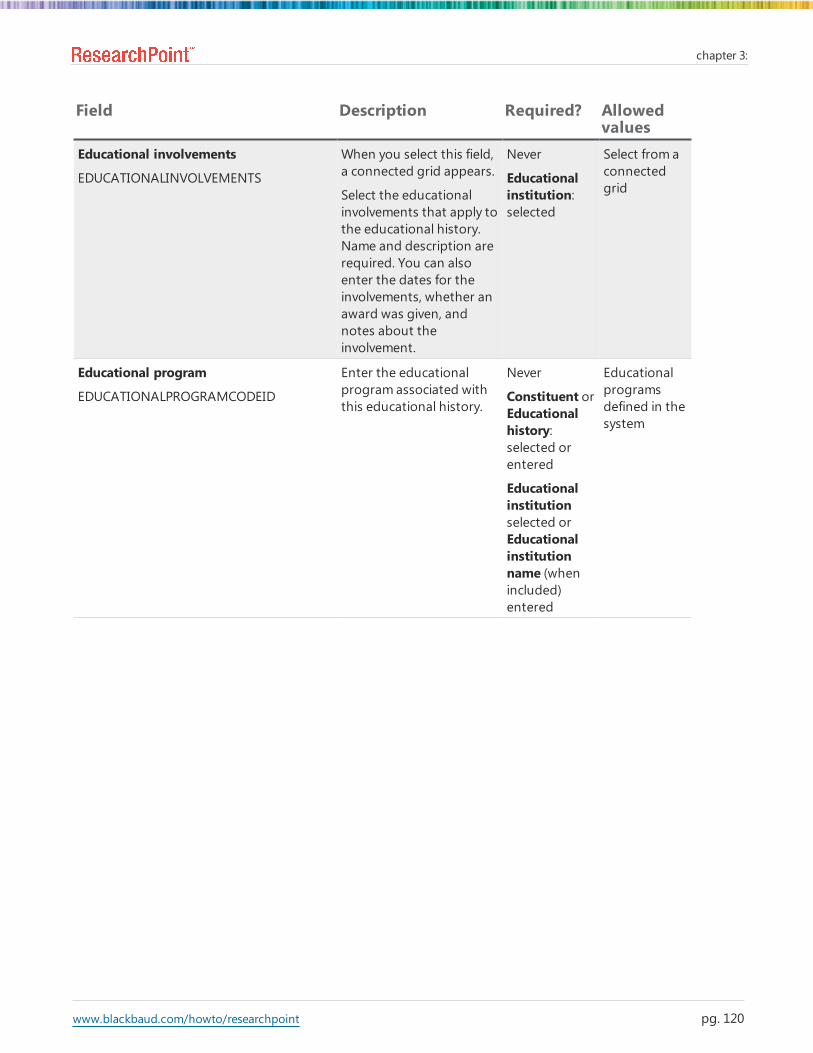
Field Description Required? Allowedvalues
Educational involvements
EDUCATIONALINVOLVEMENTS
When you select this field,a connected grid appears.
Select the educationalinvolvements that apply tothe educational history.Name and description arerequired. You can alsoenter the dates for theinvolvements, whether anaward was given, andnotes about theinvolvement.
Never
Educationalinstitution:selected
Select from aconnectedgrid
Educational program
EDUCATIONALPROGRAMCODEID
Enter the educationalprogram associated withthis educational history.
Never
Constituent orEducationalhistory:selected orentered
Educationalinstitutionselected orEducationalinstitutionname (whenincluded)entered
Educationalprogramsdefined in thesystem
www.blackbaud.com/howto/researchpoint
chapter 3:
pg. 120
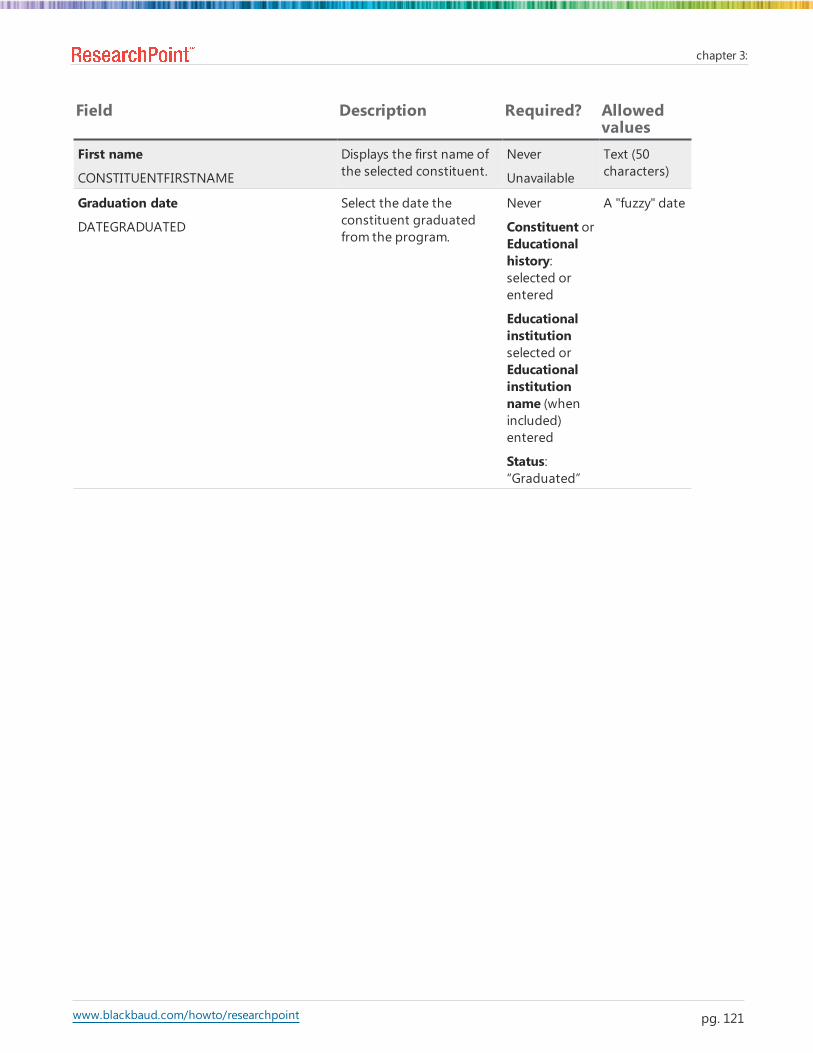
Field Description Required? Allowedvalues
First name
CONSTITUENTFIRSTNAME
Displays the first name ofthe selected constituent.
Never
Unavailable
Text (50characters)
Graduation date
DATEGRADUATED
Select the date theconstituent graduatedfrom the program.
Never
Constituent orEducationalhistory:selected orentered
Educationalinstitutionselected orEducationalinstitutionname (whenincluded)entered
Status:“Graduated”
A "fuzzy" date
www.blackbaud.com/howto/researchpoint
chapter 3:
pg. 121

Field Description Required? Allowedvalues
Honor awarded
EDUCATIONALAWARDCODEID
Select whether theinstitution awarded theconstituent with theselected degree. If you areunsure, leave this fieldblank.
Never
Constituent orEducationalhistory:selected orentered
Educationalinstitutionselected orEducationalinstitutionname (whenincluded)entered
Honorsdefined in thesystem
Information source
EDUCATIONALSOURCECODEID
Select the source for theeducational historyinformation.
Never
Constituent orEducationalhistory:selected orentered
Educationalinstitutionselected orEducationalinstitutionname (whenincluded)entered
Informationsourcesdefined in thesystem
www.blackbaud.com/howto/researchpoint
chapter 3:
pg. 122

Field Description Required? Allowedvalues
Last name
CONSTITUENTKEYNAME
Displays the last name ofthe selected constituent.
Never
Unavailable
Text (100characters)
Level
EDUCATIONALHISTORYLEVELCODEID
If you select a status of“Currently attending” fromStatus, select the level thatthe constituent mostrecently achieved in theprogram.
Never
Constituent orEducationalhistory:selected orentered
Educationalinstitutionselected orEducationalinstitutionname (whenincluded)entered
Status:“Currentlyattending”
Levels definedin the system
Lookup ID
CONSTITUENTLOOKUPID
Displays the Lookup ID forthe selected constituent.
Never
Unavailable
Text (100characters)
Preferred class of
PREFERREDCLASSYEAR
If the constituentidentifies with a class yearother than the actual classyear, enter the preferredclass year of theconstituent.
Never
Constituent orEducationalhistory:selected orentered
Educationalinstitutionselected orEducationalinstitutionname (whenincluded)entered
Year
www.blackbaud.com/howto/researchpoint
chapter 3:
pg. 123

Field Description Required? Allowedvalues
Primary education information
ISPRIMARYRECORD
If this educational historyis the constituent’sprimary education, selectthis field.
Never
Constituent orEducationalhistory:selected orentered
Educationalinstitutionselected orEducationalinstitutionname (whenincluded)entered
Selected ornot selected
Reason
EDUCATIONALHISTORYREASONCODEID
Select the reason for theunknown status.
Never
Constituent orEducationalhistory:selected orentered
Educationalinstitutionselected orEducationalinstitutionname (whenincluded)entered
Status:“Unknown”
Reasonsdefined in thesystem
www.blackbaud.com/howto/researchpoint
chapter 3:
pg. 124

Field Description Required? Allowedvalues
Source date
EDUCATIONALSOURCEDATE
Select the date that youreceived the educationalhistory information.
Never
Constituent orEducationalhistory:selected orentered
Educationalinstitutionselected orEducationalinstitutionname (whenincluded)entered
Source:selected
A "fuzzy" date
Status
EDUCATIONALHISTORYSTATUSID
Select the educationalstatus of the constituentwith the institution, suchas “Currently attending”or “Graduated.”
If you are an educationalinstitution with anaffiliation with theselected institution, theselected statusdetermines theeducational constituencyof the constituent. If youselect “Currentlyattending,” the programassigns a constituency of“Student.” If you select“Graduated,” the programassigns a constituency of“Alumnus.” If you select“Unknown” or“Incomplete,” the programdoes not assign aneducational constituency.
Never
Constituent orEducationalhistory:selected orentered
Educationalinstitutionselected orEducationalinstitutionname (whenincluded)entered
Educationalstatusesdefined in thesystem
Giving Summary Update BatchThe table below explains the fields in the Giving Summary Update Batch template. You can use thisbatch template to add or update giving summary records. When a field is not required, you can leave
www.blackbaud.com/howto/researchpoint
chapter 3:
pg. 125

it blank as necessary. For more information about the fields in a constituent’s giving summary, see theProspect Wealth & Management Guide.
Fields marked “Always” are always required. Fields marked “Never” are never required. Fields marked“Unavailable” are display-only. This information is given in the “Required” column of the table below.
Note: For updates, if you leave a field blank, the batch will not overwrite the existing entry.
Field Description Required? Allowedvalues
Constituent
PRIMARYRECORDID
Select the individual constituentassociated with this giving summary.This field is required.
Always Constituentsdefined in thesystem
First gift amount
FIRSTGIFTAMOUNT
Enter the amount of the first gift fromthis constituent.
Never Money
First gift date
FIRSTGIFTDATE
Enter the date of the first gift from thisconstituent.
Never Date
First gift designation
FIRSTGIFTDESIGNATION
Enter the designation for the first giftfrom this constituent.
Never Text (100characters)
First gift type
FIRSTGIFTTYPE
Enter the type of gift for the first giftfrom this constituent, such as, “capital.”
Never Text (100characters)
First name
FIRSTNAME
Displays the first name of the selectedconstituent.
Never
Unavailable
Text (50characters)
Largest gift amount
LARGESTGIFTAMOUNT
Enter the largest gift amount from thisconstituent.
Never Money
Largest gift date
LARGESTGIFTDATE
Enter the date of the largest gift fromthis constituent.
Never Date
Largest gift designation
LARGESTGIFTDESIGNATION
Enter the designation for the largest giftfrom this constituent.
Never Text (100characters)
Largest gift type
LARGESTGIFTTYPE
Enter the type of gift for the largest giftfrom this constituent, such as, “capital.”
Never Text (100characters)
Last name
KEYNAME
Displays the last name of the selectedconstituent.
Never
Unavailable
Text (100characters)
Latest gift amount
LATESTGIFTAMOUNT
Enter the most recent gift amount fromthis constituent.
Never Money
Latest gift date
LATESTGIFTDATE
Enter the date of the most recent giftfrom this constituent.
Never Date
www.blackbaud.com/howto/researchpoint
chapter 3:
pg. 126

Field Description Required? Allowedvalues
Latest gift designation
LATESTGIFTDESIGNATION
Enter the designation for the first giftfrom this constituent.
Never Text (100characters)
Latest gift type
LATESTGIFTTYPE
Enter the type of gift for the most recentgift from this constituent, such as,“capital.”
Never Text (100characters)
Lookup ID
LOOKUP_ID
Displays the Lookup ID for the selectedconstituent.
Never
Unavailable
Text (100characters)
Total giving
TOTALGIFTAMOUNT
Enter the total from this constituentdue to giving.
Never Money
Total number of gifts
TOTALGIFTSGIVEN
Enter the total number of gifts from thisconstituent.
Never Integer
Modeling and Propensity BatchThe table below explains the fields included in the Modeling and Propensity Batch template. You canuse this batch template to add or import modeling and propensity records. When a field is notrequired, you can leave it blank as necessary. For more information about likelihood ratings, see theProspect Wealth & Management Guide.
Fields marked “Always” are always required. Fields marked “Never” are never required. Fields marked“Conditionally” are required in some situations, such as when another field is selected. Some fields areonly accessible when another field is selected or when another field has a specific value. Some fieldare display-only when other fields are selected. This information is given in the “Required” column ofthe table below.
These fields are never required.
Field Description Required? Allowedvalues
Annual giving likelihood
ANNUALGIFTLIKELIHOOD
Enter the constituent’s rating forannual giving likelihood.
Always Integer
Annuity likelihood
ANNUITYLIKELIHOOD
Enter the constituent’s rating forannuity likelihood.
Never Integer
Bequest likelihood
BEQUESTLIKELIHOOD
Enter the constituent’s rating forbequest likelihood.
Never Integer
www.blackbaud.com/howto/researchpoint
chapter 3:
pg. 127

Field Description Required? Allowedvalues
Constituent
IMPORTID
Select the name of the individualconstituent associated with thismodeling and propensity entry.
Always Constituentsdefined in thesystem
CRT likelihood
CRTLIKELIHOOD
Enter the constituent’s rating forCRT likelihood.
Never Integer
Major giving likelihood
MAJORGIVINGLIKELIHOOD
Enter the constituent’s rating formajor giving likelihood.
Never Integer
Patient response likelihood
PATIENTRESPONSELIKELIHOOD
Enter the constituent’s rating forpatient response likelihood.
Never Integer
Planned giving likelihood
PLANNEDGIFTLIKELIHOOD
Enter the constituent’s rating forplanned giving likelihood.
Never Integer
WealthPoint screeningindicator
WPSCREENINGINDICATOR
Enter the constituent’s WealthPointscreening indicator.
Always Text (1character)
Modeling and Propensity Update BatchThe table below explains the fields included in the Modeling and Propensity Update Batch template.To use this batch template to update records, you must customize the template. For information abouthow to edit batch templates, see the Data Management Guide
Fields marked “Always” are always required. Fields marked “Never” are never required. This informationis given in the “Required” column of the table below.
Note: For updates, if you leave a field blank, the batch will not overwrite the existing entry.
Field Description Required? Allowedvalues
Annual giving likelihood
ANNUALGIFTLIKELIHOOD
Enter the constituent’srating for annual givinglikelihood.
Never SmallInt
Annuity likelihood
ANNUITYLIKELIHOOD
Enter the constituent’srating for annuitylikelihood.
Never SmallInt
Bequest likelihood
BEQUESTLIKELIHOOD
Enter the constituent’srating for bequestlikelihood.
Never SmallInt
www.blackbaud.com/howto/researchpoint
chapter 3:
pg. 128
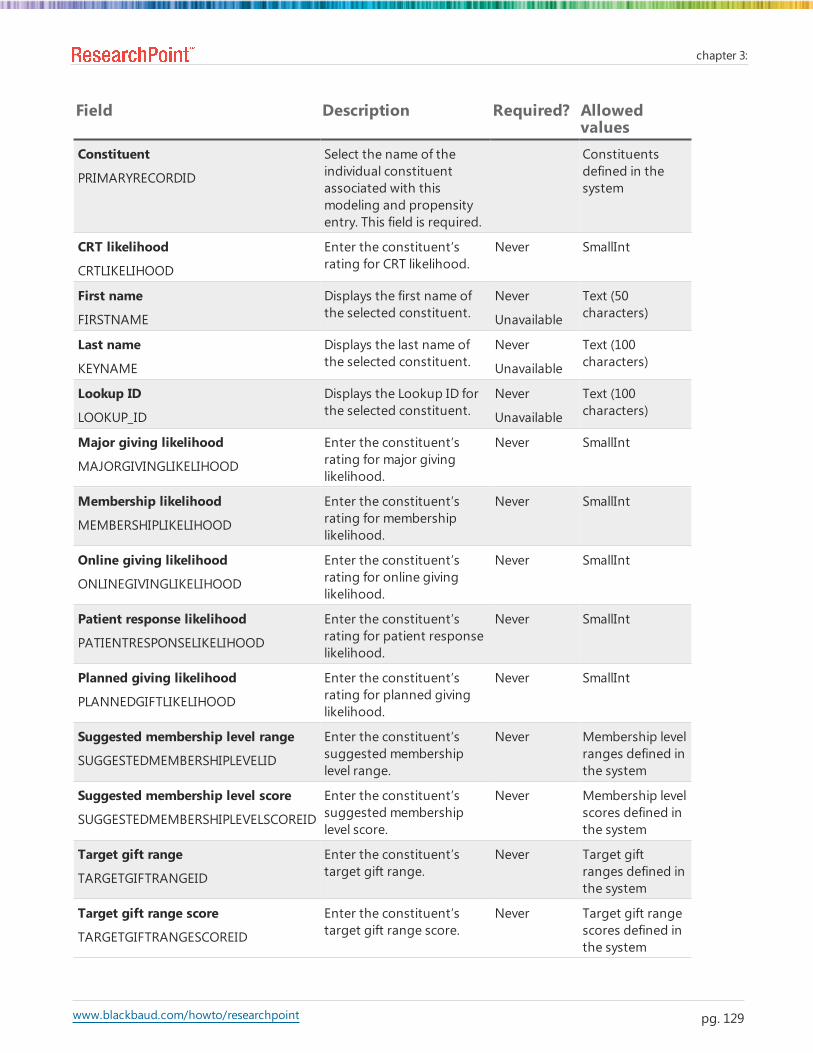
Field Description Required? Allowedvalues
Constituent
PRIMARYRECORDID
Select the name of theindividual constituentassociated with thismodeling and propensityentry. This field is required.
Constituentsdefined in thesystem
CRT likelihood
CRTLIKELIHOOD
Enter the constituent’srating for CRT likelihood.
Never SmallInt
First name
FIRSTNAME
Displays the first name ofthe selected constituent.
Never
Unavailable
Text (50characters)
Last name
KEYNAME
Displays the last name ofthe selected constituent.
Never
Unavailable
Text (100characters)
Lookup ID
LOOKUP_ID
Displays the Lookup ID forthe selected constituent.
Never
Unavailable
Text (100characters)
Major giving likelihood
MAJORGIVINGLIKELIHOOD
Enter the constituent’srating for major givinglikelihood.
Never SmallInt
Membership likelihood
MEMBERSHIPLIKELIHOOD
Enter the constituent’srating for membershiplikelihood.
Never SmallInt
Online giving likelihood
ONLINEGIVINGLIKELIHOOD
Enter the constituent’srating for online givinglikelihood.
Never SmallInt
Patient response likelihood
PATIENTRESPONSELIKELIHOOD
Enter the constituent’srating for patient responselikelihood.
Never SmallInt
Planned giving likelihood
PLANNEDGIFTLIKELIHOOD
Enter the constituent’srating for planned givinglikelihood.
Never SmallInt
Suggested membership level range
SUGGESTEDMEMBERSHIPLEVELID
Enter the constituent’ssuggested membershiplevel range.
Never Membership levelranges defined inthe system
Suggested membership level score
SUGGESTEDMEMBERSHIPLEVELSCOREID
Enter the constituent’ssuggested membershiplevel score.
Never Membership levelscores defined inthe system
Target gift range
TARGETGIFTRANGEID
Enter the constituent’starget gift range.
Never Target giftranges defined inthe system
Target gift range score
TARGETGIFTRANGESCOREID
Enter the constituent’starget gift range score.
Never Target gift rangescores defined inthe system
www.blackbaud.com/howto/researchpoint
chapter 3:
pg. 129

Prospect Research Giving Summary BatchThe table below explains the fields included in the Prospect Research Giving Batch template. You canuse this batch template to add prospect research giving records. If a field is not required, you canleave it blank as necessary. For more information about prospect research giving, see the ProspectWealth & Management Guide.
Fields marked “Always” are always required. Fields marked “Never” are never required. This informationis given in the “Required” column of the table below.
Note: For updates, if you leave a field blank, the batch will not overwrite the existing entry.
Field Description Required? Allowedvalues
Constituent
CONSTITUENTID
Select the name of the individualconstituent associated with informationfor this prospect research giving. This fieldis required.
Always Constituentsdefined in thesystem
First gift amount
FIRSTGIFTAMOUNT
Enter the amount of the first gift from thisconstituent.
Never Money
First gift date
FIRSTGIFTDATE
Enter the date of the first gift from thisconstituent.
Never Date
First gift designation
FIRSTGIFTDESIGNATION
Enter the designation for the first gift fromthis constituent.
Never Text (100characters)
First gift type
FIRSTGIFTTYPE
Enter the type of gift for the most recentgift from this constituent, such as,“capital.”
Never Text (100characters)
Largest gift amount
LARGESTGIFTAMOUNT
Enter the largest gift amount from thisconstituent.
Never Money
Largest gift date
LARGESTGIFTDATE
Enter the date of the largest gift from thisconstituent.
Never Date
Largest gift designation
LARGESTGIFTDESIGNATION
Enter the designation for the largest giftfrom this constituent.
Never Text (100characters)
Largest gift type
LARGESTGIFTTYPE
Enter the type of gift for the largest giftfrom this constituent, such as, “capital.”
Never Text (100characters)
Latest gift amount
LATESTGIFTAMOUNT
Enter the most recent gift amount fromthis constituent.
Never Money
Latest gift date
LATESTGIFTDATE
Enter the date of the most recent gift fromthis constituent.
Never Date
www.blackbaud.com/howto/researchpoint
chapter 3:
pg. 130

Field Description Required? Allowedvalues
Latest gift designation
LATESTGIFTDESIGNATION
Enter the designation for the most recentgift from this constituent.
Never Text (100characters)
Latest gift type
LATESTGIFTTYPE
Enter the type of gift for the most recentgift from this constituent, such as,“capital.”
Never Text (100characters)
Total giving
TOTALGIFTAMOUNT
Enter the total from this constituent dueto giving.
Never Money
Total number of gifts
TOTALGIFTSGIVEN
Enter the total number of gifts from thisconstituent.
Never Integer
Batch EntryWith Batch, you can add or update multiple records in your database at once. This is an efficientalternative to working with records individually and saves time. When you work with records in bulk,you eliminate the need to open and work with each individual record. For example, when you havesimilar information such as a group of volunteer timesheets from Saturday's Walk-A-Thon, it is mucheasier to add that information to your database in a group format using a timesheet batch.
In Batch entry, you can access several configuration tasks to ensure a consistent environment for yourbatch processes. Before you create and manage batches, you must first specify batch numberingschemes, workflows, and templates. For more information about these configuration tasks, see BatchConfiguration on page 11. Once you complete the necessary configuration options, you can begin tocreate and manage batches using the Uncommitted Batches and Committed Batches tabs on the BatchEntry page.
Tip: Several reports are available to help you track the records entered in a batch and correct theexceptions generated when you commit a batch. For more information, see Batch Entry Reports.
On the Batch Entry page, you can enter data into batches and process batches through their workflows.Both uncommitted and committed batches are available on this page. To access the page, fromAdministration, click Batch entry.Before you create and manage batches, you must first specify batch numbering schemes, workflows,and templates. You can access these configuration tasks from the Batch Entry page underConfiguration. For more information about these tasks, see Batch Configuration on page 11.
Uncommitted BatchesOn the Uncommitted Batches tab, you can view and manage your batches that are available for dataentry. In the Uncommitted batches grid, information about your uncommitted batches appears. Thisinformation includes the batch number, template, description, owner, status, date added, and category.
To limit the batches that appear in the grid to those of a specific type of data, use the filters thatappear above the grid. In the Date range field, select the date range by which to filter the batches.
www.blackbaud.com/howto/researchpoint
chapter 3:
pg. 131
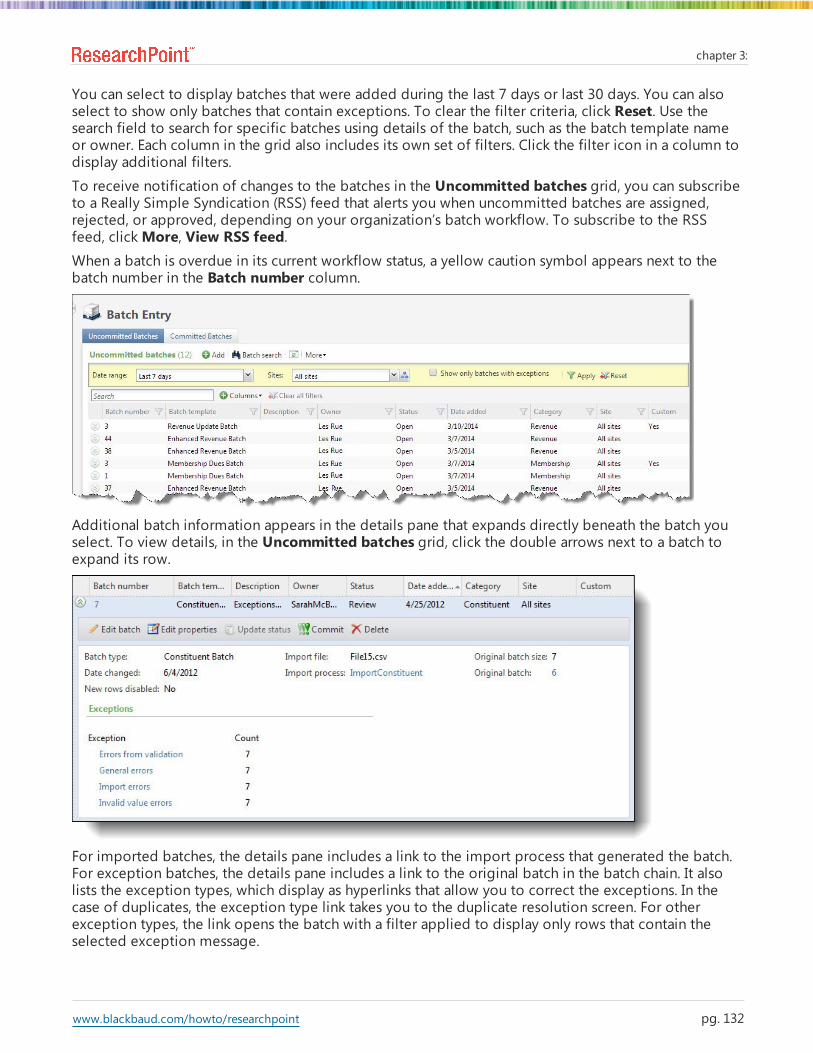
You can select to display batches that were added during the last 7 days or last 30 days. You can alsoselect to show only batches that contain exceptions. To clear the filter criteria, click Reset. Use thesearch field to search for specific batches using details of the batch, such as the batch template nameor owner. Each column in the grid also includes its own set of filters. Click the filter icon in a column todisplay additional filters.
To receive notification of changes to the batches in the Uncommitted batches grid, you can subscribeto a Really Simple Syndication (RSS) feed that alerts you when uncommitted batches are assigned,rejected, or approved, depending on your organization’s batch workflow. To subscribe to the RSSfeed, clickMore, View RSS feed.When a batch is overdue in its current workflow status, a yellow caution symbol appears next to thebatch number in the Batch number column.
Additional batch information appears in the details pane that expands directly beneath the batch youselect. To view details, in the Uncommitted batches grid, click the double arrows next to a batch toexpand its row.
For imported batches, the details pane includes a link to the import process that generated the batch.For exception batches, the details pane includes a link to the original batch in the batch chain. It alsolists the exception types, which display as hyperlinks that allow you to correct the exceptions. In thecase of duplicates, the exception type link takes you to the duplicate resolution screen. For otherexception types, the link opens the batch with a filter applied to display only rows that contain theselected exception message.
www.blackbaud.com/howto/researchpoint
chapter 3:
pg. 132

Depending on the workflow status of the batch and your security rights and system role, you canperform many tasks to manage your uncommitted batches. When the batch completes its step in theworkflow, you can update its status to the next status in the workflow or commit its records,depending on its current status.
When you commit a batch, you can create an exception batch, which contains all records that do notcommit to the database. When you commit the exception batch, you can select to create anotherexception batch of any records that still do not commit to the database. Depending on the size of theoriginal batch and the number of exceptions, you may generate several exception batches before yousuccessfully commit all records from the original batch to the database. To view all batches related toan uncommitted batch, select the batch in the grid and click the batch number. The Batch ExceptionChain page for the batch appears. For information about the items on this page, see Batch ExceptionChain on page 156.
Add a BatchTo use Batch entry to add records, you must define the basic properties of the batch. Theseproperties include the batch number and description, the template used to create the batch, and thebatch’s owner. To add a batch to the database, click Add on the Uncommitted Batches tab.
How to Add a Batch1. From the Batch page in Administration, click Batch entry. The Batch Entry page appears.2. Select the Uncommitted Batches tab.
3. On the action bar of the Uncommitted batches grid, click Add. The Add a batch screen appears.
4. In the Batch template field, select the batch template to use. The batch template defines thefields and any default values that appear in the batch. The Batch template field displays thebatch templates in the database applicable to your system role. Typically, a batch processingmanager creates the batch template. When the required batch template does not appear, yourorganization must add it to the database.
For information about how to add a batch template, see Batch Configuration on page 11.
www.blackbaud.com/howto/researchpoint
chapter 3:
pg. 133

5. To adjust the fields in the batch template, click Field options. The Batch field options screenappears. For information about how to customize the fields of the selected batch templates, seeCustomize the Fields in a Batch on page 147.
6. In the Batch number field, enter a unique number to identify the batch. Once you save a batch,you can no longer use its number for batches using the template. When you enter a number thatanother batch uses, and click Save, a message appears to remind you that the batch numbermust be unique.
Tip: When you open a batch, the batch number appears in the top corner of the screen. On theBatch Entry page, the batch number appears next to each corresponding batch in the grids.
When you select "Auto-generated" during the creation of the numbering scheme, the programuses the numbering scheme assigned to the workflow of the selected batch template toautomatically generate and assign a batch number. When you use a global numbering scheme,the batch uses the next number available in the global scheme. To manually enter a new number,select Override.
7. In the Description field, enter a unique description to identify the batch. The descriptionappears in the Uncommitted batches grid so you can determine the purpose of the batchbefore you open it.
8. In the Owner field, select the user who owns the batch in its initial status.
Note: The program automatically assigns the person creating the batch as the batch owner. Theselected owner owns the batch in its initial status. When you update the status of a batch, youcan assign the batch to a new owner. For information about how to update a batch status, seeUpdate a Batch to the Next Workflow Status on page 137.
9. Select Enable auto-save to automatically save each row in the batch as you work.10. Although this field is not required, we recommend you enter a projected value. When you
validate the batch, you can use your projections to determine the accuracy of the data entry.
11. Click Save. When you leave the Owner field blank or assign ownership of the batch to yourself,the batch data entry screen appears.
l For information about how to enter data into the batch, see Batch Data Entry on page 143.
l When you assign batch ownership to another user, you return to the Uncommitted Batchestab.
Edit a BatchYou can edit both the properties of a batch as well as the data in a batch.
You can change the properties of the batch from the Batch Entry page or batch data entry screen. Youcannot, however, change the batch template selected to create the batch.
When the workflow status of the batch allows you to edit the records included in the batch, you canenter or update the data entry of the batch. In Batch entry, you enter the information for each recordon a separate row of the spreadsheet, or batch, on the data entry screen. The batch template used tocreate the batch defines the fields that appear on the data entry screen. There is no limit to the numberof records you can enter in a batch.
Warning: You can only edit a batch when its workflow status allows it.
www.blackbaud.com/howto/researchpoint
chapter 3:
pg. 134

Edit batch propertiesEditing properties allows you to make changes to the batch configuration, such as batch numberand description, once you save it. To ensure that a batch owner has access to the batch once it iscommitted, click Update status to change owners instead of Edit properties on the action bar. Formore information, see Update a Batch to the Next Workflow Status on page 137.
1. From the Batch page in Administration, click Batch entry. The Batch Entry page appears.2. Select the Uncommitted Batches tab.
3. Under Uncommitted batches, click the double arrows next to a batch to expand its row. Onthe action bar, click Edit properties. The Edit batch properties screen appears.
Tip: You can also access the Edit batch properties screen from the toolbar of the batch data entrygrid. From the toolbar, click Properties.
4. Edit the information as necessary. You can Select Enable auto-save to automatically save eachrow in the batch as you work.
5. Click Save. You return to the Batch Entry page.
Warning: The batch number must be unique per template. When you change the batch numberto one that is used by another batch, a message appears to remind you that the batch numbermust be unique. Click OK and enter a new number to identify the batch.
Enter records in a batch1. From the Batch page in Administration, click Batch entry. The Batch Entry page appears.2. Select the Uncommitted Batches tab.
3. Under Uncommitted batches, click the double arrows next to a batch to expand its row. Onthe action bar, click Edit batch. The batch data entry screen appears. The items that appear onthis screen depend on the selected batch template.
You can limit the batches that appear in the Uncommitted batches grid to those of a specifictype of data. To filter the grid, select a date in the Date range field or select Show onlybatches with exceptions and click Apply. Use a search field to search for specific detailsassociated with a batch, such as a batch template or owner. You can also filter each column inthe grid.
www.blackbaud.com/howto/researchpoint
chapter 3:
pg. 135

The grid has the look and feel of a spreadsheet and displays the fields and default values ofthe batch template selected to create the batch. When the batch is committed, each row ofthe spreadsheet that contains information becomes a new record or updates a record.
4. In the grid, enter or update data for the records. To move from column to column, press TABon the keyboard. For more information about data entry in a batch, see Batch Data Entry onpage 143.• For columns with a down arrow, select the entry. For example, in the Constituent Typecolumn of a constituent batch, select Individual or Organization.
• For columns with a search button, use a Search screen to find the entry in the database.• For columns with date information, select the date from a calendar. To automatically enter thecurrent date in a date field, press F3 on your keyboard.The grid can contain up to 50 records. If you add more than 50 records into a grid, the batchadds a new page for the additional records. To navigate through the pages of the batch, clickthe right or left arrows next to the Displaying page field, or press PAGE UP or PAGE DOWN onyour keyboard.
To quickly perform tasks on the toolbar ribbon using your keyboard, click Ctrl + M. Shortcutkeys are then displayed over each feature that is available in the current view. To access a task,click the corresponding letter. To exit the shortcut key display mode, select Esc, or simply clickyour mouse.
Tip: When the item you want to enter in the batch is not currently in the database, you cantypically add it from the search screen. To add an item to the database from the search screen,click Add on the action bar of the Results grid.
Warning: To prevent the creation of blank address records, we recommend you delete defaultaddress information from the batch row when you add a record with no address data.
5. To save the batch data entry at any time, click Save on the action bar or press CTRL+ S on thekeyboard. To save the information and close the batch, click Save and Close on the toolbar.
www.blackbaud.com/howto/researchpoint
chapter 3:
pg. 136

• When the program detects an error in the batch data entry, such as a required field is leftblank, a message appears to inform you of the error. Click OK and correct any errors.
• When the program detects no errors in the batch data entry, a message appears to inform youthat the batch saved successfully. To return to the Batch Entry page, click OK.
Update a Batch to the Next Workflow StatusWhen a batch is ready to move to the next step in the workflow, you can update its status. Forexample, your organization’s workflow for a constituent batch specifies that after you enter data into abatch, an approver must validate the data entry before the program commits the batch to thedatabase. To submit the batch for approval, you must update its status to the next status of theworkflow. You can update a batch to the next workflow status from the Batch Entry page or the batchdata entry screen.
Note: To ensure that a batch owner has access to the batch after it is committed, always use Updatestatus to assign new owners instead of Edit properties. For more information about when to use Editproperties, see Edit batch properties on page 135.
Before you update the status of a batch, we recommend you validate the batch to verify the data entryis free from exceptions. For information about how to validate a batch, see Validate a Batch on page149.
Note: When the batch is in the final status of its workflow before committal, the Update statusoption is disabled. To move the batch to its next status, you must commit the batch. For informationabout how to commit a batch, see Commit a Batch on page 138.
Update a batch to the next workflow status1. On the Batch Entry page, under the Uncommitted batches grid, click the double arrows next
to a batch to expand its row. On the action bar, click Update status. The Update status screenappears.
2. In the Next step field, select the step to perform with the batch to move it to the next status.The selected batch workflow determines the options that appear in the list.
3. In the Assign to field, select the user to process the batch in the new status. The selections inthis field are users with system roles that allow administrator rights to batches in the newstatus.
www.blackbaud.com/howto/researchpoint
chapter 3:
pg. 137
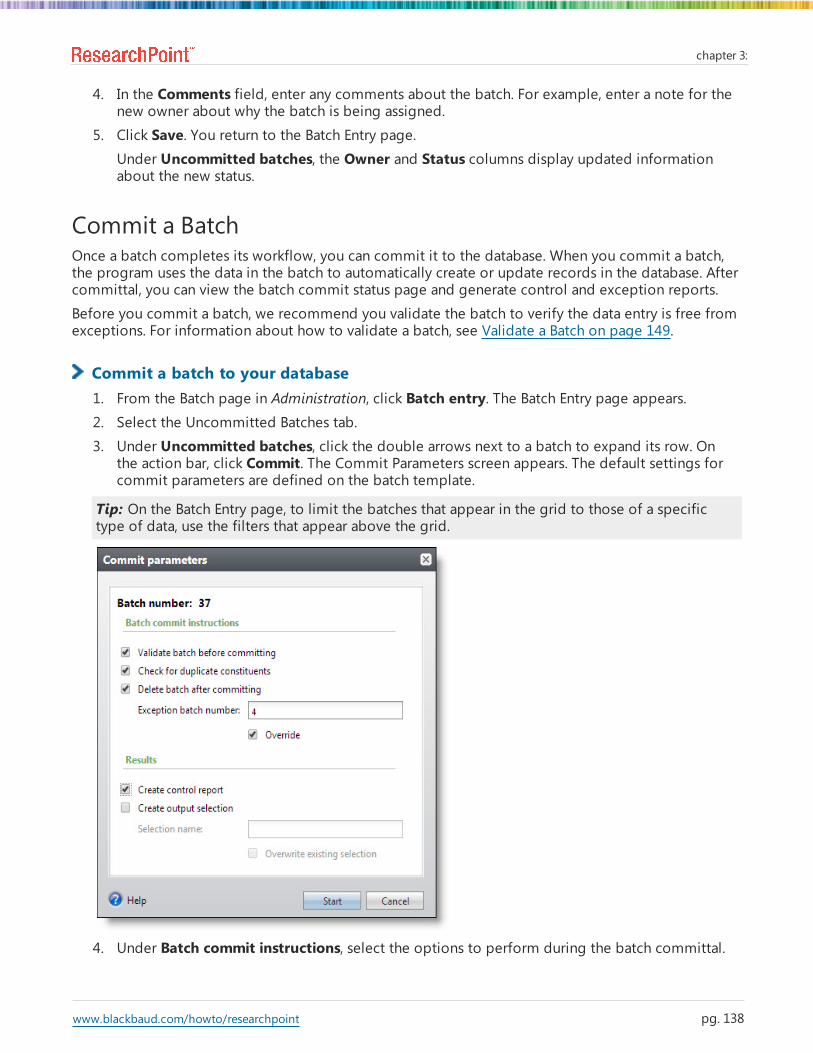
4. In the Comments field, enter any comments about the batch. For example, enter a note for thenew owner about why the batch is being assigned.
5. Click Save. You return to the Batch Entry page.Under Uncommitted batches, the Owner and Status columns display updated informationabout the new status.
Commit a BatchOnce a batch completes its workflow, you can commit it to the database. When you commit a batch,the program uses the data in the batch to automatically create or update records in the database. Aftercommittal, you can view the batch commit status page and generate control and exception reports.
Before you commit a batch, we recommend you validate the batch to verify the data entry is free fromexceptions. For information about how to validate a batch, see Validate a Batch on page 149.
Commit a batch to your database1. From the Batch page in Administration, click Batch entry. The Batch Entry page appears.2. Select the Uncommitted Batches tab.
3. Under Uncommitted batches, click the double arrows next to a batch to expand its row. Onthe action bar, click Commit. The Commit Parameters screen appears. The default settings forcommit parameters are defined on the batch template.
Tip: On the Batch Entry page, to limit the batches that appear in the grid to those of a specifictype of data, use the filters that appear above the grid.
4. Under Batch commit instructions, select the options to perform during the batch committal.
www.blackbaud.com/howto/researchpoint
chapter 3:
pg. 138

• To validate the batch before you commit it to the database, select Validate batch beforecommitting.
Note: When you validate a batch, the program examines all the information entered in the batchto determine whether data entry errors exist. Before you commit a batch, we recommend youvalidate the batch to locate any data entry errors. For information about batch validation, seeValidate a Batch on page 149.
• To check for duplicate constituents, select Check for duplicate constituents.• To delete the batch after you commit it to the database, select Delete batch aftercommitting.
Note: When you select to delete a batch after you commit it to your database, you cannot reuseits batch number. Each batch number must be unique.
• To manually add an exception batch number, select Override and enter a number. Anexception batch is created for all records that do not commit to the database.
5. Under Results, select how to handle the records the program commits to your database.• To generate a control report after you commit the batch to the database, select Createcontrol report. The control report describes the committed batch and provides informationabout the records included in the batch.
• To create a selection of all the records created in the database when you commit the batch,select Create output selection and enter a name to help identify the selection. To overwriteany existing selection of the same name, select Overwrite existing selection.
Note: The output selection query includes only records that commit to the database. The querydoes not include exceptions, or records that do not commit to the database. We stronglyrecommend you select Create output selection. You can use this query when you createacknowledgement letters or other mailings for the constituents for whom you added payments inthe batch.
6. Click Start. The commit process begins.• When you select Validate batch before committing, the program validates the batch. Whenthe batch validates, the program commits its records to the database. When the validationfails, a validation report appears so you can view the exceptions.When the process completes, the batch commit status page appears. For information aboutthe batch commit status page, see Batch Commit Status Page on page 141.
Tip: If the batch commit process seems to stop mid-process, highlight the batch and select toresume the process. This allows the batch to continue processing.
Committed BatchesOn the Committed Batches tab, the Committed batches grid displays information about your batchesthat are committed to the database. When you commit a batch to the database, the program uses itsdata to create or update records in the database. For information about how to commit a batch, seeCommit a Batch on page 138.
To limit the batches that appear in the grid to those of a specific type of data, use the filters thatappear above the grid. In the Date range field, select the date range by which to filter the batches.You can select to display batches that were added during the last 7 days or last 30 days. You can also
www.blackbaud.com/howto/researchpoint
chapter 3:
pg. 139

select to include deleted batches. To clear the filter criteria, click Reset. Use the search field to searchfor specific batches using details of the batch, such as the batch template name or owner. Each columnin the grid also includes its own set of filters. Click the filter icon in a column to display additionalfilters.
Additional batch information appears in the details pane that expands directly beneath the batch youselect. To view details, in the Committed batches grid, click the double arrows next to a batch toexpand its row.
To receive notification of changes to the batches in the Committed batches grid, you can subscribe toa Really Simple Syndication (RSS) feed that alerts you when uncommitted batches are assigned,rejected, or approved, depending on your organization’s batch workflow. To subscribe to the RSSfeed, clickMore, View RSS feed.When you commit a batch, you can create an exception batch, which contains all records that do notcommit to the database. When you commit the exception batch, you can select to create anotherexception batch of any records that still do not commit to the database. Depending on the size of theoriginal batch and the number of exceptions, you may generate several exception batches before yousuccessfully commit all records from the original batch to the database.
To view all batches related to an uncommitted batch, click the batch number in the Batch numbercolumn of the grid. The Batch Exception Chain page for the batch appears. For information about theitems on this page, see Batch Exception Chain on page 156.
Tip: It is important to note that you cannot edit or recommit a successfully committed batch. Toupdate previously committed data, you can manually update that data or create an update batch.
View the Batch Commit Status PageWhen you commit a batch, the program generates the batch commit status page to track thecommittal of the batch. This page displays information about the batch and its commit process. Fromthe batch commit status page, you can also view the control report and exception report of the batch.To view the commit status of a batch on the Committed Batches tab, select the batch in theCommitted batches grid and click Committed in the Status column. The Batch Commit status pageappears. For information about the items on this page, see Batch Commit Status Page on page 141.
www.blackbaud.com/howto/researchpoint
chapter 3:
pg. 140

Open a Committed BatchOnce you commit a batch, you can still open it to view its data. To open a batch on the CommittedBatches tab, under Committed batches, click the double arrows next to a batch to expand its row. Onthe action bar, click Open batch. The batch data entry screen appears.
View a Batch Control ReportThe batch control report lists the records in the batch that were committed to the database andprovides information about each record. The information that appears depends on the type of batchselected.
To view the batch control report for a batch on the Committed Batches tab, under Committedbatches, click the double arrows next to a batch to expand its row. On the action bar, click Viewcontrol report. To view the batch control report from the batch commit status page, click Viewcontrol report under Reports. For information about this report, see Batch Control Report.
View a Batch Exception ReportThe batch exception report contains information about the records that did not commit to thedatabase and explains why each record did not commit. The information that appears depends on thetype of batch selected.
To view the batch exception report for a batch on the Committed Batches tab, under Committedbatches, click the double arrows next to a batch to expand its row. On the action bar, click Viewexception report. To view the batch exception report from the batch commit status page, click Viewexception report under Reports. For information about this report, see Batch Exception Report.
Batch Commit Status PageWhen a batch is committed, the program automatically generates a commit status page for the batch.When the batch is committed to the database, the commit status page records and displays thesettings selected when you run the commit process.
To access the commit status page of a batch, select the batch in the Committed batches grid and clickCommitted in the Status column.
www.blackbaud.com/howto/researchpoint
chapter 3:
pg. 141
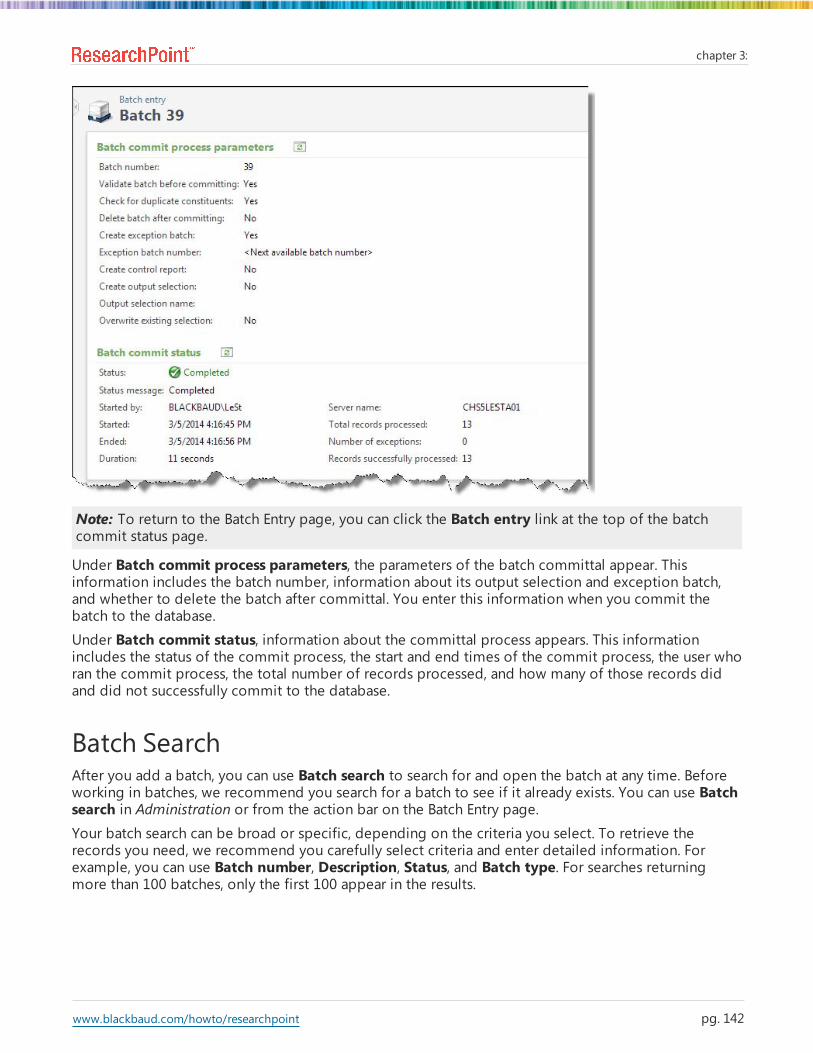
Note: To return to the Batch Entry page, you can click the Batch entry link at the top of the batchcommit status page.
Under Batch commit process parameters, the parameters of the batch committal appear. Thisinformation includes the batch number, information about its output selection and exception batch,and whether to delete the batch after committal. You enter this information when you commit thebatch to the database.
Under Batch commit status, information about the committal process appears. This informationincludes the status of the commit process, the start and end times of the commit process, the user whoran the commit process, the total number of records processed, and how many of those records didand did not successfully commit to the database.
Batch SearchAfter you add a batch, you can use Batch search to search for and open the batch at any time. Beforeworking in batches, we recommend you search for a batch to see if it already exists. You can use Batchsearch in Administration or from the action bar on the Batch Entry page.
Your batch search can be broad or specific, depending on the criteria you select. To retrieve therecords you need, we recommend you carefully select criteria and enter detailed information. Forexample, you can use Batch number, Description, Status, and Batch type. For searches returningmore than 100 batches, only the first 100 appear in the results.
www.blackbaud.com/howto/researchpoint
chapter 3:
pg. 142

Batch Data EntryIn Batch entry, you can create and manage batches using the Uncommitted Batches and CommittedBatches tabs.
Note: To access the Batch Entry page, click Batch entry in Administration and click Batch entry.
After you add a batch, you can enter or edit data using the batch data entry screen. From this screen,you enter information about each record in a separate row of the grid. The grid has the look and feelof a spreadsheet with each row in the spreadsheet representing a separate record. Within the grid, youcan quickly access information about each record, add and edit records, and attach row commentsusing the toolbar ribbon at the top of the screen. The options on the batch data entry screen dependon the selected batch type.
Tip: There is no limit to the number of records you can enter in a batch.
You can edit a batch only when its batch workflow status enables it. For more information about batchworkflows, see Configure Batch Workflows on page 15.
To enter or edit a batch for data entry, in the Uncommitted batches grid, click the double arrows nextto a batch to expand its row. On the action bar, click Edit batch.
Note: Before you create and manage batches, you must first specify batch numbering schemes,workflows, and templates. For more information about these configuration tasks, see BatchConfiguration on page 11.
Tip: Several reports are available to help you track the records entered in a batch and correct theexceptions generated when you commit a batch. For more information, see Batch Entry Reports.
Batch Data Entry ScreenOn the batch data entry screen, you enter information about each record in a separate row of thebatch. From this screen, you can perform various actions associated with Batch entry. The options onthe batch data entry screen depend on the selected batch type.
To access the batch data entry screen, in the Uncommitted batches grid, click the double arrows nextto a batch to expand its row. On the action bar, click Edit batch.
www.blackbaud.com/howto/researchpoint
chapter 3:
pg. 143

Tip: A minimized batch data entry screen appears as a link at the bottom right of your browser. Tomaximize the screen, click the link.
l The toolbar and menu bar above the grid on the batch data entry screen contain buttons thatrepresent common tasks related to data entry.
l To move quickly to the first field of the next batch row, click CTRL ENTER on your keyboard.l On the batch data entry screen, in the data entry grid, you enter information about each recordyou want to add or update. When you commit the batch, each row of the grid that containsinformation becomes a record.
Note: To support data entry for credit card transactions processed externally, when you entercredit card numbers with four digits or fewer, other credit card information is not required.
Batch Entry ToolbarAs you enter information into a batch, you can use the toolbar ribbon to quickly find commands youneed to complete a task. The tasks on the toolbar ribbon are unique to each batch type, and aregrouped together under sections. Each section on the toolbar ribbon relates to a type of activity, suchas Configuration, Processes, orMessages.
www.blackbaud.com/howto/researchpoint
chapter 3:
pg. 144
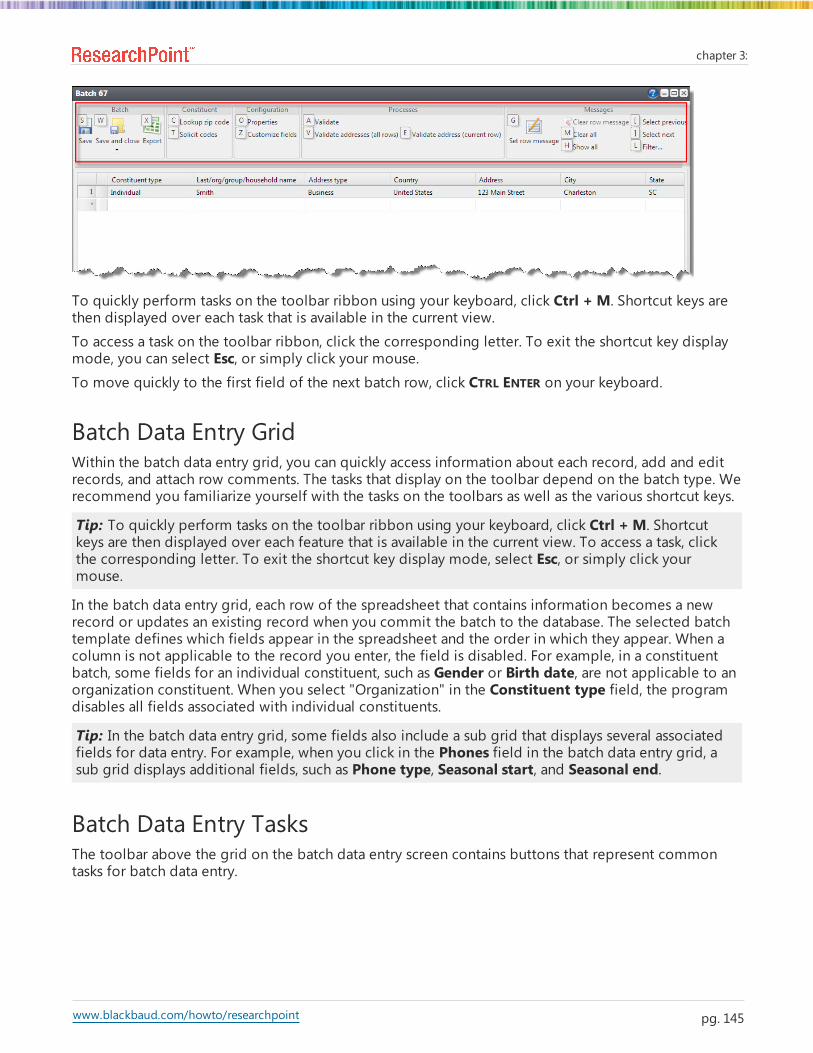
To quickly perform tasks on the toolbar ribbon using your keyboard, click Ctrl + M. Shortcut keys arethen displayed over each task that is available in the current view.
To access a task on the toolbar ribbon, click the corresponding letter. To exit the shortcut key displaymode, you can select Esc, or simply click your mouse.To move quickly to the first field of the next batch row, click CTRL ENTER on your keyboard.
Batch Data Entry GridWithin the batch data entry grid, you can quickly access information about each record, add and editrecords, and attach row comments. The tasks that display on the toolbar depend on the batch type. Werecommend you familiarize yourself with the tasks on the toolbars as well as the various shortcut keys.
Tip: To quickly perform tasks on the toolbar ribbon using your keyboard, click Ctrl + M. Shortcutkeys are then displayed over each feature that is available in the current view. To access a task, clickthe corresponding letter. To exit the shortcut key display mode, select Esc, or simply click yourmouse.
In the batch data entry grid, each row of the spreadsheet that contains information becomes a newrecord or updates an existing record when you commit the batch to the database. The selected batchtemplate defines which fields appear in the spreadsheet and the order in which they appear. When acolumn is not applicable to the record you enter, the field is disabled. For example, in a constituentbatch, some fields for an individual constituent, such as Gender or Birth date, are not applicable to anorganization constituent. When you select "Organization" in the Constituent type field, the programdisables all fields associated with individual constituents.
Tip: In the batch data entry grid, some fields also include a sub grid that displays several associatedfields for data entry. For example, when you click in the Phones field in the batch data entry grid, asub grid displays additional fields, such as Phone type, Seasonal start, and Seasonal end.
Batch Data Entry TasksThe toolbar above the grid on the batch data entry screen contains buttons that represent commontasks for batch data entry.
www.blackbaud.com/howto/researchpoint
chapter 3:
pg. 145
Delete a Row from the Batch Data Entry GridYou can easily delete a row from the data entry grid of a batch. For example, you may need to delete arow because you accidentally entered the same record twice.
Delete a row from the data entry grid of a batch1. On the batch data entry screen, select the rows to delete from the batch.
l To select a single row, click the row number to the left of the row in the data entry grid.
l To select multiple rows, press SHIFT on your keyboard as you click the row number to theleft of each row; to select non-consecutive rows, press CTRL on your keyboard as youselect each row.
2. Press DELETE on your keyboard. A message appears to confirm the deletion.
3. Click Yes. You return to the batch data entry screen.
Export Batch Data EntryYou can easily export data entered in a batch for use in Microsoft Excel, such as to do a quick spotcheck of the data you entered in the batch.
Export batch data entry to a Microsoft Excel spreadsheet1. On the batch data entry screen, click Export on the toolbar. The program opens the contents of
the data entry grid in a Microsoft Excel spreadsheet.
Tip: To quickly perform tasks on the toolbar ribbon using your keyboard, click Ctrl + M.Shortcut keys are then displayed over each feature that is available in the current view. Toaccess a task, click the corresponding letter. To exit the shortcut key display mode, select Esc,or simply click your mouse.
2. Specify a location and save the Excel spreadsheet. You return to the batch data entry screen.
Find and Replace Field Values in a BatchOn the batch data entry screen, press CTRL + F on your keyboard to search for a value in the batch.Depending on your Internet browser, one or more find fields appear.
Use the find fields to search for a value in the batch data entry grid. Values that match your searchcriteria appear highlighted in the grid.
Set a RowMessageWhen you enter data into a batch, you can add a message for a particular row of the data entry grid.For example, an approver reviews a batch and notices a correction that needs to be made. Theapprover can set a message for the row with the error and send the batch back to the batch processor.The batch processor can use the row message to determine what to correct.
www.blackbaud.com/howto/researchpoint
chapter 3:
pg. 146

Set a message for a row of batch data entry1. On the batch data entry screen, select the row to add a message.
2. On the toolbar, click Set row message. The Set message for row screen appears.
Tip: To quickly perform tasks on the toolbar ribbon using your keyboard, click Ctrl + M.Shortcut keys are then displayed over each feature that is available in the current view. Toaccess a task, click the corresponding letter. To exit the shortcut key display mode, select Esc,or simply click your mouse.
3. In the text box, enter the message for the row.
4. Click OK. You return to the batch data entry screen. To review the row message, click the icon onthe row. The row message displays below the selected row.
Note: You can remove a row message from a batch.
Clear a RowMessageYou can remove a row message when it is no longer applicable. For example, the batch processorreceives a batch with a row of data entry with a message set about a correction to make. Once theprocessor corrects the batch, the message can be removed from the row. You can remove each rowmessage one at a time, or you can remove all row messages from a batch at once.
l To clear a message from a single row of batch data entry, select the row and click Clear rowmessage from the grid toolbar.
l To clear all row messages from a batch data entry screen, click Clear all from the grid toolbar.
Tip: To quickly perform tasks on the toolbar ribbon using your keyboard, click Ctrl + M.Shortcut keys are then displayed over each feature that is available in the current view. Toaccess a task, click the corresponding letter. To exit the shortcut key display mode, select Esc,or simply click your mouse.
Customize the Fields in a BatchYou can customize the fields and default settings included in a batch template. You can adjust thefields and default settings when you first add the batch or during the batch data entry process.
When you create a batch template, you assign security permissions to customize fields within a batchbased on system roles. When you do not have rights to customize fields within a batch, the Availablefield options frame is disabled, and you can only edit field defaults. For more information about batchtemplate security, see Add a Batch Template on page 20.
Customize the fields in a batch1. On the batch data entry screen, click Customize fields on the toolbar. The Customize fields for
batch screen appears.
Tip: To quickly perform tasks on the toolbar ribbon using your keyboard, click Ctrl + M. Shortcutkeys are then displayed over each feature that is available in the current view. To access a task, clickthe corresponding letter. To exit the shortcut key display mode, select Esc, or simply click yourmouse.
www.blackbaud.com/howto/researchpoint
chapter 3:
pg. 147

Note: You can also access the Customize fields for batch screen when you first add the batch tothe database. On the Add a batch screen, in the Batch template field, select the batch template tocustomize and click Field options.
2. To change the default settings of a field in the batch, select the field in the Selected fieldscolumn and, in the Field defaults frame, select its default setting.
3. Add or remove fields in the batch or adjust the order of the fields in the batch as necessary.• To add a field to the batch, select the field in the Available field options box and click theright arrow button. The field appears in the Selected fields column. To set a default setting forthe field, select it in the grid and, in the Field defaults frame, select its default setting.
• To remove a field from the batch, select the field in the Selected fields column and click theleft arrow button. The field is enabled in the Available field options box and no longerappears in the Selected fields column.
• To adjust the order of new or existing fields in the batch, select the field to move in theSelected fields column and click the up or down arrow button.
4. Click Save. You return to the batch data entry screen.
Batch ValidationBatch validation helps your data remain consistent and error-free.
Validation occurs at different times during data entry. When you enter batches manually in Batchentry, the program flags simple errors as you enter data and more complex errors once you save thebatch. To initiate validation at any point during data entry, click Validate on the toolbar of the dataentry screen. When committing a batch, on the Commit parameters screen, you can also selectValidate batch before committing.The list below includes examples of validation errors and their solutions:
Missing required fieldsFor missing required fields, ensure the field is populated. In other cases, you may need to deselect thefield as required when customizing fields for the batch. For more information, see Customize theFields in a Batch on page 147.
Incorrectly formatted fieldsWhen incorrectly formatted fields exist, a red X appears in your batch data entry row. A commonformatting error is an incorrect email address.
Duplicate constituentsEnsure duplicate constituents do not exist in your database. For more information, see ResolveDuplicate Constituents in a Batch on page 150.
Account or account segment errorsEnsure the GL mapping is up-to-date or the segment is defined. For more information, see the GL
www.blackbaud.com/howto/researchpoint
chapter 3:
pg. 148

Setup Guide.
Validate a BatchWhen you validate a batch, the program examines all the information entered in the batch todetermine whether data entry errors exist. Before you update the status of a batch, we recommend youvalidate the batch to locate any data entry errors. When the program finishes its batch validation, amessage appears to tell you the results of the validation. For each data entry error found, an exceptionis created and appears on the batch data entry screen. To submit or approve the batch withoutdifficulty, correct any exceptions found.
Validate the data entry of a batch1. On the batch data entry screen, click Validate from the toolbar. The program automatically
searches the data entry for exceptions.
Tip: To quickly perform tasks on the toolbar ribbon using your keyboard, click Ctrl + M. Shortcutkeys are then displayed over each feature that is available in the current view. To access a task, clickthe corresponding letter. To exit the shortcut key display mode, select Esc, or simply click yourmouse.
2. When the validation is complete, a message appears to inform you of the validation results.
3. Click OK. You return to the batch data entry screen.For rows with errors, click the red error icon to display the error message. Fields with errorsdisplay a red mark in the upper right corner of the field. You can also hover your mouse overthe field to display the error message.
4. Update the batch data entry as necessary to resolve the exceptions. For more informationabout how to resolve exceptions, see Resolve Batch Exceptions on page 154.
www.blackbaud.com/howto/researchpoint
chapter 3:
pg. 149

Resolve Duplicate Constituents in a BatchWhen you validate a Constituent Batch, the program automatically runs a duplicate check to find anyexisting constituents that may match constituents in the batch. When the match confidence score for apair of constituents falls within the range defined for possible matches, the program flags theincoming record as a potential duplicate and displays an exception in the batch data entry grid. Toview information about the possible duplicate, click the message and use the duplicate resolutionscreen to decide whether to update the existing constituent or add a new constituent record.
Resolve duplicates in a Constituent Update batch
Note: The Possible duplicate matches screen appears for Constituent Update batches. TheDuplicate record check screen appears for Constituent batches. For more information about theDuplicate record check screen, see Resolve duplicates in Constituent batches on page 153.
1. From a validated batch that contains exceptions, find a row in the grid with a yellow cautionsymbol. Click the symbol and a duplicate records message appears under the row.
2. Click the message. The Possible duplicate matches screen appears.
www.blackbaud.com/howto/researchpoint
chapter 3:
pg. 150

Warning: The Possible duplicate matches screen does not appear when you turn off matching viathe Enable/disable matching configuration task in Administration.
The Incoming constituent data column displays information from the new record.
The Potential Matches column on the right lists all existing constituents in the database thatare possible matches, ranked from the highest to lowest match confidence score. Thepercentage represents the degree of similarity between the first names, last/organizationnames, middle names, suffixes, titles, addresses, and zip codes. For more information aboutthe match confidence score, see the Duplcate Constituents and Merge Tasks Guide.
When you select a constituent in the Potential matches column, its information appears in themiddle column so you can compare the incoming and existing records side-by-side. Blackfields are exact matches. Red fields are similar but need careful review. After you compare therecords, you can do one of the following:• When you decide the incoming constituent is not a duplicate, click Add this as a new record.The screen displays the name and contact information for the new record. Click Save to createa new record, or if you change your mind, you can click Don't add this as a new record toreturn to the previous screen.
www.blackbaud.com/howto/researchpoint
chapter 3:
pg. 151

• When you decide the incoming constituent matches an existing constituent, click Confirm thisrecord as a match. Additional options appear. You can evaluate each red field and decidewhat to do with the incoming data: When you select to add or update a field, it appears greenin the existing constituent column. When you select to ignore a field, it appears strickenthrough in the incoming constituent column.
a. To discard all new or conflicting data from the incoming constituent, click Ignore all.b. To automatically apply the constituent update rules, click Use my organization's rules. For
example, when you click Use my organization's rules, the program automatically adds theincoming phone number to the existing record. As a reference, the list of update rulesappears in the Tips column. For information about constituent update rules, see theDuplicate Constituents and Merge Tasks Guide.
c. To add the name as an alias to the existing constituent, click Add as alias. To add theaddress, email, or phone number as primary or secondary on the existing constituent (ratherthan replace the existing value), click Add and select Add as primary or Add as secondary.When the incoming constituent has information that is blank on the existing constituent, youcan click Add to add that data to the existing record.
Note: When the existing constituent has multiple addresses, phone numbers, or emails, use thedrop-down to select which one to display.
Note: Clickmore to view the history of changes for each field on the address, phone number, oremail.
d. To discard the incoming value (neither add a new value nor update the existing value), clickIgnore.
e. To replace the existing name, address, email, or phone number with the incoming value,click Update existing and select whether to update all fields or to select individual fields toupdate. If you select Update all name/address/email/phone number fields, the programmoves all fields of that type to the existing constituent. If you select Select fields to update,the Ignore and Update current options appear so you can handle each field individually.
www.blackbaud.com/howto/researchpoint
chapter 3:
pg. 152

3. Click Save to save your changes to the existing record, or if you change your mind, you canclick View other potential matches to return to the previous screen.
Note: When you select Automatically go to the next duplicate exception, the programautomatically opens the next record in the batch with possible matches when you click Save.
4. Click Save and close to save the batch and return to the Uncommitted batches tab.
Note: For Constituent Update batches, the program updates existing constituents with changeswhen you commit the batch.
Resolve duplicates in Constituent batches1. On the batch data entry screen, click Validate on the toolbar.
Note: The duplicate record check screen appears for Constituent batches.
When the validation finds a possible duplicate constituent, “This constituent might be aduplicate” appears under the constituent in the grid.
2. Click the message. The Duplicate record check screen appears.
www.blackbaud.com/howto/researchpoint
chapter 3:
pg. 153
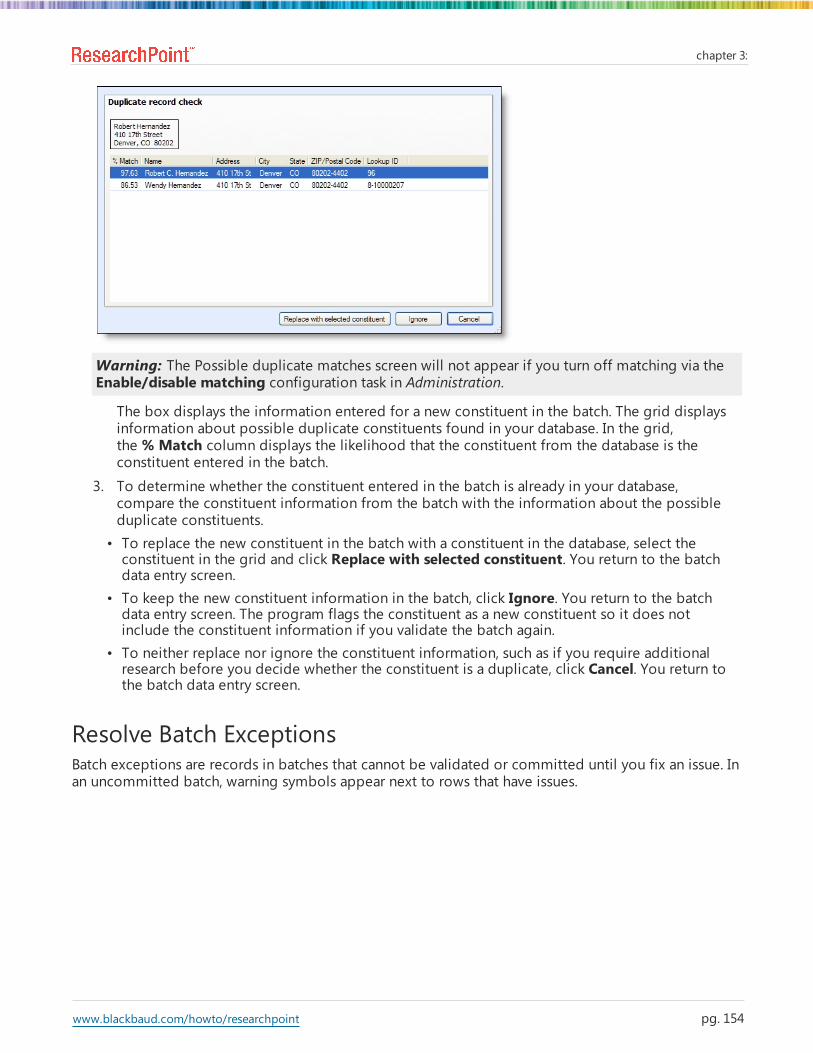
Warning: The Possible duplicate matches screen will not appear if you turn off matching via theEnable/disable matching configuration task in Administration.
The box displays the information entered for a new constituent in the batch. The grid displaysinformation about possible duplicate constituents found in your database. In the grid,the % Match column displays the likelihood that the constituent from the database is theconstituent entered in the batch.
3. To determine whether the constituent entered in the batch is already in your database,compare the constituent information from the batch with the information about the possibleduplicate constituents.• To replace the new constituent in the batch with a constituent in the database, select theconstituent in the grid and click Replace with selected constituent. You return to the batchdata entry screen.
• To keep the new constituent information in the batch, click Ignore. You return to the batchdata entry screen. The program flags the constituent as a new constituent so it does notinclude the constituent information if you validate the batch again.
• To neither replace nor ignore the constituent information, such as if you require additionalresearch before you decide whether the constituent is a duplicate, click Cancel. You return tothe batch data entry screen.
Resolve Batch ExceptionsBatch exceptions are records in batches that cannot be validated or committed until you fix an issue. Inan uncommitted batch, warning symbols appear next to rows that have issues.
www.blackbaud.com/howto/researchpoint
chapter 3:
pg. 154
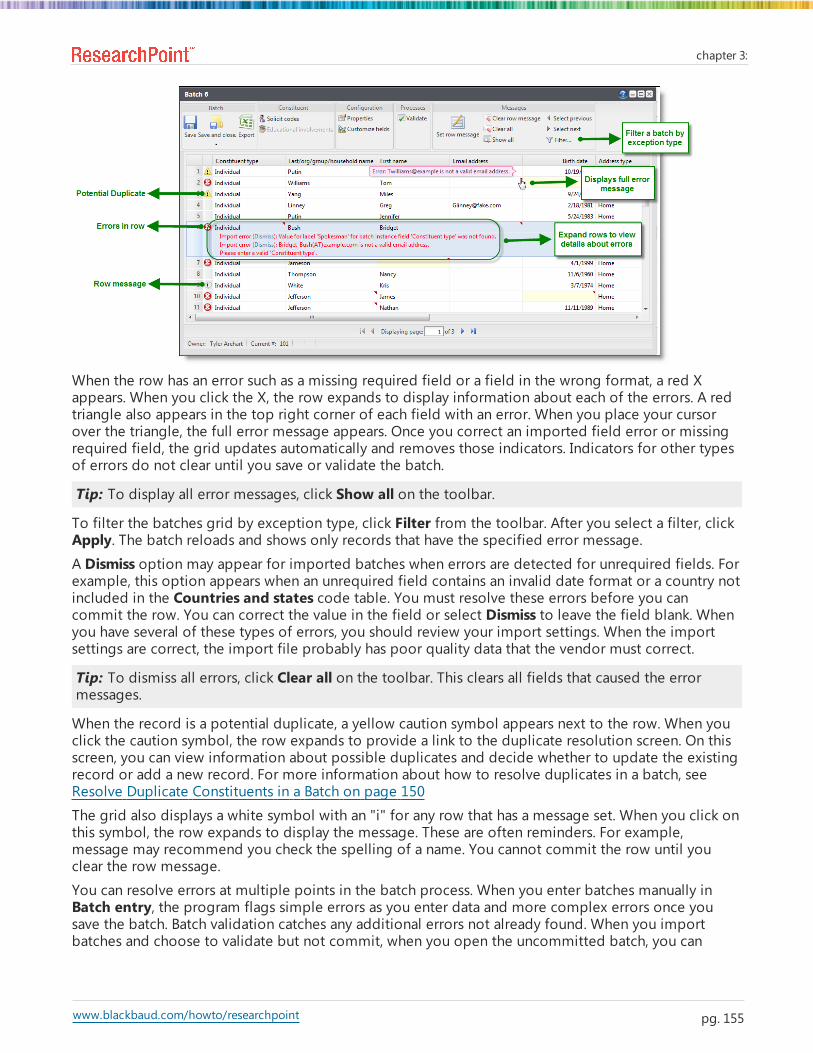
When the row has an error such as a missing required field or a field in the wrong format, a red Xappears. When you click the X, the row expands to display information about each of the errors. A redtriangle also appears in the top right corner of each field with an error. When you place your cursorover the triangle, the full error message appears. Once you correct an imported field error or missingrequired field, the grid updates automatically and removes those indicators. Indicators for other typesof errors do not clear until you save or validate the batch.
Tip: To display all error messages, click Show all on the toolbar.
To filter the batches grid by exception type, click Filter from the toolbar. After you select a filter, clickApply. The batch reloads and shows only records that have the specified error message.A Dismiss option may appear for imported batches when errors are detected for unrequired fields. Forexample, this option appears when an unrequired field contains an invalid date format or a country notincluded in the Countries and states code table. You must resolve these errors before you cancommit the row. You can correct the value in the field or select Dismiss to leave the field blank. Whenyou have several of these types of errors, you should review your import settings. When the importsettings are correct, the import file probably has poor quality data that the vendor must correct.
Tip: To dismiss all errors, click Clear all on the toolbar. This clears all fields that caused the errormessages.
When the record is a potential duplicate, a yellow caution symbol appears next to the row. When youclick the caution symbol, the row expands to provide a link to the duplicate resolution screen. On thisscreen, you can view information about possible duplicates and decide whether to update the existingrecord or add a new record. For more information about how to resolve duplicates in a batch, seeResolve Duplicate Constituents in a Batch on page 150
The grid also displays a white symbol with an "i" for any row that has a message set. When you click onthis symbol, the row expands to display the message. These are often reminders. For example,message may recommend you check the spelling of a name. You cannot commit the row until youclear the row message.
You can resolve errors at multiple points in the batch process. When you enter batches manually inBatch entry, the program flags simple errors as you enter data and more complex errors once yousave the batch. Batch validation catches any additional errors not already found. When you importbatches and choose to validate but not commit, when you open the uncommitted batch, you can
www.blackbaud.com/howto/researchpoint
chapter 3:
pg. 155

resolve errors and then commit. When you commit batches, you can select to create an exceptionbatch which contains all records that do not commit to the database. You can open the exceptionbatch, resolve any additional errors and then commit again. For more information about working withexception batches, see Batch Exception Chain on page 156.
Batch Exception ChainWhen you commit a batch, you can select to create an exception batch, which contains all records thatdo not commit to the database. From this exception batch, you can correct any errors that prevent thecommittal of records. After you correct the data, you can then commit the exception batch toautomatically create or update the records in the database.
When you commit the exception batch, you can select to create another exception batch of anyrecords that still do not commit to the database. Depending on the size of the original batch and thenumber of exceptions, you may generate several exception batches before you successfully commit allrecords from the original batch to the database. On the Batch Exception Chain page, you can view allbatches related to a selected batch. To access the Batch Exception Chain page for a batch, select thebatch on the Batch Entry page and click the batch number.
The Batch Exception Chain page displays all batches related to the batch in order of their committaldates, with the original batch listed first. In the grid, the batch from which you access the exceptionchain appears in bold. For each batch, you can view its number, description, owner, category, andcommittal status.
From the grid, you can access the batch data entry screen to open a committed batch, and view itsrecords. You can also view a control report or an exception report for a committed batch. The batchcontrol report lists the records in the batch that were committed to the database and providesinformation about each record. The batch exception report contains information about the recordsthat did not commit to the database and explains why each record did not commit. Batch ExceptionReport
For an uncommitted batch, you can access the batch data entry screen to correct data if necessary andensure its committal.
www.blackbaud.com/howto/researchpoint
chapter 3:
pg. 156
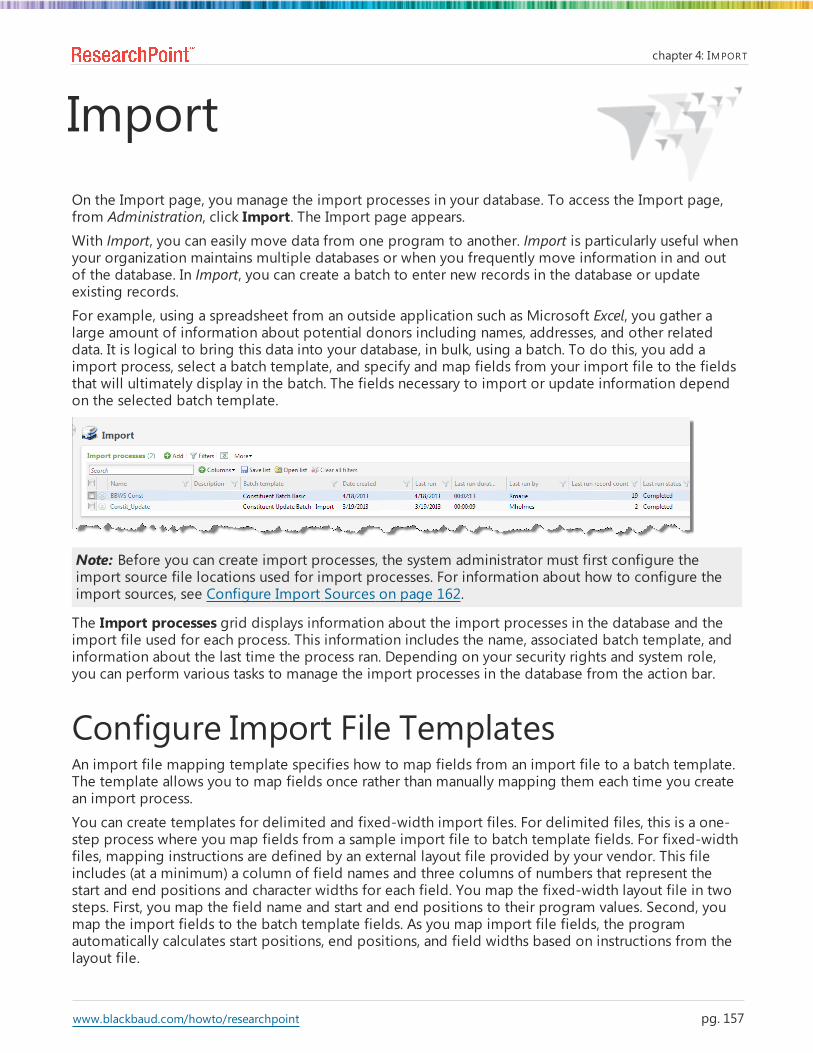
ImportOn the Import page, you manage the import processes in your database. To access the Import page,from Administration, click Import. The Import page appears.With Import, you can easily move data from one program to another. Import is particularly useful whenyour organization maintains multiple databases or when you frequently move information in and outof the database. In Import, you can create a batch to enter new records in the database or updateexisting records.
For example, using a spreadsheet from an outside application such as Microsoft Excel, you gather alarge amount of information about potential donors including names, addresses, and other relateddata. It is logical to bring this data into your database, in bulk, using a batch. To do this, you add aimport process, select a batch template, and specify and map fields from your import file to the fieldsthat will ultimately display in the batch. The fields necessary to import or update information dependon the selected batch template.
Note: Before you can create import processes, the system administrator must first configure theimport source file locations used for import processes. For information about how to configure theimport sources, see Configure Import Sources on page 162.
The Import processes grid displays information about the import processes in the database and theimport file used for each process. This information includes the name, associated batch template, andinformation about the last time the process ran. Depending on your security rights and system role,you can perform various tasks to manage the import processes in the database from the action bar.
Configure Import File TemplatesAn import file mapping template specifies how to map fields from an import file to a batch template.The template allows you to map fields once rather than manually mapping them each time you createan import process.
You can create templates for delimited and fixed-width import files. For delimited files, this is a one-step process where you map fields from a sample import file to batch template fields. For fixed-widthfiles, mapping instructions are defined by an external layout file provided by your vendor. This fileincludes (at a minimum) a column of field names and three columns of numbers that represent thestart and end positions and character widths for each field. You map the fixed-width layout file in twosteps. First, you map the field name and start and end positions to their program values. Second, youmap the import fields to the batch template fields. As you map import file fields, the programautomatically calculates start positions, end positions, and field widths based on instructions from thelayout file.
pg. 157www.blackbaud.com/howto/researchpoint
chapter 4: IMPORT
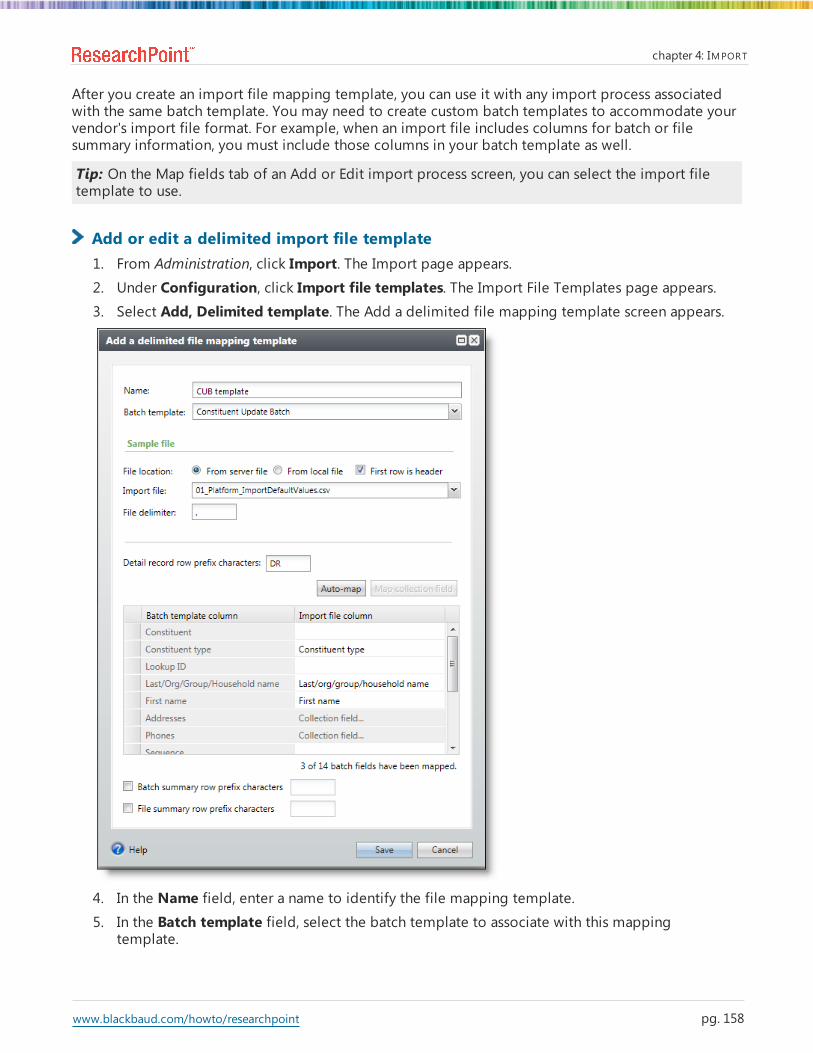
After you create an import file mapping template, you can use it with any import process associatedwith the same batch template. You may need to create custom batch templates to accommodate yourvendor's import file format. For example, when an import file includes columns for batch or filesummary information, you must include those columns in your batch template as well.
Tip: On the Map fields tab of an Add or Edit import process screen, you can select the import filetemplate to use.
Add or edit a delimited import file template1. From Administration, click Import. The Import page appears.2. Under Configuration, click Import file templates. The Import File Templates page appears.3. Select Add, Delimited template. The Add a delimited file mapping template screen appears.
4. In the Name field, enter a name to identify the file mapping template.5. In the Batch template field, select the batch template to associate with this mapping
template.
www.blackbaud.com/howto/researchpoint
chapter 4: IMPORT
pg. 158

6. Under Sample file, in the File location field, select the location of the import file to base themapping template on.• From server file: Select this option to choose the file from the network directory importsource. In the Import file field, select the sample file.
• From local file: Select this option to choose the file from your workstation. In the Import filefield, click the green arrow to browse to the import file.
7. To specify the first row of the import file as the header row, select First row is header.8. In the File delimiter field, select the character used to separate values in the file. You can use
any delimiter except spaces and tabs.
9. When the import file includes prefix characters to identify rows in the import file that containdetail records, select Detail record row prefix characters and enter the characters used, suchas "DR" for "detail row." When the file uses prefixes, they always appear in the first column.
10. The Batch template column of the grid lists the columns from the selected batch template.To map the columns, in the Import file column, select the column from the selected importfile that matches the batch template column.
11. To automatically match columns in the import file to columns in the batch template, clickAuto-map. The program attempts to match the columns of the selected batch template tosimilarly named columns in the selected import file. You can adjust these as necessary.
12. When, in the Import file column, Collection field appears for a field, select the field and clickMap collection field. The Collection field column map screen for the selected field appears.a. Collection fields can support multiple entries. In the Number field, enter the number of
entries to import for the collection field. In the grid, the fields required for each entryappear.
b. The Collection field column of the grid displays the fields required for each imported entry.In the Import file column, select the data from the selected import file that matches thecollection field. Click OK. You return to the Add a delimited file mapping template screen.
13. When the import file includes rows with batch summary data, select Batch summary rowprefix characters and enter the prefix characters used, such as "BS."
14. When the import file includes rows with file summary information, select File summary rowprefix characters and enter the prefix characters used, such as "FS."
15. Click Save. You return to the Import File Templates page.
Add or edit a fixed-width import file template1. From Administration, click Import. The Import page appears.2. Under Configuration, click Import file templates. The Import File Templates page appears.3. Select Add, Fixed-width template. The Add a fixed-width file mapping template screen
appears on the Step 1: Read file columns form.
www.blackbaud.com/howto/researchpoint
chapter 4: IMPORT
pg. 159

4. In the Name field, enter a name to identify the file mapping template.5. In the Batch template field, select the batch template to associate with this mapping
template.
6. Under Layout file, in the File location field, select the location of the layout file to base themapping template on. The layout file specifies the start and end position and field length foreach field in the import file.• From server file: Select this option to choose a file from the network directory import source.In the Layout file field, select the layout file from the drop-down.
• From local file: Select this option to choose a file from your workstation. Click the greenarrow to browse to the layout file.
7. To specify the first row of the import file as the header row, select First row is header.8. In the Layout file column mapping grid, select the column from the layout file that maps to
the Field name, Start position, or End position layout value in the program. You must map allthree of these values.
9. To automatically match columns in the layout file to program layout values, click Auto-map.The program attempts to match the program layout values to similarly named columns in theselected layout file. You can adjust these as necessary.
10. Click Next. The Step 2: Map file to batch columns form appears. On this form, you map batchtemplate columns with columns in the import file.
www.blackbaud.com/howto/researchpoint
chapter 4: IMPORT
pg. 160

11. When the import file includes prefix characters to identify rows in the import file that containdetail records, select Detail record row prefix characters and enter the characters used, suchas "DR" for "Detail Row." When the file uses prefixes, they always appear in the first column.
12. The Batch template column of the grid lists the columns from the selected batch template. Inthe Import file column, select the column from the selected import file that matches thebatch template column. As you select import file columns, the Start position, End position,and Field width values update automatically based on specifications from the selected layoutfile.
To automatically match columns in the import file to fields in the batch template, click Auto-map. The program attempts to match the columns of the selected batch template to similarlynamed columns in the selected import file. You can adjust these as necessary.
13. When Collection field appears in the Import file column, select the field and clickMapcollection field. The Collection field column map screen for the selected field appears.• Collection fields can support multiple entries. In the Number field, enter the number ofentries to import for the collection field. In the grid, the fields required for each entry appear.
• The Collection field column of the grid displays the fields required for each imported entry.In the Import file column, select the data from the selected import file that matches thecollection field. Click OK to return to the Add a fixed-width file mapping template screen.
14. When the import file includes rows with batch summary data, select Batch summary rowprefix characters and enter the prefix characters used to identify the rows, such as "BS."
15. When the import file includes rows with file summary information, select File summary rowprefix characters and enter the prefix characters used to identify the rows, such as "FS."
16. To save the mapping template and return to the Import File Templates page, click Save.
www.blackbaud.com/howto/researchpoint
chapter 4: IMPORT
pg. 161

Configure Import SourcesBefore you can create import processes, the system administrator must configure the import sourcelocations where import files are stored on Secured FTP servers or a shared network directory. Eachsource includes a URL or file path and the credentials to access the location. When you create a newimport process, you select the import source file location for that process.
Warning: When the path for a network directory import source is configured incorrectly, the SFTPserver import may fail. Since SFTP imports are dependent upon network setup, a failure may occureven when the SFTP server import is configured correctly.
After an import process uses an SFTP import source, how does the program archiveit?
After an import process uses an SFTP import source, the program archives it under the directory paththat was defined for the network directory import source. This ensures the process does not importthe file again.
The folder name is generated from the import source name and ID (name_ID). If a sub-directory isspecified on the import, a folder with the same sub-directory name is created under the importname_importID folder and the file is copied to this location. Note that the program does not remove the filefrom the initial directory.
Add an SFTP server import source1. From Administration, click Import. The Import page appears.2. Under Configuration, click Configure import sources. The Import Sources page appears.3. Click Add, SFTP server. The Add SFTP server import source screen appears.
4. In the Name field, enter a name to identify the import source.
www.blackbaud.com/howto/researchpoint
chapter 4: IMPORT
pg. 162
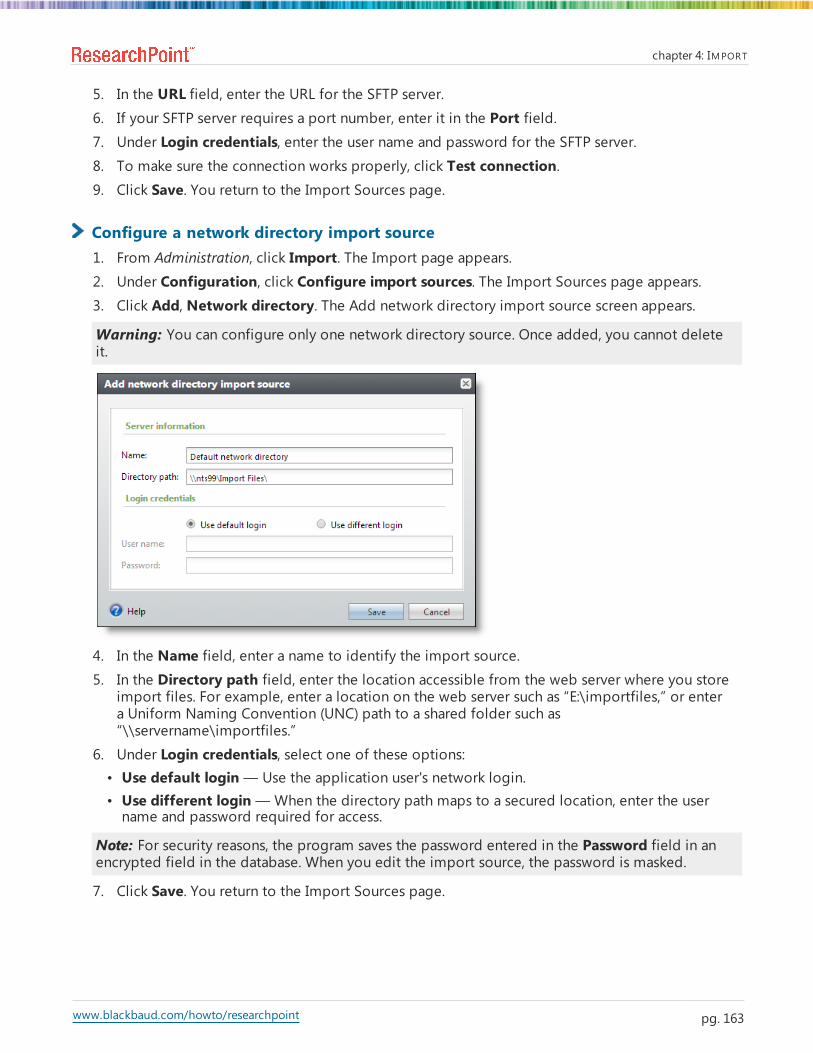
5. In the URL field, enter the URL for the SFTP server.6. If your SFTP server requires a port number, enter it in the Port field.7. Under Login credentials, enter the user name and password for the SFTP server.8. To make sure the connection works properly, click Test connection.9. Click Save. You return to the Import Sources page.
Configure a network directory import source1. From Administration, click Import. The Import page appears.2. Under Configuration, click Configure import sources. The Import Sources page appears.3. Click Add, Network directory. The Add network directory import source screen appears.
Warning: You can configure only one network directory source. Once added, you cannot deleteit.
4. In the Name field, enter a name to identify the import source.5. In the Directory path field, enter the location accessible from the web server where you store
import files. For example, enter a location on the web server such as “E:\importfiles,” or entera Uniform Naming Convention (UNC) path to a shared folder such as“\\servername\importfiles.”
6. Under Login credentials, select one of these options:• Use default login— Use the application user's network login.• Use different login— When the directory path maps to a secured location, enter the username and password required for access.
Note: For security reasons, the program saves the password entered in the Password field in anencrypted field in the database. When you edit the import source, the password is masked.
7. Click Save. You return to the Import Sources page.
www.blackbaud.com/howto/researchpoint
chapter 4: IMPORT
pg. 163
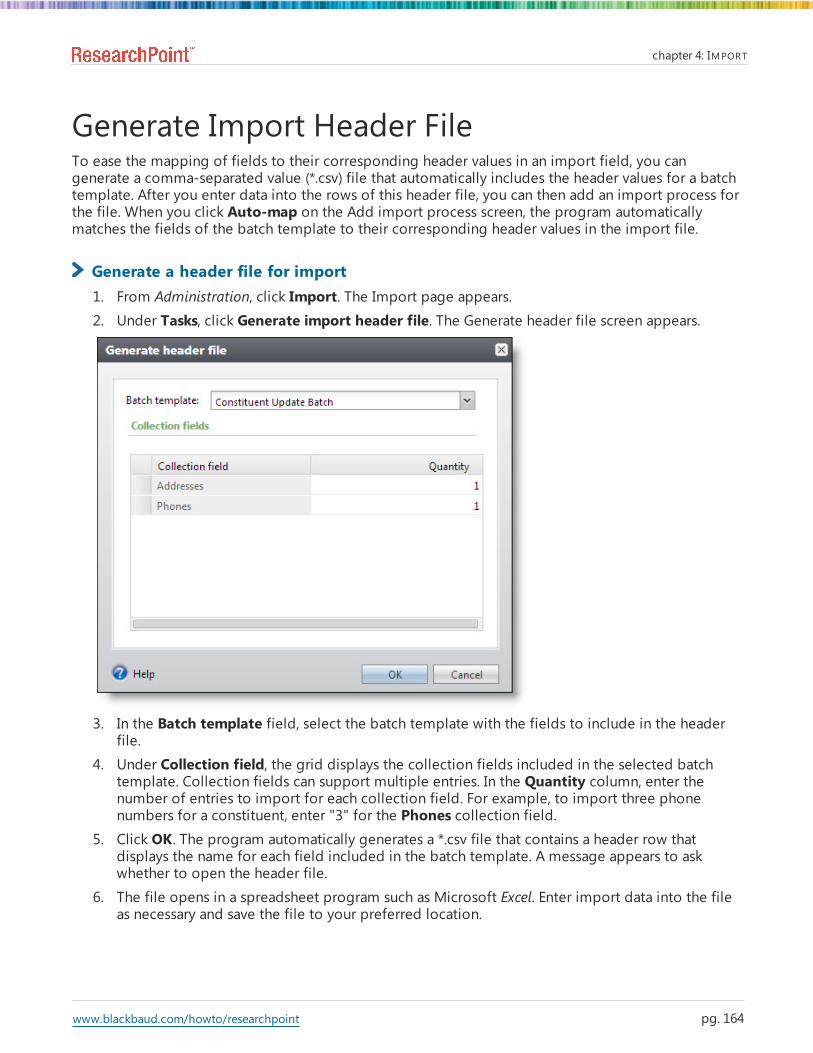
Generate Import Header FileTo ease the mapping of fields to their corresponding header values in an import field, you cangenerate a comma-separated value (*.csv) file that automatically includes the header values for a batchtemplate. After you enter data into the rows of this header file, you can then add an import process forthe file. When you click Auto-map on the Add import process screen, the program automaticallymatches the fields of the batch template to their corresponding header values in the import file.
Generate a header file for import1. From Administration, click Import. The Import page appears.2. Under Tasks, click Generate import header file. The Generate header file screen appears.
3. In the Batch template field, select the batch template with the fields to include in the headerfile.
4. Under Collection field, the grid displays the collection fields included in the selected batchtemplate. Collection fields can support multiple entries. In the Quantity column, enter thenumber of entries to import for each collection field. For example, to import three phonenumbers for a constituent, enter "3" for the Phones collection field.
5. Click OK. The program automatically generates a *.csv file that contains a header row thatdisplays the name for each field included in the batch template. A message appears to askwhether to open the header file.
6. The file opens in a spreadsheet program such as Microsoft Excel. Enter import data into the fileas necessary and save the file to your preferred location.
www.blackbaud.com/howto/researchpoint
chapter 4: IMPORT
pg. 164
Manage Import ProcessesFrom the Import processes grid of the Import page, you can add, edit, and delete the importprocesses in your database. You can also start a process and assign permissions. To access the Importpage, from Administration, click Import.
Add an Import ProcessYou can create an import process to generate a batch for adding or updating information from a filecreated in another application. For example, during an event, you may not have access to the program.Instead, you enter data in a word processing or spreadsheet program such as Microsoft Excel. After yousave your spreadsheet as a delimited or fixed-width file in the outside application, you can import theinformation into your database. You can add an import process from the Import page ofAdministration or from within Batch Entry.
Tip: You can also create recurring import processes for imports used multiple times with differentimport files. For example, an import process can pull files with similar names repeatedly from thesame location.
Note: Before you can create import processes, the system administrator must configure at least oneimport source for import processes.
To add an import process, select Add on the action bar of the Import page. The Select a batchtemplate screen appears where you can select a batch template to use as the basis for your new importprocess.
Note: When a batch template you want to use does not display, consult your batch processingmanager. For example, the batch template may not display because it is not configured to enablebatch processing with imports.
After you select a batch template, click OK.The Add import process screen displays and includes a series of tabs designed to walk you through theprocess of adding an import process.
www.blackbaud.com/howto/researchpoint
chapter 4: IMPORT
pg. 165
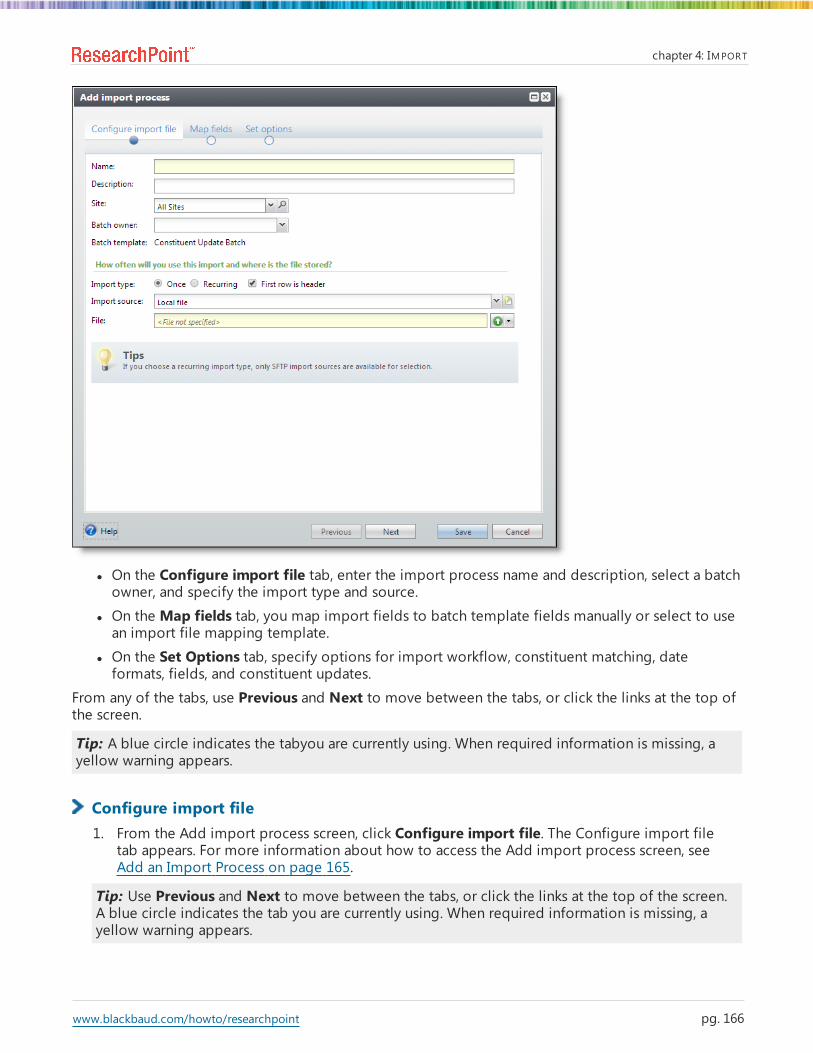
l On the Configure import file tab, enter the import process name and description, select a batchowner, and specify the import type and source.
l On the Map fields tab, you map import fields to batch template fields manually or select to usean import file mapping template.
l On the Set Options tab, specify options for import workflow, constituent matching, dateformats, fields, and constituent updates.
From any of the tabs, use Previous and Next to move between the tabs, or click the links at the top ofthe screen.
Tip: A blue circle indicates the tabyou are currently using. When required information is missing, ayellow warning appears.
Configure import file1. From the Add import process screen, click Configure import file. The Configure import file
tab appears. For more information about how to access the Add import process screen, seeAdd an Import Process on page 165.
Tip: Use Previous and Next to move between the tabs, or click the links at the top of the screen.A blue circle indicates the tab you are currently using. When required information is missing, ayellow warning appears.
www.blackbaud.com/howto/researchpoint
chapter 4: IMPORT
pg. 166

2. In the Name field, enter a name to help identify the import process. The name of each importprocess must be unique.
Tip: You can enter up to 100 characters in this field.
3. In the Description field, enter a description to identify the import process in your database.
Tip: You can enter up to 255 characters in this field.
4. In the Batch owner field, select the batch processor to receive the batch created by theimport process.
5. Under Import file, select the import's occurrence:• Once— select this option to use the import process only once.• Recurring— select this option to use the import process multiple times with different importfiles. For example, an import process can pull files with similar names repeatedly from thesame location.
6. To specify the first row of the import file as the header row, select First row is header.7. In the Import source field, select an import source location where import files are stored on
SFTP servers or shared network directories. For more information about import sources, seeConfigure Import Sources on page 162.• Local file— When you select Once as the import type, you can select a file from your currentworkstation.
• Network directory— When you select Once as the import type, you can select the networkdirectory import source and enter a file pattern in the File field.
www.blackbaud.com/howto/researchpoint
chapter 4: IMPORT
pg. 167
• SFTP server— When you select Once or Recurring as the import type, you can select an SFTPserver import source. When the URL entered on the SFTP import source does not alreadyinclude a subdirectory, you can enter one in the Subdirectory field.
8. When you select an SFTP server or network directory import source, you can enter a patternfor file names using wildcards (*,?,[],#) in the File field. This allows the import process to pullfiles with similar names from the same location. For example, if your organization downloadsa file from an SFTP site each night and the file is always named Import plus a version number(i.e., Import123.csv), enter the file name as "Import*.csv." The import process will grab all newfiles in the folder that fits the pattern, such as Import4 or Import79.
Warning: To ensure foreign characters appear correctly in an imported batch, the import filemust be encoded as UTF-8.
Tip: After an import process uses an SFTP import source, the program archives it under thedirectory path that was defined for the network directory import source.This ensures the processdoes not import the file again.
9. Click Next to move to the Map fields tab.
Map fields1. From the Add import process screen, clickMap fields. The Map fields tab appears. For more
information about how to access the Add import process screen, see Add an Import Processon page 165.
Tip: Use Previous and Next to move between the tabs, or click the links at the top of the screen.A blue circle indicates the tab you are currently using. When required information is missing, ayellow warning appears.
www.blackbaud.com/howto/researchpoint
chapter 4: IMPORT
pg. 168

2. Under Field mapping, select whether to map import fields to batch template fields manuallyor to use an import file mapping template. When you select Use file mapping template,select the mapping template. For more information about mapping templates, see ConfigureImport File Templates on page 157.
When you selectManually, the Batch template column section of the grid lists the fieldsfrom the selected batch template. In the Import file column section, select the heading fromthe selected import file that matches the batch template field. You can also select thecharacter used to separate values in the file.
To automatically match fields in the import file to fields in the batch template, click Automap. The program attempts to match the fields of the selected batch template to similarlynamed columns in the selected import file. You can adjust these as necessary.
Note: For a volunteer timesheet batch, we recommend you use Lookup ID for the Volunteer field.
Note: For a membership batch, we recommend you use Lookup ID for the Name field.
3. In the Import file column section, when Collection field appears for a field, select the fieldand clickMap collection field. The Collection field column map screen for the selected fieldappears.
a. Collection fields can support multiple entries. In the Number field, enter the number ofentries to import for the collection field. In the grid, the fields required for each entryappear.
www.blackbaud.com/howto/researchpoint
chapter 4: IMPORT
pg. 169

b. The Collection field column section of the grid displays the fields required for eachimported entry. In the Import file column section, select the data from the selected importfile that matches the collection field.
c. Click OK. You return to the Add import process screen.4. Click Next to move to the Set options tab.
Set options1. From the Add import process screen, click Set options. The Set options tab appears. For more
information about how to access the Add import process screen, see Add an Import Processon page 165.
Tip: Use Previous and Next to move between the tabs, or click the links at the top of the screen.A blue circle indicates the tab you are currently using. When required information is missing, ayellow warning appears.
2. On the Import workflow tab, select which action to perform after batches are imported.• Do nothing: Select this option to manually validate and commit the batch at a later time. Usethis option when another user must review the batch before you commit it, or when you needto skip the extra validation process to ensure the batch commits on time.
• Validate new batches but do not commit any records: Select this option to validate thebatch and then later commit it manually. Use this option when another user must reviewrecords before you commit the batch and time allows for the extra validation process. Forexample, you can schedule the validation to run overnight and then manually review andcommit the batch in the morning.
• Commit batches if they have no batch exceptions: Select this option to validate the batchand then commit it automatically if there are no batch exceptions. Use this option when youneed to enter records quickly, but you also want to manually review any errors.
• Commit all valid rows from new batches: Select this option to validate the batch and thenautomatically commit each valid row. If a row does not validate, the program adds it to anexception batch that you can review later. Use this option when you need to add data asquickly as possible.
3. Select the Constituent matching tab.
www.blackbaud.com/howto/researchpoint
chapter 4: IMPORT
pg. 170

Note: Options on the Constituent matching tab do not apply if the feature is not turned on via theEnable/disable matching configuration task in Administration.
Note: The Constituent matching tab is available only for imports that use the Constituent Updatebatch template. The settings default from the Constituent Matching Settings page inAdministration or from the associated batch template if that template uses different thresholds.For more information about constituent matching settings, see the Administration Guide.
4. You can use matching settings to identify records in the batch that may already exist asconstituents in your database. When you select Use batch template settings, the percentagesdefault from the batch template selected for the import. To change the default settings, clearUse batch template settings and select Check for records that match existing constituents.The thresholds defined on this tab apply to all batches produced from this import process.
a. Edit the percentage range for the Matched constituents threshold. Imported records withmatch scores in this range likely match records that already exist in the database. When theprogram finds a match, it automatically assigns the record ID from the existing record to thematched record in the import.
Note: For Constituent Update batches, the program may update the existing constituentwith information from the incoming constituent according to the constituent update rules.For more information, see the Administration Guide.
b. Edit the percentage range for the Possible matches threshold. Records with match scores inthis range are similar enough to existing records to be possible matches, but differentenough to require manual review. The program prompts you to compare the matchedconstituents and to choose whether to update the existing record or create a new one forthe incoming constituent.
c. The percentage range for the No match threshold is based on your settings for the upperthresholds. Imported records with match scores in this range probably do not match anexisting record.
The program creates a new record behind the scenes and requires no actions from users.
5. Select the Date formats tab.
www.blackbaud.com/howto/researchpoint
chapter 4: IMPORT
pg. 171
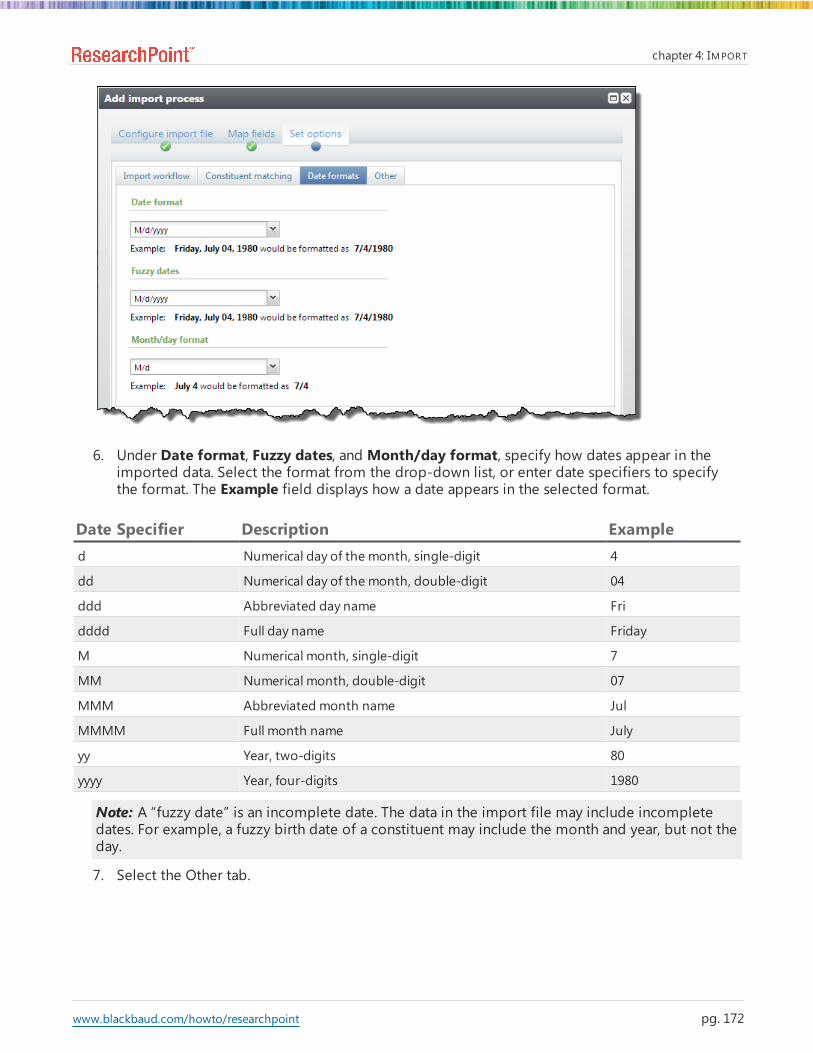
6. Under Date format, Fuzzy dates, and Month/day format, specify how dates appear in theimported data. Select the format from the drop-down list, or enter date specifiers to specifythe format. The Example field displays how a date appears in the selected format.
Date Specifier Description Exampled Numerical day of the month, single-digit 4
dd Numerical day of the month, double-digit 04
ddd Abbreviated day name Fri
dddd Full day name Friday
M Numerical month, single-digit 7
MM Numerical month, double-digit 07
MMM Abbreviated month name Jul
MMMM Full month name July
yy Year, two-digits 80
yyyy Year, four-digits 1980
Note: A “fuzzy date” is an incomplete date. The data in the import file may include incompletedates. For example, a fuzzy birth date of a constituent may include the month and year, but not theday.
7. Select the Other tab.
www.blackbaud.com/howto/researchpoint
chapter 4: IMPORT
pg. 172

8. Under Code table fields, select whether the import file contains the translation or ID value ofdata to import from code tables. To add new entries to a code table when entries do not existfor the fields in the import file, mark Add new entries. If you are unsure which to select,consult your System Administrator.
9. Under Simple data list fields, select whether the import file contains the translation or IDvalue of data to import from simple data lists. If you are unsure which to select, consult yourSystem Administrator.
10. Under Search list fields, select whether the import file contains the ID or Quick find value ofdata to import from search lists. If you are unsure which to select, consult your SystemAdministrator.
Note: For an import process based on the constituent update batch template, if you select tosearch list fields based on Quick find, the Constituent column within your import file mustcontain the constituent lookup ID.
11. Under Other, select how to handle a blank value in the imported data. You can select toimport the blank value or use the default value from the selected batch template.
12. Click Save. You return to the Import page or Batch Entry page.
Import WorkflowThe table below explains the items on the Import workflow tab under Set options. Use these optionsto specify which action to perform after batches are imported.
www.blackbaud.com/howto/researchpoint
chapter 4: IMPORT
pg. 173
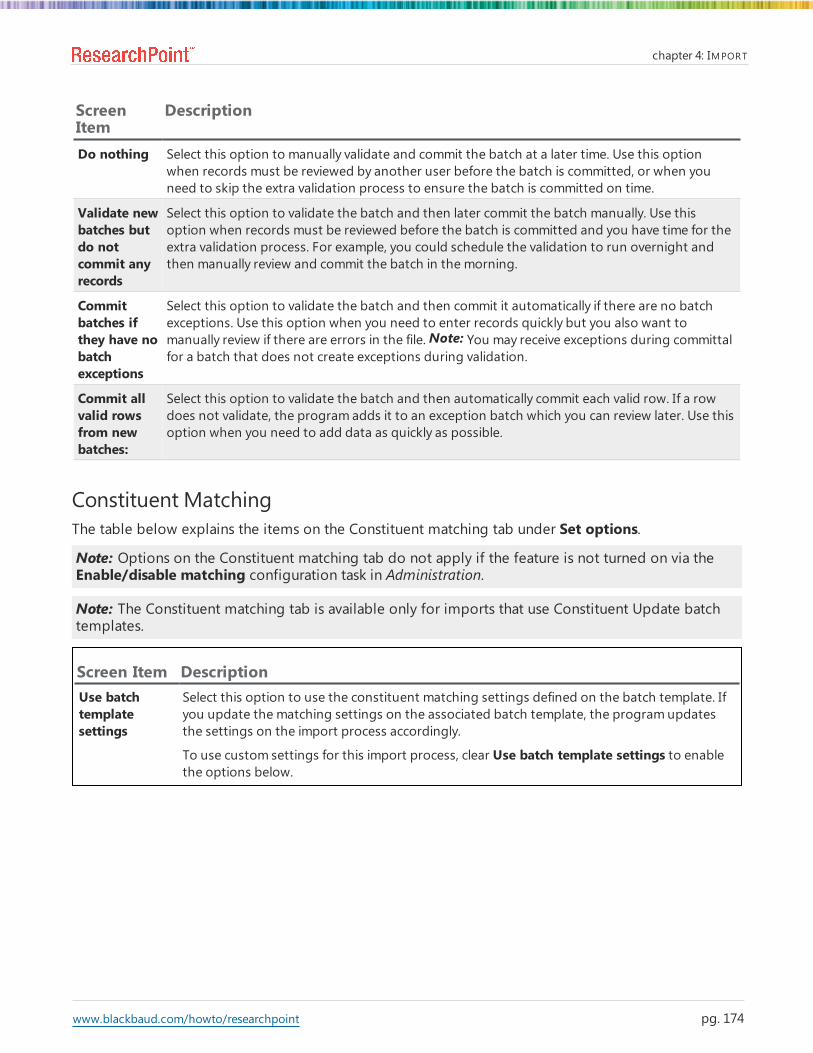
ScreenItem
Description
Do nothing Select this option to manually validate and commit the batch at a later time. Use this optionwhen records must be reviewed by another user before the batch is committed, or when youneed to skip the extra validation process to ensure the batch is committed on time.
Validate newbatches butdo notcommit anyrecords
Select this option to validate the batch and then later commit the batch manually. Use thisoption when records must be reviewed before the batch is committed and you have time for theextra validation process. For example, you could schedule the validation to run overnight andthen manually review and commit the batch in the morning.
Commitbatches ifthey have nobatchexceptions
Select this option to validate the batch and then commit it automatically if there are no batchexceptions. Use this option when you need to enter records quickly but you also want tomanually review if there are errors in the file.Note: You may receive exceptions during committalfor a batch that does not create exceptions during validation.
Commit allvalid rowsfrom newbatches:
Select this option to validate the batch and then automatically commit each valid row. If a rowdoes not validate, the program adds it to an exception batch which you can review later. Use thisoption when you need to add data as quickly as possible.
Constituent MatchingThe table below explains the items on the Constituent matching tab under Set options.
Note: Options on the Constituent matching tab do not apply if the feature is not turned on via theEnable/disable matching configuration task in Administration.
Note: The Constituent matching tab is available only for imports that use Constituent Update batchtemplates.
Screen Item DescriptionUse batchtemplatesettings
Select this option to use the constituent matching settings defined on the batch template. Ifyou update the matching settings on the associated batch template, the program updatesthe settings on the import process accordingly.
To use custom settings for this import process, clear Use batch template settings to enablethe options below.
www.blackbaud.com/howto/researchpoint
chapter 4: IMPORT
pg. 174

Screen Item DescriptionCheck forrecords thatmatch existingrecords
Select this option to identify records in the import process that may already exist asconstituents in your database. Thresholds defined on this screen apply to all batchesproduced from the import process.
Use the threshold settings to define your ranges for match confidence scores.Matchconfidence compares field values from the imported record with existing records and assignsmatch scores for fields weighted by the field type. Match confidence is calculated based onthe degree of similarity between the first names, last/organization names, middle names,suffixes, titles, addresses, and zip codes. For more information about how match confidencescores are calculated, see the Administration Guide.
Updateconstituents
Edit the percentage range for theMatched constituents threshold. Imported records withmatch scores in this range likely match records that already exist in the database. When theprogram finds a match, it automatically assigns the record ID from the existing record to thematched record in the import. This process occurs behind the scenes and requires no actionsfrom users.
Note: For Constituent Update batches, the programmay update the existing constituentwith information from the incoming constituent according to the constituent update rules.For more information, see the Administration Guide.
You can clear Update constituents to turn off automatic updates.
Reviewconstituents
Edit the percentage range for the Possible matches threshold. Records with match scores inthis range are similar enough to existing records to be possible matches, but differentenough to require manual review. The program prompts you to compare the matchedconstituents and to choose whether to update the existing record or create a new one forthe incoming constituent. For more information about how to compare records on theduplicate resolution screen, see Resolve Duplicate Constituents in a Batch on page 150.
You can clear Review constituents to turn off manual reviews. For example, you may clearReview constituents on an import when you have a high volume of records and no time orresources to manually compare records before committing. In this case, it might be better toquickly add new records and then find and delete duplicates later on.
Add newconstituent
The percentage range for theNo match threshold is based on your settings for the upperthresholds. Imported records with match scores in this range probably do not match anexisting record.
The program creates a new record behind the scenes and requires no actions from users.
Date FormatsThe table below explains the items on the Date formats tab under Set options.
Screen Item DescriptionDate format Specify how complete date values are formatted in the import file. You can select the format
from the drop-down list or enter date specifiers to create a new format. The Example fielddisplays how a date appears in the selected format.iz
www.blackbaud.com/howto/researchpoint
chapter 4: IMPORT
pg. 175

Screen Item DescriptionFuzzy dates Specify how incomplete, or fuzzy, date values are formatted in the import file. You can select the
format from the drop-down list or enter date specifiers to create a new format. The Examplefield displays how a date appears in the selected format.
Month/dayformat
Specify how date values that include only a month and day are formatted in the imported data.You can select the format from the drop-down list or enter date specifiers to create a newformat. The Example field displays how a date appears in the selected format.
OtherThe table below explains the items on the Other tab under Set options.
Screen Item DescriptionCode tablefields
Select whether the import file contains the Translation or ID value of data to import from codetable fields. To add new entries to a code table when entries do not exist for fields in the importfile, mark Add new entries. If you are unsure which to select, consult your systemadministrator.
Simple datalist fields
Select whether the import file contains the Translation or ID value of data to import fromsimple data list fields. If you are unsure which to select, consult your system administrator.
Search listfields
Select whether the import file contains the ID or Quick find value of data to import from searchlist fields. If you are unsure which to select, consult your system administrator.
For an import process based on the constituent update batch template, if you select to searchlist fields based on Quick find, the Constituent column within your import file must contain theconstituent lookup ID.
Other Select how to handle a blank value in the imported data. You can select to import the blankvalue (Blank value) or the default value from the selected batch template (Default value frombatch).
Start an Import ProcessOnce you add an import process to the database, you can run the process to import data and add thebatch to the database. You can run an import process directly from the Import page. In the Importprocesses grid, click the double arrows next to a process to expand its row. On the action bar, clickStart import. The import process status page appears and displays the status of the process. When theimport process finishes, the Status field on the Recent Status tab displays "Completed."For more information about the items on the status page, see Tabs of a Process Status Page.
Note: You can also start an import process from its status page. On the import process status page,click Start process under Tasks.
When you run an import process, the program uses the selected batch template to import theinformation in the selected import file into a new batch. After you run the import process, the newbatch appears on the Uncommitted Batches tab of the Batch Entry page.
www.blackbaud.com/howto/researchpoint
chapter 4: IMPORT
pg. 176

Note: When you import constituent records that do not include lookup IDs or system IDs into abatch, the program automatically uses the name and address entered to verify the constituent doesnot already exist in the database. When the program finds another constituent with the sameinformation, it links the constituent in the import file to the existing constituent record. When theprogram finds multiple constituents with similar information, it flags the constituent in the batch as apossible duplicate.
In Batch entry, you can add or edit data entry in the batch, submit the batch for approval, and committhe batch to the database. When a batch is committed to the database, the program uses itsinformation to add or update records in the database. To access the Batch Entry page, fromAdministration, click Batch entry. Batches created by an import process have a description of “Batchcreated by the... import process”. For more information about the batch entry page, see on page 131.
Note: Depending on your security rights and system role, you can also edit the data entry of a batchcreated by an import process from the import process status record. On the import process statuspage, click Go to batch entry under Tasks. The data entry screen of the batch appears. For moreinformation about the batch data entry screen, see Batch Data Entry Screen on page 143.
Import Process PageAfter you run an import process, you can view information about the process on its status page. Thesedetails help you track transactions for auditing and reconciliation purposes from the original importfile, to a batch, and finally to a constituent record. This information also helps you quickly identify andresolve issues in import files that prevent data from importing.
The summary section at the top of the page includes the current scheduling, batch template and filemapping template, import file name, when the import was created, the number of times run, and thenumber of batches created from the process.
Each time you run an import process, the program generates a status record for the instance. On theRecent Status tab, you view the details about the most recent instance of the import process. On theHistory tab, you view historical status record information about each instance of the process. On theJob Schedules tab, you can view details about when the import process is scheduled to run.
Recent Status TabOn the Recent Status tab, you view the details about the most recent instance of the import process.These details include the status of the process; status message; the person who last started the process;the start time, end time, and duration of the process; the name of the server most recently used to runthe process; the total number of records processed; how many of those records processedsuccessfully; and how many were import file exceptions. The tab also includes links to the last batchcreated from the process and to the exception batch if exceptions occurred.
If there are batch validation errors in the import, such as missing data, these appear in the Exceptionsgrid at the bottom.
www.blackbaud.com/howto/researchpoint
chapter 4: IMPORT
pg. 177

History TabEach time you run an import process, the program generates a status record for the instance. On theHistory tab, you view historical status record information about each instance of the process. Theinformation in the grid includes the status, process type (Import or Import + Commit), import filename, date and time started, duration, number of records processed, and server name.
When you select an instance, it expands to show additional information such as details about why animport failed. If the import is set to commit batches automatically, this section includes the number ofrecords imported and committed, as well as links to the committed batch and exception batch ifexceptions occurred. If the import is not set to commit batches automatically, this section includes alink to the uncommitted batch and displays the scheduled commit date and time. If the process fails,you can click Export to export a copy of the import file to correct errors and then reimport. The Viewreport link appears for batch types with associated validation or control reports. For revenue batchtypes, a totals section includes the projected vs. imported number of records and total revenue.
To reduce the amount of time it takes to find a process instance, you can filter the records that appearin the grid. For example, you can select to view only status records with a Status of Did not finish.Depending on your security rights and system role, you can delete a status record from the grid on theHistory tab.
Delete a Status Record from the History Tab of a Process StatusPageOn the History tab of a process status page, you can delete a specific status record of the process.When you delete a status record, you delete the specific instance and all of its history. To delete astatus record, select it and and click Delete.
Delete a status record from the History tab1. On the History tab of the process status page, click the double arrows beside a status record
and click Delete. A confirmation message appears.
Note: You can filter the records in the grid by the status of the process to reduce the amount oftime it takes to find an instance of the process. For example, to search for a completed instance,click the funnel icon, select "Completed" in the Status field, and click Apply. Only completedinstances appear in the grid.
2. Click Yes. You return to the History tab. The selected status record no longer appears.
Job Schedules Tab (Not Available on All Process Pages)On the Job schedules tab, you can view the job schedules of the process in the database. The details inthis grid include the name, whether a job schedule is enabled, the frequency of the job schedule, thestart date and time and end date and time, and the date the job schedule was added and last changedin the database. You enter this information when you set the job schedule of the process.
www.blackbaud.com/howto/researchpoint
chapter 4: IMPORT
pg. 178

Schedule Process JobsYou can create a job schedule to automatically run a business process. When you create a schedule fora process, the program exports and runs the process at the scheduled instance or interval. For example,you can schedule a process to run at a time convenient for your organization, such as overnight.
Note: To create a job schedule from any tab of the process status page, click Create job scheduleunder Tasks.
www.blackbaud.com/howto/researchpoint
chapter 4: IMPORT
pg. 179

Create a job schedule1. On the Job schedules tab of the process, click Add. The Create job screen appears.
2. In the Job name field, enter a name for the scheduled process.3. By default, the schedule is active. To suspend it, clear the Enabled checkbox.4. In the Schedule type field, select how often to run the process. You can run a process once; on a
daily, weekly, or monthly basis; whenever SQL Server Agent service starts; or whenever thecomputer is idle according to SQL Server Agent. Your selection determines which other fields areenabled.
www.blackbaud.com/howto/researchpoint
chapter 4: IMPORT
pg. 180

a. For a process that runs once, select the date and time to run it.
b. For a process that runs on a daily, weekly, or monthly basis, select the number of days,weeks, or months between instances in the Occurs every field. For a weekly process, selectthe day of the week to run it. For a monthly process, select the day of the month to run it.For a process that runs on a daily, weekly, or monthly basis, select whether to run it a singletime or at regular intervals on the days when it runs.
c. For a process that runs on a daily, weekly, or monthly basis, select a start date and, ifnecessary, an end date. To run the process indefinitely, select No end date.
5. To return to the Job schedules tab, click Save.
Create Job Screen
Screen Item Description
Job name Enter a name for the job schedule.
Schedule type Select how often to run the job schedule. You can run a process once; on a daily, weekly, ormonthly basis; whenever SQL Server Agent service starts; or whenever the computer is idleaccording to SQL Server Agent.
Enabled By default, the scheduled process is active. To suspend the process, clear this checkbox.
One-timeoccurrence
For a process that runs once, select the date and time to run it.
Frequency For a process that runs on a daily, weekly, or monthly basis, select the number of days, weeks,or months between instances in the Occurs every field.
For a weekly process, select the day of the week to run it.
For a monthly process, select the day of the month to run it.
Dailyfrequency
For a process that runs on a daily, weekly, or monthly basis, select whether to run it a singletime or at regular intervals on the days when it runs.
To run a process once, select Occurs once at and enter the start time.
To run a process at intervals, select Occurs every and enter the time between instances, aswell as a start time and end time.
Start date For a process that runs on a daily, weekly, or monthly basis, select a start date and, ifnecessary, an end date. To run the process indefinitely, select No end date.
Edit Job SchedulesAfter you create a job schedule for a process, you can update it. For example, you can adjust itsfrequency. You cannot edit the package to create the job schedule. To edit a job, select it and clickEdit.
www.blackbaud.com/howto/researchpoint
chapter 4: IMPORT
pg. 181

Edit a job schedule1. On the Job schedules tab, select a job and click Edit. The Edit job screen appears. The options
on this screen are the same as the Create job screen. For information about these options,refer to Create Job Screen on page 181.
2. Make changes as necessary. For example, in the Schedule type you can change how often torun the process.
3. Click Save. You return to the Job schedules tab.
Delete Job SchedulesOn the Job schedules tab of the status page, you can delete a job schedule of the process. This deletesthe scheduled job as well as changes made to it outside the program. To delete a job schedule, selectit and click Delete.
Delete a job schedule1. On the Job schedules tab, select the job and click Delete. A confirmation screen appears.2. Click Yes. You return to the Job schedules tab.
Start ProcessThis task allows you to start the selected business process from the process page.
Edit ProcessThis task allows you to edit the selected business process from the process page.
Create Job ScheduleThis task allows you to create a job schedule that tells the application when to automatically run theselected business process.
Delete ProcessThis task allows you to delete the selected business process from the process page. Before you deletea process, we strongly recommend you back up your data. Unless you previously save the transmissionfile or prenotification authorization file, once you delete the process, you can no longer use its outputfile that contains the data extracted from your database.
Exception ReportWhen you run a process, the process status page appears and displays the number of records that didand did not process. Records that fail to process are called exceptions. When there are exceptions, you
www.blackbaud.com/howto/researchpoint
chapter 4: IMPORT
pg. 182
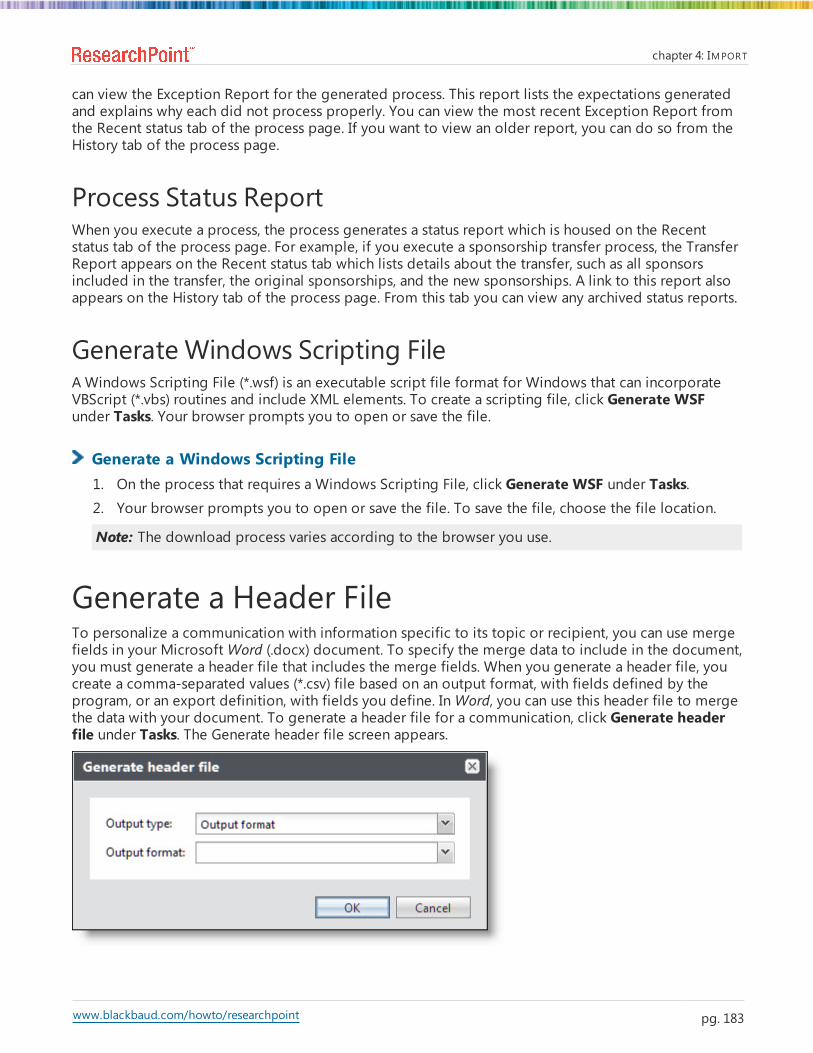
can view the Exception Report for the generated process. This report lists the expectations generatedand explains why each did not process properly. You can view the most recent Exception Report fromthe Recent status tab of the process page. If you want to view an older report, you can do so from theHistory tab of the process page.
Process Status ReportWhen you execute a process, the process generates a status report which is housed on the Recentstatus tab of the process page. For example, if you execute a sponsorship transfer process, the TransferReport appears on the Recent status tab which lists details about the transfer, such as all sponsorsincluded in the transfer, the original sponsorships, and the new sponsorships. A link to this report alsoappears on the History tab of the process page. From this tab you can view any archived status reports.
Generate Windows Scripting FileA Windows Scripting File (*.wsf) is an executable script file format for Windows that can incorporateVBScript (*.vbs) routines and include XML elements. To create a scripting file, click Generate WSFunder Tasks. Your browser prompts you to open or save the file.
Generate a Windows Scripting File1. On the process that requires a Windows Scripting File, click Generate WSF under Tasks.2. Your browser prompts you to open or save the file. To save the file, choose the file location.
Note: The download process varies according to the browser you use.
Generate a Header FileTo personalize a communication with information specific to its topic or recipient, you can use mergefields in your MicrosoftWord (.docx) document. To specify the merge data to include in the document,you must generate a header file that includes the merge fields. When you generate a header file, youcreate a comma-separated values (*.csv) file based on an output format, with fields defined by theprogram, or an export definition, with fields you define. InWord, you can use this header file to mergethe data with your document. To generate a header file for a communication, click Generate headerfile under Tasks. The Generate header file screen appears.
www.blackbaud.com/howto/researchpoint
chapter 4: IMPORT
pg. 183

In the Output type field, select whether to use fields from a standard output format or an exportdefinition.
• If you select Output format, select the output format that contains the merge fields to include.
• If you select Export definition, search for and select the export definition that includes the mergefields to include. For information about how to set up an export definition, refer to the Query andExport Guide.
When you click OK, the browser downloads the header file, based on the selected output format orexport definition, for use inWord.
Go to Batch EntryAfter running an import process, you can click Go to batch entry under Tasks to access the batchcreated by the import process.
www.blackbaud.com/howto/researchpoint
chapter 4: IMPORT
pg. 184

ResearchPoint 4.91 Batch & Import Guide US©2016 Blackbaud, Inc. This publication, or any part thereof, may not be reproduced or transmitted in any form orby anymeans, electronic, or mechanical, including photocopying, recording, storage in an information retrievalsystem, or otherwise, without the prior written permission of Blackbaud, Inc.
The information in this manual has been carefully checked and is believed to be accurate. Blackbaud, Inc., assumesno responsibility for any inaccuracies, errors, or omissions in this manual. In no event will Blackbaud, Inc., be liablefor direct, indirect, special, incidental, or consequential damages resulting from any defect or omission in thismanual, even if advised of the possibility of damages.
In the interest of continuing product development, Blackbaud, Inc., reserves the right to make improvements inthis manual and the products it describes at any time, without notice or obligation.
All Blackbaud product names appearing herein are trademarks or registered trademarks of Blackbaud, Inc.
All other products and company names mentioned herein are trademarks of their respective holder.
IMPORT 185