batometer: a bat detector to wear on your wrist. · 2013-06-13 · batometer: a bat detector to...
TRANSCRIPT
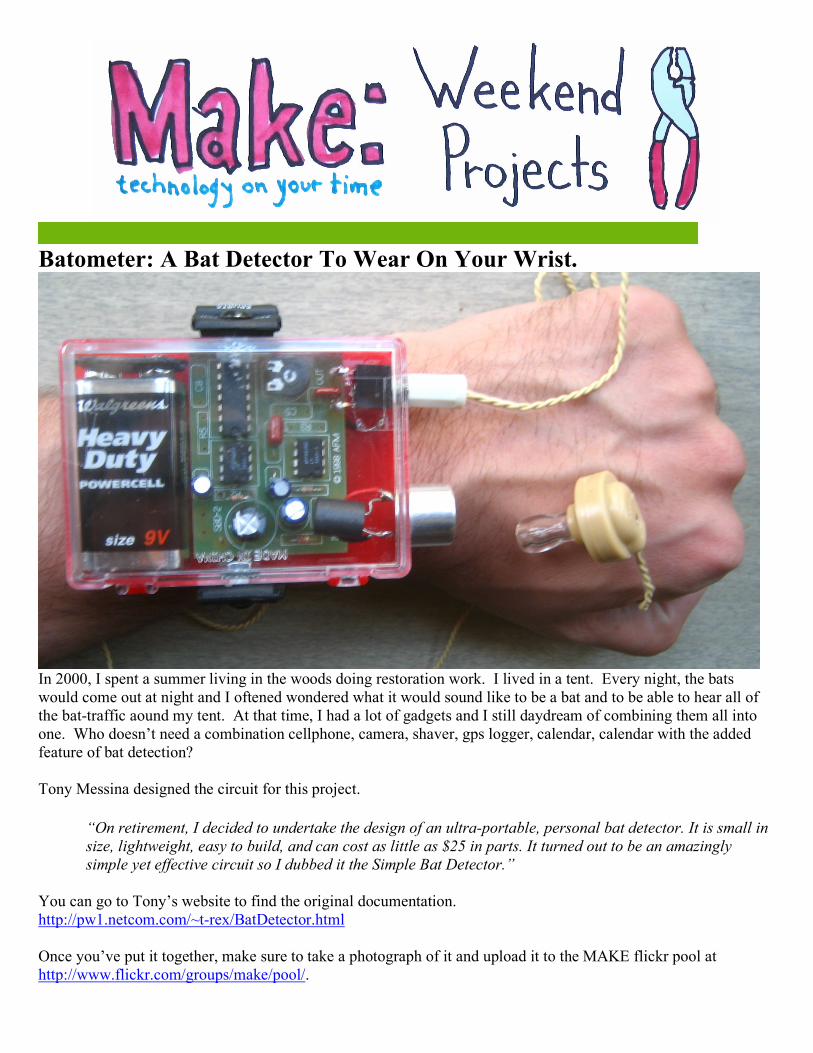
Batometer: A Bat Detector To Wear On Your Wrist.
In 2000, I spent a summer living in the woods doing restoration work. I lived in a tent. Every night, the bats would come out at night and I oftened wondered what it would sound like to be a bat and to be able to hear all of the bat-traffic aound my tent. At that time, I had a lot of gadgets and I still daydream of combining them all into one. Who doesn’t need a combination cellphone, camera, shaver, gps logger, calendar, calendar with the added feature of bat detection? Tony Messina designed the circuit for this project.
“On retirement, I decided to undertake the design of an ultra-portable, personal bat detector. It is small in size, lightweight, easy to build, and can cost as little as $25 in parts. It turned out to be an amazingly simple yet effective circuit so I dubbed it the Simple Bat Detector.”
You can go to Tony’s website to find the original documentation. http://pw1.netcom.com/~t-rex/BatDetector.html Once you’ve put it together, make sure to take a photograph of it and upload it to the MAKE flickr pool at http://www.flickr.com/groups/make/pool/.

Tools: Here are the tools that I found useful to have on hand for this project.
Personally, I like the WES50 (now the WES51) and the other ~$100 Wellers. One with temperature control and a stand is best. A conical or small 'screwdriver' tip is good, almost all irons come with one of these. A low quality (ahem, $15 radioshack) iron may cause more problems than its worth. http://www.amazon.com/gp/product/B0002BSQS0/sr=1-4/qid=1155917412/ref=pd_bbs_4/002-0532868-2131203?ie=UTF8&s=electronics
Solder. Rosin core, 60/40. Good solder is a good thing. Bad solder leads to bridging and cold solder joints, which can be tough to find. Don’t buy a tiny amount, you'll run out when you least expect it. 1lb spools are a minimum. http://www.amazon.com/gp/product/B0002KRAB0/sr=8-1/qid=1155918436/ref=sr_1_1/002-0532868-2131203?ie=UTF8
Multimeter/Oscilloscope A meter is helpful to check voltages and continuity. (Bre’s Note: This one is $5, but if you want super fancy get a Fluke) http://www.amazon.com/gp/product/B000BSHHKW/sr=1-3/qid=1155918578/ref=pd_bbs_3/002-0532868-2131203?ie=UTF8&s=electronics
Flush/diagonal cutters. Essential for cutting leads close to the PCB. http://www.amazon.com/gp/product/B000BDIS0A/sr=1-5/qid=1155919310/ref=sr_1_5/002-0532868-2131203?ie=UTF8&s=hi
Desoldering tool. If you are prone to incorrectly soldering parts. http://www.amazon.com/gp/product/B0002KRAAG/sr=1-1/qid=1155919607/ref=sr_1_1/002-0532868-2131203?ie=UTF8&s=hi
'Handy Hands' with Magnifying Glass. Not absolutely necessary but will make things go much much faster. http://www.amazon.com/gp/product/B0002BBZ2Y/ref=pd_sim_hi_4/002-0532868-2131203?ie=UTF8

Parts This parts list is straight off Tony’s website. As he mentioned in his notes, I ended up having to use the 2.2k resistor for R2 because the 1k and 1.5k gave me a lot of feedback. Here is the source of these. Tony updated these just a few days ago! It’s worth checking in for updates before you build your bat detector. http://pw1.netcom.com/~t-rex/SBD2Parts.html The following table lists the parts sources I use for the enhanced Simple Bat Detector. Web sites, mailing addresses, and phone numbers are listed below the table. The total bill of materials is usually less than $35.00.
Notes: 1. Different ultrasonic transducers require different gain settings, and some times additional components, to make them their most effective in the Simple Bat Detector. The transducer listed above will require a R2 gain resistor that may vary in the range of 470 ohms to 2.2K ohms. I usually suggest 1.5K as a good starting point. If the detector is too noisy, or oscillates, then stepping up to a 2.2K resistor will usually settle it down. If the detector seems to be insensitive to bats that are nearby, a 470 ohm resistor might solve the problem by pushing the gain of the second stage amplifier closer to the limit. One method for setting the gain resistance is to use a 5K ohm potentiometer for R2 to determine the optimum resistor value to use to provide the best gain achievable with your specific bat detector. I have even built detectors with a 5K pot for R2 as a permanent feature sp that the gain could be adjusted in the field.
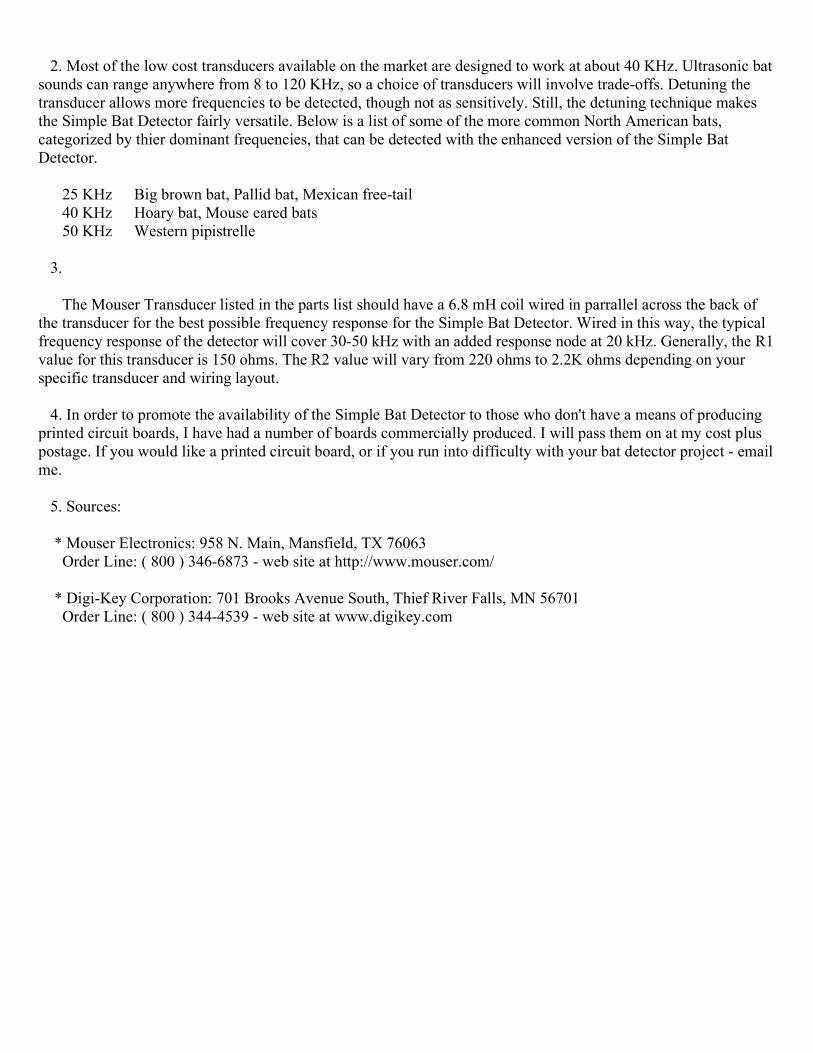
2. Most of the low cost transducers available on the market are designed to work at about 40 KHz. Ultrasonic bat sounds can range anywhere from 8 to 120 KHz, so a choice of transducers will involve trade-offs. Detuning the transducer allows more frequencies to be detected, though not as sensitively. Still, the detuning technique makes the Simple Bat Detector fairly versatile. Below is a list of some of the more common North American bats, categorized by thier dominant frequencies, that can be detected with the enhanced version of the Simple Bat Detector. 25 KHz Big brown bat, Pallid bat, Mexican free-tail 40 KHz Hoary bat, Mouse eared bats 50 KHz Western pipistrelle 3. The Mouser Transducer listed in the parts list should have a 6.8 mH coil wired in parrallel across the back of the transducer for the best possible frequency response for the Simple Bat Detector. Wired in this way, the typical frequency response of the detector will cover 30-50 kHz with an added response node at 20 kHz. Generally, the R1 value for this transducer is 150 ohms. The R2 value will vary from 220 ohms to 2.2K ohms depending on your specific transducer and wiring layout. 4. In order to promote the availability of the Simple Bat Detector to those who don't have a means of producing printed circuit boards, I have had a number of boards commercially produced. I will pass them on at my cost plus postage. If you would like a printed circuit board, or if you run into difficulty with your bat detector project - email me. 5. Sources: * Mouser Electronics: 958 N. Main, Mansfield, TX 76063 Order Line: ( 800 ) 346-6873 - web site at http://www.mouser.com/ * Digi-Key Corporation: 701 Brooks Avenue South, Thief River Falls, MN 56701 Order Line: ( 800 ) 344-4539 - web site at www.digikey.com
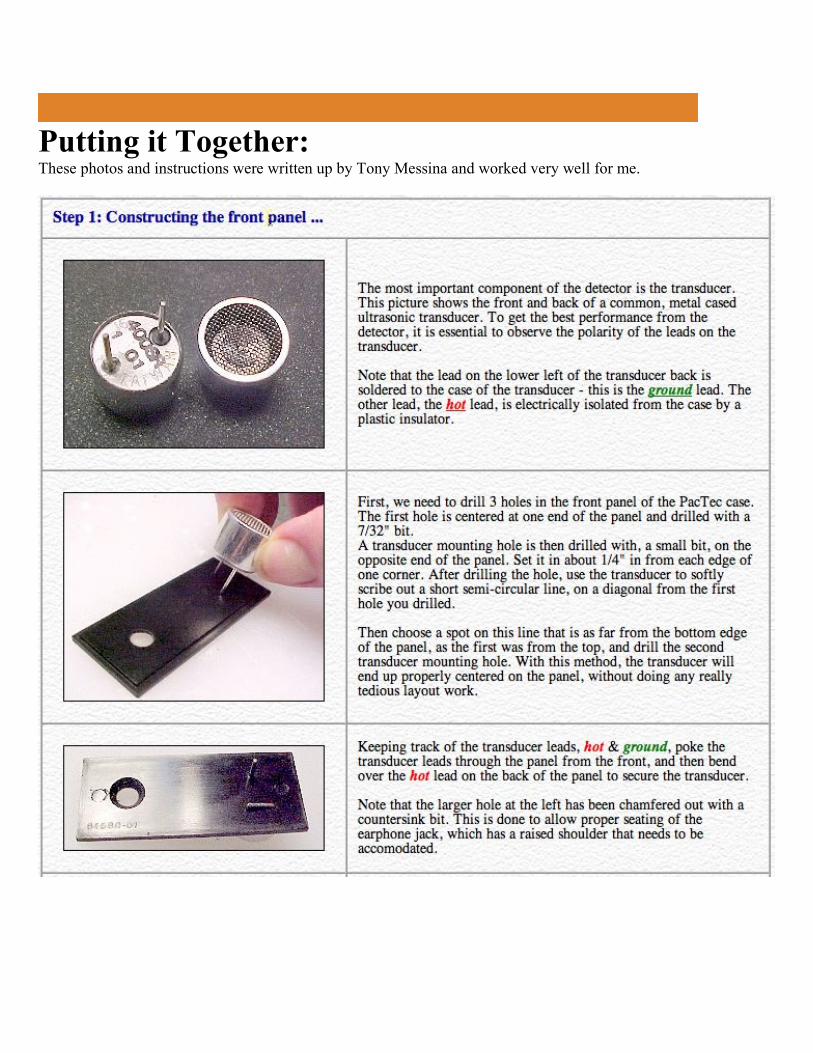
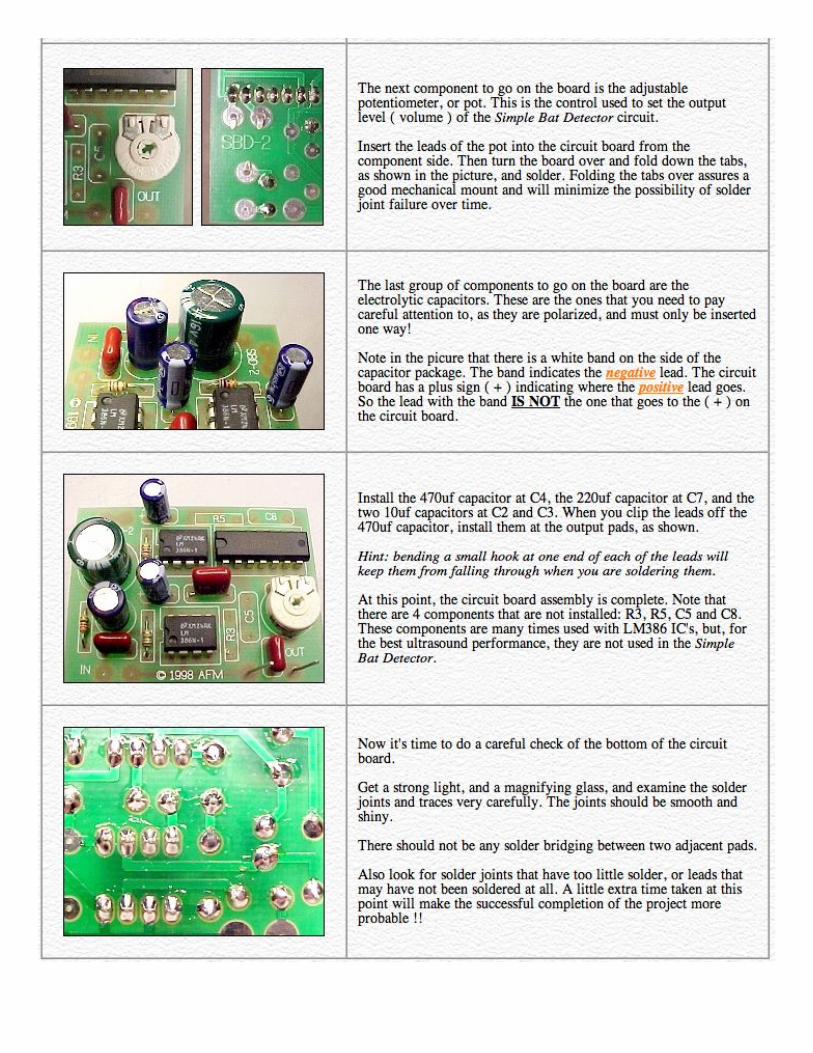
Putting it Together: These photos and instructions were written up by Tony Messina and worked very well for me.


Assembling The Circuit Board
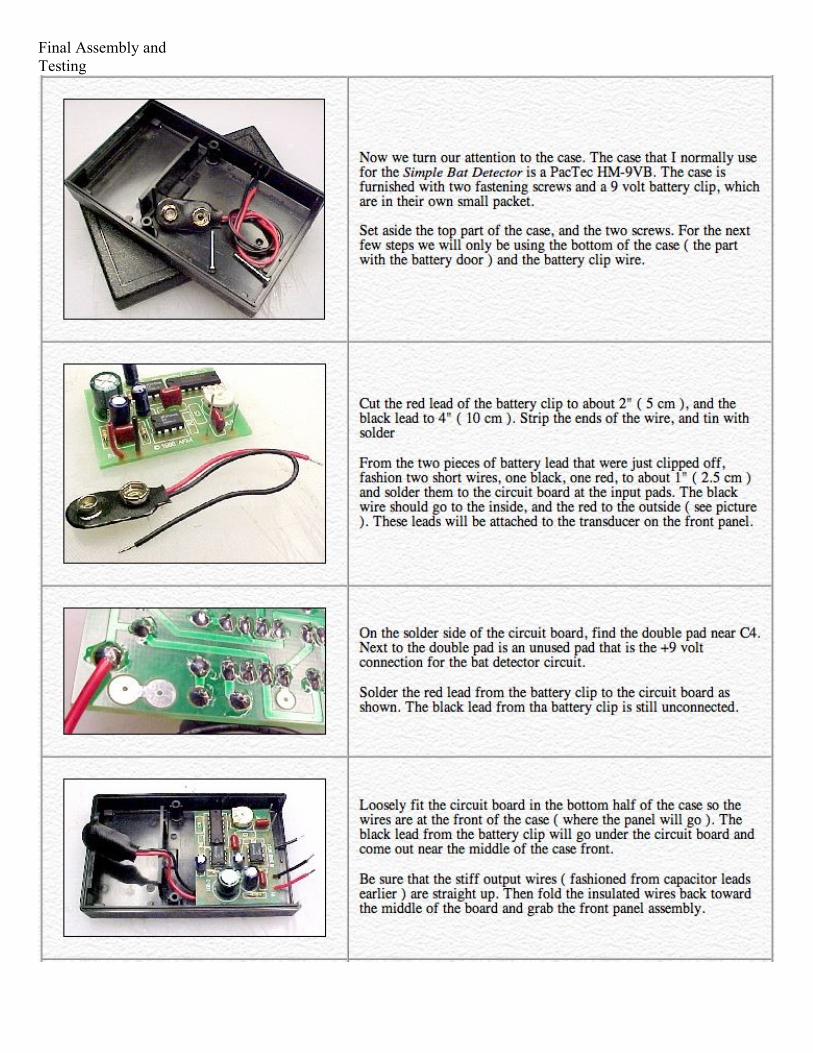
Final Assembly and Testing


Testing It Out When you finish, point it at a sink and turn on the water! If you get a lot of feedback, change the R2 resistor, then go forth and find some bats!