battle for middle earth
TRANSCRIPT
7/30/2019 battle for middle earth
http://slidepdf.com/reader/full/battle-for-middle-earth 1/15
The Battle for Middle Earth CampaignThe Lord of the Rings SBG
7/30/2019 battle for middle earth
http://slidepdf.com/reader/full/battle-for-middle-earth 2/15
2
Foreword
The Lord of the Rings SBG is fantastic gaming
system, players are able to re-tell their
favourite moments from the Epic trilogy
whether it be upon the walls of Helms Deep oron the plains of the Pelennor. The sourcebooks
provide a number of scenarios that when
linked create mini-campaigns but these are
often short and predictable. The LOTR SBG is
missing a simple campaign system that gives
players the chance to control multiple armies
based on their miniature collection. To fill the
void I’ve written this Campaign System for the
enthusiast looking to create a detailed
backstory, perhaps wanting to steer away fromTolkien’s lore and instead focus on ‘what if’
scenarios. The Battle for Middle Earth is about
to begin!
Design Notes
The rules are inspired by the Mighty Empire
rules and also the Middle Earth in Flames
rules. A number of key changes have been
made. My aim was to create a simplecampaign to be fought over by two or more
opponents, directing multiple armies around
Middle Earth. The rules allow armies to move
around the map, claiming areas of strategic
value and fighting over various lands to secure
resources. Players can reinforce their preferred
strongholds and push for dominance on key
areas of the map pitting forces of varying sizes
against one another. There are special rules
and random events to keep players on theirtoes and battlefield modifiers such as the
Watchtower/Fort special rules. Most
importantly players can tailor the campaign
towards their miniature collections.
This document is completely unofficial and in no way endorsed by Games Workshop Limited. Lord of the Rings
Warhammer, White Dwarf, the White Dwarf logo, and all associated marks, names, races, race insignia, characters,
locations, illustrations and images from the Lord of the Rings world are either ®, TM and/or © Copyright Games
Workshop Ltd 2000-2011, variably registered in the UK and other countries around the world. Used without permission.
No challenge to their status intended. All Rights Reserved to their respective owners.
7/30/2019 battle for middle earth
http://slidepdf.com/reader/full/battle-for-middle-earth 3/15
3
Contents page
Campaign Rules 4
Campaign Layout 4
Campaign Story 4
Campaign Objectives 4Strategic Points 5
Armies 5
Stationed Garrison 5
Campaign Turn 6
Initiative Roll 6
Turn Actions 6
Event Phase 6
Gather Resources 7
Move Armies 7Scouting Roll 7
Forced March 8
Capturing a Strategic Point 8
Splitting Armies 8
Distribute Resources 8
Reinforcing Armies 8
Creating New Armies 9
Building Outposts 9
Destroying Strategic Points / Outposts 9
Resolving Battles 10
Selecting Forces 10
Reinforcements 10
Battlefield Setup 10
Battlefield Objectives 11
Determining Losses 11
Battle Aftermath 12
Defeated Armies 12
Special Rules 12
Faction Bonuses 12
Wild Creatures 13
Turn Sheet 14
7/30/2019 battle for middle earth
http://slidepdf.com/reader/full/battle-for-middle-earth 4/15
4
Campaign Rules
Campaign Layout
The campaign system can be focused around a
small region of Harad, the lands of Gondor or
even the whole of Middle Earth itself! Players
may choose what they will be fighting over
based on their miniature collections, terrain
available and time constraints. A hex-based
map is suggested, the Mighty Empire tiles are
ideal for map building and I highly
recommend them. There is also a map featured
in White Dwarf 336 should players be unable
to produce their own. A campaign map is also
provided at the end of this rules set. If you
want to build your own hex based map you
can by following the link below.
http://www.hexographer.com/index.shtml
Campaign Story
The campaign story is important and should be
considered prior to anything else. Thesuggested period is the War of the Ring at the
end of Third Age however the campaign can
be set around any time during Middle Earth’s
long history. Perhaps the involvement of the
Rohirrim in the Battle of the Pelennor Fields
would have been different if their own
conflicts had turned ill. The constant
harassment of the Corsair raiders in Southern
Gondor may have prevented reinforcements
reaching Minas Tirith had they been moreeffective. All these events are linked so players
can pick and choose what conflict they would
like to fight over rewriting the history of
Middle Earth.
Campaign Objectives
The campaign objective should be decided
next and can be chosen by the participants
from the list below. Choose one that best
reflects the struggle both forces would likely
fight over. Alternatively create your own,
make sure all players understand the endgame
before beginning the campaign.
- After 20 Campaign Turns the side who
controls the most Strategic Points is thewinner.
- The campaign continues until one side
holds all of the Strategic Points at which
point they are victorious.
- The campaign lasts until one player
manages to accumulate ____________
Resource Points at which point players
gather all their strength and fight one last
battle. The force with fewer points may
set up within a Strategic Point (Minas
Tirith, Isengard etc) and so a Siege Battle
will ensue. The winner is the side which
kills or routs all the opposing side.
- After 20 Campaign Turns the player
whose faction controls the most
Resource Points (including Army and
Strategic Points) is victorious. Note for
this purpose Strategic Points count as 500
resource points each.
- The campaign continues until one side
is destroyed!
7/30/2019 battle for middle earth
http://slidepdf.com/reader/full/battle-for-middle-earth 5/15
5
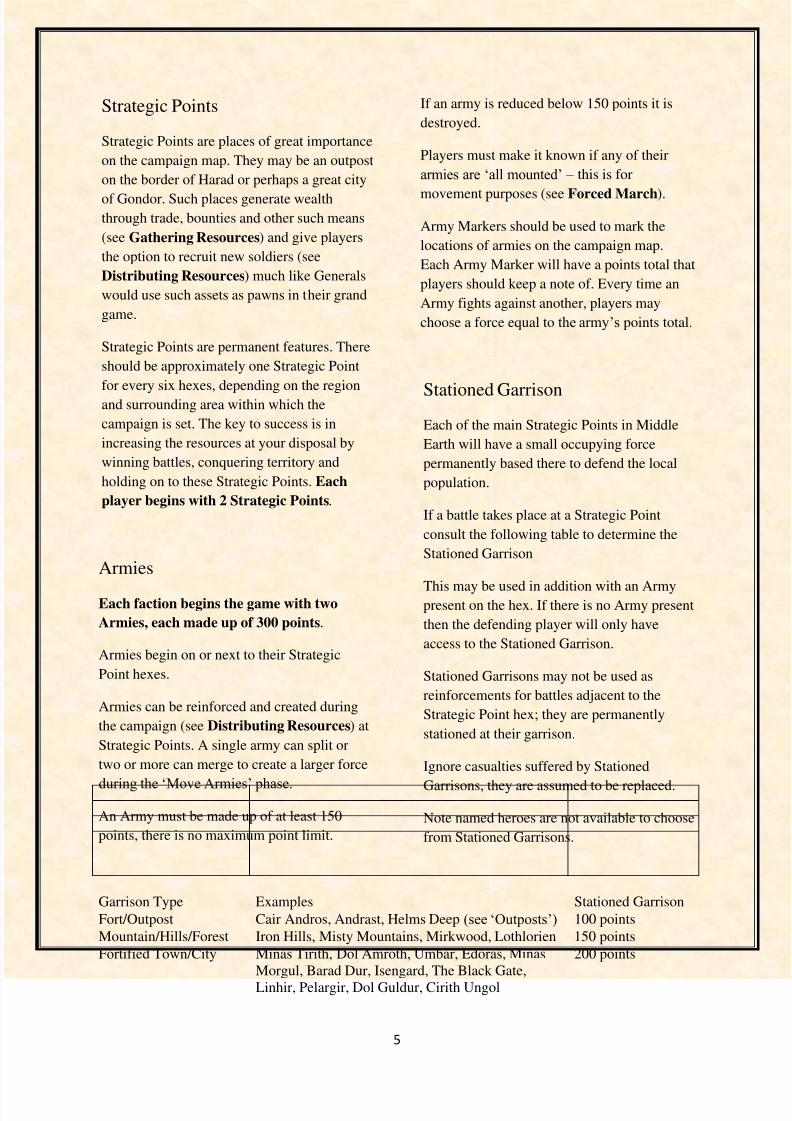
Strategic Points
Strategic Points are places of great importance
on the campaign map. They may be an outpost
on the border of Harad or perhaps a great city
of Gondor. Such places generate wealththrough trade, bounties and other such means
(see Gathering Resources) and give players
the option to recruit new soldiers (see
Distributing Resources) much like Generals
would use such assets as pawns in their grand
game.
Strategic Points are permanent features. There
should be approximately one Strategic Point
for every six hexes, depending on the regionand surrounding area within which the
campaign is set. The key to success is in
increasing the resources at your disposal by
winning battles, conquering territory and
holding on to these Strategic Points. Each
player begins with 2 Strategic Points.
Armies
Each faction begins the game with two
Armies, each made up of 300 points.
Armies begin on or next to their Strategic
Point hexes.
Armies can be reinforced and created during
the campaign (see Distributing Resources) at
Strategic Points. A single army can split or
two or more can merge to create a larger force
during the ‘Move Armies’ phase.
An Army must be made up of at least 150
points, there is no maximum point limit.
If an army is reduced below 150 points it is
destroyed.
Players must make it known if any of their
armies are ‘all mounted’ – this is for
movement purposes (see Forced March).
Army Markers should be used to mark the
locations of armies on the campaign map.
Each Army Marker will have a points total that
players should keep a note of. Every time an
Army fights against another, players may
choose a force equal to the army’s points total.
Stationed Garrison
Each of the main Strategic Points in Middle
Earth will have a small occupying force
permanently based there to defend the local
population.
If a battle takes place at a Strategic Point
consult the following table to determine the
Stationed Garrison
This may be used in addition with an Armypresent on the hex. If there is no Army present
then the defending player will only have
access to the Stationed Garrison.
Stationed Garrisons may not be used as
reinforcements for battles adjacent to the
Strategic Point hex; they are permanently
stationed at their garrison.
Ignore casualties suffered by Stationed
Garrisons, they are assumed to be replaced.
Note named heroes are not available to choose
from Stationed Garrisons.
Garrison Type Examples Stationed Garrison
Fort/Outpost Cair Andros, Andrast, Helms Deep (see ‘Outposts’) 100 points
Mountain/Hills/Forest Iron Hills, Misty Mountains, Mirkwood, Lothlorien 150 points
Fortified Town/City Minas Tirith, Dol Amroth, Umbar, Edoras, Minas
Morgul, Barad Dur, Isengard, The Black Gate,
Linhir, Pelargir, Dol Guldur, Cirith Ungol
200 points

7/30/2019 battle for middle earth
http://slidepdf.com/reader/full/battle-for-middle-earth 6/15
6
Campaign Turn
Initiative Roll
At the start of every Campaign Turn each
player rolls a dice. Compare results to
determine the order in which players will take
their Turn Actions (much like a Priority Roll).
The player that rolls highest goes first. Any
ties are re-rolled.
Turn Actions
Once Initiative has been determined, players
get to take their Turn Actions in the following
order:
i) Event Phase
ii) Gather Resources
iii) Move Armies
iv) Distribute Resources
All players take their Turn Actions before
Resolving Battles. Once every player has
taken their actions and any table-top battles
have been fought, a new Campaign Turn
begins with another Initiative Roll.
Event Phase
All players must roll a dice on the Event Chart
below starting with the player who rolled
highest in the Initiative Roll. Consult the rulesand pick an army/hex were appropriate. These
events take effect immediately and last until
the end of the Campaign Turn.
D6 Event Effect1 Heavy Storm Heavy winds and driving rain hamper the land. Pick an enemy hex.
An army located there may not move this Campaign Turn. Any armies
moving into this hex will be able to move no further than turn.
2 Local Flooding Flash flooding has devastated the area destroying crops and buildings.
Choose an enemy Strategic Point. They may not Gather Resources at
this location this Campaign Turn.
3 Pathfinder Scouts are hired to assist friendly forces through All friendly armies
receive +1 to their Scouting and Forced March rolls this Campaign
Turn.
4 Subsistence Shortfall Enemy forces begin to suffer as supplies run short. D5 x 12 resource
points are deducted from an enemy army of your choice. Note: this
effect can only be targeted against an army located outside of a
Strategic Point.
5 Raids Friendly forces have carried out successful raids against the enemy.
D6 x 10 resource points are added to your treasury.
6 Financial Turmoil War takes its toll on the enemy, blighting the land leading to famine
and unrest amongst the population. As a consequence all enemy
resources generated this Campaign Turn are halved.
7/30/2019 battle for middle earth
http://slidepdf.com/reader/full/battle-for-middle-earth 7/15
7
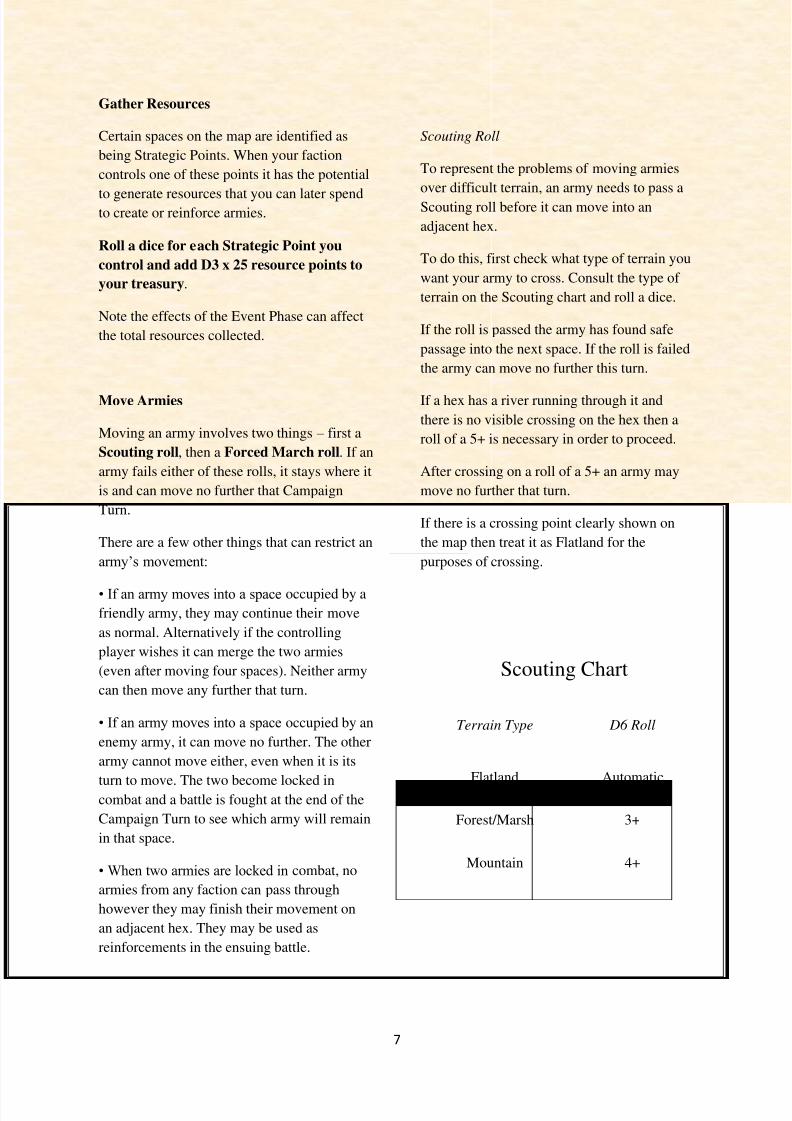
Gather Resources
Certain spaces on the map are identified as
being Strategic Points. When your faction
controls one of these points it has the potential
to generate resources that you can later spendto create or reinforce armies.
Roll a dice for each Strategic Point you
control and add D3 x 25 resource points to
your treasury.
Note the effects of the Event Phase can affect
the total resources collected.
Move Armies
Moving an army involves two things – first a
Scouting roll, then a Forced March roll. If an
army fails either of these rolls, it stays where it
is and can move no further that Campaign
Turn.
There are a few other things that can restrict an
army’s movement:
• If an army moves into a space occupied by a
friendly army, they may continue their move
as normal. Alternatively if the controlling
player wishes it can merge the two armies
(even after moving four spaces). Neither army
can then move any further that turn.
• If an army moves into a space occupied by an
enemy army, it can move no further. The other
army cannot move either, even when it is its
turn to move. The two become locked incombat and a battle is fought at the end of the
Campaign Turn to see which army will remain
in that space.
• When two armies are locked in combat, no
armies from any faction can pass through
however they may finish their movement on
an adjacent hex. They may be used as
reinforcements in the ensuing battle.
Scouting Roll
To represent the problems of moving armies
over difficult terrain, an army needs to pass a
Scouting roll before it can move into an
adjacent hex.
To do this, first check what type of terrain you
want your army to cross. Consult the type of
terrain on the Scouting chart and roll a dice.
If the roll is passed the army has found safe
passage into the next space. If the roll is failed
the army can move no further this turn.
If a hex has a river running through it and
there is no visible crossing on the hex then a
roll of a 5+ is necessary in order to proceed.
After crossing on a roll of a 5+ an army may
move no further that turn.
If there is a crossing point clearly shown on
the map then treat it as Flatland for the
purposes of crossing.
Scouting Chart
Terrain Type D6 Roll
Flatland Automatic
Forest/Marsh 3+
Mountain 4+
7/30/2019 battle for middle earth
http://slidepdf.com/reader/full/battle-for-middle-earth 8/15
8
Forced March
To represent the exhausting effects
manoeuvring an army can have, you will need
to make a Forced March roll for each space
moved.
The Forced March chart tells you the number
you need in order to successfully move into
the next hex. As indicated on the chart, you
must make a roll for each successive space
you wish to move to.
If a Forced March roll is failed the army
remains where it is and can advance no further
that Campaign Turn.
An army cannot move more than four spaces
in a single Campaign Turn.
If the army is made up of 100% mounted units
then add +1 to all Forced March rolls.
Capturing a Strategic Point
In order to capture a Strategic Point, an Army
has to move into the hex and end the current
turn’s movement there. The player then places
one of his Territory Markers to show that he
retains control of the hex even if his army
moves away in a later turn.
If a player’s army moves onto a Strategic
Point that already contains an enemy Army a
battle is fought (see Resolving Battles) and
control goes to the victor.
Splitting Armies
At the start of the Move Armies phase, a larger
force may be split into two groups. Unlike
with merging armies, splitting armies does not
halt movement that turn.
A player may choose to split his armies into no
more than two separate forces providing they
follow the ‘Creating New Armies’requirements in regards to points totals.
Note each force must have at least one Hero.
Distribute Resources
Once a player has moved his armies, he may
distribute any resources he has in his Treasury.
The points may be used to reinforce or createnew armies or simply be kept safe for a
subsequent Campaign Turn. They may also be
used to build Outposts.
Note: A Strategic Point engaged by an enemy
Army cannot spend any resources on creating
or reinforcing an army during the Campaign
Turn.
Reinforcing Armies
An army can be reinforced while it is at a
Strategic Point. It however must not be
engaged by an enemy force. Points from your
Treasury may be spent in multiples of 50 to
increase the Army points total.
Note a player must advise whether the army is
100% mounted otherwise it will be treated as
normal.
Forced March Chart
Army Movement D6 Roll
First space Automatic
Second space 3+
Third space 4+
Fourth space 5+
7/30/2019 battle for middle earth
http://slidepdf.com/reader/full/battle-for-middle-earth 9/15
9
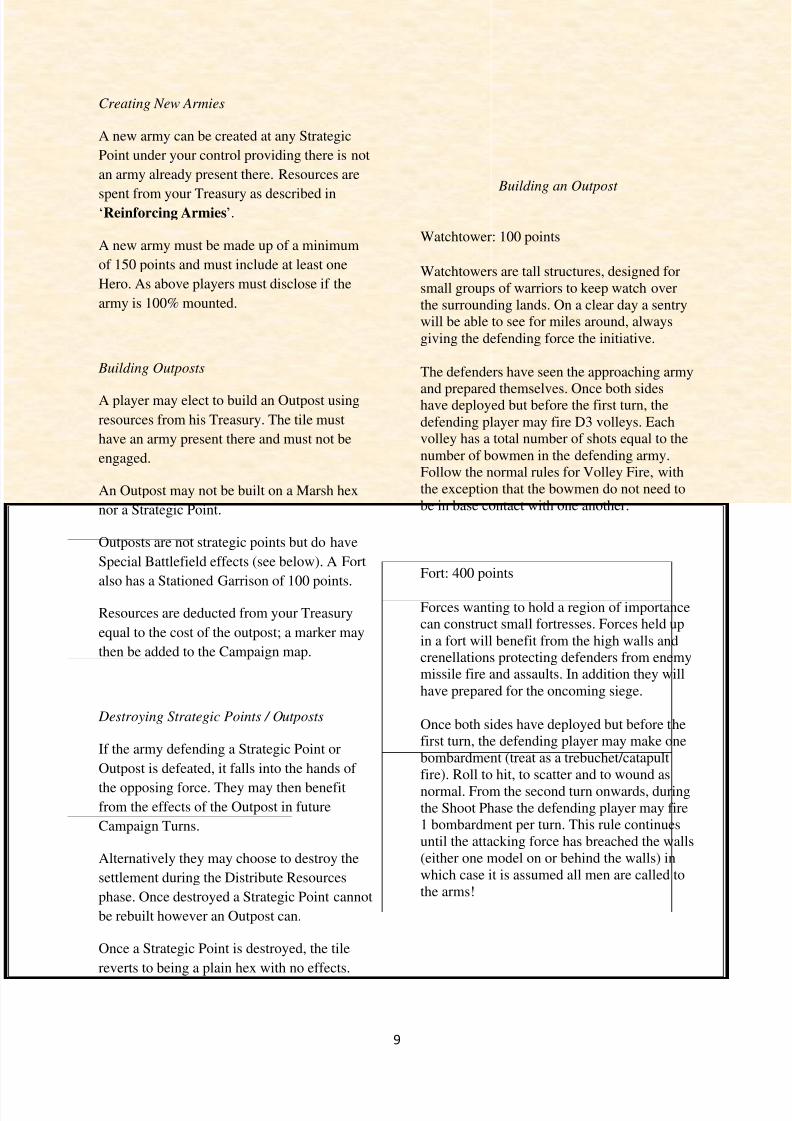
Creating New Armies
A new army can be created at any Strategic
Point under your control providing there is not
an army already present there. Resources are
spent from your Treasury as described in‘Reinforcing Armies’.
A new army must be made up of a minimum
of 150 points and must include at least one
Hero. As above players must disclose if the
army is 100% mounted.
Building Outposts
A player may elect to build an Outpost using
resources from his Treasury. The tile must
have an army present there and must not be
engaged.
An Outpost may not be built on a Marsh hex
nor a Strategic Point.
Outposts are not strategic points but do have
Special Battlefield effects (see below). A Fort
also has a Stationed Garrison of 100 points.
Resources are deducted from your Treasury
equal to the cost of the outpost; a marker may
then be added to the Campaign map.
Destroying Strategic Points / Outposts
If the army defending a Strategic Point or
Outpost is defeated, it falls into the hands of
the opposing force. They may then benefitfrom the effects of the Outpost in future
Campaign Turns.
Alternatively they may choose to destroy the
settlement during the Distribute Resources
phase. Once destroyed a Strategic Point cannot
be rebuilt however an Outpost can.
Once a Strategic Point is destroyed, the tile
reverts to being a plain hex with no effects.
Building an Outpost
Watchtower: 100 points
Watchtowers are tall structures, designed for
small groups of warriors to keep watch over
the surrounding lands. On a clear day a sentry
will be able to see for miles around, always
giving the defending force the initiative.
The defenders have seen the approaching army
and prepared themselves. Once both sideshave deployed but before the first turn, the
defending player may fire D3 volleys. Each
volley has a total number of shots equal to the
number of bowmen in the defending army.
Follow the normal rules for Volley Fire, with
the exception that the bowmen do not need to
be in base contact with one another.
Fort: 400 points
Forces wanting to hold a region of importance
can construct small fortresses. Forces held up
in a fort will benefit from the high walls and
crenellations protecting defenders from enemy
missile fire and assaults. In addition they will
have prepared for the oncoming siege.
Once both sides have deployed but before the
first turn, the defending player may make one
bombardment (treat as a trebuchet/catapult
fire). Roll to hit, to scatter and to wound as
normal. From the second turn onwards, during
the Shoot Phase the defending player may fire
1 bombardment per turn. This rule continues
until the attacking force has breached the walls
(either one model on or behind the walls) in
which case it is assumed all men are called to
the arms!
7/30/2019 battle for middle earth
http://slidepdf.com/reader/full/battle-for-middle-earth 10/15
10
Resolving Battles
An Army can attack an opposing force in an
adjacent hex to theirs (even if they have
moved four spaces), in which case they
become the attacking player. A table-top battleis to be fought using forces selected from their
respective point totals and following the rules
below. Once all the battles have been fought, a
new Campaign Turn can begin again.
Selecting Forces
Both forces are chosen to their respective
points totals.
If a Hero has already fought a battle with one
of the Armies then he is assumed to remain
with that army unless otherwise stated (see
Splitting Armies). If there are multiple
Heroes the same applies.
The rest of the forces can then be chosen.
Note: they do not have to be the same
Warriors that were present in previous battles.
Reinforcements
If an allied army is located next to the hex
where the battle is to take place, they may
arrive as reinforcements D6 + 3 turns into the
game.
Reinforcements move onto the board as one
unit from a direction that corresponds to themovements on the campaign map.
Once the battle is over, the reinforcements are
assumed to merge with the initial force into
one army (see Merging Armies)
Battlefield Setup
The Battlefield Setup should be loosely based
upon the area represented on the Campaign
Map where the two sides meet.
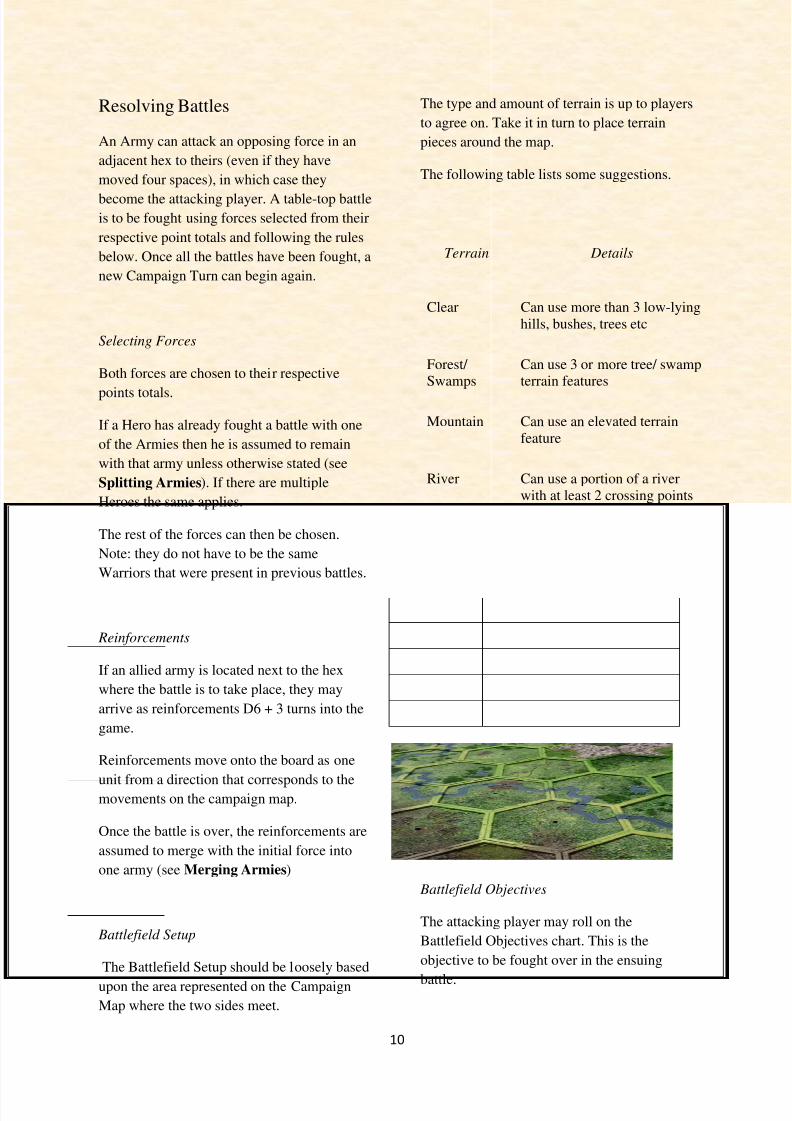
The type and amount of terrain is up to players
to agree on. Take it in turn to place terrain
pieces around the map.
The following table lists some suggestions.
Battlefield Objectives
The attacking player may roll on the
Battlefield Objectives chart. This is the
objective to be fought over in the ensuing
battle.
Terrain Details
Clear Can use more than 3 low-lying
hills, bushes, trees etc
Forest/
Swamps
Can use 3 or more tree/ swamp
terrain features
Mountain Can use an elevated terrain
feature
River Can use a portion of a river
with at least 2 crossing points
7/30/2019 battle for middle earth
http://slidepdf.com/reader/full/battle-for-middle-earth 11/15
11
Determining Losses
Any models that are killed during a battle are
removed from play. However put aside any
routed models and roll a dice for each at the
end of the game.
On a 4+ they return to the army after the battle
is over. A player may spend 25 resource points
from their Treasury to modify this roll by +1
(much like a point of Might).
Add up all the points of the remaining force
for each Army (including the routed who
returned).
The victorious army does not suffer any
further losses however the defeated side must
take a further 10% deduction from the
remaining points total to represent those too
injured and weak to go on, those that have
fallen, claimed by their battle wounds andthose too slow to keep up.
Battlefield Objectives
Objective D6 Details
Secure the Land 1
The game lasts until one side is reduced to 50% casualties in which
case that side rolls a D6. On a 1-2 the game ends. The side with the
most models within 6” of the defending players board edge wins.
Note for siege games all the land on or behind the walls is included
instead of the 6”.
Secure the Objectives 2
Place 3 objectives around the map (For siege games they must be on
or behind the walls). To secure an objective, one side must have
more models within 3” of it. The Game lasts until one side isreduced to 50% casualties in which case that side rolls a D6. On a 1-
2 the game ends. The side with the most objectives secured wins.
Leaderless Attackers 3
The attacking force is held together by the strength of their leaders
and is hopeless without them. The game continues until all of the
Heroes on the attacking side are slain or routed. As normal both
sides take courage tests once casualties amount to 50% or more of
their starting force.
Leaderless Defenders 4
The defending force has prospered under the leadership of its
experienced commanders. The game continues until all of the
Heroes on the defending side are slain or routed. As normal both
sides take courage tests once casualties amount to 50% or more of their starting force.
War of Attrition 5
The game lasts until one side is reduced to below 75% casualties in
which case that side rolls a D6. On a 1-2 the game ends. It is
assumed the remnants flee for their lives (treat as routed).
No Quarter 6
Both forces value the surrounding land dearly and will sacrifice
many lives in order to hold it. The game lasts until one side is
completely destroyed or routed.
7/30/2019 battle for middle earth
http://slidepdf.com/reader/full/battle-for-middle-earth 12/15
12
Battle Aftermath
The army that wins remains in the contested
space. In addition they are assumed to
scavenge weapons, armour and other
battlefield trophies. Add D6 x 10 points to thevictors Treasury.
Defeated Armies
If an Army loses a battle, it immediately
retreats 2 spaces towards its closest Strategic
Point, ending its movement if it reaches it.
They may not enter the hex if it is Under
Siege, instead ending their movement next to
the Strategic Point.
They may not do anything further that turn, as
the soldiers are too busy treating the injured.
Defending Armies fighting in a Mountain hex
cannot retreat and are destroyed if they lose a
battle. This also applies to armies which are
trapped on all sides on the campaign map
(although this is unlikely to ever happen).
Defeated Armies must deduct 1 from all their
Forced March rolls in the next Campaign
Turn.
They cannot attack opposing forces but can
participate in any battles if attacked.
Additionally they may be involved as
reinforcements as normal if they are adjacent
to an army or Strategic Point that is attacked.
Special Rules
Faction Bonuses
You may want to give each faction some kind
of bonus to represent the character and
background of the armies in play. As players
may choose to use multiple factions, the
special rules can be used in any arrangement.
Here are a few suggestions:
Dwarven Armies may add +1 to the Gathering
Resource roll for one of their Strategic Points.
The Armies of the Forgotten Kingdoms may
re-roll their Initiative Roll.
Elven Armies add +1 to all their Scouting
Rolls.
Gondor may re-roll on the Event Chart.
Isengard receives an additional 25 resource
points each turn.
Mordor receives D6 x 25 resource points to
their treasury for one of their Strategic Points
as opposed to the normal D3 x 25 resource
points.
The Rohirrim add +1 to all their Forced March
rolls (this is accumulative with the 100%
mounted rule).
Wild Creatures
You may wish to add the Wild Creatures
special rule to your campaign, it works asfollows.
“ Middle Earth has become a dangerous place
in recent years. Reports of savage attacks are
common place now, tales of whole warbands
disappearing in the dead of night. Wild
animals driven by hunger or something more
sinister have emboldened these creatures to
become more cunning than ever, preying
nearer now to the outlying settlements. There
are even stories of beasts hunting during the
course of battle, prowling the edges of the
battlefield for their next meal.”
If an army has declared they are attacking an
opposing force, a special event may occur, roll
on the chart below.
7/30/2019 battle for middle earth
http://slidepdf.com/reader/full/battle-for-middle-earth 13/15
13
- If the game is played as a Siege, then any
Wild Creatures must set up outside the
walls.
- During the battle the Wild Creatures are
controlled by the player with Priority.
- Wild Creatures do not pick sides so will
charge a model if they are in range.
- If there is no one in range they will
always move towards the nearest model atfull movement.
- Should there be multiple targets in range,
then the player with Priority may decide
which models they will engage.
- Wild Creatures are not skilled warriors
and so won’t back away if they lose afight. Treat them as trapped when rolling
to Wound.
- All Wild Creatures have the Survival
Instinct special rule
- The Wild Creatures are not considered to
be part of a force; they are part of the
wild! Therefore they never count as
Broken.
- If the Wild Creatures are all destroyed
continue the battle as normal.
- If the game objectives are achieved, the
game ends immediately. The Wild
Creatures are assumed to run off into the
wilderness.
D6 Roll Special Event
1-4 The creatures of this region have all but fled from the land. No effect
5
Whether it is hunger or something more sinister, the animals of this wood are
drawn to the sound of battle. Select up to 100 points of Spiders, Wargs and/orBat Swarms. They will arrive D12 turns into the battle from multiple
directions. Take it in turns to place newly arrived creatures along any of the
board edges no closer than 3” to any other models.
6
The din of battle has awoken a group of Hill Trolls (use 3 Cave Trolls). They
will arrive D6 turns into the battle from one board edge (chosen by the player
with Priority) no closer than 3” to any other models.
7/30/2019 battle for middle earth
http://slidepdf.com/reader/full/battle-for-middle-earth 14/15
14
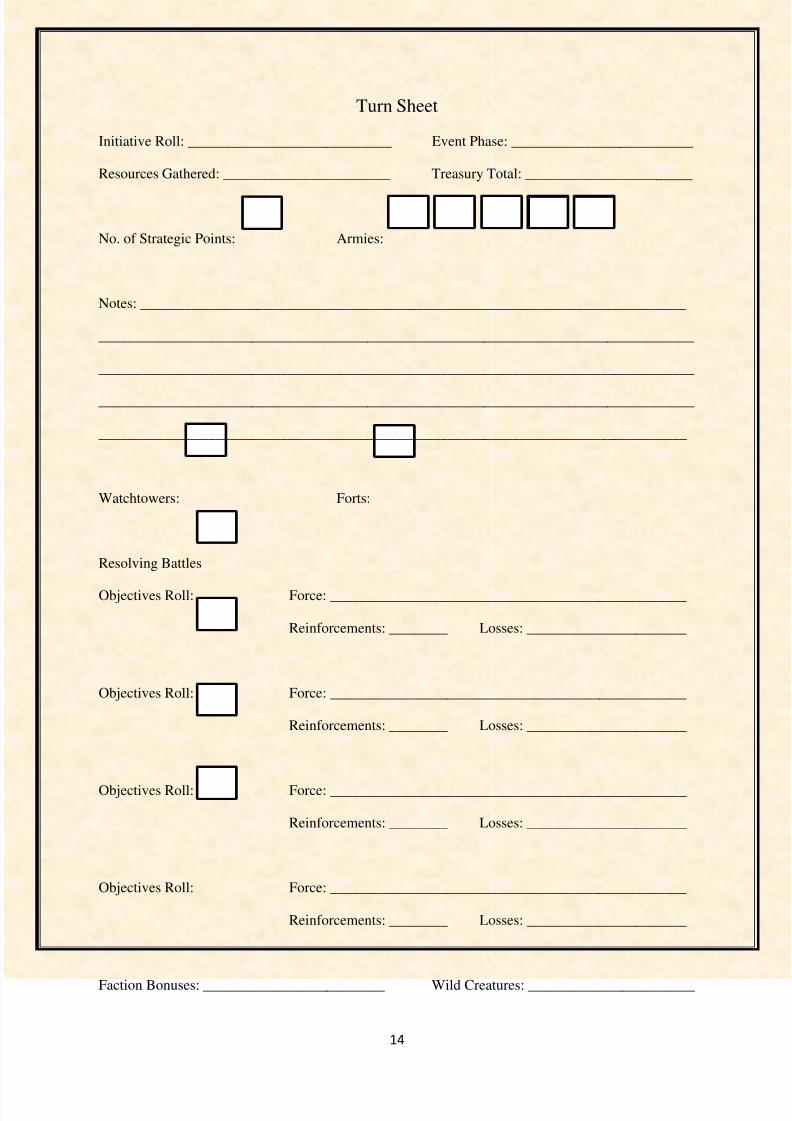
Turn Sheet
Initiative Roll: ____________________________ Event Phase: _________________________
Resources Gathered: _______________________ Treasury Total: _______________________
No. of Strategic Points: Armies:
Notes: ___________________________________________________________________________
__________________________________________________________________________________
__________________________________________________________________________________
__________________________________________________________________________________
_________________________________________________________________________________
Watchtowers: Forts:
Resolving Battles
Objectives Roll: Force: _________________________________________________
Reinforcements: ________ Losses: ______________________
Objectives Roll: Force: _________________________________________________
Reinforcements: ________ Losses: ______________________
Objectives Roll: Force: _________________________________________________
Reinforcements: ________ Losses: ______________________
Objectives Roll: Force: _________________________________________________
Reinforcements: ________ Losses: ______________________
Faction Bonuses: _________________________ Wild Creatures: _______________________
7/30/2019 battle for middle earth
http://slidepdf.com/reader/full/battle-for-middle-earth 15/15
15
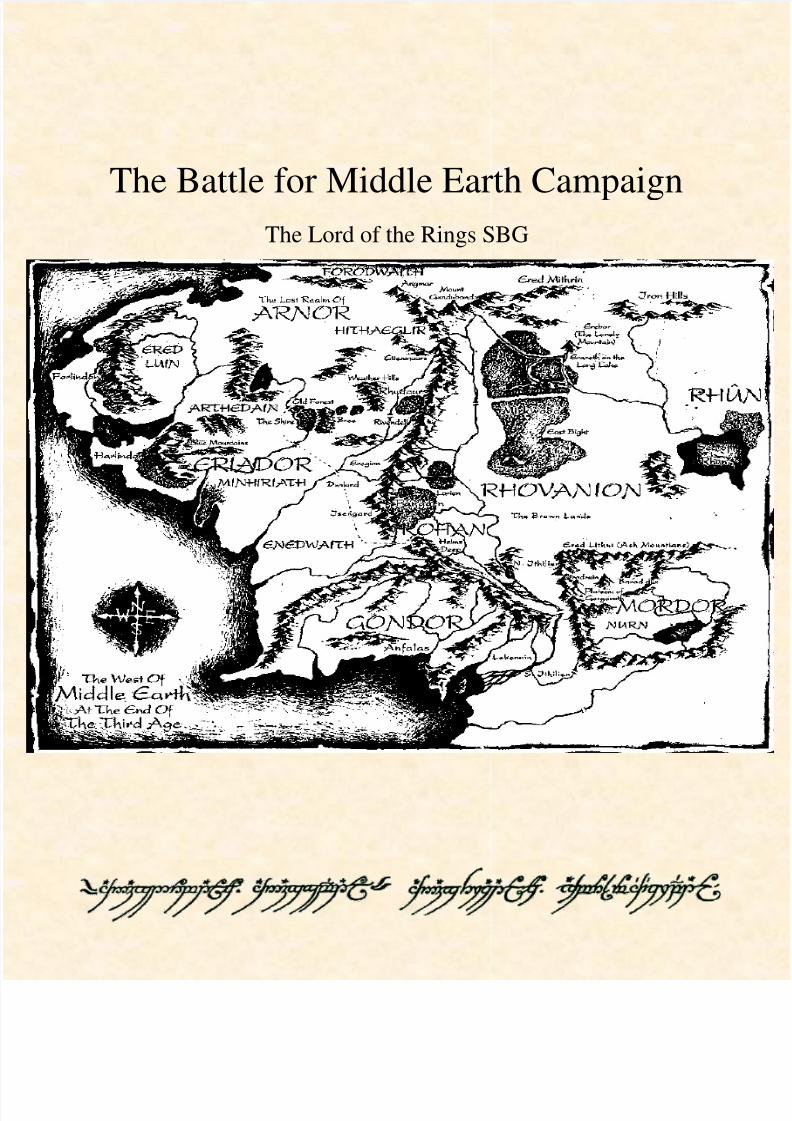
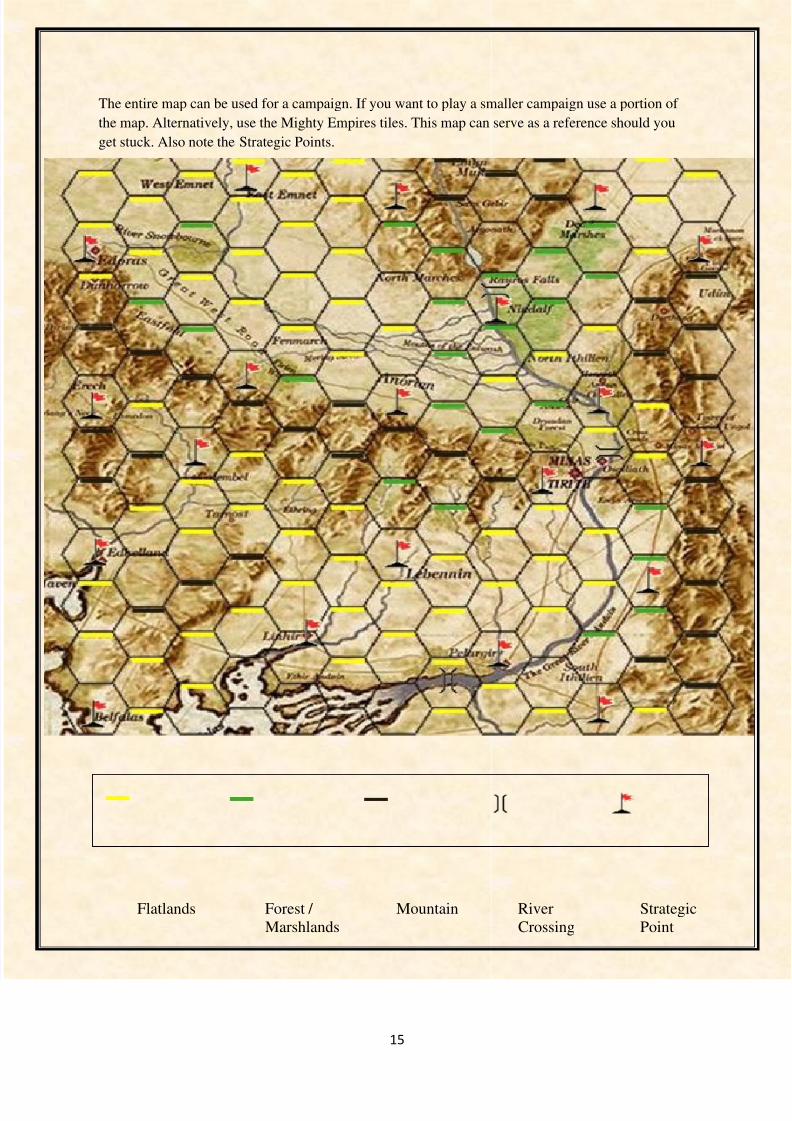
The entire map can be used for a campaign. If you want to play a smaller campaign use a portion of
the map. Alternatively, use the Mighty Empires tiles. This map can serve as a reference should you
get stuck. Also note the Strategic Points.
Flatlands Forest /
Marshlands
Mountain River
Crossing
Strategic
Point