battles of the war of the ring r · to play a scenario from battles of the war of the ring, ... the...
TRANSCRIPT

BATTLES OF THE WAR OF THE RING
RULEBOOK
A COMPANION GAME TO “WAR OF THE RING”
BY ROBERTO DI MEGLIO, MARCO MAGGI, FRANCESCO NEPITELLO

2 • BATTLES OF THE WAR OF THE RING2 • BATTLES OF THE WAR OF THE RING
GAME COMPONENTS
To play a scenario from Battles of the War of the Ring, you will need:• the appropriate game board (this Expansion Set
includes a two-sided game board, showing the kingdom of Rohan on one side and Gondor on the other side);
• the Action Dice from War of the Ring;• at least five six-sided dice in one color (e.g., the
white dice included in War of the Ring) and five six-sided dice in a different color (e.g., the black dice included in this Expansion Set), used respectively as Combat Dice and Maneuver Dice;
• a certain number of figures, included in this set and/or in War of the Ring (as detailed by the scenario rules);
• the decks of Event Cards (you will find a total of 74 Event cards in this Expansion Set):
• The first deck is composed of 30 Generic Event cards, used by both players in both scenarios;
• two other decks (one for the Shadow player and one for the Free Peoples player) are composed of 16 Story Event cards each;
• finally, each scenario uses a set of 6 Special Event cards (Gríma cards in the Battle for Rohan scenario and Darkness cards in the Battle for Gondor scenario);
• the 16 Fate Tiles included in this Expansion Set;• the Control Markers included in War of the Ring;• the Unit Replacement Counters from War of the
Ring. When using the Battles of the War of the Ring rules, Replacement Counters are used to keep track of the damage received by an army and are called Damage Counters;
• the 2 Action Tokens included in this Expansion Set;• the appropriate Character Counters and Character
Cards of the Minions, Companions, and Captains involved in the battle (as detailed by the scenario rules), included in this Expansion Set;
• a set of colored bases applied around the base of Captains’ figures to identify them, included in this Expansion Set;
• the Fate Marker, included in this Expansion Set;• the Endgame Marker, included in this Expansion
Set;• the Leadership Tokens, included in this Expansion
Set. These tokens are used by the Shadow player instead of the Leader figures by the Free Peoples player;
• the Tactics Tokens, included in this Expansion Set.
Note that you will use only some of these tokens, depending on the scenario;
• the Recruitment Tokens, included in this Expansion Set. Note that you will use only some of these tokens, depending on the scenario.
1. INTRODUCTIONBattles of the War of the Ring is a game system that lets you re-create the epic military campaigns narrated in The Lord of the Rings, using the components from the War of the Ring board game and those included in the Battles of the Third Age Expansion Set.
In this Expansion, you will find the game boards, cards, figures, and rules necessary to re-create both the Battle for Rohan, in which the Horse-Lords of Rohan face the onslaught of Saruman’s army, and the Battle for Gondor, in which the forces of Sauron attack the mightiest fortress of the Free Peoples, Minas Tirith.The first part of this rulebook introduces the general rules used in both games, while the second part details the specific rules that apply to each scenario.
Both scenarios included in this expansion put one player (called the Shadow player) in command of the armies of the Shadow, and a second player (called the Free Peoples player) in control of the opposing forces of the Free Peoples.
Note: War of the Ring players may find many of the following rules to be rather familiar. However, many important differences make this rule set a distinct game. We recommend that players read these rules very carefully, even if they have previously played War of the Ring.
2. OVERVIEWThe scenarios presented in Battles of the War of the Ring focus on the epic battles that raged in Middle Earth during the War of the Ring. The Shadow player fields great hosts of fearful creatures led by unnatural powers, and sends them to destroy the forces of the West, assembled by the Free Peoples player around the greatest heroes and commanders of the time. One player will achieve victory by making the best strategic choices amidst changing battle conditions. Will Saruman attack swiftly through the Fords of Isen
to invade Westfold, or let Gríma poison the mind of old Théoden King first? Should Gondor withdraw behind the seven circles of Minas Tirith immediately, or engage the enemy at Cair Andros and Osgiliath?
All these choices revolve around the main mechanic of the game, the action system first used in War of the Ring, customized around the specific needs of the scenarios. Players roll a number of Action Dice each turn, and then alternate in taking actions, within the options allowed by the die roll. Possible actions include moving an Army and attacking an enemy Army; recruiting new troops; rallying demoralized Units; moving Characters; and so on. Special cards can also be played as actions, to represent unusual events that sometime let a player “break the rules.” Since the number of dice and the results obtained limit the available options, players will find themselves confronted by difficult choices each turn.
But they are not alone. Another central feature of Battles of the War of the Ring is the concept of Fate. Many powers work unseen, behind the stage of the War, reacting, without warning, to the dramatic changes brought by the Shadow’s aggression. These forces sometimes intervene in spectacular fashion to turn the tide in favor of the Free Peoples, such as when the Ents rage against Isengard, and sometimes they act in subtler ways, like the wind from the West that scatters the Shadow of Mordor. In the game, the timing of these events is determined by the Fate Track, which triggers events beneficial to the Free Peoples in response to the Shadow’s actions. If the Shadow cannot achieve his victory conditions in time, the Fate Track will ultimately unleash a climatic event that ends the game and gives victory to the Free Peoples player.
The “speed” of this countdown is not fixed, but depends on direct and indirect influences from both players. The nature of the Fate Track effects is detailed in each scenario.
THE GAME BOARDThe board is divided into areas called Regions. Regions are identified with a name which usually refers to a site of note within the Region (e.g., Orthanc) or to an entire geographical area (e.g., Westemnet).
Regions are used to regulate movement, combat, and the placement of Characters and Armies.

BATTLES OF THE WAR OF THE RING • 3BATTLES OF THE WAR OF THE RING • 3
Overview of the Components
Fate Tile
Fate Tile(Back)
Fate Tile(Front)
Special Free Peoples Tile
Special Shadow Tile
Action Token Character Counter
Army/Muster side
Character side(Companion) (Commander)
Leadership Token Tactics Token
(Front) (Back)(Front) (Back)
Recruitment Token FateMarker
Endgame Marker
(Front) (Back)
Control Marker Damage Counter
(Free Peoples side)
(Shadow side)
(Free Peoples side)
(Shadow side)
The board of Battle for Rohan The board of Battle for Gondor
10/30
GATHER AND MARSHAL
Place and fl ip one Recruitment Token in one Region containing a friendly Army.
STAND AND FIGHT
The Combat Strength of each unit in your Army is considered
to be 2.
Generic Event Card (front) Generic Event Card (back)
Story Event(Free Peoples)
Story Event (Shadow)
Gríma Event (Rohan)
Darkness Event (Gondor)
4/6
ÉOMERMARSHALOF THE MARK
CAPTAIN OF ROHAN
Éomer enters the game with
Théoden.9
3/3
GOTHMOGLIEUTENANTOF MORGUL
If OUTER DEFENCES are
under Shadow control, use a Muster Die result to place Gothmog and one Mordor Orc unit in West Osgiliath.SPECIAL ABILITY:
NEW STRENGTH TO RAPE GONDOR
Use one Character die result to place and fl ip one Recruitment token (or to place two Recruitment tokens) in West Osgiliath and Cair Andros.
SPECIAL ABILITIES AS COMMANDER-IN-CHIEF:
FEAR OF THEIR MASTER
Use one Character die result to make three Rally actions on three different Armies, adding 1 to each die roll.
FLUNG INTO THE FRAY
Use one Character die result to move four different Armies.
Character Card (Free Peoples) Character Card (Shadow)

4 • BATTLES OF THE WAR OF THE RING4 • BATTLES OF THE WAR OF THE RING
All Regions are equal for movement purposes: Each movement is always from one Region to an adjacent one. Normally you can only move or retreat your Armies into a free Region: A Region is considered to be free for a player if there are no Army Units of the opponent in that Region.
Each Region has a terrain type, which affects battles in that Region. The terrain types are:
-Plains Hills Woods
Swamps Forts Strongholds
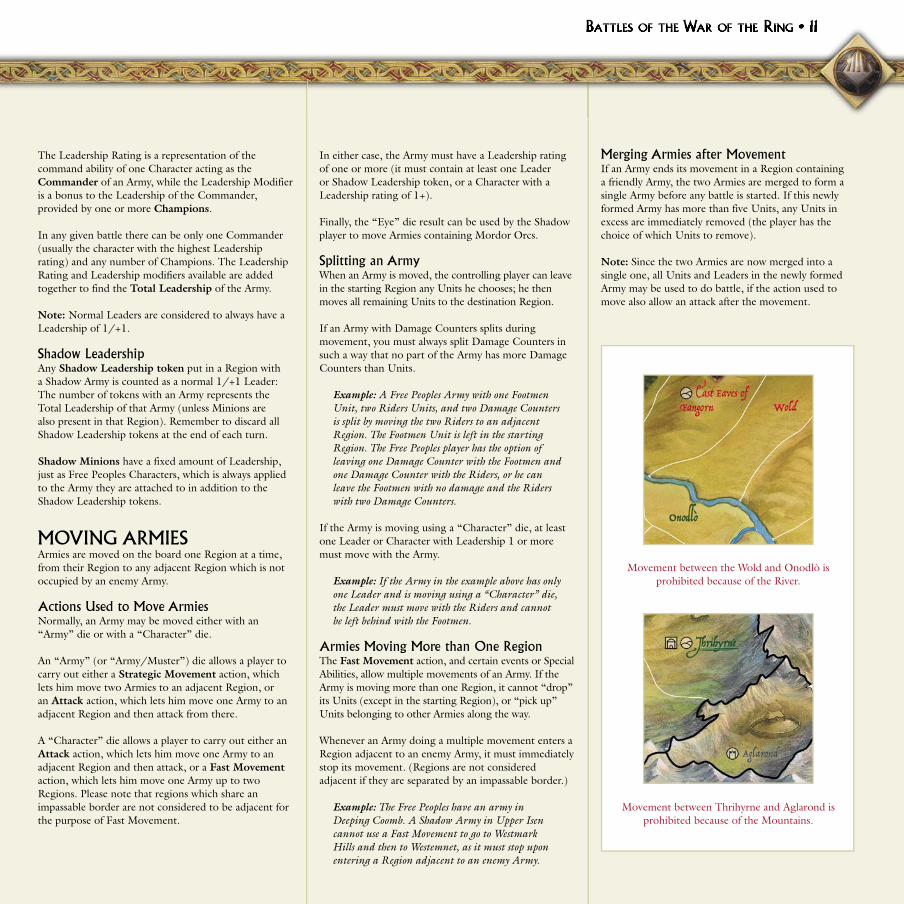
The border between two Regions is also important and affects movement and combat.The border may be:• Clear (no special rules)• Stream• Dike/Wall• Ford/Pass• River (impassable except at Fords)• Mountains (impassable except at Passes)
Most terrain types and border types affect combat, but not movement.
Note: Two Regions are not considered to be adjacent to each other if the border between them is impassable.
Additional terrain types and Regions, with special rules, may be introduced by the scenario rules.
A Region, independently of its type, may include a Settlement, where troops may be recruited.
Settlement
Finally, Regions are grouped in Territories, which represent a broad division of the map and may be referred to by the rules or cards. Each scenario describes how the game board is divided into Territories and their names.
The board also includes the Fate Track, the Shadow Box (explained below), and other types of boxes and spaces, depending on the scenario played.
GAME PIECESArmy UnitsThe troops fighting in Battles of the War of the Ring are represented by figures. Each figure represents a variable number of warriors called a Unit. Each Unit has a specific type, which identifies the weaponry and skills of the troops composing the Unit. Depending on its type, a Unit will behave differently in battle, as explained in Chapter 9: Battles. An Army is a group of friendly Units occupying the same Region, and consists of a maximum of five Units. An Army can be composed of different types of Units, but all troops must belong to the same player.
LeadersLeaders are represented by grey figures and portray “generic” captains able to lead armies (as detailed in Chapter 9: Battles). Only the Free Peoples player has Leader figures; the Shadow player uses Leadership tokens instead, which act as Leaders but are placed during the turn and removed from the board at the end of each turn.
Any number of Leaders or Shadow Leadership tokens may be attached to an Army. Leaders are immediately removed from play if they find themselves in a Region without friendly Units.
Characters Characters are the most important figures in the game. There are three different types of Characters:• Evil Minions of the Shadow, like Saruman and
the Witch-king. One of these Minions will be the Commander-in-chief of the Shadow armies and play a special role, as detailed later.
• Heroic Captains, lords and kings of the Free Peoples, like Théoden or Faramir.
• Companions of the Fellowship of the Ring, like Gandalf or Aragorn.
Minions and Companions have unique figures in silver color, while Captains are represented by Leader figures of silver color. The set of colored bases rings included in this expansion may be used to identify Captains, by applying the colored base around the figure’s base.
Borders Between Regions
Normally a border is white in color.
If a border is blue, this means that a
stream runs across it, providing protection
to the defender.
A wall may be portrayed across a border, providing protection to the
defender.
A dike may be portrayed across a border, providing protection to the
defender.
A border may be crossed by a Ford or
Pass.
A River between two Regions is considered an impassable border, if no Ford crosses it.
Mountains may create an impassable border between two
Regions, which is shown as a thick black
line.

BATTLES OF THE WAR OF THE RING • 5BATTLES OF THE WAR OF THE RING • 5
All Characters double as Leaders with superior ratings, and they also usually have special abilities, as specified by their Character cards. Any number of Characters may be attached to an Army. Characters can also move on their own, and can remain in a Region without a friendly Army. However, if a Character is in the same Region with a friendly Army, and that Army is destroyed in battle, the Character is eliminated as well.
3. THE GAME TURNThe game is played over a series of turns. Each turn is divided into six steps. The steps of the turn are:
STEP 1) DRAW EVENT CARDS• Each player, starting with the Free Peoples player,
draws two Event cards, one from the Generic deck and one from his Story deck.
• If any player has more than six cards in hand after the draw, he must discard down to six cards.
STEP 2) SHADOW PHASE• The Shadow player chooses the position of the
Commander-in-Chief of the Shadow Armies.• Depending on the Commander-in-Chief’s
position, a number of Shadow Action Dice are put in the Shadow Box. These dice are not rolled during the Action Roll step and are placed directly on their “Character” side instead.
• A number of Shadow Leadership tokens are gained depending on the Commander-in-Chief’s position. The Shadow player immediately assigns these tokens to Shadow Armies anywhere on the board.
STEP 3) FATE TRACK ADVANCEMENT• The Free Peoples player may draw a number of
Fate Tiles, one after the other, up to the number of Shadow Action Dice now in the Shadow Box.
• After drawing each tile, the Free Peoples player either stops drawing and applies its effects, or sets the drawn tile apart and pulls another one from the Fate Pool (up to the maximum number of draws allowed).
• The Free Peoples player may decide to stop drawing at any time (unless a Shadow Special Tile is drawn, in which case he must stop immediately), and then apply the effects of the last tile drawn: Advance the Fate Marker on the Fate Track a number of steps equal to the number on the chosen tile, and then apply any other special effect dictated by the tile.
• The tile chosen is discarded after use, while all other tiles drawn this turn are put back in the Fate Pool.
If the Fate counter reaches the Endgame Marker on the Fate Track, the Free Peoples player immediately wins.
STEP 4) ACTION ROLL• Players roll their Action Dice. The Shadow player
takes all the dice showing a “Character” die result and adds them to the Shadow Box.
• The Shadow player takes a number of Shadow Leadership tokens equal to the number of “Character” die results he just added to the Shadow Box and sets them apart. These additional tokens can be assigned to Shadow Armies during the Action Resolution step.
STEP 5) ACTION RESOLUTION• Starting with the Free Peoples player, players
alternate in taking actions, choosing one of their Action Dice and using one of the possible actions allowed by the die result.
• A player may pass his action if the opponent has more unused Action Dice than he has. If the Free Peoples player passes and still has unused Action tokens, he may use an Action token at this time.
• When both players have used all their Action Dice, proceed to the next step.
STEP 6) VICTORY CHECK AND END TURN• Check if either player has reached the victory
condition set by the scenario. If not, a new turn begins. Remove all Shadow Leadership tokens from the board.
Event Cards
The upper part of a Generic Event is called the Order Event, and is used during the Action
Resolution step.▼
10/30
GATHER AND MARSHAL
Place and fl ip one Recruitment Token in one Region containing a friendly Army.
STAND AND FIGHT
The Combat Strength of each unit in your Army is considered
to be 2.
▲
The lower part of a Generic Event is called the Combat Event, and is used during a battle.
This part of a Story Event is used in the Gondor scenario
▼
11/16
BEREGOND AND THE GUARDS OF THE CITADEL
Place two Gondor Footmen Units in Minas Tirith. You may place one previously eliminated Leader with the Units.
YOU DO NOT KNOW YOUR PERIL
Remove three Shadow Leadership tokens from one enemy Army adjacent to one of your Armies. If the Leadership of the enemy Army is now zero, that Army must retreat.
▲
This part of a Story Event is used in the Rohan scenario
6 • BATTLES OF THE WAR OF THE RING6 • BATTLES OF THE WAR OF THE RING
4. EVENT CARDS
The cards used in the game are called Event cards. Event cards can be Generic Event cards, scenario-specific Story Event cards, or Special Event cards.
Generic Event cards form a single deck of 30 Event cards, used to execute special actions (Order Event) or in combat (Combat Event). Both players draw cards from the same Generic deck. The Generic deck is used in both scenarios.
Story Event cards form two separate decks of 16 cards each, distinguished by their backs: a Shadow Story deck and a Free Peoples Story deck.
Story Event cards are used to introduce story elements and climatic events inspired by the books. Players draw Story Event cards from their respective Story decks.
Each Story Event card includes both an event text to use in the Gondor scenario (with the “Tree of Gondor” icon) and a text to use in the Rohan scenario (with the “Horse of Rohan” icon).
Special Event cards form a small deck of 6 cards. Each scenario has a set of Special Event cards, either the Gríma deck in the Rohan scenario or the Darkness deck in the Gondor scenario. Used solely by the Shadow player, these cards represent the cunning devices of the Enemy and its major supernatural weapons.
DRAWING EVENT CARDSAt the beginning of the first turn, and at the beginning of every following turn, each player draws two Event cards, one from the Generic deck and one from his Story deck.
By using an “Event” die result as an action during the Action Resolution step (see Chapter 7: Actions,) to carry out a Draw action, players can also draw up to two cards from the Generic deck or one card from the Story deck.
Special Event cards (the Gríma and Darkness cards) are drawn only during the Shadow Phase, if the Commander-in-Chief of the Shadow Armies has been placed in the appropriate position.
The maximum hand size is six cards. If at any time your hand includes more than six cards, you must immediately discard down to six cards (cards are discarded facedown).
Exhausting the card decksIf at any time in the game the Generic deck is exhausted, re-shuffle all used and discarded Generic Event cards to form a new deck. However, once the Story deck is exhausted, no more Story cards may be draw: Used or discarded Story cards are not re-shuffled.
GENERIC CARDSEach Generic card has a dual use.
The upper half of the card shows an Order Event, which can be used to perform a special action by spending a die during the Action Resolution step (see How to Play Event Cards, below).
The lower half of the card shows a Combat Event, which can be used during a battle. The use of Combat Events is detailed in Chapter 9: Battles.
STORY CARDSEach Story card details two effects, one for each scenario. Naturally, the only effect available to the player is the one referring to the scenario in play. To play a Story card a player must spend a die during the Action Resolution step (see How to Play Event Cards, below).
SPECIAL EVENT CARDSSpecial Event cards are drawn only using the rules detailed in Chapter 5: The Power of the Shadow. Special Event cards are Event cards, and count for the hand-size limit of six cards.
HOW TO PLAY EVENT CARDSEvent cards are played by taking an action during the Action Resolution step (see Chapter 7: Actions), in two ways:• Using an “Event” die result to carry out a Play an
Event Card action.• Using a die result matching the type of the card to
carry out a Play an Event Card action. An Army card can be played using an “Army” die result, a Muster card with a “Muster” die result, a Character card with a “Character” die result.
An “Army/Muster” die result can be used to play either an Army or a Muster card, and a “Will of the West” die result can be used to play any type of Event card.
Effect of Event CardsGenerally, Event cards are discarded as soon as the action they allow is completed.
Exception: The text of certain cards says that you must “Play on the table,” indicating that you must play the card faceup on the table, and a condition for discarding it is usually included in the text. For these cards, the effect of the card applies as long as the card is in play.
Note: Some cards have a pre-requisite (“Play … if…”) which must be met for the effects of the card to apply. If this requirement is not fully satisfied, the card cannot be played.
The effect of a card or the action allowed by a card is explained in its text. Sometimes only part of the effect or action can be executed (for example, if a card allows you to move three armies but you only have two armies
Event Card
1/30
CALL TO ARMS
Move two Armies up to two Regions. These Armies must end their movement in a Region already containing a Leader or Character, or a friendly Settlement or Stronghold.
DENSE FOG
At the end of this round, the battle ends.
Card Type
Character
1/30
CALL TO ARMS
Move two Armies up to two Regions. These Armies must end their movement in a Region already containing a Leader or Character, or a friendly Settlement or Stronghold.
DENSE FOG
At the end of this round, the battle ends.
1/30
CALL TO ARMS
Move two Armies up to two Regions. These Armies must end their movement in a Region already containing a Leader or Character, or a friendly Settlement or Stronghold.
DENSE FOG
At the end of this round, the battle ends.
Army
7/30
ENCIRCLEMENT
Move one Army. Then, if you have two or more Armies adjacent to the same enemy Army, you may perform a Combined Attack.
DENSE FOG
At the end of this round, the battle ends.
7/30
ENCIRCLEMENT
Move one Army. Then, if you have two or more Armies adjacent to the same enemy Army, you may perform a Combined Attack.
DENSE FOG
At the end of this round, the battle ends.
Muster
4/30
BLOW THE HORNS
Make one Rally action on two different Armies, adding 1 to the dice roll (success on a 4, 5, 6).
DENSE FOG
At the end of this round, the battle ends.
4/30
BLOW THE HORNS
Make one Rally action on two different Armies, adding 1 to the dice roll (success on a 4, 5, 6).
DENSE FOG
At the end of this round, the battle ends.

BATTLES OF THE WAR OF THE RING • 7BATTLES OF THE WAR OF THE RING • 7
to move). In such cases, you may still use as much of the card effect as possible.
Often, a card allows a player to take an action that violates the standard rules. However, any rule that is not expressly replaced still applies normally.
5. THE POWER OF THE SHADOWThe Shadow commands great hosts and wields a terrible power, but it is wary of displaying its might openly, because as Aragorn once said “There are other powers at work far stronger.” In Battles of the War of the Ring, the Shadow player must choose between using his powers to their maximum extent to reap a quick victory in the face of Fate, or using his abilities in a more subdued manner to bide his time and try to win through stealth and guile.
THE SHADOW PHASE ANDTHE SHADOW BOXDuring Step 2 the Shadow player chooses the position of the Commander-in-Chief. Each position grants the Shadow player a different special action that must be carried out immediately, and determines the number of Action Dice that will be put in the Shadow Box, before the Action Roll, as Character die results. These dice are not rolled during Step 4, but will be available during the Action Resolution step.
Character die results can be used to carry out the special actions allowed by the abilities of the Commander-in-Chief, or as normal Character Action Die results. Given the effectiveness of the Commander-in-Chief Special Abilities, the positions that grant a higher number of Character dice certainly give a superior advantage, but there is a drawback: A higher number of dice placed at this point in the Shadow Box can make the Fate Marker advance faster (see Chapter 6: Fate and the Fate Track, below).
Note that while all Character Action Die results rolled by the Shadow player during Step 4 are also added to the Shadow Box, they do not affect Fate.
SHADOW LEADERSHIP
LEADERSHIP IN THE SHADOW PHASEDuring the Shadow Phase, after choosing the position of the Commander-in-Chief, the Shadow player receives a number of Shadow Leadership tokens equal to the number of dice in the Shadow Box (this number may be modified by the scenario rules).
The Shadow player must immediately assign these tokens to Shadow Armies anywhere on the board.
LEADERSHIP AFTER THE ACTION ROLLAfter the Action Roll, the Shadow player receives one additional Shadow Leadership token for each rolled “Character” Action Die result.
The Shadow player may assign these tokens to Shadow Armies during the Action Resolution step, whenever the Shadow player uses an Action Die – before or after resolving the corresponding action.
Each Shadow Leadership token is considered a Leader until the end of the turn. When a Shadow Leadership token has been assigned, it cannot be reassigned to a different Army. At the end of the turn, remove all Shadow Leadership tokens in play.
6. FATE AND THE FATE TRACKThe Fate Track regulates unusual elements, including climatic events and unexpected manifestations of destiny.
THE FATE TRACKAt the beginning of the game, the Fate Marker is put on the “0” space of the Fate Track and the Endgame Marker is put on the space of the Fate Track specified by the scenario.
Each turn, the Fate Marker advances during the Fate Track Advancement step according to the mechanics explained below; the players can also affect its progress during the Action Resolution step through the use of some Event cards.
Depending on the scenario played, the Fate Marker can trigger a particular event when it reaches a step. More importantly, when the Fate Marker reaches the Endgame Marker on the Fate Track, the game is over and the Free Peoples player wins the game. The Shadow player must reach his victory conditions before this happens in order to win the game.
THE FATE POOLAt the beginning of the game, all Standard Fate Tiles (grey colored) are placed in an opaque container and shuffled to form the initial Fate Pool.
Additional tiles (blue Free Peoples Special Tiles and red Shadow Special Tiles) are set aside. They are used following the directions of each scenario, and are placed in the Fate Pool when certain Event cards are played.
Shadow Box

8 • BATTLES OF THE WAR OF THE RING8 • BATTLES OF THE WAR OF THE RING
ADVANCINGTHE FATE TRACKEach turn, during the Fate Track Advancement step, the Free Peoples player may draw a number of Fate tiles equal to the number of Action Dice in the Shadow Box.
If the Shadow Box contains more than one die, the Free Peoples player draws one tile and either chooses to apply its effects or sets the drawn tile apart and pulls another one from the Fate Pool. The Free Peoples player can draw a number of tiles up to the number of dice in the Shadow Box, but must always apply the effects of the last tile drawn.
Exception: If among the drawn tiles there is a Shadow Special Tile, the Free Peoples player immediately stops drawing and must choose that tile.
The chosen tile is discarded after use, whereas all other tiles drawn in the current turn are put back in the Fate Pool.
All Fate Tiles have a number which specifies the number of steps the Fate Marker will advance on the Fate Track (from 0 to 3). Some tiles also have additional icons, and their effect is explained in the Fate Tile Effects table.
CHARACTERS ON THEFATE TRACKThe setup included in each scenario instructs players to place a number of Free Peoples Character Counters on the Fate Track at specific steps.
When the Fate Marker reaches a Character Counter, that Character is considered ready. A ready Character can generally be brought into play by using an Action Die (normally by using a “Character” die result). Each Character card specifies the requirement and the entry Region for that Character. If more than one Region is listed, the choice is up to the Free Peoples player.
A Character can be put in play even if the entry Region is occupied by enemy Units or is controlled by the enemy; but any Free Peoples Units which are to be put in play at the same time in this Region are not recruited.
7. ACTIONS
The Action Dice system is the core game mechanic of Battles of the War of the Ring. Each player rolls a number of dice each turn (his Action Dice Pool). The icons on the dice correspond to the actions a player can carry out. All actions are described in detail in the Action Dice Summary.
THE ACTION DICE POOLThe initial Action Dice Pool for the Shadow player is composed of six dice, while that of the Free Peoples player is composed of four dice.
Additional Action Dice can be earned both by the Free Peoples and Shadow player during play.
• The Shadow player adds one die to the Action Dice Pool when all Settlements within a Territory are controlled by the Shadow. If any of these Settlements is liberated by the Free Peoples player, the die is lost.
• The Free Peoples player adds one die to the Action Dice Pool when certain key Characters enter the game. These characters have an “Action Die” icon on their Character card. If the character is eliminated, the die is lost.
The scenario rules may specify additional ways in which dice are added to or lost from the Action Dice Pool.
Dice are only added to the Action Dice Pool at the beginning of the turn, after the requirement which adds them is met (and are removed at the beginning of the turn if that requirement is no longer applicable).
Fate Tiles Effects Table
Number: Advance the Fate Track Marker the specified number of steps.
X: Advance the Fate Track Marker a number of steps equal to the number of dice in the Shadow Box.
Fate Icon: As described by the scenario rules.
Advance the Fate Track the specified number of steps and draw another tile.
NO LIVING MAN AM I! Gondor special tile. See Battle for Gondor scenario rules.
Must be chosen by the Free Peoples player. Fate is 0.
Must be chosen by the Free Peoples player. Fate is 0 and the Shadow player may add one die from the Action Dice Pool to the Shadow Box before the Action roll, and add one Shadow Leadership token anywhere on the board.
If this icon appears on a Character card, the Character adds one die to the Free Peoples Action Dice Pool when he is in
play.
BATTLES OF THE WAR OF THE RING • 9BATTLES OF THE WAR OF THE RING • 9
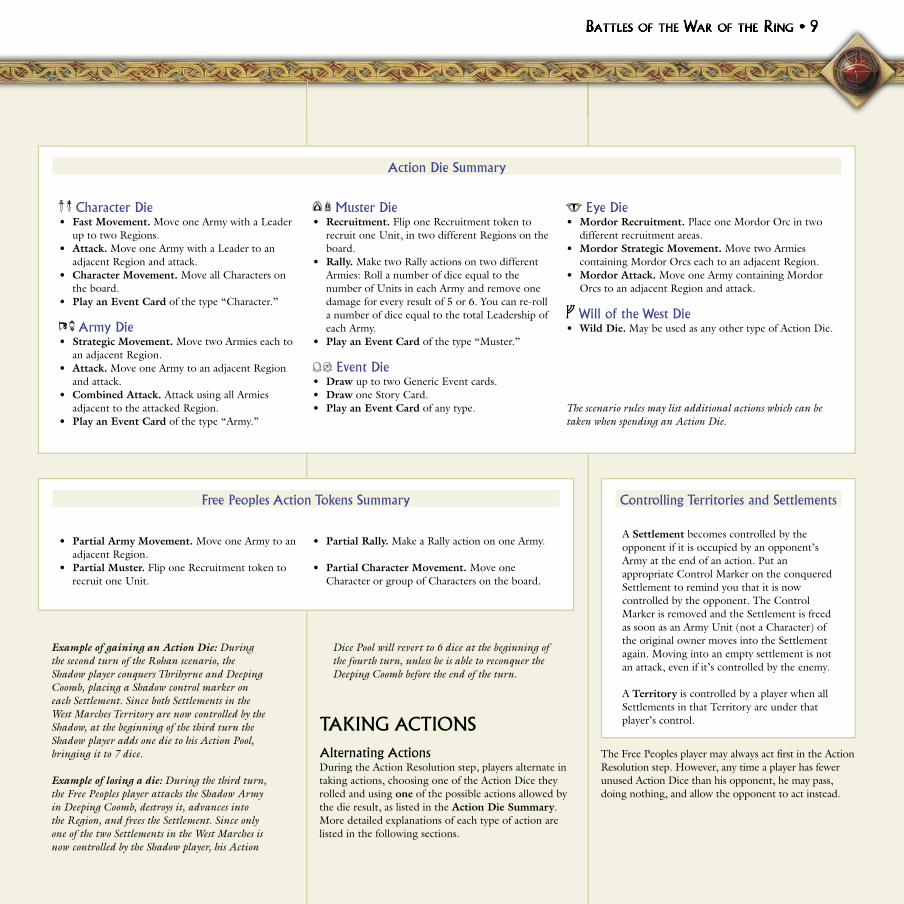
Example of gaining an Action Die: During the second turn of the Rohan scenario, the Shadow player conquers Thrihyrne and Deeping Coomb, placing a Shadow control marker on each Settlement. Since both Settlements in the West Marches Territory are now controlled by the Shadow, at the beginning of the third turn the Shadow player adds one die to his Action Pool, bringing it to 7 dice.
Example of losing a die: During the third turn, the Free Peoples player attacks the Shadow Army in Deeping Coomb, destroys it, advances into the Region, and frees the Settlement. Since only one of the two Settlements in the West Marches is now controlled by the Shadow player, his Action
Dice Pool will revert to 6 dice at the beginning of the fourth turn, unless he is able to reconquer the Deeping Coomb before the end of the turn.
TAKING ACTIONSAlternating ActionsDuring the Action Resolution step, players alternate in taking actions, choosing one of the Action Dice they rolled and using one of the possible actions allowed by the die result, as listed in the Action Die Summary. More detailed explanations of each type of action are listed in the following sections.
The Free Peoples player may always act first in the Action Resolution step. However, any time a player has fewer unused Action Dice than his opponent, he may pass, doing nothing, and allow the opponent to act instead.
Action Die Summary
Character Die• Fast Movement. Move one Army with a Leader
up to two Regions.• Attack. Move one Army with a Leader to an
adjacent Region and attack.• Character Movement. Move all Characters on
the board.• Play an Event Card of the type “Character.”
Army Die• Strategic Movement. Move two Armies each to
an adjacent Region.• Attack. Move one Army to an adjacent Region
and attack.• Combined Attack. Attack using all Armies
adjacent to the attacked Region.• Play an Event Card of the type “Army.”
Muster Die• Recruitment. Flip one Recruitment token to
recruit one Unit, in two different Regions on the board.
• Rally. Make two Rally actions on two different Armies: Roll a number of dice equal to the number of Units in each Army and remove one damage for every result of 5 or 6. You can re-roll a number of dice equal to the total Leadership of each Army.
• Play an Event Card of the type “Muster.”
Event Die• Draw up to two Generic Event cards.• Draw one Story Card.• Play an Event Card of any type.
Eye Die• Mordor Recruitment. Place one Mordor Orc in two
different recruitment areas.• Mordor Strategic Movement. Move two Armies
containing Mordor Orcs each to an adjacent Region.• Mordor Attack. Move one Army containing Mordor
Orcs to an adjacent Region and attack.
Will of the West Die• Wild Die. May be used as any other type of Action Die.
The scenario rules may list additional actions which can be taken when spending an Action Die.
Free Peoples Action Tokens Summary
• Partial Army Movement. Move one Army to an adjacent Region.
• Partial Muster. Flip one Recruitment token to recruit one Unit.
• Partial Rally. Make a Rally action on one Army.
• Partial Character Movement. Move one Character or group of Characters on the board.
Controlling Territories and Settlements
A Settlement becomes controlled by the opponent if it is occupied by an opponent’s Army at the end of an action. Put an appropriate Control Marker on the conquered Settlement to remind you that it is now controlled by the opponent. The Control Marker is removed and the Settlement is freed as soon as an Army Unit (not a Character) of the original owner moves into the Settlement again. Moving into an empty settlement is not an attack, even if it’s controlled by the enemy.
A Territory is controlled by a player when all Settlements in that Territory are under that player’s control.

10 • BATTLES OF THE WAR OF THE RING10 • BATTLES OF THE WAR OF THE RING
The Free Peoples player, when he passes, also has the option to use one Action token (see below).
Free Peoples Action TokensIn addition to the dice in his Action Pool, the Free Peoples player starts each turn with two Action tokens. These tokens can be used by the Free Peoples player whenever he “passes” to take a partial action, as an alternative to using an Action Die or doing nothing. Each Action token can be used to either:• Move one Army to an adjacent Region; or• Flip one Recruitment token in one Settlement to
recruit one Unit; or• Rally one Army in one Region; or• Move one Character or group of Characters in the
same Region a number of Regions equal to the Level of the highest ranking character in the Region.
(See the following chapters for the details on how to move Armies and Characters and recruit new Units.)
Note: Action tokens are available again at the beginning of every turn (i.e., they are not “spent” and taken out of play when they are used).
The Action Resolution step ends when both players have taken all the actions available to them.
Special Character Abilities and ActionsCharacters in the game may possess Special Abilities, as specified on the appropriate reference card. Instead of taking a normal action, a player may use one Action Die (normally a “Character” die result) to employ one special Character Ability of one of his Characters in play, using the type of die result specified on the Character card and carrying out the action described there.
8. ARMIES AND HEROESThe clash of armies is the focus of Battles of the War of the Ring. Armies muster, move, and engage in battles employing the actions available to players during the Action Resolution step.
COMPOSITION OF ARMIESAll Units belonging to the same player in a given Region are collectively called an Army. Each Army is thus composed of one or more Army Units (up to a maximum of five, called the stacking limit). These Units
may be of any Unit Type. Any number of Leaders (or Shadow Leadership tokens) and Characters can be attached to an Army.
As a consequence of battles, Armies may receive points of Damage, represented by Damage Counters, which are placed in the same Region with the Army and are moved with it when it moves.
CHARACTERS AND LEADERSLEADERS AND CHARACTERS IN ARMIESCharacters become attached to an Army when they end their movement in a Region with a friendly Army.
When attached, Characters may move with an Army, and if an Army they are attached to takes part in a battle, they are considered to be in the battle with it.
Leaders never move by themselves and thus must always be attached to an Army.
Characters and Leaders which are attached to an Army that is completely destroyed in battle are also eliminated.
CHARACTERS WITHOUT ARMIESCharacters in a Region without a friendly Army do not affect and cannot be affected by enemy armies, and cannot attack or be attacked.
Characters may move together with an Army they are attached to, but can also moved on their own, carrying out a Character Movement action using a “Character” die result. When using this action, you may move any or all of your Characters on the board. Each Character may move up to a number of Regions equal to his Level, ignoring any enemy Army. A group of Characters (Characters in the same Region before movement) may move together as if all Characters had the Level of the highest Level Character in the group.
LEADERSHIPCharacters and Leaders attached to an Army are very important, since their Leadership is applied to that Army. Leadership improves an Army’s movement (“Character” dice can be used to move the Army) and battle capabilities (allowing it to roll dice again during combat and by raising the odds of a successful Rally action; Chapter 9: Battles details these benefits).
Leadership of Free Peoples Captainsand ChampionsEach Character has a Leadership Rating and a Leadership Modifier (e.g., 2/+1). The Leadership Rating is a simple number (e.g., 2), while the Leadership Modifier is indicated as a positive modifier (e.g., +1). Both can be zero. If a Character has a Leadership Rating of 0, he is not considered to be a Leader for any game purpose.
Character Card
3/6
FARAMIRSON OF DENETHOR
CAPTAIN OF GONDOR
When he is ready, use a
Character die result to place Faramir and one Gondor Archer Unit in Cair Andros or Minas Tirith.RANGER OF ITHILIEN
If Faramir is on the Fate Track, use a Character die result to attack an enemy Army in one Region of NORTH ITHILIEN, rolling 3 dice and scoring hits on a 4+.
51
2
4
7
3
6
5
1 Character Entry Condition and Initial Position on the Fate Track
2 Special Abilities
3 Level (Movement)
4 Leadership
5 Leadership Modifier
6 Additional Action Die
7 Nation
BATTLES OF THE WAR OF THE RING • 11BATTLES OF THE WAR OF THE RING • 11
The Leadership Rating is a representation of the command ability of one Character acting as the Commander of an Army, while the Leadership Modifier is a bonus to the Leadership of the Commander, provided by one or more Champions.
In any given battle there can be only one Commander (usually the character with the highest Leadership rating) and any number of Champions. The Leadership Rating and Leadership modifiers available are added together to find the Total Leadership of the Army.
Note: Normal Leaders are considered to always have a Leadership of 1/+1.
Shadow LeadershipAny Shadow Leadership token put in a Region with a Shadow Army is counted as a normal 1/+1 Leader: The number of tokens with an Army represents the Total Leadership of that Army (unless Minions are also present in that Region). Remember to discard all Shadow Leadership tokens at the end of each turn.
Shadow Minions have a fixed amount of Leadership, just as Free Peoples Characters, which is always applied to the Army they are attached to in addition to the Shadow Leadership tokens.
MOVING ARMIESArmies are moved on the board one Region at a time, from their Region to any adjacent Region which is not occupied by an enemy Army.
Actions Used to Move ArmiesNormally, an Army may be moved either with an “Army” die or with a “Character” die.
An “Army” (or “Army/Muster”) die allows a player to carry out either a Strategic Movement action, which lets him move two Armies to an adjacent Region, or an Attack action, which lets him move one Army to an adjacent Region and then attack from there.
A “Character” die allows a player to carry out either an Attack action, which lets him move one Army to an adjacent Region and then attack, or a Fast Movement action, which lets him move one Army up to two Regions. Please note that regions which share an impassable border are not considered to be adjacent for the purpose of Fast Movement.
In either case, the Army must have a Leadership rating of one or more (it must contain at least one Leader or Shadow Leadership token, or a Character with a Leadership rating of 1+).
Finally, the “Eye” die result can be used by the Shadow player to move Armies containing Mordor Orcs.
Splitting an ArmyWhen an Army is moved, the controlling player can leave in the starting Region any Units he chooses; he then moves all remaining Units to the destination Region.
If an Army with Damage Counters splits during movement, you must always split Damage Counters in such a way that no part of the Army has more Damage Counters than Units.
Example: A Free Peoples Army with one Footmen Unit, two Riders Units, and two Damage Counters is split by moving the two Riders to an adjacent Region. The Footmen Unit is left in the starting Region. The Free Peoples player has the option of leaving one Damage Counter with the Footmen and one Damage Counter with the Riders, or he can leave the Footmen with no damage and the Riders with two Damage Counters.
If the Army is moving using a “Character” die, at least one Leader or Character with Leadership 1 or more must move with the Army.
Example: If the Army in the example above has only one Leader and is moving using a “Character” die, the Leader must move with the Riders and cannot be left behind with the Footmen.
Armies Moving More than One RegionThe Fast Movement action, and certain events or Special Abilities, allow multiple movements of an Army. If the Army is moving more than one Region, it cannot “drop” its Units (except in the starting Region), or “pick up” Units belonging to other Armies along the way.
Whenever an Army doing a multiple movement enters a Region adjacent to an enemy Army, it must immediately stop its movement. (Regions are not considered adjacent if they are separated by an impassable border.)
Example: The Free Peoples have an army in Deeping Coomb. A Shadow Army in Upper Isen cannot use a Fast Movement to go to Westmark Hills and then to Westemnet, as it must stop upon entering a Region adjacent to an enemy Army.
Merging Armies after MovementIf an Army ends its movement in a Region containing a friendly Army, the two Armies are merged to form a single Army before any battle is started. If this newly formed Army has more than five Units, any Units in excess are immediately removed (the player has the choice of which Units to remove).
Note: Since the two Armies are now merged into a single one, all Units and Leaders in the newly formed Army may be used to do battle, if the action used to move also allow an attack after the movement.
Movement between the Wold and Onodlò is prohibited because of the River.
Movement between Thrihyrne and Aglarond is prohibited because of the Mountains.

12 • BATTLES OF THE WAR OF THE RING12 • BATTLES OF THE WAR OF THE RING
BUILDING ARMIESA number of Armies are already in play at the beginning of the game, as specified in the setup rules of the scenario. Other Units are brought into play as reinforcements.
RECRUITING TROOPSThere are different ways of recruiting troops, but normally recruitment involves the use of Recruitment tokens. These tokens are cardboard counters showing a symbol corresponding to a certain type of Army Unit.
Examples of Recruitment Tokens
Uruk-hai Riders/Cavalry Warg Riders
Note: Any Unit removed from the game can always be brought back into play as a reinforcement (as long as there is the possibility of mustering it with a Recruitment token, event, or ability).
Placing Recruitment TokensAt the start of the game, a number of Recruitment tokens are selected randomly and placed on the board, facedown and unseen to both players, as specified by the scenario rules.
During the game, Characters, events, or Minion Abilities may add more Recruitment tokens. These tokens are always chosen randomly from those available to the player and placed facedown, without looking at them.
The number and type of tokens available to each player is described in the scenario. When all tokens have been used, a player may not place more tokens, even if an event or ability allows him to do so.
Using Recruitment TokensWhenever an action or ability allows a player to “flip” a token, the token is revealed and a Unit of the corresponding type is placed in the Region that contained the token; the token is then discarded.
If no Unit of the correct type is available, the player may choose a Unit of any type.
Used Recruitment tokens, or tokens discarded as a result of events or conquered Territories, are permanently out of the game.
Eliminating Recruitment TokensIf, at the end of a movement or after a battle, an Army is in a Region that contains enemy Recruitment tokens, those tokens are eliminated and permanently removed from the game.
RECRUITING FREE PEOPLES ARMY UNITSThe Free Peoples player receives additional Army Units using a “Muster” die result and choosing a Recruitment action: The player may flip one Recruitment token in each of two different Settlements or Regions.
The Special Ability of certain Characters or the effect of events may also place Units directly on the board without the need of using Recruitment tokens. The scenario rules may also provide additional ways of recruiting Free Peoples Army Units.
RECRUITING SHADOW ARMY UNITS The Shadow player may receive additional Army Units using different die results.
By using a “Muster” die for a Recruitment action, the player can flip one Recruitment token in two different Settlements.
By using an “Eye” die for a Mordor Recruitment action, the player can directly place one Mordor Orc Unit in two different Mordor Orcs recruitment areas.
The Special Ability of certain Characters or the effect of events may also place Units directly on the board without the need of using Recruitment tokens. The scenario rules may also provide additional ways of recruiting Shadow Army Units.
EXCEEDING THE STACKING LIMITIf, as a result of recruiting new Units, an Army has more than five Units, any Unit in excess are immediately removed (the controlling player has the choice of which Units to remove).
9. BATTLESWar is the main focus of Battles of War of the Ring, and performance in combat will decide the victory or defeat of a player.
A battle is initiated at the end of an Attack or Combined Attack action (using either an “Army” or a “Character” die result, as appropriate), or using a proper Event card. The Army of the active player is called the attacker, and the other is called the defender.
Since a battle happens after the movement of the Army is completed, all Units which were in the Region of the active Army are now considered to have merged into that Army. Remember that Units in excess of five must be removed before the battle starts.
Free Peoples Settlement
Free Peoples Settlement
Mordor Orc Recruitment Area

BATTLES OF THE WAR OF THE RING • 13BATTLES OF THE WAR OF THE RING • 13
PREPARING FOR BATTLEThe outcome of the battle will depend on several factors:• the Types of Units involved and their Special
Abilities;• the Combat Strength of the Armies involved;• the Leadership of each Army;• the Combat Event cards in possession of the players;• the terrain where the battle is fought.
The luck of the dice will of course also be involved, to simulate all those factors which in war are outside of the control of generals and commanders.
TYPES OF UNITSEach figure in the game, except for Leaders and Characters, is called a Unit and represents a variable number of warriors. Each Unit has a different Type (e.g., Footmen, Bowmen, Half-Orcs, Uruk-hai), to represent the specific combat capabilities of that type of troop, on the basis of its weaponry, training, and natural abilities.
In Battles of the War of the Ring, each Unit has several characteristics which include:• Favored Terrain;• Combat Strength;• Special Ability.
Example: The characteristics of a Warg Rider Unit are as follows:
Figure Symbol Unit Type Favored Terrain CS
Warg Riders Plains 2
Special Ability
Rearguard Attack: At the end of the round, your opponent is forced to apply casualties until no more than one Damage Counter is left.
The use of these characteristics is explained below. The characteristics of all Unit Types used in a scenario are described in detail in the Unit Reference Table included with the scenario rules.
Before a battle begins, take the appropriate Unit Maneuver tokens corresponding to all Unit Types involved in a battle (which have the same drawing as the symbol of that Unit). These tokens will be used during the battle as explained below, to activate the Special Abilities of the Unit. You will also need the Regroup token and the Combat Event token.
COMBAT STRENGTHThe total Combat Strength of an Army is calculated at the beginning of each round of battle and is equal to the sum of the individual Combat Strength ratings of the Units involved in the battle, up to a maximum of 5.
Most Units have a Combat Strength of 1, but the best Units have a higher Combat Strength (2 or 3). Use the Unit Reference Table included with the scenario to determine the exact Combat Strength of each type of Unit.
Example: An Army is composed of two Riders of Rohan Units and one Footmen Unit. As Riders have a Combat Strength of 2 and Footmen a Combat Strength of 1, the total Combat Strength of the Army is 5.
Combat RollThe Combat Strength of an Army is the main factor determining the Combat Roll. However, the total Combat Strength may be modified by events, terrain, and so on. After all modifiers are taken into account, the total Combat Strength determines the number of Combat Dice (normal six-sided dice) rolled in the Combat Roll in that round, up to a maximum of five. Normally, each roll of 5 or 6 on a Combat Die scores a hit against the enemy Army.
Example: An Army is composed of three Riders of Rohan Units. As Riders have a Combat Strength of 2, so the Combat Strength is normally 6. If the Riders were defending a Hill Region, 1 would be added to their Combat Strength, for a total of 7. In either case, the Combat Roll is five dice, which is the maximum allowed.
Note: Whenever an Event card or other rule refers to “adding” or “subtracting” from a Combat Roll, this means that you must add the indicated value to each die in the roll. No modification may lower a result below 1 or increase the result to more than 6.
LEADERSHIPThe Leadership of an Army improves its combat capabilities and its morale, allowing it to re-roll its Combat dice when the controlling player is not happy with the initial die result. The Total Leadership of an Army is calculated at the beginning of each round of battle as explained on pages 10-11:
• The Free Peoples player takes the Leadership Rating of the Commander of the Army and adds to this value the Leadership Modifier of any other Leader in the same Army;
• the Shadow player adds together all Shadow Leadership tokens, and adds to this the Leadership of Minions in the same Region, if any, calculated in the same way as the Leadership of Free People Armies.
Leader Re-rollThe Total Leadership you calculated indicates the number of dice rolled during your Combat Roll that you may decide to roll again in the Leader Re-roll. Simply pick up those dice and roll them again. You must keep the new result. Both normal Combat Dice and Maneuver Dice (see Maneuver with Units, pages 14-15) can be rolled again during a Leader Re-roll. In this way, if the die was not a hit before the Re-roll, it may become a hit afterwards.
TERRAIN
Effects of TerrainThe terrain where the battle is fought is very important: Defenders on a hilltop, or fighting against an enemy Army which is wading across a ford, have a distinct advantage.
Note: The terrain where the battle is fought is that of the Region where the defending army is placed.
Type of RegionEach type of Region has a Terrain Modifier (as detailed by the Terrain Effects Table in each scenario) in the form of a bonus to add to the defender’s Combat Strength (remember that a maximum of five Combat Dice are rolled even if the Combat Strength becomes higher than 5). Dice added in this way are never considered Maneuver Dice (see below). The modifier is normally either 0 (open terrain, e.g., Plains) or +1 (terrain types which provide a defensive advantage).
Terrain Type Bonus to Defender
Plains no effect
Hills/Forts/Woods/Swamps
+1 Combat Strength

14 • BATTLES OF THE WAR OF THE RING14 • BATTLES OF THE WAR OF THE RING
Region BordersDepending on the type of border between the attacking and defending Armies, the number that the attacker must roll to score hits (called the Target Number) may be raised from the normal 5 to 6, to reflect the added difficulty (as detailed by the Border Effects Table in each scenario). Usually this modifier is applied only on the first round of a battle. In following rounds, the attacker is assumed to have completed crossing the difficult border; however, certain special border types (as detailed by the scenario rules) may have a longer effect.
Border Effects Table
Border Type Target Number for the Attacker
Stream/Ford/Pass 6 on the first round ✖
Dike/Wall 6 on the first round ✖◆
RiverImpassable:
Attack is not allowed
✖ “First round” modifiers apply during a Combined Attack to the first round of attack from each enemy Army.◆ The increase in Target Number only applies to troops attacking from outside a Wall/Dike against defenders behind the Wall/Dike.
Terrain SuperiorityDifferent types of troops fight better in different terrain: Horsemen and riders in general have an advantage on open ground, while other troops benefit from the shelter provided by woods and difficult terrain. This is represented by the different Favored Terrain associated to each Unit Type. At the start of a battle, before the first round is fought, you must determine which player has Terrain Superiority.
Each player adds the number of his Units which are fighting in their Favored Terrain. If a player has a higher total than his opponent, he has terrain superiority and may immediately draw one Generic Event Card. In case of a tie, neither player draws a card.
Example: A Shadow Army composed of two Warg Riders and three Half-Orcs attacks a Free Peoples Army in Deeping Coomb (which is a Plains Region with a Settlement). The Free Peoples Army is formed by three Riders of Rohan and one Bowmen Unit. Both the Warg Riders and the Riders of Rohan are in their Favored Terrain. The total of the Shadow player is 2 while the total of the Free Peoples player is 3. Since the Free Peoples player has the highest total, he immediately draws one Generic Event card.
FIGHTING A BATTLEAfter the Combat Strength of the opposing Armies and their Leadership Total are calculated, the terrain of the Region of the defender considered, and the Border between the attacker and defender taken into account, the battle begins.
The battle will develop over a number of rounds, until either Army is destroyed or defeated.
During each round, follow the sequence below:1) Tactics2) Combat Roll3) Leader Re-roll4) Apply Unit Special Abilities5) Apply Damage6) End of Battle
1) TACTICSAll Units in the game have special combat abilities that can be employed during a battle round if a player chooses to maneuver; in addition, each player can regroup his troops or rely on a Combat Event.
Each type of Unit is featured on a Unit Maneuver token, with a distinctive icon. At the beginning of a battle, each player takes the Unit Maneuver tokens corresponding to the different Unit types of his Army, and takes also the Regroup token and the Combat Event token. These are the Tactics tokens he has available for the battle.
Tactics Tokens
Examples of Unit Maneuver
Tokens
RegroupToken
Combat Event Token
At the beginning of each round, each player secretly chooses one of his Tactics tokens to use in the current round. After the choice is made, both players reveal their token simultaneously.• If the token is a Unit Maneuver, the player may try
a Maneuver (see below).• If the token is a Combat Event, the player may play
a Combat Event card.• If the token is a Regroup, the player recovers all
the Tactics tokens used in the previous rounds. The player can also choose to retreat at the end of the round without making a Rout (see below).
A used Unit Maneuver token is considered “spent” and is left on the table, faceup. It will not be available to the player for another round of battle, until a Regroup token is used. When a player uses a Regroup token, he recovers all Unit Maneuver tokens previously spent and can use them again.
The Combat Event token and the Regroup token are never spent and can always be used.
a) Maneuver with UnitsIf a player has chosen a Unit Maneuver token, substitute a number of white Combat Dice with black six-sided dice (or any other dice of a different color). These dice of a different color are also referred to as Maneuver Dice. The number of dice to substitute with Maneuver Dice is equal to the number of Units of the chosen type (it is not based on their Combat Strength).
If, after the Combat Roll and Leader Re-roll, at least one of the Maneuver Dice scores a hit, apply the Special Ability of that Unit type. Any hits rolled are also applied normally.

BATTLES OF THE WAR OF THE RING • 15BATTLES OF THE WAR OF THE RING • 15
Example: A Shadow Army with two Warg Riders, one Half-Orc Unit, and 2 points of Leadership attacks a Free Peoples Army in a Plain Region. The Army has a Combat Strength of 5, so it rolls five Combat Dice. If the Shadow player chooses the “Warg Riders” Tactics token, he substitutes two of the Combat Dice (as there are two Warg Riders Units) with Maneuver Dice. He will roll three white dice and two black dice during the Combat Roll. All dice miss in the Combat Roll. Since the Army has 2 points of Leadership, the Shadow player may choose to re-roll both Maneuver Dice as his Leader Re-roll to try to succeed in eliminating the Warg Riders.
b) Using a Combat EventIf a player has chosen the Combat Event token, he may play a Combat card from his hand. If both players have chosen to play a Combat card, the card is chosen simultaneously; first the attacker reveals his card, then the defender does the same. The effect of the card is applied when specified by the card text, usually immediately before or after one of the steps of the combat sequence. If two cards take effect at the same time, the card played by the defender is resolved first.
Note: If the Combat Event token is canceled (e.g., as an effect of an Event or Special Ability) the player may not play a card, but no card is wasted or discarded.
c) RegroupingIf a player has chosen the Regroup token, the round of battle is fought normally, and that player can neither use the Special Abilities of his Units, nor use Combat Cards. However, at the end of the round, he recovers all Unit Maneuver tokens and can use them again in the following rounds.
In addition to this effect, when a player uses a Regroup token, if the Army who used the Regroup token wants to retreat, the Army retreats from the field in good order and it does not suffer the effects of a Rout.
Note: It is not mandatory to retreat after using the Regroup token. The player just receives an advantage in case he wants to retreat.
2) COMBAT ROLLRoll a number of Combat Dice equal to the Combat Strength of your Army. Remember to take into account any modification to Combat Strength or number of
Combat Dice due to terrain, events, or Special Abilities, and that – if you are using a Unit Maneuver – you have to replace a number of Combat Dice equal to the number of Units of the appropriate type with Maneuver Dice. The maximum total number of dice to roll is always five.
To score hits against the enemy Army, each die result (either on a Combat or a Maneuver die) must equal or exceed a Target Number, which is normally 5. The Target Number may be higher or lower than 5 if modified by terrain, events, or Special Abilities.
3) LEADER RE-ROLLYou may re-roll a number of Combat Dice (including any Maneuver Dice) up to your Leadership total. These dice will normally hit if they equal or exceed the same Target Number used for the Combat Roll (unless an event or Special Ability specifically affects only the Target Number of the Combat Roll). You must keep the new die roll result.
Note: Differently from the War of the Ring game, you may re-roll successful dice if you want (e.g., to try to roll a 6 instead of a 5, or if a Special Ability or event is activated by successes in the Leader Re-roll).
4) APPLY UNIT SPECIAL ABILITIESAfter the Leader Re-roll, if an Army was using a Unit Maneuver and at least one of the Maneuver Dice was a success, the Special Ability appropriate to the Unit chosen takes effect. Apply its effect immediately unless the ability specifies that the effect is postponed.
5) APPLY DAMAGE AND CASUALTIESFor each hit inflicted on an Army, place one Damage Counter in the Region of that Army.
During this step of the combat sequence, a player may decide to take casualties, eliminating one Unit from an Army and removing two Damage Counters from that Army.
Mandatory CasualtiesAn Army can take damage up to the number of Units in the Army without losing any troops, but as soon as the number of Damage Counters exceeds the number of Units, the Army must take casualties and lose Units.The player must take casualties (removing one Unit of his choice and two Damage Counters), and continue to do so until the number of Damage Counters becomes equal or lower than the number of surviving Units in the Army.
A player is also forced to take casualties if his army routs (see below).
When there is a single Damage Counter remaining, a player is never forced to take casualties but may do so if he wants.
Example: An Army with three Units already had two Damage Counters on it, and during the current combat round has suffered three additional hits, bringing the total number of Damage Counters to five. Since the number of Damage Counters (five) is higher than the number of Units (three), the player must take casualties. He removes one Unit and two Damage Counters. Now he has two Units and three Damage Counters, so he must continue to take casualties. He removes another Unit and two Damage Counters. Now the total number of surviving Units is one, and one Damage Counter remains, so no additional losses have to be taken.
Loss of LeadersLeaders and Characters attached to an Army are eliminated if an Army is completely eliminated in battle.
5) END OF BATTLEA battle may end if either the attacking or defending Army is eliminated, or in one of the following cases:a) Attacker ceases attack: The attacker decides to stop
attacking. The battle is immediately over.b) Defender retreats: If during this round the defender
has chosen the Regroup Tactics token, at the end of a round he may decide to retreat to an adjacent free Region (see Retreating an Army, below).
c) Defender routs: If the defender didn’t choose the Regroup token, he can retreat anyway to an adjacent free Region, but must suffer the effects of a Rout (see Rout, below)
If the defender is eliminated, retreats, or routs, the attacker may advance (see Advancing after Combat, below).
Note: The attacker must declare first if he wants to cease the attack. Then, if the attacker wishes to continue, the defender may decide if he wants to retreat or rout his Army.
If the battle does not end, a new round of combat starts.

16 • BATTLES OF THE WAR OF THE RING16 • BATTLES OF THE WAR OF THE RING
Note: If both Armies are eliminated, the defender retains control of the Region where the battle was fought.
ATTACKING WITHA COMBINED ATTACKA Combined Attack is performed using the Combined Attack action allowed by an “Army” Action Die result, and can be done when more than one Army is adjacent to the attacked Region.
A Combined Attack is resolved as a normal attack, with the difference that the attacker may choose, at the start of each round in the battle, which one of his Armies, among those adjacent to the defenders, will fight in the current round. Only the chosen Army’s Combat Strength, Leadership, Unit Type, and other characteristics will be relevant in that combat round, and all damage inflicted by the defender during the round will be taken by the chosen Army.
Notes on Combined Attack:• Terrain Superiority is only checked before the first
combat round, so it will be based on the first Army that attacks.
• The attacker always recovers any spent Tactics token when he switches the attack to a different Army.
• Any borders that affect the Target Number in the first round of combat apply to each Army in the first round that it attacks.
AFTER THE BATTLERETREATING AN ARMYAn Army retreats when the defender has used the Regroup Tactics token and decides to end the battle.
An Army may retreat to an adjacent Region which:• does not contain an enemy Army, or an enemy-
controlled Settlement or Stronghold; and• is not adjacent to a Region containing the enemy
Army (including the attacking Army); and• is not beyond a Stream or Ford border.
Even if the requirements above are not fulfilled, an Army may always retreat to an adjacent Region with a friendly Army (in this case, if you have more than five Units there after the retreat, immediately remove any Unit in excess), or a friendly-controlled Settlement or Stronghold.
If no such Region is available, the attacker chooses any one free adjacent Region to move the retreating Army to; the retreating Army suffers one additional Damage. If no adjacent free Region is available, retreat is not allowed.
ROUTAn Army may rout away from the battle to escape from the enemy. This is an option always available to the player controlling the Army, at the end of a round of a battle, independently of the tactics used in that round.
When an Army routs from a battle, it must immediately convert all its Damage Counters to casualties, removing one Unit and two Damage Counters until there are no Damage Counters, or only one Damage Counter, left in the Army.
The Army may then retreat to an adjacent Region, following the same rules and restrictions which apply to retreats, as explained above.
ADVANCING AFTER COMBATIf the defending Army is eliminated, retreats, or routs, the attacker may advance into the now-empty Region with any Units in its Army. The attacker may advance with only some of the Units in that Army if he so chooses. However, remember that the Damage Counters, if any exist, must be split in such a way that the counters remaining with each part of the Army do not exceed the number of Units in each part.
Note: Characters and Leaders attached to an advancing Army may be left behind if a part of the Army does not advance, or they may be split between the two parts of the Army as the controlling player wants. A Leader attached to the Army may be left behind without any Units.
Advancing after a Combined AttackAfter a victorious Combined Attack, the attacker may advance into the now-empty Region with one of the attacking Armies (or a part of one Army). It is not possible to advance Units from the other Armies involved in the battle.
Note: If the last attacking Army used to fight in the Combined Attack is completely eliminated, but the defender is also eliminated or if the defender retreats or routs, any other attacking Army involved in the action may advance.
RALLYING ARMIESMost of the time, the majority of losses and damage an Army suffers in a battle are not dead soldiers, but disorganized, demoralized, or scattered troops. For this reason, damage suffered by an Army which is not converted into a loss of Units may later be recovered.
You may remove Damage Counters from an Army with a Rally action, using a “Muster” Action Die result. When you do a Rally action, you may rally up to two different Armies you control.
For each Army, roll a number of dice equal to the number of Units in that Army: For every die result of 5-6, remove one Damage Counter.
You can re-roll a number of failed dice up to the Total Leadership of the Army, applying the new result.
Example: An Army with three Units and a Leadership of 2 has two Damage Counters on it. Three dice are rolled and the results are 1, 1, and 5. Only one of the dice is as success. The two failed dice are re-rolled thanks to Leadership: One scores a 2 and the other scores a 6. As two dice results are successful, both Damage Counters are removed and the Army is back to full health.
You have now learned all the rules which are common to both scenarios of Battles of the War of the Ring. You should now read the
specific rules of the scenario you wish to play. We recommend playing the simpler Battle for
Rohan scenario first.