bbaassiicc bbooookkkkeeeeppiinngg™™ - owl software guide.pdf · basic bookkeeping ......
TRANSCRIPT

i
BBaassiicc BBooookkkkeeeeppiinngg™™
UUsseerr’’ss gguuiiddee
bbyy OOWWLL SSooffttwwaarree
Copyright © 1992 - 2012
All Rights Reserved

ii
INTRODUCTION .................................................................................................. 1
Technical Support ......................................................................................................... 1
WARRANTY DISCLAIMER ............................................................................................ 1
LEARNING BASIC BOOKKEEPING ................................................................... 2
Preparing for Data Entry ............................................................................................... 3
Entering Data ................................................................................................................. 4
SETUP .................................................................................................................. 6
Report Font .................................................................................................................... 6
Printer Setup.................................................................................................................. 6
Set Password ................................................................................................................. 6
Fiscal Year Setup .......................................................................................................... 6
Mileage Rate Setup ....................................................................................................... 6
Check Layout ................................................................................................................. 7
Order Checks ................................................................................................................. 7
FILE MAINTENANCE ........................................................................................... 8
Backup ........................................................................................................................... 8
Restore ........................................................................................................................... 8
Archive ........................................................................................................................... 8
DeArchive ...................................................................................................................... 8
Upgrade Data from Version 6 Backup ......................................................................... 8
Erase Data Files ............................................................................................................ 9
Reindex .......................................................................................................................... 9
Pack ............................................................................................................................... 9
INCOME AND EXPENSES ................................................................................ 10
Entering Income .......................................................................................................... 10
Import Income ............................................................................................................. 11
Entering Expenses ...................................................................................................... 11
Print Check .................................................................................................................. 12 Ordering Checks ........................................................................................................ 13 Check Layout ............................................................................................................. 13

iii
Retroactive Rate Change ............................................................................................ 13
Income and Expense Accounts .................................................................................. 13
Folders ......................................................................................................................... 15
REPORT GENERATION .................................................................................... 16
Expense Reports ......................................................................................................... 16 Summary Report ........................................................................................................ 16 Detail Report .............................................................................................................. 16 Account Detail ............................................................................................................ 16 Expenses paid by ....................................................................................................... 17 Chart of Accounts ...................................................................................................... 17
INCOME REPORTS ...................................................................................................... 17 Summary Report ........................................................................................................ 17
Detail Report ................................................................................................................ 17
Account Detail ............................................................................................................. 17 Chart of Accounts ...................................................................................................... 17
Profit Reports .............................................................................................................. 17
General Ledger ............................................................................................................ 18
Check Register ............................................................................................................ 18
Mileage Log ................................................................................................................. 18
UPGRADING DATA FROM BASIC BOOKKEEPING 6 ..................................... 19
OWL PRODUCT INFORMATION ....................................................................... 20
Master Investor ............................................................................................................ 20
Personal Portfolio Manager ........................................................................................ 20
Simple Business Accounting ..................................................................................... 20
Simple Business Invoicing & Inventory ..................................................................... 20
Basic Bookkeeping ..................................................................................................... 20
Bookkeeping for Realtors ........................................................................................... 20
CONTACT INFORMATION ................................................................................ 22

IInnttrroodduuccttiioonn
OWL Basic Bookkeeping (BBK) is an easy-to-use program that is designed to maintain complete and accurate accounting of income and expenses. In creating Basic Bookkeeping, our objective was to produce a program that is intuitive and requires no prior knowledge of accounting. BBK uses the "single entry" bookkeeping method that is recommended by the IRS. This accounting method is easy to use and is equally suited for small businesses and individuals.
Using BBK, you can produce a variety of expense, income, profit and general ledger reports. You can define up to 1000 different income and expense accounts to fully categorize your income and expenses for tax purposes.
BBK employs the concept of folders where each folder contains income and expense data that may be reported either separately or in combination. Thus, Basic Bookkeeping may be used for multiple businesses, multiple divisions within a single business or for both business and personal accounting.
Basic Bookkeeping is linked to OWL’s Simple Business Invoicing and Inventory management program (SBII) via an import option that transfers income data from SBII into Basic Bookkeeping. SBII provides complete tracking of sales, inventory, customers and receivables. The combination of SBII and Basic Bookkeeping provides a complete business management solution for many small businesses.
Technical Support
If you have questions that are unresolved after reviewing this user’s guide, contact our technical support department as follows:
EMail: [email protected] Phone: 410-849-3590 Web Site: http://www.owlsoftware.com Mail: P.O. Box 513, Crownsville, MD 21032, USA
WARRANTY DISCLAIMER
'OTTO-WILLIAMS LTD. (OWL) MAKES NO WARRANTY OR REPRESENTATION, EITHER EXPRESS OR IMPLIED WITH RESPECT TO SOFTWARE, ITS QUALITY, PERFORMANCE, MERCHANTABILITY, OR FITNESS FOR A PARTICULAR PURPOSE. AS A RESULT, THIS SOFTWARE IS SOLD "AS IS" AND YOU, THE PURCHASER ARE ASSUMING THE ENTIRE RISK AS TO ITS QUALITY AND PERFORMANCE. IN NO EVENT WILL 'OTTO-WILLIAMS LTD. BE LIABLE FOR DIRECT, INDIRECT, SPECIAL, INCIDENTAL OR CONSEQUENTIAL DAMAGES RESULTING FROM ANY DEFECT IN THE SOFTWARE OR ITS DOCUMENTATION, even if advised of the possibility of such defects or damages.

2
LLeeaarrnniinngg BBaassiicc BBooookkkkeeeeppiinngg
Basic Bookkeeping (BBK) comes with sample data that is intended to allow new users to quickly become familiar with the program.
The following steps will help you get to know the basic functions of BBK.
All functions within the program can be accessed using standard windows drop down menus along the top of the main screen. In addition, the most commonly used functions including report generation, editing income and expense data, file maintenance and program setup may be accessed using the tabbed pages on in the main window. To switch between pages, simply click the labeled tab.
Setup your printer. On the main screen click the Setup tab then click the Printer Setup button. Select your printer, paper size and orientation (portrait or landscape). Depending on the font size you select, BBK will automatically switch from portrait to landscape printing if the report is too wide to fit on a page in portrait mode.
Setup your report font. Click the Report Font button on the setup page. Choose a font to use when creating on-screen and printed reports. We recommend Times New Roman at a pitch of 12 or Arial at a pitch of 10 to 11.
Test the reports. Choose the Reports page by clicking the Reports tab. Run each of the reports and examine the output. When running the reports, be sure to select a reporting period within calendar year 2012. The default reporting period is the current month.
Add an expense. Click the Edit Expenses button on the Income and Expenses page. Try adding an expense record by selecting the New button on the Select Expense screen.
Edit an expense. Click on the Edit Expenses button then select an expense record by double clicking on the record. The currently highlighted record may be selected by clicking on the Select button.
3
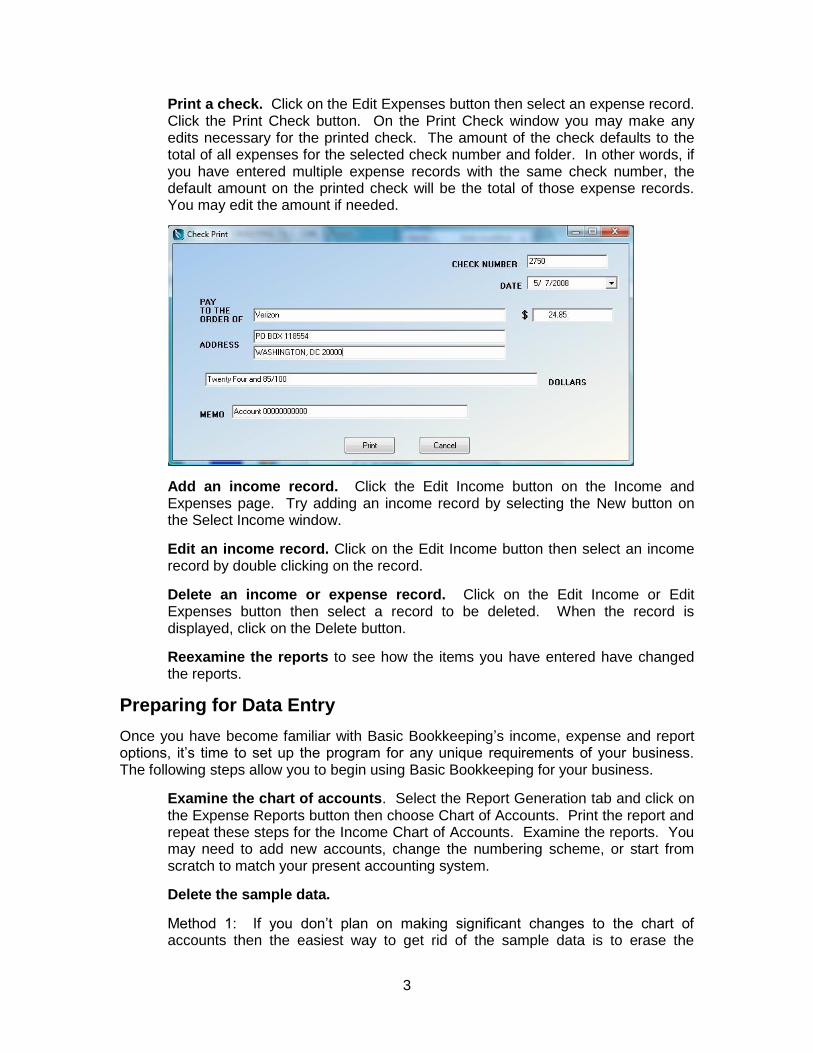
Print a check. Click on the Edit Expenses button then select an expense record. Click the Print Check button. On the Print Check window you may make any edits necessary for the printed check. The amount of the check defaults to the total of all expenses for the selected check number and folder. In other words, if you have entered multiple expense records with the same check number, the default amount on the printed check will be the total of those expense records. You may edit the amount if needed.
Add an income record. Click the Edit Income button on the Income and Expenses page. Try adding an income record by selecting the New button on the Select Income window.
Edit an income record. Click on the Edit Income button then select an income record by double clicking on the record.
Delete an income or expense record. Click on the Edit Income or Edit Expenses button then select a record to be deleted. When the record is displayed, click on the Delete button.
Reexamine the reports to see how the items you have entered have changed the reports.
Preparing for Data Entry
Once you have become familiar with Basic Bookkeeping’s income, expense and report options, it’s time to set up the program for any unique requirements of your business. The following steps allow you to begin using Basic Bookkeeping for your business.
Examine the chart of accounts. Select the Report Generation tab and click on the Expense Reports button then choose Chart of Accounts. Print the report and repeat these steps for the Income Chart of Accounts. Examine the reports. You may need to add new accounts, change the numbering scheme, or start from scratch to match your present accounting system.
Delete the sample data.
Method 1: If you don’t plan on making significant changes to the chart of accounts then the easiest way to get rid of the sample data is to erase the

4
“Sample Data” folder. Click the Folders button from the Income and Expenses page then select the “Sample Data” folder. Click the Delete button to delete the folder and all of its contents. Once deleted, define a new folder to hold your data if you have not already done so.
Method 2: On the File Maintenance page, click the Erase Data button. You may choose which of the sample data files you want to erase. While you should definitely erase the income and expenses files, we suggest that you do not erase the Accounts database unless you are converting from another accounting method that has different accounts or you have made a decision to start with a different numbering system.
Create folders for your business. On the Income and Expenses page click on the Define Folders button. If you did not delete the sample data folder, you may wish to simply edit the folder name to something appropriate. Otherwise add one or more folders to reflect your accounting needs.
Add or edit income and expense accounts. On the Income and Expenses page click the Income Accounts and Expense Accounts buttons to add or edit the account names and numbers needed for your business. Note that all account definitions are shared by all folders.
Setup your fiscal year. If your business operates on other than a calendar year, enter the starting month and day of your fiscal year on the setup page.
Setup your mileage rate. Enter the unit of distance (Miles or Kilometers) that you use and the allowable rate per mile/kilometer that you can deduct in the spaces provided on the Setup page.
Entering Data
Data to be entered into Basic Bookkeeping is falls into the following categories:
Dates: Dates are entered by clicking the drop-down arrow in the date field and selecting the date from the pop-up calendar. Individual fields (month, day, year) within the date may be also be incremented using the up and down arrow keys on the keyboard.
Monetary Amounts: Monetary amounts are entered using the decimal separator defined in the international settings in the Windows control page. Thousands separators and currency symbols are ignored when entering monetary amounts.
Plain Text: Text entered for descriptions of income and expenses is generally limited to 30 characters.
Check Boxes: Check boxes are used to indicate the taxable or deductible status of accounts. When a value is checked, it indicates a true condition. For example, if the Taxable box is checked then income in the account is listed as taxable income.
Drop Boxes: Used for selecting the Account and Folder for Income and Expenses these appear as text boxes with a down arrow to the right of the text. Click on the down arrow to change the selection.

5
Auto-Fill Feature: The program provides shortcuts in filling out some text fields by matching the user's keystrokes with a database of text that was previously entered into that field. A match is not attempted until the user has entered at least 3 keystrokes. If a match is found, it is displayed and if correct the user may simply proceed to data entry for the next field. If the match is not correct, the user may continue typing until the entry is complete or the correct match is found.
Occasionally, inappropriate matches may appear on a regular basis because a record containing incorrect text (e.g., misspelled or inappropriately capitalized words) in an auto-fill field was once saved. This condition may be corrected by clicking the "Edit Auto-Fill" button and editing or deleting the offending entry.

6
SSeettuupp
Report Font
The Report Font button opens a standard font dialog which may be used to select the font and font size that will be used for displaying and printing reports. Font sizes are limited to 10 through 12 pitches.
Hint: If you select a font that is too large to show all data when printing a report, Basic Bookkeeping will automatically reduce the font size to fit the page and page orientation selected. This may cause reports to paginate too frequently yielding large blank areas at the bottom of report pages. If this occurs, change your report font to a smaller pitch.
Printer Setup
When printing reports, Basic Bookkeeping sends reports to the default windows printer using the default printer orientation (i.e., Portrait or Landscape). The Printer Setup button may be used to change printers, paper size, orientation and other printer options supported by your specific printer.
Set Password
The Set Password button is used to enable or disable password protection for running BBK.
To enable password protection click the Set Password button then:
1. Enter your password and click OK 2. Confirm your password by entering it again.
The same process is used to change your password. Setting a blank password disables password protection.
WARNING: OWL SOFTWARE WILL CHARGE A FEE FOR RECOVERY OF DATA IF YOU LOOSE YOUR PASSWORD.
Fiscal Year Setup
This option allows you to set the month and day in which your fiscal year starts. Enter the month and day of the start of your fiscal year. The default is January 1.
Mileage Rate Setup
If you will be deducting automobile expenses based on a standard mileage rate, you should specify the unit of measure ("Miles" or "Kilometers") and the amount of the expense per unit of measure. The default is 0.505 (50.5 cents) per Mile. When entering expenses, you may then enter just the distance and the program will compute the expense amount based on the distance and rate.

7
Check Layout
While the check layout is predefined for check stock ordered through OWL Software, due to differences in printers it may become necessary to adjust the predefined layout to correctly align the printing on the check stock.
Before modifying the layout, print a test check on blank paper. Once you have your sample, overlay it on the check to examine the alignment. If the alignment needs to be adjusted click the Edit Check Layout button on the Setup page. Measurements are in millimeters (25.4 millimeters per inch). Increase or decrease the values by the amount you want to move the printing. Save the changes then print another test.
Order Checks
The Order Checks button launches your internet browser and takes you to the OWL Software web site for ordering checks that are designed for use with Basic Bookkeeping. Alternatively, you may go to the OWL Software web site to order checks. Before printing your first check, we strongly recommend you verify that the predefined check layout will work with your printer. See Check Layout above.

8
FFiillee MMaaiinntteennaannccee
The File Maintenance functions are found in the Main Menu under File and under the File Maintenance tab. They are described as follows.
Backup
The Backup option creates a backup copy of your data files. Files may be backed up to any accessible write enabled drive or directory. Select the drive and directory where you want to store the backup files. Any existing backup files will be overwritten. We recommend backing up to a removable flash/thumb drive. Drives installed after BBK has been started may not be found. If the drive is not found, close BBK and restart it.
Restore
The Restore option copies backup data files created with the Backup option, to your active data directory and recreates the necessary index files. If your backup data consists of multiple disks, you must insert the disks in the proper order.
Archive
The Archive option is designed to both secure your data from unintended editing and to maintain system performance. Archived income and expense records are flagged so that they do not appear in pick lists for editing purposes. Archived records are, however, available to the system for inclusion in reports.
We suggest that, after closing your books for a given period you archive that period’s records. This will help your system operate at peak efficiency and prevent you from accidentally editing older data.
After clicking the Archive button, enter the date span that you want to archive.
DeArchive
The De-Archive option may be used to restore previously archived income and expense data to make it available for editing. This is most useful in the event that you need to go back and review or change data from a prior year.
After clicking De-Archive button, enter the date span that you want to de-archive.
Upgrade Data from Version 6 Backup
As the button label implies, this is used to transfer data from Basic Bookkeeping version 6 so that it may be used with version 7.
Step 1 is to create a backup of your data using the Backup option in BBK Version 6. Once you have the backup, you may run version 7 and click the Upgrade Data from Version 6 Backup button. Choose the drive and directory containing your Version 6 backup data then click the Convert button.

9
Erase Data Files
The Erase Data Files button erases all data from selected database files. Generally, you will use this option only to initialize the database files to accept your own data after becoming familiar with the program using the sample data. Note that you may erase any or all of your data files using this option.
WARNING: Go slow and read each screen so that you don’t accidentally erase data you wanted to keep.
Hint: Basic Bookkeeping contains a list of expense accounts that provide most users with a good starting point for categorizing their expenses. We suggest that you do not erase the Accounts database unless you are converting from another accounting method that has different accounts.
Reindex
The Reindex button recompiles the database index files. Use this option after any abnormal exit from the program or if you find that data is missing from your files.
Pack
The Pack button physically removes records from your data that have been marked for deletion and returns the saved physical disk space to the operating system. BBK automatically attempts to pack data files each time the program is exited. In instances when the program is run on a network, the required exclusive access to the data files may not be available when the attempt is made. The Pack button then may be used to force packing of the databases.

10
IInnccoommee aanndd EExxppeennsseess
Options for entering income and expenses, setting up folders, and setting up income and expense accounts are located on the Income and Expenses page.
Entering Income
Before entering your own income records you must first define one or more folders and income accounts. Please see the Preparing for Data Entry section before entering any of your own data.
To add, edit or delete income records click on the Edit Income button on the Income and Expenses page.
Once you have clicked on the Edit Income button, a pick-list of income records presently in the system will be displayed. To edit or delete an existing record select the record by double clicking on it or by highlighting it and clicking on the Select button. To add a new record, click on the New button.
The income screen is composed of the following fields.
Field Action
Date Enter the date the income was received
Amount Enter the amount of income received
Description
Enter a description of the income. This might include the name of the payer or the source of the income. The program will attempt to automatically fill in this entry if it finds a match with a previous entry.
Account Select the appropriate account from the drop down list. The list contains all Income Accounts that you have defined.
Folder Select the appropriate folder from the drop down list. The list of folders contains all of the folders that you have defined. See Folders, below.
Command buttons at the bottom of the screen function as follows:
Button Action
Save Saves the currently displayed record. If you are editing an existing record, the original record is overwritten.
Delete Deletes the currently displayed record. Note that this option is disabled when adding new records.
Cancel Discards any changes to the currently displayed record and returns to the Income Selection menu.

11
Import Income
This option is provided for users of Simple Business Invoicing and Inventory (SBII). The option automatically transfers records of payments received from SBII to the income database of Basic Bookkeeping.
After clicking on the Import Payments button, the Import Payments screen will be displayed. The screen is composed of the following fields.
Field Action
SBII Choose the drive and directory where your SBII data resides. If you installed SBII using the default directory, this field will already be filled in for the most current version of SBII on your system.
Import Beginning Enter beginning date for the payments you wish to import. The default is the beginning of the current fiscal year.
Import Through Enter the ending date for the payments you wish to import. The default is today’s date.
Import to Account Select the Income Account into which the payments will be imported.
Import to Folder Select the Folder into which the payments will be imported.
Once you have completed entering all of the information on the screen you may click the Import button to begin the transfer.
Note: In order to prevent duplicate income records, all previously imported data within the specified date span will be deleted and replaced by the current payment information in the SBII database. This has no effect on income data that has been entered manually, but if you edited a previously imported record, your changes will be lost if the record is within the date span being imported.
Entering Expenses
Before entering your own expense records you must first define one or more folders and expense accounts. Please see the Preparing for Data Entry section before entering any of your own data.
To add, edit or delete expense records click on the Edit Expenses button on the Income and Expenses page.
Once you have clicked on the Edit Expenses button, a pick-list of expense records presently in the system will be displayed. To edit or delete an existing record select the record by double clicking on it or by highlighting it and clicking on the Select button. To add a new record, click on the New button.
The Expense screen is composed of the following fields.

12
Field Action
Paid by Select the method used to pay the expense. Note: Reports can be generated for individual payment methods (e.g., Expenses paid by cash).
Check No. If the expense was paid by check, enter the check number.
Date Enter the date the expense was paid.
Miles/KM This field is used if you need to track expenses based on the number of Miles or Kilometers driven. The program records the distance entered and automatically computes the expense amount based on the rate entered in your mileage rate setup.
Amount Enter the amount of the expense.
Pay To Enter the name of the person or company to whom the expense was paid. The program will attempt to automatically fill in this entry if it finds a match with a previous entry. See Auto-Fill Feature for more information.
Memo This is a text field that can be used to further describe the nature of the expense.
Account Select the appropriate account from the drop down list. The list of available accounts contains all of the expense accounts that you have defined.
Folder Select the appropriate folder from the drop down list. The list of available folders contains all of the folders that you have defined.
The command buttons at the bottom of the screen function as follows:
Button Action
Save Saves the currently displayed record. If you are editing an existing record, the original record is overwritten.
Delete Deletes the currently displayed record. Note that this option is disabled when adding new records.
Cancel Discards any changes to the currently displayed record and returns to the Expense Selection menu.
Print Check Saves the expense record and opens the check printing window.
Print Check
Checks may be printed on Laser/Inkjet checks ordered through OWL Software. Before printing your first check, we strongly recommend you verify that the predefined check layout will work with your printer. See Check Layout below.
To print a check, click on the Edit Expenses button then select an expense record. Click the Print Check button. Data from the selected expense record is automatically transferred to the Print Check window. If you have entered multiple expense records

13
with the same check number, the amount transferred to the Check Print window will be the total of expense records having the selected check number.
Before clicking the Print button, you may make any edits necessary for the check to be printed.
Ordering Checks
The Order Checks button launches your internet browser and takes you to the OWL Software web site for ordering checks that are designed for use with Basic Bookkeeping. Alternatively, you may go to the OWL Software web site to order checks.
Check Layout
While the check layout is predefined for Laser/Inkjet checks ordered through OWL Software, due to differences in printers it may become necessary to adjust the predefined layout to correctly align the printing on the check stock.
Before modifying the layout, print a test check on blank paper. Once you have your sample, overlay it on the check to check the alignment. If the alignment needs to be adjusted click the Edit Check Layout button on the Setup page. Measurements are in millimeters (25.4 millimeters per inch). Increase or decrease the values by the amount you want to move the printing. Save the changes then print another test.
Retroactive Rate Change
The Retroactive Rate Change is a special option that updates mileage expenses that were previously computed using a different rate. This is useful when the deductible allowed by the IRS is changed retroactively.
After clicking the Retroactive Rate Change button, enter the following information.
Field Action
New Rate Enter the new rate. For auto mileage, this would be new allowable cost per mile.
Apply From Enter the date the new rate went into effect.
Apply Through Enter the date of the day before you began entering your rate based expenses using the new rate.
Note: This does not make any of the changes to the Mileage Rate Setup that is applied to future entries. Change the mileage rate on the Setup page to edit the rate that will be applied to future entries.
Income and Expense Accounts
The Income Accounts button and Expense Accounts button allow editing of a “chart of accounts” for income and expenses respectively. The system is capable of accepting up to 9999 different accounts for categorizing your income and expenses.
Note: Income and Expense accounts are maintained separately and both must be defined.
Note: Account definitions are shared with all folders.

14
A good start in setting up account categories is to study the IRS tax forms you expect to be filing or have filed in the past. At the minimum, you should establish one account for each of the line items on the IRS forms that apply to you.
To add, edit or delete accounts click on the Income Accounts button or Expense Accounts button on the Income and Expenses page.
Each account record contains the following information.
Field Value
Account Number This is a unique number that is assigned to this account.
Description A description of the type of income (e.g., Ordinary Income, Interest, Dividends, etc.) or expense.
Taxable Income Accounts Only: Check the Taxable box if the income is taxable. Examples of non-taxable income include loans from banks, repayment of loans from employees, etc.
Tax Deductible Expense Accounts Only: Check the Tax Deductible box if the expense is deductible. Examples of non-deductible expenses include federal income tax, fixed assets, loans to employees, personal expenses, etc.
Hint: From an accounting standpoint, it is better to categorize your income and expenses at a high level of detail. Lumping many different types income or expenses under a category such as “Miscellaneous” makes your records more difficult to understand and could cause confusion and additional accounting expense.
Hint: To merge two accounts, select the account to be eliminated and change the account number to the number of the account into which the two accounts will be merged. Edit the description to reflect the name of the merged account then click the Save button. This will transfer the income or expenses from the selected account to the new account number.
Command buttons at the bottom of the screen function as follows:
Button Action
Save
Saves the currently displayed record. If you are editing an existing record, the original record is overwritten. Warning: Be sure to read the on-screen messages when saving an existing account with a new account number.
Delete
Deletes the currently displayed record. Note that this option is disabled when adding new records. Note: When deleting an account, all income or expense records that are assigned to that account are also deleted.
Cancel Discards any changes to the currently displayed record and returns to the Income Selection menu.

15
Folders
The concept behind folders is to allow users to separate their income and expenses by business activity. For example, a rental property owner may wish to maintain separate income and expense records for each rental property and be able to report income and expenses for both individual properties and all properties combined. In this case the property owner would create a folder for each rental property. When entering income and expenses, the owner enters them into the folder corresponding to the property from which the income or expense was derived.
The power of folders is rooted in the report generator's ability to generate reports for any selected folder or combination of folders. In the example above, the rental property owner would be able to create a complete set of reports for each individual property and all properties combined.
To add, edit or delete folders click on the Folders button on the Income and Expenses page.
Each Folder Record contains the following information.
Field Value
Number A unique number assigned to each folder. When adding new folders the system will assign the next unused number between 1 and 999. The folder number may be edited by subsequently selecting the folder and editing the number.
Description Enter a descriptive name for the folder.
Command buttons at the bottom of the screen function as follows:
Button Action
Save Saves the currently displayed record. Note: When you change a folder number, all income and expense records assigned to the original folder number are reassigned to the new folder number.
Delete Deletes the currently displayed record. WARNING: When you delete a folder, all income and expense records assigned to that folder are also deleted.
Cancel Discards any changes to the currently displayed record and returns to the Folder Selection menu.

16
RReeppoorrtt GGeenneerraattiioonn
The options for reports generation provide a great range of flexibility for creating reports. Each report can be run for a user specified period of time and for any selected folder or combination of folders. All reports may be previewed on your display for quick reference or printed as a permanent record. Reports may also be exported as either plain text or as tab delimited text. The tab delimited text file is useful for importing into a spreadsheet.
Hint: When you select more than one folder for inclusion in a report, the report contains the income and expenses from the selected folders as if they were a single folder (i.e., the income and expenses are merged into a composite folder).
The types of reports that are available include: Expense Reports, Income Reports, Profit Reports and a General Ledger report.
Expense Reports
Summary Report
The Expense Summary report summarizes expenses for each account within the selected reporting period. The report includes previous fiscal year to date expense totals for each account as well as fiscal year to date totals through the end of the reporting period. Information in the report includes:
1. Account Number 2. Account Description 3. Total Expenses for the account within the reporting period. 4. Total Expenses for the account from the start of the fiscal year to the beginning
of the reporting period. 5. Total Expenses for the account from the start of the fiscal year through the end of
the reporting period.
Detail Report
The Expense Detail report lists each expense item dated during the selected report period. Information in the report includes:
1. Expense Date 2. Check Number 3. Account Number 4. Name of the person to whom the expense was paid 5. The amount of the expense 6. Expense Memo information.
Account Detail
The Account Detail report lists the same information as the Expense Detail report but for only a single selected account.

17
Expenses paid by
This report lists the same information as the detail report but includes only those expenses paid by the selected criteria (check, cash, credit card or other).
Chart of Accounts
The Chart of Accounts report lists all defined expense accounts. The accounts are listed in numerical order within subheadings of deductible and non-deductible accounts.
INCOME REPORTS
Summary Report
The Income Summary report summarizes income for each account within the selected reporting period. The report includes previous fiscal year to date income totals for each account as well as fiscal year to date totals through the end of the reporting period. Information in the report includes:
1. Account Number 2. Account Description 3. Total income for the account within the reporting period. 4. Total income for the account from the start of the fiscal year to the beginning of
the reporting period. 5. Total income for the account from the start of the fiscal year through the end of
the reporting period.
Detail Report
The income detail report lists each income item within the reporting period. Listed information is as follows.
1. Date the income was received. 2. Description of the income. 3. Whether the income record was imported from the OASIS system. 4. The amount of income received.
Account Detail
The Account Detail report lists the same information as the Income Detail report but for only a single selected account.
Chart of Accounts
The Chart of Accounts report lists all defined income accounts. The accounts are listed in numerical order within subheadings of taxable and non-taxable accounts.
Profit Reports
Profit reports can be generated for any period of time and are available in either weekly or monthly form. The weekly report lists seven day totals of income and expenses for the specified reporting period. Likewise, the monthly report lists totals for each month within the reporting period. The report lists the following information.
1. Starting and ending dates. 2. Taxable income.

18
3. Deductible expenses. 4. Taxable Profit or (Loss). 5. Non-Taxable income 6. Non Deductible expenses 7. Net Profit
Reporting period totals are listed at the end of the report.
General Ledger
As its name implies, the ledger report produces a general ledger containing a detailed list of credits (income) and debits (expenses) with a running balance. Within each fiscal year, the totals of credits, debits and the fiscal year-to-date balance are brought forward. The report lists the following information.
1. Credit or debit date. 2. Description of the credit or debit. 3. Amount of the credit or debit. 4. Fiscal year-to-date balance of credits and debits.
Check Register
The check register report is designed to assist in reconciling a checking account register. When entering expenses it is often necessary to enter several expense records for different accounts with the same check number. The check register report lists each expense recorded for selected checks and provides a total for each check. This helps the user verify that the entire amount of the check has been accounted for within BBK.
Mileage Log
The mileage log report is designed to assist users who report automobile expenses as a function of the number of miles driven. The report lists the following information
1. Date 2. Check Number 3. Paid to and description of the travel 4. Number of miles driven 5. Dollar cost of the mileage as computed using the mileage rate in effect when the
miles were entered.

19
UUPPGGRRAADDIINNGG DDAATTAA FFRROOMM BBaassiicc BBooookkkkeeeeppiinngg 66
Data files from Basic Bookkeeping version 6 must be converted in order to be used with Basic Bookkeeping version 7. Use the following procedure to move your data from version 6 to version 7.
1. Run Basic Bookkeeping version 6. 2. Within version 6 choose the File – File Maintenance – Backup to create a backup
copy of your data files. The backup files may be saved to a removable drive (such as a flash drive or floppy drive) or to a subdirectory on your hard drive if you are not moving your data to a new computer.
3. Close Basic Bookkeeping 6. 4. Run Basic Bookkeeping 7. 5. On the File Maintenance page click the Upgrade Data from Version 6 Backup
button. 6. Choose the drive and/or directory containing your version 6 backup data (created
in step 2 above). 7. Click the Convert button. 8. Edit your income and expenses to check that your data transferred properly.

20
OOWWLL PPrroodduucctt IInnffoorrmmaattiioonn
'Otto-Williams Ltd. (OWL Software) is committed to producing intuitive, easy to use, software solutions that meet the challenges of today's fast paced world. OWL programs have been rated among the best software available by major publications including PC World, Computer Novice and the Financial Times.
No more deciphering complex programs and plowing through confusing software manuals. At OWL, we listen to our customers and design our programs to be easy to use with: simple menus, context sensitive help, on-line user's guides, and sample data where needed, to help you get started fast. Our programs allow you to be fully operational within minutes.
Master Investor
MI is a fully integrated system that combines portfolio management with technical analysis. The purpose of MI is to help individual investors and professional money managers organize and analyze the information that is critical to making informed investment decisions.
Personal Portfolio Manager
Personal Portfolio Manager is an easy to use portfolio management and technical analysis system designed specifically for individual investors who invest with a long term horizon.
Simple Business Accounting
Simple Business Accounting (SBA) is an easy-to-use accounting system designed specifically, for use by small and home based businesses. This new generation of our top rated accounting system (Basic Bookkeeping) has been completely redesigned for Windows 95 and includes an all new interface and powerful new features.
Simple Business Invoicing & Inventory
Simple Business Invoicing and Inventory (SBII) is a complete sales management system that includes: invoicing, inventory management, automated billing, mailing list management, and sales tracking. Invoices and bills can be printed on plain paper or your own letterhead.
Basic Bookkeeping
Basic Bookkeeping (BBK) is a very easy-to-use accounting system that is specifically designed for small and home based businesses. This single entry accounting system is very straightforward and avoids financial jargon so you don't need to be an accountant to understand and use the program.
Bookkeeping for Realtors
Bookkeeping for Realtors (BBK) is a specialized version of our popular Basic Bookkeeping program. This very easy-to-use accounting system is specifically designed for real estate sales professionals who need a fast accurate means of keeping track of their income and expenses including auto mileage.

21
Please check our web site at http://www.owlsoftware.com for current prices and
availability.

22
CCoonnttaacctt IInnffoorrmmaattiioonn
'Otto-Williams Ltd. (OWL Software) P.O. Box 513
Crownsville, MD 21032, U.S.A
Phone: 410-849-3590
Email: [email protected]
Web: http://www.owlsoftware.com
We welcome your comments & suggestions: