beaverslayer's vest tutorial - · pdf filenow it's on to the pattern making. first...
TRANSCRIPT

Beaverslayer's Vest Tutorial I'm starting a new vest so I thought I would do a tutorial while I'm at it.
Well first off what I do, is I layout the drawing that I am going to be carving into the shoulder
piece. As shown in the pictures, you can see that I use 3 pieces of 3M Transparency Films for this. I will draw what I'm looking for on regular paper in pencil, this way I can erase and make changes as needed. Then I will trace the final design onto the transparency film, making sure that I put
marks on it so that I know where exactly it sits on the leather shoulder piece.
Now, using the stylus, I'll transfer the design into the leather. I will not case the leather like a lot of you do, I will just use the spray bottle and wet the area that is going to be worked on.
Once the design is completely transferred onto the leather, I will check to make sure that I haven't missed any of the drawing. I once made a matching pair of men’s and ladies vest, and on the one Eagle on the mans vest, I missed the bottom half of the Eagles beak. I never noticed this until
the vest was complete...DUH...
After that's all done, and I'm confident that all the drawing is there, I will start to carve. On these shoulder pieces I DO NOT use the swivel knife and cut. The reason for this is that, it is a
piece of the garment that tends to move quite a bit and is always being bent and folded. With knife cuts, then there will be a great reduction in the strength, and we don't want that. I use a steep
beveller instead, this greatly reduces the chance of actually cutting through the leather.
I use 2oz leather for these shoulder pieces, as anything heavier would not fold and twist right to fit the body, and would make the vest uncomfortable to wear.
Well here's the pictures so far, as I go along, I'll be explaining each step of the process, and
will be taking pictures as well, as I do know how much everyone loves pictures.
The layout drawing

The cut leather
Laying out the design

Laying out the design
Laying out the design

Laying out the design
The design scribed onto leather

Starting to carve
Here is the shoulder piece after about 4 1/2 hours carving. Next we'll move into the layout and sizing of the rest of the vest.

Now it's on to the pattern making.
First off you need to know the measurements of the person wearing the vest. You need chest/bust measurement, from the indent in the throat (below the adams apple) to the top of the belt, and from
the first vertebrae to the top of the belt on the back.
As this vest is going to be for a 37" chest and the customer has requested that it also fit on the outside of a jacket, I have had to make a few allowances for this.
As you see in the picture, the front panel is 11 1/2" wide, there is a 1/2" extra on all edges (except the "V" on top) for folding over to make a finished edge and to accommodate the lacing.
This will give me a 10 1/2" width on each front piece, or 21" in total across the front.
The back piece is shown as only half, as I just flip it over when marking out the leather (saves poster board). You can see that it is 7 1/2" wide, not including the 1/2" fold, which is needed on the sides and bottom. So in total I will have a 15" back piece, add this to the 21" in front gives
you a total of 36".
Now when it is constructed, there will be a minimum 1" gap between the front and back on both sides where the side adjusting laces go. So add this 2" to the overall measurements, and you get 38" in total for the chest measurement. Using the adjusting laces on the side, this vest can be made 2" smaller or up to 4" larger to accommodate the wearing over a jacket, or weight gain or loss.
This is the pattern for the pockets and the side adjustors. The pocket pattern is also used for the inside pocket as well, but is cut from Pigskin Suede instead of the garment leather.

These pictures give you a look at how the side adjustor is cut 3/4" smaller than the area that it will be finally attached to. The reason for this is that when you fold the outer edge over, you
don't want the fold to be all bunched up and cause you problems. Once the outer edge is folded over and the lacing done, this piece is held in by one half of the lacing that will be done, and there
is a minimal amount of structural integrity needed at these points.
....
This picture shows you how the side adjustors will basically be assembled when we get to this point, I wanted to show you this, so I wouldn't forget later.
So now that you have the basic pattern down, it's time to lay it out on a side of garment leather, or deerskin or whatever you want to make a vest out of. I tend to use the area around the legs for the pockets, as they have some very nice texture to them and this adds to the look of the vest. Try to be very careful that you are not placing your template over any defects or brand marks, this is
very annoying once you cut all the leather and find a "Bar U" brand somewhere on your piece.

When marking your leather to cut, I use a Gel Pen. They are great for marking on garment leather, as the marks will just rub right off when you’re done with it. I use a Pentech Fireworks pen,
usually Silver in color as is shows up real good on black leather.
The hardest piece to layout and mark is the back piece. If you want, you can make a complete back template instead. If you only use a half template, then make sure you put marks on the centre line,
so when you flip it over to mark the other side, you have something to line it up with.
Lay your leather out nice and flat, being careful not to stretch it, you just want it to lay naturally.
You can see that there are a few wrinkles showing in the picture, this will not be a problem, as they will not show in the final vest. If you were to try and get all the wrinkles out, you would
have to stretch the leather and this would cause far worst problems.

Here's a picture of the Gel Pen
Next step is to make sure that the two pieces that you are going to join fit correctly. This is important as you don't want to apply the glue, then as your joining them together, finding out that
they don't fit properly, and have to redo the whole thing.

Then cut some 5/8" strips of pigskin. These are to be used to join the two pieces together and add some structural support to the seams.
The next step is to glue the two pieces together. This will be the same process with each time we have to join two pieces of leather edge to edge. I use a water soluble contact cement. It's the
same as normal Barges and such, except it is water soluble. It is very strong and will hold leather together very well. The main reason I use this rather than Barges, is that it will just rub right
off of the finished side of the leather with your thumb and not leave any residue. Also there is no foul odor. First you want to apply a small amount of glue to the edge of your shoulder piece. Try not to use to much, as it isn't needed. I use a small paint brush to apply it with....NO Q-TIPS!!!

Next, do the same to the back panel of the vest.
On this piece only apply the glue to within 1/2" of the outer edge, as the last 1/2" of leather is to be folded over and is not glued to the shoulder piece.
Next, being VERY careful not to stretch the leather, and on a flat surface, join the two pieces together. Start in the middle where the tip of the shoulder piece meets the centre of the back piece. Using your finger nail or the edge of your thumb, press the two edges together. Use your
roller to roll back and forth across the two pieces to help bond them.

Then you want to take your roller and roll the seam together FACE DOWN. This not only helps to make the bond, but doing it face down will make the finished side of the vest even, as the tooling hide
is a bit thicker than the garment leather.
Now we need to glue those strips of pigskin on to add strength to the seam. I stick painters tape to the leather to make it easier to only apply the glue where I want it to be.

Once you've laid out the tape, use a wider paint brush and apply the glue, again don't go overboard with the glue, as you really don't need that much, just enough to leave a thin film
Then apply some glue to the strips of pigskin, cut them to length first.

Pull the tape off of the leather, then starting in the middle of the back, press the strip down following the curve of the seam. Once you've got both pieces pressed onto the seam, use your roller
to bond the pieces together.
The last step for now is to mark where you will punch the holes for lacing.
Start from the outer edge of the shoulder piece and make a mark 3/16" in from the edge. From there place a mark every 3/8" apart until you get to the centre of the vest. Do the same thing on the
opposite side. If you notice that one side is a bit different, this again is not a big problem, as you can adjust the spacing a bit as you punch the holes. I wish it was an exact science, but as yet
it is not, very close though.

Now you are ready to punch your holes and do some lacing. Use a punch that is 1 size smaller than the lace you will be using.
Start by placing punching a hole in the middle of the seam, this will be your starting point. Then following your marks, punch all the rest of the holes. You want them to be 1/4" on either side of
the seam, this will give you a laced seam that is 1/2" wide.
Then when you get to the middle of the back, you will have to be a bit careful as to your hole punching, you do not want them to be too close, but then you do want them to be about the same
distance apart. You will also have to punch a few holes that are not marked, like the one at the very bottom of the "V".

Now we can start to lace. I'm going to use 1/4" lace that I have cut from the same garment hide. You do not really want to use a different lace as this tends to look a bit funny. If you need help to make your own lace, I have done a lace making tutorial that can be found on the Main Front page
of the Leatherworker.net website.
You will have to cut a piece of your lace 7 times the length of the seam, on this seam you don't want any splicing as it is a structural seam.
To begin with, you run your lace through the middle hole at the outer edge of the vest. Leave about a 1" tail on the backside, this is to be glued down in such a way that it will be held in place by
one of the following laces.
Then, using a lace roller, roll the tail to make a good bond.

Now, run your lace through the second hole on either the top or bottom of the seam. Whichever you decide is okay there is no reason to use one over the other, just be sure when you start the other
side you do the same as this side to keep everything the same.
Pull the lace all the way through and snug, not real tight, just snug.

Then on the backside, run your lace through the first hole and pull it snug again. This will not cross over but be in a straight line. Then on the front, cross over to the second hole on the
front, and run your lace through again. Again just make it snug, not real tight, as you don't want it to pull the leather and make it wrinkle.
Then again from the backside, run your lace through the first hole like you just did previously, pulling it snug. Also you want to be sure that the lace is not twisted in any way, if it is, just
give it a little tweak with your finger to straighten it out.

Now, cross over the seam again and run the lace through the third hole, then on the backside, back up through the second hole, on the front across the seam into the third hole, and so on until
you've reach the middle of the vest.
This is what the backside should look like, and also this is how your tail should be secured when you reach it.

When you've reached the middle of the vest, you will have to punch one more hole to be able to finish the seam. The placement is shown in this picture, circled in red. I will always wait till I've reached this point before I punch this hole, it sometimes has to be placed where it does not look like it should be. What I will do is lay the lace down and see where it looks "Best" and then
mark and punch the hole.
Next, using a piece of sandpaper lightly sand away any stain or dye and also the shiny finish of the garment leather between the seam holes. You need to do this to help the glue bond, as it
doesn't like to stick well to shiny surfaces.

Now, cut the lace so that it can be glued down to the area that you've just sanded clean, apply glue to both the lace and the vest, and stick the lace down.
Take your roller and roll this tail to make a good bond. This tail will be covered byt the lace that comes from the other side of the vest, and will also be held down by it as well.

Once you've completed the first seam, you want to roll the lace from the backside of the vest. This will help to lay the lace down nice and even and give you lace a real nice look.
This is what your lace should look like on the front of the vest.

And this is what your lace should look like on the back of the vest.
Doing the same as you did on the previous side, start lacing the other side. Remember that you want it to start the same as you did on the first side, so that it is all the same direction. Once you've reached the middle, your lace should tail should be on the front of the vest. Run your
needle through the lace on the opposite side, run it under this lace about 4 or 5 places, then pull nice and tight and cut it off. If the tail sticks out, just tuck it under with a lacing fid.

Here's what the completed back should look like.
And here's what the completed front should look like.

To attach the yolk of the shoulder piece to the front panel of the vest, is basically the same as what you've just done on the back panel.
Like the back, apply glue to the edges and fit together. Then mask off the area that is to have the
strips glued down to and apply the glue. Also apply glue to the strips.
Be sure to roll the strips with your roller to be sure the bond is good.

Now you can mark and punch your holes. This is again the same as the back, 3/16" in from the edge, then 3/8" apart. Punch a hole in the middle of the seam both at the beginning. The hole in the
middle by the "Point" is not needed on the yolk.
Now lace the seams one at a time from the outer edge in. When you reach the middle and the end of the lace, sand and glue the tail down just like you did on the back panel. Roll the lace from the
back, and your ready to do the other side.

Let's make a pocket now.
This is fairly simply to make, you'll need some "Pigskin Suede" to line the pocket with. Using the pocket template, cut out a piece of your garment hide, then cut a similar piece of suede except this is 1" shorter as seen in the picture. You can cut 2 of each as there is 2 pockets.
Then place a bead of glue all around the edge of the suede liner, and also the edge of the pocket front. On the front the glue bead only goes across the top of the pocket 1" down from the top. Once you have placed the liner onto the front, press them together until they align up and roll with
your roller. If there is any overhang of liner, just trim it off with your scissors.

Now place a strip of painters tape 1 1/2" down from the top of the pocket. Apply glue to this whole top area, once tacky, fold the top over the edge of the liner and press them together. This is to
keep the top of the liner from being exposed.
Now with your roller, roll the seam good to seal the bond.

I've made a template that I use to mark the hole for pockets, but all is the same as the rest. Across the top you want the holes spaced 3/8" apart but only 3/8" above each other, not the 1/2" we did on the other seams. This is because the lace running down the side is also 3/8" apart so the first laces will match the top laces. Only punch one row of holes down the side and across the
bottom of the pocket.
Okay, moving right along here, let's show how to locate where the pocket needs to live.
Make a mark 1 3/4" in from the front edge at two locations. Then measure up from the point 4" and place a small mark. Using your pocket template, align the edge and bottom up with these three
marks. Using your gel pen mark the edge of the pocket down the side and across the bottom to the middle of the pocket. Then measure 5" across from the side line to the other side of the pocket. Place your template on the other side and mark a line down the side and across the bottom to meet the other line. Now from the bottom corner of the pocket make marks 5" up to show where the top of
the pocket goes.

Once you've marked it out, you now have to use some sandpaper to rough up the surface to make a good gluing bond. I use 220 grit sandpaper for this. Sand it about 3/16" wide all the way around
the marked out area. Make sure to blow the area clean.
You also want to sand the top of the inner side of the folded over piece of garment hide, about 3/16" in from the edge as well.

Well let's place the pocket now.
Apply a bead of glue to the sanded area of where the pocket will be placed, all the way around on the inside of the line. Also apply a bead of glue to the edge of the pocket itself.
Once the glue is tacky, starting at the top corner, press the pocket into place

Then do the same to the other top corner.
On the side closest to the front, align the edge of the pocket with your line and press into place.

Do the same on the opposite side as well.
Now at the bottom of the pocket, align the centre of the pocket up with the mark you made at 4" up from the point and press down to attach. Using your finger or even a pencil, lift up the two bottom sides so they are away from the front panel. Carefully scrunch the pocket a bit and place it along the line at the bottom. This may distort a few of the pre-punched holes, but not to worry, this gives the pocket it's desired shape. Now do the same on the other side of the bottom. Take your
roller, and roll this seam very good, as you want a real good bond here for when you are lacing, it sometimes tends to come apart and give you a bit of a challenge to lace.

This is what the pocket should look like once it is glued in place. You will want to leave it for a few hours, for the glue to bond well. This gives you some time to relax, or work on something else
while you wait.
Okay, now that the glue has had some time to dry and bond real good, let's get those holes punched and laced up.
Starting 1/4" above the pocket top, punch 2 holes above so that when the lace is in place this will
keep the pocket from being pulled away from the vest. Next, following along the holes that are already punched in the pocket, punch holes 3/16" away from the edge of the pocket. When you reach the corners, you have to adjust the space a bit to allow for the lace to flow evenly around the
corner.

Now cut a piece of lace 7 times the length from the top to the centre of the bottom. We will be lacing one side from top to bottom, then the other side from top to bottom. This gives the same
look of the lace on both sides, more appealing to look at.
Now we can lace this pocket to the vest.
Start your lace into the hole shown in the picture, then in the top of the corner, sand a small area towards the opposing corner and apply a bit of glue to the lace and the sanded area. Press
this down and roll.

Run your lace up through to the front through the hole shown, and just before you pull it snug, place a bit of glue on the vest and also the lace. This will help the lace from being pulled out at any time. Now just continue lacing as before, being careful not to pull your lace to tight on this
as it will tend to pucker the leather.
A little lacing tip here: Use the edge of your thumb when pulling the lace to align it with the hole, This helps prevent the lace from twisting as you pull it through.

Once you reach the corner where the holes have been punched a bit farther apart, make sure that when you push your needle through, it comes out on the proper side of the last lace.
When you reach the centre of the pocket, sand an area that is about 1" long so that you can glue the tail down as before. This will be covered by the next lace we do. Be sure to roll all of these
glued spots, it really does help it to bond.

Now on the other side of the pocket, you want to do the exact same thing you did on the first side. Sand a small area, glue the tail down, roll the glued tail, then glue the loop of the first lace on
the backside. Then continue to lace until you've reached the end.
At the end of the run, just push your needle through like shown, you want to run it under about 4 or 5 laces back, then cut the tail and tuck any little nubs back under.

Here's the back of the finished seam.
And here's the front of the finished seam. Remember to roll the lace from the back of the vest to help lay the lace down nicely.

Now to lace the top of the pocket.
This is a bit tricky to start, but I think you will get it by the pictures.
Starting on the side closest to the front of the vest, push your needle through about 4 laces back and bring it out just before the top lace. Pull your lace slowly so that the tail is left under as
many laces as possible.
Then run your lace through the first open hole on the top of the pocket. On the inside of the pocket, push your needle up through one hole back, this hole already has 2 laces through it from
the side lacing. When you've crossed over and back through to the inside again, you will have to go back one hole on the bottom of the top, into the hole that has 2 laces, just like the last stitch that you did. Continue to lace from here as normal. Once you've reached the end, again you will
have to run your lace through holes that already have 2 laces in them.

To finish off, run your needle down the side under about 4 or 5 laces, cut the tail and straighten
out any nubs left showing.
Here's the completed laced pocket.

The outer shell is pretty much complete at this stage, now we have the two side adjustment parts to make and then it's on to the hard stuff.
Front should look like this. Back should look like this.
Okay, here we go with the side adjustment parts.
First off cut the pieces required from your garment leather, be sure you make a "Right" & "Left" hand side. You don't want all the pieces the same, once you've marked one, flip your template and
mark another.
If possible, you want to lay this out on a gridded cutting board, it just makes it a whole lot easier to line it up. On the left side (shorter side) you want to measure in 1 1/8" and place a mark. On the right side, you want to measure in 1 1/4" and place a mark. Now, laying it out as
shown in the picture, line the bottom of the curved part up with one of the lines on your cutting board, do this with both pieces. Then measure down from the highest point of the left side piece 1" and place a mark. Now you have the location for the top left corner of the in between piece, as
shown with the piece of white paper. Once you have the template in place, mark all along the edge, and a small mark at the top and bottom.

This is what they should look liked marked.
Sand the area that is marked off, and also the outer edge of the in between piece, or gusset. You should sand it about 1/4" wide on all edges.

Next, apply a bead of glue to all the sanded areas, be sure to clean the dusted leather away before gluing.
Now, align the gusset with your marks, and press together, being careful again not to stretch the leather. Once in place use your roller and seal the bond.

We want to use a different hole spacing on this area as there tends to be extra strain put on this as the wearer puts on and takes off the vest. We will be spacing the holes 1/4" apart and 3/8" wide
seam.
Start your marking 1/8" above the edge of the gusset, then every 1/4" thereafter until you've reached the end. Then again 1/8" past the bottom of the gusset.
When you punch these holes, keep them 3/8" wide, this will make a real nice tight lace and give this area some good strength.

We are going to change lace here on this piece as well. The reason for this, is that we have been using a 4/5 oz leather for the rest of the vest, which makes a fairly heavy lace. We want to use a 2/3 oz garment leather to make the lace we will use here, and on another part of the lining. The 4/5 oz lace is just a bit to bulky to use in such a short stitch, and it will not look or feel
right.
So start your lacing just as you did on the front pockets, glue down the tail, and the first loop on the backside. Lace all the way to the end, then on your last stitch go back through the hole
shown in the picture.
On the backside, 3 or 4 loops up, run your lace through the loop.

When it's close to the end, place some glue on the lace and gusset and pull tight. Press down and roll. Then cut the tail off leaving just a bit sticking out.
Here's what the tail should look like when done.

Continue onto the other side and lace the same way. Also remember that you want to have the lace to have a "Mirror" image of the one you just did, so this entails lacing the other direction that you may be used too. Some people have a hard time with lacing left to right, but with practice it can
be done quite easily.
We now have to put a "Finished" edge on these pieces. This will give the "cut" edge of the leather that will be showing, a real nice clean edge, and a very professional look to it.
First you want to mark all along the edge 1/2" in, follow the curve as best you can. Then sand this
1/2" area and clean the residue.

Now cut some strips of your suede 1 1/4" wide. Cut strips from this about 1 " longer than the edge of your gusset edges.
Now apply a bead of glue that covers the 1/2" wide area on the gusset, and a thin bead about 1/8" on the "Suede" side of your strips.

Starting on the left side, press the strip down onto the gusset, you'll have to play with it a bit to get it in the right place, you only want to attach it by the 1/8" that you've glued on the
strip. Work your way along to the curve, and tweak it to go around.
Now, apply glue the exposed area, leave about 3/8" unglued as you will need this to hold onto and you don't want the glue to get on your fingers and make a mess.

Once this is tacky, gently fold the strip over, looking to make sure you're not folding it past the glue area on the gusset. Press this down and roll with your roller.
Now, flip the piece over and apply glue to the rest of the strip and the area on the gusset that the strip will be pressed onto. If you put too much glue on the gusset, this is no big deal, as it
will not be seen when we are finished.

Fold the strip over snug to the edge, you can feel it with your fingers as you are folding it. Roll this real goo, and then snip the excess off the ends.
And there you have it, a nice finished edge. If you want, you may want to practice this procedure on some scrap before hand. We have a WHOLE lot of this to do later on.
I just remembered something that you should know. The length of the lace you want to have when doing a 1/4" spaced lace, is 7 times the length of the seam. Sorry about just remembering this now.

Here's a picture of the finished Gusset.
Okay, now we are going to tackle the liner. This is a bit harder as the material we use is not as easy to work with as the heavy leather is.
You will need to purchase some Nylon Mesh material, this is the stuff they make sports jerseys out of. The reason we want to use this, is to give the back of the vest some breathing room. This will
help to keep it a bit cooler to wear. You also need your pigskin suede.
You will want to make a template for this part. What you need to do is to take the template you have for the shoulder piece and copy it. Then, as shown in the picture, make it square at the
bottom. From the centre of the template, it is 4" down to the squared off bottom. Then place on the suede, and mark your pattern out. At the bottom, we want an additional 1/2", I know, why not make the pattern this 1/2" already, well I use this for other items as well, and it has to be 4" for
them, so I just add to do this part.
Along the bottom of the template, just make a dashed line so you can use this for reference later. Mark the suede side of this as well, not the underside. Cut the piece out, and we are ready for the
next step.
Lay your nylon mesh out, and using the template that you have for the back of the vest, and also the template you have for the shoulder piece, lay them as if you were assembling them together. Now lay the new liner template on top and align it with the other templates. Where the flat bottom lays on the back template, draw a line. We will use this as our marker for the top of the mesh lining.

As you see in the picture, have the line on your template about 1/2" down from the straight edge of your mesh. As it is hard to mark this nylon with a gel pen, I use my roller knife to cut it. Don't
worry about being exact, as we will be trimming it at a later time, just get the basic shape.
Here is what you should end up with.

Now, on the underside of the suede, apply a bead of glue 1/2" wide all across the flat side.
Then lay your nylon onto the glued area, and roll very good with your roller. Any extra nylon that is sticking up past the glued area, just snip it off, for a clean line. Then using your painters
tape, make an area 1/2" wide above the nylon liner, and apply glue to this area.

Now, fold the nylon over onto the suede, using those dashed lines we made earlier as your folding reference, and press down and then roll very well.
Here's what it should look like.

On the exposed strip of suede at the bottom, apply glue to this area as shown.
Now, fold the nylon back over the glued suede and press it down and roll again very well

Now take one of your 1 1/8" wide side strips cut to length, and use it as a guide to show you where you have to apply the painters tape to make the next glue area. Line the bottom of the strip up with where the fold is in the suede, and then apply your tape at this width, as shown in the picture. Then apply glue to both the area and the strip, press down firmly and roll the seam.
This will help to protect the nylon when you punch the holes to lace this area.
You should now have a well sealed nylon back liner, just like this picture.

To layout the holes for this seam, we want to start from the centre of the back. Place a mark at centre, then start 1/8" from there, then every 1/4" from there on out. Only mark holes until you
are 1/2" away from the edge, this gives us room for when we attach the liner later, and these laces will not get in the way.
Now, as you can see in the picture, I did not punch the first mark, this is because there would be to many holes right there. You want to have 3 hole in a row in the centre and also on each end.
Punch the holes 3/8" apart so the seam is not that wide.
Here we are also going to use the thinner lace that we've cut. This is always the case when we are doing something on the liner, as it is a closer stitch and we don't want a big bulky seam. Cut your
lace 7 times the length of the seam to be laced.

On the backside, starting in the middle, and also in the middle hole, you want to glue the tail down just like we have previously; making sure that it will be held in place by one of the
following stitches. Then lace outwards to the edge just like all the other seams.
Now when you reach the end of the seam, run the lace through the middle hole that you punched. Now run the tail under one of the stitches and glue the tail down, cut off the excess and your done. Start again in the middle and lace outwards to finish the other side. When your done, be sure to
roll the laced seam from the backside of the piece.

Here's what it should look like finished.
We are going to make the liner sides now and attach them to the rest of the liner. Using the same template you used to make the front panels of the vest, mark out and cut a left and right side
using your suede. When you are marking the "Yolk" at the top, add 1/2" to the piece, as shown in the picture. This is needed to attach the two together.

Here's what the piece should look like. Make an opposite one for the other side.
Now on the front of the side panel, mask off the 1/2" extra lip and apply glue. On the BACK of the shoulder piece, mask off a 1/2" area and apply glue.

Now press the two pieces together, be sure that you have the front panel facing the proper direction. Then roll the seam.
Now on the back of the piece we want to add some 1 1/8" strips for added strength. Cut and glue down these strips just as we have in the preceding steps.

Now, take some more 1 1/8" strips and apply glue to backside, fold over part way as shown in the picture.
Then fold the other half over, roll together for a good bond.
Cut hte strip so it follows the "V" of the yolk, and apply glue and press and roll together. This is to add some bulk to the suede for lacing purposes.

Mark, punch and lace the same way you did the yolk on the outer shell. It should look like this when done.
Then do the same with the opposite side liner.
Take the template you have that we used for the liner on the outer pocket. Use this as your template for the inside pocket. You want to lay it out as shown in the picture. Just make a small
mark at the top on each side as references. Flip the template over, align with the reference marks, and finish marking the pocket.

You should have a piece of suede that looks like this.
Now apply a bead of glue all the way around the outer edge.

Fold the piece in half, using those 2 reference marks as your guide, press together and roll the seam.
First off...IGNORE the 2 1/2" demension in this picture. You want to mark where the inside pocket is to be placed. If the person is right handed, then it goes on the inner left side, vice versa if they are left handed. Place your template 2" from the outer edge, and 4 " up from the bottom point. Mark all along the edge but only a small dash at to
top corners.

Now, just to be on the safe side so you don't get glue on places that it isn't supposed to be, mask off the entire area that we are going to apply the glue too. Then apply glue to this area, and also
the outer edges of the pocket.
Once you've placed the pocket and rolled the seam, flip the side over and you should see the outline of the pocket in the backside of the suede.

Do the same here with the tape and glue as you just did on the front of the pocket. A;so cut some 1/2" strips and apply glue to them as well. You want this glue seam to be 1/2 on and 1/2 off the
seam of the pocket. This will give the suede some bulk for the lace.
Here's what the backside should look like when done.

We want to use a 1/4" hole spacing on this seam as well, also the thinner lace. Start by making a mark 1/8" past the top of the pocket, then every 1/4" past that. Mark fro one side to the bottom
middle, then the other side to the bottom middle.
Start lacing the same as you did on the front pockets. Glue down the tail, and also the first loop on the backside. When your reach the bottom middle, glue the tail down as shown.

Here's the completed pocket.
When you attach your "Makers Mark" or "Label" centre and glue it to the front of the liner. Flip the liner over, and with your roller roll the area where it is glued. This will show you where to
place a piece of suede to use as bulk for lacing.

Cut a piece of suede to fit the area including lace hole and glue it down. Then you can punch holes and lace in your label.
Here's the completed liner.
...

Okay, as I said before, I want to put a weave pattern on the back of this vest. What we need to do is to make a template so we can not only mark the holes, but also see just what it's going to look
like before we punch holes through the back of the vest.
Then, once you've made the template, lace one side of it just to get the feel for what it will look like. Better to do this, than to punch all the holes, lace the vest and find out it just does not
work right.
You will always want to use an "odd" number of laces for this, using an even number makes one edge of it look way different than the other and it takes away from the whole look.
Once you've decided that it's all going to work okay, then cut the lace out of your template and use it to mark the holes on your vest. Make sure that you have it centred where you want it.

Once marked, then punch the holes.
To weave with lace you want to make your laces 4 times the length of the outer edge of the area to lace.Start at the outside edge, and run your 5 laces through from the back on the 5 outer holes.
Glue the tails down and roll.

Now on the front, you want to take the bottom 3 laces and lay them to the side for a minute. The last of the top 3 goes into the second hole on the bottom edge. The next lace goes through the next hole on the bottom, and then the last one through the next hole. The take the second of the bottom 2 laces and run it under the first lace, over the next and under the next, then through the second hole from the edge. The last lace goes over then under, then through the next hole. DO NOT pull
these laces tight, just pull them enough that they lay flat to the vest back. If you pull them too tight they will bunch up the vest back and make things go all funny on you.
Now flip the vest over, and the 2 laces that are at the top edge, bring them back one hole each and pull them back to the front of the vest.

Flip the vest back over, and the first lace on the top pull under then over then under, then through the next hole. The last lace over, under then through the last hole. Thus will give you all
5 laces on the bottom edge, and at the backside of the vest.
Flip the vest back over, and with the first lace, go back one hole and pull to the front. Then do the same with each of the next 4 laces until all 5 are back in the front. Continue on until you've reached the middle of the weave pattern. It's hard to explain with out actually pointing to this,
but when you reach the middle 5 holes, DO NOT go back a hole and pull to the from, you only do this on the outer edge of the weave.

Cut the tails off and glue down as shown here.
Now if you flip the vest over and look at the top right of the weave, you will see that there is a stitch missing, the same is with the bottom right. Take 2 of the left over pieces of lace that still have needles on them, and use this to fill the missing stitch. This picture shows you the
back view once you've put the 2 stitches in place. Now cut and glue these tails down also. You can make these fairly long to help them from coming loose. In my experience they are never a problem if glued down good. Once done this, take your roller and roll this weave real good to help lay the
weave in place.

Here's what the weave should look like on the front and back.
Now you can continue on to the other side, just remember that you want it a "Mirror" image of this side, so do everything the same but backwards...Here's a picture of the completed weave. There will be a lace that runs along the outer edge of this, once we are finished the vest. So it will not
look like it is jusy hanging out there where it shouldn't.
Okay we are going to tackle about the hardest part now, installing the liner.

Lay the vest shell out flat, then lay the liner on top of it so it lays nice and flat, position the liner so that it is lying where it aligns with the shell. Now on the neck section, make some
reference marks on the shell and the liner.
Be sure to mark the centre of the neck on both pieces, we want to be sure that we glue this in the right place the first time.

Mark the place where the top of the seam of the back piece is on the shell. This is an important mark. Place these reference marks on both sides of the shoulder piece.
Also mark about 6 inches up from this mark on both the shell and liner.
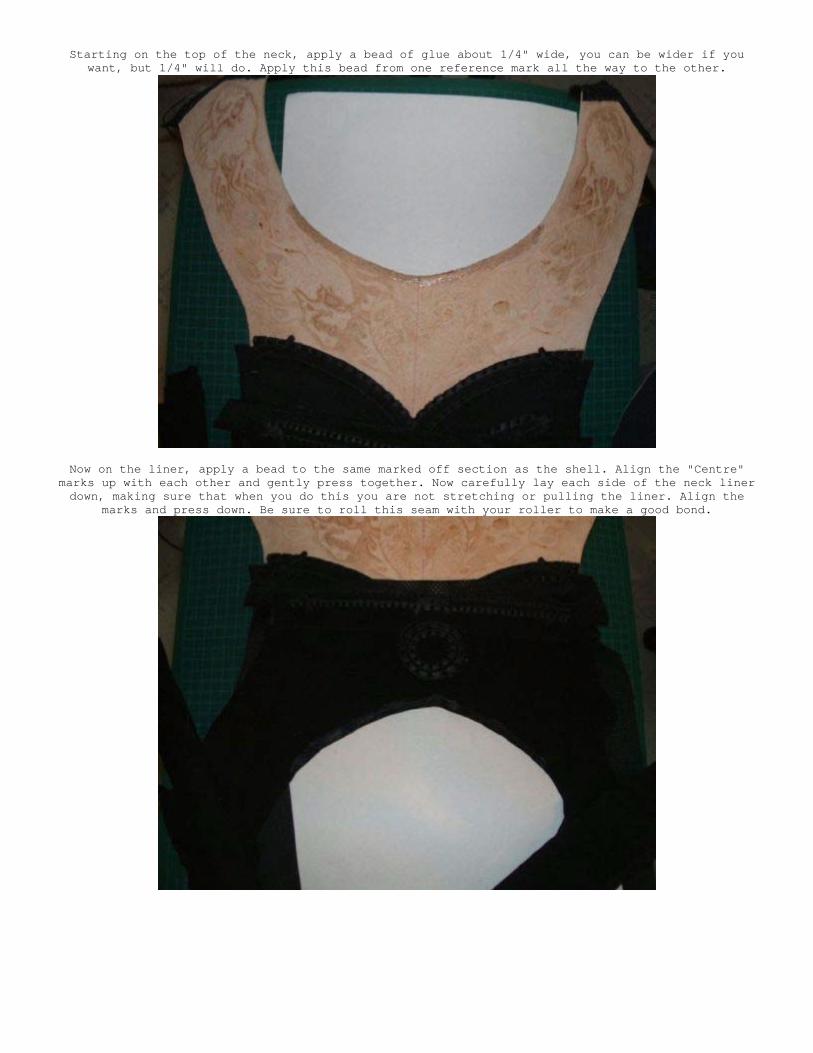
Starting on the top of the neck, apply a bead of glue about 1/4" wide, you can be wider if you want, but 1/4" will do. Apply this bead from one reference mark all the way to the other.
Now on the liner, apply a bead to the same marked off section as the shell. Align the "Centre" marks up with each other and gently press together. Now carefully lay each side of the neck liner down, making sure that when you do this you are not stretching or pulling the liner. Align the
marks and press down. Be sure to roll this seam with your roller to make a good bond.

Now, apply a bead of glue to the area where the nylon meets the suede, up to the reference mark you have on the shoulder piece. You want to be a bit liberal with the glue right where the laced seam
is, put a bit of glue on the back of the lace as well. Also run a bead of glue on the liner. Gently align the liner with the reference mark on the shell, and lay this piece in place. Using your hand in a "flat on table" way, gently press the air out of this area (you'll get what I mean by that
when you do this). Roll the seam good.
Starting at the top of the back, where your reference marks are where the back lace is, mark on the shell 1/2" from the edge of the shell. If you like you can do this before hand, and mark all the way around the shell, as you are going to need this as we glue the liner in. The reason I'm just
showing you this much, is because we only want to glue so much at a time.

Apply a 1/2" wide bead of glue to the first section that goes under the arm. DO NOT apply glue to the nylon mesh.
Now gently, and without stretching, lay the mesh down and press it down with a flat hand. Then take your roller and roll this seam REAL good. We want the glue to soak into the nylon. Then carry on
and apply glue to the side section of the shell, press down and roll as before.

Now do the same thing on the other side of the shell, just till you reach the end of the underarm section. Once you've reached this point, fold the mesh over and out of the way as shown in this
picture.

Apply a bead of glue for about 6 inches or so, then with a flat hand gently lay the mesh down so that it sits nice and flat, roll this seam.
Now with the last section folded back again, apply glue to the remaining section, lay down and roll the seam.
You've most likely noticed that the liner is a bit bigger than what is needed and are probably asking yourself, "Why not make the liner the right size to start with?" Well, it's simple, if you did make the liner the right size, there is NO ROOM for any errors. Leather tends to stretch a bit whether we want it to or not. This is the best way to do this and you have no worries about the
liner not fitting the way it's supposed too.
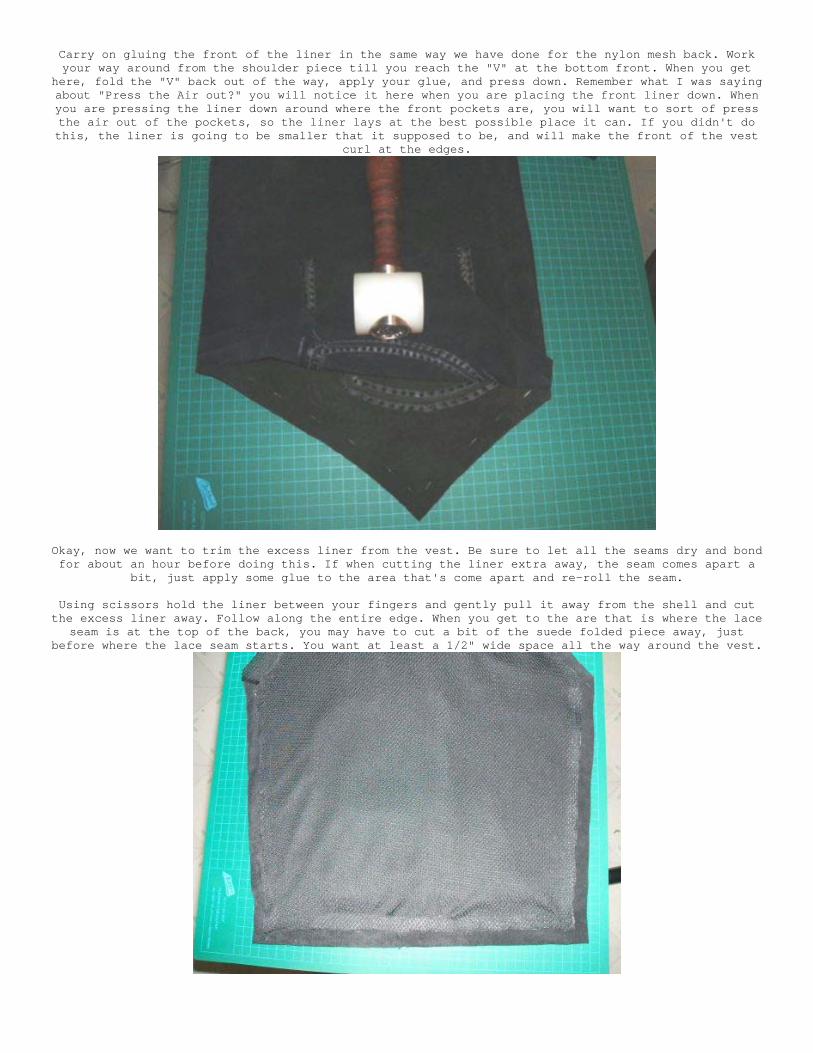
Carry on gluing the front of the liner in the same way we have done for the nylon mesh back. Work your way around from the shoulder piece till you reach the "V" at the bottom front. When you get
here, fold the "V" back out of the way, apply your glue, and press down. Remember what I was saying about "Press the Air out?" you will notice it here when you are placing the front liner down. When you are pressing the liner down around where the front pockets are, you will want to sort of press the air out of the pockets, so the liner lays at the best possible place it can. If you didn't do this, the liner is going to be smaller that it supposed to be, and will make the front of the vest
curl at the edges.
Okay, now we want to trim the excess liner from the vest. Be sure to let all the seams dry and bond for about an hour before doing this. If when cutting the liner extra away, the seam comes apart a
bit, just apply some glue to the area that's come apart and re-roll the seam.
Using scissors hold the liner between your fingers and gently pull it away from the shell and cut the excess liner away. Follow along the entire edge. When you get to the are that is where the lace
seam is at the top of the back, you may have to cut a bit of the suede folded piece away, just before where the lace seam starts. You want at least a 1/2" wide space all the way around the vest.

The same with the front vest panels as the back. Trim all the excess away. Also look on the shoulder piece and trim any overhang away from there as well.
Here you have the liner fully glued and trimmed in place.

You want to mark a 1/2" space all the way around the outer edge of the vest.
Next, sand this area, all the way around also. Then with a damp cloth, remove any remaining marker lines, so you have a clean area. You will also have to cut some long lengths of the suede into 1 1/8" strips. Makes these as long as possible, as we do not want to have to put splices on this.

I always start on the side of the front section. This is where most of the mitered corners are, and we want to be sure they are fitted correctly. First you want to just snip out a bit of the corners,
not too much, just a bit.
Then, as we did previously on the gusset pieces, apply a bead of glue to the vest shell, and also a 1/4" bead of glue to the suede side of your strip. Place this so as the 1/4" wide bead is at the
inner edge of the glued area.

Now, apply glue to the area as shown here in the picture, leave abot 1/4" from the edge, so you have a clean area to grab a hold of. Fold this over, and press and roll the seam. Then, flip the vest over and as we did on the gusset, apply glue to the underside, fold over the edge and press
and roll the seam.
You should have a nice finished edge now, that looks like this.

On the curved area under the arm, you will have to work the suede a bit so it takes the curve, try not to get too many little creases in it when you do this area, if you have to just stretch the
suede a bit, too lessen the severity of any crease.
Now to place the gusset in the right position. You want to set the gusset down on the shell, then by folding the edge over on the side, so that the outer edge of the shell you see a small thin bit of the garment leather showing. Straighten the gusset so that all the way along the edge the space
is the same.

Next, do the same thing to the top corner, moving the gusset up or down to get in the right position.
And again do this on the bottom of the gusset.

Now that the gusset is in the right place, using your gel pen, mark the inner edge of the gusset on the inside of the liner. To do this, you want the mark to be just underneath the edge of the
gusset. Hold your pen on an angle when marking.
Now apply a liberal amount of glue to the area that you've marked off, also a liberal amount of glue to the inside of the gusset.
Place the gusset onto the shell, using the line to be sure it's in the right position, roll this seam real well to make a good bond.

Now, fold the outer edge over the gusset, and make a mark where the inner edge is. Measure the distance from the outer edge to this mark. It should be right around 1 1/4". Whatever your
measurement is, this is the one you want to use to mark all along the outer edge as shown in this picture.
To get the right miter on the corners, fold one over the other and from where the two meet on the inside, make a mark to the outer point of the corner. Cut this bit off.

Then fold the two down again and use the cut edge as a guide to make the second mark. Cut this bit off as well.
This will give you the proper miter. I know it looks like hell now, but once it's in place, it looks real good.

Now, using a sharp knife, cut the edge trim away from the edge of the gusset as shown here. Be very carful to just cut deep enough to cut the suede. Then sand this marked off area around the edges.
Apply a bead of glue to the entire area that is shown here in this picture. Let this get tacky, then fold the edge over and press and roll together. Be sure to get the fold nice and straight.

After folding the edge over, marking and measuring the distance from the outer edge (yes do this each time to be sure, in most cases it will always be the same as the first measurement, but let's just be sure) continue on with the rest of the outer edge. Notice the mitered corner doesn't look
bad at all.
Here's what the edge should look like from the outer side of the vest.

Once I have this section of the vest done, I like to place the grommets, this will help to hold everything here in place when we are pulling and turning the vest when we lace it.
Find and mark the centre of the gusset and make a mark. From this mark, measure up 1 1/2" and place another mark, then 1 1/2" again. Do the same in the other direction. This will give you 5 locations
evenly spaced apart.
Now using a grommet, place it centered with each hole and mark the circular centre.

Punch these holes and insert and assemble the grommets. Always put the grommet ring on the inside of the vest, as this gives the outer side the finished grommet.
Now we are ready to start punching a million holes.
You want to punch these two holes first. These holes are placed as close to the miter corner as possible, allowing enough space on the inner edge not to beak the miter. From there you can start
to mark your holes 3/8" apart.

Do the same thing on all the corners as you've just done on the last one.
What I do is work from both directions, and if the last 2 holes are not 3/8" apart, I will correct this in the middle of the run.

On the outer edge of this, your first hole is NOT 3/8" away from the miter hole. As shown, it is inline with the first hole on the inner side. This is to keep the lace seam straight from the
corner on down.
This is what the holes should look like when punched. The corners will all look the same as this.

Where the vest front meets the yolk, you will have to punch two holes just under the lace that holds the yolk to the vest. You can see in this picture what I mean by this.
Now, flip the vest over, and working from the inside, you can start your marks from these two holes. Again work from both ends and make any correction in the middle.

Here's what the holes should look like.
Start your lacing where the yolk is attached to the front panel. Use a piece of lace NO LONGER than your arms length. The reason for this is twofold.
1: It is way easier to work with short pieces of lace, rather than 10 or 12 feet of it. 2: As you lace, the lace will wear away, as you'll notice from all the leather dust on the floor. We do not want the lace so long, that it starts to get thinner as we go along. This will make your
lacing look real bad where you splice it, as one will be thinner than the new one.
Run your needle under about 3 laces back, and out between the first and second lace loop on the bottom of this seam.

Then run it into the second hole on the inner side of the seam, pull the lace through and snug. On the back, go back to the first hole and run your lace through, and lace away as you have done
before. These stitches you can pull a bit snugger, and also be sure to give them a bit of a twist where they come out of each hole to make them nice and straight.
If your getting close to the corner, make your splice before you go around it. Always make your last stitch to the inside hole and back to the front before doing a splice. Sand off a small area
between the two rows. Then cut your lace off as long as the sanded area.

Glue and roll this tail down.
Now from about 3 stitches back, run your needle underneath and out the end of the seam on the outer edge of the glued down tail.

Run your needle into the first outer hole, and continue on lacing.
This picture shows you the reason why we made those holes close to the mitered corners. As the backside stitch is put in place, these will hold the mitered corners from coming apart.

This is what the outer lace should look like...quite a nice look I think.
Here we have the inner lace look. Again, this is a real nice looking finish to the inside of the vest.

When lacing the front of the vest, you want to lace in 2 directions, working towards the bottom point of the front as shown in this picture. This will give you the same lace design on both sides of the front panels. Rather than lacing all one direction and having the lace going a different
direction as it runs back up the front.
When you reach the bottom point, you want to got one stitch past so the joint in the suede edging is secured.

This is the completed front panel.
On the back of the vest, you also want to lace from 2 directions, starting where the back meets the shoulder piece and working down and across to the middle of the back. Measure the middle of the
bottom of the vest, and this is where you will stop your lacing in each direction.

I know the holes are not punched in this picture, but I wanted to be sure I remembered to talk about this.
When it comes time to mark the other side grommets, what you want to do is to line up the curved
corners, that's the top of each side under the arm. Then with your gel pen, mark the centre grommet from the side that's already done. This will give you the location of the centre grommet, and now
you can measure 1 1/2" between each to locate the rest.
When it comes to marking the nylon mesh to glue the edge trim down, I find the easiest thing to do, seeing as the nylon does not like the gel marker. Hold the edge trim down, and with small pieces of painters tape, slide them just under the edge and press down. Once you've taped off the whole edge,
then you will have a marked off area to glue.
Also, with this water based glue, it tends to tack up very fast on the suede and the leather, this is not the same on the nylon. Once you've applied the glue to the nylon, you will have to leave it for about 10 minutes before it is ready to attach the edge trim. Make sure you roll these seams
REAL good.

If you've done a weave or extra something on the back, or anywhere else that you decide, and this weave goes to the outer edge, you will have to be careful when punching the edge trim holes when
you reach this point.
The thing to do, is once you've marked your holes along the trim, punch up to the area that has the weave on it then stop punching.
Flip the vest over, so that you can measure and mark, then punch the holes from the outside. This will prevent you from punching through the weave lace and making a big boo boo.

Once it's laced up along the outer edge, you can see how the 2 laces kind of merge together.
The holes you need to mark and punch for the lacing along the edge of the shoulder piece needs to be 1/4" apart. There should also be 1/4" in from the edge of the shoulder piece. Start marking the holes from the first hole that already has a lace through it from attaching the shoulder piece to
the back of the vest.
Work your way to the middle, and as before, then measure and mark from the other side to the middle, making any correction at this point.

When you’re lacing this section, keep your lace to a minimum length, no longer than an arms length. If you notice that the lace is wearing a bit too much before you've reached the end and splice. The
splice it now, you do not want it to get too thin as it will show.
To start the lacing that goes around the edge of the shoulder piece, you will start in the first hole of the lace that goes down the side of the outer edge of the back. You can see in the picture. Run your lace though and leave about a 10" tail, this will be used to finish the beginning of this
a bit later.
Now, run the lace OVER the shoulder piece, and through the forth hole, start your count at the hole you just pulled the lace through.

Now go OVER the shoulder again and back up through the second hole.
Now go OVER the shoulder again, and through the fifth hole.

Go OVER the shoulder, and OVER the first lace and UNDER the second, as shown here.
Then run your lace through the third hole.

Now go UNDER then OVER the laces, then OVER the shoulder and through the sixth hole.
From here you carry on by going back OVER, then UNDER the second lace, through the hole and so forth until it's time to splice.

When it's time to make your splice run the lace OVER and BACK towards the edge that you started on. As shown in the picture, run your lace under the last 2 loops, and come out under the tightest
section of the third back lace. Pull this tight and snip it off.
Now with your new lace, run it under the second last loop as shown. Pull it all the way through, until the end of the lace is just under the loop. You can tuck any tail that shows with your fid.

Now, run your lace under as shown in this picture, and through the third last hole, and your off lacing again.
When you reach the end of the shoulder section and have the tail left to hide, the best way is to run it up under the weave that is on the front yolk.

You can now continue on and lace the other side of the shoulder piece, and also all around the inside neck area. Finish the ends off as neatly as you can and hide the tails. Again remember that if your lace is getting a bit worn as you pull it through all the holes, splice it, we'd rather
waste a bit of lace than to have a funny looking product. Once you've laced all the edges of the shoulder piece, you have to go back and finish off where you
started. Put your needle on the tail that you left when you started.
Then your first lace will go UNDER the first loop.
Then OVER the second loop, and through the thrid hole.
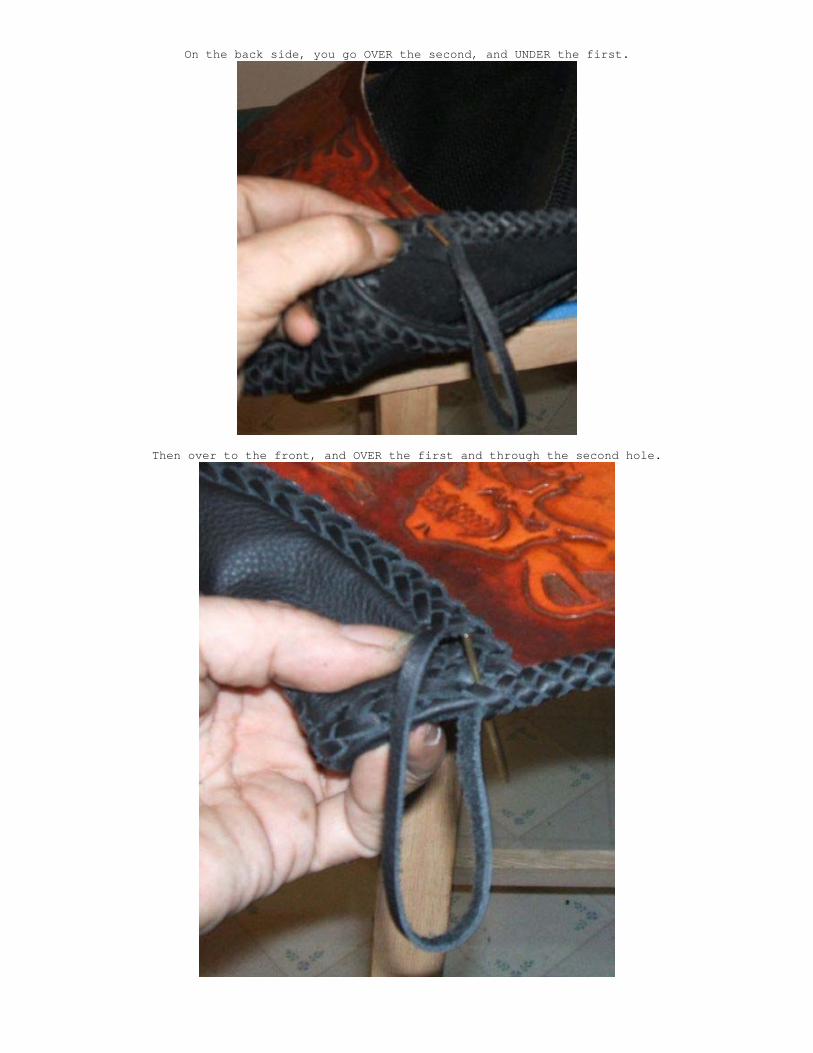
On the back side, you go OVER the second, and UNDER the first.
Then over to the front, and OVER the first and through the second hole.

Follow the next three pictures to see just how to bring the lace back to the front, so that you can hide the tail under the weaved lace.

And here's what it should look like when your done.
To lace the inside section of the gusset, run your lace under about 3 loops of the outer edge lace, from the top of the run.

Then run it through the first hole closest to the grommets.
On the backside, run it back through to the front, using the hole that is best in line on the outer edge lace, as shown here in the picture.

When you get back to the second stitch on the backside, do the same as you just did, by going through the hole of the outer edge lacing.
Now carry on lacing until you reach the end of the run. When you do, you want to finish it the same way you started, by using the holes that are on the outer edge lacing. This will hold the two
pieces together at the joint and prevent them from curling out.
Here's what the inside should look like.

Well everyone, if you take 1/2 a cow, 1 pig, a bit of nylon mesh. Punch 2040 holes in it all, dab some glue onto it here and there, then run 530 feet of lace through each of those holes 2 times,
this is what you should have when you're done. Simple as that...LOL
I hope that you've all enjoyed this tutorial, and that it has and will be helpful to someone.
Ken (Beaverslayer) Clark Beaverslayer's Custom Leather
PO Box 53059 RPO Marlborough Calgary, Alberta Canada T2A 7L9
Email: [email protected]