beginner level tutorial - · pdf filebeginner level tutorial this tutorial will introduce you...
TRANSCRIPT

VisualDOE 3.0 Program Documentation Page 1
Eley Associates, January 17, 2001
Beginner Level Tutorial........................................................................................................2 Lesson 1 – Selecting a Template....................................................................................................................... 3 Lesson 2 – Project Information .......................................................................................................................... 8 Lesson 3 – Standard Blocks ............................................................................................................................ 10 Lesson 4 – Room Data .................................................................................................................................... 12 Lesson 5 – Skylights ........................................................................................................................................ 14 Lesson 6 – Facades and Windows .................................................................................................................. 15 Lesson 7 – Thermal Zones .............................................................................................................................. 17 Lesson 8 – HVAC Systems.............................................................................................................................. 18 Lesson 9 – Running a Simulation .................................................................................................................... 20

VisualDOE 3.0 Program Documentation Page 2
Eley Associates, January 17, 2001
Beginner Level Tutorial This tutorial will introduce you to the Graphic Editor and demonstrate its main features. The following set of lessons will help you create a basic Visual DOE model for simulation.

VisualDOE 3.0 Program Documentation Page 3
Eley Associates, January 17, 2001
Lesson 1 – Selecting a Template 1. The first step is to choose a template. When you choose File | New, you are asked to select a template.
Navigate to C:\Program Files\GDT\VisualDOE\Templates and choose the stanadard IP unit template ‘standard.gIP’.
2. More often than not the default template will not contain all the fenestrations, construction, occupancy, utility rates etc. that are applicable to the building you wish to model. However, the Visual DOE library contains a large number of materials, construction, windows etc. which could be added to your project library. The following steps describe how to expand the project library to include the items required for your project from the items present in the Visual DOE library.
3. Opening organizer: The opening organizer allows you to add more window types from the Visual DOE library to the Project library. The project library contains a list of items you can choose from for the current project. If your project has openings that are not available in the Visual DOE openings library, the openings organizer will allow you to define new windows, and add it to your project library. This has been addressed in a more advanced lesson. Click on the ‘Openings Organizer’ button in the menu bar and choose ‘Openings’. This launches ‘Openings Organizer’ window. From the ‘Type’ drop down list pick ‘window’. You will see a frame on the right titled ‘Project Items’. This displays the list of openings that you can choose from for the current project. On the left you will see a frame for ‘Library Items’. This frame displays all the window types that are available in the Visual DOE windows database. From the ‘library items’ frame pick ‘6040 double clear’ by clicking on it. Click on the ‘copy’ button to add it to the ‘Project List’ frame. You select only one item to copy at a time (i.e. you cannot make multiple selections for copying).The ‘Selected Item Description’ displays the window dimensions for the highlighted window. You can add as many windows as you wish to by repeating this process.
Similarly, you can add different skylight types to your project library as well. This time from the ‘Type’ drop down menu choose ‘Skylights’. Highlight ‘4040 double clear’ on the ‘Library Items’ side and click on the ‘Copy’ button to add it to the project library. Click on the ‘Exit’ button to close this window.

VisualDOE 3.0 Program Documentation Page 4
Eley Associates, January 17, 2001
4. Construction Organizer: This works in a manner similar to the ‘Opening Organizer’, and helps you add
construction types to your project library. Choose Organizer|Construction. It opens up a window similar to the ‘Openings Organizer’ with the project library items displayed on the right and the Visual DOE library items on the left. Pick ‘Window’ for ‘Type’, and ‘Mass’ for the ‘Category’ field. Highlight ‘6" Conc., EIFS 0.5", Mtl frm R-19, 70%’ and copy this selection onto your ‘Project Items’ list. As in the case of windows, you can add as many wall construction types as you wish to. The ‘Construction Organizer’ lets you add construction types for walls, roofs, floors, slabs, below grade walls, partitions and ceilings. Walls, roofs and floors are divided into light or mass construction type.
Let us add a ‘Floor Construction’ type to the Project Library using the same procedure. This time choose ‘Floor’ for type and ‘Mass’ for category. Highlight ‘R-19 Mass’ from the Library Items list by clicking on it and add it to the Project Items list by clicking on the ‘Copy’ button. The ‘Selected Items Description’ lists the properties of the highlighted construction type.
Including a construction or opening type that is not listed in the Visual DOE Library, in your project library has been described in an advanced tutorial lesson.

VisualDOE 3.0 Program Documentation Page 5
Eley Associates, January 17, 2001
5. Occupancy Organizer: The occupancy organizer lets you create a new occupancy type or edit the
schedules associated with an existing occupancy type. This feature is very useful when the building has specialized areas which operate differently from the rest of the building.
Click on ‘Organizer’ in the menu bar, and choose ‘Occupancies’. The Occupancy Data Organizer window opens up and you will see two list boxes located at the top of the form. The list box on the left contains items from your library, while the one on the right contains items in your project. Select ‘Retail’ from the library and copy it to your project by clicking on the Copy button. You will see the properties associated

VisualDOE 3.0 Program Documentation Page 6
Eley Associates, January 17, 2001
with this Occupancy type in the Selected Item Description frame. Click on the Exit button to return to the previous window.
6. Utility Organizer: The utility organizer allows you to add appropriate utility rates to your project. This works
in a manner similar to any of the other organizers we have discussed earlier. Click on ‘Organizer’ in the menu bar, and choose ‘Utility Rates’. Alternately you can click on the ‘Utility Rate Organizer’ button in the bottom of the ‘Project’ folder window. The Utility Rate Organizer window opens up and you will see two list boxes located at the top of the form. The list box on the left contains items from your library, while the one on the right contains items in your project. You will also see a ‘Type’ field which has a drop down list of fuel types. Select ‘Electricity’ from the drop down menu. The’ Category’ field lists the billing options – ‘Time of Use’ or ‘Flat rate’ charges. Choose the ‘Time of Use’ option. Select ‘PG&E A-10’ from the library clicking on it and copy it to your project by clicking on the Copy button. You will see the properties associated with this Utility rate type in the Selected Item Description frame. Repeat the same process for gas rates. Choose ‘Natural Gas’ for the ‘Type’ field and ‘Time of Use’ for ‘the ‘Category’ field. Choose ‘PG&E GNR-1’ and click on the ‘Copy’ button to add this to your project library. Click on the Exit button to return to the previous window.
In a more advanced lesson we will discuss how to add/create utility rates applicable to your project but not available in the VisualDOE library.

VisualDOE 3.0 Program Documentation Page 7
Eley Associates, January 17, 2001

VisualDOE 3.0 Program Documentation Page 8
Eley Associates, January 17, 2001
Lesson 2 – Project Information The first step in creating a project is to enter general information including names and descriptions, utility rates, and climate data.
1. Enter ‘Tutorial’ in the ‘Name’ field and ‘Test Project’ in both the ‘Address’ and ‘Description’ fields. Enter your name in the Energy Analyst field. These data are printed on reports and graphs and help in identifying the project, but do not affect the calculations.
2. Select ‘1989-Present’ for the era built. This is used to set default information about your project, which you can later override if you wish.
3. Enter ‘90’ degrees for Front Azimuth. This implies that front of the building faces east. The azimuth is measured in a clockwise direction with 0 degree azimuth implying that the front of the building faces north, 90 is east, 180 south, 270 west, etc. The azimuth you enter must be between 0 and 360 degrees. As surfaces are created, the words ‘front’, ‘left’, etc. will be used in the names, where ‘front’ would be the direction of the azimuth, ‘left correspond to the left of the user in plan view, etc.
4. Enter ‘50’ ft. for ‘Site Elevation’.
5. Choose ‘cz12rv2’ in the Climate Zone drop down list box. This list box displays the list of weather files that exist in your GDT\Weather directory. The installation CD has weather data for locations all across the United States. To add more weather files to the list box, you could use Windows Explorer or other tools to copy the respective file(s) to the GDT\Weather Directory.
6. Choose ‘Official US’ for the holiday set. During the simulation process, the program will assume that the building is not in operating mode during these days. Choosing ‘none’ implies that no holidays are observed, and ‘Custom Holidays’ lets you define your own holidays for the project.
7. Enter 5 percent for the discount rate and 20 years for the project life cycle. These data will be used to calculate the life-cycle cost of design alternatives. Setting up discount factors and project life have been described in greater detail in a more advanced lesson.
8. In the Energy Resources frame, choose one electric meter and one fuel meter. For the electric rate choose ‘Elec Rate 66’ and for the fuel rate choose ‘Gas Rate 67’. These are standard rates contained in the VisualDOE library. Later you will learn to create your own for green energy providers or from other sources.. The ‘utility rate editor’ allows you to add various utility rates to the project and edit them This has been explained in greater detail in an advanced set of lessons. This completes the data input required to describe the general attributes of the project.

VisualDOE 3.0 Program Documentation Page 9
Eley Associates, January 17, 2001

VisualDOE 3.0 Program Documentation Page 10
Eley Associates, January 17, 2001
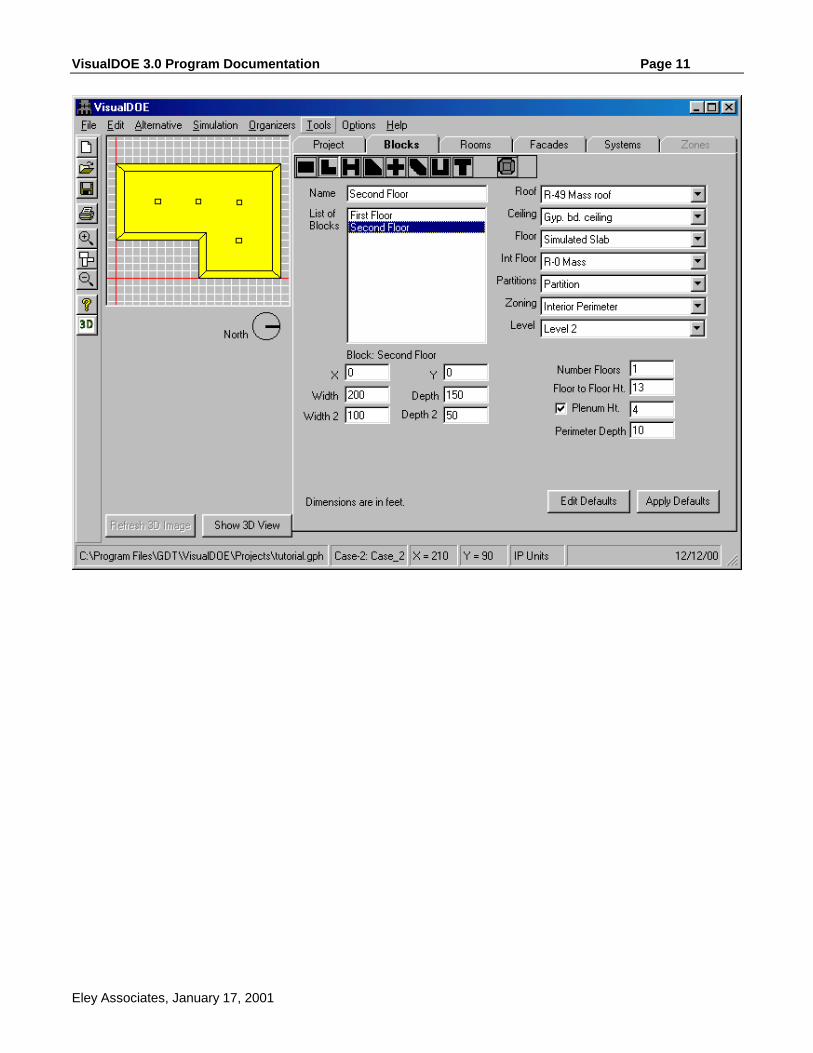
Lesson 3 – Standard Blocks This lesson illustrates how to define the physical attributes (shape and volume) of your project using standard blocks. Standard blocks are predefined block shapes (rectangular, donut, L-shaped etc.) that you can modify, stretch, stack and combine to correctly represent the physical mass of your building.
1. Add a rectangle to your model by clicking on the rectangle icon at the top of the blocks folder, dragging it to the plan view (the grid area in the upper left corner of the form), and releasing the mouse. A rectangle will be added to your model with five zones: an interior zone and a perimeter zone for each façade. Also, the ‘List of blocks’ will now include one item labeled ‘Block_1’.
2. Click on the ‘Name field’ and change the name of the block to ‘First Floor’. Notice that the contents in the ‘List of Blocks’ also changes. Renaming the block is not essential but recommended for easy identification purposes. You can rename blocks based on the floor they are located in or the primary function they serve etc.
3. Select the ‘First Floor’ block and change the ‘Width’ to 200 and the ‘Depth’ to 150. This defines the dimensions of the ‘First Floor’. Note that as you click on ‘Width’, a segment of the X-axis equivalent to the width of the block is highlighted. Similarly, the a segment of the Y-axis equivalent to the depth of the block gets highlighted when you click on ‘Depth’.
4. You will see a list describing the various construction types for roof, ceiling, floor, interior floor and partitions. This list is used to describe the construction type for your building. Let the program use the default construction types for our purposes. We will learn how to create your own construction details in a more advanced lesson.
5. You will also see entries for ‘Zoning’ and ‘Level’. Let the program use the default value for these two inputs (‘Interior perimeter’ for Zoning). ‘Zoning’ allows you to divide the block into zones with individual thermostats. One zone would imply that the entire block has only one thermostat. The ‘Level’ command allows you to locate the block in the vertical plane by making a choice from the drop-down list box. In this case, this block is located in ‘Level 1- Bottom’.
6. Let ‘Number Floors’ default to 1. This represents the number of floors with the same properties as this block, not the total number of floors in your building.
7. Let the ‘Floor to Floor Ht.’ default to 13 ft. and the ‘Plenum Height’ to 4 ft. after checking the box for plenum.
8. Let ‘Perimeter Depth’ default to 10 ft. This assigns the depth of the perimeter zones.
9. Next double click on the ‘L’ shaped icon. 4 different orientations for the L-shaped will appear as drop down list. Select (by clicking on) the one that that has the cutout on the lower left corner. Most of the standard block shapes can have more than one orientation. When you double click on a standard block icon, all the possible orientations are displayed as a drop down list.
10. Drag the rotated ‘L’ shape to the plan view and release the mouse. You will be asked if you want the new block to be placed on the level above or on the same level. Choose the level above. This places the block on the floor above the first one that you created.
11. As in the case of the earlier block, click on the name field and change the name of the block to ‘Second Floor’. Renaming the block name only helps in identifying the blocks. You could leave the default name if you wish.
12. For ‘Width’ enter 200 and ‘Depth’ enter 150. For ‘Width 2’ and ‘Depth 2’, enter 100 and 50 respectively. ‘Width 2’ and ‘Depth 2’ lets you define the length of the two arms of the L-shaped block.
13. Let the program apply defaults to the various construction types, and the other zone related parameters, as in the case of the ‘First Floor’.
VisualDOE 3.0 Program Documentation Page 11
Eley Associates, January 17, 2001

VisualDOE 3.0 Program Documentation Page 12
Eley Associates, January 17, 2001
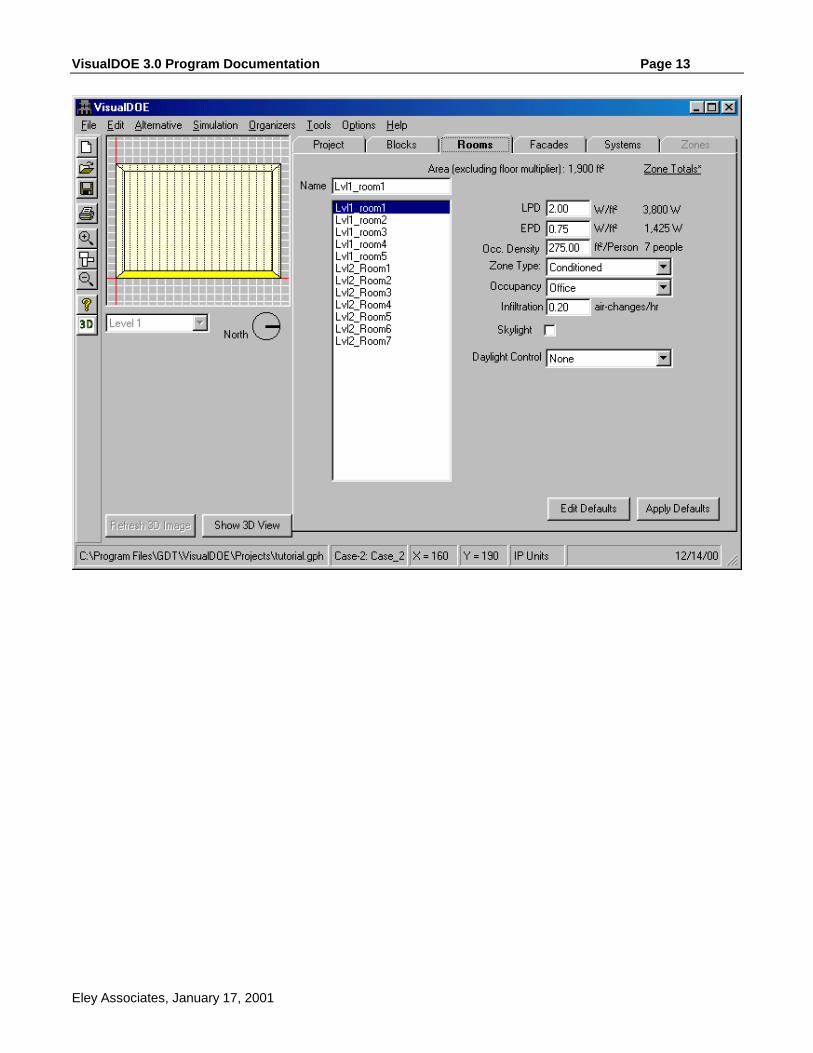
Lesson 4 – Room Data After you have created the blocks in your model, you can use the ‘Rooms’ folder to edit the properties associated with each of the rooms in the blocks. The rooms folder contains parameters that determine some of the internal loads and operating schedules associated with the specific use for that space.
1. Rename the rooms by clicking on each of the names displayed in the list box associated with Name. Renaming the rooms is optional. The rooms have been renamed here for reference in following lessons. As you highlight one of the rooms, the name appears in the box next to ‘Name’. You will also see that the associated room gets highlighted in the plan view (the grid area in the upper left corner of the form). Clicking on a particular zone in the plan view also allows you to edit the name of that zone. Edit the name of the first room on the list to ‘Lvl1_Room1’. Rename all the 5 rooms in Level 1 moving in a clockwise direction in the plan view, using the same convention (‘Lvl1_Room1’ through ‘Lvl1_Room5’). Follow the same procedure for renaming rooms on level 2 starting with ‘Lvl2_Room1’.
2. As you click on ‘Lvl1_Room1’, you will see a list of associated properties, like LPD (lighting power density), EPD (equipment power density), Occ. Density (occupant density), zone type, occupancy, infiltration and skylight. Let the program use the default values. The default values are dependant on the occupancy type (which is ‘office’ in this case). The default value for skylight is no skylight and daylight control is ‘none’. These defaults are automatically applied to all the rooms in this case. These set of variables help in determining the internal loads. The ‘Occupancy’ field determines operation schedules for the building.
3. We will assign a new occupancy type to one of the rooms in the Base Case model. Choose ‘Lvl1_room1’ and choose ‘Retail’ from the drop down menu for Occupancy (this is the occupancy type that you had Choose ‘Yes’ when asked ‘Do you want the LPD, EPD and Occupant Density to be reset to this occupancy?’ This resets the LPD, EPD and Occupant Density for this room to the default values associated with ‘Retail’ type occupancy.
4. We will learn to assign customized operation schedules for lights, plugs, occupants etc. in a more advanced lesson. For now the program will use the typical schedules associated with the ‘Office’ and ‘Retail’ type occupancy.
VisualDOE 3.0 Program Documentation Page 13
Eley Associates, January 17, 2001

VisualDOE 3.0 Program Documentation Page 14
Eley Associates, January 17, 2001
Lesson 5 – Skylights 1. Highlight ‘Lvl2_Room7’ in the list box. Check the box to model skylights in the selected room. When the box is
checked, a button for defining skylights becomes visible.
2. Click on the ‘Define Skylights’ button. This launches another window titled ‘Edit Skylight’.
3. You will see a small square object (representing the skylight) in the plan view window on the upper left of the form. Click on the window and drag and drop it in the plan view on the right of the form. Release the mouse.
4. Click on the skylight to your extreme left in the plan view of the building. This action highlights the skylight and activates the ‘Custom Opening’ frame for editing the skylight properties. Rename the opening as ‘Skylight_1’. For distance ‘From Bottom’ enter 100, and distance ‘From Left’ enter 50. This defines the position of the skylight in feet relative to the X,Y origin. Let glazing construction default to Double Low Iron 3/12/3 mm. The program allows you to customize skylights. We will learn how to do this in an advanced lesson.
5. Add 3 more skylights and edit them using this procedure. Place ‘Skylight_2’ at a distance of 100 feet from bottom and left. Place ‘Skylight_3’ at a distance of 100 feet from the bottom, 150 feet from the left. Place ‘Skylight_4’ at a distance of 50 feet from the bottom and 150 feet from the left.
6. Click ‘OK’ to exit out of this window.

VisualDOE 3.0 Program Documentation Page 15
Eley Associates, January 17, 2001
Lesson 6 – Facades and Windows After creating blocks in your model, you can use the Facades Folder to assign properties to exterior walls in the project. Clicking on the facades tab in the form takes you to the façade window.
1. Highlight the first surface name in the list box by clicking on it and rename it ‘Surface_lvl1_1’. As you click on the surface name in the list box, the associated surface is also highlighted in the plan view. This helps in understanding where this surface is located. Rename all the surfaces using the same convention (Surface_lvl1_1 through Surface_lvl1_2, and Surface_lvl2_1 through Surface_lvl2_6).
2. Highlight ‘Surface_lvl1_1’. Press the shift key and click on the surface (Surface_lvl2_6) at the end of the list box. All the surfaces get selected. This saves time in assigning properties to one surface at a time – if all the surfaces have the same properties. Select ‘Typical Bay’ from the ‘Spec. Method’ list-box. Leave the partial window box unchecked. Partial window allows the façade to have a fraction of the assigned window size if the number of bays is not a whole number.
3. Pick ‘12” Brick wall uninsulated’ for wall construction and ‘Single Bronze 6mm’ for glazing construction. (You can choose any of the construction types listed.)
4. Pick ‘4.5 x 5.5 single bronze’ for the ‘Window Choice’. The window choice has a list of associated properties with it – like opening size, exterior shades, glass type, frame type and frame fraction. We will learn how to edit these in a later lesson.
5. Type in ‘25’ ft. for Bay Width. This determines the width of the module that will be repeated along each of the facades in the building.
6. Type in ‘2.25’ for ‘Sill Height’.
7. For ‘Bays with windows’ fill in 1.0. This means that each bay will have one window. 0.5 would imply that each bay would have two windows.
8. We can assign as different properties to each surface. To demonstrate this, we assign a different window type to one of the surfaces in the Base Case. Click on ‘Surface_lvl1_4’. You will see that ‘6040 double clear’ which you had added to the project library in the beginning of the lesson been added to the list of ‘Window Choice’. Choose this window type for this surface. You can change the other parameters as well if you wish to.
9. We have now defined the external skin of the building.

VisualDOE 3.0 Program Documentation Page 16
Eley Associates, January 17, 2001

VisualDOE 3.0 Program Documentation Page 17
Eley Associates, January 17, 2001
Lesson 7 – Thermal Zones The Zone Folder is used to specify zone-level HVAC information such as the type of thermostat, supply air volume, outside air volume, exhaust fans and zone level heating systems such as baseboards and reheat coils in variable air volume boxes.
1. Before you can activate the ‘Zones’ folder, you will have to assign a HVAC system to the building. Choose the ‘Systems’ folder. Choose ‘One system for Each Block’. Two systems (one for each block) appear on the ‘List of Systems’ frame. Highlight the one on top of the list by clicking on it. You will see that ‘First Floor’ block is displayed in the plan view window on the left. Rename the system to ‘System_first_floor’ in the ‘Name’ window. You will notice that the name is updated in the ‘List of Systems’ Frame. Click on the second system on the list. You will see that the plan view changes to the ‘Second Floor’ block. Rename this system to ‘System_Second _Floor’.
2. Click on the ‘Zones’ folder. You will see a list of zones in the ‘List of Conditioned Zones’ frame. Click on the first zone name in the list. You will see that ‘First Floor’ block appears in plan view with the zone corresponding to this name highlighted. Click on the ‘Name’ tab and rename the zone to ‘Zone_1_1’. Repeat this for all the zones in First floor. Rename the other 4 zones in the First Floor ‘Zone_1_2’ through ‘Zone_1_5’. Rename all the zones in the second floor ‘Zone_2_1’ through ‘Zone_2_7’.
3. The zones folder lets you assign HVAC related variables for the zone – like the outside air supply per person etc. Let the program use defaults for the all the zone related parameters. Select all the zones by clicking on the first zone name in the list of conditioned zones and holding down the Shift key and clicking on the last zone name. Make sure that the ‘Flow/person’ option is checked in the ‘Outside Air’ frame and that it is set equal to 15. Also check zone reheat.

VisualDOE 3.0 Program Documentation Page 18
Eley Associates, January 17, 2001
Lesson 8 – HVAC Systems The Systems folder to define the HVAC system. We had already assigned one system per block.
1. Click on ‘System_First_Floor’ and then click on the ‘HVAC Systems Editor’ tab. Another window with the systems parameters pops up. Let the program use defaults for all the system parameters. You will see that the system assigned to this floor is VAV system. Change the ‘Return Air Path’ to ‘Plenum’ by picking it from the drop-down list.
2. Pick ‘System_Second_Floor’ from the drop down list for ‘System’. Change the ‘Return Air Path’ to ‘Plenum’ for this system as well.
3. Click ‘OK’ to exit out of this window.
4. With this we have completed the basic description of the model. Before simulating the model, save the file by clicking on the ‘Save File’ icon in the left edge of the window.

VisualDOE 3.0 Program Documentation Page 19
Eley Associates, January 17, 2001

VisualDOE 3.0 Program Documentation Page 20
Eley Associates, January 17, 2001
Lesson 9 – Running a Simulation The VisualDOE interface produces some summary reports as described below. You can generate these reports for viewing on the screen or for printing while you are developing your model. The results report will of course, be incomplete until you have performed a simulation
1. Architectural Summary. This report is a summary of the surface areas and window areas in the building broken down by construction type.
2. Architectural Detail. This report summarizes the information that you entered about the construction materials size and shape of the building along with details about the windows on each façade.
3. Zones Summary. This report summarizes information about the zones in the building, including internal loads, supply air volumes and outside air volumes.
4. Systems Summary. This report summarizes information about each of the systems.
5. Plant Summary. This report summarizes information about the central plant components.
6. Results. Once the simulations are complete, VisualDOE will extract a summary of end-use energy, monthly electricity use, monthly gas use, and peak demand by month, annual gas cost, annual electricity cost and the source energy use in kBtu/y-ft². These data will be displayed and then placed in the project data base for either the base case or the proposed design, depending on the type of simulation you performed.
We can assign additional DOE-2 reports if we wish to.
1. Click on ‘Simulation’ in the menu bar for VisualDOE. Choose ‘Set up and Run’ from the drop down list of commands. A ‘Run Setup’ Window pops up.
1. Click on the ‘Standard DOE-2 Reports’ folder. Choose the following reports one at a time from the ‘Standard DOE-2 Reports’ frame (by clicking on the appropriate name) and clicking on the ‘single arrow’ button to add it to the ‘Assigned Reports’ frame -
LV-A, LS-A, LS-B, LS-C, LS-D, SS-A, SS-B, SS-D, SS-F, PS-B, PS-E, PS-F.
2. Click on the ‘Simulation’ folder. Choose ‘Base Case – Unrun’ from the ‘Simulation Status List’ frame.
3. Click on the ‘Run DOE-2’ button.
4. A MS-DOS window titled ‘DOESIM’ pops up and displays the status of the simulation. After this window disappears – you can view the status on the ‘Simulation List – Status’ frame in the ‘Run Setup’ window. You will be able to see the percentage of loads not met by the system and the plant – once the simulation is complete, you can exit out of this window by clicking on the ‘Exit’ button.
5. To view the results, click on ‘Simulation’ in the VisualDOE menu bar, and choose ‘View Results’ from the drop down list. Choose ‘Reports’. This will cause a ‘VisualDOE Reports’ form to appear with two list boxes. One list box shows the reports that are available and the other shows the base case that you have created. You can make multiple selections from both lists. Click on ‘Plant Reports Summary’ from the list of reports in the ‘Reports’ frame. Click on the ‘Print Preview’ button to view the report. The report is displayed in the ‘Print Preview’ Window. You can use the ‘zoom’ icon and choose ‘Page Width’ from the drop down menu. This report contains details on the plant parameters, like size of equipment, chilled water temperature etc. Click on the ‘Print’ icon if you wish to print this report. This action displays the ‘Print’ window. Ensure that you have the correct settings for your computer for printing. Click on the ‘OK’ button after you have checked the print settings to print the report. Click on the ‘Close’ button to finish viewing this report. This action takes you back to the ‘VisualDOE Reports’ window. Click on the ‘Exit’ button to close this window.
6. You can also view the DOE – 2 input, BDL and output files. Click on ‘Simulation’ in the VisualDOE menu bar and choose ‘View DOE-2’ reports from the drop down menu. A window displaying the DOE-2 BDL file pops up. Click on the ‘Output files’ tab to view the output reports. A list of available DOE-2 reports is displayed as a drop down list in the ‘DOE-2 Reports’ field. Choose ‘BEPU Building Energy Performance Summary (Utility Units) to view the summary of total gas and electrical energy consumption by various

VisualDOE 3.0 Program Documentation Page 21
Eley Associates, January 17, 2001
components in the building from the dropdown list of reports in associated with ‘DOE-2 Reports’. Click on the ‘Exit’ button to close this window.

VisualDOE 3.0 Program Documentation Page 22
Eley Associates, January 17, 2001

VisualDOE 3.0 Program Documentation Page 23
Eley Associates, January 17, 2001
Congratulations! You have successfully completed creating and simulating a VisualDOE model. We can now
move on and learn how to use the more advanced features of this program.