beginner's guide toragnarok odyssey v1.1
DESCRIPTION
This starter guide will help you get up and running with exploring the game world, buying items and the nuances of the combat system.TRANSCRIPT

A beginner's guide to:
www.PastThePixels.com presents:

Welcome to the Past the Pixels starter guide to Ragnarok Odyssey. Here I’ll take you through some of the basics to help get you started on your quest-ing. Stuff like: basic commands, combat, shopping, the card system, missions and status ailments.
This is the first guide I’ve ever put together. It’s purely to help other importers and is strictly not for profit.
My Japanese is basic at best, but what is in here should be helpful to novice players and those who don’t have much of an understanding of Japanese. Sadly, the Vita’s screen-cap function isn’t used in RO, so most screens have been taken with my iPhone. If you have any criticisms or suggestions for improvement then drop me a message: through email: [email protected] or on Twitter: @Past_the_pixels.
I hope this starter guide helps make the beginnings of your questing in Raganrok Odyssey just that little bit easier.
Good Luck!
Grahame

Ragnarok Odyssey is a Monster Hunter style game: you take missions as they are presented to you, leveling up your character and equipment before tackling that chapters’ boss character.
The first thing you’ll need to do upon starting a new game is create your character. Everything here is cosmetic apart from one key thing, your character class. Just as in MH there are different classes that utilize different weapons and have varying abilities. In RO there are six different classes: Sword Master, Assasin, Hammersmith, Mage, Cleric and Hunter. For this starter guide we’ll be looking at the basics for the Sword Master (he’s the dude/girl with the huge sword!).
The Sword Master is the game’s generic warrior class type. They inflict big damage with their sword and focus more on guarding than dodging when it comes to defence. It’s the perfect class for a begin-ner and the first couple of chapters are a breeze playing as this class type.
Gettiing Started:
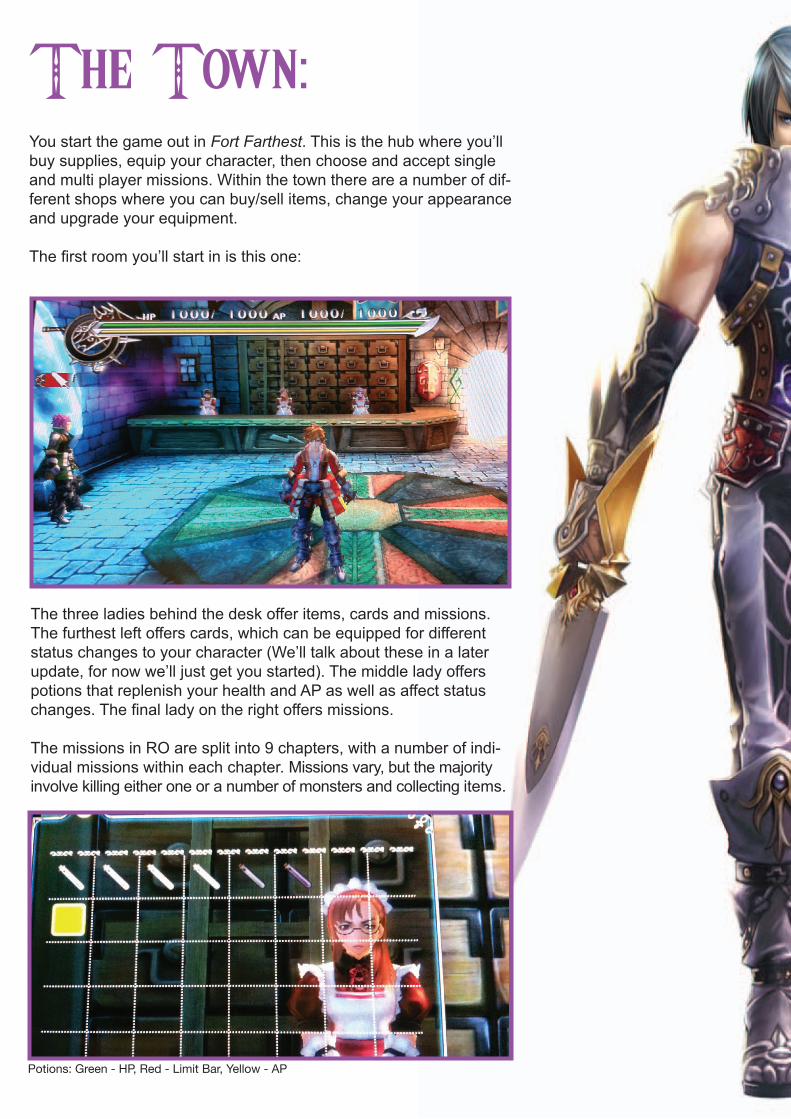
The Town:You start the game out in Fort Farthest. This is the hub where you’ll buy supplies, equip your character, then choose and accept single and multi player missions. Within the town there are a number of dif-ferent shops where you can buy/sell items, change your appearance and upgrade your equipment.
The first room you’ll start in is this one:
The three ladies behind the desk offer items, cards and missions. The furthest left offers cards, which can be equipped for different status changes to your character (We’ll talk about these in a later update, for now we’ll just get you started). The middle lady offers potions that replenish your health and AP as well as affect status changes. The final lady on the right offers missions.
The missions in RO are split into 9 chapters, with a number of indi-vidual missions within each chapter. Missions vary, but the majority involve killing either one or a number of monsters and collecting items.
Potions: Green - HP, Red - Limit Bar, Yellow - AP

In the main town there are a few different shops to outfit your char-acter. The first, in the top right of this area, is the town ironmon-ger. This guy will (funnily enough) provide you with weapons and also upgrade your weapons. You can’t buy from him straight away though.
Over to the left we have a flamboyant chap with a huge pair of scis-sors. Once you have leveled up enough this guy will alter your hair, face and voice for a price. Handy if you fancy a little change from your original character setup.
The very top right room in Fort Farthest is… your room! In here you can change clothes at the wardrobe, save your game at the desk and eventually change your classtype(!) with the shiny jewel on the left of the room. You can even listen to music you’ve purchased on your gramophone! The friendly blob with the halo? I’m working on that one. From what I’ve read on Japanese forums he’ll be your in-game gateway to DLC in the future.
Your room: Come here to save, change, or chill to some music.
The Ironmonger: All your weapon needs catered for.

The Town:Just down from the ironmonger are two shops that sell outfits and another that sells hats/masks and music.
Left: Clothes shop; Right: Hat/Mask shop
Outfits change character’s physical appearance, as missions are completed new outfits appear in the shop. Same with the hat/mask shop. You can also ‘dye’ your clothes different colours, at a price. In order to buy clothes you’ll need to have the relevant items in your in-ventory for the seamstress (hey, she looks like one!) to make them. But we’ll touch on that later, for now we’ll focus on the basics.
The hat/mask shop: Remember you’ll need the right items for her to make it!
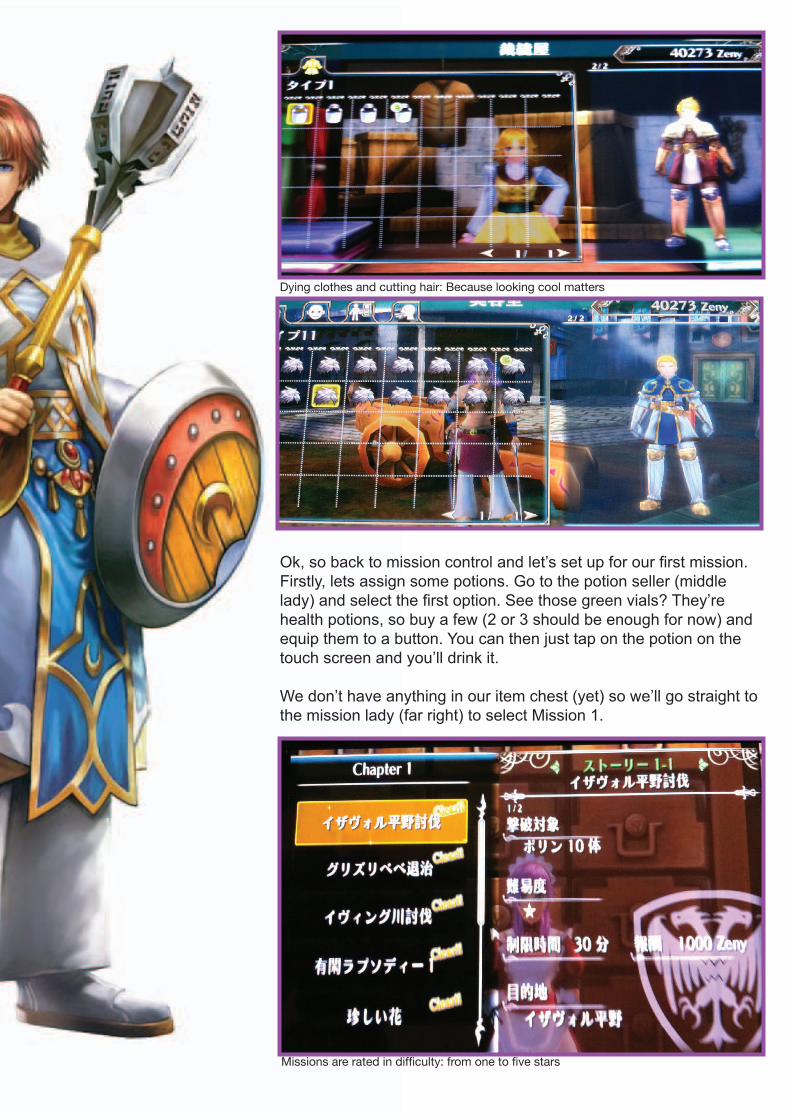
Ok, so back to mission control and let’s set up for our first mission. Firstly, lets assign some potions. Go to the potion seller (middle lady) and select the first option. See those green vials? They’re health potions, so buy a few (2 or 3 should be enough for now) and equip them to a button. You can then just tap on the potion on the touch screen and you’ll drink it.
We don’t have anything in our item chest (yet) so we’ll go straight to the mission lady (far right) to select Mission 1.
Missions are rated in difficulty: from one to five stars
Dying clothes and cutting hair: Because looking cool matters

Mission 1:Welcome to Idavoll Plain, our first destination in Ragnarok Odyssey! The first tutorial screen that pops up tells us about targeting. To target an enemy hold the left shoulder button.
Before we go kill those pink blobs though, lets go through the HUD. Top right is the map screen, blue dots indicate the next area, green dots are where you’ve just entered the area from. There are a few places with multiple routes, but nothing too confusing. You’re the red triangle, that cone is your field of vision. A red cross indicates an area not open on the current mission. A star? That’s the boss. You toggle the map display by tapping it on the touch screen.
The green bar is your health, this is also displayed as a points total just above. You replenish health with those green potions we just bought. The yellow bar is your AP, sprinting and dodging will decrease this, it’s also displayed in points next to your HP. Again, potions will replenish this or just wait til it recovers naturally.
That circular bar is the Tension Bar. When filled it allows you to trigger what is called Dáinsleif. When the red bar is filled, the icon just below your map will light up. Tapping this sends your character into a heightened state where there is no delay after combos, you cannot be stunned, and your AP will not decrease. The trade-off is that your HP will decrease over the time it’s active. Dealing damage staves off this HP depletion though. It’s best to use this on bosses or large groups of enemies, also remember that you can end Dáinsleif at any time by again tapping on the icon. Doing so definitely reduces the chances of losing health.
The jewel in the bottom left is your Talisman, this will change colour depending on your character’s state. Basically, if it’s glowing your at-tacks will do larger damage. When it’s dimmed, they’ll be lessened.

The jewel in the bottom left is your Talisman, this will change colour depending on your character’s state and cause different status effects: eg. increased critical hits. Certain status ailments can affect this changing or stop it from changing altogether.
The handshake icon? That’s for multiplayer commands. At the moment RO only supports multiplayer questing via Ad Hoc. Gung Ho have promised a future update will allow online questing. Have a run about and kill those cute pink slimes, they only take one hit. Feel good?
Now go to the next area and try out some of those combos on the rabbits. As you can see, juggling and stagger attacks are an inte-gral part of combat in RO. If you can successfully hit an enemy into the air, then huge damage can be dealt. As you get used to fighting certain monsters you’ll learn their attack patterns, when to dodge or jump, and when to go for the kill.
Congratulations! You’ve finished your first mission. Remember you can always replay missions to gather extra materials. This next screen shows you what items you’ve managed to loot from the mis-sion. Select the first option, then hit yes to take all this loot.

Basic Commands
Left Analog Stick: Move character
Right Analog Stick: Adjust Camera
l
r
T
C
X
S
l+T
- Lock on
- Sprint
- Light Attack
- Heavy Attack/Launcher
- Jump
- Dodge
- Block

Combos SWORD MASTER
Gems
Boosts TalismanStar Gem
Blue Gem
Orange Gem
Red Gem Boosts Tension Bar
Yellow Gem
Green Gem Recovers HP
Recovers AP
Temporarily boosts attack power
Temporarily boosts defence power
DescriptionNameIcon
Launcher Attack
Charged attack (3 stages)
Attack
Attack, thrust
Basic launcher combo
Launch, attack
Cross combo
Two-hit combo
Jumping slash
Jumping slash - Launcher
Launcher - Juggle combo
Three-hit combo
Four-hit heavy combo
Bowling combo
Four-hit combo
Four-hit combo - Spear
Five-hit combo
Button Action
Left stick + C
C (Press and hold)
T
TC
TCC
TCCC
TCCCC
TT
TTC
TTCC
TTCCC
TTT
TTTC
TTTCC
TTTT
TTTTC
TTTTT

Status Effects
Item Drops
Combo, Gems, Staus Effects and Items tables translated from ro-vita.game-cmr.com.These are by no means every effect or item drop, just what has been discovered so far.
HP reduced gradually
Significant HP reduction
Cannot move for period of time
Cannot move for period of time
HP reduced gradually
Reduced growth of Tension Bar
Tension Bar growth stops
Slows AP recovery
Attack power reduced
Defence reduced
Poison
Deadly Poison
Paralysis
Freeze
Burn
Nervous
Tension Stop
Fatigue
Attack Down
Defence Down
Blue Box Loot
Mission specific materialPurple Box
Weapon Variety of weapons for each class type
Cards Status cards
Boxes
Other Items
DescriptionNameIcon
Icon Name Description
DescriptionNameIcon