beni itajime: carved board clamp resist dyeing in red
TRANSCRIPT
University of Nebraska - LincolnDigitalCommons@University of Nebraska - Lincoln
Textile Society of America Symposium Proceedings Textile Society of America
2010
BENI ITAJIME: CARVED BOARD CLAMPRESIST DYEING IN REDMasanao AraiNational History Museum, Sakura, [email protected]
Yoshiko Iwamoto WadaWorld Shibori Network, [email protected]
Follow this and additional works at: http://digitalcommons.unl.edu/tsaconf
Part of the Art and Design Commons
This Article is brought to you for free and open access by the Textile Society of America at DigitalCommons@University of Nebraska - Lincoln. It hasbeen accepted for inclusion in Textile Society of America Symposium Proceedings by an authorized administrator of DigitalCommons@University ofNebraska - Lincoln.
Arai, Masanao and Wada, Yoshiko Iwamoto, "BENI ITAJIME: CARVED BOARD CLAMP RESIST DYEING IN RED" (2010).Textile Society of America Symposium Proceedings. 5.http://digitalcommons.unl.edu/tsaconf/5
1
BENI ITAJIME: CARVED BOARD CLAMP RESIST DYEING IN RED MASANAO ARAI WITH YOSHIKO IWAMOTO WADA
[email protected] & [email protected]
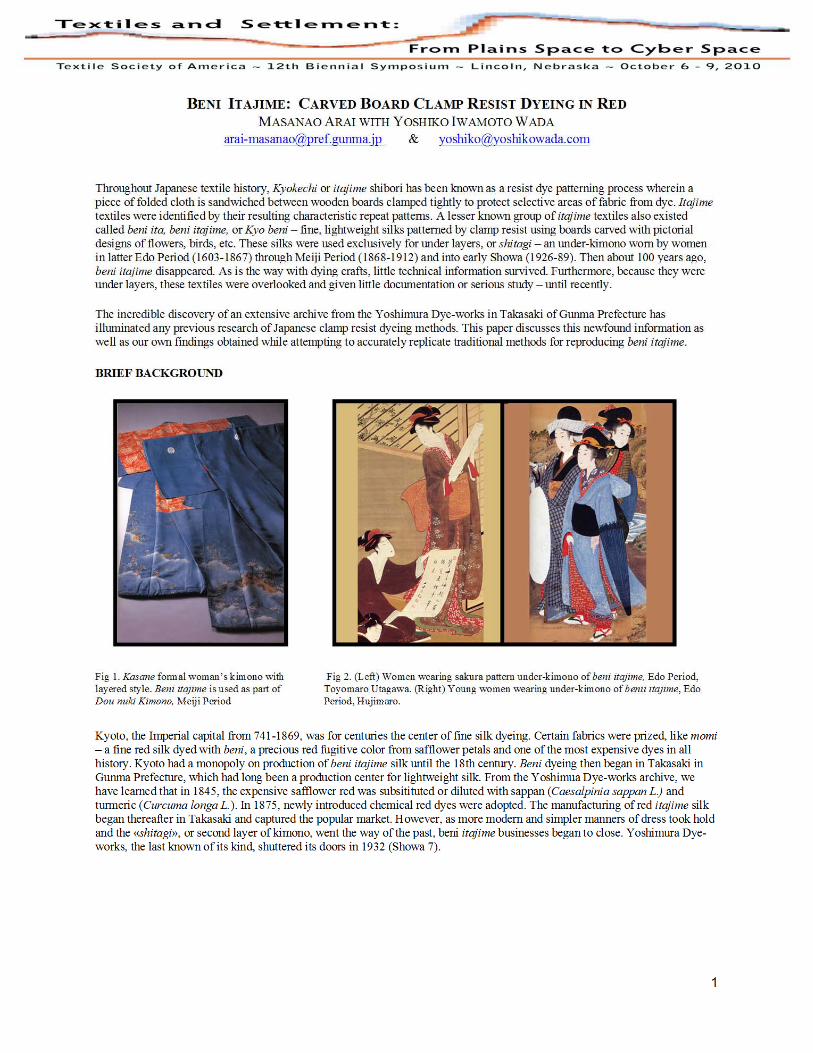
Throughout Japanese textile history, Kyokechi or itajime shibori has been known as a resist dye patterning process wherein a piece of folded cloth is sandwiched between wooden boards clamped tightly to protect selective areas of fabric from dye. Itajime textiles were identified by their resulting characteristic repeat patterns. A lesser known group of itajime textiles also existed called beni ita, beni itajime, or Kyo beni – fine, lightweight silks patterned by clamp resist using boards carved with pictorial designs of flowers, birds, etc. These silks were used exclusively for under layers, or shitagi – an under-kimono worn by women in latter Edo Period (1603-1867) through Meiji Period (1868-1912) and into early Showa (1926-89). Then about 100 years ago, beni itajime disappeared. As is the way with dying crafts, little technical information survived. Furthermore, because they were under layers, these textiles were overlooked and given little documentation or serious study – until recently.
The incredible discovery of an extensive archive from the Yoshimura Dye-works in Takasaki of Gunma Prefecture has illuminated any previous research of Japanese clamp resist dyeing methods. This paper discusses this newfound information as well as our own findings obtained while attempting to accurately replicate traditional methods for reproducing beni itajime.
BRIEF BACKGROUND
Kyoto, the Imperial capital from 741-1869, was for centuries the center of fine silk dyeing. Certain fabrics were prized, like momi – a fine red silk dyed with beni, a precious red fugitive color from safflower petals and one of the most expensive dyes in all history. Kyoto had a monopoly on production of beni itajime silk until the 18th century. Beni dyeing then began in Takasaki in Gunma Prefecture, which had long been a production center for lightweight silk. From the Yoshimua Dye-works archive, we have learned that in 1845, the expensive safflower red was subsitituted or diluted with sappan (Caesalpinia sappan L.) and turmeric (Curcuma longa L.). In 1875, newly introduced chemical red dyes were adopted. The manufacturing of red itajime silk began thereafter in Takasaki and captured the popular market. However, as more modern and simpler manners of dress took hold and the «shitagi», or second layer of kimono, went the way of the past, beni itajime businesses began to close. Yoshimura Dye-works, the last known of its kind, shuttered its doors in 1932 (Showa 7).
Fig 1. Kasane formal woman’s kimono with layered style. Beni itajime is used as part of Dou-nuki Kimono, Meiji Period
Fig 2. (Left) Women wearing sakura pattern under-kimono of beni itajime, Edo Period, Toyomaro Utagawa. (Right) Young women wearing under-kimono of benii itajime, Edo Period, Hujimaro.
2
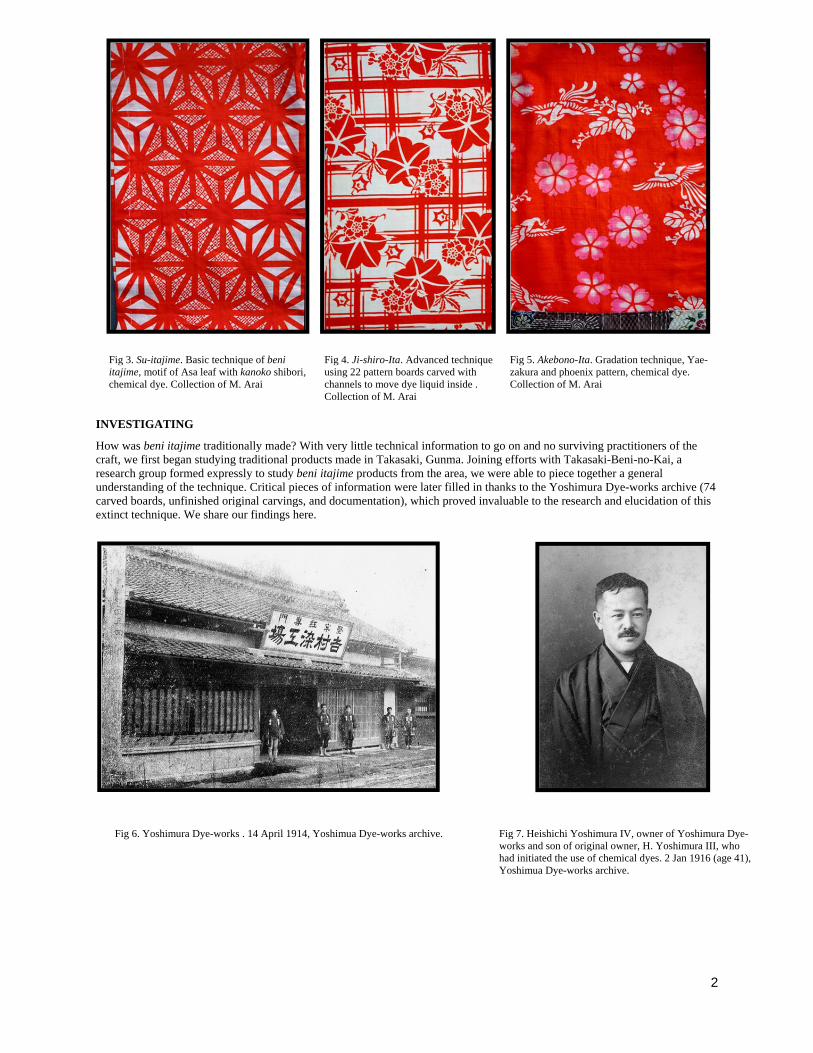
Fig 3. Su-itajime. Basic technique of beni itajime, motif of Asa leaf with kanoko shibori, chemical dye. Collection of M. Arai
Fig 4. Ji-shiro-Ita. Advanced technique using 22 pattern boards carved with channels to move dye liquid inside . Collection of M. Arai
Fig 5. Akebono-Ita. Gradation technique, Yae-zakura and phoenix pattern, chemical dye. Collection of M. Arai
INVESTIGATING
How was beni itajime traditionally made? With very little technical information to go on and no surviving practitioners of the craft, we first began studying traditional products made in Takasaki, Gunma. Joining efforts with Takasaki-Beni-no-Kai, a research group formed expressly to study beni itajime products from the area, we were able to piece together a general understanding of the technique. Critical pieces of information were later filled in thanks to the Yoshimura Dye-works archive (74 carved boards, unfinished original carvings, and documentation), which proved invaluable to the research and elucidation of this extinct technique. We share our findings here.
Fig 6. Yoshimura Dye-works . 14 April 1914, Yoshimua Dye-works archive.
Fig 7. Heishichi Yoshimura IV, owner of Yoshimura Dye-works and son of original owner, H. Yoshimura III, who had initiated the use of chemical dyes. 2 Jan 1916 (age 41), Yoshimua Dye-works archive.

3
REPRODUCING BENI ITAJIME
We availed ourselves of the authentic materials from the archive using them as guides and for historical accuracy. We learned the basic process involves carving and lacquering wooden boards; soaking boards in water before dyeing; folding fabric into eight layers; placing folded fabric between boards using a clamp frame; dyeing, rinsing and drying. The techniques used to carry out these steps were our focus. Over twenty trials were perfomed until achieving the desired red-dyed design on white silk ground.
Three critical variables were explored: (1) wooden board preparation; (2) type of fabric used; (3) folding of the fabric. Different techniques were then executed and results were analysed to determine the likeliest traditional methods.
I. Materials & Preparation
Fig 8. Original boards from the Meiji Period used at Yoshimura Dye-works , Takasaki. They started producing beni itajime in 1889. Yoshimua dye-works archive.
Fig 9. Two original Meiji Period boards carved with symmetrical crane patterns. Yoshimua Dye-works archive.
Fig 10. Original, unfinished carved boards (center) from Meii Period and stencil patterns. Pattern is carved after brushing black ink onto a board’s face with stencil paper. Yoshimua Dye-works archive
Fig 11. Newly carved boards soaking in water for 2+ weeks. Note the sides and center (red areas) of the board are kept free of lacquer.
A. Wooden Boards
Traditional boards were carved with a design and lacquered. To investigate how this was done, we created a new set using the original boards from the Meiji Period as a reference. The new boards were carved using patterns copied directly from the Meiji ones, then lacquered by a Japanese artisan.
Through trial and error, we discovered the following key points: lacquer must be applied because it protects a board's resist areas from dye liquid and thereby encourages dye to penetrate into the fabric; the sides and center of the boards should remain lacquer-free for effective pre-soaking. This became evident during process trials, which we discuss in more detail below.
4
B. Fabric
Historically, village farmers of Takasaki raised silk worms while their wives reeled the threads. Any left over low quality threads were then used to weave silk. This yielded a low quality material of non-uniform, uneven surface that was used for farmers’ own personal use or sold at a very cheap price. This material was actually good for beni itajime for the following traits: it was thin and slightly coarse thus able to soak dyestuff into layers of fabric, sufficiently lightweight for layering three or four pieces of kimono, warm to wear, and priced cheaply.
In itajime, fabric is folded for dyeing. Old documents specified that for beni itajime, a dyer would fold fabric into eight layers before placing it between carved boards. We experimented with different fabrics using consistent swatch sizes: one kimono piece (23m x 38cm). In our early trials, we tested present-day kimono fabric lining, which is considerably thicker than linings from traditional times. This proved too thick: dye could not penetrate to the inner folds and not enough color could get to the cloth.
After several trials, we determined the ideal cloth is a thin silk that should weigh about 100g per kimono piece. This yielded the best results with complete dye penetration through all layers.
II. Process
A. Soaking Boards
Before any dyeing is done, we learned that wooden boards are soaked in water. We found that this softens the wood and allows for easy clamping without use of excessive pressure or heavy-duty bolts. Also, dry wood tends to warp; this leads to uneven board fit, uneven dyeing, and an undesirable design pattern that has blurry, non-crisp edges.
Our first set of boards, which were lacquered all over (e.g., entire front face, entire back face, and sides), did not absorb enough water during the pre-soak. In order for water to penetrate deeply enough, certain areas of the boards had to be lacquer-free: only the front and back faces are lacquered while the center and the sides of the boards are not. In our trials, we had to soak boards for at least 2 weeks in order to sufficiently wet the inner core.
B. Folding
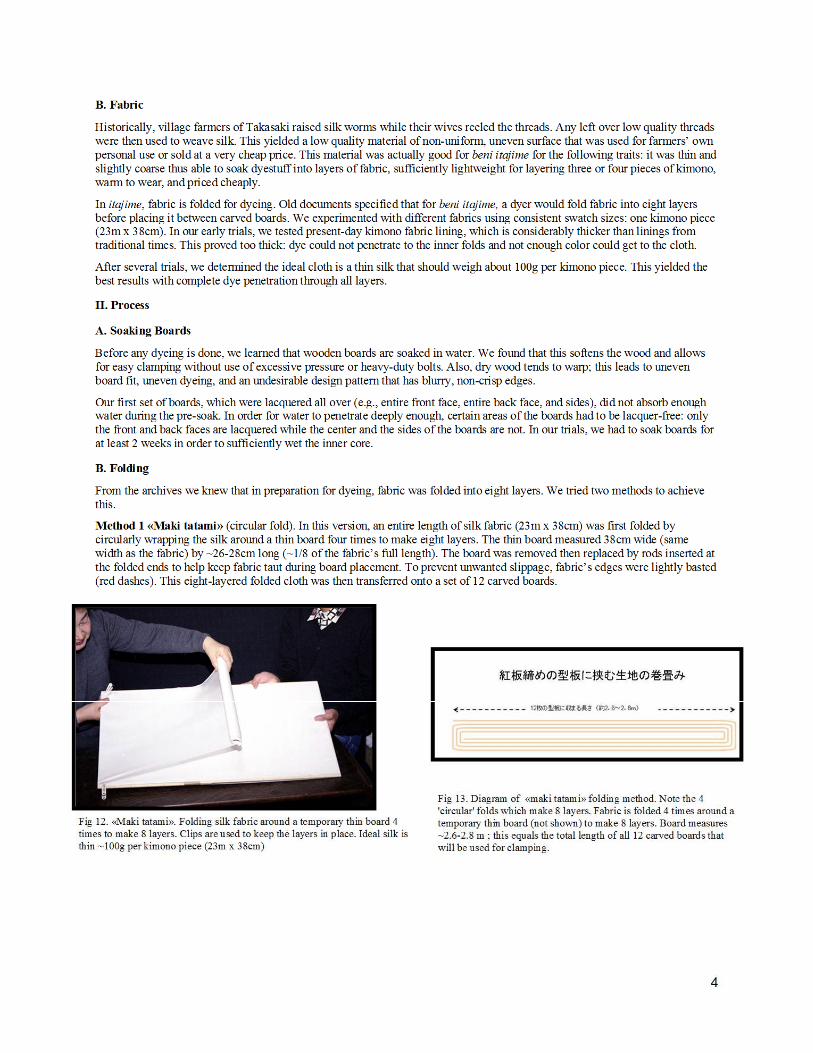
From the archives we knew that in preparation for dyeing, fabric was folded into eight layers. We tried two methods to achieve this.
Method 1 «Maki tatami» (circular fold). In this version, an entire length of silk fabric (23m x 38cm) was first folded by circularly wrapping the silk around a thin board four times to make eight layers. The thin board measured 38cm wide (same width as the fabric) by ~26-28cm long (~1/8 of the fabric’s full length). The board was removed then replaced by rods inserted at the folded ends to help keep fabric taut during board placement. To prevent unwanted slippage, fabric’s edges were lightly basted (red dashes). This eight-layered folded cloth was then transferred onto a set of 12 carved boards.
Fig 12. «Maki tatami». Folding silk fabric around a temporary thin board 4 times to make 8 layers. Clips are used to keep the layers in place. Ideal silk is thin ~100g per kimono piece (23m x 38cm)
Fig 13. Diagram of «maki tatami» folding method. Note the 4 'circular' folds which make 8 layers. Fabric is folded 4 times around a temporary thin board (not shown) to make 8 layers. Board measures ~2.6-2.8 m ; this equals the total length of all 12 carved boards that will be used for clamping.
5
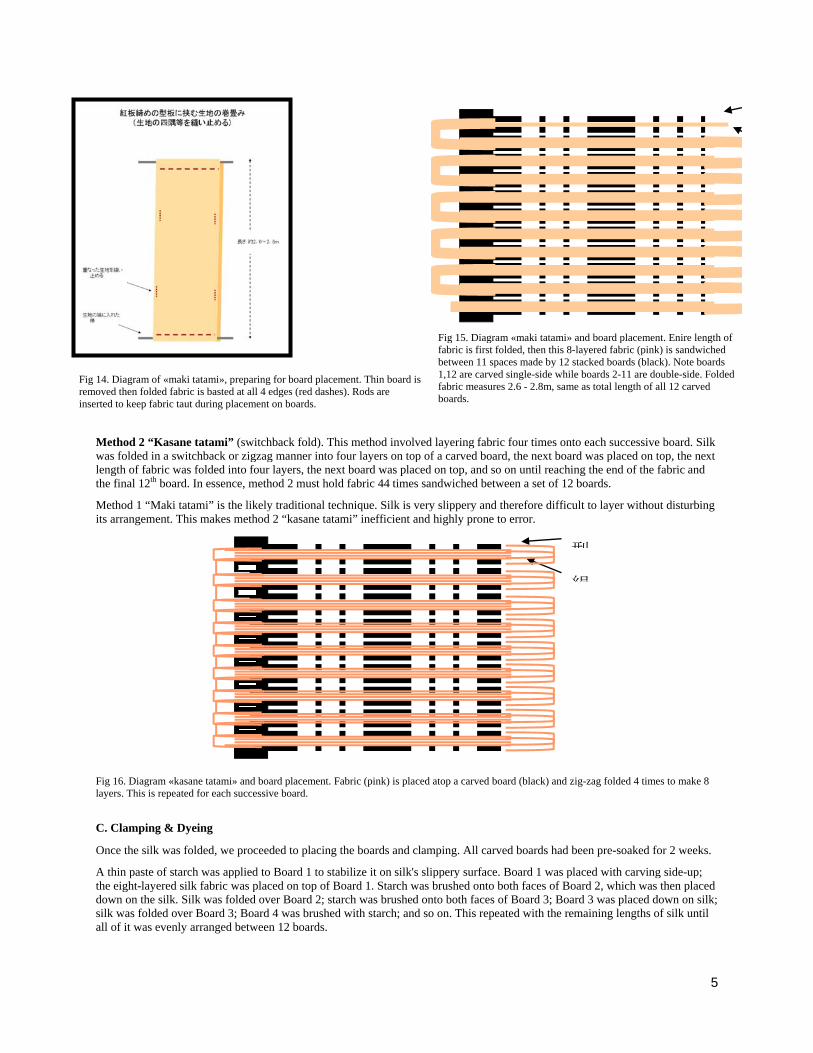
Fig 14. Diagram of «maki tatami», preparing for board placement. Thin board is removed then folded fabric is basted at all 4 edges (red dashes). Rods are inserted to keep fabric taut during placement on boards.
Fig 15. Diagram «maki tatami» and board placement. Enire length of fabric is first folded, then this 8-layered fabric (pink) is sandwiched between 11 spaces made by 12 stacked boards (black). Note boards 1,12 are carved single-side while boards 2-11 are double-side. Folded fabric measures 2.6 - 2.8m, same as total length of all 12 carved boards.
Method 2 “Kasane tatami” (switchback fold). This method involved layering fabric four times onto each successive board. Silk was folded in a switchback or zigzag manner into four layers on top of a carved board, the next board was placed on top, the next length of fabric was folded into four layers, the next board was placed on top, and so on until reaching the end of the fabric and the final 12th board. In essence, method 2 must hold fabric 44 times sandwiched between a set of 12 boards.
Method 1 “Maki tatami” is the likely traditional technique. Silk is very slippery and therefore difficult to layer without disturbing its arrangement. This makes method 2 “kasane tatami” inefficient and highly prone to error.
Fig 16. Diagram «kasane tatami» and board placement. Fabric (pink) is placed atop a carved board (black) and zig-zag folded 4 times to make 8 layers. This is repeated for each successive board.
C. Clamping & Dyeing
Once the silk was folded, we proceeded to placing the boards and clamping. All carved boards had been pre-soaked for 2 weeks.
A thin paste of starch was applied to Board 1 to stabilize it on silk's slippery surface. Board 1 was placed with carving side-up; the eight-layered silk fabric was placed on top of Board 1. Starch was brushed onto both faces of Board 2, which was then placed down on the silk. Silk was folded over Board 2; starch was brushed onto both faces of Board 3; Board 3 was placed down on silk; silk was folded over Board 3; Board 4 was brushed with starch; and so on. This repeated with the remaining lengths of silk until all of it was evenly arranged between 12 boards.
型
絹
6
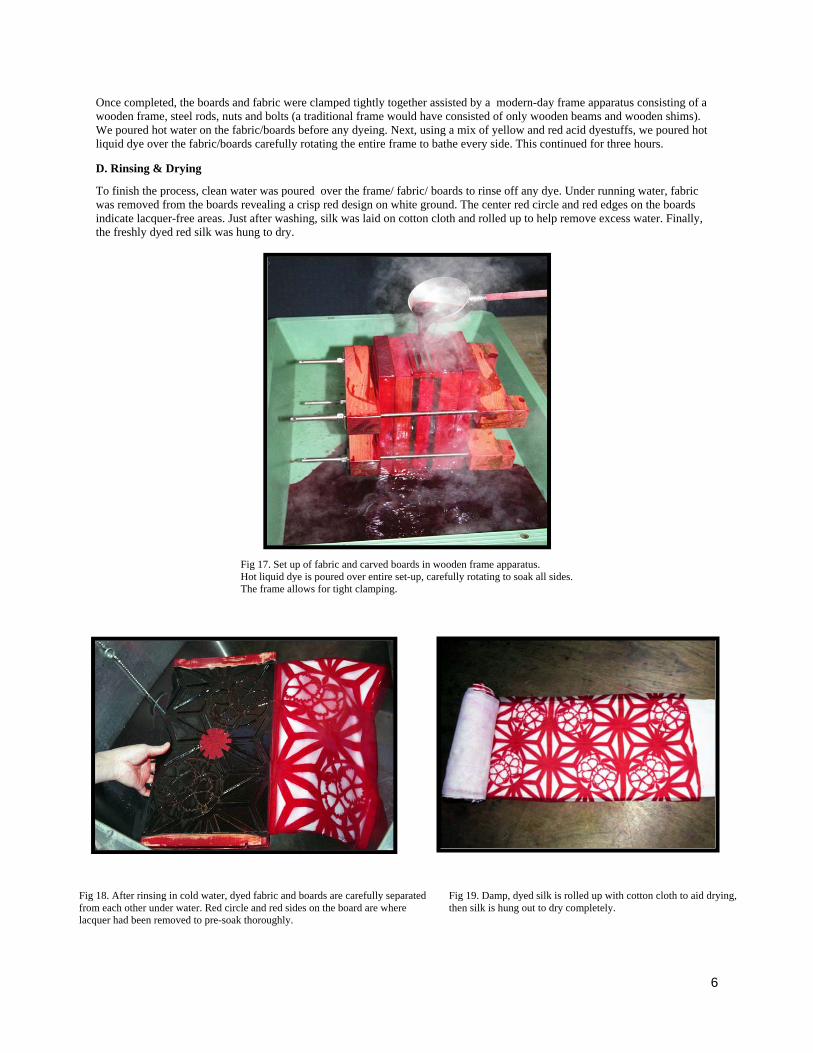
Once completed, the boards and fabric were clamped tightly together assisted by a modern-day frame apparatus consisting of a wooden frame, steel rods, nuts and bolts (a traditional frame would have consisted of only wooden beams and wooden shims). We poured hot water on the fabric/boards before any dyeing. Next, using a mix of yellow and red acid dyestuffs, we poured hot liquid dye over the fabric/boards carefully rotating the entire frame to bathe every side. This continued for three hours.
D. Rinsing & Drying
To finish the process, clean water was poured over the frame/ fabric/ boards to rinse off any dye. Under running water, fabric was removed from the boards revealing a crisp red design on white ground. The center red circle and red edges on the boards indicate lacquer-free areas. Just after washing, silk was laid on cotton cloth and rolled up to help remove excess water. Finally, the freshly dyed red silk was hung to dry.
Fig 17. Set up of fabric and carved boards in wooden frame apparatus. Hot liquid dye is poured over entire set-up, carefully rotating to soak all sides. The frame allows for tight clamping.
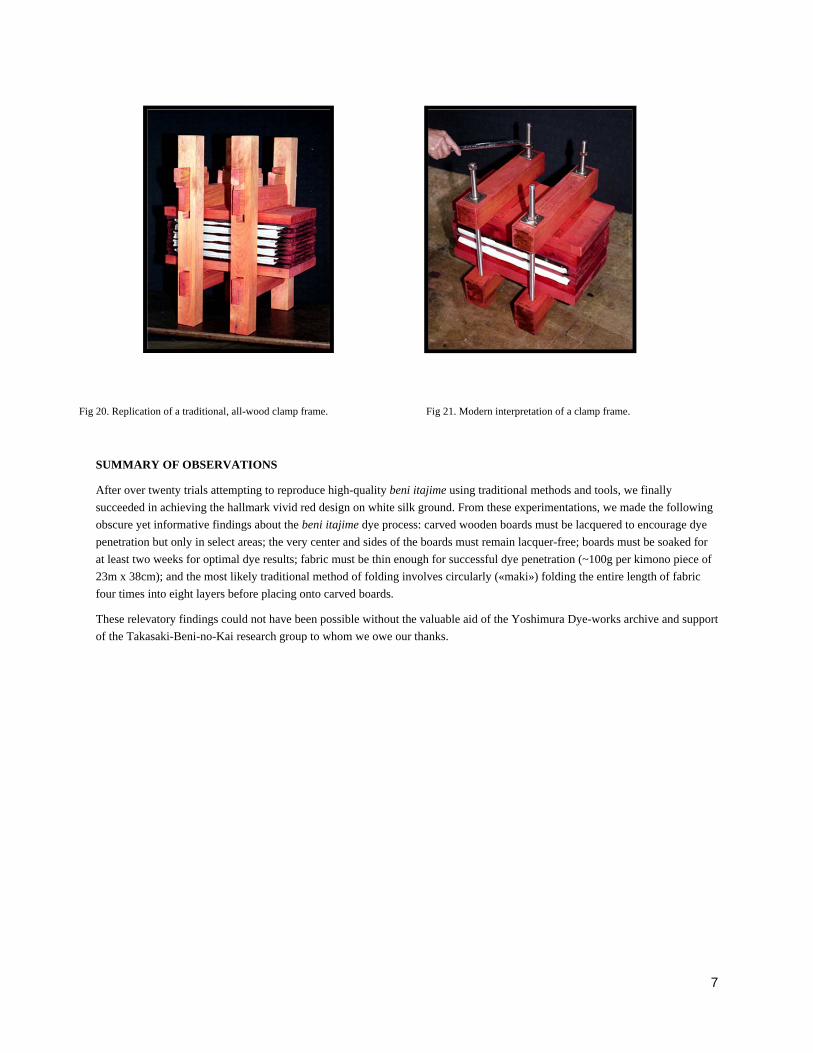
Fig 18. After rinsing in cold water, dyed fabric and boards are carefully separated from each other under water. Red circle and red sides on the board are where lacquer had been removed to pre-soak thoroughly.
Fig 19. Damp, dyed silk is rolled up with cotton cloth to aid drying, then silk is hung out to dry completely.
7
Fig 20. Replication of a traditional, all-wood clamp frame. Fig 21. Modern interpretation of a clamp frame.
SUMMARY OF OBSERVATIONS
After over twenty trials attempting to reproduce high-quality beni itajime using traditional methods and tools, we finally
succeeded in achieving the hallmark vivid red design on white silk ground. From these experimentations, we made the following
obscure yet informative findings about the beni itajime dye process: carved wooden boards must be lacquered to encourage dye
penetration but only in select areas; the very center and sides of the boards must remain lacquer-free; boards must be soaked for
at least two weeks for optimal dye results; fabric must be thin enough for successful dye penetration (~100g per kimono piece of
23m x 38cm); and the most likely traditional method of folding involves circularly («maki») folding the entire length of fabric
four times into eight layers before placing onto carved boards.
These relevatory findings could not have been possible without the valuable aid of the Yoshimura Dye-works archive and support
of the Takasaki-Beni-no-Kai research group to whom we owe our thanks.