bi publisher reports 9.2 pt. 8 - lsuhsc.edu publisher/bi... · training guide 9.2 pt. 8.55 page 1...
TRANSCRIPT

BI Publisher Reports
9.2 PT. 8.55
Version Date: February 5, 2018

Training Guide
9.2 PT. 8.55
Page ii
Table of Contents BI Publisher Reports 9.2 PT. 8.55 ................................................................................... 1
Launch PeopleSoft 9.2 PT. 8.55 ................................................................................................ 4
BI Publisher Query Report Viewer .......................................................................................... 6
BI Publisher Query Report Scheduler ................................................................................... 16
Training Guide
9.2 PT. 8.55
Page 1
BI Publisher Reports 9.2 PT. 8.55
Beginning with the PeopleTools 8.55 upgrade, Oracle PeopleSoft discontinues Crystal
Reports and replaces them with BI Publisher Reports. At this time, PeopleSoft Financials
Launcher access to Crystal Reports will be removed. This document details the steps to
run a report via BI Query Report Scheduler and the steps to run a report via BI Query
Report Viewer.
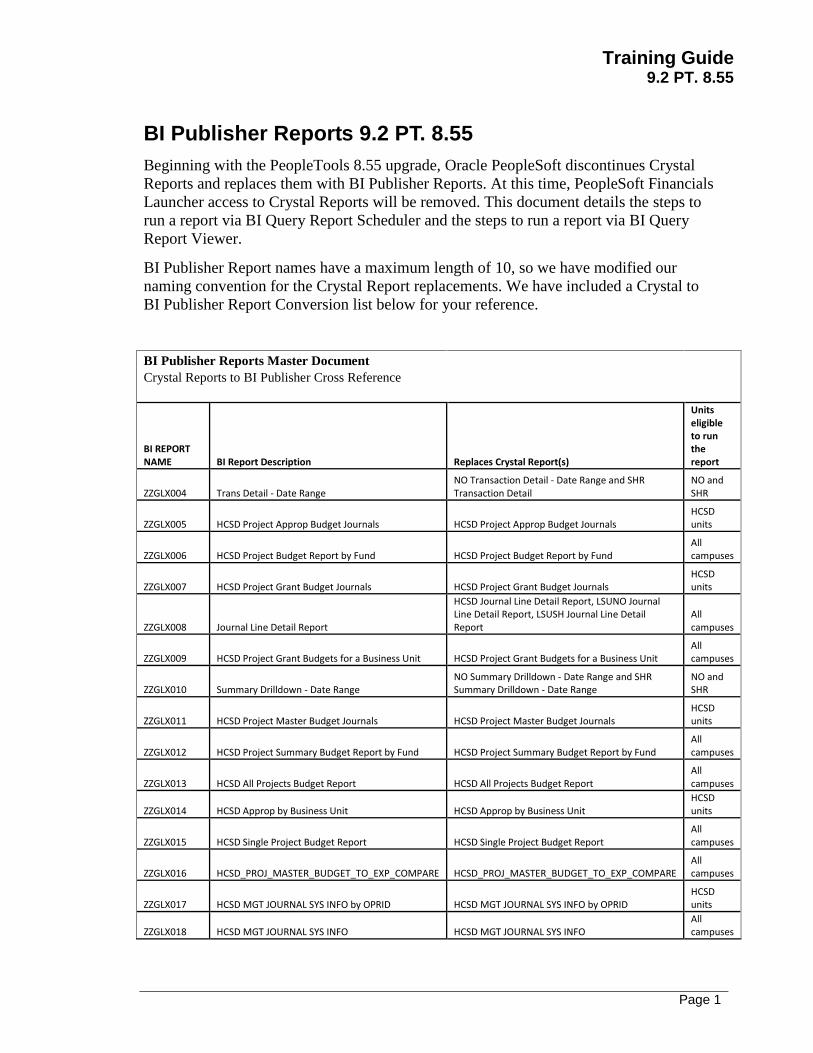
BI Publisher Report names have a maximum length of 10, so we have modified our
naming convention for the Crystal Report replacements. We have included a Crystal to
BI Publisher Report Conversion list below for your reference.
BI Publisher Reports Master Document
Crystal Reports to BI Publisher Cross Reference
BI REPORT NAME BI Report Description Replaces Crystal Report(s)
Units eligible to run the report
ZZGLX004 Trans Detail - Date Range NO Transaction Detail - Date Range and SHR Transaction Detail
NO and SHR
ZZGLX005 HCSD Project Approp Budget Journals HCSD Project Approp Budget Journals HCSD units
ZZGLX006 HCSD Project Budget Report by Fund HCSD Project Budget Report by Fund All campuses
ZZGLX007 HCSD Project Grant Budget Journals HCSD Project Grant Budget Journals HCSD units
ZZGLX008 Journal Line Detail Report
HCSD Journal Line Detail Report, LSUNO Journal Line Detail Report, LSUSH Journal Line Detail Report
All campuses
ZZGLX009 HCSD Project Grant Budgets for a Business Unit HCSD Project Grant Budgets for a Business Unit All campuses
ZZGLX010 Summary Drilldown - Date Range NO Summary Drilldown - Date Range and SHR Summary Drilldown - Date Range
NO and SHR
ZZGLX011 HCSD Project Master Budget Journals HCSD Project Master Budget Journals HCSD units
ZZGLX012 HCSD Project Summary Budget Report by Fund HCSD Project Summary Budget Report by Fund All campuses
ZZGLX013 HCSD All Projects Budget Report HCSD All Projects Budget Report All campuses
ZZGLX014 HCSD Approp by Business Unit HCSD Approp by Business Unit HCSD units
ZZGLX015 HCSD Single Project Budget Report HCSD Single Project Budget Report All campuses
ZZGLX016 HCSD_PROJ_MASTER_BUDGET_TO_EXP_COMPARE HCSD_PROJ_MASTER_BUDGET_TO_EXP_COMPARE All campuses
ZZGLX017 HCSD MGT JOURNAL SYS INFO by OPRID HCSD MGT JOURNAL SYS INFO by OPRID HCSD units
ZZGLX018 HCSD MGT JOURNAL SYS INFO HCSD MGT JOURNAL SYS INFO All campuses

Training Guide
9.2 PT. 8.55
Page 2
ZZGLX019 BUDGET Journal Line Detail Report BUDGET Journal Line Detail Report All campuses
ZZGLX020 HCSD Org Budget Exceptions Report - Count HCSD Org Budget Exceptions Report - Count All campuses
ZZGLX021 MGT SUMMARY - ALL GROUPS NO MGT SUMMARY - ALL GROUPS and SHR MGT SUMMARY - ALL GROUPS
NO and SHR
ZZGLX022 MGT SUMMARY - PI_DEPT - PI Prompt NO MGT SUMMARY - PI_DEPT - PI Prompt and SHR MGT SUMMARY - PI_DEPT - PI Prompt
NO and SHR
ZZGLX023 HCSD Org Budget Exceptions Report HCSD Org Budget Exceptions Report All campuses
ZZGLX024 HCSD Org Budget Report HCSD Org Budget Report All campuses
ZZGLX025 Org Budget Report By Category Org Budget Report By Category All campuses
ZZGLX026 Org Budget Report By Ctgy Total Org Budget Report By Ctgy Total All campuses
ZZGLX027 SUMMARY - DEPARTMENT EXP ROLLUP SHR SUMMARY - DEPARTMENT EXP ROLLUP All campuses
ZZGLX028 BU Summary- PROJ_DEPT-PI Prompt NO Summary- PROJ_DEPT-PI Prompt and SHR Summary - PROJ_DEPT- PI Prompt
NO and SHR
ZZGLX029 Actuals Summary AJ_NEW_SUMMARY for Dental School All campuses
ZZGLX030 MGt Summary - Fund 111 NO MGT Summary - Fund 111 All campuses
ZZGLX031 HCSD Inventory Issues by Department Detail HCSD Inventory Issues by Department Detail HCSD units
ZZGLX032 HCSD Inventory Issues by Department Summary HCSD Inventory Issues by Department Summary HCSD units
ZZGLX033 HCSD Inventory Journal Line Detail Report HCSD Inventory Journal Line Detail Report HCSD units
ZZGLX034 Monthly Journal Detail by Chartstring Journal Detail2 All campuses
ZZGLX035 HCSD Inventory Adjustments by Department Detail HCSD Inventory Adjustments by Department Detail HCSD units
ZZGLX036 HCSD Inventory Adjustments by Department Summary
HCSD Inventory Adjustments by Department Summary
HCSD units
ZZGLX037 Summary Report - Major Divisions NO MGT Summary - Major Divisions and SHR MGT Summary - Major Divisions
NO and SHR
ZZGLX038 Functional Summary Rp-by Fund NO MGT Function Summary and SHR MGT Function Summary
NO and SHR
ZZGLX039 Accounting Summary Rp- Fund113 NO MGT Accounting Summary - Fund113 and SHR MGT Accounting Summary - Fund 113
NO and SHR
ZZGLX040 Journal Report Accruals HCSD MGT JOURNAL SYS INFO ACCRU HCSD units
ZZGLX041 MGT Summary all Funds Test NO MGT SUMMARY - ALL FUNDS TEST All campuses
ZZGLX042 NO MGT SUMMARY - by DEPARTMENT NO MGT Summary - by Department and SHR MGT Summary - by Department
All campuses
ZZGLX045 MultiYear Dept Summary NO MULTIYEAR DEPT SUMMARY TEST and SH MULTIYEAR SUMMARY TEST
All campuses
ZZGLX046 HCSD Approp by Fund HCSD Approp by Fund HCSD units
ZZGLX047 HCSD Org Budget Report By CategoryTotal HCSD Org Budget Report By CategoryTotal ALL HCSD
HCSD units
ZZGLX048 HCSD Restr Fund Approp by BU HCSD RF Approp by Business Unit HCSD units

Training Guide
9.2 PT. 8.55
Page 3
ZZGLX049 HCSD RF Approp by Fund.rpt HCSD RF Approp by Fund HCSD units
ZZGLX050 Transaction Detail - Periods NO Transaction Detail and SHR Transaction Detail - Periods
NO and SHR
ZZGLX051 MGT Inventory Journal Info HCSD MGT INV Journal Info HCSD units
ZZGLX052 HCSD MGT ACCRUAL LEDGER JOURNAL INFO HCSD MGT ACCRUAL LEDGER JOURNAL INFO HCSD units
ZZGLX053 HCSD MGT JOURNAL SYS INFO APCNX HCSD MGT JOURNAL SYS INFO APCNX HCSD units
ZZGLX054 HCSD MGT JOURNAL SYS INFO APCLS HCSD MGT JOURNAL SYS INFO APCLS HCSD units
ZZGLX055 SHR MGT SUMMARY - Sum Exp by Dept (111,114, 115)
SHR MGT SUMMARY - Sum Exp by Dept (111,114, 115) LSUSH
ZZGLX056 MGT SUMMARY - Budget Bal by Direct Expenses
NO MGT Summary - Budget Bal by Direct Expense and SHR MGT Summary - Budget Bal by Direct Expenses
NO and SHR
ZZGLX057 Summary Expense Report Direct vs Indirect Cost NO_NEW_SUM_EXPENSE and SHR_IDC_Report NO and SHR
ZZGLX058 Summary - PROJ_DEPT Active NO Summary - Proj Dept Active and SH Summary - Proj Dept Active
NO and SHR
ZZGLX059 Summary Projections NO Summary Projections and SHR Summary Projections
NO and SHR
ZZGLX060 SHR Trans Detail EE ID Pr SHR Trans Detail EE ID Pr LSUSH
ZZAMX003 ZZBIP_HCSD_DIS_LINE_TABLE AM_Yearend_Dist Line (HCSD)
HCSD units
ZZAMX004 ZZBIP_HCSD_ASSET_FEMA_NBV AM HCSD Asset Fema NBV
HCSD units
ZZAMX005 ZZBIP_HCSD_ASSET_FEMA_NBV HCSD Cost Report Depreciation
HCSD units

Training Guide
9.2 PT. 8.55
Page 4
Launch PeopleSoft 9.2 PT. 8.55
Procedure
In this topic you will learn how to Launch PeopleSoft 9.2 PT. 8.55.
Step Action
1. Double-click the PS Launcher button.
2. You must access BI Publisher Reports through the PeopleSoft Financials system
Reports database.
Click the button to the right of the Database field.
3. Click the PS 9.2 Financials Reports (PS9FSRPT) list item.
4. Click the Start button.

Training Guide
9.2 PT. 8.55
Page 5
Step Action
5. A warning message displays stating this is a non-production database and any
information entered into the database will be lost.
Click the Yes button.
6. This completes Launch PeopleSoft 9.2 PT. 8.55.
End of Procedure.

Training Guide
9.2 PT. 8.55
Page 6
BI Publisher Query Report Viewer
Procedure
In this topic you will learn how to run BI Publisher Query Report Viewer.
Step Action
1. NOTE: BI Publisher Query report Viewer provides the user an opportunity to run
the report to your window in either PDF or XLS format. This option does not run
the report via the process scheduler.
Step Action
2. Click the Main Menu link.
3. Click the Reporting Tools link.
4. Click the BI Publisher link.

Training Guide
9.2 PT. 8.55
Page 7
Step Action
5. Click the Query Report Viewer link.
6. The Search by default option is Report Name. All of the LSUHSC reports as noted
in the table at the beginning of the document begin with the letter "ZZ". You may
search by entering zz into the selections box. However, in this exercise you will use
the Advanced Search to search for a report by report description.
Click the Advanced Search link.
7. Click the button to the right of the Description field.
8. Click the contains list item.
9. For this example, the report desired is the one that displays Direct Expenses
Balances Available.
Enter the desired information into the Description field. Enter "direct".
10. Click the Search button.
Training Guide
9.2 PT. 8.55
Page 8
Step Action
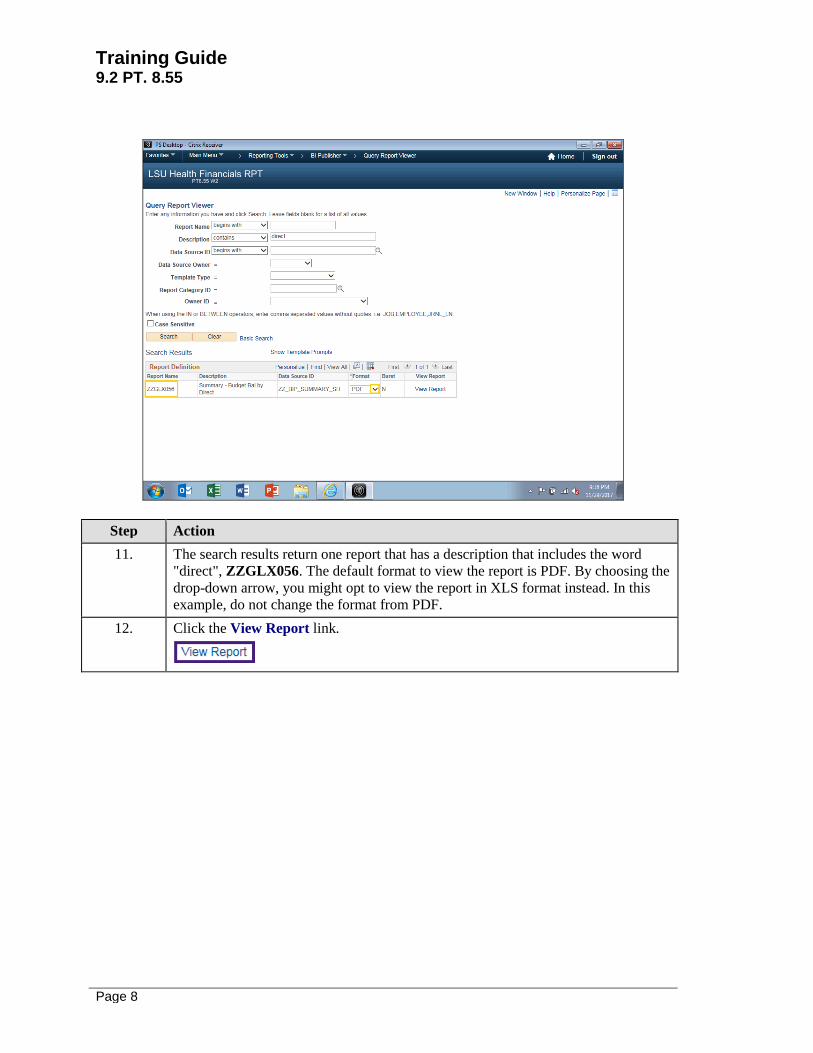
11. The search results return one report that has a description that includes the word
"direct", ZZGLX056. The default format to view the report is PDF. By choosing the
drop-down arrow, you might opt to view the report in XLS format instead. In this
example, do not change the format from PDF.
12. Click the View Report link.

Training Guide
9.2 PT. 8.55
Page 9
Step Action
13. A pop-up window displays on the screen where you must enter the prompt
parameters that you would like to include in the report.
Enter the desired information into the Business Unit field. Enter "LSUNO".
NOTE: Shreveport users should use the LSUSH Business Unit when running this
example in RPT or SND. However, if you are using the WBT, the LSUNO
Business Unit must be used.
14. Enter the desired information into the Department field. Enter "1055000".
15. Enter the desired information into the Fund Code field. Enter "%".
16. Enter the desired information into the Program Code field. Enter "%".
17. Enter the desired information into the Class Field field. Enter "%".
18. Enter the desired information into the Project field. Enter "%".
19. Enter the desired information into the Accounting Period field. Enter "2".
20. Enter the desired information into the Fiscal Year field. Enter "2018".
Training Guide
9.2 PT. 8.55
Page 10
Step Action
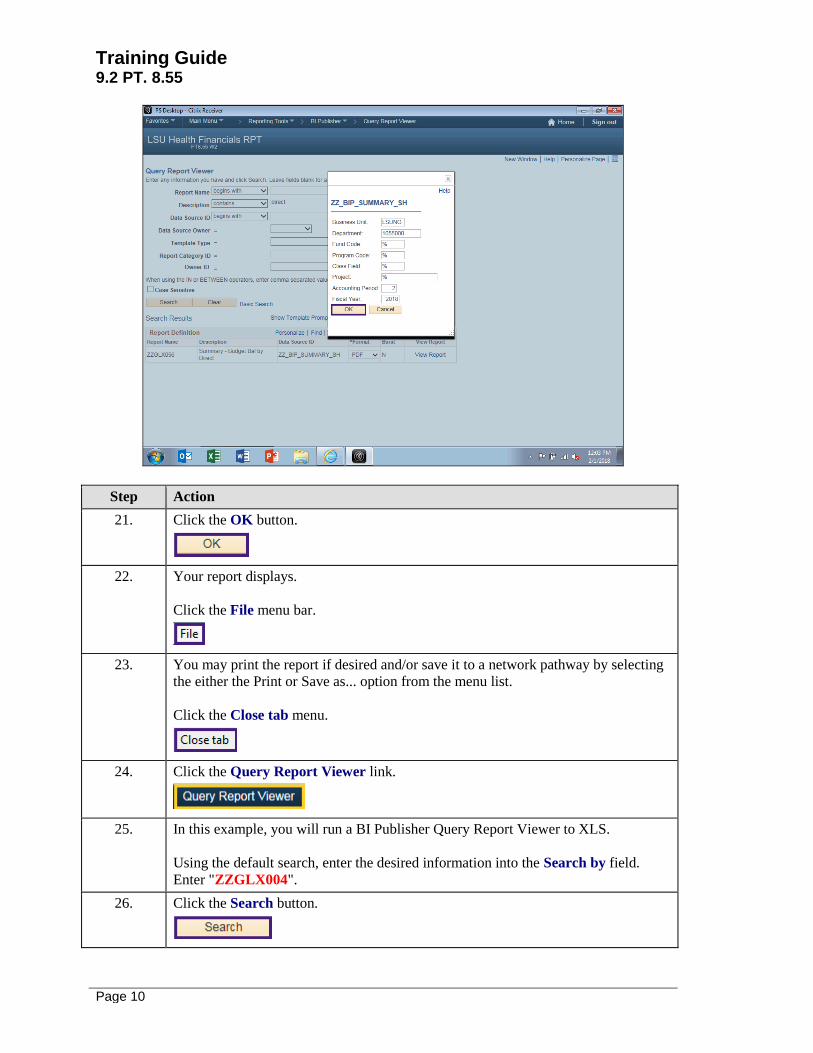
21. Click the OK button.
22. Your report displays.
Click the File menu bar.
23. You may print the report if desired and/or save it to a network pathway by selecting
the either the Print or Save as... option from the menu list.
Click the Close tab menu.
24. Click the Query Report Viewer link.
25. In this example, you will run a BI Publisher Query Report Viewer to XLS.
Using the default search, enter the desired information into the Search by field.
Enter "ZZGLX004".
26. Click the Search button.

Training Guide
9.2 PT. 8.55
Page 11
Step Action
27. Click the button to the right of the Format field.
28. Click the XLS list item.
29. Click the View Report link.
Step Action
30. The modal window for the prompt parameters displays.
Enter the desired information into the GL Business Unit field. Enter "LSUNO".
NOTE: Shreveport users should use the LSUSH Business Unit when running this
example in RPT or SND. However, if you are using the WBT, the LSUNO
Business Unit must be used.
31. Enter the desired information into the Department field. Enter "1055000".
32. Enter the desired information into the Fund Code field. Enter "%".
33. Enter the desired information into the Program Code field. Enter "%".
34. Enter the desired information into the Class Field field. Enter "%".

Training Guide
9.2 PT. 8.55
Page 12
Step Action
35. Enter the desired information into the Project field. Enter "%".
36. Enter the desired information into the Journal Date From field. Enter "09012017".
37. Enter the desired information into the To Journal Date field. Enter "11302017".
Step Action
38. Click the OK button.
Training Guide
9.2 PT. 8.55
Page 13
Step Action
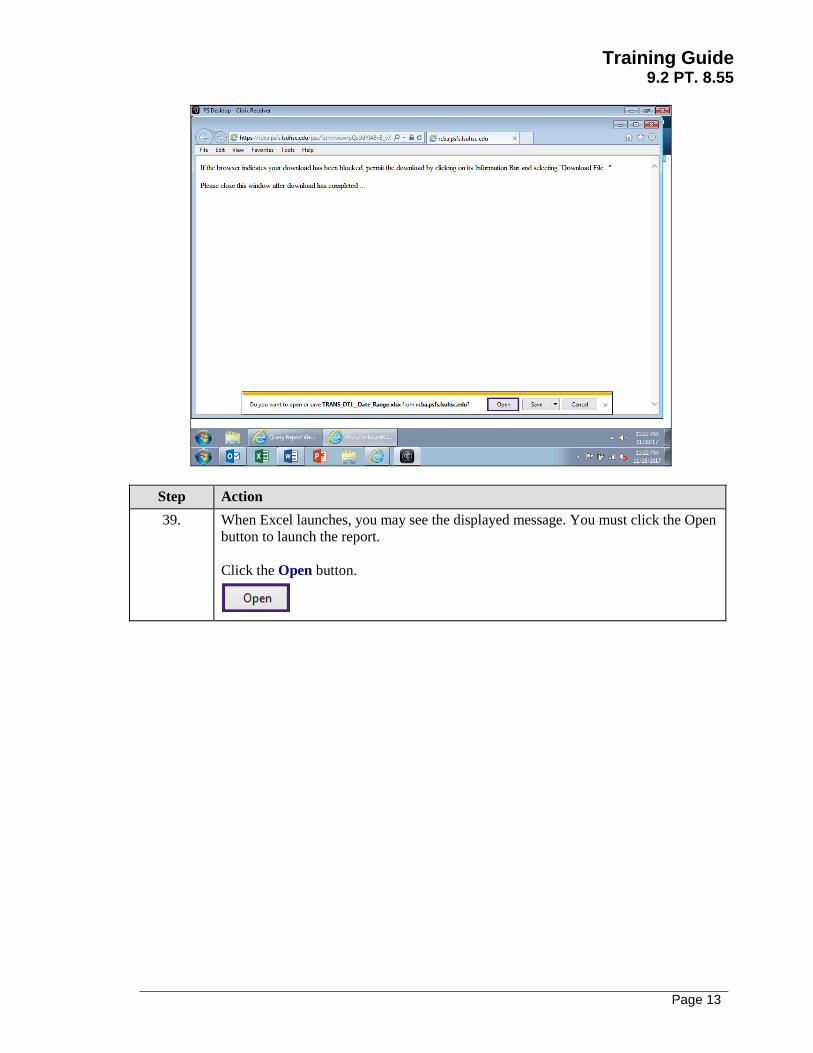
39. When Excel launches, you may see the displayed message. You must click the Open
button to launch the report.
Click the Open button.

Training Guide
9.2 PT. 8.55
Page 14
Step Action
40. NOTE: The “Protected View” defaults for the Excel files. To print, edit, or save
the excel file, you must select the Enable Editing button at the top of the screen.
Data result values are displayed in the XLS output. There are no formulas included
in the report results. To perform any additional analysis and calculations in the Excel
reports, you would need to enter formulas to perform the desired operations.
Click the Sheet 2 tab.
41. Please note that the example spreadsheet includes multiple worksheet tabs. Every
report may have different grouping structures such as by chartstring, journal id,
department, or by fund code. The report results will be grouped by that structure and
produce the amount of worksheet tabs required for all report results meeting the
grouping criteria. Please note the highlighted grouping on row 7.
Click the Sheet 3 tab.
Training Guide
9.2 PT. 8.55
Page 15
Step Action
42. Each tab represents the grouping of chartstring information displayed on the
spreadsheet. The number of tabs will vary based upon the prompt criteria entered
when running the report, the grouping methodology of the particular report, as well
as the volume of data for the prompted entries.
Click the Sheet 4 tab.
43. You may close the spreadsheet by selecting File, Close from the Excel menu or
selecting the innermost X in the top right corner of the spreadsheet page. Or to close
Excel completely, select the top X.
Click the Close button.
44. Click the Close button.
45. This completes BI Publisher Query Report Viewer.
End of Procedure.

Training Guide
9.2 PT. 8.55
Page 16
BI Publisher Query Report Scheduler
The Query Report Scheduler is used to run a report via the Process Scheduler. The BI
Query Report Scheduler is recommended for larger volumes of data. You may choose to
run the report to Window, Web (Report Manager), Email, or Print. PDF is the default
output format for the BI Publisher but, when using the BI Publisher Query Report
Scheduler, you may opt to run the report to Excel.
Procedure
In this topic you will learn how to run BI Publisher Query Report Scheduler.
Step Action
1. Click the Main Menu link.
2. Click the Reporting Tools link.
3. Click the BI Publisher link.
4. Click the Query Report Scheduler link.

Training Guide
9.2 PT. 8.55
Page 17
Step Action
5. Click the Add a New Value tab.
NOTE: In this example, you will create the run control id
BALANCE_DIRECT_EXPENSE.
6. A run control cannot contain any blank spaces or special characters, but an
underscore can be used to link words together. Your run control should not be more
than 30 characters in length.
The run control name should be meaningful to you for running the report. For
example, if you want to run the transaction Detail Report for Shreveport by Date
Range, the run control id might be called TRANS_DTL_DATERNG_ZZGLX004,
or TRNS_DTL_DATES_KAREN_WEEKLY, etc.
7. In this exercise, a sample run control id is provided for you.
Enter the desired information into the Run Control ID field. Enter
"BALANCE_DIRECT_EXPENSE".
8. Click the Add button.

Training Guide
9.2 PT. 8.55
Page 18
Step Action
9. Click the button to the right of the Data Source Type field.
10. The Data Source Type will always be Query.
Click the Query list item.
11. Use the Look up Report Definitions to search for and select a report.
Click the Look up Report Definitions button.
12. You may scroll through the list or use the Advanced Search link to search by
description for the desired report. In this example you will use a wildcard (%) and
the Lookup options to locate report ZZGLX056.
NOTE: The report name ZZGLX056 is the replacement name for the Budget
Balance Direct Expense.rpt Crystal Report.
Enter the desired information into the Search by field. Enter "%X056".

Training Guide
9.2 PT. 8.55
Page 19
Step Action
13. Click the Lookup button.
Step Action
14. Click the ZZGLX056 link.

Training Guide
9.2 PT. 8.55
Page 20
Step Action
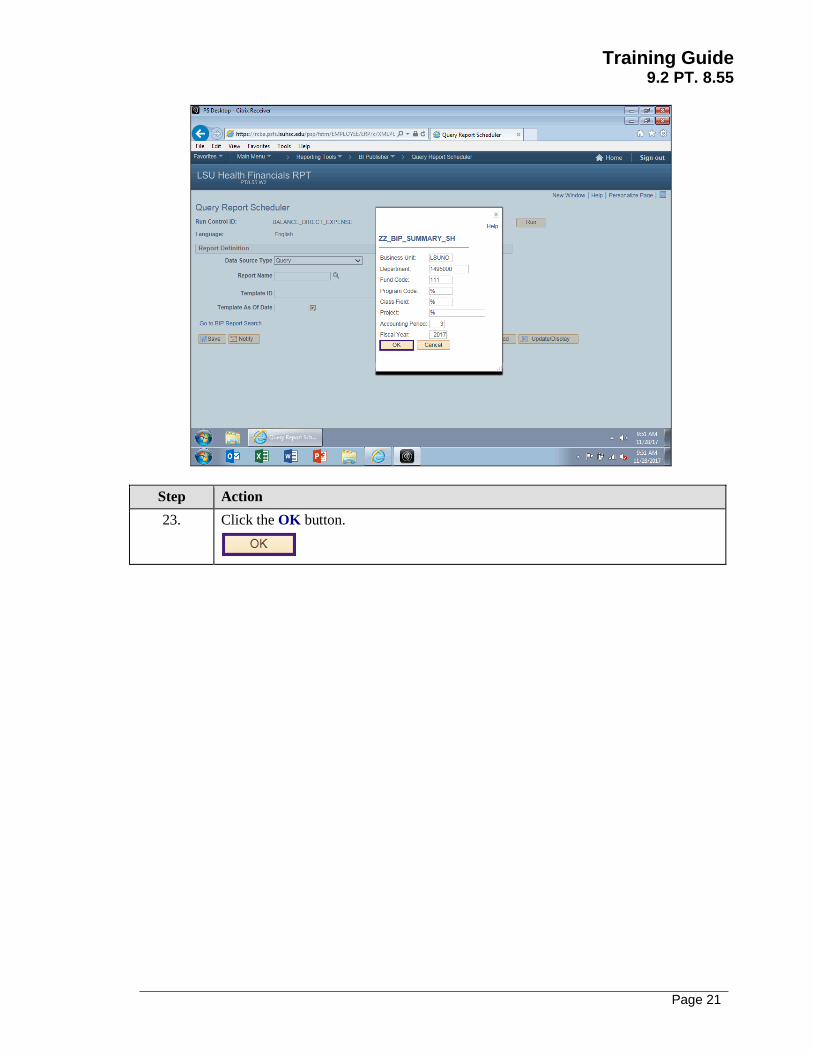
15. A pop-up box displays where you enter the prompt parameters desired for the report.
NOTE: The Business Unit must always be entered. The available Business Units
are: HCSDA – HCSD Administration
LAKMC – Lallie Kemp
LSUNO – LSU Health New Orleans
LSUSH – LSU Health Shreveport
Enter the desired information into the Business Unit field. Enter "LSUNO".
16. Enter the desired information into the Department field. Enter "1495000".
17. Enter the desired information into the Fund Code field. Enter "111".
18. Enter the desired information into the Program Code field. Enter "%".
19. Enter the desired information into the Class Field field. Enter "%".
20. Enter the desired information into the Project field. Enter "%".
21. Enter the desired information into the Accounting Period field. Enter "3".
22. Enter the desired information into the Fiscal Year field. Enter "2017".
Training Guide
9.2 PT. 8.55
Page 21
Step Action
23. Click the OK button.

Training Guide
9.2 PT. 8.55
Page 22
Step Action
24. The Query Report Scheduler page is now populated with the Report Name,
Template ID, and the parameters you selected.
Click the Save button.
25. You can create another run control for another report by clicking the Add button at
the bottom of the page. Click the Update/Display button to run a report for which a
run control has already been created.
26. NOTE: The blue link called Go to BIP Report Search may only be accessed by the
Report Development Team. End-users will receive the security message that "You
are not authorized to access this component" if the link is selected.
27. Click the Run button.
28. Click the button to the right of the Server Name field.
29. Click the PSNT list item.
30. Verify that the BI Publisher Query Report is checked.

Training Guide
9.2 PT. 8.55
Page 23
Step Action
31. Click the button to the right of the Type field.
32. The Type options are Email, File, Printer, Web, and Window.
• Email – If you select this option, you must then select the Distribution link and
enter the email address for each user to whom you will send the report.
• File – DO NOT USE – This would write the report to the process scheduler server
where you would be unable to access the file.
• Printer – If you choose to send the report directly to the printer, you must then
select the Output Destination printer where the report will be directed.
• Web – Web is the default option. The report will run and post to the Report
Repository Manager within PeopleSoft where you may access the file.
• Window – If you choose Window, the report will open a new window and process
on the screen (very similar to Window option in nVision). The report will also post
to the Report Manager where you may access the data until the repository is cleared.
33. Click the button to the right of the Format field.
34. PDF is the default option, but you may also choose to run the report to XLS format
for Excel. The HTM and RTF format are for report developers only.
35. The Distribution link is used to specify the email distribution of your report output
if email is the selected Type.
Click the Distribution link.

Training Guide
9.2 PT. 8.55
Page 24
Step Action
36. The Distribution Detail page will be grayed out if email is not the selected Type
option.
Enter the desired information into the Email Subject field. Enter "BI REPORT
EMAIL EXAMPLE".
37. Enter the desired information into the Message Text field. Enter "This is the BI
Publisher Report we discussed".
38. Enter the desired information into the Email Address List field. Enter
"[email protected], [email protected]".
NOTE: If multiple email address are entered, make sure the addresses are
separated by a comma.
39. If you were emailing this report, you would click the OK button.
For training purposes only, click the Cancel button.
40. As previously stated, the Default Type is Web and the Format is PDF. This
indicates that the report will produce a PDF file on the Report Repository Manager
page for you to access.
Click the OK button.

Training Guide
9.2 PT. 8.55
Page 25
Step Action
41. You are returned to the Query Report Scheduler page. Notice the Process Instance
number is displayed under the Process Monitor link.
Step Action
42. Please note the link called Update Parameters above the prompt entries. The next
time you navigate to Query Report Scheduler for this report, these prompt values
will be displayed. By selecting the Update Parameters link, you may modify the
prompts to run the report for another department, project, etc.
43. Click the Process Monitor link.
44. You want the Run Status = Success and the Distribution Status = Posted. Click
the Refresh button every 10 - 15 seconds until the appropriate statuses have been
posted.
Click the Go back to Query Report Scheduler link.
45. Click the Report Manager link.
Training Guide
9.2 PT. 8.55
Page 26
Step Action
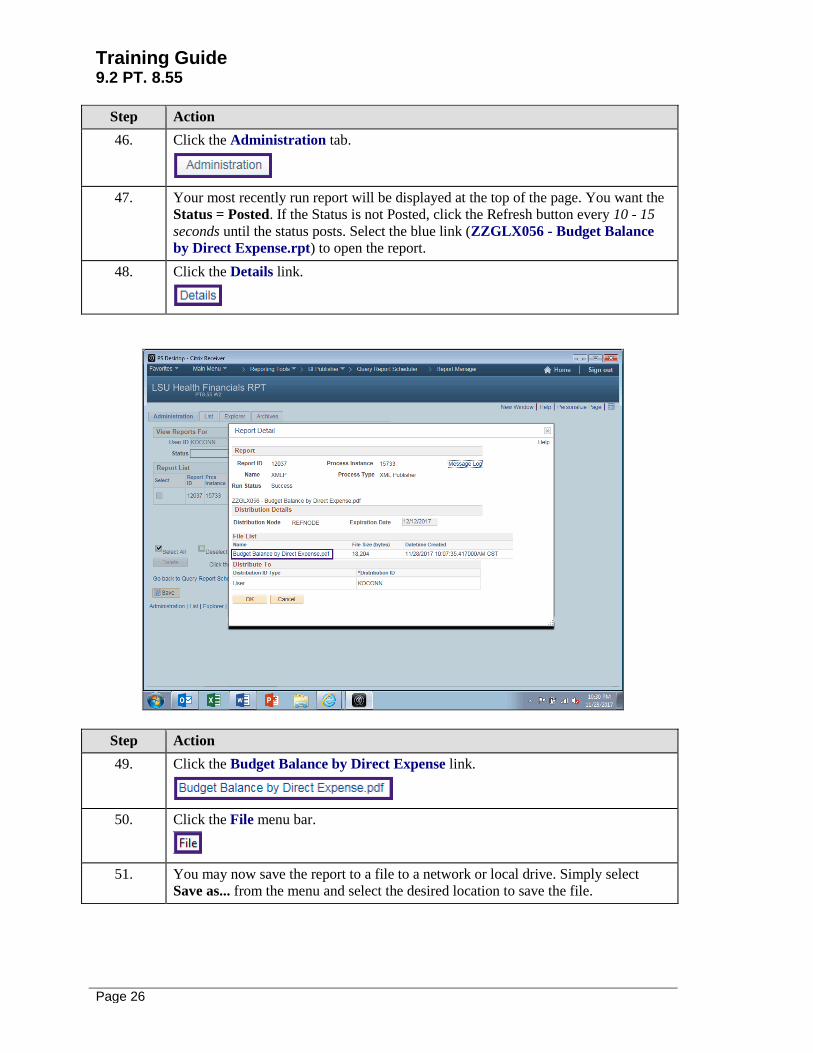
46. Click the Administration tab.
47. Your most recently run report will be displayed at the top of the page. You want the
Status = Posted. If the Status is not Posted, click the Refresh button every 10 - 15
seconds until the status posts. Select the blue link (ZZGLX056 - Budget Balance
by Direct Expense.rpt) to open the report.
48. Click the Details link.
Step Action
49. Click the Budget Balance by Direct Expense link.
50. Click the File menu bar.
51. You may now save the report to a file to a network or local drive. Simply select
Save as... from the menu and select the desired location to save the file.
Training Guide
9.2 PT. 8.55
Page 27
Step Action
52. You may print the document. Although many of the reports are created on legal size
paper due to the large amount of data included, it is much easier to pint the report on
letter sized paper in BI Publisher than it was in Crystal Reports.
Click the Print menu.
53. Simply select the desired paper size, the printer, and then click the Print button.
For training purposes only, click the Cancel button.
54. NOTE: After you have completed printing or saving your report, close the report
by selecting File, Close.
Click the File menu bar.
55. Click the Close tab menu.
56. You are returned to the Report Details page.
Click the OK button.
57. Click the Home link.
58. If you later decide you wish to reopen that report, simply navigate to the Report
Manager and select the Report link.
Click the Main Menu link.
59. Click the Reporting Tools link.
60. Click the Report Manager link.

Training Guide
9.2 PT. 8.55
Page 28
Step Action
61. Your report displays.
Click the Reporting Tools link to search for existing run control ids.
62. Click the BI Publisher link.
63. Click the Query Report Scheduler link.
64. You can rerun a report using the same run control id.
Click the Search button.
65. Your available run control ids will display at the bottom of the page.
Click the BALANCE_DIRECT_EXPENSE link.

Training Guide
9.2 PT. 8.55
Page 29
Step Action
66. You can change your parameters using the Update Parameters link.
Click the Update Parameters link.
Training Guide
9.2 PT. 8.55
Page 30
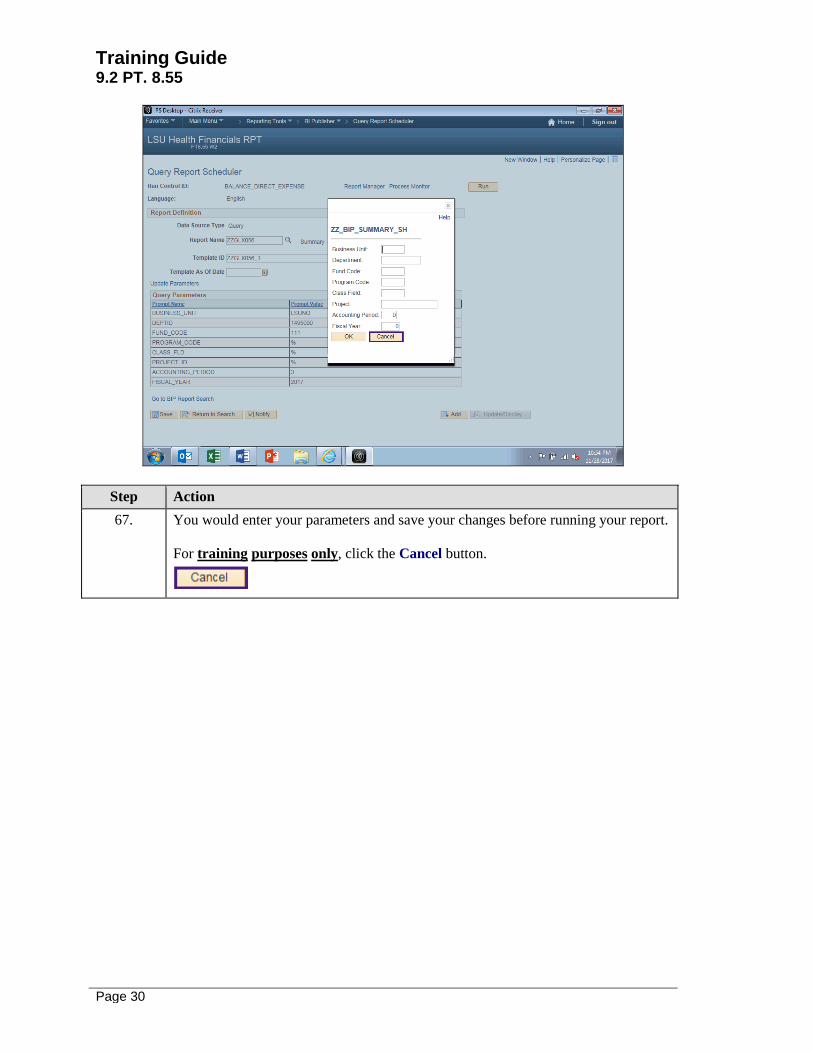
Step Action
67. You would enter your parameters and save your changes before running your report.
For training purposes only, click the Cancel button.

Training Guide
9.2 PT. 8.55
Page 31
Step Action
68. You can search for another report using the Look Up Report Definitions option.
Click the Look up Report Definitions button.
69. Use the Advanced Search option to search for a report by description.
Enter the desired information into the field. Enter "ZZGLX046".

Training Guide
9.2 PT. 8.55
Page 32
Step Action
70. Click the Lookup button.
71. Click the ZZGLX046 link.
72. Click the Cancel button.

Training Guide
9.2 PT. 8.55
Page 33
Step Action
73. Use the Return to Search button to search for and select additional run control ids.
Click the Return to Search button.
74. Click the No button.
75. If your existing run control ids are not displayed, click the Search button to view
them. Or click the Add a New Value tab to create a new run control.
76. This completes BI Publisher Query Report Scheduler.
End of Procedure.