bi4dynamics ax installation manual · bi4dynamics ax installation manual bi4dynamics ax 5.0.0 ......
TRANSCRIPT
BI4Dynamics AX
Installation Manual
BI4Dynamics AX 5.0.0
Document version 1.1
Last update: July 2016
Installation Manual BI4Dynamics AX Page 1
CONTENTS 1. Install BI4Dynamics.................................................................................................................................... 2
2. CreatE a new instance in BI4Dynamics...................................................................................................... 6
Step 1: Enter License ................................................................................................................................. 6
Step 2: New Instance ................................................................................................................................. 7
Step 3: Add Data Sources .......................................................................................................................... 8
Step 4: Global dimension ........................................................................................................................ 13
Step 5 Select Companies ......................................................................................................................... 14
Step 6 Select Modules ............................................................................................................................. 16
Step 7 Run ............................................................................................................................................... 17
Step 8 Completion ................................................................................................................................... 19

Installation Manual BI4Dynamics AX Page 2
1. INSTALL BI4DYNAMICS
To create an AX instance inside BI4Dynamics, you must have BI4Dynamics AX installed. To
do so follow the following steps. Important: BI4Dynamics must be installed on the server
where the instance will be deployed.
1. Double click BI4DynamicsAX.exe to start the installation
Note: the name of the file varies on the version your using.
2. Follow the instructions on the screen.
3. Accept the license agreement

Installation Manual BI4Dynamics AX Page 3
4. The installer will check for some of the prerequisites. If you fail any of the tests you
can click on the result to see the error. When one of the Management Objects is
not installed, you should click the Install button to install those. You have to fix the
problem before you rerun the test. Once all the tests are successfully completed
you can continue with the installation.
5. Select the folder where you would like to install BI4Dynamics. You can choose to
create a shortcut on the desktop or in the start menu.
Installation Manual BI4Dynamics AX Page 4
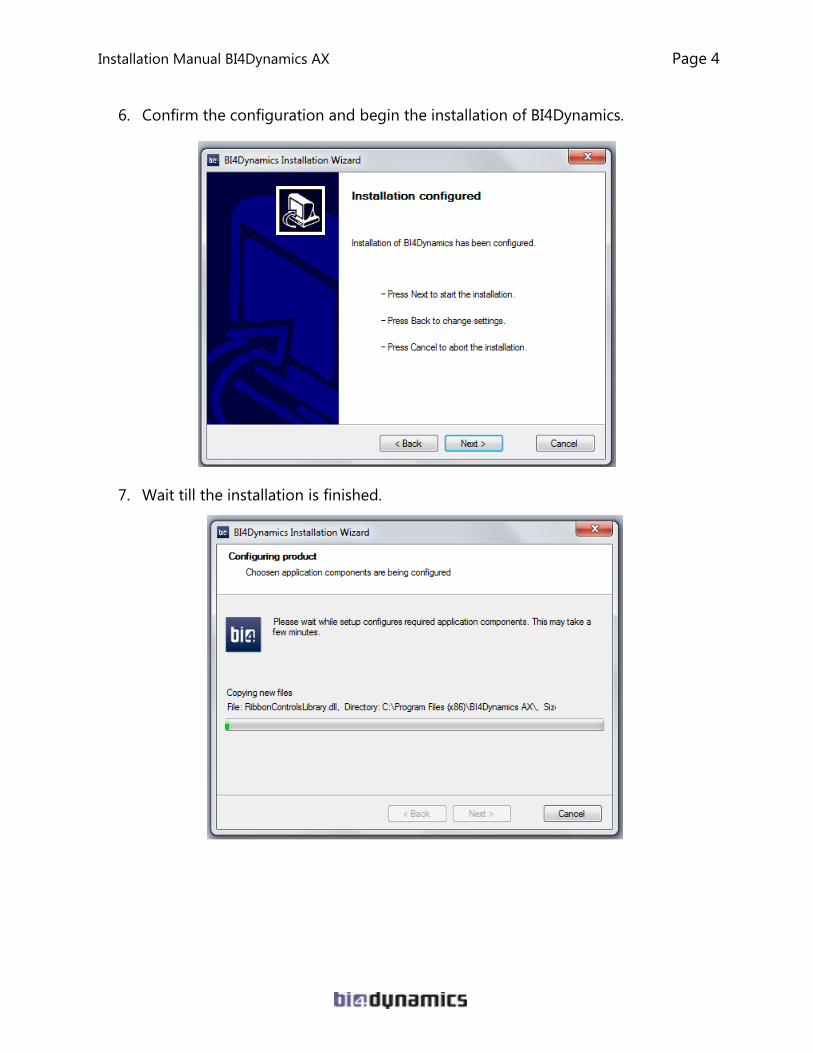
6. Confirm the configuration and begin the installation of BI4Dynamics.
7. Wait till the installation is finished.

Installation Manual BI4Dynamics AX Page 5
8. Click finish after the installation is completed.
Installation Manual BI4Dynamics AX Page 6
2. CREATE A NEW INSTANCE IN BI4DYNAMICS
1. Click the Start button. Then type BI4Dynamics > BI4Dynamics AX
Note: If you have admin rights right-click > run as admin.
2. The Instance Wizard helps you create the instance. Follow the instruction it
provides.
Note: If the Instance Wizard doesn’t automatically start go to File > New to start the
Instance Wizard.
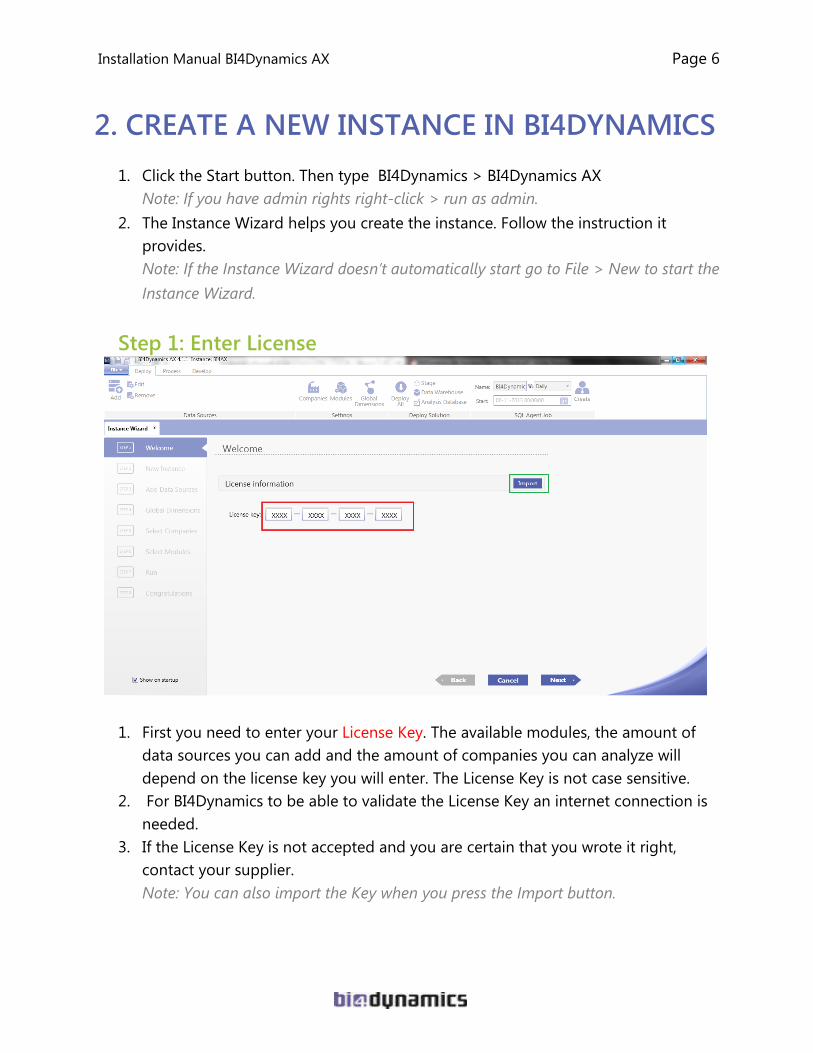
Step 1: Enter License
1. First you need to enter your License Key. The available modules, the amount of
data sources you can add and the amount of companies you can analyze will
depend on the license key you will enter. The License Key is not case sensitive.
2. For BI4Dynamics to be able to validate the License Key an internet connection is
needed.
3. If the License Key is not accepted and you are certain that you wrote it right,
contact your supplier.
Note: You can also import the Key when you press the Import button.
Installation Manual BI4Dynamics AX Page 7
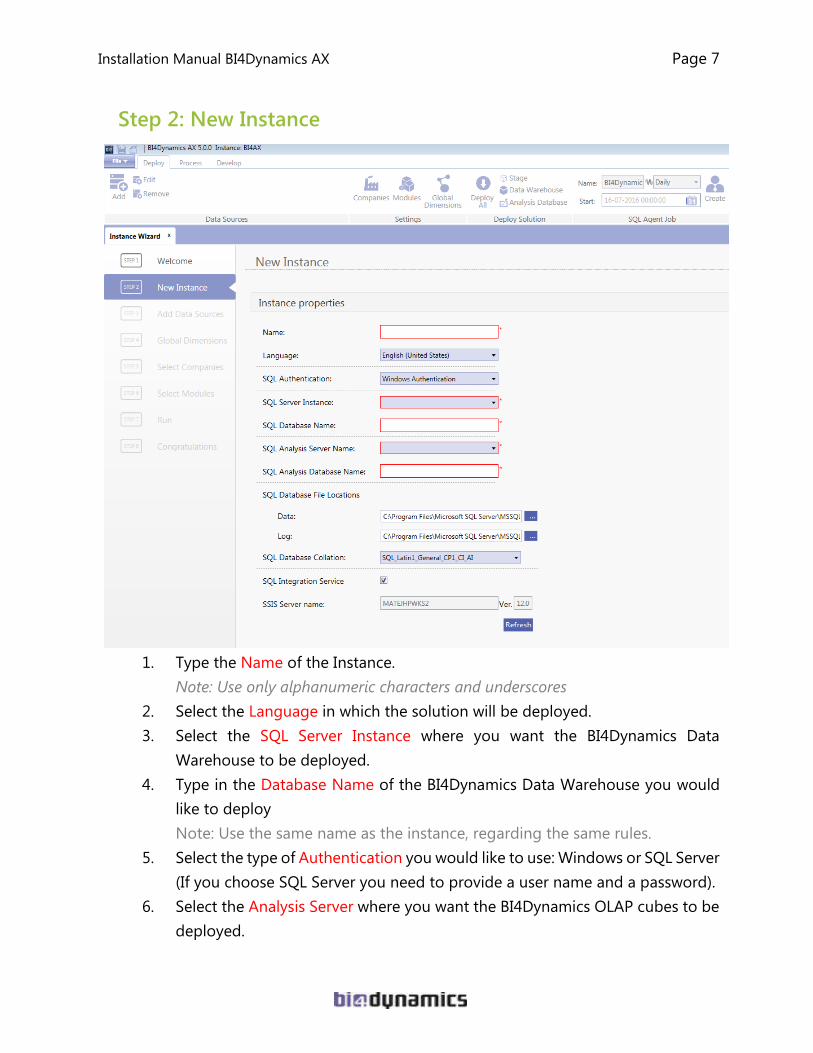
Step 2: New Instance
1. Type the Name of the Instance.
Note: Use only alphanumeric characters and underscores
2. Select the Language in which the solution will be deployed.
3. Select the SQL Server Instance where you want the BI4Dynamics Data
Warehouse to be deployed.
4. Type in the Database Name of the BI4Dynamics Data Warehouse you would
like to deploy
Note: Use the same name as the instance, regarding the same rules.
5. Select the type of Authentication you would like to use: Windows or SQL Server
(If you choose SQL Server you need to provide a user name and a password).
6. Select the Analysis Server where you want the BI4Dynamics OLAP cubes to be
deployed.

Installation Manual BI4Dynamics AX Page 8
7. Type in the Analysis Database Name you want to use for the BI4Dynamics
OLAP cubes.
Note: We advise you use the same name as the Database name
8. Select the SQL Database Collation of the BI4Dynamics Data Warehouse.
9. Option to process Data Warehouse using SQL Server Integration Services.
User interface should automatically detect SSIS Server name and version
Processing with SQL Server Integration services can always be turned on/off by
editing the property in the instance menu (File Edit Options)
Installation Manual BI4Dynamics AX Page 9
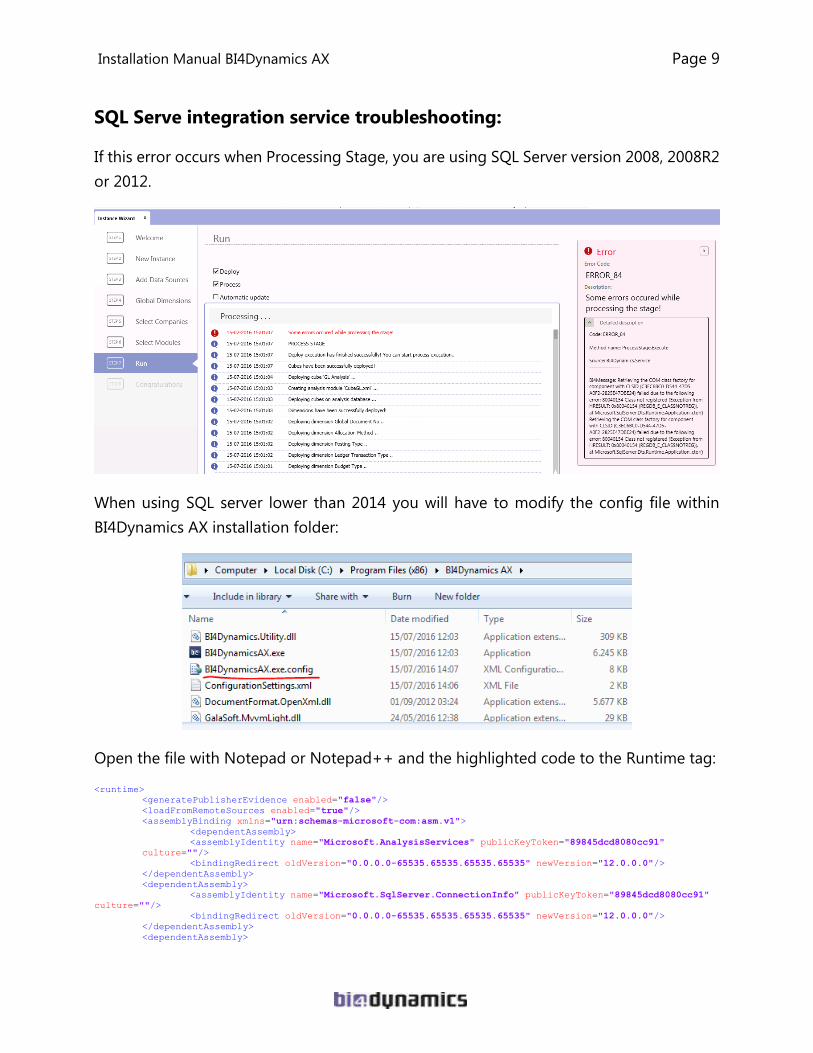
SQL Serve integration service troubleshooting:
If this error occurs when Processing Stage, you are using SQL Server version 2008, 2008R2
or 2012.
When using SQL server lower than 2014 you will have to modify the config file within
BI4Dynamics AX installation folder:
Open the file with Notepad or Notepad++ and the highlighted code to the Runtime tag:
<runtime>
<generatePublisherEvidence enabled="false"/>
<loadFromRemoteSources enabled="true"/>
<assemblyBinding xmlns="urn:schemas-microsoft-com:asm.v1">
<dependentAssembly>
<assemblyIdentity name="Microsoft.AnalysisServices" publicKeyToken="89845dcd8080cc91"
culture=""/>
<bindingRedirect oldVersion="0.0.0.0-65535.65535.65535.65535" newVersion="12.0.0.0"/>
</dependentAssembly>
<dependentAssembly>
<assemblyIdentity name="Microsoft.SqlServer.ConnectionInfo" publicKeyToken="89845dcd8080cc91"
culture=""/>
<bindingRedirect oldVersion="0.0.0.0-65535.65535.65535.65535" newVersion="12.0.0.0"/>
</dependentAssembly>
<dependentAssembly>

Installation Manual BI4Dynamics AX Page 10
<assemblyIdentity name="Microsoft.SqlServer.Managment.Sdk.Sfc"
publicKeyToken="89845dcd8080cc91" culture=""/>
<bindingRedirect oldVersion="0.0.0.0-65535.65535.65535.65535" newVersion="12.0.0.0"/>
</dependentAssembly>
<dependentAssembly>
<assemblyIdentity name="Microsoft.SqlServer.Smo" publicKeyToken="89845dcd8080cc91"
culture=""/>
<bindingRedirect oldVersion="0.0.0.0-65535.65535.65535.65535" newVersion="12.0.0.0"/>
</dependentAssembly>
<dependentAssembly>
<assemblyIdentity name="Microsoft.SqlServer.SqlEnum" publicKeyToken="89845dcd8080cc91"
culture=""/>
<bindingRedirect oldVersion="0.0.0.0-65535.65535.65535.65535" newVersion="12.0.0.0"/>
</dependentAssembly>
<dependentAssembly>
<assemblyIdentity name="Microsoft.SQLServer.ManagedDTS" publicKeyToken="89845dcd8080cc91"
culture=""/>
<bindingRedirect oldVersion="0.0.0.0-65535.65535.65535.65535" newVersion="10.0.0.0"/>
</dependentAssembly>
<dependentAssembly>
<assemblyIdentity name="Microsoft.SqlServer.SQLTask" publicKeyToken="89845dcd8080cc91"
culture=""/>
<bindingRedirect oldVersion="0.0.0.0-65535.65535.65535.65535" newVersion="10.0.0.0"/>
</dependentAssembly>
<dependentAssembly>
<assemblyIdentity name="Microsoft.SQLServer.DTSRuntimeWrap" publicKeyToken="89845dcd8080cc91"
culture=""/>
<bindingRedirect oldVersion="0.0.0.0-65535.65535.65535.65535" newVersion="10.0.0.0"/>
</dependentAssembly>
<dependentAssembly>
<assemblyIdentity name="Microsoft.SqlServer.SQLTaskConnectionsWrap"
publicKeyToken="89845dcd8080cc91" culture=""/>
<bindingRedirect oldVersion="0.0.0.0-65535.65535.65535.65535" newVersion="10.0.0.0"/>
</dependentAssembly>
</assemblyBinding>
</runtime>
When using SQL 2012, please change the red part of the script ("10.0.0.0") to ("11.0.0.0").
IMPORTANT: BI4Dynamics team can help you with this customization. If you need any
help, please contact BI4Dynamics support team at [email protected] or
your local BI4Dynamics partner.

Installation Manual BI4Dynamics AX Page 11
Step 3: Add Data Sources
1. Select the Data Source Version of the AX database.
2. Select the SQL Server Instance, where the AX database is located.
3. Select the Database Name of the AX database.
4. Choose Authentication type: Windows or SQL Server (with SQL server
authentication you also need to provide your user name and password).
5. Check Azure Data Source if you are using Azure (hosted service)
6. Test the connection to the SQL database. If the connection is successful proceed
is it’s not you need to change your settings.
7. If your Data Source Version is AX2012 or higher you could connect to AX services
and/or Business Connector.
8. When finished press the Add Data Source button.
Installation Manual BI4Dynamics AX Page 12
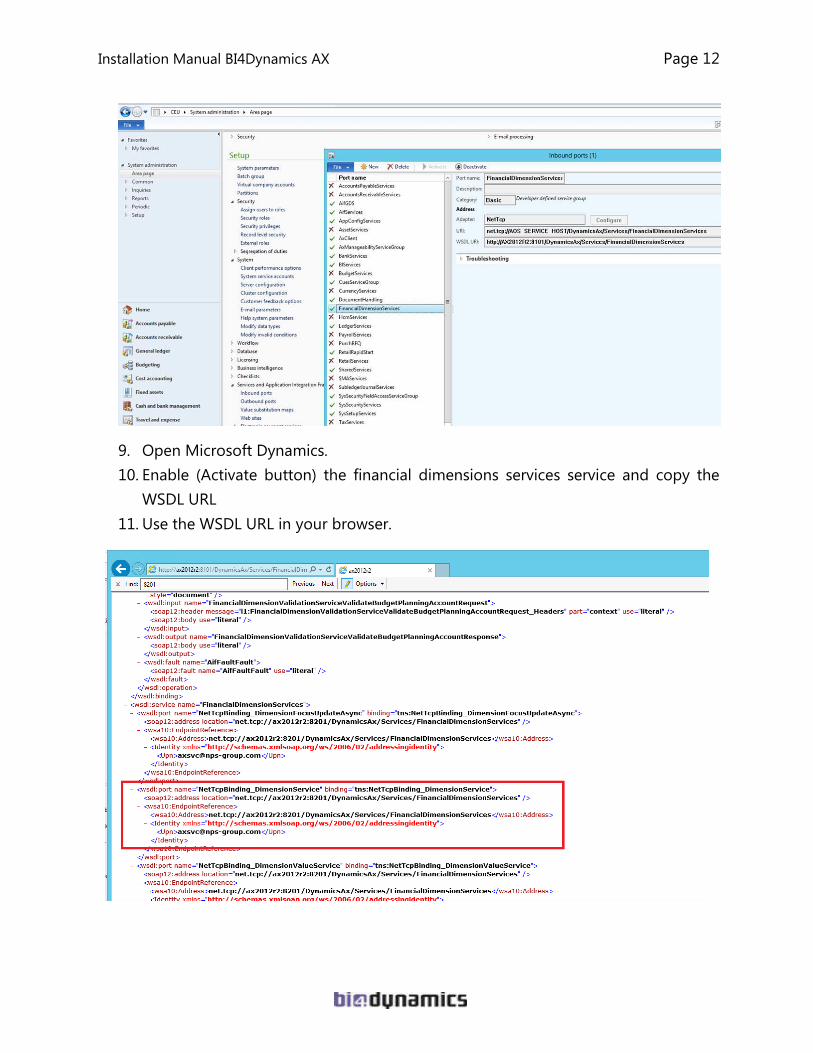
9. Open Microsoft Dynamics.
10. Enable (Activate button) the financial dimensions services service and copy the
WSDL URL
11. Use the WSDL URL in your browser.

Installation Manual BI4Dynamics AX Page 13
12. Extract the port number and (in address location) and Business Connector account (upn)
from the WSD in your browser.
13. Fill in the setting in the settings of the DataSource in BI4Dynamics
Step 4: Global dimension

Installation Manual BI4Dynamics AX Page 14
1. You could change the Name of the Global Financial / Global Item Dimensions.
The name you choose will be the name of the dimension in the Database and in
the OLAP Cubes.
2. You could add additional Dimensions.
3. You could delete not needed Dimensions.
Step 5 Select Companies
1. From the list of companies select the ones you want to include in your instance.
2. Then you need to configure the settings for each selected company.

Installation Manual BI4Dynamics AX Page 15
3. Select the Local Currency. This is the currency that is used by the selected company.
4. Select the Additional Currency. This is the currency that is selected by the customer
/ user.
5. Connect the Financial Dimension of the selected Company to a Global Financial
Dimension that is defined by us.
6. Connect the Item Dimension of the selected Company to a Global Item Dimension
that is defined by us.
7. You could add an additional dimension or remove one. This will not influence the
defined Global Dimensions or the Dimensions in the Source Database. If you add
more Dimensions then there are Global Dimensions these cannot be linked and will
be useless.
Installation Manual BI4Dynamics AX Page 16
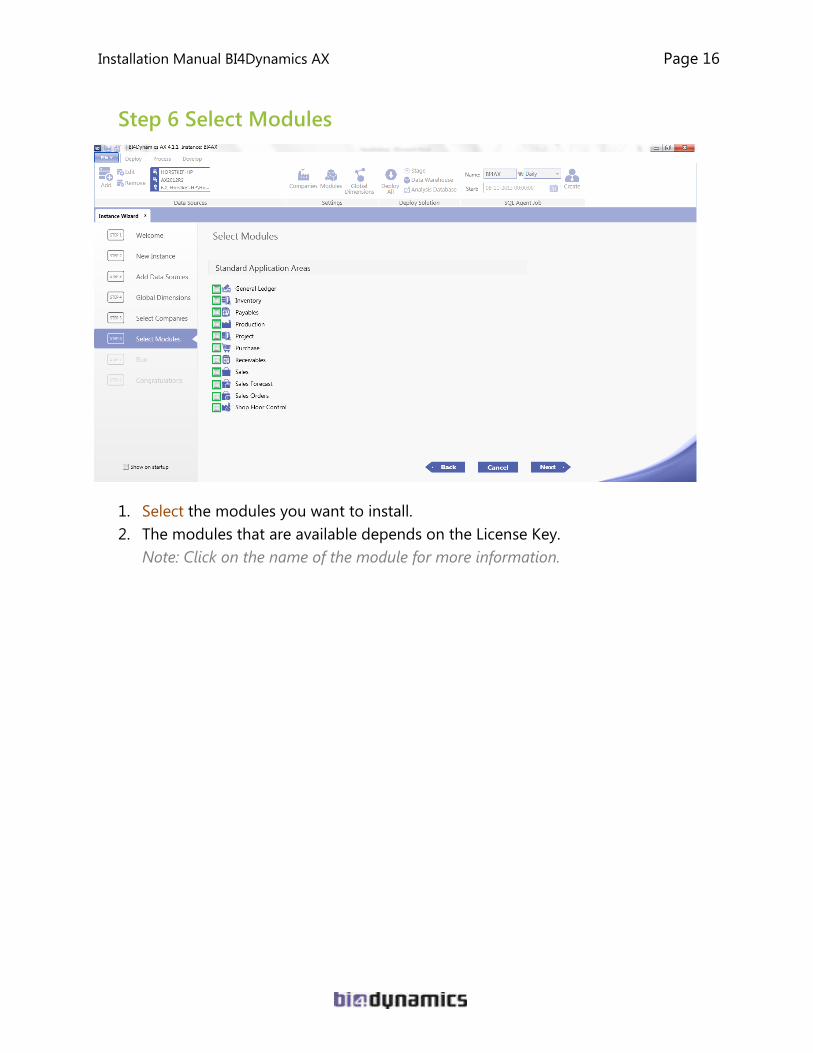
Step 6 Select Modules
1. Select the modules you want to install.
2. The modules that are available depends on the License Key.
Note: Click on the name of the module for more information.

Installation Manual BI4Dynamics AX Page 17
Step 7 Run
1. If you have made some custom scripts that you need for this instance, Deselect Deploy
and Process. If you do not need any custom scripts leave it selected.
2. Type the name of the SQL Job.
3. Select the frequency of the SQL Job.
4. Select the start date of the SQL Job.
5. Click the run button.

Installation Manual BI4Dynamics AX Page 18
6. When there already is a database with the same name of the BI4Dynamics database
on the SQL server you will get this error message. You need to change the Name of
the BI4Dynamics database (Step 2) or contact the system administrator.

Installation Manual BI4Dynamics AX Page 19
7. When there already is an Analysis database with the same name of the BI4Dynamics
Analysis database on the SQL server you will get this error message. You need to
change the Name of the BI4Dynamics Analysis database (Step 2) or contact the system
administrator.
Step 8 Completion
The Data Warehouse is successfully deployed. If you don’t need any custom scripts the
instance is finished, if you do need some custom scripts you can now start to include
them.