bioretention stormwater management practices level 1 ... · look for areas that are uphill from the...
TRANSCRIPT

Page 1 of 8
BR Drainage Area Look for areas that are uphill from the Bioretention cell. Problem (Check if Present) Follow-Up Actions
Bare soil, erosion of the ground (rills washing out the dirt)
Seed and mulch areas of bare soil to establish vegetation.
Fill in erosion areas with soil, compact, and seed and straw to establish vegetation.
If a rill or small channel is forming, try to redirect water flowing to this area by creating a small berm or adding topsoil to areas that are heavily compacted.
Other:
Bioretention Stormwater Management Practices Level 1 Inspection Checklist
SMP ID # SMP Owner Private
Public
SMP Location (Address; Latitude & Longitude)
Latitude Longitude
Party Responsible for Maintenance System Type Type of Site
Same as SMP Owner
Other
_________________________
Seasonal
Continuous Use
Other
Above Ground
Below Ground
Commercial
Industrial
Residential
State
Inspection Date Inspection Time
Inspector
Date of Last Inspection

Page 2 of 8
BR Drainage Area Look for areas that are uphill from the Bioretention cell. Problem (Check if Present) Follow-Up Actions
Kick-Out to Level 2 Inspection: Large areas of soil have been eroded, or larger channels are forming. May require rerouting of flow paths.
Piles of grass clippings, mulch, dirt, salt, or other materials
Remove or cover piles of grass clippings, mulch, dirt, etc.
Other:
Open containers of oil, grease, paint, or other substances
Cover or properly dispose of materials; consult your local solid waste authority for guidance on materials that may be toxic or hazardous.
Other:

Page 3 of 8
BR Inlets
Stand in the Bioretention cell itself and look for all the places where water flows in. Often there will be multiple points of inflow to the practice.
Problem (Check if Present) Follow-Up Actions
Inlets collect grit and debris or grass/weeds.
Some water may not be getting into the Bioretention cell. The objective is to have a clear pathway for water to flow into the cell.
Use a flat shovel to remove grit and debris (especially at curb inlets or openings). Parking lots generate fine grit that will accumulate at these spots.
Pull out clumps of growing grass or weeds and scoop out the soil or grit that the plants are growing in.
Remove any grass clippings, leaves, sticks, and other debris that is collecting at inlets.
For pipes and ditches, remove sediment and debris that is partially blocking the pipe or ditch opening where it enters the Bioretention cell.
Dispose of all material properly where it will not re-enter the Bioretention cell.
Other:
Kick-Out to Level 2 Inspection: Inlets are blocked to the extent that most of the water does not seem to be entering the Bioretention cell.
Some or all of the inlets are eroding so that
rills, gullies, and other erosion is present, or there is bare dirt that is washing into the Bioretention cell.
For small areas of erosion, smooth out the eroded part and apply rock or stone (e.g., river cobble) to prevent further erosion. Usually, filter fabric is placed under the rock or stone.
In some cases, reseeding and applying erosion-control matting can be used to prevent further erosion. Some of these materials may be available at a garden center, but it may be best to consult a landscape contractor.
Other:
Kick-Out to Level 2 Inspection: Erosion is occurring at most of the inlets, and it looks like there is too much water that is concentrating at these points. The inlet design may have to be modified.

Page 4 of 8
BR Ponding Area
Examine the entire Bioretention surface and side slopes
Problem (Check if Present) Follow-Up Actions
Mulch (if used) needs to be replaced or
replenished. The mulch layer had decomposed or is less than 1-inch thick.
Add new mulch to a total depth (including any existing mulch that is left) of 2 to 3 inches. The mulch should be shredded hardwood mulch that is less likely to float away during rainstorms.
Avoid adding too much mulch so that inlets are obstructed or certain areas become higher than the rest of the Bioretention surface.
Other:
Minor areas of sediment, grit, trash, or other
debris are accumulating on the bottom.
Use a shovel to scoop out minor areas of sediment or grit, especially in the spring after winter sanding materials may wash in and accumulate. Dispose of the material where it cannot re-enter the Bioretention cell .
If removing the material creates a hole or low area, fill with soil mix that matches original mix and cover with mulch so that the Bioretention surface area is as flat as possible.
Remove trash, vegetative debris, and other undesirable materials. Other:
Kick-Out to Level 2 Inspection: Sediment has accumulated more than 2-inches deep and covers 25% or more of the Bioretention surface.
Kick-Out to Level 2 Inspection: The Bioretention cell is too densely vegetated to assess sediment accumulation or ponding; see BR-4, Vegetation.

Page 5 of 8
BR Ponding Area
Examine the entire Bioretention surface and side slopes
Problem (Check if Present) Follow-Up Actions
There is erosion in the bottom or on the side
slopes. Water seems to be carving out rills as it flows across the Bioretention surface or on the slopes, or sinkholes are forming in certain areas.
Source: Stormwater Maintenance, LLC.
Try filling the eroded areas with clean topsoil or sand, and cover with mulch.
If the problem recurs, you may have to use stone (e.g., river cobble) to fill in problem areas.
If the erosion is on a side slope, fill with clay that can be compacted and seed and mulch the area.
Other:
Kick-Out to Level 2 Inspection: The problem persists or the erosion is more than 3-inches deep and seems to be an issue with how water enters and moves through the Bioretention cell.
Kick-Out to Level 2 Inspection: The problem does not seem to be caused by flowing water, but a collapse or sinking of the surface (e.g., “sinkhole”) due to some underground problem.
The bottom of the Bioretention cell is not flat,
and the water pools at one end, along an edge, or in certain pockets. The whole bottom is not uniformly covered with water. See design plan to verify that bioretention surface is intended to be flat. Check during or immediately after a rainstorm.
If the problem is minor (just small, isolated areas are not covered with water), try raking the surface OR adding mulch to low spots to create a more level surface. You may need to remove and replace plantings in order to properly even off the surface.
Check the surface with a string and bubble level to get the surface as flat as possible.
Other:
Kick-Out to Level 2 Inspection: Ponding water is isolated to less than half of the Bioretention surface area, and there seem to be elevation differences of more than a couple of inches across the surface.

Page 6 of 8
BR Ponding Area
Examine the entire Bioretention surface and side slopes
Problem (Check if Present) Follow-Up Actions
Water stands on the surface more than 72
hours after a rainstorm and /or wetland-type vegetation is present. The Bioretention cell does not appear to be draining properly.
Kick-Out to Level 2 Inspection: This is generally a serious problem, and it will be necessary to activate a Level 2 Inspection.
BR Vegetation
Examine all Bioretention cell vegetation.
Problem (Check if Present) Follow-Up Actions
Vegetation requires regular maintenance—pulling
weeds, removing dead and diseased plants, replacing mulch around plants, adding plants to fill in areas that are not well vegetated, etc.
If you can identify which plants are weeds or not intended to be part of the planting plan, eliminate these, preferably by hand pulling.
If weeds are widespread, check with the local stormwater authority and/or Extension Office about proper use of herbicides for areas connected with the flow of water.
Even vegetation that is intended to be present can become large, overgrown, and/or crowd out surrounding plants. Prune and thin accordingly.
If weeds or invasive plants have overtaken the whole Bioretention cell , bush-hog the entire area before seedheads form in the spring. It will be necessary to remove the root mat manually or with appropriate herbicides, as noted above.
Re-plant with species that are aesthetically pleasing and seem to be doing well in the Bioretention cell.
Other:
Kick-Out to Level 2 Inspection: You are unsure of the original planting design, or the vegetation maintenance task is beyond your capabilities of time, expertise, or resources. If you are unsure of the health of the vegetation (e.g. salt damage, invasives, which plants are undesirable) or the appropriate season to conduct vegetation management, consult a landscape professional before undertaking any cutting, pruning, mowing, or brush hogging.

Page 7 of 8
BR Vegetation
Examine all Bioretention cell vegetation.
Problem (Check if Present) Follow-Up Actions
Vegetation is too thin, is not healthy, and there are
many spots that are not well vegetated.
The original plants are likely not suited for the actual conditions within the Bioretention cell . If you are knowledgeable about plants, select and plant more appropriate vegetation (preferably native plants) so that almost the entire surface area will be covered by the end of the second growing season.
Other:
Kick-Out to Level 2 Inspection: For all but small practices (e.g., rain gardens), this task will likely require a landscape design professional or horticulturalist.
BR Outlets
Examine outlets that release water out of the Bioretention cell.
Problem (Check if Present) Follow-Up Actions
Erosion at outlet
Add stone to reduce the impact from the water flowing out of the outlet pipe or weir during storms.
Other:
Kick-Out to Level 2 Inspection: Rills have formed and erosion problem becomes more severe.
Outlet obstructed with mulch, sediment,
debris, trash, etc.
Remove the debris and dispose of it where it cannot re-enter the Bioretention cell .
Other:
Kick-Out to Level 2 Inspection: Outlet is completely clogged or obstructed; there is too much material to remove by hand or with simple hand tools.

Page 8 of 8
Additional Notes:
Inspector: Date:
Complete the following if follow-up/corrective actions were identified during this inspection:
Certified Completion of Follow-Up Actions:
“I hereby certify that the follow-up/corrective actions identified in the inspection performed on _____________ (DATE) have been completed and any required maintenance deficiencies have been adequately corrected.”
Inspector/Operator: Date:

Page 1 of 4
Bioretention Stormwater Management Practices Level 2 Inspection Checklist
SMP ID # SMP Owner Private
Public
SMP Location (Address; Latitude & Longitude)
Latitude Longitude
Party Responsible for Maintenance System Type Type of Site
Same as SMP Owner
Other
_________________________
Seasonal
Continuous Use
Other
Above Ground
Below Ground
Commercial
Industrial
Residential
State
Inspection Date Inspection Time
Inspector
Date of Last Inspection

Page 2 of 4
Level 2 Inspection: BIORETENTION NOTE: Key Source for this Information (CSN, 2013)
Recommended Repairs Triggers for Level 3 Inspection
Observed Condition: Water Stands on Surface for More than 72 Hours after Storm
Condition 1: Small pockets of standing water
Use a soil probe or auger to examine the soil profile. If isolated areas have accumulated grit, fines, or vegetative debris or have bad soil media, try scraping off top 3 inches of media and replacing with clean material. Also check to see that surface is level and water is not ponding selectively in certain areas. Condition 2: Standing water is widespread or covers entire surface
Requires diagnosis and resolution of problem:
Clogged underdrain? Filter fabric between soil media and underdrain stone?
Need to install underdrain if not present?
Too much sediment/grit washing in from drainage area?
Too much ponding depth? Improper soil media?
Soil media is clogged and problem is not evident from Level 2 inspection.
Level 2 inspection identifies problem, but it cannot be resolved easily or is associated with the original design of the practice.
Level 3 inspection necessary
Observed Condition: Vegetation is sparse or out of control
Condition 1: Original design planting plan seems good but has not been maintained, so there are many invasives and/or dead plants
Will require some horticultural experience to restore vegetation to intended condition by weeding, pruning, removing plants, and adding new plants. Condition 2: Original design planting plan is unknown or cannot be
actualized
A landscape architect or horticulturalist will be needed to redo the planting plan. Will likely require analysis of soil pH, moisture, organic content, sun/shade, and other conditions to make sure plants match conditions. Plan should include invasive plant management and maintenance plan to include mulching, watering, disease intervention, periodic thinning/pruning, etc.
Vegetation deviates significantly from original planting plan; Bioretention has been neglected and suffered from deferred maintenance.
Owner/responsible party does not know how to maintain the practice.
Level 3 inspection necessary
Observed Condition: Bioretention does not conform to original design plan in surface area or storage
Condition 1: Level 2 Inspection reveals that practice is too small based on design dimension, does not have adequate storage (e.g., ponding depth) based on the plan, and/or does not treat the drainage area runoff as indicated on the plan
Small areas of deviation can be corrected by the property owner or responsible party, but it is likely that a Qualified Professional will have to revisit the design and attempt a redesign that meets original objectives or that can be resubmitted to the municipality for approval.
More than a 25% departure from the approved plan in surface area, storage, or drainage area; sometimes less than this threshold at the discretion of the Level 2 inspector.
Level 3 inspection necessary
Page 3 of 4
Level 2 Inspection: BIORETENTION NOTE: Key Source for this Information (CSN, 2013)
Recommended Repairs Triggers for Level 3 Inspection
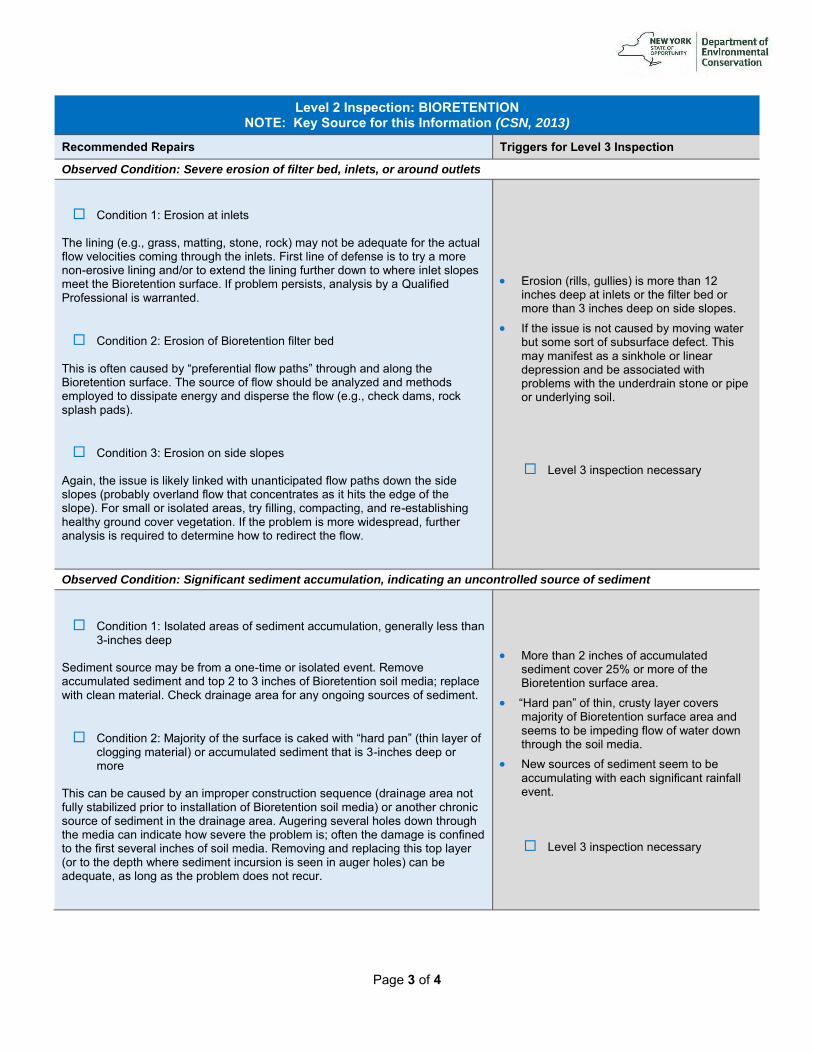
Observed Condition: Severe erosion of filter bed, inlets, or around outlets
Condition 1: Erosion at inlets The lining (e.g., grass, matting, stone, rock) may not be adequate for the actual flow velocities coming through the inlets. First line of defense is to try a more non-erosive lining and/or to extend the lining further down to where inlet slopes meet the Bioretention surface. If problem persists, analysis by a Qualified Professional is warranted.
Condition 2: Erosion of Bioretention filter bed
This is often caused by “preferential flow paths” through and along the Bioretention surface. The source of flow should be analyzed and methods employed to dissipate energy and disperse the flow (e.g., check dams, rock splash pads).
Condition 3: Erosion on side slopes
Again, the issue is likely linked with unanticipated flow paths down the side slopes (probably overland flow that concentrates as it hits the edge of the slope). For small or isolated areas, try filling, compacting, and re-establishing healthy ground cover vegetation. If the problem is more widespread, further analysis is required to determine how to redirect the flow.
Erosion (rills, gullies) is more than 12 inches deep at inlets or the filter bed or more than 3 inches deep on side slopes.
If the issue is not caused by moving water but some sort of subsurface defect. This may manifest as a sinkhole or linear depression and be associated with problems with the underdrain stone or pipe or underlying soil.
Level 3 inspection necessary
Observed Condition: Significant sediment accumulation, indicating an uncontrolled source of sediment
Condition 1: Isolated areas of sediment accumulation, generally less than 3-inches deep
Sediment source may be from a one-time or isolated event. Remove accumulated sediment and top 2 to 3 inches of Bioretention soil media; replace with clean material. Check drainage area for any ongoing sources of sediment. Condition 2: Majority of the surface is caked with “hard pan” (thin layer of
clogging material) or accumulated sediment that is 3-inches deep or more
This can be caused by an improper construction sequence (drainage area not fully stabilized prior to installation of Bioretention soil media) or another chronic source of sediment in the drainage area. Augering several holes down through the media can indicate how severe the problem is; often the damage is confined to the first several inches of soil media. Removing and replacing this top layer (or to the depth where sediment incursion is seen in auger holes) can be adequate, as long as the problem does not recur.
More than 2 inches of accumulated sediment cover 25% or more of the Bioretention surface area.
“Hard pan” of thin, crusty layer covers majority of Bioretention surface area and seems to be impeding flow of water down through the soil media.
New sources of sediment seem to be accumulating with each significant rainfall event.
Level 3 inspection necessary

Page 4 of 4
Notes:
Inspector: Date:
Complete the following if follow-up/corrective actions were identified during this inspection:
Certified Completion of Follow-Up Actions:
“I hereby certify that the follow-up/corrective actions identified in the inspection performed on _____________ (DATE) have been completed and any required maintenance deficiencies have been adequately corrected.”
Inspector/Operator: Date:

Page 1 of 5
Table 2.4.1 D&S Drainage Area Visually inspect any surfaces in the drainage area. Problem (Check if Present) Follow-Up Actions
Changes in flow; more runoff; runoff bypassing the practice
For rooftop areas, make sure downspouts are still disconnected and conveying water into the treatment area.
Look for and remove any “dams” of sediment and grass clippings that prevent water from entering the treatment area as sheet flow.
Other:
Disconnection & Sheetflow Stormwater Management Practices Level 1 Inspection Checklist
SMP ID # SMP Owner Private
Public
SMP Location (Address; Latitude & Longitude)
Latitude Longitude
Party Responsible for Maintenance System Type Type of Site
Same as SMP Owner
Other
_________________________
Seasonal
Continuous Use
Other
Above Ground
Below Ground
Commercial
Industrial
Residential
State
Inspection Date Inspection Time
Inspector
Date of Last Inspection

Page 2 of 5
Table 2.4.1 D&S Drainage Area Visually inspect any surfaces in the drainage area. Problem (Check if Present) Follow-Up Actions
Kick-Out to Level 2 Inspection: Changes to drainage area size or amount of runoff due to construction, tillage, etc.
For parking lots in the drainage area—sediment, grass clippings, or other debris has accumulated at pavement edge.
For small, isolated amounts of debris, sweep up by hand and dispose properly so that it will not be exposed to runoff.
Other:
Kick-Out to Level 2 Inspection: Sediment is widespread and cannot be removed by manual sweeping.
For parking lots in the drainage area—dips or damage at pavement edge caused flow to concentrate.
Kick-Out to Level 2 Inspection: This will likely require special expertise to diagnose and fix pavement edge.

Page 3 of 5
Table 2.4.2 D&S Level Spreader/Energy Dissipator
Inspect the energy dissipator closely, during a rain event if possible.
Problem (Check if Present) Follow-Up Actions
Debris and/or sediment accumulated behind or around the level spreader.
Remove debris and sediment by hand and ensure that the area behind the level spreader is relatively flat. Too much debris and sediment can cause runoff to bypass the level spreader structure.
Other:
Sinking, cracking, sloughing, or other structural problem makes the energy dissipator no longer level.
For stone/gravel spreaders, add new material or rake out as needed to make it even.
Other:
Kick-Out to Level 2 Inspection: Structural issues that cannot be easily fixed by hand
Table 2.4.3 D&S Treatment Area Examine where flow enters the treatment area as well as the whole flow path. Look for signs of concentrated flow.
Problem (Check if Present) Follow-Up Actions
Trash and/or debris in the treatment area Collect trash/debris and dispose of properly.
Grass filter strip has grown very tall, to the point that runoff cannot easily enter or is getting concentrated.
Mow filter strip twice a year or more frequently in a residential yard.

Page 4 of 5
Table 2.4.3 D&S Treatment Area Examine where flow enters the treatment area as well as the whole flow path. Look for signs of concentrated flow.
Problem (Check if Present) Follow-Up Actions
Sparse vegetation or bare spots
For grassy areas, add topsoil (as needed), grass seed, mulch, and water during the growing season to re-establish consistent vegetation cover.
Other:
Rills or gullies are forming in treatment area where flow has become concentrated
For minor rills, fill in with soil, compact, and add seed and straw to establish vegetation.
Other:
Kick-Out to Level 2 Inspection: Rills are more than 2" to 3" deep and require more than just hand raking and re-seeding.
Additional Notes:

Page 5 of 5
Inspector: Date:
Complete the following if follow-up/corrective actions were identified during this inspection:
Certified Completion of Follow-Up Actions:
“I hereby certify that the follow-up/corrective actions identified in the inspection performed on _____________ (DATE) have been completed and any required maintenance deficiencies have been adequately corrected.”
Inspector/Operator: Date:

Page 1 of 4
Disconnection & Sheetflow Stormwater Management Practices Level 2 Inspection Checklist
SMP ID # SMP Owner Private
Public
SMP Location (Address; Latitude & Longitude)
Latitude Longitude
Party Responsible for Maintenance System Type Type of Site
Same as SMP Owner
Other
_________________________
Seasonal
Continuous Use
Other
Above Ground
Below Ground
Commercial
Industrial
Residential
State
Inspection Date Inspection Time
Inspector
Date of Last Inspection

Page 2 of 4
Level 2 Inspection – DISCONNECTION AND SHEETFLOW
Recommended Repairs Triggers for Level 3 Inspection
Observed Condition: Significant sediment on pavement that drains to disconnection area (e.g., grass strip)
Condition 1: Sediment on parking lot is widespread Enlist a mechanical sweeper or vacuum sweeper to remove sediment across entire pavement surface. Pay special attention to downhill edges of pavement where more sediment may have accumulated.
Sediment accumulation is so serious that it cannot be sufficiently removed with mechanical sweeper. May indicate a high sediment load from uphill in the drainage area that needs to be mitigated.
Level 3 inspection necessary
Observed Condition: Pavement edge deteriorating
Condition 1: Dips or damage at pavement edge causing runoff to concentrate
Determine whether the damaged edge is causing significant enough concentration of runoff to warrant repair or regrading of the pavement.
Edge must be patched or re-paved to make secure and level.
Parking lot not draining properly to the energy dissipator and treatment area.
Level 3 inspection necessary
Observed Condition: Level spreader/energy dissipator
Condition 1: Level spreader sinking or uneven
If basic equipment can be used, prop up and secure any section of level spreader that is sinking. Regrade soil all around level spreader and add stone as necessary to prevent erosion and bypassing. Condition 2: Level spreader is broken
These repairs can be simple for small, residential-scale practices, such as at a downspout. Ensure the level spreader is level across, keyed in to soil at the edges, and made of durable material that can withstand the flow of water running across it. Larger or more complicated level spreaders (e.g., concrete) will likely require specialized skill and equipment.
Level spreader requires specialized equipment, regrading, or large amount of material to make level again.
Level spreader needs to be re-designed and replaced.
Level 3 inspection necessary
Page 3 of 4
Level 2 Inspection – DISCONNECTION AND SHEETFLOW
Recommended Repairs Triggers for Level 3 Inspection
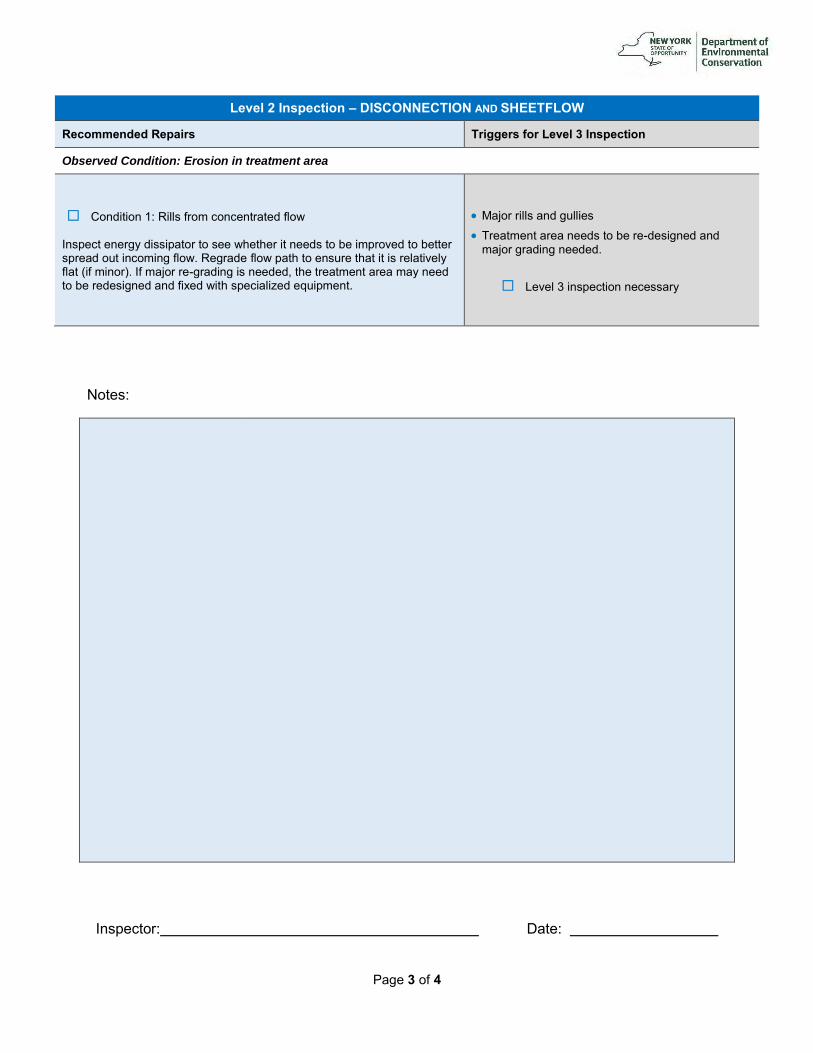
Observed Condition: Erosion in treatment area
Condition 1: Rills from concentrated flow
Inspect energy dissipator to see whether it needs to be improved to better spread out incoming flow. Regrade flow path to ensure that it is relatively flat (if minor). If major re-grading is needed, the treatment area may need to be redesigned and fixed with specialized equipment.
Major rills and gullies
Treatment area needs to be re-designed and major grading needed.
Level 3 inspection necessary
Notes:
Inspector: Date:

Page 4 of 4
Complete the following if follow-up/corrective actions were identified during this inspection:
Certified Completion of Follow-Up Actions:
“I hereby certify that the follow-up/corrective actions identified in the inspection performed on _____________ (DATE) have been completed and any required maintenance deficiencies have been adequately corrected.”
Inspector/Operator: Date:

Page 1 of 3
GR Vegetation and Surface
Visually inspect the surface and vegetation of the practice. Problem (Check if Present) Follow-Up Actions
Wilting or nutrient-deprived vegetation; bare areas developing on the roof
Water or irrigate. Prune or remove dead or dying vegetation. Other:
Green Roof Stormwater Management Practices Level 1 Inspection Checklist
SMP ID # SMP Owner Private
Public
SMP Location (Address; Latitude & Longitude)
Latitude Longitude
Party Responsible for Maintenance System Type Type of Site
Same as SMP Owner
Other
_________________________
Seasonal
Continuous Use
Other
Above Ground
Below Ground
Commercial
Industrial
Residential
State
Inspection Date Inspection Time
Inspector
Date of Last Inspection

Page 2 of 3
GR Vegetation and Surface
Visually inspect the surface and vegetation of the practice. Problem (Check if Present) Follow-Up Actions
Kick-Out to Level 2 Inspection: Greater than 20% plant dieoff or wilting, even after rainy periods. May require new vegetation or indicate a problem with the soil medium.
Kick-Out to Level 2 Inspection: Yellowing vegetation may indicate a need for fertilizer, but do not fertilize unless explicitly included in the management plan or with a Level 2 Inspection.
Kick-Out to Level 2 Inspection: Bare areas with no vegetation growing. These may become weed problems in the future.
Weeds or moss
Remove weeds by hand. Apply lime to kill moss. Other:
Kick-Out to Level 2 Inspection: Weeds cover more than 25% of the surface, or the original planting plan has been compromised.
Ponding between storm events Kick-Out to Level 2 Inspection: Surface ponding more than 24 hours after a storm event presents a hazard and needs to be addressed immediately.
GR Overflows and Drains
Review the specific maintenance plan for this practice to determine where inspection ports are. Remove the cover and inspect the port.
Problem (Check if Present) Follow-Up Actions
Inspection port for roof drainage (can be clogged with debris)
Remove debris by hand or flush through with a hose. Other:
Kick-Out to Level 2 Inspection: Debris cannot be removed, or it appears that debris has accumulated in the underdrains.
Damage to other roof drainage structures (e.g., roof scuppers)
Call contractor or individual in charge of regular building maintenance. This is a building maintenance issue.
Other:

Page 3 of 3
Additional Notes:
Inspector: Date:
Complete the following if follow-up/corrective actions were identified during this inspection:
Certified Completion of Follow-Up Actions:
“I hereby certify that the follow-up/corrective actions identified in the inspection performed on _____________ (DATE) have been completed and any required maintenance deficiencies have been adequately corrected.”
Inspector/Operator: Date:
Page 1 of 3
Green Roof Stormwater Management Practices Level 2 Inspection Checklist
SMP ID # SMP Owner Private
Public
SMP Location (Address; Latitude & Longitude)
Latitude Longitude
Party Responsible for Maintenance System Type Type of Site
Same as SMP Owner
Other
_________________________
Seasonal
Continuous Use
Other
Above Ground
Below Ground
Commercial
Industrial
Residential
State
Inspection Date Inspection Time
Inspector
Date of Last Inspection

Page 2 of 3
Level 2 Inspection: GREEN ROOF
Recommended Repairs and Required Skills Triggers for Level 3 Inspection
Observed Condition: Unhealthy or Dying Vegetation
Condition 1: Large number of plants dying from wilt
If this is a one-time occurrence, review weather and landscaping records to see whether the die off seems reasonable. If so, deeply water immediately, and plant reinforcements in the spring. Condition 2: Vegetation is dying and yellowing
For yellowing vegetation, consider testing the media for pH, nutrient levels, and other factors that may affect growth. Problems identified would go to a Level 3 inspector (see note to right).
More than 25% die off Plants are unhealthy for a prolonged period of time or need to be
replanted repeatedly, indicating that a new planting plan may be necessary, or the planting medium is not functioning properly.
pH or other media constituents are not conducive to plant growth, and the media needs to be amended (e.g., lime, fertilizer). This should be handled by a green roof vendor or green roof plant specialist.
Level 3 inspection necessary
Observed Condition: Ponding Between Storm Events or Debris Accumulation
Condition 1: Further inspection shows debris is clogging the outflow drainpipe
Remove debris by hand and revisit within 24 hours to see whether this action fixed the problem. Condition 2: Debris has backed up to include the
underdrain
Attempt to remove by hand or flush out with a hose.
Ponding continues even after debris has been removed. This may indicate a problem with either the media or the underdrain system.
Level 3 inspection necessary
Observed Condition: Structural Damage to Overflows
Condition: If the damage is minor, repair damage directly, per original design drawings
Most instances of structural damage will need to be referred to the designer or a qualified green roof vendor.
Level 3 inspection necessary
Observed Condition: Roof is Leaking or indication that the membrane has a leak
Condition: Roof is leaking
Any leaks in the membrane trigger a Level 3 inspection or an inspection by the original installer or designer.
Level 3 inspection necessary

Page 3 of 3
Notes:
Inspector: Date:
Complete the following if follow-up/corrective actions were identified during this inspection:
Certified Completion of Follow-Up Actions:
“I hereby certify that the follow-up/corrective actions identified in the inspection performed on _____________ (DATE) have been completed and any required maintenance deficiencies have been adequately corrected.”
Inspector/Operator: Date:
Page 1 of 7
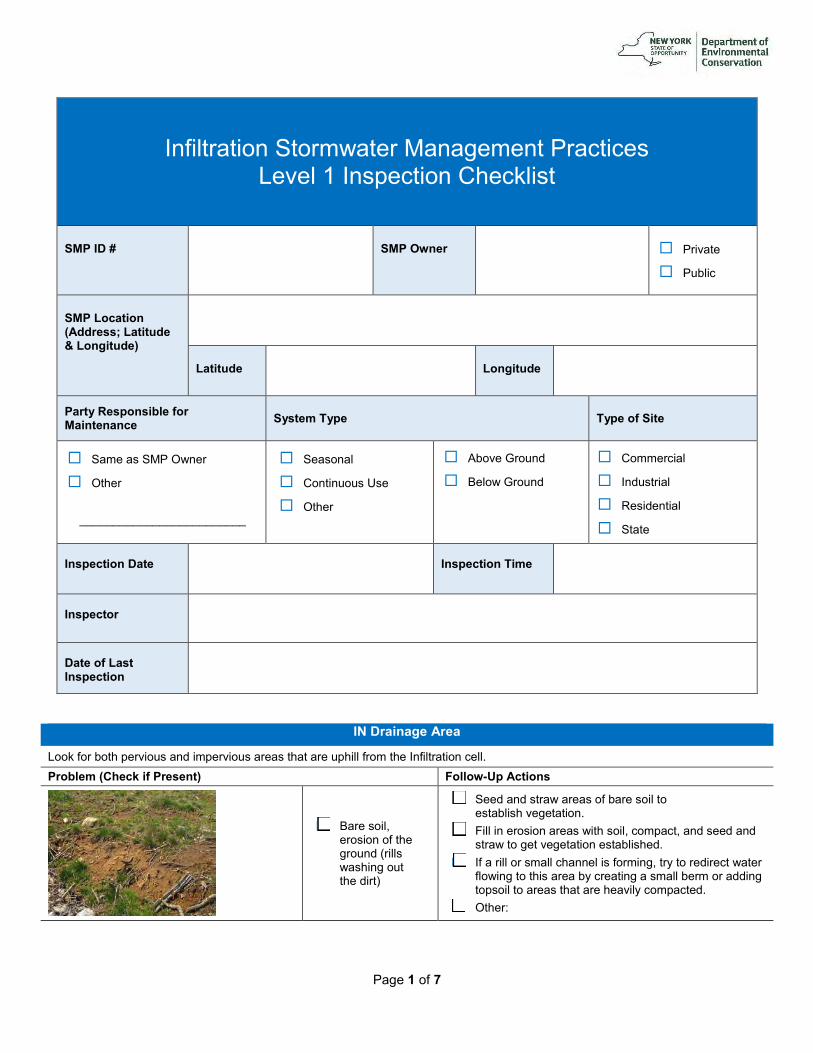
IN Drainage Area
Look for both pervious and impervious areas that are uphill from the Infiltration cell. Problem (Check if Present) Follow-Up Actions
Bare soil, erosion of the ground (rills washing out the dirt)
Seed and straw areas of bare soil to establish vegetation.
Fill in erosion areas with soil, compact, and seed and straw to get vegetation established.
If a rill or small channel is forming, try to redirect water flowing to this area by creating a small berm or adding topsoil to areas that are heavily compacted.
Other:
Infiltration Stormwater Management Practices Level 1 Inspection Checklist
SMP ID # SMP Owner Private
Public
SMP Location (Address; Latitude & Longitude)
Latitude Longitude
Party Responsible for Maintenance System Type Type of Site
Same as SMP Owner
Other
_________________________
Seasonal
Continuous Use
Other
Above Ground
Below Ground
Commercial
Industrial
Residential
State
Inspection Date Inspection Time
Inspector
Date of Last Inspection

Page 2 of 7
IN Drainage Area
Look for both pervious and impervious areas that are uphill from the Infiltration cell. Problem (Check if Present) Follow-Up Actions
Kick-Out to Level 2 Inspection: Large areas of soil have been eroded, or larger channels are forming. May require rerouting of flow paths.
For Dry Wells: Leaves, sticks, or other debris in gutters and downspouts
Remove all debris by hand. Other:
Piles of grass clippings, mulch, dirt, salt, or other materials
Remove or cover piles of grass clippings, mulch, dirt, etc.
Other:
Open containers of oil, grease, paint, or other substances
Cover or properly dispose of materials; consult your local solid waste authority for guidance on materials that may be toxic or hazardous.
Other:

Page 3 of 7
IN Inlets Look for all the places where water flows into the Infiltration practice. Problem (Check if Present) Follow-Up Actions
Inlets are collecting grit and debris or grass/weeds
are growing. Some water may not be getting into the Infiltration practice.
Use a flat shovel to remove grit and debris (especially at curb inlets or openings). Parking lots generate fine grit that will accumulate at these spots.
Pull out clumps of growing grass or weeds and scoop out the soil or grit that the plants are growing in.
Remove any grass clippings, leaves, sticks, and other debris that is collecting at inlets.
For pipes and ditches, remove sediment and debris that is partially blocking the pipe or ditch opening where it enters the Infiltration practice.
Dispose of all material properly in an area where it will not re-enter the practice.
Other:
Kick-Out to Level 2 Inspection: Inlets are blocked to the extent that most of the water does not seem to be entering the Infiltration practice.
Some or all of the inlets are eroding so that rills, gullies, and other erosion is present, or there is bare dirt that is washing into the Infiltration practice.
For small areas of erosion, smooth out the eroded part and apply rock or stone (e.g., river cobble) to prevent further erosion. Usually, filter fabric is placed under the rock or stone.
In some cases, reseeding and applying erosion-control matting can be used to prevent further erosion. Some of these materials may be available at a garden center, but it may be best to consult a landscape contractor.
Other:
Kick-Out to Level 2 Inspection: Erosion is occurring at most of the inlets and it looks like there is too much water that is concentrating at these points. The inlet design may have to be modified.

Page 4 of 7
IN Infiltration Area Examine the surface of the infiltration area and the observation well. Note: The following Problem and Follow-Up Actions apply to infiltration practice pretreatment areas also. Problem (Check if Present) Follow-Up Actions
For grass-covered Infiltration practices: grass has
grown very tall, Photo credit: Stormwater Maintenance, LLC
Mow infiltration area at least twice per year. Other:
For grass-covered Infiltration practices: sparse
vegetation cover or bare spots
Add topsoil (as needed), grass seed, straw, and water during the growing season to re-establish consistent grass coverage.
Other:
Kick-Out to Level 2 Inspection: Sparse vegetation cover can be a sign that the infiltration area is not infiltrating at the proper rate and water is standing too long after a storm. The surface may be saturated or squishy, and the conditions do not enable grass to grow. This situation should be evaluated by a Level 2 Inspection and likely corrected by a qualified contractor.
Minor areas of sediment, grit, trash, or other debris are accumulating on the surface.
Use a shovel to scoop out minor areas of sediment or grit, especially in the spring after winter sanding materials may wash in and accumulate. Dispose of the material where it cannot re-enter the Infiltration practice.
If removing the material creates a hole or low area, rake the surface smooth and level.
Remove trash, debris, and other undesirable materials. Other:
Kick-Out to Level 2 Inspection: Sediment has accumulated more than 2-inches deep and covers 25% or more of the surface of the Infiltration area.

Page 5 of 7
IN Infiltration Area Examine the surface of the infiltration area and the observation well. Note: The following Problem and Follow-Up Actions apply to infiltration practice pretreatment areas also. Problem (Check if Present) Follow-Up Actions
There is erosion on the surface; water seems to be
carving out rills as it flows across the surface of the Infiltration area or sinkholes are forming in certain areas.
For minor areas of erosion, try filling the eroded areas with clean topsoil, sand, or stone (whatever the existing cover is).
If the problem recurs, you may have to use larger stone (e.g., river cobble) to fill in problem areas.
Other:
Kick-Out to Level 2 Inspection: The problem persists or the erosion is more than 3-inches deep and seems to be an issue with how water enters and moves through the infiltration area.
Kick-Out to Level 2 Inspection: The problem does not seem to be caused by flowing water but a collapse or sinking of the surface (e.g., “sinkhole”) due to some underground problem.
Observation well is damaged or cap is missing
Kick-Out to Level 2 Inspection: Requires replacing pipes or caps.

Page 6 of 7
IN Infiltration Area Examine the surface of the infiltration area and the observation well. Note: The following Problem and Follow-Up Actions apply to infiltration practice pretreatment areas also. Problem (Check if Present) Follow-Up Actions
Water still visible in the observation well more than
72 hours after a rain storm. The Infiltration practice does not appear to be draining properly.
Kick-Out to Level 2 Inspection: This is generally a serious problem, and it will be necessary to activate a Level 2 Inspection.
IN Outlets
Locate and inspect all outlets.
Problem (Check if Present) Follow-Up Actions
Outlet obstructed with sediment, debris, trash, etc.
Remove the debris and dispose of it where it cannot re-enter the infiltration area.
Other:
Kick-Out to Level 2 Inspection: Outlet is completely obstructed; there is too much material to remove by hand or with simple hand tools.
Rills or gullies are forming at outlet.
For minor rills, fill in with soil, compact, and seed and straw to establish vegetation.
Other:
Kick-Out to Level 2 Inspection: Rills are more than 2" to 3" deep and require more than just hand raking and re-seeding.
Page 7 of 7
Additional Notes:
Inspector: Date:
Complete the following if follow-up/corrective actions were identified during this inspection:
Certified Completion of Follow-Up Actions:
“I hereby certify that the follow-up/corrective actions identified in the inspection performed on _____________ (DATE) have been completed and any required maintenance deficiencies have been adequately corrected.”
Inspector/Operator: Date:

Page 1 of 3
Infiltration Stormwater Management Practices Level 2 Inspection Checklist
SMP ID # SMP Owner Private
Public
SMP Location (Address; Latitude & Longitude)
Latitude Longitude
Party Responsible for Maintenance System Type Type of Site
Same as SMP Owner
Other
_________________________
Seasonal
Continuous Use
Other
Above Ground
Below Ground
Commercial
Industrial
Residential
State
Inspection Date Inspection Time
Inspector
Date of Last Inspection

Page 2 of 3
Level 2 Inspection: INFILTRATION
Recommended Repairs Triggers for Level 3 Inspection
Observed Condition: Water Stands on Surface for More than 72 Hours after Storm
Condition 1: Small pockets of standing water For infiltration basins with soil, use a soil probe or auger to examine the soil profile. For gravel infiltration trenches or basins, use a shovel to dig into the gravel layer where the problem is occurring. If isolated areas have accumulated grit, fine silt, or vegetative debris or have bad soil or clogged gravel, try removing and replacing with clean material. If the practice is supposed to have grass cover, it will likely be necessary to replant once the problem is resolved. Condition 2: Standing water is widespread or covers entire surface
Look in the observation well (if it exists) and use a tape measure to estimate the depth of water standing in the soil or gravel. Requires diagnosis and resolution of problem:
Too much sediment/grit washing in from drainage area? Too much ponding depth?
Improper infiltration media?
Underlying soil not suitable for infiltration? As above, the resolution will likely require replanting and re-establishment of good grass cover if this is part of the design.
Infiltration media is clogged and problem cannot be diagnosed from Level 2 inspection.
Level 2 inspection identifies problem, but it cannot be resolved easily or it is associated with the original design of the practice.
Level 3 Inspection necessary
Observed Condition: Severe erosion of infiltration bed, inlets, or around outlets
Condition 1: Erosion at inlets
The lining (e.g., grass, matting, stone, rock) may not be adequate for the actual flow velocities coming through the inlets. First line of defense is to try a less erosive lining and/or extending the lining further down to where inlet slopes meet the infiltration surface. If problem persists, analysis by a Qualified Professional is warranted. Condition 2: Erosion of infiltration bed
This is often caused by “preferential flow paths” along the surface. The source of flow should be analyzed and methods employed to dissipate energy and disperse the flow (e.g., check dams, rock splash pads).
Erosion (rills, gullies) is more than 12 inches deep
The issue is not caused by moving water but some sort of subsurface defect, which may manifest as a sinkhole or linear depression and be associated with problems with the underlying stone or soil.
Level 3 Inspection necessary

Page 3 of 3
Notes:
Inspector: Date:
Complete the following if follow-up/corrective actions were identified during this inspection:
Certified Completion of Follow-Up Actions:
“I hereby certify that the follow-up/corrective actions identified in the inspection performed on _____________ (DATE) have been completed and any required maintenance deficiencies have been adequately corrected.”
Inspector/Operator: Date:

Page 1 of 4
PP Drainage Area Look for areas that are uphill from the Permeable pavement. Problem (Check if Present) Follow-Up Actions
Bare soil, erosion of the ground (rills washing out the dirt)
Seed and straw areas of bare soil to establish vegetation.
Fill in erosion areas with soil, compact, and seed and straw to establish vegetation.
If a rill or small channel is forming, try to redirect water flowing to this area by creating a small berm or adding topsoil to areas that are heavily compacted.
Other:
Permeable Pavement Stormwater Management Practices Level 1 Inspection Checklist
SMP ID # SMP Owner Private
Public
SMP Location (Address; Latitude & Longitude)
Latitude Longitude
Party Responsible for Maintenance System Type Type of Site
Same as SMP Owner
Other
_________________________
Seasonal
Continuous Use
Other
Above Ground
Below Ground
Commercial
Industrial
Residential
State
Inspection Date Inspection Time
Inspector
Date of Last Inspection

Page 2 of 4
PP Drainage Area Look for areas that are uphill from the Permeable pavement. Problem (Check if Present) Follow-Up Actions
Kick-Out to Level 2 Inspection: Large areas of soil have been eroded, or larger channels are forming. May require rerouting of flow paths.
Piles of grass clippings, mulch, dirt, salt, or other materials
Remove or cover piles of grass clippings, mulch, dirt, etc.
Other:
Open containers of oil, grease, paint, or other substances
Cover or properly dispose of materials; consult your local solid waste authority for guidance on materials that may be toxic or hazardous.
Other:
Page 3 of 4
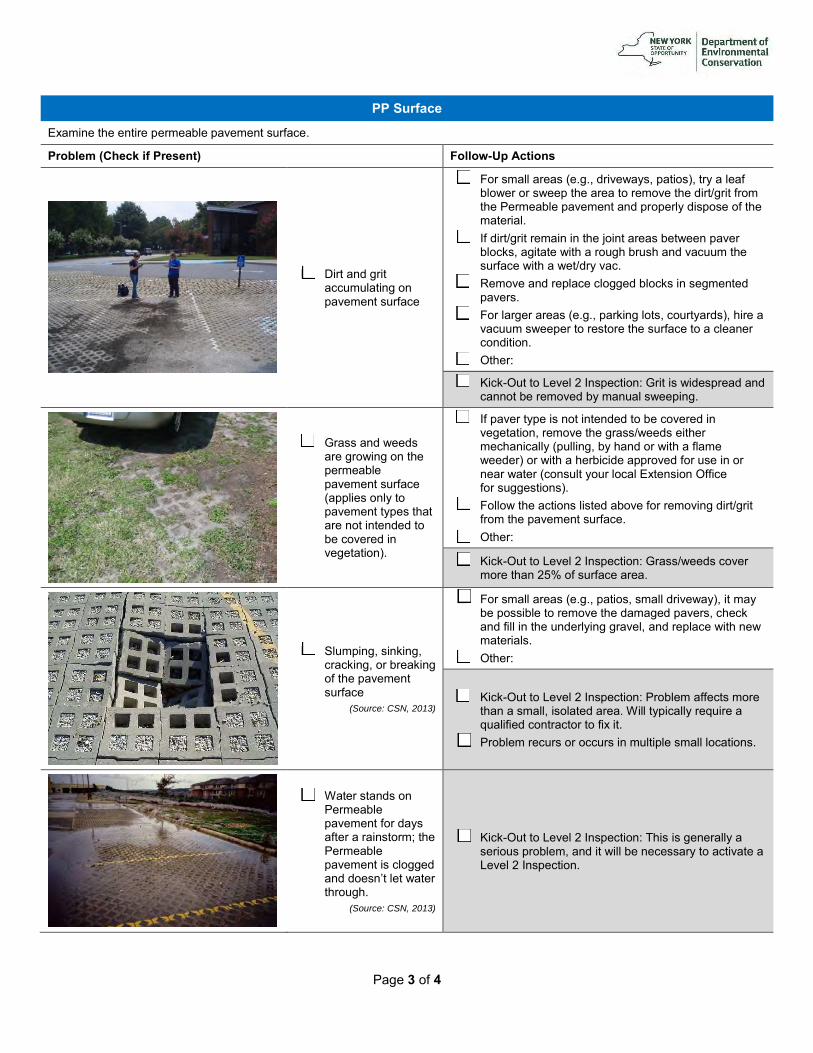
PP Surface
Examine the entire permeable pavement surface.
Problem (Check if Present) Follow-Up Actions
Dirt and grit accumulating on pavement surface
For small areas (e.g., driveways, patios), try a leaf blower or sweep the area to remove the dirt/grit from the Permeable pavement and properly dispose of the material.
If dirt/grit remain in the joint areas between paver blocks, agitate with a rough brush and vacuum the surface with a wet/dry vac.
Remove and replace clogged blocks in segmented pavers.
For larger areas (e.g., parking lots, courtyards), hire a vacuum sweeper to restore the surface to a cleaner condition.
Other:
Kick-Out to Level 2 Inspection: Grit is widespread and cannot be removed by manual sweeping.
Grass and weeds are growing on the permeable pavement surface (applies only to pavement types that are not intended to be covered in vegetation).
If paver type is not intended to be covered in vegetation, remove the grass/weeds either mechanically (pulling, by hand or with a flame weeder) or with a herbicide approved for use in or near water (consult your local Extension Office for suggestions).
Follow the actions listed above for removing dirt/grit from the pavement surface.
Other:
Kick-Out to Level 2 Inspection: Grass/weeds cover more than 25% of surface area.
Slumping, sinking, cracking, or breaking of the pavement surface
(Source: CSN, 2013)
For small areas (e.g., patios, small driveway), it may be possible to remove the damaged pavers, check and fill in the underlying gravel, and replace with new materials.
Other:
Kick-Out to Level 2 Inspection: Problem affects more than a small, isolated area. Will typically require a qualified contractor to fix it.
Problem recurs or occurs in multiple small locations.
Water stands on Permeable pavement for days after a rainstorm; the Permeable pavement is clogged and doesn’t let water through.
(Source: CSN, 2013)
Kick-Out to Level 2 Inspection: This is generally a serious problem, and it will be necessary to activate a Level 2 Inspection.

Page 4 of 4
Additional Notes:
Inspector: Date:
Complete the following if follow-up/corrective actions were identified during this inspection:
Certified Completion of Follow-Up Actions:
“I hereby certify that the follow-up/corrective actions identified in the inspection performed on _____________ (DATE) have been completed and any required maintenance deficiencies have been adequately corrected.”
Inspector/Operator: Date:

Page 1 of 4
Permeable Pavement Stormwater Management Practices Level 2 Inspection Checklist
SMP ID # SMP Owner Private
Public
SMP Location (Address; Latitude & Longitude)
Latitude Longitude
Party Responsible for Maintenance System Type Type of Site
Same as SMP Owner
Other
_________________________
Seasonal
Continuous Use
Other
Above Ground
Below Ground
Commercial
Industrial
Residential
State
Inspection Date Inspection Time
Inspector
Date of Last Inspection

Page 2 of 4
Level 2 Inspection: PERMEABLE PAVEMENT
Recommended Repairs and Required Skills Triggers for Level 3 Inspection
Observed Condition: Bare Soil or Erosion in the Drainage Area
Condition 1: Extensive problem spots, but no channels or rills forming
Reseed problem areas. If problem persists or grass does not take, consider hiring a landscape contractor. Condition 2: Problem is extensive, and rills/channels
are beginning to form May be necessary to divert or redirect water that is causing the erosion problem. If it appears that simple regrading—such as installing a berm or leveling a low spot–will fix the problem, make repairs and check to ensure that the problem is repaired after the next storm.
Large rills or gullies are forming in the drainage area.
An attempt to regrade the drainage area has been unsuccessful
Fixing the problem would require major regrading (i.e., redirecting more than a 100-square-foot area.
It is not clear why the problem is occurring.
Level 3 inspection necessary
Observed Condition: Dirt or Grit Accumulating, or Grass Growing on Pavement Surface
Condition 1: Grit beginning to form but is isolated to a small area or does not fill the joints between paver blocks
Try to agitate and sweep by hand, or hire a contractor with a vacuum sweeper. Also investigate the drainage area for potential sediment sources. If no obvious sources are found, discuss winter sanding and salting operations with the property owner to identify whether this could be the source. Condition 2: Grit is forming and cannot be removed
with agitation and hand sweeping Hire a vendor with a regenerative air vacuum sweeper, maximum power 2,500 rpm; avoid sweepers that use water.
More than 2 inches of sand/dirt/grit are on some of the pavement surface.
More than 25% of the pavement surface is covered with sand/dirt/grit to the extent that joints between paver blocks are filled.
Regenerative air sweeper cannot remove grit.
Level 3 inspection necessary

Page 3 of 4
Level 2 Inspection: PERMEABLE PAVEMENT
Recommended Repairs and Required Skills Triggers for Level 3 Inspection
Observed Condition: Structural Damage
Condition 1: Portions of porous asphalt or permeable pavers are damaged, and the cause is known to be at the surface.
If the damage is from a single event such as heavy equipment or heavy fallen objects, or the surface has been damaged by wear over time, hire a contractor experienced in permeable pavement installation to repair the damaged areas. Condition 2: Damage to other structures, such as
drainage infrastructure If possible, repair or replace damaged items, or hire a contractor with permeable pavement experience if the damaged infrastructure is within the pavement surface.
More than 25% of the surface needs to be repaired or replaced. It appears that the underlying material has “caved in,” indicating
an underlying water conveyance or soil stabilization issue. Problem is repaired but recurs within less than five years.
Level 3 inspection necessary
Observed Condition: Ponding on the Pavement Surface
Condition 1: Underdrains (if present) may be clogged
Check to see whether underdrains are clogged by inspecting cleanouts (if present) or catch basins and looking for debris. If underdrains appear clogged, it may be necessary to hire a router service to ream out the underdrains. Condition 2: At time of Level 2 inspection, water is not
ponded, and there is no obvious clogging of the surface.
Conduct a flood test to determine whether the ponding is an ongoing problem.
Water stands on the pavement surface more than 72 hours after a storm, and the problem cannot be resolved by unclogging underdrains.
More than 25% of the pavement surface is covered with sand/dirt/grit to the extent that joints between paver blocks are filled.
Level 3 inspection necessary
Page 4 of 4
Notes:
Inspector: Date:
Complete the following if follow-up/corrective actions were identified during this inspection:
Certified Completion of Follow-Up Actions:
“I hereby certify that the follow-up/corrective actions identified in the inspection performed on _____________ (DATE) have been completed and any required maintenance deficiencies have been adequately corrected.”
Inspector/Operator: Date:

Page 1 of 7
PW Drainage Area
Look for areas that are uphill from the pond. Problem (Check if Present) Follow-Up Actions
Bare soil, erosion of the ground (rills washing out the dirt)
Seed and straw areas of bare soil to establish vegetation. Fill in eroded areas with soil, compact, seed and mulch with
straw to establish vegetation. Other:
Pond and Wetland Stormwater Management Practices Level 1 Inspection Checklist
SMP ID # SMP Owner Private
Public
SMP Location (Address; Latitude & Longitude)
Latitude Longitude
Party Responsible for Maintenance System Type Type of Site
Same as SMP Owner
Other
_________________________
Seasonal
Continuous Use
Other
Above Ground
Below Ground
Commercial
Industrial
Residential
State
Inspection Date Inspection Time
Inspector
Date of Last Inspection

Page 2 of 7
Bare soil, erosion of the ground (rills washing out the dirt)
Kick-Out to Level 2 Inspection: If a rill or small channel is forming, try to redirect water flowing to this area by creating a small berm or adding topsoil to areas that are heavily compacted.
If large areas of soil have been eroded or larger channels are forming, this may require rerouting of flow paths or use of an erosion-control seed mat or blanket to reestablish acceptable ground cover or anchor sod where it is practical.
Piles of grass clippings, mulch, dirt, salt, or other materials
Remove or cover piles of grass clippings, mulch, dirt, etc. Remove excessive vegetation or woody debris that can block
drainage systems. Other:
Open containers of oil, grease, paint, or other substances exposed to rain in the drainage area
Cover or properly dispose of materials; consult your local solid waste authority for guidance on materials that may be toxic or hazardous.
Other:
Pond Inlets Look for all areas where water flows into the pond during storms. Note that there may be multiple points of inflow and types of structures (e.g., pipes, open ditches, etc.).
Problem (Check if Present) Follow-Up Actions
Inlets are buried,
covered or filled with silt, debris, or trash, or blocked by excessive vegetation.
If the problem can be remedied with hand tools and done in a safe manner, remove vegetation, trash, woody debris, etc. from blocking inlet structures.
Other:
Kick-Out to Level 2 or 3 Inspection: If the
amount of material is too large to handle OR there are ANY safety concerns about working in standing water, soft sediment, etc., the work will likely have to be performed by a qualified contractor.

Page 3 of 7
Pond Inlets Look for all areas where water flows into the pond during storms. Note that there may be multiple points of inflow and types of structures (e.g., pipes, open ditches, etc.).
Problem (Check if Present) Follow-Up Actions
Inlets are buried,
covered or filled with silt, debris, or trash, or blocked by excessive vegetation.
Kick-Out to Level 2 or 3 Inspection: If the
amount of material is too large to handle OR there are ANY safety concerns about working in standing water, soft sediment, etc., the work will likely have to be performed by a qualified contractor.
Inlets are broken, and, with pieces of pipe or concrete falling into the pond, there is erosion around the inlet, there is open space under the pipe, or there is erosion where the inlet meets the pond
Kick-Out to Level 2 Inspection: These types of structural or erosion problems are more serious and will require a qualified contractor to repair.
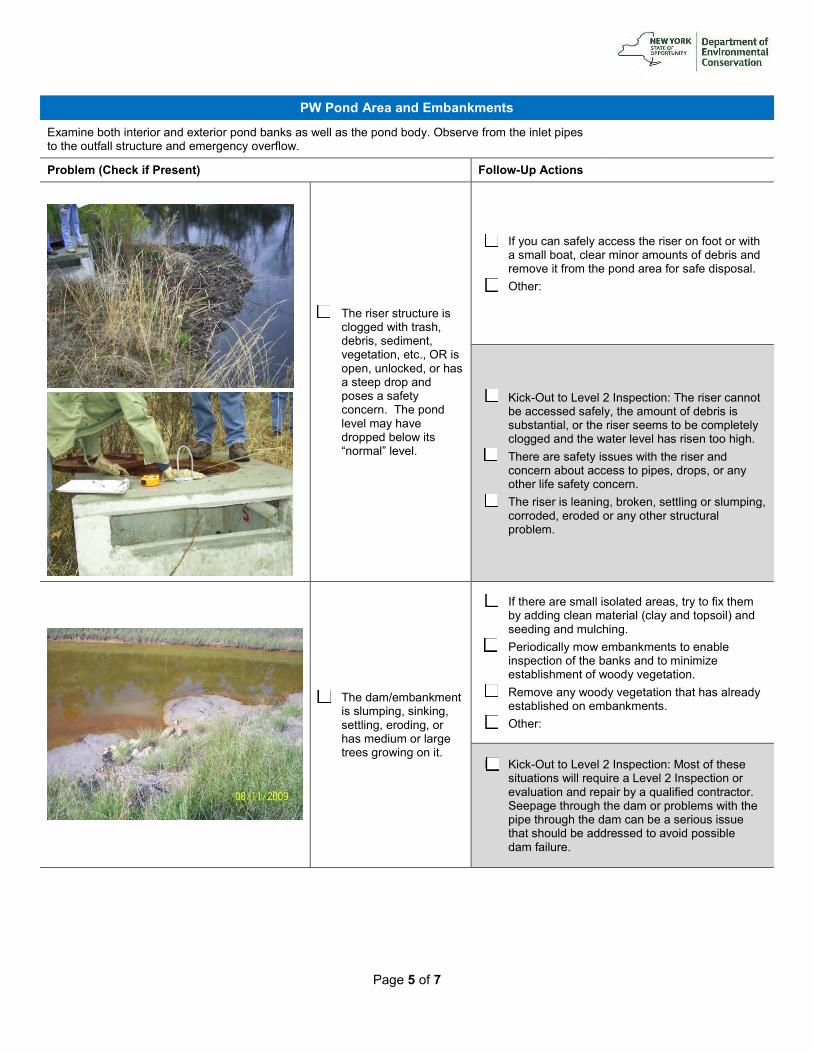
PW Pond Area and Embankments
Examine both interior and exterior pond banks as well as the pond body. Observe from the inlet pipes to the outfall structure and emergency overflow.
Problem (Check if Present) Follow-Up Actions
The pretreatment
area(s) or forebay(s) are filled with sediment, trash, vegetation, or other debris.
If the problem can be remedied with hand tools and done in a safe manner, use a flat shovel or other equipment to remove small amounts of sediment.
Remove trash and excessive vegetation from forebays if this can be done in a safe manner.
Other:

Page 4 of 7
PW Pond Area and Embankments
Examine both interior and exterior pond banks as well as the pond body. Observe from the inlet pipes to the outfall structure and emergency overflow.
Problem (Check if Present) Follow-Up Actions
The pretreatment
area(s) or forebay(s) are filled with sediment, trash, vegetation, or other debris.
Kick-Out to Level 2 Inspection: Large amounts of sediment or debris will have to be removed by a qualified contractor. ANY condition that poses a safety concern for working in standing water or soft sediments should be referred to a Level 2 Inspection or qualified contractor.
The pond area itself has accumulated sediment, trash, debris, or excessive vegetation that is choking the flow of the water, OR the pond area is covered with algae or aquatic plants.
Level 1 includes handling only small amounts of material that can be removed by hand, or with rakes or other hand tools. Do not attempt any repair that poses a safety issue.
Other:
Kick-Out to Level 2 Inspection: Most cases will call for a Level 2 Inspection and/or a qualified contractor.
You are not sure what type and amount of vegetation is supposed to be in the pond.
The algae or aquatic plants should be identified so that proper control techniques can be applied.
The side slopes of the pond are unstable, eroding, and have areas of bare dirt.
If there are only minor areas, try filling in small rills or gullies with topsoil, compacting, and seeding and mulching all bare dirt areas with an appropriate seed. Alternatively, try using herbaceous plugs to get vegetation established in tricky areas, such as steep slopes.
Other:
Kick-Out to Level 2 Inspection: Erosion and many bare dirt areas on steep side slopes will require a Level 2 Inspection and repair by a qualified contractor.
Page 5 of 7
PW Pond Area and Embankments
Examine both interior and exterior pond banks as well as the pond body. Observe from the inlet pipes to the outfall structure and emergency overflow.
Problem (Check if Present) Follow-Up Actions
The riser structure is clogged with trash, debris, sediment, vegetation, etc., OR is open, unlocked, or has a steep drop and poses a safety concern. The pond level may have dropped below its “normal” level.
If you can safely access the riser on foot or with a small boat, clear minor amounts of debris and remove it from the pond area for safe disposal.
Other:
Kick-Out to Level 2 Inspection: The riser cannot be accessed safely, the amount of debris is substantial, or the riser seems to be completely clogged and the water level has risen too high.
There are safety issues with the riser and concern about access to pipes, drops, or any other life safety concern.
The riser is leaning, broken, settling or slumping, corroded, eroded or any other structural problem.
The dam/embankment is slumping, sinking, settling, eroding, or has medium or large trees growing on it.
If there are small isolated areas, try to fix them by adding clean material (clay and topsoil) and seeding and mulching.
Periodically mow embankments to enable inspection of the banks and to minimize establishment of woody vegetation.
Remove any woody vegetation that has already established on embankments.
Other:
Kick-Out to Level 2 Inspection: Most of these situations will require a Level 2 Inspection or evaluation and repair by a qualified contractor. Seepage through the dam or problems with the pipe through the dam can be a serious issue that should be addressed to avoid possible dam failure.

Page 6 of 7
PW Pond Area and Embankments
Examine both interior and exterior pond banks as well as the pond body. Observe from the inlet pipes to the outfall structure and emergency overflow.
Problem (Check if Present) Follow-Up Actions
The emergency spillway or outfall (if it exists) has
Erosion, settlement, or
loss of material. Rock-lined spillways have excessive debris or vegetation.
Clear light debris and vegetation. Other:
Kick-Out to Level 2 Inspection: Displacement of rock lining, excessive vegetation and erosion/settlement may warrant review and decision by Level 2 Inspector to check against original plan.
Any uncertainty about the integrity of the emergency spillway should be referred to a Level 2 Inspector.
Erosion or settlement such that design has been compromised should be reviewed by an engineer.
PW Pond Outlet
Examine the outlet of the pipe on the downstream side of the dam/embankment where it empties into a stream, channel, or drainage system.
Problem (Check if Present) Follow-Up Actions
The pond outlet is clogged with sediment, trash,
debris, vegetation, or is eroding, caving in, slumping, or falling apart.
If there is a minor blockage, remove the debris or vegetation to allow free flow of water.
Remove any accumulated trash at the outlet. Outlet:
Kick-Out to Level 2 Inspection: If the area at the outlet cannot be easily accessed or if the
blockage is substantial, a Level 2 Inspection is warranted. Erosion at and downstream of the outfall should be
evaluated by a qualified professional. Any structural problems, such as broken pipes, structures
falling into the stream, or holes or tunnels around the outfall pipe, should be evaluated by a Level 2 Inspector and will require repair by a qualified contractor.
The pool of water at the outlet pipe is discolored, has an odor, or has excessive algae or vegetative growth.

Page 7 of 7
Additional Notes:
Inspector: Date:
Complete the following if follow-up/corrective actions were identified during this inspection:
Certified Completion of Follow-Up Actions:
“I hereby certify that the follow-up/corrective actions identified in the inspection performed on _____________ (DATE) have been completed and any required maintenance deficiencies have been adequately corrected.”
Inspector/Operator: Date:

Page 1 of 4
Pond and Wetland Stormwater Management Practices Level 2 Inspection Checklist
SMP ID # SMP Owner Private
Public
SMP Location (Address; Latitude & Longitude)
Latitude Longitude
Party Responsible for Maintenance System Type Type of Site
Same as SMP Owner
Other
_________________________
Seasonal
Continuous Use
Other
Above Ground
Below Ground
Commercial
Industrial
Residential
State
Inspection Date Inspection Time
Inspector
Date of Last Inspection

Page 2 of 4
Level 2 Inspection: PONDS and WETLANDS
Recommended Repairs and Required Skills Triggers for Level 3 Inspection
Observed Condition: Bare Soil or Erosion in the Drainage Area
Condition 1: Extensive problem spots, but no channels or rills forming
Reseed problem areas. If problem persists or grass does not take, consider hiring a landscape contractor. Condition 2: Problem is extensive, and rills/channels
are beginning to form May be necessary to divert or redirect water that is causing the erosion problem. If it appears that simple regrading—such as installing a berm or leveling a low spot–will fix the problem, make repairs and ensure that the problem is repaired after the next storm.
Large rills or gullies are forming in the drainage area.
An attempt to regrade the drainage area has been unsuccessful.
Fixing the problem would require major regrading (i.e., redirecting more than a 100-square-foot area.
It is not clear why the problem is occurring.
Level 3 inspection necessary
Observed Condition: Manholes or Inlet Pipe Buried or Covered with Vegetation
Condition 1: Nearest manhole and inlet pipe not found
Consult as-built drawings to get to closest suspected location and use metal detector to search for metal manhole cover. If unsuccessful, identify nearest drain inlets and approximate pipe direction to locate next manhole. Condition 2: Manhole located and inspected
Never enter a manhole, except by following confined-space entry protocols. If outlet pipe is not visible or greater than 25% full of sediment/debris or trash, it will typically require a qualified contractor to flush, clean and clear blockages. Condition 3: Inlet pipe not found at pond
Clear vegetation and brush that may be covering the inlet pipe. Buried inlet pipes may be found through use of a metal probe. Condition 4: Inlet pipe buried in sediment or blocked
by vegetation Once located, the pipe path can be cleared of vegetation with brush hook or other brush tools. Light digging may clear sediment from the end of the pipe.
To locate buried manholes and lost storm lines, it is sometimes necessary to hire a pipeline inspection contractor with televising equipment or ground-penetrating radar and enter at the closest upstream access point.
Locating a buried inlet pipe may require wading in the edge of the pond and using a metal probe and brush axe to find and expose the pipe.
If other than light digging is necessary to remove accumulated sediment, a contractor with heavy equipment may be required.
Level 3 inspection necessary

Page 3 of 4
Level 2 Inspection: PONDS and WETLANDS
Recommended Repairs and Required Skills Triggers for Level 3 Inspection
Observed Condition: Pipe or Headwall Settlement, Erosion, Corrosion or Failure
Condition 1: Pipe or headwall settlement or failure Severe sinkholes, settlement or corrosion should be kicked out to Level 3 Inspection. Condition 2: Flow not confined to pipe and visible
outside pipe wall With flashlight, observe the inside of the pipe and note its condition. Take photographs. Look for sinkholes developing that indicate pipe failure beneath the surface. Kick out to Level 3 inspection.
Where blockages are visible, a decision is needed on whether to clear them or leave in place. If a third of the pipe is full of sediment, it should be removed by a contractor with pipe-cleaning equipment.
Corrosion of inlet pipes that allows flow around the pipe exterior is a structural concern because it can lead to settlement, sinkholes and undermining pond embankment. Evidence of this type of failure may require specialized pipe-inspection equipment and investigation by an engineer.
Level 3 inspection necessary
Observed Condition: Pond Conditions
Condition 1: Pond pre-treatment zone is full of sediment or not constructed as shown on as-built drawings.
Condition 2: Excessive buildup of sediment or
overgrowth If the pre-treatment area or pond pool is overgrown or filled with sediment so that the original design is compromised, corrective measures are required. If plants have died, then replanting is necessary. If none of the original design exists due to alteration or sediment, kick out to Level 3 inspection.
It may require inspection by an engineer to determine next steps for clearing, replanting or reconstruction.
Erosion or settlement such that design has been compromised should be reviewed by an engineer. Recurring erosion may require redesign and/or regrading to direct flow away from eroding area.
If sediment has filled more than 50% of the pond’s capacity, dredging is likely needed and should be evaluated by a qualified contractor.
Removal or control of excessive algae or aquatic plants can be assessed by a qualified pond maintenance company.
Level 3 inspection necessary

Page 4 of 4
Notes:
Inspector: Date:
Complete the following if follow-up/corrective actions were identified during this inspection:
Certified Completion of Follow-Up Actions:
“I hereby certify that the follow-up/corrective actions identified in the inspection performed on _____________ (DATE) have been completed and any required maintenance deficiencies have been adequately corrected.”
Inspector/Operator: Date:
Page 1 of 4
RWH Conveyance System and Filter
Inspect any gutters, downspouts, drainage pipes, and filters connected to the Rainwater Harvesting System.
Problem (Check if Present) Follow-Up Actions
Leaves, sticks, or other debris in gutters and downspouts
Remove all debris by hand. Other:
Leaves, sticks, or other debris in filter(s) Clean out all debris and organic matter buildup by hand or by spraying with
a hose. Other:
Rainwater Harvesting Stormwater Management Practices Level 1 Inspection Checklist
SMP ID # SMP Owner Private
Public
SMP Location (Address; Latitude & Longitude)
Latitude Longitude
Party Responsible for Maintenance System Type Type of Site
Same as SMP Owner
Other
_________________________
Seasonal
Continuous Use
Other
Above Ground
Below Ground
Commercial
Industrial
Residential
State
Inspection Date Inspection Time
Inspector
Date of Last Inspection

Page 2 of 4
RWH Conveyance System and Filter
Inspect any gutters, downspouts, drainage pipes, and filters connected to the Rainwater Harvesting System.
Problem (Check if Present) Follow-Up Actions
Kick-Out to Level 2 Inspection: Filter (first-flush diverter or vortex filter outside the tank) does not seem to be operating, is completely clogged, or does not appear to be trapping any debris.
Loose or disconnected junctions between gutters, pipes, or filters
Secure any loose junctions or parts and make sure they are properly sealed to prevent leaks,
Other:
RWH Storage Tank
Inspect for any leaks or blockages when tank is full. Drain tank to visually inspect interior without breaking the plane of the opening with any part of the body. This is a confined space that should only be entered by those with special training.
Problem (Check if Present) Follow-Up Actions
Tank is above ground and not freeze proof.
Winterize the tank by performing the following steps: Drain down water level in the tank before winter to avoid damage from
freezing temperatures. Drain water from pipes and pumps. Disconnect conveyance pipes from the tank to enable roof runoff to bypass
the tank during winter.
Mosquito larvae or other insects present in the water
Add mosquito dunks to water. Ensure that insect screens are installed on all openings and are properly
sealed (inlet and outlets). Other:
Debris, algae, or organic matter accumulated in tank
Remove as much as possible, by hand. Other:
Kick-Out to Level 2 Inspection: For large tanks that cannot easily be accessed for inspection and/or cleaning, defer to Level 2 Inspection.
Tank does not appear to fill fully even during large rains, or water level drops quickly after filling.
Kick-Out to Level 2 Inspection: Water is bypassing the tank and/or there are leaks in the tank wall. This will likely require special expertise to diagnose and fix.
Problems with pumps, filters, or other mechanical components
Kick-Out to Level 2 Inspection: This will likely require special expertise to diagnose and fix.

Page 3 of 4
RWH Outlets
Examine the outlet pipe(s) and the point at which it overflows onto the ground.
Problem (Check if Present) Follow-Up Actions
Slow flow from outlet caused by faulty or clogged valve
If clogging seems to be the problem, ream out sediment from valve if this can be done from exterior.
Other:
Kick-Out to Level 2 Inspection: Valve needs to be replaced or cannot be cleaned out from outside of tank.
Flow from outlet is backing up toward building foundation.
Add flexible pipe to end of outlet pipe to divert flow further away and downhill from building.
Erosion or drainage issues at outlet
Add a gravel and/or stone pad to reduce the impact from the water flowing out of the outlet pipe during storms.
Other:
Kick-Out to Level 2 Inspection: Rills have formed, erosion or drainage problems are more severe or cannot be resolved, or there is discoloration or other unusual conditions around the outlet.
Additional Notes:

Page 4 of 4
Inspector: Date:
Complete the following if follow-up/corrective actions were identified during this inspection:
Certified Completion of Follow-Up Actions:
“I hereby certify that the follow-up/corrective actions identified in the inspection performed on _____________ (DATE) have been completed and any required maintenance deficiencies have been adequately corrected.”
Inspector/Operator: Date:

Page 1 of 3
Rainwater Harvesting Stormwater Management Practices Level 2 Inspection Checklist
SMP ID # SMP Owner Private
Public
SMP Location (Address; Latitude & Longitude)
Latitude Longitude
Party Responsible for Maintenance System Type Type of Site
Same as SMP Owner
Other
_________________________
Seasonal
Continuous Use
Other
Above Ground
Below Ground
Commercial
Industrial
Residential
State
Inspection Date Inspection Time
Inspector
Date of Last Inspection

Page 2 of 3
Level 2 Inspection – RAINWATER HARVESTING
Recommended Repairs Triggers for Level 3 Inspection
Observed Condition: Tank is not filling properly or water level drops quickly
Condition 1: Tank is not filling properly Look for signs of water bypassing the tank. Inspect the conveyance system and filters to make sure that all parts are properly connected and not leaking. Observe the system during a rainstorm to make sure that water is not backing up and spilling out of the gutters or getting excessively diverted by the filter. Adjust angles and placement of filter as needed. Condition 2: Water level drops quickly after filling
Requires diagnosis and resolution of problem:
Leaking valve or spigot?
Crack in tank wall?
Pump turning on unnecessarily?
Gutters, pipes, and/or filter appear to be undersized or not properly designed.
Structural or mechanical problem requires special expertise in rainwater harvesting systems.
Level 3 Inspection necessary
Observed Condition: Tank is sinking, leaning, or at risk of collapse
Condition 1: Foundation is not stable
This repair may need specialized equipment and skill, depending on the size and type of tank. For smaller tanks (like rain barrels), drain and disconnect the tank to move it aside. Compact the underlying soil and create a solid, level base for the tank with concrete blocks or gravel. Seek professional help for larger tanks. Condition 2: Other structural problem
Seek professional help.
Tanks cannot be easily adjusted or fixed by hand.
Level 3 Inspection necessary
Observed Condition: Severe erosion at outlet
Condition 1: Erosion gets worse even after re-seeding or adding stone
There are several potential solutions to this continued erosion. Add geotextile fabric below the stone to protect the soil. Dig out a pit at the outfall and fill with gravel or stone to absorb the velocity of the water spilling out the tank. If the outlet flows onto a steep slope, consider extending the pipe length to a flatter area. Some of these actions may require help from a contractor.
Erosion control cannot easily be installed by hand.
Erosion recurs after previous repairs. Downstream drainage concerns
Level 3 Inspection necessary

Page 3 of 3
Notes:
Inspector: Date:
Complete the following if follow-up/corrective actions were identified during this inspection:
Certified Completion of Follow-Up Actions:
“I hereby certify that the follow-up/corrective actions identified in the inspection performed on _____________ (DATE) have been completed and any required maintenance deficiencies have been adequately corrected.”
Inspector/Operator: Date:

Page 1 of 6
SF Drainage Area Look for both pervious and impervious areas that are uphill from the filter.
Problem (Check if Present) Follow-Up Actions
Bare soil, erosion of the ground (rills washing out the dirt; reference below)
Seed and straw areas of bare soil to get vegetation established. Fill in erosion areas with soil, compact, and seed and straw to establish
vegetation. If a rill or small channel is forming, try to redirect water flowing to this
area by creating a small berm or adding topsoil to areas that are heavily compacted.
Other:
Sand and Organic Filter Stormwater Management Practices Level 1 Inspection Checklist
SMP ID # SMP Owner Private
Public
SMP Location (Address; Latitude & Longitude)
Latitude Longitude
Party Responsible for Maintenance System Type Type of Site
Same as SMP Owner
Other
_________________________
Seasonal
Continuous Use
Other
Above Ground
Below Ground
Commercial
Industrial
Residential
State
Inspection Date Inspection Time
Inspector
Date of Last Inspection
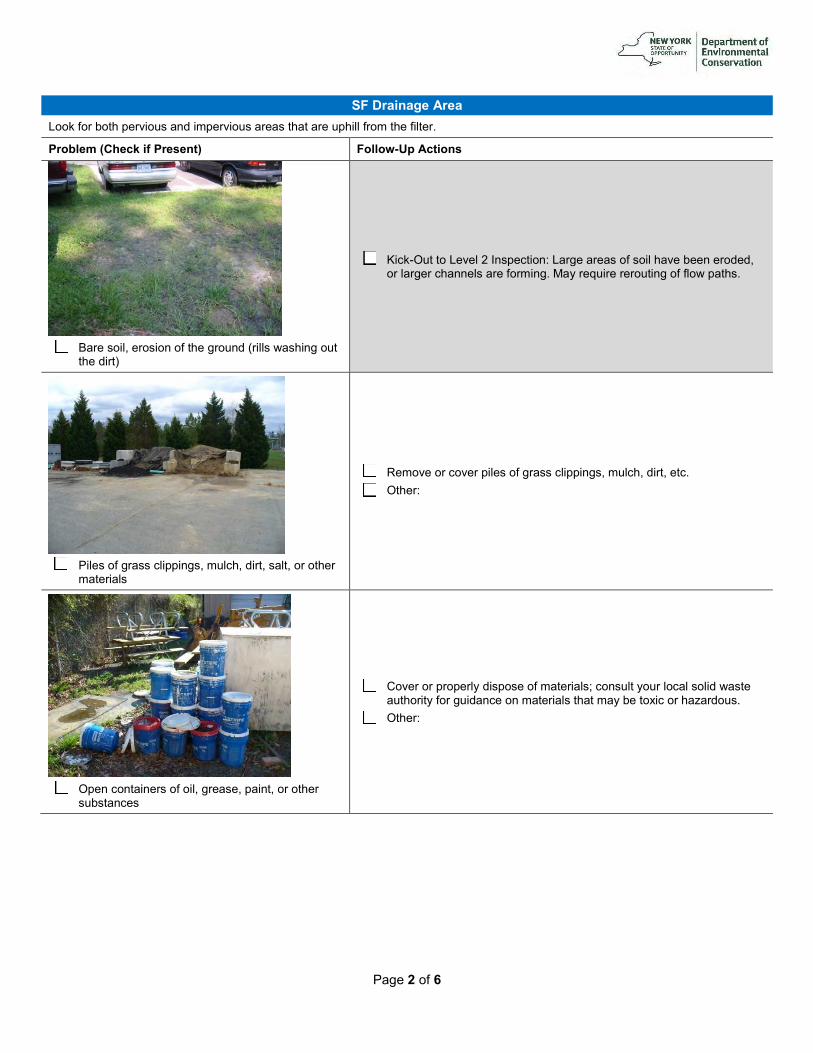
Page 2 of 6
SF Drainage Area Look for both pervious and impervious areas that are uphill from the filter.
Problem (Check if Present) Follow-Up Actions
Bare soil, erosion of the ground (rills washing out
the dirt)
Kick-Out to Level 2 Inspection: Large areas of soil have been eroded, or larger channels are forming. May require rerouting of flow paths.
Piles of grass clippings, mulch, dirt, salt, or other
materials
Remove or cover piles of grass clippings, mulch, dirt, etc. Other:
Open containers of oil, grease, paint, or other
substances
Cover or properly dispose of materials; consult your local solid waste authority for guidance on materials that may be toxic or hazardous.
Other:

Page 3 of 6
SF Inlets Look for all the places where water flows into the filter practice.
Problem (Check if Present) Follow-Up Actions
Inlets are collecting grit and debris or grass/weeds growing. Some water may not be getting into the filter practice.
Use a flat shovel to remove grit and debris (especially at curb inlets or openings). Parking lots generate fine grit that accumulates at these spots.
Pull out clumps of growing grass or weeds and scoop out the soil or grit that the plants are growing in.
Remove any grass clippings, leaves, sticks, and other debris that is collecting at inlets.
For pipes and ditches, remove sediment and debris that is partially blocking the pipe or ditch opening where it enters the Filter practice.
Dispose of all material properly in an area where it will not re-enter the practice.
Other:
Kick-Out to Level 2 Inspection: Inlets are blocked to the extent that most of the water does not seem to be entering the filter practice.
Some or all of the inlets are eroding so that rills, gullies, and other erosion are present, or there is dirt washing into the filter practice.
For small areas of erosion, smooth out the eroded part and apply rock or stone (e.g., river cobble) to prevent further erosion. Usually, filter fabric is placed under the rock or stone.
In some cases, reseeding and applying erosion-control matting can be used to prevent further erosion. Some of these materials may be available at a garden center, but it may be best to consult a landscape contractor.
Other:
Kick-Out to Level 2 Inspection: Erosion is occurring at most of the inlets and it looks like there is too much water concentrating at these points. The inlet design may have to be modified.
For an underground filter, water is ponding and doesn’t seem to be getting through the filter.
Kick-Out to Level 2 Inspection: This is generally a more serious problem and should be referred for a Level 2 Inspection because it will require opening up the filter vault to check for clogging.

Page 4 of 6
SF Filter Area (for Surface Sand Filters)
Examine the surface of the filter and the observation well, if present.
Problem (Check if Present) Follow-Up Actions
Filter has grass and vegetation growing on
more than 25% of the filter bed, threatening to clog the filter.
Vegetation growing in the filter bed should be removed either manually or with a water-safe herbicide (e.g., glysophate without surfactants).
Other:
Kick-Out to Level 2 Inspection: The filter seems clogged, or vegetation and weeds have proliferated past the point where the Level 1 person can manage it.
Minor amounts of sediment, grit, trash, or other debris are accumulating on the surface.
Use a shovel to scoop out minor amounts of sediment or grit, especially in the spring after winter sanding materials wash in and accumulate. Dispose of the material where it cannot re-enter the filter.
If removing the material creates a hole or low area, rake the surface smooth and level.
Remove trash, debris, and other undesirable materials. Other:
Kick-Out to Level 2 Inspection: Sediment (other than sand) has accumulated more than 2-inches deep and covers 25% or more of the surface of the filter area.
There is erosion on the surface; water seems
to be carving out rills as it flows across the filter surface, or sinkholes are forming in certain areas.
For minor areas of erosion, try filling the eroded areas with clean, coarse construction sand.
Other:
Kick-Out to Level 2 Inspection: The problem persists or the erosion is more than 3-inches deep and seems to be an issue with how water enters and moves through the filter area.
Kick-Out to Level 2 Inspection: The problem does not seem to be caused by flowing water but by a collapse or sinking of the surface (e.g., “sinkhole”) due to some underground problem.

Page 5 of 6
SF Filter Area (for Surface Sand Filters)
Examine the surface of the filter and the observation well, if present.
Problem (Check if Present) Follow-Up Actions
Water is still visible on the surface and/or the
standpipe (if present) more than 72 hours after a rainstorm. The filter practice drains very slowly or is completely clogged.
Kick-Out to Level 2 Inspection: This is generally a serious problem, and it will be necessary to activate a Level 2 Inspection.
Additional Notes:

Page 6 of 6
Inspector: Date:
Complete the following if follow-up/corrective actions were identified during this inspection:
Certified Completion of Follow-Up Actions:
“I hereby certify that the follow-up/corrective actions identified in the inspection performed on _____________ (DATE) have been completed and any required maintenance deficiencies have been adequately corrected.”
Inspector/Operator: Date:

Page 1 of 3
Sand and Organic Filter Stormwater Management Practices Level 2 Inspection Checklist
SMP ID # SMP Owner Private
Public
SMP Location (Address; Latitude & Longitude)
Latitude Longitude
Party Responsible for Maintenance System Type Type of Site
Same as SMP Owner
Other
_________________________
Seasonal
Continuous Use
Other
Above Ground
Below Ground
Commercial
Industrial
Residential
State
Inspection Date Inspection Time
Inspector
Date of Last Inspection
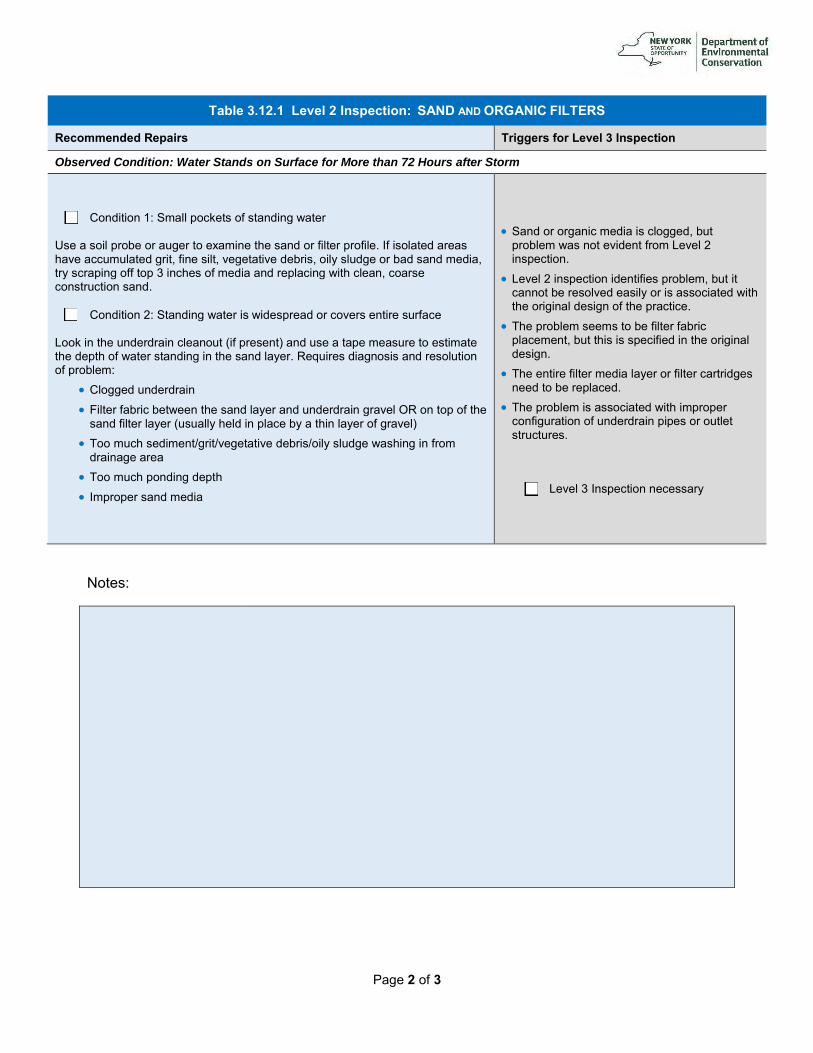
Page 2 of 3
Table 3.12.1 Level 2 Inspection: SAND AND ORGANIC FILTERS
Recommended Repairs Triggers for Level 3 Inspection
Observed Condition: Water Stands on Surface for More than 72 Hours after Storm
Condition 1: Small pockets of standing water Use a soil probe or auger to examine the sand or filter profile. If isolated areas have accumulated grit, fine silt, vegetative debris, oily sludge or bad sand media, try scraping off top 3 inches of media and replacing with clean, coarse construction sand. Condition 2: Standing water is widespread or covers entire surface
Look in the underdrain cleanout (if present) and use a tape measure to estimate the depth of water standing in the sand layer. Requires diagnosis and resolution of problem:
Clogged underdrain
Filter fabric between the sand layer and underdrain gravel OR on top of the sand filter layer (usually held in place by a thin layer of gravel)
Too much sediment/grit/vegetative debris/oily sludge washing in from drainage area
Too much ponding depth
Improper sand media
Sand or organic media is clogged, but problem was not evident from Level 2 inspection.
Level 2 inspection identifies problem, but it cannot be resolved easily or is associated with the original design of the practice.
The problem seems to be filter fabric placement, but this is specified in the original design.
The entire filter media layer or filter cartridges need to be replaced.
The problem is associated with improper configuration of underdrain pipes or outlet structures.
Level 3 Inspection necessary
Notes:

Page 3 of 3
Inspector: Date:
Complete the following if follow-up/corrective actions were identified during this inspection:
Certified Completion of Follow-Up Actions:
“I hereby certify that the follow-up/corrective actions identified in the inspection performed on _____________ (DATE) have been completed and any required maintenance deficiencies have been adequately corrected.”
Inspector/Operator: Date:

Page 1 of 7
Swale Stormwater Management Practices Level 1 Inspection Checklist
SMP ID # SMP Owner Private
Public
SMP Location (Address; Latitude & Longitude)
Latitude Longitude
Party Responsible for Maintenance System Type Type of Site
Same as SMP Owner
Other
_________________________
Seasonal
Continuous Use
Other
Above Ground
Below Ground
Commercial
Industrial
Residential
State
Inspection Date Inspection Time
Inspector
Date of Last Inspection
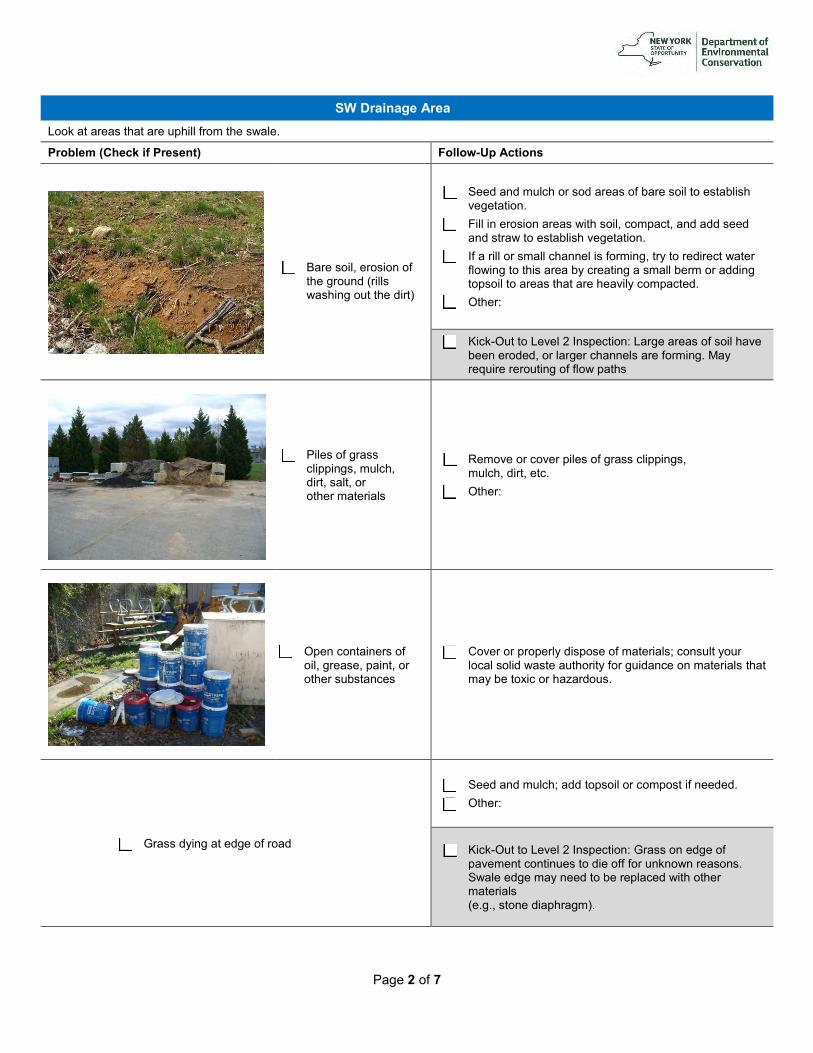
Page 2 of 7
SW Drainage Area Look at areas that are uphill from the swale.
Problem (Check if Present) Follow-Up Actions
Bare soil, erosion of
the ground (rills washing out the dirt)
Seed and mulch or sod areas of bare soil to establish vegetation.
Fill in erosion areas with soil, compact, and add seed and straw to establish vegetation.
If a rill or small channel is forming, try to redirect water flowing to this area by creating a small berm or adding topsoil to areas that are heavily compacted.
Other:
Kick-Out to Level 2 Inspection: Large areas of soil have been eroded, or larger channels are forming. May require rerouting of flow paths
Piles of grass clippings, mulch, dirt, salt, or other materials
Remove or cover piles of grass clippings, mulch, dirt, etc.
Other:
Open containers of oil, grease, paint, or other substances
Cover or properly dispose of materials; consult your local solid waste authority for guidance on materials that may be toxic or hazardous.
Grass dying at edge of road
Seed and mulch; add topsoil or compost if needed. Other:
Kick-Out to Level 2 Inspection: Grass on edge of pavement continues to die off for unknown reasons. Swale edge may need to be replaced with other materials (e.g., stone diaphragm).

Page 3 of 7
SW Inlets
Stand in the swale and look for all the places where water flows in.
Problem (Check if Present) Follow-Up Actions
Inlets or the swale edge are collecting grit, grass clippings, or debris or have grass/weeds growing. Some water may not be getting into the swale. The objective is to have a clear pathway for water to flow into
the swale.
Use a flat shovel to remove grit and debris (especially at curb inlets or opening). Parking lots
will generate fine grit that will accumulate at these spots.
Pull out clumps of growing grass or weeds, and scoop out the soil or grit that the plants are
growing in. Remove any grass clippings, leaves, sticks, and
other debris that is collecting at inlets or along the edge of the swale where water is supposed
to enter. For pipes and ditches, remove sediment and
debris that is partially blocking the pipe or ditch opening where it enters the swale.
Dispose of all material properly in an area where it will not re-enter the swale.
Other:
Kick-Out to Level 2 Inspection: Inlets are blocked to the extent that most of the water does not seem
to be entering the swale.
Some or all of the inlets are eroding
so that rills, gullies, and other erosion
are present, or there is bare dirt
that is washing into the swale.
For small areas of erosion, smooth out the eroded part and apply rock or stone (e.g., river cobble) to
prevent further erosion. Usually, filter fabric is placed under the rock or stone.
In some cases, reseeding and applying an erosion control matting can be used to prevent further
erosion. Some of these materials may be available at a garden center, but it may be best to
consult a landscape contractor. Other:
Level 2 Inspection: Erosion is occurring at most of the inlets or along much of the swale edge. The
inlet design may have to be modified.

Page 4 of 7
SW Surface Area
Examine the entire swale surface and side slopes.
Problem (Check if Present) Follow-Up Actions
Minor areas of sediment, grit, trash, or other debris are accumulating in the swale.
Use a shovel to scoop out minor areas of sediment or grit, especially in the spring after winter sanding materials may wash in and accumulate. Dispose of the material where it cannot re-enter the swale.
If removing the material creates a hole or low area, fill with good topsoil and add seed and straw to re-vegetate.
Remove trash, vegetative debris, and other undesirable materials. If the swale is densely vegetated, it may be difficult to do the maintenance;
check for excessive ponding or other issues described in this section to see if the accumulated material is causing a problem.
Other:
Kick-Out to Level 2 Inspection: Sediment has accumulated more than 3 inches deep and covers 25% or more of the swale surface.
The source of sediment is unknown or cannot be controlled with simple measures.
There is erosion in the bottom or on the side slopes. Water seems to be carving out rills as it flows through the swale or on the slopes.
Try filling the eroded areas with clean topsoil, and then seed and mulch to establish vegetation.
If the problem recurs, you may have to use some type of matting, stone (e.g., river cobble), or other material to fill in eroded areas.
If the erosion is on a side slope, fill with soil and cover with erosion-control matting or at least straw mulch after re-seeding.
Kick-Out to Level 2 Inspection: The problem persists or the erosion is more than 3 inches deep and seems to be an issue with how water enters and moves through the swale.
Kick-Out to Level 2 Inspection: The problem does not seem to be caused by flowing water, but a collapse or sinking of the surface (e.g., “sinkhole”) due to some underground problem.
Water does not flow evenly down the length of the swale, but ponds in certain areas for long periods of time (e.g., 72 hours after a storm). The swale does not seem to have “positive drainage.” Check during or immediately after a rain storm.
If the problem is minor (just small, isolated areas), try using a metal rake or other tools to create a more even flow path; remove excessive vegetative growth, sediment, or other debris that may be blocking the flow.
Other:
Kick-Out to Level 2 Inspection: Water ponds in more than 25% of the swale for three days or more after a storm. The issue may be with the underlying soil or the grade of the swale.
Water ponds behind check dams for three days or more after a storm. Check dams may be clogged or not functioning properly.

Page 5 of 7
SW Surface Area
Examine the entire swale surface and side slopes.
Problem (Check if Present) Follow-Up Actions
Check dams (if present): water is flowing
around the edges of check dams, creating erosion or sinkholes on the uphill or downhill side, or the check dams are breaking apart or breaching .
If the problem is isolated to just a few check dams, try simple repairs.
It is very important for the center of each check dam (where most of the water flows) to be lower (by at least several inches) than the edges of the check dams where they meet the side slopes. Also, the check dams should be keyed into side slopes so water does not flow between the check dam and side slope.
Use a level to check the right check-dam configuration, as noted above. Repair by moving around stone, filling and compacting soil, or adding new material so that water will be directed to the center of the check dam instead of the edges.
Other:
Kick-Out to Level 2 Inspection: Many check dams are impacted and/or the problem seems to be a design issue with height, spacing, shape, or materials used to construct them.
SW Vegetation Assess the swale vegetation. Problem (Check if Present) Follow-Up Actions
. Vegetation is too overgrown to access swale
for maintenance activities
Mow or bush-hog the path. Other:

Page 6 of 7
SW Vegetation Assess the swale vegetation. Problem (Check if Present) Follow-Up Actions
Vegetation requires regular maintenance:
pulling weeds, removing dead and diseased plants, adding plants to fill in areas that are not well vegetated, etc.
If you can identify which plants are weeds or not intended to be part of the planting plan, eliminate these, preferably by hand pulling.
If weeds are widespread, check with the local stormwater authority and/or Extension Office about proper use of herbicides for areas connected with the flow of water.
Even vegetation that is intended to be present can become large, overgrown, block flow, and/or crowd out surrounding plants. Prune and thin accordingly.
If weeds or invasive plants have overtaken the whole swale, bush-hog the entire area before seed heads form in the spring. It will be necessary to remove the root mat manually or with appropriate herbicides, as noted above.
Replant with species that are aesthetically pleasing and seem to be doing well in the swale.
Other:
Kick-Out to Level 2 Inspection: You are unsure of the original planting design or the vegetation maintenance task is beyond your capabilities of time, expertise, or resources. If you are unsure of the health of the vegetation (e.g. salt damage, invasives, which plants are undesirable) or the appropriate season to conduct vegetation management, consult a landscape professional before undertaking any cutting, pruning, mowing, or brush hogging.
Vegetation is too thin, is not healthy, and there are many spots that are not well vegetated.
The original plants are likely not suited for the actual conditions within the swale. If you are knowledgeable about plants, select and plant more appropriate vegetation (preferably native plants) so that almost the entire surface area will be covered by the end of the second growing season.
Other:
Kick-Out to Level 2 Inspection: For all but small practices (e.g., in residential yards), this task will likely require a landscape design professional or horticulturalist.
SW Outlets Examine outlets that release water out of the swale. Problem (Check if Present) Follow-Up Actions
Outlet is obstructed with mulch, sediment, debris, trash, etc.
Remove the debris and dispose of it where it cannot re-enter the swale. Other:
Kick-Out to Level 2 Inspection: Outlet is completely clogged or obstructed; there is too much material to remove by hand or with simple hand tools.

Page 7 of 7
Additional Notes:
Inspector: Date:
Complete the following if follow-up/corrective actions were identified during this inspection:
Certified Completion of Follow-Up Actions:
“I hereby certify that the follow-up/corrective actions identified in the inspection performed on _____________ (DATE) have been completed and any required maintenance deficiencies have been adequately corrected.”
Inspector/Operator: Date:

Page 1 of 3
Swale Stormwater Management Practices Level 2 Inspection Checklist
SMP ID # SMP Owner Private
Public
SMP Location (Address; Latitude & Longitude)
Latitude Longitude
Party Responsible for Maintenance System Type Type of Site
Same as SMP Owner
Other
_________________________
Seasonal
Continuous Use
Other
Above Ground
Below Ground
Commercial
Industrial
Residential
State
Inspection Date Inspection Time
Inspector
Date of Last Inspection

Page 2 of 3
Level 2 Inspection: SWALE
Recommended Repairs Triggers for Level 3 Inspection
Observed Condition: Water Stands on Surface for More than 72 Hours after Storm
Condition 1: Small pockets of standing water Use a soil probe or auger to examine the soil profile. If isolated areas have accumulated grit, fines, or vegetative debris or have compacted soil, try scraping off top 3 to 6 inches of soil and replacing with clean material. Also check to see that surface is level and water is not ponding selectively in certain areas. Condition 2: Standing water is widespread or covers entire surface
Requires diagnosis and resolution of problem:
Bad or compacted soil Filter fabric on the swale bottom Too much sediment/grit washing in from drainage area? Too much ponding depth? Longitudinal slope is too flat?
Soil is overly compacted or clogged and problem is not evident from Level 2 inspection.
Level 2 inspection identifies problem, but it cannot be resolved easily or is associated with the original design of the practice (e.g., not enough slope down through the swale).
Level 3 inspection necessary
Observed Condition: Vegetation is predominantly weeds and invasive species
For a small area, weed and dig up invasive plants. Replant with natives or plants from original planting plan. If longer than 100 feet, develop a new planting plan and have it professionally reviewed.
Vegetation deviates significantly from original planting plan; swale has been neglected and suffered from deferred maintenance.
Owner/responsible party does not know how to maintain the practice.
For large area, hire a professional to develop a grading plan and develop a planting plan.
Level 3 inspection necessary
Notes:

Page 3 of 3
Inspector: Date:
Complete the following if follow-up/corrective actions were identified during this inspection:
Certified Completion of Follow-Up Actions:
“I hereby certify that the follow-up/corrective actions identified in the inspection performed on _____________ (DATE) have been completed and any required maintenance deficiencies have been adequately corrected.”
Inspector/Operator: Date:

Page 1 of 3
TP Watering
Inspect the trees to determine whether they need watering.
Problem (Check if Present) Follow-Up Actions
Soil is not moist to the touch and/or it has not rained in a week, and leaves/needles are starting to appear wilted/dry.
Water trees deeply and slowly near the base. Soaker hoses and drip irrigation work best for deep watering of trees and shrubs.
Other:
Tree Planting Stormwater Management Practices Level 1 Inspection Checklist
SMP ID # SMP Owner Private
Public
SMP Location (Address; Latitude & Longitude)
Latitude Longitude
Party Responsible for Maintenance System Type Type of Site
Same as SMP Owner
Other
_________________________
Seasonal
Continuous Use
Other
Above Ground
Below Ground
Commercial
Industrial
Residential
State
Inspection Date Inspection Time
Inspector
Date of Last Inspection

Page 2 of 3
TP Mulch
Mulch should be applied in the late spring and during leaf fall. Check the depth of mulch regularly. Rake the old mulch to break up any matted layers and to refresh the appearance.
Problem (Check if Present) Follow-Up Actions
Mulch is too thin or thick (should be approximately 3" deep) or does not extend to tree canopy (or 5' radius if tree has a larger than 10' canopy reach).
Add or remove mulch around tree canopy to maximum 5' radius but not within 3" of the bark.
If mulch is against the stems or tree trunks, pull it back several inches to expose the base of the trunk and root crown.
Other:
TP Pruning
Examine the branches and tree shape.
Problem (Check if Present) Follow-Up Actions
Presence of suckers, dead or diseased branches, branches that interfere with pedestrian traffic
Selective cutting Prune to make the tree more aesthetically pleasing and
remove disease. Other:
Kick-Out to Level 2 Inspection: Use an arborist or landscaper for more extensive pruning jobs.
Additional Notes:

Page 3 of 3
Inspector: Date:
Complete the following if follow-up/corrective actions were identified during this inspection:
Certified Completion of Follow-Up Actions:
“I hereby certify that the follow-up/corrective actions identified in the inspection performed on _____________ (DATE) have been completed and any required maintenance deficiencies have been adequately corrected.”
Inspector/Operator: Date:

Page 1 of 2
Level 2 Inspection: TREE PLANTING Recommended Repairs Triggers for Level 3 Inspection Observed Condition: Appearance of fungus or pest damage
Condition 1: Fungus, discoloration, browning leaves or holes in leaves
Check with arborist or other tree professional about the best way to proceed. This requires a Level 3 inspection. Condition 2: Burrowing insects, holes
Check with arborist or other tree professional about the best way to proceed. This requires a Level 3 inspection.
Any concerns about how to address infestation or disease
Level 3 inspection necessary
Tree Planting Stormwater Management Practices Level 2 Inspection Checklist
SMP ID # SMP Owner Private
Public
SMP Location (Address; Latitude & Longitude)
Latitude Longitude
Party Responsible for Maintenance System Type Type of Site
Same as SMP Owner
Other
_________________________
Seasonal
Continuous Use
Other
Above Ground
Below Ground
Commercial
Industrial
Residential
State
Inspection Date Inspection Time
Inspector
Date of Last Inspection

Page 2 of 2
Notes:
Inspector: Date:
Complete the following if follow-up/corrective actions were identified during this inspection:
Certified Completion of Follow-Up Actions:
“I hereby certify that the follow-up/corrective actions identified in the inspection performed on _____________ (DATE) have been completed and any required maintenance deficiencies have been adequately corrected.”
Inspector/Operator: Date: