bird sentry™ blender - carefusion · bird sentry™ blender l1383 rev. d v emc notice this...
TRANSCRIPT

Bird Sentry™ Blender User’s Guide

Bird Sentry™ Blender
ii L1383 Rev. D
This document is protected by United States and International Copyright laws.
This document may not be copied, reproduced, translated, stored in a retrieval system, transmitted in any form, or reduced to any electronic medium or machine-readable form, in whole or in part, without the written permission of CareFusion. Information in this document is subject to change without notice.
This document is for informational purposes only and should not be considered as replacing or supplementing the terms and conditions of the License Agreement.
© 1997–2010 CareFusion Corporation or one of its subsidiaries. All rights reserved. The CareFusion logo and Bird Sentry are trademarks or registered trademarks of CareFusion Corporation or one of its subsidiaries. All other trademarks are the property of their respective owners.
USA CareFusion 22745 Savi Ranch Parkway Yorba Linda, California 92887-4668
Authorized European Representative CareFusion Germany 234 GmbH Leibnizstrasse 7 97204 Hoechberg, Germany District Court Wuerzburg HRB7004
800.231.2466 tel +1.714.283.2228 tel +1.714.283.8493 fax
+49.931.4972.0 tel +49.931.4972.423 fax
carefusion.com
Literature number: L1383 Revision D
Bird Sentry™ Blender
L1383 Rev. D iii
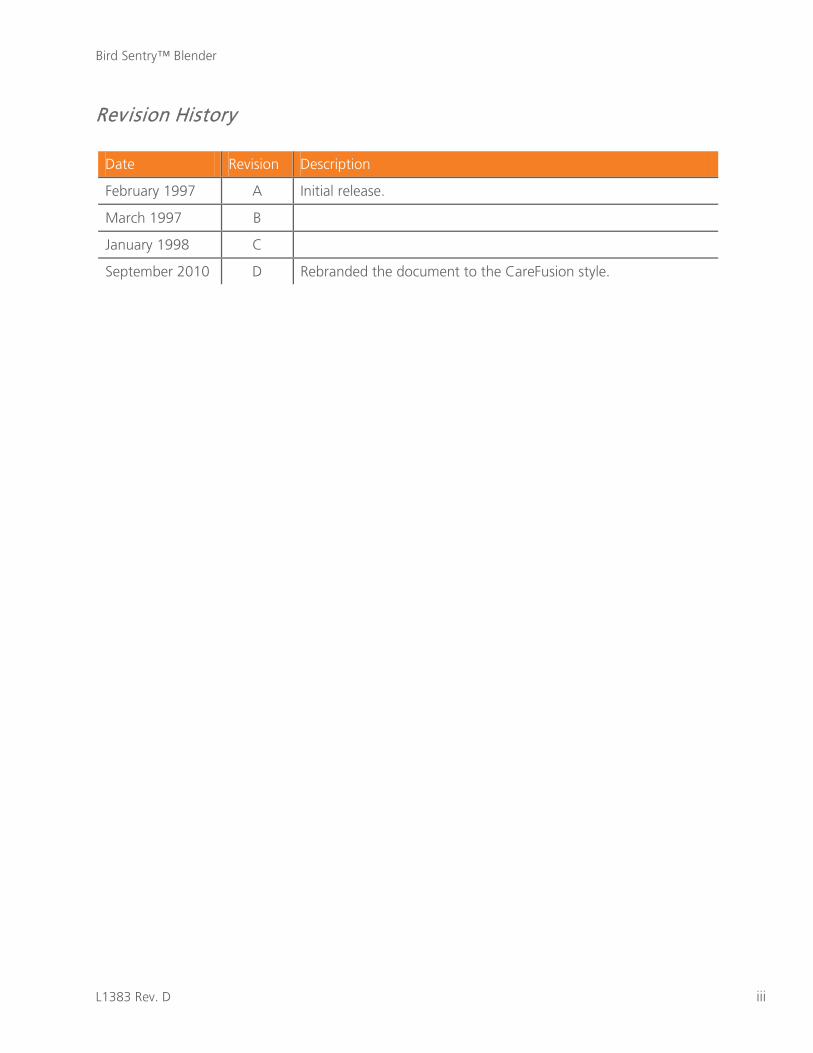
Rev ision History
Date Revision Description
February 1997 A Initial release.
March 1997 B
January 1998 C
September 2010 D Rebranded the document to the CareFusion style.
Bird Sentry™ Blender
iv L1383 Rev. D
Warranty THE BIRD SENTRY™ BLENDER IS WARRANTED TO BE FREE FROM DEFECTS IN MATERIAL AND WORKMANSHIP AND TO MEET THE PUBLISHED SPECIFICATIONS FOR ONE (1) YEAR.
The liability of CareFusion under this warranty is limited to replacing, repairing or issuing credit, at the discretion of CareFusion, for parts that become defective or fail to meet published specifications during the warranty period; CareFusion will not be liable under this warranty unless (A) CareFusion is promptly notified in writing by Buyer upon discovery of defects or failure to meet published specifications; (B) the defective unit or part is returned to CareFusion, transportation charges prepaid by Buyer; (C) the defective unit or part is received by CareFusion for adjustment no later than four (4) weeks following the last day of the warranty period; and (D) examination by CareFusion of such unit or part shall disclose, to its satisfaction, that such defects or failures have not been caused by misuse, neglect, improper installation, unauthorized repair, alteration or accident.
Any authorization of CareFusion for repair or alteration by the Buyer must be in writing to prevent voiding the warranty. In no event shall CareFusion be liable to the Buyer for loss of profits, loss of use, consequential damage or damages of any kind based upon a claim for breach of warranty, other than the purchase price of any defective product covered hereunder.
CareFusion warranties as herein and above set forth shall not be enlarged, diminished or affected by, and no obligation or liability shall arise or grow out of the rendering of technical advice or service by CareFusion or its agents in connection with the Buyer's order of the products furnished hereunder.
Limitations of Liabilities This warranty does not cover normal maintenance such as cleaning, adjustment or lubrication and updating of equipment parts. This warranty shall be void and shall not apply if the equipment is used with accessories or parts not manufactured by CareFusion or authorized for use in writing by CareFusion, or if the equipment is not maintained in accordance with a prescribed schedule of maintenance.
The warranty stated above shall extend for a period of one (1) year from date of shipment with the following exceptions:
1. Components for monitoring of physical variables such as temperature, pressure, or flow are warranted for ninety (90) days from date of receipt.
2. Elastomeric components and other parts or components subject to deterioration, over which CareFusion has no control, are warranted for sixty (60) days from date of receipt.
THE FOREGOING IS IN LIEU OF ANY WARRANTY, EXPRESSED OR IMPLIED, INCLUDING, WITHOUT LIMITATION, ANY WARRANTY OF MERCHANTABILITY, EXCEPT AS TO TITLE, AND CAN BE AMENDED ONLY IN WRITING.BY A DULY AUTHORIZED REPRESENTATIVE OF CareFusion.
Bird Sentry™ Blender
L1383 Rev. D v
EMC Notice This equipment generates, uses, and can radiate radio frequency energy If not installed and used in accordance with the instructions in this manual, electromagnetic interference may result. The equipment has been tested and found to comply with the limits set forth in IEC 601-1-2 for Medical Products. These limits provide reasonable protection against electromagnetic interference when operated in the intended use environments described in this manual.
MRI Notice This equipment contains electromagnetic components whose operation can be affected by intense electromagnetic fields.
Do not operate the Bird Sentry blender unattended in an MRI environment or in the vicinity of high-frequency surgical diathermy equipment, defibrillators, or shortwave therapy equipment. Electromagnetic interference could disrupt the operation of the Bird Sentry blender.
Regulatory Notice Federal law restricts the sale of this device except by and on order of a physician.
Declaration of Conformity Notice This medical equipment complies with the Medical Device Directive, 93/42/EEC, and the following Technical Standards, to which Conformity is declared:
IEC 601-1-2
IEC 601-1-2: 1993
ISO 9001: 1994
EN 46001, MDD-Annex-II
Type of Equipment: Medical Equipment, O2
Blender/Monitor
Trade name: Bird Sentry
Model No.: 15625 Series
If you have any questions regarding the Declaration of Conformity for this product, please contact CareFusion Corporation.
Bird Sentry™ Blender
vi L1383 Rev. D
Read this entire manual before attempting to operate or service the Bird Sentry™ blender:
Attempting to operate the Bird Sentry blender without fully understanding its features and functions may result in unsafe operating conditions.
Read the Safety Information section. It lists warnings, cautions, and notes pertinent to the safe servicing of the Bird Sentry blender.
If you have a question regarding the installation, setup, operation, or maintenance of the Bird Sentry blender, contact customer service at the following numbers:
Technical Support Hours: 7:00 a.m. to 4:30 p.m. (PST), Monday through Friday
Tel.: 714.283.2228 or 800.231.2466 (Follow the prompts to technical support.)
Fax: 714.283.8471
CareFusion Helpline Hours: 24 hours, 7 days a week
Tel.: 800.231.2466 or 800.328.4139
Bird Sentry™ Blender
L1383 Rev. D vii
Safety Information Review the following safety information before operating the Bird Sentry blender:
Definitions Warning! Identifies a condition or practice that could result in serious adverse reactions or
potential safety hazards.
Caution! Identifies a condition or practice that could result in damage to the Bird Sentry blender or other equipment.
Note: Identifies supplemental information to help you better understand how the Bird Sentry blender works.
Warnings The following warnings apply any time you operate or service the Bird Sentry blender:
● To avoid explosion, do not operate the Bird Sentry blender in the presence of flammable anesthetics or in an atmosphere of explosive gases. Operating the Bird Sentry blender in flammable or explosive atmospheres may result in fire or explosion.
● Do not operate the Bird Sentry blender unless qualified personnel are in attendance to promptly respond to alarms, inoperative conditions, or sudden malfunctions. Patients on life-support equipment should be visually monitored at all times.
● Do not ignore audible alarms occurring by the Bird Sentry blender. Alarms indicate conditions that require your immediate attention.
● Do not use parts, accessories, or options that have not been authorized for use with the Bird Sentry blender. Using unauthorized parts, accessories, or options may be harmful to the patient or damage the Bird Sentry blender.
● Check all audible and visual alarms daily to make sure they are operating properly. If an alarm fails to activate, contact your CareFusion Certified Service Technician.
● Consult a physician to determine concentration of inspired oxygen to be delivered.
● Do not operate the Bird Sentry blender without setting the adjustable alarms. All adjustable alarms must be set to ensure safe operation.
● Explosion hazard. DO NOT gas sterilize the Bird Sentry blender.
● DO NOT steam autoclave or otherwise subject the Bird Sentry blender to temperatures above 122°F (50°C).
● If the air or oxygen gas source fails, the pressure differential alarm will sound alerting the clinician that a condition has occurred that may significantly alter the FIO, and flow output from the Bird Sentry blender.
● If either the air or oxygen source pressure is reduced or increased sufficiently to create a pressure differential of 20 PSI or more, an audible alarm will sound. This condition may significantly alter the FIO and flow output from the Bird Sentry blender.
● DO NOT use humidified oxygen to calibrate this system. If calibrated with humidified oxygen, subsequent oxygen readings will be higher than the true oxygen level.
Bird Sentry™ Blender
viii L1383 Rev. D
● DO NOT tape, obstruct or remove the reed alarm during clinical use.
● DO NOT occlude the sensor port on the side of the Bird Sentry blender.
● Do not routinely disconnect or remove O2 sensors from the Bird Sentry blender. If the sensor must be disconnected, the full "warm-up" period, as stated in the sensor specifications, may be required after the sensor is reconnected.
● The mixed gas bleed continuously bleeds to atmosphere at the oxygen concentration setting of the control knob. Bleeding oxygen into any closed area could increase the risk of fire or explosion. Do not operate this device in the presence of any flame or source of ignition; or when using devices such as electrosurgical equipment or defibrillators.
Cautions ● Do not attempt to clean the Bird Sentry blender with cleaning agents that contain phenols,
ammonia chloride, or chloride compounds, or that contain more than 2% glutaraldehyde. These agents may damage the plastic components and control panel overlays.
● Dropping or severely jarring the sensor after calibration may shift the calibration point enough to require recalibration.
● Using the Bird Sentry blender to analyze and monitor oxygen concentrations other than at the sensor port of the unit will require recalibration of the sensor.
● Always operate the Bird Sentry blender with clean, dry medical grade gases. Contaminates or moisture can cause defective operation. Oxygen should have a minimum dew point of -80°F (-62°C) or moisture content less than 7.9 PPM (0.0059mg/L). Oxygen "purity" should be at least 99.6% and air used should be medical grade. Water vapor content must not exceed a dew point of 5°F (3°C) below the lowest ambient temperature to which the delivery system is exposed. Particulate content must not exceed that which would be found immediately downstream of a 15 micron absolute filter. Refer to CGA commodity specifications G-4.3 and G7.1 for more information. Water vapor content of medical air or 0, supply to the blender must not exceed 5.63 x 10³ milligrams H2O per cubic meter of non-condensable gas.
● When disassembling, care must be exercised to prevent damaging the printed circuit board. All work must be accomplished in a static safe environment.
● This device has not been tested in the presence of gases other than air or oxygen.
Notes ● The Bird Sentry blender is tested for compliance with ISO 11195:1995, clause 6, and meets
requirements regarding reverse gas flow as delivered.
● Applicable parts used in the Bird Sentry blender have been cleaned and degreased for oxygen service. Any lubricants used are designed specifically for the application. Do not use anything other than CareFusion specified lubricants when servicing the Bird Sentry blender.
● As long as the total pressure of the gas mixture being monitored is constant, the Bird Sentry blender will accurately read oxygen concentrations. However, if the total pressure varies the reading will fluctuate proportionately as the sensor actually measures the partial pressure of oxygen in the mixture. The sensor readings will also change proportionately with barometric pressure changes. Because of this, daily calibration of the sensor is recommended.
Bird Sentry™ Blender
L1383 Rev. D ix
● Users are advised to use pressure regulators, set to 50 ±5 PSIG(3.4± .4 BAR), which display system pressure.
● All specifications assume the following standard environ mental conditions, unless specified otherwise. Ambient and sample gas temperatures of 77°F (25°C); barometric pressure of 30:Hg (760mmHg); sea level altitude; ambient relative humidity of 50%; sample gas relative humidity of 0%
● It is important to note that the oxygen concentration selection scale is provided only as a guideline for selecting 0, concentrations. The clinician should use the display panel of the Bird Sentry blender to adjust the O2 concentration to the desired setting.
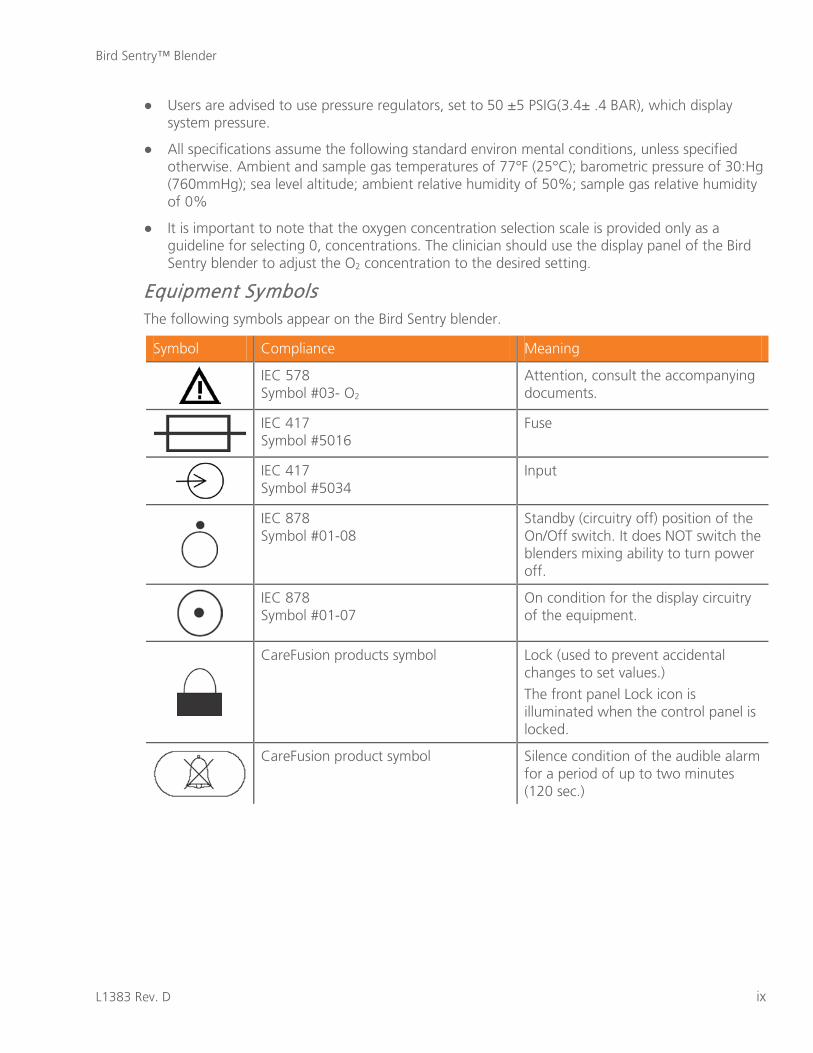
Equipment Symbols The following symbols appear on the Bird Sentry blender.
Symbol Compliance Meaning
IEC 578 Symbol #03- O2
Attention, consult the accompanying documents.
IEC 417 Symbol #5016
Fuse
IEC 417 Symbol #5034
Input
IEC 878 Symbol #01-08
Standby (circuitry off) position of the On/Off switch. It does NOT switch the blenders mixing ability to turn power off.
IEC 878 Symbol #01-07
On condition for the display circuitry of the equipment.
CareFusion products symbol Lock (used to prevent accidental changes to set values.) The front panel Lock icon is illuminated when the control panel is locked.
CareFusion product symbol Silence condition of the audible alarm for a period of up to two minutes (120 sec.)

Bird Sentry™ Blender
x L1383 Rev. D
Bird Sentry™ Blender

Bird Sentry™ Blender
L1383 Rev. D xi
Contents Revision History .............................................................................................................. iii
Warranty ....................................................................................................................... iv
Limitations of Liabilities .................................................................................................. iv
EMC Notice .................................................................................................................... v
MRI Notice ...................................................................................................................... v
Regulatory Notice ............................................................................................................ v
Declaration of Conformity Notice .................................................................................... v
Technical support ........................................................................................................... vi
CareFusion helpline ........................................................................................................ vi
Safety Information ......................................................................................................... vii
Chapter 1: Introduction ....................................................................................................... 1
Intended Use .................................................................................................................. 1
Front Panel Functional Description ................................................................................... 2
Bottom View ................................................................................................................... 4
Disposable Galvanic O2 Sensor ......................................................................................... 5
What You Will Need to Operate the Blender .................................................................... 6
What to Do If the Blender Fails ........................................................................................ 6
How to Get Help ............................................................................................................. 6
Chapter 2: Operating Procedures ......................................................................................... 7
Monitoring ..................................................................................................................... 7
Alarm Setting Procedure .................................................................................................. 7
Basic Operation ............................................................................................................... 8
Alarms and Conditions .................................................................................................... 8
Calibration Procedures .................................................................................................... 9
Automatic Calibration to Known Concentration ............................................................. 10
Chapter 3: Pressure Differential Alarm/Bypass Check .......................................................... 11
Chapter 4: Troubleshooting ............................................................................................... 13
Chapter 5: Cleaning the Bird Sentry Blender ...................................................................... 15
Chapter 6: Servicing and Maintaining the Bird Sentry Blender ............................................. 17
Maintenance ................................................................................................................. 17
Disposable Galvanic O2 Sensor Cable ............................................................................. 17
Servicing ....................................................................................................................... 18

Bird Sentry™ Blender
xii L1383 Rev. D
Chapter 7: Appendices ...................................................................................................... 19
Glossary ....................................................................................................................... 19
Specifications ................................................................................................................ 19
Setup and Installation ................................................................................................... 21
Theory of Operations .................................................................................................... 22
Flow Characteristics ...................................................................................................... 25
Bird Sentry™ Blender
L1383 Rev. D 1
Chapter 1: Introduction
The Bird Sentry blender is a compact air/oxygen gas mixing device which incorporates the use of a battery powered oxygen analyzer/monitor. The gas mixing device (blender) provides for precise mixing of medical grade air and oxygen, while the analyzer measures the selected oxygen concentrations from the blender's gas flow and samples and displays these measured concentrations on a digital display. The monitor provides high and low alarm limits which, when exceeded, cause an audible/ visual alarm to activate.
The Bird Sentry blender design allows for a wide scope of applications including:
● Free-flow oxygen administration
● Mechanical ventilation of adults, pediatrics, and neonates.
● Continuous Positive Airway Pressure (CPAP)
Intended Use The Bird Sentry blender is designed to provide a continuous air/oxygen gas mixture to infant, pediatric, and adult patients. It is a restricted medical device intended for use by qualified, trained personnel, under the direction of a physician, in institutional environments where the delivery and monitoring of air/oxygen mixtures is required.
Chapter 1: Introduction Bird Sentry™ Blender
2 L1383 Rev. D
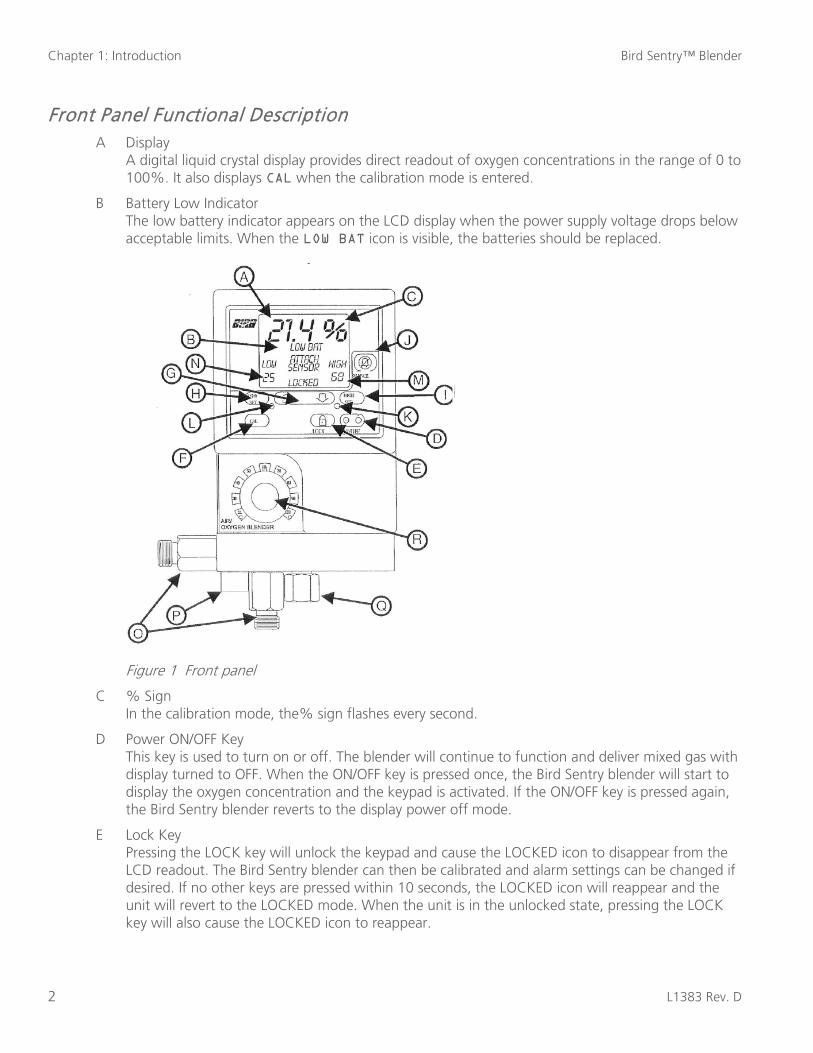
Front Panel Functional Description A Display
A digital liquid crystal display provides direct readout of oxygen concentrations in the range of 0 to 100%. It also displays CAL when the calibration mode is entered.
B Battery Low Indicator The low battery indicator appears on the LCD display when the power supply voltage drops below acceptable limits. When the LOW BAT icon is visible, the batteries should be replaced.
Figure 1 Front panel
C % Sign In the calibration mode, the% sign flashes every second.
D Power ON/OFF Key This key is used to turn on or off. The blender will continue to function and deliver mixed gas with display turned to OFF. When the ON/OFF key is pressed once, the Bird Sentry blender will start to display the oxygen concentration and the keypad is activated. If the ON/OFF key is pressed again, the Bird Sentry blender reverts to the display power off mode.
E Lock Key Pressing the LOCK key will unlock the keypad and cause the LOCKED icon to disappear from the LCD readout. The Bird Sentry blender can then be calibrated and alarm settings can be changed if desired. If no other keys are pressed within 10 seconds, the LOCKED icon will reappear and the unit will revert to the LOCKED mode. When the unit is in the unlocked state, pressing the LOCK key will also cause the LOCKED icon to reappear.
Bird Sentry™ Blender Chapter 1: Introduction
L1383 Rev. D 3
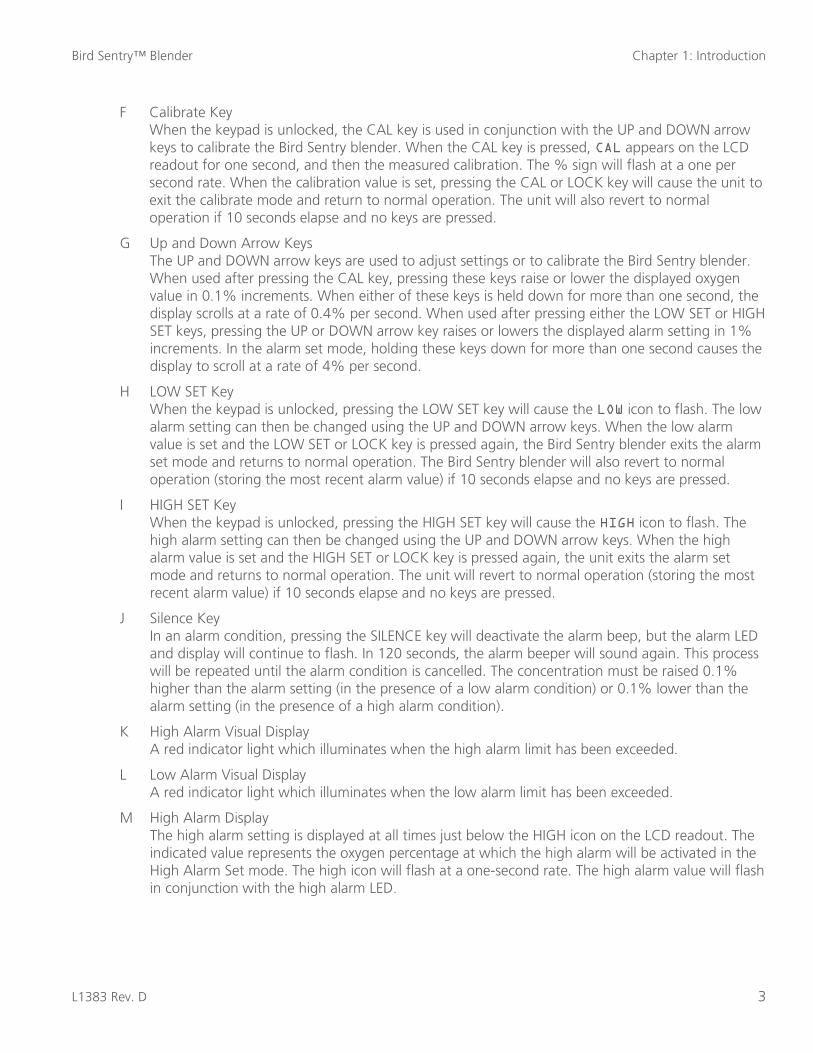
F Calibrate Key When the keypad is unlocked, the CAL key is used in conjunction with the UP and DOWN arrow keys to calibrate the Bird Sentry blender. When the CAL key is pressed, CAL appears on the LCD readout for one second, and then the measured calibration. The % sign will flash at a one per second rate. When the calibration value is set, pressing the CAL or LOCK key will cause the unit to exit the calibrate mode and return to normal operation. The unit will also revert to normal operation if 10 seconds elapse and no keys are pressed.
G Up and Down Arrow Keys The UP and DOWN arrow keys are used to adjust settings or to calibrate the Bird Sentry blender. When used after pressing the CAL key, pressing these keys raise or lower the displayed oxygen value in 0.1% increments. When either of these keys is held down for more than one second, the display scrolls at a rate of 0.4% per second. When used after pressing either the LOW SET or HIGH SET keys, pressing the UP or DOWN arrow key raises or lowers the displayed alarm setting in 1% increments. In the alarm set mode, holding these keys down for more than one second causes the display to scroll at a rate of 4% per second.
H LOW SET Key When the keypad is unlocked, pressing the LOW SET key will cause the LOW icon to flash. The low alarm setting can then be changed using the UP and DOWN arrow keys. When the low alarm value is set and the LOW SET or LOCK key is pressed again, the Bird Sentry blender exits the alarm set mode and returns to normal operation. The Bird Sentry blender will also revert to normal operation (storing the most recent alarm value) if 10 seconds elapse and no keys are pressed.
I HIGH SET Key When the keypad is unlocked, pressing the HIGH SET key will cause the HIGH icon to flash. The high alarm setting can then be changed using the UP and DOWN arrow keys. When the high alarm value is set and the HIGH SET or LOCK key is pressed again, the unit exits the alarm set mode and returns to normal operation. The unit will revert to normal operation (storing the most recent alarm value) if 10 seconds elapse and no keys are pressed.
J Silence Key In an alarm condition, pressing the SILENCE key will deactivate the alarm beep, but the alarm LED and display will continue to flash. In 120 seconds, the alarm beeper will sound again. This process will be repeated until the alarm condition is cancelled. The concentration must be raised 0.1% higher than the alarm setting (in the presence of a low alarm condition) or 0.1% lower than the alarm setting (in the presence of a high alarm condition).
K High Alarm Visual Display A red indicator light which illuminates when the high alarm limit has been exceeded.
L Low Alarm Visual Display A red indicator light which illuminates when the low alarm limit has been exceeded.
M High Alarm Display The high alarm setting is displayed at all times just below the HIGH icon on the LCD readout. The indicated value represents the oxygen percentage at which the high alarm will be activated in the High Alarm Set mode. The high icon will flash at a one-second rate. The high alarm value will flash in conjunction with the high alarm LED.

Chapter 1: Introduction Bird Sentry™ Blender
4 L1383 Rev. D
N Low Alarm Display Control The low alarm setting is displayed at all times just below the LOW icon on the LCD readout. The indicated value represents the oxygen percentage at which the low alarm will be activated. In the Low Alarm Set mode, the LOW icon will flash at a one-second rate. In a low alarm condition, the low alarm value will flash in conjunction with the low alarm LED.
O Outlet Port A diameter indexed (DISS) oxygen fitting that, when connected with a pneumatic metering device (such as a flow meter or ventilator), delivers flows from the Bird Sentry blender from 2–100 LPM.
P Medical Air Inlet Connector A diameter indexed (DISS) air fitting for connection to an air-inlet hose from the air-gas source.
Q Oxygen Inlet Connector A diameter indexed (DISS) oxygen fitting for the connection of an oxygen-inlet hose from the oxygen-gas source.
R Oxygen Concentration Selector Control A knob that allows selections of mixed oxygen concentrations from 21 to 100%.
Note: The oxygen-concentration selection scale is provided only as a guide for selecting O2 concentrations. You should use the Bird Sentry blender display panel to adjust the O2 concentration as needed.
Bottom View A Dovetail Mount Adapter
An adapter that allows the Bird Sentry blender to be mounted onto a mating bracket for mounting to a rail or ventilator system.
Figure 2 Bottom view
Bird Sentry™ Blender Chapter 1: Introduction
L1383 Rev. D 5
B Outlet Port See Figure 1, letter O.
C O2 Sensor Port A sampling port for the oxygen sensor. It allows 3 LPM of mixed gas from the blender to flow over the sensor membrane. The port is located on the back side of the plate.
D Medical Air Inlet Adapter See Figure 1, letter P.
E Oxygen Inlet Adapter See Figure 1, letter Q.
F Pressure Differential Reed Alarm Cap An audible alarm that, when activated, indicates that a pressure differential of 20 PSI or more exists between the two gas-source pressures.
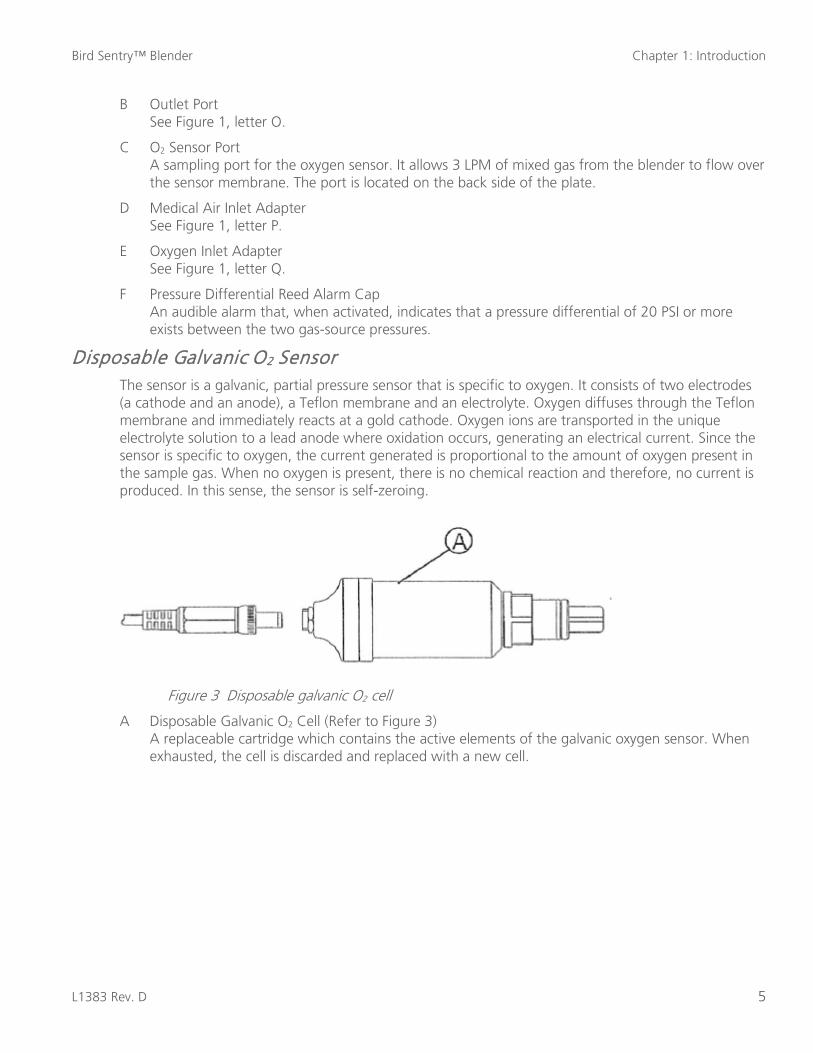
Disposable Galvanic O2 Sensor The sensor is a galvanic, partial pressure sensor that is specific to oxygen. It consists of two electrodes (a cathode and an anode), a Teflon membrane and an electrolyte. Oxygen diffuses through the Teflon membrane and immediately reacts at a gold cathode. Oxygen ions are transported in the unique electrolyte solution to a lead anode where oxidation occurs, generating an electrical current. Since the sensor is specific to oxygen, the current generated is proportional to the amount of oxygen present in the sample gas. When no oxygen is present, there is no chemical reaction and therefore, no current is produced. In this sense, the sensor is self-zeroing.
Figure 3 Disposable galvanic O2 cell
A Disposable Galvanic O2 Cell (Refer to Figure 3) A replaceable cartridge which contains the active elements of the galvanic oxygen sensor. When exhausted, the cell is discarded and replaced with a new cell.
Chapter 1: Introduction Bird Sentry™ Blender
6 L1383 Rev. D
What You Will Need to Operate the Blender ● Pressurized Oxygen. The compressed oxygen source must provide clean and dry, medical grade
oxygen at a line pressure of 40 to 60 PSIG (2.8 to 4.2 bar).
● Pressurized Air. The air source must provide clean and dry, medical grade air at a line pressure of 40 to 60 PSIG (2.8 to 4.2 bar).
What to Do If the Blender Fails If a condition is detected that could possibly prevent the blender from continuing to operate safely, it sounds an alarm. If at any time, ERX (Er1, Er4, etc.) appears on the LCD, contact a service technician, certified by CareFusion.
Warning! Do not operate the blender unless qualified personnel are in attendance to promptly respond to alarms, inoperative conditions, or sudden malfunctions.
How to Get Help If you have a question regarding the installation, setup, operation, or maintenance of the Bird Sentry blender, contact customer service at the following numbers:
Technical support:
Hours: 7:00 a.m. to 4:30 p.m. (PST), Monday through Friday
Tel. 714.283.2228 (Follow the prompts to technical support.)
Fax 714.283.8471
CareFusion helpline:
Hours: 24 hours, 7 days a week
Tel. 800.231.2466 or 800.328.4139
Bird Sentry™ Blender
L1383 Rev. D 7
Chapter 2: Operating Procedures
Before placing the Bird Sentry blender into clinical use, the performance check described in Chapter 3 should be performed. Refer to Appendix C for Setup and Installation.
Monitoring To begin monitoring, press the ON/OFF button located on the front panel (if necessary). Monitoring will begin immediately.
Should oxygen level exceed either the HIGH or LOW alarm set points, the red alarm indicator on the front panel will illuminate indicating either a high or low concentration reading, and an oxygen level returns to within limits or the limits are adjusted.
To conclude monitoring, press the ON/OFF button located on the front panel.
This will place the blender in a standby mode in which the display and alarm circuits are not functional, but the gas-blender supply hoses will continue to supply mixed gas if the inlet hoses have not been disconnected.
Alarm Setting Procedure
Low Alarm Setting To adjust the low alarm setting:
1. Press the LOCK key to unlock the keypad.
2. Press the LOW SET key. The LOW icon will start to flash.
3. Use the UP and DOWN arrow keys to set the low alarm to the desired value. Pressing the arrow keys changes the value in 1% increments. If the keys are held down for more than 1 second, the display will scroll at a rate of 4% per second.
Note: If 10 seconds elapse between key actuations, the system will store the latest low alarm value and will revert to normal operation. If this occurs inadvertently, simply repeat the alarm-setting procedure.
The low alarm value cannot be set lower than 18%, nor can it be set closer than 1% from the high alarm value. For example, if the high alarm is set at 25%, the system will not accept a low alarm setting greater than 24%.
4. When the low alarm value is set, press the LOW SET or LOCK key again to accept the low alarm setting and return to normal operation.
Note: To automatically set the low alarm to 18% without scrolling the display, hold the LOW SET key down and press the arrow key when the LOW icon is flashing.
Chapter 2: Operating Procedures Bird Sentry™ Blender
8 L1383 Rev. D
High Alarm Setting To adjust the high alarm setting:
1. Press the LOCK key to unlock the keypad.
2. Press the HIGH SET key. The HIGH icon will start to flash.
3. Use the UP and DOWN arrow keys to set the high alarm to the desired value.
The high alarm value cannot be set closer than 1% from the low alarm value. For example, if the low alarm is set at 50%, the system will not accept a high alarm setting less than 51%. Setting the high alarm to 100% turns off or deactivates the high alarm.
4. When the high alarm value is set, press the HIGH SET key again to accept the high alarm setting and return to normal operation.
Note: To automatically set the high alarm to 50% without scrolling the display, hold the HIGH SET key down, and then press the DOWN ARROW key when the HIGH icon is flashing. To automatically turn off the high alarm or set it to 100%, hold the HIGH SET key down and then press the UP ARROW key when the HIGH icon is flashing.
Basic Operation To check the oxygen concentration of a sample gas:
1. Place the sensor probe in the sensor port on the Bird Sentry blender. If using a standard T adapter in an alternate location, make sure the sensor is mounted in the adapter with the flow diverter pointing downward. This will prevent moisture from draining into the sensor membrane.
Note: It is important that a tight fit exists between the probe and the T adapter
2. Initiate flow of the sample gas to the sensor.
3. Using the ON/OFF key, make sure the Bird Sentry blender is in the Power On mode.
4. Allow the oxygen reading to stabilize. This will normally take about 30 seconds or more.
Alarms and Conditions In the event of either a low-alarm or high-alarm condition, the corresponding LED will begin to flash, accompanied by the alarm buzzer. Pressing the SILENCE key will deactivate the buzzer, but the LED and the alarm value digits on the display will continue to flash until the alarm condition has been rectified. If the alarm condition still exists 120 seconds after silencing the alarm buzzer, the buzzer will start to sound again.
Note: A low alarm condition will remain until the actual concentration is 0.1% higher than the low alarm setting. A high alarm condition will remain until the actual concentration is 0.1% lower than the high alarm setting.
Bird Sentry™ Blender Chapter 2: Operating Procedures
L1383 Rev. D 9
Calibration Procedures The Bird Sentry blender should be calibrated before being placed into clinical use. Thereafter, CareFusion recommends calibration of the unit on a daily basis. Frequent calibration will have no adverse effect on the performance of the Bird Sentry blender.
Calibration should also be performed upon replacement of a sensor or when point-of-use elevation changes by more than 500 feet or 150 meters. The sensor is best calibrated while mounted in the Bird Sentry sensor port. As in normal operation, the oxygen sensor responds best when installed in a vertical position with the sensor facing down.
It is best to calibrate the Bird Sentry blender using the sensor port, and with a technical grade oxygen standard (99.996% or better) at a pressure and flow similar to your application. Calibration of the unit at lower concentrations or with room air is less desirable.
● Ensure that gas supply lines are connected and the sensor is plugged into the O2 sensor port.
● Turn on both gas supplies, turn on the Bird Sentry blender, and rotate the FiO2 control knob to the 100 stop. Turn off the air supply.
● If the LOCKED icon is displayed, press the LOCK key. The icon should disappear.
● Press the CAL key, the CAL icon will be displayed momentarily which will be followed by a flashing %icon.
● Pressing the UP and DOWN arrow keys will adjust the displayed oxygen concentration as required to 100.0%.
● After the value is set, press the CAL or LOCK keys to return to normal operation.
Note: If 10 seconds elapse between key actuations, the system will store the latest calibration value and will revert to normal operation. If this occurs inadvertently, repeat the calibration procedure.
Note: If CAL followed by Er flashes on the display after entering the calibration value, the system has determined that the entered value will not allow operation within the specified output range of the sensor. This situation may occur if:
● The operator has inadvertently entered the wrong concentration for the calibration gas.
● The concentration of the calibration gas is not correct.
● The sensor is in need of replacement.
● The operator attempted to adjust the analyzer before allowing sufficient time for the calibration gas to purge out the previous sample.
● The flow and pressure of the calibration gas was not properly regulated. Check these items and repeat calibration. If calibration error continues to occur, contact technical support.
Chapter 2: Operating Procedures Bird Sentry™ Blender
10 L1383 Rev. D
Automatic Calibration to Room Air The Bird Sentry blender can be quickly calibrated to room air (20.9%) using a quick shortcut command. This function saves time by setting the calibration value to 20.9% without scrolling the display. To use this function:
1. Place the external probe in room air.
2. Press the LOCK key to unlock the keypad.
3. Press and hold down the CALIBRATE key. When the 96 icon starts to flash, press the DOWN arrow key to set the calibration value to 20.9%.
4. Release both the CALIBRATE key and the DOWN arrow key.
The unit will automatically enter the LOCKED condition and return to normal operation.
Automatic Calibration to Known Concentration The Bird Sentry blender can be quickly calibrated to the previous calibration value if a known, reliable standard is used for successive calibrations. This quick key function saves times by setting the calibration value to the last calibration value used, without scrolling the display. To use this function;
1. Introduce the previously used oxygen % standard to the sensor.
2. Press the LOCK key to unlock the keypad.
3. Press and hold down the CALIBRATE KEY. When the 96 icon starts to flash, press the arrow key to set the calibration value to the primary setting.
4. Release both the CALIBRATE key and the DOWN arrow key.
The unit will automatically enter the LOCKED condition and return to normal operation.
Caution! Do not use humidified oxygen to calibrate this system. If calibrated with humidified oxygen, subsequent oxygen readings will be higher than the true oxygen level. Dropping or severely jarring the sensor after calibration may shift the calibration point enough to require recalibration. Variations in inlet gas source pressures will alter the accuracy of the oxygen readings of the Bird Sentry blender. Using the Bird Sentry blender to analyze and monitor oxygen concentrations other than at the sensor port of the unit will require recalibration of the sensor.
Bird Sentry™ Blender
L1383 Rev. D 11
Chapter 3: Pressure Differential Alarm/Bypass Check
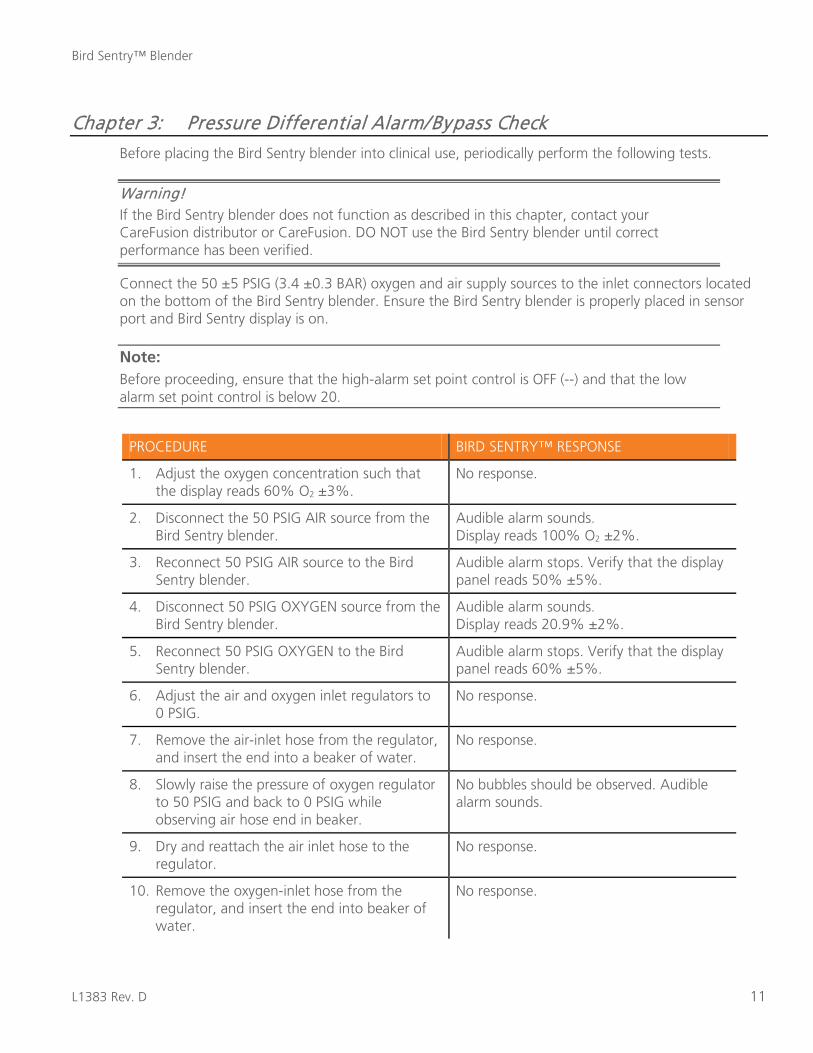
Before placing the Bird Sentry blender into clinical use, periodically perform the following tests.
Warning! If the Bird Sentry blender does not function as described in this chapter, contact your CareFusion distributor or CareFusion. DO NOT use the Bird Sentry blender until correct performance has been verified.
Connect the 50 ±5 PSIG (3.4 ±0.3 BAR) oxygen and air supply sources to the inlet connectors located on the bottom of the Bird Sentry blender. Ensure the Bird Sentry blender is properly placed in sensor port and Bird Sentry display is on.
Note: Before proceeding, ensure that the high-alarm set point control is OFF (--) and that the low alarm set point control is below 20.
PROCEDURE BIRD SENTRY™ RESPONSE
1. Adjust the oxygen concentration such that the display reads 60% O2 ±3%.
No response.
2. Disconnect the 50 PSIG AIR source from the Bird Sentry blender.
Audible alarm sounds. Display reads 100% O2 ±2%.
3. Reconnect 50 PSIG AIR source to the Bird Sentry blender.
Audible alarm stops. Verify that the display panel reads 50% ±5%.
4. Disconnect 50 PSIG OXYGEN source from the Bird Sentry blender.
Audible alarm sounds. Display reads 20.9% ±2%.
5. Reconnect 50 PSIG OXYGEN to the Bird Sentry blender.
Audible alarm stops. Verify that the display panel reads 60% ±5%.
6. Adjust the air and oxygen inlet regulators to 0 PSIG.
No response.
7. Remove the air-inlet hose from the regulator, and insert the end into a beaker of water.
No response.
8. Slowly raise the pressure of oxygen regulator to 50 PSIG and back to 0 PSIG while observing air hose end in beaker.
No bubbles should be observed. Audible alarm sounds.
9. Dry and reattach the air inlet hose to the regulator.
No response.
10. Remove the oxygen-inlet hose from the regulator, and insert the end into beaker of water.
No response.

Chapter 3: Pressure Differential Alarm/Bypass Check Bird Sentry™ Blender
12 L1383 Rev. D
PROCEDURE BIRD SENTRY™ RESPONSE
11. Slowly raise the pressure of air regulator to 50 PSIG and back to 0 PSIG while observing the oxygen hose end in beaker.
No bubbles should be observed. Audible alarm sounds.
12. Dry and reattach the oxygen inlet hose to the regulator.
No response.
Bird Sentry™ Blender
L1383 Rev. D 13
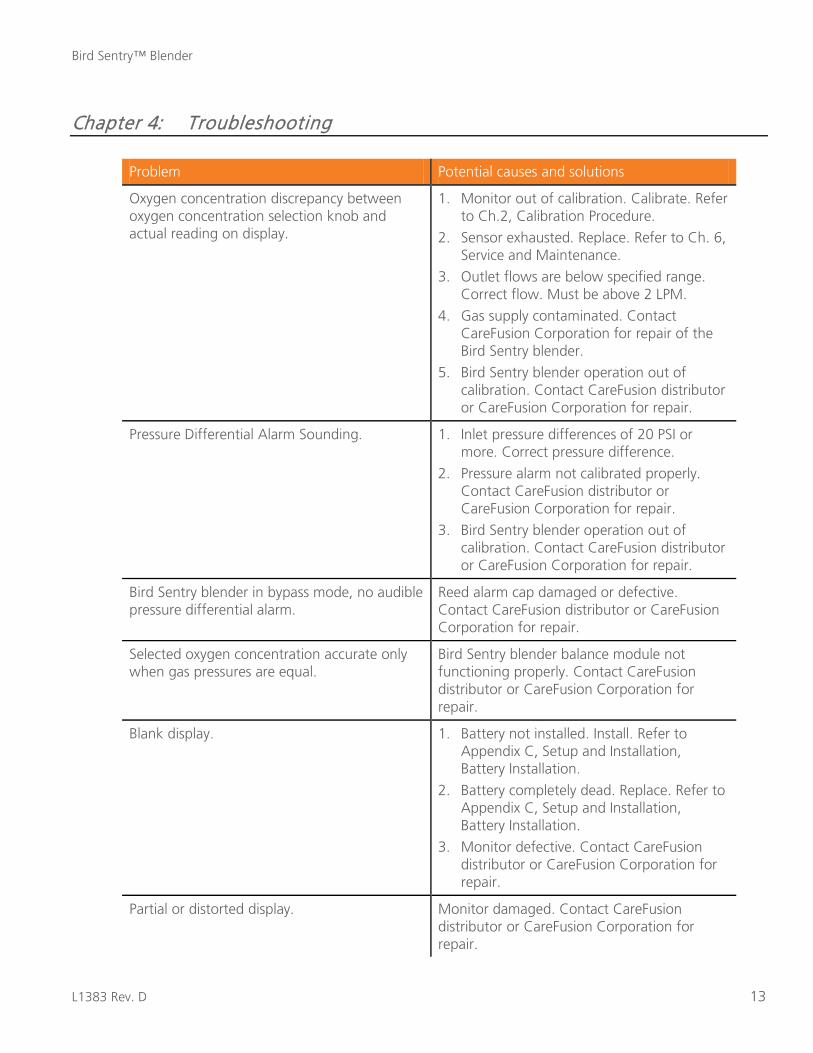
Chapter 4: Troubleshooting
Problem Potential causes and solutions
Oxygen concentration discrepancy between oxygen concentration selection knob and actual reading on display.
1. Monitor out of calibration. Calibrate. Refer to Ch.2, Calibration Procedure.
2. Sensor exhausted. Replace. Refer to Ch. 6, Service and Maintenance.
3. Outlet flows are below specified range. Correct flow. Must be above 2 LPM.
4. Gas supply contaminated. Contact CareFusion Corporation for repair of the Bird Sentry blender.
5. Bird Sentry blender operation out of calibration. Contact CareFusion distributor or CareFusion Corporation for repair.
Pressure Differential Alarm Sounding. 1. Inlet pressure differences of 20 PSI or more. Correct pressure difference.
2. Pressure alarm not calibrated properly. Contact CareFusion distributor or CareFusion Corporation for repair.
3. Bird Sentry blender operation out of calibration. Contact CareFusion distributor or CareFusion Corporation for repair.
Bird Sentry blender in bypass mode, no audible pressure differential alarm.
Reed alarm cap damaged or defective. Contact CareFusion distributor or CareFusion Corporation for repair.
Selected oxygen concentration accurate only when gas pressures are equal.
Bird Sentry blender balance module not functioning properly. Contact CareFusion distributor or CareFusion Corporation for repair.
Blank display. 1. Battery not installed. Install. Refer to Appendix C, Setup and Installation, Battery Installation.
2. Battery completely dead. Replace. Refer to Appendix C, Setup and Installation, Battery Installation.
3. Monitor defective. Contact CareFusion distributor or CareFusion Corporation for repair.
Partial or distorted display. Monitor damaged. Contact CareFusion distributor or CareFusion Corporation for repair.
Chapter 4: Troubleshooting Bird Sentry™ Blender
14 L1383 Rev. D
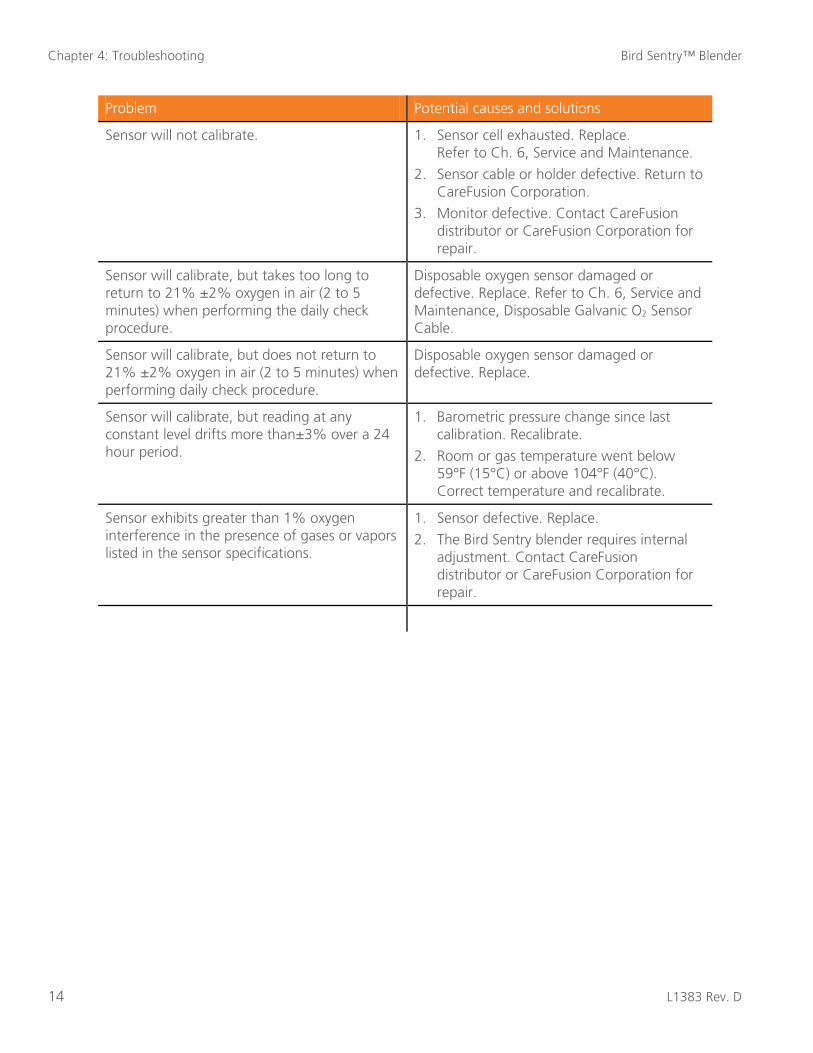
Problem Potential causes and solutions
Sensor will not calibrate. 1. Sensor cell exhausted. Replace. Refer to Ch. 6, Service and Maintenance.
2. Sensor cable or holder defective. Return to CareFusion Corporation.
3. Monitor defective. Contact CareFusion distributor or CareFusion Corporation for repair.
Sensor will calibrate, but takes too long to return to 21% ±2% oxygen in air (2 to 5 minutes) when performing the daily check procedure.
Disposable oxygen sensor damaged or defective. Replace. Refer to Ch. 6, Service and Maintenance, Disposable Galvanic O2 Sensor Cable.
Sensor will calibrate, but does not return to 21% ±2% oxygen in air (2 to 5 minutes) when performing daily check procedure.
Disposable oxygen sensor damaged or defective. Replace.
Sensor will calibrate, but reading at any constant level drifts more than±3% over a 24 hour period.
1. Barometric pressure change since last calibration. Recalibrate.
2. Room or gas temperature went below 59°F (15°C) or above 104°F (40°C). Correct temperature and recalibrate.
Sensor exhibits greater than 1% oxygen interference in the presence of gases or vapors listed in the sensor specifications.
1. Sensor defective. Replace. 2. The Bird Sentry blender requires internal
adjustment. Contact CareFusion distributor or CareFusion Corporation for repair.
Bird Sentry™ Blender
L1383 Rev. D 15
Chapter 5: Cleaning the Bird Sentry™ Blender
Warning! Explosion hazard. DO NOT gas sterilize the Bird Sentry blender.
The Bird Sentry blender should be kept clean and free of dust. The exterior of the Bird Sentry blender may be cleaned with a soft cloth lightly dampened with warm soapy water or mild disinfectant. An all-purpose cleaner may be used on the exterior of the Bird Sentry blender. Store the Bird Sentry blender in a clean, dry place when not in use.
Note: Only the exterior of the Bird Sentry blender may be cleaned by using an all-purpose cleaner.
1. Do not steam autoclave or otherwise subject the Bird Sentry sensor to temperature over 120°F (50°C),
2. Do not immerse the Bird Sentry blender or sensor into liquid decontamination agents.
3. Do not use any strong solvent cleaners on labels.

Chapter 5: Cleaning the Bird Sentry™ Blender Bird Sentry™ Blender
16 L1383 Rev. D
Bird Sentry™ Blender

Bird Sentry™ Blender
L1383 Rev. D 17
Chapter 6: Serv icing and Maintaining the Bird Sentry™ Blender
Warning! There are no user-serviceable components inside this device. All service should be referred to a CareFusion trained hospital/dealer service technician or CareFusion.
If you have any problems operating the Bird Sentry blender, read the instructions again or consult the troubleshooting guide in Chapter 4.
Caution! If the Bird Sentry blender does not function as outlined in Chapter 2, contact a CareFusion trained service technician or CareFusion Corporation for service.
Maintenance The Bird Sentry blender has been designed to provide the maximum amount of utilization with a minimum of maintenance. It is a good idea, however, to keep it clean and free of dust. Refer to Chapter 5 on cleaning the Bird Sentry blender.
The Bird Sentry blender, like other pieces of Health Care equipment, will require routine maintenance over a period of time. Before placing the Bird Sentry blender into clinical use, and periodically thereafter, please follow the performance check guidelines listed in Chapter 3.
When using the Bird Sentry blender with a medical grade compressed air source, and air inlet water-trap/filter is recommended to be attached to the air inlet of the Bird Sentry blender before use. Contaminants from hospital air lines may compromise the function of the Bird Sentry blender.
Elastomer components such as 0-rings are designed to function satisfactorily for a minimum of two (2) years. CareFusion Corporation recommends that the Bird Sentry blender be overhauled and serviced at a minimum of every two (2) years under the best circumstances.
Warning! Do not routinely disconnect or remove O2 sensors for the Bird Sentry blender. If the sensor must be disconnected, the full "warm-up" period, as stated in the sensor specifications, may be required after the sensor is reconnected.
Disposable Galvanic O2 Sensor Cable The Disposable Galvanic Sensor is designed to provide a minimum of 750,000 O2 hours of service (approximately 2 years of use). Disposable Galvanic O2 Sensor should be replaced whenever any of the problems listed in Chapter 4, Troubleshooting, dictate the need to do so.
Chapter 6: Servicing and Maintaining the Bird Sentry™ Blender Bird Sentry™ Blender
18 L1383 Rev. D
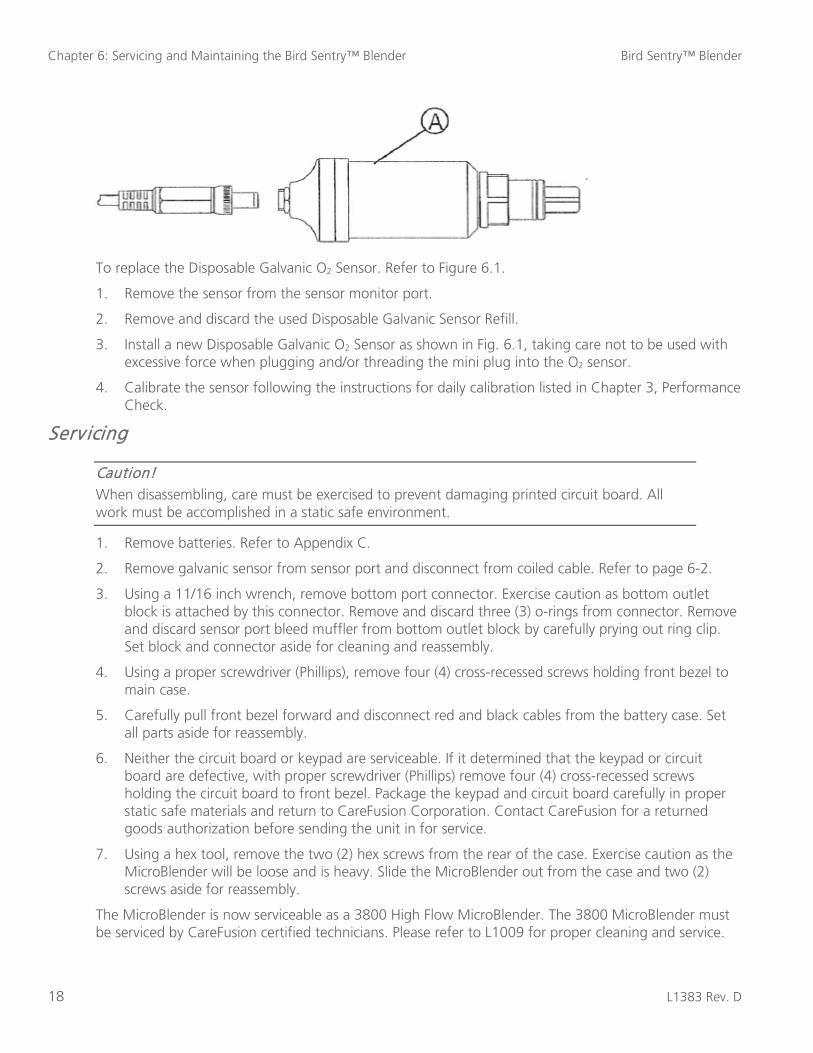
To replace the Disposable Galvanic O2 Sensor. Refer to Figure 6.1.
1. Remove the sensor from the sensor monitor port.
2. Remove and discard the used Disposable Galvanic Sensor Refill.
3. Install a new Disposable Galvanic O2 Sensor as shown in Fig. 6.1, taking care not to be used with excessive force when plugging and/or threading the mini plug into the O2 sensor.
4. Calibrate the sensor following the instructions for daily calibration listed in Chapter 3, Performance Check.
Serv icing
Caution! When disassembling, care must be exercised to prevent damaging printed circuit board. All work must be accomplished in a static safe environment.
1. Remove batteries. Refer to Appendix C.
2. Remove galvanic sensor from sensor port and disconnect from coiled cable. Refer to page 6-2.
3. Using a 11/16 inch wrench, remove bottom port connector. Exercise caution as bottom outlet block is attached by this connector. Remove and discard three (3) o-rings from connector. Remove and discard sensor port bleed muffler from bottom outlet block by carefully prying out ring clip. Set block and connector aside for cleaning and reassembly.
4. Using a proper screwdriver (Phillips), remove four (4) cross-recessed screws holding front bezel to main case.
5. Carefully pull front bezel forward and disconnect red and black cables from the battery case. Set all parts aside for reassembly.
6. Neither the circuit board or keypad are serviceable. If it determined that the keypad or circuit board are defective, with proper screwdriver (Phillips) remove four (4) cross-recessed screws holding the circuit board to front bezel. Package the keypad and circuit board carefully in proper static safe materials and return to CareFusion Corporation. Contact CareFusion for a returned goods authorization before sending the unit in for service.
7. Using a hex tool, remove the two (2) hex screws from the rear of the case. Exercise caution as the MicroBlender will be loose and is heavy. Slide the MicroBlender out from the case and two (2) screws aside for reassembly.
The MicroBlender is now serviceable as a 3800 High Flow MicroBlender. The 3800 MicroBlender must be serviced by CareFusion certified technicians. Please refer to L1009 for proper cleaning and service.
Bird Sentry™ Blender
L1383 Rev. D 19
Chapter 7: Appendices
Glossary
Term Description
Air/ O2 Mixture of compressed air and oxygen
°C Degrees Celsius
CGA Compressed Gas Association
DISS Diameter Indexed Safety System
°F Degrees Fahrenheit
FIO2 Fractional Concentration of Inspired Oxygen
O2 Oxygen
LPM Liters-per-minute
P/N Part number
PSIG Pounds Per Square Inch Gauge
Specifications
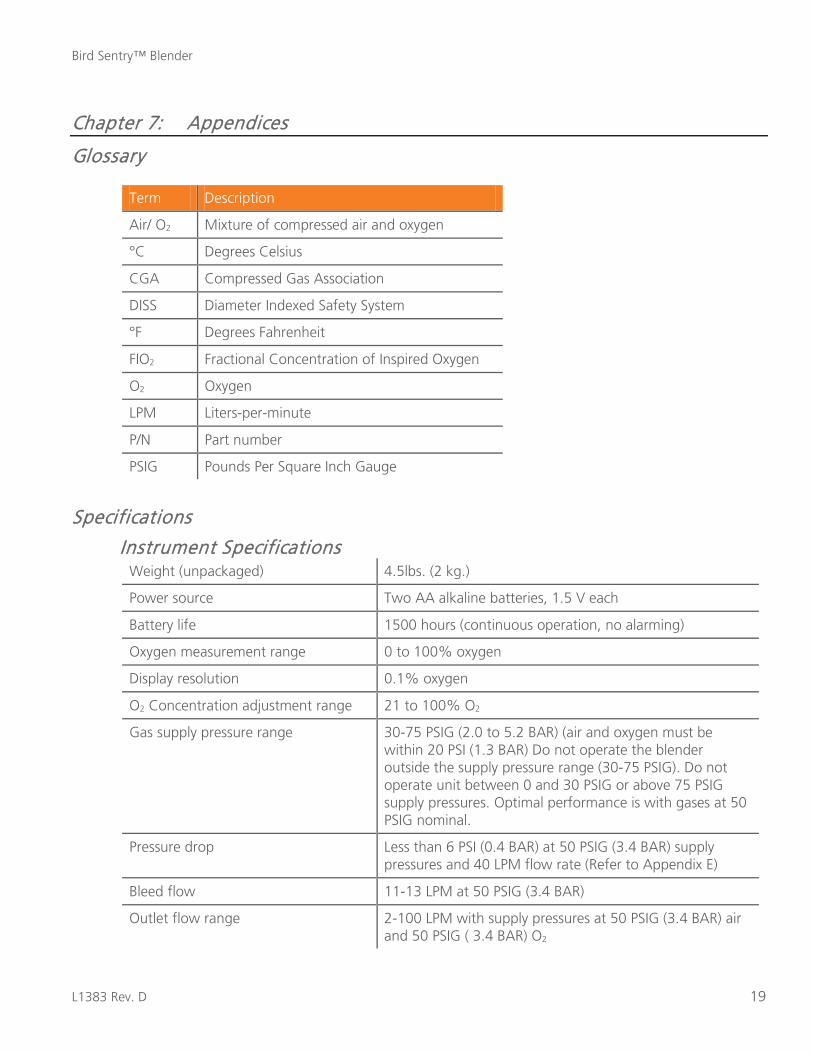
Instrument Specifications Weight (unpackaged) 4.5lbs. (2 kg.)
Power source Two AA alkaline batteries, 1.5 V each
Battery life 1500 hours (continuous operation, no alarming)
Oxygen measurement range 0 to 100% oxygen
Display resolution 0.1% oxygen
O2 Concentration adjustment range 21 to 100% O2
Gas supply pressure range 30-75 PSIG (2.0 to 5.2 BAR) (air and oxygen must be within 20 PSI (1.3 BAR) Do not operate the blender outside the supply pressure range (30-75 PSIG). Do not operate unit between 0 and 30 PSIG or above 75 PSIG supply pressures. Optimal performance is with gases at 50 PSIG nominal.
Pressure drop Less than 6 PSI (0.4 BAR) at 50 PSIG (3.4 BAR) supply pressures and 40 LPM flow rate (Refer to Appendix E)
Bleed flow 11-13 LPM at 50 PSIG (3.4 BAR)
Outlet flow range 2-100 LPM with supply pressures at 50 PSIG (3.4 BAR) air and 50 PSIG ( 3.4 BAR) O2
Chapter 7: Appendices Bird Sentry™ Blender
20 L1383 Rev. D
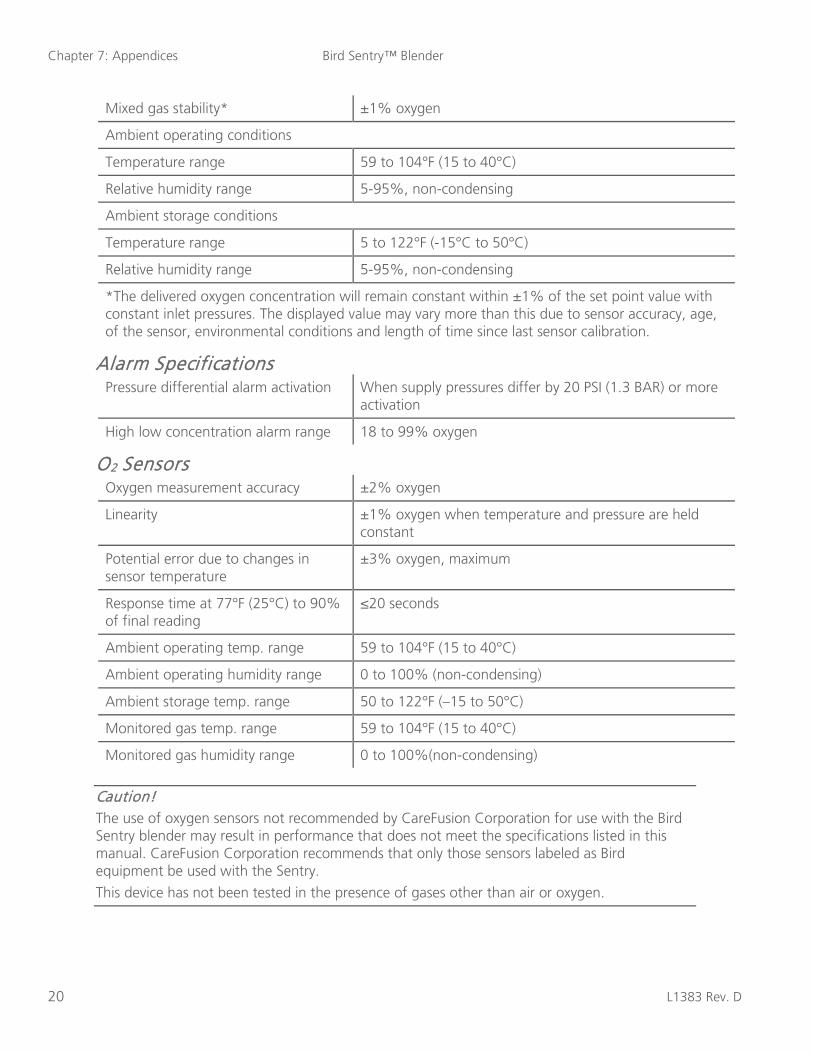
Mixed gas stability* ±1% oxygen
Ambient operating conditions
Temperature range 59 to 104°F (15 to 40°C)
Relative humidity range 5-95%, non-condensing
Ambient storage conditions
Temperature range 5 to 122°F (-15°C to 50°C)
Relative humidity range 5-95%, non-condensing
*The delivered oxygen concentration will remain constant within ±1% of the set point value with constant inlet pressures. The displayed value may vary more than this due to sensor accuracy, age, of the sensor, environmental conditions and length of time since last sensor calibration.
Alarm Specifications Pressure differential alarm activation When supply pressures differ by 20 PSI (1.3 BAR) or more
activation
High low concentration alarm range 18 to 99% oxygen
O2 Sensors Oxygen measurement accuracy ±2% oxygen
Linearity ±1% oxygen when temperature and pressure are held constant
Potential error due to changes in sensor temperature
±3% oxygen, maximum
Response time at 77°F (25°C) to 90% of final reading
≤20 seconds
Ambient operating temp. range 59 to 104°F (15 to 40°C)
Ambient operating humidity range 0 to 100% (non-condensing)
Ambient storage temp. range 50 to 122°F (–15 to 50°C)
Monitored gas temp. range 59 to 104°F (15 to 40°C)
Monitored gas humidity range 0 to 100%(non-condensing)
Caution! The use of oxygen sensors not recommended by CareFusion Corporation for use with the Bird Sentry blender may result in performance that does not meet the specifications listed in this manual. CareFusion Corporation recommends that only those sensors labeled as Bird equipment be used with the Sentry.
This device has not been tested in the presence of gases other than air or oxygen.
Bird Sentry™ Blender Chapter 7: Appendices
L1383 Rev. D 21
Note:
All specifications assume the following standard environmental conditions unless specified otherwise.
● Ambient and sample gas temperatures of 77°F (25°C)
● Barometric pressure of 30Hg (760mm Hg)
● Ambient relative humidity of 50%
● Sample gas relative humidity of 0%
Disposable Galvanic O2 Sensors Expected useful life 750,000 O2% hours* (approx. two-years average use)
Shelf life The date by which the sensor must be placed into service to achieve one year service life is marked on each sensor package.
Sensor warm-up time One minute, nominal time required after the initial installation of sensor before specifications are applicable.
Setup and Installation
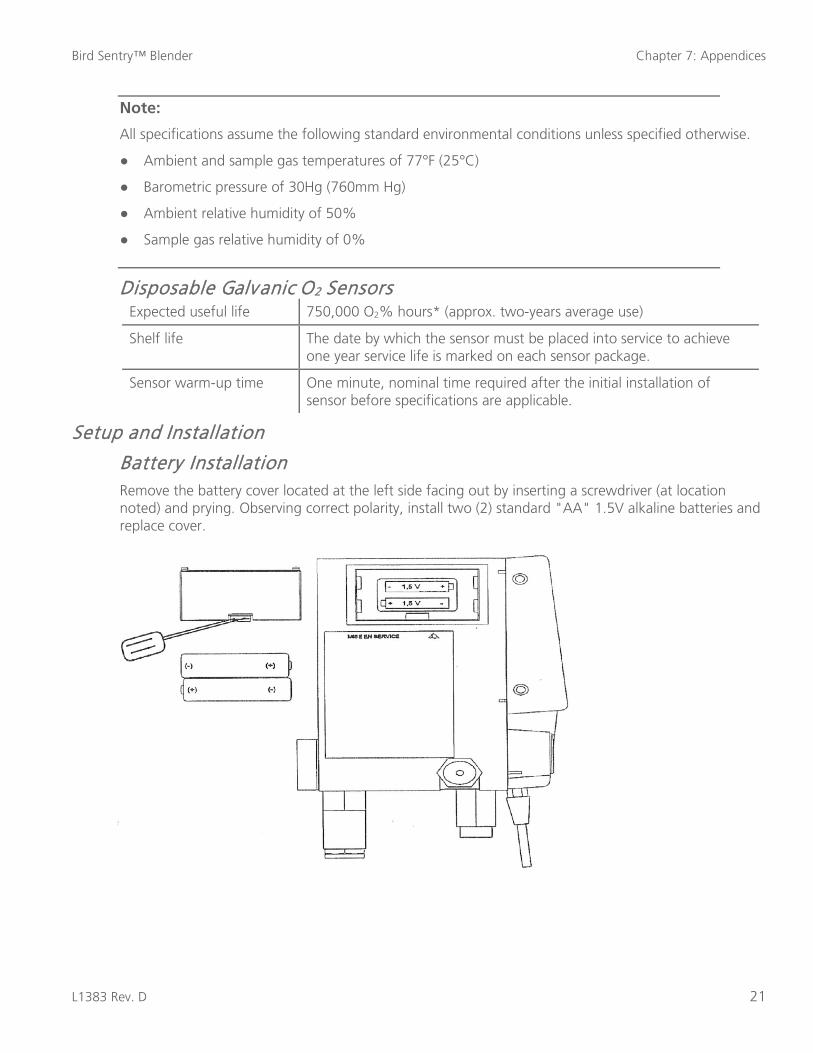
Battery Installation Remove the battery cover located at the left side facing out by inserting a screwdriver (at location noted) and prying. Observing correct polarity, install two (2) standard "AA" 1.5V alkaline batteries and replace cover.
Chapter 7: Appendices Bird Sentry™ Blender
22 L1383 Rev. D
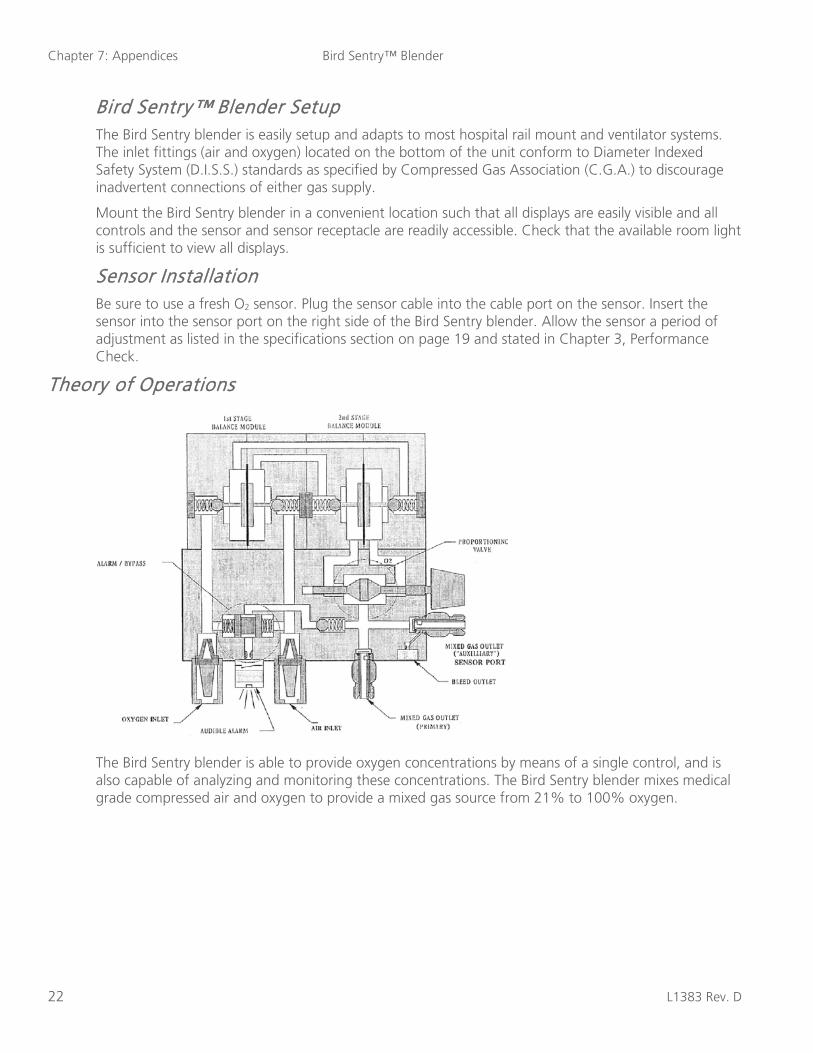
Bird Sentry™ Blender Setup The Bird Sentry blender is easily setup and adapts to most hospital rail mount and ventilator systems. The inlet fittings (air and oxygen) located on the bottom of the unit conform to Diameter Indexed Safety System (D.I.S.S.) standards as specified by Compressed Gas Association (C.G.A.) to discourage inadvertent connections of either gas supply.
Mount the Bird Sentry blender in a convenient location such that all displays are easily visible and all controls and the sensor and sensor receptacle are readily accessible. Check that the available room light is sufficient to view all displays.
Sensor Installation Be sure to use a fresh O2 sensor. Plug the sensor cable into the cable port on the sensor. Insert the sensor into the sensor port on the right side of the Bird Sentry blender. Allow the sensor a period of adjustment as listed in the specifications section on page 19 and stated in Chapter 3, Performance Check.
Theory of Operations
The Bird Sentry blender is able to provide oxygen concentrations by means of a single control, and is also capable of analyzing and monitoring these concentrations. The Bird Sentry blender mixes medical grade compressed air and oxygen to provide a mixed gas source from 21% to 100% oxygen.

Bird Sentry™ Blender Chapter 7: Appendices
L1383 Rev. D 23
Mix ing Operation The Bird Sentry blender is designed to utilize two (2) 50 PSIG (3.4 BAR) gas sources. The two (2) gas sources enter through the diameter indexed air and oxygen inlet connectors located on the bottom of the Bird Sentry blender.
Each inlet connector incorporates a 30 micron particulate filter. Once through the filters, each gas passes through a duckbill check valve which prevents possible reverse gas flow from either the air or the oxygen supply systems.
The two (2) gases then pass through a two-stage balance regulator. The purpose of this regulator is to equalize the operating pressures of the air and oxygen gas sources. Once these pressures have been balanced, the gases are proportioned according to the oxygen concentration selected on the oxygen concentration selection knob. The oxygen concentration knob allows the clinician to select a desired oxygen concentration from 21% to 100% O2. From this point, the mixed gas flows to the outlet port.
Gas Outlet There are two (2) gas outlets on the Bird Sentry blender: one on the bottom of the unit and one on the left side (facing the unit). These outlets are capable of delivering combined metered flows of 2-100 liters per minute (LPM) of mixed gases. These outlet ports are fitted with an automatic shut off valve. The flow of gas from either outlet port is automatically initiated by attaching a pneumatic device (such as a flow meter) to the outlet port. Regardless of whether or not the outlet has any device connected to it, a minimal gas bleed flow of 1143 LPIVI flows from the sensor port on the right side of the Bird Sentry blender. It is from this bleed flow that the gas is sampled and analyzed by the Bird Sentry analyzer and monitor functions.
Alarm/Bypass Function The Bird Sentry blender includes a pressure differential alarm which provides an audible alarm if gas source pressures differ by 20 PSI (1.3 BAR) (nominal) or more, or if there is a gas supply failure of one of the source gases. This alarm is generated by a reed alarm located in a cap on the bottom of the Bird Sentry blender. The primary purpose of the alarm is to audibly warn the operator of an excessive pressure drop or depletion of either source gas pressure. The alarm will also activate when there is an elevation of either source gas pressure resulting in a differential of 20 PSI (1.3 BAR)(nominal) or more. Should both gas pressures increase or decrease simultaneously, an alarm will not activate. If either source gas pressure drops, the outlet pressure will drop similarly as the mixed gas is always balanced to that of the lower gas source.
The gas bypass function operates in unison with the alarm. Once the pressure alarm is activated, the bypass function is actuated and the gas with the higher pressure flows directly to the outlet port, bypassing the mixing function of the Bird Sentry blender. The oxygen concentration flowing out of the Bird Sentry blender will be that of the gas with the higher pressure. The Bird Sentry blender in the pressure alarm/bypass mode will deliver oxygen (100%) or medical air (21%) until pressures have been restored to a differential of 6 PSI (.4 BAR).
If the Bird Sentry blender is set to deliver 21% and the OXYGEN source pressure is reduced enough to produce a 20 PSI (1.3 BAR) differential, the unit may not alarm because it will continue to deliver 21% concentration according to the setting. If the setting is moved slightly from 21%, the pressure differential alarm will sound. Similarly, if the Bird Sentry blender is set to deliver 100% and the AIR source pressure is reduced or lost, the unit may not alarm because it will continue to deliver 100% concentration.
Chapter 7: Appendices Bird Sentry™ Blender
24 L1383 Rev. D
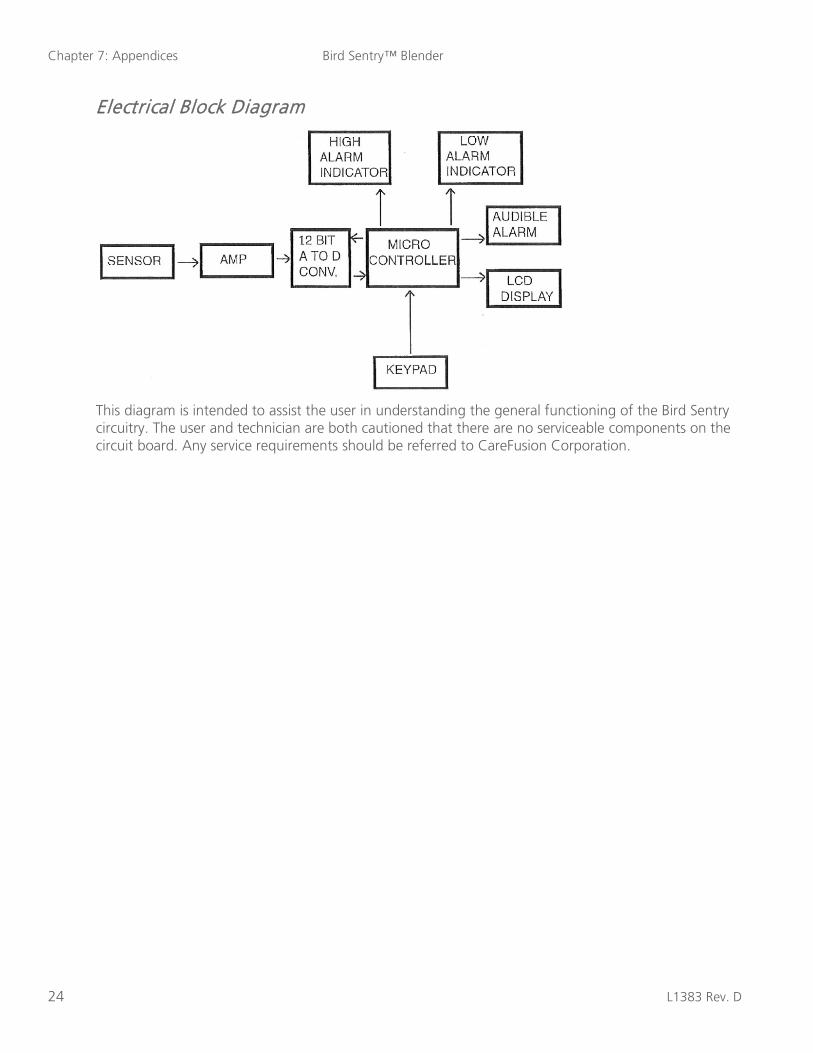
Electrical Block Diagram
This diagram is intended to assist the user in understanding the general functioning of the Bird Sentry circuitry. The user and technician are both cautioned that there are no serviceable components on the circuit board. Any service requirements should be referred to CareFusion Corporation.

Bird Sentry™ Blender Chapter 7: Appendices
L1383 Rev. D 25
Flow Characteristics
Note: Graphs are typical of a representative sample. Minor variations are to be expected.

Chapter 7: Appendices Bird Sentry™ Blender
26 L1383 Rev. D
Bird Sentry™ Blender
Bird Sentry™ Blender
L1383 Rev. D 27
Index
A
alarm bypass function, 23 pressure differential, 11 setup procedure, 7 specifications, 20
alarms and conditions, 8
B
battery, installing, 21 bypass check, 11
C
C.G.A., 22 calibration
automatic to known concentration, 10 automatic to room air, 10 procedures, 9
cleaning the blender, 15 Compressed Gas Association, 22
D
D.I.S.S., 22 Diameter Indexed Safety System (D.I.S.S.), 22 disposable galvanic O2 sensor, 5, 21
E
electromagnetic interference, v EMC, v
F
flow characteristics, 25 front panel, 2
G
galvanic O2 sensor, 5 Galvanic O2 Sensor Cable
disposing, 17
gas outlet, 23 getting help, vi, 6
H
high alarm, setup procedure, 8
I
installing the blender, 21
L
low alarm, setup procedure, 7
M
maintaining the blender, 17 mixing operation, 23 monitoring, 7 MRI, v
O
O2 sensor, 5, 20 operation, basic, 8
P
panel, front, 2
S
sensor, 5 installing, 22
servicing the blender, 18 setting up the blender, 21 support, technical, vi, 6 symbols, equipment, ix
T
technical support, vi, 6 troubleshooting, 13

Chapter 7: Appendices Bird Sentry™ Blender
28 L1383 Rev. D
Bird Sentry™ Blender