bizhub c3100p quick guide - cnet...
TRANSCRIPT
bizhub C3100PQUICK GUIDE


bizhub C3100P Contents-1
Table of contents
1 Introduction1.1 Welcome .......................................................................................................................................... 1-31.2 User's Guides .................................................................................................................................. 1-3
Booklet manuals ................................................................................................................................ 1-3User's guides included in User's Guide CD/DVD-ROM .................................................................... 1-3
1.3 User's Guide CD/DVD-ROM........................................................................................................... 1-4Operating environment ...................................................................................................................... 1-4
1.4 Notations and symbols used in this manual................................................................................. 1-5Procedural instruction........................................................................................................................ 1-5Symbols used in this manual ............................................................................................................. 1-5Product and key names ..................................................................................................................... 1-5Notations of application names ......................................................................................................... 1-5
2 Overview of This Machine2.1 About This Machine ........................................................................................................................ 2-32.1.1 Name of each part ..............................................................................................................................2-3
Front side ........................................................................................................................................... 2-3Rear side ............................................................................................................................................ 2-4
2.1.2 Option configuration ...........................................................................................................................2-52.2 About power supply........................................................................................................................ 2-62.2.1 Power Switch and Power key locations..............................................................................................2-62.2.2 Turning the Power Switch ON or OFF ................................................................................................2-72.2.3 Using the Power key ...........................................................................................................................2-82.3 Control Panel................................................................................................................................... 2-9
Deleting jobs .................................................................................................................................... 2-10
2.4 Screen layout................................................................................................................................. 2-112.4.1 Display of the Message Window.......................................................................................................2-112.4.2 Help screen.......................................................................................................................................2-11
3 Loading Paper3.1 Paper ................................................................................................................................................ 3-33.1.1 Checking the available paper types....................................................................................................3-33.1.2 Checking the available paper sizes ....................................................................................................3-43.1.3 Precautions for correct operations .....................................................................................................3-5
Unavailable paper .............................................................................................................................. 3-5Storing paper ..................................................................................................................................... 3-5
3.2 Loading paper into the Manual Feed Tray.................................................................................... 3-63.3 Loading paper into Tray 1 .............................................................................................................. 3-8
4 Initial Settings of This Machine4.1 Preparation for network connection (for administrators) ........................................................... 4-3
Checking a LAN cable for connection ............................................................................................... 4-3Assigning an IP address .................................................................................................................... 4-3
4.2 HDD settings (for administrators).................................................................................................. 4-4

Contents-2 bizhub C3100P
5 Basic Usage5.1 Using the print function (Windows environment)......................................................................... 5-35.1.1 Printer driver........................................................................................................................................5-35.1.2 Preparation for printing (network connection) ....................................................................................5-3
Checking a LAN cable for connection ............................................................................................... 5-3Checking the network settings .......................................................................................................... 5-3Installing the printer driver ................................................................................................................. 5-4
5.1.3 Preparation for printing (USB connection) ..........................................................................................5-5Changing the installation settings (Windows 7/8/8.1/Server 2008 R2/Server 2012/Server 2012 R2) ................................................................................................................................. 5-5Installing the printer driver ................................................................................................................. 5-5
5.1.4 Initial settings of the printer driver ......................................................................................................5-65.1.5 How to print ........................................................................................................................................5-75.2 Printing a file stored in USB memory............................................................................................ 5-7
Supported USB memory devices ...................................................................................................... 5-7How to print ....................................................................................................................................... 5-8
6 Index

1 Introduction


bizhub C3100P 1-3
1.1 Welcome 1
1 Introduction
1.1 WelcomeThank you for purchasing this machine.
This guide describes basic procedures required to use this machine and how to configure initial settings. For information on the detailed functions and operation procedures, refer to the user's guide included in the User's Guide CD/DVD-ROM.
To use this product securely, be sure to read the [Safety Information Guide] before using this machine.
1.2 User's Guides
Booklet manuals
User's guides included in User's Guide CD/DVD-ROM
Manual title Overview
[Installation Guide] This guide describes the items required to use this machine for the first time, for example, how to place this machine or how to install the printer driver.
[Safety Information Guide] This guide describes notes and precautions that should be fol-lowed to use this machine.Please be sure to read this manual before using this machine.
Manual title Overview
[Quick Guide] (this manual) This guide describes how to perform basic operations of this machine and configure initial settings.
[User's Guide Introduction] This guide contains information that is useful to know before be-ginning to operate this machine, such as the name of each part and how to turn the power on and off, use the Control Panel, and load an original or paper.
[User's Guide Print] This guide describes how to install the printer driver as well as basic usage and applications.
[User's Guide Advanced Functions] This guide describes how to install optional license kits and functions that can be used by installing the license kits.
[User's Guide Maintenance/Trouble-shooting]
This guide describes how to replace consumables, clean this machine, and perform troubleshooting.
[User's Guide Description of Utility Keys]
This guide describes the Utility settings of this machine.
[User's Guide Applied Functions] This guide describes the special usages of this machine such as how to use Web Connection, manually install the printer driver, configure print settings using Linux, and use the authentication unit.
1-4 bizhub C3100P
User's Guide CD/DVD-ROM1 1.3
1.3 User's Guide CD/DVD-ROMThe User's Guide CD/DVD-ROM is included in the machine package. The CD/DVD-ROM includes the user's guides required to use this machine.
From the top page, click the button of the desired user's guide. The PDF file of the user's guide opens.
Operating environment
* JavaScript must be enabled.
Item Description
Supported operating systems
Microsoft Windows XP (SP3) / Windows Vista (SP2) / Windows 7 (SP1) / Windows 8Apple Mac OS X 10.4/10.5/10.6/10.7/10.8
Supported browsers* For Windows• Internet Explorer 6.x/7.x/8.x/9.x/10.x• Firefox 3.5 or later / ESR 10.0 or laterFor Mac OS• safari 2.x/3.x/4.x/5.x/6.x
Required application For Windows• Adobe Reader 9.x/10.x/11.xFor Mac OS• Adobe Reader 8.x/9.x/10.x/11.x
Display resolution 1024 e 768 pixels or more

bizhub C3100P 1-5
1.4 Notations and symbols used in this manual 1
1.4 Notations and symbols used in this manual
Procedural instruction0 This check mark symbol shows a precondition of a procedure.
1 This format number "1" represents the first step.
2 This format number represents the order of consecutive steps.
% This symbol indicates a supplementary explanation of a procedural instruction.
Symbols used in this manualNOTICEThis symbol indicates a risk that may result in damage to this machine or documents.Follow the instructions to avoid property damage.
TipsThis symbol indicates supplemental information of a topic as well as options required to use a function.
dReferenceThis symbol indicates reference functions related to a topic.
Related settingThis shows the settings related to a particular topic for any user.
Related setting (for the administrator)This shows the settings related to a topic only for administrators.
Product and key names
Notations of application namesThis manual describes application names as shown below.
Notations used in this manual
Description
[ ] This presents a key name in the Message Window or computer screen, or the name of a user's guide.
Bold text This presents a key name, part name, product name, or option name on the Control Panel.
Application name Notations used in this manual
PageScope Direct Print Direct Print
PageScope Web Connection Web Connection
PageScope Data Administrator Data Administrator

1-6 bizhub C3100P
Notations and symbols used in this manual1 1.4

2 Overview of This Machine


bizhub C3100P 2-3
2.1 About This Machine 2
2 Overview of This Machine
2.1 About This Machine
2.1.1 Name of each part
Front side
No. Name
1 Control Panel
2 Output Tray
3 Output Stopper
4 Manual Feed Tray
5 Tray 1
45
1
2
3

2-4 bizhub C3100P
About This Machine2 2.1
Rear side
No. Name
1 USB Port (Type A)
2 Power Switch
3 Power Connection
4 USB Port (Type B)
5 Ethernet (LAN) Port (1000Base-T/100Base-TX/10Base-T)
6 USB Port (for authentication unit)
7 Ventilation Grill
5
6
4
1
23
7

bizhub C3100P 2-5
2.1 About This Machine 2
2.1.2 Option configuration
dReferenceFor details on how to register i-Option license kits, refer to [User's Guide Advanced Functions].
No. Name Description
1 Authentication Unit AU-201
Performs user authentication by scanning information recorded on the IC card.
2 Lower Feeder Unit PF-P14
Allows you to load up to 500 sheets.
The following optional components are built into this machine and are not shown in the figure above.
3 Hard Disk HD-P06 Increases the HDD capacity and extends functions.
4 i-Option LK-106 Used to add a bar code font, which is one of special fonts.This function is available when an optional Hard Disk is installed.
5 i-Option LK-107 Used to add a unicode font, which is one of special fonts.This function is available when an optional Hard Disk is installed.
6 i-Option LK-108 Used to add an OCR font, which is one of special fonts.This function is available when an optional Hard Disk is installed.
7 i-Option LK-111 Supports the ThinPrint function, which is one of a number of ad-vanced functions.
2
1

2-6 bizhub C3100P
About power supply2 2.2
2.2 About power supply
2.2.1 Power Switch and Power key locationsThis machine has two power switches: Power Switch outside the machine and Power key on the Control Panel.
NOTICEWhile printing, do not turn the Power Switch off or press the Power key. Otherwise, it may lead to a paper jam.
If the Power Switch is turned off or the Power key is pressed while this machine is running, the system de-letes the currently loaded data or communicating data as well as queued jobs.
No. Name Description
1 Power Switch Press this switch when turning the main power of this machine on or off, or when restarting this machine.
2 Power key Press this key to switch this machine to Power Save mode. This func-tion reduces power consumption and has more significant power sav-ing effect.For details, refer to page 2-8.
1
2

bizhub C3100P 2-7
2.2 About power supply 2
2.2.2 Turning the Power Switch ON or OFF
1 Connect the power cable to this machine.
2 Connect the power cable to the power outlet.
3 When turning the main power on, press n of the Power Switch.
This displays the screen showing that the machine is running the start-up process.
When Message Window appears in the [READY], it indicates that this machine is ready to run.
4 When turning the main power off, press o of the Power Switch.
NOTICEWhen restarting this machine, turn the Power Switch off and on again after 10 or more seconds have elapsed. Not doing so may result in an operation failure.

2-8 bizhub C3100P
About power supply2 2.2
2.2.3 Using the Power keyPress the Power key to switch this machine to Power Save mode.
When the Power key is pressed, the status of this machine changes as shown below. Depending on how long the Power key is pressed, the state of the power saving mode to be activated will differ.
TipsIf this machine is switched to Sleep mode in factory settings, it automatically shifts to Deep Sleep mode that reduces power consumption further than when in Sleep mode.However, this machine cannot be shifted to Deep Sleep mode if:
- An optional i-Option LK-111 is employed and the ThinPrint function is enabled.
- An optional Authentication Unit AU-201 is connected.
Related setting (for the administrator)When this machine is in Sleep mode, you can select whether or not to shift to Deep Sleep mode that reduces power consumption further than when in Sleep mode.To configure settings: Menu/Select - [ADMIN SETTINGS] - [SYSTEM SETTINGS] - [POWER SUPPLY] - [CONSUMPTION] (Default: [ENABLED])
Power key Status of this ma-chine
Status of LED
Print Description
Short press Sleep Flash: Blue Enable Turns off the backlight of the Message Window to reduce power consumption. The indicator at the top of the Message Window lights up blue.If a print job is received, it is printed while Sleep mode is kept in the active state.When the user operates the Control Panel or this machine receives print jobs, the machine returns to Normal mode.
Deep Sleep Flash: Blue Enable Reduces power consumption further than when in Sleep mode.The display of the Message Window is turned off completely.If a print job is received, this machine shifts to Sleep mode to execute the print job, then returns to Deep Sleep mode.The time required to return to Normal mode is longer than that required to re-turn from Sleep mode.To return the machine from Deep Sleep mode to Normal mode, press the Pow-er key again.
Hold down ErP Auto Power OFF
Flash:Orange
Disable This function provides a more signifi-cant power saving effect than Deep Sleep mode, which is close to the state where the main power is turned off.To enable the machine to return to Nor-mal mode from the ErP Auto Power OFF status, press the Power key again.

bizhub C3100P 2-9
2.3 Control Panel 2
2.3 Control PanelThe Control Panel on the top of this machine allows you to directly operate this machine. The Message Win-dow displays a message that indicates the status of this machine or the required operations.
No. Key Description
1 • Cancels the currently displayed menu or a setting change.• When you log in to this machine as a registered user with user au-
thentication enabled, hold down this key on the main screen to log out.
• Deletes jobs. For details, refer to page 2-10.
NoteThis key is referred to as Cancel/Access in the manual.
2 • Displays the Utility screen.• Determines the selected item.
NoteThis key is referred to as Menu/Select in the manual.
3 • Moves the cursor up.• On the setting item entry screen, you can increase a numeric value
or display the next character in alphabetical order.
4 Moves the cursor right.
5 • Moves the cursor down.• On the setting item entry screen, you can decrease a numeric val-
ue or display the preceding character in alphabetical order.
6 Moves the cursor left.
7 Switches this machine to Power Save mode or returns it from Power Save mode.For details on how to use the Power key, refer to page 2-8.
2 3 4 1
6 5 7

2-10 bizhub C3100P
Control Panel2 2.3
Deleting jobsWhen this machine has print jobs, press the Cancel/Access key to display the following menu. You can de-lete the active job or all standby jobs.
TipsWhen deleting all standby jobs with user authentication enabled, you need to enter the administrator pass-word after pressing the Cancel/Access key on the login screen.
Item Description
[CONTINUE] Continues printing without deleting jobs.
[CURRENT JOB] Deletes the active job.
[ALL JOBS] Deletes all jobs.

bizhub C3100P 2-11
2.4 Screen layout 2
2.4 Screen layout
2.4.1 Display of the Message WindowIn this machine, you can view the printer status, approximate toner level, error messages, and other informa-tion in the Message Window.
2.4.2 Help screenIf an error such as a paper jam has occurred, press the key; the help screen appears to help you perform error processing.
No. Description
1 At the top in the Message Window, the red or blue indicator lights up or flashes to indicate the current status of the printer.• Printable: The blue indicator lights up.• Printing: The blue indicator flashes.• Error: The red indicator lights up.
2 • Displays the current status of the printer.• When an error or service call occurs, the icon and the error status are displayed.• If a warning occurs, the icon appears.• If a USB memory device is connected to the USB port, the icon appears.• While print jobs are being received from a computer, the icon appears. While they are
being received from a USB memory device, the icon appears.
3 • Displays a message such as a warning.• While print jobs are being received, the user name and printing progress are displayed.• When firmware is being updated, the type of the being updated firmware and update pro-
gress are displayed.
4 Displays the key operation guidance.
5 Displays the approximate toner level.
12
3
4
5
READY
to enter

2-12 bizhub C3100P
Screen layout2 2.4

3 Loading Paper


bizhub C3100P 3-3
3.1 Paper 3
3 Loading Paper
3.1 Paper
3.1.1 Checking the available paper types
*1 Paper on which you will not print on both sides (for example, when something has already been printed on the front side).*2 Fine and other special paper.*3 Paper where company names, preset text, and other text have already been printed.
NOTICEPaper other than plain paper is referred to as special paper. When loading special paper into the paper tray, specify the correct paper type. Otherwise, it may result in a paper jam or image error.
Paper type Paper weight Paper capacity
Plain paperRecycled paperTwo-side unavailable paper*1Special Paper*2
15-15/16 lb to 23-15/16 lb(60 g/m2 to 90 g/m2)
Manual Feed Tray: 100 sheetsTray 1: 250 sheets
Thick 1 24-3/16 lb to 39-7/8 lb(91 g/m2 to 150 g/m2)
Manual Feed Tray: 20 sheetsTray 1: 20 sheets
Thick 2 40-3/16 lb to 55-7/8 lb(151 g/m2 to 210 g/m2)
Manual Feed Tray: 20 sheetsTray 1: 20 sheets
Glossy paper 1 26-5/8 lb to 34-1/16 lb(100 g/m2 to 128 g/m2)
Manual Feed Tray: 20 sheetsTray 1: 20 sheets
Glossy paper 2 34-5/16 lb to 42 lb (129 g/m2 to 158 g/m2)
Manual Feed Tray: 20 sheetsTray 1: 20 sheets
Postcard - Manual Feed Tray: 20 sheetsTray 1: 20 sheets
Envelope - Manual Feed Tray: 10 sheets
Label sheet - Manual Feed Tray: 20 sheetsTray 1: 20 sheets
Letterhead*3 - Manual Feed Tray: 20 sheetsTray 1: 20 sheets

3-4 bizhub C3100P
Paper3 3.1
3.1.2 Checking the available paper sizes
Tips- When printing is carried out, the area with the exception of a 3/16 inch (4.2 mm) border around the edg-
es of the paper, is used as the printable area on all sizes of paper. When configuring a user setting of the page size using the application, specify the paper size within the printable area so that the optimal result is obtained.
- On an envelope, it is only possible to print on the front (address) side. Also, the result of printing on the seal overlapping part on the front side cannot be assured. The area that cannot be assured varies de-pending on envelope types.
- The page margin setting is determined depending on your application. If the default paper size or mar-gin is selected, there may be some part of the paper that is not able to be printed on. To obtain the optimal result, configure the custom size setting so that an image is included in the printable area of this machine.
- Specify the custom size in the range of the numeric values shown in the table above using the printer driver.
- When custom-size paper over width 8-1/4 inches (210 mm) and length 11 inches (279 mm) is used in Tray 1, its trailing edge is loaded in the bent state due to the tray structure. (Maximum length 11-11/16 inches (297 mm)) To load such custom-size paper, use the Manual Feed Tray or load up to 100 sheets in Tray 1.
- In the Mac OS X environment, the maximum size of the Manual Feed Tray that can be used for 2-sided printing is "width 8-1/2 inches (216 mm) e length 14 inches (355 mm)".
Paper feed port Allowable sizes
Manual Feed Tray A4, A5, A6, B5 (JIS), B6Legal (8-1/2 e 14), Letter (8-1/2 e 11), SP Folio (8-1/2 e 12-11/16), Executive (7-1/4 e 10-1/2), Statement/Invoice (5-1/2 e 8-1/2)Foolscap (8 e 13), 8-1/8 e 13-1/4, Folio (8-1/4 e 13), Government Legal (8-1/2 e 13), 8-1/2 e 13-1/2, 16K, Kai 16, Kai 32Postcard (100 mm e 148 mm), Reply postal card (148 mm e 200 mm)Photo Size 4 e 6Envelope #10, Western-style envelope #6, Envelope DL, Western-style enve-lope #2, End-opening envelope #3, End-opening envelope #4B5 (ISO), UK Quarto (8 e 10), Government letter (8 e 10-1/2)Width: 3-5/8 to 8-1/2 (92 mm to 215.9 mm), Length: 5-13/16 to 14 (148 mm to 355.6 mm)
Tray 1 A4, A5, A6, B5 (JIS), B6Letter (8-1/2 e 11), Executive (7-1/4 e 10-1/2), Statement/Invoice (5-1/2 e 8-1/2)16K, Kai 16, Kai 32, Postcard (100 mm e 148 mm), Reply postal card (148 mm e 200 mm)Photo Size 4 e 6UK Quarto (8 e 10), Government letter (8 e 10-1/2)Width: 3-5/8 to 8-1/2 (92 mm to 215.9 mm), Length: 5-13/16 to 11-11/16 (148 mm to 297 mm)

bizhub C3100P 3-5
3.1 Paper 3
3.1.3 Precautions for correct operations
Unavailable paperDo not load the following types of paper into the tray. Not observing these precautions may lead to reduced print quality, a paper jam, or machine damage.
- Paper that has been printed on using a heat-transfer printer or an inkjet printer
- Folded, curled, wrinkled, or torn paper
- Paper that has been left unwrapped for a long period of time
- Paper that is damp, perforated, or that has been hole punched
- Extremely smooth or extremely rough paper, or paper with an uneven surface
- Treated paper such as carbon-backed paper, thermal paper, pressure-sensitive paper, or iron-on transfer paper
- Paper that has been decorated with foil or embossing
- Paper of a non-standard shape (paper that is not rectangular)
- Paper that is bound with glue, staples or paper clips
- Paper with labels attached
- Paper with ribbons, hooks, buttons, etc., attached
- Paper with different paper quality (roughness) on the front and back sides
- Paper that is too thin or too thick
- Paper containing static electricity
- Acidic paper
- Other types of unavailable paper
Storing paperTo store paper, be sure to note the following points.
- Store paper on an even, horizontal surface, and do not take the paper out of its packaging until it is loaded into a tray. If paper is left for a long period of time outside its package, it may cause a paper jam.
- When not using paper that has been taken out of its package once, return it to the original package and store it in a horizontal, cool, dark place.
- Do not store paper in locations or in environments that are:
- Too humid- Exposed to direct sunlight- Subject to high temperatures (95°F (35°C) or more)- Too dusty
- Do not set paper against the other or store it vertically.
TipsWhen purchasing a large quantity of paper or special paper, carry out a trial print to check the printing quality in advance.
3-6 bizhub C3100P
Loading paper into the Manual Feed Tray3 3.2
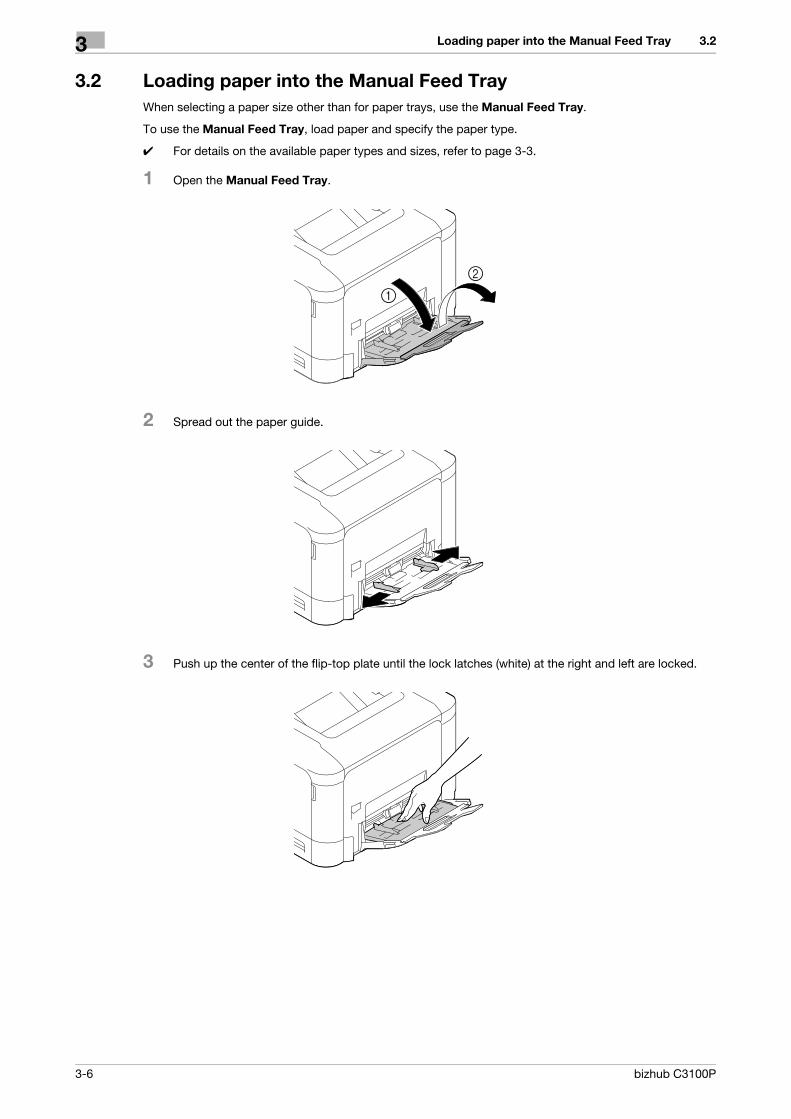
3.2 Loading paper into the Manual Feed TrayWhen selecting a paper size other than for paper trays, use the Manual Feed Tray.
To use the Manual Feed Tray, load paper and specify the paper type.
0 For details on the available paper types and sizes, refer to page 3-3.
1 Open the Manual Feed Tray.
2 Spread out the paper guide.
3 Push up the center of the flip-top plate until the lock latches (white) at the right and left are locked.

bizhub C3100P 3-7
3.2 Loading paper into the Manual Feed Tray 34 With the side to be printed on facing down, insert the paper as far as possible into the feed slot.
NOTICELoad paper within the guide indicating the upper limit.
If paper is curled, flatten it before loading.
5 Align the paper guide to the paper size.
6 Change the paper type and paper size on the Control Panel. When loading custom sized paper, also specify the paper size.
% To configure settings: Menu/Select - [PAPER MENU] - [PAPER SOURCE] - [MANUAL]

3-8 bizhub C3100P
Loading paper into Tray 13 3.3
3.3 Loading paper into Tray 10 For details on the available paper types and sizes, refer to page 3-3.
0 Tray 2 is available when the optional Lower Feeder Unit is installed. For details on how to load paper into Tray 2, refer to [User's Guide Introduction].
1 Pull out Tray 1.
2 Press the flip-top plate down until it is locked.
3 Spread out the paper guide.

bizhub C3100P 3-9
3.3 Loading paper into Tray 1 34 Load paper into the tray with the print side facing up.
% Load a postcard or reply postal card, turning the short side to the right-hand side of the tray.
NOTICEDo not load the sheets up to the point where the top of the stack is higher than the , mark.
If paper is curled, flatten it before loading.
5 Align the paper guide to the paper size.
6 Close Tray 1.
7 Change the paper type and paper size on the Control Panel. When loading custom sized paper, also specify the paper size.
% To configure settings: Menu/Select - [PAPER MENU] - [PAPER SOURCE] - [TRAY 1]

3-10 bizhub C3100P
Loading paper into Tray 13 3.3

4 Initial Settings of This Machine


bizhub C3100P 4-3
4.1 Preparation for network connection (for administrators) 4
4 Initial Settings of This Machine
4.1 Preparation for network connection (for administrators)
Checking a LAN cable for connectionCheck that a LAN cable connected to the network is connected to the LAN port of this machine.
For details on the cable connection port, refer to page 2-4.
Assigning an IP addressIf this machine has a fixed IP address, manually enter the IP address, subnet mask, and default gateway ad-dress.
In the Control Panel, select Menu/Select - [ADMIN SETTINGS] - [EXPERT ADJUSTMENT] - [ETHERNET] - [TCP/IP] - [IPV4 SETTINGS], then configure the following settings.
Tips- To check the IP address assigned to this machine, print out the Configuration Page. To print out the
Configuration Page, select Menu/Select - [PRINT REPORTS] - [CONFIGURATION PG].
Settings Description
[IP ADDRESS] When manually specifying the IP address, enter the fixed IP address assigned to the machine.
[SUBNET MASK] When manually specifying the IP address, enter the subnet mask.
[DEFAULT GATEWAY] When manually specifying the IP address, enter the default gateway.
[IP APPLICATION] When automatically specifying the IP address, select the method for automatic retrieval.• [DHCP]: [ON] is specified by default.• [BOOTP]: [OFF] is specified by default.• [ARP/PING]: [OFF] is specified by default.• [AUTO IP SETTINGS]: Fixed to [ENABLE].

4-4 bizhub C3100P
HDD settings (for administrators)4 4.2
4.2 HDD settings (for administrators)To encrypt data on this machine's HDD for protection, configure an HDD encryption setting.
If an HDD encryption setting is configured, the HDD is formatted, and data saved on the HDD is erased. Therefore, we recommend that you finish an HDD encryption setting before using this machine.
To configure settings: Menu/Select - [ADMIN SETTINGS] - [SYSTEM SETTINGS] - [SECURITY SETTINGS] - [HDD ENCRYPTION]
TipsThis function is available when an optional Hard Disk is installed.

5 Basic Usage


bizhub C3100P 5-3
5.1 Using the print function (Windows environment) 5
5 Basic Usage
5.1 Using the print function (Windows environment)This section describes how to configure print settings in Windows environment.
dReferenceFor details on how to configure print settings in the Mac OS environment, refer to [User's Guide Print].
For details on how to configure print settings in Linux environment, refer to [User's Guide Applied Functions].
5.1.1 Printer driverBefore using this machine as a printer, you need to install the printer driver on your computer.
The following types of printer drivers are available. Select the printer driver that meets your printing aims.
5.1.2 Preparation for printing (network connection)
Checking a LAN cable for connectionCheck that a LAN cable is connected to the LAN port of this machine.
For details on the cable connection port, refer to page 2-4.
Checking the network settingsPrint out the Configuration Page, then check that an IP address is assigned to this machine.
To print out the Configuration Page, select Menu/Select - [PRINT REPORTS] - [CONFIGURATION PG].
dReferenceIf no IP address is displayed, you need to set up the network. For details, refer to page 4-3.
Printer driver Page description lan-guage
Description
PCL driver PCL6 This is a standard driver for printing general office originals.Among the three drivers, this driver provides the fastest printing speed.
PS driver PostScript 3 Emulation This driver is effective for high-definition printing of data created in PostScript-supporting application software from Adobe or other vendors.This driver is often used in graphics and light print-ing applications where good color reproducibility is important.
XPS driver XPS Developed after Windows Vista, this driver sup-ports XML Paper Specification (XPS).This driver has several advantages, including high-quality reproduction of translucence.

5-4 bizhub C3100P
Using the print function (Windows environment)5 5.1
Installing the printer driverUse the installer to install the printer driver on your computer.
0 Administrator privileges are required to perform this task.
0 Use the Driver & Utilities CD/DVD-ROM.
1 Insert the printer driver CD/DVD-ROM into the CD/DVD-ROM drive of the computer.
% Make sure that the installer starts, then proceed to Step 2.
% If the installer does not start, open the printer driver folder on the CD/DVD-ROM, double-click [Set-up.exe], then go to Step 3.
% If the [User Account Control] window appears, click [Continue] or [Yes].
2 Click [Printer].
3 Read the license agreement, then click [AGREE].
4 Check the contents of the [Readme] window, then click [Next].
5 Select [Install printers/MFPs], then click [Next].
Connected printers are detected.
% In Windows Vista/7/8/8.1/Server 2008/Server 2008 R2/Server 2012/Server 2012 R2, you can select [Preference for IPv4] or [Preference for IPv6]. The address has the preference when detected in both IPv4 and IPv6.
6 Select this machine, then click [Next].
% If this machine is not detected, restart it.
% You do not need to change the printing method from [Normal Printing] (Port 9100) unless otherwise specified by the administrator. This guide describes how to configure the [Normal Printing] (Port 9100) setting.
% As the printing method, you can select [Normal Printing], [Internet Printing] (IPP), or [Secure Printing] (IPPS). For details on the printing method, refer to [User's Guide Print].
% Among the connected printers, only the target model is automatically detected and displayed. If multiple target models are displayed, check the IP addresses.
% If the connection to this machine cannot be recognized, it is not displayed in the list. In such a case, select [Specify the Printer/MFP Except for the Above. Select (IP Address, Host Name...)], then man-ually specify the IP address and host name of this machine.
7 Select the check box of the printer driver you want to install, then click [Next].
% For features of each printer driver, refer to page 5-3.
8 Check the components to be installed, then click [Install].
9 If necessary, change the printer name or print a test page, then click [Finish].
Installation of the printer driver is then completed.
dReferenceWhen you finish installing the printer driver, configure the default settings of the printer driver. For details, refer to page 5-6.
Settings Description
[Review] Displays the installed components for checking.
[Rename Printer] Changes this machine name, if necessary.
[Property] Sets the optional operating environment of this machine.
[Print Setting] Changes the default print settings of this machine, if necessary.
[Print Test page] If necessary, print a test page to check that printing process works cor-rectly.

bizhub C3100P 5-5
5.1 Using the print function (Windows environment) 5
5.1.3 Preparation for printing (USB connection)
Changing the installation settings (Windows 7/8/8.1/Server 2008 R2/Server 2012/Server 2012 R2)If you are using Windows 7/8/8.1/Server 2008 R2/Server 2012/Server 2012 R2, change the computer settings before installing the printer driver.
1 Open the [Control Panel] window.
% In Windows 8.1, click [ ] in the Start window, then click [Control Panel] - [Hardware and Sound] - [View devices and printers].
% In Windows 8, right-click the Start window, then click [All apps] - [Control Panel].
% In Windows Server 2012/Server 2012 R2, open the Start window, then click [Control Panel].
% In Windows 7/Server 2008 R2, open the Start menu, then click [Control Panel].
2 Click [System and Security] - [System].
3 Click [Advanced system settings] on the menu in the left-hand pane.
The [System Properties] window appears.
4 In the [Hardware] tab, click [Device Installation Settings].
5 Select [No, let me choose what to do], select [Never install driver software from Windows Update.], then click [Save Changes].
% After you have installed the printer driver, change the setting back to [Yes, do this automatically (rec-ommended)].
6 Click [OK] to close the [System Properties] window.
Installing the printer driverUse the installer to install the printer driver on your computer.
0 Administrator privileges are required to perform this task.
0 Use the Driver & Utilities CD/DVD-ROM.
1 Connect a USB cable to the USB port of this machine.
% For details on the cable connection port, refer to page 2-4.
% If a wizard window for adding new hardware opens, click [Cancel].
2 Insert the printer driver CD/DVD-ROM into the CD/DVD-ROM drive of the computer.
% Make sure that the installer starts, then go to Step 3.
% If the installer does not start, open the printer driver folder on the CD/DVD-ROM, double-click [Setup.exe], then go to Step 4.
% If the [User Account Control] window appears, click [Continue] or [Yes].
3 Click [Printer].
4 Read the license agreement, then click [AGREE].
5 Check the contents of the [Readme] window, then click [Next].
6 Select [Install printers/MFPs], then click [Next].
USB-connected printers are detected.
7 Select this machine, then click [Next].

5-6 bizhub C3100P
Using the print function (Windows environment)5 5.1
8 Select the check box of the printer driver you want to install, then click [Next].
% For features of each printer driver, refer to page 5-3.
9 Check the components to be installed, then click [Install].
10 If necessary, change the printer name or print a test page, then click [Finish].
Installation of the printer driver is then completed.
dReferenceWhen you finish installing the printer driver, configure the default settings of the printer driver. For details, refer to page 5-6.
5.1.4 Initial settings of the printer driverWhen you use this machine for the first time, configure the printer driver so that it contains information such as what options are installed on this machine and whether or not authentication settings have been config-ured.
1 Display the printer window.
% In Windows 8.1, click [ ]in the Start window, then click [Control Panel] - [Hardware and Sound] - [View devices and printers].
% In Windows 8, right-click the Start window, then click [All apps] - [Control Panel] - [Hardware and Sound] - [View devices and printers].
% In Windows Server 2012/Server 2012 R2, open the Start window, then click [Control Panel] - [Hard-ware] - [View devices and printers].
% In Windows 7/Server 2008 R2, open the Start menu, then click [Devices and Printers].
% In Windows Vista/Server 2008, click the Start menu, and select [Control Panel] - [Hardware and Sound] - [Printers].
% In Windows XP/Server 2003, click the Start menu, then select [Printers and Faxes].
2 Open the printer properties.
% In Windows 7/8/8.1/Server 2008 R2/Server 2012/Server 2012 R2, right-click the icon of the installed printer, and from [Printer properties], click the displayed printer name.
% In Windows XP/Vista/Server 2003/Server 2008, right-click the icon of the installed printer, then click [Properties].
The [Properties] window appears.
3 In the [Configure] tab, configure the information such as what options are installed on this machine and whether or not authentication settings have been configured.
% By default, [Auto] in [Acquire Settings...] is enabled. The information on this machine is automatically obtained and reflected to [Device Option].
% When [Auto] in [Acquire Settings...] is disabled, clicking [Acquire Device Information], obtains and reflects the information on this machine to [Device Option].
% If you cannot communicate with this machine or you are using a USB connection in Windows XP or Server 2003 environment, manually configure a setting in [Device Option]. Select the item to change from the list, and set a value in [Setting].
4 Click [OK].
Settings Description
[Review] Displays the installed components for checking.
[Rename Printer] Changes this machine name, if necessary.
[Property] Sets the optional operating environment of this machine.
[Print Setting] Changes the default print settings of this machine, if necessary.
[Print Test page] If necessary, print a test page to check that printing process works cor-rectly.
bizhub C3100P 5-7
5.2 Printing a file stored in USB memory 5
5.1.5 How to print
1 Open data of the original using the application software. From the [File] menu, select [Print].
2 In [Printer Name] (or [Select Printer]), make sure that the desired printer has been selected.
% The [Print] dialog box varies depending on the application software.
3 Specify the print range and the number of copies to print.
4 Click [Properties] (or [Preferences]) to change the print settings of the printer driver, if necessary.
% The print settings you have changed here return to the default values when you exit the application software.
% For details on the print settings of the printer driver, refer to [User's Guide Print].
5 Click [Print].
Printing is executed.
5.2 Printing a file stored in USB memory
TipsThis function is available when an optional Hard Disk is installed.
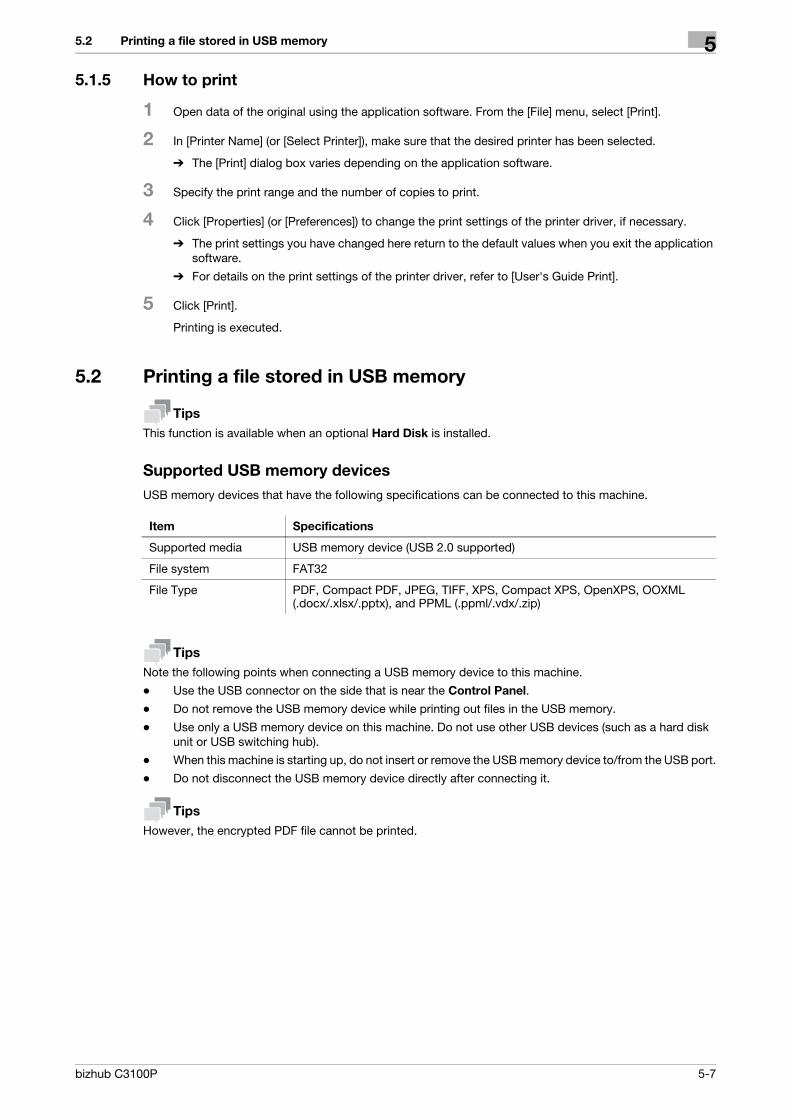
Supported USB memory devicesUSB memory devices that have the following specifications can be connected to this machine.
TipsNote the following points when connecting a USB memory device to this machine.
- Use the USB connector on the side that is near the Control Panel.
- Do not remove the USB memory device while printing out files in the USB memory.
- Use only a USB memory device on this machine. Do not use other USB devices (such as a hard disk unit or USB switching hub).
- When this machine is starting up, do not insert or remove the USB memory device to/from the USB port.
- Do not disconnect the USB memory device directly after connecting it.
TipsHowever, the encrypted PDF file cannot be printed.
Item Specifications
Supported media USB memory device (USB 2.0 supported)
File system FAT32
File Type PDF, Compact PDF, JPEG, TIFF, XPS, Compact XPS, OpenXPS, OOXML (.docx/.xlsx/.pptx), and PPML (.ppml/.vdx/.zip)

5-8 bizhub C3100P
Printing a file stored in USB memory5 5.2
How to print
1 Connect a USB memory device to the USB port of this machine.
appears on the upper right of the Message Window, and the menu of the external memory ap-pears.
2 Connect a USB memory device to the USB port of this machine.
3 Select [LIST OF FILES].
% To display a JPEG or TIFF file, select [ALL] in [TYPE OF FILES].
4 Select the file to be printed.
% If the target file is included in a folder, select the folder.
% Up to 99 folders and files in all can be displayed.
% Folders in level 8 or higher cannot be displayed.
5 If necessary, change the setting of the paper size, 2-sided printing, number of copies, or collate func-tion.
6 Select [PRINT].

6 Index


bizhub C3100P 6-3
6
6 IndexCControl Panel 2-9
LLoading paper
Manual Feed Tray 3-6Tray 1 3-8
MManual Feed Tray 3-6
NName of each part 2-3
Front side 2-3Rear side 2-4
Network setting 4-3
OOption configuration 2-5
PPaper
Available paper sizes 3-4Available paper types 3-3Storing paper 3-5Unavailable paper 3-5
Power supply 2-6Power key 2-8Power Switch 2-7
PreparationNetwork setting 4-3Print (network connection) 5-3Print (USB connection) 5-5
Print function 5-3How to print 5-7
Printer driver 5-3Initial settings 5-6Install (network connection) 5-3Install (USB connection) 5-5
SScreen layout 2-11
TTray 1 3-8
UUSB memory 5-7
How to print 5-8User's Guide 1-3

6-4 bizhub C3100P
6