bk-5 (dk/no) · forklaring af knapper og paneler på roland bk-5 10 frontpanelet 10 bagpanelet 14...
TRANSCRIPT

(DK/NO)BK-5


Tillykke med dit nye instrument fra Roland!
Registrer dig online på www.roland.dk / www.roland.no og blive medlem af My Roland – Rolands VIP klub.
Ved online registrering får du ekstra garanti på dit Roland/BOSS-produkt. På alle Roland/BOSS-produkter giver vi ved produktregistrering 1 års ekstra garanti i forhold til købelovens lovpligtige 2-årige garanti, dvs. du får i alt 3 års garanti. Hvis du har købt et HP-piano, LX-piano, RG-piano, V-Piano Grand eller Classic Orgel C-330/C-380, får du ved registrering ekstra 3 års garanti, dvs. i alt 5 års garanti.
Du har også muligheden for at sige ”ja tak” til at modtage Rolands nyhedsmail og være på forkant med information fra Roland omkring produktnyheder, produkt-demoer hos forhandlere, spændende artikler om forskellige musikere, koncerter, events, konkurrencer og meget mere.
Roland har produceret instrumenter i mange år, og er i dag en af de førende produ-center indenfor mange forskellige instrumentkategorier. Uanset om du spiller klaver, keyboard, orgel, synthesizer, guitar, trommer, bas eller er indehaver af et større eller mindre studie, så har Roland det rigtige produkt. På Rolands hjemmesider og via Rolands nyhedsmail kan du læse om de mange produkter, og læse artikler om brug af MIDI og computer.
Hvis du har brug for hjælp, så har Roland en telefonsupport du kan ringe til, på hver-dage mandag til torsdag imellem 14-16 og fredag imellem 9-11. Telefonnummeret er 39 16 62 29 og du er meget velkommen til at ringe. Vi svarer også på support via e-mail. Du kan skrive til os på [email protected].
Der tages forbehold for trykfejl.
Gå nu i gang med at spille og glæd dig over, hvor dejligt det er at spille musik.
God fornøjelse!
DANSK BRUGSANVISNING RSC-0957
BK-5
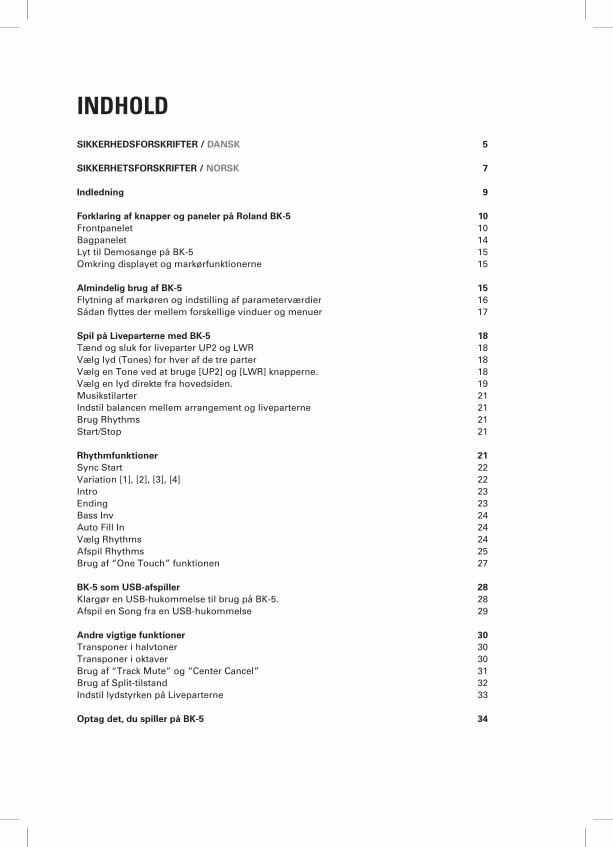
INDHOLDSIKKERHEDSFORSKRIFTER / DANSK 5
SIKKERHETSFORSKRIFTER / NORSK 7
Indledning 9
Forklaring af knapper og paneler på Roland BK-5 10Frontpanelet 10Bagpanelet 14Lyt til Demosange på BK-5 15Omkring displayet og markørfunktionerne 15
Almindelig brug af BK-5 15Flytning af markøren og indstilling af parameterværdier 16Sådan flyttes der mellem forskellige vinduer og menuer 17
Spil på Liveparterne med BK-5 18Tænd og sluk for liveparter UP2 og LWR 18Vælg lyd (Tones) for hver af de tre parter 18Vælg en Tone ved at bruge [UP2] og [LWR] knapperne. 18Vælg en lyd direkte fra hovedsiden. 19Musikstilarter 21Indstil balancen mellem arrangement og liveparterne 21Brug Rhythms 21Start/Stop 21
Rhythmfunktioner 21Sync Start 22Variation [1], [2], [3], [4] 22Intro 23Ending 23Bass Inv 24Auto Fill In 24Vælg Rhythms 24Afspil Rhythms 25Brug af “One Touch” funktionen 27
BK-5 som USB-afspiller 28Klargør en USB-hukommelse til brug på BK-5. 28Afspil en Song fra en USB-hukommelse 29
Andre vigtige funktioner 30Transponer i halvtoner 30Transponer i oktaver 30Brug af “Track Mute” og “Center Cancel” 31Brug af Split-tilstand 32Indstil lydstyrken på Liveparterne 33
Optag det, du spiller på BK-5 34

QUICK GUIDE 5
SIKKERHEDSFORSKRIFTER / DANSKDet er vigtigt, at du læser disse sider inden du bruger dit nye musikinstrument. Selvom instrumentet er produceret efter de højeste standarder og naturligvis gennemgår omfattende test fra vores fabrikker, er det vigtigt, at du læser denne lille guide, der er skrevet, for at du skal undgå problemer med dit instrument.
StrømforsyningDet er vigtigt at bruge den rette strømforsyning til dit nye instrument. Anvender du en forkert strømforsyning, kan du risikere, at instru mentet ikke fungerer, at det kan gå i stykker eller det kan udgøre brandfare. Sørg derfor for at bruge enten den strømforsyning, der følger med in-strumentet, eller brug den strømforsyning, som anbefales i den medfølgende engelske manual.
Husk at bruger du andre strømforsyninger end den, der anbefales af Roland, så vil en evt. skade ikke være omfattet af din Roland garanti.
Sørg også for, at de ledninger og kabler, som du bruger, er i god stand. Et strømkabel, der ikke er i god stand, kan udgøre en stor brandfare og skade både dig, instrument og det lokale, hvor instrumentet er placeret.
Anvender du en strømforsyning med fejl, kan det gå ud over lydkvaliteten og ødelægge dit in-strument. Vær også opmærksom på, at tilslut ter du strømforsyningen til samme strømkilde som f.eks. køleskab, fryser eller stikkontakter med dæmper, kan det medføre støj.
Når du tilslutter instrumentet til stikkontakten er det vigtigt, at instrumentet er slukket.
Når du tilslutter instrumentet til en stikkontakt så vær opmærksom på, at spændingen svarer overens med de krav, der står på instrumentet.
Det er ikke alle Roland instrumenter, der har eks tern strømforsyning. Faktisk er der mange, der har indbygget strømforsyning og som der-for kun leveres med et netkabel.
PlaceringAlle elektriske apparater påvirkes af den place-ring apparatet har og det gælder naturligvis også for dit nye instrument. Du kender sikkert den lyd, der kan komme i fjernsyn og stereo-anlæg m.v., hvis f.eks. mobiltelefonen ringer tæt på apparatet. Denne støj stammer fra den elek-tromagnetisme, som elektriske instrumenter udsender og den letteste måde at undgå støjen på, er at placere dit nye instrument væk fra po-tentielle støjkilder. Det kan være computerskær-me, kraftige forstærkere, fjernsyn m.v.
Sørg også for at instrumentet ikke er placeret i ekstrem varme, direkte sollys, steder med fugt, støv eller under andre ekstreme forhold.
Sørg for at holde dit instrument rent. Skidt og snavs kan være medvirkende årsag til at dit instrument går i stykker. Alle Rolands instru-menter indeholder elektronik og som du sikkert allerede ved, er elektronik følsomt overfor fedt, støv og snavs. Pas derfor godt på dit instru-ment. Når du skal fjerne støv skal du anvende en tør blød klud. Er der fedtpletter skal disse fjernes med en klud der er let fugtet og brug evt. lidt opvaskemiddel, hvis pletterne er svære at fjerne. Du må under ingen omstændigheder anvende væsker med opløsningsmidler.
Pas også på at instrumentet ikke kommer i for-bindelse med væsker (øl, sodavand, m.v.) eller ting som kan skade instrumentet - f.eks. skarpe genstande m.v.

6 QUICK GUIDE
Almindelig brugNår du i det daglige anvender instrumentet, så lad være med at trykke hårdt på knapper m.v. Knapperne på dit instrument skal virke uden at øve vold - Føler du, at du er nødt til at trykke hårdere end sædvanligt, bør du kontakte din autoriserede Roland-forhandler. Har du et in-strument, der kører på batteri, så bør du skifte batterier og derved checke, om det afhjælper problemet.
Når du tilslutter eller fjerner kabler fra instru-mentet, så tag fat i stikket og ikke i selve led-ningen.
Det er helt almindeligt at instrumentet kan blive varmt når det er tændt. Når du transporterer dit nye instrument, bør du bruge enten en Flight-case eller den originale papkasse, instru mentet blev leveret i.
Selvom det vel for de fleste er naturligt så udsæt ikke instrumentet for voldsomme belastninger. Sørg for ikke at kaste med instrumentet, sætte tunge ting ovenpå det eller på andre måder øve vold imod instrumentet.
ReparationSkulle uheldet være ude så husk altid at kontak-te din forhandler. Roland giver 2 års garanti på alle produkter og reparation og service skal ske på et Roland-autoriseret værksted. Kontakt Ro-lands tekniske afdeling på telefon 39 16 62 40 for yderligere information.
Du må under ingen omstændigheder selv forsø-ge at åbne og reparere dit instrument, hvis det går i stykker. Husk at din garanti bortfalder, hvis du alligevel gør det.
DataMange af Rolands instrumenter har indbygget hukommelse til lagring af data (lyde, sequencer-data, brugeropsætninger m.v.). Har dit instru-ment en hukommelse, så husk at tage backup af data med jævne mellemrum og under alle om-stændigheder, hvis instrumentet skal service-res på et værksted. Når du tager backup sker det enten på det indbyggede medie (diskette, SmartMedia, Zip o.l.) eller via MIDI til computer. For nærmere detaljer omkring dette bør du læse i den engelske manual eller ringe til Rolands support på hverdage imellem 14 og 16 på tele-fon 39 16 62 29.
Vær opmærksom på at de forskellige medier også skal håndteres med omhu. Generelt vil digitale-medier kunne miste data, hvis de op-bevares i nærheden af magnetiske kilder, f.eks. computerskærme, højttalere m.v. Læs mere om brugen af de enkelte medier i din eng elske manual.

QUICK GUIDE 7
SIKKERHETSFORSKRIFTER / NORSKDet er viktig at du leser disse sidene før du begynner å bruke ditt nye musikkinstrument. Selv om instrumentet er produsert etter de strengeste standarder og naturligvis gjennomgår omfattende tester ved våre fabrikker, er det viktig at du leser denne lille guiden som er skrevet for at du skal unngå å få problemer med ditt instrument.
StrømforsyningDet er viktig at du bruker den riktige Strøm-forsyningen til instrumentet. Bruker du feil strømforsyning kan du risikere at instrumentet ikke fungerer, at det blir ødelagt eller at det kan utgjøre brannfare. Sørg derfor og enten bruke den strømforsyningen som følger med instru-mentet, eller bruk den strømforsyningen som anbefales i den medfølgende engelskebruksanvisningen.
Husk at hvis du bruker en annen strømforsy-ning enn den som anbefales av Roland, så vil ikke eventuelle skader komme inn under Ro-lands garantiansvar.
Sørg også for at ledninger og kabler som du bruker er i god stand. En defekt strømkabel kan utgjøre stor brannfare og skade både degselv, instrumentet og lokalet der instrumentet er plassert.
Bruker du en strømforsyning med feil kan det både gå ut over lydkvaliteten og ødelegge ditt instrument. Vær også oppmerksom på at hvis du kobler strømforsyningen til samme strøm-kurs som for eksempel kjøleskap, fryser eller lysdemper, kan dette generere støy i instrumen-tet.
Når du kobler instrumentet til strømnettet er det viktig at strømbryteren på instrumentet er slått av.
Før du kobler instrumentet til strømnettet må du være sikker på at spenningen stemmer overens med de krav som står på instrumentet.
Det er ikke alle Roland instrumenter som har ekstern strømforsyning. Det er mange som har innebygget strømforsyning og som derfor bare leveres med en nettkabel.
PlasseringAlle elektriske apparater påvirkes av den plasse-ringen apparatet har, og dette gjelder naturlig-vis også ditt nye instrument. Du kjenner sikkert den lyden som kan oppstå i TV-apparater eller lydanlegg hvis en mobiltelefon befinner seg i umiddelbar nærhet. Denne støyen kommer fra det elektromagnetiske feltet som stråler ut fra alle elektriske apparater. Den letteste måten å unngå slik støy på er å plassere instrumentet i tilstrekkelig avstand fra slike forstyrrende støy-kilder. Disse kan også være dataskjermer, kraf-tige forsterkere, fjernsynsapparater osv.
Sørg også for at instrumentet ikke utsettes forekstrem varme, direkte sollys, fuktighet, støveller andre ekstreme påvirkninger.
RengjøringSørg for å holde instrumentet rent. Støv og skitt kan være en medvirkende årsak til at instrumen-tet går i stykker. Alle Rolands instrumenter inne-holder elektronikk som kan ta skade av uheldige kombinasjoner av fuktighet, støv og fremmed-elementer som kan skape kortslutninger. Pass derfor godt på ditt instrument. Når du skal fjer-ne støv og skitt bør du bruke en tørr, myk klut. Fjerning av fettflekker gjøres med en lett fuktet klut, eventuelt med litt oppvaskmiddel hvis flek-kene er vanskelige å fjerne. Du må under ingen omstendigheter bruke rensevæsker som inne-holder løsningsmidler.
Pass også på at instrumentet ikke kommer i for-bindelse med væsker (øl, mineralvann osv.) el-ler ting som kan skade instrumentet, for eksem-pel skarpe gjenstander osv.

8 QUICK GUIDE
Alminnelig brukNår du bruker instrumentet til daglig skal du ikke trykke overdrevent hardt på knapper osv. Knap-pene på instrumentet skal trykkes på uten bruk av hard kraft. Føler du at du er nødt til å trykke hardere enn vanlig bør du kontakte din autori-serte Roland-forhandler. Har du et instrument som bruker batterier, bør du først skifte til nye batterier og sjekke om dette løser problemet.
Når du kobler til eller fra ledninger skal du holde i kontakten - ikke dra i selve ledningen.
Det er helt normalt at elektroniske instrumenter blir varme når de er slått på.
Når du transporterer ditt nye instrument bør du enten bruke en egnet transportkasse eller den originale emballasjen som instrumentet ble le-vert i.
Ikke utsett instrumentet for voldsomme belast-ninger selv om det i blant kan være en fristelse... Sørg for å behandle ditt instrument med forsik-tighet.
ReparasjonSkulle uhellet være ute så husk å kontakte din forhandler. Roland gir 2 års garanti på alle pro-dukter og reparasjon, og service skal skje på et Roland-autorisert verksted.
Du må under ingen omstendighet selv forsøke å reparere ditt instrument hvis det går i stykker. Dette vil kunne resultere i at din garanti ikke len-ger gjelder.
DataMange av Rolands instrumenter har innebygget minne til lagring av data (lyder, sequencerdata, brukeroppsett osv.) Hvis ditt instrument har dette, så husk å ta sikkerhetskopier av verdifulle data med jevne mellomrom, og under alle om-stendigheter hvis instrumentet skal leveres til service på et verksted. Når du tar sikkerhetsko-pier skjer dette enten på det innebygde mediet (SD-kort, USB minne, CD og lignende) eller via MIDI til en datamaskin.
For nærmere detaljer om dette kan du lese den engelske brukerveiledningen eller ringe Ro-lands brukerstøtte man-tors mellom kl 14.00 og 16.00 på telefon 22 73 48 44.
Vær oppmerksom på at de forskjellige lagrings-medier også skal håndteres med forsiktighet. Les mer om bruken av de enkelte lagringsme-dier i din engelske manual.

QUICK GUIDE 9
INDLEDNING
QUICKGUIDE 9
Roland BK-5 Backing Keyboard er en musikarranger med næsten 300 forskellige musikalske stilarter, lagt i kategorier, så det er let at finde det helt rigtige arrangement. Hvert arrangement har 4 variationer, 4 indledninger, 6 fill in og 4 afslutninger, så selv indenfor en enkelt stilart er der mange variationsmuligheder. Du har selv 3 livepar-ter, som kan spilles på keyboardet samtidig med arrangeren kører som backingtrack. Denne livedel har mange forskellige lyde at vælge imellem, sådan at dit eget musikal-ske behov bliver dækket.
BK-5 har også 16 samtidige MIDI-kanaler, så instrumentet også kan bruges til afspil-ning af almindelige Standard MIDI Files (SMF), ligesom der både kan optages og afspilles audio filer i Wav og mp3-format direkte fra en USB-hukommelses-stick.

10 QUICK GUIDE
FORKLARING AF KNAPPER OG PANELER PÅ ROLAND BK-5
Frontpanelet
1. [Pitch Bend/Modulations Hjul] Dette kombinerede hjul vil dels bende tonen op eller ned, hvis hjulet presses mod højre eller venstre. Hvis hjulet presses opad, vil lyden få vibrato. Både Pitch Bend og Vibrato skal dog være programmeret ind i den valgte lyd for at fungere.
2. [Phones 1 & 2] stikI disse stik kan der tilsluttes op til 2 sæt hovedtelefoner. Når der isættes en hovedtele-fon i et af stikkene, afbrydes de indbyggede højttalere.
3. [Volume] knap Denne knap styrer den generelle lydstyrke på BK-5, ligesom den også styrer volumen
på hovedtelefonudgangen.
4. [Rhythm Family] knapper Disse knapper vælger stilarten på den næste kategori af Rhythm, som du ønsker at
bruge. Tryk på en af knapperne for at vise en liste over alle de Rhythms, som findes i kategorien.
5. [Tap Tempo] funktionen Tryk rytmisk flere gange på denne knap, og Rhythm eller Songtempoet på BK-5 vil
vælge dette tempo. Hvis knappen holdes nede fastlåses det valgte tempo.
Panel descriptionBacking Keyboard BK-5 r
11
3. Panel description
Front panel
A Pitch Bend/Modulation leverYou can raise or lower the pitch by moving this lever to the left or right. Push the lever away from yourself to apply modulation (normally vibrato) to the sound.
B PHONES 1 & 2 socketsThis is where you can connect one or two pairs of optional headphones (Roland RH-series). Doing so switches off the internal speakers.
C VOLUME knobUse this knob to set the BK-5’s global output volume (all signals transmitted to the speakers and OUTPUT sockets). The setting of this knob also determines the volume in the headphones you may connect.
D RHYTHM FAMILY buttonsThese buttons are used to select the family of the next rhythm you want to use. Pressing one of these buttons calls up a list of all rhythms contained in the selected family.Pressing and holding this button locks the currently selected rhythm (see p. 54).
E TAP TEMPO buttonPressing this button several times allows you to change the current rhythm’s or song’s tempo to the value calculated from the speed at which the button is pressed.
Pressing and holding this button locks the current tempo setting (see p. 54).
F TEMPO buttonsThese buttons can be used to decrease or increase the tempo of the currently selected rhythm or song. Pressing them together recalls the rhythm’s or song’s stored tempo value.
NOTE
You can also use the [TAP TEMPO] button E to set the desired tempo.
G SYNC START buttonThis button is used to activate or switch off the BK-5’s Sync Start or Sync Stop function. If it is on, rhythm playback can be started or stopped by simply playing a note or chord on the keyboard. See also page 27.While a song file is selected, this button stops play-back.
H BALANCE buttonsThese buttons allow you to set the balance between the rhythms and songs (BACKING) and the real-time parts (PART).
A
B
C
H
D E F G
I J K L M N O
BK-5_US.book Page 11 Monday, November 14, 2011 12:43 PM
QUICK GUIDE 11
6. [Tempo] knapper Disse knapper bruges til at hæve eller sænke tempoet på den valgte Rhythm eller
Song. Hvis begge knapper trykkes ned samtidig, så bliver det oprindelige tempo valgt, det tempo, som er gemt i Rhythm eller i Song.
7. [Sync Start] knap Med denne knap tændes eller slukkes Sync Start-funktionen. Hvis funktionen er tændt,
så kan en Rhythm startes eller stoppes ved simpelt hen at spille en tone eller en akkord på keyboardet.
8. [Balance] knap Denne knap styrer balancen mellem arrangementbacking (Rhythm eller Song) og det,
der bliver spillet live på BK-5 (Live Parts).
9. [Audio Rec] knappen Denne knap bruges til at starte optagelsen af det, der spilles på BK-5. Alt, hvad der
høres ud af [Output] stikkene på bagsiden af BK-5 bliver optaget. Knappen bruges også til at vælge Rhythm Composer-funktionen.
10. [Bass Inv] knap Brug knappen til at tænde eller slukke for Bass Inversion-funktionen.
11. [Auto Fill In] knap Denne knap tænder for Auto Fill In-funktionen, som sørger for, at en overgangs-
variation afspilles, inden en ny Rhythm Variation spilles.
12. [Variation 1/2/3/4] knapper Disse knapper bruges til at vælge en Rhythm Variation, dvs. enten en mere simpel
eller en mere kompleks udgave af stilarten.
13. [Intro] knap Når der trykkes på denne knap, så spilles der en introduktion, inden Rhythm-
afspilning starter. I hver stilart er der fire forskellige introduktioner, som vælges ud fra kompleksiteten af den Rhythm (stilart), der er valgt.
14. [Ending] knap Når der trykkes på denne knap, så spilles der en afslutning, inden Rhythm-afspilning
slutter. I hver stilart er der fire forskellige afslutninger, som vælges ud fra kompleksite-ten af den Rhythm (stilart), som er valgt.
15. [Start/Stop] knap Denne knap bruges til at starte eller stoppe afspilningen af en Rhythm eller en Song.

12 QUICK GUIDE
16. Display Dette display viser informationer og menuer på BK-5.
17. [Cursor/Value] drejehjul Denne store drejeknap bruges til at flytte markøren rundt i displayet, til at vælge para-
metre og ændre på værdier.
18. [Enter/Select] knap Tryk på denne knap for at bekræfte et valg eller for at vælge en funktion.
19. [Performance List] knap Tryk på denne knap for at kalde en Performance List frem på displayet.
20. [Performance Write] knap Denne knap bruges til at gemme Performance indstillinger. Alt efter hvad displayet
viser, kan knappen også bruges til at gemme Rhythms og Songs.
21. [Key] knap Denne knap kalder BK-5’s transponeringsfunktion frem. Transponeringen kan gælde
for Rhythms, Songs og de tre parter, som kan spilles live. Hvis knappen lyser, så er transponeringsfunktionen aktiv.
22. [Track Mute/ Center Cancel] knap Med denne knap lukkes der for dele af Rhythmarrangementet, så kun trommer og
basrollen høres. Knappen giver også mulighed for at lukke for den melodibærende part i den valgte SMF, eller til at dæmpe vokaldelen i en audiofil (wav eller Mp3), så man selv kan spille/synge den part. Hvis knappen holdes nede, vises der en menu i displayet, hvor bestemte dele/spor af Rhythm eller SMF MIDI fil kan slukkes.
Panel description
12
r
Backing Keyboard BK-5
I AUDIO REC buttonThis button is used to start audio recording of your performance. This function records everything the BK-5 transmits to its OUTPUT sockets (audio signals you play back and audio versions of the MIDI parts you control). See page 52.This button is also used to select the Rhythm Com-poser function (see p. 81).
J BASS INV buttonThis button is used to switch the Bass Inversion func-tion on and off (page 29).
K AUTO FILL IN buttonThis button is used to activate the Auto Fill-In func-tion, which causes a transition to be played before selecting the new rhythm variation (which is selected with the VARIATION buttons).
L VARIATION 1/2/3/4 buttonsThese buttons are used to select a rhythm “Variation”, i.e. a simpler or more complex arrangement of the selected rhythm.
M INTRO buttonWhen you activate this button, rhythm playback starts with a musical introduction whose complexity depends on which VARIATION button currently lights (there are four different introductions per rhythm).After selecting a song file, this button allows you to rewind.
NOTE
You can also press this button during rhythm playback.
N ENDING buttonWhen you activate this button, rhythm playback stops with a musical ending whose complexity depends on which VARIATION button currently lights (there are four different ending phrases per rhythm). After selecting a song file, this button allows you to fast-forward.
O START/STOP buttonThis button allows you to start and stop rhythm play-back. If you select a song, it starts and temporarily stops (pause) song playback.
P DisplayThis display shows information related to your opera-tion.
Q CURSOR/VALUE dialThis dial can be used to move the cursor in the dis-play, to select parameters and to set values.
R ENTER/SELECT buttonPress this button to confirm your selection or dese-lection of the display item where the cursor is.
S PERFORMANCE LIST buttonThis button calls up the Performance List (page 45).
T PERFORMANCE WRITE buttonThe main function of this button is to save Perfor-mance settings. Depending on the selected display page, it can also be used to save rhythms and songs.
U KEY buttonThis button calls up the BK-5’s transposition func-tion. Its settings can be applied to rhythms, Songs and the 3 real-time parts (UP1, UP2, LWR).
P
QR S T U V W
X
Y Z
a b c d e
f
BK-5_US.book Page 12 Monday, November 14, 2011 12:43 PM

QUICK GUIDE 13
23. [USB Memory] knap Tryk på denne knap for at se en liste over de filer, som er gemt på USB-hukommelsen,
som er tilsluttet BK-5’s USB-port.
24. [USB Memory] port I denne port kan der tilsluttes en ekstern USB-hukommelse.
25. [Menu] knap Ved at trykke på denne knap bliver der åbnet for de forskellige menuer og funktioner i
BK-5. Hvis knappen trykkes samtidig med [Exit] knappen, så kan der lyttes til de demo sange, som findes på BK-5.
26. [Exit] knap Brug denne knap for at komme tilbage til den forrige menu eller op til et højere niveau
i menu-systemet.
27. [Split] knap Denne knap bruges til at tænde for Splitfunktionen. Når knappen lyser og funktionen
er aktiv, så de toner du spiller på keyboardet under C4 blive spillet af LWR-parten (hvis den er aktiv) og styre akkorderne på Rhythmarrangementet. På samme måde vil toner over C4 spille UP1 og UP2 parterne.
28. [Part LWR og UP2] knapper Disse knapper tænder eller slukker for disse to Live-parter. UP1 parten vil altid være
aktiv og kan ikke slukkes.
29. [One Touch] knap Når der er trykket på denne knap, så vil Toneknapperne [1-4] kunne bruges til hurtige
valg af hukommelsesfunktioner. Hvis knappen holdes nede, vises en menu i displayet, som kan bruges til at styre One Touchfunktionerne.
30. [Melody Intell] knap Når den knap aktiveres, bliver der automatisk lagt en kontramelodi til din solo eller
melodi. Hvis knappen holdes nede, vises en menu i displayet, som kan bruges til at styre Melody Intellfunktionen.
31. [Numeric] knappen Hvis denne knap aktiveres, så fungerer Tone-knapperne som numeriske knapper 0-9.
Knapperne kan så bruges til indtastning af talværdier.
32. [Tone] knapper Disse knapper vælger din lyd (Tone) ud fra instrumentkategorier. Bruges også i sam-
menhæng med [Numeric] knappen til at indtaste talværdier.

14 QUICK GUIDE
Bagpanelet
1. [USB Computer] stik Brug et USB-kabel til at forbinde en computer til BK-5
2. [Audio Input] mini jack stik Denne indgang gør det muligt at tilslutte enheder, som sender line level på deres
udgange. Det kan f.eks. CD/mp3-afspillere og synthesizere.
3. [Audio Output R & L/Mono] jack stik Disse udgange sender alle de audiosignaler, som bliver genereret af BK-5 sammen
med de signaler, som bliver modtaget via [Audio Input] indgangen.
4. [Video output] udgang Tilslut denne udgang til enten et TV eller til en ekstern monitor.
5. [Pedal Hold] tilslutning I dette jackstik tilsluttes der en Roland DP-serie eller Boss FS-5U pedal. Denne pedal
kan bruges til at holde tonerne på liveparterne.
6. [Pedal Switch/Expression] tilslutning Tilslut i denne jack indgang enten en pedalomskifter (evt. af Roland’s DP- serie), en
fodomskifter (evt. en Boss FS-5U) eller en expressionpedal (evt. en Roland EV-5). Den tilsluttede pedal kan udføre forskellige funktioner på BK-5.
7. [MIDI In & out] stik Her kan der tilsluttes MIDI-enheder.
8. [Power] omskifter Her tændes eller slukkes BK-5. Vær opmærksom på, at BK-5 har en automatisk sluk
funktion, som slukker for instrumentet, hvis det ikke er brugt i over 30 min. ”Auto Off” funktionen kan dog slås fra, hvis det ønskes.
9. [DC In] stik Her tilsluttes den medfølgende AC-adapter.
Panel description
14
r
Backing Keyboard BK-5
Rear panel
A USB COMPUTER portUse a USB cable to connect the BK-5 to your com-puter via this connector (page 17).
B AUDIO INPUT (STEREO) mini jackThis mini jack allows you to connect the audio out-puts of an external signal source (CD/mp3 player, synthesizer, etc.).
C AUDIO OUTPUT R & L/MONO socketsThese sockets transmit all audio signals the BK-5 generates as well as the signals you input to the BK-5.
NOTE
If you can/want to use only one channel on your external amplifier, connect the L/MONO socket to its input. For opti-mum sound quality, we recommend working in stereo, though.
D VIDEO OUTPUT socketConnect this socket to the appropriate input of your TV or external display.
NOTE
The signal format (PAL or NTSC) and aspect ratio are select-able (page 67).
E PEDAL HOLD socketAn optional Roland DP-series or BOSS FS-5U foot-switch connected to this socket can be used to hold the notes of the real-time parts. (The MELODY INTELL part can also be sustained in this way.) This function is also referred to as “sustain” or “damper”.
F PEDAL SWITCH/EXPRESSION socketConnect a separately available pedal switch (Roland DP-series), a separately available foot switch (BOSS FS-5U) or a separately available expression pedal (Roland EV-5) to this jack (page 18).
G MIDI IN & OUT socketsYou can connect MIDI devices to these sockets (page 17).
H POWER switchTurns the power on/off (page 20). With the factory settings, the BK-5’s power will auto-matically be switched off 30 minutes after you stop playing or operating the BK-5. If the BK-5’s power has been turned off automati-cally, you can use the [POWER] switch to turn the BK-5 back on. If you don’t want the power to turn off automatically, set the “Auto Off” parameter to “OFF” (page 69).
I DC IN socketConnect the supplied PSB-7U AC adapter here (page 16).
A B C D E F G IH
BK-5_US.book Page 14 Monday, November 14, 2011 12:43 PM

QUICK GUIDE 15
ALMINDELIG BRUG AF BK-5
Lyt til Demosange på BK-5
Tryk samtidig på knapperne [Menu] og [Exit]
BK-5 spiller en Demo Song og hvis du har tilsluttet en ekstern monitor viser den de vigtigste muligheder på instrumentet.
Tryk på [Exit] knappen for at forlade demofunktionen.
Omkring displayet og markørfunktionerne
Her fortælles, hvordan informationer vises og hvordan du flytter markøren rundt i displayet.
Her ses et displaybillede af hovedsiden
Basic operation of the BK-5
22
rBacking Keyboard BK-5
6. Basic operation of the BK-5
About the display and cursor operationThis section introduces the information that appears on the main page in the BK-5’s display and how to navi-gate the menu.
Main page
Moving the cursor and setting parameter valuesThe display cursor can only be moved to the fields that contain numeric values.
1. Rotate the dial to move the cursor to the parameter whose value you want to change.
2. Press the [ENTER/SELECT] button to confirm your selection.
The setting field of the selected parameter is dis-played in reverse.
In our example, we want to assign a different Tone to the Upper1 (UP1) part.
3. Rotate the [CURSOR÷VALUE] dial to change the value.
4. Press the [ENTER/SELECT] button again to deselect the “UP1” field.The parameter’s setting field once again appears on a white background and the [CURSOR÷VALUE] dial can once again be used to select another parameter.
Moving between windowsHere is how to navigate the menu to select the setting you want to change.
1. Press [MENU] button.
The display changes to:
This page allows you to select the function group that contains the setting you want to change.
NOTE
In some cases, the [MENU] button may recall a special edit menu window instead of a main menu page.
2. Rotate the [CURSOR÷VALUE] dial to select the entry of the desired function group.
Current measure or remaining time Time signature
Tempo setting or time stretching
Selected file type: Rhythm, .SMF, .WAV, .mp3
Real-time part field: UP1, UP2, LWR. The black field refers to the selected real-time part.
Name of the last chord you played
One Touch mem-ory indication
Name of the selected rhythm (or loaded file)
Current “Key” setting
Selected sounds
Lock status of these parameters
Octave settings of the real-time parts.
Recording time
BK-5_US.book Page 22 Monday, November 14, 2011 12:43 PM
Den valgte lyd
Oktavering af Liveparterne
”Låst” (Lock) tilstand på disse parametreLive Part : UP12, UP2, LWR. Den valgte part ser optrykket i sort
Navn på den sidst spillede akkord
Navn på gældende Rhythm eller fil
“One Touch” indikator
Valgte fil type: Rhythm, .smf, .wav, mp3
Tempo eller Time Stretch
Toneart
Takt artGældende takt

16 QUICK GUIDE
Flytning af markøren og indstilling af parameterværdier
1. Drej på [Cursor/Value] hjulet for at flytte markøren hen til feltet på den parameter, som du vil ændre.
2. Tryk på [Enter/Select] knappen for at bekræfte dit valg.
Feltet skifter fra hvid på sort baggrund til at være sort på hvid baggrund. Det fortæller, hvilken funktion, du har fat i og betyder, at værdien kan ændres med [Value/Cursor] hjulet.
3. Drej på [Cursor/Value] hjulet for at ændre på parameter værdien.
4. Tryk på [Enter/Select] knappen for at bekræfte din indstilling. Baggrundsfarven skifter igen på feltet og betyder, at [Value/Cursor] hjulet igen kan bruges til at flytte markø-ren.
Basic operation of the BK-5
22
r
Backing Keyboard BK-5
6. Basic operation of the BK-5
About the display and cursor operationThis section introduces the information that appears on the main page in the BK-5’s display and how to navi-gate the menu.
Main page
Moving the cursor and setting parameter valuesThe display cursor can only be moved to the fields that contain numeric values.
1. Rotate the dial to move the cursor to the parameter whose value you want to change.
2. Press the [ENTER/SELECT] button to confirm your selection.
The setting field of the selected parameter is dis-played in reverse.
In our example, we want to assign a different Tone to the Upper1 (UP1) part.
3. Rotate the [CURSOR÷VALUE] dial to change the value.
4. Press the [ENTER/SELECT] button again to deselect the “UP1” field.The parameter’s setting field once again appears on a white background and the [CURSOR÷VALUE] dial can once again be used to select another parameter.
Moving between windowsHere is how to navigate the menu to select the setting you want to change.
1. Press [MENU] button.
The display changes to:
This page allows you to select the function group that contains the setting you want to change.
NOTE
In some cases, the [MENU] button may recall a special edit menu window instead of a main menu page.
2. Rotate the [CURSOR÷VALUE] dial to select the entry of the desired function group.
Current measure or remaining time Time signature
Tempo setting or time stretching
Selected file type: Rhythm, .SMF, .WAV, .mp3
Real-time part field: UP1, UP2, LWR. The black field refers to the selected real-time part.
Name of the last chord you played
One Touch mem-ory indication
Name of the selected rhythm (or loaded file)
Current “Key” setting
Selected sounds
Lock status of these parameters
Octave settings of the real-time parts.
Recording time
BK-5_US.book Page 22 Monday, November 14, 2011 12:43 PM

QUICK GUIDE 17
Sådan flyttes der mellem forskellige vinduer og menuer
1. Tryk på [Menu] knappen
Displayet ændres til
2. Drej på [Cursor/Value] hjulet for at flytte til den ønskede funktionsgruppe
3. Tryk på [Enter/Select] knappen for at gå ind i funktionens undermenuer
Her bruges Global Menuen som eksempel og displayet skifter til
Funktionerne med værdier i feltet kan ændres direkte, mens de øvrige kræver, at man går ind i en undermenu.
4. Prøv at vælge andre menuer ved at gøre følgende:
A: Tryk på [Exit] knappen for at returnere til den overordnede menudisplay.
B: Drej på [Cursor/Value] hjulet for at flytte til den ønskede funktionsgruppe og tryk på [Enter/Select] knappen for at gå ind i funktionsgruppen eller undermenuerne.
C: Tryk og hold [Exit] knappen nede for at gå tilbage til BK-5’s hovedside.
Basic operation of the BK-5
22
rBacking Keyboard BK-5
6. Basic operation of the BK-5
About the display and cursor operationThis section introduces the information that appears on the main page in the BK-5’s display and how to navi-gate the menu.
Main page
Moving the cursor and setting parameter valuesThe display cursor can only be moved to the fields that contain numeric values.
1. Rotate the dial to move the cursor to the parameter whose value you want to change.
2. Press the [ENTER/SELECT] button to confirm your selection.
The setting field of the selected parameter is dis-played in reverse.
In our example, we want to assign a different Tone to the Upper1 (UP1) part.
3. Rotate the [CURSOR÷VALUE] dial to change the value.
4. Press the [ENTER/SELECT] button again to deselect the “UP1” field.The parameter’s setting field once again appears on a white background and the [CURSOR÷VALUE] dial can once again be used to select another parameter.
Moving between windowsHere is how to navigate the menu to select the setting you want to change.
1. Press [MENU] button.
The display changes to:
This page allows you to select the function group that contains the setting you want to change.
NOTE
In some cases, the [MENU] button may recall a special edit menu window instead of a main menu page.
2. Rotate the [CURSOR÷VALUE] dial to select the entry of the desired function group.
Current measure or remaining time Time signature
Tempo setting or time stretching
Selected file type: Rhythm, .SMF, .WAV, .mp3
Real-time part field: UP1, UP2, LWR. The black field refers to the selected real-time part.
Name of the last chord you played
One Touch mem-ory indication
Name of the selected rhythm (or loaded file)
Current “Key” setting
Selected sounds
Lock status of these parameters
Octave settings of the real-time parts.
Recording time
BK-5_US.book Page 22 Monday, November 14, 2011 12:43 PM
Basic operation of the BK-5
22
r
Backing Keyboard BK-5
6. Basic operation of the BK-5
About the display and cursor operationThis section introduces the information that appears on the main page in the BK-5’s display and how to navi-gate the menu.
Main page
Moving the cursor and setting parameter valuesThe display cursor can only be moved to the fields that contain numeric values.
1. Rotate the dial to move the cursor to the parameter whose value you want to change.
2. Press the [ENTER/SELECT] button to confirm your selection.
The setting field of the selected parameter is dis-played in reverse.
In our example, we want to assign a different Tone to the Upper1 (UP1) part.
3. Rotate the [CURSOR÷VALUE] dial to change the value.
4. Press the [ENTER/SELECT] button again to deselect the “UP1” field.The parameter’s setting field once again appears on a white background and the [CURSOR÷VALUE] dial can once again be used to select another parameter.
Moving between windowsHere is how to navigate the menu to select the setting you want to change.
1. Press [MENU] button.
The display changes to:
This page allows you to select the function group that contains the setting you want to change.
NOTE
In some cases, the [MENU] button may recall a special edit menu window instead of a main menu page.
2. Rotate the [CURSOR÷VALUE] dial to select the entry of the desired function group.
Current measure or remaining time Time signature
Tempo setting or time stretching
Selected file type: Rhythm, .SMF, .WAV, .mp3
Real-time part field: UP1, UP2, LWR. The black field refers to the selected real-time part.
Name of the last chord you played
One Touch mem-ory indication
Name of the selected rhythm (or loaded file)
Current “Key” setting
Selected sounds
Lock status of these parameters
Octave settings of the real-time parts.
Recording time
BK-5_US.book Page 22 Monday, November 14, 2011 12:43 PM
Basic operation of the BK-5Backing Keyboard BK-5 r
23
For this example, we will select “Global”.
3. Press the [ENTER/SELECT] button to go to the “Global” function group.The display changes to:
On this display page, “Display Contrast”, “Display Brightness” and “Tuning” can be changed directly. The remaining entries provide access to additional display pages.
4. Try to select other “Menu” functions by pro-ceeding as follows:
(a) Press the [EXIT] button once to return to the “Menu” page.
(b) Rotate the [CURSOR÷VALUE] dial to select an entry, then press the [ENTER/SELECT] button to go to the corresponding function group or setting.
(c) Press and hold the [EXIT] button to return to the BK-5’s main page.The [EXIT] button stops flashing.
BK-5_US.book Page 23 Monday, November 14, 2011 12:43 PM

18 QUICK GUIDE
SPIL PÅ LIVEPARTERNE MED BK-5 BK-5 indeholder 3 parter, der kan spilles live vha. keyboardet eller via MIDI. De kaldes
UP1, UP2 og LWR. Enten en eller flere kan spilles på en gang. Du kan vælge den ønskede lyd for alle tre parter.
Tænd og sluk for live parter UP2 og LWR
UP1 parten er altid aktiv. Derimod kan der tændes og slukkes for UP2 og LWR- parterne
Tryk på [UP2] eller [LWR] knappen for at tænde for en eller begge parter (knappen lyser), Hvis der derefter trykkes igen på parten, bliver der slukket for den.
Den sidst tændte part vil blive vist i displayet.
Vælg lyd (Tones) for hver af de tre parter
På BK-5 kaldes en lyd, som er tildelt en af de tre Liveparter, for en “Tone”. Vi bruger samme terminologi her. Man vælger en Tone for en part på to forskellige måder. De beskrives herunder.
Vælg en Tone ved at bruge [UP2] og [LWR] knapperne.
1. Tryk og hold [UP2] eller [LWR] knappen nede. Displayet viser lyd-kategorierne på en liste og kategorien til den valgte lyd er markeret i sort.
2. Hvis du vil vælge en lyd fra en anden kategori, så vælg kategorien på en af de 10 [Tone] knapper.
Playing the BK-5’s real-time parts
24
r
Backing Keyboard BK-5
7. Playing the BK-5’s real-time parts
Your BK-5 contains three real-time parts that can be controlled via MIDI: UP1, UP2 and LWR. Feel free to use only UP1 or to control all three simultaneously. You can assign the desired sounds (or “Tones”) to each of these parts. See page 119 for a list of the available sounds.
Switching the UP2 and LWR parts on and offThe UP1 part is always active. The UP2 and LWR parts, however, can be switched on or off.
1. Press the [UP2] or [LWR] button to switch the corresponding part (Upper2 or Lower) on (indicator lights) or off (indicator goes dark).
If you switch on one of these parts, the cursor on the main page automatically jumps to the “UP2” or “LWR” field. If [UP2] and [LWR] are both switched off, the cursor jumps to the “UP1” field.
Selecting Tones for the real-time parts On the BK-5, the sounds you can assign to the real-time parts are called “Tones”. The BK-5 allows you to assign any of the available Tones to any of the three real-time parts. Tone selection always applies to the part (UP1, UP2, or LWR) whose field is currently displayed in reverse.
Tones can be selected in two ways:
Using the [UP2] or [LWR] button to select Tones1. Press and hold the [UP2] or [LWR] button.
The display now shows a list of Tones where the cur-rently selected sound is displayed in reverse:
2. If the Tone you need belongs to another family (see p. 119), press another Tone but-ton.
3. Rotate the [CURSOR÷VALUE] dial to select the desired Tone, then press the [ENTER/SELECT] button to confirm your selection.
4. Press [EXIT] to leave the Tone selection page.
NOTE
You can only listen to Tones for the Upper2 or Lower part if the [UP2] or [LWR] button lights.
NOTE
Tones can also be selected by simply pressing the [NUMERIC] key and entering their number.
Selecting a Tone on the main page1. If the main page is not displayed, press and
hold the [EXIT] button until it appears.The numbers and names of the Tones assigned to the three real-time parts are displayed in the lower half of the display:
The highlighted numeric field refers to the part whose Tone assignment can be changed. To select a different part, move the cursor to its numeric field and press the [ENTER/SELECT] button.
2. Rotate the [CURSOR÷VALUE] dial to select the desired numeric field, then press the [ENTER/SELECT] button.
BK-5_US.book Page 24 Monday, November 14, 2011 12:43 PM
QUICK GUIDE 19
3. Drej på [Cursor/Value] knappen for at vælge den lyd indenfor kategorien, som du ønsker .
4. Bekræft valget ved at trykke på [Enter/Select] knappen.
5. Tryk på [Exit] knappen for at forlade menuen, hvor lyde vælges.
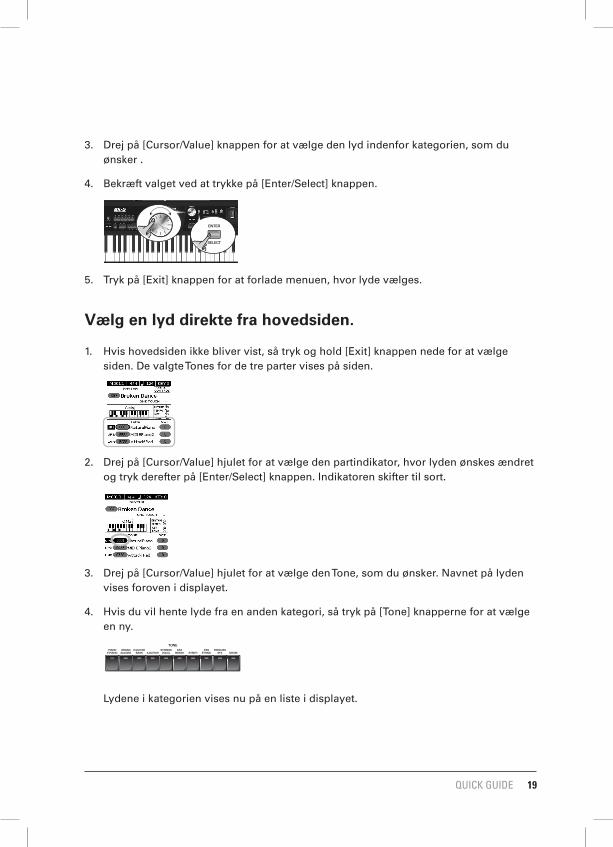
Vælg en lyd direkte fra hovedsiden.
1. Hvis hovedsiden ikke bliver vist, så tryk og hold [Exit] knappen nede for at vælge siden. De valgte Tones for de tre parter vises på siden.
2. Drej på [Cursor/Value] hjulet for at vælge den partindikator, hvor lyden ønskes ændret og tryk derefter på [Enter/Select] knappen. Indikatoren skifter til sort.
3. Drej på [Cursor/Value] hjulet for at vælge den Tone, som du ønsker. Navnet på lyden vises foroven i displayet.
4. Hvis du vil hente lyde fra en anden kategori, så tryk på [Tone] knapperne for at vælge en ny.
Lydene i kategorien vises nu på en liste i displayet.
Playing the BK-5’s real-time parts
24
r
Backing Keyboard BK-5
7. Playing the BK-5’s real-time parts
Your BK-5 contains three real-time parts that can be controlled via MIDI: UP1, UP2 and LWR. Feel free to use only UP1 or to control all three simultaneously. You can assign the desired sounds (or “Tones”) to each of these parts. See page 119 for a list of the available sounds.
Switching the UP2 and LWR parts on and offThe UP1 part is always active. The UP2 and LWR parts, however, can be switched on or off.
1. Press the [UP2] or [LWR] button to switch the corresponding part (Upper2 or Lower) on (indicator lights) or off (indicator goes dark).
If you switch on one of these parts, the cursor on the main page automatically jumps to the “UP2” or “LWR” field. If [UP2] and [LWR] are both switched off, the cursor jumps to the “UP1” field.
Selecting Tones for the real-time parts On the BK-5, the sounds you can assign to the real-time parts are called “Tones”. The BK-5 allows you to assign any of the available Tones to any of the three real-time parts. Tone selection always applies to the part (UP1, UP2, or LWR) whose field is currently displayed in reverse.
Tones can be selected in two ways:
Using the [UP2] or [LWR] button to select Tones1. Press and hold the [UP2] or [LWR] button.
The display now shows a list of Tones where the cur-rently selected sound is displayed in reverse:
2. If the Tone you need belongs to another family (see p. 119), press another Tone but-ton.
3. Rotate the [CURSOR÷VALUE] dial to select the desired Tone, then press the [ENTER/SELECT] button to confirm your selection.
4. Press [EXIT] to leave the Tone selection page.
NOTE
You can only listen to Tones for the Upper2 or Lower part if the [UP2] or [LWR] button lights.
NOTE
Tones can also be selected by simply pressing the [NUMERIC] key and entering their number.
Selecting a Tone on the main page1. If the main page is not displayed, press and
hold the [EXIT] button until it appears.The numbers and names of the Tones assigned to the three real-time parts are displayed in the lower half of the display:
The highlighted numeric field refers to the part whose Tone assignment can be changed. To select a different part, move the cursor to its numeric field and press the [ENTER/SELECT] button.
2. Rotate the [CURSOR÷VALUE] dial to select the desired numeric field, then press the [ENTER/SELECT] button.
BK-5_US.book Page 24 Monday, November 14, 2011 12:43 PMPlaying the BK-5’s real-time parts
24
r
Backing Keyboard BK-5
7. Playing the BK-5’s real-time parts
Your BK-5 contains three real-time parts that can be controlled via MIDI: UP1, UP2 and LWR. Feel free to use only UP1 or to control all three simultaneously. You can assign the desired sounds (or “Tones”) to each of these parts. See page 119 for a list of the available sounds.
Switching the UP2 and LWR parts on and offThe UP1 part is always active. The UP2 and LWR parts, however, can be switched on or off.
1. Press the [UP2] or [LWR] button to switch the corresponding part (Upper2 or Lower) on (indicator lights) or off (indicator goes dark).
If you switch on one of these parts, the cursor on the main page automatically jumps to the “UP2” or “LWR” field. If [UP2] and [LWR] are both switched off, the cursor jumps to the “UP1” field.
Selecting Tones for the real-time parts On the BK-5, the sounds you can assign to the real-time parts are called “Tones”. The BK-5 allows you to assign any of the available Tones to any of the three real-time parts. Tone selection always applies to the part (UP1, UP2, or LWR) whose field is currently displayed in reverse.
Tones can be selected in two ways:
Using the [UP2] or [LWR] button to select Tones1. Press and hold the [UP2] or [LWR] button.
The display now shows a list of Tones where the cur-rently selected sound is displayed in reverse:
2. If the Tone you need belongs to another family (see p. 119), press another Tone but-ton.
3. Rotate the [CURSOR÷VALUE] dial to select the desired Tone, then press the [ENTER/SELECT] button to confirm your selection.
4. Press [EXIT] to leave the Tone selection page.
NOTE
You can only listen to Tones for the Upper2 or Lower part if the [UP2] or [LWR] button lights.
NOTE
Tones can also be selected by simply pressing the [NUMERIC] key and entering their number.
Selecting a Tone on the main page1. If the main page is not displayed, press and
hold the [EXIT] button until it appears.The numbers and names of the Tones assigned to the three real-time parts are displayed in the lower half of the display:
The highlighted numeric field refers to the part whose Tone assignment can be changed. To select a different part, move the cursor to its numeric field and press the [ENTER/SELECT] button.
2. Rotate the [CURSOR÷VALUE] dial to select the desired numeric field, then press the [ENTER/SELECT] button.
BK-5_US.book Page 24 Monday, November 14, 2011 12:43 PM
Selecting Tones for the real-time partsBacking Keyboard BK-5 r
25
The numeric field is displayed in reverse.
3. Rotate the dial to select the desired Tone.If necessary, use the TONE buttons to select a differ-ent family.
The display now shows a page similar to the follow-ing:
You can also use the “Numeric” function (see below) to select the desired Tone. In that case, you need to confirm your selection by pressing the BK-5 button.Pressing the same TONE button several times allows you to select the first sound of the various categories within that family (“NaturalPiano”‰ “Vintage EP1”‰ “Clav-1”…).
4. Press [EXIT] to leave the Tone selection page.The display returns to the main page where the name of the newly selected Tone is shown.
On the main page, you can also use the “Numeric” function to select Tones. The procedure is as follows:
(a) Use the [CURSOR÷VALUE] dial to select the numeric field of the part you wish to assign a different Tone to.
(b) Press the [NUMERIC] button (a pop-up window is dis-played).
(c) Use the [0]~[9] button to enter the number of the Tone you want to use.
(d) Press the [ENTER/SELECT] button to confirm.
NOTE
You can also select the BK-5’s Tones via MIDI. Be aware, however, that if the BK-5 receives a sound select cluster (bank select + program change message) for which there is no Tone, the display shows “---” instead of a Tone name and the real-time part in question no longer sounds.
Using the ‘Numeric’ function to select Tones, Rhythms and PerformancesThe “Numeric” function can be used to enter the number of the Tone, Rhythm or Performance memory you want to use, which is faster than scrolling with the [CURSOR÷VALUE] dial.This function is automatically activated when you call up a display or mode where using it makes sense. Below please find an example that shows you how to use the “Numeric” function for selecting Tones.
NOTE
For Tone selection, it would be a good idea to check on the main page which real-time part is currently selected to ensure that you don’t select a Tone for the wrong part. To select a different Tone for the Upper2 or Lower part, you can simply press and hold the [UP2] and [LWR] button while using the following procedure.
In the following example, we will assign a different sound to the Upper1 part.
1. Press the button of the Tone family that contains the Tone you want to select ([PIANO/E.PIANO], for example).
NOTE
By pressing and holding one of these buttons, you activate the lock function for Tone selection, which means that Tones no longer change when you select Performance memories (page 54).
The display changes to:
BK-5_US.book Page 25 Monday, November 14, 2011 12:43 PM

20 QUICK GUIDE
5. Tryk på [Exit] knappen for at forlade menuen, hvor lyde vælges.
Selecting Tones for the real-time partsBacking Keyboard BK-5 r
25
The numeric field is displayed in reverse.
3. Rotate the dial to select the desired Tone.If necessary, use the TONE buttons to select a differ-ent family.
The display now shows a page similar to the follow-ing:
You can also use the “Numeric” function (see below) to select the desired Tone. In that case, you need to confirm your selection by pressing the BK-5 button.Pressing the same TONE button several times allows you to select the first sound of the various categories within that family (“NaturalPiano”‰ “Vintage EP1”‰ “Clav-1”…).
4. Press [EXIT] to leave the Tone selection page.The display returns to the main page where the name of the newly selected Tone is shown.
On the main page, you can also use the “Numeric” function to select Tones. The procedure is as follows:
(a) Use the [CURSOR÷VALUE] dial to select the numeric field of the part you wish to assign a different Tone to.
(b) Press the [NUMERIC] button (a pop-up window is dis-played).
(c) Use the [0]~[9] button to enter the number of the Tone you want to use.
(d) Press the [ENTER/SELECT] button to confirm.
NOTE
You can also select the BK-5’s Tones via MIDI. Be aware, however, that if the BK-5 receives a sound select cluster (bank select + program change message) for which there is no Tone, the display shows “---” instead of a Tone name and the real-time part in question no longer sounds.
Using the ‘Numeric’ function to select Tones, Rhythms and PerformancesThe “Numeric” function can be used to enter the number of the Tone, Rhythm or Performance memory you want to use, which is faster than scrolling with the [CURSOR÷VALUE] dial.This function is automatically activated when you call up a display or mode where using it makes sense. Below please find an example that shows you how to use the “Numeric” function for selecting Tones.
NOTE
For Tone selection, it would be a good idea to check on the main page which real-time part is currently selected to ensure that you don’t select a Tone for the wrong part. To select a different Tone for the Upper2 or Lower part, you can simply press and hold the [UP2] and [LWR] button while using the following procedure.
In the following example, we will assign a different sound to the Upper1 part.
1. Press the button of the Tone family that contains the Tone you want to select ([PIANO/E.PIANO], for example).
NOTE
By pressing and holding one of these buttons, you activate the lock function for Tone selection, which means that Tones no longer change when you select Performance memories (page 54).
The display changes to:
BK-5_US.book Page 25 Monday, November 14, 2011 12:43 PM

QUICK GUIDE 21
RHYTHMFUNKTIONER
Musikstilarter
Roland BK-5 kan selv generere interaktive akkompagnementer ud fra den musikstilart, Rhythm, som du har valgt. Der ligger over 300 forskellige Rhythms i BK-5, som er ind-delt i musikalske stilarter.
Indstil balancen mellem arrangement og live parterne
Du kan bruge [Balance] knapperne til at styre forholdet mellem arrangement og de parter, som du spiller oven på arrangementet (liveparter). Tryk på knappen [Backing], hvis du vil have arrangementet højere i lydstyrke eller tryk på knappen [Keyboard], hvis du vil have live parterne højere.
Displayet viser, hvordan balancen er indstillet, når du trykker kort på en af knapperne.
Brug Rhythms
Start/Stop
Denne knap starter og stopper Rhythms. Når Rhythms spiller, så blinker knappen i det valgte tempo med grønt lys på underdelingerne og med et rødt lys på hvert et-slag i takten.
Rhythm functionsBacking Keyboard BK-5 r
27
8. Rhythm functions
The BK-5 contains a function that plays back automatic accompaniments called “rhythms”. This section explains how to take advantage of the BK-5’s accompaniments.
Volume balance between the backing and the real-time partsIf the rhythm accompaniment is too loud or too soft with respect to the real-time parts you are using, you can change the balance with the [BACKING] and [KEY-BOARD] buttons:
When the [BACKING] or [KEYBOARD] button is pressed, the “BALANCE” pop-up window appears, showing the current setting:
After about 3 seconds, the pop-up window disappears again.
About the rhythmsThe BK-5 can generate interactive accompaniments based on the rhythm you select. Each rhythm is a typical accompaniment for a given musical genre. The BK-5 comes with over 300 internal rhythms divided over 6 families (see the RHYTHM FAMILY section on the front panel).The melodic accompaniment parts of the selected rhythms follow the chords you play on the keyboard.
Using rhythmsThe “interactive” aspect about the rhythms is that you can change the key of the accompaniment simply by playing different notes or chords. Additionally, you can select different variations (more or less complex arrangements) for the active rhythm. The BK-5 provides several buttons for this.
■ START/STOP
This button is used to start and stop rhythm playback. While a rhythm is running, the button’s indicator flashes red on the first beat of each bar, and green on the remaining beats.
NOTE
You can also start (and stop) rhythm playback simply by playing on the keyboard. See the next function. (The Start/Stop function can also be assigned to an optional foot-switch.)
■ SYNC START
This button activates and switches off the “Sync Start” or “Sync Start/Stop” function. Pressing it sev-eral times allows you to select one of the following options:
Function [SYNC START] indicator
Explanation
Sync Start Lights red Rhythm playback can be started by playing a note or chord. Press [START/STOP] to stop rhythm playback.
BK-5_US.book Page 27 Monday, November 14, 2011 12:43 PM

22 QUICK GUIDE
Sync Start
Denne knap styrer funktionen Sync Start. Hvis knappen ikke lyser, er funktionen inaktiv. Hvis knappen lyser rød, så starter den valgte Rhythm, når du spiller en tone eller en akkord på MIDI-keyboardet. Brug [Start/Stop] knappen, når Rhythm skal stoppe. Hvis knappen derimod lyser grøn (du vælger funktionen ved gentagne tryk på knappen), så både startes og stoppes Rhythm med keyboardet. Så længe en eller flere tangenter er trykket ned, så spiller Rhythm.
Variation [1], [2], [3], [4]
Disse knapper bruges til at vælge kompleksiteten på Rhythmarrangementet.
Hvis knappen [1] lyser, så afspilles det mest enkle arrangement
Hvis knappen [2] lyser, så afspilles et arrangement, der er lidt mere kompleks og sam-tidig kan bruges som en god variation af [1].
Hvis knappen [3] lyser, så afspilles en variation, som i mange tilfælde vil fungere godt til det første omkvæd.
Hvis knappen [4] lyser, så afspilles det arrangement, der er mest komplekst og som er god at bruge f.eks. i en bro eller i de sene omkvæd i arrangementet.
Rhythm functionsBacking Keyboard BK-5 r
27
8. Rhythm functions
The BK-5 contains a function that plays back automatic accompaniments called “rhythms”. This section explains how to take advantage of the BK-5’s accompaniments.
Volume balance between the backing and the real-time partsIf the rhythm accompaniment is too loud or too soft with respect to the real-time parts you are using, you can change the balance with the [BACKING] and [KEY-BOARD] buttons:
When the [BACKING] or [KEYBOARD] button is pressed, the “BALANCE” pop-up window appears, showing the current setting:
After about 3 seconds, the pop-up window disappears again.
About the rhythmsThe BK-5 can generate interactive accompaniments based on the rhythm you select. Each rhythm is a typical accompaniment for a given musical genre. The BK-5 comes with over 300 internal rhythms divided over 6 families (see the RHYTHM FAMILY section on the front panel).The melodic accompaniment parts of the selected rhythms follow the chords you play on the keyboard.
Using rhythmsThe “interactive” aspect about the rhythms is that you can change the key of the accompaniment simply by playing different notes or chords. Additionally, you can select different variations (more or less complex arrangements) for the active rhythm. The BK-5 provides several buttons for this.
■ START/STOP
This button is used to start and stop rhythm playback. While a rhythm is running, the button’s indicator flashes red on the first beat of each bar, and green on the remaining beats.
NOTE
You can also start (and stop) rhythm playback simply by playing on the keyboard. See the next function. (The Start/Stop function can also be assigned to an optional foot-switch.)
■ SYNC START
This button activates and switches off the “Sync Start” or “Sync Start/Stop” function. Pressing it sev-eral times allows you to select one of the following options:
Function [SYNC START] indicator
Explanation
Sync Start Lights red Rhythm playback can be started by playing a note or chord. Press [START/STOP] to stop rhythm playback.
BK-5_US.book Page 27 Monday, November 14, 2011 12:43 PM
Rhythm functions
28
r
Backing Keyboard BK-5
■ VARIATION [1], [2], [3], [4]
These buttons are used to select the complexity (number of parts) of the rhythm’s arrangement:
Note that the VARIATION patterns are repeated (played back in a loop) until select a different pattern or stop rhythm playback.
■ INTRO
Selects an introduction, which is usually used at the beginning of a song. You can, however, also select this pattern for other song sections. The behavior of the Intro pattern depends on when you press the [INTRO] button:
There are, in fact, four different INTRO patterns, that can be selected using the VARIATION [1], [2], [3] and [4] buttons. Again, the VARIATION buttons determine the complexity of the intro arrangement.
■ ENDING
This button allows you to end your songs with a suit-able closing section if you don’t want to simply stop playback. The behavior of the Ending pattern depends on when you press the [ENDING] button:
Sync Start/Stop
Lights green Rhythm playback can be started by playing a note or chord. Playback will stop when you release all keys.
— Dark Rhythm playback needs to be started and stopped using the [START/STOP] button (or the assigned optional footswitch).
VARIATION Explanation
[1] The simplest accompaniment pattern. A good choice for the first of the songs you play.
[2] A slightly more complex pattern you may want to use for subsequent verses.
[3] This pattern would be a good choice for the first chorus.
[4] This is the most complex arrangement. Consider selecting it for the bridge or the final chorus sections of a song.
Function [SYNC START] indicator
Explanation
[INTRO] Behavior
Pressed before starting rhythm playback
The indicator lights.When you start rhythm playback, the Arranger first plays a musical intro-duction. (This pattern is played back only once).
Pressed during rhythm playback
The indicator flashes to signal that the INTRO pattern will begin on the next downbeat.When the intro is finished, the BK-5 returns to the previously selected VARIATION pattern.
[ENDING] Behavior
Pressed before starting rhythm playback
The indicator lights.When you start rhythm playback, the Arranger plays a musical ending. At the end of the phrase, playback stops.
BK-5_US.book Page 28 Monday, November 14, 2011 12:43 PM

QUICK GUIDE 23
Intro
Med denne [Intro] knap vælges der at afspille en musikalsk introduktion. Hvis knap-pen lyser, inden at Rhythm er startet, så vil en start af Rhythm betyde, at der startes med en intro. Hvis knappen aktiveres, mens Rhythm spiller, så vil den valgte variation bliver erstattet af en intro på det næste et-slag. Efter at introduktionen er afspillet, så vendes der tilbage til den sidst valgte variation. Der er 4 forskellige introduktioner, der kan vælges med variationknapperne [1], [2], [3], [4], igen ud fra devisen, at kompleksi-teten øges med variationtallet.
Ending
Med denne knap vælges der at afspille en musikalsk slutning. Hvis knappen lyser, inden at Rhythm er startet, så vil en start af Rhythm betyde, at der startes med en slutning og derefter stoppes afspilningen. Hvis knappen aktiveres, mens Rhythm spil-ler, så vil den valgte variation bliver erstattet af en afslutning på det næste et slag og efter at afslutningen er afviklet, så vil Rhythmafspilningen stoppe. Der er 4 forskellige slutninger, der kan vælges med variationknapperne [1], [2], [3], [4], på samme måde ud fra devisen, at kompleksiteten øges med størrelsen af tallet.
Rhythm functions
28
r
Backing Keyboard BK-5
■ VARIATION [1], [2], [3], [4]
These buttons are used to select the complexity (number of parts) of the rhythm’s arrangement:
Note that the VARIATION patterns are repeated (played back in a loop) until select a different pattern or stop rhythm playback.
■ INTRO
Selects an introduction, which is usually used at the beginning of a song. You can, however, also select this pattern for other song sections. The behavior of the Intro pattern depends on when you press the [INTRO] button:
There are, in fact, four different INTRO patterns, that can be selected using the VARIATION [1], [2], [3] and [4] buttons. Again, the VARIATION buttons determine the complexity of the intro arrangement.
■ ENDING
This button allows you to end your songs with a suit-able closing section if you don’t want to simply stop playback. The behavior of the Ending pattern depends on when you press the [ENDING] button:
Sync Start/Stop
Lights green Rhythm playback can be started by playing a note or chord. Playback will stop when you release all keys.
— Dark Rhythm playback needs to be started and stopped using the [START/STOP] button (or the assigned optional footswitch).
VARIATION Explanation
[1] The simplest accompaniment pattern. A good choice for the first of the songs you play.
[2] A slightly more complex pattern you may want to use for subsequent verses.
[3] This pattern would be a good choice for the first chorus.
[4] This is the most complex arrangement. Consider selecting it for the bridge or the final chorus sections of a song.
Function [SYNC START] indicator
Explanation
[INTRO] Behavior
Pressed before starting rhythm playback
The indicator lights.When you start rhythm playback, the Arranger first plays a musical intro-duction. (This pattern is played back only once).
Pressed during rhythm playback
The indicator flashes to signal that the INTRO pattern will begin on the next downbeat.When the intro is finished, the BK-5 returns to the previously selected VARIATION pattern.
[ENDING] Behavior
Pressed before starting rhythm playback
The indicator lights.When you start rhythm playback, the Arranger plays a musical ending. At the end of the phrase, playback stops.
BK-5_US.book Page 28 Monday, November 14, 2011 12:43 PM

24 QUICK GUIDE
Bass Inv
Denne knap bruges til aktivere “Bass Inv” funktionen. Hvis knappen ikke lyser, så vil bassen i det valget arrangement altid spille grundtonen i den akkord, som der spilles på tangenterne. Hvis knappen derimod lyser, og “Bass Inv” funktionen er aktiv, så vil bassen altid spille den laveste tone i den akkord, som der spilles på tangenterne. Funktionen vil selvfølgelig kun give forskelligt resultat, hvis nogle af akkorderne “omvendes”, dvs. at grundtonen ikke ligger nederst i akkorden.
Auto Fill In
Når denne funktion er aktiveret og knappen lyser, så vil der altid spilles en “Fill In” variation som indgang ind i en ny, valgt variation. For at der skal høres et Fill in kræves der altså to ting, dels at [Fill In] knappen er aktiveret og at der skiftes til en ny variation ved hjælp af knapperne [1] til [4].
Vælg Rhythms
1. Tryk på en af [Rhythm Family] knapperne for at vælge en af de 12 forskellige stilart kategorier. Den pågældende knap lyser og displayet viser de Rhythms, som findes i denne kategori (Family).
Selecting rhythmsBacking Keyboard BK-5 r
29
There are four different ENDING patterns, that can be selected using the VARIATION [1], [2], [3] and [4] but-tons. Again, the VARIATION buttons determine the complexity of the arrangement.
■ BASS INV
This button is used to switch the “Bass Inversion” function on or off. While the button is dark, the rhythm’s bass part always plays the fundamental of your notes or chords. Example: if you play a chord consisting of the notes C, E and G (which is recog-nized as a C major chord), the bass part plays a C.If the [BASS INV] button lights, the rhythm’s bass part uses the lowest notes of the chords you play. Example: if you play a chord consisting of the notes E, G and C (still a C major chord), the bass part plays an E. This function therefore gives you more artistic licence.
■ AUTO FILL IN
When this button lights, the BK-5 plays a transition before switching to the newly selected VARIATION pattern. Example: if the VARIATION [1] pattern is run-ning, pressing the [4] button will not switch to that pattern right away—the BK-5 first plays a fill-in to announce the new song section.
NOTE
The duration of the fill-ins (transitions) can be halved if you like. See “Fill In Half Bar” on p. 63. You can also speed up or slow down playback during a fill-in. See “Fill Ritardando” on p. 63.
Selecting rhythms1. Press a RHYTHM FAMILY button to select
the rhythm family.
NOTE
By pressing and holding one of these buttons, you activate the lock function for rhythm selection, which means that rhythms no longer change when you select Performance memories (see p. 54).
The display shows a list of the rhythms that belong to this family. If the currently selected rhythms belongs to the family whose button you pressed, its name is displayed in reverse and the indicator of the button you pressed lights:
If you press a different RHYTHM FAMILY button, the display shows the beginning of the associated list (but the indicator of the associated family button doesn’t light):
2. Rotate the [CURSOR÷VALUE] dial to select the desired rhythm, then press [ENTER/SELECT] to confirm your selection.The indicator of the selected family button lights.
Pressed during rhythm playback
The indicator flashes to signal that the ENDING pattern will begin on the next downbeat.When the ending is finished, rhythm playback stops.
[ENDING] Behavior
BK-5_US.book Page 29 Monday, November 14, 2011 12:43 PM

QUICK GUIDE 25
2. Hvis du er i samme Rhythmkategori som den Rhythm, som på nuværende tidspunkt spiller, så vil den afspillede Rhythm være indikeret med sort på listen.
3. Drej på [Cursor/Value] hjulet for at vælge den nye ønskede Rhythm, og tryk derefter på [Enter/Select] for at bekræfte dit valg. Den nye Rhythm høres efter næste et-slag.
Afspil Rhythms
1. Indstil BK-5 [Volume] knap til et passende niveau.
2. Indstil [Balance] knapperne til midtpositionen.
3. Tryk på [Intro] knappen, så den lyser. Når du nu begynder at afspille en Rhythm, vil arrangementet begynde med en intro.
4. Tryk på en af Variationknapperne [1], [2], [3], [4] for at indikere den kompleksitet, som du ønsker, at introduktionen skal afspille med.
Selecting rhythmsBacking Keyboard BK-5 r
29
There are four different ENDING patterns, that can be selected using the VARIATION [1], [2], [3] and [4] but-tons. Again, the VARIATION buttons determine the complexity of the arrangement.
■ BASS INV
This button is used to switch the “Bass Inversion” function on or off. While the button is dark, the rhythm’s bass part always plays the fundamental of your notes or chords. Example: if you play a chord consisting of the notes C, E and G (which is recog-nized as a C major chord), the bass part plays a C.If the [BASS INV] button lights, the rhythm’s bass part uses the lowest notes of the chords you play. Example: if you play a chord consisting of the notes E, G and C (still a C major chord), the bass part plays an E. This function therefore gives you more artistic licence.
■ AUTO FILL IN
When this button lights, the BK-5 plays a transition before switching to the newly selected VARIATION pattern. Example: if the VARIATION [1] pattern is run-ning, pressing the [4] button will not switch to that pattern right away—the BK-5 first plays a fill-in to announce the new song section.
NOTE
The duration of the fill-ins (transitions) can be halved if you like. See “Fill In Half Bar” on p. 63. You can also speed up or slow down playback during a fill-in. See “Fill Ritardando” on p. 63.
Selecting rhythms1. Press a RHYTHM FAMILY button to select
the rhythm family.
NOTE
By pressing and holding one of these buttons, you activate the lock function for rhythm selection, which means that rhythms no longer change when you select Performance memories (see p. 54).
The display shows a list of the rhythms that belong to this family. If the currently selected rhythms belongs to the family whose button you pressed, its name is displayed in reverse and the indicator of the button you pressed lights:
If you press a different RHYTHM FAMILY button, the display shows the beginning of the associated list (but the indicator of the associated family button doesn’t light):
2. Rotate the [CURSOR÷VALUE] dial to select the desired rhythm, then press [ENTER/SELECT] to confirm your selection.The indicator of the selected family button lights.
Pressed during rhythm playback
The indicator flashes to signal that the ENDING pattern will begin on the next downbeat.When the ending is finished, rhythm playback stops.
[ENDING] Behavior
BK-5_US.book Page 29 Monday, November 14, 2011 12:43 PM
Rhythm functions
30
r
Backing Keyboard BK-5
NOTE
The “Help” function is available in this environment (see p. 26). You can also press and hold [NUMERIC] to check the MIDI address of the selected rhythm (see p. 26).
Playing back rhythmsLet us now take a closer look at the interactive aspects of the BK-5’s rhythms and at how to use them.
1. Switch on the BK-5 (see p. 20).2. Set the BK-5’s [VOLUME] knob to a reason-
able level (about 1/4).
3. Press the [SPLIT] button if you want to play in Split mode.
4. Select the rhythm you want to use (see p. 29).
5. Press the [INTRO] button (it lights) to start rhythm playback with an introduction.
6. Press the VARIATION [1], [2], [3] or [4] but-ton to select the complexity of the INTRO pattern.
7. Play a chord on the keyboard.
The main page displays the name of the last chord the BK-5 recognized:
8. Press the [START/STOP] button to start rhythm playback.
The [START/STOP] indicator lights and the BK-5 starts playing back the introductory phrase.
9. Play different chords on the keyboard and listen to the effect this has on the rhythm.
10. Switch on the [AUTO FILL IN] button (it lights).This means that when you select a different VARIA-TION pattern, the BK-5 will play a transition (fill-in) before switching to the new pattern.
11. Press a VARIATION [1], [2], [3] or [4] button to select a more complex or a simpler accompaniment.
• If you press it before the last beat of the current measure, the fill-in starts immediately and lasts until the end of the current measure, then the newly selected VARIATION pattern is played back.
• If you press the desired VARIATION button on the last beat of a bar, the fill-in starts at the next downbeat and lasts an entire bar. Only then will the BK-5 switch to the newly selected VARIATION pattern.
12. If necessary, you can change the rhythm’s tempo:
BK-5_US.book Page 30 Monday, November 14, 2011 12:43 PM

26 QUICK GUIDE
4. Spil en akkord på keyboardet. Akkorden bliver vist i displayet
5. Tryk på [Start/Stop] knappen for at starte Rhythmafspilning.
6. Spil forskellige akkorder på dit MIDI-keyboard og lyt efter, hvordan arrangementet følger dine akkord skift.
7. Tryk på [Auto Fill In] knappen, så den lyser.
8. Tryk på en af variationsknapperne [1] til [4] for at vælge en ny variation indenfor den valgte Rhythm. Prøv både at trykke på Variationknapperne før og efter den sidste fjer-dedel i takten. Fill in’et enten slutter takten eller starter næste takt.
9. Prøv eventuelt at ændre tempoet på arrangementet ved at ændre tempoet i displayet vha. tempo [<>] knapperne eller ved enten at bruge Tap Tempofunktionen.
10. Tryk på [Ending] knappen på et musikalsk velvalgt sted for at gå over i en slutning og derefter stoppe Rhythm-afspilning.
Rhythm functions
30
r
Backing Keyboard BK-5
NOTE
The “Help” function is available in this environment (see p. 26). You can also press and hold [NUMERIC] to check the MIDI address of the selected rhythm (see p. 26).
Playing back rhythmsLet us now take a closer look at the interactive aspects of the BK-5’s rhythms and at how to use them.
1. Switch on the BK-5 (see p. 20).2. Set the BK-5’s [VOLUME] knob to a reason-
able level (about 1/4).
3. Press the [SPLIT] button if you want to play in Split mode.
4. Select the rhythm you want to use (see p. 29).
5. Press the [INTRO] button (it lights) to start rhythm playback with an introduction.
6. Press the VARIATION [1], [2], [3] or [4] but-ton to select the complexity of the INTRO pattern.
7. Play a chord on the keyboard.
The main page displays the name of the last chord the BK-5 recognized:
8. Press the [START/STOP] button to start rhythm playback.
The [START/STOP] indicator lights and the BK-5 starts playing back the introductory phrase.
9. Play different chords on the keyboard and listen to the effect this has on the rhythm.
10. Switch on the [AUTO FILL IN] button (it lights).This means that when you select a different VARIA-TION pattern, the BK-5 will play a transition (fill-in) before switching to the new pattern.
11. Press a VARIATION [1], [2], [3] or [4] button to select a more complex or a simpler accompaniment.
• If you press it before the last beat of the current measure, the fill-in starts immediately and lasts until the end of the current measure, then the newly selected VARIATION pattern is played back.
• If you press the desired VARIATION button on the last beat of a bar, the fill-in starts at the next downbeat and lasts an entire bar. Only then will the BK-5 switch to the newly selected VARIATION pattern.
12. If necessary, you can change the rhythm’s tempo:
BK-5_US.book Page 30 Monday, November 14, 2011 12:43 PM
Using the ‘One Touch’ functionBacking Keyboard BK-5 r
31
• Press the TEMPO [√] or [®] button to decrease or increase the tempo.
• Press the [TAP TEMPO] button at least three times at the desired tempo.
The BK-5 calculates the intervals between your presses and sets the corresponding tempo value.
NOTE
Simultaneously press the TEMPO [√] and [®] buttons (“STANDARD”) to return to the rhythm’s preset tempo.
NOTE
You can press and hold the [TAP TEMPO] button to lock the tempo setting (see p. 54).
13. Press the [ENDING] button to end rhythm playback with a suitable closing section.You could also stop playback simply by pressing the [START/STOP] button or by releasing all keys on the keyboard (see “Sync Start/Stop” on p. 28).While rhythm or SMF song playback is stopped, the [TAP TEMPO] button flashes to indicate the selected tempo.
Using the ‘One Touch’ functionThe ONE TOUCH memories help you select Tones for the real-time parts that match the atmosphere of the cur-rent rhythm. There are four such ONE TOUCH memories per rhythm.
1. Select the desired rhythm. See page 29.
2. Press the [EXIT] button to return to the main page.
3. Switch on the [ONE TOUCH] button (its indi-cator lights).
If you haven’t selected any ONE TOUCH memory since switching on the BK-5, the indicators of TONE buttons [1], [2], [3] and [4] flash. Otherwise, the BK-5 automatically recalls the last ONE TOUCH memory you selected.The main page displays “ONE TOUCH --” (or the num-ber of the last ONE TOUCH memory).
The indicators of TONE buttons [1]~[4] flash.
4. Press the flashing TONE button assigned to the desired ONE TOUCH memory ([1]~[4]).
The indicator of the button you press lights, while the indicators of the remaining three buttons still flash.
5. Start playback of the rhythm.See page 30.
6. Play a melody on the keyboard.7. Now press another TONE ([1]~[4]) button
than the one that is currently active.8. Again play a melody on the keyboard.
BK-5_US.book Page 31 Monday, November 14, 2011 12:43 PM

QUICK GUIDE 27
Brug af “One Touch” funktionen
“One Touch” funktionen er en let måde at ændre flere ting på en gang blot ved at trykke på en knap. Dels kan funktionen vælge en ny lyd, men funktionen kan også ændre tempo, taktart og lignende på den valgte Rhythm.
1. Vælg den ønskede Rhythm.
2. Tryk på [Exit] knappen for at returnere til hoved siden.
3. Tryk på [One Touch] knappen, så den lyser. De fire Toneknapper [1], [2], [3], [4] får nu en ny funktion og vælger nu blandt de fire “One Touch” hukommelser i stedet for at vælge lyde. Du kan se i displayet, hvilken One Touchhukommelse, som er i funktion.
4. Tryk på en af de 4 knapper.
5. Start afspilning af en Rhythm.
6. Spil en melodi på keyboardet og lyt både til Rhythm og til lyden, som spiller melodien.
7. Vælg en anden “One Touch” hukommelse end den, der før var valgt. Hør, hvad der sker med lyden og arrangementet, når du igen spiller på keyboardet.
8. For at forlade ”One Touch” funktionen, tryk igen på [One touch] knappen, så den ikke lyser. Hvis du vil programmere dine egne ”One Touch” funktioner ind i hukommelsen, så læs på side 32 i den engelske manual.
Using the ‘One Touch’ functionBacking Keyboard BK-5 r
31
• Press the TEMPO [√] or [®] button to decrease or increase the tempo.
• Press the [TAP TEMPO] button at least three times at the desired tempo.
The BK-5 calculates the intervals between your presses and sets the corresponding tempo value.
NOTE
Simultaneously press the TEMPO [√] and [®] buttons (“STANDARD”) to return to the rhythm’s preset tempo.
NOTE
You can press and hold the [TAP TEMPO] button to lock the tempo setting (see p. 54).
13. Press the [ENDING] button to end rhythm playback with a suitable closing section.You could also stop playback simply by pressing the [START/STOP] button or by releasing all keys on the keyboard (see “Sync Start/Stop” on p. 28).While rhythm or SMF song playback is stopped, the [TAP TEMPO] button flashes to indicate the selected tempo.
Using the ‘One Touch’ functionThe ONE TOUCH memories help you select Tones for the real-time parts that match the atmosphere of the cur-rent rhythm. There are four such ONE TOUCH memories per rhythm.
1. Select the desired rhythm. See page 29.
2. Press the [EXIT] button to return to the main page.
3. Switch on the [ONE TOUCH] button (its indi-cator lights).
If you haven’t selected any ONE TOUCH memory since switching on the BK-5, the indicators of TONE buttons [1], [2], [3] and [4] flash. Otherwise, the BK-5 automatically recalls the last ONE TOUCH memory you selected.The main page displays “ONE TOUCH --” (or the num-ber of the last ONE TOUCH memory).
The indicators of TONE buttons [1]~[4] flash.
4. Press the flashing TONE button assigned to the desired ONE TOUCH memory ([1]~[4]).
The indicator of the button you press lights, while the indicators of the remaining three buttons still flash.
5. Start playback of the rhythm.See page 30.
6. Play a melody on the keyboard.7. Now press another TONE ([1]~[4]) button
than the one that is currently active.8. Again play a melody on the keyboard.
BK-5_US.book Page 31 Monday, November 14, 2011 12:43 PM

28 QUICK GUIDE
BK-5 SOM USB-AFSPILLER Der er mulighed for at bruge BK-5 som SMF- og audio afspiller. Filerne kan afvikles
fra en USB-hukommelse. Denne hukommelse kan også bruges til at afvikle eksterne Rhythms.
Klargør en USB-hukommelse til brug på BK-5.
1. På din computer kan du kopiere enten Rhythm, SMF MIDI files eller audio over på en USB-hukommelse, som er købt til formålet og formatteret på BK-5.
BK-5 kan forstå følgende slags filer:
Rhythms : .stl
SMF : .mid eller .kar
Audio files: .mp3 (44.1 kHz/32-320 kbps) eller .wav (44.1 kHz/16 bit).
2. Tilslut USB-hukommelsen til BK-5.
3. Efter nogle sekunder viser displayet, hvad der er på USB-hukommelsen enten i mapper eller i filnavne, alt efter hvordan den er forberedt på computeren. En Rhythm har symbolet stl, en SMF-fil har symbolet smf, en audiofil har navnet mp3 eller wav, mens en folder vises med en grafisk indikation. Hvis du allerede har tilsluttet USB-hukommelsen for et stykke tid siden, så kan du gense listen over filer ved at trykke på [USB Memory].
4. Drej [Cursor/Value] hjulet for at vælge den fil, som du ønsker at afspille. Hvis du ønsker at vælge en fil fra en folder, så må du først vælge folderen, trykke på [Enter/Select] knappen og derefter vælge filen i folder menuen med [Cursor/Value] hjulet.
5. Tryk på [Enter/Select] knappen for at vælge filen til afspilning på BK-5.
Using the BK-5 as a USB player
34
r
Backing Keyboard BK-5
9. Using the BK-5 as a USB player
This section explains how to playback MIDI (SMF) and audio songs stored on an optional USB memory. Note that it is also possible to select rhythms on that device and to use them in the same way as the internal rhythms. New song and rhythm files can be copied to the USB memory using your computer as you purchase them.
Getting ready to use the BK-5 as a USB player
1. On your computer, copy the new song and rhythm files to an optional USB memory (memory stick).
NOTE
Use USB memory sold by Roland (M-UF-series). We cannot guarantee operation if any other USB memory is used.
2. Connect the USB memory to your BK-5.
NOTE
Carefully insert the optional USB memory all the way into the port until it is firmly in place.
NOTE
The BK-5 supports USB memories with a capacity of up to 2TB.
File types the BK-5 can read and play back
Selecting a song or rhythm on a USB memory
1. Connect an optional USB memory to the BK-5.After a few seconds, the display shows the contents of the USB memory.
Press the [USB MEMOMRY] button if you inserted the USB memory at an earlier stage and now want to return to this display page.
Extension Format
Rhythms .stl
Standard MIDI Files (SMF)
.mid 0 or 1
.kar
VIMA TUNES files (on CD-ROMs pro-duced for the VIMA series)
Connect an optional CD-ROM drive to the BK-5’s USB MEMORY port to be able to play back commercially avail-able CD-ROMs made for VIMA-series instruments (“VIMA TUNES”). While a song plays, you can view a slide show suitable for the character of that song on an external display or television.
Audio files
.mp3mp3+CDG
• MPEG-1 Audio Layer 3• Sampling frequency: 44.1kHz• Bit rate: 32/40/48/56/64/80/96/112/128/160/192/224/256/320kbps, VBR (variable bit rate)
.wav • 16-bit linear• Sampling frequency: 44.1kHz• Stereo/mono
BK-5_US.book Page 34 Monday, November 14, 2011 12:43 PM

QUICK GUIDE 29
Afspil en Song fra en USB-hukommelse
1. Vælg en Song (SMF eller audio file) på USB-hukommelsen som forklaret i forrige kapi-tel.
2. Tryk på [Start/Stop] knappen for at afspille filen.
3. Hvis der er behov, så kan du ændre tempoet på den valgte Song. Det kan enten gøres ved at bruge [<][>] tempoknapperne eller ved at trykke rytmisk på [Tap Tempo] knappen. mp3 og wav filer kan lyde underligt, hvis du vælger et tempo, som er langt væk fra det oprindelige. Prøv at holde dig indenfor +-25% i forhold til det oprindelige tempo.
4. Tryk på [Start/Stop] knappen for at pause afspilningen.
5. Tryk igen på [Start/Stop] knappen for at genoptage afspilningen.
6. Tryk på [Sync Start] knappen for at stoppe afspilningen.
7. Du kan bruge [Intro] og [Ending] knapperne for at spole frem eller tilbage i afspilnin-gen. Disse funktioner er indikeret med symboler under knapperne.
Playing back a song or rhythm from a USB memoryBacking Keyboard BK-5 r
35
The icons to the left of the file names indicate the file type:
2. Rotate the [CURSOR÷VALUE] dial to select the file you want to play back or display.
3. Press the [ENTER/SELECT] button to load the file.The [USB MEMORY] button now lights to indicate that you selected a file on the USB memory.If the file you need is located inside a folder, you must first select that folder, press the [ENTER/SELECT] button to see its contents and then select the file. If you opened a folder by mistake, press the [EXIT] but-ton to return to a higher level.
NOTE
Press and hold the [EXIT] button to return to the main page.
Playing back a song or rhythm from a USB memoryIf you selected a rhythm, see “Playing back rhythms” on p. 30, because operation is the same as for internal rhythms.
In the following, we will therefore only show you how to play back song files located on a USB memory.
NOTE
The BK-5 has no internal memory where you could store SMF or audio files.
1. Select a song (SMF or audio file) on the USB memory.See page 34.
2. Press the [START/STOP] button to start play-back.This button is also labeled [®÷π].
The [®÷π] button’s indicator lights and song playback starts.
3. If necessary, you can change the song’s playback tempo:
• Press the TEMPO [√] or [®] button to decrease or increase the tempo.
NOTE
If you set a tempo value close to the upper or lower limit for an mp3 or WAV file, playback may sound a little strange.
• Press the [TAP TEMPO] button at least three times at the desired tempo. (This function is not available if you selected an audio file (WAV or mp3).)
The BK-5 calculates the intervals between your presses and sets the corresponding tempo value.
NOTE
Simultaneously press the TEMPO [√] and [®] buttons (“STANDARD”) to return to the rhythm’s preset tempo.
4. Press the [®÷π] button again to pause song playback.The [®÷π] button goes dark.
5. Press [®÷π] yet again to resume playback.6. Press the [SYNC START] button (ª) to stop
playback
You can use the following buttons to control song playback (see the gray legends):
Icon Explanation
STL Rhythm file
SMF SMF file
MP3 Audio mp3 file
WAV Audio WAV file
JPG Picture file
Folder
BK-5_US.book Page 35 Monday, November 14, 2011 12:43 PM

30 QUICK GUIDE
ANDRE VIGTIGE FUNKTIONER
Transponer i halvtoner
Denne funktionen giver mulighed for at transponere BK-5 i halvtonespring, således at der kan transponeres i forhold til f.eks. vokalbegrænsninger.
1. Tryk på [Key] knappen
Displayet skifter til
2. Drej på [Cursor/Value] hjulet for at transponere til den ønskede værdi. Der kan trans-poneres -6 halvtoner ned og +5 halvtoner op.
[Key] knappen lyser for at indikere, at der er transponeret. Keybilledet i displayet sluk-kes efter et par sekunder.
3. Du kan også ændre på den måde, der bliver transponeret på. Tryk Keyknappen nede et stykke tid. Flyt med [Cursor/Value] hjulet markøren ned i “Mode” feltet. Her kan der med hjulet vælges mellem tre transponeringstilstande: Song, Keyboard eller Song+Keyboard. Song giver kun transponering af Song, mens Keyboard kun giver transponering af de parter, som spilles live på keyboardet. Song+Keyboard vælger transponering af begge.
Transponer i oktaver
Med denne funktion kan du vælge at transponere en eller flere af de tre liveparter i oktavtrin.
1. Tryk på [Exit] knappen for at komme tilbage til hovedsiden.
Other important functionsBacking Keyboard BK-5 r
41
10. Other important functions
This section presents other important functions you may need regularly.
Changing the keyThis function allows you to transpose the BK-5’s pitch in semi-tone steps. Depending on the mode setting, this transposition applies to all sections or just a specific setting.
NOTE
If you choose to transpose the real-time parts, rhythm play-back is also transposed.
1. Press [KEY] button.
The display changes to:
The current “KEY” setting (transposition interval) is displayed and already selected.
NOTE
Pressing and holding the [KEY] button locks the “Key” set-ting.
2. Rotate the [CURSOR÷VALUE] dial to select the desired “Key” setting.
If the “Key” setting differs from “0”, the [KEY] indica-tor lights.After a few seconds, the “KEY” pop-up window disap-pears. Press the [EXIT] button to close it immediately.
NOTE
If you also need to change the “Mode” setting, see p. 62.
Changing the octaveThis function allows you to transpose the real-time parts (UP1, UP2 and LWR) up or down in octave steps.
1. If necessary, press the [EXIT] button to return to the main page.
The display shows the current octave setting (“OCT”) for all 3 real-time parts.
2. Use the [CURSOR÷VALUE] dial to select the “OCT” parameter of the real-time part whose setting you want to change.
3. Press the [ENTER/SELECT] button.The selected “OCT” field is displayed in reverse.
4. Rotate the [CURSOR÷VALUE] dial to select the desired setting.
5. Press the [ENTER/SELECT] button again.The “OCT” field is no longer selected and the [CURSOR÷VALUE] dial can be used to select other fields.
NOTE
You can also change the octave setting using [MENU] but-ton‰ “Performance Edit”‰ “Tone Part View”‰ “Octave Shift” (page 59).
“Key” setting
–6~0~+5 (semitone units)
“Octave” setting
–4~0~+4
BK-5_US.book Page 41 Monday, November 14, 2011 12:43 PM

QUICK GUIDE 31
Displayet viser oktavindstillingerne for de tre liveparter nederst til højre.
2. Brug [Cursor/Value] hjulet til at vælge den af de tre parter, som du ønsker at ændre oktavering på.
3. Tryk på [Enter/Select] knappen og drej derefter på [Cursor/Value] hjulet for at skifte oktav. Du kan ændre oktavering op eller ned med +-4 oktaver.
4. Tryk på [Enter/Select] knappen igen for at kunne flytte markøren frit rundt i displayet.
Brug af “Track Mute” og “Center Cancel”
På en almindelig mp3/Wav-fil vil vokalen være tilstede i musikken. Denne vokal kan dæmpes betydeligt ved at bruge funktionen Track Mute/Center Cancel. Hvis du deri-mod bruger en SMF MIDI-fil, så vil melodien sandsynligvis spilles af et instrument. Dette instrument eller andre instrumenter (Tracks) kan slukkes ved hjælp af Track Mute/Center Cancel.
1. Vælg en Song i MIDI eller audioformat (SMF/mp3/Wav) eller en Rhythm.
2. Tryk på [Start/Stop] knappen for at starte afspilning.
3. Tryk på [Track Mute] (Center Cancel) knappen, så den lyser. Funktionen er nu aktiv. Lyt til, hvad der sker med afspilningen.
4. Tryk igen på [Track Mute] (Center Cancel) knappen, så den ikke lyser. Funktionen er nu inaktiv.
Other important functions
42
r
Backing Keyboard BK-5
Using ‘Track Mute’ and ‘Center Cancel’You can use this function to mute tracks of rhythms or the melody part of the selected Standard MIDI File (SMF). After selecting a WAV or mp3 audio file, you can attenuate the vocal part at the center of the stereo image (“Center Cancel”). The Mute function’s behavior depends on the selected file type.
1. Select a song (SMF or audio) or a rhythm.2. Press the [START/STOP] button to start play-
back.3. Press the [TRACK MUTE] (CENTER CANCEL)
button (its indicator lights).
The “Track Mute” or “Center Cancel” function will turn on. This depends on the file type you selected:
NOTE
For some audio songs, the vocal sound may not be elimi-nated completely.
4. Press the [TRACK MUTE] (CENTER CANCEL) button again to make its indicator go dark.This switches the “Track Mute” or “Center Cancel” function back off.
Selecting the track(s) to mute for rhythms or SMF songsThe following procedure allows you to specify the track of the selected Standard MIDI File that should be muted when you switch on the [TRACK MUTE] button.
NOTE
This function is not available for audio files.
1. Select a rhythm or an SMF song.2. Press and hold the [TRACK MUTE] (CENTER
CANCEL) button.This function can also be selected using [MENU] but-ton ‰ “Global” ‰ “Rhythm/SMF Track Mute”. Depending on the file type, the display changes to…
…or:
When you start playback, you will notice that active parts are indicated by moving bar graphs that simu-late level meters. The bar graphs of muted parts do not move.
3. Rotate the [CURSOR÷VALUE] dial to move the cursor to the track you want to mute.
4. Press the [ENTER/SELECT] button to high-light the corresponding parameter.
5. Rotate the dial to change the setting and press [ENTER/SELECT] to confirm you set-ting.The possibilities are:
6. If you want to save your selection of the track(s) that should be muted for any rhythm or SMF file you play back, see “Save Global” on p. 70.
7. If there is no need to save your settings, press and hold the [EXIT] button to return to the main page.
File Type Function Explanation
Rhythm Track Mute The specified rhythm track(s) is muted (Default: AC1~AC6).
SMF Track Mute The specified Standard MIDI file track is muted (Default: channel 4).
Audio(mp3, Wav)
Center Cancel Sounds in the center (the melodic portion of the sound) will be minimized.
Display indication
<no indication> The associated track is played back.
M The associated track is no longer played back (muted).
BK-5_US.book Page 42 Monday, November 14, 2011 12:43 PM

32 QUICK GUIDE
5. Hvis du vil slukke en bestemt del af Rhythm eller for en anden MIDI-kanal end kanal 4 (standard), så afspil en Rhythm eller en SMF Song og tryk og hold [Track Mute] knap-pen nede. Displayet viser følgende billede, alt efter om du afspiller Rhythm eller SMF.
6. Drej på [Cursor/Value] hjulet for at flytte dig til den track/kanal, som du vil lukke for. Tryk på [Enter/Select] knappen for at vælge parten.
7. Drej på [Cursor/Value] hjulet. “M” betyder, at der er lukket for kanalen. Intet symbol betyder, at kanalen spiller.
8. Hold [Exit] knappen nede, så du kommer tilbage til hovedsiden.
Brug af Splittilstand
Splittilstand er god at bruge, hvis du både vil styre afvikling af Rhythmakkorderne og spille undervejs. Når Split Mode er aktiv, vil de toner du spiller under splitpunktet på keyboardet automatisk sendes til styring af Rhythmarrangementets akkorder, mens toner spillet over splitpunktet bliver sendt til liveparterne.
1. Tryk på [Split] knappen, så knappen lyser.
Splitpunktet er i de fleste tilfælde C4, men det er dog muligt at ændre splitpunktet, læs evt. side 61 i den engelske manual.
Other important functions
42
r
Backing Keyboard BK-5
Using ‘Track Mute’ and ‘Center Cancel’You can use this function to mute tracks of rhythms or the melody part of the selected Standard MIDI File (SMF). After selecting a WAV or mp3 audio file, you can attenuate the vocal part at the center of the stereo image (“Center Cancel”). The Mute function’s behavior depends on the selected file type.
1. Select a song (SMF or audio) or a rhythm.2. Press the [START/STOP] button to start play-
back.3. Press the [TRACK MUTE] (CENTER CANCEL)
button (its indicator lights).
The “Track Mute” or “Center Cancel” function will turn on. This depends on the file type you selected:
NOTE
For some audio songs, the vocal sound may not be elimi-nated completely.
4. Press the [TRACK MUTE] (CENTER CANCEL) button again to make its indicator go dark.This switches the “Track Mute” or “Center Cancel” function back off.
Selecting the track(s) to mute for rhythms or SMF songsThe following procedure allows you to specify the track of the selected Standard MIDI File that should be muted when you switch on the [TRACK MUTE] button.
NOTE
This function is not available for audio files.
1. Select a rhythm or an SMF song.2. Press and hold the [TRACK MUTE] (CENTER
CANCEL) button.This function can also be selected using [MENU] but-ton ‰ “Global” ‰ “Rhythm/SMF Track Mute”. Depending on the file type, the display changes to…
…or:
When you start playback, you will notice that active parts are indicated by moving bar graphs that simu-late level meters. The bar graphs of muted parts do not move.
3. Rotate the [CURSOR÷VALUE] dial to move the cursor to the track you want to mute.
4. Press the [ENTER/SELECT] button to high-light the corresponding parameter.
5. Rotate the dial to change the setting and press [ENTER/SELECT] to confirm you set-ting.The possibilities are:
6. If you want to save your selection of the track(s) that should be muted for any rhythm or SMF file you play back, see “Save Global” on p. 70.
7. If there is no need to save your settings, press and hold the [EXIT] button to return to the main page.
File Type Function Explanation
Rhythm Track Mute The specified rhythm track(s) is muted (Default: AC1~AC6).
SMF Track Mute The specified Standard MIDI file track is muted (Default: channel 4).
Audio(mp3, Wav)
Center Cancel Sounds in the center (the melodic portion of the sound) will be minimized.
Display indication
<no indication> The associated track is played back.
M The associated track is no longer played back (muted).
BK-5_US.book Page 42 Monday, November 14, 2011 12:43 PM
Using the ‘Melody Intell(igence)’ functionBacking Keyboard BK-5 r
43
Using the ‘Melody Intell(igence)’ functionThe Arranger can add a counter-melody to the notes you play with the Upper1 part (UP1). Those automatic harmonies are based on the chords you play in the chord recognition area.
The counter-melody is played by the MELODY INTELL part. There are 18 harmony types to choose from.
1. Press the [MELODY INTELL] button (so that it lights).
This adds a harmony to the notes you play.
2. Press the [MELODY INTELL] button again (its indicator goes dark) to switch off the counter-melody.
NOTE
Press and hold the [MELODY INTELL] button to open the window where you can change the “Melody Intelligence” settings (see p. 64).
Using Split modeIn Split mode, the BK-5’s keyboard transmits notes played to the left of the split point to the Arranger parts. The notes to the right of the split point, however, are played back by the real-time parts..
NOTE
In most cases, the default setting for the split point is note number 60 (C4). You can change the split point to a different note (see “Split Point” on p. 61).
1. Press the [SPLIT] button (its indicator lights).
The BK-5 is now in Split mode: note numbers below the split point (see “Split” on p. 56) are used to trans-pose rhythm playback in real-time and to play the
LWR part (if it is active). Note numbers above the split point can be used to play melodies using the UP1 and/or UP2 part.In Split mode, the “Type” parameter (see p. 62) is automatically set to “Intelligent”.
NOTE
See page 24 for how to select the real-time parts you want to use.
NOTE
You can activate a “Hold” function for the LWR part. See “Lower Hold” on p. 62.
2. Press the [SPLIT] button again.The BK-5 leaves Split mode, the [SPLIT] indicator goes dark and chord recognition (see “Type” on p. 62) is set to “Pianist2”.
Setting the volume of the real-time partsThe BK-5 provides an easy way to change the volume balance of the Upper1, Upper2 and Lower parts.
1. Simultaneously press the [LWR] and [UP2] buttons to call up the “Parts Volume” page.
The “Volume” value of the last part you selected (on the main page) is already highlighted.
2. Rotate the [CURSOR÷VALUE] dial to set the desired volume for that part (0~127).
3. Press the [UP2] button to select the “UP2 Volume” value.Pressing it again selects the “UP1 Volume” value.
4. Repeat step (2) above.5. Press the [LWR] button to select the “LWR
Volume” value.6. Repeat step (2) above.
BK-5_US.book Page 43 Monday, November 14, 2011 12:43 PM

QUICK GUIDE 33
Toner spillet under splitpunktet vil nu dels styre akkorden på Rhythmarrangementet og til at spille LWR parten, hvis den er aktiv. Toner over splitpunktet spiller parterne UP1 og UP2 (hvis den er aktiv).
2. Tryk igen på [Split] knappen, så den ikke lyser, hvis du vil ud af Splitfunktionen.
Indstil lydstyrken på Liveparterne
1. Tryk samtidig på [LWR] og [UP2] knapperne.
2. Displayet viser nu ”Parts Volume”, hvor lydstyrken på hver af de tre Liveparter er indi-keret.
3. Brug [Cursor/Value] hjulet til at vælge den Part Volume, som du vil ændre.
4. Tryk på [Enter/Select] for at kunne ændre værdien.
5. Drej på [Cursor/Value] hjulet for at ændre værdien.
6. Tryk på [Enter/Select] for at bekræfte værdien. Gentag punkterne 3 til 6, hvis du vil ændre lydstyrken for de andre parter.
Using the ‘Melody Intell(igence)’ functionBacking Keyboard BK-5 r
43
Using the ‘Melody Intell(igence)’ functionThe Arranger can add a counter-melody to the notes you play with the Upper1 part (UP1). Those automatic harmonies are based on the chords you play in the chord recognition area.
The counter-melody is played by the MELODY INTELL part. There are 18 harmony types to choose from.
1. Press the [MELODY INTELL] button (so that it lights).
This adds a harmony to the notes you play.
2. Press the [MELODY INTELL] button again (its indicator goes dark) to switch off the counter-melody.
NOTE
Press and hold the [MELODY INTELL] button to open the window where you can change the “Melody Intelligence” settings (see p. 64).
Using Split modeIn Split mode, the BK-5’s keyboard transmits notes played to the left of the split point to the Arranger parts. The notes to the right of the split point, however, are played back by the real-time parts..
NOTE
In most cases, the default setting for the split point is note number 60 (C4). You can change the split point to a different note (see “Split Point” on p. 61).
1. Press the [SPLIT] button (its indicator lights).
The BK-5 is now in Split mode: note numbers below the split point (see “Split” on p. 56) are used to trans-pose rhythm playback in real-time and to play the
LWR part (if it is active). Note numbers above the split point can be used to play melodies using the UP1 and/or UP2 part.In Split mode, the “Type” parameter (see p. 62) is automatically set to “Intelligent”.
NOTE
See page 24 for how to select the real-time parts you want to use.
NOTE
You can activate a “Hold” function for the LWR part. See “Lower Hold” on p. 62.
2. Press the [SPLIT] button again.The BK-5 leaves Split mode, the [SPLIT] indicator goes dark and chord recognition (see “Type” on p. 62) is set to “Pianist2”.
Setting the volume of the real-time partsThe BK-5 provides an easy way to change the volume balance of the Upper1, Upper2 and Lower parts.
1. Simultaneously press the [LWR] and [UP2] buttons to call up the “Parts Volume” page.
The “Volume” value of the last part you selected (on the main page) is already highlighted.
2. Rotate the [CURSOR÷VALUE] dial to set the desired volume for that part (0~127).
3. Press the [UP2] button to select the “UP2 Volume” value.Pressing it again selects the “UP1 Volume” value.
4. Repeat step (2) above.5. Press the [LWR] button to select the “LWR
Volume” value.6. Repeat step (2) above.
BK-5_US.book Page 43 Monday, November 14, 2011 12:43 PM

34 QUICK GUIDE
OPTAG DET, DU SPILLER PÅ BK-5 Alt, hvad der høres ud af udgangen på Roland BK-5, kan optages, gemmes på en
USB-hukommelse og senere afspilles. Det gælder også de signaler, som modtages via [Audio in] stikkene på bagsiden af BK-5. Optagelsen gemmes som en wav-fil. (Metro-nome signalet bliver ikke optaget)
1. Tilslut en USB-hukommelse til BK-5, hvorpå du vil lave din optagelse.
2. Forbered din optagelse, både med hensyn til Rhythms, lyde på liveparterne og balance på backing, effekter og lignende.
3. Når alt er klart, så tryk på [Audio Rec] knappen. Den blinker.
4. Tryk på [Start/stop] knappen. Din optagelse går igang, og [Audio Rec] knappen lyser konstant gennem hele optagelsen. Gennemfør det musikalske arrangement, som du har forberedt.
5. Slut derefter optagelsen ved enten at trykke på [Audio Rec] knappen eller på [Start/Stop] knappen.
6. Du får derefter følgende meddelse på displayet
Herfra kan du vælge at gemme optagelsen ved at trykke på [Write] knappen, eller vælge ikke at gemme din optagelse ved at trykke [Exit]. I det første tilfælde vil din optagelse blive gemt i folderen “My Recordings” med et fortløbende nummer og i det sidste tilfælde vil du blive bedt om at bekræfte, at du ikke vil gemme. Drej på hjulet over på “Yes“ og derefter tryk på [Enter/Select] for at slette.
Recording your performance as audio data
52
r
Backing Keyboard BK-5
13. Recording your performance as audio data
Your BK-5 allows you to record everything it can transmit to its outputs, i.e. rhythm or song playback, your playing, your singing, and any audio signal transmitted to the BK-5. (The metronome signal is not recorded.)
Feel free to connect the master outputs of an external mixing console to the BK-5’s AUDIO INPUT (STEREO) socket if you want to record your band or the signals of an accordion, additional synthesizers, pianos, drum machines, etc., as well.The resulting audio file is stored in the WAV format (not mp3), which allows you to burn your recordings onto a CD using your computer.
NOTE
You will need a USB memory to record your performance.
RecordingNOTE
The following is based on the assumption that the “Rec Audio Sync” parameter (page 68) is active.
1. Connect the USB memory to which you wish to save the audio data.
NOTE
Use USB memory sold by Roland (M-UF-series). We cannot guarantee operation if any other USB memory is used.
2. Prepare everything you want to record:• Select the rhythm or song you want to use as accom-
paniment• Set the levels and effects, etc.
3. Set the desired balance between the rhythm/song and the real-time parts using the BALANCE buttons.You may also want to set the “Audio In Level” param-eter (page 68).
4. Press the [AUDIO REC] button (its indicator flashes).
NOTE
If you pressed the [AUDIO REC] button by accident, press and hold it until its indicator goes dark again.
5. Press the [START/STOP] button.
The indicators of the [AUDIO REC] and [START/STOP] buttons light and the BK-5 starts playing back the selected rhythm or song and recording. Everything you play on the keyboard is recorded.
6. At the end of the song, press the [AUDIO REC] or [START/STOP] button to stop recording.Rhythm or song playback and recording stop. The fol-lowing message appears:
You can now…(a) Save the song under a new name.
‰ “Saving your recording as an audio file” on p. 53(b) Save the song under the name suggested by the BK-5
(“My recording001”).‰Press the [WRITE] button. After a few seconds, the display will return to the main page. In this case, your audio file is saved in the “My Recordings” folder.
(c) Decide to discard your recording, because you are unhappy with it.‰ Press the [EXIT] button. The display changes to:
‰ Rotate the [CURSOR÷VALUE] dial to select “YES”, then press [ENTER/SELECT] to erase your recording.
BK-5_US.book Page 52 Monday, November 14, 2011 12:43 PM

QUICK GUIDE 35
7. Hvis du har gemt din optagelse, kan den indspilles ved at trykke på [Start/Stop]. Hvis du senere vil afspille din optagelse, så bruger du samme metode som beskrevet under afspilning fra USB-hukommelse. Dine optagelser ligger i folderen “My Recor-dings”.
Hermed slutter denne Quick Guide for Roland BK-5. Læs i den engelske manual, hvis du vil have yderligere informationer omkring BK-5. Her kan du bl.a. læse om, hvordan du kan få endnu større kontrol over Rhythm, hvordan du bruger Performance og hvor-dan Mastering Tools kan bruges til afpudse den endelige lyd.
Held og lykke med dit nye Roland BK-5 arrangerkeyboard.

XXXXXXXXXXXXXXX (DK/NO)
FINLANDVanha Nurmijärvent. 62FIN-01670 Vantaa
NORWAYLilleakerveien 2P.O. Box 95, LilleakerNO-0216 Oslo
SWEDENMårbackagatan 31, 4trSE-123 43 Farsta
DENMARKSkagerrakvej 7DK-2150 Nordhavn
ROLAND SCANDINAVIA AS