blackboard 7.2 manualblackboardfaq.weblog.leidenuniv.nl/files/2008/09/blackboard_instruct… ·...
TRANSCRIPT

Blackboard 7.2.
Instructor Manual

Blackboard 7.2 ManualI
© <2007> Universiteit Leiden / Blackboard
Table of Contents
Part I Getting Started 2
................................................................................................................................... 21 Introduction
................................................................................................................................... 32 Login Blackboard
................................................................................................................................... 43 My Institution page
................................................................................................................................... 54 Open your course
................................................................................................................................... 65 Course layout
................................................................................................................................... 76 Request a Course Shell
Part II Course Management 9
................................................................................................................................... 91 Introduction
................................................................................................................................... 92 Control Panel
................................................................................................................................... 103 Manage Course Menu
................................................................................................................................... 114 Changing menu design
................................................................................................................................... 125 Changing language settings
................................................................................................................................... 126 Course Availability
Part III User Management 14
................................................................................................................................... 141 Enroll users to your Course
................................................................................................................................... 142 Remove users from Course
................................................................................................................................... 153 Change a user's role.
................................................................................................................................... 154 Request a Guest account
................................................................................................................................... 165 Making a Course available for guests
................................................................................................................................... 176 Create a Group
................................................................................................................................... 187 Add users to a group
................................................................................................................................... 188 Remove users from a group
Part IV Upload your course material 20
................................................................................................................................... 201 Introduction
................................................................................................................................... 212 Adding an Announcement
................................................................................................................................... 223 Add an Item
.......................................................................................................................................................... 23Using the rich text editor
.......................................................................................................................................................... 24Copy and Paste
.......................................................................................................................................................... 25Upload an attachtment
.......................................................................................................................................................... 26Upload multiple folders and files
................................................................................................................................... 274 Add a Folder
................................................................................................................................... 275 Add an item in a Folder
................................................................................................................................... 286 Copy and move items and folders

IIContents
II
© <2007> Universiteit Leiden / Blackboard
................................................................................................................................... 297 Add Staff Information
................................................................................................................................... 308 Add a Link
.......................................................................................................................................................... 31Link Checker
................................................................................................................................... 319 Creating a Glossary
Part V Communication & Collaboration 33
................................................................................................................................... 331 Introduction
................................................................................................................................... 342 Send Email
................................................................................................................................... 353 Discussion Board
.......................................................................................................................................................... 35Create a Discussion Board
.......................................................................................................................................................... 36View a Discussion board
.......................................................................................................................................................... 36Add a new thread
.......................................................................................................................................................... 37Reply to a message
................................................................................................................................... 384 Exchange files (Digital Dropbox)
................................................................................................................................... 395 Exchange file (Groups)
................................................................................................................................... 406 Chat
................................................................................................................................... 407 Send Messages
Part VI Assessment, Evaluation and Marking 42
................................................................................................................................... 421 Introduction
................................................................................................................................... 432 Tests and Surveys
.......................................................................................................................................................... 44Create a test or survey
......................................................................................................................................................... 45Creation Settings
......................................................................................................................................................... 46Question Types
.......................................................................................................................................................... 47Apply a test
......................................................................................................................................................... 48Test Options
.......................................................................................................................................................... 49Modify a Test
.......................................................................................................................................................... 50View Test results
.......................................................................................................................................................... 51Grading Open questions
................................................................................................................................... 513 Assignments
.......................................................................................................................................................... 52Creating an Assignment
.......................................................................................................................................................... 52Marking and viewing assignments
.......................................................................................................................................................... 53Download Assignments
................................................................................................................................... 534 Gradebook
.......................................................................................................................................................... 54Making a Gradelist
.......................................................................................................................................................... 55Adjusting the weight
.......................................................................................................................................................... 55Adding grades to your gradebook
.......................................................................................................................................................... 56Download Gradebook
Index 57

Part
I
Getting Started

Getting Started 2
© <2007> Universiteit Leiden / Blackboard
Background Information
Where can I get moreinformation or support? All faculties have their ownBlackboard contact person orhelpdesk.
Where can I follow a trainingsession? Training sessions and individualsupport are offered by facultiesand by ICLON. Contact yourfaculty contact person for moreinformation about the differenttraining sessions and support.
Faculty support Go to http://blackboard.leidenuniv.nl andclick on 'Contactpersonen' for a listof contact persons per faculty.
ICLON Go to http://www.iclon.leidenuniv.nl formore information on trainingcourses en support.
ICT helpdesk Go to http://blackboard.leidenuniv.nl andclick on "FAQ" > "inlogproblemen".
© <2007> Universiteit Leiden /Blackboard
Introduction
Blackboard is a virtual learning environment, a virtuallocation where instructors can place course materials andcourse information to support students in their learningprocess.
Blackboard 7.2 Manual3
© <2007> Universiteit Leiden / Blackboard
Background Information
Guest access? Sometimes you can enter acolleague's course as a 'guest'.Guest access does not make allBlackboard's areas available butyou will be able to view contentsuch as announcements, courseinformation and coursedocuments. · Click on the Courses Tab. · Browse for a course in the
Course Catalogue. · Click on the Course Title.
Login to your Blackboard Course
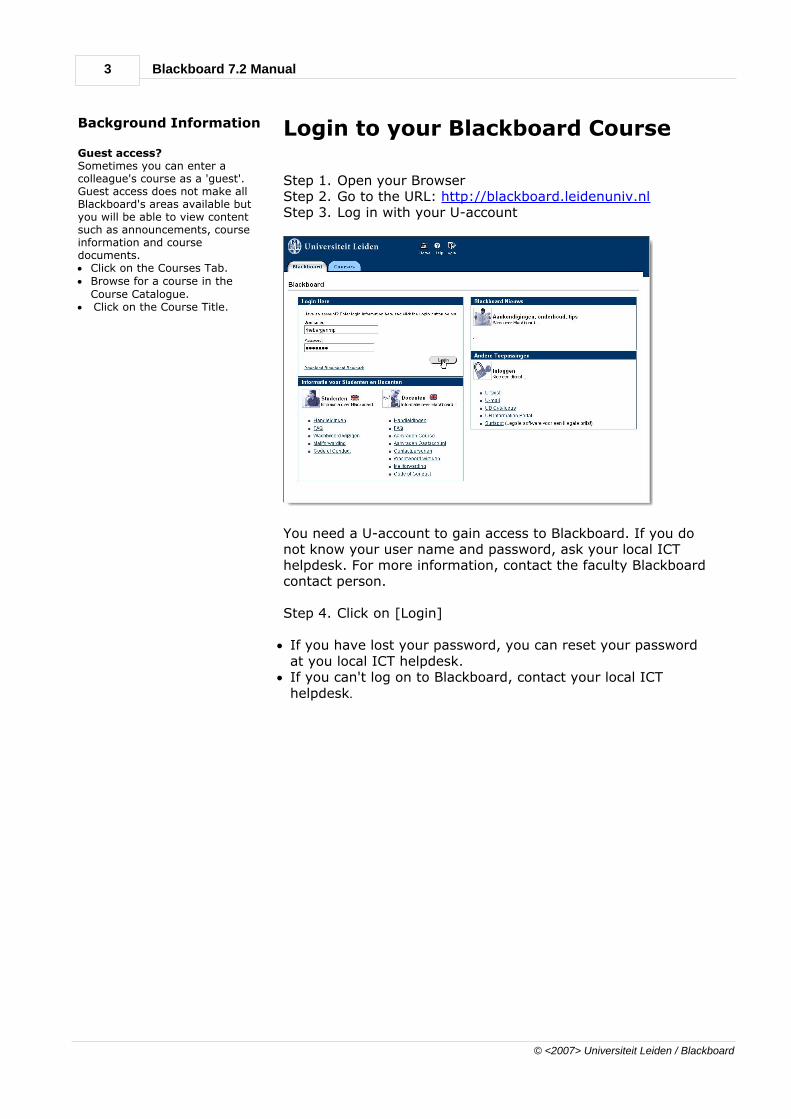
Step 1. Open your Browser Step 2. Go to the URL: http://blackboard.leidenuniv.nlStep 3. Log in with your U-account
You need a U-account to gain access to Blackboard. If you donot know your user name and password, ask your local ICThelpdesk. For more information, contact the faculty Blackboardcontact person.
Step 4. Click on [Login]
· If you have lost your password, you can reset your passwordat you local ICT helpdesk.
· If you can't log on to Blackboard, contact your local ICThelpdesk.

Getting Started 4
© <2007> Universiteit Leiden / Blackboard
Background Information
When you log on to Blackboard,you will see the My Institutionpage. This is your personalhomepage. You can find thecourses you are teaching on theright-hand side of the screen.
You can customize the content andlayout of the My Institution tab.After customization, the MyInstitution area displays thedesired settings when a User logsin again.
Unavailable Some courses are listed asunavailable. An unavailablecourse is not visible to studentsbut is visible to instructors,teaching assistants, and coursedesigners.You can make your courseavailable using the course controlpanel: · Click on [Settings] · Click on [Course
Availability] · In the [Set Availability]
section, click on the Yesradio button.
· Click on [Submit]
My Institution page
Step 1.Go to http://blackboard.leidenuniv.nl
Step 2.Log on to Blackboard.
Customize the content
Step 1.Open the [My Institution] tab.
Step 2.Click [Content] on the upper right hand corner.
Step 3.Check the boxes next to those modules to appearon the tab.
Step 4.Click [Submit]. Modules with a red check arerequired and cannot be changed.
Customize the color and placement of the modules
Step 1. Open the My Institution tab or another moduletab.
Step 2. Click [Layout] on the upper right hand corner.
Step 3. You can change where the modules appear on thetab, remove a module from the page, change theappearance of the modules
Step 4.Click [Submit].
Edit, minimize, and remove modules
You can edit, minimize, and remove modules from a tabarea unless the module is required.
· Click the Pencil icon located at the top of each module toedit the content of that specific module.
· Click the minus (-) button located at the top of eachmodule to minimize a module.
· Click the remove icon (x) located at the top of eachmodule to remove the module. Click [Remove] and aconfirmation receipt will appear when the process iscompleted. Modules that do not have a remove icon arerequired and cannot be removed.

Blackboard 7.2 Manual5
© <2007> Universiteit Leiden / Blackboard
My Courses Lists all courses you are teaching or inwhich you are participating.
My Announcements Lists all announcements whichare placed the last seven days. Click on more to readall announcements.
Tools
ImageTools-frame
E-mail Blackboard is not an email programme.You can only send email to otherinstructors and students. The email willbe sent to the U-account of theinstructors or students.
Change your Email address You cannot change your U-account butyou can forward mail, send it to youru-account, or to another account. Go to http://blackboard.leidenuniv.nland clickon [Mail forwarding]. Follow theinstructions on the screen.
View Grades View grades is a student tool. It shows their gradesfor online quizzes and surveys which they havetaken.
Send Email This tool allows you to send an email to all users,groups, teaching assistants or instructors, or toindividual users or groups in a given course.
Step 1. Click on [Send Email].
Step 2. Select the name of the course.
Step 3. Select the recipients. Step 4. Type your message and click on [Submit].
Address Book This tool enables you to store contacts’ emailaddresses and personal information.
Personal Information The personal information tool allows users to edit theirpersonal information, change their password, set the
CD ROM drive and set their privacy options.
Open your course
Through the My Institution pageStep 1. Go to http://blackboard.leidenuniv.nl and log on to
Blackboard.Step 2. Click on the Course Title to open the Course site.

Getting Started 6
© <2007> Universiteit Leiden / Blackboard
Background Information
When you have entered aBlackboard Course, you will see amenu on the left side on thescreen. Manage your Course Menu You can manage your course menuby adding or removing menubuttons, or change the menu text.
Control Panel The control panel is a special link. Itgives access to an area from whereyou can add, modify or deleteinformation in your Course.
Course layout Step 1.Go to http://blackboard.leidenuniv.nl and log on to
Blackboard
Step 2.Click on the Course Title to open the Course site.
Image Course site
Announcements are used for notes relating to the course. Bydefault, messages posted in the last 7 days are displayed. Use thetabs to select messages posted before that period. In Course Information you can add information about thecourse, such as the timetable, reading lists etc.
Staff Information displays information about the courseinstructors. You can provide your email address, contact detailsand a link to your home page.
Course Documents hosts the learning materials relating to yourcourse. You can add materials as text or as files for the studentsto download. You can structure your materials in folders orlearning units.
The Assignments area hosts assignments. You can also placeonline quizzes and surveys.
The Communication area hosts the email facilities that enableyou to email your students or colleagues. It also hosts thediscussion board, virtual classroom, group pages and timetable.
The Discussion Board is a place where students cancommunicate asynchronically.
Groups: these are hosts’ group spaces. Students can e-mail,discuss, chat and exchange files in their own group space.
In the Student Tools area, students can find a Student Manual,Digital Drop Box, Grades and Calendar.
Blackboard 7.2 Manual7
© <2007> Universiteit Leiden / Blackboard
Background Information
If your course is not listed on theMy Institution page, you have torequest a Course Shell from yourlocal Blackboard support group.
Faculty Support PointGo to http://blackboard.leidenuniv.nl and click on [Contactpersonen] orthe English flag icon. Click onSupport to view a list of all contactpersons/points.
Request a Course Shell
Step 1. Go to http://blackboard.leidenuniv.nl.Step 2. Click on [Aanvragen course] or
Step 1. Click on the English flag icon.Step 2. Click on [Request a Course] and follow the
instructions on the screen.

Part
II
Course Management

Blackboard 7.2 Manual9
© <2007> Universiteit Leiden / Blackboard
Background Information
If you do not have your owncourse shell, contact your localcontact person.
Copy of last year's course. It is possible to make a copy of lastyear's course or parts of thatcourse. You can request a copy atyour local Blackboard supportpoint.
Introduction
This chapter will explain how you can add, modify and deleteinformation in your Course.
Image Course website
Background Information
All course administration is donethrough the Control Panel. Thisarea is only available to users withone of the following defined courseroles: Instructor, TeachingAssistant, Grader and SystemAdministrator.
You can make all modifications toyour Course site via the ControlPanel, such as uploading andmanaging content, course layout,managing users, quizzes and tests.
The Control Panel is comprised ofsix areas:· Content Areas
Provides the tools necessaryto add text, files, andinformation into a course.
· Course ToolsContains the communicationtools to send email, createtasks, and work with groups.
· Course OptionsContains security andcustomization options.
· User ManagementProvides tools to manageusers and enrollments.
· AssessmentProvides tools for buildingAssessments, Recordinggrades, and tracking useractivity.
· SupportOffers support contacts andonline documentation.
Control Panel
Step 1. Go to http://blackboard.leidenuniv.nl and log onto Blackboard.
Step 2. Open a courseStep 3. Click [Control Panel] on the Course Menu.

Course Management 10
© <2007> Universiteit Leiden / Blackboard
Background Information
Add and modify course areas fromthe Manage Course Menu page.For example, choose areas forStaff Information, specific content,and Course Links.
User-friendly tips can be foundhere to help students locate thecourse materials as easily aspossible:· Remove all menu items
which you do not wish touse.
· Each menu item should beused for a specific purpose.
Most instructors use the followingstructure: · Announcements for
announcements.
· Course Information fororganisational information suchas course outline, readings,etc.
· Course Documents: coursematerials like Powerpointpresentations, images, etc.
· Assignments for assignments,
quizzes, tests.
To change the order of the menubuttons, click on the drop-downarrow and select a number.Course areas will appear in theCourse Menu in the order selected.
Manage the Course Menu
Step 1.Go to http://blackboard.leidenuniv.nl and log on toBlackboard.
Step 2.Open a courseStep 3.Click [Control Panel] on the Course Menu
Step 4.Click on [Manage Course Menu].
Add a menu button Step 1. Click on 'Add Content Area' or 'Add Tool Link'. Step 2. Click on [Submit].
Remove a menu button Step 1. Click on [Remove] button. This action is irreversible.If you
remove a button, you will also remove all content addedbehind that button.
Change the menu titleStep 1. Click on [Modify]. Step 2. Rename the menu. Step 3. Click on [Submit].

Blackboard 7.2 Manual11
© <2007> Universiteit Leiden / Blackboard
Background Information
You can manage the appearance ofthe Course Menu from the CourseDesign page. You can choose touse buttons or text links and selectcolors and design features.
You can also add a banner to thetop of the Announcements area onthe Course from the Course Bannerpage.
You can make a banner in agraphics programme. Save yourbanner as .gif of .jpg. Do not makethe banner too big, otherwise it willtake up too much space on yourannouncement page.
Changing the menu design and banner
Menu designStep 1. Go to http://blackboard.leidenuniv.nl and log on
to Blackboard.Step 2. Open a courseStep 3. Click [Control Panel] on the Course MenuStep 4. Click [Course Design] under Course Options.Step 5. Click [Course Menu Design]. Select Buttons to
make the items in the Course Menu appear asbuttons. Select Text Navigation to make the itemsin the Course Menu appear as text links.
Step 6. Click on [Submit].
course bannerStep 1. Go to http://blackboard.leidenuniv.nl and log on
to Blackboard.Step 2. Open a courseStep 3. Click [Control Panel] on the Course MenuStep 4. Click [Course Design] in Course Options on the
Control Panel.Step 5. Click [Course Banner].Step 6. Click [Browse] to select your banner.Step 7. Click [Submit].
Other fields on this page:Current BannerDisplays the banner that currently appears at the top ofthe Announcements area.
Remove this bannerSelect this check box to remove the banner image from theCourse.
Course Management 12
© <2007> Universiteit Leiden / Blackboard
Background information
The instructor can set a languagepack and enforce it. Enforcing alanguage pack means that all userswill see that language pack. If alanguage pack is not enforced, anda user had a preferred languagepack associated with their account,the user's language pack willoverride the course language pack.
Changing the language settings foryour course
Step 1. Go to http://blackboard.leidenuniv.nl and log onto Blackboard.
Step 2. Open a courseStep 3. Click [Control Panel] on the Course MenuStep 4. Click [Settings].Step 5. Click [Set Language Pack].Step 6. Select a language pack form the drop-down list.Step 7. Click [Enforce Language Pack] to always display
this course in the selected language pack.Step 8. Click [Submit].
BackgroundInformation
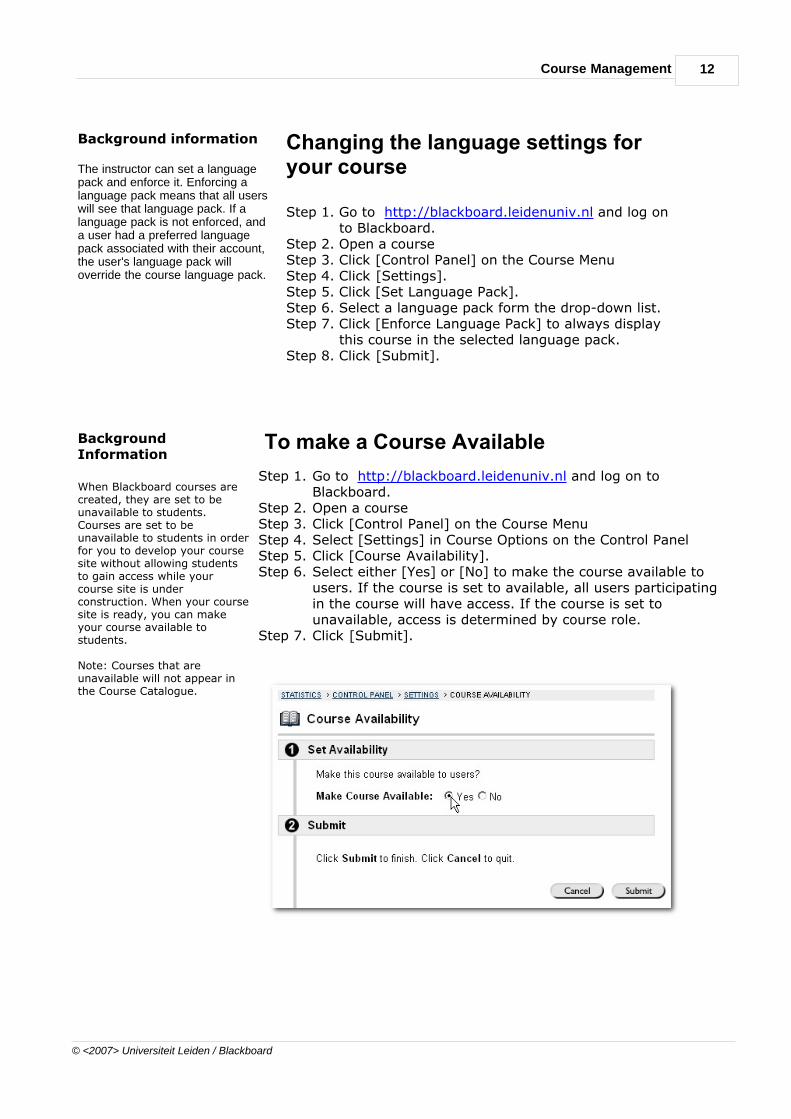
When Blackboard courses arecreated, they are set to beunavailable to students.Courses are set to beunavailable to students in orderfor you to develop your coursesite without allowing studentsto gain access while yourcourse site is underconstruction. When your coursesite is ready, you can makeyour course available tostudents.
Note: Courses that areunavailable will not appear inthe Course Catalogue.
To make a Course Available
Step 1. Go to http://blackboard.leidenuniv.nl and log on toBlackboard.
Step 2. Open a courseStep 3. Click [Control Panel] on the Course MenuStep 4. Select [Settings] in Course Options on the Control PanelStep 5. Click [Course Availability]. Step 6. Select either [Yes] or [No] to make the course available to
users. If the course is set to available, all users participatingin the course will have access. If the course is set tounavailable, access is determined by course role.
Step 7. Click [Submit].

Part
III
User Management

User Management 14
© <2007> Universiteit Leiden / Blackboard
BackgroundInformation
Instructors may enroll anexisting user into thecourse using the EnrollUser page.
You can make the courseenrollment student led.
· Open a course and click[Control Panel]
· Select [Settings] in CourseOptions on the Control Panel
· Click [Enrollment Options].
· Select [Self Enrollment] andClick [Submit].
Enroll users to your Course
Step 1. Go to http://blackboard.leidenuniv.nl and log on toBlackboard.
Step 2. Open a courseStep 3. Click [Control Panel] on the Course MenuStep 4. Click [Enroll User] to open the Enroll User page.
Step 5. Select the check box next to the names of the users to enroll Only 20 names will appear on a page. If more the 20 usersare found during the search, multiple pages may be viewed. Instructors may only select and submit users from one pageat a time. For example, if the search returns three pages ofusers, the Instructor must select the users to add on the firstpage and click Submit before continuing to the next page.
Step 6. and click [Submit].
Background Information
Instructors may remove users froma course. When a user is removedfrom a course all of the informationassociated with the user, such as,Gradebook information, Drop Boxfiles, is removed.
Note: Removed users cannot berestored to the course. To restore aremoved user, the user must beenrolled in the course again.
Remove users from Course
Step 1. Go to http://blackboard.leidenuniv.nl and log onto Blackboard.
Step 2. Open a courseStep 3. Click [Control Panel] on the Course MenuStep 4. Click [Remove Users from course] Step 5. Select the check box next to the names of the
users to remove and type [Yes] in the field at thebottom of the page. A message will appearverifying that the user should be removed. Thisaction is irreversible.

Blackboard 7.2 Manual15
© <2007> Universiteit Leiden / Blackboard
Background Information
Course roles
· Student: User is able to access
all available Course content and
will be graded on Assessments.
· Instructor: User is able to
control all aspects of the course
through the Control Panel.
· Teacher’s Assistant: User is able
to control most aspects of the
course through the Control
Panel.
· Grader: User is able to access
all areas under Assessments.
· Course Builder: User is able to
add content to the course
through the Control Panel.
· Guest: Guests are able to view
areas of the course, but cannot
participate in any way.
Change a user's role.
Users are enrolled with a Course role of ‘Student by default’. Follow the steps below to open change the course role.
Step 1. Go to http://blackboard.leidenuniv.nl and log onto Blackboard.
Step 2. Open a courseStep 3. Click [Control Panel] on the Course MenuStep 4. Select [List/Modify Users] in the User Management
area of the Control Panel.Step 5. Search for a user.Step 6. Click [Properties] next to a user.
Step 1. Select a role option.Step 2. Click [Submit].
Background Information
Staff members can request aBlackboard account for a thirdparty, such as a colleague fromanother university.
A request for a guest account canbe submitted to the facultycontact person by email.
Request a Guest account
Step 1. Go to the Blackboard homepagehttp://blackboard.leidenuniv.nl
Step 2. Click on [Aanvragen Gastaccount]
or
Step 1. Click on the English flagStep 2. Click on [Request a guest account]

User Management 16
© <2007> Universiteit Leiden / Blackboard
Background Information
You can make your course or apart of your course available toguests.
Guests are able to view areas ofthe course, but cannot participatein any way. They can't make tests,surveys, post messages in aDiscussion Board or submitassignments.
Guest access You can visit Courses as a guestwhen an instructor made his of hercourse available for guests.
· Click on the tab [Courses]· Search for the course in the
Course Catalogue · When a course is open for guests
you can click on the Course Title.
Making a Course available for guests
Course available for guestsStep 1. Go to http://blackboard.leidenuniv.nl and log on to
Blackboard.Step 2. Open a courseStep 3. Click [Control Panel] on the Course MenuStep 4. Select [Settings] in Course Options on the Control
Panel.Step 5. Click [Guest Access] Step 6. Select either Yes or No to make the course available
for Guests to view.Step 7. Click [Submit].
Course tools available for guests.Step 1. Click [Manage Tools]Step 2. Click [Tool availability]Step 3. Select all toolsStep 4. Click [Submit]
Specific menu buttons available for guestsStep 1.Click [Control Panel] on the Course MenuStep 2.Click on [Manage Course Menu]. Step 3.Click [Modify]Step 4.Select the check box "Allow guest access" to make
the menu button available to Guests in the course.Step 5.Click [Submit]

Blackboard 7.2 Manual17
© <2007> Universiteit Leiden / Blackboard
Background Information
Groups enable Users to collaboratewith each other. Groups usuallyconsist of a smaller group of Usersin a course or organisation, such asstudy groups or project groups.From a Group page, users can:
· send email
· exchange files
· enter discussion forums
· enter Collaboration Sessions
The following functions areavailable from the Group page:
· File ExchangeShare files with Group members.
· Group CollaborationMeet classmates and moderatorsfor real-time discussion or classlessons.
· Send EmailSend email to one or all of theirgroup members.
· Group MembersThe names and email addressesof all group members appear.
Groups
Create a group pageStep 1. Go to http://blackboard.leidenuniv.nl and log on
to Blackboard.Step 2. Open a courseStep 3. Click [Control Panel] on the Course Menu.Step 4. Click [Manage Groups].Step 5. Click [Add Group].Step 6. Fill in the options under [1 Group Information]Step 7. Select the group options under [2 Group Options]:
- Group Discussion Board available- Group Virtual Classroom available- Group File Exchange available- Group Email available
Step 8. Select [Yes] if you would like to make the groupavailable to students.
Step 9. Click [Submit].
Open the group page
Follow the steps below to open the group page.
Step 1. Open a Course.
Step 2. Click [Communication] on the Course Menu orOrganisation Menu.
Step 3. Click [Group Pages] from the Communicationarea.
Step 4. Select the name of a Group.

User Management 18
© <2007> Universiteit Leiden / Blackboard
Groups
Step 1. Go to http://blackboard.leidenuniv.nl and log on toBlackboard.
Step 1. Open a courseStep 2. Click [Control Panel] on the Course Menu.Step 3. Click [Manage Groups].Step 4. Click on [Modify].
Step 5. Click [Add Users to Group].Step 6. Once the search has been completed, select the check
box next to a user to add to the Group and click [Submit]
Background Information
Instructors may drop users from aGroup. If a user is removed from aGroup all of the informationassociated with that user, such asfiles in the File Exchange andDiscussion Board messages, isremoved. Removed users cannot berestored to the Group. Removedusers must be added again.
Remove users form a group
Step 1. Go to http://blackboard.leidenuniv.nl and log onto Blackboard.
Step 1. Open a courseStep 2. Click [Control Panel] on the Course Menu.Step 3. Click [Manage Groups] in the User Management
area of the Control Panel.Step 4. Click [Modify] next to a Group.Step 5. Click [Remove Users From Group].Step 6. Select the check boxes of the users to remove. Step 7. Type [Yes] in the entry field at the bottom of the
page and click [Submit]. The selected users andall information associated with those users will beremoved from the Group. This action isirreversible.

Part
IV
Upload your course material

Upload your course material 20
© <2007> Universiteit Leiden / Blackboard
Background Information
The most important locations toadd information will be discussedshortly.
Announcements You can place announcementswhich students can read in their"My Institution” or directly whenthey open your course.
Course Information You can add information about thecourse, such as readings, coursedescription, exam information, etc.
Staff Information You can add information about allinstructors, such name, telephonenumber, email address and aphoto.
Course documents Add all your course materials in thisarea.
Assignments Add all your assignments, quizzesand tests in this area.
Introduction In this chapter you can read how you can upload yourcourse material and information in your course site.
Information can be placed at different locations inBlackboard. It is recommended that you decide first whatkind of information you would like to add to your courseand where you would like to add it. It is worthwhile askingcolleagues how they have structured their information intheir course sites. You can also enter a course as a guestto see how other instructors have structured their courses.Go to the Courses tab and browse through the coursecatalogue to find a course with a preview button. Click onthe preview button to enter the course.

Blackboard 7.2 Manual21
© <2007> Universiteit Leiden / Blackboard
BackgroundInformation
The Instructor can add,modify, and removeannouncements from theAnnouncements page. This isan ideal place to posttime-sensitive material suchas:
· when assignments aredue
· changes in the syllabus
· corrections/clarificationsof materials
· exam schedules
When adding anAnnouncement, Instructorscan also send theAnnouncement as an email toStudents in the course. Thisensures that Students receivethe announcement even ifthey do not login to thecourse.
Adding an Announcement
Step 1. Click [Control Panel] on the Course MenuStep 2. Open a Content Area, such as Course Documents, from the
Control Panel.Step 3. Click [Announcements] in Course areas of the Control Panel.Step 4. Click [Add Announcement].Step 5. Enter a subject for the announcement. This will appear as the
title of the announcement. Step 6. Enter the announcement by either typing directly into the field
or copy and paste text from another word processingdocument.
Options:Step 7. Select [Yes] to create a permanent Announcement. This
Announcement is automatically displayed after the time anddate it is created. There is no end date for this Announcement,unless the Display Until option is selected.
Step 8. Use the option dates to display an Announcement for a specificperiod of time. Select the date the Announcement begins inDisplay After and the date the Announcement.
Step 9. Select Email Announcement to send an email to all Courseusers with the contents of the Announcements. This will ensurethat all users are aware of the Announcement even if they donot login to the Course.
Upload your course material 22
© <2007> Universiteit Leiden / Blackboard
BackgroundInformation
Items are generalpieces of contentadded to a course towhich items may beattached.
Item Options There are several itemoptions you can select: "Make the contentvisible" indicates if thecontent is visible or notfor students.
Track number ofviews Select Yes to indicatethat the system is totrack the number oftimes a user accessesthis item.
Choose daterestrictions Select the range ofdates that the contentwill appear using thedrop-down lists or clickthe icon for a calendarinterface.
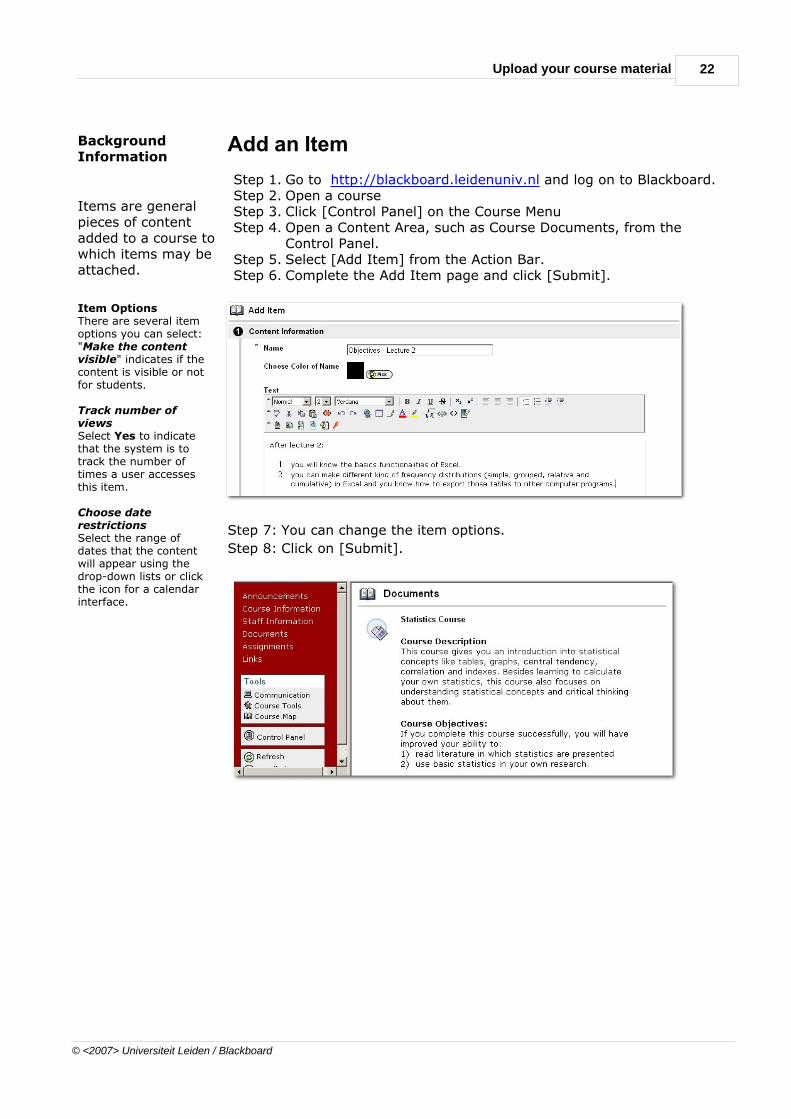
Add an Item
Step 1. Go to http://blackboard.leidenuniv.nl and log on to Blackboard.Step 2. Open a courseStep 3. Click [Control Panel] on the Course MenuStep 4. Open a Content Area, such as Course Documents, from the
Control Panel.Step 5. Select [Add Item] from the Action Bar.Step 6. Complete the Add Item page and click [Submit].
Step 7: You can change the item options.
Step 8: Click on [Submit].

Blackboard 7.2 Manual23
© <2007> Universiteit Leiden / Blackboard
Background Information
The simplest way to enter text intoa text field is to type themessage.
You can also copy your text froman existing document and paste itin the text field. See "Copy andPaste".
AdvantageYou do not have to download thefile if you have typed or copied thetext into the text field.
DisadvantageIf your text is long, your studentwill not see it completely on his orher screen. Preview Use the Preview button if youwould like to know how your textwill appear.
Attachments You can add attachments withinthe text (use the first button onthe third menu bar) or you canadd your attachment via options(the attachment will appear underthe item title).
HTML Your text will be converted intohtml. If you know how to edit html,you can click on the html buttonand make your changes.
Using the rich text editor
Step 1.Go to http://blackboard.leidenuniv.nl and log on toBlackboard.
Step 2.Open a courseStep 3.Click [Control Panel] on the Course MenuStep 4.Open a Content Area, such as Course Documents, from
the Control Panel. Step 5.Select [Add Item] from the Action Bar.
Step 6.Complete the Content Information.
Step 7.You can change the default colour by clicking on the Pick button, and select a colour from the colouroptions. Type your text in the 'Text' field. Use thetoolbars at the top of the text field to modify yourcontent. If you do not see all the toolbars, click on thearrow button to expand the missing bars.
Image: buttons above the text field

Upload your course material 24
© <2007> Universiteit Leiden / Blackboard
Background Information
Copy and PasteThere are several ways to copy andpaste in Windows. You can copywith your right mouse button, butyou can also copy a text by usingCtrl-C (copy) and Ctrl-V (paste).
Copy and Paste
Step 1. Click on [Control Panel] in your Course. Step 2. Click on the content area in which you wish to add
an item.
Step 3. Click on [Add Item].
Step 4. Fill in the Content Information. Step 5. You can change the default colour by clicking on
the Pick button, and select a colour from the
colour options.
Step 6. Open the document with the text. Do not log outform Blackboard.
Step 7. Select the text. Step 8. Click the right mouse button. Step 9. Select [Copy].
Step 10.Go to BlackboardStep 11.Click the right mouse button in the text field.Step 12.Select [Paste]Step 13.Click on [Submit].
Step 14.Go to BlackboardStep 15.Click the right mouse button in the text field.Step 16.Select [Paste]Step 17.Click on [Submit].
Blackboard 7.2 Manual25
© <2007> Universiteit Leiden / Blackboard
Background Information
You can upload Word, PDF,Powerpoint and other files inBlackboard. You can upload themby adding them as an attachmentto an item.
Adding an attachment to an item
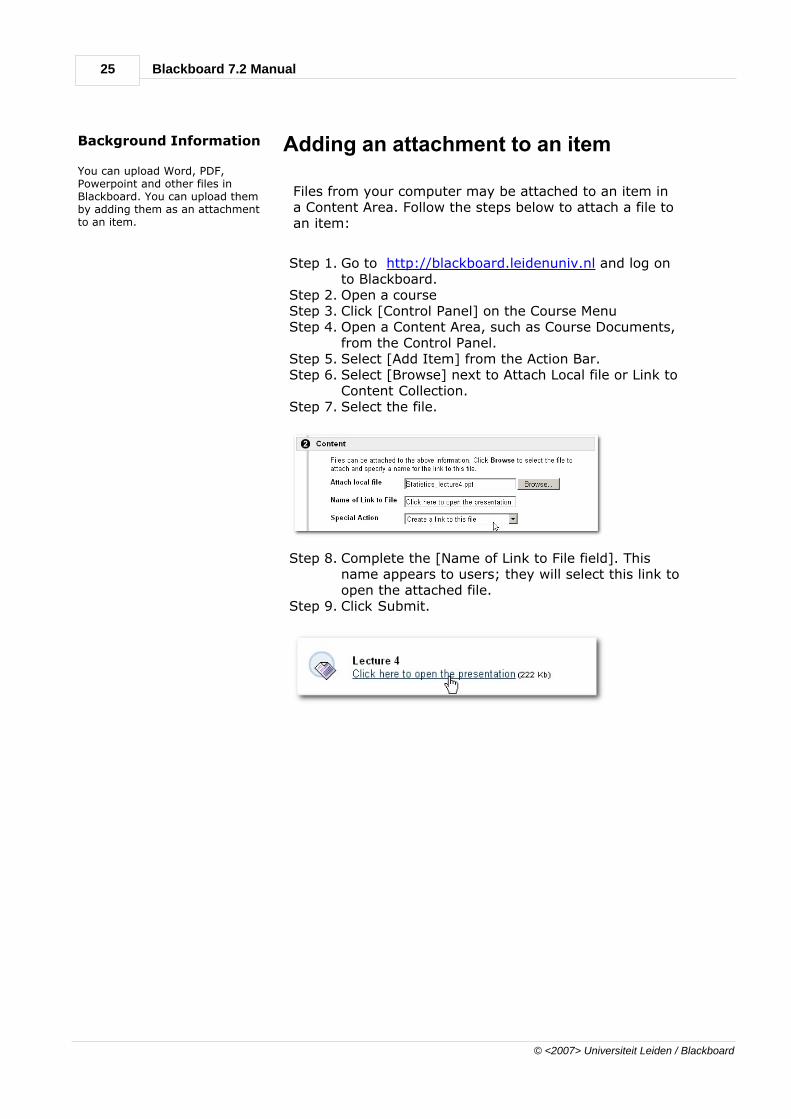
Files from your computer may be attached to an item ina Content Area. Follow the steps below to attach a file toan item:
Step 1. Go to http://blackboard.leidenuniv.nl and log onto Blackboard.
Step 2. Open a courseStep 3. Click [Control Panel] on the Course MenuStep 4. Open a Content Area, such as Course Documents,
from the Control Panel. Step 5. Select [Add Item] from the Action Bar.Step 6. Select [Browse] next to Attach Local file or Link to
Content Collection. Step 7. Select the file.
Step 8. Complete the [Name of Link to File field]. Thisname appears to users; they will select this link toopen the attached file.
Step 9. Click Submit.

Upload your course material 26
© <2007> Universiteit Leiden / Blackboard
Background information
Need to save time? You can uploadmultiple documents at once into aBlackboard course. First you haveto create a zip file on yourcomputer, which you have toupload in Blackboard.
Upload multiple folders and files inBlackboard
You can upload multiple folders and files into Blackboardat one time with the Document Package
Step 1. Open Zip Central.Step 2. Click [New] to create a zip file.Step 3. Select [Add From] : and indicate the correct
drive and directory which contain all the relevantfiles. (see image below) .
Step 4. Select the directory and/ or file(s) that you wishto upload.
Step 5. Select [Options] from the Menu and then [SaveRelative Path] .
Step 6. Click [Current Folder] .Step 7. Select [Use separate folder entries] .Step 8. Click [OK] .
Step 9. Log in to Blackboard.Step 10. Open the relevant course and proceed to the
content area to which you wish to add the files.Step 11. Select [Document Package] in the pull-down
menu and Click [Go] Click [Browse] in thesubmenu [File to Upload] and select thepreviously created zip file.
Step 12. Click [Submit].

Blackboard 7.2 Manual27
© <2007> Universiteit Leiden / Blackboard
Background Information
Folders are useful for organizingand structuring content in aContent Area. For example,Instructors may add folders foreach week of the course to aContent Area, or organize theContent Area by topic, such asseparate folder for Assignments,Assessments, and Group Projects.
Once a folder is created, contentand additional subfolders may beadded to it. All of the ContentTypes available in Content Areasmay be added to a folder.
Add a Folder
Step 1. Go to http://blackboard.leidenuniv.nl and log onto Blackboard.
Step 2. Open a courseStep 3. Click [Control Panel] Step 4. Open a Content Area, such as Course Documents,
from the Control Panel.Step 5. Select [Add Folder] from the Action Bar.Step 6. Complete the Add Folder page and Click [Submit].
Image: example of a folder structure.
Background Information
Folders can be used to organiseyour materials within a ContentArea. Most instructors use onefolder per week.
Add an item in a Folder
Step 1.Click [Control Panel] on the Course MenuStep 2.Open a Content Area, such as Course Documents,
from the Control Panel.Step 3.Click on the Folder title.
Step 4.Select [Add Item] from the Action Bar.Step 5.Complete the Add Item page and click [Submit].

Upload your course material 28
© <2007> Universiteit Leiden / Blackboard
BackgroundInformation
Instructors are able to copy ormove content and place it inanother area within the samecourse or in another course.Entire folders and LearningUnits can also be copied.Instructors must have anInstructor role in thedestination course whencontent is moved or copied toanother course. Instructorscan choose whether to deletean item after it is copied (in amove operation) or to alsokeep it in its original place (ina copy operation).
Copy and move items and folders
Step 1. Click [Control Panel] on the Course MenuOpen a ContentArea, such as Course Documents, from the Control Panel.
Step 2. Open the Content Area that holds the piece of content fromthe Control Panel.
Step 3. Select Copy next to the content. (If Copy does not appear,this option in not available). The Copy or Move Item pageappears.
Step 4. Complete the Copy or Move Item page with the followinginformation:
· Destination Course: Select a destination from the drop-down list for the item.Only those courses in which the Instructor has anInstructor role appear in the list.
· Destination Folder: Select Browse to view the Course Map.Select a folder on the Course Map and click Submit.
· Remove item after copy: If the item is being copied (it will exist in multiple places)select No. If the item is being moved to a different locationelect Yes. If Yes is selected the item is removed from thecurrent Content Area.
Blackboard 7.2 Manual29
© <2007> Universiteit Leiden / Blackboard
Background Information
The Staff Information page allowsInstructors to post informationabout themselves, TeachingAssistants, guest speakers, andother Course leaders. The pagegives users a resource to look upnames, email addresses, officehours, and photographs.
PhotoYou can only add photos with theextension *.gif or *.jpg. If it is nota gif or jpg image, you can save itas one in a graphic application onyour own computer. Open thegraphic application and open theimage. Save the image via File >Save as. Choose *.gif or *.jpg
TipKeep the image size below 150 *150 pixels.
Add Staff Information
Step 1. Click [Control Panel] on the Course MenuStep 2. Open Staff Information in Course Tools area of the
Control Panel.Step 3. Click [Add Profile].

Upload your course material 30
© <2007> Universiteit Leiden / Blackboard
BackgroundInformation
This paragraph will explain howyou can add an link to anotherwebsite in your Course.
External Links:Links to outside websites may beadded to content areas asexternal links. When entering aURL, always enter the full Webaddress to the link. For example,enter http://www.leidenuniv.nl,not www.leidenuniv.nl.
Course LinkCourse Links are used to link toother items within a course. Allitems that appear in the CourseMap may be linked to using aCourse Link. For example, anInstructor may create aDiscussion Board where usersdiscuss the class readings. A linkto this Discussion Board may beplaced in the Content Area wherethe articles are posted, such asCourse Documents.
Add a Link
External LinkStep 1. Click [Control Panel] on the Course MenuStep 2. Open a Content Area, such as Course Documents,
from the Control Panel.Step 3. Select [Add External Link] from the Action Bar.Step 4. Complete the Add External Link page with a [Name],
[Description], and [URL] for the link. Note that theURL is required.
Step 5. Click [Submit].
Course LinkStep 1. Click [Control Panel] on the Course Menu.Step 2. Open a Content Area, such as Course Documents,
from the Control Panel.Step 3. Select [Add Course Link] from the Action Bar. The
Add Course Link page appears.In Section 1 of the page enter a name anddescription. In Section 2, click Browse to open theCourse Map. Click the link for an item in the CourseMap to select it as the Course Link. In Section 3, setthe options for the Course Link.
Step 4. Click [Submit].
Text Box EditorStep 1. Chose Hyperlink to add an hyperlink within your text.Step 2. Fill in the form.Step 3. Click [Submit]

Blackboard 7.2 Manual31
© <2007> Universiteit Leiden / Blackboard
You can use the LinkChecker to check theaccessibility of ExternalLinks in your course.
Link Checker
Link Checker
Step 1. Click [Control Panel] on the Course MenuStep 2. Click [Link Checker] in the tools area. A page will be
generated, which shows the external links. This may takea while, especially if your course contains a lot of links.
Step 3. The overview will show every link, its name, address(URL), the location within Blackboard, the accessibility ofthe link to students (availability) and whether the pagestill exists (valid) .
Step 4. Check the [Hide] box, if you wish a link to be[unavailable] for students.
Step 5. Click [Submit] to alter the availability.
Each course has its ownGlossary of terms. Eachentry consists of the termand an accompanyingdefinition. The Glossarymust be enabled by theInstructor before Studentscan view it. To turn on theGlossary, simply enable it asa Course Tool and then addit to the Course Menu.
Glossary terms may beadded one-by-one using theAdd Glossary Term page. Onthis page, an Instructor mayadd a single term and itsassociated definition. To loada number of terms at onceinto the Glossary, use the Upload Glossary feature.
Creating a Glossary
Step 1. Click [Control Panel] on the Course MenuStep 2. Click [Glossary Manager] from the Control Panel.Step 3. Click [Add Term] from the action bar on the Glossary Manager
page.Step 4. Enter a term to add to the Glossary.Step 5. Enter a definition for the term. Definitions may include simple
HTML to modify text, but more sophisticated HTML formattingshould be avoided. Also, carriage returns are not recognizedwhen entered in a definition, but HTML code to denote breaks intext will work.

Part
V
Communication & Collaboration

Blackboard 7.2 Manual33
© <2007> Universiteit Leiden / Blackboard
Background Information
The most importantcommunications tools arediscussed below.
Email Blackboard offers a simple emailprogram. The email is not sent tothe selected u-account.
Messages Messages works like a normal webmail program. Messages are sentto the inbox of the recipients. Youcan read sent messages in the Send folder. You can find incomingmessages in the Folder Inbox. Youcan add extra folders and sortyour messages. You can only sendmessages to students andinstructors enrolled in your course.
Collaboration Collaboration is the chat functionof Blackboard. Students andinstructors can communicatesynchronously via Light Chat orthe Virtual Chat Room.
Discussion Board The discussion board can consistof different forums. Students andinstructors can post messages andreply on other posts. Use thediscussion board for asynchronousdiscussion.
Digital Drop Box You can exchange files with thedigital drop box. Students can onlysend files to instructors and not toother students.
File Exchange File exchange is one of the groupfunctions. Group members canexchange files with the file
exchange.
Introduction
Blackboard offers different tools for communication,allowing instructors and students to engage insynchronous or asynchronous communication, orexchange files.

Communication & Collaboration 34
© <2007> Universiteit Leiden / Blackboard
Background Information
Instructors can send email toindividuals who participate in thecourse from the Send Email page.Emails can be sent to individualusers or to groups of users withinthe course, such as all TeachingAssistants.
Instructors cannot send email toothers via the Internet with theSend Email function.
Note: Recipients of each email willnot see the email addresses ofother recipients.
Restricting email optionsYou can restrict the students’email options. You can select thedesired options at control panel >manage course menu > modifycommunication Email addressBlackboard sends by default emailto the U-mail. If you don't readyour U-mail, you can forward youru-mail to your preferred emailaccount. For more information, seethe Blackboard homepage > mailforwarding
Send Email
Step 1. Click [Control Panel] on the Course Menu.Step 2. Click [Send Email] in Course Tools on the Control
Panel.Step 3. Click one of the options to select the recipients.
The Compose Message page will appear.Step 4. Complete the Compose Message page.
Options:· Check [Return Receipt] box to receive a copy of this
message that includes a list of recipients. If this box isnot checked, the sender will receive a copy of thismessage without the list of recipients.
· Click [Add] to add attachments. Select Browse, andnavigate to the file that should be attached to the email.After adding one file, the option to attach another filewill appear.

Blackboard 7.2 Manual35
© <2007> Universiteit Leiden / Blackboard
BackgroundInformation
Forums can appear throughout acourse, in any area where anInstructor chooses. Each groupmay also have a privateDiscussion Board with forumsavailable only to those users thatare a part of the group. Allforums that are not a part of agroup are accessible from variouspoints in the course or by goingto the Discussion Board tool. TheDiscussion Board tool centralizesall of the forums in the course.
A search function appears at thetop of the page throughout theDiscussion Board. The searchincludes a keyword field, daterestrictions, and options forwhere to search. The searchfunction starts at the current leveland options exist to work up. Forexample, in a thread, the defaultsearch option only searches thatthread but options exist to searchthe entire forum or all forumsFrom the search function, userscan search all forums in thecourse, including any forums thatappear in the user’s groups.
Discussion Board
Create a ForumStep 1. Open the [Control Panel] and navigate to the Content Area
and folder where the forum will appear.Step 2. On the right side of the action bar, select [Discussion
Board] from the Select drop-down list. Click [Go].
Step 3. Click [Create new forum] to build a new forum. The forumwill not appear in the desired content area after creation.
Step 4. Add information about the link on the next page. Thisdetermines how the link to the forum will appear in thecontent area.
Step 5. Click [Submit].Step 6. Navigate back to the content area and use the [Select a
Discussion Board Forum] option to place the new forum inthe correct location. Choose [Select a Discussion BoardForum] and select a forum from the list.
Step 7. Click [Next].Note that the Discussion Board page option will link to theDiscussion Board Page and show all the forums in thecourse.

Communication & Collaboration 36
© <2007> Universiteit Leiden / Blackboard
BackgroundInformation
An instructor can add a forum.Students and instructors can posttheir messages in the forums andreply to each other’s messages.
Show Options On the right side there is a tab[Show option]. This tab revealsseveral useful options. UseCollect if you wish to printseveral messages. · First select all messages you
wish to print. · Click on [Collect]. · Right mouse click and select
print.
SubscribeYou can subscribe to a post. You willreceive an email alert when a post isupdated or a user posts a reply
View a Discussion board
Step 1. Go to [Control Panel] in your course.Step 2. Click on [Discussion Board]. Step 3. Click on the forum in which you wish to view the posts.Step 4. Click on the title of the post which you wish to read.
The left column displays the message title, followed by the person
who posted the message and the date and time of the message. All
unread messages are displayed with a New flash.
BackgroundInformation
You can post a message as anew thread or as a reply toanother message. Thisparagraph explains how to add anew thread. The next paragraphwill explain how to reply toanother message
StructureYou can use [add new thread] ifyou would like to post a newidea. If you wish to react tosome else's ideas, you can usethe reply button. The first postand all the replies constitute athread.
Preview If you wish to view your postbefore you submit, you can clickon the preview button. This isrecommended because it isgenerally not possible to modify
your post after submitting.
Add a new thread
Add a new threadStep 1. Open a Discussion Board Forum.Step 2. Click [Add Thread] in the action bar. The Add Thread page
will appear.Step 3. Enter a [Subject] and a [Message]. It is also possible to
attach files to the post.Step 4. Click [Save] to store a draft of the post or click [Submit] to
create the thread.

Blackboard 7.2 Manual37
© <2007> Universiteit Leiden / Blackboard
BackgroundInformation
Etiquette It can become complicated tokeep track of a discussion,especially when a forum is usedfrequently. It's important toexplain some rules to yourstudents. Students have tolearn where to place a reactionnot as a new thread but as areply. Sometimes they find itdifficult to enter a specificsubject to the content. Theresult is different messageswith the same subjects.
Remove Instructors can always removemessages. Click on the[Remove] button an the right ofthe subject. Depending theforum settings, students canalso remove posts [Allowauthor to remove own messageafter posting]. We do notrecommend this option. If amessage is deleted, all repliesto that message will be deletedas well.
Reply to a message Reply to a postStep 1. Open a Discussion Board Forum.Step 2. Find a post.Step 3. Click [Reply] for that post.Step 4. Enter a [Subject] and a [Message]. It is also possible to
attach files to the post. Only one file can be added using theAttachment function below the text box. When using theVisual Text Box Editor, multiple files may be added.
Step 5. Click [Save] to store a draft of the post or click [Submit] tocreate the thread. The post will appear in the threadunderneath the original post.

Communication & Collaboration 38
© <2007> Universiteit Leiden / Blackboard
Background Information
Email vs Drop Box Digital Drop Box can be comparedto Email. The difference is thelocation to which the files are sent.Some instructors prefer to receivethe files by email, other to find thefiles in one place organized bycourse. Students can find the digital dropbox behind the menu item Tools.Instructors can find the digitaldrop box in the control panel.
There are some disadvantage touse the digital drop box:· You cannot sort or structure
the files.· You cannot download all files
in one.· You cannot delete all files in
one.
If you wish to sort, structure ordownload the files, werecommend using Assignments.Assignments are a moreinteractive alternative to theDigital Drop Box. Students cansubmit assignments asattachments. Instructors cancorrect the assignments throughthe Gradebook, add grades andgive feedback.
Exchange files (Digital Dropbox)
Add a file to your Digital DropboxStep 1. Open a Course.Step 2. Click [Control Panel].Step 3. Select [Digital Dropbox].Step 4. Click [Add File].Step 5. Enter the title of the file.Step 6. Click [Browse] to locate a file or enter the exact
path.Step 7. Enter any comments related to the file in the
comments field. These comments will appearbeneath the title on the Dropbox page.
Send a file to your Digital DropboxStep 1.Open a Course.Step 2.Click [Control Panel].Step 3.Select [Digital Dropbox].Step 4.Click [Send File].Step 5.Enter the title of the file.Step 6.Click [Browse] to locate a file or enter the exact
path.Step 7.Enter any comments related to the file in the
comments field. These comments will appearbeneath the title on the Dropbox page.

Blackboard 7.2 Manual39
© <2007> Universiteit Leiden / Blackboard
Background Information
File Exchange is one of the groupoptions. Students and instructorscan exchange files.
File Exchange is not visible? Instructors can make severaldifferent group options availableto group members.
· Go to [Manage Groups] in[Control Panel]
· Click on [Modify]· Click on [Group Properties]
and select the [FileExchange]
You can also use Advanced GroupManagement:· Go to [Advanced Group
Management] in [ControlPanel]
· Check the group in which youwish to change the groupsettings.
· Click on [Modify Group] andselect the [File Exchange]
· Click on [Submit].
TipAn instructor has to be a groupmember in order to exchangefiles. It is important to know that allgroup members can removefiles.
Exchange a file (Groups)
Step 1. Go to [Communication] or [Groups] and select the Group inwhich you wish to exchange files.
Step 2. Click on [File exchange].Step 3. Click on [Add File].
Step 4. Enter a title.
Step 5. Click on [Browse] locate the file on your computer and clickon [Open].
Step 6. Click on [Submit].

Communication & Collaboration 40
© <2007> Universiteit Leiden / Blackboard
Background Information
Use the collaboration tool forsynchronous discussion.
Collaboration is the most complexfunctionality of Blackboard. Onlysome basic functions will bediscussed in this paragraph.
TipThe collaboration tool is a Javaapplication. This application isinstalled on most computers in theuniversity. If you are unable toopen the chat function, contactyour local ICT helpdesk.
The collaboration tool consists ofChat and Virtual Classroom.
Chat is an easy to use chat room.
The Virtual Classroom has morefunctions than Lightweight chattingand most other chat rooms.Besides chatting, you can use thewhiteboard (drawing canvas),open an external webpage or anyother file uploaded in your course.Ask question tool enabled studentsto ask a question.
Control: You can select thefeatures that are accessible tostudents during a session.
Chatten in Collaboration
Step 1. Go to [Control Panel] in your course. Step 2. Click on [Collaboration].
Step 3. Click on [Join].
Step 4. Enter your text in the Compose field and Click onSend. Your text will appear in the field on top ofthe compose field where every participant canread it.
Background Information
Note: Bear in mind that messagescannot be sent or received outsidethe users in the course. Studentshave to log into Blackboard andopen their course to see if theyhave received new messages.
Sent Items Sent items will be saved in thefolder Sent Items (go to controlpanel > messages and click onSent Items).
Add Folders You can add folders to organiseyour messages. You can only addfolders at the same level as theinbox and the sent folder.
Send Messages
Step 1. Go to [Control Panel] in your course. Step 2. Click [Messages].Step 3. Click [New Message].
Step 4. Click 'To' to select the recipients.
Step 5. Enter a subject.Step 6. Enter a message.Step 7. Click on [Browse] if you wish to upload an
attachment.
a) Click on [Browse].
b) Locate the file on your computer.
c) Click twice on the file name or click [Open].
d) Click on [Submit].
Step 8. Click on [Submit].

Part
VI
Assessment, Evaluation and Marking

Assessment, Evaluation and Marking 42
© <2007> Universiteit Leiden / Blackboard
Background Information
Course Statistics Blackboard keeps track of allmouse clicks in your Course. It notonly gives information on howmany times something is viewed,but also when and by whom.Instructors can view the coursestatistics by clicking on [controlpanel] followed by [coursestatistics].
TipStudents are often unaware thatBlackboard keeps track of theircourse usage. Let them know howyou use the course statistics.
Introduction
Blackboard offers different features to assess students’knowledge.
From the different features, you will use most frequentlyuse the Test Manager, Survey Manager and Gradebook.
Test Manager and Survey Manager are almost identicaland will be explained in the same paragraph. TheGradebook features will be explained in the nextparagraph. Another feature is Assignments. This is theinteractive alternative to Digital Drop Box. Students canupload and send their work as attachments. Instructorscan correct students’ assignments through the Gradebook,record grades and give feedback.

Blackboard 7.2 Manual43
© <2007> Universiteit Leiden / Blackboard
Background Information
Instructors use Assessments to testStudent knowledge, measureStudent progress, and gatherinformation from Students. Whencreating an Assessment there are anumber of things the Instructorshould consider before creating theAssessment:
· The structure of the Assessmentand the types of questions thatwill be included
· Deployment and setting options,such as test presentation andfeedback
· How the Assessment will begraded and the availability ofmultiple attempts
The Test Manager is used tocreate, modify, and remove Tests.
Note: Surveys include many ofthe same features and functions asTests. Surveys are managedthrough the Survey Manager,which functions like the TestManager.
Survey ManagerSurveys provide Instructors withan Assessment tool that is usefulfor polling purposes, evaluations,and random checks of knowledge.The Survey Manager is used tocreate, add, preview, modify, and
remove Surveys.
Pool ManagerThe Pool Manager allowsInstructors to store questions for
repeated use.
Tests and Surveys
You have to use different parts of the Blackboard Control Panelwhen using tests or surveys. First of all, you have to make thequestion with the test, survey or pool manager. You can make,edit or remove the test in the manager.

Assessment, Evaluation and Marking 44
© <2007> Universiteit Leiden / Blackboard
Background Information
Test or Survey? Choose survey if you wish to makean anonymous survey. Otherwisechoose test.
Creation Settings You will see the link creationsettings to the right of the questiontype. Click on creation settings ifyou wish to provide feedback perindividual answer, add images orfiles to questions or answers.
Import questionsYou can import questions formother Test or Surveys. If the test orsurvey is in the same course, youcan add the questions with the'question type' [From Question Poolor Assessment]. When the test orsurvey is in another course, youhave to export the test or surveyfirst. Export a Test
· Click [Test Manager] in theAssessment Area on the ControlPanel to open the Test Manager.
· To export a test, click [Export] next tothe Test. The Export Test Page willappear. Tests may be exported to thelocal computer.
Import a Test
· Click [Test Manager] in theAssessment Area on the ControlPanel to open the Test Manager
· Click [Import]
Create a test or survey
Step 1. Go to [Control Panel] in your course.Step 2. Click [Test Manager]Step 3. Select [Add Test] on the Test Manager page.
Step 4. Enter a name, description, instructions and click[Submit].
Step 5. Select [Creation Settings].
Step 6. Select a question type on the Test Canvas and click [Go].
Step 7. Create a question.Step 8. Enter the [Point Value] for the question.Step 9. Attach a file or URL (optional).Step 10.Enter answers to choose from and select the correct
answer.Step 11.Enter feedback that Students will see based on their
answer.Step 12.Repeat Step 3 through Step 8 until finished adding
questions.

Blackboard 7.2 Manual45
© <2007> Universiteit Leiden / Blackboard
Creation Settings
Provide feedback for individual answersSelect this check box to include the option to enter feedback for individualanswers rather then just one set of feedback for correct or incorrect answers.
Add images, files, and URLs to questionsSelect this check box to include the option to attach images, files, and URLs toquestions.
Add images and files to answersSelect this check box to include the option to attach images and files to answers.
Add categories and keywords to questions Select this check box to include the option to create categories for questions.
Specify default point value for questionsSelect this option and all questions will automatically have the same point value.Enter the point value in the Default point value: field. This only sets a default.
Specify partial credit options for answersSelect this option to make partial credit available for questions included in thisAssessment. If selected, an option to give partial credit appears when questionsare created.
Specify extra credit option for questionsSelect this option to make extra credit available for questions included in thisAssessment.
Assessment, Evaluation and Marking 46
© <2007> Universiteit Leiden / Blackboard
Question Types
You can chose different kind of question types:· Multiple-choice
Multiple-choice questions allow the users a multitude of choices with only one correctanswer.
· True-FalseTrue/False questions allow the user to choose either true or false. True and False answeroptions are limited to the words True and False.
· Fill in the BlankFill in the Blank answers are evaluated based on an exact text match. Accordingly, it isimportant to keep the answers simple and limited to as few words as possible.
· Multiple AnswerMultiple answer questions allow users to choose more than one answer.
· MatchingMatching questions allow Students to pair items in one column to items in anothercolumn.
· Ordening questionOrdering questions require users to provide an answer by selecting the correct order ofa series of items.
· Essay questionEssay questions require the Instructor to provide Students with a question orstatement. Students are given the opportunity to type an answer into a text field.
· Calculated formulaA Calculated Formula question contains a formula, the variables of which can be set tochange for each user.
· Calculated Numeric Response questionThis question resembles a fill-in-the-blank question. The user enters a number tocomplete a statement.
· File Response questionUsers upload a file from the local drive as the answer to the question.
· Hot Spot questionUsers indicate the answer by marking a specific point on an image. A range of pixelcoordinates is used to define the correct answer.
· Fill In Multiple Blanks questionThis question type builds on fill-in-the-blank questions with multiple fill in the blankresponses that can be inserted into a sentence or paragraph.
· Jumbled Sentence questiosUsers are shown a sentence with a few parts of the sentence as variables.
· Opinion Scale/Likert questionsQuestion type based on a rating scale designed to measure attitudes or reactions. Thistype of question is popular to use in surveys in order to get a comparable scale ofopinion.
· Short Answer questionShort Answer questions are similar to essay questions. The length of the answer can belimited to a specified number of rows in the text box.
· Either/Or questionUsers are presented with a statement and asked to respond using a selection ofpre-defined two-choice answers, such as: Yes/No Agree/Disagree; Right/Wrong.
· Quiz Bowl questionQuiz Bowl questions are a way to add fun and creativity to tests, such as selfassessments or in-class contests. The user is shown the answer and responds byentering the correct question into a text box.
· Random Blocks Random Blocks enable the Instructor to use a random selection of questions from aPool.

Blackboard 7.2 Manual47
© <2007> Universiteit Leiden / Blackboard
Background Information
You can make a test in the TestManager or in a Content Area. Werecommend creating a test in theTest Manager. When making a testin a content area, you can only
apply a test in that content area.
TipWhen removing a test, you canchoose whether or not to save theresults in the Gradebook .
Apply a test
Step 1. Go to [Control Panel] in your course.Step 2. Open a course area and select [Add Test].
Step 3. Select the Test to add and click [Submit].Step 4. Click [Modify the Test Options]Step 5. Select the Properties, Availability, Feedback, and
Presentation options for the Test.Step 6. Click [Submit]
Assessment, Evaluation and Marking 48
© <2007> Universiteit Leiden / Blackboard
Test Options
Test Options:· Make the link available
Select Yes to make a link to this Assessment appear to Students. If this option is setto No, it will not appear to Students. Instructors may make the link available, thenuse the Display After and Display Until fields to limit the amount of time the linkappears.
· Add a new announcement for this TestSelect Yes to create an Announcement about the Test. The Announcement will includethe date and state “an Assessment has been made available in [Course area thatincludes the link to the Assessment]”. This Announcement will appear in the courseAnnouncements.
· Allow multiple attemptsThis option allows Students to take the Test multiple times. The status of multipleattempts is displayed to Students at the top of the Assessment. Select Allow unlimitedattempts for Students to take the test as many times as they wish. Select Allow<blank> attempts to indicate a specific number of attempts that is allowed. Fill in theapplicable number in the blank.
· Force CompletionStudents must complete the Assessment the first time it is launched if ForceCompletion is selected. Students may not exit the Assessment and continue workingon it at a later date. The Save button is available for Students to save the Assessmentas they work through it, but they may not exit and re-enter the Assessment. If theForce Completion option is enabled, it is noted and explained to Students at the top ofthe Assessment. If Force Completion is not enabled, Students may save their progressand complete the Assessment at another time.
· Set TimerSelect this check box to set a time limit for finishing the Assessment. If this option isselected, enter the amount of time to allow for the Test in the hours and minutesboxes below. The time elapsed is displayed to the Student during the Assessment. Aone-minute warning is also displayed as Students approach the time limit.
· Display AfterSelect the date and time when the Test will become available to Students. This field isoptional; the Instructor may control availability through the Make the link availableoption without setting specific dates.
· Display UntilSelect the date and time the Test will be made unavailable to Students. This field maybe left blank.
· PasswordSelect this check box to require a password for Students to access this Assessment. Ifthis check box is selected, enter a password in the field below.
· Include this test in Gradebook score calculationSelect this option to include this test in Gradebook calculations. If the test is notincluded, the score will not affect any Gradebook calculations.
· Hide the score of this test from the GradebookSelect this option to hide this test score in the Gradebook. If selected, this itembehaves as a survey. The display in the Gradebook will read Complete / Incompleteand N/A or zero appears on the grade detials pages.

Blackboard 7.2 Manual49
© <2007> Universiteit Leiden / Blackboard
Background Information
Modifying a testYou can modify a test, if the testhas not been not by students orwas not available to students.If the test or survey you areattempting to modify has beenapplied, you will be warned to onlymake textual changes to existing
fields.
If you wish to make more thantextual changes, we recommendcreating a new test.
Changing the questionsequence You can change the questionsequence by clicking the drop-downmenu to the left of the questiontype. Click on the arrow and selecta number to change the sequence.
Modify a Test
Step 1. Go to [Control Panel] in your course.Step 2. Click on [Test Manager] or on [Survey Manager].
Step 3. Click on [Modify].
Modifying an existing part. Step 1. Click on [Modify] right of the part you wish to modify
(instructions, question, answer).
Step 2. Click on [Submit].
Add a new questionStep 1. Choose a question type and click on [Go]. Fill out the
question form and click on [Submit].
Remove a question Step 1. Click on [Remove] right of the part you wish to remove.
Step 2. Click on [OK] to exist the Test Canvas.

Assessment, Evaluation and Marking 50
© <2007> Universiteit Leiden / Blackboard
Background Information
You can find the test results in theGradebook.
Blackboard only automaticallygenerates test results when the testconsists of closed questions. If atest consists of one or more openquestions, Blackboard will show asymbol (see image below).
· Padlock: In Progress. A Studentis currently using theAssessment or Assignment.
· Dash: No Information. AStudent has not taken theAssessment or submitted theAssignment.
· Exclamation Point: NeedsGrading. The item has beensubmitted by the Student andneeds to be reviewed by theInstructor. Tests that includeEssay questions will have thissymbol when they aresubmitted.
· Question Mark: GradebookError.
· Checkmark: Item has beencompleted by the Student.
· Asterisk: Item is not visible.
TipIf the internet connection isinterrupted, students are unable tocomplete their test. An 'inprogress' sign will be displayed inthe Gradebook. You can clear thestudent's attempt by clicking on'clear attempt'.
Needs Grading If this sign is showing, theinstructor needs to grade one ormore questions.
View Test results
Step 1. Go to [Control Panel] in your course. Step 2. Click [Gradebook]
Step 3. Click on the test title in column head. Step 4. Click on [Assessment Attempt Detail]. You will see
the results per answer item as a percentage forthe whole class.
Blackboard 7.2 Manual51
© <2007> Universiteit Leiden / Blackboard
Background Information
An instructor can view the testresults by student or by question.Surveys can only be viewed byquestion.
Grading questions. A test with only closed questionswill be graded as soon as the testis completed. Open questions, likeessay questions, must by gradedby the instructor.
Viewing the test resultsIf you view the test results byquestion, you will see the resultsas a percentage of the class. Youcan click on [Details] to read thestudents' answers to openquestions. You can use this optionto get a general impression of theresults. Where are themisconceptions? Which questionsare too difficult / too easy?
· Click on the Tests title in thecolumn head
· Click on [Assessment AttemptDetails]
Grading Open questions
Grading open questions
Step 1. Go to [Control Panel] in your course. Step 2. Click on [Gradebook]. Step 3. Click on the exclamation mark (!) link. Step 4. Click on [View]. You will see the student's answer.
It is possible to grade open questions. Step 5. Click on [OK]. Step 6. Click on [Submit].
View survey results Step 1. Go to [Control Panel] in your course. Step 2. Click on [Gradebook]. Step 3. Click on the survey title in the column head.
Step 4. Click on [Assessment Attempt Detail].
Background Information
Students can submit assignmentsas attachments. Instructors cancorrect the assignments throughthe Gradebook, add grades andgive feedback.
The attachments are sorted perassignment. Instructors candownload these attachments easilyto correct them off-line.
Assignments
The following paragraphs will explain how to add anassignment, grade submitted assignments and givefeedback to students. The two images on this page showthe student’s view of the assignments.

Assessment, Evaluation and Marking 52
© <2007> Universiteit Leiden / Blackboard
Background Information
Assignments allow Instructors tocreate coursework and manage thegrades and feedback for eachStudent separately. Instructors maycreate Assignments that lists thename, point value and descriptionof the Assignment; files may alsobe attached. After an Assignment isadded to a Content Area, Studentsmay access the Assignment,complete it in a separate file, andsend it back to the Instructor. TheInstructor may respond to eachStudent separately, sendingcomments about their individualAssignment and attaching files, ifnecessary.
Note: Once a Student completesand submits an Assignment theInstructor may access this file inthe Gradebook.
Creating an Assignment
Step 1. Open a Content Area, such as Assignment, from theControl Panel.
Step 2. Select [Add Assignment] from the Action Bar.
Step 3. Complete the [Add Assignment page] and click [Submit].
Background Information
You can view assignments
submitted in the Gradebook.
An exclamation mark shows asubmitted assignment which needsgrading.
Marking and viewing assignments
Step 1. Go to [Control Panel] in your course. Step 2. Click on [Gradebook].Step 3. Click on the exclamation mark (= needs grading)
after the name of the student you wish to grade.Step 4. Click on [View]. You will see the following form. Step 5. You can read the student's comments in the field
[Student's Comments]. Click on the files todownload the student's files.
Step 6. Type your feedback in a file or in the fieldComments.
Step 7. Enter the grade in the field [Grade].Step 8. You can also upload your own notes. Students will
not see these notes.Step 9. Click on [Submit].
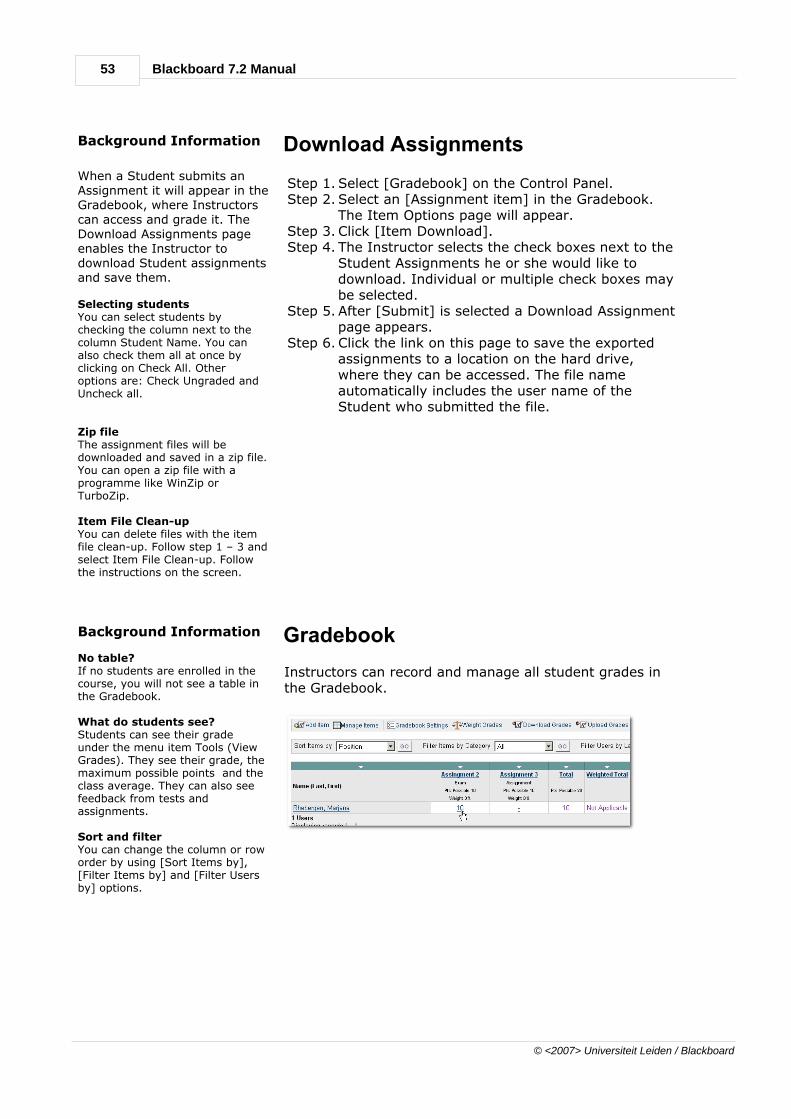
Blackboard 7.2 Manual53
© <2007> Universiteit Leiden / Blackboard
Background Information
When a Student submits anAssignment it will appear in theGradebook, where Instructorscan access and grade it. TheDownload Assignments pageenables the Instructor todownload Student assignmentsand save them.
Selecting students You can select students bychecking the column next to thecolumn Student Name. You canalso check them all at once byclicking on Check All. Otheroptions are: Check Ungraded andUncheck all.
Zip file The assignment files will bedownloaded and saved in a zip file.You can open a zip file with aprogramme like WinZip orTurboZip.
Item File Clean-up You can delete files with the itemfile clean-up. Follow step 1 – 3 andselect Item File Clean-up. Followthe instructions on the screen.
Download Assignments
Step 1. Select [Gradebook] on the Control Panel.Step 2. Select an [Assignment item] in the Gradebook.
The Item Options page will appear.Step 3. Click [Item Download].Step 4. The Instructor selects the check boxes next to the
Student Assignments he or she would like todownload. Individual or multiple check boxes maybe selected.
Step 5. After [Submit] is selected a Download Assignmentpage appears.
Step 6. Click the link on this page to save the exportedassignments to a location on the hard drive,where they can be accessed. The file nameautomatically includes the user name of theStudent who submitted the file.
Background Information
No table?If no students are enrolled in thecourse, you will not see a table inthe Gradebook.
What do students see? Students can see their gradeunder the menu item Tools (ViewGrades). They see their grade, themaximum possible points and theclass average. They can also seefeedback from tests andassignments.
Sort and filterYou can change the column or roworder by using [Sort Items by],[Filter Items by] and [Filter Usersby] options.
Gradebook
Instructors can record and manage all student grades inthe Gradebook.

Assessment, Evaluation and Marking 54
© <2007> Universiteit Leiden / Blackboard
Background Information
Tests, Surveys and Assignmentsare automatically included in theGradebook. Items can also beadded manually. You can addmarks for assignments or exams.Use one item per exam orassignment.
Tip It is also possible to display marksas complete / incomplete, text orletter.
Making a Gradelist
Step 1.Go to [Control Panel] in your course.Step 2.Select [Gradebook] in Assessments on the Control
Panel.Step 3.Select [Add Item].
Step 4. Enter an Item Name.Step 5. Chose a category.Step 6. Fill in the maximum Points Possible.Step 7. Select score at [Display as] .Step 8. Chose [Yes] when the Item has to be visible to
students. Step 9. Select [Yes] when the item has to be includes in
the gradebook score calculation.
Step 10. Click on [Submit].

Blackboard 7.2 Manual55
© <2007> Universiteit Leiden / Blackboard
Background Information
Instructors can set a weight foreach Gradebook item to determinea final grade. For example, a finalexam may be worth 25 percent of aStudent's grade while a readingquiz may be worth only 10 percent.Instructors can adjust Gradebookweights according to category oritem.
Adjusting the weight
Step 1. Select [Gradebook] on the Control Panel.Step 2. Select [Weight Grades].Step 3. Chose [Weight by Category] or [Weight by Item]
Weight by CategoryClick Weight by Category to weight grades by thecategory. For example, all Assignments will havethe same weight and all Quizzes will have thesame weight. Enter the percentage to weight eachcategory in the boxes to the left.
Click Weight by Item to weight grades by name asthey are defined in the Gradebook. For example,the mid-term exam can be weighted differentlythen the final exam. Enter the percentage toweight each item in the boxes to the left.
Step 4. Click [Submit]
BackgroundInformation
Where can students findtheir grades?Students can find theirgrades under the menuitem Tools > My Grades.They only see their owngrades, maximum possiblepoints and the classaverage. They can also seetheir answers andfeedback from tests andassignments.
Exclamation MarkThe exclamation markmeans the assignment ortests needs grading. Click on the exclamationmark to view the result andenter the mark.
Adding grades to your gradebook
Step 1. Select [Gradebook] on the Control Panel.Step 2. Select a cell on the spreadsheet for the student and the
Gradebook Item.
Step 3. Modify Grade page will appear, listing information about thestudent and the Gradebook item. Use the Manual Grade field toenter the grade. Note that there is an Override field on thispage as well. Enter a value in the Override field and this valuewill be displayed as the grade for the item. Instructors may findit useful to store a grade in the Manual Grade field and laterreplace it (but not remove a record of the original score) byentering a new grade in the Override field. The grade that isused for calculations and shown to the student is always thegrade in the Current Grade field.
Step 4. Click [Submit]

Assessment, Evaluation and Marking 56
© <2007> Universiteit Leiden / Blackboard
BackgroundInformation
Instructors can download andsave a Grade book as acomma-delimited file for use ina spreadsheet program. Thisfile, or Grade book items in thisfile, can be uploaded to a Gradebook at a later date.
Download file The default name of thedownload file is: gb_export.csv.You can change the file namebut not the file extension (csv).
Delimiters Delimiters are characters whichseparate the data. Use ,(comma) and | (enter this signby clicking on shift and \ (slashback).
Check the field Comma andOther. Enter | in the Otherfield.
Tip Check the Gradebook for 'locksigns' before downloading. The'lock' will displayed as a html tag<img src="..">.
Download Grade book
Step 1.Select [Gradebook] on the Control Panel.Step 2.Select [Download Grades].Step 3.Click [Submit]
Step 4.Click [Download] and select where to save the Grade bookfile. Downloading a Grade book does not remove anyinformation from the Grade book.
Step 5.Select "Save this file to disc" and click on [OK].Step 6.Open Excel. Step 7.Select 'File' > 'Open'. Chose [Text files (*.prn, *txt, *.csv) in
the [Files of type] field.Step 8.Click on [Open]. Step 9.The data is not yet split into different columns. You can split
the data by selecting column A and clicking on the columnhead.
Step 10.Select [Text to column] in the menu [Data].Step 11.Select [Delimited] and click on [Next]. Step 12.Select the characters which separate the data fields.Step 13.Click on [Finish].

Blackboard 7.2 Manual57
© <2007> Universiteit Leiden / Blackboard
Index- A -Account 2
Add
Announcement 21
Assignments 52
Attachtment 25
Course Link 30
External Link 30
Folder 27
Glossary 31
Item 22, 27
Link 30
Staff Information 29
Survey 43, 44
Test 43, 44
Announcement 21
Assessment 42
Pool Manager 43
Survey 43
Test 43
Assignments 51
Add 52
Marking 52
Viewing 52, 53
- B -Banner 11
- C -Chat 40
Collaboration 33
Control Panel 6, 9
Assessment 9
Content Areas 9
Course Options 9
Course Tools 9
Support 9
User Management 9
Copy 28
Course
Available 12
Available for Guests 16
Banner 11
Copy 9
Menu Design 11
Open 5
Course Builder 15
Course Link 30
Course menu
Announcements 6, 10, 20
Assignments 6, 10, 20
Communication 6
Course Documents 6, 10, 20
Course Information 6, 10, 20
Discussion Board 6
Groups 6
Staff Information 6, 20
Student Tools 6
Course Shell 7
Course Statistics 42
- D -Date Restrictions 22
Digital Drop Box 33, 38
Discussion Board 33, 35, 36
Add new Thread 36
Reply to a message 37
- E -Email 33
Change email address 4
Forward email 4
Send 34
External Link 30
- F -Faculty support 2
File Exchange 33
Folder 27
- G -Glossary 31
Gradebook 53

Index 58
© <2007> Universiteit Leiden / Blackboard
Gradebook 53
Add Grades 55
Download 56
Gradebook Item 54
Weights 55
Grader 15
Group
Add user 18
Exchange Files 39
Remove user 18
Groups
Create 17
Guest 15
Guest Access 16
Guest account 15
- I -Instructor 15
Item 27
Attachtment 25
Copy 28
Copy and Paste 24
Date Restrictions 22
Item Options 22
Metadata 22
Move 28
Off-line Content 22
Rich text editor 23
Track number of views 22
- L -Link 30
Link Checker 31
Log into Blackboard 3
- M -Menu Design 11
Messages 33, 40
Metadata 22
Move 28
My Announcements 4
My Courses 4
My Institution Page
Content 4
Layout 4
- O -Off-line Content 22
Open Course 5
- P -Password 2
Pool Manager 43
- R -Rich text editor 23
- S -Self Enrollment 14
Staff Information 29
Student 15
Survey 43
Add 44
Creation Settings 44
- T -Teacher’s Assistant 15
Term 31
Test 43
Add 44
Creation Settings 44
Deploy 47
Essay Questions 51
Modify 49
Needs Grading 50
Question Types 46
Test Options 47, 48
View results 50
Tools 4
Collaboration 33
Digital Drop Box 33
Discussion Board 33
Email 33
File Exchange 33
Messages 33
Blackboard 7.2 Manual59
© <2007> Universiteit Leiden / Blackboard
Track number of views 22
- U -Upload
Files 26
Folders 26
Users
Add User 14
Change role 15
Remove User 14
User's role
Course Builder 15
Grader 15
Guest 15
Instructor 15
Student 15
Teacher’s Assistant 15