blackboard rubrics · blackboard rubrics rubrics are guides to grading or scoring students’ work....
TRANSCRIPT

Page 1 of 9
BlackboardRubrics
Rubrics are guides to grading or scoring students’ work. They can
be used solely by the instructor but there are great advantages if
used to provide guidance to the students in advance of their work
and for offering detailed feedback that will help the student in
future work. Usually you will have designed your Rubric “on
paper” in advance. The following will walk you through the use of
the Blackboard Rubric tool.
ConstructaRubric
The Rubric tool can be accessed through the Control Panel
(Control Panel > Course Tools > Rubrics) Click on the Rubrics link to
see all the Rubrics that are currently within your course and to
create new rubrics. You can also export these Rubrics to use in a
different course.
You can associate a Rubric with most types of gradable
assessments in Blackboard: Assignments (where students turn in a
paper or other file), Discussion Forums, Wikis, Blogs, Essay Tests,
etc. You can create the rubric by going directly to the Rubric tool in Course Tools or while you are creating the gradable
assessment. You can re‐use rubrics for more than one assessment.
CreateaRubric
1. After clicking the Rubric tool in Course Tools you’ll see a screen that will
show any existing Rubrics. Click on the Create Rubric button.
2. A window will open for you to create
your Rubric.
You begin with a default Rubric to edit
and modify.
Give your Rubric a Name and (optional)
Description.
Scroll down.

Blackboard Rubrics
Page 2 of 9
RubricDetail
The Rubric grid is where you enter your Rubric.
Rubric Type: Rubrics can be constructed to reflect points or
percentages. You can also choose “Point Range” or “Percentage
Range” if you want more flexibility in grading. Even if you don’t
choose to use a Range you will still be able to modify the final grade.
Criteria: Also known as Dimensions. These are the different criteria
under which the student works will be evaluated.
Levels of Achievement: Also known as Performance Levels – across the
grid horizontally are the columns which reflect different levels of
proficiency for the different criteria.
Modify Criteria or Levels of Achievement: Next to the labels for Levels
of Achievement and Criteria you will find the circular links for menus to edit or delete columns and rows.
Add Columns and Rows: The buttons for adding columns and rows are above the Rubric Grid.
Weighting Criteria: If the scores for different levels of achievement are given as percentages you can also weight the
different criteria to reflect their significance to the final grade.
Blackboard Rubrics
Page 3 of 9
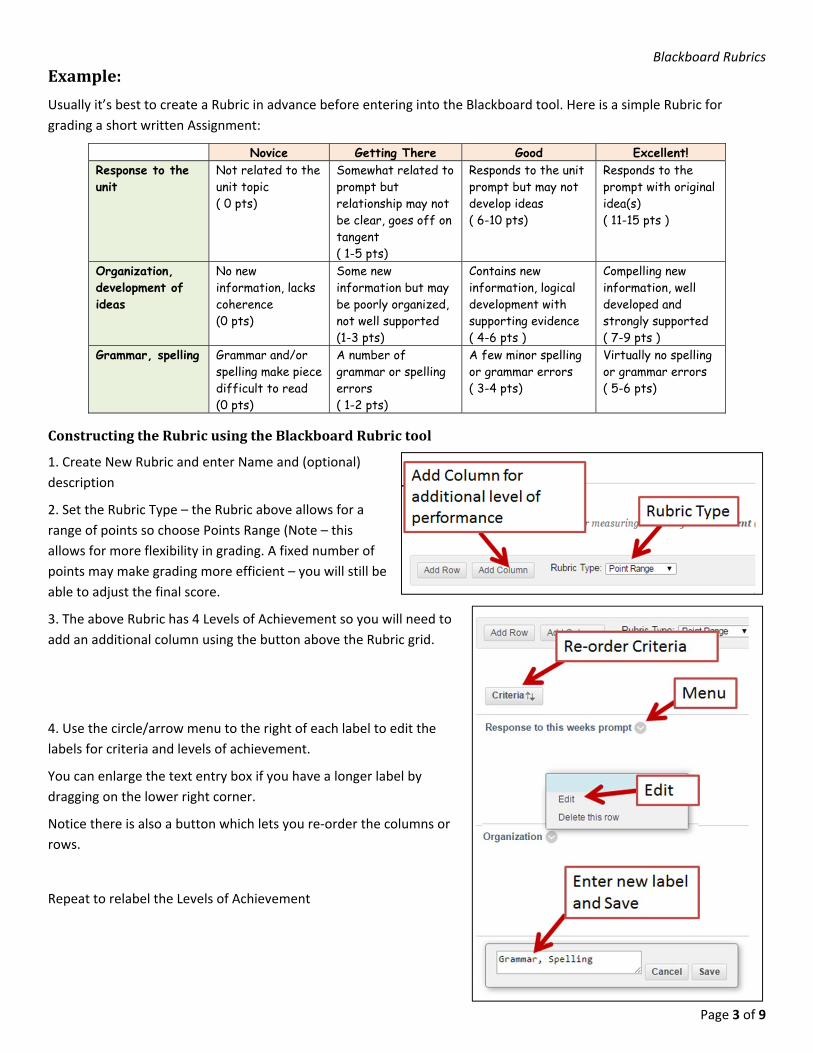
Example:
Usually it’s best to create a Rubric in advance before entering into the Blackboard tool. Here is a simple Rubric for
grading a short written Assignment:
Novice Getting There Good Excellent! Response to the unit
Not related to the unit topic ( 0 pts)
Somewhat related to prompt but relationship may not be clear, goes off on tangent ( 1-5 pts)
Responds to the unit prompt but may not develop ideas ( 6-10 pts)
Responds to the prompt with original idea(s) ( 11-15 pts )
Organization, development of ideas
No new information, lacks coherence (0 pts)
Some new information but may be poorly organized, not well supported (1-3 pts)
Contains new information, logical development with supporting evidence ( 4-6 pts )
Compelling new information, well developed and strongly supported ( 7-9 pts )
Grammar, spelling
Grammar and/or spelling make piece difficult to read (0 pts)
A number of grammar or spelling errors ( 1-2 pts)
A few minor spelling or grammar errors ( 3-4 pts)
Virtually no spelling or grammar errors ( 5-6 pts)
ConstructingtheRubricusingtheBlackboardRubrictool
1. Create New Rubric and enter Name and (optional)
description
2. Set the Rubric Type – the Rubric above allows for a
range of points so choose Points Range (Note – this
allows for more flexibility in grading. A fixed number of
points may make grading more efficient – you will still be
able to adjust the final score.
3. The above Rubric has 4 Levels of Achievement so you will need to
add an additional column using the button above the Rubric grid.
4. Use the circle/arrow menu to the right of each label to edit the
labels for criteria and levels of achievement.
You can enlarge the text entry box if you have a longer label by
dragging on the lower right corner.
Notice there is also a button which lets you re‐order the columns or
rows.
Repeat to relabel the Levels of Achievement

Blackboard Rubrics
Page 4 of 9
6. Next step – enter the descriptions for the levels of achievement for each criterion.
Enter the start and end of the Points Range
Enter (or copy and paste) the description of the Level of Performance for each Criterion
Click Submit (lower right)
AttachtheRubrictoanAssessment
The following example shows how to attach a Rubric to an Assignment. Following similar steps you could attach the
Rubric to a graded Discussion forum, Blog, Wiki, etc.
1. Go to the content area or folder where you want to post your
Assignment. (Alternatively you could go to the Discussions to create a
graded forum, etc.)
2. From the Assessment menu choose Assignment . We won’t go over the
details of creating an Assignment (tool for students to turn in a paper or
other type of electronic document) but will focus on the grading section.

Blackboard Rubrics
Page 5 of 9
3. Scroll down in the Assignment options and you’ll see the
Grading section. Here is where you’ll assign points (if needed –
for a points based Rubric the points in the Rubric will be used)
and can add your Rubric to the Assignment.
Click on “Add Rubric “
4. You’ll have the options to re‐use an existing Rubric, create a
new Rubric, or re‐use and modify an existing Rubric. For this
example, choose “Select Rubric”
5. The window now shows the list of Rubrics within your
course. Use button with two squares on it if you don’t recognize it by name and description.
6. Check the square next to the one you wish
to associate with this Assignment.
Submit
7. Once the Rubric is associated with an Assignment, graded Discussion forum or other gradable assessment within
Blackboard you have various options, as shown below
Delete, View or Edit Rubric
Use for grading (typical) or secondary evaluation (gives feedback but not a grade)
Show Rubric to Students. The options are: o No (only the instructor sees the Rubric before grading) o Yes (with Rubric Scores ) – will see Rubric before grading with scores o Yes ( without Rubric Scores) ‐‐ will see Rubric before grading but not scores o After Grading – will see Rubric and scores only after grading
The default is for the students not to see the Rubric before
grading but many instructors will choose to show the Rubric to
students before they submit the assessment in order that they
to better understand what is expected of them.

Blackboard Rubrics
Page 6 of 9
UsingtheRubricforgradingandreturningfeedback
When grading an Assignment you’ll go to the Grade Center and begin grading as you normally would. For example, in
the Full Grade Center you find the appropriate column, the row associated with the particular student then from the
dropdown menu next to that cell choose “View Grade Details” then choose “Grade Attempt”.
For a Graded Assignment you must first expand the cell
labeled “Attempt”.
Once the Attempt area has been expanded there are two ways to
use the Rubric for grading
MethodOne:
Click on the underlined link that is the Title of the Rubric
This will expand the ATTEMPT area further and allow you to grade inline.
Checking theboxes for “Show Description” will display the
descriptions for that criterion/level of achievement
Checking theboxes for “Show Feedback” will provide a textbox which
lets you give individual feedback for that criterion.
Blackboard Rubrics
Page 7 of 9
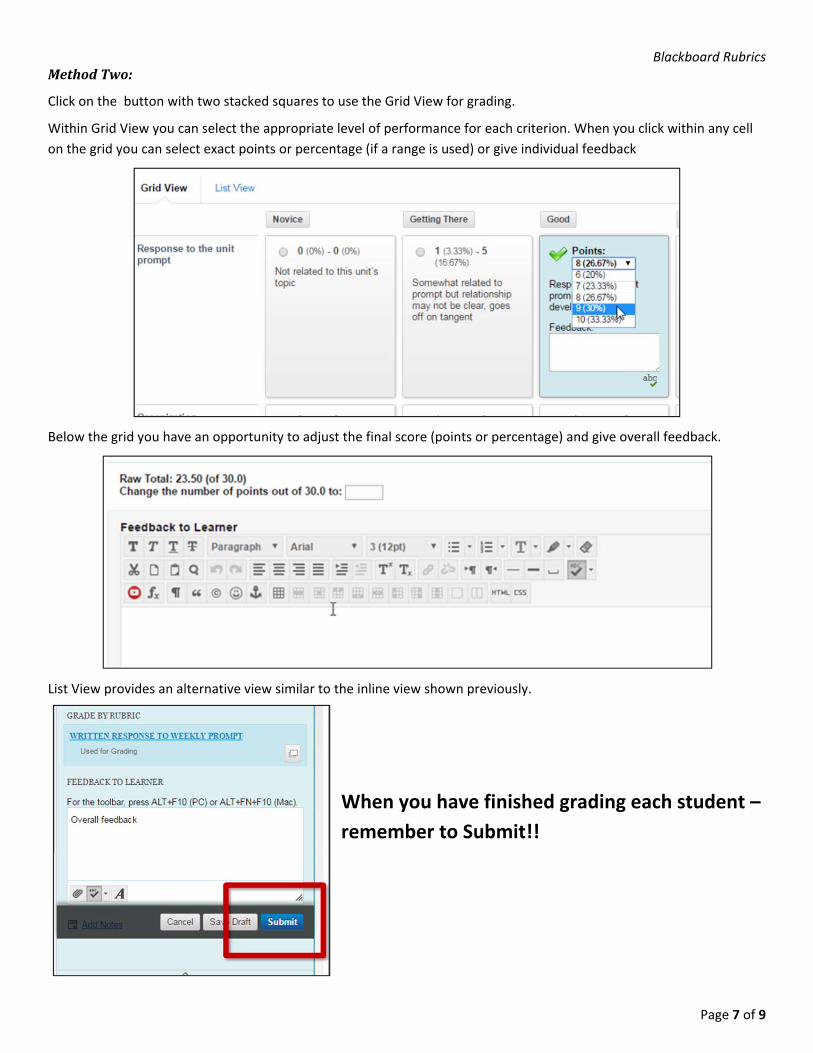
MethodTwo:
Click on the button with two stacked squares to use the Grid View for grading.
Within Grid View you can select the appropriate level of performance for each criterion. When you click within any cell
on the grid you can select exact points or percentage (if a range is used) or give individual feedback
Below the grid you have an opportunity to adjust the final score (points or percentage) and give overall feedback.
List View provides an alternative view similar to the inline view shown previously.
When you have finished grading each student –
remember to Submit!!

Blackboard Rubrics
Page 8 of 9
HowstudentsviewtheRubric
Students view the Rubric in multiple ways . They’ll see it with the posted assessment if you allow them to view it in
advance of when you’ll of grading. This is recommended! Viewing the Rubric before they submit their work helps them
know what to expect. Note that it is not the default and you’ll have to turn it on in the grading options.
Students view the Rubric (including before submitting their work if you’ve allowed that):
Within the Assignment
When students open the Assignment they’ll see a button that
allows them to view the Rubric.
WithinaDiscussionForum
Within a gradeable Discussion
forum a button labeled “Grading
Information” will also show them
the Rubric. In this case the link to
the Rubric is represented by a link
that looks like a grid. They’ll need
to click there to view the Rubric.
Within“MyGrades”
A link to the Rubric will be
provided in “My Grades” for any
assessment which has an
associated Rubric. This will be
visible before the assessment is
submitted if you have allowed
that, and after the assessment is
graded in order for the student to view the criteria, their performance level and any feedback.

Blackboard Rubrics
Page 9 of 9
Howstudentsviewyourgradesandfeedback
Students can view their scores and feedback either in My Grades or directly within the Assignment, Discussion forum,
etc. (if it is still available). After grading they’ll see the Rubric grid along with the chosen levels of performance and
feedback
Remember to instruct your students on how to view the Rubric – before the assessment if you allow that then and after
it is graded in order to see the scores and feedback that will help improve their performance.
As instructor you can always use “Student Preview” in order to see the course site from your students’ point of view and
practive submitting and Assignment, grading with a rubric and viewing grades and feedback.