blender cycles: lighting and rendering cookbook · pdf filewww. -cycles -lighting -and...
TRANSCRIPT
Blender Cycles: Lighting and Rendering Cookbook
Bernardo Iraci
Chapter No. 3 "Creating an Interior Scene"
In this package, you will find: A Biography of the author of the book
A preview chapter from the book, Chapter NO.3 "Creating an Interior Scene"
A synopsis of the book’s content
Information on where to buy this book
About the Author Bernardo Iraci was born in Livorno, Italy in 1985. He followed a standard education career until he graduated in Economics in 2009. He always had a great passion for computers, especially gaming. During the latter part of his studies, he also developed a passion for 3D graphics, and this soon became the main focus of his career. It was at this time that he came to understand that his passion was the most important thing to pursue, more important than even attending university.
Even though Bernardo later participated in various online courses teaching the different aspects of computer graphics, he has been largely self-taught. In 2010, he moved to Warsaw, Poland, where he was finally able to start working full-time in computer graphics as a 3D generalist in the field of movies VFX and advertisements. He also started work as a freelancer.
For More Information: www.packtpub.com/blender-cycles-lighting-and-rendering-cookbook/book

Bernardo constantly works to improve his skills and knowledge about computer graphics and thinks that this is the only way to keep pace with this field. When he is not busy with graphics, he likes to travel, watch movies, and play the guitar.
I would like to thank my family because they gave me the tools and the spirit to pursue my dreams. It is thanks to them that I am able to do what I do today.
I would also like to thank my girlfriend as she constantly supports, pushes, and inspires me every day of my life.
For More Information: www.packtpub.com/blender-cycles-lighting-and-rendering-cookbook/book
Blender Cycles: Lighting and Rendering Cookbook One of the most advanced 3D packages on the scene, Blender now has a powerful new tool to allow its users to achieve even more astonishing results: the Cycles rendering engine. Cycles is based on an accurate lighting model and realistic shaders. It is also blazing fast, thanks to the fact that it can take advantage of the modern GPU-rendering capabilities. Cycles is definitely a modern and effective tool that every Blender user wants to know in order to get the best results. Blender Cycles: Lighting and Rendering Cookbook will take you on a journey through the new great Blender rendering engine Cycles. We will start with understanding the fundamental concepts of this rendering engine, and use them to learn the creation of any kind of lighting, material, texture, and setup. At the end of the book, both beginners and more advanced users will not only be able to create virtually any kind of shader and lighting, but will also be able to find and experiment with new techniques on their own. Thanks to the logical way in which the topics are presented in the book; the readers will be able to create their work without additional tutorials by just using the knowledge they will master by reading this book.
What This Book Covers Chapter 1, Key Holder and Wallet Studio Shot, will highlight the fundamentals of lighting, along with the creation of materials in Cycles. Finally, this chapter will teach you how to set up the render parameters in Cycles.
Chapter 2, Creating Different Glass Materials in Cycles, will help us create from the most basic to really advanced glass materials. To achieve this, we will go deeper into the Cycles material creation, learning interesting node trees and techniques.
Chapter 3, Creating an Interior Scene, will help us with the creation of an interior scene, a situation that can be quite challenging without proper knowledge. You will learn how to light a scene in an efficient way, along with new materials and advanced techniques.
Chapter 4, Creating an Exterior Scene, will help you learn the secrets of exterior lighting. Here we will learn how to create a flawless natural exterior lighting using different advanced techniques together with the creation of new materials.
Chapter 5, Creating a Cartoonish Scene, will teach you how to create stylized yet appealing lighting materials, for example, a fake subsurface scattering and hair material, ideal for a cartoon scene.
For More Information: www.packtpub.com/blender-cycles-lighting-and-rendering-cookbook/book

Chapter 6, Creating a Toy Movie Scene, will show you how to create a lighting setup that will resemble a movie set, together with highly realistic materials. Moreover, you will learn different techniques to give our image an even closer look to that of a cinema movie.
Chapter 7, Car Rendering in Cycles, will help you set up great studio lighting to make the car look great, and of course, will show you how to create complex and captivating car paint material.
Chapter 8, Creating a Car Animation, will help you deal with your first animation and explain to you how to set up Cycles at its best for this purpose. You will optimize the scene to lower the render times while maintaining a high quality and detail level, and learn how to deal with a huge project.
Chapter 9, Creating an Iceberg Scene, will highlight some really advanced material creation in Cycles, and some greatly advanced techniques about seamlessly mixing two materials inside the same mesh. Moreover, you will learn to use information from scene objects to use for even more advanced materials.
Chapter 10, Creating Food Materials in Cycles, the final chapter, will talk about the creation of food, one of the most challenging topics to deal with in Computer Graphics. This chapter will teach you the creation of highly realistic and complex Cycles materials.
For More Information: www.packtpub.com/blender-cycles-lighting-and-rendering-cookbook/book
3Creating an
Interior Scene
In this chapter, we will cover the following recipes in detail:
Creating fake portals to decrease the noise in the scene
Creating a parquet material
Creating materials for the plant in the scene
Creating a different kind of leather
Creating the materials for the lamp
Creating a carpet using hair particles
Setting up night lighting
Using IES fi les in Cycles
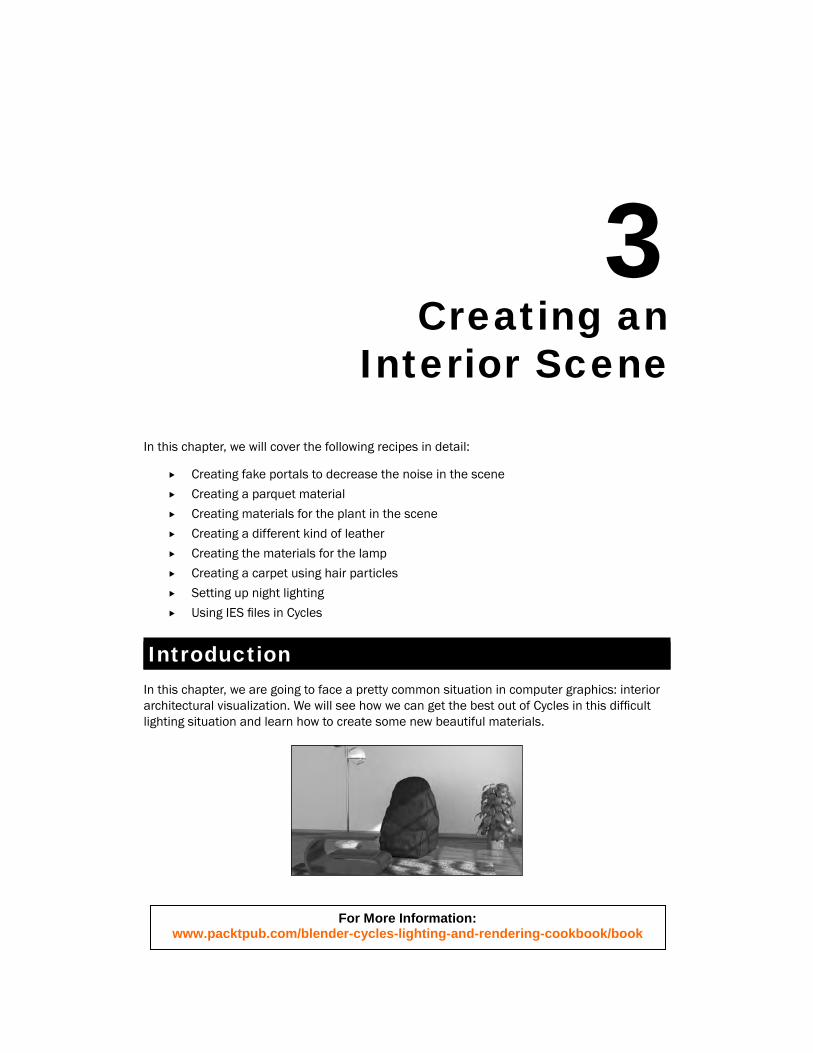
IntroductionIn this chapter, we are going to face a pretty common situation in computer graphics: interior architectural visualization. We will see how we can get the best out of Cycles in this diffi cult lighting situation and learn how to create some new beautiful materials.
For More Information: www.packtpub.com/blender-cycles-lighting-and-rendering-cookbook/book
Creating an Interior Scene
70
Creating fake portals to decrease the noise in the scene
Before we start, it is important to state one thing about the scene we are going to prepare in this chapter. Cycles is a path tracer, and for path tracers, closed spaces are hard to render. This is a chronic problem of this kind of renderer. There are several methods to help reduce noise, but as Cycles is still under development, they haven't been implemented yet.
Getting readyIn this fi rst recipe, we will observe a couple of tricks to make the situation a bit better, but in general, it is good to know that to have this scene noise-free, we will need a lot of samples and a lot of time to render.
Now that we know this, let's open up the Chapter03_Empty.blend fi le and start setting up our scene!
How to do it…To create fake portals, follow these steps:
1. In the World settings, set the surface color to RGB 0.85, 1, 1 and Strength to 0.600.
2. Turn on Ambient Occlusion. Set Intensity to 0.700 and the Distance to 12.
3. Add a sun light and orient it so that we have a nice light coming in from the window, which goes over the pouffe and the plant.
4. Set the sun's size to 0.010 and the Intensity to 3.000. Let's also set the color to a really subtle yellow (RGB: 1, 0.95, 0.85).
5. Add an Area Light and name it DayPortal. Place it right outside the window so that one of the faces will look perpendicularly inside the room. Change the size to 4.600 and uncheck the Cast Shadows option.
6. Set the area light Intensity to 8.000 and change the color to RGB: 0.85, 1, 1.
7. In the Render menu, set the Exposure to 1.400. We can fi nd this setting in the fi lm panel.
For More Information: www.packtpub.com/blender-cycles-lighting-and-rendering-cookbook/book
Chapter 3
71
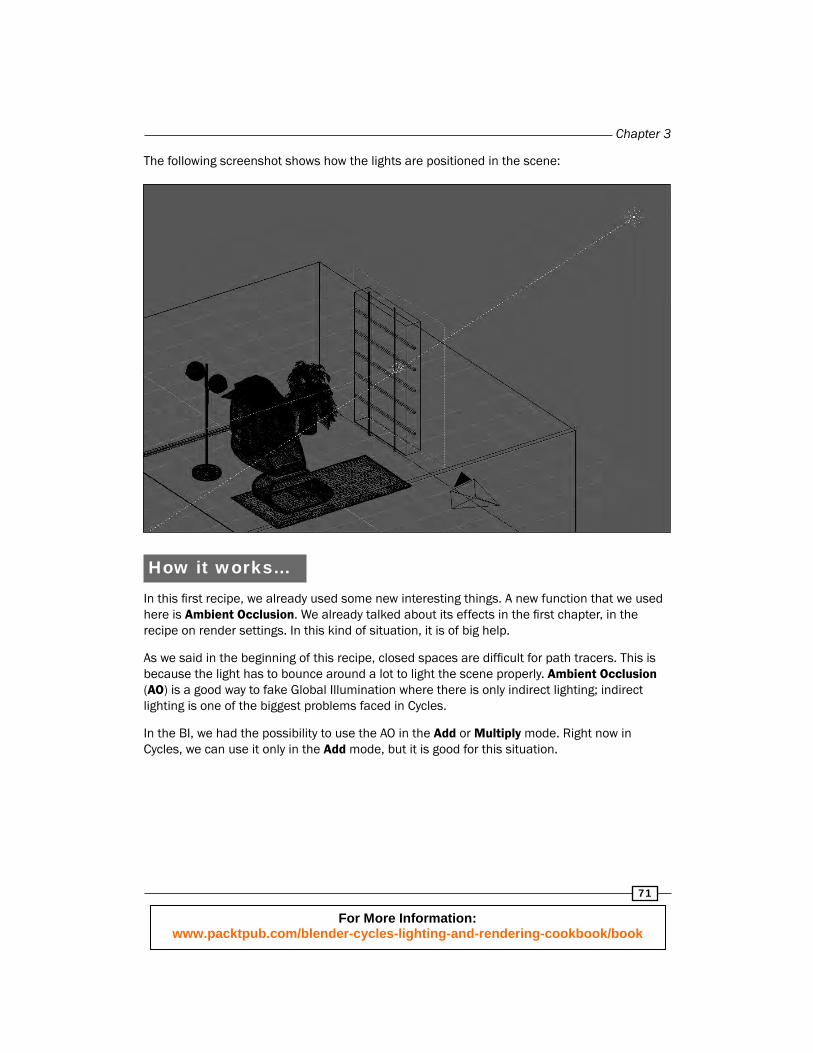
The following screenshot shows how the lights are positioned in the scene:
How it works…In this fi rst recipe, we already used some new interesting things. A new function that we used here is Ambient Occlusion. We already talked about its effects in the fi rst chapter, in the recipe on render settings. In this kind of situation, it is of big help.
As we said in the beginning of this recipe, closed spaces are diffi cult for path tracers. This is because the light has to bounce around a lot to light the scene properly. Ambient Occlusion (AO) is a good way to fake Global Illumination where there is only indirect lighting; indirect lighting is one of the biggest problems faced in Cycles.
In the BI, we had the possibility to use the AO in the Add or Multiply mode. Right now in Cycles, we can use it only in the Add mode, but it is good for this situation.
For More Information: www.packtpub.com/blender-cycles-lighting-and-rendering-cookbook/book
Creating an Interior Scene
72
Increasing the distance setting makes the effect of the AO visible on more distantly occluded objects.
Another technique we used here is the fake portal. A portal is one of those tricks that render engines use to make things easier for interior rendering. What a portal does is help the engine understand from where the light will come into the room and optimize the rendering accordingly.
Cycles does not support this function yet, but we can fake it. The method we used of course does not do the things that a real portal would. Regardless, like the AO, it helps Cycles to brighten the most diffi cult areas, helping a lot with the noise. It is important to uncheck the Cast Shadows option because we want only the real-light source to be the sun, and as you don't have any other artifi cial lights in the scene, other shadows would look wrong.
There's more…The room in our scene has only got 3 walls, while one side is open. This is another way to help Cycles light up diffi cult areas. In this situation, the wall on the side of the camera is not needed and not visible. Taking it out from the scene will further help us with the rendering.
There is another really quick and easy method to improve the lighting in dark areas. We can add a sun light perpendicular to the ground and deactivate the Cast Shadows option. The intensity doesn't need to be high, around 0.500 is usually fi ne. This method is really effective in lightening up dark corners of interior scenes.
However, it is not completely correct to say that all the methods we saw help us reduce noise. Or say, they do not do this directly. We have two ways of increasing light in dark areas, where the only source is indirect light. We can increase light bounce, which will lead to more noise and more rendering time, or we can use some trick as we did to fake the indirect light without pushing the light bounce up. By using these methods, we can remove the dark areas without having to push the render settings. This will greatly reduce the noise.
This is how these methods helped us reduce the noise. Thanks to them, we can set the light paths of our scene as shown in the following screenshot and still have proper lighting. Notice that 250 samples will not be enough to get a clean scene at the end, but they are a good compromise for test renders.
For More Information: www.packtpub.com/blender-cycles-lighting-and-rendering-cookbook/book

Chapter 3
73
A last note about the fact that all the methods we used here will lead to a slightly increased render time. This is true looking only at the amount of samples. To get similar images in terms of noise and light, not using these techniques would lead to a much bigger render time.
In this scene, it is also good to set the acceleration structure to Static BVH and activate both Spatial Splits and Cache BVH (to learn more about these options, refer to the Setting the Cycles renders parameters recipe in Chapter 1, Key Holder and Wallet Studio Shot). Also notice that the fi nal render will require at least 1,000 samples to get a decent image.
For More Information: www.packtpub.com/blender-cycles-lighting-and-rendering-cookbook/book
Creating an Interior Scene
74
Creating a parquet materialNow that our scene lighting is ready, we can start adding the materials to the scene. A really important material is the fl oor, followed by the material of the wall, which in this scene will be very simple.
Getting readyLet's start by selecting the object named Floor and add a material to it. Let's name the material Parquet.
How to do it…To create the parquet material, follow these steps:
1. Let's go to the material node editor and add a Glossy BSDF and a Mix Shader node. Change the Glossy BSDF Roughness to 0.040 and the Diffuse BSDF roughness to 1.000.
2. Mix the Glossy and the Diffuse BSDFs with the Mix Shader node (diffuse on the top) with a Fac of 0.300.
3. Now add an Image Texture, a Texture Coordinate, and a Mapping node. Link the output to the diffuse BSDF Color input.
4. In the image texture, let's load the texture_seamless_parquet.jpg fi le located in the Textures folder.
5. For this texture, we want to use UV coordinates. Also place the mapping node between the texture coordinates and the image texture, and set the scale for X, Y, and Z to 2.000.
6. Now let's add a ColorRamp (Add | Convertors) and plug the image texture into its Color input, the image texture. Press the F button to fl ip the colors and then set the node as shown in the reference screenshot at the end of this section.
7. Now add a Color Mix node and set the mode to Color. Plug the output of the ColorRamp into the fi rst socket and the output of the Image Texture into the second. Set the Fac to 0.400.
8. Duplicate the Image Texture node and click on the button with the number 2 right next to the image path to make this a unique texture. Then click on the open texture button and select the texture_seamless_parquet_DISP.jpg fi le.
9. We want to use the exact same coordinates for this texture, so for the vector input, plug in the output of the mapping node.
For More Information: www.packtpub.com/blender-cycles-lighting-and-rendering-cookbook/book
Chapter 3
75
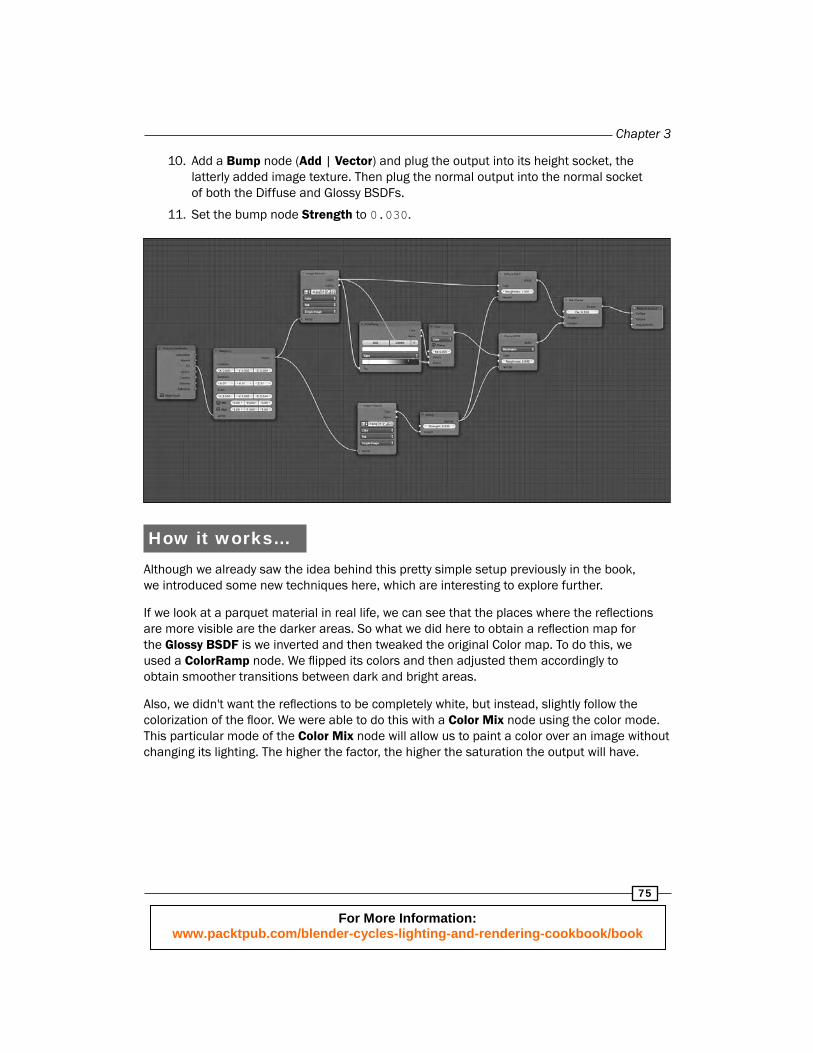
10. Add a Bump node (Add | Vector) and plug the output into its height socket, the latterly added image texture. Then plug the normal output into the normal socket of both the Diffuse and Glossy BSDFs.
11. Set the bump node Strength to 0.030.
How it works…Although we already saw the idea behind this pretty simple setup previously in the book, we introduced some new techniques here, which are interesting to explore further.
If we look at a parquet material in real life, we can see that the places where the refl ections are more visible are the darker areas. So what we did here to obtain a refl ection map for the Glossy BSDF is we inverted and then tweaked the original Color map. To do this, we used a ColorRamp node. We fl ipped its colors and then adjusted them accordingly to obtain smoother transitions between dark and bright areas.
Also, we didn't want the refl ections to be completely white, but instead, slightly follow the colorization of the fl oor. We were able to do this with a Color Mix node using the color mode. This particular mode of the Color Mix node will allow us to paint a color over an image without changing its lighting. The higher the factor, the higher the saturation the output will have.
For More Information: www.packtpub.com/blender-cycles-lighting-and-rendering-cookbook/book

Creating an Interior Scene
76
There's more…Another interesting thing to talk about is the Diffuse BSDF roughness. By default, it is set to 0, and this means that the node follows the Lambertian refl ectance model. Setting it to 1 will change this model to an Oren-Nayar one.
Without going into too much technical detail, the Oren-Nayar refl ectance model will take into account the roughness of a surface. A parquet, even if it is a fl at surface, has a lot of small differences in the surface orientation, which we recreated using the bump. The Lambertian model is not adequate for this kind of surface, and even if the difference in the fi nal image is very subtle, it will help to get the right look for our parquet.
Creating materials for the plant in the sceneIn this recipe, we will have our fi rst brief contact with organic materials, which is a really challenging topic in computer graphics. We will go more in depth on this in the last chapters of the book, but this will be a good introduction.
Getting readyIt is time to create the material for the plant in our scene. To start, let's select the object named Plant and add a material to it. Name the material Leaf01 and go to the materials' node editor.
How to do it…To create the plant materials, follow these steps:
1. Add a Glossy BSDF and Mix Shader node. Set the Glossy roughness to 0.080 and change the algorithm from Beckmann to GGX.
2. Mix the default Diffuse BSDF and the Glossy BSDF with the Mix Shader node. Put the Diffuse on top and the Glossy at the bottom, and use a Fac value of 0.200. Also set the Diffuse roughness to 1.000.
3. Now, let's add a Translucent BSDF and an Add shader node. Add the output of the previously added shaders and the Translucent node with the Add shader.
4. Now add a Mix Shader node and plug in the fi rst socket, the output of the mix of the Diffuse and Glossy BSDFs, and in the second socket, the output of the addition of the Translucent and the Mix node. Set the Fac value to 0.800.
5. Now add a Texture coordinate node and an Image Texture node. We will use UV coordinates. In the Image Texture node, load the image named LeafCOLOR.png and plug the output into the Diffuse BSDF Color input.
For More Information: www.packtpub.com/blender-cycles-lighting-and-rendering-cookbook/book
Chapter 3
77
6. Add a Color Mix node and plug the output of the LeafCOLOR image texture into it. Leave the mode as Mix and set the Fac value to 0.500. Finally, plug the output of the Color Mix node into the Color input of the Glossy BSDF.
7. Leave the second input of the Color Mix node empty and adjust the color until we get the desired glossy intensity. To set the color, click on the HSV button right under the color wheel and set the Value to 0.600.
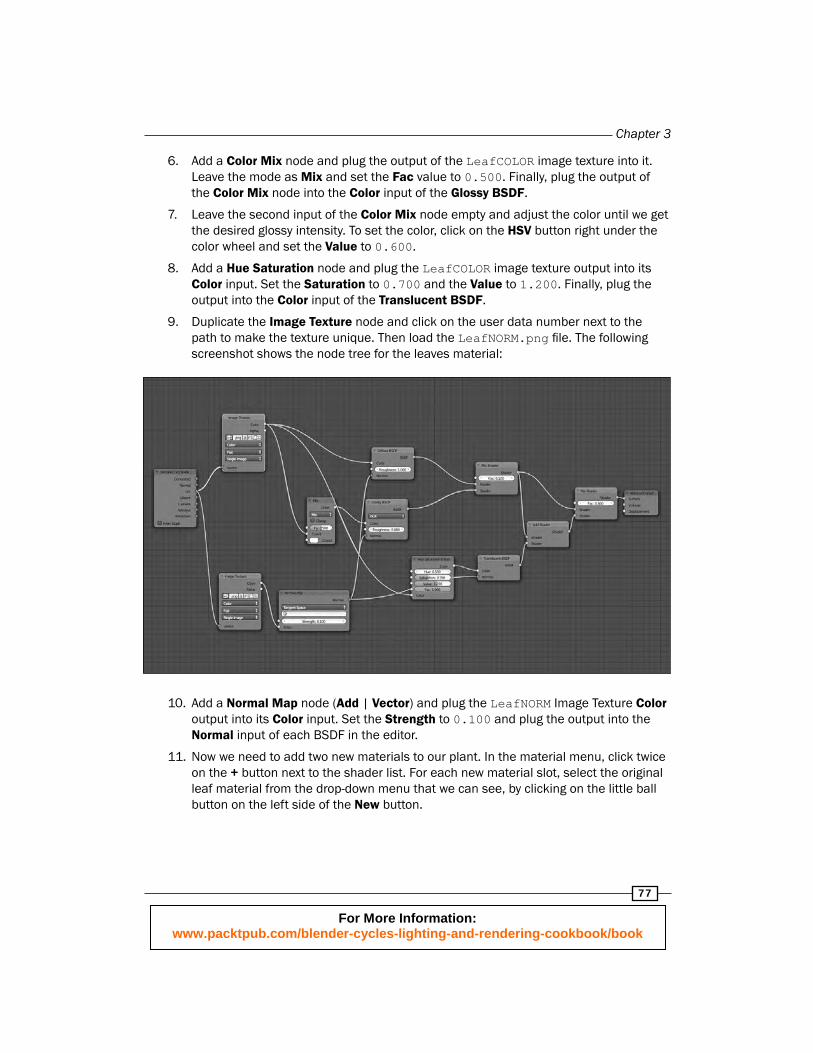
8. Add a Hue Saturation node and plug the LeafCOLOR image texture output into its Color input. Set the Saturation to 0.700 and the Value to 1.200. Finally, plug the output into the Color input of the Translucent BSDF.
9. Duplicate the Image Texture node and click on the user data number next to the path to make the texture unique. Then load the LeafNORM.png fi le. The following screenshot shows the node tree for the leaves material:
10. Add a Normal Map node (Add | Vector) and plug the LeafNORM Image Texture Color output into its Color input. Set the Strength to 0.100 and plug the output into the Normal input of each BSDF in the editor.
11. Now we need to add two new materials to our plant. In the material menu, click twice on the + button next to the shader list. For each new material slot, select the original leaf material from the drop-down menu that we can see, by clicking on the little ball button on the left side of the New button .
For More Information: www.packtpub.com/blender-cycles-lighting-and-rendering-cookbook/book
Creating an Interior Scene
78
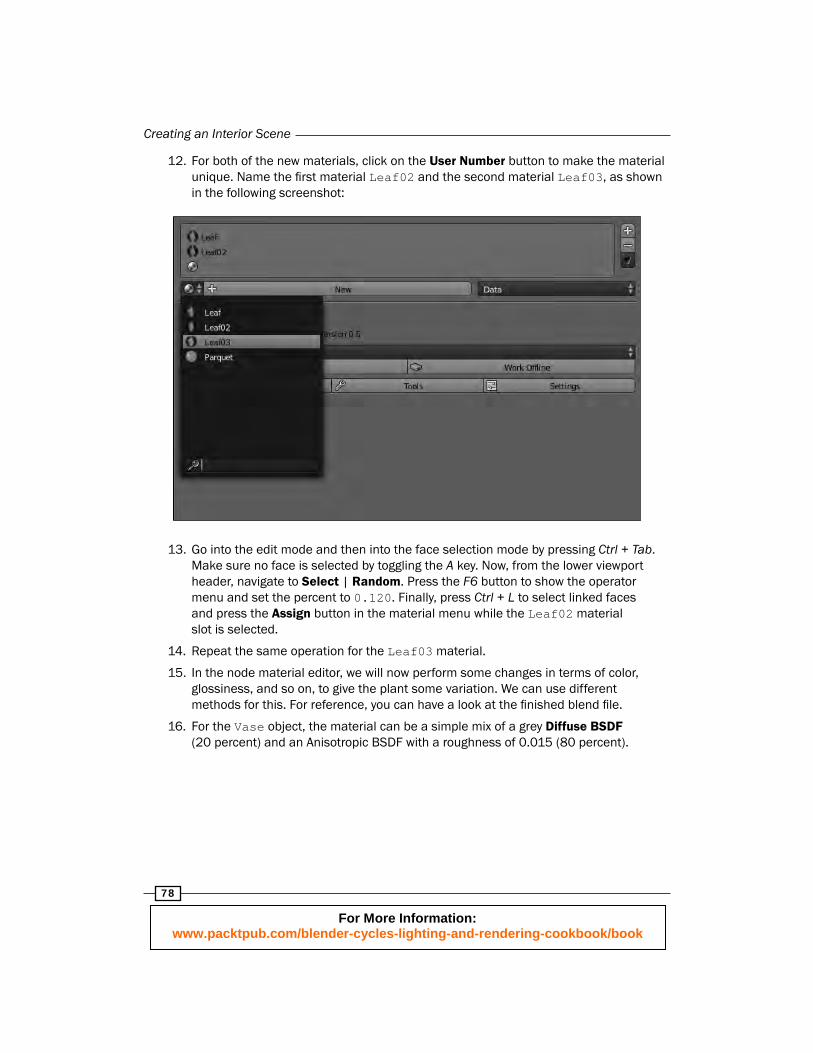
12. For both of the new materials, click on the User Number button to make the material unique. Name the fi rst material Leaf02 and the second material Leaf03, as shown in the following screenshot:
13. Go into the edit mode and then into the face selection mode by pressing Ctrl + Tab. Make sure no face is selected by toggling the A key. Now, from the lower viewport header, navigate to Select | Random. Press the F6 button to show the operator menu and set the percent to 0.120. Finally, press Ctrl + L to select linked faces and press the Assign button in the material menu while the Leaf02 material slot is selected.
14. Repeat the same operation for the Leaf03 material.
15. In the node material editor, we will now perform some changes in terms of color, glossiness, and so on, to give the plant some variation. We can use different methods for this. For reference, you can have a look at the fi nished blend fi le.
16. For the Vase object, the material can be a simple mix of a grey Diffuse BSDF (20 percent) and an Anisotropic BSDF with a roughness of 0.015 (80 percent).
For More Information: www.packtpub.com/blender-cycles-lighting-and-rendering-cookbook/book
Chapter 3
79
How it works…To create the material for the leaves, we fi rst created a mix of different BSDFs to get the right shader. Later, we applied the textures. To give the illusion of the imperfections on the surface of the leaf, this time we used a normal map. This kind of map works like a bump map but is more precise. While a bump map uses greyscale values to assess the height of the surface, the normal map is also able to provide information about the orientation of the surface.
As a Color input for the different BSDFs, we used the same color map, which is tweaked each time to get the result we want for a specifi c situation. While for the Diffuse BSDF it is alright to use the clean color map, for the Glossy and Translucent BSDF, it is nice to get a slightly brighter colorization. Also, remember that in this case the color also affects the intensity of the BSDF, and a brighter texture will give a stronger glossiness and translucency.
There's more…There are different kinds of normal maps. In this situation, we used the tangent space type normal map. This kind of normal map is probably the most commonly used. It can be baked out of high-res geometry or even be created from a color map using several standalone programs or plugins for image editors such as Photoshop or GIMP.
The other kinds of normal maps are the World space and the Object space ones. If we want to use one of these kinds of normal maps, it will be necessary to specify it in the drop-down menu of the Normal Map node. It is also possible to specify the UV layer that we intend to use. In case there is only one UV layer, Cycles will automatically use that one.
See alsoThe following are some interesting free and commercial programs to create every kind of map that is needed:
http://www.mapzoneeditor.com/?PAGE=HOME: This is a free node-based map generator
http://www.xnormal.net/1.aspx: This is a free map creator
https://code.google.com/p/gimp-normalmap/: This is a free GIMP plugin for creating maps
http://www.crazybump.com/: This is one of the best known and intuitive commercial map generators
http://quixel.se/ndo/: This is a powerful suite of commercial plugins for Photoshop
For More Information: www.packtpub.com/blender-cycles-lighting-and-rendering-cookbook/book

Creating an Interior Scene
80
Creating a different kind of leatherIn the real world, the same type of materials can have a lot of different variants. For example, there are different kinds of leather. In this recipe, we will learn how to create leather of a different kind from the one that we used to create a wallet in Chapter 1, Key Holder and Wallet Studio Shot.
Getting readyWe will now create the leather material for the pouffe. The kind of leather will not be the same as the one we created for the wallet, which was smooth. Here we will apply a lot of wrinkles, which will give us a really nice leather effect.
Select the pouffe object, add a material, and name it puff.
How to do it…1. Add a Glossy BSDF and a Mix Shader node. Set the Glossy node to GGX mode and
set the roughness to 0.350.
2. Mix the Diffuse and the Glossy BSDF giving 80 percent for the Glossy and 20 percent for the Diffuse BSDF.
3. Add an Image Texture node and a Texture Coordinate node. Use the UV coordinates. Also add a Mapping node and set the scale to 13.000 for every axis.
4. In the Image Texture node, load the fi le called Leather.jpg and plug the Color output into the diffuse BSDF Color input.
5. Duplicate the texture node and make it accessible to a single user using the button next to the path. Load the image named Leather_SPEC.png.
6. Add a Color Mix node and plug the last added texture into the fi rst color socket and leave the second slot empty with a color of RGB: 0.5, 0.5, 0.5. Set the Fac to 0.200 and leave the mode to Mix. Finally, plug the Color Mix output into the Glossy BSDF Color input.
For More Information: www.packtpub.com/blender-cycles-lighting-and-rendering-cookbook/book
Chapter 3
81
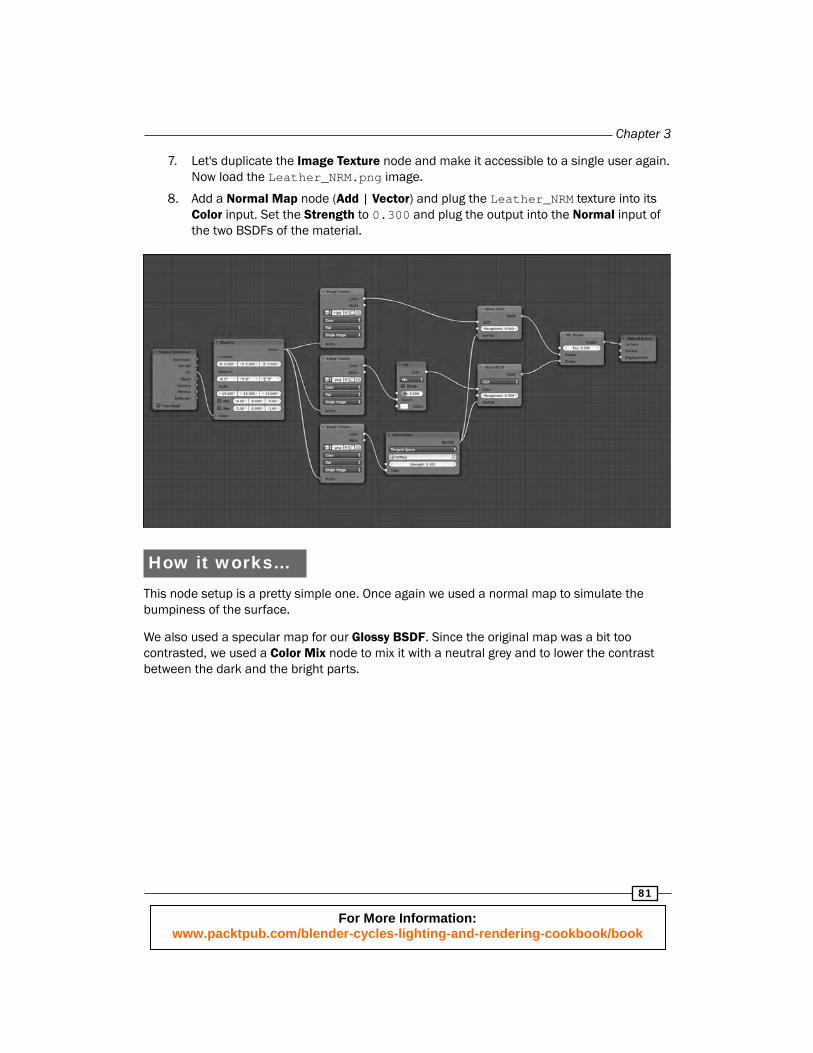
7. Let's duplicate the Image Texture node and make it accessible to a single user again. Now load the Leather_NRM.png image.
8. Add a Normal Map node (Add | Vector) and plug the Leather_NRM texture into its Color input. Set the Strength to 0.300 and plug the output into the Normal input of the two BSDFs of the material.
How it works…This node setup is a pretty simple one. Once again we used a normal map to simulate the bumpiness of the surface.
We also used a specular map for our Glossy BSDF. Since the original map was a bit too contrasted, we used a Color Mix node to mix it with a neutral grey and to lower the contrast between the dark and the bright parts.
For More Information: www.packtpub.com/blender-cycles-lighting-and-rendering-cookbook/book
Creating an Interior Scene
82
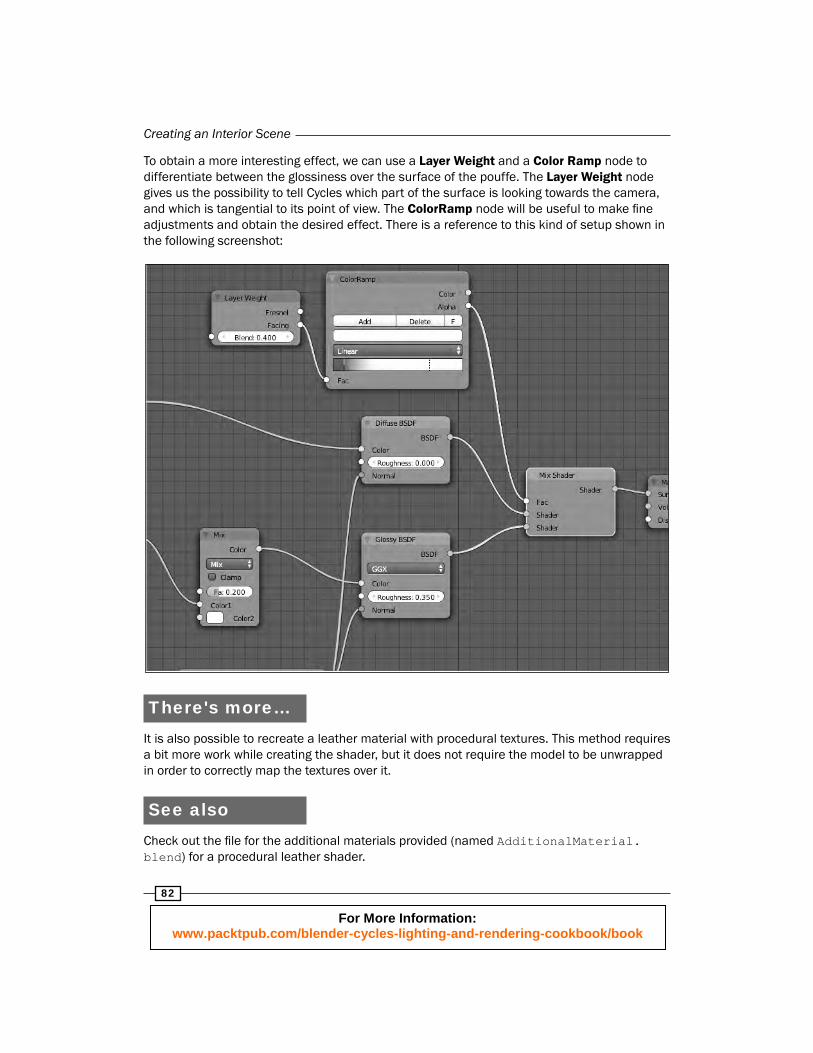
To obtain a more interesting effect, we can use a Layer Weight and a Color Ramp node to differentiate between the glossiness over the surface of the pouffe. The Layer Weight node gives us the possibility to tell Cycles which part of the surface is looking towards the camera, and which is tangential to its point of view. The ColorRamp node will be useful to make fi ne adjustments and obtain the desired effect. There is a reference to this kind of setup shown in the following screenshot:
There's more…It is also possible to recreate a leather material with procedural textures. This method requires a bit more work while creating the shader, but it does not require the model to be unwrapped in order to correctly map the textures over it.
See alsoCheck out the fi le for the additional materials provided (named AdditionalMaterial.blend) for a procedural leather shader.
For More Information: www.packtpub.com/blender-cycles-lighting-and-rendering-cookbook/book

Chapter 3
83
Creating the materials for the lampNow we will create the shaders for the lamp. Among others, a really interesting material will be the marble for the base. For this particular shader, we will be using a new node, subsurface scattering, which is often written as SSS.
Getting readyTo start, select the object called Lamp, add a new material to it, and name it LampMarble.
How to do it…To create the materials for the lamp, follow these steps:
Assigning the different materialsTo assign different materials, follow these steps:
1. With the lamp object selected, let's go into the edit mode by pressing the Tab key and make sure no vertex is selected. With the mouse cursor over the piece of geometry that we want to select, press the L key on the keyboard to select the entire part of the mesh. Using this method, let's select the two spheres at the top of the lamp.
2. Add a new material slot by pressing the + button in the material menu. Create a new material and name it Lamp, and then click on the Assign button.
3. Repeat the operation described in step 1, but this time, select the cylinder pipe and the two support spheres. Add a new material slot and a new material. Name this material LampMetal and click on the Assign button.
Creating the marbleTo create the marble, follow these steps:
1. Let's select the marble material and add a Glossy BSDF and an Add Shader node. Add the default Diffuse BSDF to the Glossy one and set the Glossy BSDF's roughness to 0.100.
2. Add a Subsurface Scattering BSDF (Add | shaders) and a Mix Shader node. Mix the output of the sum of the Diffuse and Glossy BSDFs with the SSS node. Put the SSS in the lower input socket and set the Fac value to 0.400.
3. Add an Image Texture and a Texture Coordinate node. Connect them using the generated coordinates. In the Image Texture node from the second drop-down menu, set the projection method to Box. A Blend slider will appear. Set it to 1.000.
For More Information: www.packtpub.com/blender-cycles-lighting-and-rendering-cookbook/book
Creating an Interior Scene
84
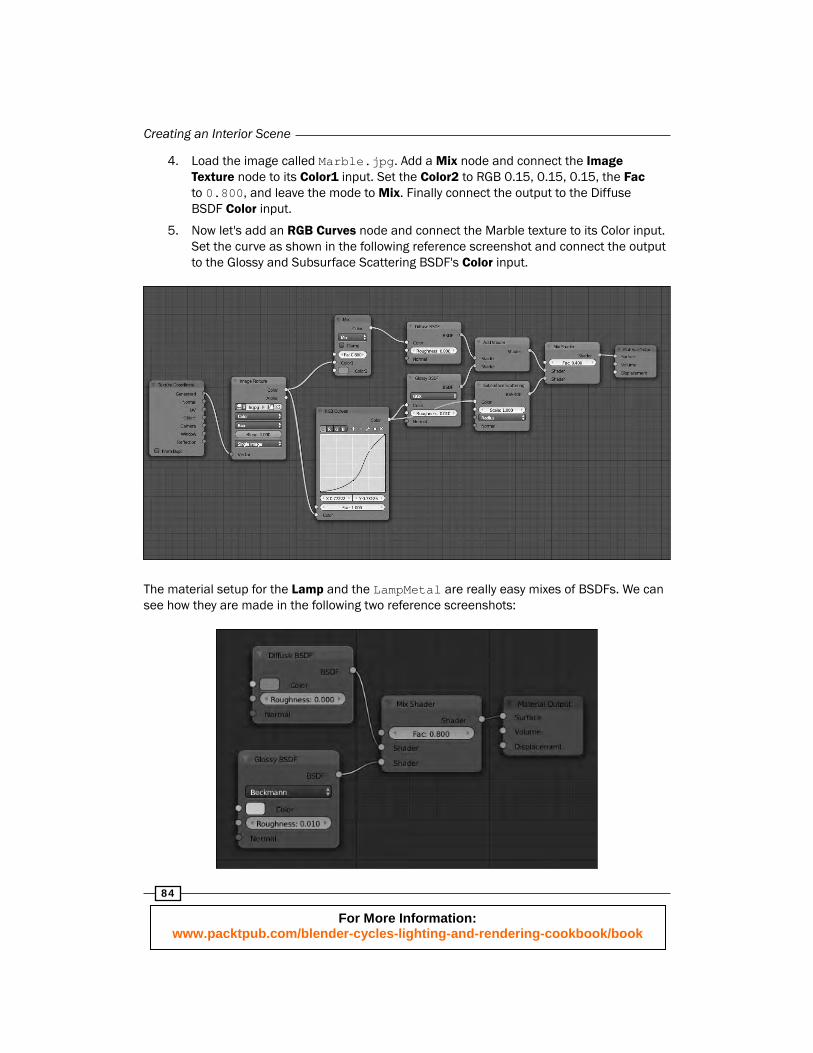
4. Load the image called Marble.jpg. Add a Mix node and connect the Image Texture node to its Color1 input. Set the Color2 to RGB 0.15, 0.15, 0.15, the Fac to 0.800, and leave the mode to Mix. Finally connect the output to the Diffuse BSDF Color input.
5. Now let's add an RGB Curves node and connect the Marble texture to its Color input. Set the curve as shown in the following reference screenshot and connect the output to the Glossy and Subsurface Scattering BSDF's Color input.
The material setup for the Lamp and the LampMetal are really easy mixes of BSDFs. We can see how they are made in the following two reference screenshots:
For More Information: www.packtpub.com/blender-cycles-lighting-and-rendering-cookbook/book
Chapter 3
85
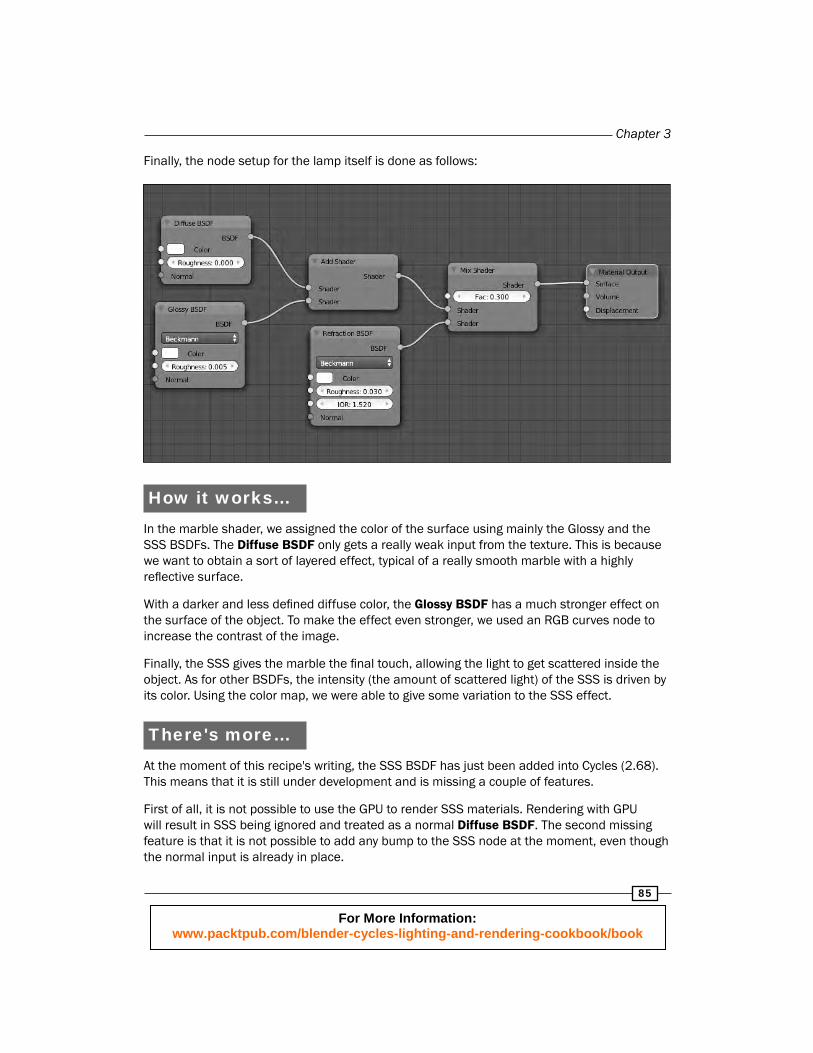
Finally, the node setup for the lamp itself is done as follows:
How it works…In the marble shader, we assigned the color of the surface using mainly the Glossy and the SSS BSDFs. The Diffuse BSDF only gets a really weak input from the texture. This is because we want to obtain a sort of layered effect, typical of a really smooth marble with a highly refl ective surface.
With a darker and less defi ned diffuse color, the Glossy BSDF has a much stronger effect on the surface of the object. To make the effect even stronger, we used an RGB curves node to increase the contrast of the image.
Finally, the SSS gives the marble the fi nal touch, allowing the light to get scattered inside the object. As for other BSDFs, the intensity (the amount of scattered light) of the SSS is driven by its color. Using the color map, we were able to give some variation to the SSS effect.
There's more…At the moment of this recipe's writing, the SSS BSDF has just been added into Cycles (2.68). This means that it is still under development and is missing a couple of features.
First of all, it is not possible to use the GPU to render SSS materials. Rendering with GPU will result in SSS being ignored and treated as a normal Diffuse BSDF. The second missing feature is that it is not possible to add any bump to the SSS node at the moment, even though the normal input is already in place.
For More Information: www.packtpub.com/blender-cycles-lighting-and-rendering-cookbook/book
Creating an Interior Scene
86
However, it could be that by the time you read this recipe, these features will already be working.
See alsoIn the following link, you will fi nd a thread about a skin shader for Cycles. It is a node group created by a user on Blender Artist who tried to recreate the Arnold skin shader in Cycles. It defi nitely is a good reference to learn from!
http://blenderartists.org/forum/showthread.php?287516-Arnold-skin-shader-ported-to-Cycles
Creating a carpet using hair particlesNow we will create the hair for the carpet under the coffee table in our scene. For the creation of the hair, we will cover just the part regarding the rendering in Cycles. Then we will see how to create the material for it.
Getting readyFirst of all, we have to check a couple of render settings. At the moment of this recipe's writing, hair rendering is a new feature, and the support for GPU rendering is being added right now. By the time you read this, everything will already be supported, but right now, to activate hair rendering on the GPU, we need to go to the Render menu, and in the render panel, set the Features drop-down menu to Experimental.
Now we are ready to start. The fi rst step is to select the object called Carpet and add two materials to it. We will call the fi rst one Carpet and the second CarpetHair.
How to do it…1. Let's go to the particles menu with the carpet object selected. In the render panel,
we will check that the Material slot is set to 2.000.
2. Let's go down to the Cycles Hair Rendering settings. From the Mode drop-down menu, select Accurate. Below that the Cycles Hair settings is present. Here we need to set the Shape to -0.970, and in the thickness panel, set the Root to 0.200 and Tip to 0.150, and make sure the Close tip option is off.
3. Now let's go to the material node editor with the CarpetHair material selected. Add a Glossy BSDF and a Translucent BSDF and two Mix Shader nodes.
4. Mix the Diffuse BSDF and the Glossy BSDF with the Glossy infl uence to 5 percent. Also, set the Glossy roughness to 0.400.
For More Information: www.packtpub.com/blender-cycles-lighting-and-rendering-cookbook/book
Chapter 3
87
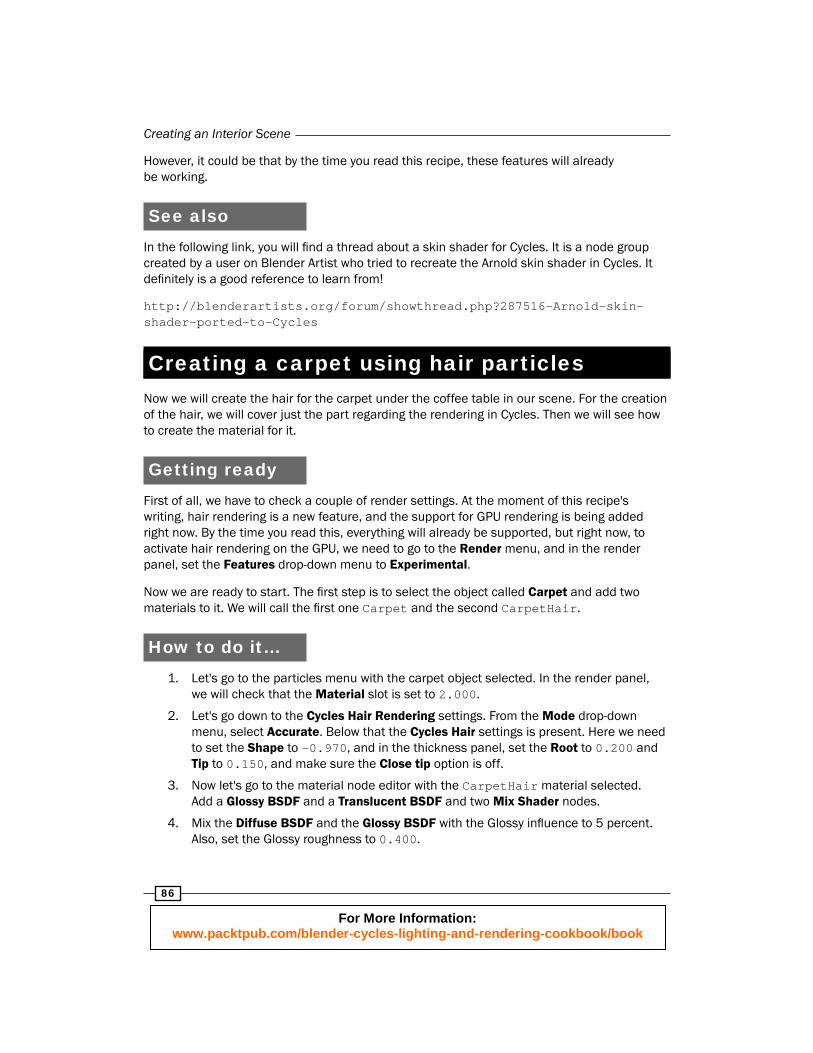
5. Now mix the output of these two BSDFs with the Translucent BSDF and set the translucent infl uence to 10 percent.
6. Now let's add a Hair Info node (Add | Input) and a ColorRamp node. Plug the Intercept output from the Hair Info node into the ColorRamp node and set the color ramp as shown in the following screenshot.
7. Let's add a Wave Texture node. We want to use UV coordinates and also a Mapping node to set the Z rotation to 30. Inside the Wave Texture node, set the scale to 3.000 and the distortion to 15.000.
8. Add an RGB Mix node and plug the Wave Texture Color output into the Fac input and the ColorRamp Color output into the Color1 input of the RGB Mix node. Set the mode to Multiply and the Color2 to RGB 0.14, 0.11, 0.07. Finally, plug the RGB Mix node output into the Diffuse Color input.
9. Select the Carpet material and change the diffuse BSDF color to a medium dark brown (RGB 0.25, 0.2, 0.15).
How it works…First of all, let's talk about Cycles rendering settings for the hair. As we saw, they can be found in the particles panel. There are several modes we can select to render the hair. Basically, the lowest option (Fast Planes) is the least accurate but the fastest to render, while the highest (Smooth Curves) is the best looking one, but also the slowest in terms of render time. There is also an option to create a custom setup, but in general, the presets are quite good.
For More Information: www.packtpub.com/blender-cycles-lighting-and-rendering-cookbook/book
Creating an Interior Scene
88
Usually, the Accurate mode is suitable for the majority of situations, providing a good balance between quality and render time. The smooth curves provide additional quality at the cost of a much higher render time. It can help if we have to render a close up that shows hair in detail. It is also possible to give a minimum pixel width for the strands. This is useful if we have really thin hair, which can give us some aliasing problems. This option can help to fi x these kinds of issues.
In the Cycles Hair Settings, we can choose the thickness of the hair at the root and at the tip. The way the thickness changes from the root to the tip depends on the shape option. Negative values will make the infl uence of the root value stronger even when we get close to the tip, while positive values will make the tip thickness visible much lower along the hair. The Close tip option will set the tip of the strands to zero, no matter what value we set in the tip thickness. We also have a multiplier for the thickness, which is the scaling option. Changing this, we can change the whole thickness of the strands without changing the ratio between the root and tip thickness.
In the material we created for the hair, a really important node is the Hair Info node. This node gives us a lot of useful input to use for strand rendering. In this situation, we used the Intercept value. This value gives us information about the position along the strand. Using the ColorRamp node, we were able to set the color from the root to the tip of the strands (left to right). This was useful to give some variation to the color, making it a bit darker at the root. We also used a Wave Texture node to give some interesting pattern to the color of the carpet. Using this method, we can apply any kind of texture and recreate, for example, beautiful animal fur patterns. We used the texture as the Fac input for the Color Mix node in order to decide where we want the original color of the strands to be multiplied by the color we set in the Color Mix node.
There's more…There is another way to assign a material to strands while rendering with Cycles. In this recipe, we used the old method, which also worked in the Blender Internal render engine, which is selecting the number of the material slot from the rendering panel of the particles settings.
With Cycles, we can use the Is Strand output of the Hair Info node as a Fac input to mix two different node setups inside the same material. Everything going into the second socket of the Mix Shader node will be the material used for the strands. Remember to set the number of the material slot inside the particles settings to the material that is assigned to the mesh (in our scene, this is the Carpet material, therefore slot number1).
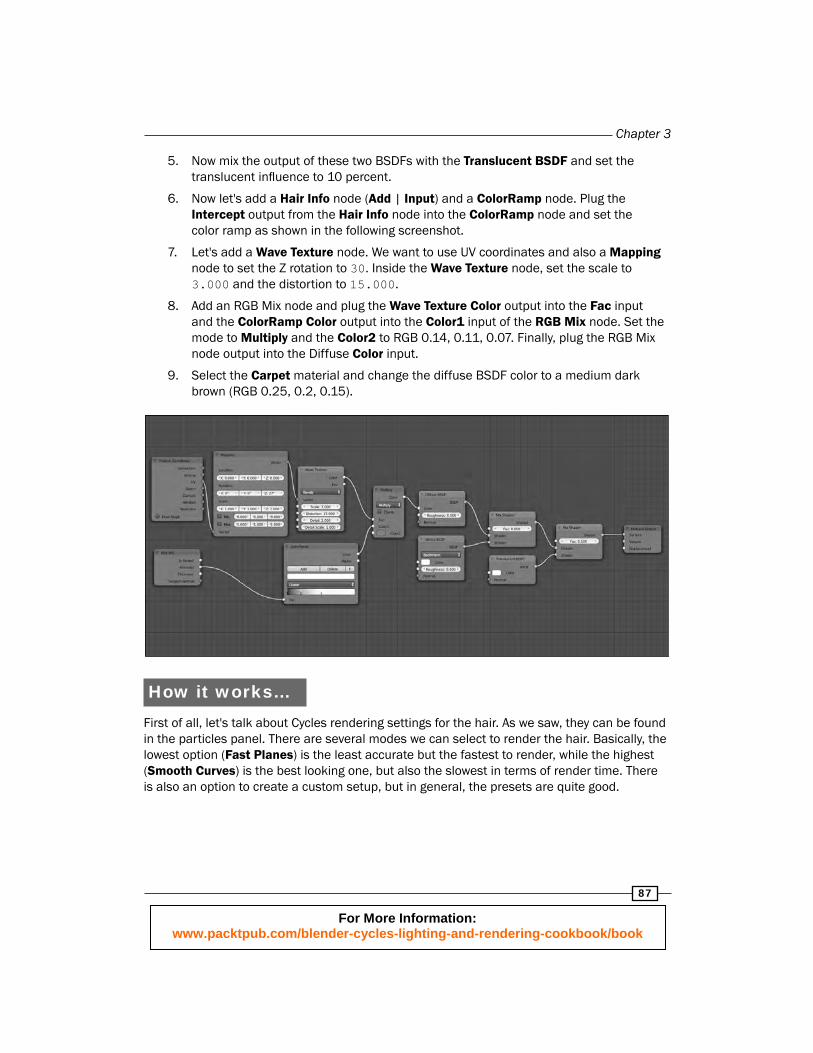
For any other material in Cycles, the fact that we can use nodes to create the materials for strands gives us a lot of fl exibility. The number of effects that can be obtained using this setup are practically endless. For example in the following screenshot, we can see a node setup to map a texture on each strand, which was created by a user on Blender Artists:
For More Information: www.packtpub.com/blender-cycles-lighting-and-rendering-cookbook/book
Chapter 3
89
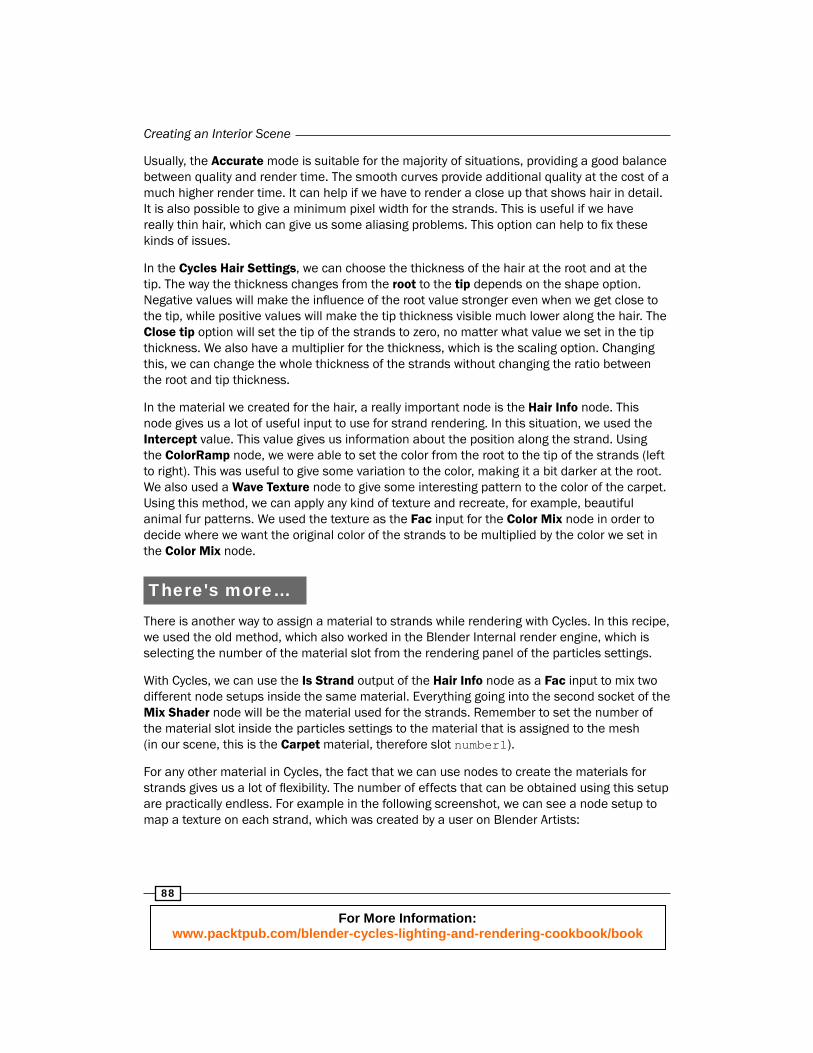
Shown in the following screenshot is another node setup, also created by a BA user, which shows how to apply color to strands horizontally:
For More Information: www.packtpub.com/blender-cycles-lighting-and-rendering-cookbook/book

Creating an Interior Scene
90
See alsoIn the following link, you can fi nd a really good tutorial about hair. The most interesting thing, however, is an in-depth overview of the settings available for strand rendering in Cycles.
http://www.blenderguru.com/videos/how-to-render-hair-with-cycles/
Setting up night lightingNow that our scene is ready, let's play a bit with the lighting. Let's see how we can set up a nice night lighting system. We will try to create two separated setups so that it will be easy to switch from day to night.
Getting startedThe fi rst thing that we want to change is the environment. Let's go to the World Settings and rename the World to Day. Also click on the F button, as doing so will assign a fake user to the world to prevent Blender from erasing it, if it isn't in use when closing the fi le. Then click on the plus button on the right side and rename the new world as Night. Press the F key for the Night world as well.
How to do it…1. Let's change the color of the Night world to a dark blue. Something like RGB 0, 0,
0.01 will be fi ne. Also set the Strength to 0.100.
2. Set the AO Factor to 0.050.
3. In the viewport, select the area light for the window and the sun, and move it to layer 2. To do this with the two lights selected, press the M key and click on the layer we want to move them in.
4. Activate layer 2 to see the lights again. Select the Area Light and copy it with Ctrl + D. Move the new light to layer 3. Deactivate layer 2 and activate layer 3.
5. Name the new Area Light NightPortal. Set its color to a blue lighter than that of the world, for example, RGB 0.3, 0.3, 0.7. Also let's activate the Cast Shadows option.
6. Create a plane (press Shift + A and then navigate to Mesh | Plane) and go into the edit mode by pressing the Tab key. Press the W key and select Subdivide from the drop-down menu. Remember to always keep the mouse cursor in the viewport while performing these operations.
7. Select the central vertex and move it down slightly. Also, scale the whole plane down to a quarter of its original size.
For More Information: www.packtpub.com/blender-cycles-lighting-and-rendering-cookbook/book
Chapter 3
91
8. Exit the edit mode and name the new plane Emit01 from the object menu. Add a new material and name it Emit01.
9. From the surface panel in the material menu, select Emission and set the Strength to 20 and the color HSV to 0.15, 0.4, 0.8.
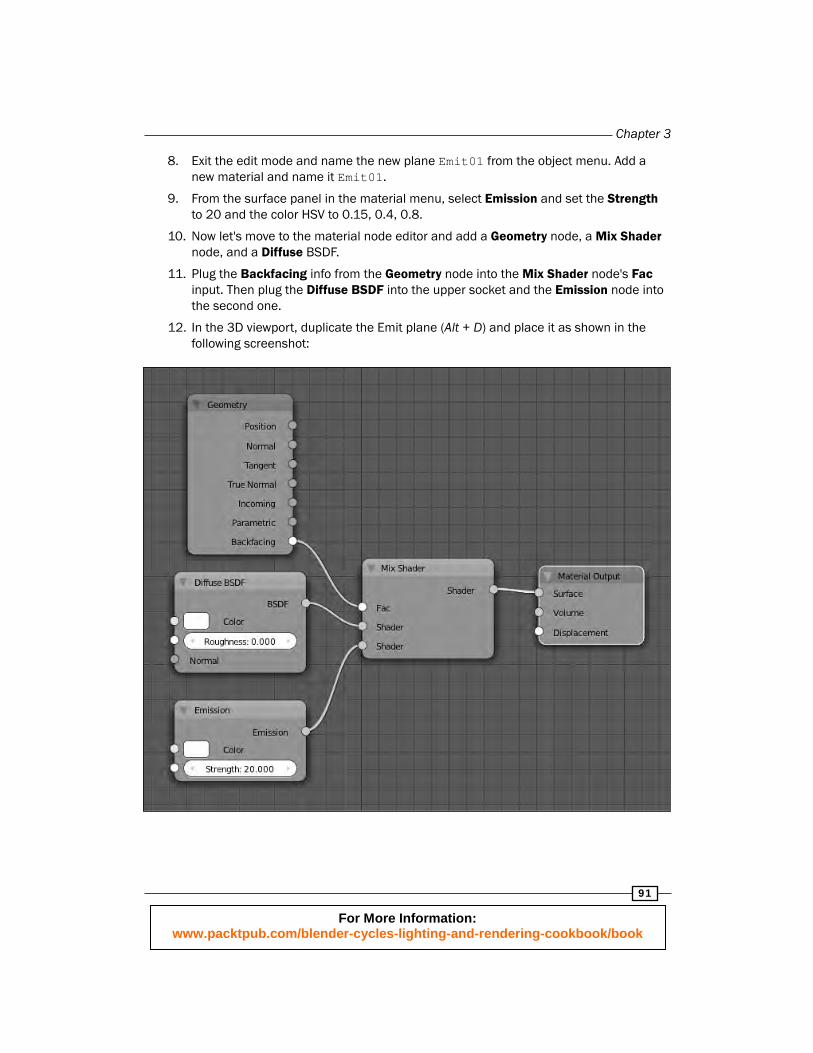
10. Now let's move to the material node editor and add a Geometry node, a Mix Shader node, and a Diffuse BSDF.
11. Plug the Backfacing info from the Geometry node into the Mix Shader node's Fac input. Then plug the Diffuse BSDF into the upper socket and the Emission node into the second one.
12. In the 3D viewport, duplicate the Emit plane (Alt + D) and place it as shown in the following screenshot:
For More Information: www.packtpub.com/blender-cycles-lighting-and-rendering-cookbook/book
Creating an Interior Scene
92
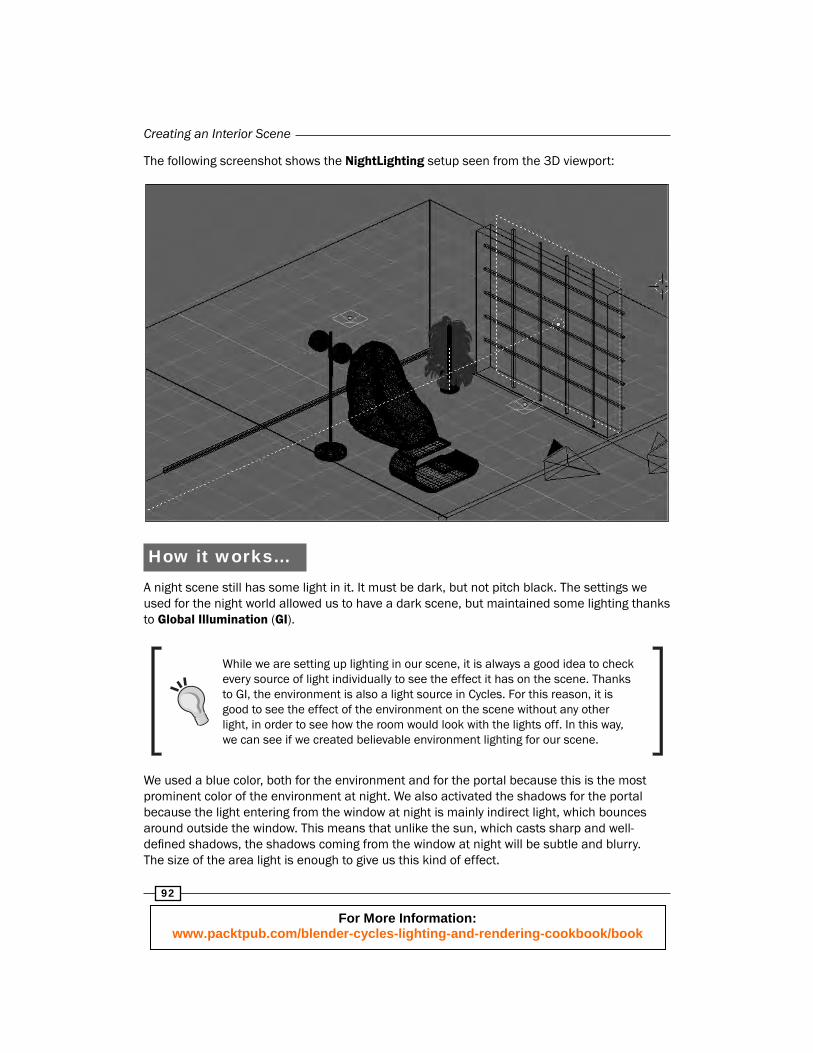
The following screenshot shows the NightLighting setup seen from the 3D viewport:
How it works…A night scene still has some light in it. It must be dark, but not pitch black. The settings we used for the night world allowed us to have a dark scene, but maintained some lighting thanks to Global Illumination (GI).
While we are setting up lighting in our scene, it is always a good idea to check every source of light individually to see the effect it has on the scene. Thanks to GI, the environment is also a light source in Cycles. For this reason, it is good to see the effect of the environment on the scene without any other light, in order to see how the room would look with the lights off. In this way, we can see if we created believable environment lighting for our scene.
We used a blue color, both for the environment and for the portal because this is the most prominent color of the environment at night. We also activated the shadows for the portal because the light entering from the window at night is mainly indirect light, which bounces around outside the window. This means that unlike the sun, which casts sharp and well-defi ned shadows, the shadows coming from the window at night will be subtle and blurry. The size of the area light is enough to give us this kind of effect.
For More Information: www.packtpub.com/blender-cycles-lighting-and-rendering-cookbook/book

Chapter 3
93
After the environment, we added some artifi cial lighting inside the room. The particular setup that we used allows us to apply the emission shader only on one side of the plane. As the light sources are outside our view, we didn't need the light to bounce on the ceiling as this would just have added a lot of noise to our scene.
The color of the artifi cial light is yellow, as these kinds of lights are usually warmer when compared to natural lighting coming from the outside, especially by night. The third layer contains a plane that closes the open side of the room. In this night scene, without this plane, the opening in the wall would have been visible in the refl ections. Moreover, the night scene has the strongest sources of light inside, so the opening in the wall would not have been of great help here compared to the day setup.
There's more…In the end, using Duplicate Linked on the plane instead of copying it gives us different advantages. Duplicates share several settings with the original. This means that we can still modify the size, position, and rotation in the object mode, but if we change something in the edit mode, every single duplicate will be modifi ed as well. Moreover, duplicates also share the same memory during the rendering process. This can be of great help in cases of complex scenes where the memory usage is really high. Duplicates can be obtained by pressing Alt + D as we have seen in the recipe, or by using particle instances or arrays.
Since in the night lighting, the fact that the portal light casts shadows is acceptable, we can also use an emitting plane instead of the area light. This could allow us to map a texture onto it, to refl ect on the fl oor whatever kind of background we would like to use as the exterior of our room. Note that this technique can also be used in the case of day lighting if the sun light does not come directly inside the window. In this case, the light would be coming from indirect bounces just like the night scene, and using the Cast Shadows option would be acceptable.
If we would like to use mesh emitters as portals, we will have to remember to deactivate the camera and shadow ray visibility for the plane in the object menu. The following screenshot shows how to set up the Ray Visibility panel for the emitter.
For More Information: www.packtpub.com/blender-cycles-lighting-and-rendering-cookbook/book
Creating an Interior Scene
94
Using IES fi les in CyclesThe fi nal step for this recipe will be to add the light for the big lamp next to the pouffe. To do this, we will use Illuminated Engineering Society (IES), which is a fi le format used to store photometric data. Thanks to IES fi les, we will be able to recreate the distribution of lights based on specifi c lamps inside programs that support this format.
Getting readyCycles, by default, does not support IES fi les, but we can use a script for it. You can fi nd the script at the following page on the Blender Artists' website: http://blenderartists.org/forum/showthread.php?276063-IES-Lamps-to-Cycles.
The script is also included with the recipe fi les of this cookbook.
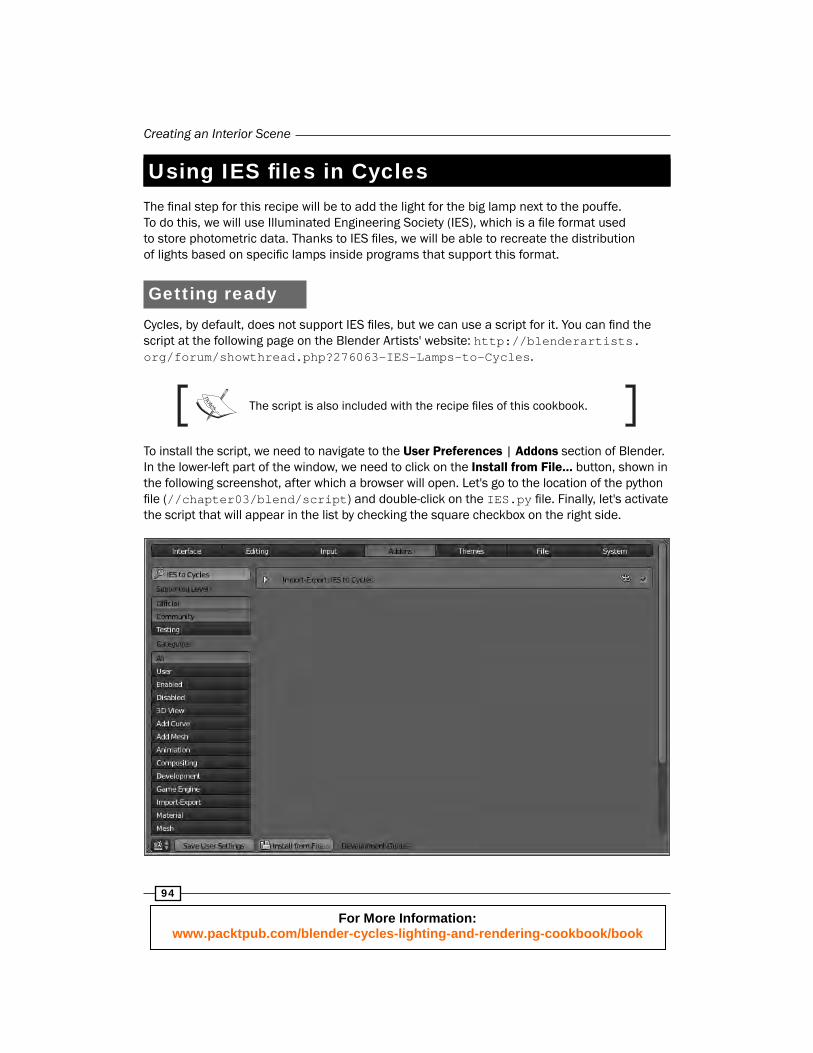
To install the script, we need to navigate to the User Preferences | Addons section of Blender. In the lower-left part of the window, we need to click on the Install from File… button, shown in the following screenshot, after which a browser will open. Let's go to the location of the python fi le (//chapter03/blend/script) and double-click on the IES.py fi le. Finally, let's activate the script that will appear in the list by checking the square checkbox on the right side.
For More Information: www.packtpub.com/blender-cycles-lighting-and-rendering-cookbook/book

Chapter 3
95
How to do it…1. After installing the add-on, navigate to File | Import | IES lamp data (.ies). If there is
no such option in the Import menu, we need to activate the add-on as shown in the Getting ready section.
2. In the browser, load the L6441.IES fi le from the following path:
\\IES\ALG\IESFiles\Lithonia_Lighting\Fluorescent\Parabolic_Louvers\9PMO\L6441.IES.
3. A point light and a mesh will be created. By moving the mesh around, we will also move the point light. We need to place the IES rig inside the two lamps of the stand next to the puff as shown in the following screenshot:
4. Once the rig is placed inside the lamp, let's go to the properties shelf by pressing the N key while the cursor is over the 3D viewport. When the mesh of the IES rig is selected, at the bottom of the properties shelf, there is a lamp properties panel. In this panel, we want to set Strength Multiplier to 400 and Color to RGB 1, 0.9, 0.7.
5. Now we need to copy the rig (Ctrl + D) and place it inside the second lamp sphere. When we copy the rig, we need to make sure that both the mesh and the point light are selected.
For More Information: www.packtpub.com/blender-cycles-lighting-and-rendering-cookbook/book
Creating an Interior Scene
96
How it works…The usage of IES allows us to easily achieve effects, which would otherwise require the creation of additional geometry. As we have seen several times already, when Cycles has to deal with a lot of bounces, a lot of noise is generated, and this is exactly the case when achieving this effect with geometry. Using an IES will not require the creation of any additional memory.
It is important to choose the right IES fi le for each light in order to achieve a believable result. IES fi les can be found for free on a lot of lamp producers' websites where they often show from which real lamp a certain IES comes from. This is a good way to learn if a certain IES is suited for our lamp.
There's more…Observing the effect of an IES fi le can be quite tricky from the viewport, but we have a much better and faster method to see how an IES fi le will look in our fi nal render.
We can use a program called IES viewer. It is a really useful freeware program, which allows us to quickly inspect IES fi les without having to render them in Cycles. Using this program is quite simple. We just need to go to the location of our IES fi les from the browser on the top-left part of the screen. Then choose one of the fi les from the big window in the middle. As we select one fi le, we will be able to see the graph in the lower left part of the screen. Pressing Ctrl + R or clicking on the render button under the fi le browser will show us the IES rendered. What we see is how our light would look on a surface. Notice that this program is for Windows only.
The program can be freely downloaded from http://www.photometricviewer.com/.
See alsoThere are a lot of websites where you can download IES fi les. The following websites are some of them where you can fi nd good IES fi les:
http://www.cooperindustries.com/content/public/en/lighting/resources/design_center_tools/photometric_tool_box.html
http://www.lithonia.com/photometrics.aspx
In the following link, on the other hand, there is a small program that will allow us to create our own IES fi les from scratch:
http://www.tom-schuelke.com/ies-gen3.exe
For More Information: www.packtpub.com/blender-cycles-lighting-and-rendering-cookbook/book

Where to buy this book You can buy Blender Cycles: Lighting and Rendering Cookbook from the Packt Publishing website: http://www.packtpub.com/blender-cycles-lighting-and-rendering-cookbook/book. Free shipping to the US, UK, Europe and selected Asian countries. For more information, please read our shipping policy.
Alternatively, you can buy the book from Amazon, BN.com, Computer Manuals and most internet book retailers.
www.PacktPub.com
For More Information: www.packtpub.com/blender-cycles-lighting-and-rendering-cookbook/book