block design created by liz kolonsky of benartex · llc uses benartex’s basic blacks & beiges...
TRANSCRIPT

© 2
015
Jack
ie R
obin
son
for
Ben
arte
x, L
LC
Uses Benartex’s Basic Blacks & Beiges collection
by Jackie RobinsonFinished Size: 59” x 72”
Jackie’s new quilt pattern “Circling Stars”, uses her Blacks
and Beiges collection, makes a unique circle block pattern.
The block really draws you into this quilt. Great contrast with
detailed prints make this quilt as interesting up close as it is
far away. This quilt is sure to gain everyone’s
undivided attention.
the quilt shown is a digital representation. actual fabric repeats will vary from design shown.
Block design created byLiz Kolonsky of Benartex
animasquilts.com
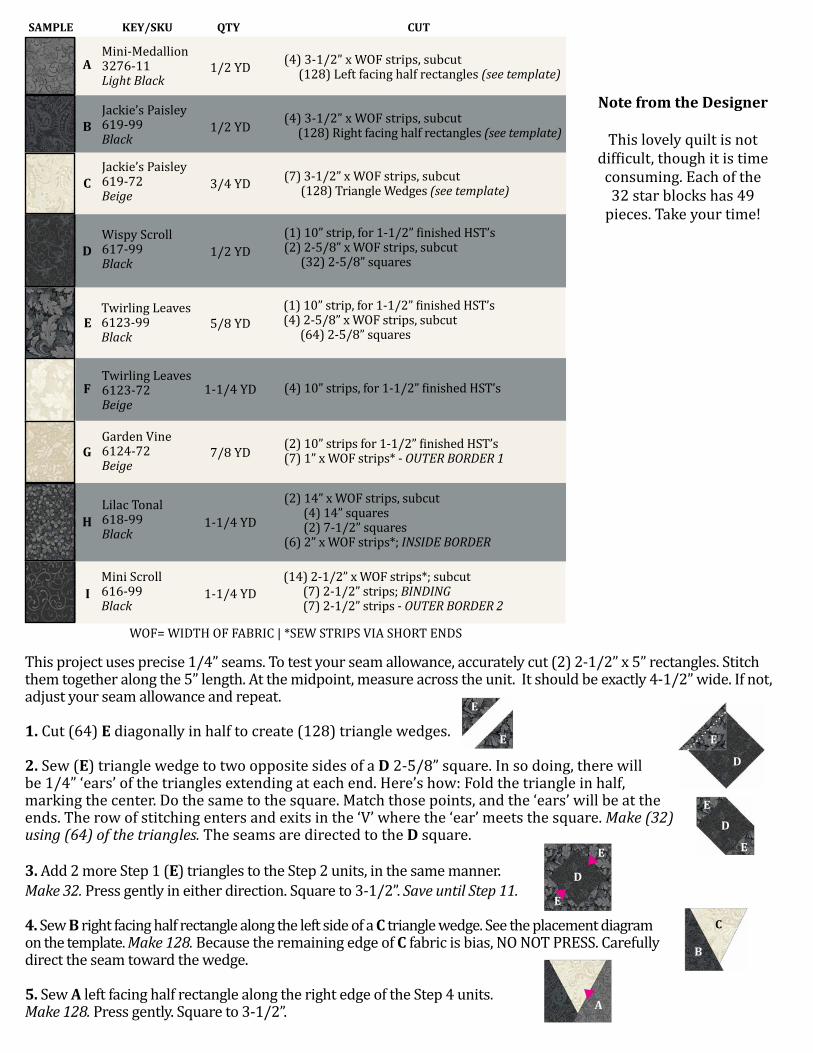
This project uses precise 1/4” seams. To test your seam allowance, accurately cut (2) 2-1/2” x 5” rectangles. Stitch them together along the 5” length. At the midpoint, measure across the unit. It should be exactly 4-1/2” wide. If not, adjust your seam allowance and repeat.
1. Cut (64) E diagonally in half to create (128) triangle wedges.
2. Sew (E) triangle wedge to two opposite sides of a D 2-5/8” square. In so doing, there will be 1/4” ‘ears’ of the triangles extending at each end. Here’s how: Fold the triangle in half, marking the center. Do the same to the square. Match those points, and the ‘ears’ will be at the ends. The row of stitching enters and exits in the ‘V’ where the ‘ear’ meets the square. Make (32) using (64) of the triangles. The seams are directed to the D square.
3. Add 2 more Step 1 (E) triangles to the Step 2 units, in the same manner. Make 32. Press gently in either direction. Square to 3-1/2”. Save until Step 11.
4. Sew B right facing half rectangle along the left side of a C triangle wedge. See the placement diagram on the template. Make 128. Because the remaining edge of C fabric is bias, NO NOT PRESS. Carefully direct the seam toward the wedge.
5. Sew A left facing half rectangle along the right edge of the Step 4 units. Make 128. Press gently. Square to 3-1/2”.
SAMPLE KEY/SKU QTY CUT
AMini-Medallion3276-11Light Black
1/2 YD (4) 3-1/2” x WOF strips, subcut (128) Left facing half rectangles (see template)
BJackie’s Paisley619-99Black
1/2 YD(4) 3-1/2” x WOF strips, subcut (128) Right facing half rectangles (see template)
E
DWispy Scroll617-99Black
1/2 YD(1) 10” strip, for 1-1/2” finished HST’s(2) 2-5/8” x WOF strips, subcut (32) 2-5/8” squares
C
Twirling Leaves6123-99Black
5/8 YD (1) 10” strip, for 1-1/2” finished HST’s(4) 2-5/8” x WOF strips, subcut (64) 2-5/8” squares
WOF= WIDTH OF FABRIC | *SEW STRIPS VIA SHORT ENDS
Jackie’s Paisley619-72Beige
3/4 YD (7) 3-1/2” x WOF strips, subcut (128) Triangle Wedges (see template)
FTwirling Leaves6123-72Beige
1-1/4 YD (4) 10” strips, for 1-1/2” finished HST’s
I
HLilac Tonal618-99Black
1-1/4 YD
(2) 14” x WOF strips, subcut (4) 14” squares (2) 7-1/2” squares (6) 2” x WOF strips*; INSIDE BORDER
G
Mini Scroll616-99Black
1-1/4 YD(14) 2-1/2” x WOF strips*; subcut (7) 2-1/2” strips; BINDING (7) 2-1/2” strips - OUTER BORDER 2
Garden Vine6124-72Beige
7/8 YD (2) 10” strips for 1-1/2” finished HST’s(7) 1” x WOF strips* - OUTER BORDER 1
E
E
E
D
D
E
E
D
E
E
B
C
A
Note from the Designer
This lovely quilt is not difficult, though it is time
consuming. Each of the 32 star blocks has 49
pieces. Take your time!
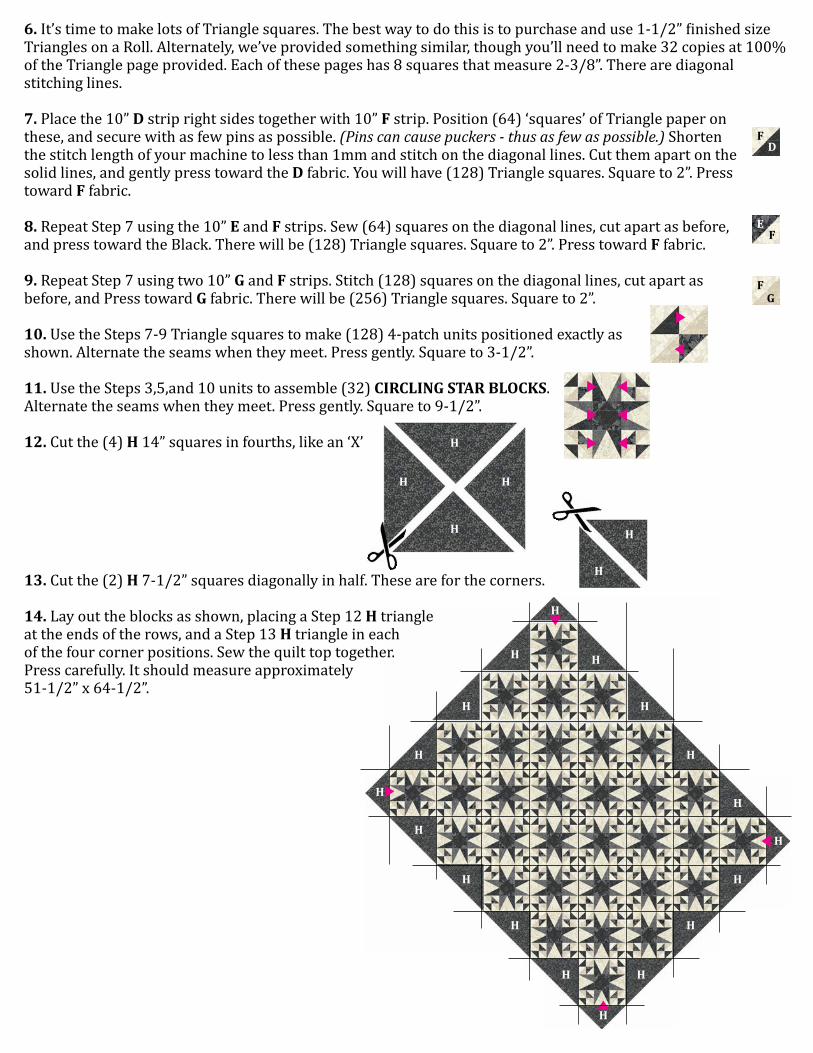
6. It’s time to make lots of Triangle squares. The best way to do this is to purchase and use 1-1/2” finished size Triangles on a Roll. Alternately, we’ve provided something similar, though you’ll need to make 32 copies at 100% of the Triangle page provided. Each of these pages has 8 squares that measure 2-3/8”. There are diagonal stitching lines.
7. Place the 10” D strip right sides together with 10” F strip. Position (64) ‘squares’ of Triangle paper on these, and secure with as few pins as possible. (Pins can cause puckers - thus as few as possible.) Shorten the stitch length of your machine to less than 1mm and stitch on the diagonal lines. Cut them apart on the solid lines, and gently press toward the D fabric. You will have (128) Triangle squares. Square to 2”. Press toward F fabric.
8. Repeat Step 7 using the 10” E and F strips. Sew (64) squares on the diagonal lines, cut apart as before, and press toward the Black. There will be (128) Triangle squares. Square to 2”. Press toward F fabric.
9. Repeat Step 7 using two 10” G and F strips. Stitch (128) squares on the diagonal lines, cut apart as before, and Press toward G fabric. There will be (256) Triangle squares. Square to 2”.
10. Use the Steps 7-9 Triangle squares to make (128) 4-patch units positioned exactly as shown. Alternate the seams when they meet. Press gently. Square to 3-1/2”.
11. Use the Steps 3,5,and 10 units to assemble (32) CIRCLING STAR BLOCKS. Alternate the seams when they meet. Press gently. Square to 9-1/2”.
12. Cut the (4) H 14” squares in fourths, like an ‘X’
13. Cut the (2) H 7-1/2” squares diagonally in half. These are for the corners.
14. Lay out the blocks as shown, placing a Step 12 H triangle at the ends of the rows, and a Step 13 H triangle in each of the four corner positions. Sew the quilt top together. Press carefully. It should measure approximately 51-1/2” x 64-1/2”.
DF
FE
FG
H
H
H
H
H
H
H
H
H
H
H
H
H
H
H
H H
H
H
H
H
H
H
H

Border Assembly: MEASURE WIDTH AND LENGTH OF THE QUILT TOP TO ENSURE BORDER SIZES, BELOW ARE OUR CUTTING SIZES.
15. Sew (2) H 2” x (64-1/2”) strips to left and right side of Quilt Center and (2) H 2” x 54-1/2” to top and bottom. Press gently.
16. Sew (2) G 2” x (67-1/2”) strips to left and right side of Quilt Center and (2) G 2” x 55-1/2” to top and bottom. Press gently.
17. Sew (2) I 2” x (68-1/2”) strips to left and right side of Quilt Center and (2) G 2” x 59-1/2” to top and bottom. Press gently.
18. Layer and quilt. We suggest curvey lines that accentuate the curved appearance of the blocks. Bind with the strips indicated following the directions with the Binding Miter Tool. There is a video of this fabulous tool at www.animasquilts.com/video.html
FINISHING : Cut batting and backing 3” larger than top on all sides. Layer backing, batting
and top together and baste or pin. When quilting is completed, trim excess batting and
backing. Bind as usual. Finished Quilt Size: 59” W x 72” L
Note: If this Benartex pattern is included in a kit, any questions about the kit should be addressed to
the vendor from whom you bought it.
QUILT DIAGRAM
H
IG
H
IG
HI G H IG

Cut from 3-1/2” strips, theseHalf-Rectangles ‘finish’ at 1-1/2” x 3”
For best results, use the RecsTool from a Tri Recs set ora Half Rectangle Tool from Nifty Notions, or similar.
How to Cut: Cut SINGLE layer. Do NOT Flip - simply Spin.
Right FacingLeft facing
Print at 100%
Test SquareThis measures 1”
Base Triangle
How to Cut: Cut SINGLE layer. Do NOT Flip - simply Spin.

1”-1/2 Triangle Paper
Stitch on the dotted lines.Cut on the solid lines.
Print at 100%