blood glucose monitoring system - arkray usa · thank you for choosing the glucocard 01 blood...
TRANSCRIPT
User Instruction Manual Read this User Instruction Manual carefully before you start testing.
BLOOD GLUCOSE MONITORING SYSTEM

CAUTION: Before using any product to test your blood sugar (blood glucose), read all instructions and practice the test. Do all quality control checks as directed and consult with a diabetes healthcare professional.

Introduction . . . . . . . . . . . . . . . . . . . . . . . . . . . . . . . . . . . . . . . . . . . 5 Intended Use . . . . . . . . . . . . . . . . . . . . . . . . . . . . . . . . . . . . . . . 6 Important Safety Instructions . . . . . . . . . . . . . . . . . . . . . . . . . . . 6 Warnings, Precautions & Limitations . . . . . . . . . . . . . . . . . . . . . 8Understanding the GLUCOCARD 01 Blood Glucose Meter . . . . . . 11 Changing the Battery . . . . . . . . . . . . . . . . . . . . . . . . . . . . . . . . 14 Meter Set-up . . . . . . . . . . . . . . . . . . . . . . . . . . . . . . . . . . . . . . . . . 17 Basic Rules . . . . . . . . . . . . . . . . . . . . . . . . . . . . . . . . . . . . . . . . 17 Audible Beep . . . . . . . . . . . . . . . . . . . . . . . . . . . . . . . . . . . . . . 20 Year. . . . . . . . . . . . . . . . . . . . . . . . . . . . . . . . . . . . . . . . . . . . . . 22 Month/Day . . . . . . . . . . . . . . . . . . . . . . . . . . . . . . . . . . . . . . . . 23 Hour/Minute . . . . . . . . . . . . . . . . . . . . . . . . . . . . . . . . . . . . . . . 24 Test Averaging . . . . . . . . . . . . . . . . . . . . . . . . . . . . . . . . . . . . . 25 Ending Set-up. . . . . . . . . . . . . . . . . . . . . . . . . . . . . . . . . . . . . . 26Performing a Control Solution Test . . . . . . . . . . . . . . . . . . . . . . . . 27 Troubleshooting Control Solution Test . . . . . . . . . . . . . . . . . . . 34
TABLE OF CONTENTS
3
Blood Glucose Testing . . . . . . . . . . . . . . . . . . . . . . . . . . . . . . . . . . . . . . . . 37 Obtaining a Drop of Blood . . . . . . . . . . . . . . . . . . . . . . . . . . . . . . . . . . 37 Performing a Blood Glucose Test . . . . . . . . . . . . . . . . . . . . . . . . . . . . . 40 Flagging Test Results . . . . . . . . . . . . . . . . . . . . . . . . . . . . . . . . . . . . . . 44Cleaning & Disinfecting Meter & Lancing Device . . . . . . . . . . . . . . . . . . . 46Alternate Site Testing (AST) . . . . . . . . . . . . . . . . . . . . . . . . . . . . . . . . . . . . 52Downloading Test Results to a Computer . . . . . . . . . . . . . . . . . . . . . . . . . 60Understanding Test Results . . . . . . . . . . . . . . . . . . . . . . . . . . . . . . . . . . . . 61 Recalling Results - Entering Memory Mode. . . . . . . . . . . . . . . . . . . . . . . . 67Maintenance . . . . . . . . . . . . . . . . . . . . . . . . . . . . . . . . . . . . . . . . . . . . . . . 71 Display Screen and Error Messages . . . . . . . . . . . . . . . . . . . . . . . . . . . 71 Storage and Handling . . . . . . . . . . . . . . . . . . . . . . . . . . . . . . . . . . . . . . 76Product Information . . . . . . . . . . . . . . . . . . . . . . . . . . . . . . . . . . . . . . . . . . 78 ProductSpecifications . . . . . . . . . . . . . . . . . . . . . . . . . . . . . . . . . . . . . 78 Warranty. . . . . . . . . . . . . . . . . . . . . . . . . . . . . . . . . . . . . . . . . . . . . . . . 79
4
Thank you for choosing the GLUCOCARD 01 Blood Glucose Monitoring System. This system measures blood glucose in fresh capillary whole blood. Results are shown as plasma values. This makes it easy to compare the GLUCOCARD 01 blood glucose meter and lab results.
Please read this manual before using the system. If you have any questions, call ARKRAY Customer Service at 800.566.8558 (24 hours a day, 7 days a week, USA and Canada only). Contact your healthcare professional with questions if you are unable to reach Customer Service.
INTRODUCTION
5

6
Intended UseThe GLUCOCARD 01 Blood Glucose Monitoring System is intended for the quantitative measurement of glucose in fresh capillary whole blood samples drawnfromthefingertipsorpalm.Testingisdoneoutsidethebody(In Vitro diagnostic use). It is indicated for use at home by persons with diabetes as an aid to monitor the effectiveness of diabetes control. It is not intended for the diagnosis of or screening for Diabetes Mellitus, and is not intended for use on neonates. It is intended for single patient use and should not be shared with other individuals.
Important Safety Instructions
WARNING:•Themeterandlancingdeviceareforsinglepatientuse.Donotshare
them with anyone including other family members! Do not use on multiple patients!
•Allpartsofthekitareconsideredbiohazardousandcanpotentiallytransmit infectious diseases, even after you have performed cleaning and disinfection.¹,²
7
Cleaning & Disinfecting Meter & Lancing DeviceAll parts of the blood glucose meter and lancing device are considered biohazardousandcanpotentiallytransmitinfectiousdiseases.CLEANINGremovesdirtandothervisiblematerialwhereasDISINFECTINGdestroysorganisms that can cause infection or disease such as Hepatitis B, C, and HIV. For complete cleaning and disinfecting instructions see page 48 of this manual.
¹ “FDAPublicHealthNotification:UseofFingerstickDevicesonMorethanOnePersonPosesRiskfor TransmittingBloodbornePathogens:InitialCommunication”(2010)http://www.fda.gov/MedicalDevices/ Safety/AlertsandNotices/ucm224025.htm
² “CDCClinicalReminder:UseofFingerstickDevicesonMorethanOnePersonPosesRiskforTransmitting BloodbornePathogens”(2010)http://www.cdc.gov/injectionsafety/Fingerstick-DevicesBGM.html
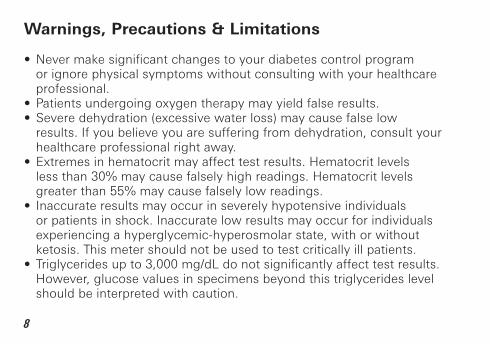
Warnings, Precautions & Limitations
•Nevermakesignificantchangestoyourdiabetescontrolprogram or ignore physical symptoms without consulting with your healthcare professional.•Patientsundergoingoxygentherapymayyieldfalseresults.•Severedehydration(excessivewaterloss)maycausefalselow results. If you believe you are suffering from dehydration, consult your healthcare professional right away.•Extremesinhematocritmayaffecttestresults.Hematocritlevels less than 30% may cause falsely high readings. Hematocrit levels greater than 55% may cause falsely low readings.•Inaccurateresultsmayoccurinseverelyhypotensiveindividuals or patients in shock. Inaccurate low results may occur for individuals experiencingahyperglycemic-hyperosmolarstate,withorwithout ketosis. This meter should not be used to test critically ill patients.•Triglyceridesupto3,000mg/dLdonotsignificantlyaffecttestresults. However, glucose values in specimens beyond this triglycerides level should be interpreted with caution.
8
9
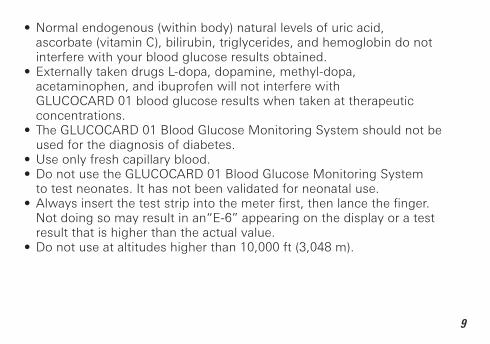
•Normalendogenous(withinbody)naturallevelsofuricacid, ascorbate (vitamin C), bilirubin, triglycerides, and hemoglobin do not interfere with your blood glucose results obtained.•ExternallytakendrugsL-dopa,dopamine,methyl-dopa, acetaminophen, and ibuprofen will not interfere with GLUCOCARD 01 blood glucose results when taken at therapeutic concentrations.•TheGLUCOCARD01BloodGlucoseMonitoringSystemshouldnotbe
used for the diagnosis of diabetes. •Useonlyfreshcapillaryblood.•DonotusetheGLUCOCARD01BloodGlucoseMonitoringSystem to test neonates. It has not been validated for neonatal use.•Alwaysinserttheteststripintothemeterfirst,thenlancethefinger. Notdoingsomayresultinan“E-6”appearingonthedisplayoratest result that is higher than the actual value. •Donotuseataltitudeshigherthan10,000ft(3,048m).
10
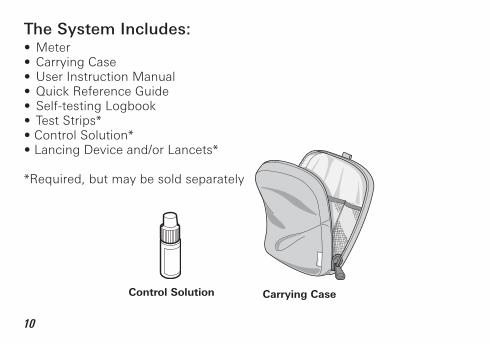
The System Includes:•Meter•CarryingCase•UserInstructionManual•QuickReferenceGuide•Self-testingLogbook•TestStrips*•ControlSolution*•LancingDeviceand/orLancets*
*Required,butmaybesoldseparately
Control Solution Carrying Case
11
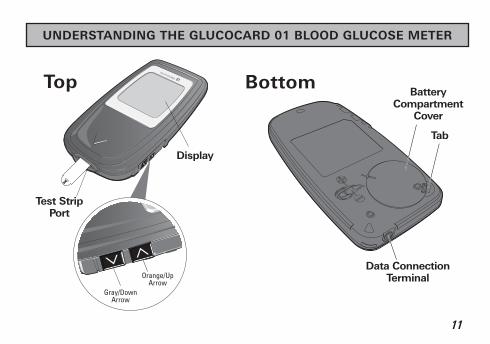
UNDERSTANDING THE GLUCOCARD 01 BLOOD GLUCOSE METER
BottomBattery
Compartment Cover
Display
Data Connection Terminal
Test Strip Port
Orange/UpArrow
Gray/DownArrow
Top
Tab
12
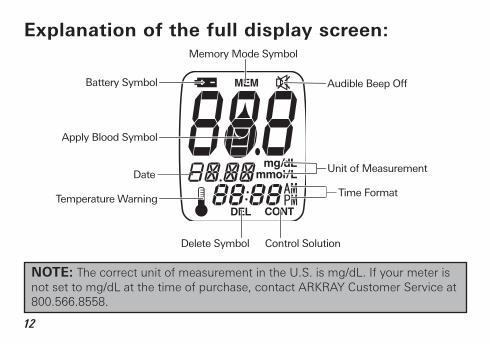
NOTE: The correct unit of measurement in the U.S. is mg/dL. If your meter is not set to mg/dL at the time of purchase, contact ARKRAY Customer Service at 800.566.8558.
Memory Mode Symbol
Battery Symbol
Apply Blood Symbol
Temperature Warning
Audible Beep Off
Unit of Measurement
Time Format
Delete Symbol Control Solution
Date
Explanation of the full display screen:
13
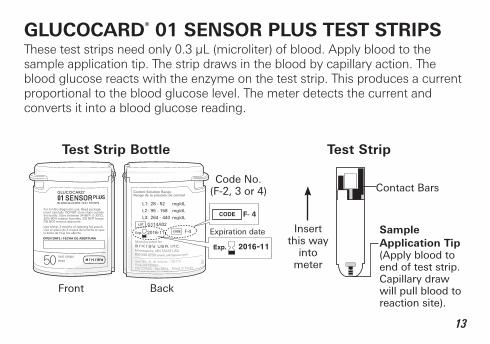
GLUCOCARD® 01 SENSOR PLUS TEST STRIPSThese test strips need only 0.3 µL (microliter) of blood. Apply blood to the sample application tip. The strip draws in the blood by capillary action. The bloodglucosereactswiththeenzymeontheteststrip.Thisproducesacurrentproportional to the blood glucose level. The meter detects the current and converts it into a blood glucose reading.
Test Strip Bottle
Front Back
Test Strip
Sample Application Tip (Apply blood to end of test strip. Capillary draw will pull blood to reaction site).
Code No.(F-2, 3 or 4) Contact Bars
Insert this way
into meter
14
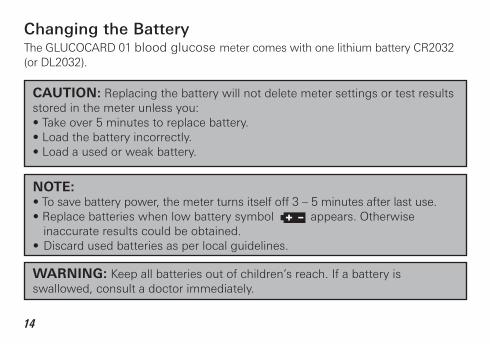
CAUTION: Replacing the battery will not delete meter settings or test results storedinthemeterunlessyou:•Takeover5minutestoreplacebattery.•Loadthebatteryincorrectly.•Loadausedorweakbattery.
Changing the BatteryThe GLUCOCARD 01 blood glucose meter comes with one lithium battery CR2032 (or DL2032).
WARNING: Keep all batteries out of children’s reach. If a battery is swallowed, consult a doctor immediately.
NOTE:•Tosavebatterypower,themeterturnsitselfoff3–5minutesafterlastuse.•Replacebatterieswhenlowbatterysymbolappears.Otherwise inaccurate results could be obtained.•Discardusedbatteriesasperlocalguidelines.
15
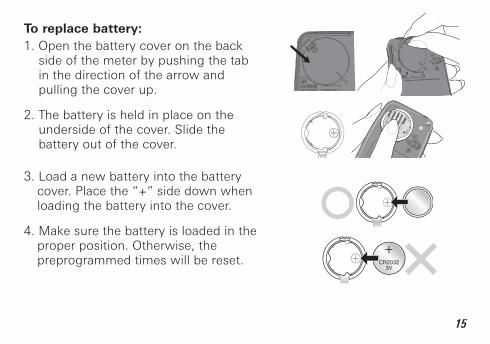
To replace battery:1. Open the battery cover on the back side of the meter by pushing the tab in the direction of the arrow and pulling the cover up.
2. The battery is held in place on the underside of the cover. Slide the battery out of the cover.
3. Load a new battery into the battery cover.Placethe“+”sidedownwhen loading the battery into the cover.
4. Make sure the battery is loaded in the proper position. Otherwise, the preprogrammed times will be reset.

16
5. Put the battery cover back into correct position and snap to close.
Iftheclocksettinghasbeendeleted,either“12:00”or“0:00”willblinkwhen you put a test strip into the meter. The low battery symbol means you need to replace the battery as soon as possible. Discard used batteries as per local guidelines.
17
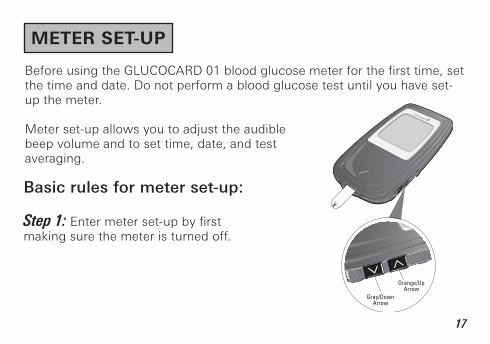
BeforeusingtheGLUCOCARD01bloodglucosemeterforthefirsttime,setthe time and date. Do not perform a blood glucose test until you have set-up the meter.
Meterset-upallowsyoutoadjusttheaudiblebeep volume and to set time, date, and test averaging.
Basic rules for meter set-up:
Step 1:Entermeterset-upbyfirstmaking sure the meter is turned off.
METER SET-UP
Orange/UpArrow
Gray/DownArrow
18
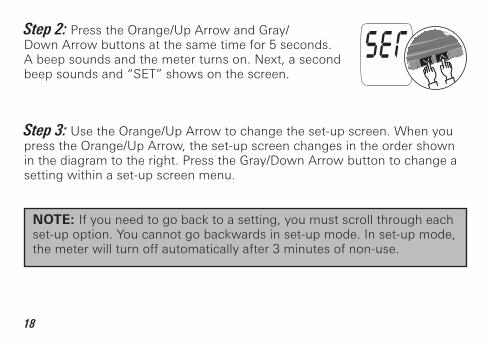
Step 2: Press the Orange/Up Arrow and Gray/ Down Arrow buttons at the same time for 5 seconds. Abeepsoundsandthemeterturnson.Next,asecondbeepsoundsand“SET”showsonthescreen.
Step 3: Use the Orange/Up Arrow to change the set-up screen. When you press the Orange/Up Arrow, the set-up screen changes in the order shown in the diagram to the right. Press the Gray/Down Arrow button to change a setting within a set-up screen menu.
NOTE: If you need to go back to a setting, you must scroll through each set-up option. You cannot go backwards in set-up mode. In set-up mode, the meter will turn off automatically after 3 minutes of non-use.

19
<Power OFF>
Gray Arrow
Ending Set-up
Setting the Year
2
8
OrangeArrow
OrangeArrow
OrangeArrow
OrangeArrow
OrangeArrow
Return
Setting the Hour5
Setting the Day
4
Setting theMinute6
Setting the Month
3
Setting TestAveraging7
OrangeArrow
OrangeArrow
OrangeArrow
OrangeArrow
Setting theAudible Beep
1
20
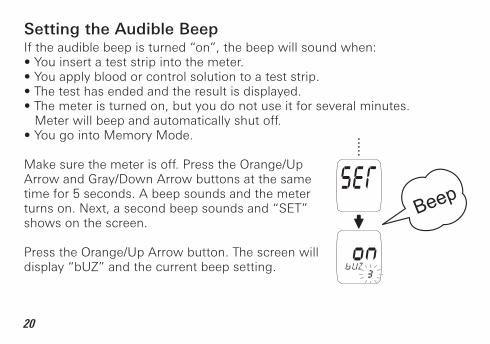
Setting the Audible BeepIftheaudiblebeepisturned“on”,thebeepwillsoundwhen:•Youinsertateststripintothemeter.•Youapplybloodorcontrolsolutiontoateststrip.•Thetesthasendedandtheresultisdisplayed.•Themeteristurnedon,butyoudonotuseitforseveralminutes. Meter will beep and automatically shut off.•YougointoMemoryMode.
Make sure the meter is off. Press the Orange/Up Arrow and Gray/Down Arrow buttons at the same time for 5 seconds. A beep sounds and the meter turnson.Next,asecondbeepsoundsand“SET” shows on the screen.
Press the Orange/Up Arrow button. The screen will display“bUZ”andthecurrentbeepsetting.
Beep
21
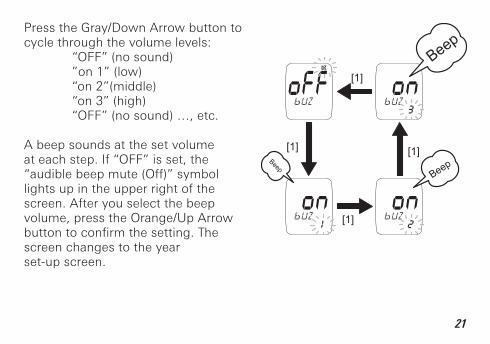
Press the Gray/Down Arrow button to cyclethroughthevolumelevels: “OFF”(nosound) ”on1”(low) “on2”(middle) “on3”(high) “OFF”(nosound)…,etc.
A beep sounds at the set volume ateachstep.If“OFF”isset,the“audiblebeepmute(Off)”symbollights up in the upper right of the screen. After you select the beep volume, press the Orange/Up Arrow buttontoconfirmthesetting.Thescreen changes to the year set-up screen.
Beep
BeepBeep
[1]
[1]
[1]
[1]

22
Setting the Year
In the year set-up screen, the last two digits of the currently set year appear at the top of the screen. “yER”appearsinthemiddleofthescreen.Allfourdigits of the currently set year appear at the bottom of the screen. The last two digits will blink.
Press the Gray/Down Arrow to change the last two digits of the year to the correct year. After you set the year, press the Orange/Up Arrow button to confirmthesetting.Thescreenchangestothemonth set-up screen.
[1]
[2]
[3]

23
Setting the MonthPress the Gray/Down Arrow button to change the month. After you set the month, press the Orange/Up Arrow buttontoconfirmthesetting.Thescreenchangestotheday set-up screen.
Setting the DayPress the Gray/Down Arrow button to change the day. After you set the day, press the Orange/Up Arrow button toconfirmthesetting.Thescreenchangestothehourset-up screen.
[1]
[2]
[3]
[4]

24
Setting the HourPress the Gray/Down Arrow button to change the hour. After you set the hour, press the Orange/Up Arrow buttontoconfirmthesetting.Thescreenchangestotheminute set-up screen.
Setting the MinutePress the Gray/Down Arrow button to change the minute. After you set the minute, press the Orange/UpArrowbuttontoconfirmthesetting.Thescreenchanges to the test averaging set-up screen.
[1]
[2]
[3]
[4]

25
Setting Test Averaging
Press the Gray/Down Arrow button to cycle throughthetestaveragingchoices:“oFF”(notdisplayed),“14”(14-dayaverage),or“30”(30-dayaverage).“AVE”appearsnearthemiddle of the screen.
If you select either 14-day or 30-day averaging, your average test result will appear when you recall results from memory. See page 69.
After you set test averaging, press the Orange/UpArrowbuttontoconfirmthesetting. The display changes to the data download baud rate set-up screen.
NOTE: “Lo”resultsareincludedas20mg/dLintheaverages.“Hi”resultsare included as 600 mg/dL in the averages.
26
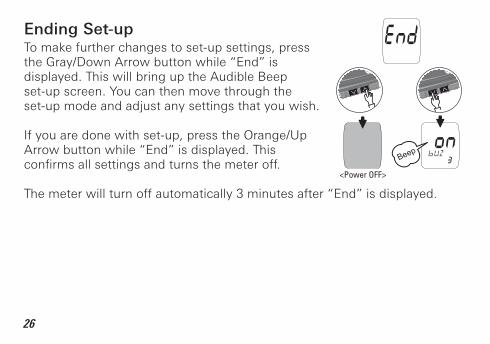
Ending Set-up To make further changes to set-up settings, press theGray/DownArrowbuttonwhile“End”isdisplayed. This will bring up the Audible Beep set-up screen. You can then move through the set-upmodeandadjustanysettingsthatyouwish.
If you are done with set-up, press the Orange/Up Arrowbuttonwhile“End”isdisplayed.Thisconfirmsallsettingsandturnsthemeteroff.
Themeterwillturnoffautomatically3minutesafter“End”isdisplayed.
<Power OFF>
Beep

27
It is recommended to use GLUCOCARD®01CONTROLtocheckif:•themeterandteststripsareworkingcorrectlyasasystem.•youaretestingcorrectly.
Call your local supplier or pharmacy to order control solution. If they do not stock it, call ARKRAY Order Services at 800.566.8558 (USA and Canada only).
PERFORM A CONTROL SOLUTION TEST
28
It is recommended to perform a Control Solution Test:•Whenyouopenanewbottleofteststrips.•Wheneveryoususpectthemeterorteststripsmaynotbe functioning properly.•Iftestresultsappeartobeabnormallyhighorloworarenot consistent with clinical symptoms.•Theteststripbottlehasbeenleftopenorhasbeenexposedto temperatures below 34°F (1°C) or above 86°F (30°C), or humidity levels outside the range of 20%-80% relative humidity.•Tocheckyourtechnique.•WhentheGLUCOCARD01bloodglucosemeterhasbeen dropped or stored below 32°F (0°C) or above 122°F (50°C).
IMPORTANT:•UseonlywithGLUCOCARD01bloodglucosemeterand GLUCOCARD01SENSORPLUSbloodglucoseteststrips.
29
•GLUCOCARD01CONTROLisnotintendedforhuman consumption. Do not drink.•Donotapplytoeye.Contactyourhealthcareprofessional immediatelyifsolutionisswallowed,injected,orappliedtotheeye.•Dyeincontrolsolutionmaystainskin,clothing,orsurfaces.•Storethecontrolsolutionbetween34-86°F(1-30°C).Keepawayfrom directsunlight,fluorescentlight,andheat.Donotfreeze.•Usebeforetheexpirationdateprintedonbottle.•Usethecontrolsolutionwithin3monthsoffirstopening.Itis recommended that you write the date of opening on the control solutionbottlelabel(OPENDATE)asaremindertodisposeofthe opened solution after 3 months.•Alwaysreplacethecapimmediatelyafteruse.•GLUCOCARD01CONTROLisnotacleaningsolution.Donotclean your GLUCOCARD 01 blood glucose meter with GLUCOCARD 01 CONTROL.•UsetheControlSolutionbetween72-82°F(22-28°C).
30
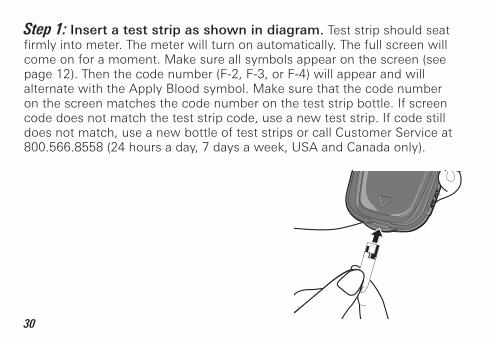
Step 1: Insert a test strip as shown in diagram. Test strip should seat firmlyintometer.Themeterwillturnonautomatically.Thefullscreenwillcome on for a moment. Make sure all symbols appear on the screen (see page 12). Then the code number (F-2, F-3, or F-4) will appear and will alternate with the Apply Blood symbol. Make sure that the code number on the screen matches the code number on the test strip bottle. If screen code does not match the test strip code, use a new test strip. If code still does not match, use a new bottle of test strips or call Customer Service at 800.566.8558 (24 hours a day, 7 days a week, USA and Canada only).
31
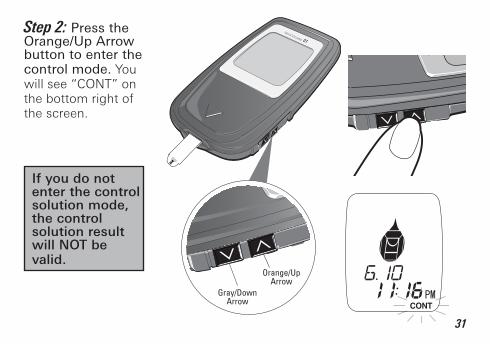
Step 2: Press the Orange/Up Arrow button to enter the control mode. You willsee“CONT”onthe bottom right of the screen.
If you do not enter the control solution mode, the control solution result will NOT be valid.
Orange/UpArrow
Gray/DownArrow
32
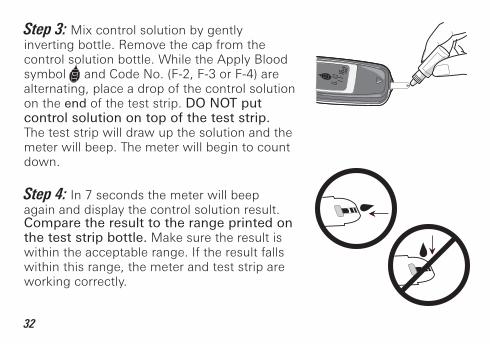
Step 3:Mixcontrolsolutionbygentlyinverting bottle. Remove the cap from the control solution bottle. While the Apply Blood symbolandCodeNo.(F-2,F-3orF-4)arealternating, place a drop of the control solution on the end of the test strip. DO NOT put control solution on top of the test strip. The test strip will draw up the solution and the meter will beep. The meter will begin to count down.
Step 4: In 7 seconds the meter will beep again and display the control solution result.Compare the result to the range printed on the test strip bottle. Make sure the result is within the acceptable range. If the result falls within this range, the meter and test strip are working correctly.
33
NOTE: Control solution test results are not included in the averages.
Do not use the system if control solution result is out of range. See Troubleshooting Control Solution Test (page 34).
Result is automatically stored in memory. See page 69 for additional information
Step 5: Remove test strip. Dispose of the used test strip.
Control solutions are available in three (3) levels - L1, L2, and L3.
Repeat Steps 1-5 with other Control Solution levels as per recommendations of your healthcare professional.
Call your local supplier or pharmacy to order control solution. If they do not stock it, call ARKRAY Order Services at 800.566.8558 (USA and Canada only)
34
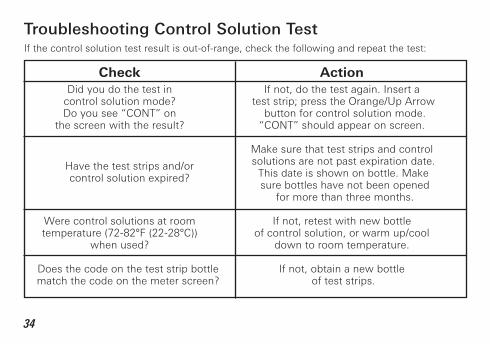
Troubleshooting Control Solution TestIfthecontrolsolutiontestresultisout-of-range,checkthefollowingandrepeatthetest:
Check Action Did you do the test in If not, do the test again. Insert a control solution mode? test strip; press the Orange/Up Arrow Doyousee“CONT”on buttonforcontrolsolutionmode. thescreenwiththeresult? “CONT”shouldappearonscreen. Make sure that test strips and control solutionsarenotpastexpirationdate. This date is shown on bottle. Make sure bottles have not been opened for more than three months. Were control solutions at room If not, retest with new bottle temperature (72-82°F (22-28°C)) of control solution, or warm up/cool when used? down to room temperature. Does the code on the test strip bottle If not, obtain a new bottle match the code on the meter screen? of test strips.
Have the test strips and/or controlsolutionexpired?

35
Check Action Make sure test strip is inserted all the way into test strip port. See diagram on page 30.
Did you follow the Reread “Performing a Control procedurecorrectly? SolutionTest”(pages27-33)andretest.
Were test strips stored correctly (between 34-86°F (1-30°C))? Was the bottle cap replaced immediately after removing a test strip? Is the meter damaged? If yes, contact ARKRAY Customer Service at Does it show an error code? 800.566.8558.
Did you insert test stripfirmlyintometer?
If not, retest with a new bottle of test strips.
36
Does your Control Solution result still read outside the range printed on the teststripbottle?Ifyes,thesystemmaynotbeworkingcorrectly.DONOTUSE the system to test your blood glucose until the control solution result is within range. If you need help, please call ARKRAY Customer Service at 800.566.8558 (24 hours a day, 7 days a week, USA and Canada). Contact your diabetes healthcare professional if you cannot reach Customer Service.

37
BLOOD GLUCOSE TESTING
Obtaining a Drop of BloodStep 1: Wash hands with soap and warm water. Dry hands thoroughly. If you use alcohol wipes to cleanse fingers,makesuretheareaisdrybeforelancingfinger.Residual alcohol may lead to inaccurate readings.
Step 2: Let the arm hang down for 10 to 15 seconds. (Holding the arm below the heart and massaging thewrist,palmandfingermakesiteasiertoobtaina blood drop).
Step 3:Chooseasiteonthesideofafingertiptominimizepain.
38
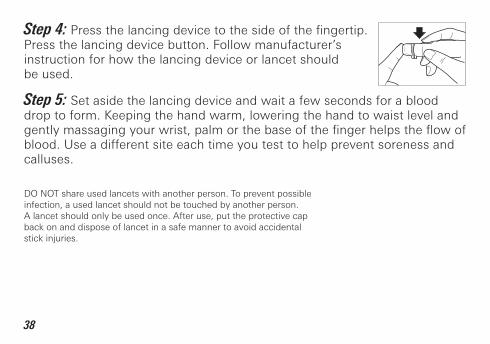
Step 4:Pressthelancingdevicetothesideofthefingertip. Press the lancing device button. Follow manufacturer’s instruction for how the lancing device or lancet should be used.
Step 5: Set aside the lancing device and wait a few seconds for a blood drop to form. Keeping the hand warm, lowering the hand to waist level and gentlymassagingyourwrist,palmorthebaseofthefingerhelpstheflowofblood. Use a different site each time you test to help prevent soreness and calluses.
DONOTshareusedlancetswithanotherperson.Topreventpossibleinfection, a used lancet should not be touched by another person. A lancet should only be used once. After use, put the protective cap back on and dispose of lancet in a safe manner to avoid accidental stickinjuries.
39
NOTE: Do not use the lancet if the cap is missing or damaged.
WARNING: Lancing devices, lancets and meters are for single-patient use only and should never be shared with another person, even a family member. This lancing device should not be used for multi-patient testing by healthcare providers or at healthcare provider sites.Allpartsofthekitareconsideredbiohazardousandcanpotentiallytransmitinfectious diseases, even after you have performed cleaning and disinfection.
40
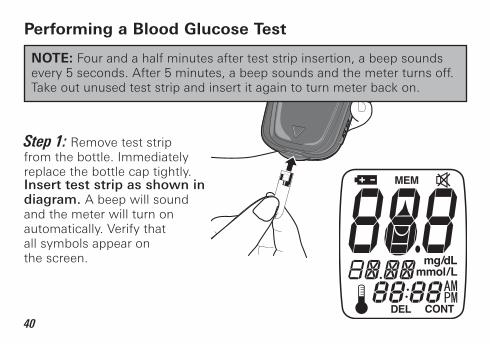
Performing a Blood Glucose Test
Step 1: Remove test strip from the bottle. Immediately replace the bottle cap tightly. Insert test strip as shown in diagram. A beep will sound and the meter will turn on automatically. Verify that all symbols appear on the screen.
NOTE: Four and a half minutes after test strip insertion, a beep sounds every 5 seconds. After 5 minutes, a beep sounds and the meter turns off. Take out unused test strip and insert it again to turn meter back on.

41
Step 2: The beep will sound again. The Apply Blood symbol and the code number (F-2, F-3, or F-4) will alternate on the screen. Verify that the code number on the screen matches the code number printed on the bottle. If the code number does not match, the meter may give a false reading. If code does not match, use a new strip. If code still does not match, use a new bottle of test strips or call Customer Service at 800.566.8558 (24 hours a day, 7 days a week, USA and Canada only). Verify that the date and time appear on the screen and are correct. If date and time are not correct, reset them (see Meter Set-up, page 17).
42
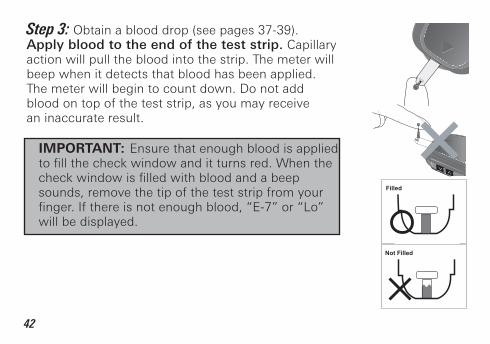
Step 3: Obtain a blood drop (see pages 37-39). Apply blood to the end of the test strip. Capillary action will pull the blood into the strip. The meter will beep when it detects that blood has been applied. The meter will begin to count down. Do not add blood on top of the test strip, as you may receive an inaccurate result.
IMPORTANT: Ensure that enough blood is applied tofillthecheckwindowanditturnsred.Whenthecheckwindowisfilledwithbloodandabeepsounds, remove the tip of the test strip from your finger.Ifthereisnotenoughblood,“E-7”or“Lo”will be displayed.
Not FilledFilled
Not FilledFilled
43
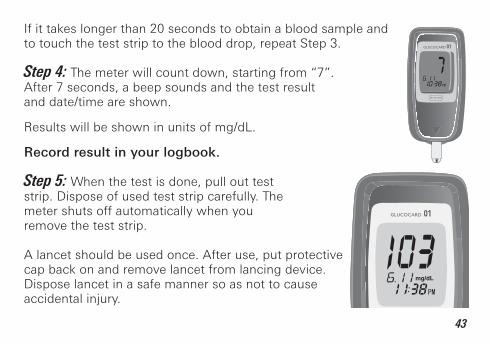
If it takes longer than 20 seconds to obtain a blood sample and to touch the test strip to the blood drop, repeat Step 3.
Step 4:Themeterwillcountdown,startingfrom“7”.After 7 seconds, a beep sounds and the test result and date/time are shown.
Results will be shown in units of mg/dL.
Record result in your logbook.
Step 5: When the test is done, pull out test strip. Dispose of used test strip carefully. The meter shuts off automatically when you remove the test strip.
A lancet should be used once. After use, put protective cap back on and remove lancet from lancing device. Dispose lancet in a safe manner so as not to cause accidentalinjury.
mg/dL
44
Flagging Test Results
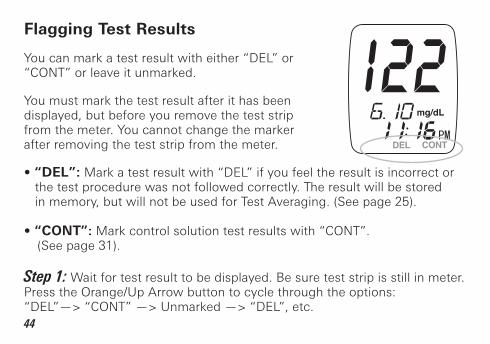
Youcanmarkatestresultwitheither“DEL”or“CONT”orleaveitunmarked.
You must mark the test result after it has been displayed, but before you remove the test strip from the meter. You cannot change the marker after removing the test strip from the meter.
•“DEL”:Markatestresultwith“DEL”ifyoufeeltheresultisincorrector the test procedure was not followed correctly. The result will be stored in memory, but will not be used for Test Averaging. (See page 25).
•“CONT”:Markcontrolsolutiontestresultswith“CONT”. (See page 31).
Step 1: Wait for test result to be displayed. Be sure test strip is still in meter. PresstheOrange/UpArrowbuttontocyclethroughtheoptions: “DEL”—>“CONT”—>Unmarked—>“DEL”,etc.
mg/dL
45
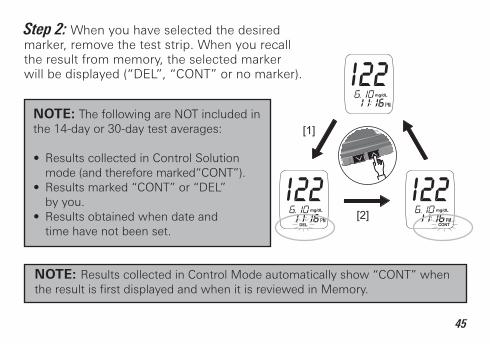
Step 2: When you have selected the desired marker, remove the test strip. When you recall the result from memory, the selected marker willbedisplayed(“DEL”,“CONT”ornomarker).
NOTE: ResultscollectedinControlModeautomaticallyshow“CONT”whentheresultisfirstdisplayedandwhenitisreviewedinMemory.
NOTE: ThefollowingareNOTincludedinthe14-dayor30-daytestaverages:
•ResultscollectedinControlSolution mode(andthereforemarked“CONT”).•Resultsmarked“CONT”or“DEL” by you.•Resultsobtainedwhendateand time have not been set.
[1]
[2]mg/dL mg/dL
mg/dL
46
CLEANING & DISINFECTING METER & LANCING DEVICE
WARNING:• Themeterandlancingdeviceareforsinglepatientuse.Donotsharethem with anyone including other family members! Do not use on multiple patients!• Allpartsofthekitareconsideredbiohazardousandcanpotentiallytransmit
infectious diseases, even after you have performed cleaning and disinfection.¹,²
CLEANINGremovesdirtandothervisiblematerialwhereasDISINFECTINGdestroys organisms that can cause infection or disease such as Hepatitis B, C, and HIV.
Your meter and lancing device should be CLEANEDand DISINFECTED a minimum of once per week and immediately when blood is visible, for up to 2 cleaning and disinfection cycles per week over the 4 year use life of the device.

47
¹ “FDAPublicHealthNotification:UseofFingerstickDevicesonMorethanOnePersonPosesRiskfor TransmittingBloodbornePathogens:InitialCommunication”(2010)http://www.fda.gov/MedicalDevices/ Safety/AlertsandNotices/ucm224025.htm
² “CDCClinicalReminder:UseofFingerstickDevicesonMorethanOnePersonPosesRiskforTransmitting BloodbornePathogens”(2010)http://www.cdc.gov/injectionsafety/Fingerstick-DevicesBGM.html
If meter is being operated by a second person who is providing testing assistance to the user, the meter and lancing device should be cleaned and disinfected prior to use by the second person. In addition, caregivers should wear gloves when testing another person’s blood. Wash hands thoroughly with soap and water after handling the meter, test strips, lancing device or disinfecting wipes.
For technical assistance or questions on cleaning and disinfecting, call ARKRAY Customer Service at 800.566.8558 (24 hours a day, 7 days a week, USA and Canada only).
48
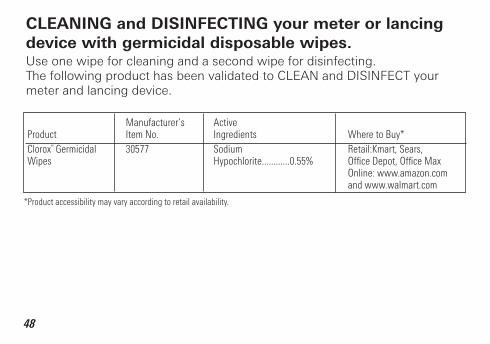
CLEANING and DISINFECTING your meter or lancing device with germicidal disposable wipes. Use one wipe for cleaning and a second wipe for disinfecting.ThefollowingproducthasbeenvalidatedtoCLEANandDISINFECTyourmeter and lancing device.
*Product accessibility may vary according to retail availability.
Manufacturer’s Active Product Item No. Ingredients Where to Buy*Clorox® Germicidal 30577 Sodium Retail: Kmart, Sears, Wipes Hypochlorite............0.55% OfficeDepot,OfficeMax Online: www.amazon.com and www.walmart.com
49
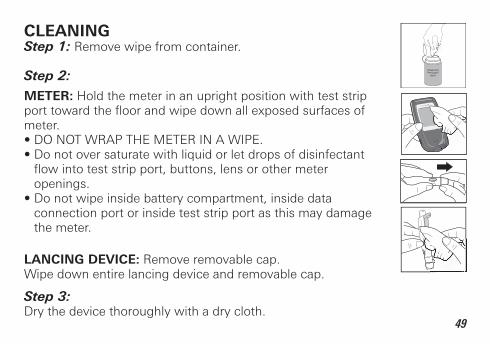
CLEANING Step 1: Remove wipe from container.
Step 2:
METER: Hold the meter in an upright position with test strip porttowardthefloorandwipedownallexposedsurfacesofmeter. •DONOTWRAPTHEMETERINAWIPE.•Donotoversaturatewithliquidorletdropsofdisinfectantflowintoteststripport,buttons,lensorothermeteropenings.
•Donotwipeinsidebatterycompartment,insidedataconnection port or inside test strip port as this may damage the meter.
LANCING DEVICE: Remove removable cap. Wipe down entire lancing device and removable cap.
Step 3: Dry the device thoroughly with a dry cloth.
50
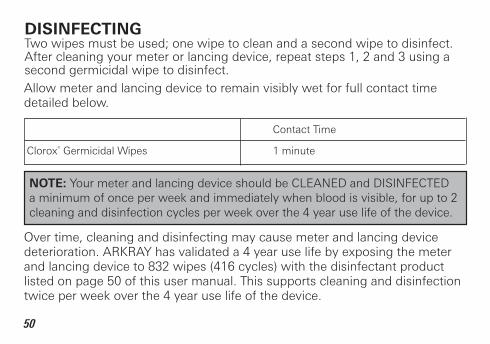
Allow meter and lancing device to remain visibly wet for full contact time detailed below.
Contact Time
Clorox® Germicidal Wipes 1 minute
DISINFECTING Two wipes must be used; one wipe to clean and a second wipe to disinfect. After cleaning your meter or lancing device, repeat steps 1, 2 and 3 using a second germicidal wipe to disinfect.
NOTE:YourmeterandlancingdeviceshouldbeCLEANEDandDISINFECTED a minimum of once per week and immediately when blood is visible, for up to 2 cleaning and disinfection cycles per week over the 4 year use life of the device.
Over time, cleaning and disinfecting may cause meter and lancing device deterioration.ARKRAYhasvalidateda4yearuselifebyexposingthemeterand lancing device to 832 wipes (416 cycles) with the disinfectant product listed on page 50 of this user manual. This supports cleaning and disinfection twice per week over the 4 year use life of the device.

51
Physical signs of deterioration include:•Cloudyorcrackedmeterlens. •Crackedmetercase.•Debrisundermeterlens.•Meterdisplaymissingcomponents.•Lancingdevicecapiscloudyorstreaked.•Bodyoflancingdeviceshowssignsofcracking,swelling,streaking,softening
or brittleness.
Performance signs of deterioration include:•Meterbuttonsnotworkingproperly. •Meterdoesn’tregisterteststrip,controlsolutionorbloodsample.•Meterturnsoff.•Firingbuttononlancingdeviceisstuckandwon’trelease.•Lancingdevicedepthsettingdialisfrozen/stuck.•Lancingdevicedisposal-and-setleverisfrozen/stuck.•Lancingdevicecapcan’tberemovedorreplaced.
If you notice any signs of deterioration, as mentioned above, stop using the device and please call ARKRAY Customer Service at 800.566.8558 (24 hours a day, 7 days a week, USA and Canada only).
52
ALTERNATE SITE TESTING (AST)
Important Information About AST
Sitesotherthanyourfingertipmayhavefewernerveendingssoobtainingabloodsample from these sites may be less painful. The technique for alternate site testing isdifferentfromfingertiptesting.Bloodglucoseresultsfromsitesotherthanyourfingertipcouldbesignificantlydifferentduetobloodglucoselevelschangingrapidlyafterameal,insulin,orexercise.
Consult with your diabetes healthcare professional prior to testing from a site other thanyourfingertips.
Resultsobtainedfromsitesotherthanthefingertipmaydiffersignificantlyasisthecase with all blood glucose monitoring systems. Rapidly changing results are likely tooccuraftereating.Insulindosingandphysicalactivityareshowninthefingertipmore quickly than in alternate sites.AST results must not be used to calibrate continuous glucose monitoring systems or for insulin dose calculations.
53
•Testingbeforeameal. •Youareinafastingstate. •Twohourshavepassedsinceameal. •Twohourshavepassedsinceinsulindosing. •Twohourshavepassedsincephysicalactivity.
•Withintwohoursafterameal. •Withintwohoursafterinsulindosing. •Withintwohoursafterphysicalactivity. •Ifyouhaveahistoryofhypoglycemia,areexperiencinglow blood glucose, or suffer from hypoglycemic unawareness (you cannot tell when you have low blood glucose). •ToconfirmyourbloodglucoselevelifyourASTresultisnot consistent with how you feel. •Duringtimesofstressorillness.
Consider Alternate Site Testing When
Use Fingertip Testing
54
Ask your diabetes healthcare professional about recommended testing procedureswhenoperatingmachineryordrivingacar,asfingertiptestingisusually the preferred method of testing under these circumstances.
Preparing to Test Your Blood Glucose From an Alternate Site
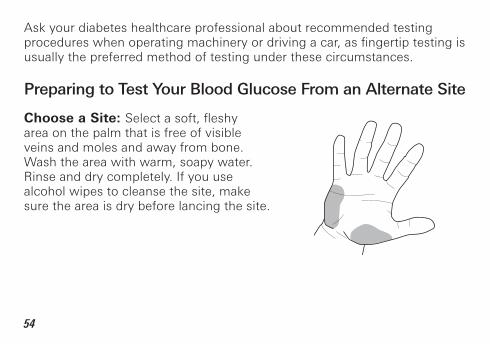
Choose a Site: Selectasoft,fleshyarea on the palm that is free of visible veins and moles and away from bone. Wash the area with warm, soapy water. Rinse and dry completely. If you use alcohol wipes to cleanse the site, make sure the area is dry before lancing the site.
55
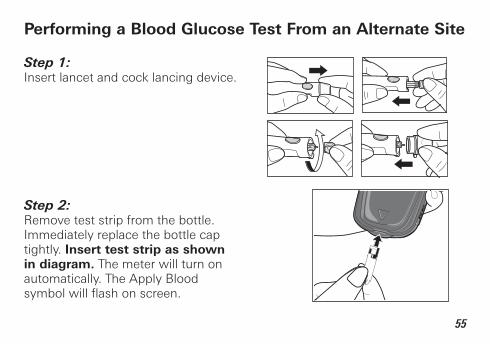
Step 1:Insert lancet and cock lancing device.
Performing a Blood Glucose Test From an Alternate Site
Step 2:Remove test strip from the bottle. Immediately replace the bottle cap tightly. Insert test strip as shown in diagram. The meter will turn on automatically. The Apply Blood symbolwillflashonscreen.

56
b) Firmly hold the cocked lancing device against the clean skin for 5-10 seconds.
Step 3:a) Press and vigorously rub the selected area for 10 seconds until it starts to feel warm to the touch.
c) Press the release button on the lancing device to lance the skin. Drop your hand down to your side and let the blood drop pool to a deep red color. If blood drop does not build bigger, lance again. Look for a round drop of blood.
Actualsize

57
IMPORTANT•Repeatblooddrawiffluidisnotadeepredcolor.
•DONOTTESTBLOODifsampleissmeared,flattenedout,ornotforming a round drop. Repeat steps starting at Step 3.
•Ifittakeslongerthan10SECONDStoobtainabloodsample,and any sample has been applied to the strip, discard strip and use a new strip before proceeding.
Step 4:Pick up the meter. Check screen to make sure Apply BloodSymbolisflashing.Ifmeterhasshutoff,reinsertstrip. Touch the end of the test strip to the blood sample until the reaction site is full. Immediately remove the meter and test strip from the blood drop.
DO NOT push test strip through blood dropand make contact with skin. This may blockoff wicking action into the strip.

58
IMPORTANT
•Wasthesampledeepredincolorandfreeofwateryfluid?•Wasthedroplargeenough(atleast0.3µL)?•Didthereactionsitefillwithenoughbloodallatonce?
Step 5:The meter will count down and display result in 7 seconds.
CONSIDER YOUR RESULT. REPEAT ALTERNATE SITE TEST:•IFthebloodsampleappearedtobedilutedwithclearfluid.•IFyoudidnotvigorouslyrubthetestsite.•IFtheblooddropwasnotlargeenoughtofillthereactionsite.•IFthetestwasaccidentallymarkedasa“Control”result.•IFyourresultwasnotconsistentwithhowyoufeel.•IFmorethan10secondselapsedfromsamplecollectiontomeasurement
(evaporation of the blood sample may cause an inaccurate result).
IF NOT, REPEAT TEST.
Not FilledFilled
59
Any of the listed situations can lead to an inaccurate test result.
If the repeated alternate site result is still not consistent with how you feel, confirmyourbloodglucoselevelwithfingertiptesting.
Step 6: Dispose of used test strip. The meter shuts off automatically. The result is automatically stored in memory with the time and date.
Record result in your logbook.

60
DOWNLOADING TEST RESULTS TO A COMPUTERWe offer a variety of diabetes management software systems to help you download your test results to a computer. For more information on ARKRAY Diabetes Management Software and which software system meets your needs, call ARKRAY Customer Service at 800.566.8558 (24 hours a day, 7 days a week, USA and Canada only).
61
The GLUCOCARD 01 blood glucose meter is referenced to a fresh plasma sample. Your meter results may differ from clinical lab results. This is due to normal variation. To compare your meter with lab results, follow the guidelines below.
Perform a control solution test. This makes sure your meter and test strips are working correctly. Wait at least 2 hours after a meal or drink (other than water) before doing a comparison. If the lab test needs venous blood, you must fast before giving a blood sample.
Blood samples for both tests must be taken and tested within 15 minutes of each other. Collect blood for the lab test with an approved preservative. See test strip insert for additional information. GLUCOCARD 01 blood glucose meter is plasma referenced.
UNDERSTANDING TEST RESULTS

62
ALWAYS wash hands with warm soapy water. Rinse and dry them before testing. ALWAYS use fresh capillary whole blood on meter tests.
You may still see a difference from the lab result. This can be due to several causes. Blood glucose levels can change over short periods of time, for exampleduetofoodorstress.Teststripresultsalsomayvaryduetomedications or to low or high hematocrit.
Analyzedatawithaclinicallyacceptablemethod.
Yourtestresultswillvaryovertime.Forexample,resultsmayvarydueto: 1) The time of day the test was done. 2) The food you eat. 3) Activities you do. 4) The insulin and other medications you take.
If your readings do not seem correct, repeat the test. Contact your healthcareprofessionalimmediatelyif: •abnormallyhighorlowreadingspersist. •yourtestresultsdonotmatchyoursymptoms.

63
Expected Blood Glucose Readings
Expectedbloodglucoselevelsforadultswithoutdiabetes¹: Fasting and before meals <100 mg/dL 1-2 hours after meals <140 mg/dL
High Blood Glucose Readings
Ifyourbloodglucoseisabove600mg/dL,youwillreceivea“Hi.”Repeatthe test with a new test strip. If this message shows again, contact your healthcare professional immediately!
Contact your physician for advice if test results are very high2 (above 240 mg/dL) or you have symptoms of high blood glucose. These symptoms include dry mouth, thirst, frequent urination, nausea, vomiting, blurred vision, sleepiness, or abdominal pain. Symptoms will vary person to person. You may have one or more of these symptoms, or none at all.

64
Low Blood Glucose ReadingsIfyourbloodglucoseisbelow20mg/dL,youwillreceivea“Lo.”Repeatthe test with a new test strip. If this message shows again, contact your healthcare professional immediately!
Contact your physician for advice if test results are very low3 (below 70 mg/dL) or you have symptoms of low blood glucose. Symptoms of low blood glucose include sweating, shakiness, trembling, blurred vision, hunger, headache, confusion, rapid heartbeat, or tingling or numbness around the mouthorfingertips.Symptomswillvarypersontoperson.Youmayhaveone or more of these symptoms, or none at all.
Diabetes FindingsIn1993,theNationalInstitutesofHealthconcludedanextensivelong-termstudy of people with Type 1 diabetes. This study, called the Diabetes Control and Complications Trial (DCCT), found that by keeping your blood glucose close to the levels of people without diabetes you can reduce the risk of complications involving theeyes,kidneys,andnervoussystembyapproximately60%4.
65
What This Means for YouFrequent blood glucose testing is the best means you have for keeping track of how wellyouaredoingwiththefactorsthataffectyourdiabetes-medication,diet,exercise,and stress management. Blood glucose test results can also tell you whether your diabetesischanginginwaysthatmightrequireanadjustmenttoyourtreatmentplan.Always consult your healthcare professional before making any changes in managing your diabetes.
Frequency of TestingHow often you need to test your blood glucose will vary according to your age, the type of diabetes you have, the medications you are taking, and your physical and emotional health. Your healthcare professional will guide you. After deciding when and how often you should test, it is important that you make testing part of your routine.
Recommendations for Better Diabetes Control• Followtheadviceofyourhealthcareprofessional.• Followtheexerciseandmealplansrecommendedbyyourhealthcare
professional.

66
References
1 American Diabetes Association: Diabetes Care Vol 36 (Supp.1) January 2013, pS1-S100.2 Krall, L.P. and Beaser R.S.: Joslin Diabetes Manual. Philadelphia: Lea and Fibiger (1989), 261–263.3 Kahn, R. and Weir, G.: Joslin’s Diabetes Mellitus. Philadelphia: Lea and Fibiger (1994), 489.4 American Diabetes Association position statement on the Diabetes Control and Complications Trial (1993).5
• Takeinsulinordiabetesmedicationatyourscheduledtimes.• Keepintouchwithyouremotionalandphysicalcondition.• Stressorillnesscanaffectdiabetes.• Watchforsymptomsofhypoglycemia(lowbloodglucose)and
hyperglycemia (high blood glucose).• Alwaysrecordyourtestresultsinyourlogbook.Thelogbookassistsyouin
keeping a record of your blood glucose results, along with information on yourfoodintake,exercise,andmedication.
• Reviewyourlogbookoftestresultswithyourhealthcareprofessionalregularly.
67
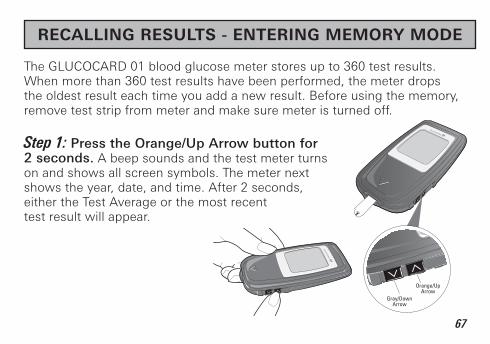
The GLUCOCARD 01 blood glucose meter stores up to 360 test results. When more than 360 test results have been performed, the meter drops the oldest result each time you add a new result. Before using the memory, remove test strip from meter and make sure meter is turned off.
Step 1: Press the Orange/Up Arrow button for 2 seconds. A beep sounds and the test meter turns onandshowsallscreensymbols.Themeternextshows the year, date, and time. After 2 seconds, either the Test Average or the most recent test result will appear.
RECALLING RESULTS - ENTERING MEMORY MODE
Orange/UpArrow
Gray/DownArrow
68
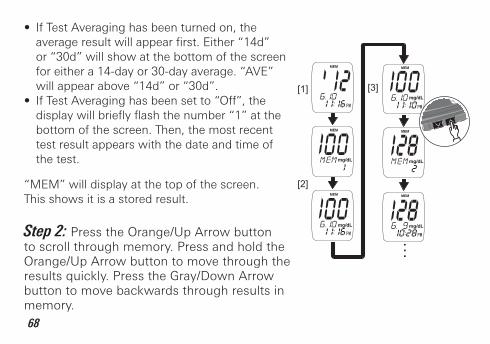
•IfTestAveraginghasbeenturnedon,the averageresultwillappearfirst.Either“14d” or“30d”willshowatthebottomofthescreen foreithera14-dayor30-dayaverage.“AVE” willappearabove“14d”or“30d”.•IfTestAveraginghasbeensetto“Off”,the displaywillbrieflyflashthenumber“1”atthe bottom of the screen. Then, the most recent test result appears with the date and time of the test.
“MEM”willdisplayatthetopofthescreen.This shows it is a stored result.
Step 2: Press the Orange/Up Arrow button to scroll through memory. Press and hold the Orange/Up Arrow button to move through the results quickly. Press the Gray/Down Arrow button to move backwards through results in memory.
[1]
[2]
[3]
mg/dL
mg/dL mg/dL
mg/dL
mg/dL

69
Step 3: Afteralltestresultshavebeenreviewed,“End”appears.•PresstheOrange/UpArrowbuttononcetogobacktothefirstresult in memory. You can then scroll through results in memory again.•PresstheGray/DownArrowbuttonfor2secondstoexitMemoryand turnoffthemeter.YoucanexitMemoryinthiswayatanytimewhen recalling results.
NOTE:•Ifnotestshavebeenperformed,oralltestresultshavebeen deleted,thecurrentdateandtimeappearfirst,then“End”appears.
•If3minuteselapsebeforeeithertheupperorlowerbuttonispressed, a beep sounds and the test meter turns off automatically.
70
Deleting all test results
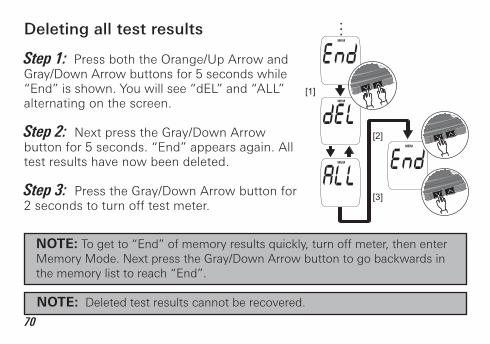
Step 1: Press both the Orange/Up Arrow and Gray/Down Arrow buttons for 5 seconds while “End”isshown.Youwillsee“dEL”and“ALL”alternating on the screen.
Step 2: NextpresstheGray/DownArrowbuttonfor5seconds.“End”appearsagain.Alltest results have now been deleted.
Step 3: Press the Gray/Down Arrow button for 2 seconds to turn off test meter.
NOTE:Togetto“End”ofmemoryresultsquickly,turnoffmeter,thenenterMemoryMode.NextpresstheGray/DownArrowbuttontogobackwardsinthememorylisttoreach“End”.
[1]
[2]
[3]
NOTE: Deleted test results cannot be recovered.
71
MAINTENANCE
Display Screen and Error Messages
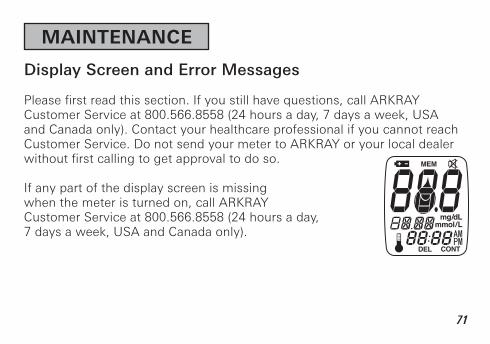
Pleasefirstreadthissection.Ifyoustillhavequestions,callARKRAYCustomer Service at 800.566.8558 (24 hours a day, 7 days a week, USA and Canada only). Contact your healthcare professional if you cannot reach Customer Service. Do not send your meter to ARKRAY or your local dealer withoutfirstcallingtogetapprovaltodoso.
If any part of the display screen is missing when the meter is turned on, call ARKRAY Customer Service at 800.566.8558 (24 hours a day, 7 days a week, USA and Canada only).
72
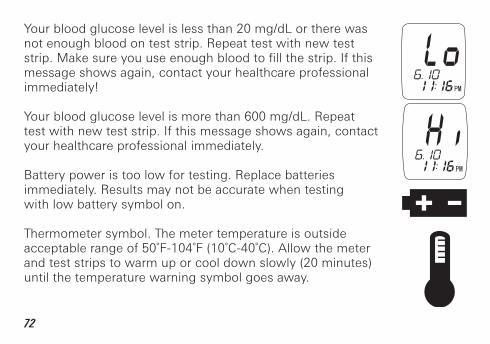
Your blood glucose level is less than 20 mg/dL or there was not enough blood on test strip. Repeat test with new test strip.Makesureyouuseenoughbloodtofillthestrip.Ifthismessage shows again, contact your healthcare professional immediately!
Your blood glucose level is more than 600 mg/dL. Repeat test with new test strip. If this message shows again, contact your healthcare professional immediately.
Battery power is too low for testing. Replace batteries immediately. Results may not be accurate when testing with low battery symbol on.
Thermometer symbol. The meter temperature is outside acceptablerangeof50˚F-104˚F(10˚C-40˚C).Allowthemeterand test strips to warm up or cool down slowly (20 minutes) until the temperature warning symbol goes away.

73
The meter is faulty. Contact ARKRAY Customer Serviceat 800.566.8558.
The meter temperature is outside acceptable rangeof50˚F-104˚F(10˚C-40˚C).Allowthemeterand test strips to warm up or cool down slowly (20 minutes) until the temperature warning symbol goes away.
The meter is faulty. Contact ARKRAY Customer Serviceat 800.566.8558.
The meter is faulty. Contact ARKRAY Customer Serviceat 800.566.8558.
74
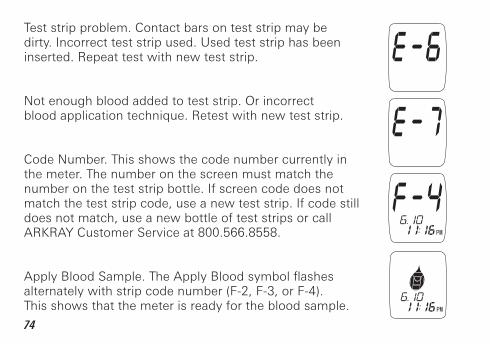
Test strip problem. Contact bars on test strip may be dirty. Incorrect test strip used. Used test strip has been inserted. Repeat test with new test strip.
Notenoughbloodaddedtoteststrip.Orincorrectblood application technique. Retest with new test strip.
CodeNumber.Thisshowsthecodenumbercurrentlyinthe meter. The number on the screen must match the number on the test strip bottle. If screen code does not match the test strip code, use a new test strip. If code still does not match, use a new bottle of test strips or call ARKRAY Customer Service at 800.566.8558.
ApplyBloodSample.TheApplyBloodsymbolflashesalternately with strip code number (F-2, F-3, or F-4).This shows that the meter is ready for the blood sample.
75
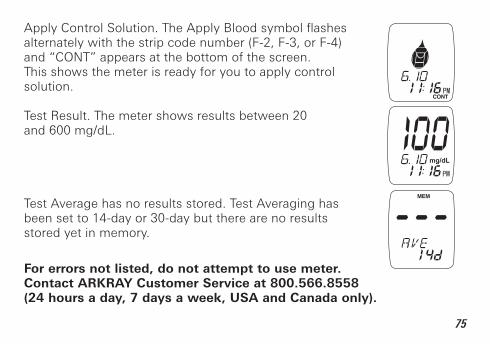
ApplyControlSolution.TheApplyBloodsymbolflashesalternately with the strip code number (F-2, F-3, or F-4) and“CONT”appearsatthebottomofthescreen.This shows the meter is ready for you to apply control solution.
Test Result. The meter shows results between 20 and 600 mg/dL.
Test Average has no results stored. Test Averaging has been set to 14-day or 30-day but there are no results stored yet in memory.
mg/dL
For errors not listed, do not attempt to use meter. Contact ARKRAY Customer Service at 800.566.8558 (24 hours a day, 7 days a week, USA and Canada only).
76
Storage and Handling•Storemeterat32°F-122°F(0°C-50°C).•Donotleavethemeterinveryhotorcoldplaces.Donotleaveit near a heat source (radiator) or in a car in hot or cold weather.•Donotstoreorusemeterorteststripsinhighhumidity,suchasa bathroom or kitchen.•Donotuseameterthathasbeendroppedintowater,orifany water has entered the meter. Even if you dry it, correct test results may not be obtained, and malfunction may result.•Donotstoremeterorteststripsnearbleachorcleanersthatcontainbleach.•Donotdropmeter.Thiscandamagethemeter.Ifyoudodropmeter,check it with a control solution test.•Donottakethemeterapart.•Donotleaveteststripsoutoftheirbottles.•Donotholdteststripswithfingersforalongperiodoftime.•Donotholdteststripswithwetordirtyfingers.Otherwisecorrecttest results may not be obtained.
77
If you have technical problems or questions, please call Customer Service at 800.566.8558 (24 hours a day, 7 days a week, USA and Canada only). Contact your healthcare professional with questions if you cannot reach ARKRAY Customer Service.
78
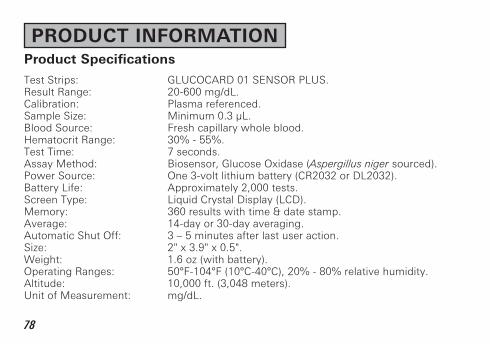
Product Specifications
TestStrips: GLUCOCARD01SENSORPLUS.ResultRange: 20-600mg/dL.Calibration: Plasmareferenced.SampleSize: Minimum0.3µL.BloodSource: Freshcapillarywholeblood.HematocritRange: 30%-55%.TestTime: 7seconds.AssayMethod: Biosensor,GlucoseOxidase(Aspergillus niger sourced).PowerSource: One3-voltlithiumbattery(CR2032orDL2032).BatteryLife: Approximately2,000tests.ScreenType: LiquidCrystalDisplay(LCD).Memory: 360resultswithtime&datestamp.Average: 14-dayor30-dayaveraging.AutomaticShutOff: 3–5minutesafterlastuseraction.Size: 2"x3.9"x0.5".Weight: 1.6oz(withbattery).OperatingRanges: 50°F-104°F(10°C-40°C),20%-80%relativehumidity.Altitude: 10,000ft.(3,048meters).UnitofMeasurement: mg/dL.
PRODUCT INFORMATION

79
Warranty
You are a valued customer of ARKRAY. It is important to us that you are completelysatisfiedwithyourGLUCOCARD01bloodglucosemeter.
ARKRAY warrants your GLUCOCARD 01 blood glucose meter will be free fromdefectsinmaterialsandworkmanshipforaperiodoffiveyearsfromthe date of the original purchase. If during this time the meter does not work properly because of a defect in materials or workmanship, ARKRAY agrees to replace or repair, free of charge any and all parts proven to be defective and subjecttowarranty.
Thiswarrantyisinlieuofallotherwarranties,expressedorimplied,includinganyimpliedwarrantyofmerchantabilityorfitnessforanypurpose,otherthanstated herein.
This warranty does not apply to the performance of the GLUCOCARD 01 blood glucose meter that has been damaged by accident or has been altered, misused, tampered with, or abused in any way. This warranty only applies to the original purchaser of the meter and/or its agents.
Returns
You must contact ARKRAY Customer Service at 800.566.8558 beforereturning your meter. You will be instructed how to return the meter toARKRAY.Returnedmeterswithoutthisauthorizationwillnotbeaccepted.
PN7267-02Rev 01/15
ARKRAY USA, Inc.Minneapolis, MN 55439 USATEL 800.566.8558FAX 952.646.3110www.arkrayusa.com
©2015 ARKRAY, Inc.GLUCOCARD® is a registered trademark of ARKRAY