blum metabox ‘visual’ user guide. - solid setup | are...
TRANSCRIPT

Page 1 of 11
Solid Setup Pty Ltd
www.solidsetup.com
BLMMBOX User Guide
Blum Metabox ‘Visual’ User Guide.
Introduction
Overview
• The ‘Blum Metabox Visual Package’ from Solid Setup adds the Blum Metabox drawers and Inner drawers
(Rollouts), to Cabinet Vision Solid.
• It provides drilling for the drawer box parts, the cabinet ends and the drawer front for CNC output.
• It also adds 3d graphics for the drawer sides, runners, galleries and inner brackets etc.
• The runners and brackets etc are added as a separate parts and materials for reporting purposes.
• All material descriptions contain the Blum order number after the # symbol.
• Box Sides can be added via attribute for Gallery-Height drawers.
• Screw on and Quick Assembly (C15) versions are included.
• Front brackets can be switched between Screw-on or Knock-in.
• You can choose which type of screw on bracket and which type of knock-in bracket you wish to order
Included in This Package
Drawer Guide Schedules:
• “Blum Metabox Std SE” Metabox Screw-on base Single Extension
• “Blum Metabox Std FE” Metabox Screw-on base Full Extension
• “Blum Metabox C15 SE” Metabox Quick Assembly (C15) Single Extension
• “Blum Metabox C15 FE” Metabox Quick Assembly (C15) Full Extension
Drawer Guide Materials:
Colour Extension Type Weight Height mm Depths
Cream Single Screwon or C15 25Kg N 54 54 270 350 400 450 500 550
Cream Single Screwon or C15 25Kg M 86 86 270 350 400 450 500 550
Cream Single Screwon or C15 25Kg K 118 118 n/a 350 400 450 500 550
Cream Single Screwon or C15 25Kg H 150 150 n/a 350 400 450 500 550
Cream Single Screwon or C15 25Kg N54 + 1 Gallery 110 n/a 350 400 450 500 550

Page 2 of 11
Solid Setup Pty Ltd
www.solidsetup.com
BLMMBOX User Guide
Cream Single Screwon or C15 25Kg N54 + 2 Galleries 175 n/a 350 400 450 500 550
Cream Single Screwon or C15 25Kg M86 + 1 Gallery 142 n/a 350 400 450 500 550
Cream Single Screwon or C15 25Kg M86 + 2 Galleries 207 n/a 350 400 450 500 550
Cream Single Screwon or C15 25Kg K118 + 1 Gallery 174 n/a 350 400 450 500 550
Cream Single Screwon or C15 25Kg K118 + 2 Galleries 238 n/a 350 400 450 500 550
Cream Single Screwon or C15 25Kg H150 + 1 Gallery 206 n/a 350 400 450 500 550
Cream Single Screwon or C15 25Kg H150 + 2 Galleries 270 n/a 350 400 450 500 550
Cream Full Screwon or C15 30Kg N 54 54 270 350 400 450 500 550
Cream Full Screwon or C15 30Kg M 86 86 270 350 400 450 500 550
Cream Full Screwon or C15 30Kg K 118 118 n/a 350 400 450 500 550
Cream Full Screwon or C15 30Kg H 150 150 n/a 350 400 450 500 550
Cream Full Screwon or C15 30Kg N54 + 1 Gallery 110 n/a 350 400 450 500 550
Cream Full Screwon or C15 30Kg N54 + 2 Galleries 175 n/a 350 400 450 500 550
Cream Full Screwon or C15 30Kg M86 + 1 Gallery 142 n/a 350 400 450 500 550
Cream Full Screwon or C15 30Kg M86 + 2 Galleries 207 n/a 350 400 450 500 550
Cream Full Screwon or C15 30Kg K118 + 1 Gallery 174 n/a 350 400 450 500 550
Cream Full Screwon or C15 30Kg K118 + 2 Galleries 238 n/a 350 400 450 500 550
Cream Full Screwon or C15 30Kg H150 + 1 Gallery 206 n/a 350 400 450 500 550
Cream Full Screwon or C15 30Kg H150 + 2 Galleries 270 n/a 350 400 450 500 550
User Created Standards
The Following UCS’s are provided (ensure they are in this order once installed):
• { DRAWS } -- Attribute Detailed Adds the “Draws Detailed?” attribute to the cabinet (V7 and 8 only)
• { DRAWS } -- Blum MBox ID's Identifies Metabox drawer guide materials.
• { DRAWS } -- Blum MBox Attributes Adds “Mbox Box Sides?” or “1 Gallery?” Attributes to backs.
• { DRAWS } -- Blum MBox Hole Masking Deletes unwanted holes from drawer fronts and drawer box backs etc.
• { DRAWS } -- Blum MBox Runners Adds the drawer profiles and drawer guides
• { DRAWS } -- Blum MBox Brackets Adds the drawer front brackets
• { DRAWS } -- Blum MBox Galleries Adds the galleries , and Box Sides.
• { DRAWS } -- Blum MBox Rollout Adds the rollout front drilling etc.
• { DRAWS } -- Blum MBox Bot Holes Adds the extra bottom holes.
• { DRAWS } -- Blum MBox Hole Reduction (Optional) Reduce Carcase end hole quantity from 5 to 3
Drawer Boxes Version 9
• Blum Metabox Drawer SE Drawer Boxes for Single Ext Guides
• Blum Metabox Inner SE Inner Drawers for Single Ext Guides
• Blum Metabox Drawer FE Drawer Boxes for Full Ext Guides
• Blum Metabox Inner FE Inner Drawers for Full Ext Guides
Drawer Boxes Version 7 or 8
• Blum Metabox Drawer Drawer Boxes
• Blum Metabox Inner Inner Drawers
Library
• CVS Blum.cvc Cabinet Vision Catalog of Blum Library parts
Room Attributes
The Following system attributes are provided:
• S_Room_DFront_Screwon “Draw Front Screwon”

Page 3 of 11
Solid Setup Pty Ltd
www.solidsetup.com
BLMMBOX User Guide
Metabox Standard Usage
Menu Selections for a Job , Room or Cabinet.
To use the Metabox drawers in a job you must make the following selections:
• In the job or room properties the Cabinet Construction tab should have the Drawer Box set to “Blum Metabox
Drawer” and the Roll Outs set to “Blum Metabox Inner” as shown here:
• In the Hardware tab, choose one of the Blum Metabox guide schedules:
• Select an “SE” schedule name for Single Extension or FE for Full Extension guides.
• Then select “C15” for “Quick Assembly” bottoms and “Std” for “Screw on” bottoms .
• The Schedules have been set up to select N54, M86, K118, H150, H150+1Gallery and H150+2Galleries
automatically, depending on the drawer front height and its clearances.
• All other extra gallery combinations (N54,M86 and K118 with 1 or 2 Galleries) can only be selected by changing
the drawer guide material on the drawer required as explained in the next section.
• Box Sides are activated by attribute on drawers with Galleries as explained later on.
• NOTE: - Gallery rails and Box Sides are not available on Metabox Inner drawers (Rollouts) .
• In the Materials tab, you can choose any of the Drawer Box or Roll Out schedules you have set up for other
drawers as long as the materials selected are suitable for Blum Metabox.
Menu Selections for one Drawer/Rollout.
To use Metabox drawers for one drawer/rollout when Metabox has not been selected in the cabinet, or you wish
to use a gallery combination such as “118mm + 2 galleries” for example, which is not in the guide schedule…
• Take the cabinet into the cabinet editor, click on the section view, and double click on the drawer/rollout to
bring up its Properties menu, and then select the Drawer Box or Rollout Tray tab.
• The Construction tab should be set to Metabox if it is not already.
• To Change to a different guide type press the “change” button shown here:
• Use the “Search” tab and a keyword to quickly find the guide you want rather than paging through materials..
Page 4 of 11
Solid Setup Pty Ltd
www.solidsetup.com
BLMMBOX User Guide
• Metabox guides are named like this:
• “MBox C15 SE 086 x500” or “MBox Std FE 118+2Gx550” etc
• Here are some keyword examples:
• “MBox C15 FE” = All Metabox C15 Full Extension guides.
• “MBox Std SE” = All Metabox Single Extension Screwon guides.
• “MBox*150” = All Metabox 150 high guides
• “SE 086” = All Single Extension 86mm high profiles.
• “118+2” = All 118 profiles with 2 galleries.
• “SE 150+2Gx450” = Single Extenstion 150 profile with 2 Galleries 450 deep..Etc
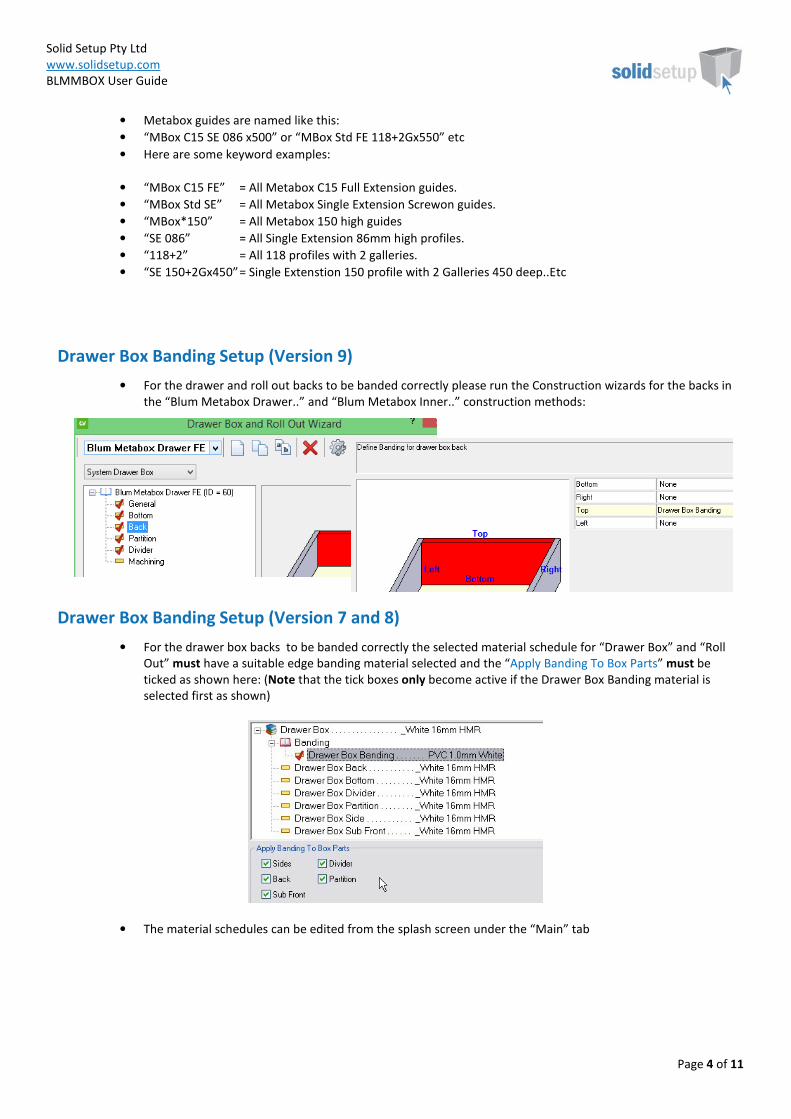
Drawer Box Banding Setup (Version 9)
• For the drawer and roll out backs to be banded correctly please run the Construction wizards for the backs in
the “Blum Metabox Drawer..” and “Blum Metabox Inner..” construction methods:
Drawer Box Banding Setup (Version 7 and 8)
• For the drawer box backs to be banded correctly the selected material schedule for “Drawer Box” and “Roll
Out” must have a suitable edge banding material selected and the “Apply Banding To Box Parts” must be
ticked as shown here: (Note that the tick boxes only become active if the Drawer Box Banding material is
selected first as shown)
• The material schedules can be edited from the splash screen under the “Main” tab
Page 5 of 11
Solid Setup Pty Ltd
www.solidsetup.com
BLMMBOX User Guide
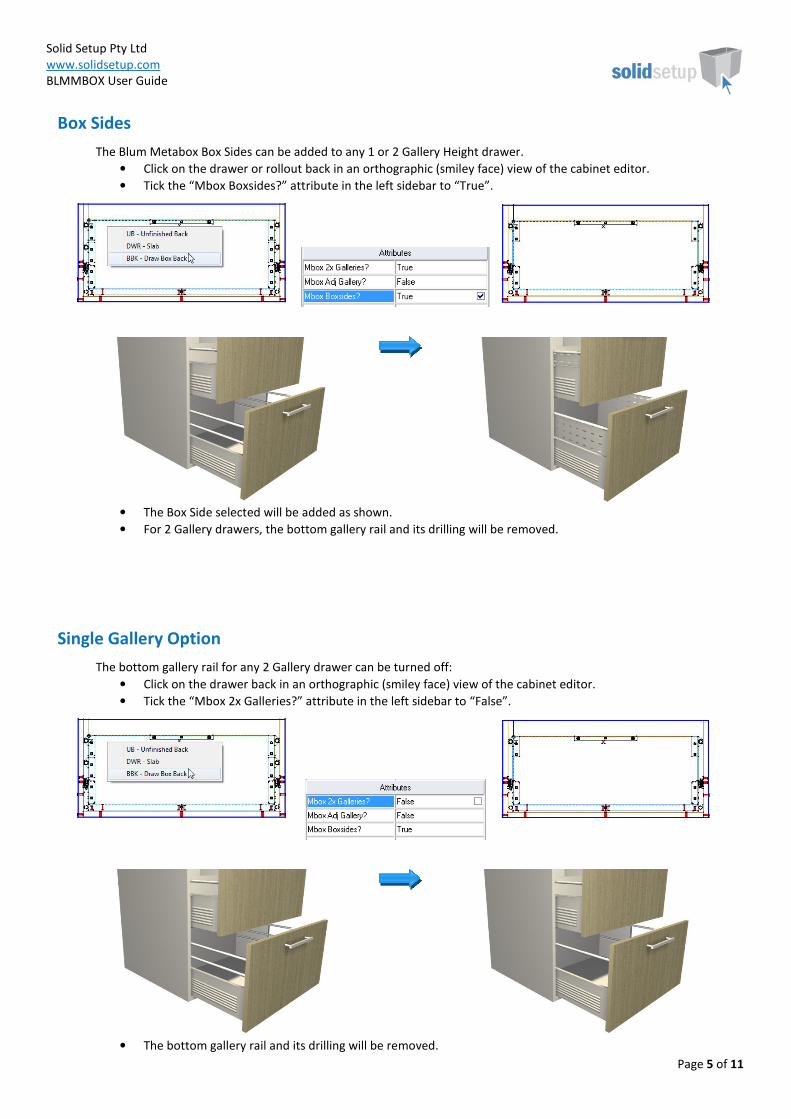
Box Sides
The Blum Metabox Box Sides can be added to any 1 or 2 Gallery Height drawer.
• Click on the drawer or rollout back in an orthographic (smiley face) view of the cabinet editor.
• Tick the “Mbox Boxsides?” attribute in the left sidebar to “True”.
• The Box Side selected will be added as shown.
• For 2 Gallery drawers, the bottom gallery rail and its drilling will be removed.
Single Gallery Option
The bottom gallery rail for any 2 Gallery drawer can be turned off:
• Click on the drawer back in an orthographic (smiley face) view of the cabinet editor.
• Tick the “Mbox 2x Galleries?” attribute in the left sidebar to “False”.
•
• The bottom gallery rail and its drilling will be removed.

Page 6 of 11
Solid Setup Pty Ltd
www.solidsetup.com
BLMMBOX User Guide
Extra Adjustable Gallery Option
An Extra Adjustable height gallery can be added to any drawer if there is enough room above. (revision 13 1/Sept/2015)
• Click on the drawer back in an orthographic (smiley face) view of the cabinet editor.
• Tick the “Mbox Adj Gallery?” attribute in the left sidebar to “True”.
• Use the “Mbox Adj Height?” to adjust the height of the drawer back:
Drawer Box Height Control
When a drawer is first added to a cabinet, Cabinet Vision will always choose the tallest drawer that will fit from the
drawer guide schedule, based on the available space.
• The space is determined by the distance between any cabinet or internal parts directly behind the drawer
front, minus the drawer guide material top and bottom clearances.
• To select a smaller drawer height, click on the drawer front in the section view.
• Increase the “Top Clearance” in the sidebar until the drawer height you require appears, like this:
• NOTE: If you are using a drawer leveling UCS (which moves the top drawer boxes up to match the bottom lip
reference of the bottom drawer), this may cause those drawer boxes to interfere with an object above them,
whether it be the next drawer front, the cabinets top or top stretcher or a drawer stretcher or some other part
which would normally not be in the way.

Page 7 of 11
Solid Setup Pty Ltd
www.solidsetup.com
BLMMBOX User Guide
• This occurs because the leveling UCS is applied after the drawer height selection has been calculated.
• To prevent this always check every drawer in the cabinet editor, (preferably with the graphics turned on so you
can clearly see any part interference), and reduce the drawer box height using the “Top Clearance” as described
above.
Drawer Box Depth Control
When a drawer is first added to a cabinet, Cabinet Vision will always choose the deepest drawer that will fit from
the drawer guide schedule, based on the available space.
• To select a smaller drawer box depth, click on the drawer front in the section view.
• Choose the “Box Depth” from the dropdown list in the sidebar as shown here:
Rollouts (Metabox Standard Only)
Rollout Height Control
• To add a rollout in the section interior view of the cabinet editor, add a “Split Horz” and then select it and
change it to a “Rollout Tray” in the left sidebar. Or use the “Split Multi Horz” function and choose the “Roll-out
Tray” button and then press OK.
• In version 5, when a rollout is first added to a cabinet, Cabinet Vision will choose the height of the default
drawer guide material set in the material schedule which we have set to the “M” height (86mm) rollout.
• In version 6 or later, when a rollout is first added to a cabinet, Cabinet Vision will choose the height based on
the tallest rollout that will fit from the drawer guide schedule, based on the available space.
• To select a different rollout height, click on the rollout in the section interior view and use the sidebar.
• In Version 6 or later choose the height from the dropdown box provided as shown here:

Page 8 of 11
Solid Setup Pty Ltd
www.solidsetup.com
BLMMBOX User Guide
c
• In Version 5 type in the heights listed here to select the height
1. 54mm will select an N Height rollout
2. 86mm will select an M Height rollout
3. 118mm will select a K Height rollout
4. 150mm will select a H Height rollout
• NOTE: The actual heights of the inner drawer are slightly more than the above measurements due to the taller
front brackets etc. This may cause the inner drawers to interfere with each other or another cabinet part.
• To prevent this always check every rollout in the cabinet editor, (preferably with the graphics turned on so you
can clearly see any part interference), and reduce the rollout box height using the method described above.
• The actual overall heights of the rollouts are as follows:
1. 75mm for the N Height rollout
2. 107mm for the M Height rollout
3. 139mm for the K Height rollout
4. 171mm for the H Height rollout

Page 9 of 11
Solid Setup Pty Ltd
www.solidsetup.com
BLMMBOX User Guide
Rollout Depth Control
• When a rollout is first added to a cabinet, Cabinet Vision will always choose the deepest rollout that will fit
from the drawer guide schedule, based on the available space.
• To select a smaller rollout depth, click on the rollout in the section interior view.
• Increase the negative “Depth” adjustment in the sidebar until the size required is selected, as shown here:
Rollout Setback
• By default we have set all the rollouts back by 9mm compared to a drawer.
• This is enough for the front brackets of the rollout drawer to clear the door.
• To change the default value Refer to the “Drilling Setup” section below
• To adjust the setback of each rollout individually, use the “Set Back” setting under “Adjustments”, in the
section view:
Turning off the Graphics (not required in Version 9)
Cabinet Attribute (Version 7 or 8 only)
On any cabinet containing a drawer or a rollout there will be an attribute called “Draws Detailed?”
This attribute allows you to turn the 3D graphics on or off for the drawer box parts.
• This is because having the graphics turned on can cause too much lag on slower computers.
• Turning off the graphics does not alter the reports or CNC output.

Page 10 of 11
Solid Setup Pty Ltd
www.solidsetup.com
BLMMBOX User Guide
Drawer Fronts Screwon
Room Attribute
The “Draw Front Screwon” is a Room attribute which will change all the drawer front mounting holes to screw holes
and change the front bracket material to the screw mount bracket for reports and ordering purposes.
Drilling Setup
UCS Public Variables
There are 18 Public Variables in the “{ DRAWS } -- Blum Metabox Attributes “ UCS.
• To change these variables go to the Utilities – Edit User Created Standards from the Plan or Elevation views
• Then click on the “{ DRAWS } -- Blum Metabox Attributes” UCS.
• On the top right hand side of the screen you will see the Public Variables list:
Each set of holes has a diameter and depth value.
Box Bottom = Holes in the Drawer box or Rollout bottom for the drawer side profiles (C15 and Screwon).
Front Knockin = Holes in the Drawer Front for drawer side brackets if Room Attribute “Draw Front Screwon” is False.
Front Screwon = Holes in the Drawer Front for drawer side brackets if Room Attribute “Draw Front Screwon” is True.
Guide Cabinet = Holes in the Cabinet ends for the Drawer or Rollout Guides.
Box Back = Holes in the Drawer box or Rollout back for the drawer side profiles.
Rollout Front = Holes in the Rollout front for the inner drawer front brackets.
• If you’re system is set to mm, Edit the values in the Imp() brackets to the diameter and depths you require.
• If you’re system is set to inches, simply replace the whole imp() with the imperial measurement instead.
• Eg: Imp(3) might become 1/8
Note: To turn off any of the holes if not required, like the box bottom holes for example, set the depth to zero.

Page 11 of 11
Solid Setup Pty Ltd
www.solidsetup.com
BLMMBOX User Guide
Drawer Front Bracket Selection
The Last 5 Public Variables are used to select which screw on and knock in front bracket you wish to appear on your
reports for ordering.
For Knock in front brackets (when the room attribute, “Draw Front Screwon” is false), choose only one of the following
four bracket types, by setting its value to “1” – leave the others as “0”.
Note: The N height drawers will always receive the Standard Knock-in bracket as no Clip-on or Expando is available for
N height.
Brkt Expansion Clipon? = Clip-on Expando brackets (codes: ZSF.130E L and R) per drawer
Brkt Knock-in Clipon? = Clip-on Knock-in brackets (codes: ZSF.1300 L and R) per drawer
Brkt Knock-in Std? = Standard Knock-in brackets (codes: ZSF.1800 L and R) per drawer (ZSF.1610 for N height)
For Screw on front brackets (when the room attribute, “Draw Front Screwon” is True), choose only one of the following
two bracket types by setting its value to “1” – leave the other one as “0”.
Note: The N height drawers will always receive the Standard Screw-on bracket as no Clip-on is available for N height.
Brkt Screwon Clipon? = Clip-on Screw-on brackets (codes: ZSF.1200 L and R) per drawer
Brkt Screwon Std? = Standard Screw-on brackets (codes: ZSF.1700 L and R) per drawer (ZSF.1510 for N height)
Once you have changed these values to your requirements, you can close the UCS editor.
Vertical position of drawers
We have positioned the Metabox drawers according to Blums recommended position, which will place the drawer
guide holes in the ends for the bottom drawer, 102mm above the cabinet deck for 86mm drawers, or 134mm for
118mm, and 166mm for 150mm drawers. We have achieved this by setting the “Minimum Bottom Clearance” in the
drawer guide materials to 5.mm. This will give approximately 2.7mm clearance between the cabinet deck and the
bottom of the drawer side and can be seen when the “Drawer Detail” is True.
Tools Required
• The drill diameters you choose in the UCS Public Variables above are all required for this package to work. You
must have these tool diameters in your tool catalog and in your machine.
Package Exclusions
Some of the drawer drilling shown in various images contained in this document are not included in the Blum Metabox
Visual Package, but come from other packages which are sold separately as listed here:
• DRFCAM Drawer Front Cam. Cams the drawer box bottom into the drawer front.
• DRFMRK Drawer Front Marker. Drills a 5mmx2mm marker under the front brackets top left hole to
help identify the top and bottom of the drawer front during assembly.
• DRBMRK Drawer Back Marker. Drills a 5mmx2mm marker in the top of the back face of the drawer
box back to help identify the top and bottom of the drawer back during banding and assembly.
• DRSCRW Screw Drawer Boxes Together. Uses intellijoints to screw together edges of the drawer box
parts which are not available in the drawer/rollout wizard.
Any other items shown in any images such as cabinet screw holes, benchtop brackets, plastic legs etc are also part of
our other packages which are sold separately.
See our website for more detailed information on these packages.