bolt v.lite easy guide - bristolwatch.com · bolt v.lite easy guide this manual consists of two...
TRANSCRIPT

Bolt v.Lite system Easy Guide. Punto Flotante, S.A. 2013
1
Bolt v.Lite easy guide
This manual consists of two parts:
PART 1. Preliminary tests to Bolt v.Lite board.
PART 2. Loading new programs to the board.
PART 1. PRELIMINARY TESTS TO BOLT V.LITE BOARD
For these tests you will need the Bolt v.Lite module, a PC or Laptop computer, and a USB cable. Please follow
step by step the next instructions:
1. Identify the components in the Bolt v.Lite module, based on the picture shown below. The microcontroller is
Microchip’s 18F2550-I/SP.
Figure 1

Bolt v.Lite system Easy Guide. Punto Flotante, S.A. 2013
2
2. Put the power supply jumper JP1 near the sign “USB”, as shown in photo. This will feed the board using the
power supply from the USB cable.
Figure 2
3. Put the programming jumper JP2 in the autorun position near the sign "JP2", as shown in photo. This will
make the microcontroller run its user program (autorun mode) on power up or after pushing the reset button.
Figure 3
Bolt v.Lite system Easy Guide. Punto Flotante, S.A. 2013
3
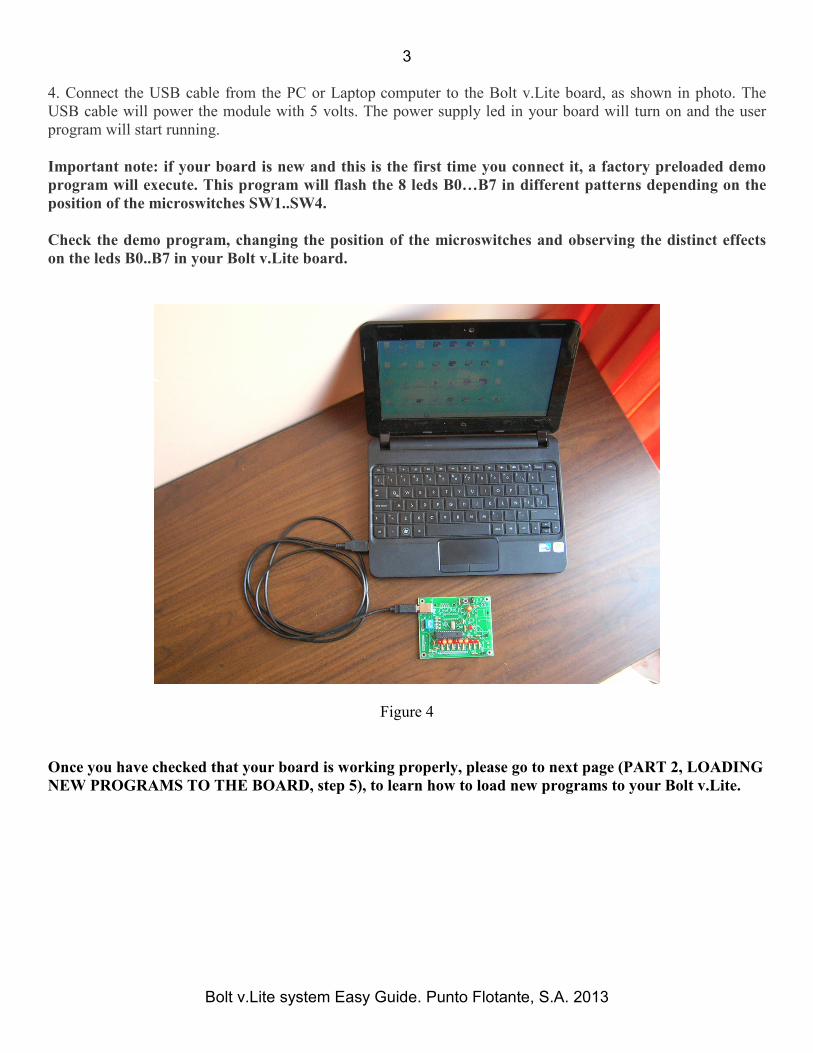
4. Connect the USB cable from the PC or Laptop computer to the Bolt v.Lite board, as shown in photo. The
USB cable will power the module with 5 volts. The power supply led in your board will turn on and the user
program will start running.
Important note: if your board is new and this is the first time you connect it, a factory preloaded demo
program will execute. This program will flash the 8 leds B0…B7 in different patterns depending on the
position of the microswitches SW1..SW4.
Check the demo program, changing the position of the microswitches and observing the distinct effects
on the leds B0..B7 in your Bolt v.Lite board.
Figure 4
Once you have checked that your board is working properly, please go to next page (PART 2, LOADING
NEW PROGRAMS TO THE BOARD, step 5), to learn how to load new programs to your Bolt v.Lite.

Bolt v.Lite system Easy Guide. Punto Flotante, S.A. 2013
4
PART 2. LOADING NEW PROGRAMS TO THE BOARD.
5. Download from the following link the .zip file with 5 simple test programs for the Bolt v.Lite board:
http://puntoflotante.net/Bolt-v-Lite-5-test-programs.zip
6. Extract the files in the .zip, and you will have the following folder with the 5 test programs. Store this folder
for later use, and go to step 7.
Important note: in folder “C18-BOLT-MICROSWITCHES-LEDS-3” you will find the .hex file that is
used as the demo program mentioned in step 4, and is factory preloaded in your Bolt v.Lite board.
7. Download the programming software from this link, according to your OS:
http://puntoflotante.net/Bolt-amd64-1.0.2.exe if you have Windows 8
http://puntoflotante.net/Bolt-amd64-1.0.1.exe if you have Windows 7, 64 bits
http://puntoflotante.net/Bolt-x86-1.0.1.exe if you have Windows 7, 32 bits, Vista or XP
With this software you will be able to load new programs to your Bolt v.Lite board.

Bolt v.Lite system Easy Guide. Punto Flotante, S.A. 2013
5
8. You are ready now to install the programming software in your PC or Laptop. Open the corresponding .exe
file downloaded in step 7, and you will see the window shown below. The installation files will be stored in the
specified folder (Destination Folder). Do not change the name of this destination.
Click “Install” to continue.
The installation program may require to install or update additional files for runtime operation of Visual C ++.
If the program asks for it, as shown in the window below, choose "Repair".

Bolt v.Lite system Easy Guide. Punto Flotante, S.A. 2013
6
Click “Finish”. End of installation!
***IMPORTANT NOTE WHEN INSTALLING Bolt v.1.0.2, for Windows 8***
If the installation program finds a previous version of Visual C++ libraries installed on your PC, it will show the
following message. This IS NOT an error message, and you do not have to take any actions. Just close this
window and the installation will succesfully finish.
Remember that the installation software files were stored in a folder in the path: C:\Program Files\Bolt.

Bolt v.Lite system Easy Guide. Punto Flotante, S.A. 2013
7
9. Go to directory C:\Program Files\Bolt and you will see the installed files as shown below. Giving a right
mouse click to the application file "Bolt.exe" (marked in the image below), create a shortcut in the desktop of
your computer. Now your programming software is ready to run with the click of your mouse on the icon
with the name “Bolt”.
10. Now you will load a new program to your board: in your Bolt v.Lite board, change the position of JP2, as
shown in photo below.
Bolt v.Lite system Easy Guide. Punto Flotante, S.A. 2013
8
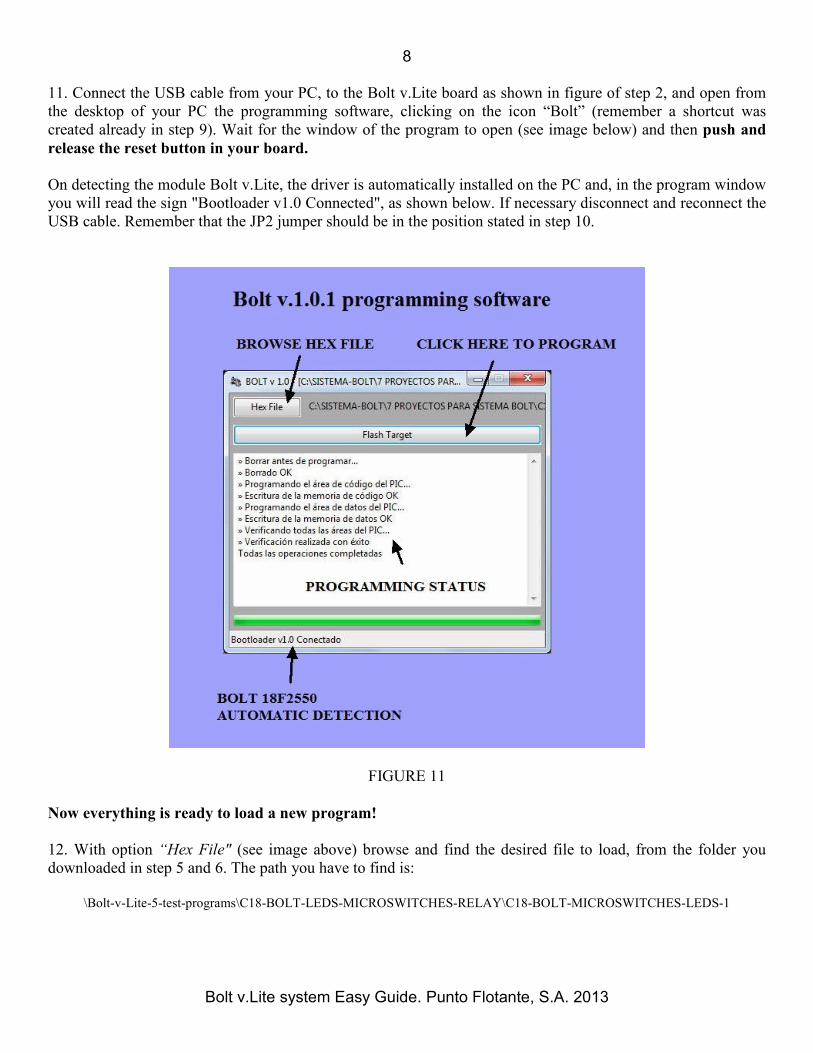
11. Connect the USB cable from your PC, to the Bolt v.Lite board as shown in figure of step 2, and open from
the desktop of your PC the programming software, clicking on the icon “Bolt” (remember a shortcut was
created already in step 9). Wait for the window of the program to open (see image below) and then push and
release the reset button in your board.
On detecting the module Bolt v.Lite, the driver is automatically installed on the PC and, in the program window
you will read the sign "Bootloader v1.0 Connected", as shown below. If necessary disconnect and reconnect the
USB cable. Remember that the JP2 jumper should be in the position stated in step 10.
FIGURE 11
Now everything is ready to load a new program!
12. With option “Hex File" (see image above) browse and find the desired file to load, from the folder you
downloaded in step 5 and 6. The path you have to find is:
\Bolt-v-Lite-5-test-programs\C18-BOLT-LEDS-MICROSWITCHES-RELAY\C18-BOLT-MICROSWITCHES-LEDS-1

Bolt v.Lite system Easy Guide. Punto Flotante, S.A. 2013
9
Choose the file “C18-BOLT-FLASH-LED.hex” as shown in the image below. Click option “Open”. Now you
are almost done. Finally click on the option “Flash Target”, as shown in step 11.
In just a few seconds, the programming software will perform the file transfer, indicating in the window every
step of the programming protocol as shown:

Bolt v.Lite system Easy Guide. Punto Flotante, S.A. 2013
10
13. Once your 18F2550 microcontroller has been successfully programmed in your Bolt v.Lite board, to run this
program in autorun mode, change the programming jumper JP2 to the “autorun” position stated in step 3,
Finally, press and release the reset button to execute the program. The program will run, flashing led B0 of
your board every half second (500 ms).
14. Repeat the procedure from step 10 to 13 to load the other 4 files of your test folder (downloaded in steps 5
and 6). To know what each of the programs does, open the corresponding source (.c) file, and in the upper part
you will see a description of the program. For example this is the source program for the “C18-BOLT-FLASH-
LED.hex” program:
Should you have any questions, please contact us:
Tel. (52)(55)5653-5801