booking (registering students for...
TRANSCRIPT

1
Booking (Registering Students for Classes) SAP Screen Shots
The University of Mississippi End User Documentation – 4.7
2/2011 SAP Support: 662.915.5222 SAP Web Site E-Mail: [email protected] https://my.olemiss.edu/irj/portal
Begin by going to the Student File and selecting the appropriate student.
SAP Menu Path and Transaction Codes for Student File. Student Lifecycle Management > Student File (PIQST00)
Student File: Enter student number or use the drop-down box to find student number.
Menu Path: Student Lifecycle Management > Student File Or Use Transaction Code (PIQST00) in the Command File
Command Field
Enter student number or use the drop-down box to find student number.

2
Program Content Icon: Left-click on Program Content Icon to book a student into a class (Register a student into a course).
Maintain Modules in Program: On the Booking dialog tab, Select appropriate Academic year and session, and program type. Object Manager should appear on your left. If Object Manager does not appear, select Settings > Show Object Manager (see below).
Program Content (Folder) – Booking icon.
Acad. Year and Acad. Session 2
Object Manager
Check Program Type. 1

3
Search for Module (course) Via Name: Double left-click on Via Name.
Select Via Name

4
Find Module: Enter Course name
Select Module (Course): Double left-click on Module name.
Module name

5
Business Event Package: The Business Event Package should now be on the right side of your screen. To view section information; left-click on arrow to the left of the section. Use scroll bar to view additional data.
Section Capacities: (For additional information on capacities, see page 16) Optimum: Number of seats that can be booked by student over the web. Maximum: Department can book up to Maximum by using the override. Booked: The number of students booked into this section. Number of spaces available: Should be the Maximum minus booked.
Book Class: To select the class, highlight by left-clicking on Section # and then left-click on the ‘Copy’ icon. Green light = seats are still available.
Section arrow
Scroll bar Course name
Meeting time Campus Location Instructor
N = # of seats available
Class location
Start and End date of semester
Highlight section (left-click to highlight) 1
Left-click on Copy 2
# Booked Optimum
Maximum

6
Capacity Limit: Yellow light = Optimum number reached.
Capacity Limit: Red light = no seats available.
Continue adding classes, when you are completed remember to save. Save after each booking. Booking reason: Registration should be used by Departments and Deans Offices. Save: Left-click on save icon.
Booking was successfully saved: If booking was successful, an information message should appear. (see page12 for sample of errors).
Booking Status: Booked should now appear.
Save 2
Red light = no seats available.
Booking reason – Registration 1
Yellow light = optimum number reached

7
Variable Hours Courses If a course is set up for variable hours, you will not receive a message in SAP indicating the course can be variable hours. To book, select and copy just like any other course, then change the attempted hours. Variable hours – Scroll to the right to attempted hours.
• Change attempted hours • Save
Changing variable hours:
• If class has already been booked and the variable hours need to be changed, highlight line item and left-click on pencil.
• Change hours • Save.
Auditing a Course Auditing a course – Send all requests to change a grade scale to the Registrar’s Office. Never change the Grade Scale!
Change attempted hours. 1 SAVE 2

8
Switching Sections The student is booked in one section and wishes to change section. Example: Accy 201, Section 1 and wants to change to Section 2.
Select the new section, just like there was no booking. Highlight Section 2 and left-click on copy.
Module booking was changed – this is an information message, make sure you SAVE.
SAVE:
SAVE
9
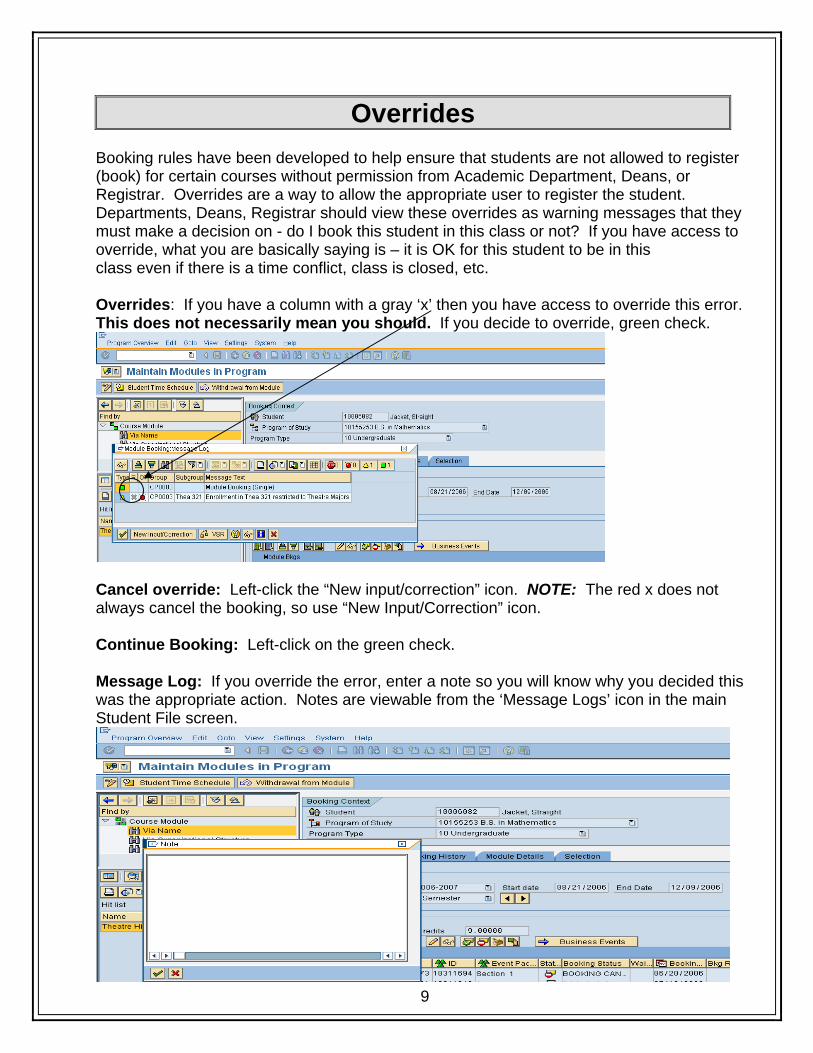
Overrides Booking rules have been developed to help ensure that students are not allowed to register (book) for certain courses without permission from Academic Department, Deans, or Registrar. Overrides are a way to allow the appropriate user to register the student. Departments, Deans, Registrar should view these overrides as warning messages that they must make a decision on - do I book this student in this class or not? If you have access to override, what you are basically saying is – it is OK for this student to be in this class even if there is a time conflict, class is closed, etc. Overrides: If you have a column with a gray ‘x’ then you have access to override this error. This does not necessarily mean you should. If you decide to override, green check.
Cancel override: Left-click the “New input/correction” icon. NOTE: The red x does not always cancel the booking, so use “New Input/Correction” icon. Continue Booking: Left-click on the green check. Message Log: If you override the error, enter a note so you will know why you decided this was the appropriate action. Notes are viewable from the ‘Message Logs’ icon in the main Student File screen.

10
Booking was successfully saved: Make sure you receive the saved message.
Message Logs: To view the message log, left-click on Message log icon . Message Log will appear: Open by left-clicking on the arrows. You can see that ocarter1 was the individual who did the override. View the override: To view what error that was overridden, double click on the paper on the message log
Message log icon 1
Message log will appear 2
Paper (double-click) Message text should now appear 3

11
Dropping a Course (Booking) Note: Only the Registrar’s Office should drop a student to zero hours. In the booking module:
• Select the course by highlighting. • Change Status to cancelled: Left click on the Change Status icon.
Cancel Module Booking: Departments and/or Dean’s Office should not be dropping students after the last day to drop. Cancel Date: The date will default to today’s date. Cancel Reason: Required
• Administrative: Registrar’s Office only • Cancellation Before Classes Begin: Registrar’s Office only • Course Drop After Deadline: Registrar’s Office only • Course Drop Before Deadline: Departments, Deans, Registrar • Withdrawal After Drop Deadline: Registrar’s Office only • Withdrawal Before Drop Deadline: Registrar’s Office only
Make sure you get the informational message: “Bookings were successfully saved.”
Change status – cancelled icon 2
Highlight the course. 1
Cancel Reason 1
SAVE

12
Booking Errors Next Offering Do(es) not exist: The selected modules (courses) is not offered for the selected session.
Prerequisite Module is not fulfilled: This error message indicates a prerequisite module (course) has not been fulfilled. If there is a green check with a pencil, you have access to override.
If you wish to cancel the Override icon, left-click on New entry/correction. The green check or the red x will override the error message. If you believe it is appropriate to allow this student in the class; then press the green check. A box will appear that will allow you to enter any comments.
Not offered for selected session
Override icon
13
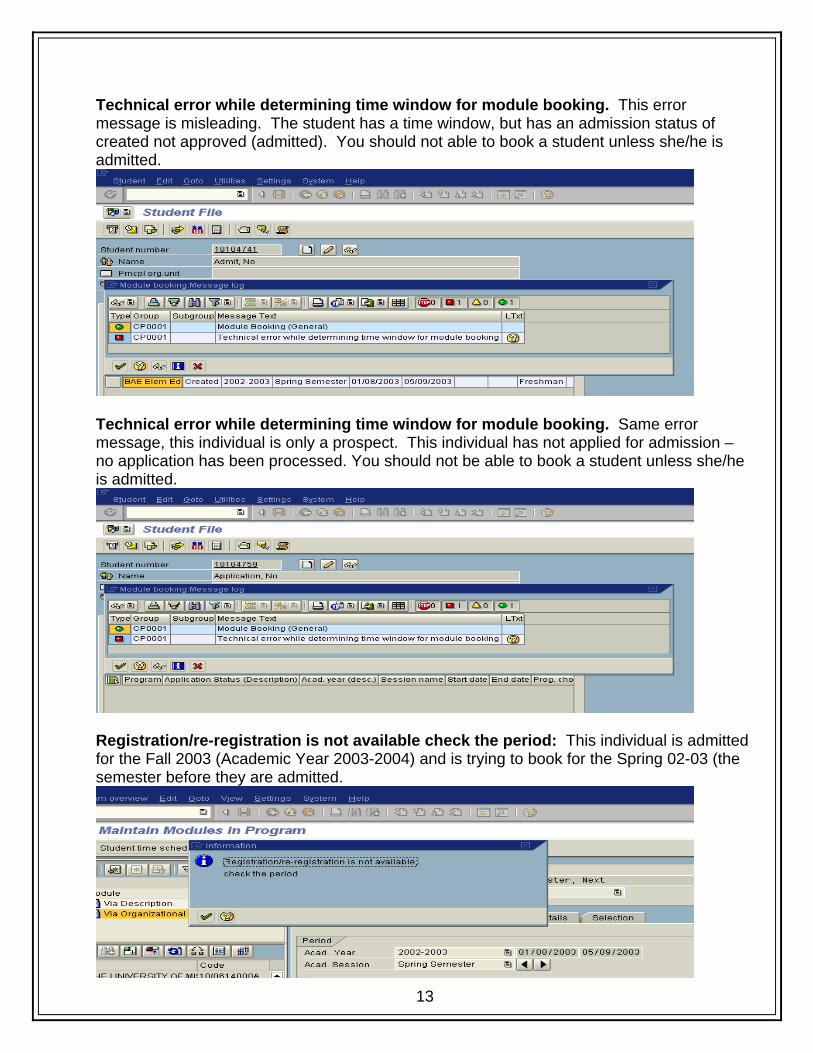
Technical error while determining time window for module booking. This error message is misleading. The student has a time window, but has an admission status of created not approved (admitted). You should not able to book a student unless she/he is admitted.
Technical error while determining time window for module booking. Same error message, this individual is only a prospect. This individual has not applied for admission – no application has been processed. You should not be able to book a student unless she/he is admitted.
Registration/re-registration is not available check the period: This individual is admitted for the Fall 2003 (Academic Year 2003-2004) and is trying to book for the Spring 02-03 (the semester before they are admitted.

14
Information Message - Module booking is not possible: If module booking is not possible, the system will take you to display mode (see below).
Show Modules in Program: You will only be able to view.
Booking date and time are not within allowed time window: This individual has not been assigned a time window to register. The time window is located on the Student Master Data, Advising Data Tab. During Priority Registration, this error may occur if the individual is trying to book before their time window is open. More information on Priority Windows will be provided before October. For the Fall Semester (2003 -2004), 0101 is the Time Window.

15
Bursar Hold: Unable to Register – Bursar Hold – Contact the Bursar’s Office. This type message will appear for any hold – Example, I used Bursar.
Registration/re-registration is not available check the period. This individual has been admitted for Intersession but is trying to enroll for First Summer Term and did not register for intersession. If the individual books a intersession class, then they are OK to book for first summer, second, etc.
Maximum capacity of Business event package Section 1 has already been reached. This errors means class is full.

16
Capacities Room Capacity: Room Optimum will be the number of seats that the room will allow per Code. (Note: Actual number of chairs in the classroom may be different. The Optimum will be the room capacity (# of people) allowed by fire code. This is determined by square footage, # of doors, etc. Note: Room capacity is considered master data, and only needs to be updated when physical changes have been made to the room. This data will be maintained by the Registrar’s Office with the assistance of PPD. Room Optimum: # of seats per Code Room Maximum: 10% above Optimum (To allow department control for drop/adds). In a few cases, this number maybe a little higher than 10%. Sections Capacity (SE & E): Section Optimum: Stops students from booking over the Web. Section Maximum: Booking from Optimum to Maximum is controlled by Department, Deans and Registrar. zchange_capacity: Allows department to control the section limits. Section Optimum stops booking over the web. Section Maximum stops Departments, Deans, and Registrar from booking. Note: Section Maximum can not be set above Room Maximum. Example: A Department wishes to stop booking for section over the Web at 30 and control the additional bookings up to 40 within their department. Optimum Maximum Room 50 55 (10%) Section Capacity (zchange_capacity)
30 (This will stop students from register over the Web)
40 (This will allow departments, Deans, Registrar to book up to 40)
Department now wishes to book up to 50. Section Capacity (zchange_capacity)
50 (This would allow students to register over the Web)
50 (Max must be at least the same)
OR Section Capacity (zchange_capacity)
Leave at 30 50 (This would allow department to control bookings)
Department now wishes to book up to 60 Section Capacity (zchange_capacity)
zchange_capacity will not allow user to change the maximum to 60 since the room maximum is 55. User will receive an error message. Opt could be changed to 50, and Max to 55 because of room capacities.