booting and configuring a xen host -...
TRANSCRIPT

Booting and Configuring a Xen Host
Now the fun actually begins! The previous chapters provided background information on virtualization in general and Xen in particular, and discussed how to obtain and install Xen on a Linux system. In this chapter, we finally get to start the Xen hypervisor and boot a paravirtualized Linux kernel under the hypervisor. By the end of this chapter, you ’ ll have a fully functioning administrative domain for Xen (domain0) and will be ready to move on to installing paravirtualized Xen virtual machines and/or fully virtualized Hardware Virtual Machines (HVMs) in your Xen environment, depending upon the capabilities of your hardware.
As in the rest of this book, this chapter focuses on using Xen on Linux systems. Therefore, this chapter focuses on the Xen hypervisor boot process, which is essentially the same on any system, and subsequent interaction between the Linux boot process and Xen domain0 initialization. If you are booting Xen on a Solaris or *BSD system, the startup process will be similar and will perform the same types of tasks, but systems other than Linux are not covered in detail in this chapter.
Overview of Xen and Linux System Startup
As discussed in the previous chapter, the standard Linux boot loader, known as the Grand Unified Bootloader or GRUB to its friends, is a key component of installing and booting the Xen hypervisor on a Linux system. GRUB not only understands how to boot the Xen hypervisor like any other bootable image, but it also understands how to identify a Linux kernel and associated initial RAM disk that your domain0 Linux kernel may require. As you might expect, there are many options, bells, and whistles that you can configure when booting the hypervisor and loading the domain0
c04.indd 87c04.indd 87 12/14/07 4:01:19 PM12/14/07 4:01:19 PM

Chapter 4: Booting and Confi guring a Xen Host
88
kernel and any associated RAM disk. This makes it important to have a good idea of both the Xen and standard Linux boot processes, how Linux systems discover devices and start processes such as system daemons during the boot process, and so on.
The next few sections of this chapter discuss each aspect of the startup process on a Xen domain0 system: BIOS initialization, executing GRUB, starting the Xen hypervisor, and starting a domain0 kernel and associated Linux system. A final section discusses how to use a serial console and serial connection to another system in order to capture system boot information for debugging purposes. This should rarely be necessary, but can be critically important when you do actually need it.
BIOS Initialization and System Startup When you first turn on a computer system, it loads a boot monitor or BIOS (Basic Input/Output System) from storage on the motherboard. This storage is usually a programmable read -o nly memory (PROM), chip or a section of flash memory that is present on the board. The BIOS or boot monitor is a very low - level, hardware-oriented application that does some basic hardware initialization, performs some amount of hardware testing and verification (often optional), waits for keyboard or console input for some pre determined period of time, and then usually begins to execute a set of pre determined instructions to load another program into memory. These instructions load another program into memory from a predetermined location such as a portion of flash memory or the Master Boot Record (MBR) of a storage device such as a hard drive or CD - ROM, and then they specify the memory address at which to begin executing the program once it has been loaded successfully.
On most desktop and server computer systems, an intermediate program is loaded into memory from the MBR, which then provides additional configuration and customization options for the boot process. On modern x86, PPC, and SPARC systems, the program that is loaded into memory at this point is known as a boot loader, which is a configurable application that provides higher - level options for loading an operating system on the computer. The boot loader that is most commonly used on modern x86 systems today (including 64 - bit systems) is the Grand Unified Bootloader (GRUB), although some Linux distributions still use an older, simpler boot loader known as the Linux Loader (LILO). Xen requires the use of GRUB.
GRUB Boot loaders traditionally consist of two stages: a minimal first - stage boot loader and a more elegant, second - stage boot loader. The size of a first - stage boot loader is constrained by the size of the MBR on a storage device, which is a single sector (512 bytes). Therefore, the first - stage boot loader primarily contains enough information to locate and load the second - stage boot loader, which is where all the action is.
GRUB uses an intermediate step in the boot process, first loading what GRUB calls a stage 1.5 boot loader that understands a specific type of Linux filesystem, and can therefore load GRUB ’ s text - format
c04.indd 88c04.indd 88 12/14/07 4:01:20 PM12/14/07 4:01:20 PM
89
Chapter 4: Booting and Confi guring a Xen Host
configuration file directly from your machine ’ s root filesystem. GRUB provides many different stage 1.5 boot loaders, including the following:
e2fs_stage1_5 : For booting from a partition containing an ext2 or ext3 filesystem
fat_stage1_5 : For booting from a partition containing a DOS or Microsoft Windows VFAT filesystem
ffs_stage1_5 : For booting from a partition containing a Berkeley Fast FileSystem
iso9660_stage1_5 : For booting from a partition containing an ISO9660 filesystem, such as a CD - ROM
jfs_stage1_5 : For booting from a partition containing a JFS filesystem
minix_stage1 : For booting from a partition containing a Minix filesystem
reiserfs_stage1_5 : For booting from a partition containing a ReiserFS filesystem
ufs2_stage1_5 : For booting from a partition containing a traditional UNIX filesystem
vstafs_stage1_5 : For booting from a partition containing a Plan 9 VSTa filesystem
xfs_stage1_5 : For booting from a partition containing an XFS filesystem
The stage 1.5 boot loaders provided with GRUB depend on the Linux distribution that you have installed and are using for your domain0 system. Most Linux systems include stage 1.5 boot loaders for booting from ext2/ext3, JFS, Minix, ReiserFS, VFAT, and XFS filesystems.
The stage 1.5 boot loader then loads GRUB ’ s second - stage boot loader and associated configuration files directly from the type of filesystem on which they are located.
A second - stage boot loader typically provides access to a menu that enables you to choose between different ways of loading an operating system on your computer. GRUB can be configured to display this menu for a short period of time, to only display it in response to specific keyboard input (such as pressing the Escape key), or not to display it at all. Once your system boots Linux, you can modify the configuration of the boot loader to automatically display a menu by modifying the boot loader ’ s configuration file, which is usually /boot/grub/menu.lst for GRUB. On some Linux distributions, such as Fedora, /boot/grub/menu.lst (which stands for menu list, hence the lst extension) is actually a symbolic link to the GRUB configuration file /boot/grub/grub.conf .
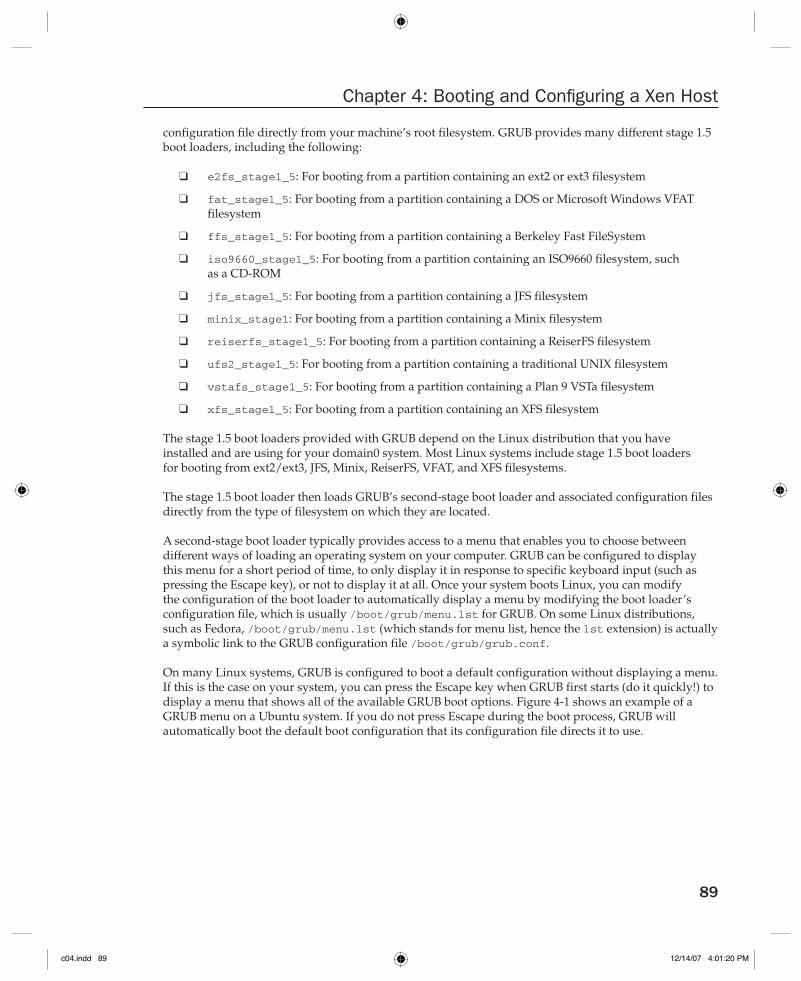
On many Linux systems, GRUB is configured to boot a default configuration without displaying a menu. If this is the case on your system, you can press the Escape key when GRUB first starts (do it quickly!) to display a menu that shows all of the available GRUB boot options. Figure 4 - 1 shows an example of a GRUB menu on a Ubuntu system. If you do not press Escape during the boot process, GRUB will automatically boot the default boot configuration that its configuration file directs it to use.
❑
❑
❑
❑
❑
❑
❑
❑
❑
❑
c04.indd 89c04.indd 89 12/14/07 4:01:20 PM12/14/07 4:01:20 PM

Chapter 4: Booting and Confi guring a Xen Host
90
GRUB configuration files typically contain multiple definitions for ways to boot your system. Each set of related entries is referred to as a stanza. In a standard, non - Xen GRUB stanza, the GRUB entries look like the following:
title Ubuntu, kernel 2.6.15-23-386
root (hd0,0)
kernel /boot/vmlinuz-2.6.15-23-386 root=/dev/hda1 ro quiet splash
initrd /boot/initrd.img-2.6.15-23-386
Extra white space is ignored in entries in a GRUB stanza. Each line in a stanza begins with a keyword that identifies the aspect of the boot process that it described. In the preceding example, these entries have the following meanings:
title : Provides the name for this entry displayed on the GRUB menu.
root : Identifies the absolute location of the runtime root filesystem using GRUB ’ s own nomenclature.
kernel : Identifies the kernel to boot and provides command - line boot parameters for that kernel.
initrd : Identifies an initial RAM disk or initial RAM filesystem image that should be loaded by the kernel during the boot process.
❑
❑
❑
❑
Figure 4-1
c04.indd 90c04.indd 90 12/14/07 4:01:21 PM12/14/07 4:01:21 PM

91
Chapter 4: Booting and Confi guring a Xen Host
In a Xen boot stanza, the syntax is slightly different. A standard Xen boot stanza for GRUB looks like the following:
title Xen 3.0.5 RC2 Serial Console
root (hd0,0)
kernel /boot/xen.gz
module /boot/vmlinuz-2.6-xen ro root=/dev/hda1
module /boot/initrd-2.6.18-xen.img
In a Xen boot stanza, GRUB loads the Xen hypervisor using its kernel command, and then uses the module keywords to subsequently identify the domain0 kernel and an (optional) initial RAM disk or filesystem. You can pass a variety of options to Xen on the kernel line, all of which are discussed in the “Configuring GRUB for Xen” section later in this chapter. The majority of these only affect the Xen hypervisor, although some are also propagated to the Linux kernel for domain0. These options are discussed in the “Shared Xen and Linux Boot Options” section later in this chapter.
Finally, Xen adds a few new command - line parameters to the Linux kernel itself. These are discussed later in this chapter, in the “Xen-Specific Linux Boot Options” section.
The GRUB keywords discussed in this section are only a subset of the keywords supported by GRUB. For complete information about GRUB configuration files, see the online documentation for GRUB, which is provided in the grub - doc package, which you must install manually using the Synaptic package manager or the apt - get application. Once you have installed this package, the complete GRUB documenta-tion is available by typing info grub from any Ubuntu command line. For even more information about GRUB, see the GRUB home page at www.gnu.org/ software/grub . This page also discusses the new, improved, family - size version of GRUB, GRUB2, that is currently under development.
The next step in booting your domain0 Xen system is actually loading and executing the hypervisor, which is described in the next section.
The Xen Boot and Initialization Process When you boot your system and select a Xen boot stanza, the system boots the hypervisor, which probes your system and performs some basic initialization before chain - loading the domain0 Xen kernel and an optional RAM disk. Much of the Xen hypervisor ’ s initialization process can be customized by the options discussed later in this chapter in the section “ Configuring GRUB for Xen. ” This section provides a high - level overview of the vanilla hypervisor boot and initialization processes up to the point where the hypervisor loads the domain0 kernel, at which point the remainder of the boot process is the same as that on any Linux (or other UNIX - like system).
The Xen hypervisor ’ s initialization process primarily consists of probing and initializing your system ’ s hardware so that the hypervisor can correctly map and handle incoming requests from the actual device drivers used by the domain0 kernel, as well as requests from paravirtualized drivers in other domains. The hypervisor begins by reserving internal regions for bookkeeping, interrupt, and device management. It then examines system memory, optionally disabling any pages that have been marked as bad through Xen command line options (explained later in this chapter), and selecting a processor or processor core for its use.
c04.indd 91c04.indd 91 12/14/07 4:01:22 PM12/14/07 4:01:22 PM

Chapter 4: Booting and Confi guring a Xen Host
92
Once a processor has been selected, the hypervisor enables Advanced Programmable Interrupt Controller (APIC) interrupt requests, and allocates physical memory for use, once again optionally limited by Xen hypervisor command - line options. Xen then creates its own memory map for managing memory use by various domains. Finally, the hypervisor loads the Linux kernel that it should boot for domain0 and validates the initial RAM disk (if any) that is associated with the domain0 kernel. It then transfers control to the domain0 kernel.
If you want to see detailed information about the Xen hypervisor boot process, you can either capture Xen information through a serial console (as described later in this chapter in the section “ Capturing Xen and Linux Boot and Startup Information “ ) or execute the xm dmesg command as a user with root privileges on your domain0 system after it has booted successfully and started the xend process. The xm dmesg command is exactly like the standard dmesg command, except that it displays the message ring buffer associated with the Xen hypervisor rather than the standard Linux kernel ’ s ring buffer. The following is sample output from the xm dmesg command on one of my systems:
__ __ _____ _ _
\ \/ /___ _ __ |___ / / | / |
\ // _ \ ‘_ \ |_ \ | | | |
/ \ __/ | | | ___) || |_| |
/_/\_\___|_| |_| |____(_)_(_)_|
http://www.cl.cam.ac.uk/netos/xen
University of Cambridge Computer Laboratory
Xen version 3.1.1 (root@) (gcc version 4.1.2 (Ubuntu 4.1.2-0ubuntu4)) Thu Oct 11
09:23:46 EDT 2007
Latest ChangeSet: Thu Oct 11 10:12:07 2007 +0100 15467:d6d3c7856abc
(XEN) Command line: noreboot dom0_mem=1G
(XEN) Video information:
(XEN) VGA is text mode 80x25, font 8x16
(XEN) VBE/DDC methods: V2; EDID transfer time: 1 seconds
(XEN) Disc information:
(XEN) Found 1 MBR signatures
(XEN) Found 1 EDD information structures
(XEN) Xen-e820 RAM map:
(XEN) 0000000000000000 - 00000000000a0000 (usable)
(XEN) 00000000000f0000 - 0000000000100000 (reserved)
(XEN) 0000000000100000 - 00000000cf688000 (usable)
(XEN) 00000000cf688c04 - 00000000cf68ac04 (ACPI NVS)
(XEN) 00000000cf68ac04 - 00000000cf68cc04 (ACPI data)
(XEN) 00000000cf68cc04 - 00000000d0000000 (reserved)
(XEN) 00000000f0000000 - 00000000f4000000 (reserved)
(XEN) 00000000fec04000 - 00000000fed00400 (reserved)
(XEN) 00000000fed20000 - 00000000feda0000 (reserved)
(XEN) 00000000fee00000 - 00000000fef00000 (reserved)
(XEN) 00000000ffb00000 - 0000000100000000 (reserved)
(XEN) System RAM: 3318MB (3397792kB)
(XEN) Xen heap: 9MB (10132kB)
(XEN) Domain heap initialised: DMA width 32 bits
(XEN) PAE enabled, limit: 16 GB
(XEN) Processor #0 15:4 APIC version 20
(XEN) Processor #1 15:4 APIC version 20
(XEN) IOAPIC[0]: apic_id 8, version 32, address 0xfec04000, GSI 0-23
(XEN) Enabling APIC mode: Flat. Using 1 I/O APICs
c04.indd 92c04.indd 92 12/14/07 4:01:22 PM12/14/07 4:01:22 PM

93
Chapter 4: Booting and Confi guring a Xen Host
(XEN) Using scheduler: SMP Credit Scheduler (credit)
(XEN) Detected 2793.153 MHz processor.
(XEN) CPU0: Intel(R) Pentium(R) D CPU 2.80GHz stepping 07
(XEN) Mapping cpu 0 to node 255
(XEN) Booting processor 1/1 eip 90000
(XEN) Mapping cpu 1 to node 255
(XEN) CPU1: Intel(R) Pentium(R) D CPU 2.80GHz stepping 07
(XEN) Total of 2 processors activated.
(XEN) ENABLING IO-APIC IRQs
(XEN) - > Using new ACK method
(XEN) Platform timer overflows in 14998 jiffies.
(XEN) Platform timer is 14.318MHz HPET
(XEN) Brought up 2 CPUs
(XEN) acm_init: Loading default policy (NULL).
(XEN) *** LOADING DOMAIN 0 ***
(XEN) Xen kernel: 32-bit, PAE, lsb
(XEN) Dom0 kernel: 32-bit, PAE, lsb, paddr 0xc0100000 - > 0xc0447e3c
(XEN) PHYSICAL MEMORY ARRANGEMENT:
(XEN) Dom0 alloc.: 000000003c040000- > 000000003e000000 (253952 pages to be
allocated)
(XEN) VIRTUAL MEMORY ARRANGEMENT:
(XEN) Loaded kernel: c0100000- > c0447e3c
(XEN) Init. ramdisk: c0448000- > c1847800
(XEN) Phys-Mach map: c1848000- > c1948000
(XEN) Start info: c1948000- > c194846c
(XEN) Page tables: c1949000- > c195c040
(XEN) Boot stack: c195c040- > c195d000
(XEN) TOTAL: c0400000- > c1c04000
(XEN) ENTRY ADDRESS: c0100000
(XEN) Dom0 has maximum 2 VCPUs
(XEN) Initrd len 0x13ff800, start at 0xc0448000
(XEN) Scrubbing Free RAM: .......................done.
(XEN) Xen trace buffers: disabled
(XEN) Std. Loglevel: Errors and warnings
(XEN) Guest Loglevel: Nothing (Rate-limited: Errors and warnings)
(XEN) Xen is relinquishing VGA console.
(XEN) *** Serial input - > DOM0 (type ‘CTRL-a’ three times to switch input to Xen).
(XEN) Freed 96kB init memory.
The next section describes the process of booting a Linux kernel, loading its optional RAM disk or RAM filesystem, and performing basic initialization up to the point where the kernel actually starts the first Linux user - space process and begins user - space system startup.
Loading the Kernel and Optional RAM Disk As with a regular Linux kernel, the kernel specified in a Xen GRUB stanza is typically a compressed kernel image that is loaded directly into memory. This compressed kernel is prefixed by some instructions that perform initial hardware and execution environment setup (stack definition, page table initialization, starting the swapper, and so on), uncompress the kernel image into high memory, store any initial RAM disk or initial RAM filesystem in memory for subsequent access, and then begin execution of the uncompressed kernel. Xen - based kernels use the virtual memory map for the kernel and initial RAM disk or filesystem that have already been laid out by the hypervisor during its initialization.
c04.indd 93c04.indd 93 12/14/07 4:01:22 PM12/14/07 4:01:22 PM

Chapter 4: Booting and Confi guring a Xen Host
94
The kernel then sets up interrupts, performs additional hardware initialization, and then uncompresses and mounts any initial RAM disk or filesystem that was found in the kernel image or specified using GRUB ’ s initrd keyword. If an initial RAM disk or filesystem is found or specified, the system follows the sequence of events described in the next section, “ Loading and Using an Initial RAM Disk or RAM Filesystem. ” If no initial RAM disk or initial RAM filesystem is found in the kernel or identified using the initrd parameter, the kernel mounts the root filesystem identified on the command line using the disk identifiers specified in GRUB ’ s root entry, and then starts the standard system initialization process, as described in “The Linux System Startup Process” later in this chapter.
Loading and Using an Initial RAM Disk or RAM Filesystem Many Linux systems use a special type of filesystem as part of the boot process, before actually mounting the non - transient storage devices that are attached to your system. These initial filesystems are optional, and come in two different flavors: an initrd (initial RAM disk) or initramfs (initial RAM filesystem). On most desktop and server computer systems, these initial filesystems are typically used to load kernel modules, such as specialized device drivers that the kernel needs but which are not built into the kernel, and to perform specialized hardware and software initialization functions. On most desktop and server systems, an initial RAM disk or initial RAM filesystem is almost always a transient part of the boot process.
Initial RAM disks are the traditional mechanism used by many 2.6 and all earlier Linux kernels to enable the kernel to load drivers and execute processes that must be available in order to boot successfully. Initial RAM disks are compressed files that contain an actual filesystem in a format such as ext2, romfs, and so on. Initial RAM disks are uncompressed into a pre - allocated portion of memory and are then mounted for use by the kernel. The primary problems with initial RAM disks is that they consume a substantial amount of system memory and, because they are actual block devices, require the kernel to contain drivers for whatever type of filesystem they use.
The development series (2.5) preceding the release of the 2.6 Linux kernel introduced the idea of initial RAM filesystems that exist directly in the kernel ’ s file and directory cache. Initial RAM filesystems are identified or built into the kernel in the same way that initial RAM disks are, but consist of compressed archive files in the format produced by the UNIX/Linux cpio command. These archive files contain all of the files and directory entries for the initial RAM filesystem, and are directly unpacked into the kernel ’ s file and directory entry cache, which is then mounted as a filesystem. Using the file and directory cache as a filesystem substantially reduces the amount of memory required for the initial RAM filesystem because files and directories live in the kernel ’ s page and directory entry (dentry) cache, where they would be copied anyway if they were used from a filesystem located on a block device. An initial RAM filesystem is an instance of the Linux tmpfs filesystem.
Linux systems that boot with an initial RAM disk execute the file /linuxrc from that filesystem after uncompressing and mounting the filesystem. This file is typically a command file, but can also be a version of the /sbin/init program that follows the standard initialization process described in the “The Linux System Startup Process” section later in this chapter. (This is typically done when the initial RAM disk will be your runtime filesystem, as in embedded systems.) Linux systems that boot with an initial RAM filesystem execute the file /init from that filesystem after loading it into the file and directory entry cache. As with the /linuxrc file used with initial RAM disks, /init is typically a command file, but can also be a version of the init program that follows the standard runtime system initialization process described in the next section.
c04.indd 94c04.indd 94 12/14/07 4:01:23 PM12/14/07 4:01:23 PM

95
Chapter 4: Booting and Confi guring a Xen Host
On desktop and server systems that use physical root filesystems, the last step in the /linuxrc or /init instructions is to mount the real root filesystem (identified in the kernel or by using the root= kernel boot parameter), begin using that root filesystem as the new root filesystem (by using a pivot_root or chroot command), and starting the init process, as described in the section “ The Linux System Startup Process. ”
Comparing Initial RAM Disks and RAM - Based Filesystems Some of the more significant ways in which initial RAM disks and initial RAM filesystems differ are the following:
You do not need any special privileges to build an initial RAM filesystem file or a kernel that contains one. Building an initial RAM disk typically requires root privileges unless you do so using an external application such as the genext2fs application.
Initial RAM disks (initrd) are compressed files containing a filesystem in a specific format such as ext2 , romfs , cramfs , squashfs , and so on. Initial RAM filesystems (initramfs) are compressed archive files in the format used by the Linux/UNIX cpio application.
Initial RAM disks must be prepared outside the kernel and identified during the kernel build process if you want to link them directly into the kernel. Initial RAM filesystems can be prepared outside the kernel and identified during the kernel build process, but can also be automatically created during the kernel build process. 2.6 and later kernels enable you to identifying a directory that contains the files that you want to have in your initial RAM filesystem or a configuration file that describes their contents.
Initial RAM disks allocate and require a fixed amount of memory that is specified when building the kernel, regardless of the actual size of the files and directories that they contain. Any space not used by files and directories in the initial RAM disk is completely wasted. Initial RAM filesystems are directly allocated in the kernel ’ s page and dentry cache, and therefore only require allocating the amount of memory that is required by the files and directories that they contain.
You can easily add a new script or file to an initial RAM filesystem that is specified as an external file in GRUB by using the gunzip application to uncompress the cpio archive, using the cpio --append command to add the new file to the archive, and using the gzip command to recompress the archive. You should do this only for testing purposes because your modification will go away the next time you build a kernel or receive an update. You can permanently add the file or script to future initial RAM filesystems that you build by adding that file or script to the directory or script pointed to by the CONFIG_INITRAMFS_SOURCE kernel configuration variable for your kernel.
Initial RAM disks automatically execute the file /linuxrc from the RAM disk. Initial RAM filesystems automatically execute the file /init from the RAM filesystem. The /init file in an initramfs filesystem runs with process ID 1, just like the init process in a standard Linux system.
The contents of an initial RAM disk or initial RAM filesystem differ based on the hardware, system capabilities, and type of Linux system that you are using. Desktop Linux systems typically use these filesystems to provide loadable device drivers or mandatory system setup procedures that are required in order to proceed with the boot process. This is especially important for server systems that may need to load drivers for special hardware that enables them to configure and access network - based storage, such as ATA - over - Ethernet (AoE) or iSCSI hardware or filesystems, before the system can actually come
❑
❑
❑
❑
❑
❑
c04.indd 95c04.indd 95 12/14/07 4:01:23 PM12/14/07 4:01:23 PM

Chapter 4: Booting and Confi guring a Xen Host
96
all the way up. Both initial RAM disks and initial RAM filesystems provide only transient storage that does not enable you to save files across system restarts, but initial RAM filesystems are much more efficient and place fewer requirements on the kernel.
The Linux System Startup Process After loading the kernel and mounting a runtime root filesystem, traditional UNIX and Linux systems execute a system application known as the init (initialization) process, which is typically found in /sbin/init on Linux systems. Typically, the init process is process number 1 on the system, as shown in a process status listing produced using the ps command, and is therefore the ancestor of all other processes on your system.
The traditional init binary used on most UNIX and Linux systems is part of a package of applications known as the sysvinit package. The sysvinit package uses a package of related command scripts known as the initscripts package, to identify the processes that are started when a system boots into different runlevels and the order in which they are started. The sysvinit program reads the file /etc/inittab to identify the way in which the system should boot and defines all of the other processes and programs that it should start.
As the name suggests, the sysvinit package and related processes have their conceptual roots in the Sys V version of UNIX — or more properly UNIX System V, Release 4 (SVR4) — which was released in 1989. Although elegant in its simplicity, the sysvinit package suffers from a lack of parallelism and flexibility, which can lead to longer system startup times than are absolutely necessary and can complicate the process of recognizing and using networked and removable devices. Various replacement init packages are available to replace sysvinit with a faster, increasingly parallel, and more responsive system initialization mechanism. The best known of these are initng (Init, the Next Generation — www.initng.org/ ), Apple ’ s launchd ( http://developer.apple.com/macosx/launchd.html ), Sun ’ s Predictive Self - Healing architecture and Service Management Facilities (SMF) ( www.sun.com/bigadmin/content/selfheal ), and upstart ( http://upstart.ubuntu.com ):
initng: Can start multiple processes in parallel, and is designed to be able to start subsequent processes as soon as any dependencies that they have are satisfied. (It is therefore commonly referred to as a “ dependency - based ” initialization mechanism.) initng is available for many Linux distributions, but is not used by default on any distribution that I ’ m aware of.
launchd: The replacement init system used in Mac OS X, and designed to also replace other system scheduling mechanisms such as cron and xinetd . launchd was not originally an open source project, and its conversion to open source hasn ’ t attracted many users other than those from Mac OS X.
SMF: Sun ’ s SMF is a dependency - based and extremely responsive notification system that enables processes to be started and restarted as needed. It is now open source with the rest of Solaris, but is not GPL and therefore no one is using it outside of Solaris. In general, I can ’ t see widespread adoption of this, primarily because it is a complex system that is orthogonal to most of the initialization and notification mechanisms that are currently used by Linux, such as udev , dbus , and hotplug . It would also need another name for anyone to take it seriously — “ Predictive Self - Healing ” sounds like it should ship with a crystal or some incense.
upstart: Developed for the Ubuntu Linux distribution and used only by that distribution at the time of this writing. However, it is designed to be portable and can easily be adopted by other distributions. upstart is an event - driven system initialization package that increases parallelism
❑
❑
❑
❑
c04.indd 96c04.indd 96 12/14/07 4:01:24 PM12/14/07 4:01:24 PM

97
Chapter 4: Booting and Confi guring a Xen Host
in system startup tasks and provides a highly responsive framework for starting, stopping, and automatically restarting processes that depend on the availability of services that are started earlier in the system initialization process.
This chapter focuses on discussing the system startup mechanisms that are deployed by default with existing Linux distributions, namely sysvinit and upstart.
The existence of different system initialization mechanisms on different Linux distributions is another good argument for using the set of Xen packages that are provided by whatever Linux distribution you select as the basis for your virtualization environment. These packages will be integrated with your system ’ s startup mechanism, simplifying that aspect of system administration for you. However, you may still need to use a version of Xen that is newer than the one that is available for your distribution. The “Xen-Related Startup Scripts and Processes” section of this chapter identifies the critical Xen and Xen - related processes that must be started on a domain0 system and the scripts that traditionally start them. If you are rolling your own version of Xen, you must make sure that these critical processes are available for successful integration with the Xen hypervisor and the correct initialization of your network environment. You may need to customize the default Xen startup mechanism to work correctly on your system.
System Runlevels Most desktop and server Linux systems use the concept of runlevels to identify the applications that the system executes and the order in which they are executed. Different runlevels are simply a way of defining a set of applications that the system administrator believes should be run when the system is being used in a certain way. For example, runlevel 1 is usually known as single - user mode, and is used for system maintenance. Only the core set of applications required for a system administrator to contact the system and perform maintenance tasks are running when the system is in runlevel 1. The runlevels used by Linux systems are the following:
0: Halt.
1: Single - user.
2: Default multiuser runlevel on Linux systems such as Ubuntu and Debian. On Linux distributions where runlevel 3 or 5 is the default multiuser runlevels, runlevel 2 is a multiuser runlevel without networking support.
3: Non - graphical multiuser runlevel on Linux distributions such as Fedora, Red Hat, SUSE, Mandrake, and so on.
4: Reserved for a custom, user - defined runlevel.
5: Graphical multiuser runlevel on Linux distributions such as Fedora, Red Hat, SUSE, Mandrake, and so on.
6: Used to reboot a Linux system.
Runlevels are a core concept of the sysvinit package and provide the traditional mechanism for system initialization on Linux systems. The concept of runlevels is therefore well - known and well-understood by most system administrators. Even alternate system initialization and init packages, such as those introduced at the end of the previous section, are typically installed so that they emulate the spirit and behavior of the sysvinit package, while forsaking its internals. For example, Ubuntu ’ s upstart package
❑
❑
❑
❑
❑
❑
❑
c04.indd 97c04.indd 97 12/14/07 4:01:24 PM12/14/07 4:01:24 PM

Chapter 4: Booting and Confi guring a Xen Host
98
installs itself in sysvinit compatibility mode so that it still follows the run level convention. (More about this in the “Upstart System Initialization” section later in this chapter.)
The startup commands associated with each Linux runlevel are located in the directory /etc/rc N .d , where N is the number associated with a runlevel. The files in these directories have names of the form Snnname or Knnname, and are usually executable shell scripts (or, more commonly, are links to a common set of scripts) that contain lists of other system commands to execute. Files beginning with the letter “ S ” are executed when the system starts a specified runlevel. Entries beginning with the letter “ K ” are executed when the system leaves a specified runlevel. Commands are executed in the numerical order specified by the number Variable. The Variable portion of an entry is user - defined, but is generally evocative of the program or subsystem that the file starts.
Because Linux systems start many of the same commands at different runlevels, the entries in the runlevel command directories are usually just symbolic links to the master collection of system startup and shutdown scripts located in the directory /etc/init.d . The names of the symbolic links in the different runlevel directories use the Snnname and Knnname naming convention to impose a sequence on their execution. The names of the scripts in /etc/init.d (that is, the scripts that the runlevel directories link) have generic names. Using symbolic links rather than explicit startup and shutdown scripts for each runlevel makes it easy to add or remove services from a given runlevel without duplicating the master scripts, and leaves /etc/init.d as a single, central location where you can modify any of these scripts to propagate your changes to the startup/shutdown process for all of the associated runlevels.
sysvinit System Initialization Systems that use both the sysvinit and initscripts packages boot in the following sequence: once the kernel is loaded and begins executing from its runtime root filesystem, it invokes a process known as the /sbin/init (initialization) process, which reads the file /etc/inittab to identify the basic processes and programs that it should start.
In the /etc/inittab file, the default runlevel for your system is identified with a line containing the string “ initdefault, ” as in the following example:
id:2:initdefault:
In this case, the default runlevel is 2. An additional entry in the /etc/inittab file identifies a command script that is run to initialize the system itself, as in the following example:
si::sysinit:/etc/init.d/rcS
On some Linux distributions, such as Ubuntu with sysvinit compatibility, the /etc/init.d/rcS command actually runs the /etc/init.d/rc command with an argument of S which executes all of the scripts in the directory /etc/rcS.d that begin with an upper - case S, as described in the rest of this section. On some other Linux distributions, the system initialization script is a single script to which you manually add any initialization commands that you want to run.
c04.indd 98c04.indd 98 12/14/07 4:01:25 PM12/14/07 4:01:25 PM

99
Chapter 4: Booting and Confi guring a Xen Host
After the system initialization script is run, Linux distributions that use the sysvinit and initscripts packages then define what occurs when the system enters a specific runlevel. For example, a few lines later in the /etc/inittab file, you might see additional information about runlevel 2 in an entry such as the following:
l2:2:wait:/etc/init.d/rc 2
This line specifies that when the system enters runlevel 2, the /etc/init.d/rc command will be executed with an argument of 2 . This causes rc (run command) to execute all of the appropriate files located in the directory /etc/rc2.d , following the S (start) and K (kill) naming convention that was discussed earlier in the section on runlevels.
As the last step of the startup process for any multiuser run level, the init process for most Linux distributions runs the script /etc/rc.local , which is provided so that you can customize the startup process for a specific machine without making general changes to the startup scripts and symbolic links for that machine.
Two traditional assumptions that you can make about the startup scripts on your system are the following, regardless of the system initialization mechanism that it uses:
All device drivers have been initialized, local filesystems have been mounted, and networking is available after all of the S40* scripts have completed.
The system clock has been set, NFS filesystems have been mounted (if any are listed in /etc/fstab or you use the automounter, which is started later), and all filesystems have been checked for consistency after all of the S60* scripts have been executed.
You should keep these rules in mind when adding your own startup scripts to the startup sequence for any of your system runlevels.
upstart System Initialization upstart is an extremely interesting event - driven system initialization system that replaces the traditional init program and (currently) provides compatibility with the sysvinit and initscripts runlevel mechanism. Events are essentially string messages that can be sent by a process in response to a change in the state of something that it is monitoring. Event messages are sent once by a process.
The control files for upstart ’ s version of /sbin/init are known as job files and are located in the directory /etc/event.d . Each of these is a text file that must contain at least the following:
One or more events in response to which that job file should perform some action. For example, the start on startup entry states that a job file should be executed when a startup event is received, and the stop on runlevel 2 entry states that a job file should stop whenever a runlevel 2 event is received.
An exec or script stanza that identifies the tasks to be performed in response to the events for which this job file is valid. An exec stanza is used to execute a specific binary and associated command line on the system. A script stanza provides shell script code that should be exe-cuted, and must end with an end script statement.
❑
❑
❑
❑
c04.indd 99c04.indd 99 12/14/07 4:01:25 PM12/14/07 4:01:25 PM

Chapter 4: Booting and Confi guring a Xen Host
100
Other keywords can also be used in upstart job files in order to identify output devices, scripts to run before the primary exec or script section is executed, scripts to run after the primary exec or script sections are completed, and so on. The pre - and post - scripts are intended to be able to initialize the environment required for script or exec commands, and to clean up or perform post - processing after they complete. Other upstart commands are also available in job files. See http://upstart.ubuntu.com/getting-started.html for a complete list.
For example, the following is the job file /etc/event.d/rcS , which is used to emulate the behavior of a Linux system at startup time or in single - user mode:
start on startup
stop on run level
# Note: there can be no previous run level here, if we have one
# it’s bad information (we enter rc1 not rcS for maintenance).
console output
script
run level --set S > /dev/null || true
PREVLEVEL=N
RUNLEVEL=S
export PREVLEVEL RUNLEVEL
exec /etc/init.d/rcS
end script
The following two conceptual classes of processes are managed by upstart:
Tasks : Must complete and therefore essentially transition from stopped, to started, and back to stopped.
Services : Must be running, and therefore essentially transition from stopped to started. Services have either respawn or service in their job file.
upstart ’ s init program generates the following system events:
startup : Event issued when the system boots and /sbin/init first starts.
shutdown : Event issued when the system is in the process of being shut down.
stalled : Event issued when there are no jobs running and no pending events are in the queue.
Similarly, the shutdown tool provided with upstart sends one of the following events when the system is being shut down, depending upon the way in which the shutdown command was issued:
reboot
halt
poweroff
maintenance (i.e., single - user mode)
You can also manually send a specific event from the shutdown command by invoking it as:
shutdown -e event ...
❑
❑
❑
❑
❑
❑
❑
❑
❑
c04.indd 100c04.indd 100 12/14/07 4:01:25 PM12/14/07 4:01:25 PM

101
Chapter 4: Booting and Confi guring a Xen Host
upstart jobs also generate events themselves when they change state, making it easy to chain multiple job files together and guarantee dependencies. Job files issue the following events:
jobname/start : Sent when a job is first started.
jobname/started : Sent once a job has actually started.
jobname/stop : Sent when a job is stopping.
jobname/stopped : Sent once a job has stopped.
jobname : For services, this event is generated once the associated task is running. For tasks, this event is generated once it has finished.
Processes on the system can send events through the upstart control socket or by invoking initctl trigger event from within a script or job file.
As mentioned earlier in this section, Ubuntu ’ s upstart system is installed in sysvinit emulation mode by default. When you start up a Ubuntu system, /sbin/init issues a startup event. This causes the script /etc/event.d/rcS to run, which executes the run level command, triggering a runlevel event. The script then execs itself again, and stops when the runlevel event is detected. Stopping this script triggers the /etc/event.d/rc-default script.
The /etc/event.d/rc-default script first checks if you booted the system with the single keyword on the kernel command line, indicating that you want to boot the system in single - user mode. If so, the script uses the telinit command to put the system in single - user mode. If not, the script checks for the presence of an /etc/inittab file. This file is not provided by default on Ubuntu 7.04 and later systems, but this check gives you a way to override the system ’ s default runlevel by creating this file with an appropriate initdefault entry (as described in the previous section). If this file is not found, the script automatically executes the run level command to put the system in runlevel 2. This invokes the script /etc/event.d/rc2 , which executes the scripts in the directory /etc/rc2.d in the standard order, and away we go!
Ubuntu ’ s upstart mechanism is a breath of fresh air that provides a faster, simpler, and more parallel boot mechanism while (at the moment) preserving the core runlevel concepts and associated startup script model that all Linux system administrators have become one with over the years.
Xen - Related Startup Scripts and Processes Xen assumes that your Linux system is running a sysvinit - like startup mechanism. Installing Xen domain0 on a system causes two primary scripts to be installed in the directory /etc/init.d :
xend : The shell script responsible for starting, stopping, and otherwise managing the primary Xen daemon, /usr/sbin/xend , which is written in the Python programming language. The xend script accepts the following keywords: start , stop , reload , restart , and status . The Xen daemon executes the commands in its configuration file, /etc/xen/xend-config-xenapi.sxp , when it starts. Among other things, this configuration file identifies the network startup script that xend should run to initialize Xen ’ s bridged networking. By default, this is the script /etc/xen/scripts/network-bridge , although other network startup scripts are available. All of the Xen - specific scripts provided with Xen are located in the directory /etc/xen/scripts . See Chapter 8 for more detailed information about Xen networking and the different networking configurations that are available.
❑
❑
❑
❑
❑
❑
c04.indd 101c04.indd 101 12/14/07 4:01:26 PM12/14/07 4:01:26 PM

Chapter 4: Booting and Confi guring a Xen Host
102
xendomains : The script responsible for automatically starting selected Xen domains at boot time. By default, this script sets environment variables from the system configuration file /etc/sysconfig/xendomains (if it exists), restarting any stopped domains whose images are located in the directory /var/lib/xen/save , and automatically starting any domains whose configu-ration files are located in the directory /etc/xen/auto . All of these options can be configured by modifying the /etc/sysconfig/xendomains system configuration file.
On Fedora, Red Hat, SUSE, Mandrake, and similar systems, these startup scripts are installed in the /etc/init.d directory and symbolic links are created to them from various /etc/rc?.d directories. At a minimum, a symbolic link should be created to these scripts from the directory that is appropriate for your default runlevel, as identified in /etc/inittab . (This is usually either runlevel 3 or runlevel 5, and therefore one of the directories /etc/rc3.d or /etc/rc5.d .) On Gentoo systems, these startup scripts are added to the /etc/init.d directory, and symbolic links to them are created from the /etc/runlevels/default directory that identifies the system startup scripts for the default runlevel. On Ubuntu and Debian systems, these scripts are added to the /etc/init.d directory, and symbolic links to them are created in the /etc/rc2.d directory, causing them to be executed at the system ’ s default runlevel, which is 2.
Capturing Xen and Linux Boot and Startup Information If you encounter problems booting the hypervisor or starting the domain0 kernel, it can be difficult to capture the verbose output from the boot process in order to diagnose the problem. You can resolve this by using a serial console with GRUB and capturing the serial output of the boot process on another system. If the system on which you are running Xen still has a serial port, you can run a serial cable between your Xen system and another system, and use the Xen and Linux boot options described later in this chapter to redirect the Xen system ’ s boot information to the serial port. You can then use minicom or a similar terminal emulation program on the non - Xen system to capture the output from GRUB and the Xen and Linux boot processes for further analysis.
Getting serial output from GRUB when booting Xen is somewhat different than the standard mechanism for using a serial console with GRUB. You will need to add serial port–configuration information to both the GRUB entry for the Xen hypervisor and the entry for the Xen - enabled Linux kernel in the same GRUB boot stanza in /boot/grub/menu.lst . A sample GRUB stanza for serial output while booting Xen is the following:
title Xen 3.0.5 Serial Console
root (hd0,0)
kernel /boot/xen.gz com1=115200,8n1
module /boot/vmlinuz-2.6-xen ro root=LABEL=/ console=tty0
console=ttyS0,115200n8r
module /boot/initrd-2.6.18-xen.img
The first line identifies the title of this boot stanza. The second identifies the disk and partition on which the /boot directory and associated kernels and initial RAM disks are located. The third line boots the Xen hypervisor /boot/xen.gz , configuring its first serial port to communicate at 115,200 baud, using 8-bit communications, no stop bits, and 1 parity bit.
The fourth line is the truly interesting one. Because you are chain - loading the kernel through Xen, this is a module line. The first three arguments on this line identify the domain0 kernel, the fact that it must be mounted read - only initially to check its consistency (and replay its log if it is a journaling filesystem),
❑
c04.indd 102c04.indd 102 12/14/07 4:01:26 PM12/14/07 4:01:26 PM

103
Chapter 4: Booting and Confi guring a Xen Host
and the partition that contains the root filesystem (in this case identified by the partition label). The last two items on this line tell the kernel where to send boot output. The first entry, console=tty0 , tells the kernel to send output to virtual console 0. The second entry, console=ttyS0,115200n8r , tells the kernel to send output to ttyS0 (the first serial port on most Linux systems) and to do so at 115,200 baud, using no parity, 8 bits, and using hardware flow control (RTS/CTS, hence the r ). If there are multiple console declarations on the kernel ’ s module line, the last is the device that will be associated with /dev/console by the kernel.
Depending upon the Linux distribution that you are using, you may see other options on a kernel ’ s module line. Red Hat and Fedora Core systems typically include a rhgb option (Red Hat Graphical Boot) that tells GRUB to use a user - space X server during the boot process to show whizzy graphical status screens. Other common options tell the kernel not to display verbose initialization messages ( quiet ) and to display a graphical splash screen ( splash ). See the GRUB home page ( www.gnu.org/software/grub ) and its associated documentation and reference sites for more complete information about GRUB and all available GRUB boot options and configuration settings.
The last module line in the GRUB boot stanza identifies an initial RAM disk or RAM filesystem archive file that should initially be used by the kernel when it boots.
See the “ GRUB Boot Options for the Xen Hypervisor ” section later in this chapter for more detailed information about the com1 and console configuration options in GRUB boot entries for Xen.
If you are building your own version of the hypervisor or the domain0 kernel and are using the serial console for debugging, you may also want to ensure that your domain0 kernel starts a getty process on the serial console, so that you can log in there (just in case). The getty process (which stands for “ get tty “ ) is a process that communicates over a specified serial port or other terminal connection, displays the login and password prompts, and enables you to log in and create a shell on the system through those connections. This is only useful, of course, if your system actually comes up to the point where it processes /etc/inittab and/or runs all of the system startup scripts.
On Linux systems that use /etc/inittab , you can start a getty process on your serial port by adding a line like the following to the end of /etc/inittab :
S0:2345:respawn:/sbin/agetty -L 115200 ttyS0 vt102
This starts a 115,200 baud agetty process on serial port S0 at runlevels 2, 3, 4, and 5, restarting the process if it ever terminates ( respawn ). The specific options that you will need to use depend on the version of getty that your system uses. If it is available on your system, /sbin/agetty is a good choice, because it is well-suited to serial connections. The -L option identifies /dev/ttyS0 as a local line that does not require a carrier detect signal in order for the agetty process to start successfully. The last two arguments identify the entry, relative to /dev/ on your system, on which the agetty process should be started, and the type of terminal that it should expect to encounter there. I typically use vt102 because this is one of the types of terminals that are emulated by the Linux minicom terminal emulator, which is what I typically use to connect to serial consoles from Linux systems.
On Ubuntu systems, you should create the file /etc/event.d/ttyS0 by copying one of the other ttyn files and editing its exec entry to look like the following:
exec /sbin/agetty -L 115200 ttyS0 vt102
c04.indd 103c04.indd 103 12/14/07 4:01:27 PM12/14/07 4:01:27 PM

Chapter 4: Booting and Confi guring a Xen Host
104
Using a serial console with GRUB and capturing the serial output of the boot process on another system can be very useful during debugging, or simply to keep an accurate record of your system ’ s boot sequence and any messages that are being displayed when booting. Having a getty running there can be quite useful for subsequent system exploration or when attempting to correct problems before rebooting.
Configuring GRUB for Xen Although the Xen hypervisor is not a standalone operating system in the sense that you could boot it and execute applications within that context, it is a standalone operating system in the sense that it has its own set of boot options that define its initial configuration and many aspects of the way that it performs. This section discusses the options that you can pass to the Xen hypervisor within the GRUB stanza for a Xen domain0 kernel and root filesystem.
The following are three basic types of Xen boot options:
Those that you can supply on the GRUB kernel entry for the hypervisor and which are only meaningful to the hypervisor.
Those that you can supply on the GRUB kernel entry for the hypervisor that are also propagated to the Linux domain0 kernel.
Xen - specific options that you supply on the module line for the domain0 kernel and which are only meaningful to the domain0 kernel.
In my experience, few of these boot options (with the exception of the serial console options discussed in the previous section) are necessary for most Xen domain0 systems. However, they can be quite useful to work around specific hardware issues or problems.
GRUB Boot Options for the Xen Hypervisor This section discusses boot options that are only meaningful to the Xen hypervisor. If used, these are most commonly appended to the kernel line for the Xen hypervisor in the GRUB boot stanza for a domain0 kernel.
If you believe that these boot options are necessary on your system, the easiest way to test them is to manually append them to the Xen hypervisor boot entry during the boot process. To do this, select the entry for the kernel that you want to boot from the initial GRUB boot screen, and press UserInput to edit that stanza. This displays all of the lines associated with the selected GRUB boot stanza. Use the arrow keys to highlight the kernel entry for the Xen hypervisor and press UserInput to edit that command. This enables you to edit that line, automatically placing you at the end of the line so that you can simply append options. If you make an error or want to add options in a specific order, you can use the right and left arrow keys to move the cursor within the line. When you are done adding or editing options, press Enter or Return to return to the stanza edit menu, and press UserInput to boot the system using the modified stanza.
Note that any changes you make or additional options that you add in this fashion are completely transient. They are not written back to your GRUB configuration file. If you are experimenting with large number of options, you should write them down as you add them, so that you can easily remember the
❑
❑
❑
c04.indd 104c04.indd 104 12/14/07 4:01:27 PM12/14/07 4:01:27 PM

105
Chapter 4: Booting and Confi guring a Xen Host
exact options that had the desired effect on your system. You can then add them permanently by manually editing the GRUB configuration file once Linux is running correctly in domain0.
The options that are available for configuring the Xen hypervisor are the following:
apic=platform : Enables you to specify a particular Non - Uniform Memory Access (NUMA) platform, which selects a specific x86 sub - architecture that in turn determines how APIC types are recognized and configured. Available values for this platform are bigsmp , default , es7000 , and summit . This can usually be probed automatically when the hypervisor boots, but can be useful if your NUMA platform is being detected incorrectly.
apic_verbosity=value : Prints more detailed information about local APIC and IOAPIC configuration during Xen hypervisor initialization. Available values are verbose , which simply displays additional information, and debug , which displays a great deal of detailed information that is intended to help you diagnose APIC and IOAPIC configuration.
badpage=pagenumber,pagenumber, ... : Enables you to specify one or more pages of physical system memory that should not be used because they contain one or more bytes that cannot be written to or read from reliably. By default, each memory page is 4K in size, and the page on which a bad byte is located is therefore identified by the leading five hexadecimal digits from a problem report from your system or a memory tester. For example, if a memory tester says that byte 0x12345678 is bad, you would identify 0x12345 as the bad page by adding the badpage=0x12345 option to the hypervisor boot entry.
com1=baud,DPS,io_base,irq and com2=baud,DPS,io_base,irq : Enable you to configure the two UART 16550 - compatible serial ports supported by the Xen hypervisor. You need to specify only the options that are not standard and cannot be auto - detected. For example, if the I/O base and IRQ are standard but you want to use a different baud rate or word size, you could specify something such as com1=115200,8n1 or com2=9600,8n1 . If the baud rate is pre configured but you want to be able to change the communications parameters for that port, you can specify auto for the baud rate setting, as in com1=auto,8o0 for a (strange) port that requires 8 data bits, odd parity, and no stop bits.
Because the hypervisor supports only two serial ports directly, you can still use more than two serial ports within a Linux kernel by loading the appropriate drivers for the expansion card that provides the serial ports. This option only refers to two serial ports that Xen can use directly.
console=list : Enables you to specify one or more destinations for Xen console I/O as a comma - separated list. If not explicitly defined, the default value for this option is com1 , vga , which sends console output to both the first serial port and the VGA console, the latter only until domain0 begins booting. Possible values are:
❑ vga : Uses the VGA console until domain0 boots and then relinquishes it unless the vga=keep Xen boot option is also specified.
❑ com1 : Uses the first 16550 - compatible serial port.
❑ com2H : Uses the second 16550 - compatible serial port and communicate with the most sig-nificant bit (MSB) set.
❑ com2L : Uses the second 16550 - compatible serial port and communicate with the most significant bit (MSB) cleared. The com2H and com2L options enable you to share a single serial port between two subsystems, such as the console and a debugger, as long as each device can be configured to respect specific communication requirements.
❑
❑
❑
❑
❑
c04.indd 105c04.indd 105 12/14/07 4:01:27 PM12/14/07 4:01:27 PM

Chapter 4: Booting and Confi guring a Xen Host
106
console_to_ring : Enables Xen guest domains to write their console output into the same memory buffer that is used by the Xen hypervisor ’ s console. Although disabled by default, this option can be useful to centralize logging or to simplify the retrieval, analysis, and display of Xen domain0 and domainU console data.
conswitch=switch-char auto-switch-char : Enables you to identify the character used to switch serial - console input between Xen and domain0. To do this, you must press Ctrl+{switch - char} three times. The default switch - char is a, so pressing Ctrl+a three times is the default character sequence for switching between the Xen console and domain0. To disable switching between the Xen console and domain0, specify a back tick (`) as the switch - char. By default, Xen automatically switches from the Xen console to domain0 when it boots — to disable this, specify x as the auto - switch - char.
dma_bits=xxx : Enables you to specify the width of a Direct Memory Access (DMA) address. By default, 30 - bit DMA addresses are used, enabling you to address up to 1GB via DMA.
dma_emergency_pool=xxx : Enables you to specify a lower boundary on the size of the DMA pool. Addresses below this value will fail rather than being allocated from the DMA pool. Many drivers need small DMA - coherent memory regions for DMA descriptors or I/O buffers. Because of their small size, these are allocated from the DMA pool rather than in page units.
dom0_mem=specifiers : Sets the amount of memory to be allocated to domain0. Specifiers is a comma - separated list containing one or all of the following: min:amount , the minimum amount to allocate to domain0; max:amount , the maximum amount to allocate to domain0, and amount , which is a precise amount to allocate to domain0. Amounts can be specified in numeric units using the B (bytes), K (kilobytes), M (megabytes), or G (gigabytes) suffix. If no units are specified, the default unit is kilobytes. Negative numeric values can also be specified, in which case the associated amount is the full amount of system memory minus the specified numeric value.
If no specific amount of memory is reserved for domain0, the Xen hypervisor allocates all available system memory to domain0, minus 128KB for its own use. Guest domains can request memory from domain0 when they are created.
dom0_vcpus_pin : Pins domain0 virtual CPUs to their respective physical CPUs (the default is false).
guest_loglvl=level/level : Specifies the level of log messages that guest domains should write to the Xen console, and (optionally) any log levels that should be rate - limited. See the loglvl option for more information. If you do not specify this parameter, Xen behaves as if you had specified guest_loglvl=none/warning .
hap : Tells the Xen hypervisor to detect hardware - assisted paging support, such as AMD - V ’ s nested paging or IntelVT ’ s extended paging. If available, Xen will use hardware - assisted paging instead of shadow paging for guest memory management. Shadow paging is a software technique whereby memory is allocated to watch for changes in the per - machine page table and swap pages in and out of VM memory, which uses additional system memory. The shadow_pagetable entry in your domainU configuration file option defines the amount of memory reserved for shadow paging, and recommends at least 2KB per megabyte of domain memory, plus a few megabytes for each virtual CPU, for each guest domain.
ignorebiostables : Specifying this option disables parsing and the use of BIOS - supplied hardware information tables. This option may be useful if you are having problems running Xen on a specific motherboard or system. Specifying this option also disables SMP (nosmp) and APIC tables (nolapic).
❑
❑
❑
❑
❑
❑
❑
❑
❑
c04.indd 106c04.indd 106 12/14/07 4:01:28 PM12/14/07 4:01:28 PM

107
Chapter 4: Booting and Confi guring a Xen Host
lapic : Specifying this option forces the hypervisor to use local APIC assignments even if APIC is disabled in the BIOS.
loglvl=level/level : Specifies the level of log messages that the Xen hypervisor should write to the console, and (optionally) any log levels that should be rate - limited. The first specifier identifies the security level of messages that will be printed to the Xen console. Valid levels are all , debug , error , info , none , and warning . Messages of the specified security level and higher will be sent to the console. By default, all messages of level warning and above are sent to the Xen console.
The second specifier is optional, and identifies a minimum log level at which messages should be discarded if they arrive too frequently. This enables you to reduce the size of your logs by not having 100,000 messages stating that the system can ’ t read from a floppy drive, for example.
mem=amount : Enables you to define the maximum amount of physical memory that can be used by the hypervisor and domain0. Any RAM beyond this address in the memory map will be ignored. Amounts can be specified in numeric units using the B (bytes), K (kilobytes), M (mega-bytes), or G (gigabytes) suffix. If no units are specified, the default unit is kilobytes.
nmi=reaction : Enables you to specify how the hypervisor reacts to a non - maskable interrupt (NMI) resulting from a parity or I/O error. Possible values for reaction are fatal (the hypervi-sor prints a diagnostic message and then hangs), dom0 (send a message to domain0 for logging purposes but continue), and ignore (ignore the error). If you do not specify this option, Xen uses the default value dom0 internally.
noht : Enables you to tell Xen to disable hyper - threading. This may be useful if you suspect that hyper - threading is conflicting with Xen ’ s allocations and management of virtual CPUs.
noirqbalance : Specifying this option disables software IRQ balancing and affinity, which can be useful on some systems (such as the Dell 1850/2850) that already use hardware support to work around IRQ - routing issues.
nolapic : Tells the hypervisor to ignore local APIC settings in a uniprocessor system, even if they are enabled in the BIOS. This may be useful if you are using peripherals with fixed IRQs.
noreboot : Tells the hypervisor not to reboot the machine automatically if errors occur. Specifying this option can be useful if you are having problems but are not using a serial console to track debugging and general system messages.
nosmp : Specifying this option disables SMP support. This option is implied by the ignorebiostables option, and may be useful if you are having problems running Xen on a specific motherboard.
sched=name : Specifying this option enables you to manually specify which CPU scheduler the hypervisor should use. Possible values for name are credit (which is the default), and sedf . See the section of Chapter 2 entitled “ Controlling Hypervisor Scheduling ” for additional information about scheduling in Xen.
sync_console : Specifying this option forces Xen to perform synchronous console output. This can slow down the overall performance of your Xen host, but is very useful if your system is failing before all messages are being flushed to the console. The hypervisor generally enters this mode automatically when internal errors occur, but you can specify this option on the Xen GRUB entry to force this behavior if you are experiencing problems and suspect that you are not seeing all possible console output.
❑
❑
❑
❑
❑
❑
❑
❑
❑
❑
❑
c04.indd 107c04.indd 107 12/14/07 4:01:28 PM12/14/07 4:01:28 PM

Chapter 4: Booting and Confi guring a Xen Host
108
tbuf_size=size : Enables you to manually set the size of the trace buffers that are available for every physical CPU in your system. The size parameter is expressed as the number of memory pages that you want to devote to trace output for each CPU.
vga=options : Enables you to specify the resolution at which the hypervisor should use a VGA console, and optionally enables you to tell the hypervisor not to relinquish the VGA console when domain0 begins to boot. Possible values are text-mode , where mode is 80x25 , 80x28 , 80x30 , 80x34 , 80x43 , 80x50 , or 80x60 . To instruct Xen not to relinquish the VGA console, pass the keep option. For example, vga=text-80x50,keep would instruct Xen to display text on the console using 80 characters per line, with 50 lines of text, and to keep the console after your domain0 operating system begins to boot.
watchdog : Specifying this option enables an internal NMI watchdog function, which can be useful in reporting transient problems or mysterious failures.
Additional options for the Xen kernel entry in a GRUB configuration file may have been added since this book was written, but you will rarely have to use most of these unless you are trying to work around hardware problems or are trying to use Xen with a specific motherboard and associated chipset that is not fully supported. See the documentation for the version of Xen that you are using for information about any additional options that may have been added since Xen 3.0.5, which is the version of Xen that was available when this book was written.
Shared Xen and Linux Boot Options In addition to the options discussed in the previous section, a few other options are available for the Xen entry in your Xen boot stanza. Unlike those discussed in the previous section, which are only relevant to the Xen hypervisor, the options discussed in this section are first used by the Xen hypervisor and are then automatically passed by the hypervisor to the domain0 kernel when it begins execution. These are therefore standard Linux kernel boot options that the Xen hypervisor also makes use of.
The boot options that are shared by the hypervisor and the Linux kernel are the following:
acpi=type : Enables you to specify how the Xen hypervisor and domain0 parse and use the Advanced Configuration and Power Interface (ACPI) tables that are stored in the BIOS. Possible values for type are: force (enable ACPI even if it is off in the BIOS), ht (use sufficient ACPI information to enable hyper - threading), noirq (do not use ACPI for IRQ routing), off (disable ACPI even if it is on in the BIOS), and strict (requires strict compliance with the ACPI specification — this can cause problems if your motherboard is not completely compliant).
acpi_skip_timer_override : Tells the Xen hypervisor and domain0 to ignore timer - interrupt override IRQ0/pin2 instructions. These instructions are only necessary on some nForce2 BIOS versions.
noapic : Tells the Xen hypervisor and domain0 not to use any IOAPICs that may be present in the system, and to instead continue to use the legacy PIC.
❑
❑
❑
❑
❑
❑
c04.indd 108c04.indd 108 12/14/07 4:01:29 PM12/14/07 4:01:29 PM

109
Chapter 4: Booting and Confi guring a Xen Host
Xen - Specific Linux Boot Options In addition to the standard Linux kernel boot options that can be used with any Linux kernel, the Xen patches to the kernel also add one kernel boot option. This is the xencons option, which tells the Linux kernel which device node (if any) to attach to Xen ’ s virtual console driver. Possible values are as follows:
xencons=off : Disables the virtual console.
xencons=tty : Attaches the Xen console to /dev/tty1 once the system is available. The device tty0 is still used during the boot process.
xencons=ttyS : Attaches the Xen console to /dev/ttyS0 , which is typically the first serial port on a Linux system.
If you do not explicitly specify this option, domain0 will always attach the Xen console to /dev/ttyS1 , and all guest domains will attach their Xen consoles to /dev/tty1 .
Hiding PCI Devices from domain0 The most common way in which you may want to customize a domain0 Xen host is to customize domain0 ’ s knowledge of available I/O devices, which therefore determines which domains can access specific hardware. This is typically done for performance reasons, but can also be used to heighten network security.
As discussed in the “ Virtualization Caveats ” section of Chapter 1 , having to share hardware resources such as network and disk connections between multiple virtual machines can hurt performance in I/O - intensive environments. There are multiple solutions to this problem, which fall into two general classes:
Providing dedicated hardware, such as network interfaces, for specific domains so that there is no contention for specific local interfaces.
Virtualizing underlying resources, most commonly storage, so that filesystem access is either network - based or logical, avoiding the overhead of increased access to single, local filesystems.
The second of these is covered in detail in the sections of Chapter 5 that discuss creating and using filesystems for virtual machines, and is primarily a driver and infrastructure issue. However, “ hiding ” specific PCI hardware from domain0 so that it can be dedicated to one or more guest domainU domains is quite common, and is also quite easy to do.
Dedicating PCI devices to specific Xen domains leverages the standard support for PCI driver domains in the Linux kernel. Xen ’ s PCI device backend driver (known as pciback ) logically separates PCI driver requests into a front end and back end that use shared memory and an event channel to communicate configuration and access requests. The pciback driver primarily prevents other drivers from attaching to hidden devices in the domain0 kernel. This enables you to still see the hidden devices in domain0 using utilities that probe your hardware (such as the lspci utility), but prevents domain0 from using these devices directly. Specific PCI devices can then be allocated to different domains by identifying their PCI ID in the configuration file for that domain using the pci keyword.
❑
❑
❑
❑
❑
c04.indd 109c04.indd 109 12/14/07 4:01:29 PM12/14/07 4:01:29 PM

Chapter 4: Booting and Confi guring a Xen Host
110
The PCI devices that you want to use exclusively with specific guest domains are hidden from domain0 through the pciback driver in one of two ways:
If the pciback driver is compiled into your domain0 kernel, you can supply GRUB command - line arguments to invoke the driver at boot - time and hide specific devices based on their PCI ID.
If the pciback driver is a loadable kernel module (the most common scenario), you can load the module and hide specific devices based on their PCI ID. Devices should be hidden before the Xen daemon is started and before other startup scripts associated with that hardware might be run. This ensures that the xend daemon has an accurate picture of the hardware on your system that it is responsible for, and eliminates potential problems in related startup scripts that might otherwise attempt to configure the hidden hardware.
Regardless of which scenario you use, the key to hiding a specific PCI device is knowing its PCI identifier (ID). This information is provided by the first field in the entry in lspci output for your device. Consider the following sample lspci output for the Ethernet devices on a sample system (abbreviated slightly for formatting purposes):
# lspci | grep -i Ethernet
00:04.0 Ethernet controller: Silicon Integrated Systems [SiS] 190 ...
00:09.0 Ethernet controller: 3Com Corporation 3c905B 100BaseTX ...
The first field is the interesting one for the device that you want to hide. This field identifies the number of the PCI bus on which the device is found, the slot in which the device was found, and the function number of this particular service on that bus slot. The slot is actually more of a sequence number for the order in which the PCI device was found when probing, and the function is typically 0 except for multi - function devices such as USB controllers and integrated I/O controllers.
Locating the pciback Driver on Your System To determine if the Xen pciback driver is compiled into your kernel, already loaded by default on your system, or available as a loadable kernel module, boot your system using the domain0 kernel and look for the directory /sys/bus/pci/drivers/pciback . If this directory exists, the pciback driver is installed, which probably means that it ’ s built into your kernel if you haven ’ t done anything special. Just to be sure, check the kernel modules that are loaded on your system by typing the following:
# lsmod | grep pci
If you don ’ t get any output but the /sys/bus/pci/drivers/pciback directory exists, the driver is definitely built into your domain0 kernel. If you see something like the following, the pciback driver is indeed a loadable kernel module that is already being loaded:
# lsmod | grep pci
pciback 38865 0
If you do not get any output from the lsmod command, the pciback module simply may not be loaded on your system (which is normally the case unless you ’ ve already experimented with hiding PCI devices). To make sure that the pciback module is available on your domain0 system, try manually
❑
❑
c04.indd 110c04.indd 110 12/14/07 4:01:30 PM12/14/07 4:01:30 PM

111
Chapter 4: Booting and Confi guring a Xen Host
loading the pciback module into your kernel using the following command as the root user (depending on the Linux distribution that you are using, you may need to use the sudo command to execute this as root):
# modprobe pciback
If this command doesn ’ t return anything, this means that the pciback module was successfully located on your system and loaded correctly into the kernel. If you see a message such as “ FATAL: Module pciback not found, ” then you will either have to build the module for your domain0 kernel or rebuild the kernel with the module built in. See the sidebar “ Adding pciback Support to Your domain0 Kernel ” for more information.
The next two sections describe how to hide a specific PCI device from your domain0 kernel depending on whether the pciback driver is built into your kernel or is available as a loadable kernel module.
Adding pciback Support to Your domain0 KernelIf you are building your own domain0 kernel and the pciback module is not activated by default as a built-in or loadable kernel module, or the pciback module is not available for the Xen domain0 kernel for your Linux distribution, you’ll have to activate the module and rebuild your kernel. Follow the instructions in Chapter 3 for obtaining the source for the kernel that you are using and starting your favorite kernel configuration utility (usually either make menuconfig or make xconfig, as discussed in Chapter 3). Next, scroll down until you see the XEN section, and do one of the following:
❑ If you want to build the pciback module as a loadable kernel module in your domain0 kernel, make sure that the CONFIG_XEN_PCIDEV_BACKEND configuration variable is set to m.
❑ If you want to compile the pciback driver into your kernel, make sure that the CONFIG_XEN_PCIDEV_BACKEND configuration variable is set to y.
If you are using the same kernel for domain0 and your domainU virtual machines, you will also need to set the CONFIG_XEN_PCIDEV_FRONTEND kernel configuration variable to either y (to compile it into your kernel) or m (to make it available as a module).
If you are using a single kernel for both domain0 and domainU systems, it is usually a good idea to make the pciback driver available as a module in your domain0 kernel, and to build the frontend support for this driver into your kernel. If you are using separate kernels, you can do it however you like, but you will have to ensure that the appropriate driver is available before you try to hide a PCI device or use a hidden one.
For more information about configuring and building the kernel and loadable kernel modules, see the “Building Xen from Source Code” section in Chapter 3.
c04.indd 111c04.indd 111 12/14/07 4:01:30 PM12/14/07 4:01:30 PM

Chapter 4: Booting and Confi guring a Xen Host
112
Hiding a PCI Device Using Kernel Command - Line Arguments
If the pciback driver is compiled into your kernel, you can hide PCI devices from a domain0 kernel at boot time by adding the pciback.hide=(ID) argument to the module entry for the domain0 kernel in the appropriate stanza of your /boot/grub/menu.lst file. You should replace ID with the bus:slot.function identifier for the card that you want to hide. If you want to hide more than one PCI card, each ID should appear within its own set of parentheses, as in the following example:
pciback.hide=(00:09.0)(00:04.0)
This hides the PCI devices whose IDs are 00:09.0 and 00:04.0, as reported by the lspci command.
That ’ s all there is to it! As mentioned previously, the pciback driver prevents domain0 from binding other drivers to that PCI device, and does not affect the inclusion of hidden PCI devices in the output from commands that actually probe hardware, such as the lspci command.
See the “ Creating Xen Configuration Files for Paravirtualization ” section in Chapter 5 for detailed information about configuring guest domains to use the hardware that you have hidden from domain0.
Hiding a PCI Device Using a Loadable Kernel Module If the pciback driver is a loadable kernel module on your system (which is the most common case), you will need to integrate loading this module into your system ’ s startup process. Actually, you will have to do several things:
Unload any driver that your system may already have bound to the device that you want to hide .
Load the pciback kernel module .
Bind the PCI device that you want to hide to the pciback driver .
Depending on the Linux distribution that you are using and your personal preferences, you can do these in three basic ways:
By creating clever module installation entries in /etc/modprobe.conf that replace the entry for loading the driver for the device that you want to hide with instructions that load the pciback driver instead
By modifying an existing script that is run as part of your system ’ s startup sequence
By adding a new startup script to the series of scripts that are run as part of your system ’ s startup sequence
Regardless of which of these solutions you select, you will usually want to add a pciback options entry to the kernel module configuration file, /etc/modprobe.conf . This entry defines the device that you want to hide, and looks like the following:
options pciback hide=(00:09.0)
❑
❑
❑
❑
❑
❑
c04.indd 112c04.indd 112 12/14/07 4:01:31 PM12/14/07 4:01:31 PM

113
Chapter 4: Booting and Confi guring a Xen Host
Whenever you load the pciback driver, this entry tells the driver to automatically hide the device whose PCI identifier is 00.09.0. As with the pciback.hide kernel option discussed in the previous section, you can hide multiple devices by enclosing each of their PCI IDs within its own set of parentheses, as in the following example:
options pciback hide=(00:09.0)(00:04.0)
After adding an entry like this one (but which uses the PCI identifiers of your cards, not mine), you should select the approach that you ’ re most comfortable with for loading the pciback driver on your system. Remember that this should take place before you start the xend daemon.
Of the three approaches listed, I personally prefer the third, adding a custom startup script to the system ’ s startup sequence. The startup script that I use is called xen_hide_pci.sh , and looks like the following:
#!/bin/sh
#
### BEGIN INIT INFO
# Required-Start: $local_fs
# Default-Start: 2 3 4 5
# Description: Hide an Ethernet card from Xen domain0
### END INIT INFO
check_if_loaded_or_in_kernel() {
if [ -d /sys/bus/pci/drivers/pciback ] ; then
echo “Xen pciback driver already loaded”
exit 0
fi
}
hide_me() {
/sbin/modprobe -r 3c59x
/sbin/modprobe pciback
# The following code is not needed if you have an
# entry like the following in /etc/modprobe.conf:
#
# options pciback hide=(00:09.0)
#
# This is just here as a manual example.
#
# if [ $? = 1 ] ; then
# echo “ERROR: Modprobe of pciback module failed”
# else
# cd /sys/bus/pci/drivers/3c59x
# echo -n “0000:00:09.0” > unbind
# cd /sys/bus/pci/drivers/pciback
# echo -n “0000:00:09.0” > new_slot
# echo -n “0000:00:09.0” > bind
# echo “SUCCESS: 3com Ethernet card hidden from domain0”
# fi
}
case “$1” in
start)
check_if_loaded_or_in_kernel
hide_me
;;
(continued)
c04.indd 113c04.indd 113 12/14/07 4:01:31 PM12/14/07 4:01:31 PM

Chapter 4: Booting and Confi guring a Xen Host
114
stop)
echo “Xen pciback: No reason to unhide”
;;
*)
echo “Usage: $0 {start|stop}”
exit 1
esac
exit $?
As you can see, this script first checks if the pciback module is already loaded. I use this script at various runlevels when running and testing a variety of kernels, some of which have pciback compiled in, and some which the module may have already been loaded in a different runlevel. If that ’ s the case, the script simply displays a message and exits. If the driver is not already loaded, the script removes the kernel module for a 3c59x Ethernet card (my favorite standard, inexpensive Ethernet card), and then loads the pciback module. The commented section in the middle of the script shows the steps that you would need to perform in the script if you chose not to put an “ options pciback . . . ” statement in your /etc/modprobe.conf file.
Once I ’ ve created this script, typically in /etc/init.d , and made it executable, I then manually create the symlinks for this script from the startup directories for the appropriate runlevels for the type of system I ’ m configuring. (Usually runlevel 2 on Ubuntu and Debian systems and runlevels 3 and 5 everywhere else.) The sample script I ’ ve provided has the correct entries for use with LSB - compliant startup scripts, and many systems provide tools for graphically integrating these into your startup process. I generally find executing one or two ln -s commands from a shell to be faster.
If you would prefer to modify /etc/modprobe.conf to do the correct module loading there, you could add something like the following to /etc/modprobe.conf to load the pciback driver instead of the example 3c59x driver:
install 3c59x /sbin/modprobe pciback ;
This entry redefines the command that the modprobe utility uses when it thinks that it should load the 3c59x driver. As you can see, it loads the pciback driver instead of the actual 3c59x driver. If you happen to have multiple cards in your system that use this driver, you would still need to load the driver, but it could try to bind to the cards that you ’ ve hidden in the option you supplied for the pciback driver in /etc/modprobe.conf . In this case, you would use an entry like the following:
install 3c59x /sbin/modprobe pciback ; \
/sbin/modprobe --first-time --ignore-install 3c59x ;
This entry should be on a single line but is split here for formatting purposes, and also assumes that you have added the appropriate options pciback command earlier in /etc/modprobe.conf .
This entry redefines the command that the modprobe utility uses when it thinks that it should load the 3c59x driver, first loading the pciback module and hiding the cards whose PCI IDs you specified, and then loads the actual 3c59x driver. The --ignore-install option prevents it from going into an infinite loop when it sees a command to load a driver whose load process has been redefined. The --ignore-install option tells the modprobe utility to ignore module loading (install) command redefinitions for a specific drivers, and to simply load the real driver.
(continued)
c04.indd 114c04.indd 114 12/14/07 4:01:31 PM12/14/07 4:01:31 PM
115
Chapter 4: Booting and Confi guring a Xen Host
I do not like to use this approach because trying to be too clever in /etc/modprobe.conf can confuse your system and lead to changes in the discovery sequence and aliases for the devices in your system. It also makes it difficult for other system administrators to see what you ’ ve done on a system. Adding a unique startup script is highly visible to other system administrators, and a well - commented script can easily be read to see exactly what it ’ s doing.
Similarly, I do not like to modify existing system startup scripts, such as the /etc/rc.d/rc.sysinit script that Fedora systems run at boot time. While tempting, there are two basic problems with this. First, it is hard for other system administrators to locate and maintain modifications that you bury in an existing script. Secondly, modifying scripts that the system delivers as part of its default set of packages may prevent updates from being delivered. Worst - case, forcing the installation of updates that affect these scripts can cause you to lose your changes.
As with all system-administration tasks, the choice is yours, but I believe that every week is “ Be Kind to Your Sysadmin Week, ” and integrating system changes in a visible location is always better than hiding them away somewhere.
Summary Booting a domain0 Xen host is usually quite straightforward, especially if you ’ ve installed Xen packages that were provided by the supplier of your Linux distribution. However, depending on the complexity of how you want to use Xen, you may find that you ’ ll need to do some customization to get things working just the way you want them. This can involve anything from supplying different command - line options in your GRUB configuration file, to creating and modifying startup scripts for your domain0 host, to building and deploying your own kernel.
This chapter explains the startup process on various types of Linux systems, discussing the BIOS, Xen hypervisor, and Linux phases of system initialization and startup. The last section discusses how to modify the boot sequence on your domain0 system to reserve specific hardware for other domains.
Now that you have a domain0 system up and running, the next chapter explains how to configure and boot virtual machines, known as guest domains in Xen parlance. Soon, you ’ ll be getting the most out of your hardware (and having fun with it, too)!
c04.indd 115c04.indd 115 12/14/07 4:01:32 PM12/14/07 4:01:32 PM

c04.indd 116c04.indd 116 12/14/07 4:01:32 PM12/14/07 4:01:32 PM