bootstrap for rails - sample chapter
DESCRIPTION
Chapter No. 1 Introducing Web Application Development in RailsA quick-start guide to developing beautiful web applications with the Bootstrap toolkit and Rails frameworkFor more information: http://bit.ly/1AoDAM1TRANSCRIPT
C o m m u n i t y E x p e r i e n c e D i s t i l l e d
A quick-start guide to developing beautiful web applications with the Bootstrap toolkit and Rails framework
Bootstrap for Rails
Syed Fazle R
ahman
Bootstrap for Rails
Bootstrap is a free, open source CSS and JS framework that helps you create websites in minutes, and Ruby on Rails, or Rails as it's known, is an open source web application framework written in the Ruby programming language. Bootstrap is typically used in Rails applications to design websites and create themes because it comes loaded with predesigned CSS and HTML templates.
Bootstrap for Rails is for Rails web developers who are struggling to get their website designs right. It will enable you to create beautiful responsive websites in minutes without writing much CSS and JavaScript code.
The book starts by taking you through web application development in Rails. It teaches you how to set up the Bootstrap framework, and will showcase the true power of your Rails app using Bootstrap's grid system. You will learn about other Bootstrap components and move on to work with modals and carousels. It concludes with the opportunity to test your skills by creating a shopping cart using Bootstrap modals.
Who this book is written forIf you are a web developer who has a basic understanding of Ruby on Rails, this is the book for you. You should defi nitely have previous knowledge about HTML and how it works. However, CSS and JavaScript knowledge is optional for this book.
$ 29.99 US£ 18.99 UK
Prices do not include local sales tax or VAT where applicable
Syed Fazle Rahman
What you will learn from this book
Discover how to use Bootstrap in a Ruby on Rails environment
Use advanced components and plugins from Bootstrap in Rails applications
Create navigation bars to enable navigation between different views
Understand Bootstrap's grid system and create page layouts
Use Bootstrap's typography, buttons, and images in a Rails application
Design a dummy shopping cart Rails application using Bootstrap
Bootstrap for R
ails
P U B L I S H I N GP U B L I S H I N G
community experience dist i l led
Visit www.PacktPub.com for books, eBooks, code, downloads, and PacktLib.
Free Sample
In this package, you will find: • The author biography • A preview chapter from the book, Chapter 1 "Introducing Web Application
Development in Rails" • A synopsis of the book’s content • More information on Bootstrap for Rails
About the Author Syed Fazle Rahman is an experienced frontend developer. He has published many frontend articles for SitePoint.com and HTMLxprs.com. His articles on Bootstrap framework are amongst the most popular ones in the web. He is enthusiastic about start-ups and likes technical writing/editing.
He is the cofounder of devmag.io-a network for developers and technologists. devmag.io helps technology enthusiasts connect and discover various programming and technology content.
Bootstrap for Rails Howdy! So, you want to learn Bootstrap and its awesomeness and implement it in a Rails project? I think you made the right choice by selecting this book.
Web designing is not everyone's cup of tea. I have seen many experienced web developers who are extremely poor at web designing. They have the ability to make the most powerful applications, but lack the skills to create a decent looking website.
On the other hand, there's a sudden rise in the popularity of CSS and JavaScript frontend frameworks. These frameworks let the users create popular CSS and JavaScript components, such as drop-down menus, responsive menus, a proper grid system to structure websites, and so on easily without having any knowledge about CSS and JavaScript coding. Bootstrap, being one of the pioneers in the book, provides many prestyled CSS components that come ready to be used. You simply need to know the appropriate HTML fi les to use these frontend frameworks.
This book will help you understand what Bootstrap is, and how it can be used in a Rails environment. It will guide you through various CSS and JavaScript components of Bootstrap via many practical examples. If you are a Sass developer, this book will help you identify various Sass variables to customize Bootstrap.
I hope you have fun reading this book!
What This Book Covers Chapter 1, Introducing Web Application Development in Rails, focuses on how to beautify Rails applications through the help of Bootstrap. This explanation is followed by the summary of this chapter.
Chapter 2, Introducing Bootstrap 3, will show you how to download and use Bootstrap in Rails projects.
Chapter 3, Powering a Rails App with Bootstrap's Grid System, will take you through Bootstrap's grid system and then proceed to show you how to use it in our first example application.
Chapter 4, Using Bootstrap's Typography, Buttons and Images in a Rails Application, focuses more on how to style a website's content such as text, links, and images.
Chapter 5, Reinventing Tables and Forms in Bootstrap, will take a look at the various features of Bootstrap tables and forms. In this chapter, we will first create dummy products and then integrate them in our real application.
Chapter 6, Creating Navigation Bars, will teach you how to create a Bootstrap navigation bar, and how we can modify it to fi t our needs.

Chapter 7, Various Other Bootstrap Components, will explore some more Bootstrap components, which come ready to use.
Chapter 8, Working with Bootstrap Modals, will teach you how to create a Bootstrap modal and its various types and functionalities. We will also integrate a modal component in our Rails application.
Chapter 9, Creating Image Slideshows with Bootstrap Carousel, will get you started with the Bootstrap Carousel, how to add captions to the slides, and how to customize the Carousel.
Chapter 10, Creating a Shopping Cart Using Bootstrap Modals, is all about implementing what we have learned so far in Bootstrap. This chapter will definitely clear some of the core concepts of Bootstrap such as how to use Bootstrap modal, typography, buttons, and responsive tables.
Appendix, Adding Custom Styles to a Rails Application, talks about how to add a custom style to a Rails application, which is powered by a Bootstrap framework.

Introducing Web Application Development in Rails
Presenting your application in the best possible way has been the most important factor for every web developer for ages. In this mobile-fi rst generation, we are forced to go with the wind and make our application compatible with Mobiles, Tables, PCs, and every possible display on Earth.
Bootstrap is the one stop solution for all woes that developers have been facing. It creates beautiful responsive designs without any extra efforts and without any advanced CSS knowledge. It is a true boon for every developer.
In this chapter, and throughout the book, we will be focusing on how to beautify our Rails applications through the help of Bootstrap. In this chapter, we will create a basic Todo application with Rails. We will explore the folder structure of a Rails application and analyze which folders are important for templating a Rails Application. This will be helpful if you want to quickly revisit Rails concepts.
We will also see how to create views, link them, and also style them. The styling in this chapter will be done traditionally through the application's default CSS fi les. Finally, we will discuss how we can speed up the designing process using Bootstrap.
In short, we will cover the following topics:
• Why Bootstrap with Rails?• Setting up a Todo Application in Rails• Analyzing folder structure of a Rails application• Creating views• Styling views using CSS• Challenges in traditionally styling a Rails Application
Introducing Web Application Development in Rails
[ 8 ]
Why Bootstrap with Rails?Rails is one the most popular Ruby frameworks which is currently at its peak, both in terms of demand and technology trend. With more than 3,100 members contributing to its development, and tens of thousands of applications already built using it, Rails has created a standard for every other framework in the Web today.
Rails was initially developed by David Heinemeier Hansson in 2003 to ease his own development process in Ruby. Later, he became generous enough to release Rails to the open source community. Today, it is popularly known as Ruby on Rails.
Rails shortens the development life cycle by moving the focus from reinventing the wheel to innovating new features. It is based on the convention of the confi gurations principle, which means that if you follow the Rails conventions, you would end up writing much less code than you would otherwise write.
Bootstrap, on the other hand, is one of the most popular frontend development frameworks. It was initially developed at Twitter for some of its internal projects. It makes the life of a novice web developer easier by providing most of the reusable components that are already built and are ready to use. Bootstrap can be easily integrated with a Rails development environment through various methods. We can directly use the .css fi les provided by the framework, or can extend it through its Sass version and let Rails compile it.
Sass is a CSS preprocessor that brings logic and functionality into CSS. It includes features like variables, functions, mixins, and others. Using the Sass version of Bootstrap is a recommended method in Rails. It gives various options to customize Bootstrap's default styles easily.
Bootstrap also provides various JavaScript components that can be used by those who don't have any real JavaScript knowledge. These components are required in almost every modern website being built today.
Bootstrap with Rails is a deadly combination. You can build applications faster and invest more time to think about functionality, rather than rewrite codes.
Setting up a Todo application in RailsSince this book is targeted for Rails developers, I assume that you already have basic knowledge of Rails development. You should also have Rails and Ruby installed in your machine to start with.
Chapter 1
[ 9 ]
While writing this book, Ruby 2.1.1 and Rails 4.1.4 was used.Let's fi rst understand what this Todo application will do. Our application will allow us to create, update, and delete items from the Todo list. We will fi rst analyze the folders that are created while scaffolding this application and which of them are necessary for templating the application.
So, let's dip our feet into the water:
1. First, we need to select our workspace, which can be any folder inside your system. Let's create a folder named Bootstrap_Rails_Project. Now, open the terminal and navigate to this folder.
2. It's time to create our Todo application. Write the following command to create a Rails application named TODO:rails new TODO
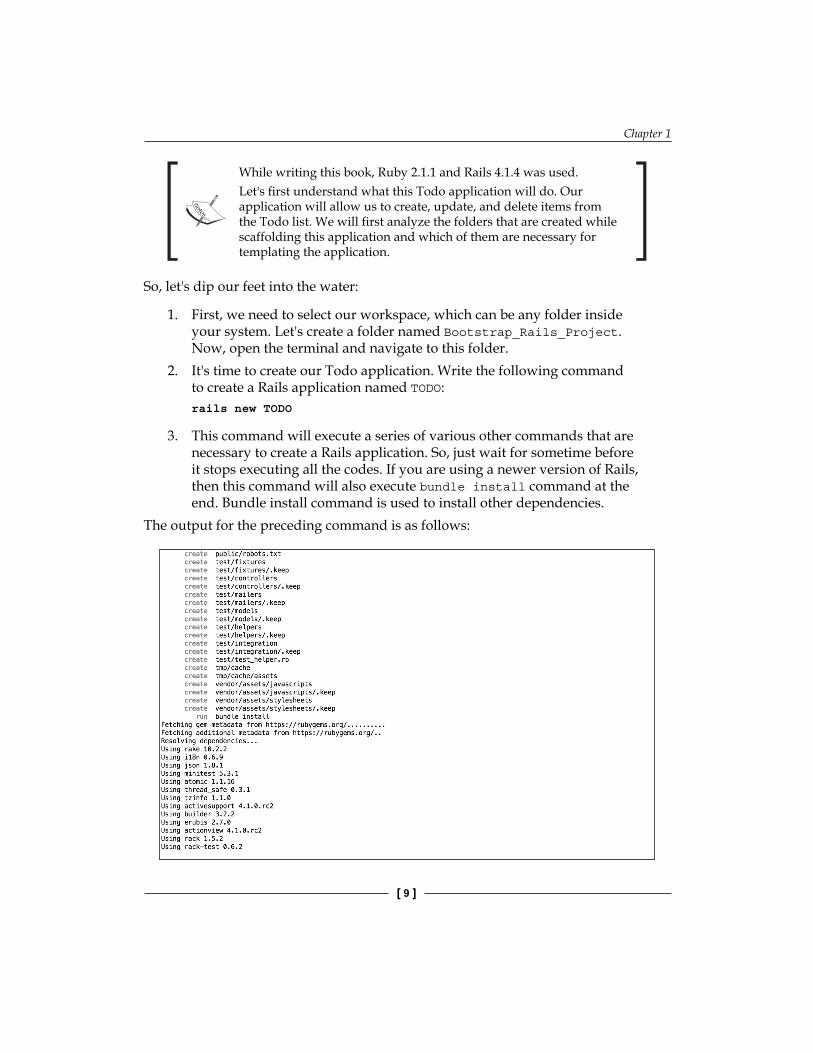
3. This command will execute a series of various other commands that are necessary to create a Rails application. So, just wait for sometime before it stops executing all the codes. If you are using a newer version of Rails, then this command will also execute bundle install command at the end. Bundle install command is used to install other dependencies.
The output for the preceding command is as follows:
Introducing Web Application Development in Rails
[ 10 ]
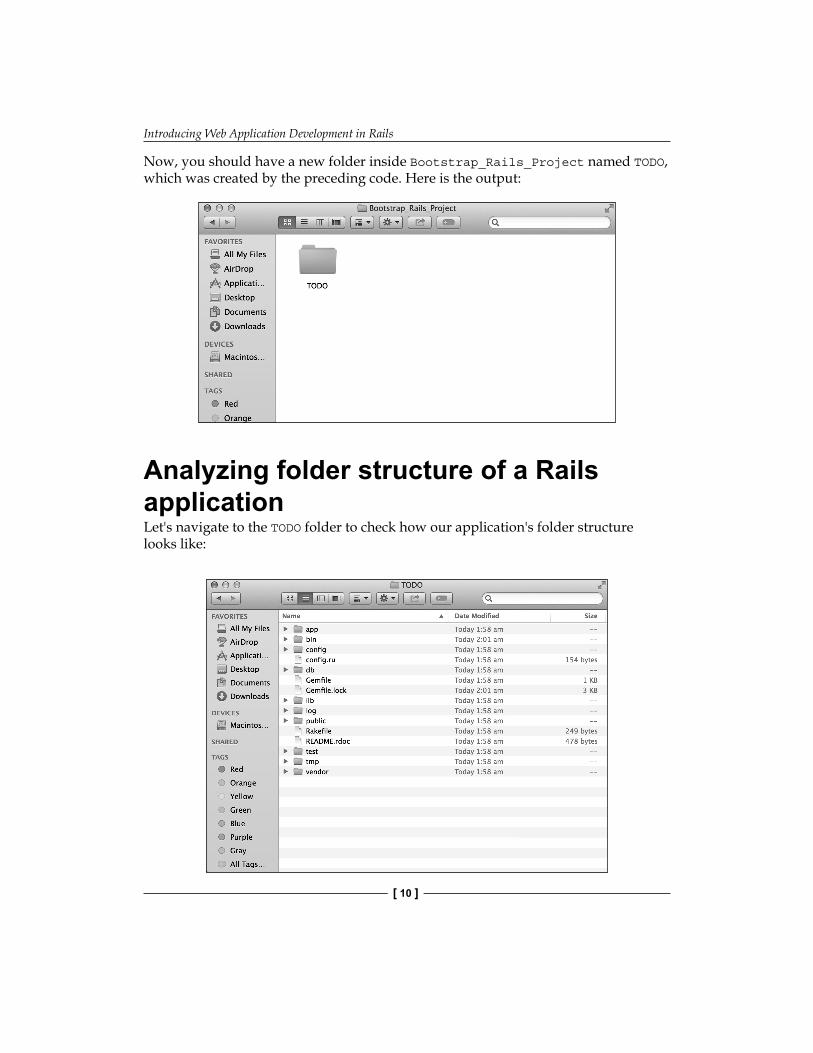
Now, you should have a new folder inside Bootstrap_Rails_Project named TODO, which was created by the preceding code. Here is the output:
Analyzing folder structure of a Rails applicationLet's navigate to the TODO folder to check how our application's folder structure looks like:
Chapter 1
[ 11 ]
Let me explain to you some of the important folders here:
• The fi rst one is the app folder, which we will be focusing on the most throughout this book. All our application's content will be present inside this folder.
• The assets folder inside the app folder is the location to store all the static fi les like JavaScript, CSS, and Images. You can take a sneak peek inside them to look at the various fi les.
• The controllers folder handles various requests and responses of the browser.
• The helpers folder contains various helper methods both for the views and controllers.
• The next folder mailers, contains all the necessary fi les to send an e-mail.• The models folder contains fi les that interact with the database.• Finally, we have the views folder, which contains all the .erb fi les that
will be complied to HTML fi les.
So, let's start the Rails server and check out our application on the browser:
1. Navigate to the TODO folder in the terminal and then type the following command to start a server:rails server
You can also use the following command:
rails s
2. You will see that the server is deployed under the port 3000. So, type the following URL to view the application:http://localhost:3000.
You can also use the following URL: http://0.0.0.0:3000.
Introducing Web Application Development in Rails
[ 12 ]
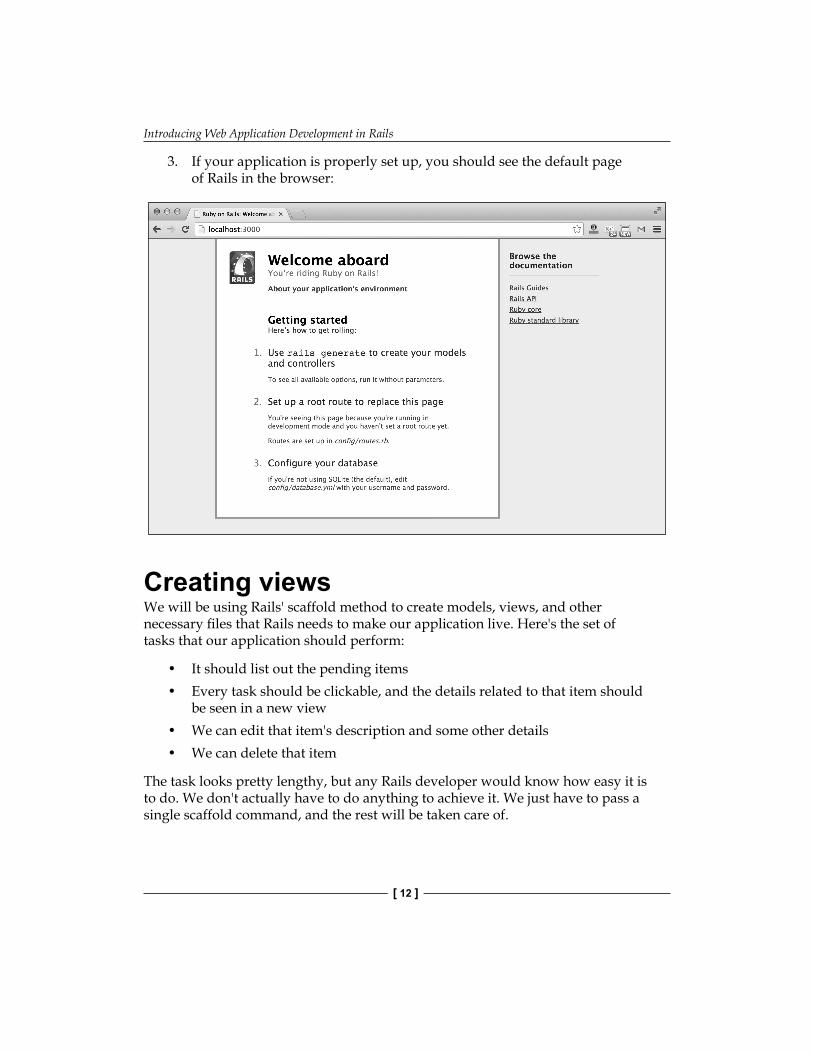
3. If your application is properly set up, you should see the default page of Rails in the browser:
Creating viewsWe will be using Rails' scaffold method to create models, views, and other necessary fi les that Rails needs to make our application live. Here's the set of tasks that our application should perform:
• It should list out the pending items• Every task should be clickable, and the details related to that item should
be seen in a new view• We can edit that item's description and some other details• We can delete that item
The task looks pretty lengthy, but any Rails developer would know how easy it is to do. We don't actually have to do anything to achieve it. We just have to pass a single scaffold command, and the rest will be taken care of.
Chapter 1
[ 13 ]
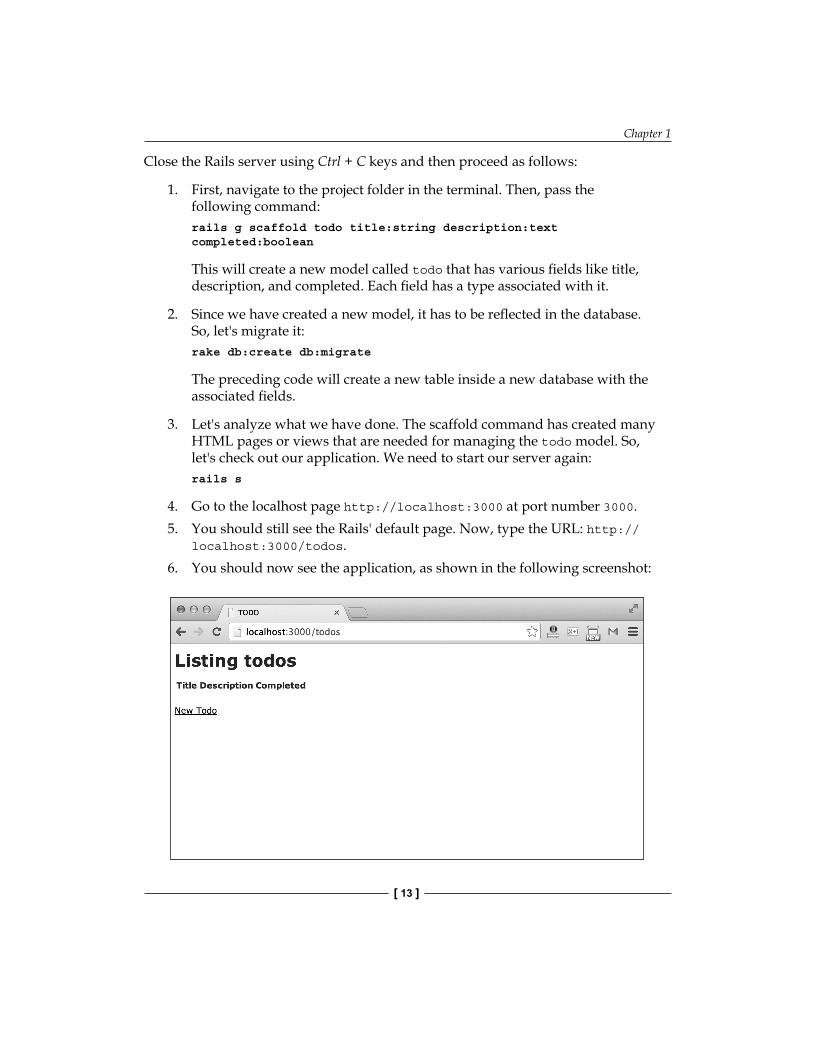
Close the Rails server using Ctrl + C keys and then proceed as follows:
1. First, navigate to the project folder in the terminal. Then, pass the following command:rails g scaffold todo title:string description:text completed:boolean
This will create a new model called todo that has various fi elds like title, description, and completed. Each fi eld has a type associated with it.
2. Since we have created a new model, it has to be refl ected in the database. So, let's migrate it:rake db:create db:migrate
The preceding code will create a new table inside a new database with the associated fi elds.
3. Let's analyze what we have done. The scaffold command has created many HTML pages or views that are needed for managing the todo model. So, let's check out our application. We need to start our server again:rails s
4. Go to the localhost page http://localhost:3000 at port number 3000.5. You should still see the Rails' default page. Now, type the URL: http://
localhost:3000/todos.6. You should now see the application, as shown in the following screenshot:
Introducing Web Application Development in Rails
[ 14 ]
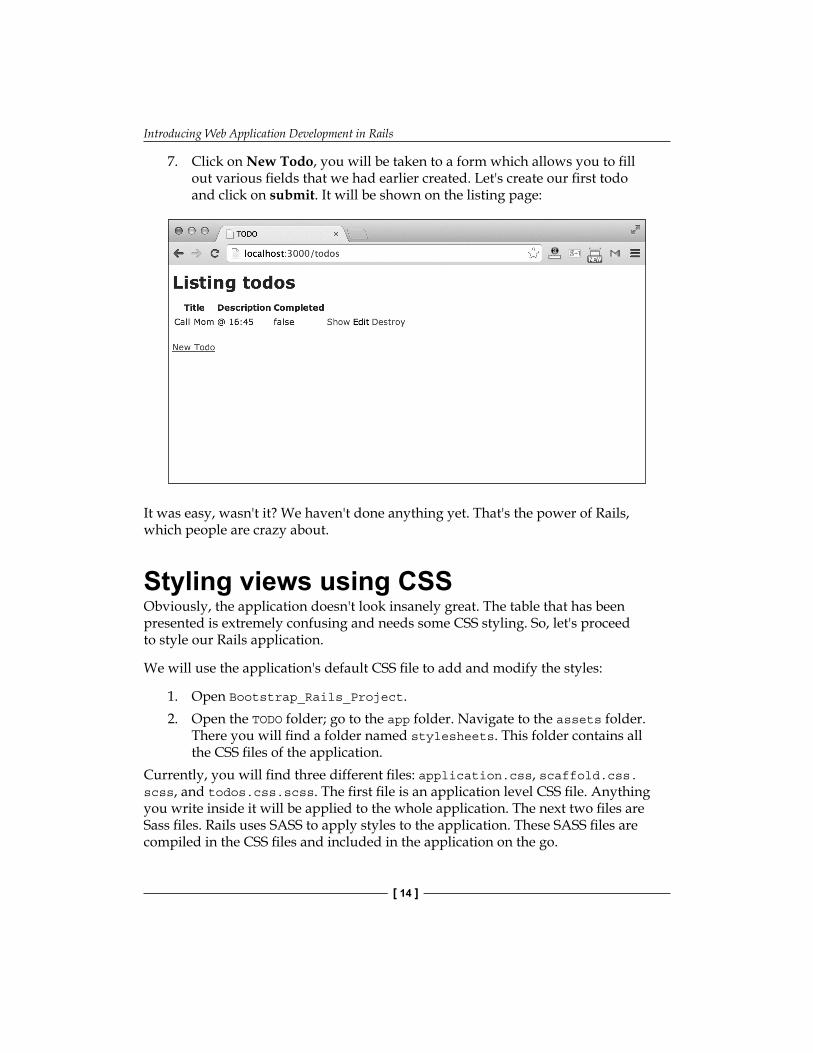
7. Click on New Todo, you will be taken to a form which allows you to fi ll out various fi elds that we had earlier created. Let's create our fi rst todo and click on submit. It will be shown on the listing page:
It was easy, wasn't it? We haven't done anything yet. That's the power of Rails, which people are crazy about.
Styling views using CSSObviously, the application doesn't look insanely great. The table that has been presented is extremely confusing and needs some CSS styling. So, let's proceed to style our Rails application.
We will use the application's default CSS fi le to add and modify the styles:
1. Open Bootstrap_Rails_Project.2. Open the TODO folder; go to the app folder. Navigate to the assets folder.
There you will fi nd a folder named stylesheets. This folder contains all the CSS fi les of the application.
Currently, you will fi nd three different fi les: application.css, scaffold.css.scss, and todos.css.scss. The fi rst fi le is an application level CSS fi le. Anything you write inside it will be applied to the whole application. The next two fi les are Sass fi les. Rails uses SASS to apply styles to the application. These SASS fi les are compiled in the CSS fi les and included in the application on the go.
Chapter 1
[ 15 ]
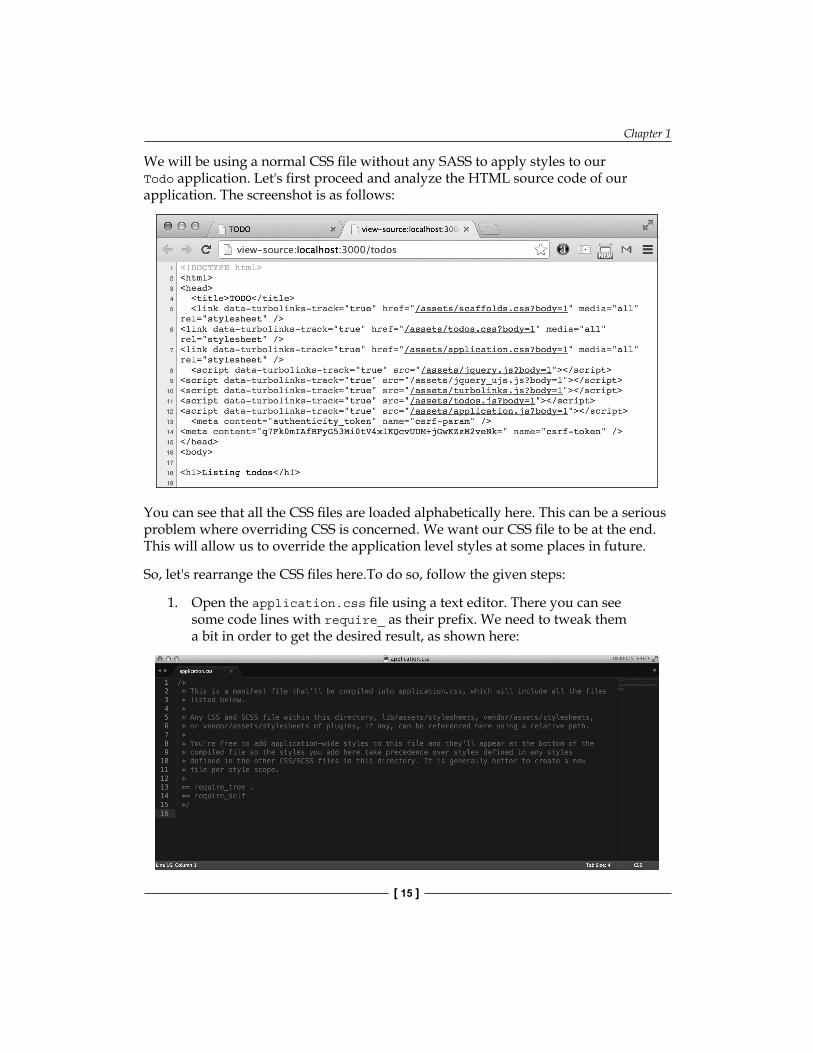
We will be using a normal CSS fi le without any SASS to apply styles to our Todo application. Let's fi rst proceed and analyze the HTML source code of our application. The screenshot is as follows:
You can see that all the CSS fi les are loaded alphabetically here. This can be a serious problem where overriding CSS is concerned. We want our CSS fi le to be at the end. This will allow us to override the application level styles at some places in future.
So, let's rearrange the CSS fi les here.To do so, follow the given steps:
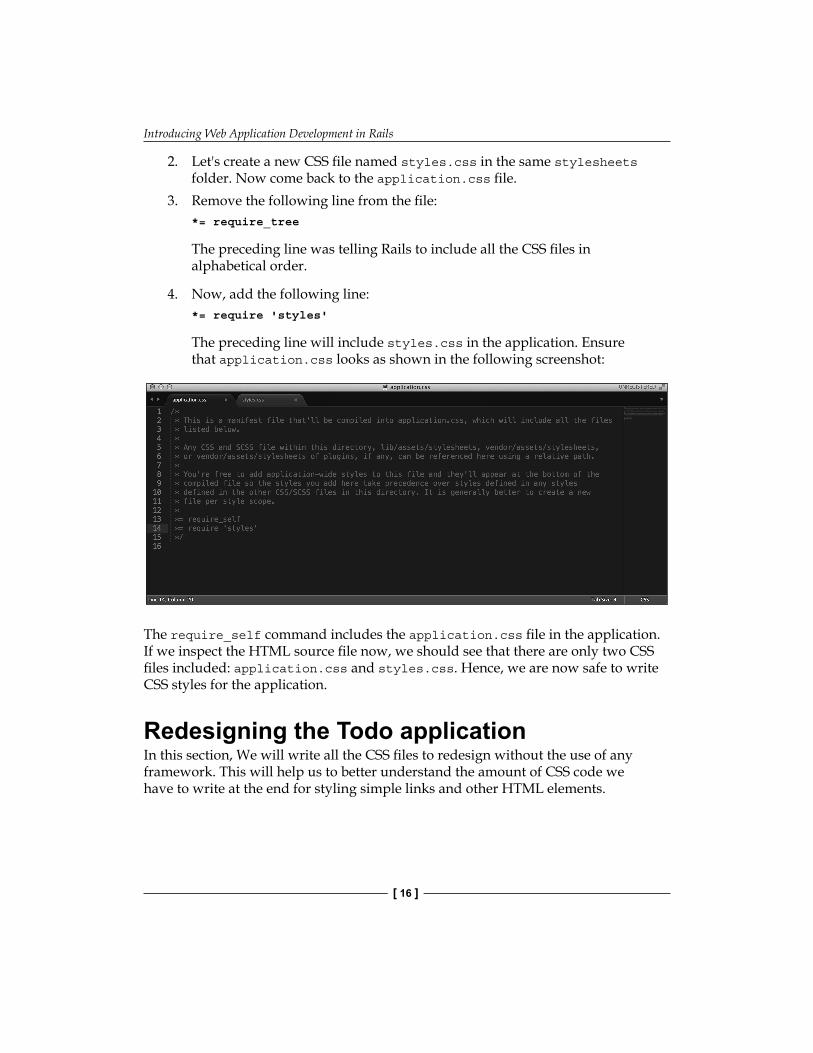
1. Open the application.css fi le using a text editor. There you can see some code lines with require_ as their prefi x. We need to tweak them a bit in order to get the desired result, as shown here:
Introducing Web Application Development in Rails
[ 16 ]
2. Let's create a new CSS fi le named styles.css in the same stylesheets folder. Now come back to the application.css fi le.
3. Remove the following line from the fi le:*= require_tree
The preceding line was telling Rails to include all the CSS fi les in alphabetical order.
4. Now, add the following line:*= require 'styles'
The preceding line will include styles.css in the application. Ensure that application.css looks as shown in the following screenshot:
The require_self command includes the application.css fi le in the application. If we inspect the HTML source fi le now, we should see that there are only two CSS fi les included: application.css and styles.css. Hence, we are now safe to write CSS styles for the application.
Redesigning the Todo applicationIn this section, We will write all the CSS fi les to redesign without the use of any framework. This will help us to better understand the amount of CSS code we have to write at the end for styling simple links and other HTML elements.
Chapter 1
[ 17 ]
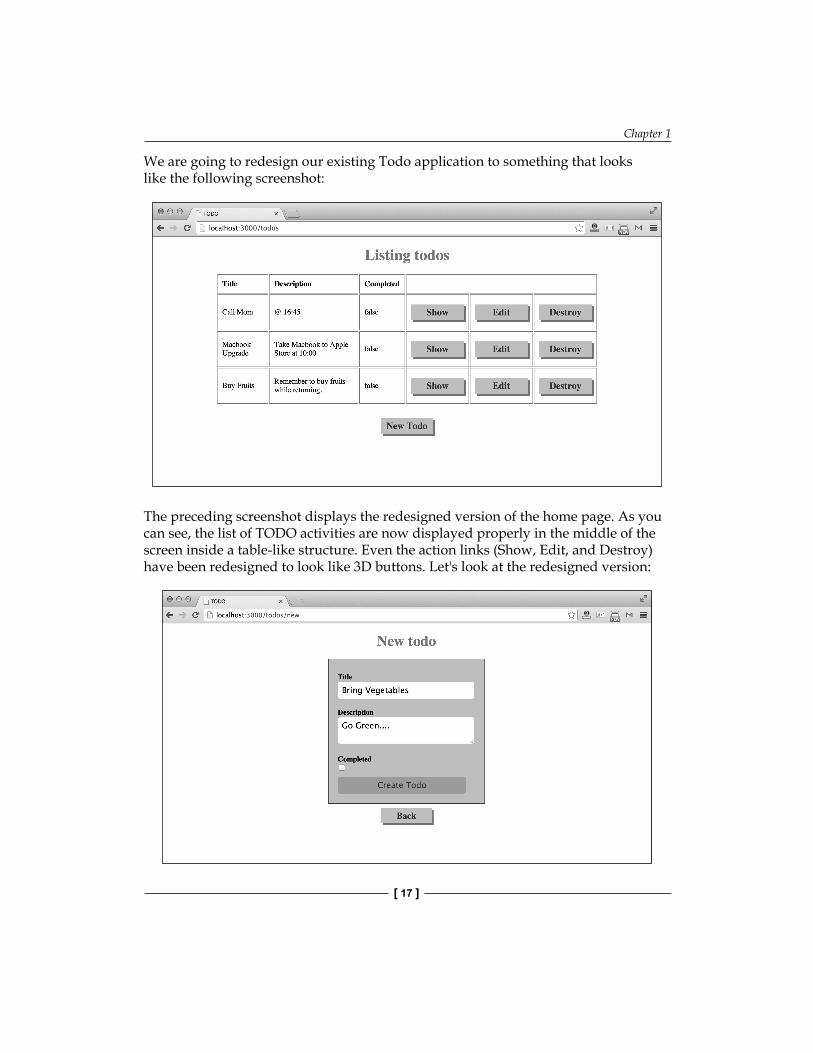
We are going to redesign our existing Todo application to something that looks like the following screenshot:
The preceding screenshot displays the redesigned version of the home page. As you can see, the list of TODO activities are now displayed properly in the middle of the screen inside a table-like structure. Even the action links (Show, Edit, and Destroy) have been redesigned to look like 3D buttons. Let's look at the redesigned version:
Introducing Web Application Development in Rails
[ 18 ]
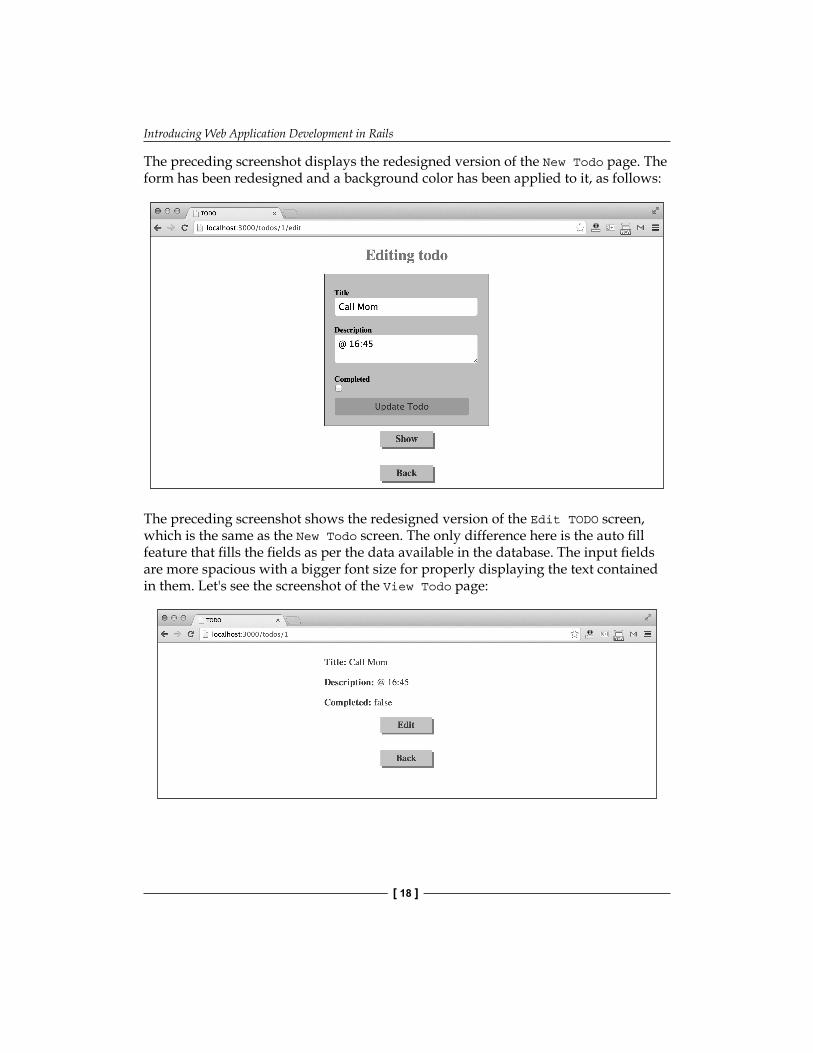
The preceding screenshot displays the redesigned version of the New Todo page. The form has been redesigned and a background color has been applied to it, as follows:
The preceding screenshot shows the redesigned version of the Edit TODO screen, which is the same as the New Todo screen. The only difference here is the auto fi ll feature that fi lls the fi elds as per the data available in the database. The input fi elds are more spacious with a bigger font size for properly displaying the text contained in them. Let's see the screenshot of the View Todo page:
Chapter 1
[ 19 ]
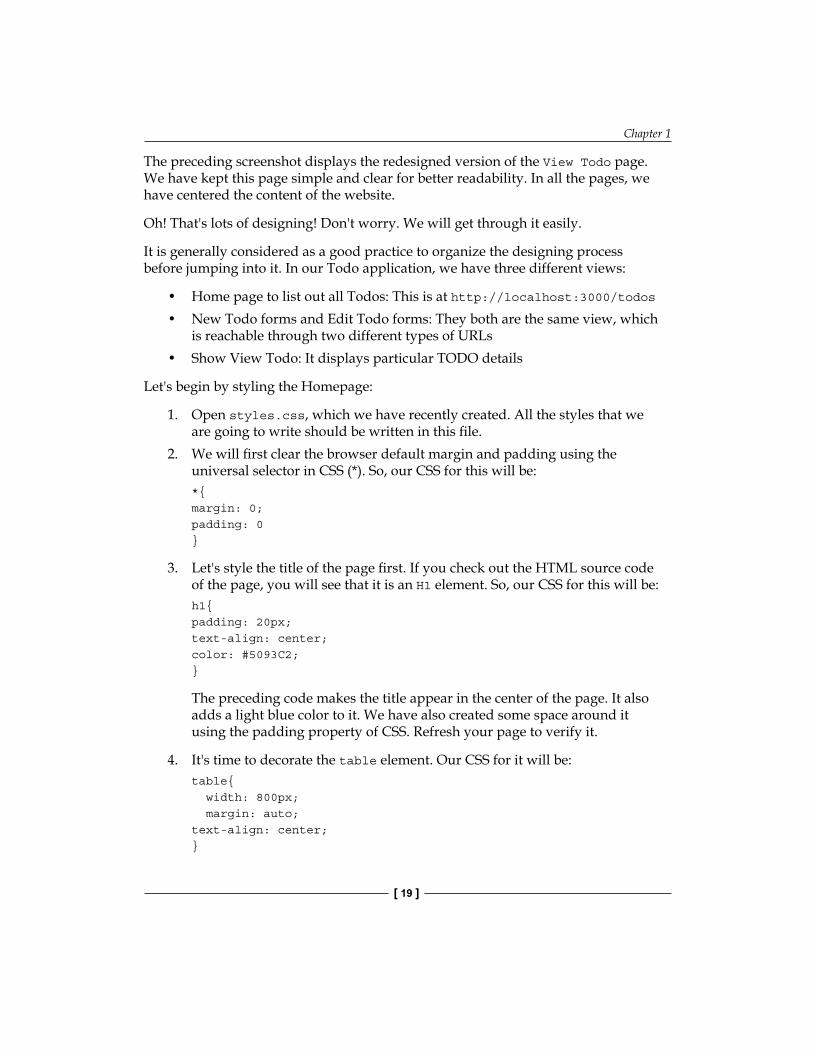
The preceding screenshot displays the redesigned version of the View Todo page. We have kept this page simple and clear for better readability. In all the pages, we have centered the content of the website.
Oh! That's lots of designing! Don't worry. We will get through it easily.
It is generally considered as a good practice to organize the designing process before jumping into it. In our Todo application, we have three different views:
• Home page to list out all Todos: This is at http://localhost:3000/todos• New Todo forms and Edit Todo forms: They both are the same view, which
is reachable through two different types of URLs• Show View Todo: It displays particular TODO details
Let's begin by styling the Homepage:
1. Open styles.css, which we have recently created. All the styles that we are going to write should be written in this fi le.
2. We will fi rst clear the browser default margin and padding using the universal selector in CSS (*). So, our CSS for this will be:*{margin: 0;padding: 0}
3. Let's style the title of the page fi rst. If you check out the HTML source code of the page, you will see that it is an H1 element. So, our CSS for this will be:h1{padding: 20px;text-align: center;color: #5093C2;}
The preceding code makes the title appear in the center of the page. It also adds a light blue color to it. We have also created some space around it using the padding property of CSS. Refresh your page to verify it.
4. It's time to decorate the table element. Our CSS for it will be:table{ width: 800px; margin: auto;text-align: center;}
Introducing Web Application Development in Rails
[ 20 ]
The preceding code makes the table position to the center of the browser. First, we applied a width of 800px to it and then we applied an auto positioned margin to it. Since the browser now knows the width of the table element, it will automatically divide the extra space on each side of it. This will make our table centered to the browser screen. The last property, text-align is used to align the text present inside the table.
5. Let's apply some more styles to the elements present inside the table:td, th{ padding: 10px; border: 1px solid #888888;}
In the preceding CSS code, we have applied styles to the td and th elements of the table element. We created some space around the text using padding. We also applied a border to each cell. It is a solid border of 1px width and color #888888.
6. It's time to design the application's links. We will try to make them appear like a button so that it appears more clickable. Our CSS for it will be:a{display: block;text-decoration: none;width: 100px;margin: 10px auto;padding: 5px;text-align: center;background: #ccc;color: #444;font-size: 20px;box-shadow: 4px 4px 0px #888;font-weight: bold;}
Links <a> are inline HTML elements. Hence in the fi rst line, we have made it look like a block-level element using the display property. Now, we can apply width and margin to it. Just like we did to our table element; we will also apply a particular width and make all the links appear centered to their parent elements. We have also applied a padding of 5px to create space around the link text.
To color the links, we applied background to it, and to make the text appear more distinct in this background, we applied a color property to it. We have also played with the shadow of the button to make it appear more 3D.
Chapter 1
[ 21 ]
Make sure to refresh the browser screen to see the changes we are continuously applying. Hope you are enjoying the process of designing the application.
We have fi nally designed the home screen. The form is still not styled! Let's do it now:
1. Click on the New Todo fi le and let's style it:form{ width: 300px; margin: auto; background: #ccc; padding: 20px; border: 1px solid #444;}
We applied proper width to the form and made it appear at the center of the screen. We have also given a decent background color to it. Padding and border is also applied to make it look more spacious and fl at.
2. Next, we have to design the labels and input fi elds. If you check out the HTML source of this page, you will see that every label, and its associated input fi eld, is wrapped inside a div which has a field class. Remember that these classes and the HTML structures are not written by us. These have been autogenerated by Rails. We are just working with the CSS fi le.
3. Now, we will use the field class to apply style to the elements present inside the New Todo view. Here we will design the label, input fi eld, and textarea element:.field{ padding: 10px 0;}
.field label{ font-weight: bold;}
.field input, .field textarea{ padding: 8px; border: 1px solid #ccc; border-radius: 5px; font-size: 18px; width: 280px;}
Introducing Web Application Development in Rails
[ 22 ]
We applied a decent space inside the field with div element. Here, we have give two different values to the padding property. The fi rst value is for creating spaces to the top and bottom, whereas the next value will be used for the left and right side.
4. Next, we applied style to the label element of the field element. We have made it appear bold using the font-weight property. Lastly, we gave both the input fi elds and textarea the same set of CSS styles. We made them look spacious using padding. A border property is applied to get rid of the browser default border around the input and textarea elements. We also applied border-radius to make the corners a little rounded. Finally, we fi xed the width of both the textarea and input elements so that they appear properly aligned.
5. It's time to design the last element in this HTML page, the Create Todo button:.actions input{ padding: 8px; border: 1px solid #CCC; border-radius: 5px; font-size: 18px; width: 280px; background: #83B5D8; color: #444;}
Most of the CSS styles that we applied here are similar to what we have applied to the input and textarea element. Here, we have added two extra properties, background and color to make it look different and stand out properly in the form.
6. We have successfully designed the New Todo and Edit Todo pages. We are now only left with the Show Todo page. So, without any further delay, let's fi rst check out the page. Click on the Show link.Most of the content is already styled by us. We are only left with designing the text on this page, the code is as follows:
p{ width: 350px; font-size: 20px; margin: auto; padding: 10px 0; color: #444;
Chapter 1
[ 23 ]
}
p#notice{ color: #76a3da;}
We applied a fi xed width to the p element and made it appear to the center of the screen using the margin property. We also applied a decent font size to them. Now, let's separate them from each other using the margin and padding properties.
This page is also shown after the New Todo or Edit Todo pages with a notice at the top. This element has an id element, which is used to show the status, whether a new todo was successfully created or an existing todo was successfully updated. Using CSS, we have applied style to it. Make sure that you are not giving any space between p and #notice in the preceding CSS code. We are targeting the p tag, which has an id, #notice, so spaces shouldn't be present between the selectors.
Congrats! We have successfully completed designing the whole application.
Downloading the example codeYou can download the example code fi les for all Packt books you have purchased from your account at http://www.packtpub.com. If you purchased this book elsewhere, you can visit http://www.packtpub.com/support and register to have the fi les e-mailed directly to you.
Challenges in styling a Rails application traditionallyThe application which we have created was so basic that we did not write a single line of code for its logic part. We didn't even touch the HTML layout of the application. You have seen how complex the CSS styling can be at some places, such as designing a link. The CSS which we have written here is very poorly organized. We have a target element level selector at many places to apply styles to them. This is considered as a very poor way of designing.
Our CSS code was not segregated into various, smaller parts. All the styles were written directly in one fi le, styles.css. In the coming chapters, we will see how we can use SASS to apply styles to our Rails applications. Using SASS, we can bring logic to the CSS codes.
Introducing Web Application Development in Rails
[ 24 ]
We will also overcome the diffi culties of styling each and every element in our Rails application using Bootstrap. You will realize how easy it can become for a Non-CSS developer to design a high-end application using Bootstrap. You won't write a single piece of CSS code when using Bootstrap. Its developers have written a bunch of CSS codes for you.
SummaryThe main intention of this chapter, was to brief you on how to develop and design a simple Rails application without the help of any CSS frontend frameworks. We manually styled the application by creating an external CSS fi le styles.css and importing it into the application using another CSS fi le application.css. We also discussed the complexities that a novice web designer might face on directly styling the application.
In the next chapter, we will get our hands dirty with Bootstrap. We will learn what it is, and how it can help to design a Rails application quickly. We will also learn how to integrate Bootstrap with the Rails application.
Where to buy this book You can buy Bootstrap for Rails from the Packt Publishing website. Alternatively, you can buy the book from Amazon, BN.com, Computer Manuals and most internet book retailers.
Click here for ordering and shipping details.
www.PacktPub.com
Stay Connected:
Get more information Bootstrap for Rails